

Arec KS-2 User Manual
AREC Inc.© All Rights Reserved 2016. l www.arec.com
All information contained in this document is Proprietary
KS-2
Media Station
User Manual English

KS-2 User Manual
Chapter 1 Package Accessories
Chapter 2 Product Overview
2.1 Product Appearance
2.2 Remote Controller
Chapter 3 Wiring and Initial Installation
3.1 Product Connection
3.2 Product First installation
Chapter 4 User Menu
4.1 Playback
4.2 Recording
4.2.1 Enable Recording
4.2.2 Export Lecture
4.2.3 Delete Lecture
4.3 Settings
4.3.1 Language
4.3.2 Volume
4.3.3 Screen Adjustment
4.3.4 Streaming
4.3.5 Resolution
4.3.6 About
Chapter 5 Basic Operations
5.1 Host Tutorial
5.1.1 Layout Settings
5.1.2 Display Resolution Settings
5.1.3 Video Quality Settings Adjustment
5.1.4 Volume
5.1.5 Return and Exit
5.2 Recording Tutorial
5.2.1 Start recording
5.2.2 Recording operation
5.2.3 Export Lecture
5.2.4 Delete Lecture
5.3 Playback Tutorial
5.3.1 Local Storage
5.3.2 Playback Operations
5.4 Table of event icons
5.5 Remote Control Function List
Chapter 6 Management Interface
6.1 System Information
6.2 Network Settings
6.3 Recording Settings
6.3.1 Basic Setting
6.3.2 Storage Setting
6.3.3 Streaming Settings
3
4
4
5
6
6
8
10
11
11
11
12
12
12
13
13
13
14
14
14
15
15
15
16
17
17
18
18
18
19
19
19
20
20
20
21
22
23
24
25
26
26
27
29
Table of Contents

KS-2 User Manual
6.4 Local Storage Settings
6.5 Event Log
6.6 About
Chapter 7 Video Management Platform
7.1 Lecture Manager
7.2 Live Broadcast
7.2.1 Standby
7.2.2 Recording
32
32
33
34
34
35
35
36
Table of Contents
3
KS-2 User Manual
Specications
Featuring a compact and stand-alone design, AREC KS-2 Media Station consists of diverse features and functionality,
including dual-signals capturing, recording synchronously, codec, streaming online, live broadcasting, and web-based
monitor page, providing complete lecture capture solution.
Product Name Media Station
Model Name KS-2
Dimension 354mm(L) x 188.2mm(W) x 46mm(H)
Weight 1320g
Power Requirement 12V / 2A
Power Consumption (Max.) 24W (Max.)
Operating Temperature / Humidity 0ºC ~ 50ºC / 90%
Maximum normal load description Insert 2 video signals (either HDMI or VGA input).Using external USB
flash to record the transcoded video / audio. And output the transcoded
video / audio to both HDMI and VGA port.
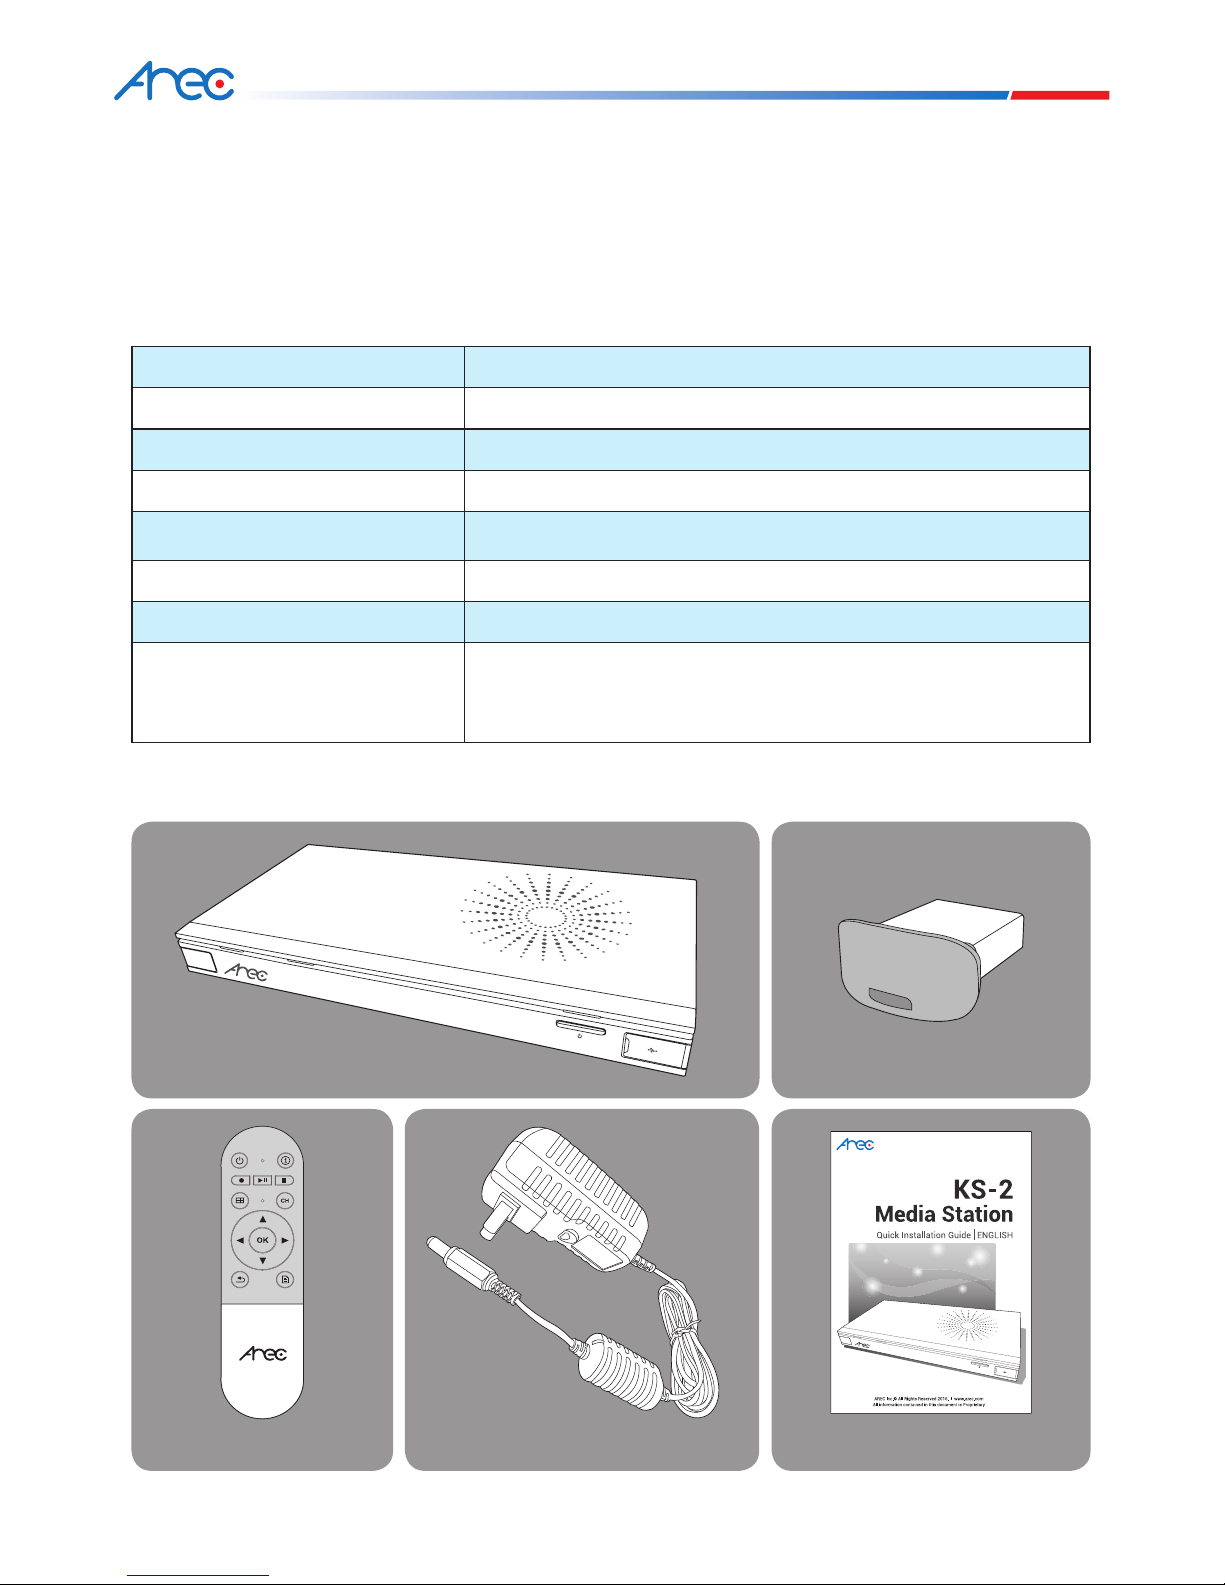
Chapter 1 Package Accessories
Introduction
Package Contents
AREC Media Station
Quick Installation GuideRemote Controller
USB Drive
Power Adapter
4
KS-2 User Manual
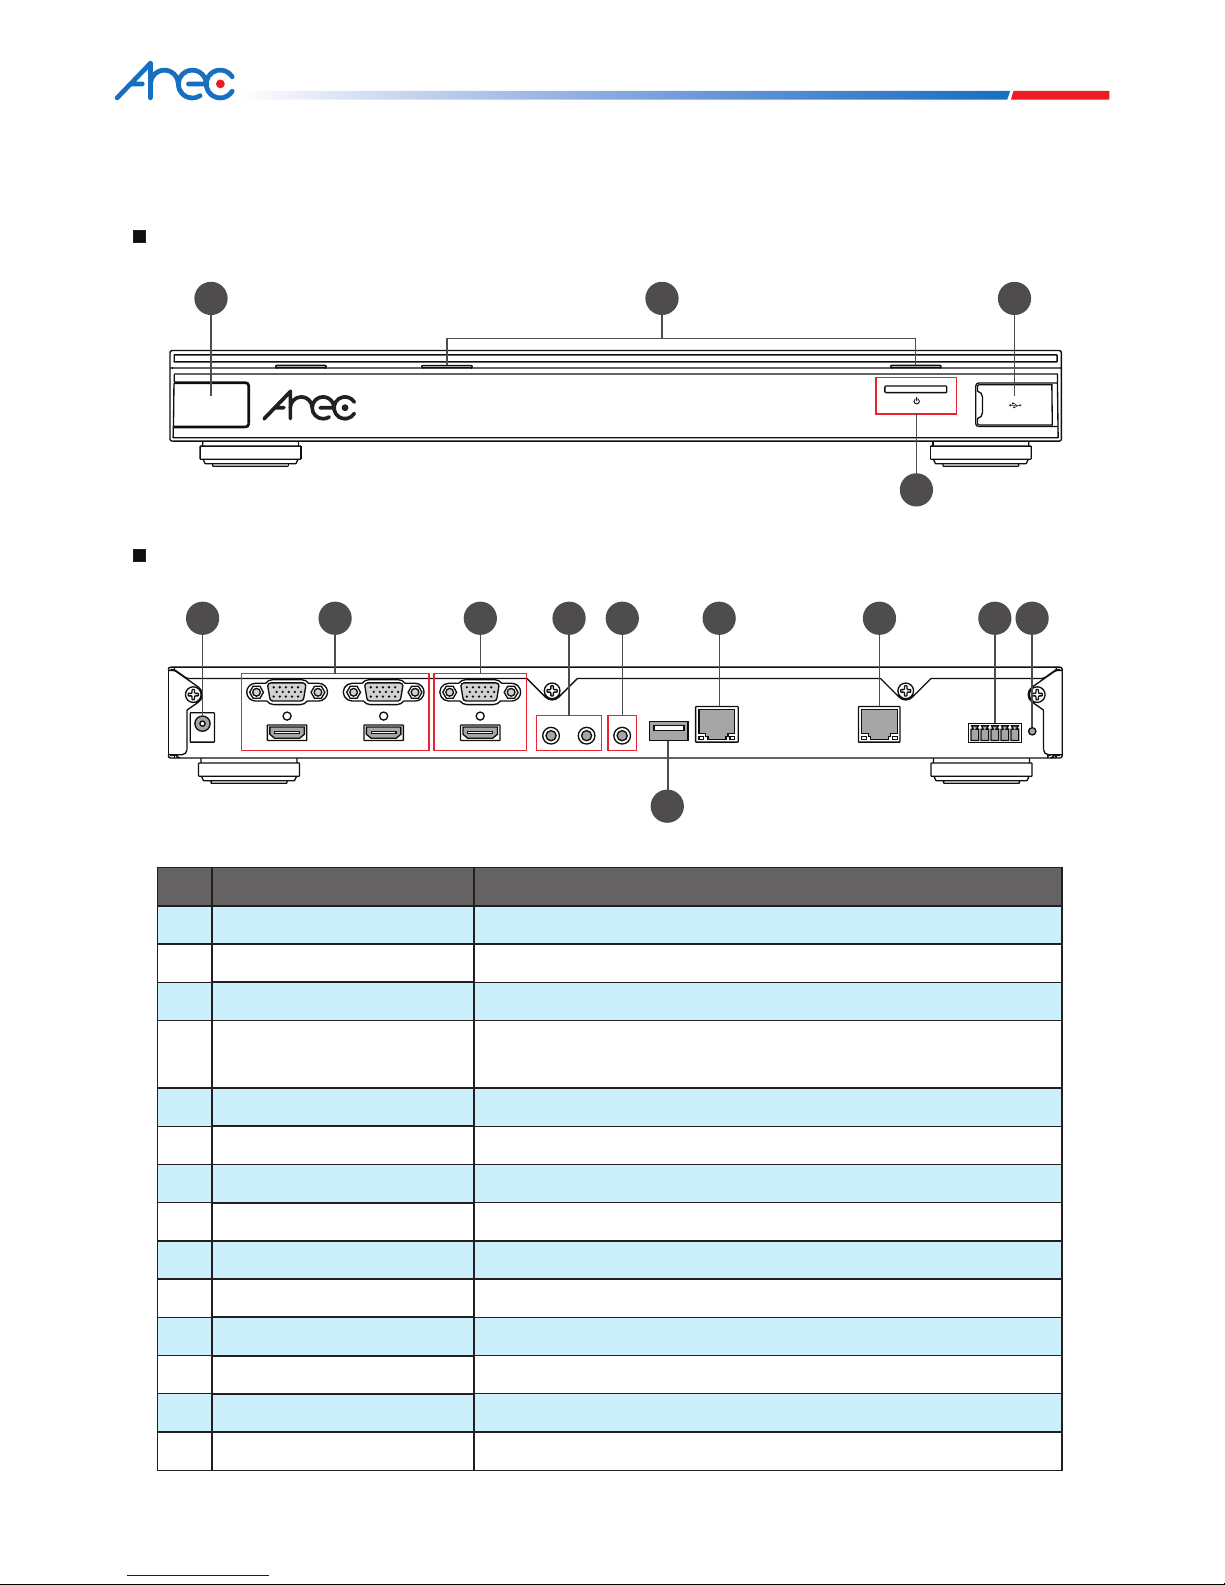
No. Name Brief introduction
1 Remote Control receiver Remote Control receiving area
2 Led light Record / Power
3 Power Power on / off devices
4 USB port
Export document by driving USB flash drive into USB port /
Firmware update through USB disk
5 Power port 12V / 2A
6 Video input source VGA / HDMI cables input source
7 Video output source VGA / HDMI cables output source
8 Audio input source Line / Mic audio input source
9 Audio output source Line audio output connect to amplier
10 Hard drive port USB flash drive
11 Network WAN port Connect to network
12 Setting LAN port Connect to setting PC
13 RS-232 RS-232 control signal connector
14 Reset Restoring devices to its factory default state
Chapter 2 Product Overview
2.1 Product Appearance
Front
Back
1
4
2
3
5 8 11 139
10
6 7 12 14
5
KS-2 User Manual
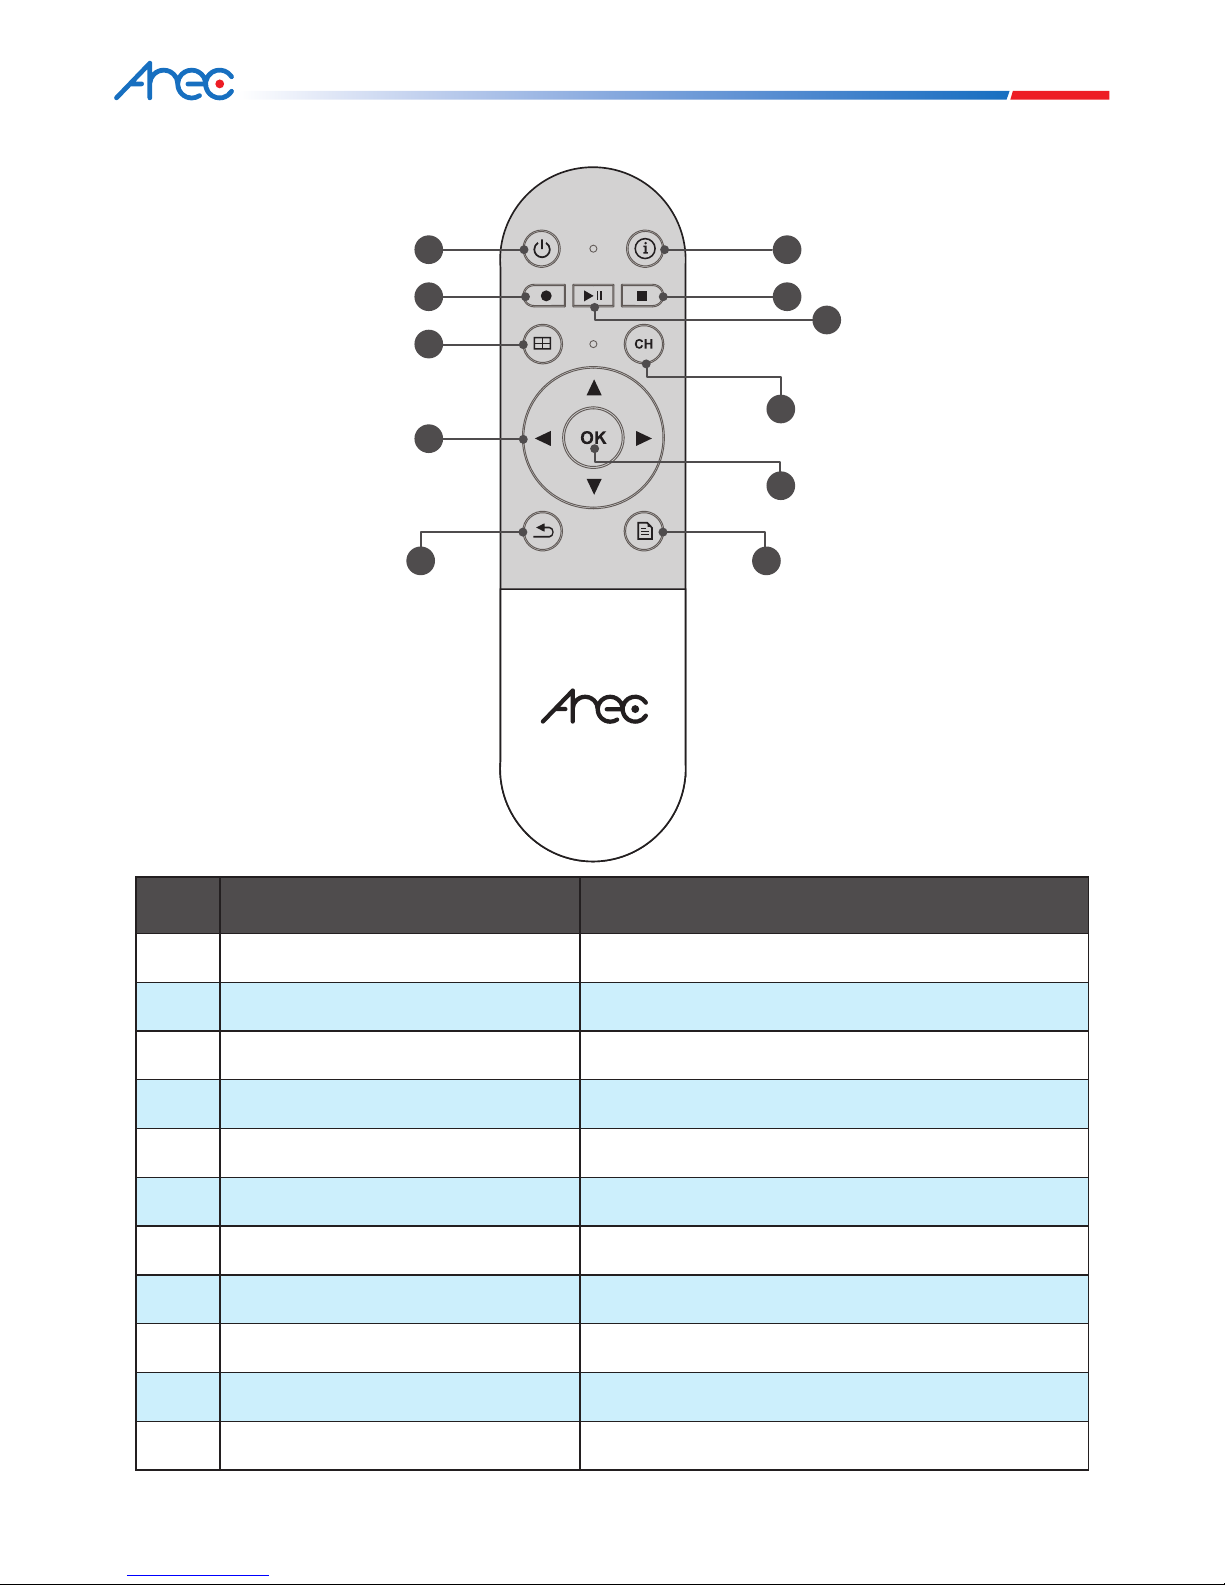
NO. Name Brief introduction
1 Power Power on / off devices
2 Info Show information
3 Record Start video recording
4 Play Start or resume video play
5 Stop Stop video play / Stop video recording and exit
6 Record Layout Switch record layout
7 Export Export latest video to USB drive
8 Select:Up / Down / Left / Right Navigate menu
9 OK Select and execute option
10 Back Cancel option / Return to previous view
11 Menu Go to main menu screen
2.2 Remote Controller
1
2
4
9
6
3 5
7
10
8
11

6
KS-2 User Manual
Chapter 3 Wiring and Initial Installation
3.1 Product Connection
Power
TV
Speaker
Setting PC
projector
document cam notebook DVD player
microphone amplier
network
Audio output
LAN
Video output VGA / HDMI
Video input VGA / HDMI
Audio input
USB
RS-232
WAN
10
2
3
4
5
6 7
8
9
1
USB
Hard drive or
USB drive
7
KS-2 User Manual
NO. Name Brief introduction
1 Power Power connection
2 Video input
Video input for VGA or HDMI cables.
For example: Connected to notebook or document cam,
DV camcorder.
3 Video output
Video output for VGA or HDMI cables.
For example: Connected to projector or TV.
4 Audio input
Audio input for Line or Mic.
For example: Connected to amplier or microphone.
5 Audio output
Audio output for Line or Mic.
For example: Connected to amplier or Speaker
6 Hard drive USB flash drive.
7 Network WAN port Connected to network for Internet video streaming.
8 Setting LAN port Connected to setting PC.
9 RS-232 Connected to RS-232 device for control command.
10 Export USB hard drive
Driving USB flash drive into USB port to export document or
update rmware.
8
KS-2 User Manual
3.2 Product First installation
Initial installation
Connet PC to setting LAN port, and input 192.168.11.254 in the browser page.
Step 1:Log in System Administration with default user ID admin and password admin.
Step 2:Set up time of host machine by selecting settings in time tab in System Information.
1
3
2

9
KS-2 User Manual
Recommendations for your hard disk:
1. Please install hard disk of capacity greater than 64G
if you want to record full HD images as the host
system can record videos up to 8 hours in one shot.
2. A poor quality hard disk may lead to host reading
failure. Please make sure the following message
prompts when a hard disk is inserted.
Step 3:Plug USB drive to backside USB port and set up local storge. Click to format your hard disk after rst
installation.
Please check both Enable local storage and Cycling Record checkbox. Click Apply to exit the page after
setup.
Step 4 : Click Logout to exit setting page.
Step 5 : Plug DV or PC tp Video input port,you may see the image on connected display.
1
2
3
4

10
KS-2 User Manual
Display Screen Function Description
The KS-2 will enter the display
screen upon boot up. The rst time
it is turned ON the screen will be
divided into four by default. If the
manager has not yet installed and
set the source for channels 1~4, you
will see a black screen.
Main Menu Function Description
Press the remote control button
to enter the main menu.
Chapter 4 User Menu
This chapter will introduce the product’s main menu and sub-menu paths, and describe how to use simple
instructions to operate this product’s playback and recording functions, and to enter Settings to congure this
product, satisfying your smart recording/playback needs.
Local Display
Main Menu
Record
Start Record
Playback
Local Storage
preview
Setting
Language Volume
Screen
Adjustment
Streaming Resolution AboutExport Lecture Delete Lecture
Recording
preview
preview
preview
HDMI1/HDMI2/
Mic1/Mic2/
Output
Brightness/
Contrast/
Saturation/
Hue
Auto Scan
1920x1080/
1280x720/
1280x1024/
1024x768
11
KS-2 User Manual
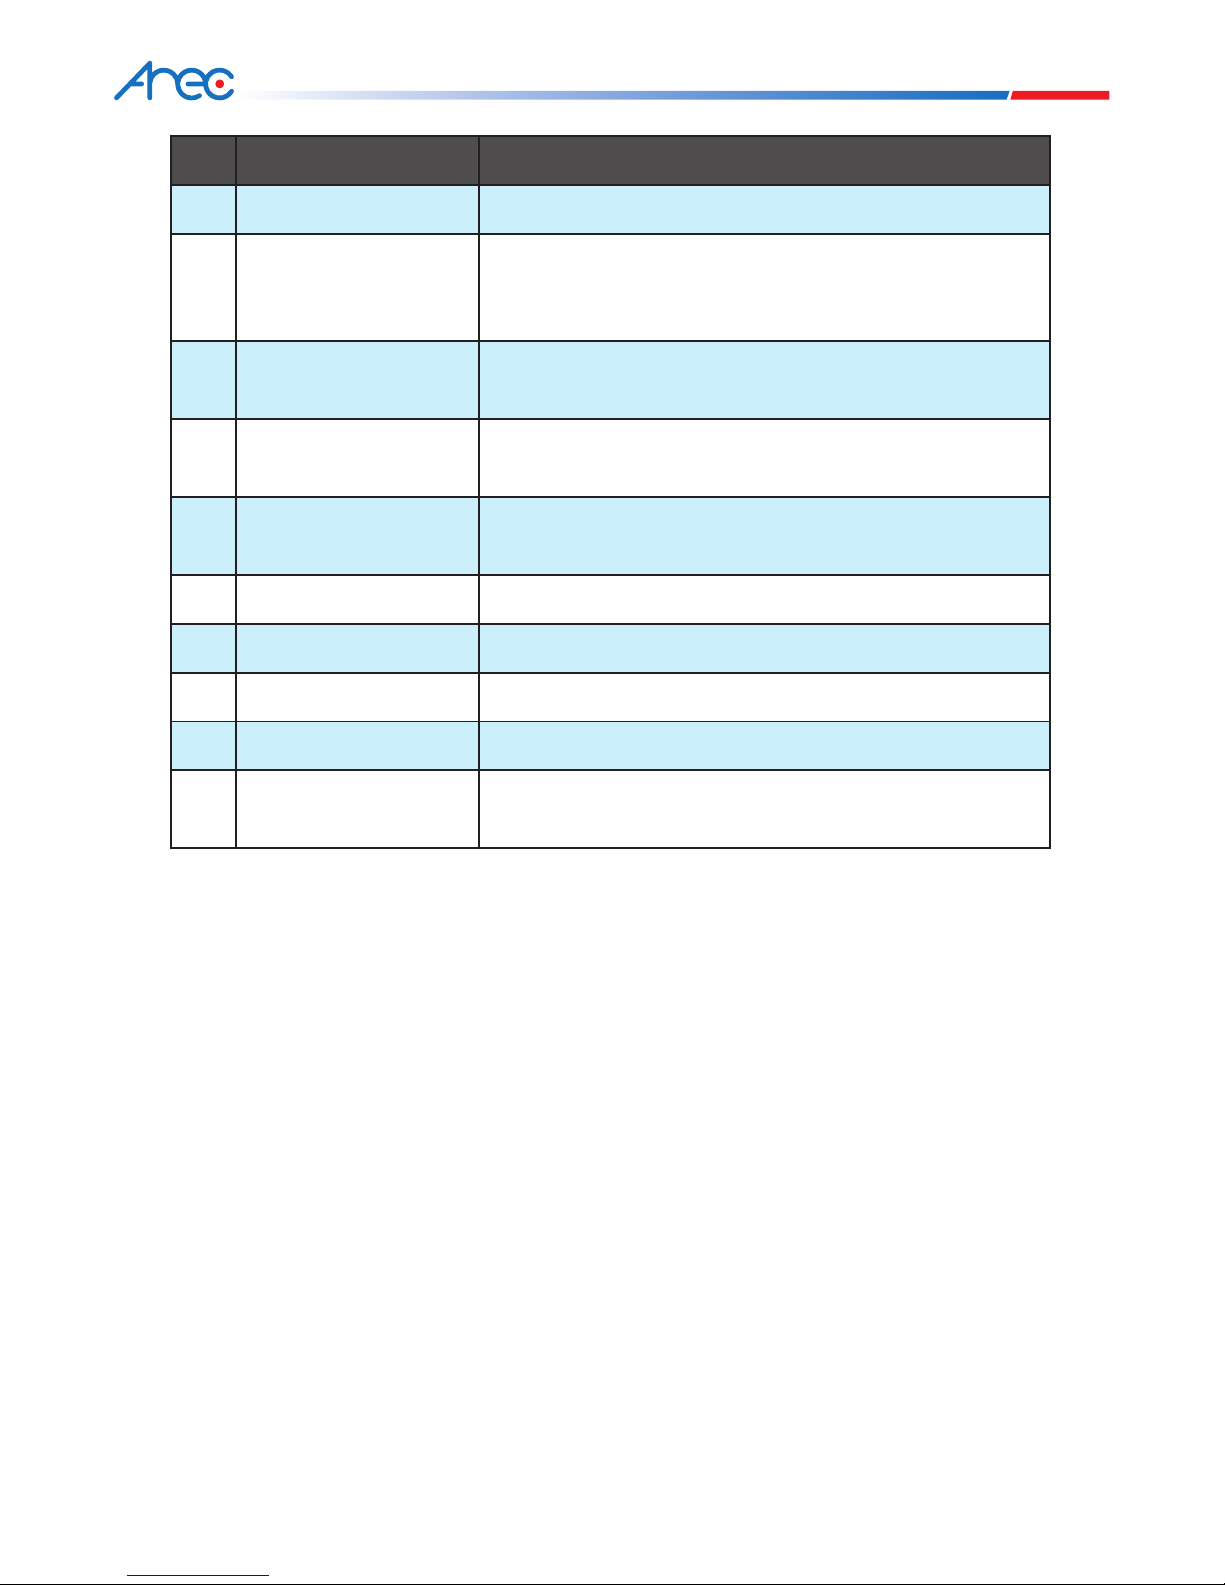
4.1 Playback
Screen Function Description
Use the remote control buttons
to select the item to
playback.
Lectures recorded on the local hard
drive for the user to browse.
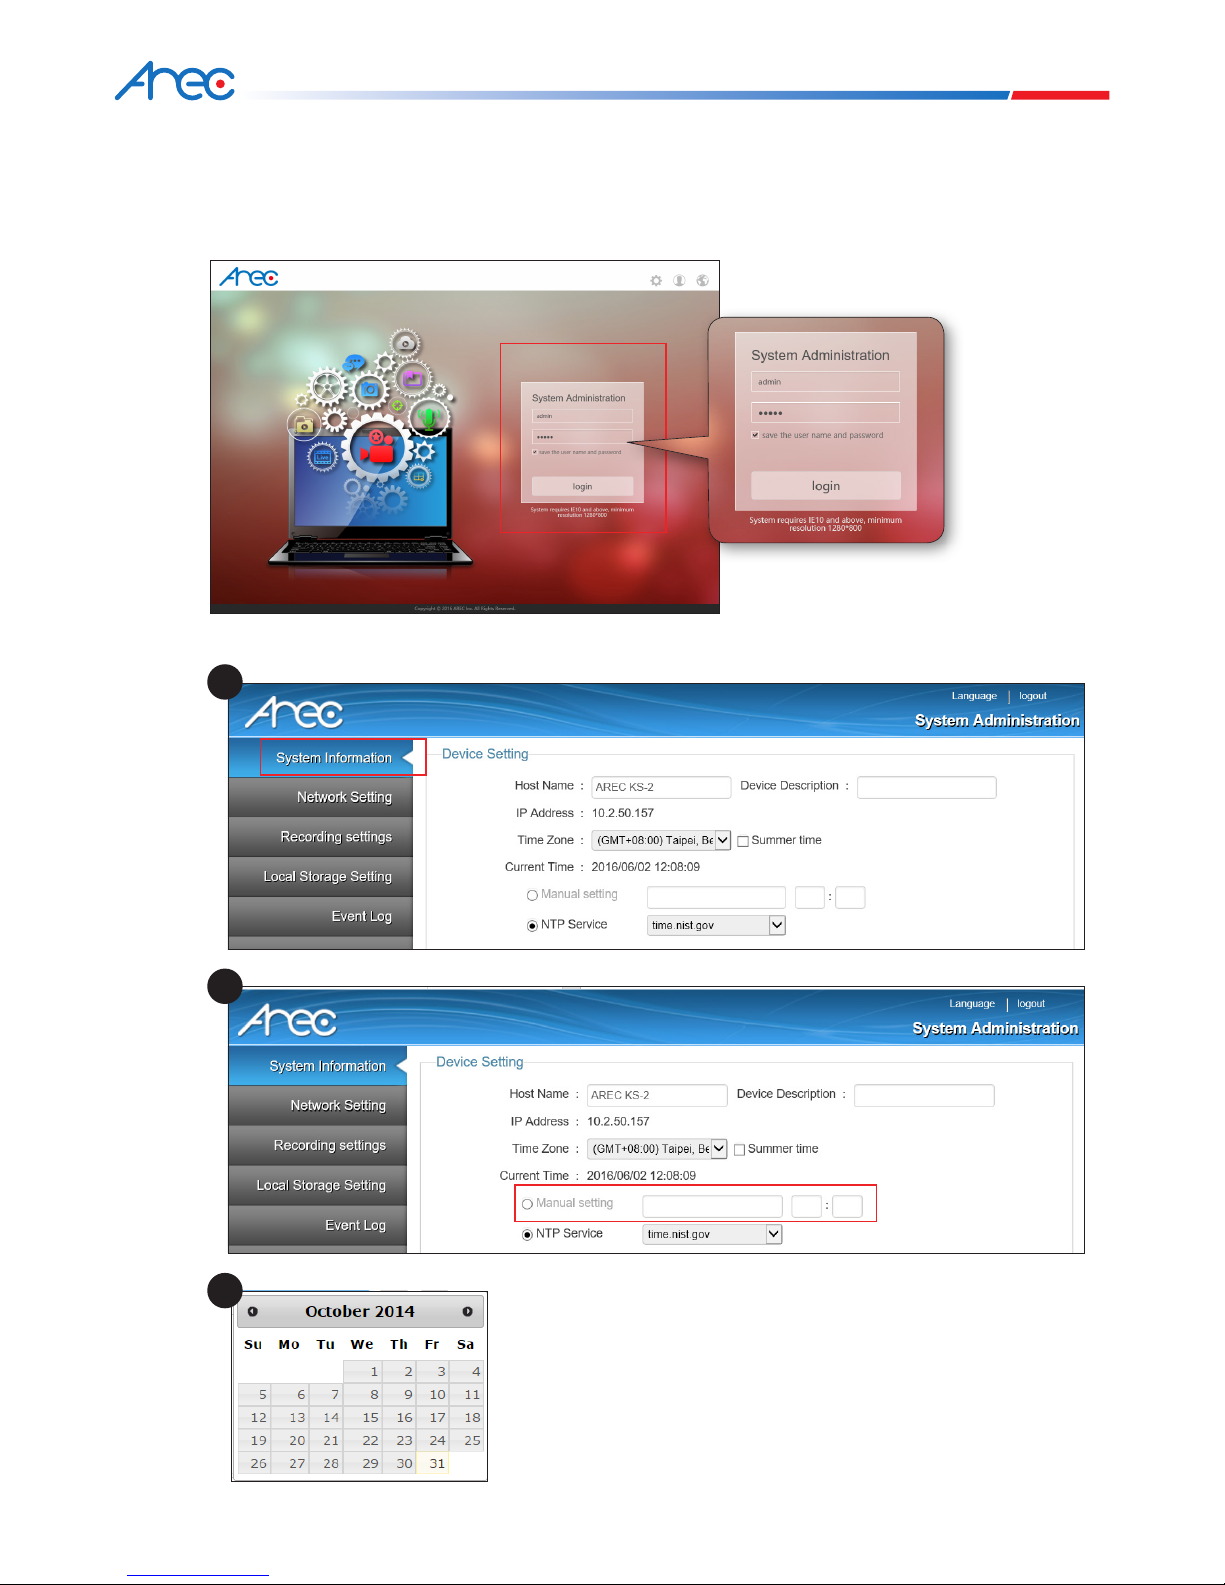
4.2 Recording
4.2.1 Enable Recording
Screen Function Description
Use the remote control buttons
to select the
recording-related item to execute.
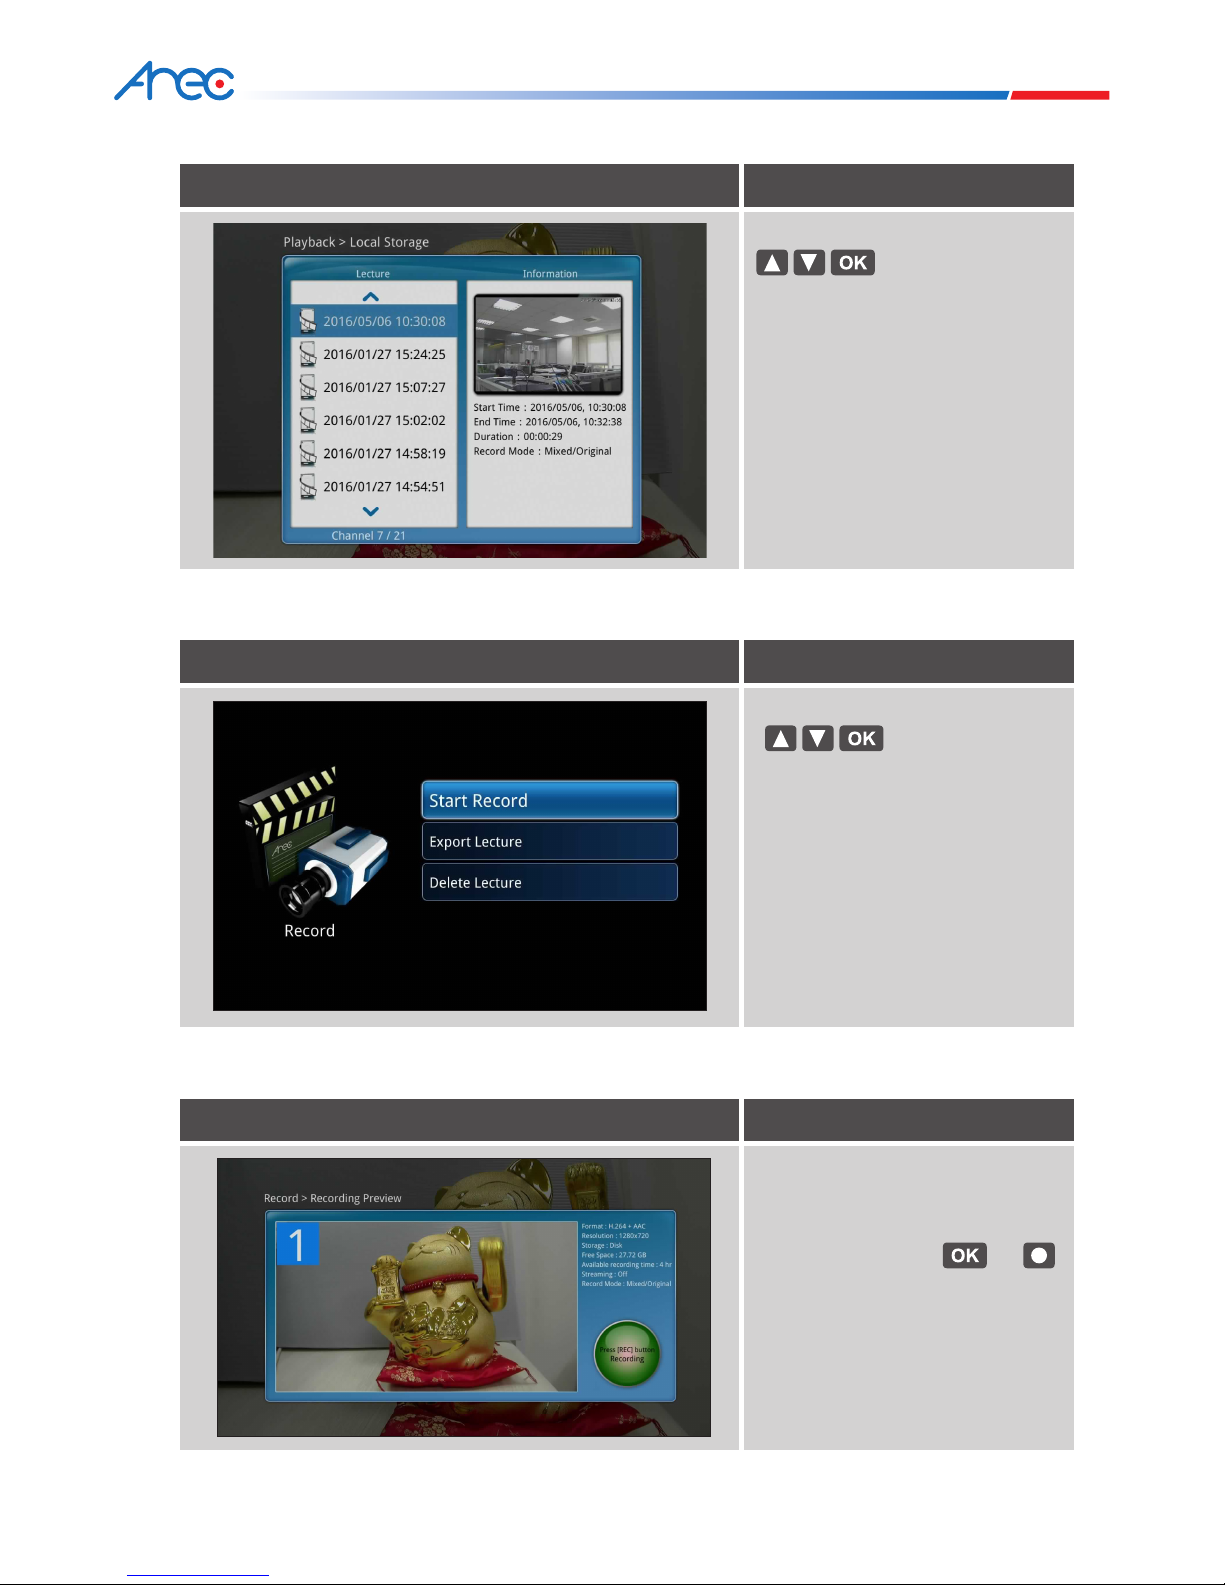
Screen Function Description
To enable recording mode, rst enter
the recording typesetting preview
screen. User the remote control or
control panel buttons or
to enable recording.
 Loading...