

Page 1
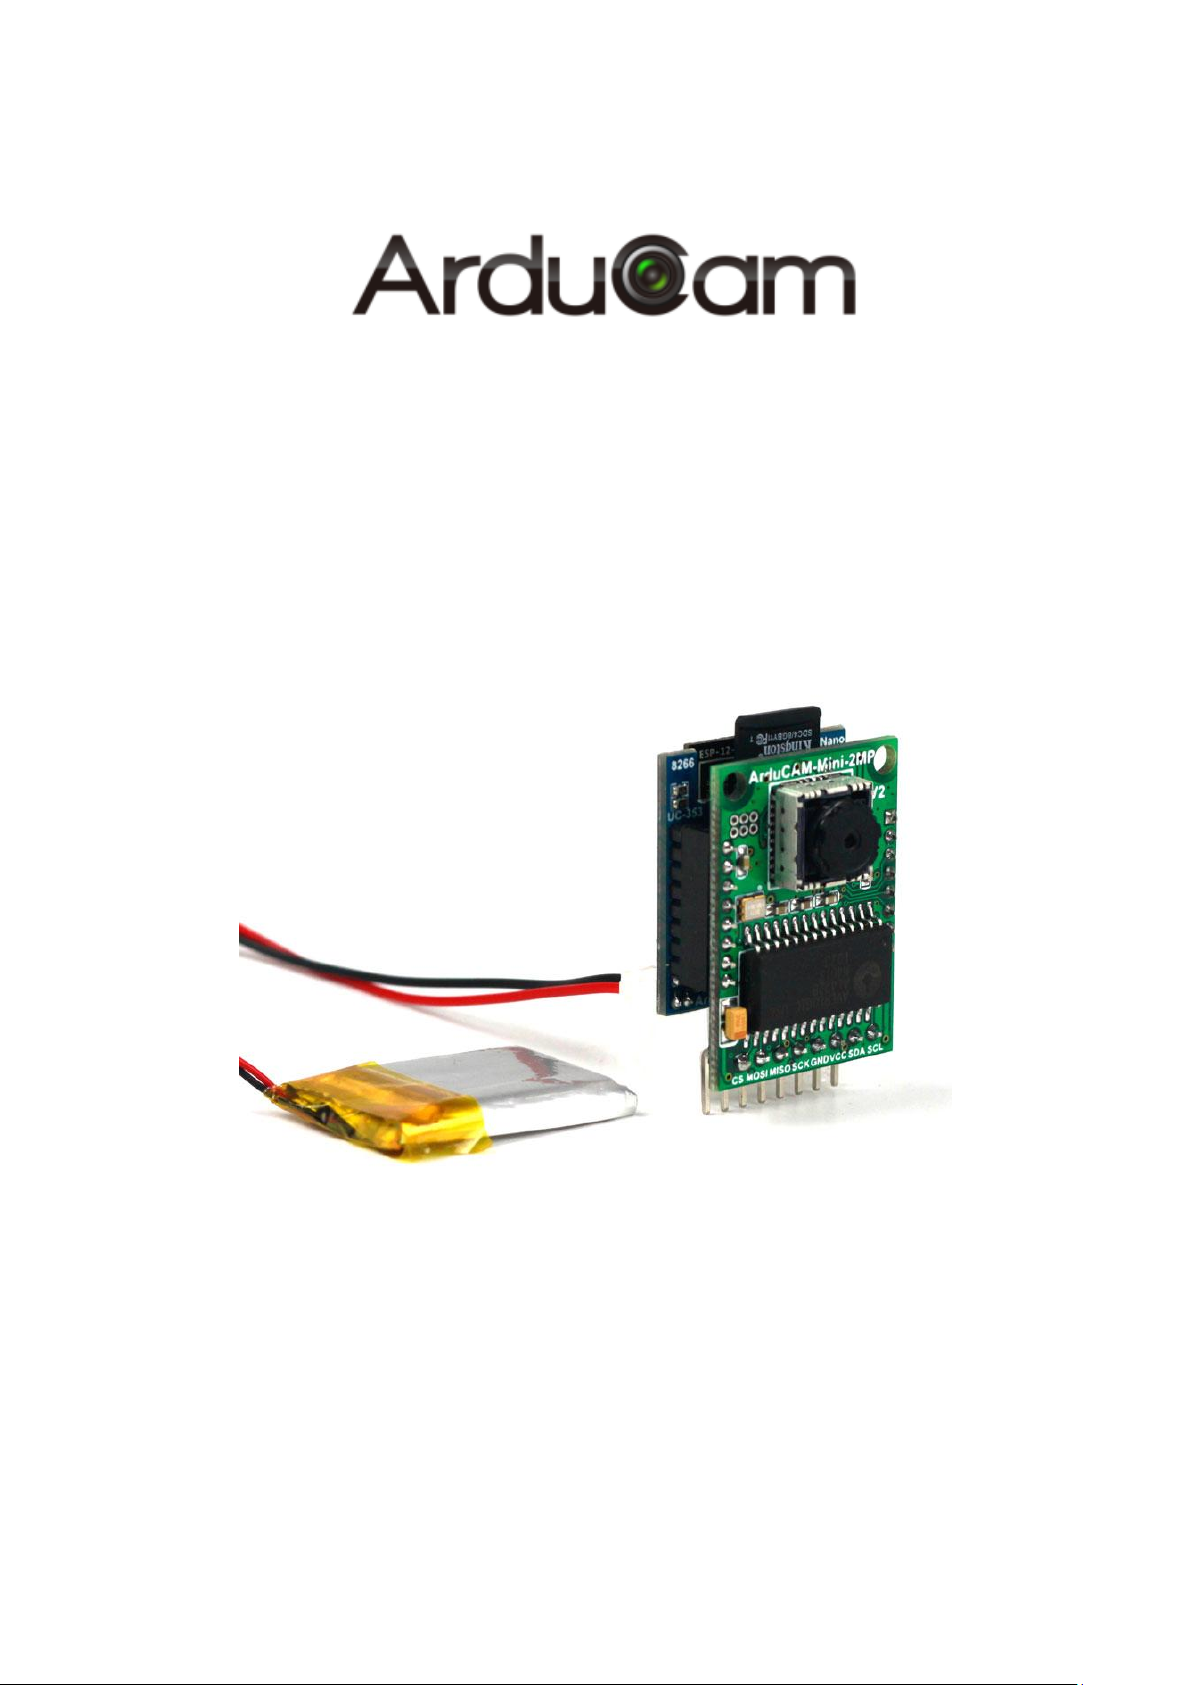
ArduCAM-M-2MP ESP8266
Evaluation Kit User Guide
Rev 1.1, March 2017
Page 2

ArduCAM-M-2MP ESP8266 Evaluation Kit User Guide
1
Table of Contents
1 Introduction ............................................................................................................................. 2
2 Kit Content .............................................................................................................................. 2
3 Features .................................................................................................................................... 2
4 Pin Definition ........................................................................................................................... 3
5 Wiring Diagram ...................................................................................................................... 4
6 Getting Started ESP8266 with Arduino IDE ........................................................................ 4
6.1 Installing with Boards Manager ........................................................................................... 4
6.2 Using Arduino IDE................................................................................................................. 5
6.3 Examples ................................................................................................................................. 7
www.ArduCAM.com
Page 3
ArduCAM-M-2MP ESP8266 Evaluation Kit User Guide
2
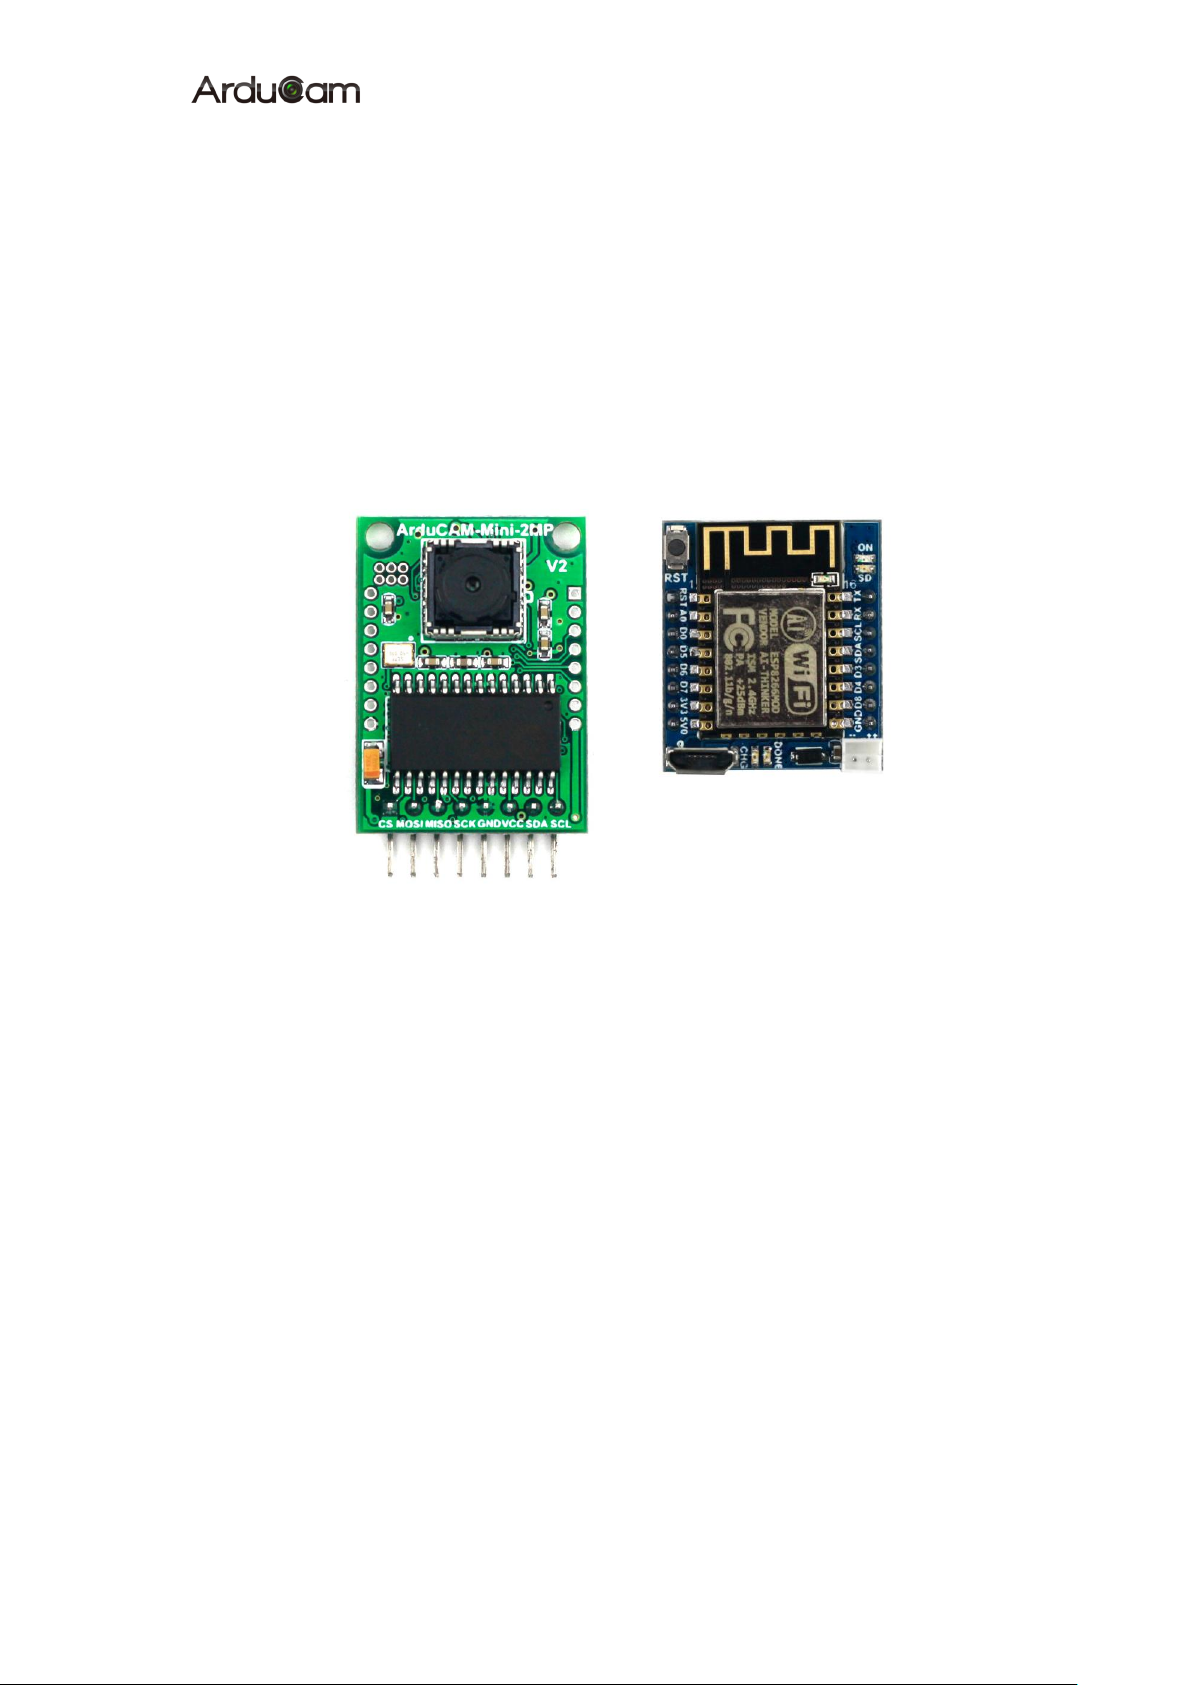
Figure 1 ArduCAM-Mini-2MP-V2 and ESP8266-Nano
1 Introduction
The evaluation kit is designed for low cost WIFI IoT camera based on
ArduCAM-Mini-2MP-V2 and ArduCAM-ESP8266-Nano modules. User can implement a 2MP
WIFI camera using HTTP or Websocket protocol on ESP8266, and the camera can be acted as an
AP and mobile phone/PC can connect to the camera directly or acted as a Station which connected
to the home router. The kit can take 2MP full resolution JPEG still image, but streaming low
resolution low frame rate video due to the limitation of ESP8266. The kit can be USB powered or
battery powered with buildin charging circuits. The kit can also be used separately, it is identical
to an ArduCAM-Mini-2MP camera and a ESP8266 module.
2 Kit Content
ArduCAM-Mini-2MP-V2 x1
ArduCAM-ESP8266-Nano x1
Battery power cable x1
Note: not battery is included, need to buy from local.
3 Features
2MP image sensor OV2640, support JPEG
Standard FOV 60°stock lens
I2C interface for the sensor configuration
SPI interface for camera commands and data stream
Onboard ES8266-12F module
Build in Lithium battery recharging 3.7V/500mA max
Build in SD/TF card socket
Build in micro USB-Serial (CH340g) convertor
Compatible with Arduino IDE
Small form of factor
www.ArduCAM.com
Page 4
ArduCAM-M-2MP ESP8266 Evaluation Kit User Guide
3
Pin No.
PIN NAME
TYPE
DESCRIPTION
1
CS
Input
SPI slave chip select input
2
MOSI
Input
SPI master output slave input
3
MISO
Output
SPI master input slave output
4
SCLK
Input
SPI serial clock
5
GND
Ground
Power ground
6
VCC
POWER
3.3V~5V Power supply
7
SDA
Bi-directional
Two-Wire Serial Interface Data I/O
8
SCL
Input
Two-Wire Serial Interface Clock
Pin No.
PIN NAME
TYPE
DESCRIPTION
1
RST
Input
ESP8266 reset input
2
A0
Input
Analog input
3
D0/GPIO16
Input
Chip select for camera
4
D5/SCK
Ground
Hardware SPI SCLK
5
D6/MISO
Input
Hardware SPI MISO
6
D7/MOSI
Output
Hardware SPI MOSI
7
3.3V
POWER
3.3V Power supply
8
5V
POWER
5V Power supply
9
GND
Ground
Power ground
10
D8/GPIO15
INOUT
GPIO
11
D4/GPIO2
INOUT
GPIO
12
D3/GPIO0
INOUT
Chip select for SD card
13
SDA/GPIO04
Bi-directional
Two-Wire Serial Interface Data I/O
14
SCL/GPIO05
Output
Two-Wire Serial Interface Clock
15
Rx/GPIO03
Input
Hardware UARTRX
16
Tx/GPIO01
Output
Hardware UARTTX
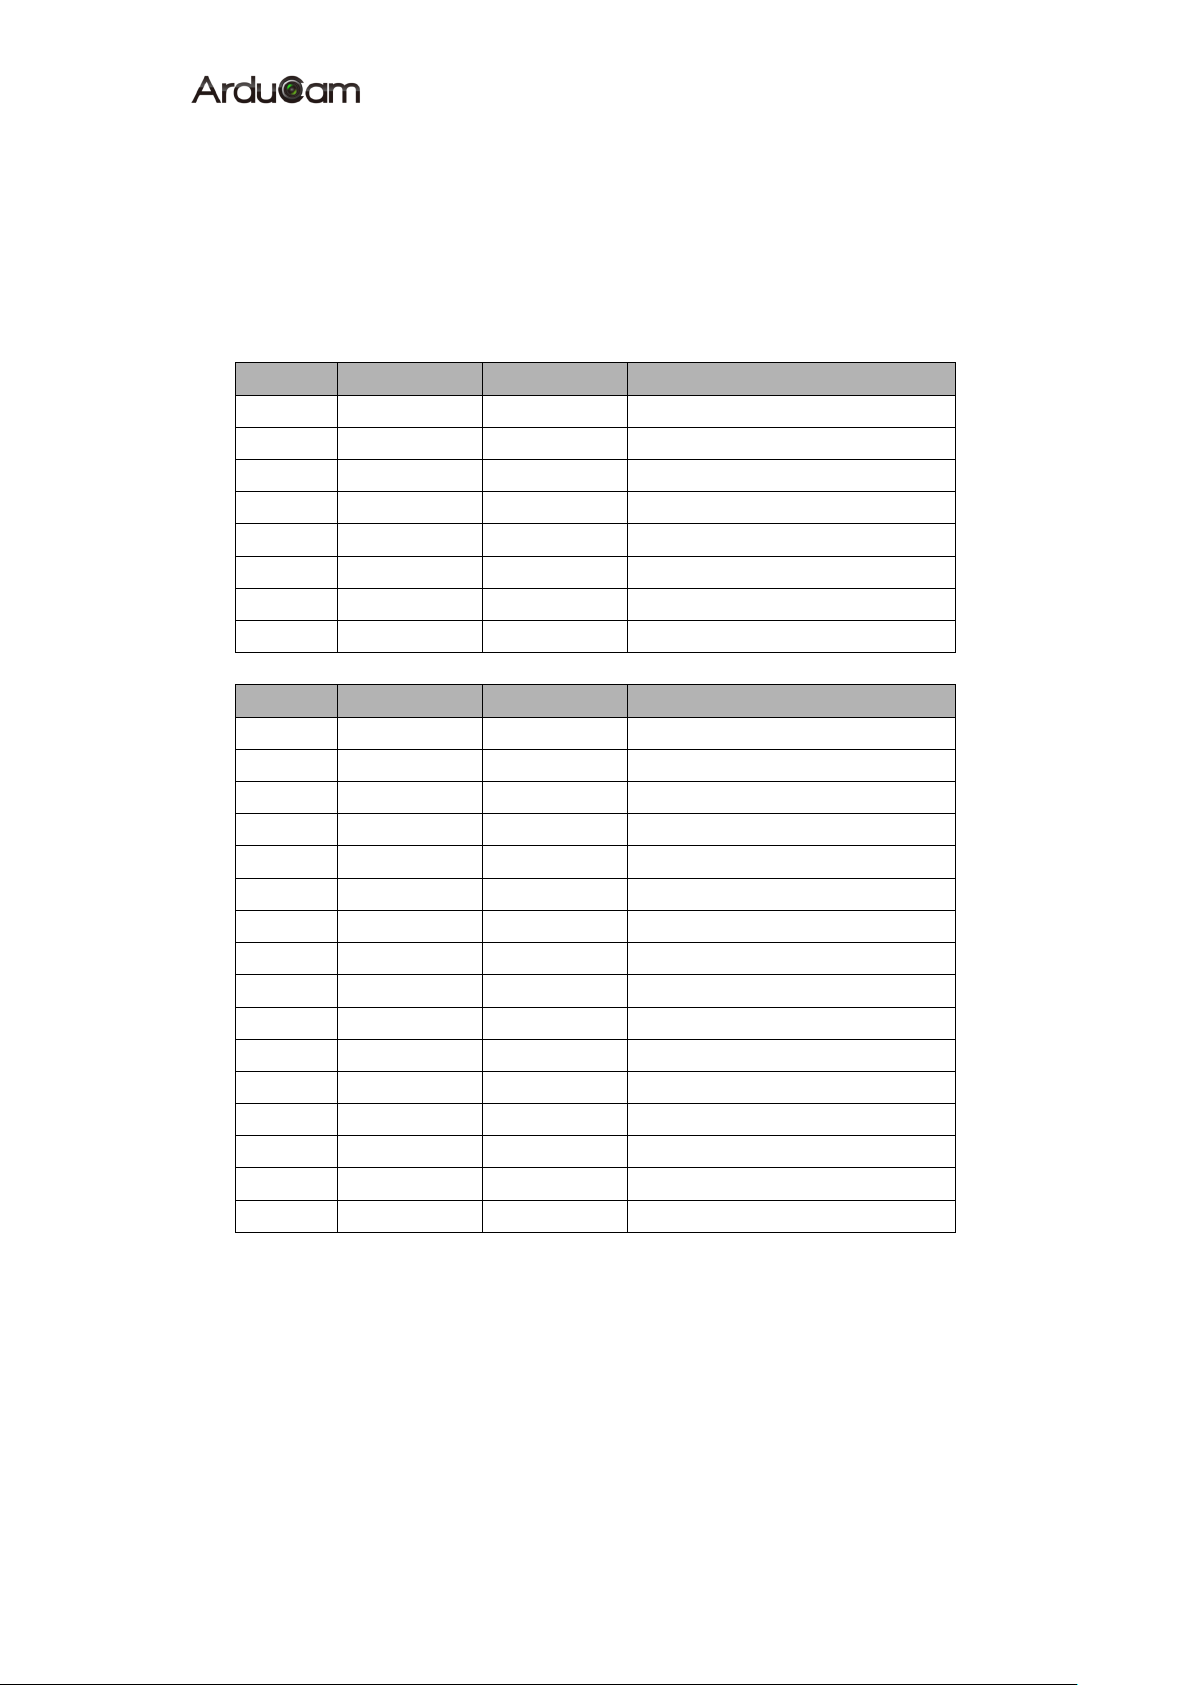
4 Pin Definition
There are two connectors on ArduCAM-Mini-2MP camera module, the 8 pin connector on
the down side is standard ArduCAM connector. The other dual line 16 pin connector is dedicate
connector for ArduCAM-ESP8266-Nano module, it can be well mated with ESP8266 Nano
module directly.
Table 1 ArduCAM-M-2MP Standard Connector Pin Definition
Table 2 ArduCAM-ESP8266-Nano Pin Definition
www.ArduCAM.com
Page 5
ArduCAM-M-2MP ESP8266 Evaluation Kit User Guide
4
CSn
MISO
MOSI
SCLK
SCL
SDA
3.3V
GND
Micro
USB
Battery
+-
5 Wiring Diagram
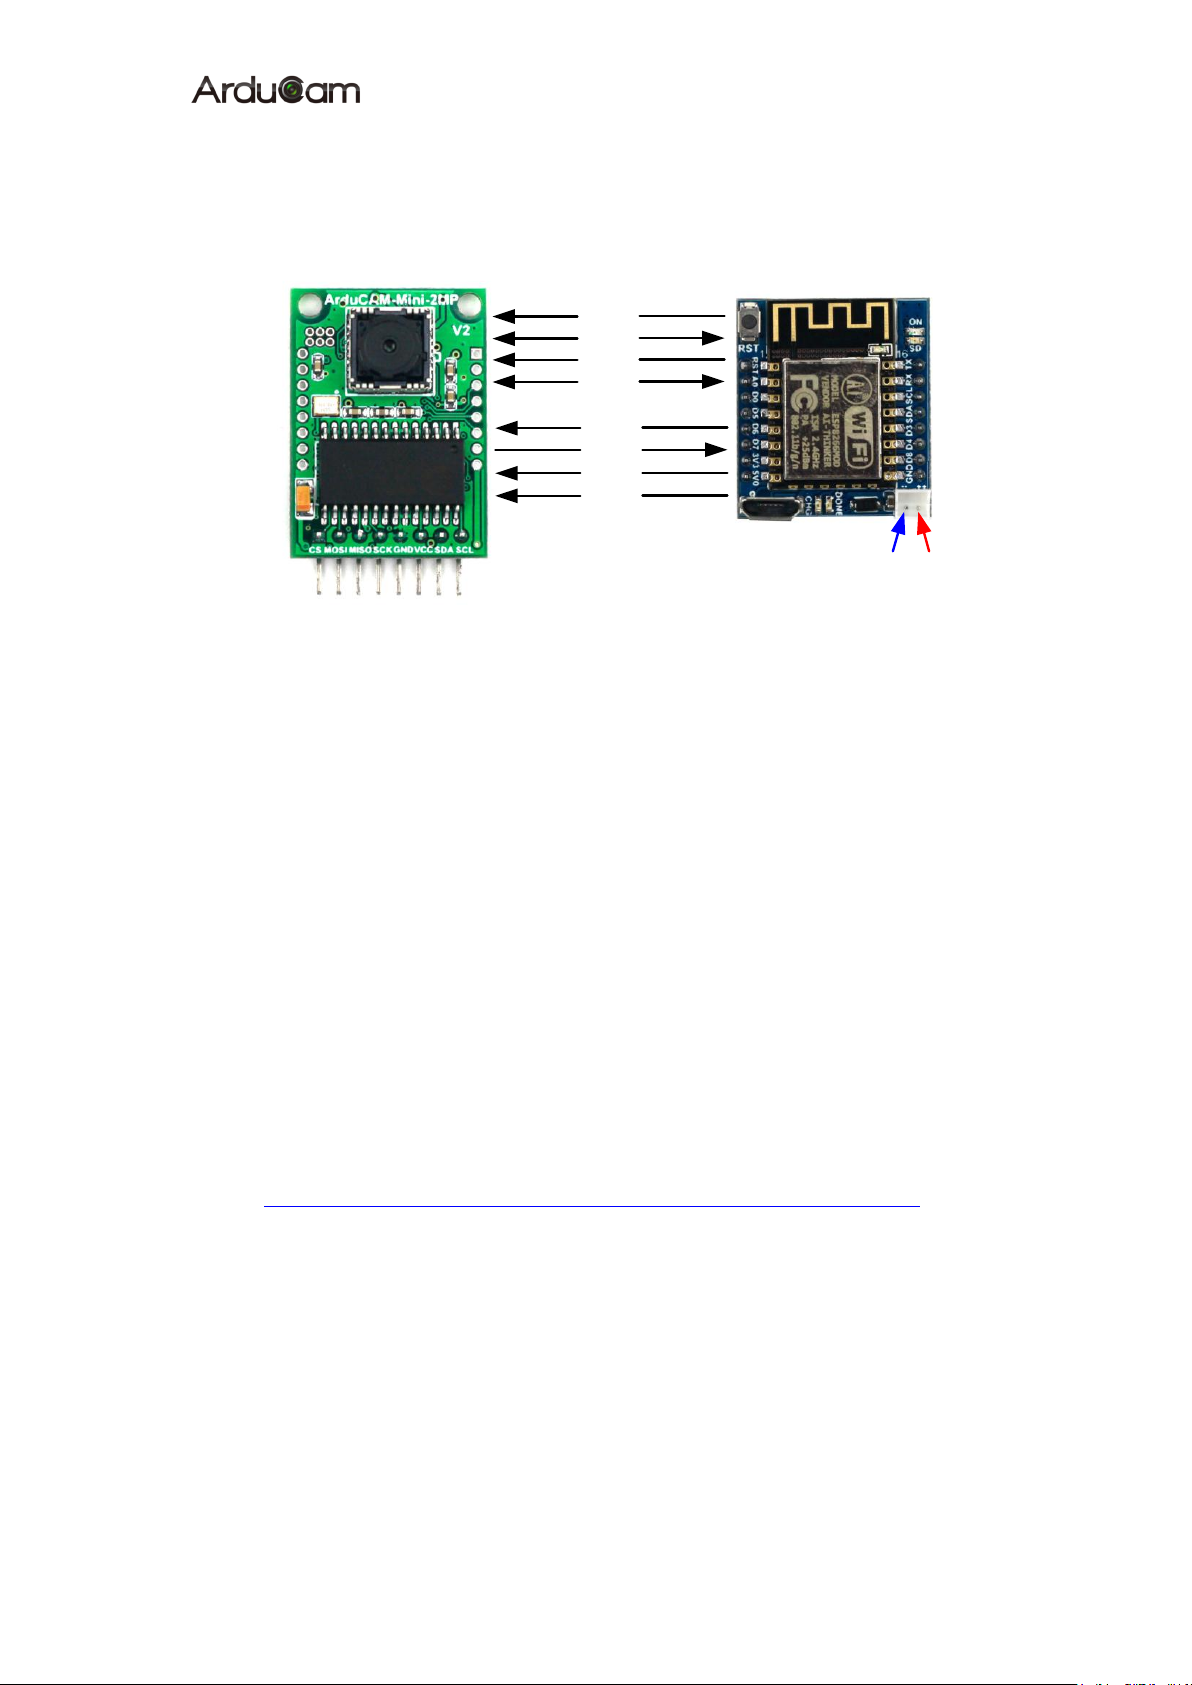
Figure 2 shows the wiring diagram between the ArduCAM mini 2MP and ESP8266 Nano
module.
Figure 2 Wiring Diagram
6 Getting Started ESP8266 with Arduino IDE
This chapter shows you how to develop an application for ArduCAM ESP8266
Nano board using Arduino IDE.
6.1 Installing with Boards Manager
Starting with 1.6.4, Arduino allows installation of third-party platform packages
using Boards Manager. We have packages available for Windows, Mac OS, and
Linux (32 and 64 bit).
Install Arduino 1.6.8 from the Arduino website.
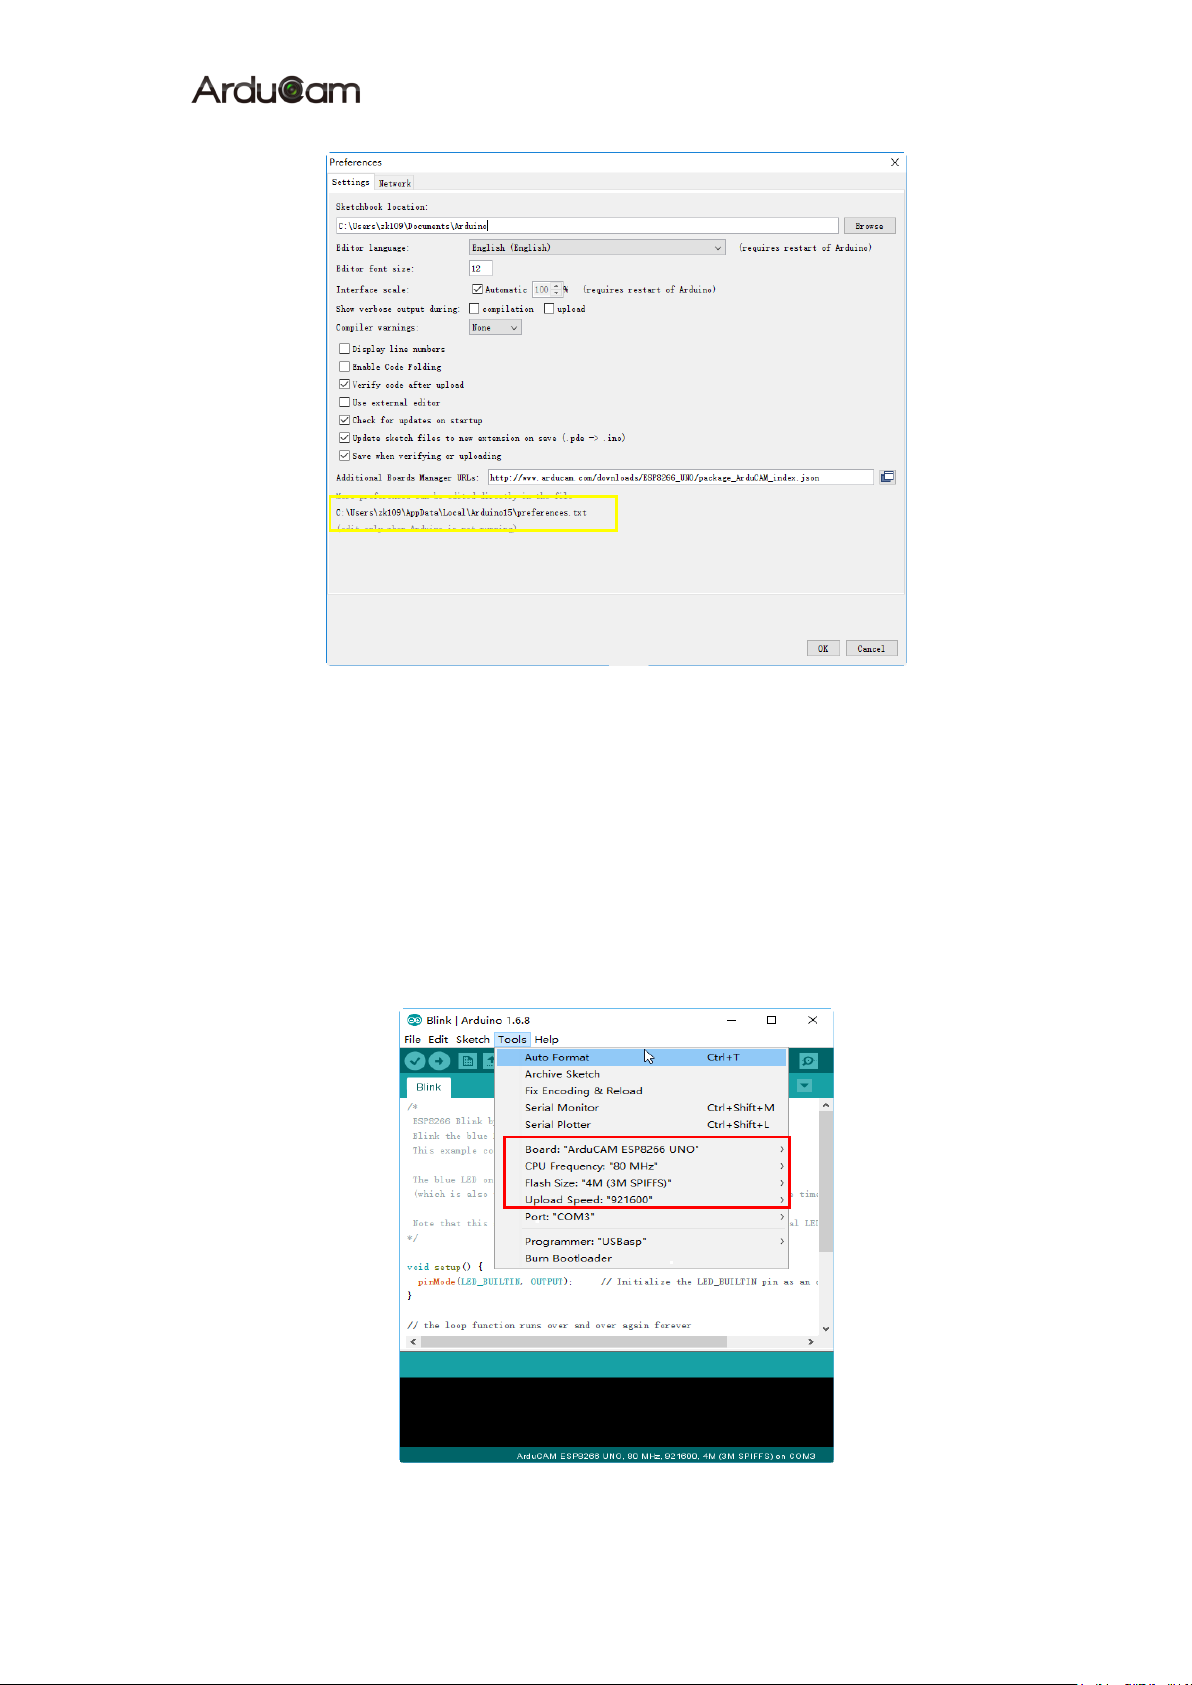
Start Arduino and open Preferences window.
Enter the following link into Additional Board Manager URLs field. You can
add multiple URLs, separating them with commas.
http://www.arducam.com/downloads/ESP8266_UNO/package_ArduCAM_index.json
Open Boards Manager from Tools -> Board menu and install
ArduCAM_ESP8266_UNO addon package.
Note that the installed package source file is located in the C:\Users\Your computer
name\AppData\Local\Arduino15\ folder, here is
C:\Users\zk109\AppData\Local\Arduino15\ for example.
www.ArduCAM.com
Page 6
ArduCAM-M-2MP ESP8266 Evaluation Kit User Guide
5
Figure 4 ArduCAM ESP8266 UNO addon package
6.2 Using Arduino IDE
After installation of ArduCAM ESP8266 Nano board add-on package, you can
select this board from the Tool->Board menu. And there several ready to use
examples from the File->Examples->ArduCAM. You can use these examples directly
or as a starting point to develop your own code.
Select ArduCAM_ESP8266_UNO board from Tool->Board menu.
Figure 3 Board Selection
www.ArduCAM.com
Page 7
ArduCAM-M-2MP ESP8266 Evaluation Kit User Guide
6
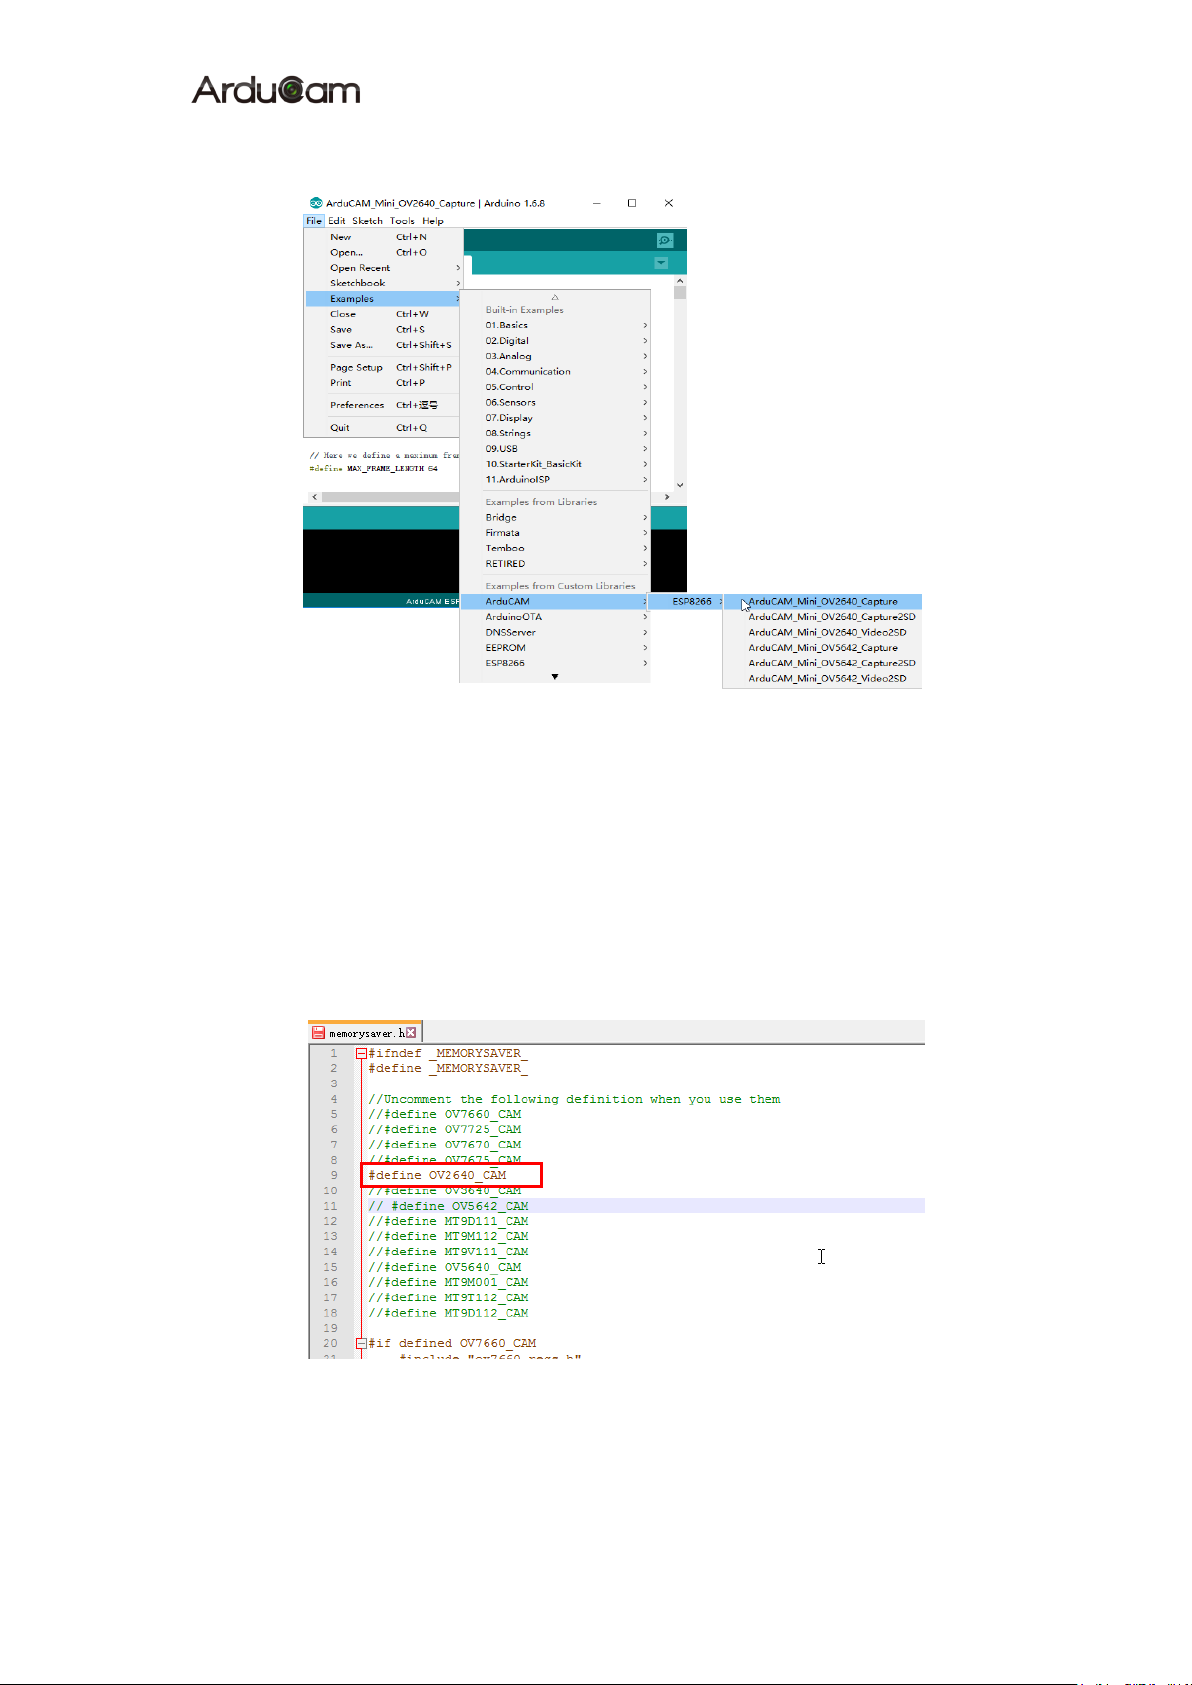
Select the example from File->Examples->ArduCAM .
Figure 4 Example Selection
Configure the camera setting
You need to modify the memorysaver.h file in order to enable OV2640 camera
for ArduCAM Mini 2MP camera modules. Only one camera can be enabled at a
time. The memorysaver.h file is located at C:\Users\Your computer
name\AppData\Local\Arduino15\packages\
ArduCAM_ESP8266_UNO\hardware\ArduCAM_ESP8266_UNO\2.1.0\libraries\ArduCAM
Figure 5 Camera Configuration
Compile and uploading
www.ArduCAM.com
Page 8
ArduCAM-M-2MP ESP8266 Evaluation Kit User Guide
7
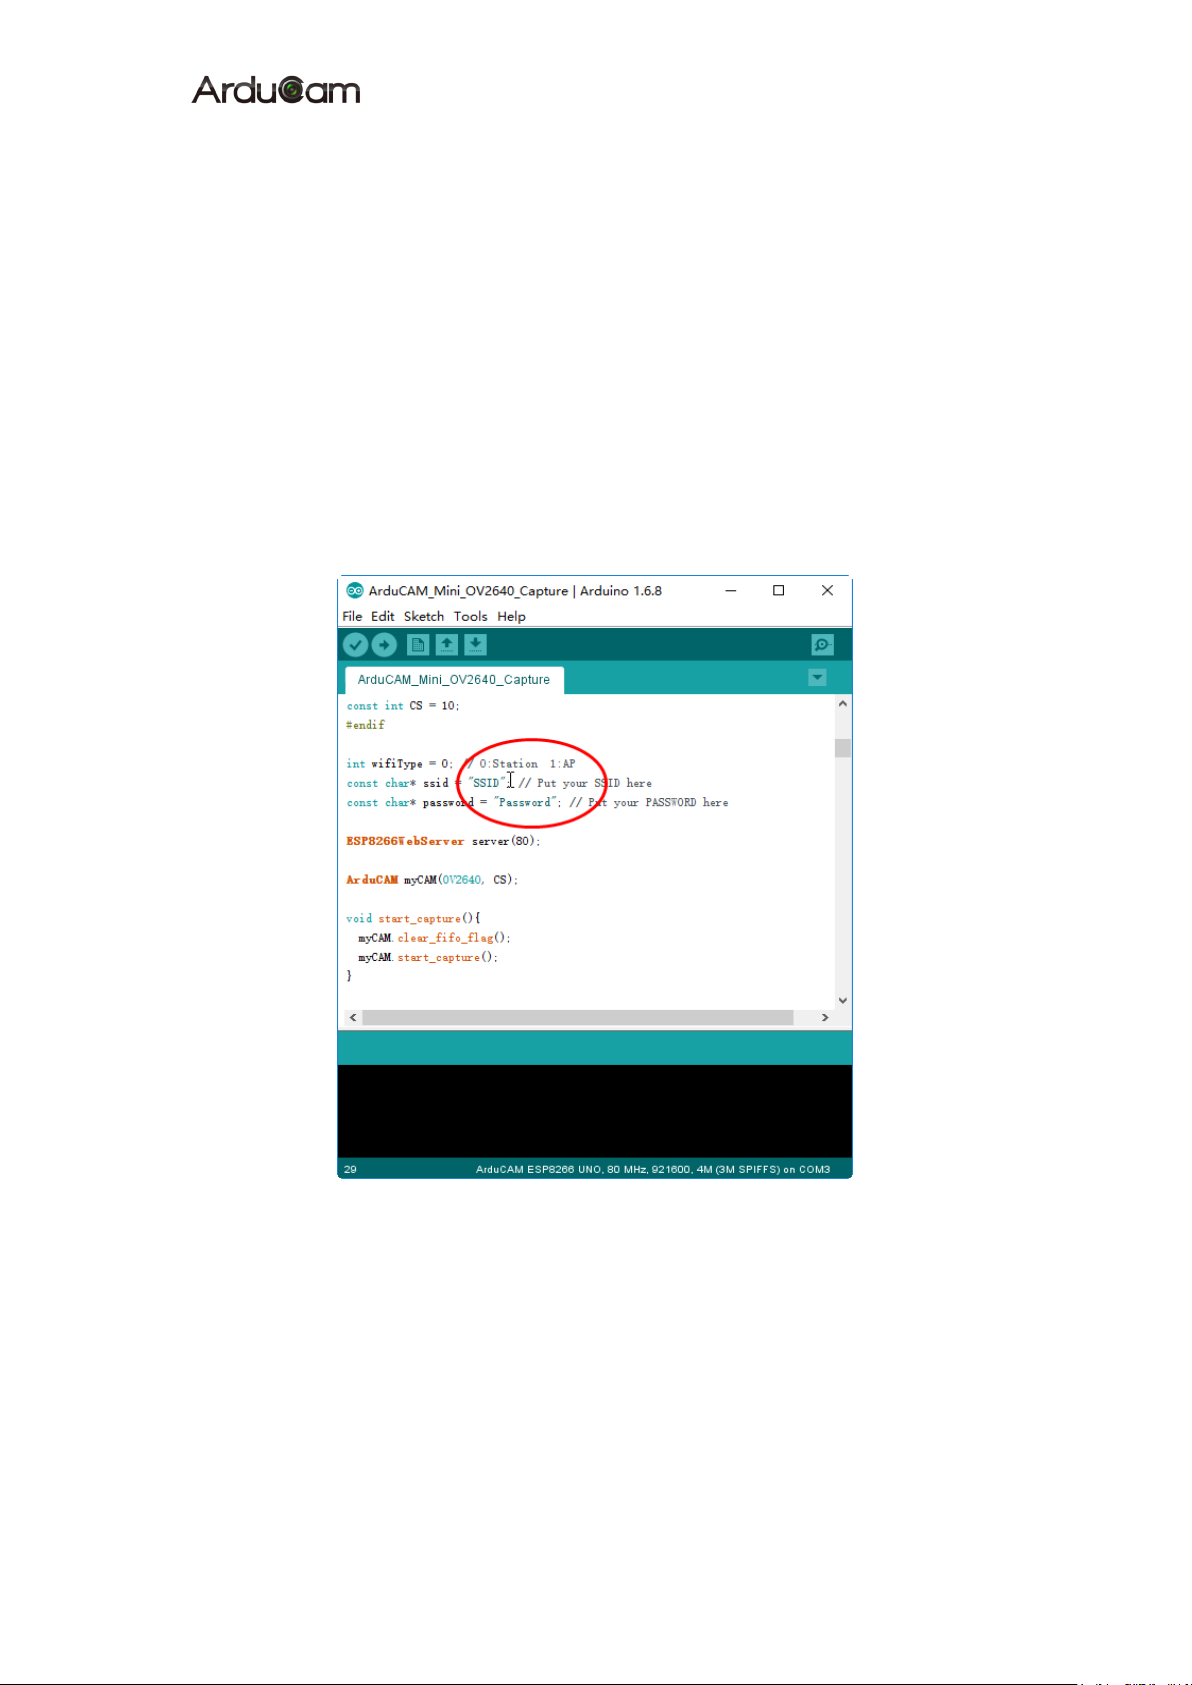
Change the SSID and password if needed with your own network environment
before compile the example. Click uploading the example will automatically
flashed into the board.
6.3 Examples
There are 3 examples for both 2MP ArduCAM mini camera modules.
ArduCAM_Mini_OV2640_Capture
This example uses HTTP protocol to capture still or video over home wifi
network from ArduCAM mini 2MP and display on the web browser.
Using this example the ssid and password should be modifies before uploading.
Figure 6 Wifi Camera Example
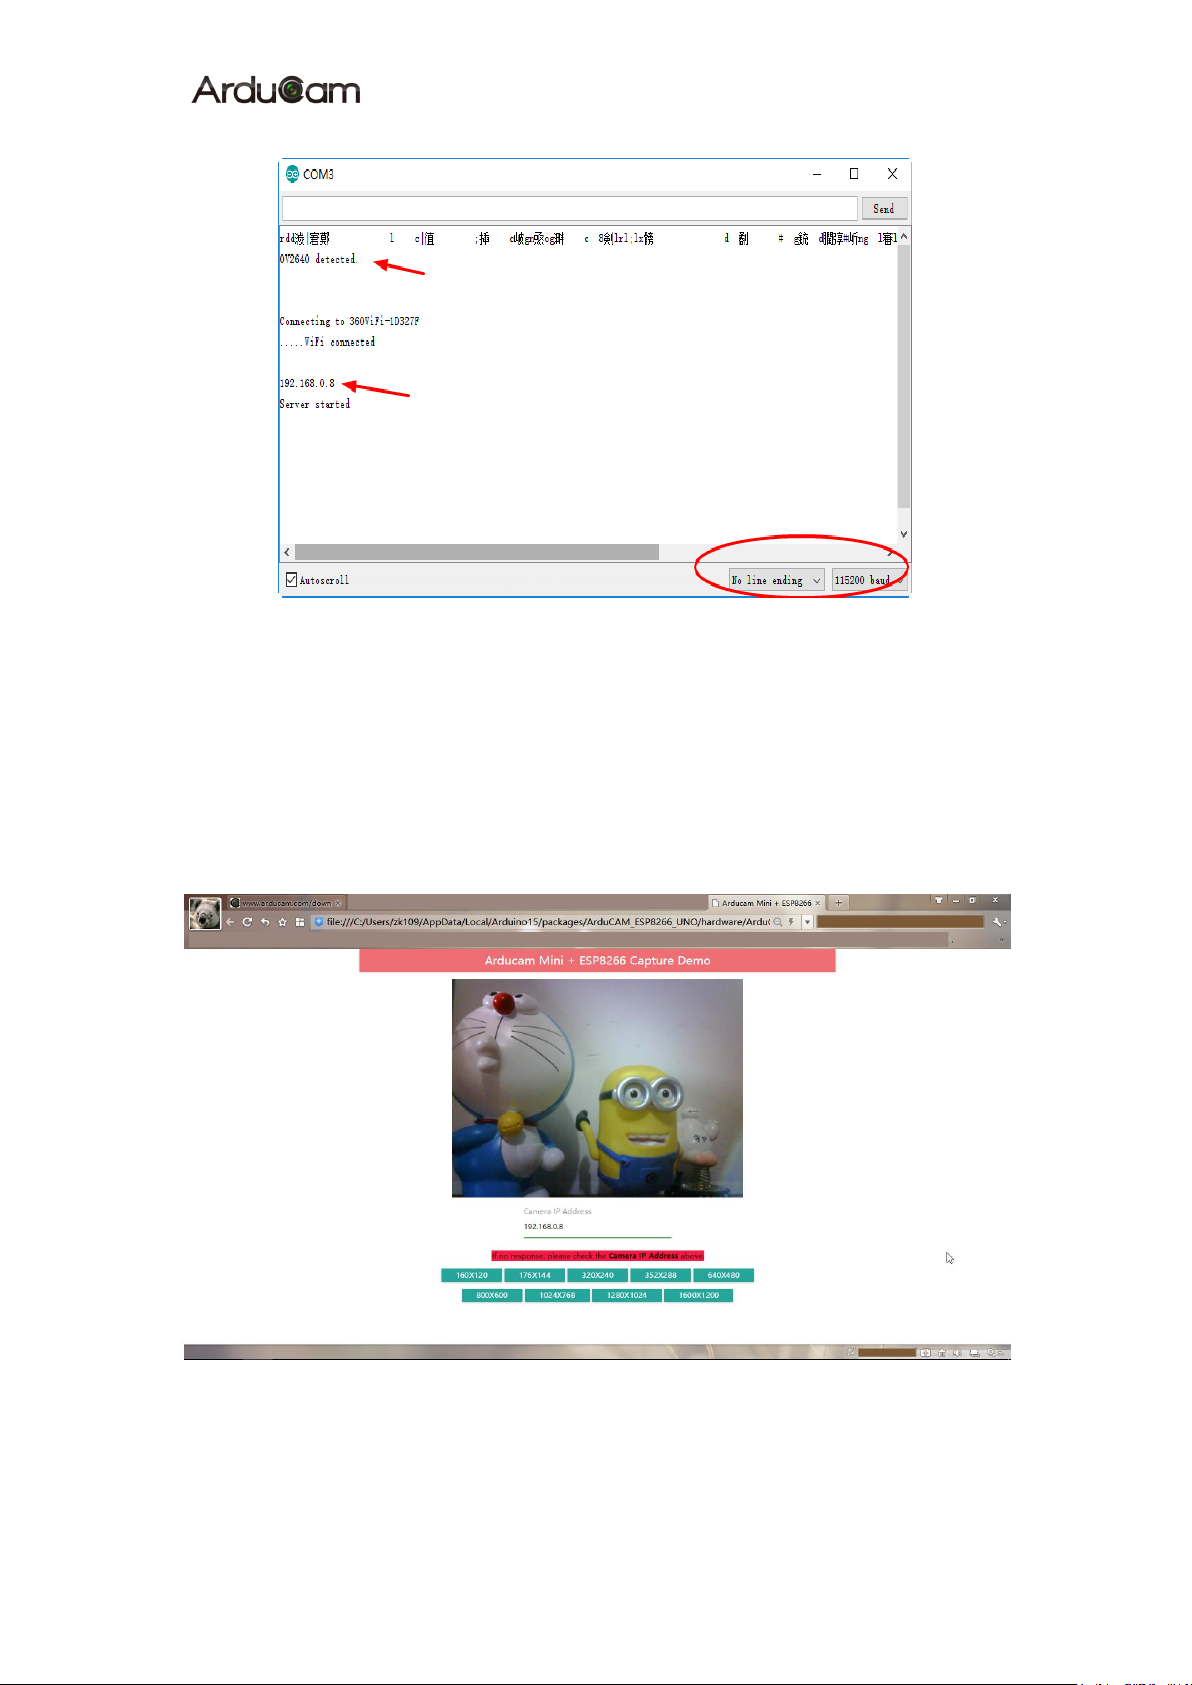
After uploading, the board IP address is obtained via DHCP protocol. You can
figure out the IP address through the serial monitor as Figure 7 shown. The default
serial monitor baudrate setting is 115200bps.
www.ArduCAM.com
Page 9
ArduCAM-M-2MP ESP8266 Evaluation Kit User Guide
8
Figure 7 Identifying IP address
Finally, open the index.html or video.html, input the IP address obtained from the
serial monitor then take pictures or videos. The html files are located at
C:\Users\Your computer name\Local\Arduino15\packages\
ArduCAM_ESP8266_UNO\hardware\ArduCAM_ESP8266_UNO\2.1.0\libraries\ArduCAM\examples\ESP8266\
ArduCAM_Mini_OV2640_Capture\html
Figure 8 Example Html page
ArduCAM_Mini_OV2640_Capture2SD
www.ArduCAM.com
Page 10

ArduCAM-M-2MP ESP8266 Evaluation Kit User Guide
9
This example takes time elapse still photos using ArduCAM mini 2MP and then
stored on the TF/SD card. The LED indicates when the TF/SD card is writing.
ArduCAM_Mini_OV2640_Video2SD
This example takes motion JPEG video clips using ArduCAM mini 2MP and
then stored on the TF/SD card as AVI format,about 4 minutes to complete.
www.ArduCAM.com
 Loading...