

Page 1

made for you.
Page 2

ITALIANO 3-10
IT
ENGLISH 11-18
GB
DEUTSCH 19-26
DE
FRANÇAIS 27-34
FR
ESPAÑOL 35-42
ES
PORTUGUÊS 43-50
PT
NL
NEDERLANDS 51-58
SLOVENSKY 75-82
MAGYAR 83-90
LIETUVIŠKA 91-98
СРПСКИ 99-106
РУССКИЙ 123-130
POLSKI 59-66
PL
ČESKY
CZ
67-74
SK
HU
LT
SR
UA
RO
УКРАЇНСЬКА
ROMÂNA
107-114
115-122
RU
Page 3

ITALIANO
3
Gentile cliente,
La ringraziamo per aver scelto il nostro prodotto.
Prima di collegare e utilizzare l’apparecchio Le consigliamo di leggere attentamente il presente
libretto d’istruzioni. La conoscenza del funzionamento dell’apparecchio Le permetterà di usarlo
correttamente e in sicurezza.
Nel presente libretto d’istruzioni sono riportate le caratteristiche tecniche dell’asciugatrice e una
serie di utili indicazioni concernenti il suo funzionamento, il tutto concepito al fi ne di aiutarLa a trarre
il meglio dall’apparecchio. Qualora l’apparecchio venga venduto o trasferito a terzi, non dimenticate
di consegnare al nuovo utente il presente libretto d’istruzioni.
INDICE
NOTE E AVVERTENZE PER L’UTENTE 3-4
• Informazioni tecniche 3
DESCRIZIONE DELL’APPARECCHIO 5
INSTALLAZIONE DELL’APPARECCHIO 5-7
• Installazione 5-6
• Livellamento dell’asciugatrice 6
• Collegamento alla tubazione di scarico 6
• Allacciamento alla rete elettrica 7
USO DELL’ASCIUGATRICE 7-9
• Descrizione delle funzioni 7
• Apertura della porta e modifi ca del senso di apertura 8
• Per una corretta asciugatura della biancheria 8
• Precauzioni a seconda del tipo di tessuto 9
• Tabella programmi 9
• Peso della biancheria 9
MANUTENZIONE 10
• Pulizia del fi ltro 10
• Ricerca guasti 10
• Risoluzione dei problemi 10
• Accessori opzionali 10
NOTE E AVVERTENZE PER L’UTENTE
DATI TECNICI
Larghezza cm.:
Dimensioni:
Altezza cm.:
Profondità cm.:
Capacità massima
Potenza Nominale
Tensione di alimentazione
MODELLO: ............................................................................................................................................................................................................
NUMERO DI SERIE: ......................................................................................................................................................................................
DATA DI ACQUISTO: .....................................................................................................................................................................................
SM2255
59.5
85.0
60.4
6,0 kg. Asciutti
vedere targhetta dati
vedere targhetta dati
IT
Page 4
4
NOTE E AVVERTENZE PER L’UTENTE
▼ La presente asciugabiancheria è destinata ad
uso esclusivamente domestico. Ogni altro uso è
da considerarsi improprio e quindi pericoloso.
▼ Conservare il presente libretto vicino all'appa-
recchio, in modo da poterlo sempre consultare
con facilità, se necessario.
▼ Qualsiasi modifi ca o tentativo di manomissione
apportati all'apparecchio possono essere fonte
di pericolo per l'utilizzatore e provocare danni
al prodotto.
▼ Al momento della consegna controllare che
l'apparecchio non abbia subito danni durante
il trasporto. Qualora vengano rilevati dei danni,
informarne immediatamente il rivenditore.
▼ Non coprire l'asciugatrice con biancheria o altri
oggetti.
▼ Nel posizionare l'apparecchio, assicurarsi che
il cavo d'alimentazione non rimanga piegato o
schiacciato e verifi carne l’accessibilità.
▼ Dopo l'uso dell'asciugatrice chiudere sempre
la porta.
In questo modo si eviterà che i bambini si arram-
pichino sulla porta provocando il ribaltamento
dell'asciugatrice.
▼ L'apparecchio non deve essere usato da bam-
bini senza sorveglianza.
▼ Ricordarsi che durante il ciclo di asciugatura
il tubo di scarico si scalda e può raggiungere
temperature superiori a 60°. Evitate di toccare
questa parte prima di aver completato il ciclo
di raffreddamento.
▼ Non utilizzare l'apparecchio per asciugare capi
sporchi.
▼ Non asciugare capi sporchi di olio per cucinare,
petrolio, acetone, alcool, benzina, kerosene,
smacchiatori, acqua ragia, cera.
▼ Eliminare queste sostanze mediante un lavag-
gio a caldo e con un abbondante dose di detersivo prima di caricare i capi nell'asciugatrice.
▼ Non asciugare oggetti in gommapiuma, lattice,
impermeabili, tessuti impermeabilizzati, materassini di gomma, oggetti stampati, vestiti o
cuscini imbottiti con gommapiuma, poiché questi
materiali potrebbero sciogliersi e danneggiare gli
altri capi di biancheria o lo stesso apparecchio.
▼ Ammorbidenti e prodotti simili devono essere
usati rispettando le istruzioni del fabbricante
riportate sulla confezione.
▼ In caso di vendita o trasferimento dell'apparec-
chio, non dimenticare di consegnare assieme
ad esso anche il presente libretto. Ciò aiuterà il
nuovo proprietario ad usare l'asciugabiancheria
correttamente e in sicurezza.
▼ Non cercate di riparare eventuali guasti all'appa-
recchio da soli; riparazioni eseguite da personale
non professionale possono essere causa di seri
danni e renderanno nullo qualsiasi diritto a ripa-
▼ La riparazione dell'apparecchio deve essere
▼ Centrifugare o strizzare bene la biancheria pri-
▼ Pulire accuratamente il fi ltro dopo ogni uso
▼ Non inserire o estrarre la spina dalla presa di
▼ L'asciugatrice deve essere collegata a una presa di
▼ Non usare prolunghe o adattatori multipli per col-
▼ Non esporre l'apparecchio all'azione degli
▼ Prima di eseguire la manutenzione o la pulizia
▼ Su questo apparecchio è apposta la marcatura
▼ Questo simbolo applicato sul prodotto
▼ Per lo smaltimento dell'apparecchio attenersi
razioni in garanzia.
effettuata soltanto da personale autorizzato dai
centri di assistenza. Tutte le riparazioni devono
essere eseguite utilizzando esclusivamente
parti di ricambio originali.
ma di caricarla nell'asciugatrice. La biancheria
centrifugata asciugherà più in fretta.
dell'asciugatrice in modo da garantire una
perfetta circolazione dell'aria.
corrente con le mani umide.
corrente munita di un effi ciente sistema di messa a
terra rispondente alle vigenti norme di sicurezza.
legare l'apparecchio alla rete di alimentazione.
agenti atmosferici.
dell'apparecchio, non dimenticare di scollegarlo dalla rete elettrica. Non tirare il cavo di
alimentazione per scollegare l'apparecchio
dalla rete, ma afferrare la spina.
attestante la sua rispondenza alla Direttiva Europea 2002/96/CEE, Rifi uti di apparecchiature
elettriche ed elettroniche (WEEE). Assicurarsi
che lo smaltimento dell'apparecchio avvenga
in maniera corretta. L'utilizzatore è tenuto a
contribuire alla prevenzione di qualsiasi conseguenza negativa sulla salute e sull'ambiente.
o sui documenti che lo accompagnano sta
ad indicare che questo apparecchio non può
essere trattato come i normali rifi uti domestici,
ma deve essere consegnato ad un centro di
raccolta autorizzato per consentire il riutilizzo
di parti elettriche ed elettroniche.
alle vigenti norme locali in materia. Per ulteriori
informazioni sul trattamento, il recupero e il riutilizzo del presente apparecchio rivolgersi agli
organi competenti, ai servizi locali di raccolta
rifi uti domestici o al rivenditore presso il quale
l'apparecchio è stato acquistato.
IL COSTRUTTORE NON PUO’ ESSERE RITENUTO RESPONSABILE PER EVENTUALI
INCIDENTI CAUSATI DALLA MANCATA OSSERVANZA DELLE NORME DI SICUREZZA E
DELLE INDICAZIONI RIPORTATE NEL PRESENTE LIBRETTO D’ISTRUZIONI
IT
SM2255
Page 5

DESCRIZIONE DELL’APPARECCHIO
5
DESCRIZIONE DELL’APPARECCHIO
2
11
L’asciugatrice è un apparecchio per uso domestico in grado di asciugare ogni tipo
di tessuto.
▼ La struttura della macchina è costituita da pannelli in acciaio trattati e vernicia-
10
ti in modo da garantire inalterate le sue qualità estetiche nel tempo.
▼ Il motore e le parti in movimento sono state progettate e fabbricate in modo
da garantire i minimi livelli di rumorosità possibili.
▼ Il pannello di comando è concepito in modo da consentire all'utilizzatore di
eseguire senza diffi coltà i programmi di asciugatura previsti.
8
9
▼ La porta di ampie dimensioni rende ancora più facili il carico e lo scarico della
biancheria.
modello con controllo
asciugatura a tempo
170’
120’
150’
130’
110’
90’
70’
50’
30’
30’
40’
60’
80’
100’
1 - Pulsante di avvio
2 - Indicatore luminoso di funzionamento
3 - Manopola selezione tempo di asciugatura
4 - Porta cestello
5 - Filtro
6 - Piedini regolabili
7 - Targhetta caratteristiche tecniche.
8 - Foro di scarico vapore
9 - Flangia di raccordo
10 - Tubo di scarico
11 - Supporto tubo
2
1
3
4
5
1
6
7
INSTALLAZIONE DELL’APPARECCHIO
INSTALLAZIONE
L’installazione deve essere affi data a personale qualifi cato ed eseguita secondo le
istruzioni fornite dal costruttore. Un’installazione non corretta può provocare danni
a persone e cose.
▼ Posizionare l'asciugatrice in prossimità di una fi nestra al fi ne di facilitare l'eva-
cuazione dell'aria umida.
▼ Per evitare la formazione di condensa utilizzare un tubo di scarico da collegare
3
A
SM2255
al foro A ricavato in basso nel pannello posteriore dell’apparecchio (fi g. 3).
IT
Page 6

6
▼ Non ostruire l'ingresso dell'aria nella parte posteriore dell'apparecchio.
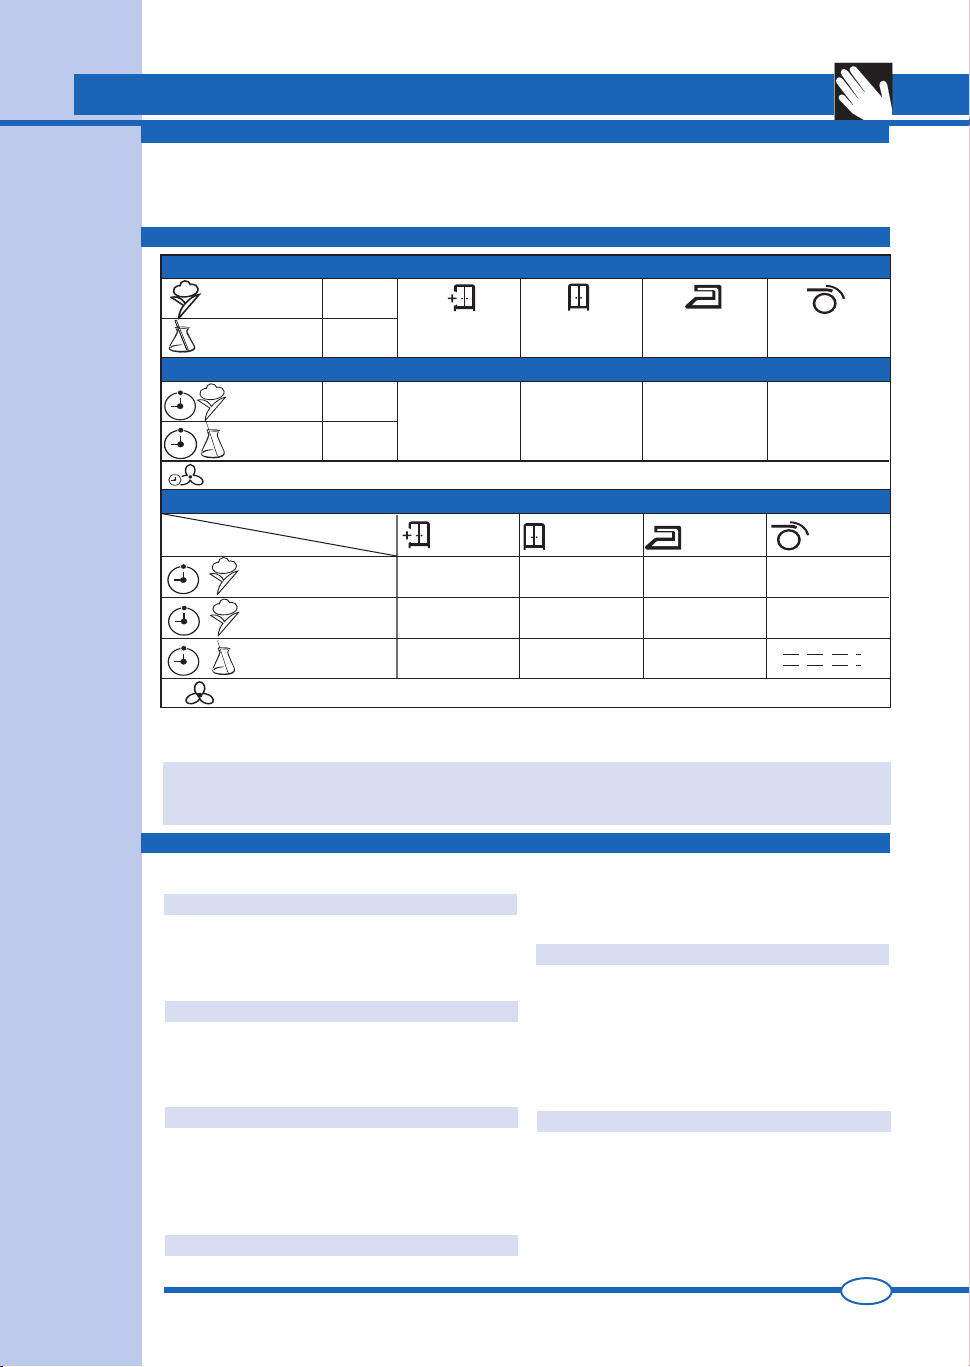
▼ Montare il fi ltro nella posizione prevista come indicato nella (fi g. 4).
▼ Pulire l'interno del cestello di asciugatura con uno straccio umido per eliminare
depositi di polvere.
Piedini regolabili. Mettere l’asciugatrice in posizione verticale in modo che poggi
saldamente sui tutti e quattro i piedini, quindi livellarla regolando i piedini come segue:
▼ Sollevare leggermente l'asciugatrice.
▼ Regolare i piedini alla giusta altezza (fi g. 5).
(Non svitare eccessivamente i piedini e non utilizzare un avvitatore).
▼ Abbassare l'asciugatrice.
Una macchina livellata non correttamente può danneggiare i cuscinetti e accelerarne
l’usura. Questa asciugatrice non necessita di essere fi ssata a pavimento.
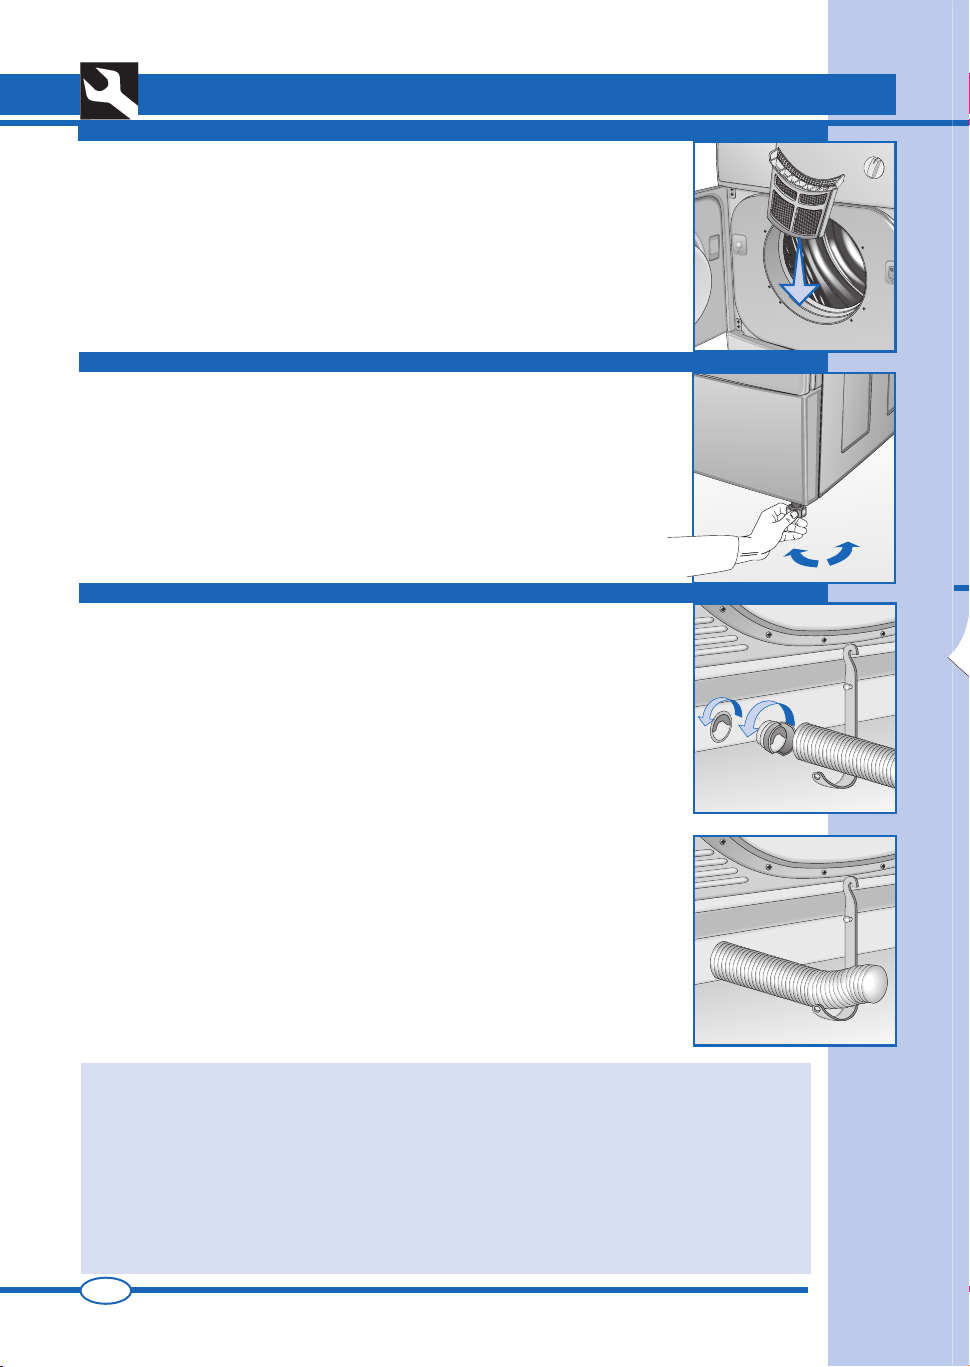
Collegare il tubo di scarico all’uscita posta sul retro dell’asciugatrice (fi g.6) secondo
le seguenti indicazioni:
▼ Collegare un'estremità del tubo alla fl angia di raccordo fornita a corredo.
▼ Ruotare l'elemento d'unione (assieme al tubo) in senso antiorario all'interno del
foro d'uscita.
▼ Far uscire il tubo dal retro dell'asciugatrice verso sinistra o verso destra attraverso
la cavità presente nella parte inferiore del corpo della macchina.
INSTALLAZIONE DELL’APPARECCHIO
INSTALLAZIONE
LIVELLAMENTO DELL’ASCIUGATRICE
COLLEGAMENTO DEL TUBO DI SCARICO
4
5
6
▼ Posizionare l'altra estremità del tubo vicino a una fi nestra o a un'apertura di
ventilazione nella parete esterna. Qualora ciò non fosse possibile, assicurarsi
che il locale sia ben ventilato quando l'asciugatrice è in funzione. Utilizzare il
supporto (fi g. 7) per fi ssare il tubo.
7
Importante: Il tubo di evacuazione dell’aria deve essere collegato anche nel caso in cui l’aria
non venga scaricata all’esterno; in caso contrario l’aria umida scaricata può rientrare nella
macchina allungando i tempi di asciugatura.
L’aria umida può inoltre danneggiare l’asciugatrice. Sebbene l’aria in uscita dalla tubazione
di scarico sia soltanto calda e umida e non costituisca un pericolo, non deve mai essere
diretta verso persone, animali o piante.
Importante: L’aria di scarico non deve mai essere convogliata in una canna fumaria utilizzata per l’evacuazione dei fumi generati da apparecchi che utilizzano gas o altri tipi di
combustibile.
IT
SM2255
Page 7

INSTALLAZIONE DELL’APPARECCHIO
COLLEGAMENTO ALLA RETE ELETTRICA
▼ Assicurarsi che la tensione indicata sulla targhetta posta sul retro dell'apparecchio
corrisponda alla tensione di rete.
▼ Al termine dell'istallazione, l'apparecchio deve essere collegato alla rete di
alimentazione tramite un interruttore bipolare.
▼ Tutti i dispositivi d'interruzione, i cablaggi e le prese di corrente devono avere una portata
nominale in grado di sopportare il carico massimo indicato sulla targhetta dati.
▼ La rete di alimentazione alla quale è collegato l'apparecchio deve essere dotato
di sistema di messa a terra. In caso contrario il costruttore non sarà responsabile
8
Importante: Al termine del ciclo di asciugatura, staccare l’apparecchio dalla rete elettrica di
alimentazione in modo da evitare che bambini possano metterlo in funzione.
per eventuali incidenti (fi g. 8).
▼ In caso di danneggiamento del cavo di alimentazione, rivolgersi al più vicino
servizio assistenza clienti.
▼ Non collegare l'asciugatrice alla rete elettrica in modo indiretto mediante prolun-
ghe o adattatori multipli.
▼ Posizionare l'apparecchio in modo che il cavo di alimentazione sia agevolmente
accessibile per scollegarlo in caso di necessità.
7
UTILIZZO DELL’APPARECCHIO
DESCRIZIONE DELLE FUNZIONI
3. Manopola del programmatore utilizzata per selezionare il programma de-
9
siderato in base al tipo di tessuto e alle specifi che necessità. Se, per una
qualsiasi ragione, si desidera cambiare il programma o aggiungere altra biancheria in macchina durante il ciclo di asciugatura, basta semplicemente ruotare
la manopola del programmatore su “STOP” e poi riportarla in corrispondenza
del programma desiderato e premere il pulsante “START” (fi g. 9).
N.B. Attenzione!! Utilizzare questa funzione solo in caso di effettiva necessità e se il programma da resettare è iniziato da meno di 3 minuti.
10
11
SM2255
1. Pulsante di avvio Premere questo pulsante per avviare il ciclo di asciugatura
programmato (fi g. 10).
2. Il LED Start spento indica la posizione di “STOP”. L’accensione a luce fi ssa
indica che il ciclo è in corso. Il lampeggiamento veloce avvisa che il programma
prescelto è pronto per essere avviato. Il lampeggiamento lento indica che il
programma di asciugatura è terminato (fi g. 11).
IT
Page 8
8
APERTURA DELLA PORTA E MODIFICA DEL SENSO DI APERTURA
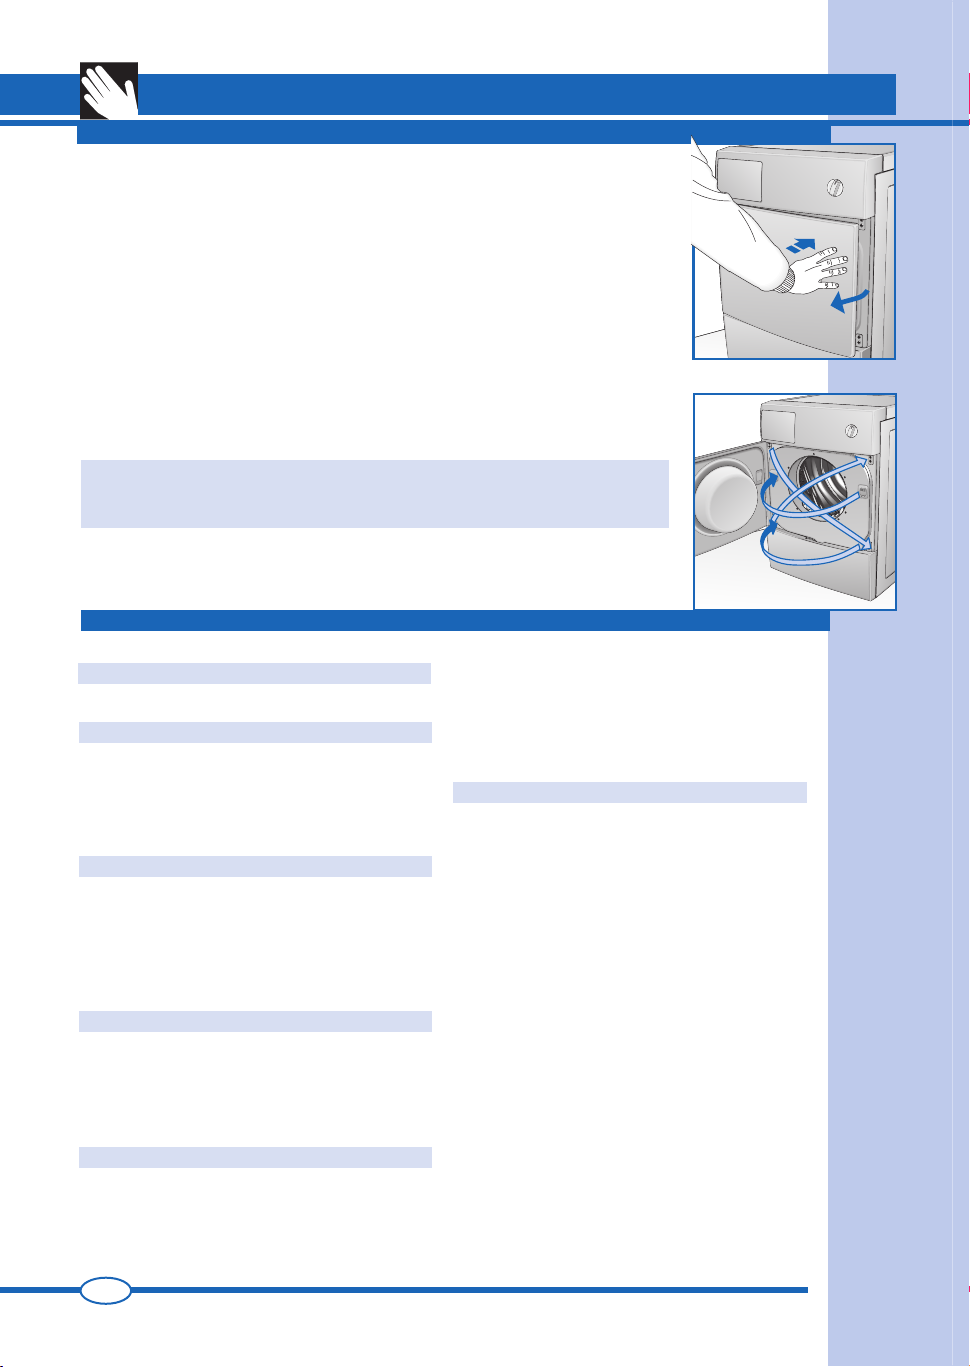
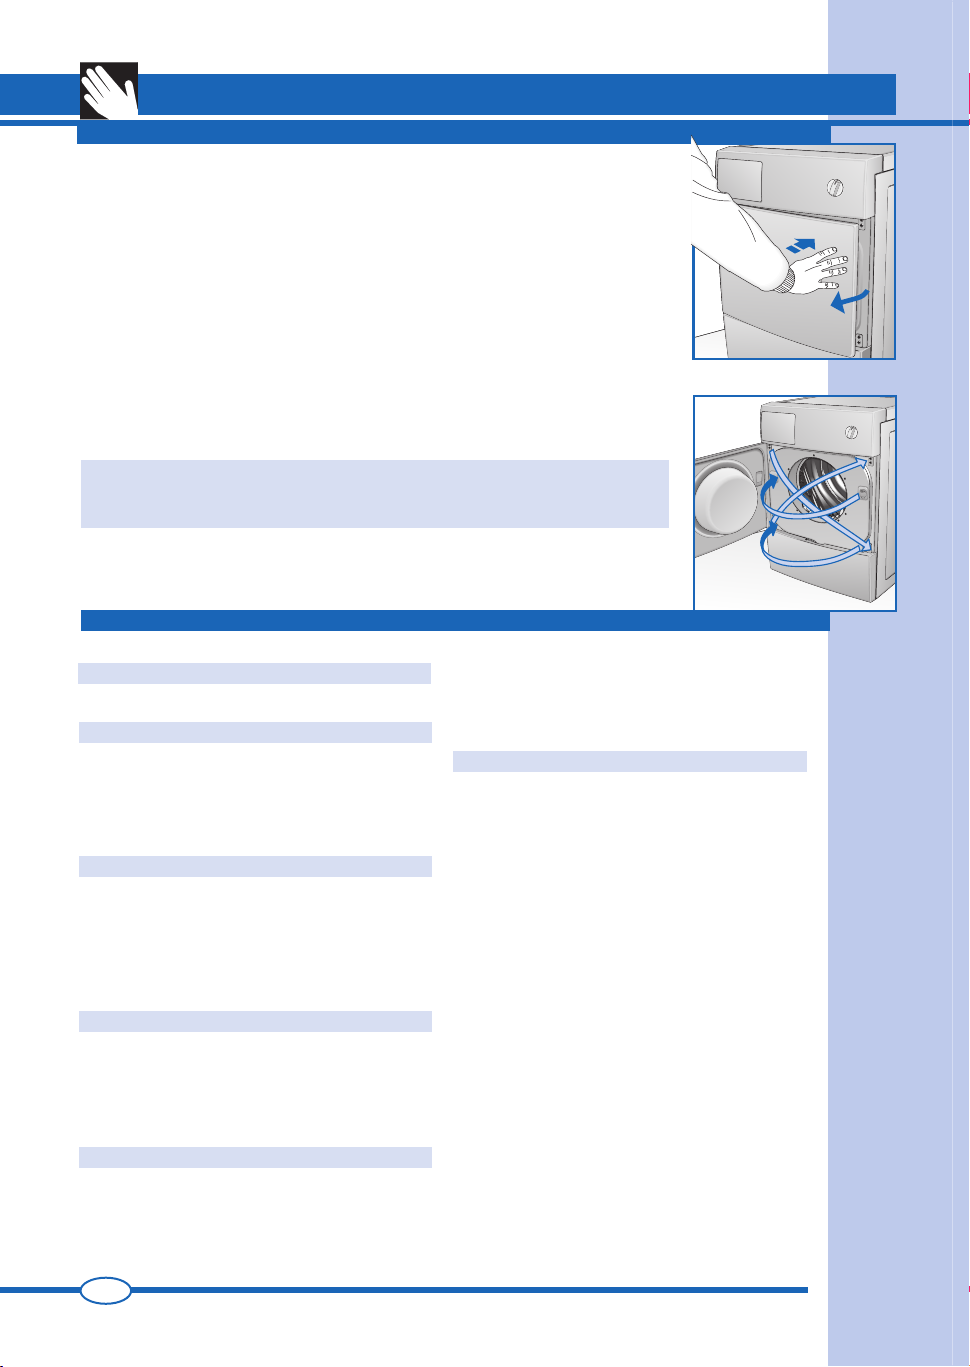
▼ Esercitare una pressione sulla parte destra della porta (fi g. 12) per aprirlo. Se
il senso di apertura è stato cambiato, allora premere sulla parte sinistra.
▼ Il senso di apertura della porta può essere modifi cato in base alle necessità (fi g. 13).
N.B.: Questa operazione deve essere eseguita soltanto da un tecnico
specializzato.
Rivolgersi al centro assistenza del venditore.
UTILIZZO DELL’APPARECCHIO
13
PER UNA CORRETTA ASCIUGATURA DELLA BIANCHERIA
Procedere come segue:
A
▼ Centrifugare la biancheria.
B
▼ Separare i capi in base al tipo o al tessuto.
▼ Chiudere le cerniere lampo, allacciare i bottoni
e ricordarsi di vuotare le tutte tasche.
▼ Rovesciare i maglioni.
C
▼ Aprire la porta.
▼ Caricare la biancheria nel cestello ricordando di
caricare per prime le lenzuola da un angolo.
▼ Si consiglia di caricare assieme capi piccoli e
grandi.
D
▼ Chiudere la porta.
▼ Asciugarsi le mani (mai toccare apparecchi
elettrici con le mani bagnate).
▼ Inserire la spina nella presa di corrente.
E
▼ Posizionare la manopola del programmatore
sullo Stop per resettare eventuali programmi
precedenti, quindi ruotarla sul programma
più idoneo per il tipo di tessuto, la quantità
di biancheria caricata nel cestello, e il grado
IT
d’asciugatura desiderato (vedi Tabella Programmi).
▼ Premere il tasto START per iniziare l’asciuga-
tura.
F
▼ Per arrestare la macchina durante un ciclo
di asciugatura basta semplicemente aprire
la porta e il cestello si arresterà lentamente.
(Ricordarsi, quando si apre la porta, che le parti
interne dell’asciugatrice possono essere molto
calde).
▼ Per proseguire il ciclo di asciugatura, chiudere
la porta e premere il pulsante “Start”.
▼ Finita l’asciugatura segnalata dal lampeggio
del led start e dal cicalino riportare il selettore
nella posizione di STOP.
▼ Aprire la porta del cestello ed estrarre la bian-
cheria.
▼ Richiudere la porta.
▼ Con le mani asciutte staccare la spina del-
l’asciugatore dalla rete.
SM2255
12
Page 9
UTILIZZO DELL’APPARECCHIO
PRECAUZIONI PER I TIPI DI TESSUTO
In caso di dubbio sul tipo di tessuto, leggere l’etichetta applicata sul capo. Quasi tutti i capi che possono
essere asciugati a macchina hanno la relativa indicazione sull’etichetta. Per evitare scariche di elettricità,
aggiungere ai capi un ammorbidente durante il ciclo di risciacquo in lavatrice. Togliere immediatamente
dal cestello i capi in materiale sintetico per evitare che si sgualciscano.
TABELLA DEI PROGRAMMI
PROGRAMMI A CONTROLLO ELETTRONICO DELL'UMIDITÀ
Resistenti
Delicati
Resistenti
Delicati
PROGRAMMI PER ASCIUGATORE CON CONTROLLO DELL'ASCIUGATURA A TEMPO
Tipo tessuto
Max 6.0 kg.
Max 3.0 kg.
Max 3.0 kg.
* Tempo di asciugatura necessario dopo centrifuga a 800 giri/min.
** Tempo di asciugatura necessario dopo centrifuga a 1000 giri/min.
Importante: Il tempo di asciugatura dipende da una serie di fattori: peso, dimensioni del capo,
tipo di tessuto, grado di umidità. Capi ben strizzati e centrifugati asciugano più in fretta. Per
evitare che i capi si sgualciscano non sovraccaricare l’asciugatrice.
I pesi indicati sono approssimativi e possono variare a seconda del fabbricante, della qualità e della fi nitura.
Biancheria da letto
Trapunta 700 g
Lenzuolo di sotto 550 g
Lenzuolo di sopra 600 g
Federa 180 g
Biancheria per la casa
Canovaccio (per piatti) 90 g
Canovaccio (per bicchieri) 70 g
Panno 20 g
Asciugamano 200 g
Altri capi di biancheria
Accappatoio 1200 g
Telo da bagno 800 g
Camicetta donna 300 g
Camicia uomo 600 g
Camicette/camicie in materiale sintetico 300 g
Biancheria da tavola
Tovaglia 250 g
SM2255
Max
6.0 kg.
Max
3.0 kg.
Max
6.0 kg.
Max
3.0 kg.
Umido +/-
Extra secco Secco
PROGRAMMI A TEMPO
min.
120 - 60
da riporre
min.
120 - 60
20 min.
Extra
secco
* 150 min.
**130 min.
* 110 min.
** 90 min.
* 100 min.
** 80 min.
Secco
da riporre
*130 min.
**110 min.
* 90 min.
** 70 min.
* 80 min.
** 60 min.
20 min.
PESI DELLA BIANCHERIA
Tovaglia grande 1000 g
Salvietta 80 g
Abbigliamento uomo
Camicia lava-indossa 250 g
Canottiera (senza maniche) 120 g
Calzoni corti 150 g
Mutande lunghe 250 g
Pigiama 480 g
Camicia da notte 400 g
Fazzoletti 25 g
Abbigliamento donna
Camicetta 100 g
Maglia 100 g
Minigonna 80 g
Slip 80 g
Camicia da notte 180 g
Pigiama 450 g
Fazzoletto 15 g
Umido da stiro Molto umido
min.
60 - 40
Umido
da stiro
*110 min.
** 90 min.
* 70 min.
** 50 min.
* 60 min.
** 40 min.
min.
60 - 40
Molto
umido
* 90 min.
** 70 min.
* 50 min.
** 30 min.
IT
9
Page 10

10
Per garantire un’ottima asciugatura in ogni circostanza non dimenticate di pulire
il fi ltro a intervalli regolari. Ricordarsi di controllare ed eventualmente pulire il fi ltro
dopo ogni ciclo di asciugatura.
Importante:
La pulizia del fi ltro deve essere eseguita ad apparecchio freddo! Per la pulizia del
fi ltro seguire le indicazioni riportate qui di seguito:
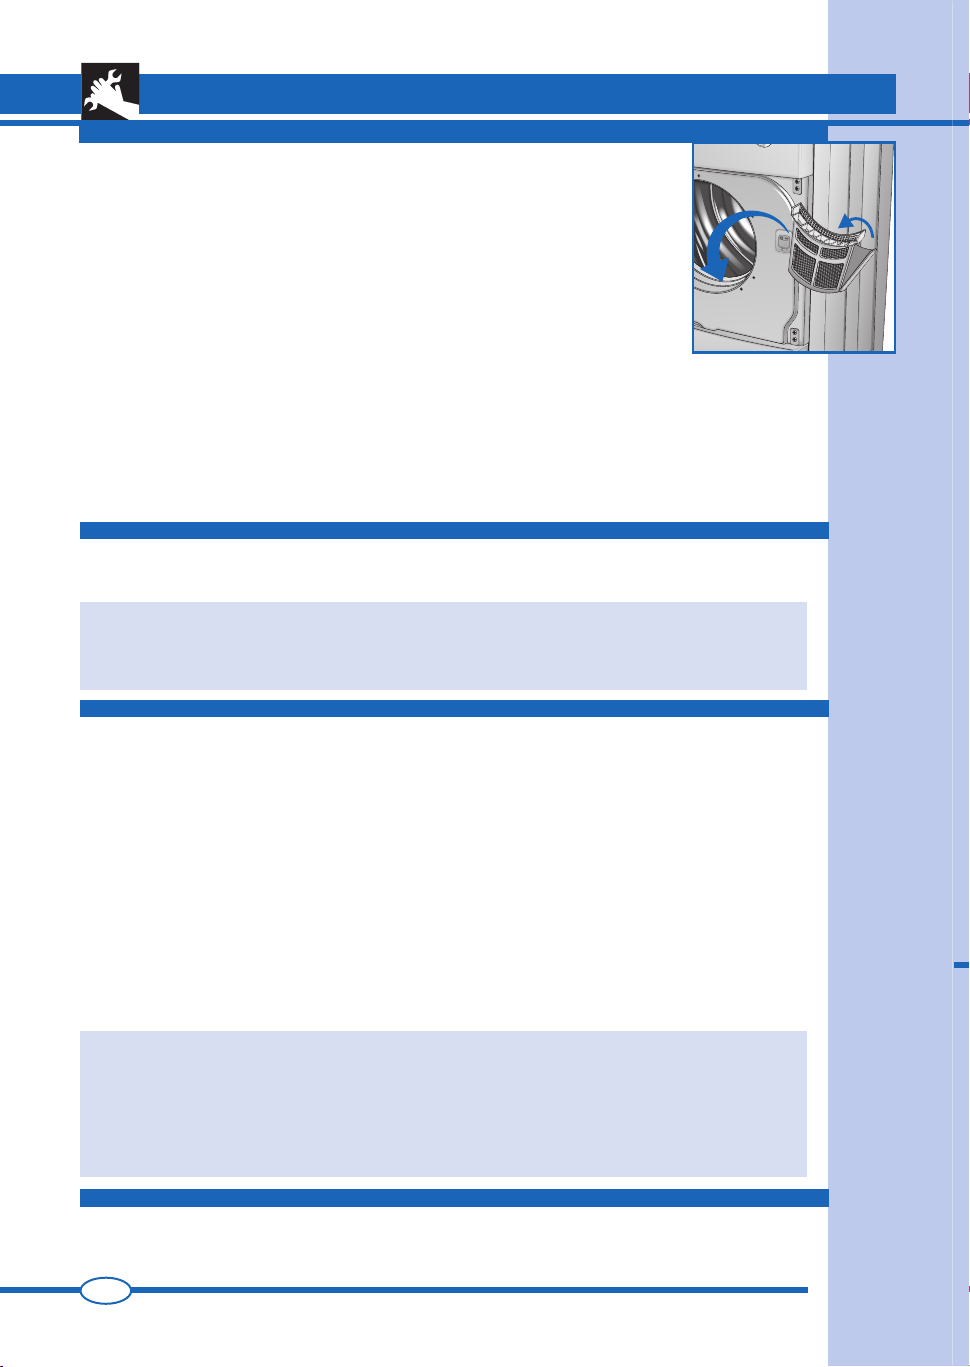
▼ Aprire la porta.
▼ Afferrare il fi ltro con ambedue le mani e spingerlo in avanti per toglierlo.
▼ Allargare delicatamente il bordo superiore del fi ltro ed aprire quest'ultimo.
▼ Rimuovere le particelle di tessuto.
▼ Chiudere il fi ltro assicurandosi che il fermo sia nella giusta posizione.
▼ Pulire le guide di scorrimento del fi ltro sull'apparecchio con un aspiratore, se
necessario.
▼ Riposizionare il fi ltro sulle guide di scorrimento (fi g. 14).
Tutti gli apparecchi elettrici sono ogni tanto sottoposti a guasti. In questi casi rivolgersi ad un elettricista
qualifi cato. Tuttavia molti problemi possono essere risolti senza bisogno di interventi dall’esterno.
Importante: In caso di guasto, scollegare immediatamente l’apparecchio dalla rete elettrica.
Prima di chiamare il centro assistenza eseguire i controlli descritti qui di seguito.
MANUTENZIONE
PULIZIA DEL FILTRO
14
RICERCA GUASTI
RISOLUZIONE DEI PROBLEMI
L’asciugatrice non parte
• Controllare che:
1) L’apparecchio sia correttamente collegato
alla rete di alimentazione.
2) La spina di rete funzioni regolarmente:
2a)
Il fusibile non sia bruciato. (Controllare
collegando alla rete un altro apparecchio;
p.e. una lampada da tavolo).
2b)
Siano state seguite le istruzioni riportate
nel manuale.
Se, una volta eseguiti tutti questi controlli l’apparecchio non funziona ancora, rivolgersi al
più vicino centro di assistenza.
Comunicare al personale del centro il modello dell’apparecchio, il numero di serie e il tipo
di guasto.
Queste informazioni aiuteranno l’operatore del centro di assistenza a procurare le parti di
ricambio necessarie, garantendo così un intervento di riparazione celere ed effi ciente.
ACCESSORI OPZIONALI
Per guadagnare spazio, il rivenditore può fornire un accessorio che consente di installare l’asciugatrice
sopra una lavatrice con la porta di carico anteriore. L’installatore potrà informarvi circa il modello di
apparecchio al quale può essere applicato questo accessorio.
IT
L’asciugatrice non parte
• Controllare che:
1) La porta sia chiusa correttamente.
2) Sia stato premuto il pulsante “START”.
L’asciugatrice non asciuga
• Controllare che:
1) Il tubo di scarico aria non sia schiacciato o
contorto.
2)
Il fi ltro non sia ostruito. (Ricordarsi, quando si
apre la porta, che le parti interne dell’asciugatrice possono essere molto calde).
SM2255
Page 11

ENGLISH
Dear Customer,
Thank you for choosing our product.
Please read these instructions carefully before connecting and using the appliance. Knowledge of
the operating principles will help guarantee correct and safe use of the appliance.
This instruction booklet contains the technical characteristics of the drier and is full of useful infor-
mation regarding its operation, all designed to help you get the best out of your appliance.
If the appliance is sold or handed over for use by others, remember to give the new user the
instruction booklet.
CONTENTS
NOTES AND ADVICE FOR THE USER 11-12
• Technical information 11
DESCRIPTION OF THE APPLIANCE 13
INSTALLING THE APPLIANCE 13-15
• Installation 13-14
• Levelling the drier 14
• Connecting the air exhaust tube 14
• Electrical connection 15
USING THE DRIER 15-17
• Description of the functions 15
• Opening the door and changing the opening direction 16
• Drying the washing correctly 16
• Precautions for fabrics types 17
• Program table 17
• Weights of washing 17
11
MAINTENANCE 18
• Cleaning the fi lter 18
• Fault fi nding 18
• Resolving problems 18
• Optional accessories 18
NOTES AND ADVICE FOR THE USER
TECHNICAL DATA
Width cm.:
Dimensions:
Height cm.:
Depth cm.:
Max. capacity
Power rating
Voltag e
see characteristics plate
see characteristics plate
MODEL: ...................................................................................................................................................................................................................
SERIAL NUMBER: .........................................................................................................................................................................................
DATE OF PURCHASE: ................................................................................................................................................................................
SM2255
59.5
85.0
60.4
6,0 kg dry
GB
Page 12

12
NOTES AND ADVICE FOR THE USER
▼ This appliance has been designed for use as a
domestic drier. Any other use is to be considered as improper and therefore dangerous.
▼ Keep this instruction book near to the appliance
at all times, so that it can be easily consulted
when necessary.
▼ Any modifi cations or attempts to interfere with
the appliance can be dangerous for the user
and may damage the product.
▼ On delivery of the appliance, check that it has
not been damaged during transport. If any
damage is discovered, report the matter to the
retailer immediately.
▼ Do not cover the drier with washing or any other
items.
▼ When positioning the appliance, ensure that the
power supply cable is not kinked or squashed
and is accessible.
▼ Always close the door after using the drier.
This will prevent children from leaning on the
door and possibly overturning the drier.
▼ Remember that the exhaust tube will heat up
during a drying cycle and can reach tempera-
tures of up to 60°. Do not touch this part before
the cooling cycle has been completed.
▼ Do not use the drier for drying dirty clothes.
▼ Never dry items that have been soiled with
substances such as cooking oil, petroleum, ac-
etone, alcohol, petrol, kerosene, stain remove
comma after turpentine, and wax.
▼ Remove these substances in a hot wash us-
ing an additional quantity of detergent prior to
loading the items in the drier.
▼ Do not dry items such as foam rubber, latex,
raincoats, waterproof fabrics, rubber mats,
preformed items, clothes or cushions with foam
rubber inserts, as these may melt and damage
other items or even the appliance itself.
▼ Fabric softeners, or similar products, must be
used respecting the manufacturer’s instructions
on the packaging.
▼ If the appliance is sold or given away, remember
to hand over this instruction book with it. This
will help the new owner use the drier both cor-
rectly and safely.
▼ Do not attempt to repair any appliance faults
alone, repairs carried out by a non-professional
may cause serious damage and will invalidate
any rights to repairs under guarantee.
▼ Repairs to the appliance can only be carried
out by personnel authorised by the customer
service centres. All repairs must make use of
GB
original spare parts only.
▼ Spin dry or wring the washing well before
loading it into the drier. Spun dry washing will
dry quicker.
▼ Clean the fi lter thoroughly each time the drier
is used in order to guarantee perfect air circulation.
▼ Never insert or remove the plug from the mains
socket with wet hands.
▼ The drier must be connected to a mains socket
fi tted with an effi cient earth complying with
current safety standards.
▼ Do not use extension leads or multiple plug
adapters to connect the appliance to the mains
supply.
▼ Do not expose the appliance to atmospheric
agents.
▼ When servicing or cleaning the appliance,
remember to disconnect it from the mains
supply. Do not pull the power supply cable to
unplug the appliance from the mains supply.
Pull the plug only.
▼ This appliance is marked as complying with
European Directive 2002/96/EC, Waste Electrical and Electronic Equipment (WEEE). Make
sure that the product is disposed of in a correct
manner. The user is obliged to contribute towards preventing any negative consequences
for health and the environment.
▼ The symbol affi xed to the product
or accompanying documents signifi es that
the product must not be treated as normal
domestic refuse, but must be delivered to an
authorised collection centre to enable the electric and electronic equipment to be recycled.
▼ When disposing of the appliance, comply with
local waste disposal regulations. For further
information on the treatment, recovery and recycling of this product, refer to the appropriate
offi ces, local domestic waste collection service
or the retailer from where the appliance was
purchased.
THE MANUFACTURER WILL NOT BE HELD
RESPONSIBLE FOR ANY INCIDENTS RESULTING FROM NON-COMPLIANCE WITH
SAFETY STANDARDS OR THE REQUIREMENTS OF THIS INSTRUCTION BOOK.
SM2255
Page 13

DESCRIPTION OF THE APPLIANCE
13
DESCRIPTION OF THE APPLIANCE
2
11
The drier is a domestic appliance capable of drying any type of fabric at any time.
▼ The drier has been constructed in steel panels, which have been treated and
10
painted to guarantee that its aesthetic qualities remain unaltered over time.
▼ The motor and all moving parts have been designed and manufactured to guar-
antee the minimum possible noise levels
▼ The control panel has been designed to enable the user to run the desired drying
program without diffi culty.
8
9
▼ The wide door makes loading and unloading the washing much easier.
Model with timer controlled
drying
170’
120’
150’
130’
110’
90’
70’
50’
30’
30’
40’
60’
80’
100’
1 - Start button
2 - Spin function active indicator light
3 - Drying time control knob
4 - Door
5 - Filter
6 - Adjustable feet
7 - Rating plate
8 - Exhaust outlet
9 - Outlet coupling
10 - Exhaust tube
11 - Tube support
2
1
3
4
5
1
6
7
INSTALLING THE APPLIANCE
INSTALLATION
Installation must be carried out by qualifi ed personnel in line with the instructions
supplied by the manufacturer. Incorrect installation may result in damage and
injury.
▼ Install the drier near to a window to facilitate the evacuation of the damp air from
the drier.
▼ The exhaust tube must be used to prevent condensation, and must be inserted
3
A
SM2255
in hole A at the bottom of the back panel of the appliance (fi g. 3).
GB
Page 14
14
▼ Never cover the air intake on the back of the appliance.
▼ Place the fi lter in its normal position as shown (fi g. 4).
▼ Clean the inside of the drum using a damp cloth to remove any dust deposits.
Adjustable feet. Place the drier upright so that it rests fi rmly on all four feet. Level
the drier by adjusting the feet as follows:
▼ Lift the drier slightly.
▼ Adjust the feet to the correct height (fi g. 5). (Do not unscrew the feet too much
and do not use a screwdriver).
▼ Lower the drier.
A badly levelled machine may cause damage to the bearings and lead to their
premature wear. This drier does not need to be anchored to the fl oor.
Connect the exhaust tube to the outlet on the back of the drier (fi g.6), as follows:
▼ Connect one end of the tube to the connecting piece supplied.
▼ Rotate the connecting piece (together with the tube) anticlockwise in the drier
outlet.
▼ Feed the tube away from the back of the drier to the left or right through the
recess at the bottom of the drier body.
INSTALLING THE APPLIANCE
INSTALLATION
LEVELLING THE DRIER
CONNECTING THE AIR EXHAUST TUBE
4
5
6
▼ Position the other end of the tube near a window or a ventilation aperture on an
external wall. If this is not possible, make sure that the room is well ventilated
when the drier is being used. Use the support supplied to anchor the tube (fi g.
7).
7
Important: The air exhaust tube must be connected even if the air is not discharged outdoors,
otherwise the drier will re-absorb the discharged damp air and thus prolong the drying time.
Damp air can also damage the drier. Although the air discharged from the exhaust tube is only
warm and damp and does not constitute a danger, it must never be directed towards people,
animals or plants.
Important: The exhaust air must not be conveyed to a chimney discharging fumes
generated by gas or other fuel burning appliances.
GB
SM2255
Page 15

INSTALLING THE APPLIANCE
ELECTRICAL CONNECTION
▼ Make sure that the voltage indicated on the identifi cation plate attached to the
back of the appliance corresponds to that of the mains supply.
▼ On completion of the installation, the appliance must be connected to the mains
supply through a two-pole switch.
▼ All cutouts, electric wiring and mains sockets must have a rating such that enables
them to support the maximum load indicated on the identifi cation plate.
▼ The mains supply to which the appliance is connected must be fi tted with an
earthing system. If this is not the case, the manufacturer will not be held liable
8
Important: On completion of the drying cycle, disconnect the appliance from the mains supply
to prevent young children from operating the drier.
for any incidents that may occur (fi g. 8).
▼ If the power supply cable is damaged in any way, contact the nearest customer
service centre.
▼ The drier must not be connected to the mains supply using indirect methods
such as extension leads or multiple adapters.
▼ Position the appliance so that the power supply cable is easily accessible for
disconnection when the need arises.
15
USING THE DRIER
USING THE APPLIANCE
3. Programmer knob Used to select the required programmes according to the
9
types of fabrics and their specifi c needs. If, for any reason, you want to change
the program or add more washing to the load during the drying cycle, simply
place the programmer knob in the “STOP” position. Then re-position the knob
on the required program and press the “START” button (fi g. 9).
10
11
SM2255
NB. Warning!! Only use this function if strictly necessary and then only if
the program to reset has been running for less than 3 minutes.
1. Start button Press this button to start the programmed drying cycle (fi g. 10).
2. Start LED Off indicates the “STOP” position. On fi xed indicates the cycle is run-
ning. Fast fl ashing indicates the set programme is ready to start. Slow fl ashing
indicates the end of the drying programme (fi g. 11).
GB
Page 16
16
OPENING THE DOOR AND CHANGING THE OPENING DIRECTION
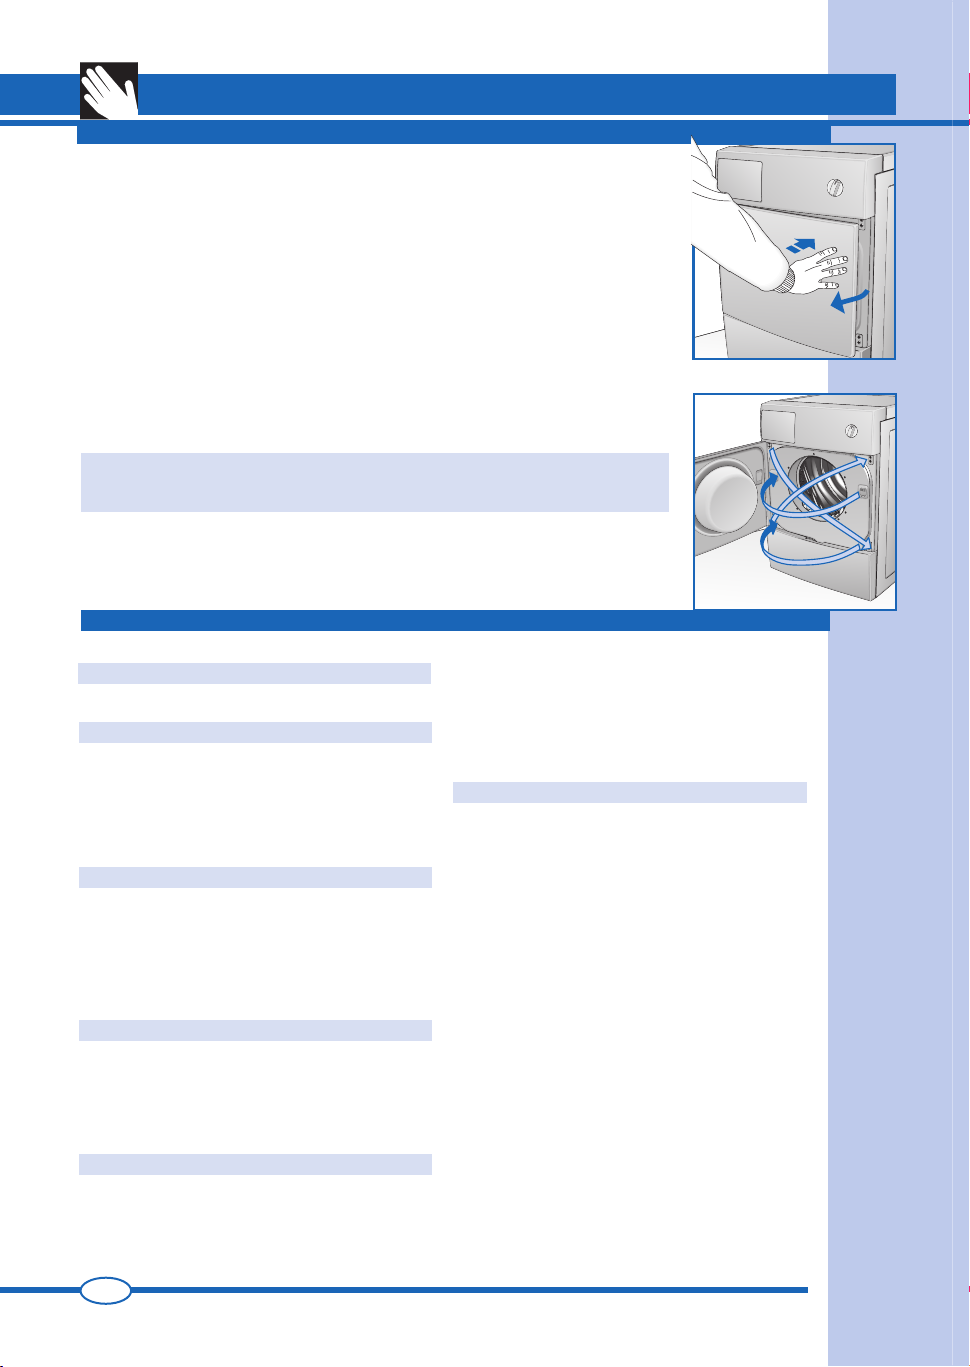
▼ Press on the right side of the door (fi g. 12) to open it. If the direction of the door
opening has been changed, press the left side.
▼ The opening direction of the door opening can be modifi ed according to needs
(fi g. 13).
N.B.: This operation must only be carried out by a qualifi ed technician.
Contact the customer service centre.
DRYING THE WASHING CORRECTLY
Proceed as follows:
A
▼ Spin the washing.
B
▼ Separate the items into types or fabrics.
▼ Close any zips and fasten buttons and remem-
ber to empty the pockets of any clothing.
▼ Turn jumpers inside out.
C
▼ Open the door.
▼ Load the washing in the drum and remember
to load sheets from a corner fi rst.
▼ It is advisable to load small and large items
together.
D
▼ Close the door.
▼ Dry your hands (never touch electric appliances
with wet hands).
▼ Insert the plug in the mains socket.
E
▼ Position the Programmes knob on Stop to reset
any previously set programme, then rotate knob
to select the most suitable programme for the
type of fabric, the quantity of washing loaded
in the drier and the degree of dryness required
USING THE DRIER
(see Programme Table).
▼ Press START to start the drying cycle.
F
▼ To stop the machine during a drying cycle,
simply open the door and the drum will slow
down then stop. (
is opened, the internal parts of the drier and the
washing may be very hot
▼ To resume the drying cycle, close the door and
press the start button.
▼ Once the drying cycle is over, the start led
fl ashes and the alarm will sound; position the
selector on STOP.
▼ Open the drum door and take the washing
out.
▼ Close the door.
▼ With dry hands unplug the drier from the mains
supply.
Remember that when the door
GB
12
13
).
SM2255
Page 17

USING THE DRIER
PRECAUTIONS FOR FABRIC TYPES
In the case of doubt as to the type of fabric, read the label on the item itself. Almost all items that can
be machine dried have this information specifi ed on the label. To avoid static electricity being generated
in the items, add a conditioner to the rinse cycle of the washing machine. Remove synthetic materials
from the drum immediately to prevent them from creasing.
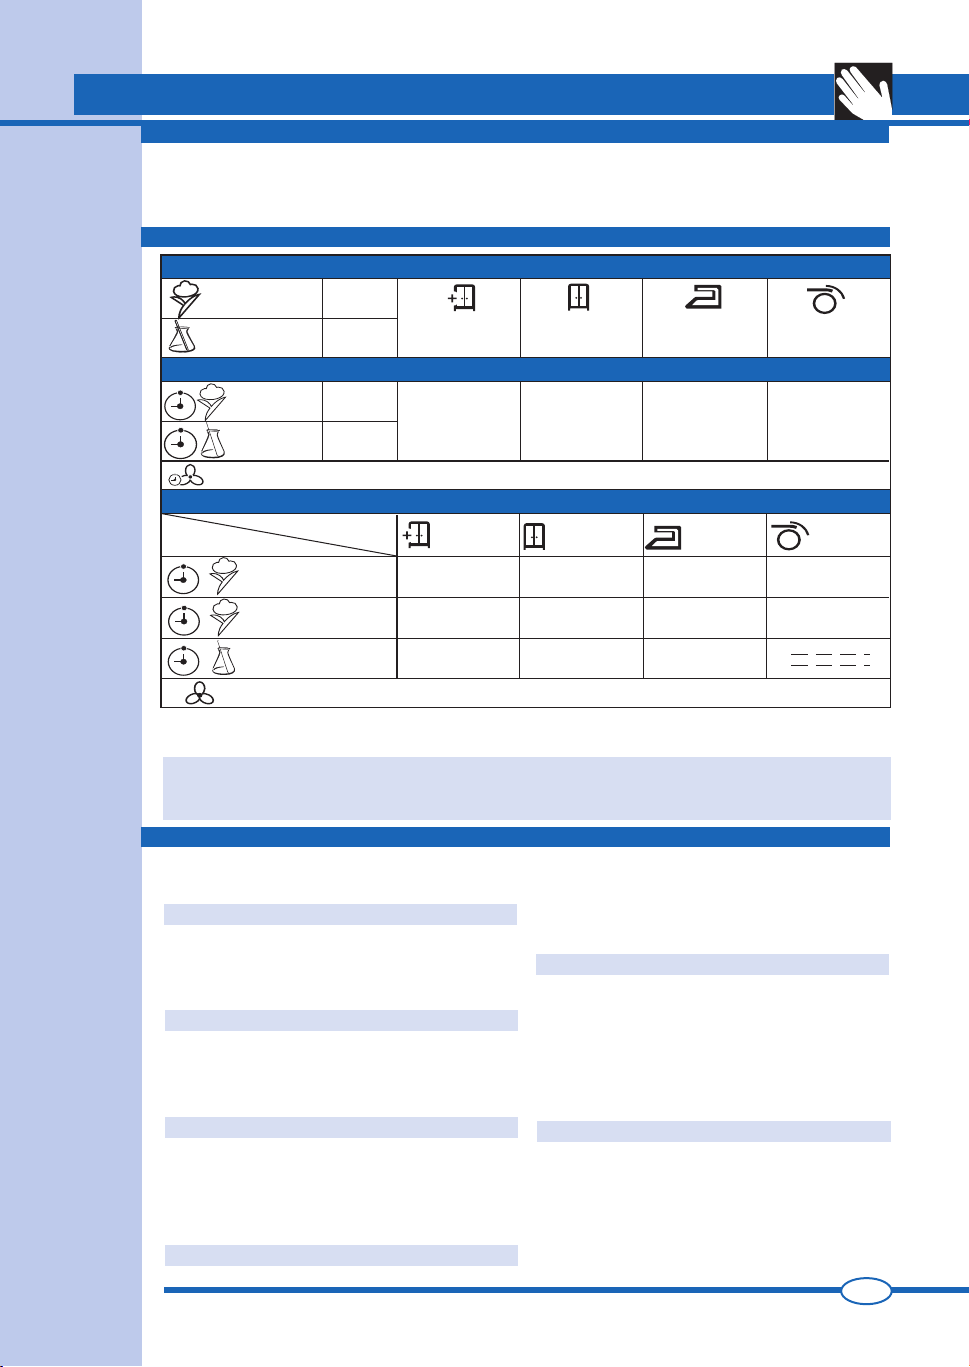
PROGRAMME TABLE
ELECTRONIC DAMPNESS CONTROL PROGRAMMES
Resistant
Delicates
Resistant
Delicates
PROGRAMMES FOR DRIERS WITH TIMED DRYING CONTROL
Damp +/-
Fabric type
Max 6.0 kg.
Max 3.0 kg.
Max 3.0 kg.
* Drying time necessary after spinning at 800 rpm.
** Drying time necessary after spinning at 1000 rpm.
Important: The drying depends on a number of factors: weight, size of the items, type of
fabric, degree of dampness. Well wrung/spun items dry quicker. To prevent items from creasing, do not overload the drier.
WASHING WEIGHTS THE MANUFACTURER
The indicated weights are approximate and may vary according to their manufacturer, quality and fi nish.
Bedding
Quilt 700 g
Bottom sheet 550 g
Top sheet 600 g
Pillowcase 180 g
Household linen
Tea towel (dishes) 90 g
Tea towel (glasses) 70 g
Flannel 20 g
Hand towel 200 g
Other linen items
Bath robe 1200 g
Bath towel 800 g
Woman’s blouse 300 g
Man’s shirt 600 g
Blouse/shirt in synthetic material 300 g
Table linen
Tablecloth 250 g
SM2255
Max
6.0 kg.
Max
3.0 kg.
Max
6.0 kg.
Max
3.0 kg.
Extra dry Wardrobe
TIMED PROGRAMMES
min.
120 - 60
dry
min.
120 - 60
20 min.
Extra
dry
* 150 min.
**130 min.
* 110 min.
** 90 min.
* 100 min.
** 80 min.
Wardrobe
dry
*130 min.
**110 min.
* 90 min.
** 70 min.
* 80 min.
** 60 min.
20 min.
Large tablecloth 1000 g
Napkin 80 g
Men’s clothing
Wash ‘n wear shirt 250 g
Vest (sleeveless) 120 g
Briefs 80 g
Long johns 250 g
Pyjamas 480 g
Nightshirt 400 g
Handkerchief 25 g
Women’s clothing
Blouse 100 g
Jumper 100 g
Miniskirt 80 g
Briefs 80 g
Nightdress 180 g
Pyjamas 450 g
Handkerchief 15 g
Iron damp Very damp
min.
60 - 40
Iron
damp
*110 min.
** 90 min.
* 70 min.
** 50 min.
* 60 min.
** 40 min.
min.
60 - 40
Very
damp
* 90 min.
** 70 min.
* 50 min.
** 30 min.
GB
17
Page 18
18
In order to guarantee optimum drying results under all circumstances, remember
that the fi lter must be cleaned regularly. Remember to check and clean the fi lter
after each drying cycle.
Important:
The fi lter must only be cleaned when the appliance is cold! Clean the fi lter following
the procedure described below:
▼ Open the door.
▼ Grasp the fi lter in both hands and push it upwards to remove it.
▼ Carefully widen the top edge and open the fi lter.
▼ Remove the fabric particles.
▼ Close the fi lter, making sure that the catch closes at the correct position.
▼ Clean the fi lter slide guides on the appliance, using a vacuum cleaner if neces-
sary.
▼ Reposition the fi lter in the slide guides (fi g. 14).
All electric appliances may breakdown at some point. Remember to call a qualifi ed electrician in these
cases. However, many problems can be resolved without the need for external intervention.
Important: If a fault occurs, disconnect the appliance from the mains supply immediately.
Before calling the customer service centre, check the points listed below.
MAINTENANCE
CLEANING THE FILTER
14
FAULT FINDING
TROUBLESHOOTING IS ONE WORD
If the drier doesn’t start
• Check that:
1) The appliance is plugged into the mains
supply.
2) The mains socket is working correctly:
2a) The fuse has not blown. (Check by
plugging in another appliance such as a
table lamp).
2b) All the instructions in the manual have
been followed.
If, after all these checks have been carried out, the appliance still does not work, inform the
nearest customer service centre.
When contacting the service centre, inform them of the appliance model, serial number and
type of fault.
This information will help the service centre operator in procuring the necessary spare parts,
thus guaranteeing a speedy and effi cient repair service.
OPTIONAL ACCESSORIES
To save space, the retailer can supply an accessory to enable the drier to be mounted on top of a frontloading washing machine. The installer can provide the information on the model of appliance on which
this accessory can be fi tted.
GB
If the drier doesn’t start
• Check that:
1) The door is closed properly.
2) The “START” button has been pressed.
The washing does not dry
• Check that:
1) The air exhaust tube is not twisted or
kinked.
2) The fi lter is not blocked. (Remember that
when the door is opened, the internal parts
of the drier and the washing may be very
hot).
SM2255
Page 19

DEUTSCH
19
Verehrter Kunde,
Wir gratulieren Ihnen zur Wahl unseres Trockners.
Bitte lesen Sie diese Gebrauchsanweisung genau durch, bevor Sie das Gerät anschließen und
gebrauchen. Die gute Kenntnis der Gerätefunktion wird Ihnen den korrekten und sicheren Gebrauch
des Geräts ermöglichen.
Diese Gebrauchsanweisung enthält neben den technischen Merkmalen des Trockners viele nützliche
Tipps, die Ihnen helfen werden, das Gerät optimal zu nutzen. Falls Sie den Trockner weiterverkaufen
oder abgeben, muss dem neuen Benutzer auch die Gebrauchsanweisung ausgehändigt werden.
INHALT
HINWEISE UND RATSCHLÄGE FÜR DEN BENUTZER
• Technische Angaben 19
BESCHREIBUNG DES GERÄTS 21
INSTALLATION DES GERÄTS 21-23
• Installation 21-22
• Gerades Ausrichten des Trockners 22
• Anschluss an den Abfl ussschlauch 22
• Anschluss an das Stromnetz 23
GEBRAUCH DES TROCKNERS
• Beschreibung der Funktionen 23
• Öffnen der Tür und Ändern der Anschlagrichtung 24
• Korrektes Trocknen der Wäsche 24
• Vorbereitung der Wäsche 25
• Programmtabelle 25
• Gewicht der Wäsche 25
19-20
23-25
WARTUNG 26
• Reinigen des Flusensiebs 26
• Störungssuche 26
• Problemlösungen 26
Optionales Zubehör
•
26
HINWEISE UND RATSCHLÄGE FÜR DEN BENUTZER
TECHNISCHE DATEN
Breite cm:
Abmessungen:
Höhe cm:
Tiefe cm:
Max. Fassungsvermögen
Nennleistung
Versorgungsspannung
MODELL: ............................................................................................................................................................................................................
SERIENNUMMER: ........................................................................................................................................................................................
DATUM DES ERWERBS: .........................................................................................................................................................................
SM2255
59.5
85.0
60.4
6,0 kg Tockenwäsche
Siehe Typenschild
Siehe Typenschild
DE
Page 20

20
HINWEISE UND RATSCHLÄGE FÜR DEN BENUTZER
▼ Dieser Trockner dient zum Trocknen von Wäsche im
Haushalt. Jede andere Verwendung ist unsachgemäß und folglich gefährlich.
▼ Bewahren Sie dieses Handbuch stets in der Nähe
des Trockners auf, damit es im Bedarfsfall problemlos
konsultiert werden kann.
▼ Jede Veränderung oder sonstige Manipulierung des
Geräts kann den Benutzer gefährden und Schäden
am Trockner verursachen.
▼ Bei Lieferung des Geräts dieses umgehend auf
eventuelle Transportschäden untersuchen. Falls
solche festgestellt werden, ist sofort der Händler zu
benachrichtigen.
▼ Den Trockner nicht mit Wäsche oder anderen Ge-
genständen bedecken.
▼ Beim Aufstellen des Trockners drauf achten, dass
das Stromkabel nicht geknickt oder gequetscht wird
und problemlos zugänglich ist.
▼ Nach dem Gebrauch des Trockners stets die Tür
verschließen.
▼ Auf diese Weise wird verhindert, dass Kinder an der
Tür herumturnen und so das Gerät umfallen kann.
▼ Kinder dürfen sich nicht unbeaufsichtigt in der Nähe
des Geräts aufhalten.
▼ Bedenken Sie, dass der Abfl ussschlauch während
des Betriebs Temperaturen von über 60° erreichen
kann. Diesen Geräteteil nicht berühren, bevor er ganz
abgekühlt ist.
▼ Keine schmutzigen Wäschestücke im Trockner
trocknen.
▼ Auf keinen Fall Wäschestücke trocknen, die mit
Speiseöl, Erdöl, Azeton, Alkohol, Benzin, Kerosin,
Fleckenmittel, Terpentin oder Wachsen verschmutzt
sind.
▼ Derlei Wäschestücke müssen heiß und mit reichlich
Waschmittel gewaschen werden, bevor sie in den
Trockner eingefüllt werden.
▼ Auf keinen Fall Kleidungsstücke mit Schaumgummi,
Latex, impermeable und wasserdichte Gewebe,
Gummimatten, bedruckte Stoffe, Kleidungsstücke
oder Kissen mit Schaumgummipolsterung im Trockner trocknen, weil derlei Materialien schmelzen
und andere Wäschestücke oder das Gerät selbst
beschädigen könnten.
▼ Weichspüler oder ähnliche Mittel müssen laut Ge-
brauchsanweisung angewandt werden.
▼ Falls das Gerät weiterverkauft oder verschenkt wird,
muss auch die Gebrauchsanweisung ausgehändigt
werden. Dies trägt dazu bei, dass der neue Besitzer
den Trockner auf korrekte und sichere Weise benutzen kann.
▼ Bei Betriebsstörungen auf keinen Fall versuchen, das
Gerät selbst zu reparieren, weil unsachgemäße Re-
paraturen schwerwiegende Schäden verursachen
können und außerdem den Gewährleistungsanspruch verfallen lassen.
▼ Das Gerät darf ausschließlich von autorisiertem
Personal der Kundendienstzentren repariert werden.
Für Reparaturen dürfen nur Original-Ersatzteile
verwendet werden.
▼ Die Wäsche vor dem Einfüllen in den Trockner gut
auswringen oder schleudern. Je besser die Wäsche
geschleudert ist, umso schneller wird sie trocknen.
▼ Das Flusensieb nach jedem Gebrauch des Trockners
sorgfältig reinigen, damit die Luft immer ungehindert
zirkulieren kann.
▼ Den Stecker nicht mit feuchten Händen aus- oder
einstecken.
▼ Der Trockner muss an eine vorschriftsmäßig geer-
dete Steckdose angeschlossen werden.
▼ Für den Anschluss des Geräts an das Netz keine
Verlängerungskabel oder Mehrfachstecker verwenden.
▼ Das Gerät nicht den Witterungseinfl üssen ausset-
zen.
▼ Vor Wartungs- oder Reinigungsarbeiten muss das
Gerät unbedingt spannungslos gemacht werden.
Beim Ausstecken des Steckers nie am Kabel selbst,
sonder ausschließlich am Stecker selbst ziehen.
▼ An diesem Gerät ist das Schild angebracht, wel-
ches die Übereinstimmung mit den Europäischen
Richtlinien 2002/96/EG über Elektro- und Elektronik-Altgeräte (WEEE) attestiert. Das Gerät muss
vorschriftsmäßig entsorgt werden. Der Benutzer
muss seinen Beitrag zur Vermeidung von gesundheits- und umweltschädigenden Folgen leisten.
▼ Das Symbol am Gerät oder in den Begleit-
papieren weist darauf hin, dass dieses Produkt nicht
als Hausmüll behandelt werden darf, sondern als
Sondermüll einer Sammelstelle für elektrische und
elektronische Altgeräte zu übergeben ist.
▼ Gemäß den lokalen Vorschriften zur Abfallbesei-
tigung entsorgen. Für weitere Informationen zu
Behandlung, Abbau und Recycling dieses Geräts
die zuständige Behörde, das Abfallbeseitungsunternehmen oder den Händler kontaktieren, bei dem
das Gerät erworben wurde.
DER HERSTELLER HAFTET NICHT FÜR EVENTUELLE SCHÄDEN, WELCHE INFOLGE DER
NICHTBEACHTUNG DER SICHERHEITSVORSCHRIFTEN UND DER GEBRAUCHSANWEISUNG ENTSTEHEN KÖNNEN
DE
SM2255
Page 21

BESCHREIBUNG DES GERÄTS
21
BESCHREIBUNG DES GERÄTS
2
11
Der Trockner ist ein Haushaltsgerät, in dem jede Gewebeart getrocknet werden kann.
▼ Die Struktur der Maschine besteht aus Platten aus behandeltem und lackiertem
10
Stahl, welche ihr gutes Aussehen dauerhaft erhalten.
▼ Der Motor und die Bewegungsteile wurden so entwickelt und produziert, dass
sie einen sehr niedrigen Lärmpegel gewährleisten.
▼ Die Bedienblende ist so angelegt, dass der Benutzer die vorgesehenen Trok-
kenprogramme problemlos eingeben kann.
8
9
▼ Die große Tür macht das Einfüllen und Herausnehmen der Wäsche einfach und
bequem.
Modell mit Trocknungssteuerung
nach Zeit
30’
40’
60’
80’
100’
120’
170’
150’
130’
110’
90’
70’
50’
30’
2
1
3
1 - Starttaste
2 - Betriebs-LED
4
3 - Wahlschalter für die Trockenzeit
4 - Trommeltür
5 - Flusensieb
6 - Verstellbare Füße
7 - Typenschild.
8 - Dampfauslassöffnung
9 - Anschlussfl ansch
10 - Abluftschlauch
11 - Schlauchhalterung
1
5
6
7
INSTALLATION DES GERÄTS
INSTALLATION
Der Trockner muss von Fachpersonal gemäß den Anweisungen des Herstellers
installiert werden. Eine fehlerhafte Installation kann Personen- und Sachschäden
verursachen.
▼ Den Trockner in der Nähe eines Fensters aufstellen, damit die feuchte Luft
problemlos abgeführt werden kann.
▼ Um die Kondensatbildung zu vermeiden, einen Abluftschlauch an die Öffnung
3
A
A unten an der Rückwand des Geräts anschließen (Abb. 3).
SM2255
DE
Page 22

22
▼ Darauf achten, dass die Luftöffnung an der Geräterückseite nicht abgedeckt
wird.
▼ Das Flusensieb an der angegebenen Position einbauen (Abb. 4).
▼ Das Innere der Trockentrommel mit einem feuchten Tuch von eventuellem Staub
befreien.
Verstellbare Füße. Den Trockner so aufstellen, dass er mit allen vier Füßen fest auf
dem Boden steht, und anschließend gerade ausrichten, indem die Füße wie folgt
verstellt werden:
▼ Den Trockner leicht anheben.
▼ Die Füße auf die richtige Höhe einstellen (Abb. 5).
(Die Füße nicht zu stark aufschrauben und keinen Akku-Schrauber verwenden).
▼ Den Trockner wieder hinstellen.
Wenn die Maschine nicht korrekt ausgerichtet ist, können die Lager beschädigt werden und
folglich vorzeitig verschleißen. Dieser Trockner muss nicht am Boden verankert werden.
Den Abluftschlauch nach den folgenden Anweisungen an die Öffnung an der
Rückseite des Trockners (Abb. 6) anschließen:
▼ Ein Ende des Schlauchs mit dem mitgelieferten Anschlussfl ansch verbinden.
▼ Das Verbindungselement zusammen mit dem Schlauch im Gegenuhrzeigersinn
in die Ausgangsöffnung eindrehen.
▼ Den Schlauch an der Rückseite des Trockners durch die Aussparung an der
Unterseite der Maschine nach links oder rechts austreten lassen.
INSTALLATION DES GERÄTS
INSTALLATION
GERADES AUSRICHTEN DES TROCKNERS
ANSCHLUSS DES ABLUFTSCHLAUCHS
4
5
6
▼ Das andere Ende des Schlauchs in der Nähe eines Fensters oder einer Entlüf-
tungsöffnung positionieren. Sollte dies nicht möglich sein, muss sichergestellt
werden, dass der Raum während des Betriebs des Trockners gut belüftet wird.
Zum Befestigen des Schlauchs die Halterung (Abb. 7) verwenden.
7
Wichtig: Der Abluftschlauch muss auch dann angeschlossen werden, wenn die Luft nicht
nach Außen abgeführt wird, andernfalls kann die feuchte Luft in die Maschine zurückströmen
und die Trockenzeit verlängern.
Die feuchte Luft kann außerdem den Trockner beschädigen. Obwohl die aus dem Abluftschlauch
austretende Luft nur warm und feucht ist, und an sich keine Gefahr darstellt, darf der Luftstrahl
nie auf Personen, Tiere oder Pfl anzen gerichtet werden.
Wichtig: Die Abluft darf auf keinen Fall in einen Abzug geleitet werden, der für die Abführung von
Rauch von Geräten benutzt wird, die mit Gas oder anderem Brennstoff betrieben werden.
DE
SM2255
Page 23

INSTALLATION DES GERÄTS
ANSCHLUSS AN DAS STROMNETZ
▼ Sicherstellen, dass der am Typenschild an der Geräterückseite angegebene Spannungswert
dem Wert Ihrs Netzes entspricht.
▼ Nach erfolgter Installation soll das Gerät über einen allpoligen Schalter an die Netzversor-
gung angeschlossen werden können.
▼ Alle Schaltvorrichtungen, die Verkabelungen und die Steckdosen müssen eine Nennstrom-
festigkeit haben, welche für die am Typenschild angegebene Höchstlast ausreichend ist.
▼ Das Versorgungsnetz, an welches das Gerät angeschlossen wird, muss vorschriftsmäßig
8
Wichtig: Nach dem Trockengang das Gerät immer vom Stromnetz trennen, damit es nicht
unerwartet von Kindern in Betrieb gesetzt werden kann.
geerdet sein. Andernfalls kann der Hersteller nicht für eventuelle Unfälle haften (Abb. 8).
▼ Im Falle einer Beschädigung des Stromkabels wenden Sie sich an den nächstgelegenen
Kundendienst.
▼ Zum Anschließen des Trockners an das Stromnetz keine Verlängerungskabel oder Mehr-
fachstecker verwenden.
▼ Das Gerät so aufstellen, dass das Stromkabel problemlos zugänglich ist und im Bedarfsfall
ausgesteckt werden kann.
23
BESCHREIBUNG DES GERÄTS
BESCHREIBUNG DER FUNKTIONEN
3. Programmwähler zum Einstellen des für die jeweilige Gewebeart und die
9
speziellen Anforderungen geeigneten Programms. Wenn während eines
Waschgangs das Programm aus irgendeinem Grund verändert werden soll, oder
wenn ein vergessenes Wäschestück während des Trockengans in den Trockner
eingelegt werden soll, den Programmwähler einfach auf die Position “STOPP”
stellen, auf das neue Programm verstellen und die Taste für “START” drücken
(Abb. 9).
NB: Achtung: Diese Funktion nur wenn unbedingt notwendig durchführen,
und nur wenn das betreffende Programm seit nicht mehr als 3 Minuten
begonnen hat.
10
11
SM2255
1. Taste für Start Mit dieser Taste wird der programmierte Trockengang ausgelöst
(Abb. 10).
2. Die ausgeschaltete LED für Start steht für die Position “STOPP”. Die bleibend
eingeschaltete LED steht für den laufenden Trockengang. Die schnell blinkende
LED bedeutet, dass das gewählte Programm gestartet werden kann. Die langsam
blinkende LED zeigt das Ende des Trockenprogramms an (Abb. 11).
DE
Page 24
24
ÖFFNEN DER TÜR UND ÄNDERN DER ANSCHLAGRICHTUNG
▼ Auf den rechten Teil der Tür drücken, um sie zu öffnen (Abb. 12). Falls die An-
schlagrichtung geändert wurde, auf den linken Teil drücken.
▼ Die Anschlagrichtung der Tür kann je nach Bedarf umgekehrt werden (Abb.
13).
NB: Dieser Vorgang muss Fachpersonal überlassen werden.
Wenden Sie sich an den Kundendienst Ihres Händlers.
Wie folgt vorgehen:
A
▼ Die Wäsche schleudern.
B
▼ Die Wäsche nach Gewebeart sortieren.
▼ Reißverschlüsse schließen, Knöpfe zuknöpfen
und die Taschen leeren.
▼ Pullover auf die linke Seite wenden.
C
▼ Die Tür öffnen.
▼ Die Wäsche, Bettlaken immer ausgebreitet, in
die Trommel einfüllen.
▼ Es empfi ehlt sich kleine zusammen mit großen
Wäschestücken in den Trockner zu geben.
D
▼ Die Tür schließen.
▼ Die Hände trocknen (Elektrogeräte dürfen auf kei-
nen Fall mit nassen Händen angefasst werden).
▼ Den Stecker in die Steckdose stecken.
E
▼ Den Programmwähler auf Stopp stellen, um
eventuelle frühere Programme zu löschen, und
dann auf das für die zu trocknende Wäsche,
deren Menge und den gewünschten Trok-
GEBRAUCH DES GERÄTS
KORREKTES TROCKNEN DER WÄSCHE
kenheitsgrad passende Programm einstellen
(siehe Programmtabelle).
▼ Die Taste für START drücken, um den Trok-
kengang zu beginnen.
F
▼ Um einen Trockengang zu unterbrechen ge-
nügt es, die Trommeltür zu öffnen, damit die
Trommel allmählich anhält. (Bedenken Sie
beim Öffnen der Tür, dass die Innenteile des
Trockners sehr heiß sein können).
▼ Um mit dem Trockengang fortzufahren, die Tür
schließen und die Taste für „Start“ drücken.
▼ Nach dem Trocknen, dessen Ende durch
Blinken der LED für Start und den Summer
angezeigt wird, den Programmwähler wieder
auf die Position STOPP stellen.
▼ Die Trommeltür öffnen und die Wäsche her-
ausnehmen.
▼ Die Tür wieder schließen.
▼ Mit trockenen Händen den Gerätestecker aus
der Steckdose nehmen.
12
13
DE
SM2255
Page 25
GEBRAUCH DES GERÄTS
25
Falls Zweifel über die Beschaffenheit eines Wäschestücks bestehen, die Angaben auf dem Pfl egeetikett kontrollieren.
Bei fast allen für den Trockner geeigneten Kleidungsstücken ist diese Besonderheit auf dem Pfl egeetikett vermerkt.
Um statische Elektrizität der Wäschestücke zu vermeiden, sollten Sie zum Spülen der Wäsche einen Weichspüler
verwenden. Synthetische Wäschestücke immer gleich aus der Trommel nehmen, damit sie nicht knittern.
PROGRAMMTABELLE
VORBEREITUNG DER WÄSCHE
PROGRAMME MIT ELEKTRONISCHER FEUCHTIGKEITSKONTROLLE
Beständige
Gewebe
Empfindliche
Gewebe
Beständige
Gewebe
Empfindliche
Gewebe
Max
6.0 kg.
Max
3.0 kg.
Max
6.0 kg.
Max
3.0 kg.
Extratrocken
ZEITPROGRAMME
min.
120 - 60
Schrankfertig
min.
120 - 60
Bügelfeucht
min.
60 - 40
Sehr feucht
min.
60 - 40
20 min.
PROGRAMME F
Gewebeart
ÜR TROCKNER MIT ZEITGEREGLTER TROCKNUNGSSTUERUNG
Feucht
+/-
Max 6.0 kg.
Max 3.0 kg.
Max 3.0 kg.
Extratroc
ken
* 150 min.
**130 min.
* 110 min.
** 90 min.
* 100 min.
** 80 min.
Schrankfer
tig
*130 min.
**110 min.
* 90 min.
** 70 min.
* 80 min.
** 60 min.
Bügelfeu
cht
*110 min.
** 90 min.
* 70 min.
** 50 min.
* 60 min.
** 40 min.
Sehr
feucht
* 90 min.
** 70 min.
* 50 min.
** 30 min.
20 min.
*
Erforderliche Trockenzeit nach einem Schleudergang bei 800 U/min.
**
Erforderliche Trockenzeit nach einem Schleudergang bei 1000 U/min.
Wichtig: Die Trockenzeit hängt von einer Reihe von Faktoren ab: Gewicht, Größe, Gewebeart,
Feuchtigkeitsgrad. Gut ausgewrungene und geschleuderte Wäschestücke trocknen schneller.
Den Trockner nicht überfüllen, damit die Wäschestücke nicht zerdrückt werden.
GEWICHT DER WÄSCHE
Die angegebenen Gewichte sind ungefähre Angaben, die je nach Hersteller, Qualität und Fertigungsart
variieren können.
Bettwäsche
Steppdecke 700 g
Bettlaken 550 g
Überschlaglaken 600 g
Kissenbezug 180 g
Hauswäsche
Geschirrtuch 90 g
Gläsertuch 70 g
Tuch 20 g
Handtuch 200 g
Andere Wäschestücke
Bademantel 1200 g
Badetuch 800 g
Bluse 300 g
Herrenhemd 600 g
Blusen/Hemden aus Synthetikmaterial 300 g
Tischwäsche
Tischdecke 250 g
SM2255
Große Tischdecke 1000 g
Serviette 80 g
Herrenkleidung
Pfl egeleichtes Hemd 250 g
Achselhemd 120 g
Kurze Socken 80 g
Lange Unterhosen 250 g
Pyjama 480 g
Nachthemd 400 g
Taschentücher 25 g
Damenkleidung
Bluse 100 g
Pulli 100 g
Minirock 80 g
Slip 150 g
Nachthemd 180 g
Pyjama 450 g
Taschentuch 15 g
DE
Page 26

26
REINIGEN DES FLUSENSIEBS
Damit stets optimales Trocknen gewährleistet wird, muss das Flusensieb regelmäßig
gesäubert werden. Am besten kontrollieren und reinigen Sie das Flusensieb nach
jedem Trockengang.
Wichtig:
Das Flusensieb muss gereinigt werden, wenn das Gerät kalt ist. Dazu wie folgt
vorgehen:
▼ Die Tür öffnen.
▼ Das Flusensieb mit beiden Händen anfassen, nach vorne drücken und herausnehmen.
▼ Den oberen Rand des Flusensiebs vorsichtig auseinander ziehen und das Sieb öffnen.
▼ Die Flusen entfernen.
▼ Das Sieb schließen und sicherstellen, dass die Halterung richtig positioniert ist.
▼ Die Gleitführungen des Flusensiebs am Gerät im Bedarfsfall mit dem Staubsau-
ger reinigen.
▼ Das Sieb wieder an den Gleitführungen anbringen (Abb. 14).
Alle Elektrogeräte können manchmal Störungen aufweisen. Wenden Sie sich in einem solchen Fall
unbedingt an einen Fachmann. Kleinere Probleme können Sie jedoch selbst beseitigen.
Wichtig: Im Falle einer Funktionsstörung das Gerät zu allererst spannungslos machen.
Bevor Sie unseren Kundendienst hinzuziehen, sollten Sie die folgenden Punkte überprüfen.
WARTUNG
14
STÖRUNGSSUCHE
PROBLEMLÖSUNGEN
Der Trockner läuft nicht an
• Die folgenden Kontrollen durchführen:
1) Ob das Gerät korrekt an das Netz angeschlossen ist.
2) Ob die Steckdose in Ordnung ist:
2a)
Ob die Schmelzsicherung durchgebrannt
ist. (Um dies zu prüfen, einfach ein anderes
Gerät, zum Beispiel eine Tischlampe, an
die Steckdose anschließen).
2b)
Ob die Anleitungen des Handbuchs befolgt
wurden.
Wenn das Gerät nach diesen Kontrollen weiterhin nicht korrekt funktioniert, wenden Sie sich
bitte an das nächstgelegene Kundendienstzentrum.
Geben Sie dabei das Modell und die Seriennummer an und beschreiben Sie die Art der
Störung.
Mit diesen Informationen wird der Kundendiensttechniker in die Lage versetzt, die erforderlichen
Ersatzteile zu besorgen und die Reparatur folglich schnell und effi zient durchzuführen.
OPTIONALES ZUBEHÖR
Um Platz zu sparen hält Ihr Händler ein Zubehör bereit, mit dem der Trockner auf einer Frontladerwaschmaschine installiert werden kann. Ihr Installateur kann Ihnen sagen, welches Modell sich für
die Installation mit diesem Zubehör eignet.
DE
Der Trockner läuft nicht an
• Die folgenden Kontrollen durchführen:
1) Ob die Tür richtig verschlossen ist.
2) Ob die Taste für “START” gedrückt wurde.
Der Trockner trocknet nicht
• Die folgenden Kontrollen durchführen:
1) Ob der Abluftschlauch geknickt oder verdreht ist.
2) Ob das Flusensieb verstopft ist. (Bedenken
Sie beim Öffnen der Tür, dass die Innenteile des Trockners sehr heiß sein können).
SM2255
Page 27

FRANÇAIS
27
Cher client,
Nous vous remercions d’avoir choisi notre produit.
Avant de brancher et d’utiliser l’appareil, nous vous conseillons de lire attentivement le présent
manuel d’instructions. La connaissance du fonctionnement de l’appareil vous permettra de l’utiliser
correctement et en toute sécurité.
Vous trouverez dans ce manuel d’instructions les caractéristiques techniques du séchoir à linge et
une série d’informations utiles concernant son fonctionnement, le tout conçu de manière à vous
aider à obtenir la meilleure performance possible de votre appareil. Si l’appareil est revendu ou
donné à des tiers, n’oubliez pas de remettre ce manuel d’instructions au nouvel utilisateur.
SOMMAIRE
NOTES ET INSTRUCTIONS POUR L’UTILISATEUR 27-28
• Informations techniques 27
DESCRIPTION DE L’APPAREIL 29
INSTALLATION DE L’APPAREIL 29-31
• Installation 29-30
• Mise à niveau du séchoir 30
• Raccordement au tuyau d’évacuation 30
• Raccordement au réseau électrique 31
EMPLOI DU SÉCHOIR À LINGE 31-33
• Description des fonctions 31
• Ouverture de la porte et modifi cation du sens de l’ouverture 32
• Pour un séchage correct du linge 32
• Précautions à prendre selon le type du tissu 33
• Tableau des programmes 33
• Poids du linge 33
ENTRETIEN 34
• Nettoyage du fi ltre 34
• Recherche des pannes 34
• Résolution des problèmes 34
• Accessoires en option 34
NOTES ET INSTRUCTIONS POUR L’UTILISATEUR
INFORMATIONS TECHNIQUES
Largeur cm.:
Dimensions:
Hauteur cm.:
Profondeur cm.:
Capacité maximum
Puissance Nominale
Tension électrique
Voir plaque d’identification
Voir plaque d’identification
MODÈLE: ............................................................................................................................................................................................................
NUMÉRO DE SÉRIE: ................................................................................................................................................................................
DATE D’ACHAT: .............................................................................................................................................................................................
SM2255
59.5
85.0
60.4
6,0 kg. linge sec
FR
Page 28
28
NOTES ET INSTRUCTIONS POUR L’UTILISATEUR
▼ Ce séchoir à linge est destiné à un usage
exclusivement domestique. Tout autre emploi
doit être considéré comme impropre et donc
dangereux.
▼ Conserver ce manuel près de l’appareil, pour
pouvoir toujours le consulter facilement, si
nécessaire.
▼ Toute modifi cation ou tentative d’altération de
l’appareil peut être une source de danger pour
l’utilisateur et endommager le produit.
▼ Au moment de la livraison, contrôlez si l’ap-
pareil a été endommagé durant le transport.
Si vous relevez des dommages, informez le
revendeur sans délai.
▼ Ne pas couvrir le séchoir avec du linge ou
d’autres objets.
▼ Lorsque vous placez l’appareil, assurez-vous
que le câble électrique ne soit ni plié ni écrasé
et vérifi ez son accessibilité.
▼ Après l’emploi du séchoir, refermer toujours le
hublot.
De cette manière, vous éviterez que les enfants
ne grimpent sur la porte et puissent renverser
le séchoir.
▼ L’appareil ne doit pas être utilisé par des enfants
sans surveillance.
▼ Rappelez-vous que durant le cycle de séchage,
le tuyau d’évacuation devient chaud et peut
atteindre des températures supérieures à 60°.
Évitez de toucher cet élément avant d’avoir
terminé le cycle de refroidissement.
▼ Ne pas utiliser l’appareil pour sécher du linge
sale.
▼ Ne pas sécher du linge souillé d’huile de
cuisine, pétrole, acétone, essence, kérosène,
détachant, térébenthine et cire.
▼ Éliminer ces substances avec un lavage à l’eau
chaude et une grande dose de détergent avant
de charger le linge dans le séchoir.
▼ Ne pas sécher d’objets en caoutchouc-mousse
et latex, les imperméables, les tissus imperméabilisés, les matelas en caoutchouc, les
objets moulés, les vêtements ou coussins
rembourrés de caoutchouc-mousse parce
que toutes ces matières pourraient fondre et
endommager le reste du linge ou l’appareil.
▼ Les assouplissants et produits similaires doi-
vent être utilisés en respectant les instructions
du fabricant qui se trouvent sur l’emballage.
▼ En cas de revente ou de transfert de l’appareil,
n’oubliez pas de remettre aussi cette notice.
Cela aidera le nouveau propriétaire à utiliser
le séchoir correctement et en toute sécurité.
▼ N’essayez pas de réparer seuls d’éventuelles
pannes de l’appareil ; les réparations effectuées
par du personnel non professionnel peuvent
causer de sérieux dommages et annuleront tout
droit à une réparation sous garantie.
▼ La réparation de l’appareil doit être effectuée
▼ Essorer ou bien tordre le linge avant de le char-
▼ Nettoyer soigneusement le fi ltre après chaque
▼ Ne pas brancher ou débrancher la fi che de la
▼ Le séchoir doit être raccordé à une prise de
▼ Ne pas utiliser de rallonges ou d’adaptateurs
▼ Ne pas exposer l’appareil aux agents atmos-
▼ Avant d’effectuer l’entretien ou le nettoyage
▼ Il y a sur cet appareil un marquage attestant sa
▼ Ce symbole appliqué sur le produit
▼ Pour la mise au rebut de l’appareil, s’en tenir
FR
uniquement par du personnel autorisé par nos
centres d’assistance. Toutes les réparations
doivent être effectuées en utilisant exclusivement des pièces détachées originales.
ger dans le séchoir. Le linge essoré sèchera
plus vite.
emploi du séchoir de manière à garantir une
parfaite circulation de l’air.
prise de courant avec les mains humides.
courant munie d’un système effi cace de mise
à la terre conforme aux règlements sur la
sécurité en vigueur.
multiples pour raccorder l’appareil au réseau
électrique.
phériques.
de l’appareil, n’oubliez pas de débrancher
la fi che électrique. Ne pas tirer sur le câble
électrique pour débrancher l’appareil, mais
saisir la fi che.
conformité à la directive européenne 2002/96/
CEE, Mise au rebut d’appareils électriques
et électroniques (WEEE). Vérifi er la mise au
rebut correcte de l’appareil. L’utilisateur doit
contribuer à la prévention de toute infl uence
négative sur la santé et sur l’environnement.
ou sur des documents qui l’accompagnent
indique que cet appareil ne peut pas être traité
comme les rebuts domestiques normaux, mais
doit être remis à un centre de récolte autorisé
pour permettre la réutilisation de pièces électriques et électroniques.
aux normes locales en vigueur en la matière.
Pour toute information supplémentaire sur le
traitement, la récupération et la réutilisation
du présent appareil, adressez-vous aux organismes compétents, aux services locaux de
récolte des déchets domestiques ou au revendeur chez lequel l’appareil a été acheté.
LE CONSTRUCTEUR NE PEUT PAS ÊTRE RETENU RESPONSABLE D’ÉVENTUELS INCIDENTS
CAUSÉS PAR LA NON-OBSERVANCE DES
NORMES DE SÉCURITÉ ET DES INDICATIONS
DE CETTE NOTICE D’EMPLOI
SM2255
Page 29

DESCRIPTION DE L’APPAREIL
29
DESCRIPTION DE L’APPAREIL
2
11
Le séchoir est un appareil à usage domestique en mesure de sécher tous les types
de tissu.
10
▼ La structure de la machine est constituée de panneaux en acier traités et vernis
de manière à garantir ses qualités esthétiques inaltérées dans le temps.
▼ Le moteur et les pièces en mouvement ont été conçues et fabriquées pour
garantir les plus bas niveaux de bruit possibles.
▼ Le tableau de commande est conçu pour permettre à l’utilisateur d’exécuter sans
diffi culté les programmes de séchage prévus.
8
9
▼ La large porte facilite le chargement et le déchargement du linge.
MODÈLE AVEC CONTRÔLE DU
SÉCHAGE PAR MINUTERIE
170’
120’
150’
130’
110’
90’
70’
50’
30’
30’
40’
60’
80’
100’
1 - Touche de mise en marche
2 - Indicateur lumineux de fonctionnement
3 - Bouton de sélection durée de séchage
4 - Porte du tambour
5 - Filtre
6 - Pieds réglables
7 - Plaquette des caractéristiques techniques
8 - Évacuation de la vapeur
9 - Collet de raccord
10 - Tuyau d’évacuation
11 - Support du tuyau
2
1
3
4
5
1
6
7
INSTALLATION DE L’APPAREIL
INSTALLATION
L’installation doit être confi ée à du personnel qualifi é et effectuée selon les instructions
fournies par le constructeur. Une installation non correcte peut provoquer des
dommages aux personnes et aux choses.
▼ Placer le séchoir à proximité d’une fenêtre afi n de faciliter l’évacuation de l’air
humide.
▼ Pour éviter la formation de condensation, utiliser un tuyau d’évacuation à raccorder
3
A
SM2255
au trou A qui se trouve au bas du panneau postérieur de l’appareil (fi g. 3).
FR
Page 30

30
▼ Ne pas boucher l’entrée de l’air à l’arrière de l’appareil.
▼ Monter le fi ltre comme le montre le dessin (fi g 4).
▼ Nettoyer l’intérieur du tambour de séchage avec un linge humide pour éliminer
tout dépôt de poussière.
Pieds réglables. Mettre le séchoir en position verticale bien d’aplomb sur les quatre
pieds, puis le mettre à niveau en réglant les pieds somme suit:
▼ Soulever légèrement le séchoir.
▼ Régler les pieds à la bonne hauteur (fi g. 5).
(Ne pas trop dévisser les pieds et ne pas utiliser de visseuse).
▼ Abaisser le séchoir.
La mauvaise mise à niveau d’une machine peut endommager les coussinets et
accélérer leur usure. Ce séchoir n’a pas besoin d’être fi xé au sol.
Raccorder le tuyau d’évacuation à la sortie qui se trouve à l’arrière du séchoir (fi g.
6) selon les indications suivantes:
▼ Raccorder une extrémité du tuyau au collet de raccord fourni.
▼ Faire pivoter le raccord (avec le tube) dans le sens contraire aux aiguilles d’une
montre à l’intérieur du trou de sortie.
▼ Faire sortir le tuyau de l’arrière du séchoir vers la gauche ou vers la droite à
travers la cavité qui se trouve dans la partie inférieure du corps de la machine.
INSTALLATION DE L’APPAREIL
INSTALLATION
MISE À NIVEAU DU SÉCHOIR
RACCORDEMENT DU TUYAU D’ÉVACUATION
4
5
6
▼ Placer l’autre extrémité du tuyau près d’une fenêtre ou d’une ouverture de ven-
tilation dans le mur extérieur. Si ce n’est pas possible, faire en sorte que le local
soit bien ventilé quand le séchoir marche. Utiliser le support (fi g. 7) pour fi xer le
tuyau.
7
Important : Le tuyau d’évacuation de l’air doit être raccordé même dans le cas où l’air n’est
pas déchargé à l’extérieur; autrement, l’air humide déchargé pourrait rentrer dans la machine
et prolonger les temps de séchage.
L’air humide peut en outre endommager le séchoir. Bien que l’air sortant du tuyau d’évacuation
soit seulement chaud et humide et ne constitue pas de danger, il ne doit jamais être dirigé
vers des personnes, des animaux ou des plantes.
Important : L’air évacué ne doit jamais être acheminé dans un conduit de cheminée utilisé
pour l’évacuation des fumées produites par des appareils qui utilisent du gaz ou d’autres
types de combustibles.
FR
SM2255
Page 31

INSTALLATION DE L’APPAREIL
BRANCHEMENT AU RESEAU ÉLECTRIQUE
▼ Vérifi er si la tension indiquée sur la plaque fi xée à l’arrière de l’appareil correspond
à la tension du réseau.
▼ À la fi n de l’installation, l’appareil doit être branché au réseau électrique au moyen
d’un interrupteur bipolaire.
▼ Tous les dispositifs d’interruption, les câblages et les prises de courant doivent
avoir une puissance nominale en mesure de supporter la charge maximum
indiquée sur la plaque d’identifi cation.
▼ Le réseau électrique auquel est raccordé l’appareil doit être muni d’un système
8
Important : À la fi n du cycle de séchage, déconnecter l’appareil du réseau électrique de
manière à éviter que des enfants ne puissent le mettre en marche.
de mise à la terre. En cas contraire, le constructeur décline toute responsabilité
pour tout incident (fi g. 8).
▼ En cas de dommage au câble électrique, s’adresser au service d’assistance
clients le plus proche.
▼ Ne pas brancher le séchoir au réseau électrique de manière indirecte au moyen
de rallonges ou d’adaptateurs multiples.
▼ Placer l’appareil en sorte que le câble électrique soit facile à atteindre pour le
déconnecter en cas de besoin.
31
UTILISATION DE L’APPAREIL
DESCRIPTION DES FONCTIONS
3. Bouton du programmateur utilisé pour sélectionner le programme désiré
9
sur base du type de tissu et des besoins spécifi ques. Si, pour n’importe
quelle raison que ce soit, on désire changer le programme ou ajouter du linge
dans la machine durant le cycle de séchage, il suffi t de tourner le bouton du
programmateur sur “ARRÊT” et ensuite de le remettre en face du programme
désiré et d’enfoncer la touche “DÉPART” (fi g. 9).
N.B. Attention!! Utiliser cette fonction seulement en cas de besoin réel et si
le programme à remettre à zéro a commencé depuis moins de 3 minutes.
10
11
SM2255
1. Touche de mise en marche Enfoncer cette touche pour mettre le cycle de
séchage programmé en marche (fi g. 10).
2. Le voyant lumineux Départ éteint indique la position “ARRÊT”. L’allumage
fi xe indique que le cycle est en cours. Le clignotement rapide indique que le
programme choisi est prêt à partir. Le clignotement lent indique que le programme
de séchage est terminé (fi g. 11).
FR
Page 32

32
OUVERTURE DE LA PORTE ET MODIFICATION DU SENS DE L’OUVERTURE
▼ Exercer une pression sur la partie droite du hublot (Fig. 12) pour l’ouvrir. Si le
sens de l’ouverture a été changé, il faut pousser sur la partie gauche.
▼ Le sens de l’ouverture de la porte peut être modifi é au besoin (fi g. 13).
N.B. : Cette opération doit être effectuée exclusivement par un technicien
spécialisé.
S’adresser au centre d’assistance du vendeur.
Procéder comme suit:
A
▼ Essorer le linge.
B
▼ Séparer les pièces selon le type ou selon le tissu.
▼ Fermer les fermetures éclair, boutonner les boutons
et ne pas oublier de vider toutes les poches.
▼ Retourner les chandails.
C
▼ Ouvrir la porte.
▼ Charger le linge dans le tambour sans oublier
de charger d’abord les draps de lit par un coin.
▼ Nous conseillons de charger ensemble des
petites et grandes pièces.
D
▼ Refermer la porte.
▼ Se sécher les mains (ne jamais toucher d’ap-
pareils électriques avec les mains mouillées).
▼ Brancher la fi che dans la prise de courant.
E
▼ Placer le bouton du programmateur sur Arrêt
pour remettre à zéro d’éventuels programmes
précédents, puis le tourner sur le programme
le mieux adapté au type de tissu, à la quantité
de linge chargé dans le tambour et au degré de
UTILISATION DE L’APPAREIL
POUR UN SÉCHAGE CORRECT DU LINGE
séchage désiré (voir Tableau Programmes).
▼ Enfoncer la touche DÉPART pour commencer
le séchage.
F
▼ Pour arrêter la machine pendant un cycle de
séchage, il suffi t d’ouvrir la porte et le tambour
s’arrêtera lentement. (Ne pas oublier, quand
on ouvre la porte, que les parois internes du
séchoir peuvent être très chaudes).
▼ Pour poursuivre le cycle de séchage, fermer
la porte et enfoncer la touche “DÉPART”.
▼ Lorsque le del start clignotant et la sonnerie ont
signalé la fi n du séchage, remettre le bouton
en position ARRÊT.
▼ Ouvrir la porte du tambour et retirer le linge.
▼ Refermer la porte.
▼ Avec les mains sèches, retirer la fi che du
séchoir de la prise électrique.
FR
12
13
SM2255
Page 33

UTILISATION DE L’APPAREIL
PRÉCAUTIONS POUR LES TYPES DE TISSU
En cas de doute sur le type de tissu, lire l’étiquette de la pièce. Presque toutes les pièces qui peuvent être
séchées à la machine ont l’indication sur l’étiquette. Pour éviter la formation d’électricité statique, ajouter
un assouplissant au linge durant le cycle de rinçage dans la machine à laver. Retirer immédiatement
du tambour toutes les pièces en tissu synthétique pour éviter qu’elles ne se froissent.
TABLEAU DES PROGRAMMES
PROGRAMMES AVEC CONTRÔLE ÉLECTRONIQUE
Résistants
Délicats
Résistants
Délicats
PROGRAMMES POUR SÉCHAGE AVEC CONTRÔLE DU SÉCHAGE PAR MINUTERIE
Humide +/-
Type de tissu
Max 6.0 kg.
Max 3.0 kg.
Max 3.0 kg.
* Durée du séchage nécessaire après essorage à 800 tours/min.
** Durée du séchage nécessaire après essorage à 1000 tours/min.
Important : La durée du séchage dépend d’une série de facteurs : poids, dimensions de la
pièce, type de tissu, degré d’humidité. Les pièces bien tordues et essorées sèchent plus
vite. Pour éviter que les pièces ne se froissent, ne pas surcharger le séchoir.
Les poids indiqués sont approximatifs et peuvent varier selon le fabricant, la qualité et la fi nition.
Linge de chambre à coucher
Courtepointe 700 g
Drap de dessous 550 g
Drap de dessus 600 g
Taie d’oreiller 180 g
Linge de maison
Torchon (pour assiettes) 90 g
Torchon (pour verres) 70 g
Chiffon 20 g
Serviette éponge 200 g
Autres pièces de linge
Sortie de bain 1200 g
Serviette de bain 800 g
Serviette de bain 300 g
Chemise d’homme 600 g
Chemisiers/chemises en matière synthétique 300 g
Linge de table
Nappe 250 g
SM2255
Max
6.0 kg.
Max
Extra sec Prêt à ranger
3.0 kg.
PROGRAMMES AVEC MINUTERIE
Max
6.0 kg.
Max
min.
120 - 60
3.0 kg.
20 min.
Extra
sec
* 150 min.
**130 min.
* 110 min.
** 90 min.
* 100 min.
** 80 min.
POIDS DU LINGE
*130 min.
**110 min.
* 90 min.
** 70 min.
* 80 min.
** 60 min.
20 min.
Grande nappe 1000 g
Serviette 80 g
Vêtements d’homme
Chemise lave et sèche 250 g
Maillot de corps (sans manches) 120 g
Pantalon court 150 g
Calzones largos 250 g
Pyjama 480 g
Chemise de nuit 400 g
Mouchoirs 25 g
Vêtements de dame
Chemisier 100 g
Tricot 100 g
Minijupe 80 g
Slip 80 g
Chemise de nuit 180 g
Pyjama 450 g
Mouchoirs 15 g
min.
120 - 60
Prêt à
ranger
Prêt à repasser
min.
60 - 40
Prêt à
repasser
*110 min.
** 90 min.
* 70 min.
** 50 min.
* 60 min.
** 40 min.
Très humide
min.
60 - 40
Très
humide
* 90 min.
** 70 min.
* 50 min.
** 30 min.
FR
33
Page 34

34
NETTOYAGE DU FILTRE
Pour garantir un excellent séchage en toute circonstance, ne pas oublier de nettoyer
le fi ltre à intervalles réguliers. Se rappeler de contrôler et éventuellement de nettoyer
le fi ltre après chaque cycle de séchage.
Important :
Le nettoyage du fi ltre doit être fait quand l’appareil est froid ! Pour le nettoyage du
fi ltre, suivre les indications qui suivent :
▼ Ouvrir la porte.
▼ Saisir le fi ltre avec les deux mains et le pousser en avant pour le retirer.
▼ Élargir délicatement le bord supérieur du fi ltre et ouvrir ce dernier.
▼ Retirer les particules de tissu.
▼ Fermer le fi ltre en vous assurant que la fi xation est bien dans la bonne posi-
tion.
▼ Nettoyer les coulisseaux de glissement du fi ltre sur l’appareil avec un aspirateur
si nécessaire.
▼ Remettre le fi ltre sur les coulisseaux de glissement (fi g. 14).
RECHERCHE PANNES
Tous les appareils électriques subissent des pannes de temps à autre. Dans ces cas, s’adresser
à un électricien qualifi é. Toutefois de nombreux problèmes peuvent être résolus sans intervention
extérieure.
Important : En cas de panne, débrancher immédiatement la prise électrique de l’appareil.
Avant d’appeler le centre d’assistance, effectuer les contrôles décrits ci-après.
ENTRETIEN
14
RÉSOLUTION DES PROBLÈMES
Le séchoir ne se met pas en marche
• Contrôler si:
1) L’appareil est correctement branché au
réseau électrique.
2) La fi che électrique fonctionne bien :
2a)
Le fusible n’a pas sauté. (Contrôler en
branchant un autre appareil au réseau
électrique, par ex. une lampe de bureau).
2b)
Les instructions du manuel ont été sui-
vies.
Si, quand on a effectué tous ces contrôles, l’appareil ne fonctionne toujours pas, s’adresser
au centre d’assistance le plus proche.
Communiquer au personnel du centre le modèle de l’appareil, le numéro de série et le type
de panne.
Ces informations aideront l’opérateur du centre d’assistance à procurer les pièces de rechange nécessaires, garantissant ainsi une réparation rapide et effi cace.
ACCESSOIRES EN OPTION
Pour gagner de la place, le revendeur peut fournir un accessoire qui permet d’installer le séchoir
au-dessus d’une machine à laver avec chargement frontal. L’installateur pourra vous donner tous les
renseignements sur le modèle d’appareil auquel cet accessoire peut être appliqué.
FR
Le séchoir ne se met pas en marche
• Contrôler si:
1) La porte est bien fermée.
2) La touche “START” a été enfoncée.
Le séchoir ne sèche pas
• Contrôler si:
1) Le tuyau d’évacuation de l’air n’est pas
écrasé ou tordu.
2) Le fi ltre n’est pas obstrué. (Ne pas oublier,
quand on ouvre la porte, que les parois
internes du séchoir peuvent être très
chaudes).
SM2255
Page 35

ESPAÑOL
35
Estimado Cliente
Nuestra enhorabuena por haber elegido un producto nuestro.
Antes de conectar y utilizar el aparato le aconsejamos leer atentamente el presente manual de
instrucciones. Conocer el funcionamiento del aparato le permitirá usarlo correctamente y en
condiciones de seguridad.
En el presente manual de instrucciones se ilustran las características técnicas de la secadora y
una serie de indicaciones útiles referentes a su funcionamiento, todo lo cual concebido con el fi n
de ayudarle a obtener lo mejor de su aparato. En el caso que el aparato sea vendido o transferido
a terceros, no olvide entregar al nuevo usuario el presente manual de instrucciones.
ÍNDICE
NOTAS Y ADVERTENCIAS PARA EL USUARIO 35-36
• Informaciones técnicas 37
DESCRIPCIÓN DEL APARATO 39
INSTALACIÓN DEL APARATO 39-41
• Instalación 39-40
• Nivelación de la secadora 40
• Conexión a la tubería de descarga 40
• Conexión a la red eléctrica 41
USO DE LA SECADORA 41-43
• Descripción de las funciones 41
• Apertura de la puerta y modifi cación del sentido de apertura 42
• Para un correcto secado de la ropa 42
• Precauciones según el tipo de tejido 43
• Tabla de programas 43
• Peso de la ropa 43
MANTENIMIENTO 44
• Limpieza del fi ltro 44
• Investigación de averías 44
• Solución de los problemas 44
• Accesorios opcionales 44
NOTAS Y ADVERTENCIAS PARA EL USUARIO
DATOS TÉCNICOS
Ancho cm.:
Dimensiones:
Alto cm.:
Profundidad cm.:
Capacidad Máxima
Potencia Nominal
Tensión De Alimentación
MODELO: ............................................................................................................................................................................................................
NÚMERO DE SERIE: ................................................................................................................................................................................
FECHA DE COMPRA: ................................................................................................................................................................................
SM2255
59.5
85.0
60.4
6,0 kg. secado
ver placa de datos
ver placa de datos
ES
Page 36

36
NOTAS Y ADVERTENCIAS PARA EL USUARIO
▼ La presente secadora está destinada a un
uso exclusivamente doméstico. Cualquier otro
uso debe considerarse impropio y por lo tanto
peligroso.
▼ Conservar el presente manual de uso cerca
del secador para poderlo consultar siempre
rápidamente si es necesario.
▼ Cualquier modifi cación o intento de forzamiento
del aparato puede ser peligroso para el usuario
y provocar daños al producto.
▼ En el momento de la entrega controlar que
el aparato no haya sufrido daños durante el
transporte. En el caso se detecten daños,
informar inmediatamente al revendedor.
▼ No cubrir la secadora con ropa u otros obje-
tos.
▼ Al posicionar el aparato, asegurarse que el
cable de alimentación no quede doblado o
aplastado y verifi car su accesibilidad.
▼ Después del uso de la secadora cerrar siempre
la puerta.
De este modo se evita que los niños se suban
a la puerta provocando el volcamiento de la
secadora.
▼ El aparato no debe ser usado por niños sin
vigilancia.
▼ Recuerde que durante el ciclo de secado el
tubo de descarga se calienta y puede alcanzar
temperaturas superiores a 60°. Evite tocar esta
parte antes de haber completado el ciclo de
enfriamiento.
▼ No utilizar el aparato para secar ropa sucia.
▼ No secar ropa sucia con aceite para cocinar,
petróleo, acetona, alcohol, bencina, keroseno,
desmanchadores, aguarrás, cera.
▼ Eliminar estas sustancias mediante un lavado
en caliente con abundante dosis de detergente
antes de cargar la ropa en la secadora.
▼ No secar objetos de espuma de goma, látex,
impermeables, tejidos impermeabilizados,
colchones de goma, objetos estampados,
vestidos o cojines acolchados con espuma
de goma, dado que estos materiales pueden
disolverse y dañar las demás prendas o el
mismo aparato.
▼ Suavizantes y productos similares deben usar-
se respetando las instrucciones del fabricante
indicadas en la confección.
▼ En caso de venta o transferencia del aparato,
no olvide entregar junto con éste el presente
manual de instrucciones. Esto ayudará al nuevo
propietario a usar la secadora correctamente
y en condiciones de seguridad.
▼ No trate de reparar Ud. mismo eventuales
averías al aparato; las reparaciones ejecutadas
por personal no profesional pueden ser causa
de serios daños y harán caducar cualquier
derecho las reparaciones en garantía.
▼ La reparación del aparato debe ser efectuada
▼ Centrifugar o estrujar bien la ropa antes de
▼ Limpiar cuidadosamente el fi ltro después de cada
▼ No introducir o extraer el enchufe de la toma
▼ La secadora debe conectarse a una toma
▼ No usar extensiones o adaptadores múltiples
▼ No exponer el aparato a la acción de los
▼ Antes de ejecutar el mantenimiento o la limpie-
▼ En este aparato está aplicada la marca que
▼ Este símbolo aplicado en el producto
▼ Para el desguace del aparato atenerse a
ES
sólo por personal autorizado por los centros
de asistencia. Todas las reparaciones deben
ejecutarse utilizando exclusivamente piezas
de recambio originales.
cargarla en la secadora. La ropa centrifugada
se seca más rápidamente.
uso para garantizar una perfecta circulación del
aire.
de corriente con las manos húmedas.
de corriente dotada de un efi caz sistema de
puesta a tierra que corresponda a las normas
de seguridad vigentes.
para conectar el aparato a la red de alimentación.
agentes atmosféricos.
za del aparato, no olvidar desconectarlo de la
red eléctrica. No tirar del cable de alimentación
para desconectar el aparato de la red, tomarlo
por el enchufe.
certifi ca su conformidad a la Directiva Europea
2002/96/CEE, Desechos de equipos eléctricos
y electrónicos (WEEE). Comprobar que el
desguace del aparato se produzca de manera
correcta. El usuario debe contribuir a la prevención de cualquier consecuencia negativa
sobre la salud y el ambiente.
o en los documentos que lo acompañan indica
que este aparato no puede ser tratado como
los desechos domésticos normales, sino que
debe ser entregado a un centro de recolección
autorizado para permitir la reutilización de las
partes eléctricas y electrónicas.
las normas locales vigentes referentes a la
materia. Para mayores informaciones sobre el
tratamiento, la recuperación y la reutilización
del presente aparato dirigirse a los órganos
competentes, a los servicios locales de recolección de desechos domésticos o al revendedor donde se ha comprado el aparato.
EL CONSTRUCTOR NO PUEDE CONSIDERARSE
RESPONSABLE POR EVENTUALES INCIDENTES CAUSADOS POR LA FALTA DE CUMPLIMIENTO DE LAS NORMAS DE SEGURIDAD Y LAS
INDICACIONES ILUSTRADAS EN EL PRESENTE
MANUAL DE INSTRUCCIONES.
SM2255
Page 37
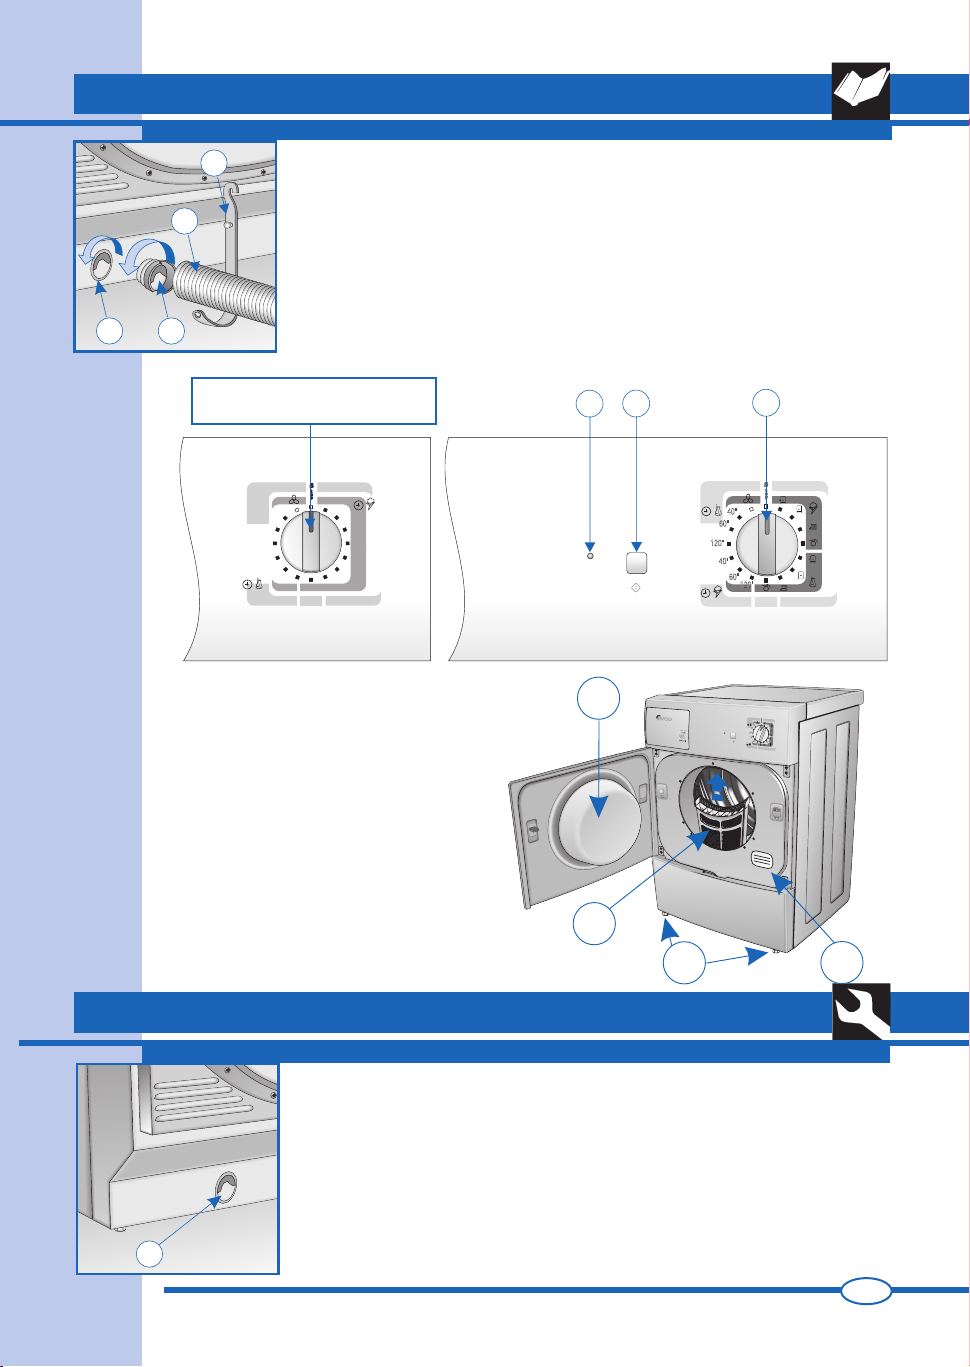
DESCRIPCIÓN DEL APARATO
37
DESCRIPCIÓN DEL APARATO
2
11
La secadora es un aparato para uso doméstico en condiciones de secar cualquier
tipo de tejido.
▼ La estructura de la máquina está constituida por paneles de acero tratados o
10
barnizados con el fi n de garantizar la inalterabilidad de sus cualidades estéticas
en el transcurso del tiempo.
▼ El motor y las partes en movimiento han sido proyectadas y fabricadas con el
fi n de garantizar los niveles mínimos de ruidosidad posibles.
▼ El tablero de mandos ha sido concebido para permitir al usuario ejecutar sin
8
9
difi cultad los programas de secado previstos.
▼ La puerta de amplias dimensiones facilita aún más la carga y la descarga de la ropa.
Modelo con control de secado
a tiempo
170’
120’
150’
130’
110’
90’
70’
50’
30’
30’
40’
60’
80’
100’
1 - Pulsador de puesta en marcha
2 - Indicador luminoso de funcionamiento
3 - Perilla de selección tiempo de secado
4 - Puerta tambor
5 - Filtro
6 - Pies regulables
7 - Placa de características técnicas.
8 - Orifi cio de descarga de vapor
9 - Brida de racor
10 - Tubo de descarga
1
11 - Soporte tubo
2
1
3
4
5
6
7
INSTALACIÓN DEL APARATO
INSTALACIÓN
La instalación debe ser efectuada por personal califi cado y ejecutada según las
instrucciones suministradas por el constructor. Una instalación no correcta puede
provocar daños a personas y cosas.
▼ Posicionar la secadora cerca de una ventana para facilitar la evacuación del aire
húmedo.
▼ Para evitar la formación de condensación utilizar un tubo de descarga a conectar
3
A
SM2255
al orifi cio A obtenido en la parte inferior del panel posterior del aparato (fi g. 3).
ES
Page 38

38
▼ No obstruir la entrada del aire en la parte posterior del aparato.
▼ Montar el fi ltro en la posición prevista como se indica en la (fi g. 4).
▼ Limpiar el interior del tambor de secado con un paño húmedo para eliminar los
depósitos de polvo.
Pies regulables Colocar la secadora en posición vertical de manera que se apoye
sólidamente en los cuatro pies, luego nivelarla regulando los pies de la siguiente
manera:
▼ Levantar ligeramente la secadora.
▼ Regular los pies a la altura correcta (fi g. 5).
(No destornillar excesivamente los pies y no utilizar un destornillador).
▼ Bajar la secadora.
Una máquina nivelada no correctamente puede dañar los cojinetes y acelerar su
desgaste. Esta secadora no necesita fi jarse al piso.
Conectar el tubo de descarga a la salida situada en la parte posterior de la secadora
(fi g.6) según las siguientes indicaciones:
▼ Conectar un extremo del tubo a la brida de racor suministrada de serie.
▼ Girar el elemento de unión (junto con el tubo) en sentido antihorario al interior
del orifi cio de salida.
▼ Hacer salir el tubo por la parte posterior de la secadora hacia la izquierda o
hacia la derecha a través de la cavidad presente en la parte inferior del cuerpo
de la máquina.
INSTALACIÓN DEL APARATO
INSTALACIÓN
NIVELACIÓN DE LA SECADORA
CONEXIÓN DEL TUBO DE DESCARGA
4
5
6
▼ Posicionar el otro extremo del tubo cerca de una ventana o de una apertura de
ventilación en la pared externa. Si no fuera posible, comprobar que el local esté
bien ventilado cuando la secadora está funcionando. Usar el soporte (fi g. 7) para
fi jar el tubo.
7
Importante: el tubo de evacuación del aire debe conectarse incluso en el caso en que el aire
no sea descargado al exterior; en caso contrario el aire húmedo descargado puede volver
a entrar a la maquina prolongando los tiempos de secado.
Además el aire húmedo puede dañar la secadora. Aunque el aire que sale de la tubería de
descarga esté solamente caliente y húmedo y no constituya un peligro, no debe dirigirse
nunca hacia personas, animales o plantas.
Importante: el aire de descarga no debe nunca ser encauzado hacia una chimenea utilizada
para la evacuación de los humos generados por aparatos que utilizan gas u otros tipos de
combustible.
ES
SM2255
Page 39

INSTALACIÓN DEL APARATO
CONEXIÓN A LA RED ELÉCTRICA
▼ Comprobar que la tensión indicada en la placa situada en la parte posterior del
aparato corresponda a la tensión de red.
▼ Al fi nal de la instalación, el aparato debe ser conectado a la red de alimentación
mediante un interruptor bipolar.
▼ Todos los dispositivos de interrupción, los cablajes y las tomas de corriente
deben tener una capacidad nominal en condiciones de soportar la carga máxima
indicada en la placa de datos.
▼ La red de alimentación a la cual está conectado el aparato debe estar dotada de
8
Importante: Al fi nal del ciclo de secado, desconectar el aparato de la red eléctrica de alimentación para evitar que los niños puedan ponerlo en función.
sistema de puesta a tierra. En caso contrario el constructor no será responsable
de eventuales incidentes (fi g. 8).
▼ En caso de daño del cable de alimentación, dirigirse al servicio de asistencia
clientes más cercano.
▼ No conectar la secadora a la red eléctrica de manera indirecta mediante exten-
siones o adaptadores múltiples.
▼ Posicionar el aparato de manera que el cable de alimentación quede fácilmente
accesible para desconectarlo en caso de necesidad.
39
USO DEL APARATO
DESCRIPCIÓN DE LAS FUNCIONES
3. Perilla del programador utilizada para seleccionar el programa deseado se-
9
gún el tipo de tejido y a las necesidades específi cas. Si, por cualquier razón,
se desea cambiar el programa o agregar otra ropa en la máquina durante el ciclo
de secado, basta simplemente colocar la perilla del programador en “STOP”
y luego llevarla al punto correspondiente al programa deseado y presionar el
pulsador “START” (fi g. 9).
N.B. Atención!! Utilizar esta función sólo en caso de efectiva necesidad y
si el programa a reconfi gurar ha iniciado desde menos de 3 minutos.
10
11
SM2255
1. Pulsador de puesta en marcha Presionar este pulsador para poner en marcha
el ciclo programado (fi g. 10).
2. El LED Start apagado indica la posición de “STOP”. El encendido con luz fi ja
indica que el ciclo está en curso. El parpadeo veloz avisa que el programa seleccionado está listo para ser puesto en marcha. El parpadeo lento indica que
el programa de secado ha terminado (fi g. 11).
ES
Page 40

40
APERTURA DE LA PUERTA Y MODIFICACIÓN DEL SENTIDO DE APERTURA
▼ Ejercer una presión en la parte derecha de la puerta (fi g. 12) para abrirla. Si el
sentido de apertura ha sido cambiado, presionar en la parte izquierda.
▼ El sentido de apertura de la puerta puede ser modifi cado según las necesidades
(fi g. 13).
N.B.: Esta operación debe ser ejecutada exclusivamente por un técnico
especializado.
Dirigirse al centro de asistencia del vendedor.
USO DEL APARATO
13
PARA UN CORRECTO SECADO DE LA ROPA
Proceder de la siguiente manera:
A
▼ Centrifugar la ropa.
B
▼ Separar las prendas según el tipo de tejido.
▼ Cerrar las cremalleras, abotonar los botones y
acordarse de vaciar todos los bolsillos.
▼ Poner al revés los jerseys.
C
▼ Abrir la puerta.
▼ Cargar la ropa en el tambor recordando cargar
en primer lugar las sábanas por un ángulo.
▼ Se aconseja cargar juntas las prendas peque-
ñas y grandes.
D
▼ Cerrar la puerta.
▼ Secarse las manos (no tocar nunca aparatos
eléctricos con las manos mojadas).
▼ Introducir el enchufe en la toma de corriente.
E
▼ Posicionar la perilla del programador en el
Stop para reconfi gurar eventuales programas
precedentes, luego colocarla en el programa
más adecuado para el tipo de tejido, la cantidad
de ropa cargada en el tambor, y el grado de
ES
secado deseado (ver Tabla de Programas).
▼ Presionar la tecla START para iniciar el seca-
do.
F
▼ Para detener la máquina durante un ciclo de
secado basta abrir la puerta y el tambor se
detiene lentamente. (Recuerde, cuando abre
la puerta, que las partes internas de la secadora pueden estar muy calientes)
▼ Para seguir el ciclo de secado, cerrar la puerta
y presionar el pulsador “Start”.
▼ Una vez terminado el secado señalado por
el parpadeo del led Start y por el zumbador
colocar el selector de STOP.
▼ Abrir la puerta del tambor y extraer la ropa.
▼ Cerrar la puerta.
▼ Con las manos secas desconectar el enchufe
del secador de la red.
12
SM2255
Page 41

USO DEL APARATO
PRECAUCIONES PARA LOS TIPOS DE TEJIDOS
En caso de duda sobre el tipo de tejido, leer la tarjeta aplicada en la prenda. Casi todas las prendas que
pueden secarse a máquina tienen la indicación correspondiente en la etiqueta. Para evitar descargas
eléctricas, agregar a las prendas un suavizante durante el ciclo de aclarado en la lavadora. Quitar
inmediatamente del tambor las prendas de material sintético para evitar que se estropeen.
TABLA DE LOS PROGRAMAS
PROGRAMAS CON CONTROL ELECTRÓNICO DE LA HUMEDAD
Resistentes
Delicados
Resistentes
Delicados
PROGRAMAS PARA SECADORA CON CONTROL DEL SECADO A TIEMPO
Húmedo +/-
Tipo de tejido
Max 6.0 kg.
Max 3.0 kg.
Max 3.0 kg.
* Tiempo de secado necesario después de centrífuga a 800 rev/min.
** Tiempo de secado necesario después de centrífuga a 1000 rev/min.
Importante: El tiempo de secado depende de una serie de factores: peso, dimensiones de
la prenda, tipo de tejido, grado de humedad. Las prendas bien estrujadas se secan más
rápidamente. Para evitar que las prendas se estropeen no sobrecargar la secadora.
Los pesos indicados son aproximados y pueden variar según el fabricante, la calidad y el acabado.
Lencería de cama
Colcha 700 g
Sábana inferior 550 g
Sábana superior 600 g
Funda 180 g
Lencería para la casa
Estropajo (para los platos) 90 g
Estropajo (para copas) 70 g
Paño 20 g
Toalla 200 g
Otras piezas de lencería
Albornoz 1200 g
Toalla de baño 800 g
Blusa mujer 300 g
Camisa hombre 600 g
Blusa/camisa de material sintético 300 g
Lencería de mesa
Mantel 250 g
SM2255
Max
6.0 kg.
Max
3.0 kg.
Max
6.0 kg.
Max
3.0 kg.
Extra seco Seco para
guardar
PROGRAMAS A TIEMPO
min.
120 - 60
min.
120 - 60
20 min.
Extra
seco
* 150 min.
**130 min.
* 110 min.
** 90 min.
* 100 min.
** 80 min.
Seco para
guardar
*130 min.
**110 min.
* 90 min.
** 70 min.
* 80 min.
** 60 min.
20 min.
PESOS DE LA ROPA
Mantel grande 1000 g
Servilleta 80 g
Vestuario de hombre
Camisa wash and wear 250 g
Camiseta (sin mangas) 120 g
Caleçons cortos 150 g
Caleçons longs 250 g
Pijama 480 g
Camisa de dormir 400 g
Pañuelos 25 g
Vestuario mujer
Blusa 100 g
Jersey 100 g
Minifalda 80 g
Slip 80 g
Camisa de dormir 180 g
Pijama 450 g
Pañuelo 15 g
Húmedo para
planchar
min.
60 - 40
Húmedo para
planchar
*110 min.
** 90 min.
* 70 min.
** 50 min.
* 60 min.
** 40 min.
Muy húmedo
min.
60 - 40
Muy
húmedo
* 90 min.
** 70 min.
* 50 min.
** 30 min.
ES
41
Page 42

42
Para garantizar un óptimo secado en cualquier circunstancia no olvide limpiar el fi ltro
a intervalos regulares. Recuerde controlar y eventualmente limpiar el fi ltro después
de cada ciclo de secado.
importante:
La limpieza del fi ltro debe ejecutarse con el aparato frío! Para la limpieza del fi ltro
seguir las indicaciones ilustradas a continuación:
▼ Abrir la puerta.
▼ Tomar el fi ltro con ambas manos y empujarlo hacia adelante para quitarlo.
▼ Ensanchar delicadamente el borde superior del fi ltro y abrir éste último.
▼ Quitar las partículas de tejido.
▼ Cerrar el fi ltro comprobando que el retén esté en la posición correcta.
▼ Limpiar las guías de desplazamiento del fi ltro en el aparato con un aspirador,
si es necesario.
▼ Reposicionar el fi ltro en las guías de desplazamiento (fi g. 14).
INVESTIGACIÓN DE AVERÍAS
Todos los aparatos eléctricos están sometidos cada cierto tiempo a averías. En estos casos dirigirse
a un electricista califi cado. Sin embargo muchos problemas pueden resolverse sin necesidad de
intervenciones desde el exterior.
Importante: En caso de avería, desconectar inmediatamente el aparato de la red eléctrica.
Antes de llamar al centro de asistencia ejecutar los controles que se describen a continua-
ción.
SOLUCIÓN DE LOS PROBLEMAS
MANTENIMIENTO
LIMPIEZA DEL FILTRO
14
La secadora no parte
• Controlar que:
1) El aparato esté correctamente conectado
a la red de alimentación.
2) El enchufe enchufe de red funcione regularmente:
2a)
El fusible no esté quemado. (Se hayan
ejecutado las instrucciones indicadas en
el manual).
2b)
Siano state seguite le istruzioni riportate
nel manuale.
Si, una vez ejecutados estos controles el aparato aún no funciona, dirigirse al centro de
asistencia más cercano.
Comunicar al personal del centro el modelo del aparato, el número de serie y el tipo de
avería.
Estas informaciones ayudarán al operador del centro de asistencia a obtener las piezas de
recambio necesarias, garantizando de este modo una intervención de reparación rápida
y efi ciente.
ACCESORIOS OPCIONALES
Para ganar espacio, el revendedor puede vender un accesorio que permite instalar la secadora arriba
de una lavadora con puerta de carga anterior. El instalador le informará sobre el modelo de aparato al
cual se puede aplicar este accesorio.
ES
La secadora no parte
• Controlar que:
1) La puerta esté cerrada correctamente.
2) Se haya presionado el pulsador “START”.
La secadora no seca
• Controlar que:
1) El tubo de descarga no esté aplastado o
retorcido.
2) El filtro no esté obstruido. (Recuerde,
cuando abre la puerta, que las partes
internas de la secadora pueden estar muy
calientes)
SM2255
Page 43

PORTUGUÊS
Estimado Cliente,
Agradecemos-lhe a preferência por o nosso produto.
Antes de ligar e utilizar o aparelho, aconselhamo-lo a ler com atenção este livro de instruções. Saber
como funciona o aparelho permitir-lhe-á utilizá-lo devidamente e em condições de segurança.
Neste livro de instruções estão transcritas as características técnicas do secador de roupa e dão-se
uma série de indicações úteis acerca do seu funcionamento, a fi m de lhe permitir tirar o máximo
proveito do aparelho. No caso do aparelho ser vendido ou transferido a terceiros, não se esqueça
de entregar este livro de instruções ao novo utilizador.
ÍNDICE
NOTAS E ADVERTÊNCIAS ÚTEIS PARA O UTILIZADOR 43-44
• Informações técnicas 43
DESCRIÇÃO DO APARELHO 45
INSTALAÇÃO DO APARELHO 45-47
• Instalação 45-46
• Nivelação do secador 46
• Ligação à tubagem de escoamento 46
• Ligação à instalação eléctrica 47
UTILIZAÇÃO DO SECADOR DE ROUPA 47-49
• Descrição das funções 47
• Abertura da porta e alteração do sentido de abertura 48
• Como secar a roupa de modo correcto 48
• Precauções a ter segundo o tipo de tecido 49
• Tabela de programas 49
• Peso da roupa 49
43
MANUTENÇÃO 50
• Limpeza do fi ltro 50
• Pesquisa de avarias 50
• Resolução de problemas 50
• Acessórios de opção 50
NOTAS E ADVERTÊNCIAS ÚTEIS PARA O UTILIZADOR
DADOS TÉCNICOS
Largura cm.:
Dimensões:
Altura cm.:
Profundidade cm:
Capacidade máxima
Potência Nominal
Tensão de alimentação
MODELO: ...............................................................................................................................................................................................................
NÚMERO DE SÉRIE: .....................................................................................................................................................................................
DATA DE COMPRA: .......................................................................................................................................................................................
SM2255
59.5
85.0
60.4
6,0 kg de roupa seca
ver placa de dados
ver placa de dados
PT
Page 44

44
NOTAS E ADVERTÊNCIAS ÚTEIS PARA O UTILIZADOR
▼ Este secador de roupa é para uso exclusivamen-
te doméstico. Quaisquer outras utilizações são
consideradas indevidas e, portanto, perigosas.
▼ Guarde este livro de instruções perto do apa-
relho, de maneira a poder sempre consultá-lo
com facilidade, em caso de necessidade.
▼ Qualquer alteração ou tentativa de modifi cação
feita ao aparelho pode ser fonte de perigo para o
utilizador e provocar danos no electrodoméstico.
▼ Aquando da entrega, certifi que-se de que o
aparelho não sofreu danos durante o transporte. Se detectar qualquer problema, informe
imediatamente o seu revendedor.
▼ Não cubra o secador com roupa ou outros
objectos.
▼ Ao colocar o aparelho no lugar de instalação,
certifi que-se de que o cabo de alimentação
não fi ca dobrado nem esmagado e de que fi ca
acessível.
▼ Depois de utilizar o secador de roupa, feche
sempre a porta do tambor.
Deste modo, evitará que as crianças trepem
para cima da porta e façam cair o secador.
▼ O aparelho não deve ser utilizado por crianças,
sem vigilância.
▼ Lembre-se de que durante o ciclo de secagem,
o tubo de esgoto aquece e pode atingir temperaturas superiores a 60°. Evite tocar-lhe antes
da conclusão do ciclo de arrefecimento.
▼ Não utilize o aparelho para secar roupa suja.
▼ Não seque roupa suja de óleo de cozinha,
petróleo, acetona, álcool, gasolina, querosene,
tira-nódoas, aguarrás, cera.
▼ Elimine estas substâncias previamente, lavan-
do as nódoas com água quente e uma dose
abundante de detergente, antes de introduzir
a roupa no secador.
▼ Não seque na máquina objectos de borracha
esponjosa, látex, impermeáveis, tecidos impermeabilizados, colchões de borracha, objectos
gravados, roupa ou almofadas embutidas com
borracha esponjosa, porque podem derreter e
estragar o resto da roupa ou mesmo o próprio
electrodoméstico.
▼ Amaciadores e produtos análogos devem ser
utilizados respeitando as instruções do fabricante indicadas na respectiva embalagem.
▼ Em caso de venda ou transferência do apare-
lho, é importante lembrar-se de entregar este
livro de instruções juntamente com a máquina.
Isto ajudará o novo proprietário a utilizar correctamente o secador de roupa e em condições
de segurança.
▼ Não tente reparar eventuais avarias do apa-
relho sozinho, porque as reparações não
realizadas por profi ssionais podem provocar
danos graves e anulam o direito a reparação
ao abrigo da garantia
PT
▼ A reparação do aparelho só pode ser feita por
pessoal técnico autorizado dos centros de assistência. Todas as reparações deverão ser feitas
utilizando, exclusivamente, peças originais.
▼ Centrifugue ou torça bem a roupa antes de a
introduzir no secador. A roupa centrifugada
seca mais rapidamente!
▼ Sempre que acabar de utilizar o secador de
roupa, limpe o fi ltro muito bem, para garantir
uma circulação de ar perfeita.
▼ Não ligue ou desligue a fi cha da tomada de
corrente com as mãos húmidas.
▼ O secador de roupa deve ser ligado a uma
tomada de corrente eléctrica que possua
um sistema de ligação à terra efi ciente que
cumpra os requisitos de segurança.
▼ Não utilize extensões nem fi chas múltiplas
para ligar o aparelho à rede eléctrica.
▼
Não exponha o aparelho aos efeitos deletérios
do tempo.
▼ Antes de fazer a manutenção ou limpeza do
aparelho, não se esqueça de o desligar da
rede eléctrica. Não puxe pelo fi o eléctrico para
desligar o aparelho da rede, agarre a fi cha e
retire-a da tomada.
▼ Este aparelho tem afi xada a marca compro-
vativa de que cumpre com os requisitos da
Directiva Europeia 2002/96/CEE, Resíduos
de Equipamentos Eléctricos e Electrónicos
(REEE). Certifi que-se de que a eliminação
do aparelho é feita convenientemente. O
utilizador tem de contribuir para a prevenção
de consequências negativas para a saúde e
meio ambiente.
▼ Este símbolo aplicado no produto e
nos documentos que o acompanham indica
que este aparelho não pode ser tratado como
lixo doméstico normal e que tem de ser entregue num centro de recolha autorizado, para
permitir a reutilização das partes eléctricas e
electrónicas.
▼ Para a eliminação do aparelho, siga o disposto
nas normas locais vigentes aplicáveis. Para
mais informações sobre o tratamento, recuperação e reutilização deste aparelho, contacte os
órgãos competentes, o serviço de recolha de
desperdícios domésticos local ou a loja onde
adquiriu o aparelho.
O FABRICANTE DECLINA TODA E QUALQUER RESPONSABILIDADE POR POSSÍVEIS
ACIDENTES DECORRENTES DA NÃO OBSERVÂNCIA DAS NORMAS DE SEGURANÇA
E DAS INDICAÇÕES DADAS NESTE LIVRO
DE INSTRUÇÕES.
SM2255
Page 45

DESCRIÇÃO DO APARELHO
45
DESCRIÇÃO DO APARELHO
2
11
O secador de roupa é um aparelho para uso doméstico que seca todos os tipos de tecidos.
▼ A estrutura da máquina foi construída com painéis de aço tratados e pintados de
10
modo a conservar inalteradas as suas qualidades estéticas ao longo do tempo.
▼ O motor e as partes de movimento foram concebidos e fabricados de modo a
garantir o mínimo nível de ruído possível .
▼ O painel de comando foi concebido de modo a proporcionar ao utilizador uma
execução dos programas de secagem previstos sem difi culdade.
8
9
▼ A porta do tambor, muito ampla, torna ainda mais fáceis as operações de carga
e descarga de roupa.
modelo com controlo de
secagem por tempo
170’
120’
150’
130’
110’
90’
70’
50’
30’
30’
40’
60’
80’
100’
2
1
3
1 - Botão de arranque
4
2 - Indicador luminoso de funcionamento
3 - Botão selector do tempo de secagem
4 - Porta do tambor
5 - Filtro
6 - Pés reguláveis
7 - Placa de características técnicas.
8 - Furo de escoamento do vapor
9 - Flange de união
10 - Tubo de escoamento
11 - Suporte do tubo
1
5
6
7
INSTALAÇÃO DO APARELHO
INSTALAÇÃO
A instalação deve ser feita por pessoal qualifi cado e segundo as instruções do
fabricante.
Uma instalação incorrecta pode provocar danos nas pessoas e coisas.
▼ Coloque o secador de roupa próximo de uma janela, para facilitar a evacuação
do ar húmido.
3
A
SM2255
▼ Para evitar formação de condensação, utilize um tubo de escoamento que deverá
ligar no furo A situado na parte inferior do painel posterior do aparelho (fi g. 3).
PT
Page 46

46
▼ Não obstrua a entrada de ar na retaguarda do aparelho.
▼ Monte o fi ltro na posição prevista, como indicado na (fi g. 4).
▼ Limpe o interior do tambor de secagem com um pano húmido, para eliminar o
pó eventualmente depositado.
Pés reguláveis. Coloque o secador de roupa em posição vertical, de maneira a fi car
bem apoiado nos quatro pés. A seguir, nivele o aparelho do modo seguinte:
▼ Levante ligeiramente o secador de roupa.
▼ Regule os pés de modo a fi carem com a altura devida (fi g. 5). (Não desaperte
os pés do secador excessivamente e não utilize chave de parafusos).
▼ Baixe o secador.
As máquinas mal niveladas podem danifi car os rolamentos e acelerar-lhes o
desgaste. Este secador de roupa não precisa de fi xação ao pavimento.
Ligue o tubo de escoamento à saída na retaguarda do secador (fi g. 6) de acordo
com as indicações seguintes:
▼ Ligue uma das extremidades do tubo à fl ange de união incluída nos acessórios
que acompanham a máquina.
▼ Rode o elemento de união (juntamente com o tubo) no sentido contrário aos
ponteiros do relógio, no interior do furo de saída.
▼ Empurre o tubo para o exterior da parte posterior da máquina, orientando-o para
a esquerda ou para a direita, através do espaço existente no fundo da estrutura
da máquina.
▼ Coloque a outra extremidade do tubo próximo de uma janela ou de uma abertura
de ventilação na parede exterior. Se não for possível, certifi que-se de que o local
está bem ventilado quando o secador estiver a funcionar. Utilize o suporte (fi g.
7) para fi xar o tubo.
INSTALAÇÃO DO APARELHO
INSTALAÇÃO
NIVELAÇÃO DO SECADOR
LIGAÇÃO DO TUBO DE ESCOAMENTO
4
5
6
7
Importante: É necessário ligar o tubo de evacuação de ar ao secador de roupa mesmo quando
o ar não é evacuado para o exterior, caso contrário o ar húmido descarregado pode voltar a
entrar dentro da máquina, aumentando o tempo de secagem.
Além disso, o ar húmido pode provocar danos no secador. Apesar do ar que sai da tubagem
de escoamento ser só quente e húmido e, portanto, não perigoso, não deverá nunca estar
orientado na direcção de pessoas, animais ou plantas.
Importante: O ar evacuado não deverá nunca ser descarregado para uma chaminé utilizada
para evacuação de fumos gerados por aparelhos que utilizam gás ou outros tipos de combustíveis.
PT
SM2255
Page 47

INSTALAÇÃO DO APARELHO
LIGAÇÃO À INSTALAÇÃO ELÉCTRICA
▼ Ve ri fi que se a tensão eléctrica indicada na placa de características aplicada na re-
taguarda da máquina corresponde à tensão da instalação eléctrica de sua casa.
▼ No fi m da instalação, o aparelho deverá ser ligado à rede de alimentação mediante
utilização de um interruptor bipolar.
▼ Todos os dispositivos de corte de corrente, cabos e tomadas de corrente eléctrica
devem ter capacidade nominal para aguentar a corrente máxima indicada na
placa de dados.
▼ A rede de alimentação a que o aparelho estiver ligado deve ser provida de
8
Importante: No fi m do ciclo de secagem, desligue o aparelho da rede de alimentação eléctrica,
para evitar que as crianças o possam pôr a funcionar.
sistema de ligação à terra. Caso contrário, o fabricante declina toda e qualquer
responsabilidade por eventuais acidentes (fi g. 8).
▼ Em caso de danos no fi o eléctrico, dirija-se ao centro de assistência a clientes
mais próximo.
▼ Não ligue o secador à rede eléctrica utilizando extensões ou fi chas múltiplas.
▼ Coloque o aparelho de modo a deixar o cabo de alimentação facilmente acessível,
para poder desligá-lo sempre que necessitar.
47
UTILIZAÇÃO DO APARELHO
UTILIZAÇÃO DO APARELHO
3. Botão programador - utilizado para seleccionar o programa desejado, de acordo
9
com o tipo de tecido e as necessidades específi cas. Se por qualquer motivo se
desejar alterar o programa ou adicionar outra roupa na máquina durante o ciclo
de secagem, basta colocar o botão programador na posição “STOP”, rodá-lo
depois para a posição correspondente ao programa desejado e premir o botão
“START” (fi g. 9).
Nota: Atenção!! Utilize esta função apenas em caso de efectiva necessidade
e somente se o programa que deseja substituir tiver iniciado há menos de
3 minutos.
10
11
SM2255
1. Botão de arranque - prima este botão para iniciar o ciclo de secagem progra-
mado (fi g. 10).
2. O LED Start apagado indica a posição “STOP”. O acendimento com luz fi xa
indica que está a decorrer o ciclo. A intermitência rápida avisa que o programa
predefi nido está pronto para ser iniciado. A intermitência lenta indica que o
programa de secagem se concluiu (fi g. 11).
PT
Page 48

48
ABERTURA DA PORTA E ALTERAÇÃO DO SENTIDO DE ABERTURA
▼ Faça pressão do lado direito da porta (fi g. 12), para a abrir. Se tiver invertido o
sentido de abertura da porta, faça pressão do lado esquerdo.
▼ O sentido de abertura da porta pode ser mudado segundo as necessidades (fi g.
13).
Nota: Esta operação deve ser feita apenas por um técnico especializado.
Dirija-se ao centro de assistência do vendedor.
UTILIZAÇÃO DO APARELHO
13
COMO SECAR A ROUPA DE MODO CORRECTO
Proceda do modo seguinte:
A
▼ Centrifugue a roupa.
B
▼ Separe as peças de roupa segundo os teci-
dos.
▼ Feche os fechos de correr, aperte os botões e
lembre-se de esvaziar todos os bolsos.
▼ Coloque as malhas do avesso.
C
▼ Abra a porta.
▼ Carregue a roupa no tambor, lembrando-se de
introduzir primeiro os lençóis, começando por
uma ponta.
▼ Recomenda-se introduzir ao mesmo tempo
peças de roupa grandes e pequenas.
D
▼ Feche a porta.
▼ Seque as mãos (nunca toque aparelhos eléc-
tricos com as mãos molhadas).
▼ Introduza a fi cha na tomada de corrente.
E
▼ Coloque o botão programador na posição
Stop, para fazer o reset de eventuais programas anteriores. A seguir, rode o botão para o
programa mais indicado para tipo de tecido, à
quantidade de roupa no tambor e ao grau de
PT
secagem desejados (ver Quadro de Programas).
▼ Prima o botão START, para dar inicio à seca-
gem.
F
▼ Para interromper o funcionamento da máquina
durante o ciclo de secagem, basta abrir a
porta do secador. O tambor parará lentamente.
(Lembre-se de que quando se abre a porta,
as partes interiores do secador podem estar
muito quentes).
▼ Para prosseguir o ciclo de secagem, feche a
porta e prima o botão “Start”.
▼ Concluída a secagem, facto sinalizado pelo
piscar do led start e pelo disparar do sinal
sonoro, coloque de novo o programador na
posição STOP.
▼ Abra a porta do tambor e tire a roupa do
secador.
▼ Feche de novo a porta.
▼ Com as mãos secas, desligue a ficha do
secador da tomada de rede.
12
SM2255
Page 49

UTILIZAÇÃO DO APARELHO
PRECAUÇÕES A TER SEGUNDO OS TECIDOS
Em caso de dúvida sobre o tipo de tecido, verifi que a etiqueta aplicada na própria peça de roupa. Quase todas as peças
de roupa que podem ser secas no secador de roupa têm uma indicação específi ca na etiqueta. Para evitar descargas
de electricidade, adicione amaciador de roupa na máquina de lavar durante o ciclo de enxaguamento. Retire a roupa
de fi bra sintética do tambor imediatamente após conclusão do ciclo, para evitar que se se formem vincos.
TABELA DE PROGRAMAS
PROGRAMAS COM CONTROLO ELECTRÓNICO DA HUMIDADE
Resistentes
Delicados
Resistentes
Delicados
PROGRAMAS PARA SECADORES COM CONTROLO DE SECAGEM POR TEMPO
Húmido +/-
Tipo de tecido
Max 6.0 kg.
Max 3.0 kg.
Max 3.0 kg.
* Tempo de secagem necessário após centrifugação a 800 rot./min.
** Tempo de secagem necessário após centrifugação a 1000 rot./min.
Importante: O tempo de secagem depende de vários factores, como o peso, dimensões da
roupa, tipo de tecido e grau de humidade. A roupa bem torcida e centrifugada seca mais
rapidamente. Para evitar que a roupa ganhe vincos, não sobrecarregue o secador.
Os pesos indicados são aproximativos. Podem variar segundo o fabricante, a qualidade e o acabamento.
Roupa de cama
Colcha 700 g
Lençol de baixo 550 g
Lençol de cima 600 g
Fronha 180 g
Roupa de casa
Pano de limpar (pratos) 90 g
Pano de limpar (copos) 70 g
Pano 20 g
Toalha de mãos 200 g
Outras peças de roupa
Roupão 1200 g
Lençol de banho 800 g
Blusa de senhora 300 g
Camisa de homem 600 g
Blusas/camisas de material sintético 300 g
Roupa de mesa
Toalha 250 g
SM2255
Max
6.0 kg.
Max
3.0 kg.
Max
6.0 kg.
Max
3.0 kg.
Extra seco
PROGRAMAS POR TEMPO
min.
120 - 60
Seco para guardar
directamente
no armário
min.
120 - 60
20 min.
Seco para
Extra
seco
* 150 min.
**130 min.
* 110 min.
** 90 min.
* 100 min.
** 80 min.
guardar
directamente
no armário
*130 min.
**110 min.
* 90 min.
** 70 min.
* 80 min.
** 60 min.
20 min.
PESO DA ROUPA
Toalha grande 1000 g
Guardanapo 80 g
Roupa de homem
Camisa de lavar e usar 250 g
Camisola interior (sem mangas) 120 g
Calções curtos 150 g
Cuecas compridas 250 g
Pijama 480 g
Camisa de noite 400 g
Lenços de assoar 25 g
Roupa de senhora
Blusa 100 g
Camisola de malha 100 g
Mini-saia 80 g
Cuecas de senhora 80 g
Camisa de noite 180 g
Pijama 450 g
Lenço de assoar 15 g
Húmido para
passar a ferro
min.
60 - 40
Húmido para
passar a ferro
*110 min.
** 90 min.
* 70 min.
** 50 min.
* 60 min.
** 40 min.
Muito húmido
min.
60 - 40
Muito
húmido
* 90 min.
** 70 min.
* 50 min.
** 30 min.
PT
49
Page 50

50
Para garantir os melhores resultados de secagem em qualquer circunstância, não se
esqueça de limpar o fi ltro com regularidade. Lembre-se de verifi car e limpar sempre
o fi ltro, se necessário a seguir a cada ciclo de secagem.
Importante:
A limpeza do fi ltro deve ser feita com o aparelho frio! Para limpar o fi ltro, siga as
indicações a seguir:
▼ Abra a porta.
▼ Agarre o fi ltro com ambas as mãos e empurre-o para a frente, para o tirar.
▼ Alargue o bordo superior do fi ltro e abra este último.
▼ Remova as partículas de tecido.
▼ Feche o fi ltro, certifi cando-se de que o fecho está na posição devida.
▼ Se necessário, limpe as guias de deslizamento do fi ltro no aparelho com um
aspirador.
▼ Coloque de novo o fi ltro nas guias de deslizamento (fi g. 14).
Todos os aparelhos eléctricos se avariam de vez em quando. Neste caso, dirija-se a um electricista
qualifi cado. Há, porém, muitos problemas que podem ser resolvidos sem necessidade de intervenção
do exterior.
Importante: Em caso de avaria, desligue imediatamente o aparelho da rede eléctrica.
Antes de chamar o centro de assistência, proceda às verifi cações descritas a seguir.
MANUTENÇÃO
LIMPEZA DO FILTRO
14
PESQUISA DE AVARIAS
RESOLUÇÃO DE PROBLEMAS
O secador não arranca
• Certifi que-se de que:
1) O aparelho está devidamente ligado à
rede de alimentação.
2) A ficha de rede está a funcionar normalmente:
2a) O fusível não está queimado. (Ligando
outro aparelho à rede, p/ex. um candeeiro
de mesa).
2b) Foram seguidas as instruções dadas no
manual.
Se após fazer todas estas verifi cações o aparelho continuar a não funcionar, contacte o centro
de assistência técnica autorizado mais próximo.
Comunique ao pessoal do centro o nome do modelo do aparelho, o número de série e o tipo
de avaria detectada.
Estas informações ajudarão o operador do centro de assistência a procurar de antemão as
peças sobresselentes necessárias garantindo, assim, uma reparação rápida e efi caz.
ACESSÓRIOS DE OPÇÃO
Para ganhar espaço, o revendedor pode fornecer-lhe um acessório que permite instalar o secador em
cima de uma máquina de lavar roupa com carga frontal. O instalador poderá informá-lo acerca dos
modelos de aparelho em que é possível aplicar este acessório.
PT
O secador não arranca
• Certifi que-se de que:
1) A porta está devidamente fechada.
2) Foi premido o botão “START”.
O secador não seca a roupa
• Certifi que-se de que:
1) O tubo de escoamento de ar não está
esmagado ou torcido.
2) O fi ltro não está entupido. (Lembre-se de
que quando se abre a porta, as partes
interiores do secador podem estar muito
quentes).
SM2255
Page 51
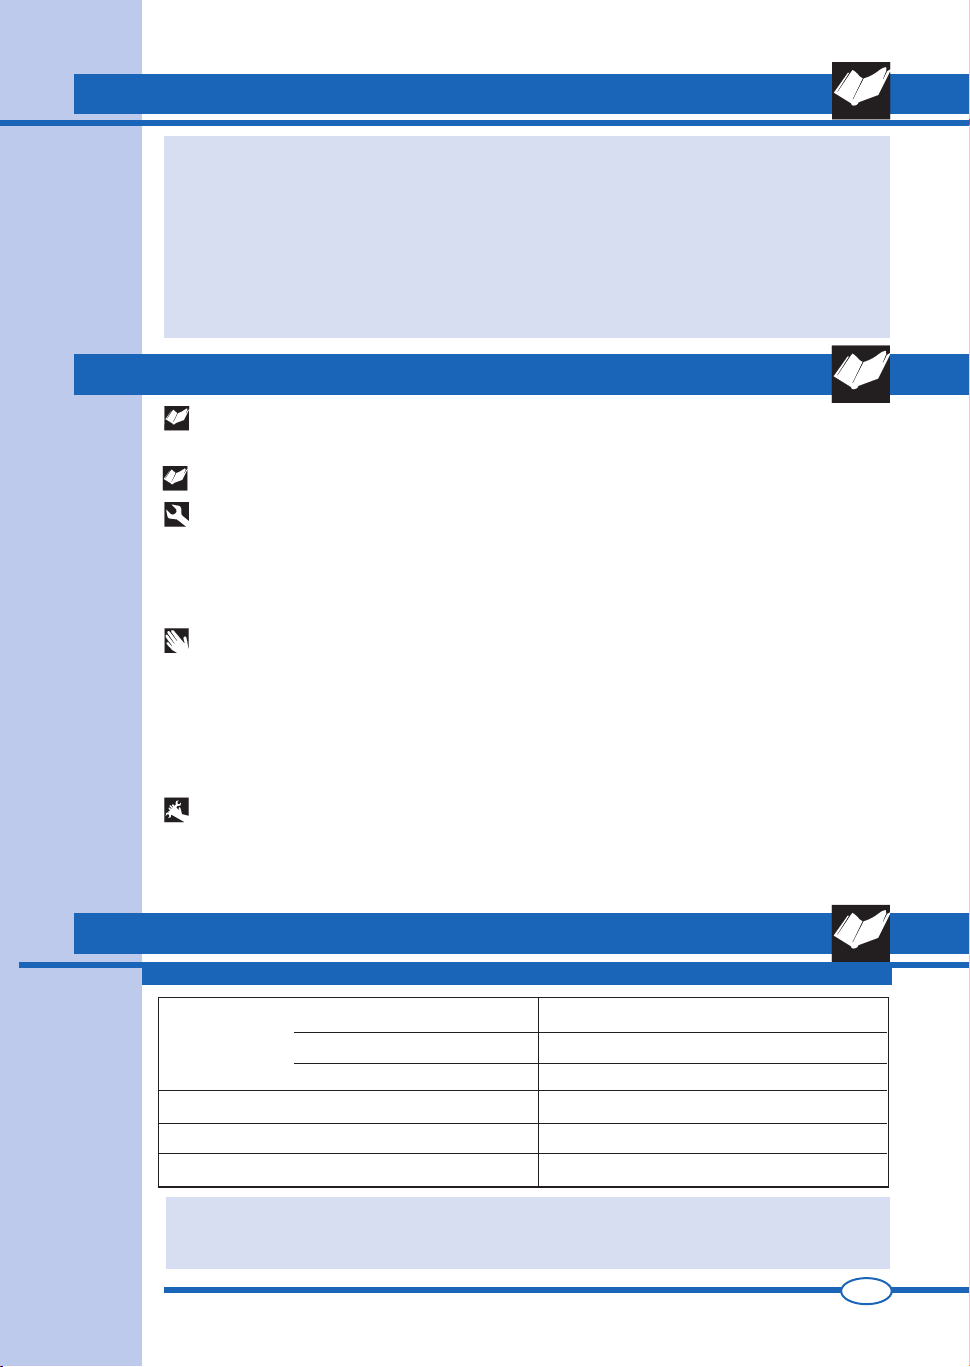
NEDERLANDS
51
Geachte klant,
Wij danken u voor uw keuze voor ons product.
Wij raden u aan om dit instructieboekje aandachtig te lezen alvorens het apparaat aan te sluiten en te
gebruiken. Kennis van de werking van het apparaat maakt een correct en veilig gebruik mogelijk.
Dit instructieboekje bevat de technische kenmerken van de wasdroger en een aantal nuttige
aanwijzingen voor het gebruik, zodat u het beste uit het apparaat kunt halen. Vergeet bij een
eventuele verkoop of overdracht aan derden niet om de nieuwe gebruiker dit instructieboekje te
overhandigen.
INHOUD
OPMERKINGEN EN WAARSCHUWINGEN VOOR DE GEBRUIKER 51-52
• Technische informatie 51
BESCHRIJVING VAN HET APPARAAT 53
INSTALLATIE VAN HET APPARAAT 53-55
• Installatie 53-54
• Waterpas zetten van de wasdroger 54
• Aansluiten op de afvoerleiding 54
• Aansluiten op het waterleidingnet 55
GEBRUIK VAN DE WASDROGER 55-57
• Beschrijving van de functies 55
• Openen van de deur en omkeren van de draairichting 56
• Voor een goed droogresultaat van het wasgoed 56
• Voorzorgsmaatregelen afhankelijk van de textielsoort 56
• Programmatabel 57
• Gewicht van het wasgoed 57
ONDERHOUD 58
• Reinigen van het fi lter 58
• Opsporen van storingen 58
• Oplossen van problemen 58
• Optionele accessoires 58
OPMERKINGEN EN WAARSCHUWINGEN VOOR DE GEBRUIKER
TECHNISCHE GEGEVENS
Breedte cm:
Afmetingen:
Hoogte cm:
Diepte cm:
Maximale inhoud
Nominaal Vermogen
Voedingsspanning
MODEL: ...............................................................................................................................................................................................................
SERIENUMMER: ...........................................................................................................................................................................................
AANKOOPDATUM: .......................................................................................................................................................................................
SM2255
59.5
85.0
60.4
6,0 kg Droog
Zie het typeplaatje
Zie het typeplaatje
NL
Page 52

52
OPMERKINGEN EN WAARSCHUWINGEN VOOR DE GEBRUIKER
▼ Deze wasdroger is uitsluitend bedoeld voor huis-
houdelijk gebruik. Elk ander gebruik is oneigenlijk
en dus gevaarlijk.
▼ Bewaar dit boekje in de buurt van het apparaat,
zodat u het zo nodig altijd gemakkelijk kunt raadplegen.
▼ Elke wijziging of poging om het apparaat onklaar
te maken kan een gevaar voor de gebruiker
opleveren en schade aan het product tot gevolg
hebben.
▼ Controleer bij ontvangst of het apparaat schade
heeft geleden tijdens het transport. Meld eventuele schade onmiddellijk aan de verkoper.
▼ Bedek de wasdroger niet met wasgoed of andere
voorwerpen.
▼ Zorg er bij het plaatsen van het apparaat voor dat
de voedingskabel niet geknikt of afgekneld wordt
en controleer of de kabel toegankelijk is.
▼ Sluit na gebruik altijd de deur van de wasdroger.
▼ Op deze manier voorkomt u dat kinderen op de
deur klimmen waardoor de wasdroger kan kantelen.
▼ Het apparaat mag niet zonder toezicht door kin-
deren worden gebruikt.
▼ Bedenk dat de afvoerslang warm wordt tijdens de
droogcyclus en temperaturen van meer dan 60°
kan bereiken. Raak dit deel niet aan, voordat de
koelcyclus is voltooid.
▼ Gebruik het apparaat niet voor het drogen van
vuile kledingstukken.
▼ Droog geen kledingstukken die bevuild zijn met
keukenolie, petroleum, aceton, alcohol, benzine, kerosine, vlekkenmiddelen, kunstterpentijn,
was.
▼ Verwijder deze stoffen met warm water en een
ruime hoeveelheid wasmiddel alvorens de kledingstukken in de droger te laden.
▼ Droog geen artikelen van schuimrubber, latex,
regenjassen, waterafstotende stoffen, rubberen
matrassen, bedrukte artikelen, met schuimrubber
gevulde kleding of kussens, omdat deze kunnen
smelten en andere kledingstukken of zelfs het
apparaat kunnen beschadigen.
▼ Wasverzachters en soortgelijke producten moeten
volgens de instructies van de fabrikant op de
verpakking worden gebruikt.
▼ Vergeet bij verkoop of overdracht van het apparaat
niet om ook dit boekje mee te geven. Dit zal de
nieuwe eigenaar helpen om de wasdroger correct
en veilig te gebruiken.
▼ Probeer eventuele defecten van het apparaat
niet alleen te repareren, reparaties die door onvakkundig personeel worden uitgevoerd kunnen
NL
zware schade aanrichten en doen elk recht op
een garantiereparatie vervallen.
▼ Het apparaat mag uitsluitend door bevoegd per-
soneel van de servicecentra worden gerepareerd.
Alle reparaties mogen uitsluitend met originele
reserveonderdelen worden uitgevoerd.
▼ Het wasgoed moet goed worden gecentrifugeerd
of uitgewrongen, alvorens het in de wasdroger te
laden. Gecentrifugeerd wasgoed droogt sneller.
▼ Maak het fi lter na elk gebruik goed schoon, zodat
de lucht kan circuleren.
▼ Verwijder of steek de stekker nooit met natte
handen uit respectievelijk in het stopcontact.
▼ De droger moet op een stopcontact met een
effi ciënt aardingssysteem zijn aangesloten, dat
voldoet aan de geldende veiligheidsvoorschriften.
▼ Gebruik geen verlengsnoeren of meervoudige
adapters om het apparaat op het elektriciteitsnet
aan te sluiten.
▼ Stel het apparaat niet bloot aan weersinvloeden.
▼ Vergeet het apparaat niet van het elektriciteitsnet
los te koppelen alvorens onderhouds- of reinigingswerkzaamheden uit te voeren. Trek niet aan
de voedingskabel om het apparaat van het net
los te koppelen, maar pak de stekker vast.
▼ Dit apparaat is voorzien van het merkteken dat
aangeeft dat het voldoet aan de Europese richtlijn
2002/96/EEG, Afgedankte elektrische en elektronische apparaten (AEEA). Zorg ervoor dat het
apparaat correct wordt afgedankt. De gebruiker
is gehouden om negatieve gevolgen voor de
gezondheid en het milieu te voorkomen.
▼ Het symbool op het product of op de
bijbehorende documentatie geeft aan dat dit
product niet als normaal huishoudelijk afval mag
worden behandeld. In plaats daarvan moet het
worden afgegeven bij een verzamelpunt voor
recycling van elektrische en elektronische apparaten.
▼ Houd u voor het afdanken van het apparaat
aan de geldende plaatselijke normen. Wend
u voor meer informatie over de behandeling,
terugwinning en hergebruik van dit apparaat tot
de bevoegde instanties, uw afvalophaaldienst of
de winkel waar u het product hebt aangeschaft.
DE FABRIKANT KAN NIET AANSPRAKELIJK
WORDEN GESTELD VOOR EVENTUELE ONGELUKKEN DIE HET GEVOLG ZIJN VAN HET
NIET IN ACHT NEMEN VAN DE VEILIGHEIDSVOORSCHRIFTEN EN DE AANWIJZINGEN IN DIT
INSTRUCTIEBOEKJE.
SM2255
Page 53

BESCHRIJVING VAN HET APPARAAT
53
BESCHRIJVING VAN HET APPARAAT
2
11
De wasdroger is een apparaat voor huishoudelijk gebruik dat elk textieltype kan
drogen.
10
▼ De machinestructuur bestaat uit panelen van behandeld en gelakt staal, zodat
de esthetische kwaliteiten in de loop van de tijd onveranderd blijven.
▼ De motor en de bewegende onderdelen zijn zodanig ontworpen en vervaardigd
dat ze een zo laag mogelijk geluidsniveau garanderen.
▼ Het bedieningspaneel is zodanig ontworpen dat de gebruiker de droogprogram-
8
9
ma’s zonder moeilijkheden kan uitvoeren.
▼ De grote deur maakt het in- en uitladen van het wasgoed nog gemakkelijker.
model met tijdgestuurd
droogprogramma
170’
120’
150’
130’
110’
90’
70’
50’
30’
30’
40’
60’
80’
100’
2
1
3
1 - Startknop
2 - Werkingslampje
4
3 - Keuzeknop droogtijd
4 - Deur trommel
5 - Filter
6 - Stelvoetjes
7 - Typeplaatje.
8 - Afvoergat stoom
9 - Koppelfl ens
10 - Afvoerslang
11 - Slangsteun
1
5
6
7
INSTALLATIE VAN HET APPARAAT
INSTALLATIE
De installatie moet worden toevertrouwd aan gekwalifi ceerd personeel en volgens de
instructies van de fabrikant worden uitgevoerd. Een onjuiste installatie kan schade
en letsel veroorzaken.
▼ Zet de wasdroger in de buurt van een raam om de afvoer van vochtige lucht te
bevorderen.
▼ Gebruik een afvoerslang die u op het gat A onderaan het achterpaneel van het
3
A
apparaat aansluit om condensvorming te voorkomen (afb. 3).
SM2255
NL
Page 54

54
▼ Zorg ervoor de luchtinlaat op de achterkant van het apparaat niet te verstop-
pen.
▼ Monteer het fi lter in de positie zoals weergegeven op (afb. 4).
▼ Maak de binnenkant van de droogtrommel schoon met een vochtige doek om
het stof te verwijderen.
Stelvoetjes. Zet de wasdroger in een verticale stand, zodat hij stevig op alle vier de voetjes
steunt en verstel de stelvoetjes daarna als volgt:
▼ Til de wasdroger iets op.
▼ Stel de voetjes op de juiste hoogte af (afb. 5).
(Draai de voetjes niet te los en gebruik geen schroefmachine).
▼ Zet de wasdroger weer neer.
Als de machine niet correct waterpas is gezet, kunnen de lagers beschadigd raken en slijt de
machine sneller. Deze wasdroger hoeft nier aan de vloer te worden bevestigd.
Sluit de afvoerslang op de uitgang op de achterkant van de droger (afb. 6) aan
volgens deze aanwijzingen:
▼ Sluit een uiteinde van de slang aan op de bijgeleverde koppelfl ens.
▼ Draai het verbindingselement (samen met de slang) linksom in het afvoergat.
▼ Laat de slang naar links of rechts uit de achterkant van de droger komen door
de holte in de onderkant van het machinehuis.
▼ Plaats het andere uiteinde van de slang in de buurt van een raam of een ven-
tilatieopening in de buitenmuur. Zorg er tijdens de werking van de droger voor
dat de ruimte goed geventileerd is. Gebruik de steun (afb. 7) om de slang te
bevestigen.
INSTALLATIE VAN HET APPARAAT
INSTALLATIE
WATERPAS ZETTEN VAN DE WASDROGER
AANSLUITEN VAN DE AFVOERSLANG
4
5
6
7
Belangrijk: de luchtafvoerbuis moet ook worden aangesloten als de lucht niet naar buiten
wordt afgevoerd; zo niet, dan kan de afgevoerde vochtige lucht weer in de machine worden
gevoerd waardoor de droogtijd wordt verlengd.
De vochtige lucht kan de wasdroger bovendien beschadigen. Hoewel de lucht die uit de afvoerslang komt alleen warm en vochtig is en geen gevaar vormt, mag de luchtstroom nooit
op personen, dieren of planten worden gericht.
Belangrijk: de afvoerlucht mag niet worden afgevoerd in een rookkanaal voor de afvoer van
rook die wordt voortgebracht door apparaten op gas of andere brandstoffen.
NL
SM2255
Page 55
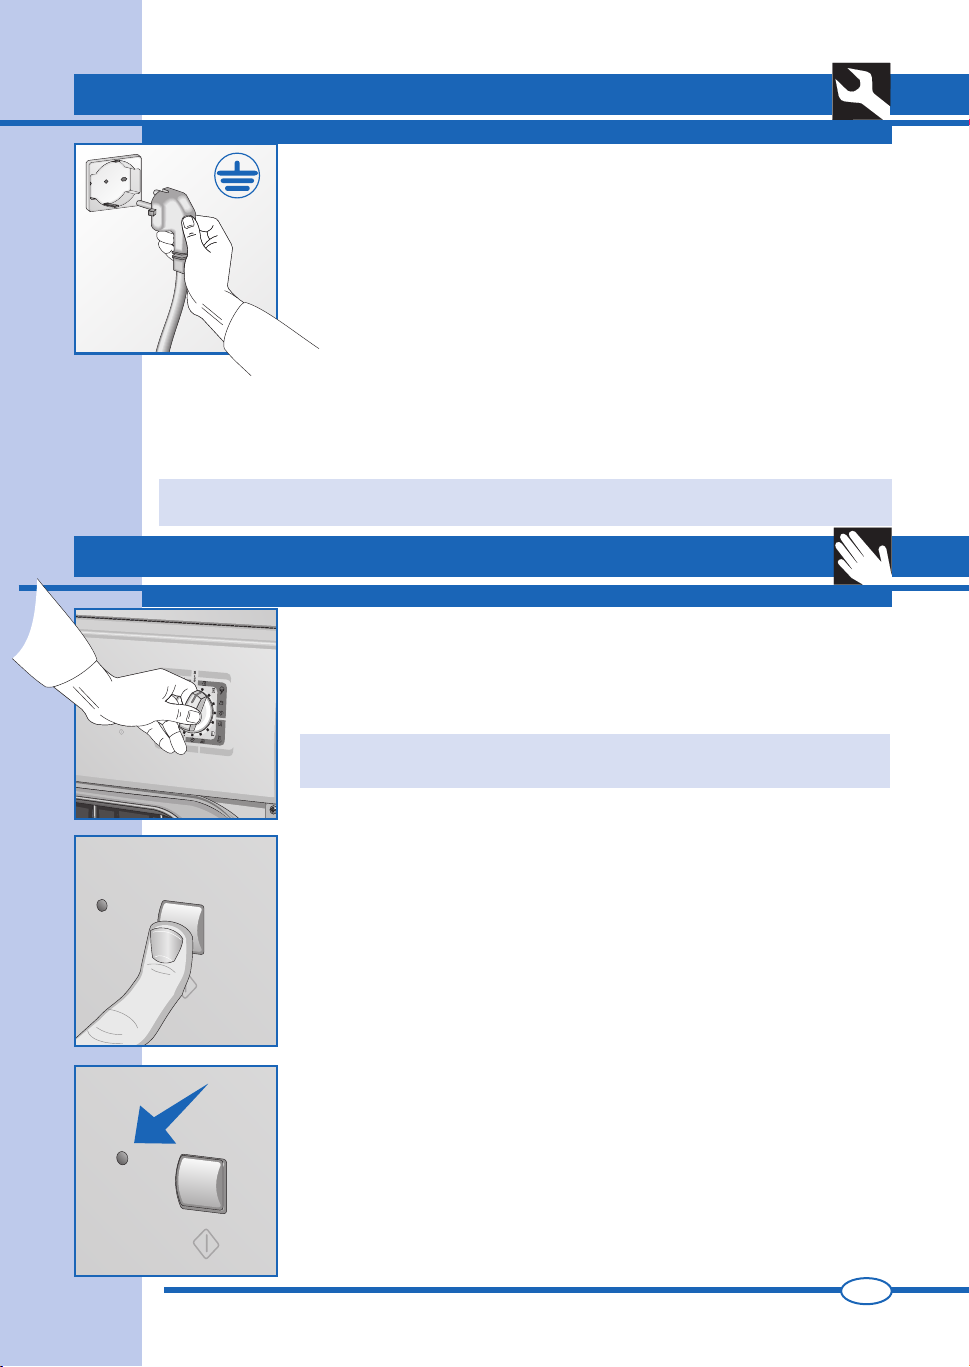
INSTALLATIE VAN HET APPARAAT
AANSLUITEN OP HET ELEKTRICITEITSNET
▼ Controleer of de spanning op het plaatje op de achterkant van het apparaat overeenstemt
met de netspanning.
▼ Het apparaat moet na de installatie met een tweepolige schakelaar op het elektriciteitsnet
worden aangesloten.
▼ Alle onderbrekingsinrichtingen, kabels en stopcontacten moeten een nominaal vermogen
hebben dat geschikt is voor de maximale belasting op het typeplaatje.
▼ Het voedingsnet waarop het apparaat wordt aangesloten moet van een aardingssysteem
8
Belangrijk: koppel het apparaat na de droogcyclus los van het elektriciteitsnet, zodat kinderen
het niet in werking kunnen stellen.
zijn voorzien. Zo niet, dan is de fabrikant niet aansprakelijk voor eventuele ongelukken
(afb. 8).
▼ Wend u bij beschadiging van de voedingskabel tot de dichtstbijzijnde klantenservice.
▼ Sluit de wasdroger niet op indirecte wijze met verlengsnoeren of meervoudige adapters
op het elektriciteitsnet aan.
▼ Zorg er bij de plaatsing van het apparaat voor dat de voedingskabel gemakkelijk toegankelijk
is om zo nodig te worden losgekoppeld.
55
GEBRUIK VAN HET APPARAAT
BESCHRIJVING VAN DE FUNCTIES
3. Programmaknop gebruikt voor het kiezen van het gewenste programma op
9
basis van de textielsoort en de specifi eke wensen. Als u tijdens een droogcyclus het programma om welke reden dan ook wilt wijzigen of nog wat wasgoed
wilt toevoegen, is het voldoende om de programmaknop op ‘STOP’ te draaien,
daarna op het gewenste programma te zetten en op de ‘START’-knop te drukken
(afb. 9).
NB Let op!! Gebruik deze functie alleen als dit beslist noodzakelijk is en als
het te resetten programma minder dan 3 minuten begonnen is.
10
11
SM2255
1. Startknop Druk op deze knop om de geprogrammeerde droogcyclus te starten
(afb. 10).
2. Start-LED uit geeft de ‘STOP’-stand aan. Als deze led voortdurend brandt, be-
tekent dit dat de cyclus bezig is. Als de led snel knippert, waarschuwt deze dat
het gekozen programma startklaar is. Als de led langzaam knippert, betekent
dit dat het droogprogramma is beëindigd (afb. 11).
NL
Page 56

56
OPENEN VAN DE DEUR EN OMKEREN VAN DE DRAAIRICHTING
▼ Druk op de rechterkant van de deur (afb. 12) om hem te openen. Als de ope-
ningsrichting is veranderd, druk dan op de linkerkant van de deur.
▼ De openingsrichting van de deur kan naar wens worden gewijzigd (afb. 13).
NB.: deze handeling mag uitsluitend door een gespecialiseerde technicus
worden uitgevoerd.
Wend u tot het servicecentrum van de verkoper.
VOOR EEN GOED DROOGRESULTAAT VAN HET WASGOED
Ga als volgt te werk:
A
▼ Centrifugeer het wasgoed.
B
▼ Sorteer de kledingstukken op basis van het
type of van de stof.
▼ Sluit knopen en ritsen en maak alle zakken leeg.
▼ Draai truien binnenstebuiten.
C
▼ Open de deur.
▼ Laad het wasgoed in de trommel en stop bij lakens
eerst een hoek van het laken in de trommel.
▼ Het is raadzaam kleine en grote kledingstukken
samen te laden.
D
▼ Sluit de deur.
▼ Droog uw handen (raak elektrische apparaten
nooit met natte handen aan).
▼ Steek de stekker in het stopcontact.
E
▼ Zet de programmaknop op Stop om eventuele
vorige programma’s te resetten, draai hem
daarna op het meest geschikte programma
voor de textielsoort, de hoeveelheid wasgoed
in de trommel en de gewenste drooggraad (zie
GEBRUIK VAN HET APPARAAT
Programmatabel).
▼ Druk op de START-toets om de droogcyclus
te starten.
F
▼ Om de machine tijdens een droogcyclus te
stoppen, is het voldoende om de deur te
openen en de trommel komt langzaam tot
stilstand. (Denk er bij het openen van de deur
aan dat de binnenkant van de wasdroger erg
heet kan zijn).
▼ Sluit de deur en druk op de ‘Start’-knop om de
droogcyclus voort te zetten.
▼ Zet de knop weer in de STOP-stand als het
einde van de droogcyclus wordt aangegeven
door het knipperen van de led start en door
de zoemer.
▼ Open de deur van de trommel en neem het
wasgoed eruit.
▼ Sluit de deur weer.
▼ Haal de stekker van de wasdroger met droge
handen uit het stopcontact.
NL
12
13
SM2255
Page 57

GEBRUIK VAN HET APPARAAT
VOORZORGSMAATREGELEN VOOR DE TEXTIELSOORTEN
Kijk bij twijfels over de textielsoort op het kledingetiket. Voor bijna alle kledingstukken die in een machine
kunnen worden gedroogd wordt dit aangegeven op het etiket. Voeg tijdens de spoelcyclus in de
wasmachine een wasverzachter aan de kledingstukken toe om elektrische ontladingen te voorkomen.
Neem synthetische kleding meteen uit de trommel om te voorkomen dat ze kreuken.
PROGRAMMATABEL
PROGRAMMA
Witte en
bonte was
Fijne was
Witte en
bonte was
Fijne was
Textielsoort
*
Benodigde droogtijd na een centrifugecyclus bij 800
**
Benodigde droogtijd na een centrifugecyclus bij 1000 toeren/min.
Belangrijk: de droogtijd is afhankelijk van een aantal factoren: gewicht, grootte van het kledingstuk,
textielsoort, vochtigheidsgraad. Goed uitgewrongen en gecentrifugeerde kledingstukken drogen sneller.
Laad de wasdroger niet te vol om te voorkomen dat de kledingstukken kreuken.
De aangegeven gewichten zijn indicatief en kunnen variëren afhankelijk van de fabrikant, de kwaliteit en de afwerking.
Beddengoed
Gestikte deken 700 g
Onderlaken 550 g
Bovenlaken 600 g
Kussensloop 180 g
Huislinnen
Droogdoek (voor borden) 90 g
Droogdoek (voor glazen) 70 g
Doek 20 g
Handdoek 200 g
Ander wasgoed
Badjas 1200 g
Badhanddoek 800 g
Damesblouse 300 g
Herenblouse 600 g
Synthetische blousejes/blouses 300 g
Tafelgoed
Tafelkleed 250 g
SM2255
’S MET ELEKTRONISCHE CONTROLE VAN DE VOCHTIGHEID
Max
6.0 kg.
Max
Extra droog Kastdroog
Strijkdroog Zeer vochtig
3.0 kg.
TIJDPROGRAMMA’S
Max
6.0 kg.
Max
min.
120 - 60
min.
120 - 60
min.
60 - 40
3.0 kg.
20 min.
PROGRAMMA’S VOOR TIJDGESTUURDE WASDROGER
Vochtig +/-
Max 6.0 kg.
Max 3.0 kg.
Max 3.0 kg.
GEWICHT VAN HET WASGOED
Extra
droog
* 150 min.
**130 min.
* 110 min.
** 90 min.
* 100 min.
** 80 min.
Kastdroog Strijkdro
*130 min.
**110 min.
* 90 min.
** 70 min.
* 80 min.
** 60 min.
og
*110 min.
** 90 min.
* 70 min.
** 50 min.
* 60 min.
** 40 min.
20 min.
toeren/min.
Groot tafelkleed 1000 g
Servet 80 g
Herenkleding
Wash-and-wear blouse 250 g
Hemd (zonder mouwen) 120 g
Korte broek 150 g
Lange onderbroek 250 g
Pyjama 480 g
Nachthemd 400 g
Zakdoeken 25 g
Dameskleding
Blouseje 100 g
Trui 100 g
Minirok 80 g
Slip 80 g
Nachthemd 180 g
Pyjama 450 g
Zakdoek 15 g
min.
60 - 40
Zeer
vochtig
* 90 min.
** 70 min.
* 50 min.
** 30 min.
NL
57
Page 58

58
REINIGEN VAN HET FILTER
Voor een goed droogresultaat onder alle omstandigheden moet het fi lter regelmatig
worden schoongemaakt. Vergeet niet om het fi lter na elke droogcyclus te controleren
en eventueel schoon te maken.
Belangrijk:
Het fi lter moet worden schoongemaakt als het apparaat is afgekoeld! Volg voor het
schoonmaken de onderstaande aanwijzingen:
▼ Open de deur.
▼ Pak het fi lter met beide handen vast en duw het naar voren om het te verwijderen.
▼ Maak de bovenste rand van het fi lter voorzichtig wijder en open het.
▼ Verwijder de pluizen.
▼ Sluit het fi lter en controleer of de blokkering in de juiste stand staat.
▼ Maak de rails van het fi lter in het apparaat zo nodig schoon met een stofzui-
ger.
▼ Zet het fi lter weer in de rails (afb. 14).
OPSPOREN VAN STORINGEN
Alle elektrische apparaten hebben zo nu en dan een storing. Wend u in dat geval tot een gekwalifi ceerde
elektricien. Veel problemen kunnen echter zonder hulp worden opgelost.
Belangrijk: koppel het apparaat bij een storing onmiddellijk los van het elektriciteitsnet.
Voer de volgende controles uit alvorens het servicecentrum te bellen.
ONDERHOUD
14
OPLOSSEN VAN PROBLEMEN
De wasdroger start niet
• Controleer of:
1) het apparaat correct op het elektriciteitsnet
is aangesloten.
2) de stekker goed werkt:
2a)
de zekering niet is doorgebrand. (Con-
troleer dit door een ander apparaat op
het elektriciteitsnet aan te sluiten, bv. een
tafellamp).
2b)
de instructies in de handleiding zijn uitge-
voerd.
Als het apparaat na al deze controles nog niet werkt, wend u dan tot het dichtstbijzijnde
servicecentrum.
Geef aan het personeel van het centrum het model van het apparaat, het serienummer en het
storingstype door.
Deze informatie helpt de medewerker van het servicecentrum om de benodigde vervangingsonderdelen te vinden, zodat een snelle en effi ciënte reparatie gewaarborgd is.
OPTIONELE ACCESSOIRES
Om ruimte te winnen kan de verkoper een accessoire leveren dat het mogelijk maakt om de wasdroger
op een wasmachine met de laaddeur aan de voorkant te installeren. De installateur kan u informatie
verstrekken over het model van het apparaat waarop dit accessoire kan worden toegepast.
NL
De wasdroger start niet
• Controleer of:
1) de deur correct gesloten is.
2) op de ‘START’-toets is gedrukt.
De wasdroger droogt niet
• Controleer of:
1) de luchtafvoerslang niet platgedrukt of
gedraaid is.
2) het fi lter niet verstopt is. (Denk er bij het
openen van de deur aan dat de binnenkant
van de wasdroger erg heet kan zijn).
SM2255
Page 59
POLSKI
Szanowny Kliencie,
Dziękujemy za wybór naszego produktu.
Przed uruchomieniem i przystąpieniem do użytkowania urządzenia prosimy uważnie przeczytać
instrukcję obsługi. Znajomość zasad działania gwarantuje Państwu właściwą i bezpieczną obsługę
urządzenia.
W niniejszej instrukcji obsługi podane są danych techniczne suszarki oraz wiele użytecznych
informacji dotyczących jej funkcjonowania, wszystko to będzie na pewno pomocne podczas jej
użytkowania. Jeżeli urządzenie zostanie sprzedane lub podarowane, należy również pamiętać o
przekazaniu nowemu użytkownikowi niniejszej instrukcji obsługi.
59
SPIS TREŚCI
UWAGI ORAZ WSKAZÓWKI DLA UŻYTKOWNIKA 59-60
• Informacje techniczne 59
OPIS URZĄDZENIA 61
INSTALACJA URZĄDZENIA 61-63
• Instalacja 61-62
• Poziomowanie suszarki 62
• Podłączenie rury wylotowej 62
Podłączenie do sieci elektrycznej
•
UŻYTKOWANIE SUSZARKI 63-65
• Opis funkcji 63
• Otwieranie drzwiczek i zmiana kierunku 64
• Dla właściwego wysuszenia rzeczy 64
• Uwagi odnośnie typów tkaniny 65
• Tabela programów 65
• Waga wsadu 65
63
KONSERWACJA 66
• Czyszczenie filtra 66
• Analiza awarii 66
• Rozwiązywanie problemów 66
• Akcesoria opcjonalne 66
UWAGI ORAZ WSKAZÓWKI DLA UŻYTKOWNIKA
DANE TECHNICZNE
6,0 kg.
MODEL: ..................................................................................................................................................................................................................
NUMER SERII: ..................................................................................................................................................................................................
DATA ZAKUPU: .................................................................................................................................................................................................
SM2255
PL
Page 60

60
UWAGI ORAZ WSKAZÓWKI DLA UŻYTKOWNIKA
▼ Niniejsza suszarka przeznaczona jest wyłącznie
do użytku domowego. Każde inne użycie jest
niewłaściwe i niebezpieczne.
▼ Niniejszą instrukcję obsługi należy przechowywać
zawsze w pobliżu suszarki, tak aby w razie
konieczności szybko zasięgnąć informacji.
▼ Wszelkie modyfikacje lub próby dokonywania
zmian działania urządzenia mogą być
niebezpieczne dla użytkownika oraz mogą
powodować postanie usterek w urządzeniu.
▼ Przy dostawie urządzenia sprawdzić, czy
urządzenie nie ma usterek, które mogły
powstać podczas transportu. W przypadku
wystąpienia usterek należy od razu powiadomić
o tym sprzedawcę.
▼ Nie przykrywać suszarki praniem ani innymi
przedmiotami.
▼ Po ustawieniu urządzenia upewnić się,
czy kabel zasilania nie jest zagięty lub
przygnieciony oraz czy jest do niego dostęp.
▼ Po zakończeniu używania suszarki należy
zawsze zamknąć jej drzwiczki.
▼ Dzięki temu dzieci nie będą mogły wieszać się
na drzwiczkach i nie wywrócą urządzenia.
▼ Dzieci bez opieki nie mogą obsługiwać suszarki.
▼ Należy pamiętać, że podczas trwania cyklu suszenia
rura odpływowa nagrzewa się i może osiągnąć
temperaturę powyżej 60°. Nie wolno dotykać tej
części przed zakończeniem cyklu ochładzania.
▼ Nie wolno suszyć brudnych ubrań.
▼ Nigdy nie wolno suszyć rzeczy, które zostały
zabrudzone przez: olej spożywczy, ropę,
aceton, alkohol, benzynę, naftę, wywabiacz
do plam, terpentynę, cerezynę itp.
▼ Przed suszeniem należy wyprać rzeczy w ciepłej
wodzie z odpowiednią ilością detergentu.
▼ Nie wolno suszyć materiałów takich jak: guma,
pianka, lateks, materiały nieprzemakalne,
uszczelki, materiały gumowe, artykuły, ubrania
lub pościel z elementami pianki gumowej,
gdyż mogą się one roztopić i zniszczyć inne
elementy danej rzeczy lub samo urządzenie.
▼ Zmiękczaczy do tkanin lub produktów podobnych
należy używać zgodnie z zaleceniami podanymi
przez producenta na opakowaniu.
▼ W razie sprzedaży lub przekazania suszarki
należy przekazać nowemu użytkownikowi
także niniejszą instrukcję obsługi. Dzięki temu
nowy użytkownik będzie mógł użytkować
suszarkę prawidłowo i bezpiecznie.
▼ Nie wolno próbować samemu naprawiać
ewentualnych usterek suszarki, nieprofesjonalne
naprawy mogą spowodować kolejne usterki oraz
powodują utratę gwarancji.
▼ Naprawy urządzenia mogą być wykonywane
PL
wyłącznie przez osoby z autoryzowanych centrów
serwisowych. Do napraw mogą być używane
wyłącznie oryginalne części zamienne.
▼ Przed włożeniem prania do suszarki należy je
dobrze odwirować lub wykręcić. Pranie dobrze
odwirowane wysuszy się szybciej.
▼ Aby zapewnić dobrą cyrkulację powietrza,
należy dokładnie oczyścić filtr przed każdym
użyciem suszarki.
▼ Nie wolno wkładać lub wyjmować wtyczki z
gniazdka mokrymi rękami.
▼ Urządzenie musi być podłączone do
gniazdka wyposażonego w odpowiednie
uziemienie, zgodnie z odpowiednimi normami
bezpieczeństwa.
▼ Nie wolno podłączać urządzenia do gniazdka
elektrycznego przy pomocy przedłużaczy lub
rozdzielaczy.
▼ Nie wystawiać urządzenia na działanie
czynników atmosferycznych.
▼ Przed przystąpieniem do jakichkolwiek prac
konserwacyjnych lub czyszczenia urządzenia
należy wyłączyć wtyczkę z gniazdka. Przy
odłączaniu kabla zasilającego urządzenie
należy ciągnąć za wtyczkę – nigdy za kabel.
▼ Jeżeli okres żywotności urządzenia dobiegnie
końca, należy oddać go do utylizacji zgodnie z
Dyrektywą Europejską 2002/96/CEE, Odpady
elektryczne i elektroniczne (WEEE). Należy
upewnić się, że utylizacja urządzenia zostanie
przeprowadzona prawidłowo. Użytkownik ma
także wpływ na potencjalny negatywny wpływ
na środowisko i zdrowie.
▼ Symbol na produkcie lub w dołączonej
dokumentacji oznacza, że produktu
tego nie można traktować jak zwykłych
odpadów domowych, ale należy go zawieźć
do odpowiedniego punktu zajmującego
się likwidacją urządzeń elektrycznych i
elektronicznych.
▼ Utylizacja urządzenia musi być wykonana
zgodnie z odpowiednimi lokalnymi normami i
przepisami. Szczegółowe informacje na temat
recyclingu tego produktu uzyskasz w urzędzie
miasta/gminy, lokalnych instytucjach zajmujących
się likwidacja odpadów lub w sklepie, w którym
urządzenie zostało zakupione.
PRODUCENT URZĄDZENIA NIE MOŻE BYĆ
ODPOWIEDZIALNY ZA EWENTUALNE WYPADKI
SPOWODOWANE NIEPRZESTRZEGANIEM
NORM BEZPIECZEŃSTWA ORAZ WSKAZÓWEK
ZAWARTYCH W NINIEJSZEJ INSTRUKCJI OBSŁUGI
SM2255
Page 61

OPIS URZĄDZENIA
61
OPIS URZĄDZENIA
2
11
Suszarka jest urządzeniem do użytku domowego przeznaczonym do suszenia
każdego typu tkaniny.
10
▼ Konstrukcja maszyny oparta jest na panelach z blachy opracowanych i pomalowanych
tak, aby zapewnić niezmienną jakość i estetykę przez długi czas.
▼ Silnik oraz części ruchome zostały zaprojektowane i wykonane tak, aby zapewnić
najmniejszy możliwy poziom hałasu.
▼ Panel sterowania został opracowany tak, aby użytkownik mógł bez trudności
8
9
ustawić odpowiedni program suszenia.
▼ Drzwiczki o dużych rozmiarach pozwalają na łatwy załadunek i wyładunek.
model ze sterowaniem
czasowym suszenia
170’
120’
150’
130’
110’
90’
70’
50’
30’
30’
40’
60’
80’
100’
1 - Przycisk uruchamiania
2 - Wskaźnik działania
3 - Pokrętło wyboru czasu suszenia
4 - Drzwiczki
5 - Filtr
6 - Nóżki regulowane
7 - Tabliczka znamionowa.
8 - Otwór wylotu pary
9 - Kołnierz łączący
10 - Rura odpływowa
11 - Wspornik rury
2
1
3
4
5
1
6
7
INSTALACJA URZĄDZENIA
INSTALACJA
Instalacja powinna być wykonana przez osobę wykwalifikowaną oraz zgodnie ze
wskazówkami producenta. Nieprawidłowa instalacja może spowodować wypadki
lub uszkodzenie sprzętu.
▼ Suszarkę należy ustawić w pobliżu okna, aby ułatwić wylot wilgotnego
powietrza.
▼ Aby uniknąć skraplania się wody, należy podłączyć rurę odpływową do otworu
3
A
SM2255
A, znajdującego się u dołu panelu tylnego urządzenia (rys. 3).
PL
Page 62
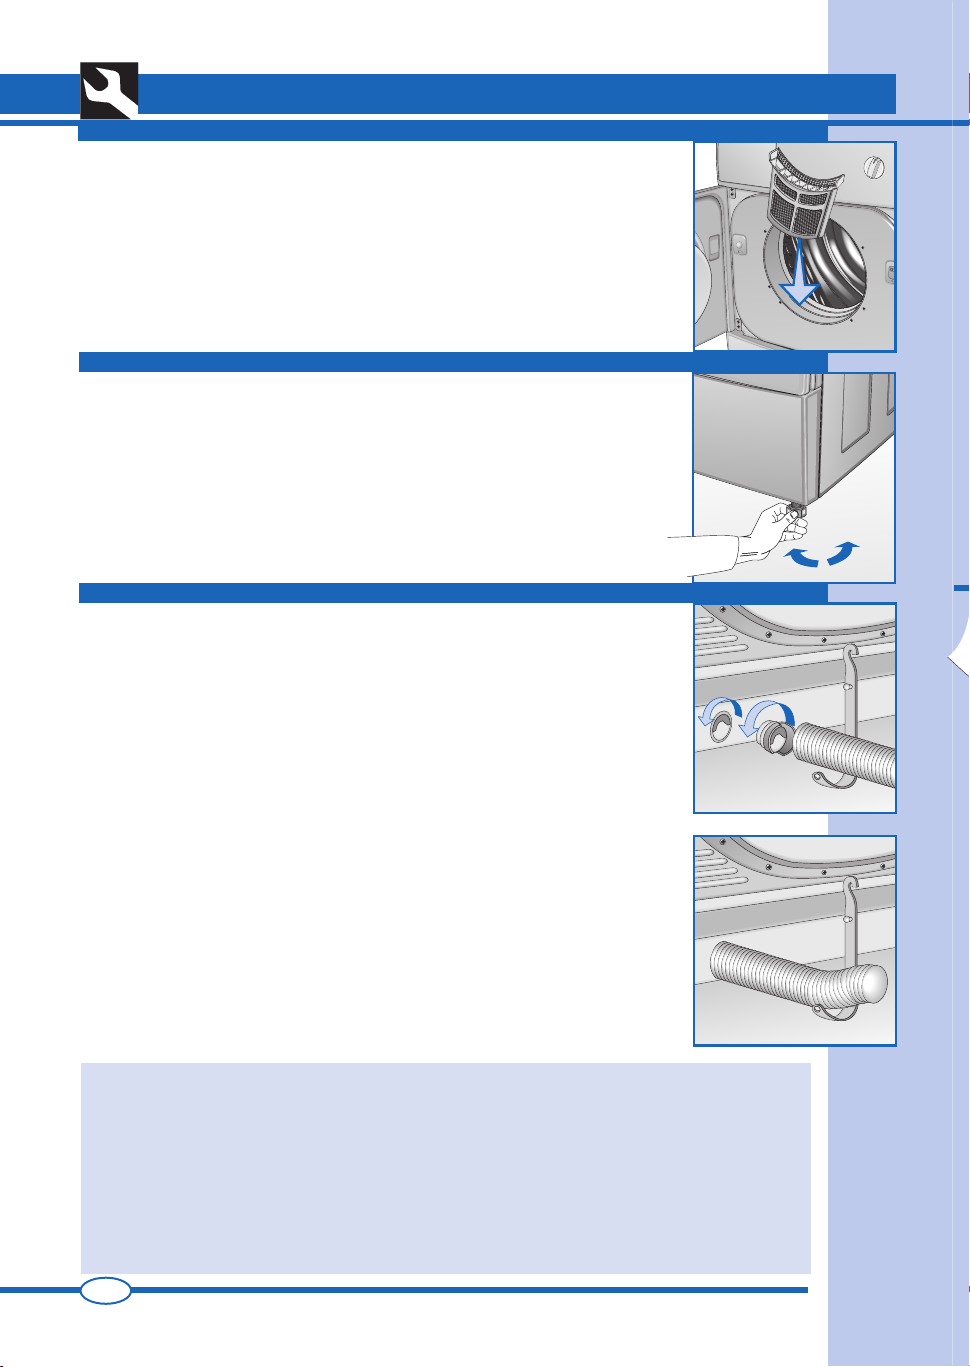
62
▼ Nie zakrywać wlotu powietrza znajdującego się w części tylnej urządzenia.
▼ Założyć filtr w odpowiednim miejscu, tak jak pokazano na rysunku (rys. 4).
▼ Wnętrze kosza suszenia należy czyścić przy pomocy wilgotnej ściereczki, aby
usunąć ewentualne nagromadzone zanieczyszczenia.
Nóżki regulowane. Ustawić suszarkę w pozycji pionowej tak, aby oparła się stabilnie
na wszystkich czterech nóżkach, następnie wykonać poziomowanie nóżek w
następujący sposób:
▼ Podnieść nieznacznie urządzenie.
▼ Dokonać regulacji nóżek na odpowiednią wysokość (rys. 5). (Nie wykręcać
nadmiernie nóżek oraz nie używać wkrętaka elektrycznego).
▼ Opuścić urządzenie.
Jeżeli maszyna będzie źle wypoziomowana, może dojść do uszkodzenia łożysk oraz
wcześniejszego zużycia się. Niniejsza suszarka nie musi być przymocowana do podłoża.
Podłączyć rurę wylotową do wyjścia znajdującego się z tyłu suszarki (rys. 6) zgodnie
z poniższymi wskazówkami:
▼ Połączyć koniec rury z kołnierzem łączącym, który znajduje się na
wyposażeniu.
▼ Obrócić element łączący (razem z rurą) w kierunku przeciwnym do ruchu
wskazówek zegara do wnętrza otworu wyjściowego.
▼ Wyprowadzić rurę z tyłu suszarki w lewo lub w prawo wzdłuż wgłębienia
znajdującego się w tylnej części urządzenia.
INSTALACJA URZĄDZENIA
INSTALACJA
POZIOMOWANIE SUSZARKI
PODŁĄCZENIE RURY WYLOTOWEJ
4
5
6
▼ Ustawić drugi koniec rury w oknie lub zamocować w odpowiednim otworze
wentylacyjnym. Jeżeli jest nie możliwe, podczas działania suszarki pomieszczenie
musi być dobrze wentylowane. Do zamocowania rury użyć wspornika (rys. 7).
7
Ważne: Rura wylotowa powietrza musi być podłączona także wtedy, jeżeli powietrze nie jest
odprowadzane na zewnątrz; w przeciwnym razie wilgotne powietrze wylotowe może powracać
do urządzenia i powodować wydłużenie czasu suszenia.
Wilgotne powietrze może także powodować uszkodzenia suszarki. Powietrze w wylocie
rury jest ciepłe oraz wilgotne i chociaż nie stanowi zagrożenia, nie wolno nigdy kierować go
bezpośrednio na osoby, zwierzęta lub rośliny.
Ważne: Powietrze wylotowe nie może być nigdy kierowane do przewodów dymowych
używanych do odprowadzania spalin z urządzeń gazowych lub innych opałowych.
PL
SM2255
Page 63

INSTALACJA URZĄDZENIA
PODŁĄCZENIE DO SIECI ELEKTRYCZNEJ
▼ Należy sprawdzić, czy napięcie zasilania instalacji elektrycznej jest takie samo
jak podane na tabliczce znamionowej urządzenia.
▼ Na koniec instalowania urządzenie należy podłączyć do sieci elektrycznej przez
wyłącznik dwubiegunowy.
▼ Wszystkie wyłączniki, kable elektryczne oraz gniazdko zasilające muszą mieć
parametry odpowiednie dla maksymalnego obciążenia podanego na tabliczce
znamionowej.
▼ Sieć zasilająca, do której zostanie podłączone urządzenie, musi być wyposażona
8
Ważne: Po zakończeniu cyklu suszenia należy odłączyć urządzenie od zasilania elektrycznego,
tak aby dzieci nie mogły uruchomić go.
w system uziemienia. W przeciwnym razie producent zrzeka się wszelkiej
odpowiedzialności za ewentualne wypadki (rys. 8).
▼ W razie uszkodzenia kabla zasilania należy zwrócić się do najbliższego
autoryzowanego serwisu.
▼ Nie wolno podłączać suszarki do sieci zasilającej poprzez przedłużacze lub
rozdzielacze.
▼ Urządzenie należy ustawić w taki sposób, aby kabel zasilania był łatwo dostępny
w razie konieczności odłączenia.
63
UŻYTKOWANIE MASZYNY
UŻYTKOWANIE MASZYNY
3. Pokrętło programatora służy do wyboru programu w zależności od danej
9
tkaniny oraz potrzeb. Jeżeli podczas trwania cyklu suszenia z jakiegoś powodu
zajdzie konieczność zmiany programu lub dołożenia rzeczy, wystarczy obrócić
pokrętło programatora do pozycji “STOP”, a następnie ponownie ustawić je na
wybranym programie i nacisnąć przycisk “START” (rys. 9).
10
11
SM2255
UWAGA: UWAGA!! Zaleca się korzystanie z tej funkcji tylko, jeżeli jest to
konieczne, a program nie trwał dłużej niż 3 minuty.
1. Przycisk uruchamiania Naciśnij ten przycisk, aby uruchomić wybrany cykl
suszenia (rys. 10).
2. Kontrolka LED Start zgaszona oznacza pozycję “STOP”. Zapalona oznacza,
że cykl suszenia jest w trakcie. Szybkie miganie oznacza, że wybrany program
jest gotowy do uruchomienia. Miganie powolne oznacza, że program suszenia
zakończył się (rys. 11).
PL
Page 64
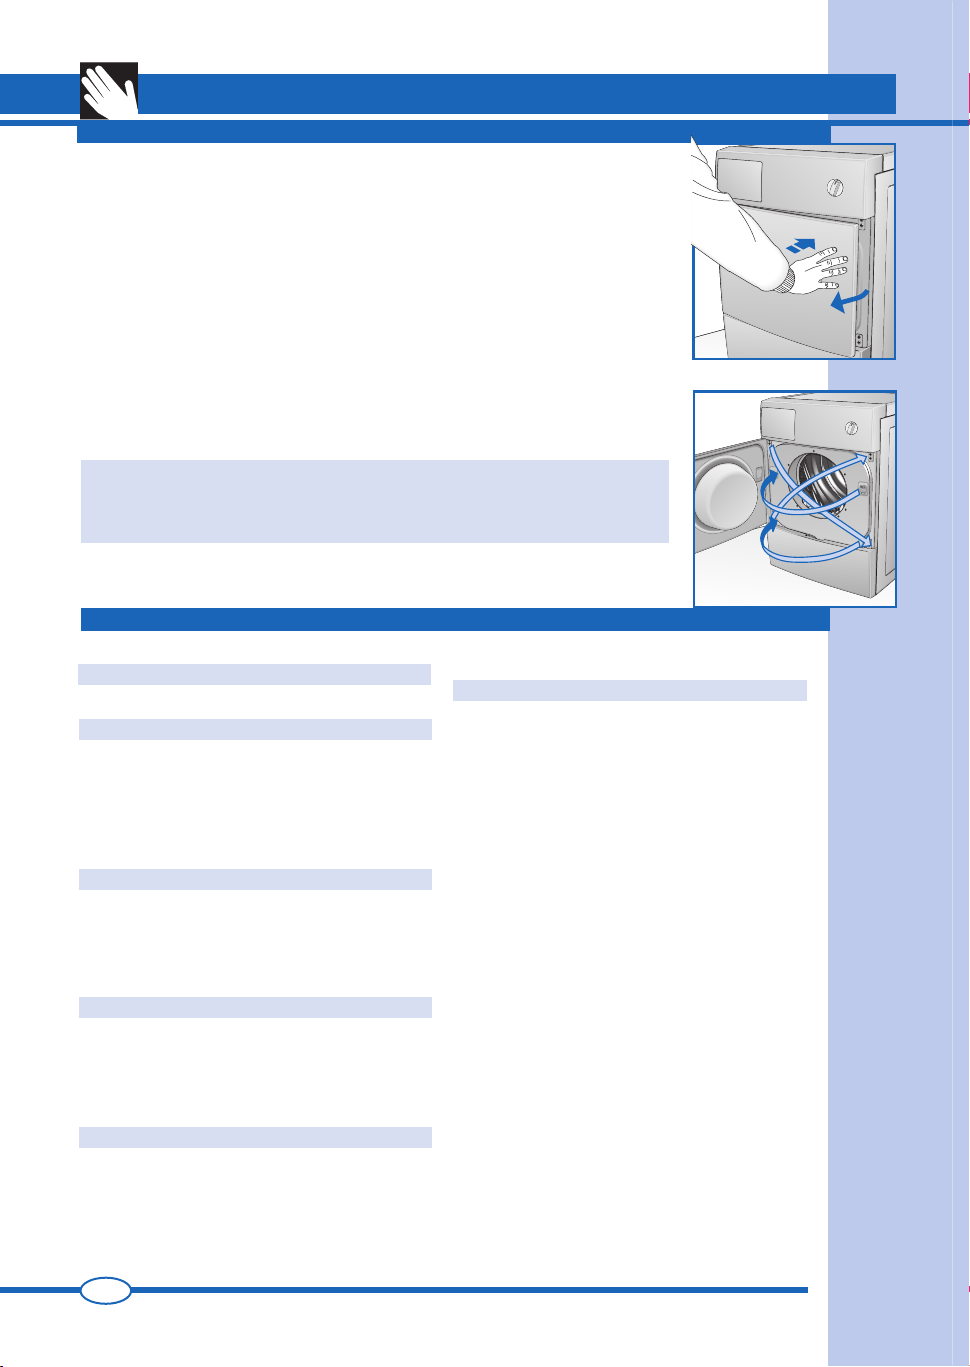
64
OTWIERANIE DRZWICZEK I ZMIANA KIERUNKU
▼ Nacisnąć na część prawą drzwiczek (rys. 12), aby je otworzyć. Jeżeli kierunek
otwierania został zmieniony, należy nacisnąć na stronę lewą.
▼ Jeżeli to konieczne, kierunek otwierania drzwiczek może zostać zmieniony (rys.
13).
UWAGA: Operacja ta może być wykonywana wyłącznie przez osobę
wykwalifikowaną.
Należy zwrócić się do centrum serwisowego.
DLA WŁAŚCIWEGO WYSUSZENIA RZECZY
Należy postępować w następujący sposób:
A
▼ Odwirować pranie.
B
▼ Posegregować rzeczy na według typu
tkaniny.
▼ Zamknąć zamki, guziki oraz opróżnić wszystkie
kieszenie.
▼ Odwrócić bluzy (swetry).
C
▼ Otworzyć drzwiczki.
▼ Włożyć rzeczy do koszyka pamiętając, aby na
początku włożyć złożoną pościel.
▼ Zaleca się wkładać rzeczy małe z dużymi.
D
▼ Zamknąć drzwiczki.
▼ Wytrzeć ręce (nigdy nie wolno dotykać
urządzeń elektrycznych mokrymi rękami).
▼ Włożyć wtyczkę do gniazdka zasilania.
E
▼ Ustawić pokrętło programatora w pozycji Stop,
aby zatrzymać ewentualne wcześniejsze
programy, następnie obrócić je do pozycji
programu odpowiedniego dla włożonych
rzeczy, ich ilości oraz stopnia koniecznego
wysuszenia (patrz Tabela programów).
UŻYTKOWANIE MASZYNY
▼ Nacisnąć przycisk START, aby uruchomić cykl
suszenia.
F
▼ Aby zatrzymać urządzenie podczas cyklu
suszenia, wystarczy po prostu otworzyć
drzwiczki, a bęben powoli zatrzyma się.
(Należy pamiętać, że po otwarciu drzwiczek
części wewnętrzne suszarki oraz suszone
rzeczy mogą być bardzo gorące).
▼ Aby kontynuować cykl suszenia, zamknąć
drzwiczki i nacisnąć przycisk “Start”.
▼ Zakończenie cyklu suszenia sygnalizowane
jest przez miganie kontrolki start oraz sygnał
dźwiękowy, ustawić pokrętło z powrotem w
pozycji STOP
▼ Otworzyć drzwiczki i wyjąć rzeczy.
▼ Zamknąć drzwiczki.
▼ Suchymi rękoma wyjąć wtyczkę suszarki z
gniazdka zasilania.
PL
12
13
SM2255
Page 65

UŻYTKOWANIE MASZYNY
Wilgotnośćść
65
UWAGI DOTYCZĄCE TYPÓW TKANINY
W razie wątpliwości co do typu tkaniny, należy sprawdzić jej etykietę. Prawie wszystkie etykiety podają
dokładnie, czy dana tkanina jest przystosowana do suszenia maszynowego. Aby uniknąć nagromadzenia
się elektryczności statycznej na tkaninach, należy podczas cyklu prania używać zmiękczaczy. Aby
uniknąć pomięcia, należy od razu po zakończeniu cyklu wyjąć z kosza tkaniny syntetyczne.
TABELA PROGRAMÓW
Max
6.0 kg.
Max
3.0 kg.
Max
6.0 kg.
Max
3.0 kg.
Wilgotno
Max 6.0 kg.
Max 3.0 kg.
Max 3.0 kg.
Ważne: Czas suszenia zależy od wielu czynników: ciężaru, rozmiarów rzeczy, typu tkaniny,
wilgotności. Ręczy dobrze odwirowane suszą się szybciej. Aby rzeczy nie uległy pomięciu,
nie wolno przeładowywać suszarki.
Podane ciężary są przybliżone i mogą różnić się w zależności od producenta, jakości oraz
wykończenia.
Bielizna pościelowa
Poszewka na kołdrę 700 g
Prześcieradło 550 g
Poszewka do przykrycia 600 g
Poszewka na poduszkę 180 g
Bielizna domowa
Ściereczka (do talerzy) 90 g
Ściereczka (do kieliszków) 70 g
Ściereczka 20 g
Ręcznik 200 g
Inne typy rzeczy
Szlafrok 1200 g
Ręcznik kąpielowy 800 g
Bluzka damska 300 g
Koszula męska 600 g
Bluzka/koszula z materiału syntetycznego 300 g
Bielizna stołowa
Obrus 250 g
SM2255
* 150 min.
**130 min.
* 110 min.
** 90 min.
* 100 min.
** 80 min.
CIĘŻAR RZECZY
*130 min.
**110 min.
* 90 min.
** 70 min.
* 80 min.
** 60 min.
*110 min.
** 90 min.
* 70 min.
** 50 min.
* 60 min.
** 40 min.
* 90 min.
** 70 min.
* 50 min.
** 30 min.
Duży obrus 1000 g
Serwetka 80 g
Ubrania męskie
Koszulka 250 g
Podkoszulka (bez rękawów) 120 g
Krótkie spodenki 150 g
Kalesony 250 g
Piżama 480 g
Koszula nocna 400 g
Chusteczka 25 g
Ubrania damskie
Bluzka 100 g
Koszulka 100 g
Spódniczka mini 80 g
Majtki 80 g
Koszula nocna 180 g
Piżama 450 g
Chustka 15 g
PL
Page 66

66
Aby zapewnić dobre rezultaty suszenia w każdych warunkach, nie wolno zapominać
o regularnym czyszczeniu filtra. Należy pamiętać, aby kontrolować i ewentualnie
czyścić filtr po każdym cyklu suszenia.
Ważne:
Czyszczenie filtra należy wykonywać po ostygnięciu urządzenia! Czyszczenie filtra
należy wykonywać w następujący sposób:
▼ Otworzyć drzwiczki.
▼ Chwycić filtr obiema rękami i popchnąć go do przodu.
▼ Delikatnie rozciągnąć krawędź górną filtra, aby go otworzyć.
▼ Usunąć fragmenty tkanin.
▼ Zamknąć filtr upewniając się, że blokada jest we właściwej pozycji.
▼ Wyczyścić prowadnice filtra w urządzeniu, jeżeli to konieczne przy pomocy
odkurzacza.
▼ Włożyć z powrotem filtr w prowadnice (rys. 14).
Wszystkie urządzenia elektryczne mogą od czasu do czasu ulegać awariom. W takim wypadku należy
zwrócić się do wykwalifikowanego elektryka. Jednak wiele z problemów można rozwiązać samodzielnie,
bez pomocy z zewnątrz.
Ważne: W razie wystąpienia usterki należy od razu odłączyć urządzenie od sieci
elektrycznej.
Przed wezwaniem serwisu należy sprawdzić poniżej podane punkty.
KONSERWACJA
CZYSZCZENIE FILTRA
14
ANALIZA AWARII
ROZWIĄZYWANIE PROBLEMÓW
Suszarka nie uruchamia się
• Należy sprawdzić:
1) czy urządzenie jest prawidłowo podłączone
do sieci zasilającej.
2) czy działa gniazdko zasilania:
2a)
czy nie przepalił się bezpiecznik. (Sprawdzić
zasilanie przy pomocy innego urządzenia;
np. lampki stołowej).
2b)
czy były przestrzegane wskazówki zawarte
w tej instrukcji obsługi.
Jeżeli po sprawdzeniu wszystkich powyższych punktów urządzenie dalej nie działa, należy
zwrócić się do najbliższego autoryzowanego serwisu.
Należy podać model urządzenia, numer seryjny oraz typ usterki.
Informacje te pozwolą serwisantowi przygotować odpowiednie części zamienne oraz
gwarantują szybką i skuteczną naprawę.
AKCESORIA OPCJONALNE
Dla oszczędności miejsca u sprzedawców dostępne są akcesoria dla instalacji suszarki nad pralką z
drzwiczkami znajdującymi się z przodu. Instalator może doradzić, który model urządzenia może być
zamocowany w ten sposób.
PL
Suszarka nie uruchamia się
• Należy sprawdzić:
1) czy drzwiczki zostały dokładnie zamknięte.
2) czy naciśnięto przycisk “START”.
Urządzenie nie suszy
• Należy sprawdzić:
1) czy rura wylotowa powietrza nie jest
przygnieciona lub wykrzywiona.
2) czy filtr nie jest zapchany. (Należy
pamiętać, że po otwarciu drzwiczek części
wewnętrzne suszarki oraz suszone rzeczy
mogą być bardzo gorące).
SM2255
Page 67

ČESKY
Vážený zákazníku
Děkujeme Vám, že jste zvolil náš výrobek.
Před připojením a použitím přístroje Vám doporučujeme si pozorně přečíst tento návod k použití.
Znalost fungování přístroje Vám umožní jej používat řádným a bezpečným způsobem.
V tomto návodu k použití jsou uvedeny technické parametry sušičky a další užitečné informace o
jejím používání, což Vám umožní tento přístroj maximálně využít.
V případě, že přístroj prodáte nebo darujete třetím osobám, nezapomeňte k němu přiložit i tuto
příručku.
67
OBSAH
POZNÁMKY A RADY PRO UŽIVATELE 67-68
• Technické informace 67
POPIS PŘÍSTROJE 69
INSTALACE PŘÍSTROJE 69-71
• Instalace 69-70
• Vyrovnání sušičky 70
• Připojení k trubici odvodu
Připojení k elektrické síti
•
POUŽITÍ SUŠIČKY 71-73
• Popis funkcí 71
• Otvírání dvířek a změna směru otvírání 72
• Jak řádně sušit prádlo 72
• Opatření pro různé druhy tkanin 73
• Tabulka programů 73
• Hmotnost prádla 73
71
70
ÚDRŽBA 74
• Čištění filtru 74
• Vyhledávání závad 74
• Řešení problémů 74
• Volitelné příslušenství 78
POZNÁMKY A RADY PRO UŽIVATELE
TECHNICKÁ DATA
6,0 kg.
MODEL: ..................................................................................................................................................................................................................
VÝROBNÍ ČÍSLO: ...........................................................................................................................................................................................
DATUM PRODEJE: .......................................................................................................................................................................................
SM2255
CZ
Page 68

68
POZNÁMKY A RADY PRO UŽIVATELE
▼ Tato sušička musí být používána pouze k
domácímu použití. Jakékoliv jiné použití je
nesprávné a tudíž nebezpečné.
▼ Uchovávejte tuto příručku stále v blízkosti
přístroje, aby bylo možné ji v případě potřeby
rychle použít.
▼ Jakékoliv provádění úprav či pokusy o úpravy
mohou být pro uživatele nebezpečné a mohou
výrobek poškodit.
▼ Při dodání přístroje zkontrolujte, zda nedošlo
k jeho poškození během přepravy. V případě,
že zjistíte nějaké poškození, ihned informujte
prodejce.
▼ Nepokládejte na sušičku prádlo či jiné věci.
▼ Při umísťování přístroje zkontrolujte, zda
napájecí kabel není ohnutý či stlačený a rovněž
zkontrolujte jeho přístupnost.
▼ Po použití sušičky vždy zavírejte dvířka.
▼ Tímto se zabrání dětem, aby se mohly pověsit
na dvířka a sušičku převrhnout.
▼ Děti nesmí používat přístroj bez dozoru.
▼ Pamatujte, že při cyklu sušení může trubice
odvodu dosáhnout teplot vyšších než 60°.
Nesahejte na tuto část sušičky, dokud se
neukončí cyklus ochlazování.
▼ V sušičce nesušte špinavé prádlo.
▼ Nesušte prádlo, které bylo zašpiněno látkami
jako kuchyňské oleje, nafta, aceton, líh, benzín,
petrolej, čistící prostředky, terpentýn, vosky.
▼ Tyto látky odstraňte tím, že prádlo před
vložením do sušičky vyperete v teplé vodě s
větším množstvím pracího prášku.
▼ Nesušte materiály jako gumová pěna, latex,
pláštěnky, nepropustné látky, gumové koberce,
potištěné předměty, oděvy nebo polštářky
vycpané gumovou pěnou, neboť tyto materiály
by se mohly rozpadnout a poškodit ostatní
prádlo či vlastní spotřebič.
▼ Změkčovadla nebo podobné přípravky je třeba
používat podle návodu výrobce uvedeného na
obalu výrobku.
▼ V případě dalšího prodeje nebo převodu
sušičky nezapomeňte spolu se spotřebičem
předat i tento návod k použití. Toto pomůže
novému majiteli používat sušičku řádným a
bezpečným způsobem.
▼ Případné závady na přístroji se nesnažte
opravovat sami, protože opravy prováděné
nekvalifikovaným personálem by mohly
přístroj vážně poškodit a zanikl by tím nárok
CZ
na jakoukoliv záruku.
▼ Oprava přístroje může být prováděna pouze
autorizovaným personálem v servisních
střediscích. Při všech opravách musí být
používány pouze originální náhradní díly.
▼ Před naplněním sušičky prádlo dobře odstřeďte
a vyždímejte. Dobře odstředěné prádlo se
usuší rychleji.
▼ Po každém použití sušičky pečlivě vyčistěte
filtr, aby bylo umožněno perfektní proudění
vzduchu.
▼ Nezapojujte zástrčku do zásuvky elektrického
proudu a neodpojujte ji vlhkýma rukama.
▼ Sušička musí být připojena k zásuvce
elektrického proudu vybavené efektivním
systémem uzemnění odpovídajícím platným
bezpečnostním normám.
▼ Na připojení přístroje k napájecí síti nepoužívejte
prodlužovačky nebo multiadaptéry.
▼ Nevystavujte přístroj působení atmosférických vlivů.
▼ Před prováděním údržby nebo čištění přístroje
jej nezapomeňte odpojit od elektrické sítě. Při
odpojování přístroje od elektrické sítě netahejte
za napájecí kabel, ale uchopte zástrčku.
Tento přístroj je označen v souladu s evropskou
▼
směrnicí 2002/96/EU, Odpad z elektrických a
elektronických přístrojů (WEEE). Zkontrolujte,
zda je likvidace přístroje prováděna řádným
způsobem. Uživatel je povinen přispívat k
ochraně před negativními vlivy na zdraví osob
a životní prostředí.
▼ Symbol na výrobku nebo v doprovodné
dokumentaci označuje, že tento výrobek není
považován za normální domácí odpad a že
je třeba jej odevzdat do autorizované sběrny,
aby bylo možné recyklovat jeho elektrické a
elektronické části.
▼ Při likvidaci přístroje dodržujte příslušné
platné místní normy. Podrobnější informace o
zpracování, dalším použití a recyklaci přístroje
Vám podá příslušný místní orgán, sběrná
služba domácího odpadu nebo prodejce, u
něhož byl výrobek zakoupen.
VÝROBCE NENÍ V ŽÁDNÉM PŘÍPADĚ
ODPOVĚDNÝ ZA PŘÍPADNÉ ÚRAZY
ZPŮSOBENÉ NEDODRŽOVÁNÍM
BEZPEČNOSTNÍCH NOREM UVEDENÝCH
V TOMTO NÁVODU K POUŽITÍ.
SM2255
Page 69

POPIS PŘÍSTROJE
69
POPIS PŘÍSTROJE
2
11
Sušička je spotřebič k domácímu použití schopný vysušit jakýkoliv druh látky.
▼ Struktura stroje je tvořena ocelovými panely, na nichž byly provedeny úpravy a
10
smaltování, které zaručují trvanlivost jeho estetického vzhledu v čase.
▼ Motor a části pohonu jsou projektovány a vyrobeny tak, aby byl zaručen minimální
možný stupeň hlučnosti.
▼ Ovládací panel je koncipován tak, aby uživateli umožnil bez problémů používat
všechny sušící programy.
8
9
▼ Široká dvířka umožňují velmi snadné naplňování prádla a jeho vyjímání.
model s ovládáním sušení s
nastavitelným časem
170’
120’
150’
130’
110’
90’
70’
50’
30’
30’
40’
60’
80’
100’
1 - Tlačítko startu
2 - Světelný ukazatel fungování
3 - Tlačítko volby doby sušení
4 - Dvířka bubnu
5 - Filtr
6 - Seřiditelné nožičky
7 - Štítek technických parametrů.
8 - Otvor odvodu par
9 - Připojovací příruba
10 - Odvodní hadice
11 - Držák hadice
2
1
3
4
5
1
6
7
INSTALACE PŘÍSTROJE
INSTALACE
Instalaci musí provádět kvalifikovaný personál podle instrukcí dodaných výrobcem.
Nesprávně provedená instalace může způsobit škody osobám či věcem.
▼ Umístěte sušičku do blízkosti okna, aby byl usnadněn odvod vlhkého vzduchu.
▼ Připojte odvodní hadici k otvoru A v dolní části zadního panelu přístroje (obr. 3),
aby nedocházelo k vytváření kondenzátu.
3
A
SM2255
CZ
Page 70

70
▼ Nevytvářejte překážky proudění vzduchu v zadní části přístroje.
▼ Namontujte filtr do předepsané polohy, tak jak je uvedeno na obr 4.
▼ Případný prach, který se usazuje uvnitř sušícího bubnu, čistěte navlhčeným
hadrem.
Seřiditelné nožičky. Sušičku postavte do svislé polohy tak, aby pevně stála na všech
čtyřech nožičkách a poté ji vyrovnejte seřízením nožiček následujícím způsobem:
▼ Sušičku mírně nadzvedněte.
▼ Seřiďte nožičky do správné výšky (obr.5). (Nožičky neuvolňujte příliš a
nepoužívejte utahovák).
▼ Sušičku dejte dolů.
U špatně vyrovnaného stroje může dojít k poškození ložisek a k předčasnému
opotřebení. Tato sušička nevyžaduje připevnění k podlaze.
Připojte odvodní hadici na zadní stranu sušičky (obr.6) podle následujících
instrukcí:
▼ Připevněte jeden konec hadice k připojovací přírubě, která je součástí
vybavení.
▼ Otočte spojovacím prvkem (spolu s hadicí) proti směru hodinových ručiček uvnitř
výstupního otvoru.
▼ Vysuňte hadici ze zadní strany sušičky směrem doleva nebo doprava vyhloubením
v dolní části tělesa stroje.
INSTALACE PŘÍSTROJE
INSTALACE
VYROVNÁNÍ SUŠIČKY
PŘIPOJENÍ ODVODNÍ HADICE
4
5
6
▼ Umístěte druhý konec hadice do blízkosti okna nebo ventilačního otvoru na
vnější stěně. Kdyby to nebylo možné, zajistěte, aby během chodu sušičky byla
místnost dobře větrána. Použijte držák (obr.7) na upevnění hadice.
7
Důležité: Hadice odvodu vzduchu musí být připojena i v případě, že vzduch nebude odváděn
ven. Kdyby tomu tak nebylo, vlhký odváděný vzduch by se mohl vracet do stroje a prodlužovat
tak dobu sušení.
Navíc by vlhký vzduch mohl poškodit sušičku. I když vzduch, který vychází z odvodní hadice,
je pouze teplý a vlhký a nepředstavuje žádné nebezpečí, nikdy nesmí být směrován na osoby,
zvířata či rostliny.
Důležité: Odváděný vzduch nesmí být nikdy sváděn do kouřové trubky používané pro odvod
kouře z plynových přístrojů či přístrojů, které používají jiné druhy paliv.
CZ
SM2255
Page 71

INSTALACE PŘÍSTROJE
PŘIPOJENÍ K ELEKTRICKÉ SÍTI
▼ Zkontrolujte, zda hodnota elektrického napětí uvedená na štítku přístroje odpovídá
hodnotě elektrické sítě.
▼ Po ukončení montáže musí být přístroj připojený k napájecí síti pomocí
dvoupólového vypínače.
▼ Nominální výkon všech vypínacích zařízení, kabelů a elektrických zásuvek
musí být takový, aby byl schopen snést maximální zatížení uvedené na štítku
parametrů.
▼ Napájecí síť, k níž je přístroj připojen, musí být vybavena systémem uzemnění.
8
Důležité: Po ukončení cyklu sušení odpojte přístroj od elektrické sítě, aby jej děti nemohly
uvést do chodu.
Není-li tomu tak, výrobce není odpovědný za případné úrazy (obr.8).
▼ V případě poškození napájecího kabelu se obraťte na nejbližší zákaznický servis.
▼ Sušičku nepřipojujte k napájecí síti nepřímo, tj. pomocí prodlužovaček či
multiadaptérů.
▼ Umístěte přístroj tak, aby byl napájecí kabel snadno přístupný a bylo možné jej
v případě potřeby odpojit.
71
POUŽITÍ PŘÍSTROJE
POUŽITÍ PŘÍSTROJE
3. Tlačítko programů používané na zvolení požadovaného programu podle
9
druhu tkaniny a podle potřeby. Chcete-li program z jakéhokoliv důvodu změnit
nebo do stroje přidat další prádlo během cyklu sušení, stačí jednoduše otočit
tlačítkem programů do polohy “STOP”, poté zvolit nový program a stisknout
tlačítko “START” (obr. 9).
10
11
SM2255
POZN. Upozornění!! Tuto funkci používejte pouze v nezbytně nutných
případech a za předpokladu, že se program, který má být resetován, spustil
ne víc před třemi minutami.
1. Tlačítko start Tímto tlačítkem spustíte naprogramovaný cyklus sušení (obr.
10).
2. LED Start zhasnutý označuje polohu “STOP”. Rozsvícené stálé světlo označuje
probíhání cyklu. Rychlé blikání označuje, že zvolený program je připraven ke
spuštění. Pomalé blikání označuje, že program sušení byl ukončen (obr. 11).
CZ
Page 72

72
OTVÍRÁNÍ DVÍŘEK A ZMĚNA SMĚRU OTVÍRÁNÍ
▼ Zatlačte na pravou stranu dvířek (obr. 12), aby se otevřela. Jestliže směr otvírání
dvířek byl změněn, zatlačte na levou stranu.
▼ Směr otvírání dvířek může být změněn podle potřeby (obr. 13).
POZN.: Tuto operaci může provádět pouze kvalifikovaný technik.
Obraťte se na servisní středisko prodejce.
Postupujte následujícím způsobem:
A
▼ Odstřeďte prádlo.
B
▼ Roztřiďte prádlo podle druhu a podle tkaniny.
▼ Zapněte zipy a knoflíky a pamatujte na
vyprázdnění všech kapes.
▼ Obraťte svetry.
C
▼ Otevřete dvířka.
▼ Naplňte buben prádlem, nejdříve vložte rohová
prostěradla.
▼ Doporučujeme naplnit společně malé i velké
kusy prádla.
D
▼ Zavřete dvířka.
▼ Osušte si ruce (nikdy nesahejte na elektrické
přístroje mokrýma rukama).
▼ Zapojte zástrčku do elektrické zásuvky.
POUŽITÍ PŘÍSTROJE
JAK ŘÁDNĚ SUŠIT PRÁDLO
▼ Stiskněte tlačítko START, aby se spustilo
sušení.
F
▼ Během cyklu sušení zastavíte stroj tím,
že jednoduše otevřete dvířka a buben se
okamžitě zastaví. (Pamatujte, že při otevření
dvířek vnitřní části sušičky mohou být velmi
horké).
▼ Jestliže zavřete dvířka a stisknete tlačítko
“Start”, cyklus bude pokračovat.
▼ Po ukončení sušení signalizovaném blikáním
kontrolky led start a bzučákem nastavte opět
přepínač do polohy STOP.
▼ Otevřete dvířka bubnu a vyndejte prádlo.
▼ Znovu zavřete dvířka.
▼ Suchýma rukama odpojte zástrčku ze sítě.
12
13
E
▼ Nastavte tlačítko programů na Stop, aby se
resetovaly případné předchozí programy Poté
nastavte tlačítko na program, který nejvíce
vyhovuje druhu tkaniny, množství prádla v
bubnu a požadovanému stupni sušení (viz
Tabulka programů).
CZ
SM2255
Page 73

POUŽITÍ PŘÍSTROJE
OPATŘENÍ PRO RŮZNÉ DRUHY TKANIN
V případě pochybností zkontrolujte cedulku na oděvu. Téměř všechny oděvy, které mohou být strojově
sušeny,obsahují informaci o sušení na cedulce. Během cyklu máchání prádla v pračce přidejte
změkčovadlo, aby nemohlo docházet k elektrickým výbojům Prádlo ze syntetických tkanin vyndejte z
bubnu okamžitě, aby se nezmačkalo.
TABULKA PROGRAMŮ
73
Max
6.0 kg.
Max
3.0 kg.
Max
6.0 kg.
Max
3.0 kg.
Max 6.0 kg.
Max 3.0 kg.
Max 3.0 kg.
Důležité: Doba sušení závisí na mnoha faktorech: hmotnost, rozměr oděvu, druh tkaniny,
stupeň vlhkosti. Dobře vyždímané prádlo se usuší rychleji. Nepřetěžujte sušičku, aby se
prádlo nezmačkalo.
Uvedené hmotnosti jsou přibližné a mohou se měnit podle jednotlivých výrobců, podle kvality či podle
konečné úpravy kusů prádla.
Ložní prádlo
Prošívaná pokrývka 700 g
Spodní prostěradlo 550 g
Prostěradlo k přikrytí 600 g
Povlak 180 g
Prádlo pro domácnost
Utěrka (na nádobí) 90 g
Utěrka (na sklo) 70 g
Hadr 20 g
Ručník 200 g
Další prádlo
Koupací plášť 1 200 g
Osuška 800 g
Dámská halenka 300 g
Pánská košile 600 g
Halenky/košile ze syntetického materiálu 300 g
Stolní prádlo
Ubrus 250 g
SM2255
* 150 min.
**130 min.
* 110 min.
** 90 min.
* 100 min.
** 80 min.
HMOTNOST PRÁDLA
*130 min.
**110 min.
* 90 min.
** 70 min.
* 80 min.
** 60 min.
Velký ubrus 1000 g
Ubrousek 80 g
Pánské oděvy
Nemačkavá košile 250 g
Nátělník (bez rukávů) 120 g
Krátké kalhoty 80 g
Dlouhé spodky 250 g
Pyžamo 480 g
Noční košile 400 g
Kapesníky 25 g
Dámské oděvy
Halenka 100 g
Svetr 100 g
Minisukně 80 g
Spodní kalhotky 150 g
Noční košile 180 g
Pyžamo 450 g
Kapesník 15 g
*110 min.
** 90 min.
* 70 min.
** 50 min.
* 60 min.
** 40 min.
* 90 min.
** 70 min.
* 50 min.
** 30 min.
CZ
Page 74
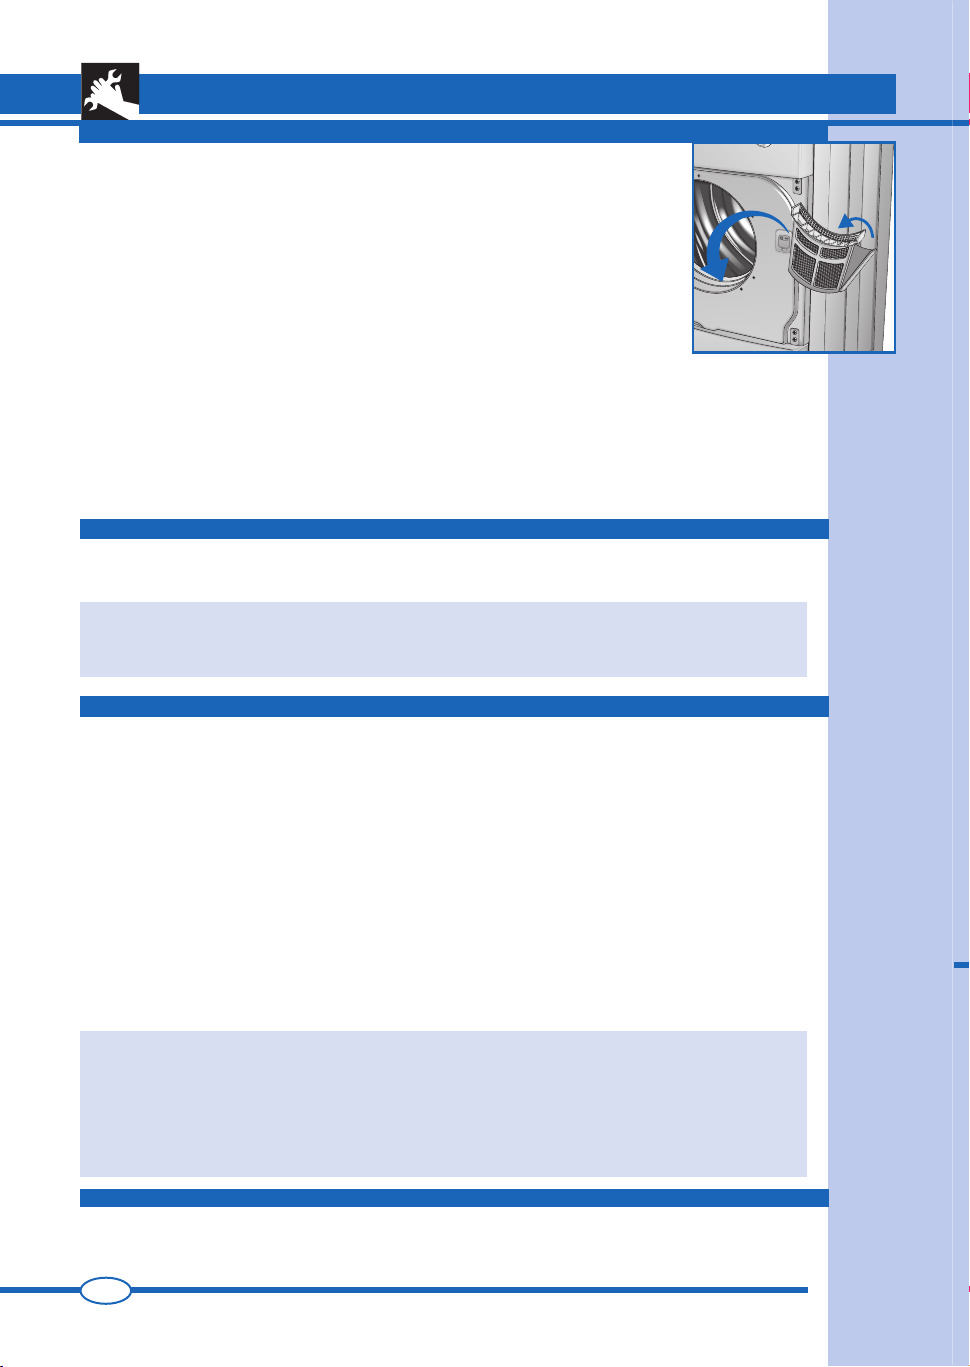
74
Aby bylo zaručeno dokonalé sušení za každé okolnosti, je třeba v pravidelných
intervalech čistit filtr. Po každém cyklu sušení pamatujte na kontrolu a případné
vyčištění filtru.
Důležité:
Čištění filtru musí být prováděno na studeném přístroji. Při čištění filtru postupujte
podle níže uvedených instrukcí:
▼ Otevřete dvířka.
▼ Uchopte filtr oběma rukama a zatlačte jej dopředu.
▼ Jemně rozšiřte horní okraj filtru a otevřete jej.
▼ Odstraňte částice tkaniny.
▼ Zavřete filtr a zkontrolujte, zda pevně drží ve správné poloze.
▼ V případě potřeby vyčistěte vysavačem kluzná vodítka filtru na přístroji.
▼ Znovu umístěte filtr na kluzná vodítka (obr. 14).
VYHLEDÁVÁNÍ ZÁVAD
Na každém elektrickém přístroji může dojít k závadě. V těchto případech se obraťte na kvalifikovaného
elektrikáře. Mnoho problémů je možné vyřešit i bez vnějších zásahů.
Důležité: V případě závady přístroj ihned odpojte od elektrické sítě.
Předtím než se obrátíte na servisní středisko proveďte následující kontroly.
ÚDRŽBA
ČIŠTĚNÍ FILTRU
14
ŘEŠENÍ PROBLÉMŮ
Jestliže se sušička nespustí
• Zkontrolujte, zda:
1) Přístroj je řádně připojen k napájecí síti.
2) Síťová zásuvka řádně funguje:
2a) Pojistky nejsou spálené. (Toto zkontrolujte
připojením dalšího přístroje k síti, např.
stolní lampu).
2) Byly provedeny instrukce uvedené v
příručce.
Jestliže po všech uvedených kontrolách přístroj ještě nebude fungovat, obraťte se na nejbližší
servisní středisko.
Personálu střediska oznamte model přístroje (výrobní číslo a druh závady).
Tyto informace umožní personálu servisního střediska zajistit nutné náhradní díly a provést
rychlou a efektivní opravu.
VOLITELNÉ PŘÍSLUŠENSTVÍ
Za účelem ušetření místa může prodejce dodat příslušenství, které umožní namontovat sušičku na
pračku s předními plnícími dvířky. Instalační technik Vám může podat informace o modelu přístroje, na
němž může být toto příslušenství použito.
CZ
Jestliže se sušička nespustí
• Zkontrolujte zda:
1) Dvířka jsou správně zavřena.
2) Bylo stisknuto tlačítko “START”.
Jestliže se sušička nespustí
• Zkontrolujte zda:
1) Odvodní hadice není stlačená nebo
pokroucená.
2) Filtr není ucpaný. (Pamatujte, že při
otevření dvířek vnitřní části sušičky mohou
být velmi horké).
SM2255
Page 75
SLOVENSKY
Vážený spotrebiteľ,
ďakujeme Vám, že ste si vybrali náš výrobok.
Pred zapojením spotrebiča do elektrickej siete a pred jeho používaním Vám odporúčame pozorne
si prečítať návod na použitie. Oboznámenie sa s činnosťou spotrebiča Vám umožní používať ho
správnym a bezpečným spôsobom.
V tomto návode na použitie sú uvedené technické charakteristiky sušičky a niekoľko rád ohľadom
jej používania, všetko vypracované s cieľom dosiahnuť od Vašej sušičky čo najviac. V prípade, že
spotrebič odpredáte alebo odovzdáte niekomu inému, nezabudnite odovzdať novému užívateľovi
aj tento návod na použitie.
75
OBSAH
POZNÁMKY A UPOZORNENIA PRE UŽÍVATEĽA
• Technické údaje 75
POPIS SPOTREBIČA 77
INŠTALÁCIA SPOTREBIČA 77-79
• Inštalácia 77-78
• Vyrovnanie sušičky do vodorovnej polohy 78
• Zapojenie odtokovej hadice 78
• Zapojenie do elektrickej siete 79
POUŽÍVANIE SUŠIČKY 79-81
• Popis funkcií 79
• Otváranie dverí a zmena smeru otvárania 80
• Správne sušenie bielizne 80
• Ochranné opatrenia v závislosti od druhu tkaniny 81
• Tabuľka programov 81
• Hmotnosť bielizne 81
75-76
ÚDRŽBA 82
• Čistenie filtra 82
• Vyhľadávanie porúch 82
• Odstránenie problémov 82
• Doplnkové príslušenstvo 82
POZNÁMKY A UPOZORNENIA PRE UŽÍVATEĽA
TECHNICKÉ ÚDAJE
6,0 kg.
MODEL: ..................................................................................................................................................................................................................
SÉRIOVÉ ČÍSLO: ...........................................................................................................................................................................................
DÁTUM PREDAJA: .......................................................................................................................................................................................
SM2255
SK
Page 76

76
POZNÁMKY A UPOZORNENIA PRE UŽÍVATEĽA
▼ Táto sušička bielizne je určená výhradne na
použitie v domácnosti. Každé iné používanie
sa bude považovať za nevhodné a preto
nebezpečné.
▼ Odložte si tento návod na použitie, aby ste
doňho mohli v prípade potreby rýchlo nazrieť.
▼ Akákoľvek zmena alebo pokus o manipuláciu so
spotrebičom môžu znamenať nebezpečenstvo pre
používateľa a môžu spôsobiť poškodenie výrobku.
▼ Pri dodávke spotrebiča skontrolujte, či sa
počas prepravy nepoškodil. Ak by ste zistili
poškodenia, okamžite ich ohláste predajcovi.
▼ Sušičku neprikrývajte bielizňou, ani inými
materiálmi.
▼ Pri umiestňovaní spotrebiča zabezpečte, aby
napájací elektrický kábel nebol zalomený,
stlačený a aby bol v prípade nevyhnutných
zásahov prístupný
▼ Po používaní sušičky vždy zatvorte dvere.
▼ Takto zamedzíte tomu, že sa deti budú opierať
o dvierka, čím by mohli spôsobiť prevrhnutie
sušičky.
▼ Je zakázané používanie spotrebiča deťmi bez
dozoru.
▼ Nezabudnite, že počas cyklu sušenia sa
odtoková hadica zohreje a môže dosiahnuť
teplotu vyššiu ako 60°C. Nedotýkajte sa týchto
častí pred ukončením cyklu chladenia.
▼ Spotrebič nepoužívajte na sušenie špinavých
odevov.
▼ Nesušte odevy zašpinené od kuchynského
oleja, nafty, acetónu, alkoholu, benzínu,
kerosénu, odstraňovačov škvŕn, rozpúšťadiel,
vosku.
▼ Z takto zašpinených odevov, pred ich vložením
do sušičky, odstráňte uvedené látky vypraním
v teplej vode s väčším prídavkom pracieho
prostriedku.
▼ Nikdy nesušte odevy z penovej gumy, latexu,
nepriepustné odevy, impregnované tkaniny,
gumené koberčeky, odevy s potlačou, ani odevy
a vankúše s časťami z penovej gumy, pretože
tieto materiály by sa mohli rozpustiť a poškodiť
iné odevy alebo dokonca aj spotrebič.
▼ Avivážne prostriedky a podobné produkty
treba používať v súlade s pokynmi výrobcu
uvedenými na ich obale.
▼ V prípade predaja alebo odovzdania spotrebiča
nezabudnite odovzdať novému majiteľovi
aj tento návod na používanie. Umožní mu
to používať sušičku bielizne správnym a
bezpečným spôsobom.
▼ Nepokúšajte sa opraviť poruchy spotrebiča
sami; opravy vykonané inými osobami, ako
odborníkmi, môžu spôsobiť vážne poškodenia
SK
a znamenajú stratu akéhokoľvek nároku na
záručné opravy.
▼ Opravy spotrebiča môžu vykonať výhradne
autorizovaní pracovníci servisného strediska.
Pri opravách môžu byť použité výhradne
originálne náhradné diely.
▼ Pred vložením do sušičky bielizeň dôkladne
odstreďte alebo vyžmýkajte. Dobre odstredená
bielizeň sa vysuší rýchlejšie.
▼ Pri každom použití sušičky dobre vyčistite
filter, aby sa zabezpečilo dokonalé prúdenie
vzduchu.
▼ Zástrčku do zásuvky elektrickej siete
nevsúvajte, ani ju nevyťahujte mokrými
rukami.
▼ Spotrebič musí byť zapojený do elektrickej
zásuvky s uzemnením, ktorá vyhovuje
bezpečnostným normám.
▼ Pri zapojení spotrebiča do elektrickej siete
nepoužívajte predlžovačky, ani adaptéry.
▼ Spotrebič nevystavujte atmosferickým
vplyvom.
▼ Pred vykonaním údržby alebo čistenia
spotrebiča ho nezabudnite odpojiť od
elektrickej siete. Neťahajte za napájací
elektrický kábel, uchopte zástrčku.
▼ Tento spotrebič je označený značkou
potvrdzujúcou, že je v súlade s európskou
smernicou 2002/96/ES, Elektrický a
elektronický odpadový materiál (WEEE).
Zabezpečte likvidáciu spotrebiča správnym
spôsobom. Povinnosťou užívateľa je prispievať
k predchádzaniu akýchkoľvek škodlivých
dopadov na zdravie a životné prostredie.
▼ Tento symbol na spotrebiči alebo na
sprievodných dokumentoch znamená, že s
týmto výrobkom sa nesmie zaobchádzať ako
s bežným mestským odpadom, ale treba ho
odovzdať v autorizovanom zbernom stredisku,
aby bola umožnená recyklácia elektrických a
elektronických častí.
▼ Pri likvidácii spotrebiča dodržiavajte platné
miestne predpisy. Podrobnejšie informácie o
zaobchádzaní a opätovnom použití spotrebiča
získate na príslušných úradoch, v miestnych
zberných strediskách alebo u predajcu, u
ktorého ste spotrebič kúpili.
VÝROBCA NENESIE ŽIADNU ZODPOVEDNOSŤ
ZA PRÍPADNÉ NEHODY SPÔSOBENÉ
NEDODRŽANÍM BEZPEČNOSTNÝCH
PREDPISOV A POKYNOV UVEDENÝCH V
TOMTO NÁVODE NA POUŽITIE
SM2255
Page 77

POPIS SPOTREBIČA
77
POPIS SPOTREBIČA
2
11
Sušička bielizne je spotrebič určený na použitie v domácnosti, na sušenie všetkých
druhov tkanín.
10
▼ Štruktúru spotrebiča tvoria lakované oceľové panely s povrchovou úpravou, ktorá
zaručuje, že sa ich vzhľad časom nezmení.
▼ Motor a pohybujúce sa časti boli navrhnuté a vyrobené tak, aby zaručili minimálnu
možnú hlučnosť.
▼ Ovládací panel bol navrhnutý tak, aby užívateľovi umožnil bez ťažkostí vykonávať
8
9
programy sušenia, ktoré sú k dispozícii.
▼ Dvierka veľkých rozmerov ešte viac uľahčujú vloženie a vyloženie bielizne.
model s časovým ovládaním
sušenia
170’
120’
150’
130’
110’
90’
70’
50’
30’
30’
40’
60’
80’
100’
2
1
3
1 - Tlačidlo spustenia do chodu
2 - Svetelný ukazovateľ činnosti
4
3 - Ovládač doby sušenia
4 - Dvere bubna
5 - Filter
6 - Nastaviteľné nožičky
7 - Štítok s technickými charakteristikami.
8 - Otvor na odvod pary
9 - Spojovacia príruba
10 - Odtoková hadica
11 - Držiak hadice
1
5
6
7
INŠTALÁCIA SPOTREBIČA
INŠTALÁCIA
Inštaláciu treba zveriť kvalifikovanému pracovníkovi a musí byť vykonaná podľa
pokynov výrobcu. Nesprávna inštalácia môže spôsobiť poranenia osôb a poškodenie
majetku.
▼ Sušičku bielizne umiestnite v blízkosti okna, aby sa uľahčil odvod vlhkého
vzduchu.
▼ Aby ste predišli tvorbe kondenzovanej vody, používajte odvodnú hadicu, ktorú
3
A
pripojíte k otvoru A v spodnej časti zadného panela spotrebiča (obr. 3).
SM2255
SK
Page 78

78
▼ Nezakrývajte vstupný vzduchový otvor na zadnej strane spotrebiča.
▼ Filter namontujte na príslušné miesto podľa zobrazenia (obr. 4).
▼ Vnútro bubna sušičky čistite vlhkou handrou, aby ste odstránili usadený prach.
VYROVNANIE SUŠIČKY DO VODOROVNEJ POLOHY
Nastaviteľné nožičky. Sušičku umiestnite do vertikálnej polohy tak, aby pevne stála
na všetkých štyroch nožičkách, potom ju vyrovnajte do vodorovnej polohy podľa
nasledujúceho postupu:
▼ Sušičku mierne nadvihnite.
▼ Nastavte nožičky do správnej výšky (obr. 5). (Nožičky nevytáčajte viac ako treba
a nepoužívajte elektrický skrutkovač).
▼ Sušičku spusťte.
Nesprávne vyvážený spotrebič môže poškodiť ložiská a urýchliť ich opotrebovanie.
Tútu sušičku nemusíte upevňovať k podlahe.
ZAPOJENIE HADICE NA ODVOD VLHKOSTI
Hadicu na odvod vlhkosti zapojte k výstupu na zadnej stene sušičky (obr. 6), podľa
nasledujúcich pokynov:
▼ Koniec hadice zapojte k dodávanej spojovacej prírube.
▼ Otočte spojovací prvok (spolu s hadicou) smerom vľavo do vnútra výstupného
otvoru.
▼ Nechajte vystúpiť hadicu zo zadnej steny sušičky smerom vľavo alebo smerom
vpravo cez priehlbeninu v spodnej časti telesa spotrebiča.
INŠTALÁCIA SPOTREBIČA
INŠTALÁCIA
4
5
6
▼ Druhý koniec hadice umiestnite v blízkosti okna alebo ventilačného otvoru na
vonkovom múre. Ak by to nebolo možné, zabezpečte počas činnosti sušičky
dostatočné vetranie miestnosti. Použite držiak (obr. 7) určený na upevnenie
konca hadice.
7
Dôležité upozornenie: Hadicu na odvod vzduchu treba zapojiť aj v prípade, že sa vzduch
neodvádza von z miestnosti; v opačnom prípade by sa vlhký vzduch mohol dostať späť do
spotrebiča, čo by predĺžilo dobu sušenia.
Vlhký vzduch môže okrem toho poškodiť sušičku. Napriek tomu, že vzduch vystupujúci z
hadice je iba horúci a vlhký a nepredstavuje nebezpečenstvo, nikdy nesmie smerovať na
osoby, zvieratá, ani na rastliny.
Dôležité upozornenie: Vzduch zo sušičky sa nikdy nesmie odvádzať do komína používaného
na odvod spalín z plynových spotrebičov a iných zdrojov.
SK
SM2255
Page 79

INŠTALÁCIA SPOTREBIČA
ZAPOJENIE DO ELEKTRICKEJ SIETE
▼ Skontrolujte, či napätie uvedené na štítku umiestnenom na zadnej stene
spotrebiča zodpovedá napätiu elektrickej siete.
▼ Po ukončení inštalácie treba spotrebič zapojiť k elektrickej napájacej sieti
prostredníctvom bipolárneho vypínača.
▼ Všetky zariadenia na prerušenie napájania, káble a elektrické zástrčky musia
mať nominálny výkon zodpovedajúci maximálnemu zaťaženiu uvedenému na
štítku s údajmi.
▼ Elektrická napájacia sieť, ku ktorej je spotrebič zapojený, musí byť uzemnená. V opačnom
8
Dôležité upozornenie: Po ukončení cyklu sušenia odpojte spotrebič od elektrickej napájacej
siete, zabránite tak možnosti, že by deti mohli zapnúť spotrebič.
prípade výrobca odmieta akúkoľvek zodpovednosť za prípadné nehody (obr. 8).
▼ V prípade poškodenia elektrického napájacieho kábla sa obráťte na najbližšie
servisné stredisko.
▼ Sušičku bielizne nezapájajte k elektrickej sieti nepriamym spôsobom,
prostredníctvom predlžovačiek alebo adaptérov.
▼ Spotrebič umiestnite tak, aby bol napájací kábel ľahko prístupný a aby ste ho
mohli v prípade potreby ľahko odpojiť.
79
POUŽÍVANIE SPOTREBIČA
POUŽÍVANIE SPOTREBIČA
3. Gombík programátora sa používa na nastavenie želaného programu v
9
závislosti od druhu tkaniny a špecifických potrieb. Ak z akéhokoľvek dôvodu
chcete zmeniť program alebo pridať do bubna počas cyklu sušenia ďalšiu bielizeň,
stačí jednoducho otočiť gombík programátora do polohy „STOP“ a potom ho
otočiť do polohy želaného programu a stlačiť tlačidlo „ŠTART“ (obr. 9).
10
11
SM2255
POZN.: Pozor!! Používajte túto funkciu iba v prípade, že je to skutočne
nevyhnutné a ak program, ktorý chcete zrušiť, nebol v činnosti dlhšie ako
3 minúty.
1. Tlačidlo spustenia do chodu Stlačte toto tlačidlo, aby ste zapli naprogramovaný
cyklus sušenia (obr. 10).
2. Svetelná kontrolka Štart, ak je zhasnutá, indikuje polohu “STOP”. Ak svieti
nepretržite, znamená to, že prebieha cyklus sušenia. Ak bliká rýchlo, znamená
to, že nastavený program je pripravený na spustenie. Ak bliká pomaly, znamená
to, že sa cyklus sušenia ukončil (obr. 11).
SK
Page 80
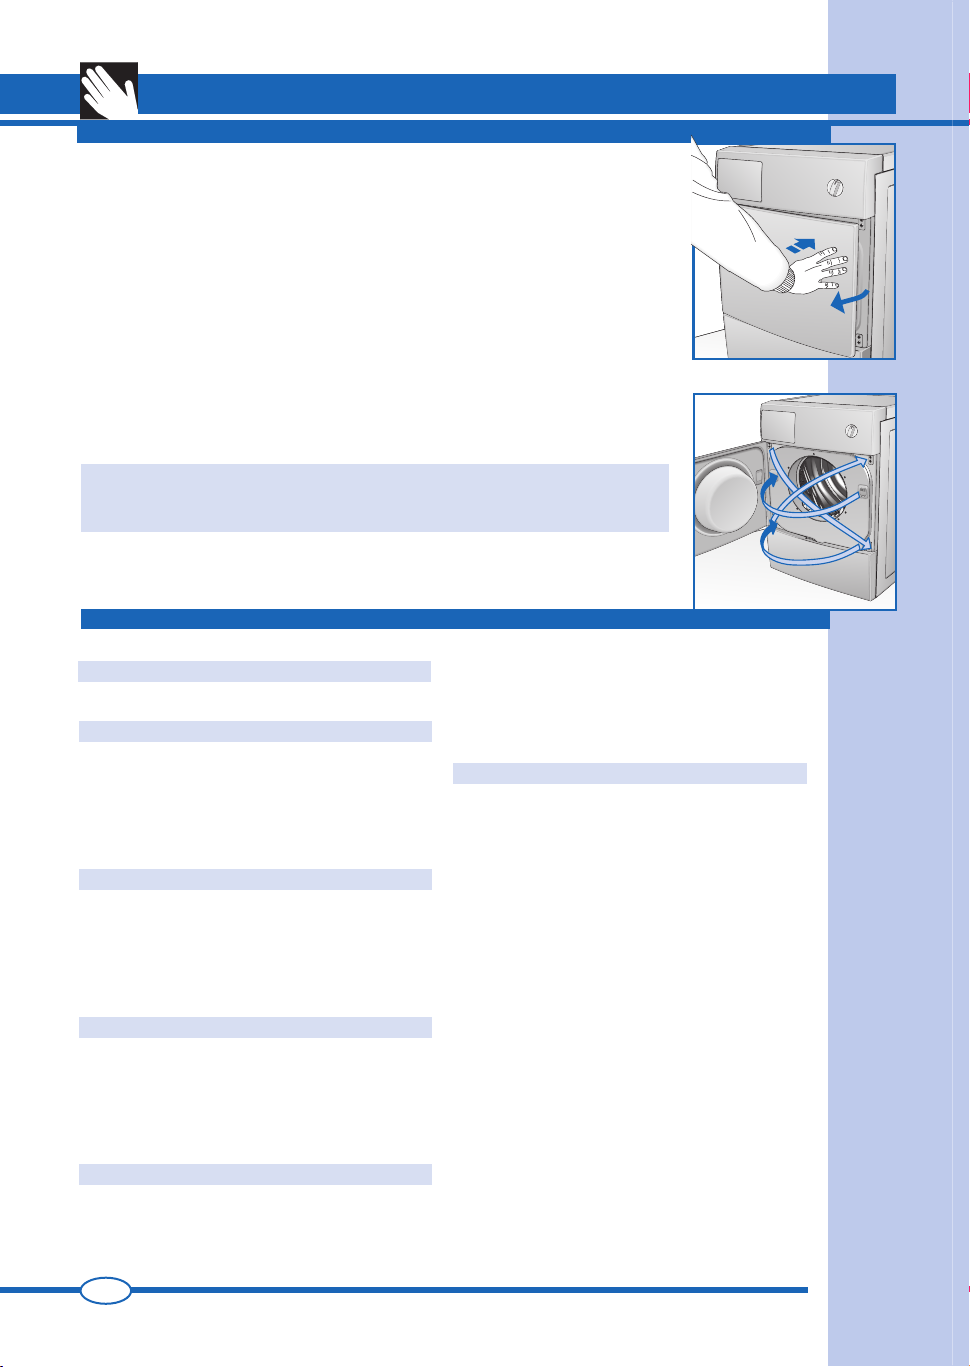
80
OTVÁRANIE DVERÍ A ZMENA SMERU OTVÁRANIA
▼ Zatlačte na pravú stranu dvierok (obr. 12), aby ste ich otvorili. Ak bol smer otvárania
zmenený, zatlačte na ľavú stranu.
▼ Smer otvárania dverí možno zmeniť podľa osobných potrieb (obr. 13).
POZN.: Túto operáciu môže vykonať výhradne špecializovaný pracovník.
Obráťte sa na servisné stredisko predajcu.
Postupujte nasledovne.
A
▼ Bielizeň odstreďte.
B
▼ Jednotlivé odevy rozdeľte podľa druhu odevu
alebo druhu tkaniny.
▼ Zatvorte zipsy, zapnite gombíky a nezabudnite
vyprázdniť všetky vrecká.
▼ Pulóvre obráťte naruby.
C
▼ Otvorte dvere.
▼ Bielizeň vložte do bubna, nezabudnite, že
najprv treba vložiť posteľnú bielizeň.
▼ Odporúčame vám vložiť do bubna spoločne
malé a veľké kusy bielizne.
D
▼ Zatvorte dvere.
▼ Osušte si ruky (nikdy sa nedotýkajte elektrických
spotrebičov mokrými rukami).
▼ Vsuňte zástrčku spotrebiča do elektrickej
sieťovej zásuvky.
E
▼ Gombík programátora otočte do polohy
Stop, čím zrušíte prípadné predchádzajúce
programy, potom otočte programátor do polohy
programu najvhodnejšieho pre druh tkaniny,
POUŽÍVANIE SPOTREBIČA
SPRÁVNE SUŠENIE BIELIZNE
ktorá sa má sušiť, pre množstvo bielizne v
bubne a podľa stupňa želaného sušenia (pozri
Tabuľka programov).
▼ Stlačte tlačidlo ŠTART , aby ste zapli
sušenie.
F
▼ Aby ste mohli spotrebič zastaviť počas cyklu
sušenia, stačí jednoducho otvoriť dvierka,
bubon sa potom pomaly zastaví. (Nezabudnite,
že po otvorení dvierok môžu byť vnútorné časti
a bielizeň horúce).
▼ Aby ste pokračovali v cykle sušenia, zatvorte
dvere a stlačte tlačidlo „Štart“.
▼ Koniec sušenia je indikovaný blikaním kontrolky
štart a zvukovým znamením. Programátor
otočte do polohy STOP.
▼ Otvorte dvere bubna a vyberte bielizeň.
▼ Dvere znovu zatvorte.
▼ Suchými rukami vytiahnite zástrčku zo zásuvky
elektrickej siete.
12
13
SK
SM2255
Page 81
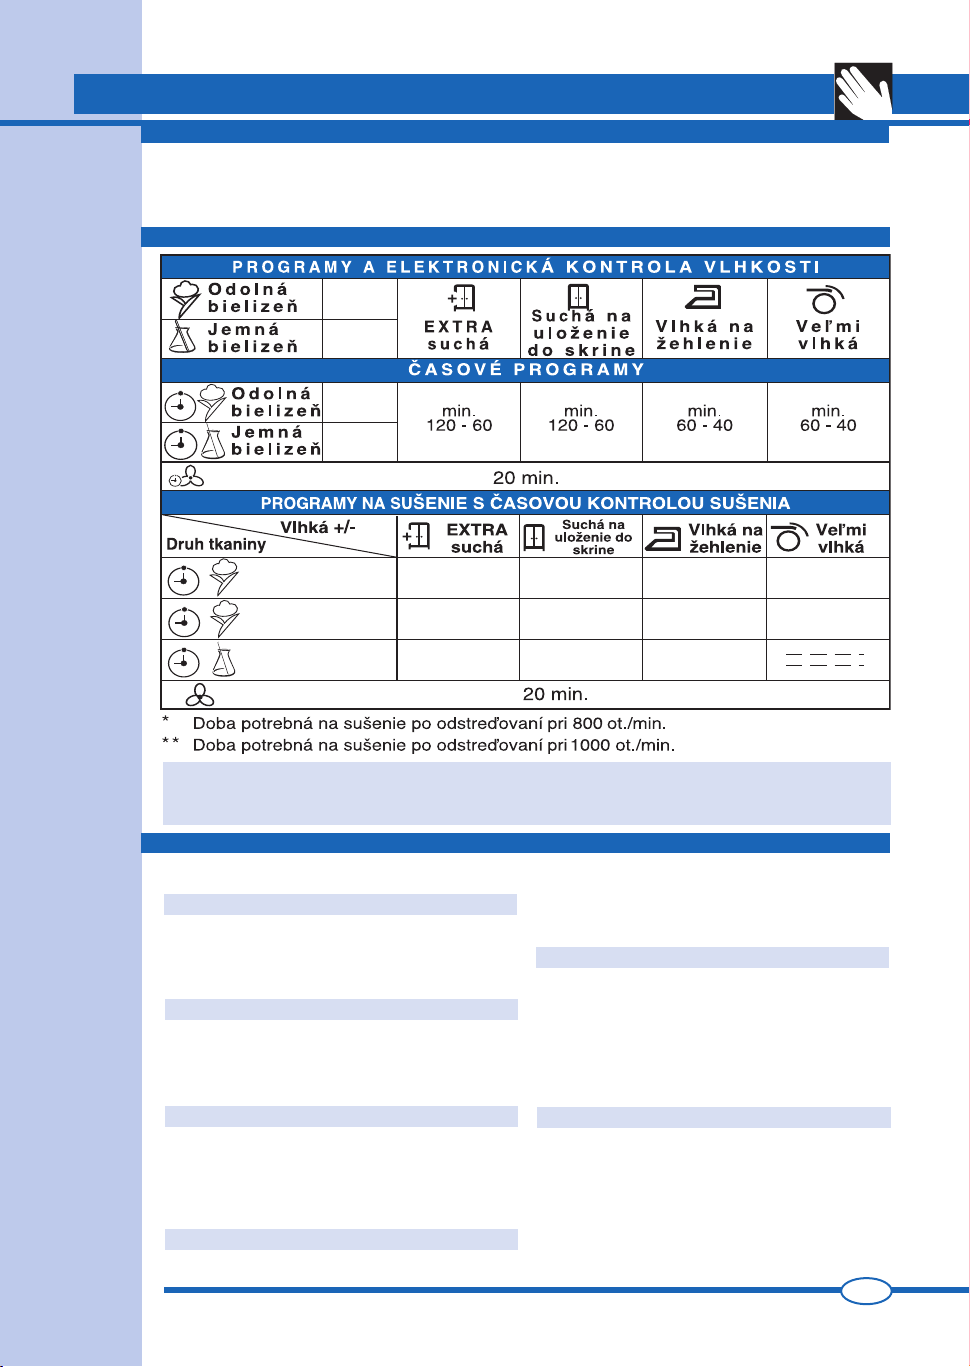
POUŽÍVANIE SPOTREBIČA
OCHRANNÉ OPATRENIA V ZÁVISLOSTI OD DRUHU TKANINY
V prípade, že máte pochybnosti o druhu tkaniny, skontrolujte štítok na odeve. Takmer všetky odevy, ktoré
sa môžu sušiť v sušičke, sú označené príslušným symbolom na etikete. Aby ste predišli elektrickým
výbojom, počas pláchania bielizne v práčke pridajte avivážny prostriedok. Po usušení vyberte syntetické
odevy okamžite z bubna, aby ste predišli tomu, že sa pokrčia.
TABUĽKA PROGRAMOV
Max
6.0 kg.
Max
3.0 kg.
Max
6.0 kg.
Max
3.0 kg.
81
Max 6.0 kg.
Max 3.0 kg.
Max 3.0 kg.
Dôležité upozornenie: Doba sušenia závisí od niekoľkých faktorov: hmotnosti, rozmerov odevu,
druhu tkaniny, stupňa vlhkosti. Dobre vyžmýkané a odstredené odevy sa vysušia rýchlejšie.
Aby ste predišli tomu, že sa odevy pokrčia, sušičku bielizne neprepĺňajte.
Uvedené hmotnosti sú iba približné a môžu sa meniť v závislosti od výrobcu, kvality a úpravy.
Posteľná bielizeň
Prešívaná deka 700 g
Spodná plachta 550 g
Obliečka na paplón 600 g
Obliečka na vankúš 180 g
Bielizeň pre domácnosť
Utierka (na riad) 90 g
Utierka (na poháre) 70 g
Obrúsok 20 g
Uterák 200 g
Iná bielizeň
Kúpací plášť 1200 g
Osuška 800 g
Dámska blúzka 300 g
Pánska košeľa 600 g
Syntetické blúzky/košele 300 g
Obrusy
Obrus 250 g
SM2255
* 150 min.
**130 min.
* 110 min.
** 90 min.
* 100 min.
** 80 min.
HMOTNOSŤ BIELIZNE
*130 min.
**110 min.
* 90 min.
** 70 min.
* 80 min.
** 60 min.
Veľký obrus 1000 g
Obrúsok 80 g
Pánska bielizeň
Košeľa z nekrčivého materiálu 250 g
Tielko (bez rukávov) 120 g
Krátke ponožky 150 g
Dlhé spodky 250 g
Pyžamo 480 g
Nočná košeľa 400 g
Vreckovky 25 g
Dámska bielizeň
Blúzka 100 g
Pulóver 100 g
Minisukňa 80 g
Nohavičky 80 g
Nočná košeľa 180 g
Pyžamo 450 g
Vreckovky 15 g
*110 min.
** 90 min.
* 70 min.
** 50 min.
* 60 min.
** 40 min.
* 90 min.
** 70 min.
* 50 min.
** 30 min.
SK
Page 82

82
ČISTENIE FILTRA
Aby sa zaručilo optimálne usušenie bielizne za každých okolností, nezabudnite
pravidelne vyčistiť filter. Filter nezabudnite skontrolovať a prípadne vyčistiť po
každom sušení.
Dôležité upozornenie:
Čistenie filtra sa môže vykonávať iba ak spotrebič vychladol! Pri čistení filtra
postupujte podľa nasledujúcich pokynov:
▼ Otvorte dvierka.
▼ Uchopte filter oboma rukami a potlačte ho dopredu, aby ste ho vybrali.
▼ Jemne rozšírte horný okraj filtra a otvorte ho.
▼ Odstráňte vlákna tkanín.
▼ Filter zatvorte, pričom skontrolujte, či zapadol dobre na miesto.
▼ Podľa potreby vyčistite koľajničky filtra na spotrebiči vysávačom.
▼ Vložte filter na koľajničky (obr. 14).
VYHĽADÁVANIE PORÚCH
Na všetkých elektrických spotrebičoch sa môžu niekedy vyskytnúť poruchy. V takýchto prípadoch sa
obráťte na vyškoleného elektrikára. Napriek tomu možno mnoho problémov odstrániť bez zásahu
servisnej služby.
Dôležité upozornenie: V prípade poruchy odpojte spotrebič okamžite od elektrickej siete.
Predtým, ako zavoláte servisné stredisko, vykonajte nasledujúce kontroly.
ÚDRŽBA
14
ODSTRÁNENIE PROBLÉMOV
Sušička sa nezapne
• Skontrolujte, či:
1) Spotrebič je správne zapojený do napájacej
elektrickej siete.
2) Elektrická zásuvka funguje správne:
2a)
Je vypálená poistka. (Skontrolujte tak, že
do siete zapojíte iný spotrebič; napr. nočnú
lampu).
2b)
Dodržali ste všetky pokyny uvedené v
návode na použitie.
Ak po vykonaní týchto kontrol spotrebič naďalej nefunguje, obráťte sa na najbližšie servisné
stredisko.
Oznámte pracovníkom strediska model spotrebiča, sériové číslo a typ poruchy.
Tieto informácie pomôžu pracovníkovi servisného strediska zabezpečiť potrebné náhradné
diely, čo zaručí rýchly a účinný opravný zásah.
DOPLNKOVÉ PRÍSLUŠENSTVO
Aby ste získali viac priestoru, predajca Vám môže poskytnúť súpravu, ktorá Vám umožní nainštalovať
sušičku na práčku, ktorá má dvierka na vkladanie bielizne vpredu. Zodpovedný pracovník Vám poskytne
informácie o modeloch spotrebiča, na ktorý možno túto súpravu namontovať.
SK
Sušička sa nezapne
• Skontrolujte, či:
1) Sú dobre zatvorené dvierka.
2) Či ste stlačili tlačidlo „ŠTART“.
Sušička nesuší bielizeň
• Skontrolujte, či:
1) Hadica na odvod vzduchu nie je zalomená
alebo pokrútená.
2) Nie je upchatý filter. (Nezabudnite, že po
otvorení dvierok môžu byť vnútorné časti
sušičky horúce).
SM2255
Page 83
MAGYAR
Tisztelt Vásárló!
Köszönjük, hogy a termékünket választotta.
A termék bekötése és használata előtt javasoljuk, hogy figyelmesen olvassa el a jelen használati
utasítást. A készülék működésének ismerete lehetővé teszi a helyes és biztonságos használatot.
A jelen használati utasításban a szárítógép műszaki tulajdonságainak leírását találja, valamint
egy sor hasznos információt a működésére vonatkozón; a kézikönyv úgy készült, hogy segítséget
nyújtson Önnek, és a legjobbat hozza ki a készülékből. Amennyiben a készüléket eladja vagy átadja
valakinek, ne feledje a jelen használati utasítást is átadni az új felhasználónak.
83
TARTALOMJEGYZÉK
MEGJEGYZÉSEK ÉS FIGYELMEZTETÉSEK A FELHASZNÁLÓ RÉSZÉRE 83-84
• Műszaki információk 83
A KÉSZÜLÉK LEÍRÁSA 85
A KÉSZÜLÉK ÜZEMBE HELYEZÉSE 85-87
• Üzembe helyezés 85-86
• A szárító vízszintezése 86
• Bekötés a lefolyócsőbe 86
• Csatlakoztatás az elektromos hálózatra 87
A SZÁRÍTÓ HASZNÁLATA 87-89
• A funkciók leírása 87
• Ajtónyitás és a nyitási irány módosítása 88
• A ruhanemű helyes szárítása 88
• Óvintézkedések anyagfajták szerint 89
• Programtáblázat 89
• A ruhanemű súlya 89
KARBANTARTÁS 90
• A szűrő tisztítása 90
• Hibakeresés 90
• A problémák megoldása 90
• Választható tartozékok 90
MEGJEGYZÉSEK ÉS FIGYELMEZTETÉSEK A FELHASZNÁLÓ RÉSZÉRE
MŰSZAKI ADATOK
6,0 kg.
MODELL: ............................................................................................................................................................................................................
SOROZATSZÁM: ............................................................................................................................................................................................
A VÁSÁRLÁS IDŐPONTJA: ....................................................................................................................................................................
SM2255
HU
Page 84

84
MEGJEGYZÉSEK ÉS FIGYELMEZTETÉSEK A FELHASZNÁLÓ RÉSZÉRE
▼ A jelen szárítógép kizárólag háztartási
használatra készült. Minden egyéb használat
helytelennek, tehát veszélyesnek minősül.
▼ A jelen használati utasítást a készülék
közelében tárolja, úgy, hogy mindig könnyen
elő lehessen venni, ha szükséges.
▼ A készülék bármiféle módosítása, vagy nem
rendeltetésszerű használata veszélyes lehet a
felhasználó számára, és a termék károsodását
okozhatja.
▼ Átadáskor ellenőrizze, hogy a készülék a szállítás
során nem sérült-e meg. Amennyiben sérülést
észlel, azonnal értesítse a viszonteladót.
▼ Ne takarja le a szárítót ruhaneművel vagy más
tárggyal.
▼ A készülék elhelyezésekor ellenőrizze, hogy
a tápvezeték nem tört-e meg, vagy nem
nyomódott-e össze, ellenőrizze, hogy a vezeték
hozzáférhető-e.
▼ A szárító használata után mindig csukja be az
ajtaját.
▼ Így el lehet kerülni, hogy a gyerekek felmásszanak
a szárítógépre, és az emiatt felboruljon.
▼ A berendezést felügyelet nélkül hagyott
gyermekek nem használhatják.
▼ Ne feledje, hogy a szárítási ciklus alatt a leeresztő
cső felmelegszik, és 60° fölé is emelkedhet a
hőmérséklete. A hűtési ciklus befejezése előtt
ne nyúljon a gépnek ehhez a részéhez.
▼ Ne használja a készüléket szennyes ruha
szárítására.
▼ Ne szárítson étolajjal, petróleummal, acetonnal,
alkohollal, benzinnel, kerozinnal, folttisztítóval,
terpentinnel, viasszal szennyezett ruhát.
▼ Ezeket az anyagokat meleg vízzel, sok
mosószerrel végzett mosással távolítsa el,
mielőtt a ruhát a szárítóba helyezi.
▼ Ne szárítson olyan cikkeket, mint gumi
granulátum, latex gumi, vízhatlan anyag,
vízhatlan textília, gumiszőnyeg, gumitömbökből
formázott árucikkek, ruhaneműk és párnák, mivel
elolvadhatnak, és károsíthatnak más ruhaneműt
és esetleg magát a háztartási gépet.
▼ A textilöblítőket és a hasonló termékeket a
csomagoláson lévő gyártói utasítások szerint
kell használni.
▼ A készülék eladása vagy átadása esetén
ne felejtse el a készülékkel együtt átadni a
jelen használati utasítást is. Ez segíti az új
tulajdonost a szárítógép helyes és biztonságos
használatában.
▼ A készülék esetleges hibáit ne próbálja önállóan
javítani; a nem szakember által végzett javítás
súlyos károkat okozhat, és ilyenkor elvész a
garanciális javításhoz való jog.
HU
▼ A készülék javítását kizárólag a vevőszolgálatok
által fölhatalmazott szakember végezheti.
Minden javítást kizárólag eredeti alkatrész
felhasználásával szabad elvégezni.
▼ A szárítóba történő behelyezés előtt centrifugázza
vagy erősen csavarja ki a ruhaneműt. A
kicentrifugázott ruhanemű hamarabb megszárad.
▼ A szárító minden egyes használata után
gondosan tisztítsa meg a szűrőt, hogy biztosítva
legyen a levegő tökéletes körforgása.
▼ A dugót ne nedves kézzel fogva helyezze be
vagy húzza ki az aljzatból.
▼ A gépet az érvényes biztonsági előírásoknak
megfelelő, hatékony földeléssel ellátott
dugaljba kell csatlakoztatni.
▼ A készülék elektromos hálózatra történő
csatlakoztatásához ne használjon hosszabbítót
vagy elosztót.
▼ Ne tegye ki a berendezést az időjárási hatásoknak.
▼ A készülék tisztítása és karbantartása előtt
ne feledje el leválasztani a készüléket az
elektromos hálózatról. A készülék hálózatról
történő leválasztásakor ne a tápvezetéket
húzza, hanem erősen fogja meg a dugót.
▼ A jelen készüléken megtalálható a 2002/96/EK
sz. irányelvnek – Elektromos és elektronikus
készülékek hulladéka (WEEF) – való
megfelelést igazoló jelzés. Ellenőrizze, hogy a
készülék megsemmisítése helyesen történike. A felhasználó hozzá kell, hogy járuljon
minden negatív egészségi és környezeti
következmény megelőzéséhez.
▼ A terméken vagy az azt kísérő
dokumentumokon jelzés arra utal, hogy ez
a termék nem kezelhető normál háztartási
hulladékként, hanem egy engedéllyel
rendelkező telepen kel leadni, lehetővé téve
az elektromos és elektronikus alkatrészek
újrahasznosítását.
▼ A készülék megsemmisítésekor tartsa be a
vonatkozó érvényes helyi előírásokat. A jelen
készülék kezelésével, újrahasznosításával
és újrafeldolgozásával kapcsolatos további
információkért vegye fel a kapcsolatot az
illetékes szervekkel, a helyi háztartási hulladék
teleppel vagy a kereskedővel, akitől a terméket
vásárolta.
A GYÁRTÓ NEM FELEL A BIZTONSÁGI
ELŐÍRÁSOK ÉS A JELEN HASZNÁLATI
UTASÍTÁSBAN SZEREPLŐ ELŐÍRÁSOK
BE NEM TARTÁSA MIATT BEKÖVETKEZŐ
ESETLEGES BALESETEKÉRT.
SM2255
Page 85

A BERENDEZÉS LEÍRÁSA
85
A BERENDEZÉS LEÍRÁSA
2
11
A szárítógép háztartási készülék, amely bármilyen típusú textília szárítására
alkalmas.
10
▼ A gép háza olyan módon kezelt és festett acél panelekből áll, ami biztosítja a
külalak időbeni tartósságát.
▼ A motor és a mozgó alkatrészek tervezése és gyártása úgy történt, hogy a
zajszint minimális legyen.
▼ A kezelőpanel úgy készült, hogy a felhasználó nehézség nélkül végre tudja
hajtani a tervezett szárítási programokat.
8
9
▼ A nagyméretű ajtó még könnyebbé teszi a ruha betöltését és kivételét.
szárításiidő-vezérléssel ellátott
modell
170’
120’
150’
130’
110’
90’
70’
50’
30’
30’
40’
60’
80’
100’
1 - Indítógomb
2 - Működést jelző lámpa
3 - Szárítási idő beállító tárcsája
4 - Dob ajtaja
5 - Szűrő
6 - Állítható lábacskák
7 - Műszaki adattábla.
8 - Gőzleeresztő nyílás
9 - Szerelvényperem
10 - Leeresztő cső
11 - Csőalátét
2
1
3
4
5
1
6
7
A BERENDEZÉS ÜZEMBE HELYEZÉSE
BEÜZEMELÉS
A beüzemelést szakemberre kell bízni, aki azt a gyártó utasításai szerint végzi el. A
nem megfelelő beüzemelés személyi sérülést és anyagi kárt okozhat.
▼ A szárítót ablak közelében helyezze el, hogy könnyebben távozhasson a párás
levegő.
▼ A kondenzvíz kialakulásának elkerülése végett a leeresztő csövet a készülék
hátsó paneljén alul lévő A furatba kösse (3. ábra).
3
A
SM2255
HU
Page 86

86
▼ A készülék hátán lévő levegőbemeneti nyílást ne tömítse el.
▼ A szűrőket az erre kialakított helyekre tegye, ahogy azt a (4. ábra) mutatja.
▼ A szárítódob belsejét nedves ruhával tisztítsa, hogy eltávolítsa az esetleg ott
lerakódott port.
Állítható lábak Állítsa függőleges helyzetbe a szárítót úgy, hogy stabilan
támaszkodjon mind a négy lábra, majd végezze el a vízszintezést a lábak beállításával
az alábbiak szerint:
▼ Enyhén emelje meg a gépet.
▼ Állítsa be a lábakat a megfelelő magasságba (5. ábra). (Ne csavarja ki túlságosan
a lábakat, és ne használjon motoros csavarhúzót).
▼ Engedje le a szárítót.
Egy nem megfelelően vízszintezett gép tönkreteheti a csapágyakat, és korán elkophat.
Ezt a szárítót nem kell a padlóhoz rögzíteni.
Kösse a lefolyócsövet a szárító hátlapján lévő kimenetre (6. ábra) az alábbiak
szerint:
▼ A cső egyik végét kösse a készülékkel együtt leszállított szerelvényperemre.
▼ Az összekötő elemet (a csővel együtt) forgassa el a kimeneti furatban az
óramutató járásával ellentétes irányban.
▼ Dugja ki a csövet a szárító hátoldalán balra vagy jobbra a géptest alsó részén
lévő bemélyedésen keresztül.
A BERENDEZÉS ÜZEMBE HELYEZÉSE
BEÜZEMELÉS
A SZÁRÍTÓ VÍZSZINTEZÉSE
A LEFOLYÓCSŐ BEKÖTÉSE
4
5
6
▼ A cső másik végét vigye a külső falon lévő ablak vagy szellőző nyílás közelébe.
Ha ez nem lehetséges, ellenőrizze, hogy a szárító működésekor a helyiségnek
jó a szellőzése. Használja az alátétet (7. ábra) a cső rögzítéséhez.
7
Fontos: A levegőelvezető csövet akkor is be kell kötni, ha a levegő nem a kültérbe lesz
kivezetve; ellenkező esetben a párás levegő a gépbe visszajuthat, és ez meghosszabbítja a
szárítási időt.
A párás levegő ezenfelül károsíthatja a szárítót. Bár az elvezető csőből távozó levegő csak
meleg és párás, és nem jelent veszélyt, soha nem irányulhat személyek, állatok vagy növények
felé.
Fontos: A távozó levegőt soha nem szabad gáz vagy más fűtőanyagot használó készülékek
füstjének elvezetésére használt füstcsőbe vezetni.
HU
SM2255
Page 87

A BERENDEZÉS ÜZEMBE HELYEZÉSE
ELEKTROMOS CSATLAKOZTATÁS
▼ Ellenőrizze, hogy a készülék hátlapján lévő adattáblán jelzett feszültség egyezik-e
a villamos hálózat feszültségével.
▼ A beüzemelés végeztével a készüléket kétpólusú megszakítóval rá kell kötni a
hálózatra.
▼ Minden megszakító berendezés, a vezetékek és a dugaljak névleges teljesítménye
olyan kell legyen, hogy elviselje az adattáblán jelölt maximális terhelést.
▼ A hálózat, amire a készülék be van kötve, földelő rendszerrel kell, hogy
8
Fontos: A szárítási ciklus végén válassza le a szárítót az elektromos hálózatról, nehogy
gyermekek működésbe tudják hozni a gépet.
rendelkezzen. Ellenkező esetben a gyártó nem felel az esetleges balesetekért
(8. ábra).
▼ Ha a tápvezeték sérült, forduljon a legközelebbi vevőszolgálathoz.
▼ A szárító elektromos hálózatra történő csatlakoztatásához ne használjon
hosszabbítót vagy elosztót.
▼ A készüléket úgy helyezze el, hogy a tápvezeték könnyen hozzáférhető legyen,
és szükség esetén ki lehessen húzni.
87
A KÉSZÜLÉK HASZNÁLATA
A KÉSZÜLÉK HASZNÁLATA
3. Programtárcsa a ruhanemű és a specifikus igények alapján megvalósítani
9
kívánt program kiválasztásához. Ha bármilyen okból úgy dönt, hogy
megváltoztatja a programot, vagy további ruhát tesz be a gépbe a szárítási
ciklus során, elég egyszerűen STOP állásba állítani a programtárcsát, majd a
kiválasztott programra állítani, és megnyomni a START gombot (9. ábra).
10
11
SM2255
Megjegyzés Figyelem!! Ezt a műveletet csak akkor végezze, ha tényleg
szükséges, és a törlendő program még csak legfeljebb 3 perce fut.
1. Indítógomb: A szárítási ciklus indításához nyomja meg ezt a gombot (10.
ábra).
2. LED Start: Ha nem ég, az a “STOP” pozíciót jelzi. Ha folyamatosan ég, akkor
a ciklus folyamatban van. Ha gyorsan villog, az azt jelenti, hogy a kiválasztott
program indításra kész. Ha lassan villog, az azt jelenti, hogy a szárítási program
lejárt (11. ábra).
HU
Page 88

88
AJTÓNYITÁS ÉS A NYITÁSI IRÁNY MÓDOSÍTÁSA
▼ Az ajtó kinyitásához nyomja meg a jobb oldalát (12. ábra). Ha a nyitásirány meg
lett változtatva, az ajtó bal oldalát kell megnyomni.
▼ Igénye szerint az ajtónyitás iránya megfordítható (13. ábra).
Megjegyzés: Ezt a műveletet csak szakember végezheti. Forduljon a
vevőszolgálathoz.
Az alábbiak szerint járjon el:
A
▼ Centrifugázza a ruhaneműt.
B
▼ Az anyagnak megfelelően válassza szét a
ruhadarabokat.
▼ Zárja be a cipzárakat, gombolja be a gombokat,
és ne feledje kiüríteni az összes zsebet.
▼ A pulóvereket fordítsa ki.
C
▼ Nyissa ki az ajtót.
▼ Töltse be a ruhákat a dobba, először a
lepedőket tegye be egy sarokba.
▼ Javasoljuk, hogy a kis és nagy darabokat
egyszerre töltse be.
D
▼ Csukja be az ajtót.
▼ Törölje meg a kezét (elektromos készülékhez
soha ne nyúljon nedves kézzel).
▼ Dugja be a hálózati csatlakozót a konnektorba.
E
▼ Állítsa a programtárcsát Stop állásba az
esetleges korábbi programok törléséhez,
majd állítsa a ruhafélének, a dobba töltött
mennyiségnek és a kívánt szárítási foknak
megfelelő programra (lásd: Programtáblázat).
A KÉSZÜLÉK HASZNÁLATA
A RUHANEMŰ HELYES SZÁRÍTÁSA
▼ Nyomja le a START gombot a szárítás
megkezdéséhez.
F
▼ A gép szárítási ciklus közben történő
leállításához elég kinyitni az ajtót, és a dob
lassan leáll. (Ne feledje, hogy amikor kinyitja
az ajtót, a gép belső részei forrók lehetnek.)
▼ A szárítási ciklus folytatásához csukja be az
ajtót, és nyomja meg a “Start” gombot.
▼ Ha vége a szárításnak, amit a start led villogása
és a csengő jelez, állítsa a választókapcsolót
vissza STOP állásba.
▼ Nyissa ki a dob ajtaját, és vegye ki a ruhát.
▼ Csukja vissza az ajtót.
▼ Száraz kézzel húzza ki a szárító dugóját az
aljzatból.
HU
12
13
SM2255
Page 89

A KÉSZÜLÉK HASZNÁLATA
ÓVINTÉZKEDÉSEK ANYAGFAJTÁK SZERINT
Ha kétségei vannak a textil fajtáját illetően, olvassa el a ruhanemű céduláját. Szinte minden ruhadarabot
lehet gépben szárítani, a cédula tartalmazza az erre vonatkozó jelzést. Az elektrosztatikus töltés
elkerülése végett a mosógép öblítési ciklusában használjon öblítőszert. A szintetikus ruhaneműket
azonnal vegye ki a dobból, nehogy összegyűrődjenek.
PROGRAMTÁBLÁZAT
Max
6.0 kg.
Max
3.0 kg.
Max
6.0 kg.
Max
3.0 kg.
89
Max 6.0 kg.
Max 3.0 kg.
Max 3.0 kg.
Fontos: A szárítási idő egy sor tényezőtől függ: a ruhadarab súlya, mérete, az anyag fajtája, a
nedvesség foka. A jól kicsavart és kicentrifugázott ruhadarabok hamarabb megszáradnak. A
ruhadarabok gyűrődésének elkerülése végett ne terhelje túl a szárítót.
A megadott súlyok közelítő értékek, és a gyártótól, a minőségtől és a kikészítéstől függően
változhatnak.
Ágynemű
Paplan 700 g
Alsó lepedő 550 g
Felső lepedő 600 g
Párnahuzat 180 g
Háztartási textília
Törölgető ruha (tányérokhoz) 90 g
Törölgető ruha (poharakhoz) 70 g
Törlőruha takarításhoz 20 g
Törölköző 200 g
Egyéb ruhanemű
Köpeny 1200 g
Fürdőlepedő 800 g
Blúz 300 g
Férfi ing 600 g
Műanyag blúz és ing 300 g
Asztalterítő és szalvéta
Terítő 250 g
SM2255
* 150 perc.
**130 perc.
* 110 perc.
** 90 perc.
* 100 perc.
** 80 perc.
A RUHANEMŰ SÚLYA
*130 perc.
**110 perc.
* 90 perc.
** 70 perc.
* 80 perc.
** 60 perc.
Nagy terítő 1000 g
Textilszalvéta 80 g
Férfi ruhanemű
Nem vasalandó ing 250 g
Atlétatrikó 120 g
Rövid zokni 150 g
Boxer 250 g
Pizsama 480 g
Hálóing 400 g
Zsebkendő 25 g
Női ruhanemű
Blúz 100 g
Pulóver 100 g
Miniszoknya 80 g
Bugyi 80 g
Hálóing 180 g
Pizsama 450 g
Zsebkendő 15 g
*110 perc.
** 90 perc.
* 70 perc.
** 50 perc.
* 60 perc.
** 40 perc.
* 90 perc.
** 70 perc.
* 50 perc.
** 30 perc.
HU
Page 90
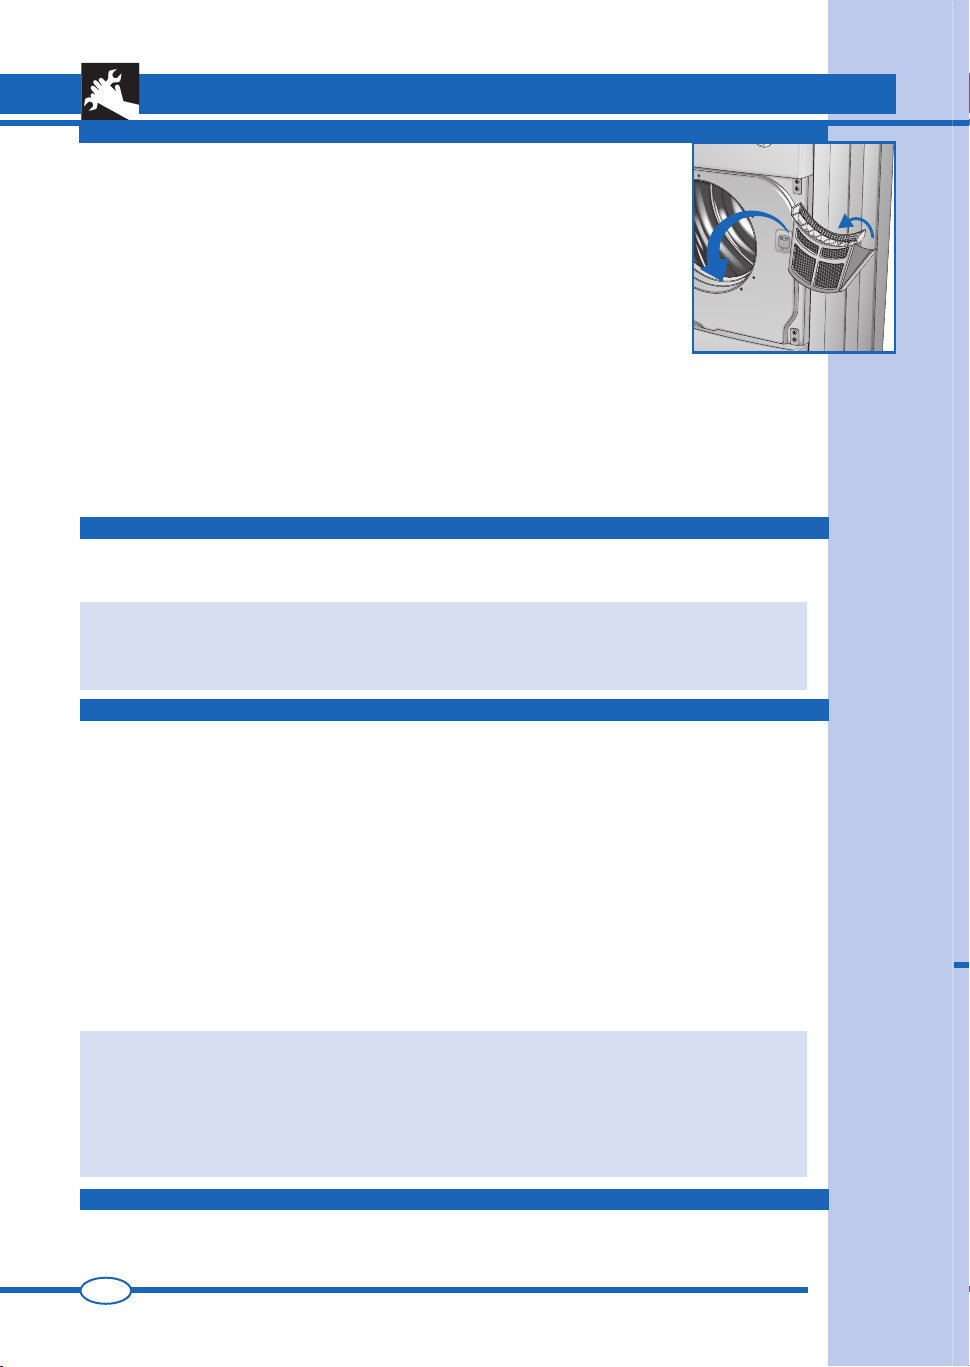
90
Hogy minden körülmények között biztosítva legyen a kitűnő szárítás, ne feledje
rendszeresen tisztítani a szűrőt. Ne feledje minden szárítási ciklust követően a szűrő
ellenőrzését és esetleg tisztítását.
Fontos:
A szűrő tisztítását olyankor kell végezni, amikor a készülék hideg. A szűrő tisztításánál
kövesse az alábbiakban megadott előírásokat:
▼ Nyissa ki az ajtót.
▼ Mindkét kézzel erősen fogja meg a szűrőt, és nyomja előre, hogy ki lehessen
venni.
▼ A szűrő felső szegélyét enyhén tágítsa meg, és nyissa ki a szűrőt.
▼ Vegye ki a szöszöket
▼ Csukja be a szűrőt, ellenőrizze, hogy a rögzítője helyes állásban van.
▼ Ha szükséges, a szűrő készülékben lévő csúszósínjeit porszívóval tisztítsa.
▼ Helyezze vissza a szűrőt a csúszósínekre (14. ábra)
Minden elektromos készüléknél időnként előfordulnak hibák. Ilyen esetben forduljon villanyszerelő
szakemberhez. Ugyanakkor sok probléma megoldható külső segítség nélkül.
Fontos: Meghibásodás esetén azonnal válassza le a készüléket az elektromos hálózatról.
Mielőtt kihívja a vevőszolgálatot, végezze el az alább leírt ellenőrzéseket.
KARBANTARTÁS
A SZŰRŐ TISZTÍTÁSA
14
HIBAKERESÉS
A PROBLÉMÁK MEGOLDÁSA
A szárító nem indul
• Ellenőrizze, hogy:
1) A készülék megfelelően van csatlakoztatva
az elektromos hálózatra.
2) A hálózati dugó szabályosan működik:
2a)
A biztosíték nem égett ki. (A hálózatra
egy másik készüléket, például egy asztali
lámpát csatlakoztatva végezze el az
ellenőrzést).
2b)
A használati utasítás előírásait betartották
Ha ezeket ez ellenőrző műveleteket elvégezve sem működik a készülék, forduljon a legközelebbi
vevőszolgálathoz.
A vevőszolgálat munkatársával közölje a modellt, a sorozatszámot és a hiba fajtáját.
Ezek az információk segítik a vevőszolgálat szakemberét abban, hogy beszerezzék a szükséges
alkatrészeket, és így gyors és hatékony javítást biztosítanak.
VÁLASZTHATÓ TARTOZÉKOK
Helymegtakarítás céljából a viszonteladó biztosítani tud egy olyan tartozékot, ami lehetővé teszi a
szárítónak egy elöltöltős mosógép fölött történő elhelyezését. A beszerelést végző szakember meg
tudja mondani, melyik készülékmodellnél alkalmazható ez a tartozék.
HU
A szárító nem indul
• Ellenőrizze, hogy:
1) Jól be van-e csukva a készülék ajtaja.
2) A „START” gombot megnyomták.
A szárító nem szárít
• Ellenőrizze, hogy:
1) A levegőelvezető cső nincs-e összenyomva
vagy megtörve.
2) A szűrő nincs-e eltömődve. (Ne feledje,
hogy amikor kinyitja az ajtót, a gép belső
részei forrók lehetnek.)
SM2255
Page 91

LIETUVIŲ
Gerbiamasis kliente,
Dėkojame, kad pasirinkote mūsų gaminį.
Prieš įjungdami ir naudodami šį prietaisą, atidžiai perskaitykite instrukcijas. Veikimo principų
žinojimas padės užtikrinti tinkamą ir saugų prietaiso naudojimą.
Šioje instrukcijoje yra pateikti džiovintuvo techniniai duomenys, daug naudingos informacijos apie
jo veikimą, ši informacija padės optimaliai išnaudoti prietaiso galimybes.
Jei džiovintuvą parduosite arba perduosite kitiems žmonėms, naujam naudotojui perduokite šią
instrukciją.
91
TURINYS
PASTABOS IR PATARIMAI NAUDOTOJUI 91-92
• Techniniai duomenys 91
DŽIOVINTUVO APRAŠYMAS 93
DŽIOVINTUVO ĮRENGIMAS 93-95
• Įrengimas 93-94
• Džiovintuvo padėties išlyginimas 94
• Oro šalinimo vamzdžio jungimas 94
• Jungimas prie elektros tinklo 95
DŽIOVINTUVO NAUDOJIMAS 95-97
• Funkcijų aprašymas 95
• Durelių atidarymas ir atidarymo krypties keitimas 96
• Taisyklingas skalbinių džiovinimas 86
• Atsargumo nurodymai audinių tipams 97
• Programų lentelė 97
• Skalbinių svoriai 97
TECHNINĖ PRIEŽIŪRA 98
• Filtro valymas 98
• Gedimų nustatymas 98
• Gedimų šalinimas 98
• Papildomi priedai 98
PASTABOS IR PATARIMAI NAUDOTOJUI
TECHNINIAI DUOMENYS
6,0 kg.
MODELIS: .............................................................................................................................................................................................................
SERIJOS NUMERIS: ......................................................................................................................................................................................
PIRKIMO DATA: .................................................................................................................................................................................................
SM2255
LT
Page 92

92
PASTABOS IR PATARIMAI NAUDOTOJUI
▼ Šis džiovintuvas yra skirtas naudoti buityje.
Kitai paskirčiai naudoti netinkamas, todėl gali
būti pavojingas.
▼ Šią instrukciją visada laikykite prie džiovintuvo,
kad esant reikalui būtų galima rasti reikalingus
nurodymus.
▼ Bet kokios džiovintuvo modifikacijos arba
bandymai liesti jo mechanizmus naudotojui kelia
pavojų, be to, prietaisas gali būti sugadintas.
▼ Gavę prietaisą patikrinkite, ar jis nebuvo
pažeistas transportuojant. Jei pastebėsite
gedimus, apie tai nedelsdami praneškite
prekybinės firmos darbuotojui.
▼ Neuždenkite džiovintuvo skalbiniais arba kitais
daiktais.
▼ Statydami prietaisą į vietą, patikrinkite, ar
elektros kabelis yra nesusisukęs, nepažeistas
ir lengvai pasiekiamas.
▼ Išdžiovinę skalbinius visada uždarykite
dureles, kad vaikai nesiramstytų prie durelių ir
neapverstų džiovintuvo.
▼ Atminkite, kad džiovinant šalinimo vamzdis
įkaista ir gali pasiekti 60° laipsnių temperatūrą.
Nelieskite šios dalies, kol nebaigsite aušinimo
ciklo.
▼ Nenaudokite džiovintuvo nešvariems
drabužiams džiovinti.
▼ Niekada nedžiovinkite drabužių, kurie buvo
ištepti tokiomis medžiagomis, pvz.: kepimo
aliejumi, nafta, acetonu, alkoholiu, benzinu,
žibalu, dėmių valikliu, terpentinu ir vašku.
▼ Prieš dėdami tokius skalbinius į džiovintuvą,
pašalinkite šias medžiagas: išplaukite šiltame
vandenyje papildomai įdėję ploviklio.
▼ Nedžiovinkite tokių gaminių, pvz.: pagamintų iš
porolono, latekso, neperšlampamų medžiagų;
lietpalčių, guminių kilimėlių, įvairių detalių,
drabužių arba pagalvėlių su porolono įdėklais,
nes šios medžiagos gali išsilydyti ir ištepti kitus
drabužius arba sugadinti patį prietaisą.
▼ Audinių minkštikliai arba panašūs produktai
turi būti naudojami atsižvelgiant į gamintojo
pateiktus nurodymus (rasite ant pakuotės).
▼ Jei džiovintuvą parduodate arba perduodate
kitam naudotojui, nepamirškite kartu perduoti
ir instrukcijų. Tai padės naujam naudotojui
tinkamai ir saugiai naudoti džiovintuvą.
▼ Nebandykite atlikti remonto darbų vieni,
nes dėl neprofesionaliai atlikto remonto gali
susižaloti žmonės, taip pat negalios suteiktos
garantijos.
LT
▼ Džiovintuvo remonto darbus gali atlikti
tik klientų aptarnavimo centruose įgalioti
darbuotojai. Atliekant remonto darbus būtina
naudoti tik originalias gamintojo atsargines
dalis.
▼ Prieš dėdami skalbinius į džiovintuvą, juos
gerai išgręžkite. Sausai išgręžti skalbiniai
greičiau išdžiūsta.
▼ Kiekvieną kartą naudodami džiovintuvą,
kruopščiai išvalykite filtrą.
▼ Džiovintuvo kištuko nekiškite į lizdą ir jo
netraukite šlapiomis rankomis.
▼ Džiovintuvas turi būti prijungtas prie tinkamai
įžeminto elektros tinklo lizdo, atitinkančio
esamus saugos reikalavimus.
▼ Džiovintuvui jungti į elektros tinklą nenaudokite
ilginimo laidų arba daugializdžių jungiklių.
▼ Saugokite prietaisą nuo atmosferos medžiagų
poveikio.
▼ Atlikdami techninės priežiūros arba valymo
darbus, džiovintuvą išjunkite iš elektros tinklo.
Norėdami džiovintuvą išjungti iš elektros tinklo,
netraukite jo paėmę už kabelio. Traukite tik
paėmę už kištuko.
▼ Šis prietaisas yra pažymėtas kaip atitinkantis
elektros ir elektronikos prietaisų (WEEE)
Europos direktyvą 2002/96/EB. Pasirūpinkite,
kad pasibaigus naudojimo laikui prietaisas būtų
tinkamai pašalintas. Naudotojas įpareigotas
prisidėti prie pastangų mažinant neigiamą poveikį
aplinkai ir sveikatai.
▼ Prie gaminio pritvirtintas simbolis arba
pridėti dokumentai rodo, kad prietaisas negali
būti laikomas įprastomis buitinėmis atliekomis,
o turi būti atiduotas į specialų surinkimo centrą,
kad elektros ir elektronines atliekas būtų galima
perdirbti.
▼ Prietaisą šalinkite laikydamiesi vietinių atliekų
tvarkymą reguliuojančių nurodymų. Norėdami
gauti smulkesnę informaciją apie gaminio
atidavimą į atliekas ir jo perdirbimą, kreipkitės
į atitinkamas institucijas, vietinę atliekų
surinkimo tarnybą arba parduotuvę, kurioje
džiovintuvą įsigijote.
GAMINTOJAS NĖRA ATSAKINGAS
UŽ NELAIMINGUS ĮVYKIUS, KURIE
ĮVYKSTA DĖL SAUGOS TAISYKLIŲ
ARBA ŠIOS INSTRUKCIJOS NURODYMŲ
NESILAIKYMO.
SM2255
Page 93

DŽIOVINTUVO APRAŠYMAS
93
DŽIOVINTUVO APRAŠYMAS
2
11
10
Džiovintuvas yra buitinis prietaisas, kuriuo galima džiovinti įvairius drabužius.
▼ Prietaisas pagamintas iš plieno plokščių, apdorotų ir nudažytų taip, kad jų
estetinės savybės išliktų ilgą laiką nepakitusios.
▼ Variklis ir judančios dalys sukonstruotos ir pagamintos taip, kad užtikrintų kuo
mažesnį triukšmo lygį.
▼ Valdymo skydelis sukonstruotas taip, kad vartotojas galėtų lengvai įjungti norimą
programą.
8
9
▼ Per platesnes dureles galima lengvai įdėti ir išimti skalbinius.
Modelis su chronometru
valdomu džiovinimu
170’
120’
150’
130’
110’
90’
70’
50’
30’
30’
40’
60’
80’
100’
1 - Įjungimo mygtukas
2 - Džiovintuvo ĮJUNGIMO indikatoriaus lemputė
3 - Džiovinimo laiko valdymo rankenėlė
4 - Durelės
5 - Filtras
6 - Reguliuojamos kojelės
7 - Techninių duomenų lentelė
8 - Šalinimo anga
9 - Sujungiklio detalė
10 - Šalinimo vamzdis
11 - Vamzdžio atrama
1
2
1
3
4
5
6
7
DŽIOVINTUVO ĮRENGIMAS
ĮRENGIMAS
Įrengimo darbus turi atlikti kvalifikuotas darbuotojas laikydamasis gamintojo pateiktų
nurodymų. Netinkamai pastačius džiovintuvą galima sugadinti turtą ir sužaloti
žmones.
▼ Statykite džiovintuvą prie lango, kad greičiau būtų šalinamas drėgnas džiovintuvo
oras.
▼ Kad drėgmė nesikondensuotų, reikia naudoti šalinimo vamzdį; jis turi būti įdėtas
3
A
SM2255
į skylę A prietaiso užpakalinės plokštės apačioje (3 pav.).
LT
Page 94

94
▼ Niekada neuždenkite oro traukimo angos, esančios prietaiso užpakalinėje
dalyje.
▼ Įdėkite filtrą į įprastą padėtį, kaip parodyta paveikslėlyje (4 pav.).
▼ Būgne susikaupusias dulkes šluostykite sausu skudurėliu.
Reguliuojamos kojelės. Pastatykite džiovintuvą vertikaliai, kad jis tvirtai stovėtų ant
keturių kojelių. Išlyginkite džiovintuvo padėtį reguliuodami kojeles.
▼ Šiek tiek pakelkite džiovintuvą.
▼ Sureguliuokite džiovintuvo padėtį iki reikiamo aukščio (5 pav.).
▼ Kojelių per daug neatsukite, nenaudokite atsuktuvo.
▼ Nuleiskite džiovintuvą.
Jei džiovintuvas stovės nelygiai, gali būti pažeisti guoliai ir prietaisas pirma laiko
susidėvės. Džiovintuvo prie grindų tvirtinti nereikia.
Junkite šalinimo vamzdį prie džiovintuvo užpakalinėje dalyje esančios angos (6
pav.).
▼ Prijunkite vieną vamzdžio galą prie pateikto sujungiklio dalies.
▼ Pasukite jungiamąją detalę (kartu su vamzdžiu) prieš laikrodžio rodyklę
džiovintuvo jungimo angoje.
▼ Nukreipkite vamzdį nuo džiovintuvo užpakalinės dalies į kairę arba dešinę per
prietaiso apačioje esančią nišą.
DŽIOVINTUVO ĮRENGIMAS
ĮRENGIMAS
DŽIOVINTUVO PADĖTIES LYGINIMAS
ORO ŠALINIMO VAMZDŽIO JUNGIMAS
4
5
6
▼ Pastatykite kitą vamzdžio galą netoli lango arba ventiliacijos angos išorinėje
sienoje. Jei tai neįmanoma, pasirūpinkite, kad džiovintuvo naudojimo laiku patalpa
būtų gerai vėdinama. Vamzdžiui tvirtinti naudokite atramą (7 pav.).
7
Svarbu! Oro šalinimo vamzdis turi būti jungiamas, net jei oras nešalinamas į išorę, nes
džiovintuvas trauks drėgną orą, todėl pailgės džiovinimo laikas.
Drėgnas oras taip pat gali pažeisti džiovintuvą. Nors iš džiovintuvo šalinamas oras yra šiltas
ir drėgnas bei nekelia pavojaus aplinkiniams, jo negalima nukreipti į žmones, gyvūnus arba
augalus.
Svarbu! Šalinamas oras neturi būti nukreiptas į kaminą, per kurį šalinamos sudegusios degiklių
dujos arba kitas kuras.
LT
SM2255
Page 95

DŽIOVINTUVO ĮRENGIMAS
JUNGIMAS Į ELEKTROS TINKLĄ
▼ Įsitikinkite, ar ant prietaiso užpakalinės pusės esančios lentelės nurodyta įtampa
atitinka elektros tinklo įtampą.
▼ Užbaigę pastatymą, prietaisą junkite į elektros tinklą naudodami dvipolį jungiklį.
▼ Visų saugiklių, elektros laidų ir tinklo lizdų pajėgumas turi būti toks, kad galėtų
išlaikyti ant identifikacinės lentelės nurodytą maksimalią apkrovą.
▼ Elektros lizdas, prie kurio jungiamas džiovintuvas, turi būti įžemintas. Jei jis
neįžemintas, gamintojas nebus atsakingas už jokius įvykusius nelaimingus
atsitikimus (8 pav.).
8
Svarbu! Baigę džiovinimo ciklą, džiovintuvą išjunkite iš elektros tinklo, kad juo negalėtų
naudotis vaikai.
▼ Jei džiovintuvo jungimo kabelis yra pažeistas, kreipkitės į artimiausią klientų
aptarnavimo centrą.
▼ Džiovintuvo negalima jungti prie elektros tinklo naudojant netiesioginius būdus,
pvz., ilgintuvus arba daugializdžius jungiklius.
▼ Džiovintuvą pastatykite taip, kad esant reikalui galėtumėte lengvai išjungti iš
elektros tinklo. N.B.! Šį darbą gali atlikti tik kvalifikuotas darbuotojas.
95
DŽIOVINTUVO NAUDOJIMAS
DŽIOVINTUVO NAUDOJIMAS
3. Programavimo rankenėlė naudojama norint pasirinkti reikiamą programą
9
pagal audinio tipus ir specialius reikalavimus. Jei dėl kokių nors priežasčių
norite pakeisti programą arba džiovinimo ciklo metu pridėti daugiau skalbinių,
programavimo rankenėlę tiesiog nustatykite į STOP padėtį. Tada pasirinkite
reikiamą programą, nustatykite rankenėlę ir paspauskite START mygtuką (9
pav.).
N.B.! ĮSPĖJIMAS! Šią funkciją naudokite, jei yra būtina ir jei iš naujo
nustatoma programa dirbo mažiau negu 3 minutes.
10
11
SM2255
1. START mygtukas. Spauskite šį mygtuką, kad paleistumėte užprogramuotą
džiovinimo ciklo programą (10 pav).
2. Kai START indikatorius išjungtas, rodoma STOP padėtis. Įjungimo indikatorius
rodo, kad vyksta džiovinimo ciklas. Greitas blykčiojimas rodo, kad programa yra
paruošta vykdyti. Lėtas blykčiojimas rodo, kad džiovinimo programa pasibaigė
(11 pav.).
LT
Page 96

96
DURELIŲ ATIDARYMAS IR ATIDARYMO KRYPTIES KEITIMAS
▼ Norėdami dureles atidaryti, paspauskite dešinę durelių pusę (12 pav.). Jei durelių
atidarymo kryptis buvo pakeista, paspauskite kairę pusę.
▼ Durelių atidarymo kryptis yra keičiama priklausomai nuo poreikio (13 pav.).
N.B.! Šį darbą gali atlikti tik kvalifikuotas darbuotojas.
Kreipkitės į klientų aptarnavimo centrą.
Atlikite šiuos veiksmus
A
▼ Išgręžkite skalbinius.
B
▼ Suskirstykite skalbinius pagal tipus ar
audinius.
▼ Užsekite užtrauktukus ir sagas, nepamirškite
ištuštinti drabužių kišenių.
▼ Megztinius išverskite.
C
▼ Atidarykite dureles.
▼ Įdėkite skalbinius į būgną; paklodės turi būti
būgno šone.
▼ Patariama kartu sudėti didelius ir mažus
skalbinius.
D
▼ Uždarykite dureles.
▼ Nusausinkite rankas (elektros įrenginių
nelieskite šlapiomis rankomis).
▼ Įkiškite kištuką į elektros tinklo lizdą.
E
▼ Nustatykite programavimo mygtuką į STOP
padėtį, norėdami iš naujo nustatyti ankstesnes
programas, tada pasukite rankenėlę ir
pasirinkite tinkamiausią programą audinio tipui.
Pateikiamas reikiamas dedamų skalbinių svoris
DŽIOVINTUVO NAUDOJIMAS
TAISYKLINGAS SKALBINIŲ DŽIOVINIMAS
ir sausumo laipsnis (žr. Programų lentelę).
▼ Paspauskite START, norėdami įjungti
džiovinimo ciklą.
F
▼ Norėdami sustabdyti mašiną džiovinimo ciklo
metu, tiesiog atidarykite dureles; būgnas
sulėtės, vėliau sustos. Atminkite, kad kai
durelės yra atidaromos, džiovintuvo vidinės
dalys gali būti labai įkaitusios.
▼ Norėdami atnaujinti džiovinimo ciklą, uždarykite
dureles ir paspauskite įjungimo mygtuką.
▼ Pasibaigus džiovinimo ciklui blykčioja įjungimo
indikatorius, girdimas garsinis signalas.
Nustatykite rankenėlę į STOP padėtį.
▼ Atidarykite būgno dureles ir išimkite
skalbinius.
▼ Uždarykite dureles.
▼ Sausomis rankomis ištraukite kištuką iš
elektros lizdo.
LT
12
13
SM2255
Page 97
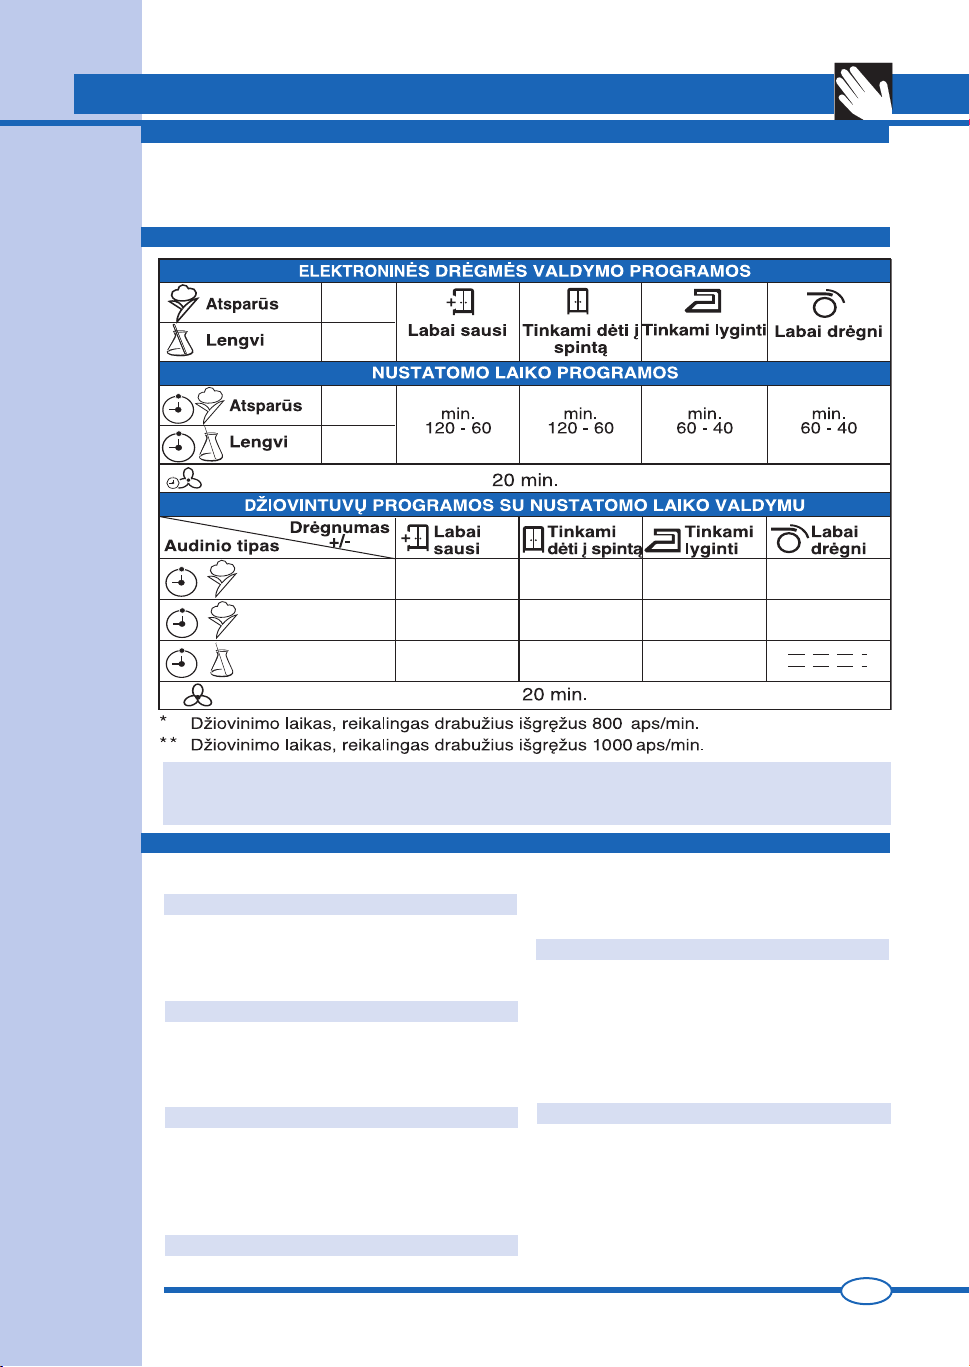
DŽIOVINTUVO NAUDOJIMAS
ATSARGUMO NURODYMAI AUDINIŲ TIPAMS
Jei abejojate dėl audinio tipo, perskaitykite prisiūtą etiketę. Beveik visi mašinomis džiovinami drabužiai
turi etiketes, kuriose pateikta reikiama informacija. Kad išvengtumėte skalbinių įsielektrinimo, skalavimo
ciklo metu į skalbyklę įdėkite kondicionieriaus. Iš būgno tuoj pat išimkite sintetinius drabužius, kad jie
nesusiglamžytų.
PROGRAMŲ LENTELĖ
Max
6.0 kg.
Max
3.0 kg.
Max
6.0 kg.
Max
3.0 kg.
97
Max 6.0 kg.
Max 3.0 kg.
Max 3.0 kg.
* 150 min.
**130 min.
* 110 min.
** 90 min.
* 100 min.
** 80 min.
*130 min.
**110 min.
* 90 min.
** 70 min.
* 80 min.
** 60 min.
*110 min.
** 90 min.
* 70 min.
** 50 min.
* 60 min.
** 40 min.
* 90 min.
** 70 min.
* 50 min.
** 30 min.
Svarbu! Džiovinimo laikas priklauso nuo skalbinių svorio, dydžio, audinio tipo, drėgnumo
laipsnio. Gerai išgręžti skalbiniai išdžiūsta greičiau. Kad džiovinami skalbiniai nesiglamžytų,
į būgną jų per daug nedėkite.
SKALBINIŲ SVORIAI
Nurodyti skalbinių svoriai yra apytiksliai ir gali kisti, tai priklauso nuo gamintojo, kokybės ir drabužių
pasiuvimo.
Patalynė
Antklodė 700 g
Apatinė paklodė 550 g
Viršutinė paklodė 600 g
Pagalvės užvalkalas 180 g
Buitiniai rankšluosčiai
Virtuvinis rankšluostis (indams) 90 g
Virtuvinis rankšluostis (stiklinėms) 70 g
Flanelė 20 g
Rankšluostis rankoms 200 g
Kiti drabužiai
Chalatas 1 200 g
Vonios rankšluostis 800 g
Moteriška palaidinukė 300 g
Vyriški marškiniai 600 g
Palaidinė / marškiniai iš sintetikos 300 g
Staltiesės ir servetėlės
Staltiesė 250 g
SM2255
Didelė staltiesė 1 000 g
Servetėlė 80 g
Vyriški drabužiai
Marškiniai, kurių nereikia lyginti 250 g
Berankoviai apatiniai marškiniai 120 g
Trumpikės 150 g
Šiltos apatinės kelnės 250 g
Pižama 480 g
Naktiniai marškiniai 400 g
Nosinė 25 g
Moteriški drabužiai
Palaidinukė 100 g
Megztinis 100 g
Mini sijonas 80 g
Trumpikės 80 g
Naktiniai marškiniai 180 g
Pižama 450 g
Nosinė 15 g
LT
Page 98

98
Kad džiovinimo rezultatai būtų tinkami, reikia reguliariai valyti filtrą. Po kiekvieno
džiovinimo ciklo nepamirškite patikrinti ir išvalyti filtrą.
Svarbu!
Filtrą valykite, kai džiovintuvas yra neįkaitęs! Filtrą valykite laikydamiesi toliau
pateiktų nurodymų.
▼ Atidarykite dureles.
▼ Abiem rankomis suimkite filtrą ir patraukite į viršų.
▼ Atsargiai atidarykite viršutinį kraštą ir atidarykite filtrą.
▼ Pašalinkite susikaupusias audinių dulkes.
▼ Uždarykite filtrą, pasirūpinkite, kad skląstis būtų nustatytas į reikiamą padėtį.
▼ Jei reikia, naudodami dulkių siurblį išvalykite filtro nukreipiamąsias dalis.
▼ Vėl uždėkite filtrą ant nukreipiamųjų dalių (14 pav.).
Visi elektros prietaisai kartais gali gesti. Tokiu atveju skambinkite reikiamą kvalifikaciją turinčiam elektrikui.
Tačiau daug gedimų galima pašalinti be kitų žmonių pagalbos.
Svarbu! Jei džiovintuvas sugenda, tuoj pat išjunkite prietaisą iš elektros tinklo.
Prieš skambindami į klientų aptarnavimo centrą, atlikite toliau nurodytus darbus.
TECHNINĖ PRIEŽIŪRA
FILTRO VALYMAS
14
GEDIMŲ NUSTATYMAS
GEDIMŲ NUSTATYMAS
Jei džiovintuvas neįsijungia
• Patikrinkite, ar:
1) džiovintuvo kištukas yra įjungtas į elektros
tinklą;
2) nesugedęs elektros tinklo lizdas;
2a)
neperdegė saugikliai (patikrinkite įjungdami
kitą prietaisą, pavyzdžiui, stalinę lempą);
2b)
buvo laikomasi instrukcijoje pateiktų
nurodymų.
Jei atlikus nurodytus veiksmus džiovintuvas vis tiek neveikia, kreipkitės į artimiausią klientų
aptarnavimo centrą.
Kreipdamiesi į aptarnavimo centrą, nurodykite prietaiso modelį, serijos numerį ir gedimo
tipą.
Ši informacija aptarnavimo centro darbuotojui padės parūpinti reikalingas dalis – taip bus
užtikrintas efektyvus ir greitas remontas.
PAPILDOMI PRIEDAI
Kad būtų efektyviau naudojama patalpa, gamintojas gali pateikti priedus, leisiančius pastatyti džiovintuvą
ant skalbyklių, į kurias skalbiniai dedami iš priekio. Darbuotojai gali suteikti daugiau informacijos apie
prietaiso modelio tipą, prie kurio toks priedas gali būti tvirtinamas.
LT
Jei džiovintuvas neįsijungia
• Patikrinkite, ar:
1) durelės yra tinkamai uždarytos;
2) buvo įjungtas START mygtukas.
Skalbiniai neišdžiūsta
• Patikrinkite, ar:
1) oro šalinimo vamzdis nėra sulenktas;
2) filtras neužkimštas (atminkite, kad kai
durelės yra atidaromos, džiovintuvo
vidinės dalys gali būti labai įkaitusios).
SM2255
Page 99

СРПСКИ
99
Поштовани корисниче,
Захваљујемо вам на куповини овог производа.
Пажљиво прочитајте ова упутства пре укључивања и коришћења овог уређаја. Познавање
принципа рада допринеће исправном и безбедном коришћењу уређаја.
Овај приручник садржи техничке карактеристике сушача и корисне информације у вези
његове употребе и помоћи ће вам да свој уређај користите на најбољи начин.
Ако уређај продате или дате некоме на коришћење, не заборавите да му дате и овај
приручник.
САДРЖАЈ
НАПОМЕНЕ И САВЕТИ ЗА КОРИСНИКА 99-100
• Технички подаци 99
ОПИС УРЕЂАЈА 101
ИНСТАЛИРАЊЕ УРЕЂАЈА 101-113
• Инсталирање 101-102
• Нивелација сушача 102
• Прикључивање издувне цеви 102
• Прикључивање на струју 103
УПОТРЕБА СУШАЧА 103-105
• Опис функција 103
• Отварање врата и промена смера отварања врата 104
• Правилно сушење рубља 104
• Подешавање према врсти тканина 105
• Табела програма 105
• Тежина рубља 105
ОДРЖАВАЊЕ 106
• Чишћење филтера 106
• Налажење грешака 106
• Решавање проблема 106
• Додатна опрема 106
НАПОМЕНЕ И САВЕТИ ЗА КОРИСНИКА
ТЕХНИЧКИ ПОДАЦИ
Ширина (cm):
Д
имензије:
Висина (cm):
Дубина (cm):
Макс. капацитет
Номинална снага
Напон
Види плочицу с подацима
Види плочицу с подацима
МОДЕЛ: .................................................................................................................................................................................................................
СЕРИЈСКИ БРОЈ: ......................................................................................................................................................................................
ДАТУМ КУПОВИНЕ: ...................................................................................................................................................................................
SM2255
59.5
85.0
60.4
6,0 kg суво
SR
Page 100
100
НАПОМЕНЕ И САВЕТИ ЗА КОРИСНИКА
▼ Овај уређај је намењен употреби као кућни
сушач. Свака друга примена се сматра
неодговарајућом и стога опасном.
▼ Увек држите приручник близу уређаја да
бисте га по потреби могли брзо прегледати.
▼ Модификације или покушаји измене уређаја
могу бити опасни по корисника и могу
оштетити производ.
▼ Проверите приликом испоруке уређаја да није
оштећен током транспорта. Ако откријете
било какво оштећење то одмах пријавите
продавцу.
▼ Не прекривајте сушач рубљем и другим
предметима.
▼ При постављању уређаја проверите да кабл
за напајање можда није преломљен или
нагњечен, као и да ли је лако доступан.
▼ Увек затворите врата сушача након његове
употребе.
▼ Тиме ћете спречити децу да се наслањају на
врата и евентуално преврну уређај.
▼ Не заборавите да се издувна цев током
сушења загрева и може достићи температуру
од 60°. Не додирујте овај део пре него што се
заврши циклус хлађења.
▼ Не користите сушач за сушење прљаве
одеће.
▼ Никада не сушите одећу запрљану супстанцама
као што су уље за кување, петролеј, ацетон,
алкохол, бензин, керозин, разређивач,
терпентин и восак.
▼ Ове супстанце уклоните са одеће перући је
топлом водом и детерџентом пре него што је
ставите у сушач.
▼ Не сушите предмете као што су гума, латекс,
кишни мантили, водоотпорне тканине, гумене
простирке, калуповане предмете, одећу
или јастуке са умецима од гуме, јер се могу
истопити и оштетити друге предмете или сам
уређај.
▼ Омекшивачи и слични производи се
морају користити у складу са упутствима
произвођача.
▼ Ако уређај продате или дате некоме на
коришћење, не заборавите да му дате и овај
приручник. То ће допринети да нови корисник
исправно и безбедно користи сушач.
▼ Не покушавајте сами да оправите било коју
грешку уређаја, јер оправке које не обавља
професионално лице могу изазвати тешка
оштећења и поништити права на оправке под
гаранцијом.
▼ Оправку уређаја сме да врши искључиво
▼ Центрифугирајте или ручно исцедите
▼ Добро очистите филтер након сваког сушења
▼ Никад не стављајте и не вадите утикач из
▼ Сушач мора бити прикључен у струјну
▼ За прикључивање уређаја у струјну утичницу не
▼ Не излажите уређај атмосферским
▼ При сервисирању или чишћењу уређаја
▼ Овај уређај је означен као усклађен са
▼ Симбол причвршћен на производ
▼ При уклањању уређаја држите се локалних
SR
особље овлашћено од стране центра за
подршку корисницима. Приликом свих
оправки морају се користити само оригинални
резервни делови.
рубље пре него што га ставите у сушач.
Центрифугирано рубље ће се брже осушити.
да бисте одржали савршену циркулацију
ваздуха.
струјне утичнице влажним рукама.
утичницу са уземљењем која је у складу са
важећим безбедносним стандардима.
користите продужне гајтане и разделнике.
падавинама.
морате га искључити из струјне утичнице.
Не искључујте уређај из струје повлачењем
кабла за напајање. Вуците само утикач.
европском Директивом 2002/96/EC, “Отпадна
електрична и електронска опрема”. Производ
уклоните на прописани начин. Корисник се
обавезује да ће доприносити спречавању
негативних последица по здравље и животну
средину.
или пратећа документа означава да се
овај производ не сме сматрати нормалним
кућним отпадом, већ се мора испоручити
овлашћеном центру за рециклажу електричне
и електронске опреме.
прописа о уклањању отпада. За додатне
информације о уклањању и рециклажи овог
производа обратите се надлежним органима,
локалној служби за одношење кућног отпада
или продавцу од кога сте купили уређај.
ПРОИЗВОЂАЧ НЕ МОЖЕ БИТИ ОДГОВОРАН
ЗА БИЛО КАКВЕ НЕЗГОДЕ НАСТАЛЕ
УСЛЕД НЕПОШТОВАЊА БЕЗБЕДНОСНИХ
СТАНДАРДА ИЛИ ЗАХТЕВА ДАТИХ У ОВОМ
ПРИРУЧНИКУ.
SM2255
 Loading...