

Page 1
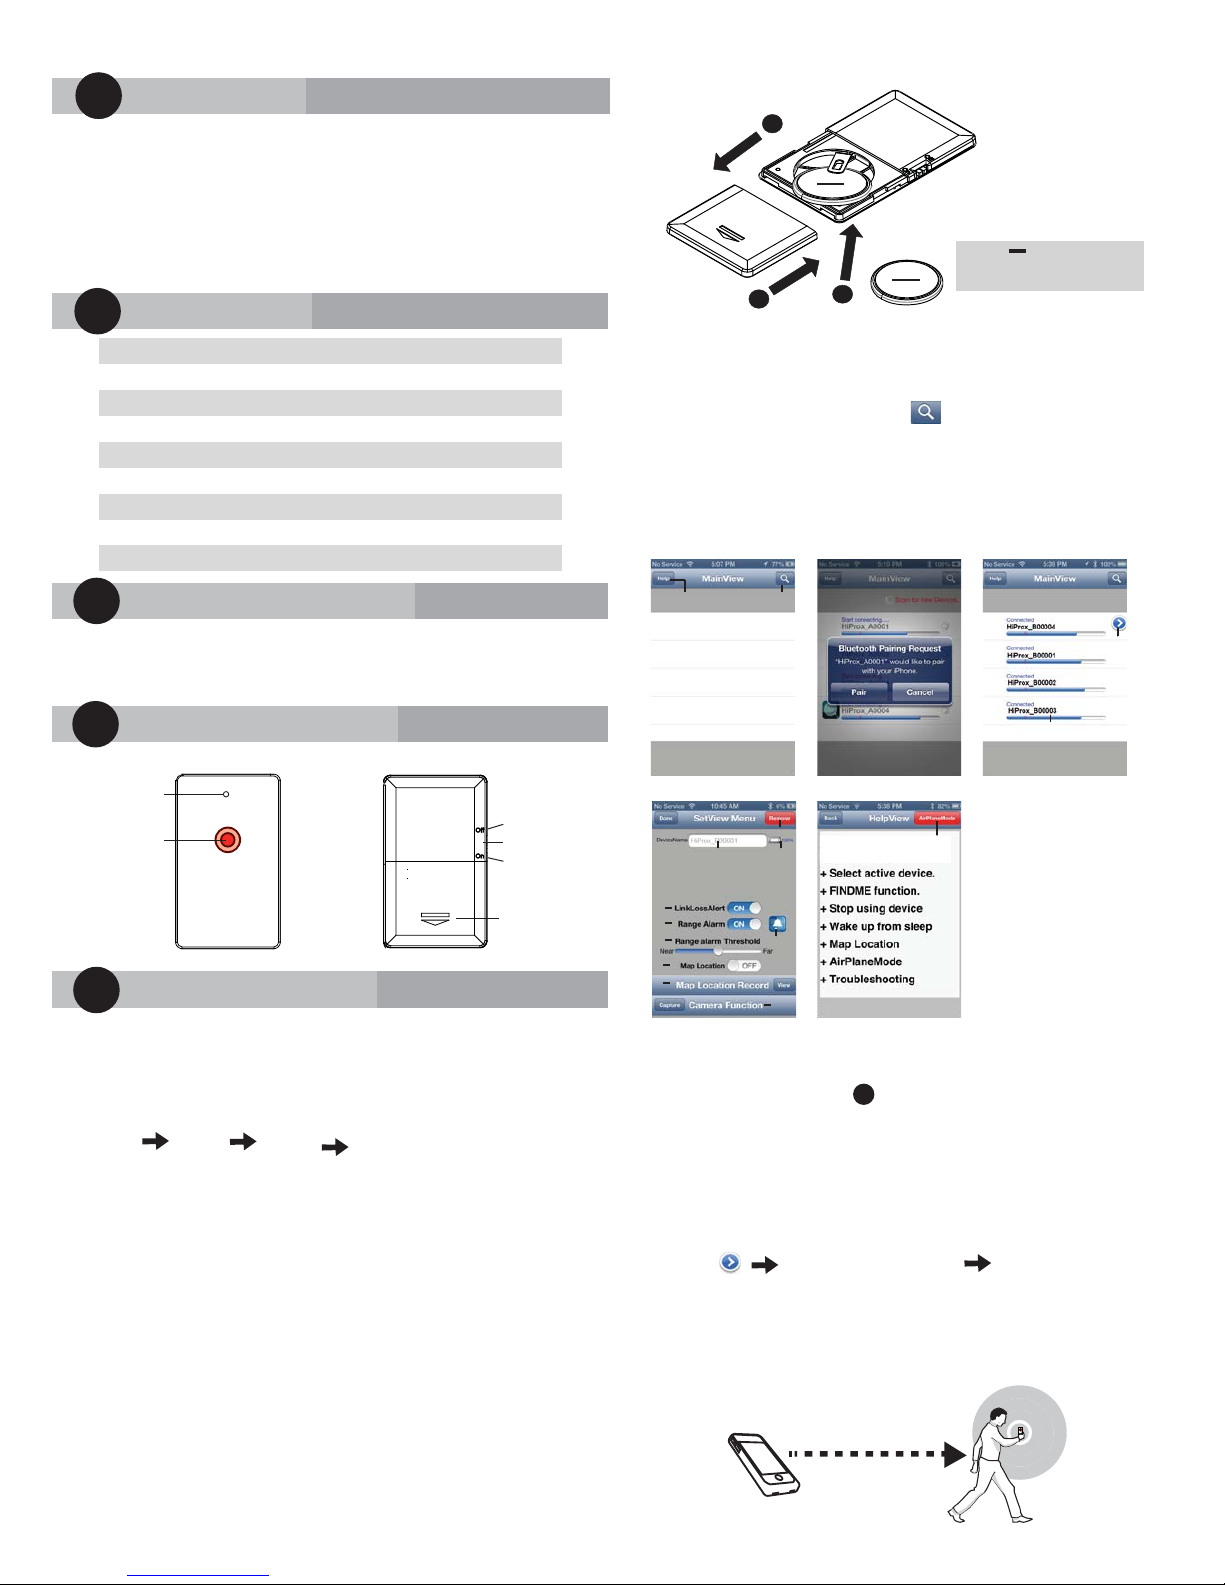
A) Wallet Reminder Unit x 1~4 B) Battery CR 2016 x 1~4
C) User Manual x 1
If any components are missing from the package, please return
the product to your dealer immediately.
Product Description
3
Multiple Wallet Reminder User Manual
The Wallet Reminder SB11 is a quick alarm to prevent your wallet
from lost. It can be easily put into any wallet since the size is half
of a credit card. Download the free HiProx Multi app from App
Store, and combine with Wallet Reminder unit, you will never lose
or leave your wallet behind. As a remote shutter release for
self-portraits or to prevent blur by shaking camera. Moreover, the
app will take a GPS snapshot when your wallet is away from your
phone for a certain range you set, which let you know where your
wallet is left at. This device works with your BLE iPhone/iPad.
1 Introduction
Quick Setup Guide
Step 1 - Download App ”HiProx Multi”
Download ”HiProx Multi” on App Store for free. (Please search for
HiProx Multi on App store, or search for BLE and find the HiProx
Multi application)
Step 2 - Enable Bluetooth on your iPhone/iPad
Go to Setting General Enable Bluetooth
Step 3 - Place battery into Wallet Reminder Units
Insert batteries in to Wallet Reminder unit in accordance with the
battery installation Instructions illustrated.
BE SURE TO SLIDE THE WALLET REMINDER UNIT
BATTERY BETWEEN THE UPPER AND LOWER BATTERY
CONTACTS.
IMPORTANT NOTE: Placing battery on top of contact and
closing the lid will cause damage to the battery terminal
and will invalidate the warranty.
1. Slide out the battery cover.(Figure 1)
2. Insert batteries (included) following the polarity markings in
the battery compartment
3. Close the battery cover back to its place as shown.
Notice : Once the battery is inserted, the power will
turn on automatically and enter pairing mode. Green
LED will blink per second to indicate device is ready
to pair.
Specification
Product description
2
4
1 Introduction
5
Quick setup guide
Front
Back
Page 1
Package components
3
Step 4 - Run ”HiProx Multi” application
a. Open ”HiProx Multi” and tap the button in the upper right
corner to discover all available devices.(Figure 2)
b. ”HiProx Multi” will pop up Bluetooth Pairing Request.(Figure 3)
c. Select ”Pair” from ”Bluetooth Paring Request” for each device.
The Green LED light will blink once every 5 seconds in the
connecting mode.
d. Once the pairing process is completed, the iReminder function is
enabled.
(Figure 4)
Step 5 - Test the Wallet Reminder system
a. Set ”Hold Switch” to “On” from Reminder to enable ”FindMe”
function. (Please refer to Product description Back picture)
b. Press ”FindMe” button on the Reminder unit , and your BLE
device will beep.
c. Press and release ”Find Me” button to stop the FindMe function.
d.
To set different alarm sounds for each tag, press 'Alarm Button'
(Figure 5)and go to Alarm Sound Selection View to choose your alert
tone for that tag.
e. Set alarm ”threshold level” depends on the alarm distance you
like.
Step: Range Alarm Threshold Move the threshold
bar depends on the distance alarm you need.
(Figure 5)
f. Test your setup by placing the iPhone in a stationary location.
Then take the Reminder and walk away from the BLE device
when you reach 7-30 feet from the BLE device, and your BLE
device will beep. If you move back into the range, the alarm will
cease.
(Figure 7)
Figure 1
4
7-30 Feet
Figure 7
Communication Standard Bluetooth® 4.0 Low Energy Wireless Technology
Compatibility
Bluetooth 4.0 BLE device, ex. iPhone 4S/5, iPad (iOS 5 / iOS 6 or later)
Search Range
98 ft /30m (*Distance will vary depending on terrain and other factors.)
Alert Range 7~30 feet / 2~9 meters adjustable
Battery Type CR2016x1
Battery Life 6 months
Weight 4.9g
Dimension 50x30x3mm(1.96x1.18x0.12inch)
Working Temperature
Temperature: 5℃~40℃、humidity: 20%~80%
Status LED
Hold Switch
Battery cover
FindMe
Button
The side facing
upwards
1
2
CR2016
3
Disable FindMe
Button Function
Enable FindMe
Button Function
1. Enter Help menu
2. Find new device
3. Setting button
4. Signal indicator
5. Remove tag button
6. Change device name
7. Battery status
8. On/Off link loss function
9. On/Off range alarm function
10. Set alarm range
11. Alarm sound setting
12. On/Off Map location function
13. Enter Map view menu
14. Enter Camera function
15. Enter airplane mode setting
Figure 2 Figure 3
Figure 5
Figure 4
Figure 6
2
15
1
Signal Indication
3
4
6 7
11
8
9
10
12
13
14
5
Page 2
Map Location
Warning
11
Do not disassemble, repair, modify or replace the iReminder
Unit or any of its components.
Please comply with the national and international flight safety
regulations when using device during your flight trip.
When storing rechargeable batteries for collection, keep in a
vented, non-metal container.
Operating for this product is between 40˚F~103˚F
(5˚C~40˚C). Storage for this product is between
-4F˚~185˚F(-20˚C~85˚C).
Do NOT dispose of the battery in public trash; it is unlawful
under state and federal environmental laws and regulations.
Please dispose of the battery at local battery recycling center.
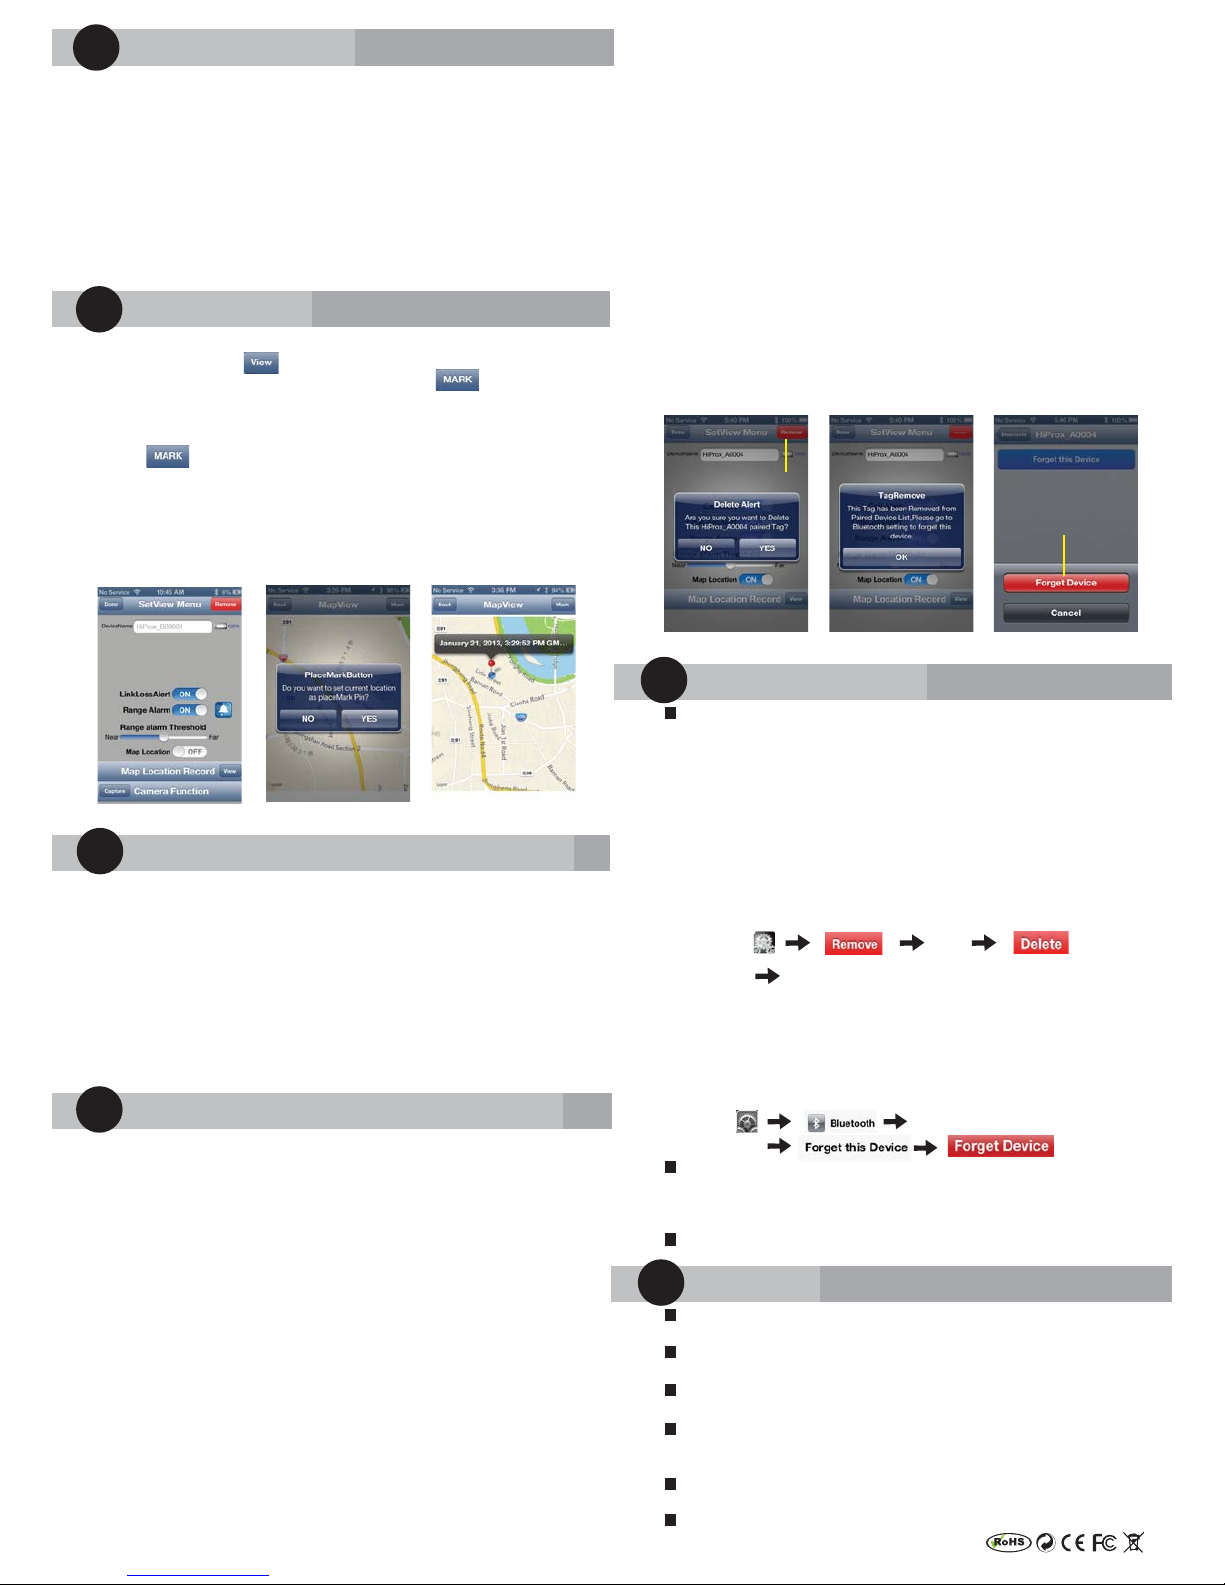
a. To set map Location function manually, go to SetView Menu
page and tap the View button to go to MapView.
(Figure 8)
b. To manually select a Location mark, tap the button
and choose [YES] ,you will see a red mark pin on the current
blue location mark.
(Figure 9)
c. Auto set map location function: go to MapView Menu and tap
the button and remove the current mark pin , then
enable the Map Location function.
When your iOS Device detects linkLossAlert , the iOS Device
will automark the Location pin on MapView.
(Figure 10)
Please notice map location is at the base of the iOS
Device GPS function if outdoors. If indoor, Please enable
Wi-Fi to get Location accurately.
Troubleshooting
10
If you try to discover a device or once the battery had been
removed, but cannot find it, this usually indicates that there is
existing bond information. Locate and remove existing bond
information from your iOS device and from Bluetooth Setting to
"Forget device". (Figure 12)
May be you need to shut down iOS device to clean holding
information completely.
Removing bond information from HiProx App
To remove device permanently:
a. Disconnection device first and go to SetView page to
“Remove” (Figure 11) and “Delete” (Figure 12) Device.
Follow “Removing bond information from iOS” setps to
completely remove device from the iOS.
Step : YES
YES
b. Remove battery from device and re-install to re-start pairing
process.
Removing bond information from iOS
Bond information can be removed from the Settings menu, by
going to General and then Bluetooth. There you should see the
name of the device you want to remove, tap it, and choose
"Forget this device". (Figure 13)
Step :
When you are not going to use the FindMe function, please
switch the Hold Switch to the right side to disable the FindMe
button. Otherwise, when the Hold Switch is switched to the left
side, the FindMe button is enable.
Please change batteries if audible alarm becomes weak.
7
Option B: Enable sleep mode for all devices:
a. To temporarily stop using one or more devices, enter sleep
mode for each device. Hold device button for over 3 seconds
until you hear the first beep or the status LED light blinks Red. If
you are still in connect mode, a link lost alert will register to iOS
DEVICE and iOS will issue Alert Sound with 'LinkLoss/sleep'
message. Tap that row to stop Alert Sound. You can wakeup
that device by press and release device button once. iOS
Device will detect wakeup signal and enable connection
automatically.
b. Device LED will stop blinking when it is in sleep mode.
Option C: Remove device from iOS
You can remove device permanently by tapping the red
Remove button
(Figure 11) in the upper right corner of the
SetView page. To delete this device
(Figure 12) ,Please GO TO
your iOS Device Settings menu, select General/Bluetooth . You
should see the name of the device you want to remove, tap it
and choose "Forget this device".
(Figure 13)
9
Page 2
Figure 8 Figure 9
Figure 10
Figure 11 Figure 12
Figure 13
Delete device
HiProx_Bxxxxx
Forget device
Remove device
8
Re-connect or Stop using device
9
Re-connect Device to iOS system
It will enter sleep mode (the LED light is off) when your iOS Device
detects linkLossAlert after 30 seconds, please press and release
FindMe button, device will wake up from sleep mode and send
connection request to iOS DEVICE. iOS DEVICE Will automatically
connect to this device with "Connected" message.
Stop using device
Option A: Enter Airplane Mode
To DISCONNECT all active device, please go to Help/ AirPlane
Mode option and tap 'YES' to disconnect all devices. Device
will enter standby mode after 30 seconnds. Green LED will
blink every 10 seconds to indicate standby mode. To RECONNECT
all active device: please go to Help/AirPlane Mode option and tap
'Reconnect' to connect all devices. If all devices are in sleep mode,
please press and release device button to wakeup each device. In
this case, you have to exit App and Run again to reconnect all
device (this may take up to 20 seconds for device in SLEEP mode).
Press and release device button, Device will wake up from sleep
mode and send connection request to iOS DEVICE. iOS DEVICE
Will automatically connect to this device with "Connected" message.
Press and Release Device 'FindMe' button (hardware button
under the LED) will gernerate ”FindMe Request” from that Device.
Your iOS device (iPhone / iPad...) will issue Alert sound continuesly. Press and Release Device FindMe button to stop this
request.
Holding the device button for over 3 seconds will force the device
to enter SLEEP mode and generate a linkLossAlert to the iOS
device; to wake up and re-connect to the iOS device, press and
release device button.
To avoid accident put device into SLEEP mode, please set the
switch in Off to disable FindMe button .
FindMe Function
6
Remote control for Photo Capture
To use the 'Photo' remote control function, go to the SetView page
and tap the Capture button to go to Capture View. The Smart Tag
remote key can control your smartphone camera function for
photo capture with one second per 'capture count number' or one
minute per 'capture time'.
For the Photo Capture function: You can use '+' or '-' to increase or
decrease the 'Capture count number' up to 100 images. Press the
smart tag remote button to start photo image capture one image
per second for the specified capture count period (you only press
the remote button once and you can pan your camera around
your target area).
 Loading...