

Arctic Cooling CX36BD2SPD, CX302DDWT, CX30BD2SPD, CX24BD2SPD, CX242DDWT User Manual
WHOLE HOUSE FANS
by
A COMPLETE GUIDE FOR
DO-IT-YOURSELF INSTALLATION
of Cool Attic Models
CX242DDWT
CX302DDWT
CX24BD2SPD
CX30BD2SPD
CX36BD2SPD
THANK YOU for your purchase of a Cool Attic Whole House Fan.
Your new fan is easy to install and will operate efficiently and be trouble-free
for many years to come. Should you have any problem with the installation
or operation of your fan, please call our toll-free customer service line at
1-800-433-1626. We welcome your call and will do everything we can to
help you complete the installation of your Cool Attic Whole House Fan.
VENTAMATIC, LTD. P.O. BOX 728, MINERAL WELLS, TX 76068-0728 • PHONE 800-433-1626 FAX 940-325-9311 • WWW.BVC.COM • E-MAIL: BVC@BVC.COM
A leader in the ventilation industry for over 60 years, Ventamatic, Ltd. oers a complete line of air movement
products for commercial, industrial, agricultural, and residential use sold under these ne names:
®
®

PLEASE READ AND SAVE
THESE INSTALLATION INSTRUCTIONS
THIS FAN IS INTENDED FOR RESIDENTIAL USE ONLY
TO REDUCE THE RISK OF FIRE, ELECTRIC SHOCK OR INJURY, OBSERVE THE FOLLOWING:
DO NOT USE Models CX242DDWT, CX302DDWT, CX24BD2SPD,
1.
CX30BD2SPD, CX36BD2SPD WITH ANY SOLID STATE VARIABLE SPEED
CONTROL DEVICE (RHEOSTAT).
Use this unit only in the manner intended by the manufacturer. If you have any
2.
questions, contact the manufacturer.
Before servicing or cleaning this unit, switch the power off at the service panel and
3.
lock out to prevent power from being switched on accidentally.
Installation work and electrical wiring must be done by qualified people in
4.
accordance with all applicable codes and standards, including fire-rated
construction.
Sufficient air is needed for proper combustion and exhausting of gasses through
5.
the flue (chimney) of fuel burning equipment to prevent back-drafting. Follow the
heating equipment manufacturers' guidelines and safety standards such as those
published by the National Fire Protection Association (NFPA) and the American
Society for Heating, Refrigeration and Air Conditioning Engineers (ASHRAE) and
local code authorities.
When cutting or drilling into walls or ceilings, do not damage electrical wiring and
6.
other hidden utilities.
7.
To avoid injury from fiberglass insulation, wear long sleeves, rubber gloves,
goggles, and a respirator mask both in the attic and below when cutting and
removing sheet rock from the shutter opening.
CAUTION
1.
This fan is intended for general ventilating use only. Do not use it to exhaust
hazardous or explosive materials or vapors.
2.
This unit has an unguarded impeller. Do not use in locations easily accessible to
people or animals.
3.
Do not operate fan when a fire is burning in the fireplace.
PAGE 2
INSTALLING YOUR WHOLE HOUSE FAN
BEFORE BEGINNING INSTALLATION, PLEASE READ INSTRUCTIONS
THOROUGHLY.
PRELIMINARY STEPS
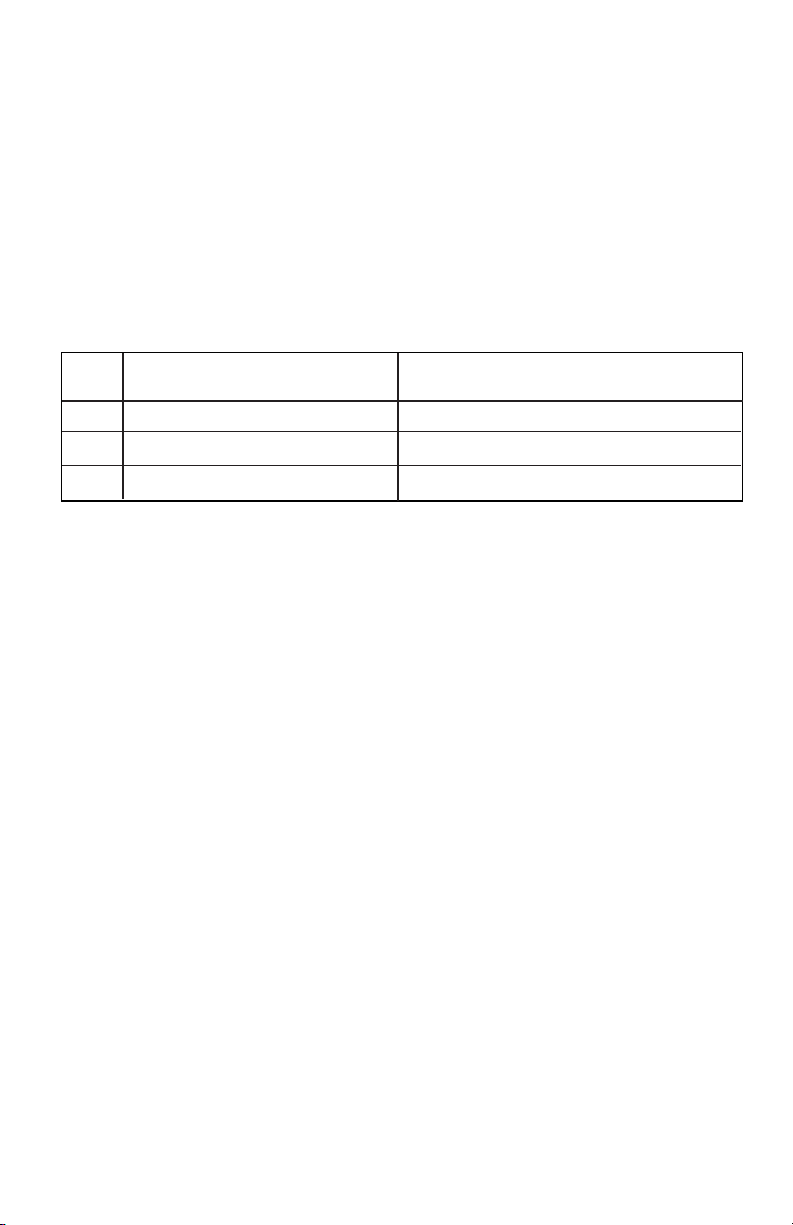
1. Review the Attic Air Exhaust Requirements in the chart below.
Whole House Fans are designed to pull in fresh, cool air from the outside through
open windows in your home. Hot air that is in the home is pulled up through the
fan and into the attic, and then exhausted through vents in the roof, undereaves,
soffits or gables. This exhaust ventilation is measured in Net Free Area (NFA).
For your Whole House Fan to operate properly, you must have adequate
NFA as listed in the chart below.
FAN
SIZE
SQUARE FOOTAGE OF
AREA TO BE VENTILATED
NFA (Net Free Area)
EXHAUST REQUIRED
24" up to 1800 sq ft (1 story) 8 to 10 sq ft (1152 to 1440 sq in)
30" 2000 to 3000 sq ft (1 story) 10 to 12 sq ft (1440 to 1728 sq in)
36" over 3200 sq ft (1 story) 12 to 14 sq ft (1728 to 2016 sq in)
2. Assemble the following tools and materials. They will be used
during the installation procedure.
TOOLS NEEDED:
• Tape measure
• Marker or pencil
• Circular saw, saber saw, or keyhole saw
• Hand saw
• Electric drill
• Screwdrivers (slotted & Phillips)
• Hammer
• Utility knife
• 6 to 8 ft. stepladder
• Goggles, rubber gloves, respirator mask
MATERIALS NEEDED:
• 11/2 pounds of #12d (3") common nails or #16 box nails (about 100 nails)
• Sixteen to twenty 1
• Twelve to sixteen 1
• Lumber of the same dimension and type (i.e., 2" x 6", 2" x 8" etc.) as your ceiling joists
to frame the shutter opening. The length of the lumber will depend on the size of your fan.
• Two 8-ft pieces of lumber of the same type as your ceiling joists (i.e., 2" x 6", 2" x 8" etc.).
Two 8-ft sections will be enough to face even the largest fan.
• Wiring Supplies:
UL-listed junction boxes that meet local code requirements.
3-conductor Romex cable with ground.
1/2" ring shank drywall nails
1/2" #8 decking screws
3. Read through the 9 Installation Steps on the following pages before
beginning installation.
PAGE 3
 Loading...