

Arctic Cat 2007 Operator's Manual

2007
2007
Snowmobile
Operator’s
Manual
p/n 2257-617

LIMITED WARRANTY
Arctic Cat Inc. (hereinafter referred to as Arctic Cat) extends a limited w arranty on each new Arctic Cat
Snowmobile it manufactures and on each part and accessory manufactured or sold by Arctic Cat. The
warranty is extended to the original retail purchaser only on parts and accessories sold through an
authorized Arctic Cat Snowmobile dealer. Warranty on snowmobiles is extended to the original retail
purchaser; however, the balance of the unused warranty may be transferred to a second party.
Arctic Cat warrants only the products it manufactures and/or sells and does not warrant that other
products will function properly when used with an Arctic Cat Snowmobile or will not damage the Arctic
Cat Snowmobile. Arctic Cat does not assume any liability for incidental or consequential damages.
Arctic Cat will repair or replace, at its option, free of charge (including any related labor charges), any
parts that are found to be warrantable in material or workmanship. This repair work MUST be done by
an authorized Arctic Cat Snowmobile dealer. No transportation charges, rental charges, or
inconvenience costs will be paid by Arctic Cat. The warranty is validated upon examination of said
parts by Arctic Cat or an authorized Arctic Cat Snowmobile dealer. Arctic Cat reserves the right to
inspect such parts at its factory for final determination if warranty should apply.
The warranty periods are as follows:
1. For snowmobiles used for recreational purposes:
—If purchased between May 1 and November 30, warranty expires ONE (1) YEAR from
December 1 of the current year.
—If purchased between December 1 and April 30, ONE (1) YEAR from the date of sale.
2. For snowmobiles used for commercial purposes (including rental operations), ONE (1) YEAR
from the date of sale.
3. SIX (6) MONTHS from date of sale for batteries on a full exchange basis and 50% exchange for
the remaining SIX (6) MONTHS of the first year.
4. THIRTY (30) DAYS from date of sale for all dealer installed service parts and accessories.
5. UNTIL EXPIRATION OF THE NEW PRODUCT WARRANTY for all eligible replacement parts.
Exclusions to this warranty include normal wear, abuse (i.e. a track run on marginal snow conditions
without proper lubrication or additional idler wheels), and the following parts:
Fuel Filter Light Bulbs Windshield Drive Clutch/Driven Pulley Wear Parts
Drive Belt Wear Bars Water Pump Belt Brake Pads
Wear Strips Fan Belt Spark Plugs Torn or Punctured Upholstery
The following will VOID Arctic Cat’s warranty:
1. Failure to perform the proper break-in procedure and all operator related maintenance, storage
procedures, and service as recommended in the Operator’s Manual.
2. Repairs and/or adjustments by anyone other than an authorized Arctic Cat Snowmobile dealer.
3. Use of an improper fuel mixture ratio.
4. Use of improper carburetor main jets.
5. Use of improper gasoline, lubricating oils, or spark plugs.
6. An accident or subjecting the snowmobile to misuse, abuse, or negligent operation.
7. Any modification or removal of parts (i.e. air-intake silencer, muffler, etc.) unless instructed to do
so by Arctic Cat.
8. Use of the snowmobile in any wa y for racing purposes.
9. Removal of the engine for use in another vehicle.
10. Removal or mutilation of the Vehicle Identification Number or Engine Serial Number.
11. Use of parts not sold or approved by Arctic Cat.
12. Track and tunnel damage resulting from either ice stud or hooker plate installation.
13. Damage due to improper transportation.
In consideration of the foregoing, any implied warranty is limited in duration to the various warranty
periods set forth. This warranty gives you specific legal rights, and you may also have other rights
which vary from state to state and country to country. Some states do not allow limitations on how long
an implied warranty lasts, so the above limitations may not apply to you.

Table of Contents
Limited Warranty..................Inside Front Cover
Foreword.........................................................1
Declaration of Confo rmity ...............................2
Snowmobile Safety Rules...............................3
General Information...................................4-30
Snowmobile Identification...........................4
Control Locations ................................ .......4
Tipped Snowmobile....................................7
Gasoline-Oil ...............................................8
Engine Break-In (2-Stroke Mo dels)...........10
Engine Break-In (660 cc/1100 cc
Z1 Models) ...................................... .....10
Indicator Lights (Carbure ted Models/
Bearcat W/T Non-Turbo/
Panther 660)................................. ........11
Low Oil Warning Light
(Standard 2-Stroke Models )..................11
Low Oil Pressure Warning Light
(Bearcat W/T Non-T urbo/
Panther 660 Mo dels)............................11
Coolant T emperature
Warning Light (Carbureted Models/
Bearcat W/T Non-Turbo/
Panther 660)................................. ........12
Charging System Warning Light
(660 cc Models)................................... .12
Check Engine Light (Bearcat W/T
Non-T u rbo/P anther 660 Models)...........12
Speedometer/Tacho meter Indicator
Lights (Crossfire/F-Series/Jaguar Z1/
M-Series/660 cc Turb o Models)............12
Diagnostic Codes/Check Engine
(2-Stroke Models).................................15
Diagnostic Codes/Check Engine
(Jaguar Z1)...........................................16
Handlebar Tilt.......................................... .17
Handlebar Tilt
(F-Series - STD)....................................17
Handlebar Tilt (F-Series L XR/Sno Pro/
Jaguar Z1)........................................... .18
Exhaust System ...................................... .19
Air-Intake Silencer....................................19
Battery (Electric Start Models)..................19
Cooling System (Liquid).......................... .20
Drive Clutch and Driven Pulley.................20
Drive Clutch/Driven
Pulley Alignment...................................21
Drive Chain Tension. ......................... ........21
Fuel Pump................................................22
Gas T ank Shut-Off V alv e...........................22
Shock Absorbers (Standard Gas).............22
Shock Absorbers (Rebu ildable Gas).........22
Deep-Lug Trac k........................................23
Hacksaw Tr ack......... ......................... ........23
T rac k Studs.............................................. .23
Reverse Transmission ...................... ........24
Reverse Transmission (Crossfir e/
F-Series/Jaguar Z1/
M-Series Models).................................25
Towing ......................................................26
Adjustable Backrest .................................26
Removable Rear Seat ..............................26
Removable Se at (Crossfire/M-Series
Models) ........................................ ........27
Removable/Ad justable Seat
(F-Series/Jaguar Z1)............................27
Arctic Pow er V alv e (APV) System.............28
Exhaust Controlled Timing
(ECT) System (600/800/1000 cc).........29
Operating Instructions............................ ..31-39
Starting and Stopping Engine...................31
High RPM Operation
(660 cc Models)....................................35
Braking (Hydraulic Brak e Models)............35
Emergency Stopping................................36
Throttle/Ignition Monitor Switch
(2-Stroke/J aguar Z1 Models)................37
Varying Altitude Oper ation........................39
Lubrication...............................................40-45
Standard Chain Case...............................40
ACT Drive Gear Case...............................41
Front Suspens ion ................................. ....43
Speedometer Drive Adapter.....................44
Rear Suspension......................................45
Maintenance............................................46-93
Periodic Maintenance Chec klist................46
Fuel System .............................................47
Checking Engine Oil Level
(660 cc Models)....................................48
Checking Engine Oil Le vel (J aguar Z1).....49
Changing Engine Oil
(660 cc Models)....................................49
Changing Engine Oil/Filter (Jagu ar Z1).....50
Adjusting Carburetor (Single)...................52
Adjusting Carburetors (Twin) ....................54
Selecting Carburetor Main Jet (s)..............58
Spark Plugs (1100 cc Z1) .........................59
Spark Plugs..............................................59
Checking/Adjusting Valve Clearance
(660 cc/1100 cc Z1)..............................62
Charging Battery
(Electric Start Models)..........................62
Fuses (660 cc Models) .............................64
Fuses (1100 cc Z1)...................................65
Engine Heater (660 cc Models)................66
Mechanical Brake System........................66
Hydraulic Brake System...........................68
Drive Belt................................ ..................72
T rac k Tension............................................76
T rac k Alignment........................................78
Suspension ..............................................79
Lights........................................................83
Ski Wear Bars...........................................89
Adjusting Ski Stance(M-Series/
Bearcat 570 Models) ............................90
Rail Wear Strips........................................91
Axial Fan Belt (37 0 cc Models)..................91
Accessory Belt (660 cc Models)................92
Perf ormance Tips................................... .......94
Preparation For Stor age...........................95-97
Preparation After Storage........................98-99
U.S. EPA Emission Control
Statement/Warra nty Cove rage...............100
Change of Address, Own ership ,
or Warranty Transfer...............................101
Warranty Procedure/
Owner Responsibility.......Inside Back Cover

REFERENCE INFORMATION
Write the appropriate information for your Arctic Cat Snowmobile in the spaces
below.
Always use these numbers when referring to your snowmobile.
Model: ________________________________________________
Date of Purchase: _______________________________________
Vehicle Identification Number: _____________________________
Engine Serial Number: ___________________________________
Your Arctic Cat Dealer: _____________________________________
Address: ________________________________________________
Phone: __________________________________________________
! WARNING
A snowmobile is a very high performance vehicle. Because it does accelerate rapidly and is capable of very high speeds, it should not be operated by
a novice or an inexperienced operator. Never accelerate rapidly or drive at
high speed beyond the limits of visibility or without being totally familiar
with the terrain and what lies in front of you. Obey speed limits and never
operate at speeds that do not allow adequate maneuvering and stopping
distances. Read and study the entire Operator’s Manual and Safety Handbook.
Failure to follow this warning could result in personal i njury to yourself or
others.
PERSONAL INJURY
• To avoid injury to yourself and others, NEVER operate the snowmobile without first
reading and understanding this manual and the Snowmobile Safety Handbook; then
follow the instructions and heed the warnings given.
• USE COMMON SENSE.
• DON’T DRINK and DRIVE.
• STAY IN CONTROL at ALL TIMES.
• TELL Y OUR FRIENDS. If y ou see a friend operating a snowmobile recklessly, at excessive speeds, while intoxicated, or in other unsafe ways, don’t wait until it is too late to
warn of the consequences of snowmobile misuse. Such conduct endangers everyone.
TAKE AN ACTIVE ROLE IN THE SAFETY OF YOURSELF AND OTHERS.
PARTS AND ACCESSORIES
When in need of replacement parts, oil, or accessories for your Arctic Cat Snowmobile, be sure to only use GENUINE ARCTIC CAT PARTS, OIL, AND ACCESSORIES. Only genuine Arctic Cat parts, oil, and accessories are engineered to meet the
standards and requirements of your Arctic Cat Snowmobile. For a complete list of
accessories, refer to the current Arctic Cat Accessory Catalog. An Illustrated Parts
Manual is available through your local Arctic Cat Snowmobile dealer.

1
FOREWORD
Congratulations! You have chosen a quality Arctic Cat Snowmobile designed
and manufactured to give dependable service. Be sure, as the owner/operator of
an Arctic Cat Snowmobile, to become thoroughly familiar w ith its basic operation, maintenance, and off-season storage procedures. Read this manual and the
accompanying Snowmobile Safety Handbook before operating the snowmobile
to learn safe and proper use of your new Arctic Cat Snowmobile. Always operate
the snowmobile within your level of skill and current terrain conditions.
The Operator’s Manual, Snowmobile Safety Handbook, and Snowmobile Decals
display the words Warni ng, Caution, and Note to emphasize important information. The symbol ! WARNING identifies personal safety-related information. Be sure to follow the directive because it deals with the possibility of severe
personal injury or even death. The symbol ! CAUTION identifies unsafe
practices which may result in snowmobile-related dama ge. Follow the directive
because it deals with the possibility of damaging part or parts of the snowmobile.
The symbol
NOTE: identifies supplementary information worthy of particu-
lar attention.
This manual covers operator-related maintenance, operating instructions, and
off-season storage instructions. If major repair or service is ever required, contact
an authorized Arctic Cat Snowmobile dealer for professional service.
At the time of publication, all information and illust rations were technically correct. Some illustrations used in this manual are used for clarity purposes only and
are not designed to depict actual conditions. Because Arctic Cat Inc. constantly
refines and improves its products, no retroactive obligation is incurred.
This Operator’s Manual should be considered a permanent part of the snow mobile and must remain with the snowmobile at the time of resale. If the snow mobile changes ownership more than once, contact Arctic Cat Inc., Service
Department, P.O. Box 810, Thief River Falls, MN 56701, for proper registration
information. This manual was prepared by the Product Service and Warranty
Department of Arctic Cat Inc.
Every Arctic Cat Snowmobile meets or exceeds the standards of the Snowmobile
Safety and Certification Committee and displays the SSCC decal. Arctic Cat Inc.
endorses and encourages the safe use of all snowmobiles. Always wear a helmet
and eye protection. Drive with caution, observe all state and local regulations,
and respect the rights of others. ISMA members like Arctic Cat do their part to
improve trails, sponsor events, and gene rally support the spo rt of snowmobili ng.
As a member of the National Snowmobile Foundation, Arctic Cat Inc. promotes
snowmobiling through education, charity, and research programs.
© 2006 Arctic Cat Inc.
Printed in U.S.A.

2
DECLARATION OF CONFORMITY
Application of council directives: EMC Directive 89/336/EEC
EC Machinery Directive 98/37/EC
Issued by European Commission.
Type of Equipment: Snowmobile
Brand Name: Arctic Cat
Model Numbers:
Standards to which conformity is declared:
EMC: EN 50082-1/ 1992, EN 50081-1
MACHINERY: EN 292-1, EN 292-2, EN 953, EN 1050, EN 954-1
Manufacturer (if not issuing agent): Arctic Cat Inc.
601 Brooks Ave. S.
Thief River Falls, MN
56701 USA
I, the undersigned, hereby declare that the equipment specified above conforms to the
directive(s) and standard(s) as specified.
Fred Bernier
Manager, Product Testing & Certification
S2007ACAAAUSG S2007CFH36USO S2007M1LEKUSO S2007F8HTSUSO
S2007ACAAAUSO S2007CFHSPUSO S2007M1LSPUSO S2007F1LEFUSB
S2007ZAAFCUSO S2007CFL36USB S2007M1LPRUSO S2007F1LEFUSG
S2007ZAALXUSO S2007CFL36USG S2007F5CEFUSB S2007F1LEFUSO
S2007ZADFCUSO S2007CFL36USO S2007F5CEFUSG S2007F1LLXUSB
S2007ZADLXUSO S2007CFLSPUSO S2007F5CEFUSO S2007F1LLXUSG
S2007BCDLTUSL S2007M6D1EUSB S2007F5CLXUSB S2007F1LLXUSO
S2007BCFWTUSL S2007M6D1EUSG S2007F5CLXUSG S2007F1LEPUSB
S2007BCFTWUSL S2007M6D1EUSO S2007F5CLXUSO S2007F1LEPUSG
S2007BCFAWUSL S2007M6D3EUSB S2007F6DEFUSB S2007F1LEPUSO
S2007PAAFCUSB S2007M6D3EUSG S2007F6DEFUSG S2007BCDLTOSL
S2007PADFCUSB S2007M6D3EUSO S2007F6DEFUSO S2007BCFWTOSL
S2007PAFTOUSB S2007M8H1EUSB S2007F6DLXUSB S20077BCFTWOSL
S2007PAFLCUSB S2007M8H1EUSG S2007F6DLXUSG S2007PAAFCOSB
S2007ACFTTUSB S2007M8H1EUSO S2007F6DLXUSO S2007PADFCOSB
S2007ACFTLUSG S2007MBH3EUSB S2007F6DEPUSB S2007PAFTOOSB
S2007ACFTBUSB S2007M8H3EUSG S2007F6DEPUSG S2007ACFTLOSG
S2007ACFTRUSG S2007M8H3EUSO S2007F6DEPUSO S2007CFC36OSB
S2007Z1NJGUSB S2007M8HEKUSB S2007F8HEFUSB S2007CFHSPOSO
S2007Z1NJGUSG S2007M8HEKUSG S2007F8HEFUSG S2007CFLSPOSO
S2007Z1NJGUSR S2007M8HEKUSO S2007F8HEFUSO S2007F5CLXOSG
S2007CFC36USB S2007M8HSPUSO S2007F8HLXUSB S2007F6DEPOSG
S2007CFD36USB S2007M1L3EUSB S2007F8HLXUSG S2007F8HEPOSO
S2007CFD36USG S2007M1L3EUSG S2007F8HLXUSO S2007F1LEPOSB
S2007CFD36USO S2007M1L3EUSO S2007F8HEPUSB S2007Z1NJGOSR
S2007CFH36USB S2007M1LEKUSB S2007F8HEPUSG
S2007CFH36USG S2007M1LEKUSG S2007F8HEPUSO
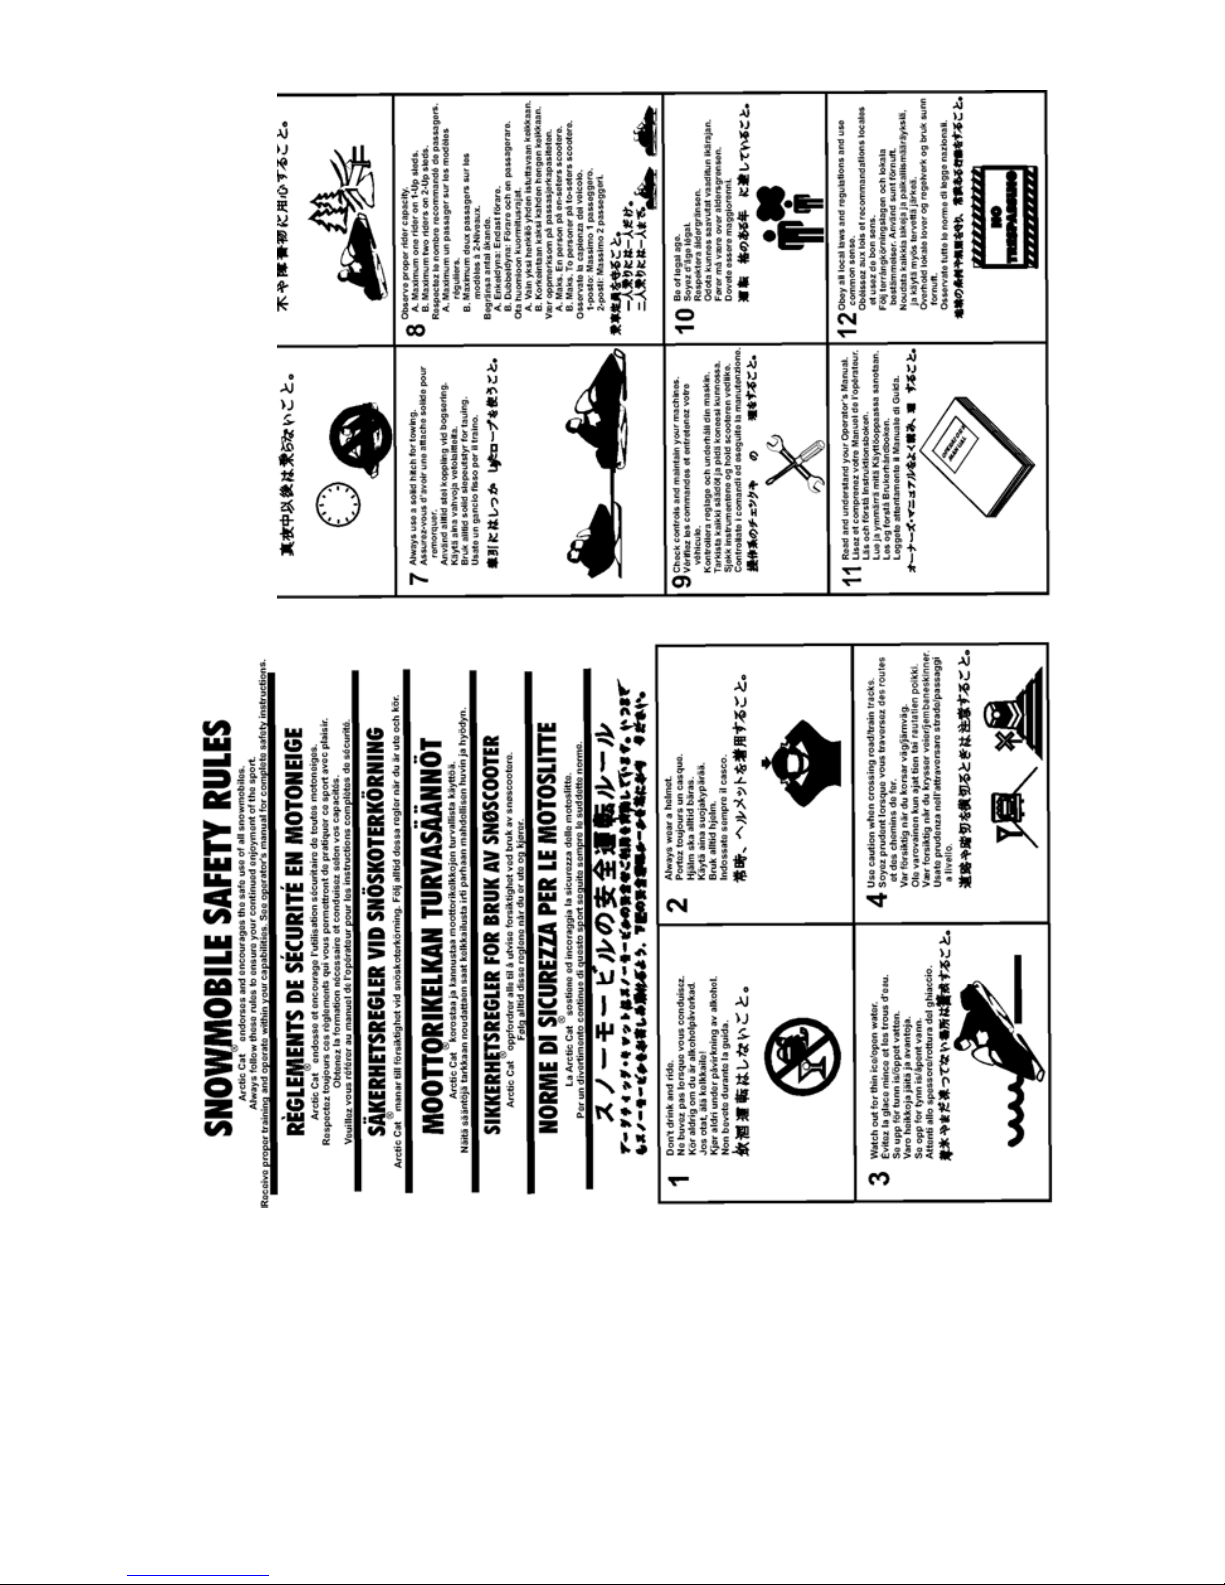
SNOWMOBILE SAFETY RULES 3
SNOWMOBILE SAFETY RULES
4 GENERAL INFORMATION
GENERAL INFORMATION
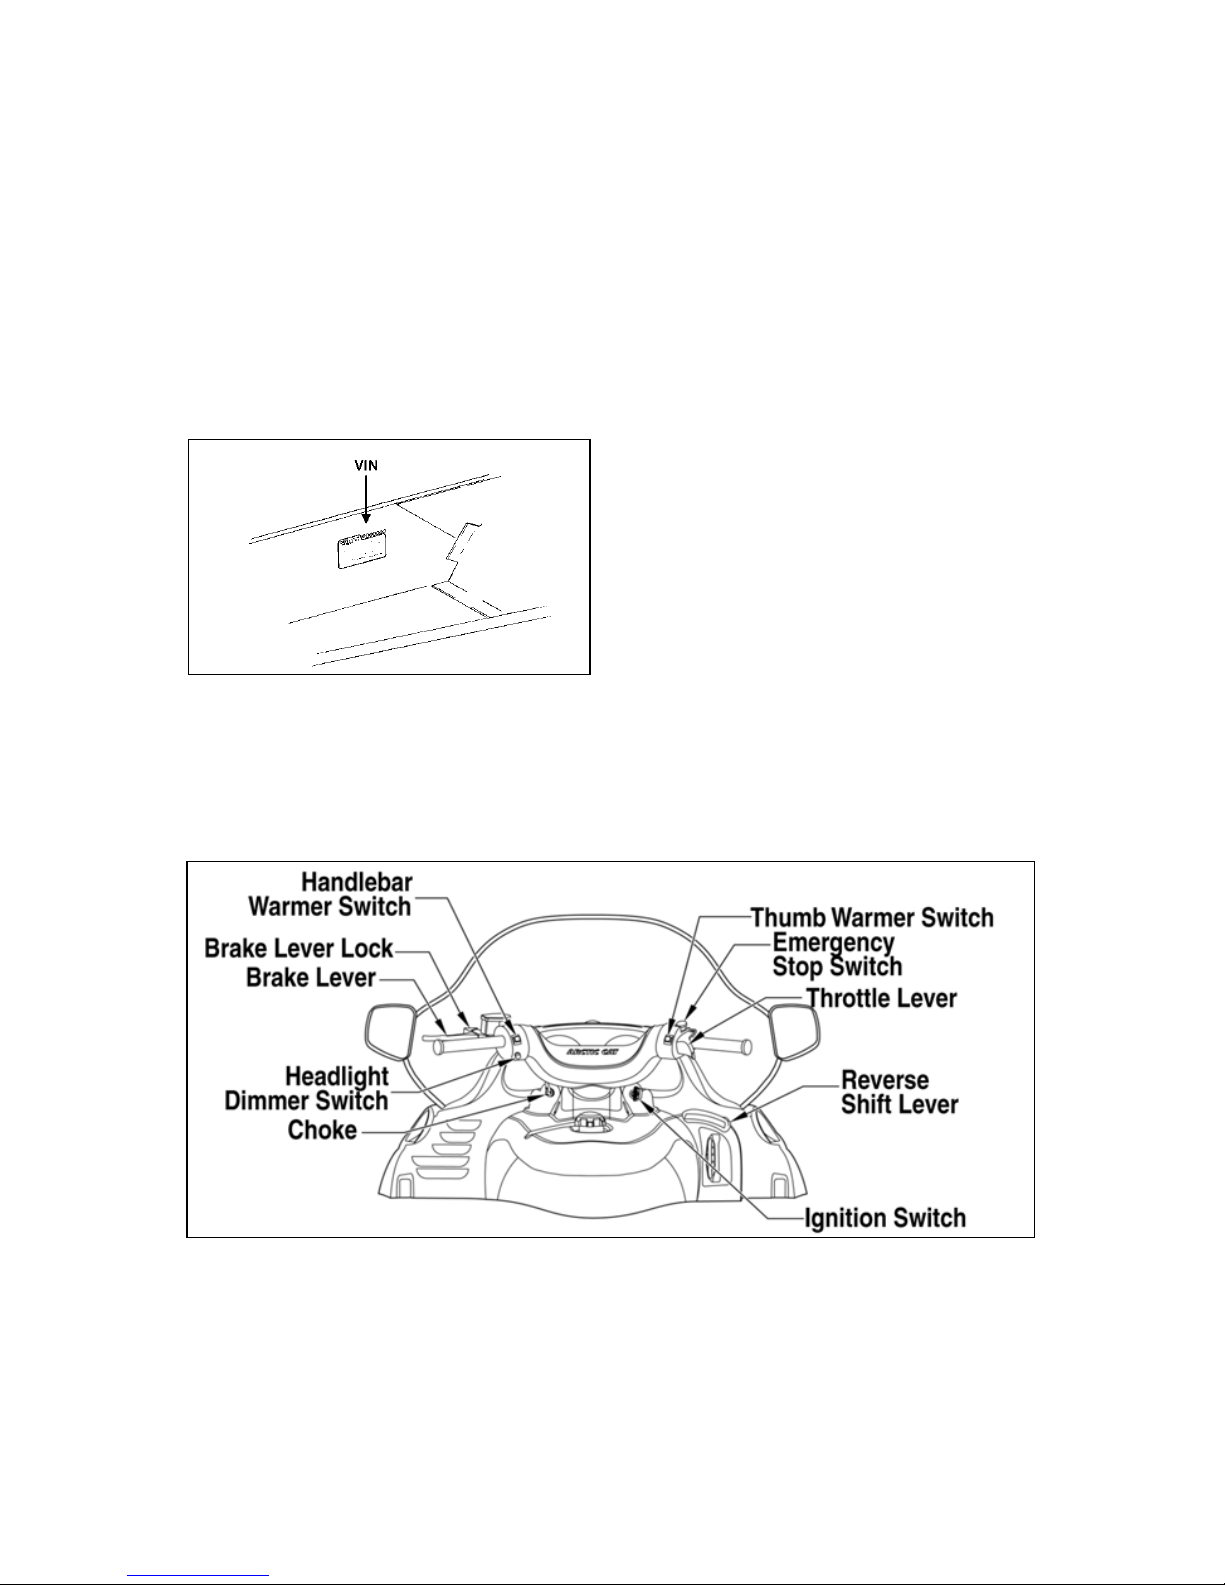
SNOWMOBILE
IDENTIFICATION
The Arctic Cat Snowmobile has two
important identification numbers. The
Vehicle Identification Number (VIN)
is stamped into the tunnel near the
right-side footrest. The Engine Serial
Number (ESN) is stamped into the
crankcase of the engine.
0726-383
These numbers are required by the
dealer to complete warranty claims
properly. No warranty will be allowed
by Arctic Cat Inc. if the engine serial
number or VIN is removed or mutilated in any way.
Always provide the snowmobile
name, VIN, and ESN when contacting
an authorized Arctic Cat Snowmobile
dealer for parts, service, accessories,
or warranty. If the complete engine
must be replaced, ask the dealer to
notify Arctic Cat for correct registration information.
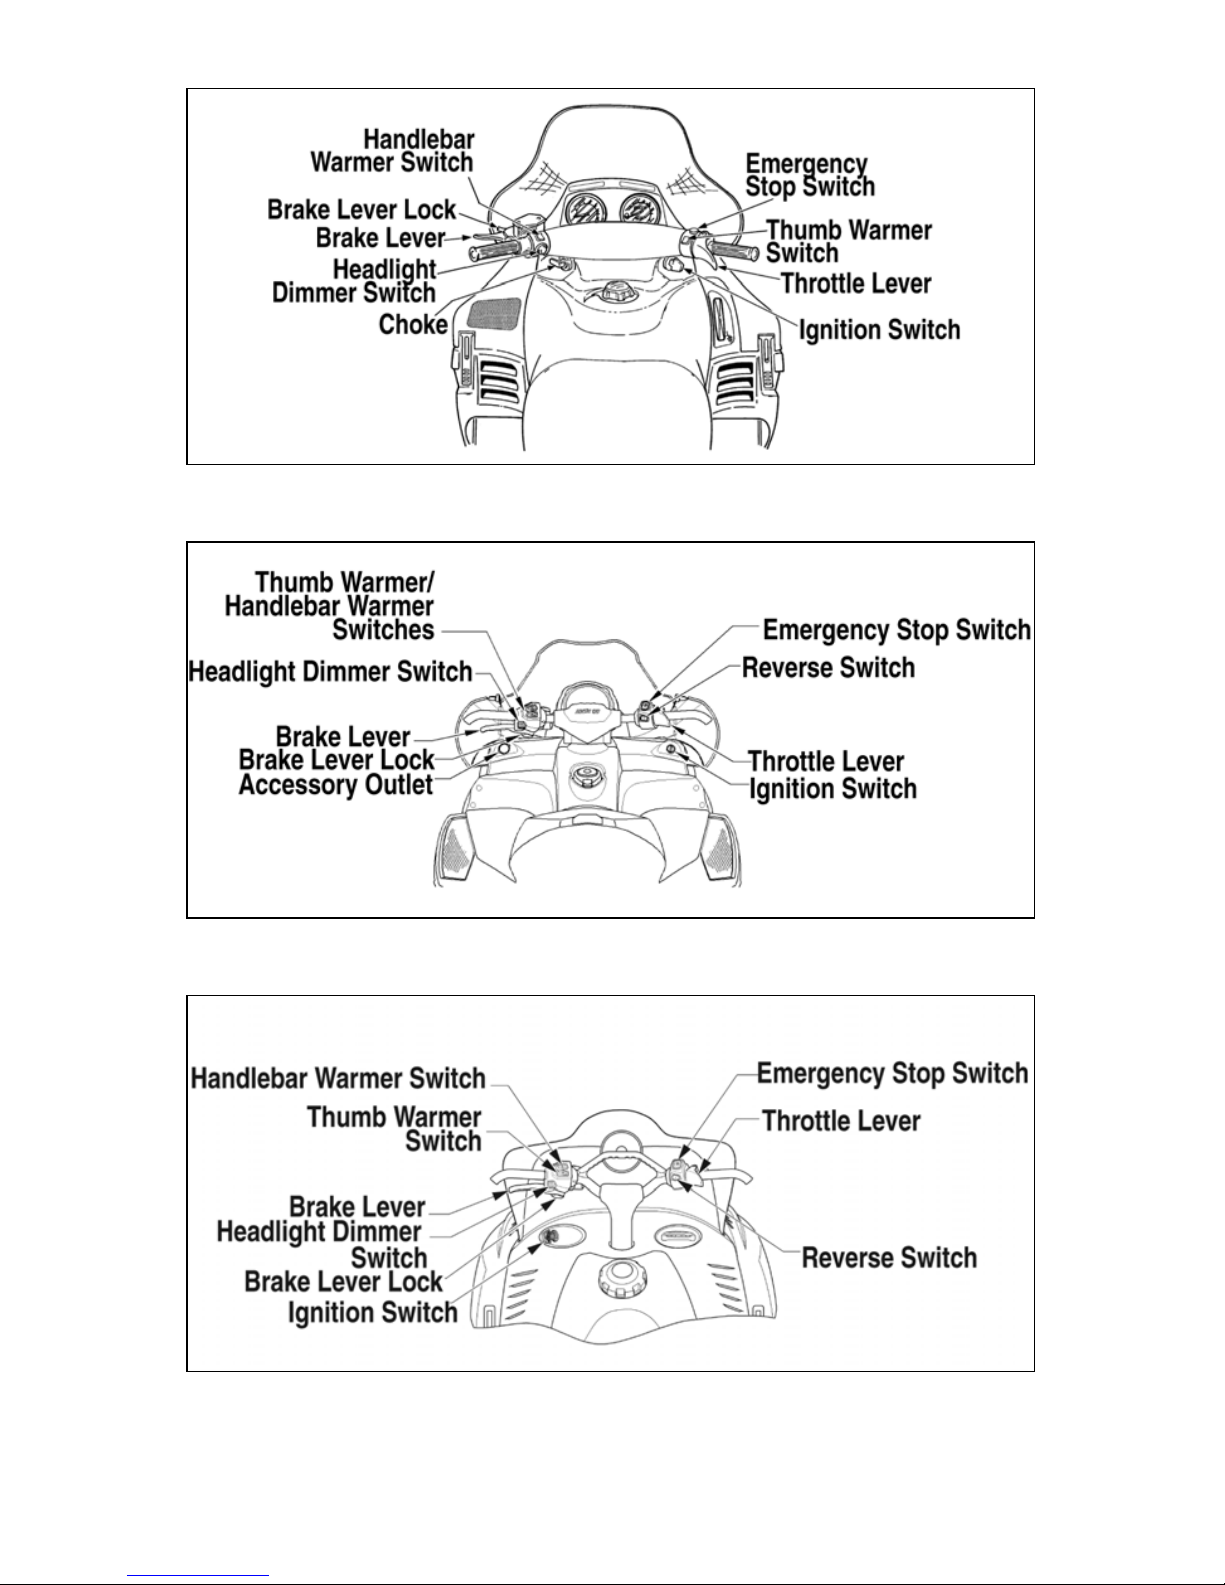
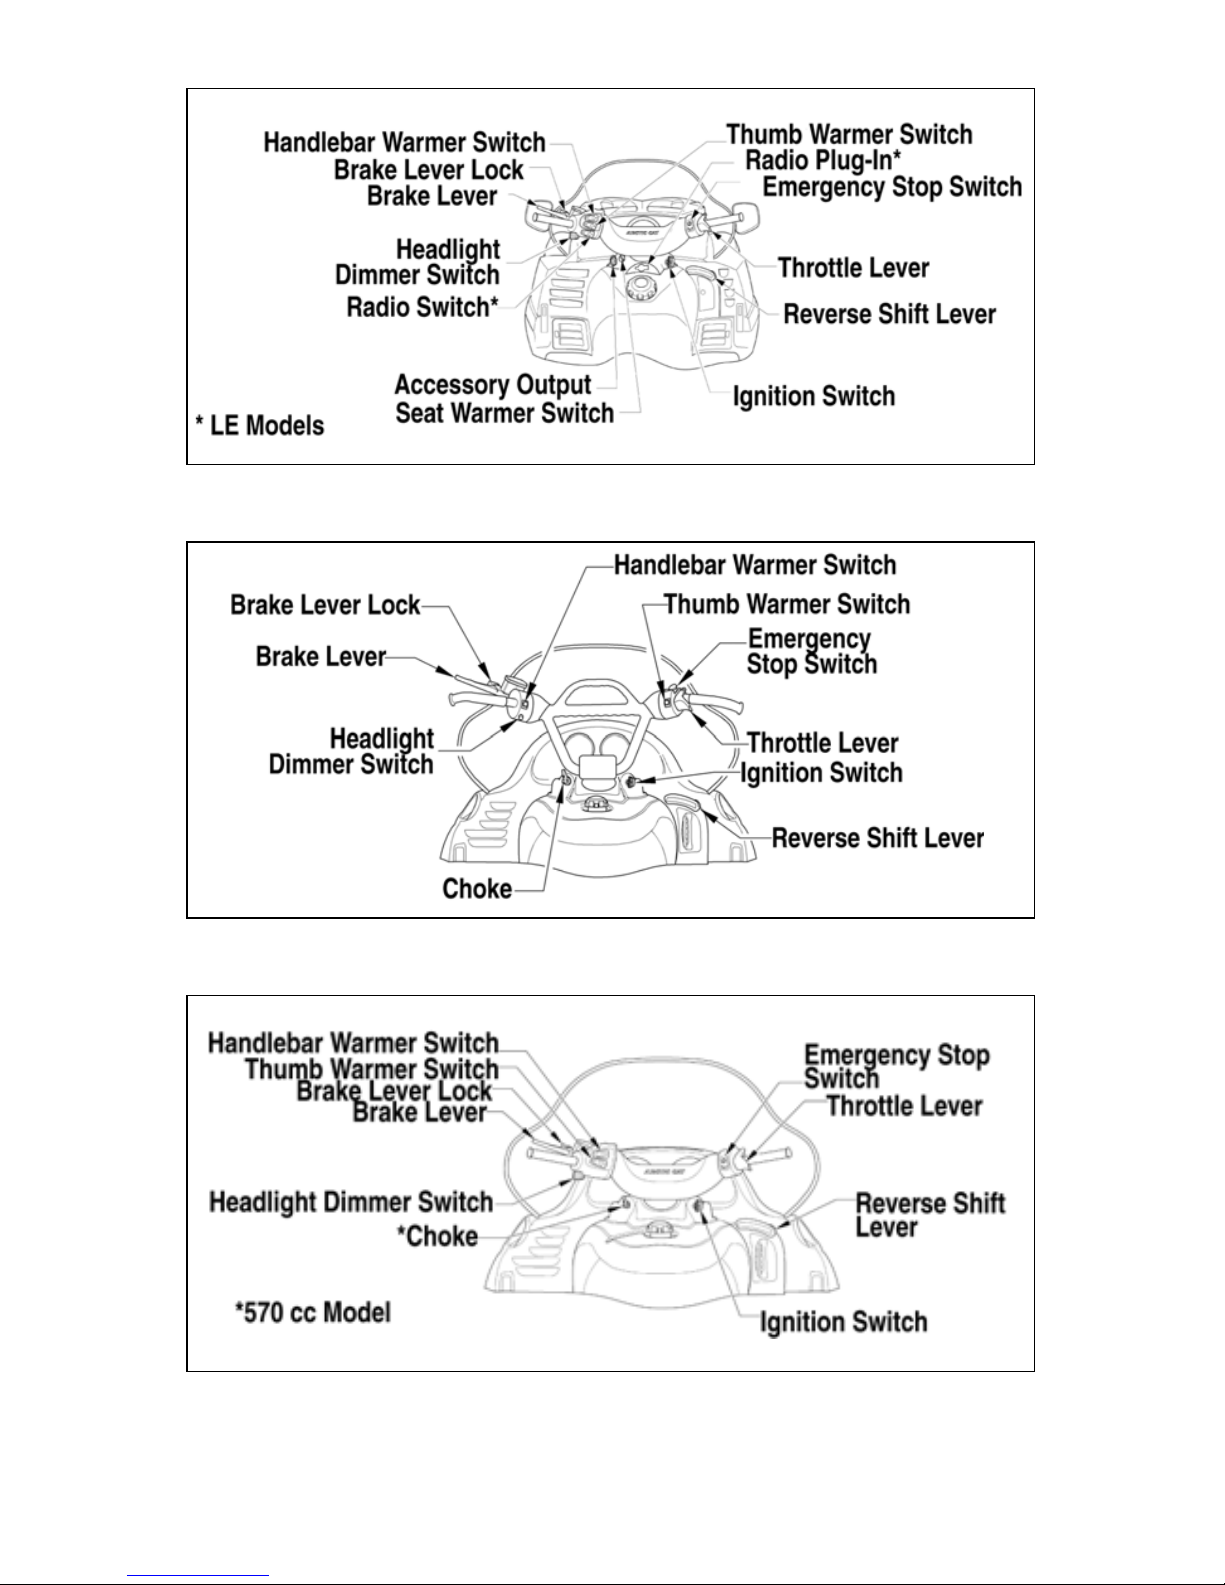
CONTROL
LOCATIONS
Shown are the typical control locations for Arctic Cat snowmobiles.
Location of a specific control will
vary according to model.
Panther 370 Model
739-592D
GENERAL INFORMATION 5
Z Models
734-268A
F-Series/Jaguar Z1 Models
741-375B
Crossfire/M-Series Models
741-633A
6 GENERAL INFORMATION
T660/Bearcat Wide Track Models
741-632A
Bearcat 570 Model
740-586A
Panther 570/660 Models
741-634A
GENERAL INFORMATION 7
TIPPED SNOWMOBILE
Tipping a snowmobile on its side is
sometimes desirable for maintenance
purposes; however, on a 660 cc model,
Arctic Cat recommends NOT TIP-
PING IT ON ITS SIDE IN EXCESS
OF A 70° ANGLE.
If a 660 cc model is tipped on its side
in excess of a 70° angle or if it has
been upside down at all, return the
snowmobile to the upright position
and use the following procedure:
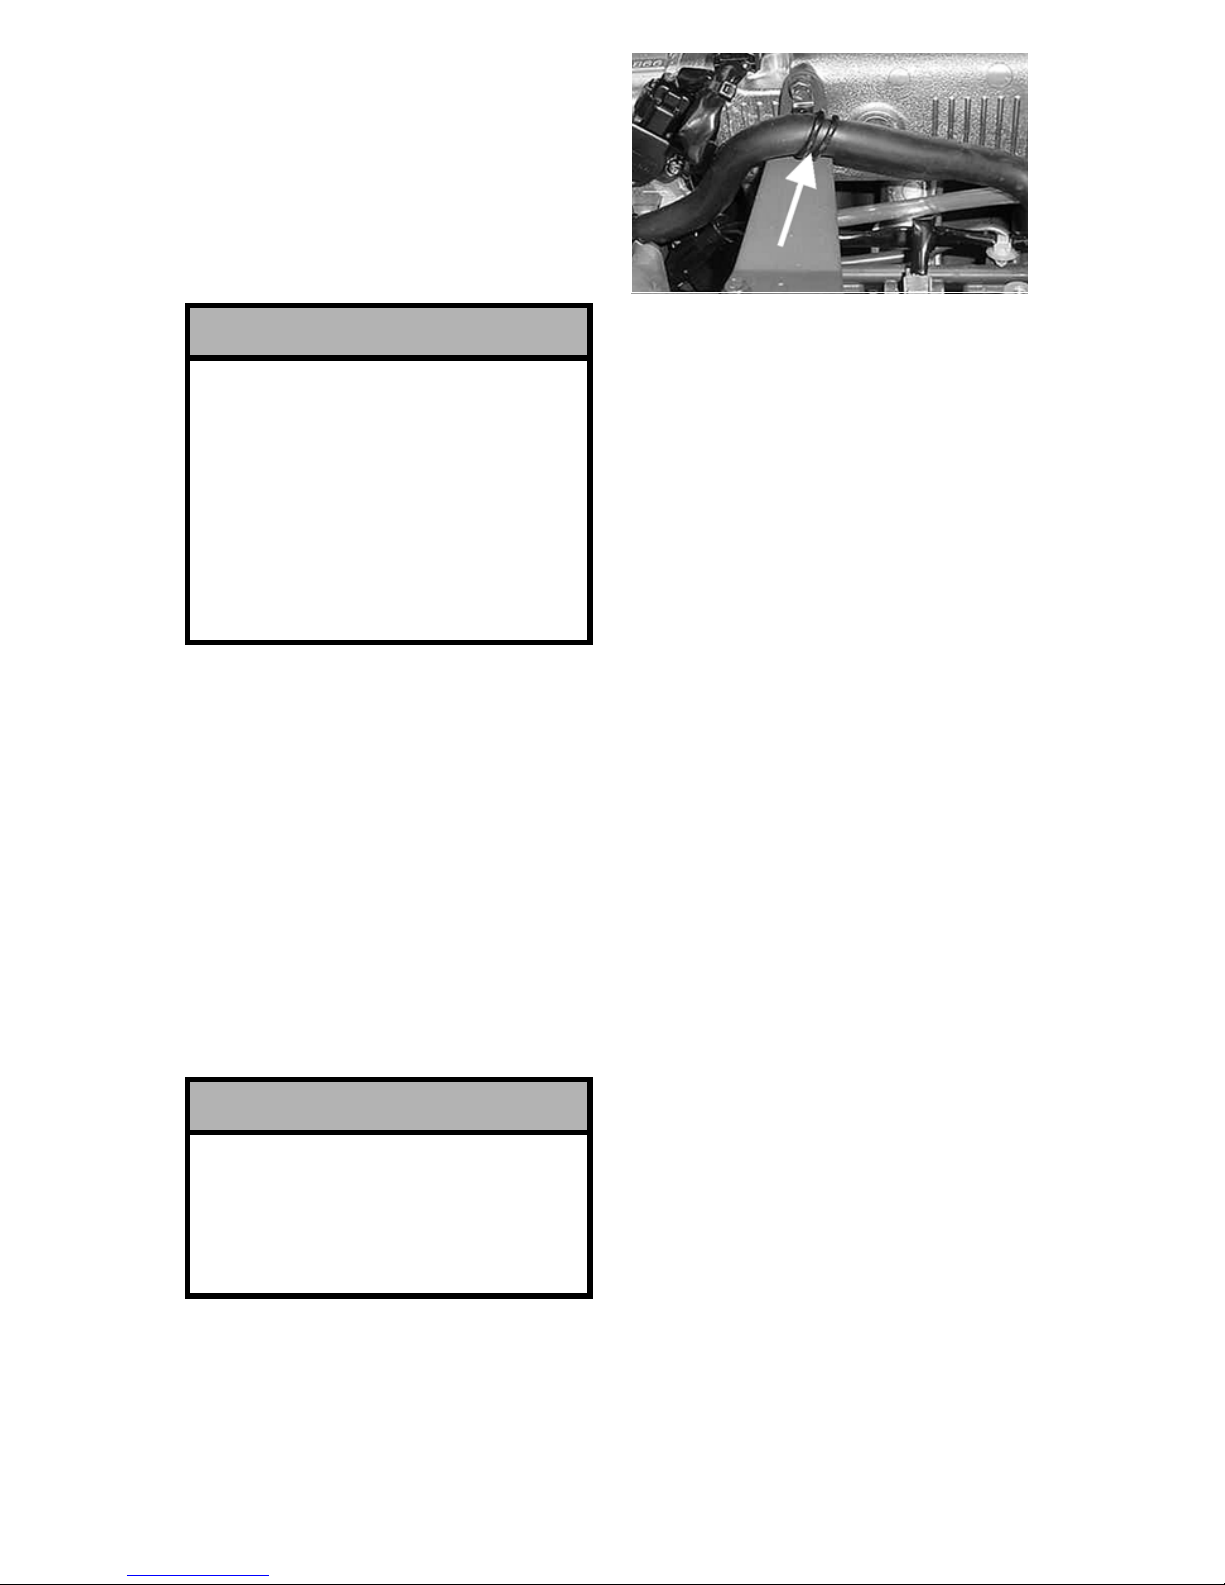
1. With the ignition switch in the
OFF position, remove the engine
to air-intake silencer hose at the
engine. If oil is present, proceed
to step 2. If no oil is present,
install the hose and start the
engine.
AO224B
2. Remove the air-intake silencer
from the engine. If oil is present
in the air-intake silencer, proceed
to step 3. If no oil is present,
install the air-intake silencer and
the engine to air-intake silencer
hose; then start the engine.
NOTE: Prior to doing step 3,
clean the air s ilencer thoroughly .
3. Remove the spark plugs from the
engine and cover the spark plug
holes with a rag (see Spark Plugs
in this manual). With the emergency stop button in the down
(OFF) position, turn the ignition
switch to the START position.
4. Allow the engine to turn over for
approximately 10 seconds. If oil
was noted coming from the spark
plug holes during this procedure,
repeat the process until all oil has
been discharged from the cylinders.
5. Install the spark plugs, spark plug
wires, air-intake silencer, and the
engine to air-intake silencer hose.
NOTE: The engine should
now be safe to operate.
! CAUTION
The 660 cc models should not be
tipped on their sides in excess of
a 70° angle for any reason, as
engine oil may seep into the
upper engine through the airintake system. Severe engine
damage could result if the engine
is run with oil in the upper
engine.
! CAUTION
Care must be taken when installing the hose that it does not sag
below the entrance/exit ends. If
there is a “valley” in the hose,
freezing may occur.

8 GENERAL INFORMATION
GASOLINE-OIL
Recommended
Gasoline (Carbureted
Models)
The recommended gasoline to use in
these snowmobiles is 87 minimum
octane regular unleaded. In many
areas, oxygenates (either ethanol or
MTBE) are added to the gasoline.
Oxygenated gasolines containing up
to 10% ethanol or up to 15% MTBE
are acceptable gasolines; however,
whenever using oxygenated gasolines,
the carburetor main jet must be one
size larger than the main jet required
for regular unleaded gasoline. For
example, if a 400 main jet is recommended for regular unleaded gasoline,
a 410 main jet must be installed if
using an oxygenated gasoline.
When using ethanol blended gasoline,
it is not necessary to add a gasoline
antifreeze since ethanol will prevent
the accumulation of moisture in the
fuel system.
Recommended
Gasoline (EFI Models)
The recommended gasoline to use in
these snowmobiles is 87 minimum
octane regular unleaded. In many
areas, oxygenates (either ethanol or
MTBE) are added to the gasoline.
Oxygenated gasolines containing up
to 10% ethanol or up to 15% MTBE
are acceptable gasoline. Do not use
gasolines containing methanol.
Recommended
Injection Oil
The recommended oil to use in the oilinjection system is Arctic Cat 50:1
Injection Oil (for standard models) or
Arctic Cat Synthetic APV 2-Cycle Oil
(for APV models). These oils are specially formulated to be used either as
an injection oil or as a pre-mix oil (for
break-in) and meets all of the lubrication requirements of the Arctic Cat
snowmobile engine.
Recommended Engine
Oil (660 cc STD)
NOTE: See the accompanying
Specifications sheet for specific
details on recommended engine
oil.
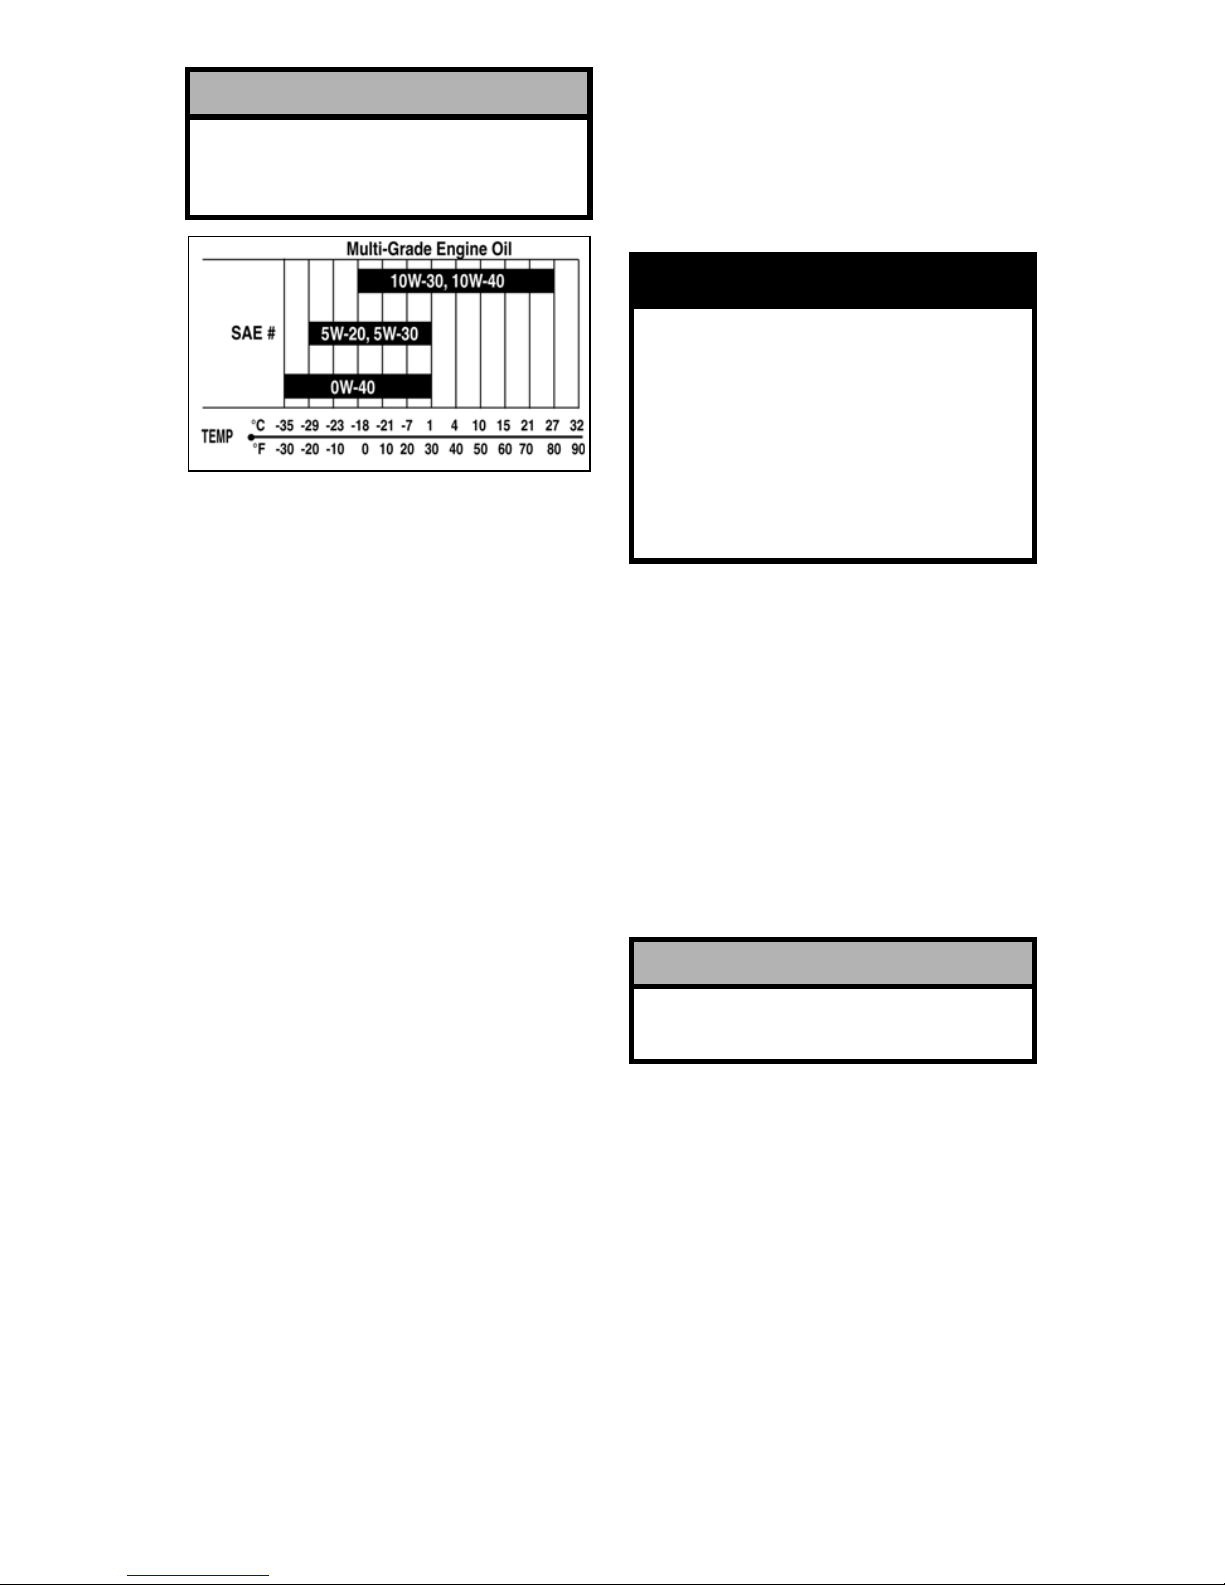
The recommended oil to use is a
multi-grade oil calibrated to the ambient temperature at which the engine is
run. See the viscosity chart for details.
! CAUTION
Do not use white gas or gasolines containing methanol. Only
Arctic Cat approved gasoline
additives should be used.
! CAUTION
Do not use white gas or gasoline
containing methanol. Only Arctic Cat approved gasoline additives should be used.
! CAUTION
Any oil used in place of the recommended oil could cause serious engine damage.
GENERAL INFORMATION 9
OILCHARTD
After the engine break-in period, the
engine oil should be changed every
2500-3000 miles on standard 660 cc
models.
Recommended Engine
Oil (660 cc Turbo/
1100 cc Z1)
The recommended oil to use is Synthetic Turbo 0W-40 Oil (p/n 3639-
510).
After the engine break-in period, the
engine oil should be changed every
2500-3000 miles on the 1100 cc Z1
model and every 2000 miles on 660 cc
Turbo models and before prolonged
storage.
Filling Gas Tank
Since gasoline expands as its temperature increases, the gas tank must be
filled to its rated capacity only . Expansion room must be maintained in the
tank particularly if the tank is filled
with cold gasoline and then moved to
a warm area.
Also, if the snowmobile is to remain
on a trailer after filling the gas tank,
the bed of the trailer must be maintained level to prevent gasoline from
draining out through the gas tank vent
hose.
Break-In Gas/Oil
Mixing Instructions
(2-Stroke Models)
Before mixing gasoline and oil, make
sure the oil is at room temperature
(20° C/68° F). Use a U.L. approved
22.7 l (6 U.S. gal.) gasoline container
for mixing the gasoline and oil. To
properly mix the fuel at a 100:1 ratio,
use the following procedure:
1. Pour gasoline into the gasoline
container until approximately half
full.
2. Pour 236 ml (8 fl oz) of the recommended 2-cycle oil into the
gasoline container.
3. Install cap on gasoline container
and shake the mixture vigorously.
! CAUTION
Any oil used in place of the recommended oil may cause serious damage.
! WARNING
Always fill the gas tank in a wellventilated area. Never add gasoline to the snowmobile gas tank
near any open flames or with the
engine running. DO NOT SMOKE
while filling the gas tank. Do not
sit on the snowmobile without
first installing the gas tank cap.
! CAUTION
Never mix oil and gasoline in the
snowmobile gas tank.
10 GENERAL INFORMATION
4. Fill the gasoline container with
gasoline; then cap the gasoline
container and shake the mixture
vigorously.
5. Using a fine-mesh screened funnel, pour the fuel mixture from
the gasoline container into the
snowmobile gas tank.
ENGINE BREAK-IN
(2-Stroke Models)
The Arctic Cat engine (when new or
rebuilt) requires a short break-in
period before the engine is subjected
to heavy load conditions. Arctic Cat
requires that the first tankful of fuel be
premixed at a 100:1 ratio in all oilinjection models.
During the break-in period, a maximum of 1/2 throttle is recommended;
however, brief full-throttle accelerations and variations in driving speeds
contribute to good engine break-in.
After one (1) tankful break-in period,
the snowmobile may be taken to an
authorized Arctic Cat Snowmobile
dealer for a checkup. This checkup is
at the discretion and the expense of the
snowmobile owner.
ENGINE BREAK-IN
(660 cc/1100 cc Z1
Models)
The Arctic Cat engine (when new or
rebuilt) requires a short break-in
period before the engine is subjected
to heavy load conditions.
This engine does not require any premixed fuel during the break-in period.
To ensu re trouble-free operation, careful adherence to the following breakin guidelines will be beneficial.
* With occasiona l full-throttle operation.
! WARNING
Always fill the gas tank in a wellventilated area. Never add gasoline to the snowmobile gas tank
near any open flames or with the
engine running. DO NOT SMOKE
while mixing fuel or filling the
gas tank.
! CAUTION
DO NOT exceed the one (1) tankful limitation of a 100:1 gas/oil
break-in mixture. Continuous
use of a gas/oil mixture, unless
consistently operating in
extremely cold conditions (-26°C/
-15°F or colder), could cause
spark plug fouling and excessive
carbon buildup. A 100:1 gas/oil
mixture must be used in conjunction with the oil-injection
system to ensure adequate
engine lubrication in extremely
cold conditions.
! CAUTION
DO NOT use premixed fuel in the
snowmobile gas tank. Engine
damage will occur.
0-200 miles 1/2 Throttle
(45 MPH-max)
200-400 miles 1/2-3/4 Throttle
400-600 miles 1/2-3/4 Throttle *

GENERAL INFORMATION 11
To ensure proper engine break-in on
the 1100 cc Z1 and 660 cc models,
Arctic Cat recommends that the
engine oil and filter be changed after
200-500 miles. This service is at the
expense of the snowmobile owner.
INDICATOR LIGHTS
(Carbureted Models/
Bearcat W/T NonTurbo/Panther 660)
Indicator lights are incorporated
within the speedometer.
LOW OIL WARNING
LIGHT (Standard 2Stroke Models)
The Low Oil Warning Light is
designed to alert the snowmobile
operator when the oil in the oil injection reservoir gets below a prescribed
level; however, it is highly recommended that a visual verification of
the oil level in the reservoir be done
prior to operating the snowmobile.
Once the Low Oil Warning Light ill uminates during operation of the snowmobile, the operator must periodically
monitor the level of oil in the reservoir
and must fill the reservoir the next
time gasoline is added to the gas tank.
The “alert level” of the Low Oil Warning Light is approximately equal to 1
tankful of gasoline under normal operating conditions.
LOW OIL PRESSURE
WARNING LIGHT
(Bearcat W/T NonTurbo/Panther 660
Models)
The Low Oil Pressure Warning Light
indicates engine oil pressure, not the
oil level; however, if the oil level is
low, it may affect oil pressure. The
light should illuminate each time the
ignition switch is turned to RUN or
START, and it should go out wh en the
engine starts. If the light illuminates
while the engine is running, oil pressure has been lost and the engine will
automatically shut off.
If oil pressure is lost, use the following
procedure:
1. Check the oil level.
NOTE: To ensure an accurate
reading, the snowmobile should
be on level ground.
2. If the oil level is below the lower
mark on the oil level stick, add
only enough recommended oil to
raise the level between the upper
and lower marks. DO NOT overfill the crankcase with oil.
3. After adding oil if the engine
starts, oil pressure should be normal.
If the engine does not start, take the
snowmobile to an authorized Arctic
Cat Snowmobile dealer.
12 GENERAL INFORMATION
COOLANT
TEMPERATURE
WARNING LIGHT
(Carbureted Models/
Bearcat W/T NonTurbo/Panther 660)
If the coolant temperature is at the
maximum running temperature, the
coolant temperature warning light will
flash a warning (alert). If the coolant
temperature is above the maximum
running temperature, the coolant temperature warning light will cease
flashing and will remain constantly
illuminated.
CHARGING SYSTEM
WARNING LIGHT (660
cc Models)
The Charging System Warning Light
is designed to warn the operator if the
battery charging system is not functioning. The light should illuminate
each time the key is turned to RUN or
START, and it should go out when the
engine starts. If the light stays illuminated or it illuminates while the
engine is running, the battery is not
being charged, and the snowmobile is
running on battery reserve power only.
If the Charging System Warning Light
illuminates, you should, as soon as
possible, take the snowmobile to an
authorized Arctic Cat Snowmobile
dealer for service. If not under warranty, this service is at the discretion
and expense of the snowmobile owner.
The engine WILL NOT RUN without battery power.
CHECK ENGINE LIGHT
(Bearcat W/T NonTurbo/Panther 660
Models)
The Check Engine Light is controlled
by the ECU and may illuminate for a
number of reasons. The light should
illuminate each time the key is turned
to RUN or START, and it should go
out when the engine starts. If the light
stays illuminated or it illuminates
while the engine is running, the ECU
is receiving input that is outside of its
established parameters. If the Check
Engine Light illuminates, take the
snowmobile to an authorized Arctic
Cat Snowmobile dealer for service. If
not under warranty, this service is at
the discretion and expense of the
snowmobile owner.
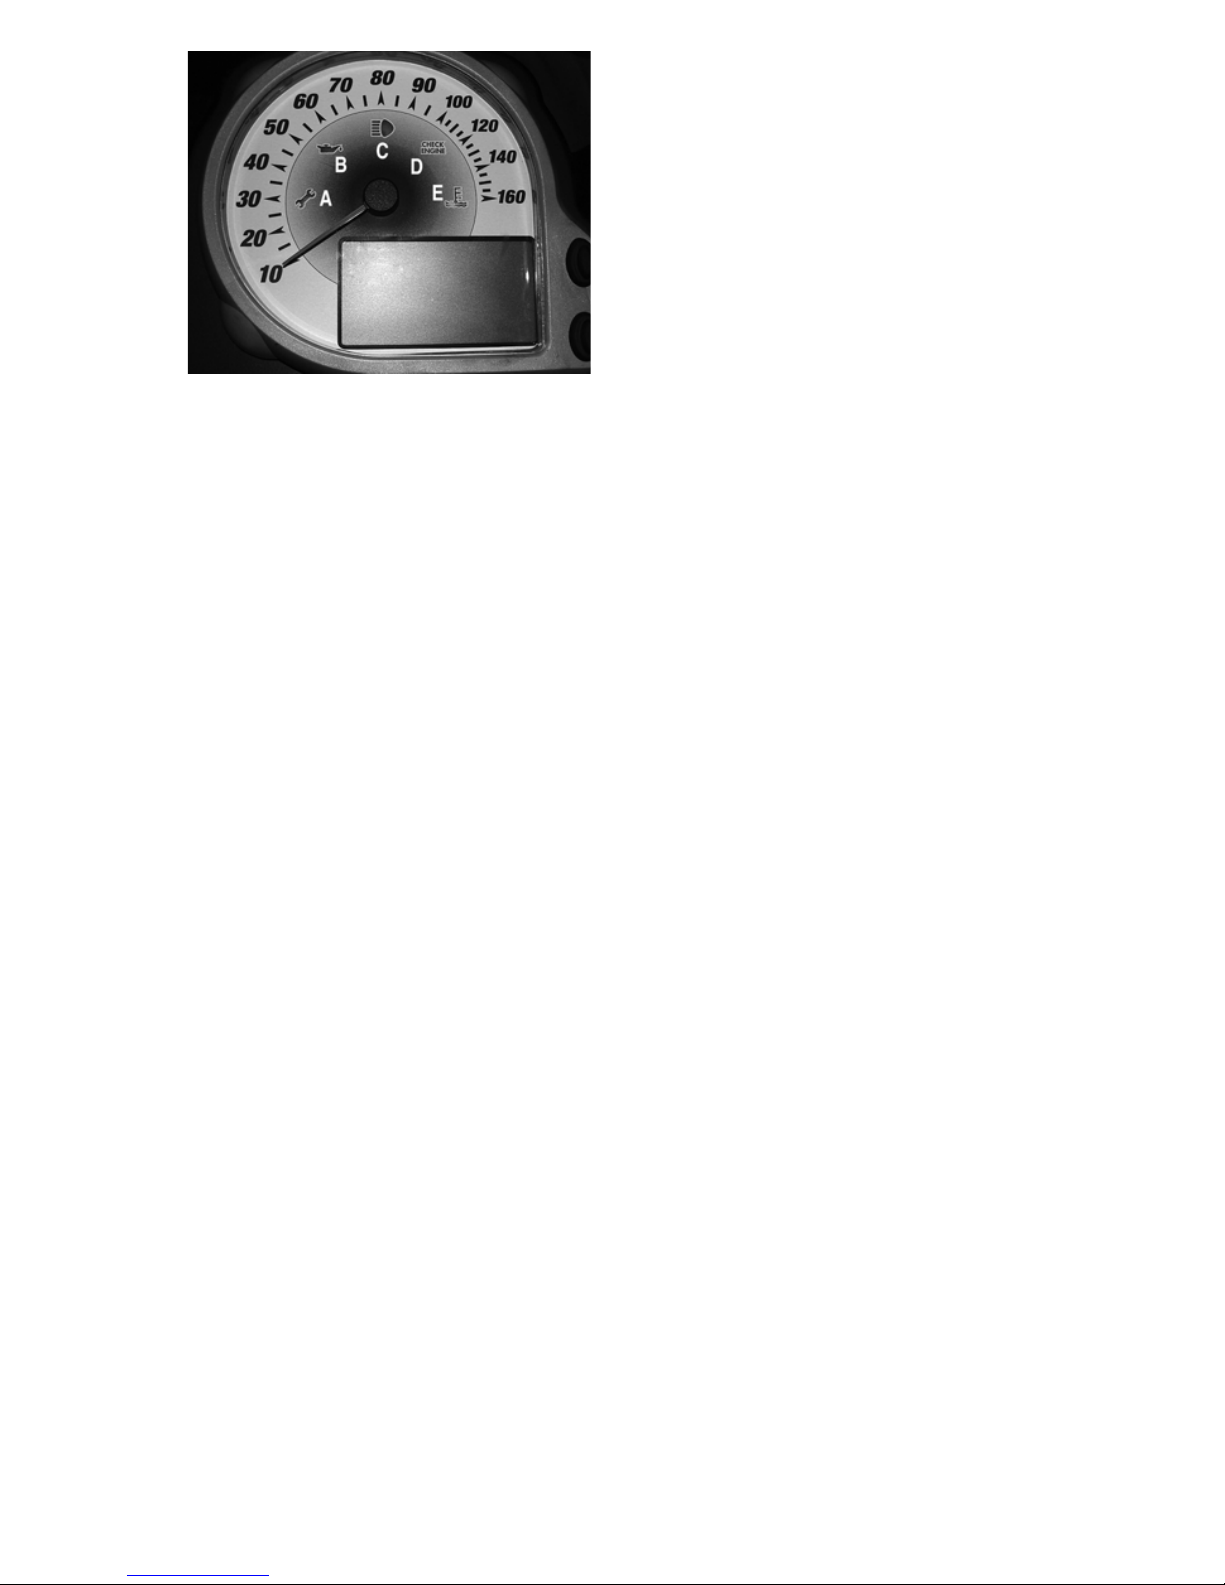
SPEEDOMETER/
TACHOMETER
INDICATOR LIGHTS
(Crossfire/F-Series/
Jaguar Z1/M-Series/
660 cc Turbo Models)
This snowmobile is equipped with a
combination speedometer/tachometer.
Indicator lights are incorporated
within the speedometer/tachometer.
Also incorporated into the speedometer/tachometer is a digital readout
screen.
! CAUTION
At this point, take precautionary
measures such as changing to
loose snow terrain, shutting the
engine off (allowing the engine to
cool down), and checking coolant level. If unable to either determine or remedy the problem,
take the snowmobile to an authorized Arctic Cat Snowmobile
dealer for service.
GENERAL INFORMATION 13
ZJ001A
A. Chassis Control Unit
B. Oil Pressure/Low Oil
C. High Beam
D. Check Engine
E. Coolant Temperature
Top Button
By pushing the top button once (lower
right-hand side of the speedometer/
tachometer), the RPM and MPH will
be displayed (one on the readout
screen and one with the needle). By
pushing the button once again, the
functions will be reversed.
By pushing the top button (with speed
being displayed) for more than two
seconds, the display will show
between standard mph or metric kph.
Release the button when desired display appears.
By pushing and holding the top button, maximum RPM will be displayed
on the readout screen. The maximum
RPM readout will reset when the
engine is shut off.
Bottom Button
By pushing the bottom button once,
the readout screen will display hourmeter or trip-meter/odometer; by
pushing the button once again, the two
functions will be reversed. T o reset the
trip meter with the trip meter displayed, push and hold the bottom button until the display is cleared. The
hour-meter readout will not reset.
Chassis Control Unit
On electric start models, the icon
should illuminate each time the key is
turned to RUN or START, and it
should go out when the engine starts.
If the light stays illuminated (on electric start models) or it illuminates
while the engine is running, the CCU
is receiving input that is outside of its
established parameters. If the CCU
icon illuminates indicating an error,
take the snowmobile to an authorized
Arctic Cat Snowmobile dealer for service. If not under warranty, this service is at the discretion and expense of
the snowmobile owner.
Coolant Temperature
Warning Light
If the coolant temperature is at the
maximum running temperature, the
coolant temperature warning light will
flash a warning (alert). If the coolant
temperature is above the maximum
running temperature, the coolant temperature warning light will cease
flashing and will remain constantly
illuminated.
14 GENERAL INFORMATION
Low Oil Warning Light
(Crossfire/F-Series/MSeries Models)
The Low Oil Warning Light is
designed to alert the snowmobile
operator when the oil in the oil injection reservoir gets below a prescribed
level; however, it is highly recommended that a visual verification of
the oil level in the reservoir be done
prior to operating the snowmobile.
Once the Low Oil Warning Light ill uminates during operation of the snowmobile, the operator must periodically
monitor the level of oil in the reservoir
and must fill the reservoir the next
time gasoline is added to the gas tank.
The “alert level” of the Low Oil Warning Light is approximately equal to 1
tankful of gasoline under normal operating conditions.
Oil Pressure Warning
Light (Jaguar Z1/660
cc Turbo Models)
The Oil Pressure Warning Light indicates engine oil pressure, not the oil
level; however, if the oil level is low , it
may affect oil pressure.
The light should illuminate each time
the ignition switch is turned to RUN
or START, and it should go out when
the engine starts. If the light illuminates while the engine is running, oil
pressure has been lost and the engine
will automatically shut off.
If oil pressure is lost, use the following
procedure to check the oil level:
NOTE: On the 660 cc Turbo
models, to ensure an accurate
reading, the snwomobile should
be on level ground.
1. On the 660 cc Turbo models,
check the oil level. If the oil level
is below the lower mark on the oil
level stick, add only enough recommended oil to raise the level
between the upper and lower
marks. DO NOT overfill the
crankcase with oil.
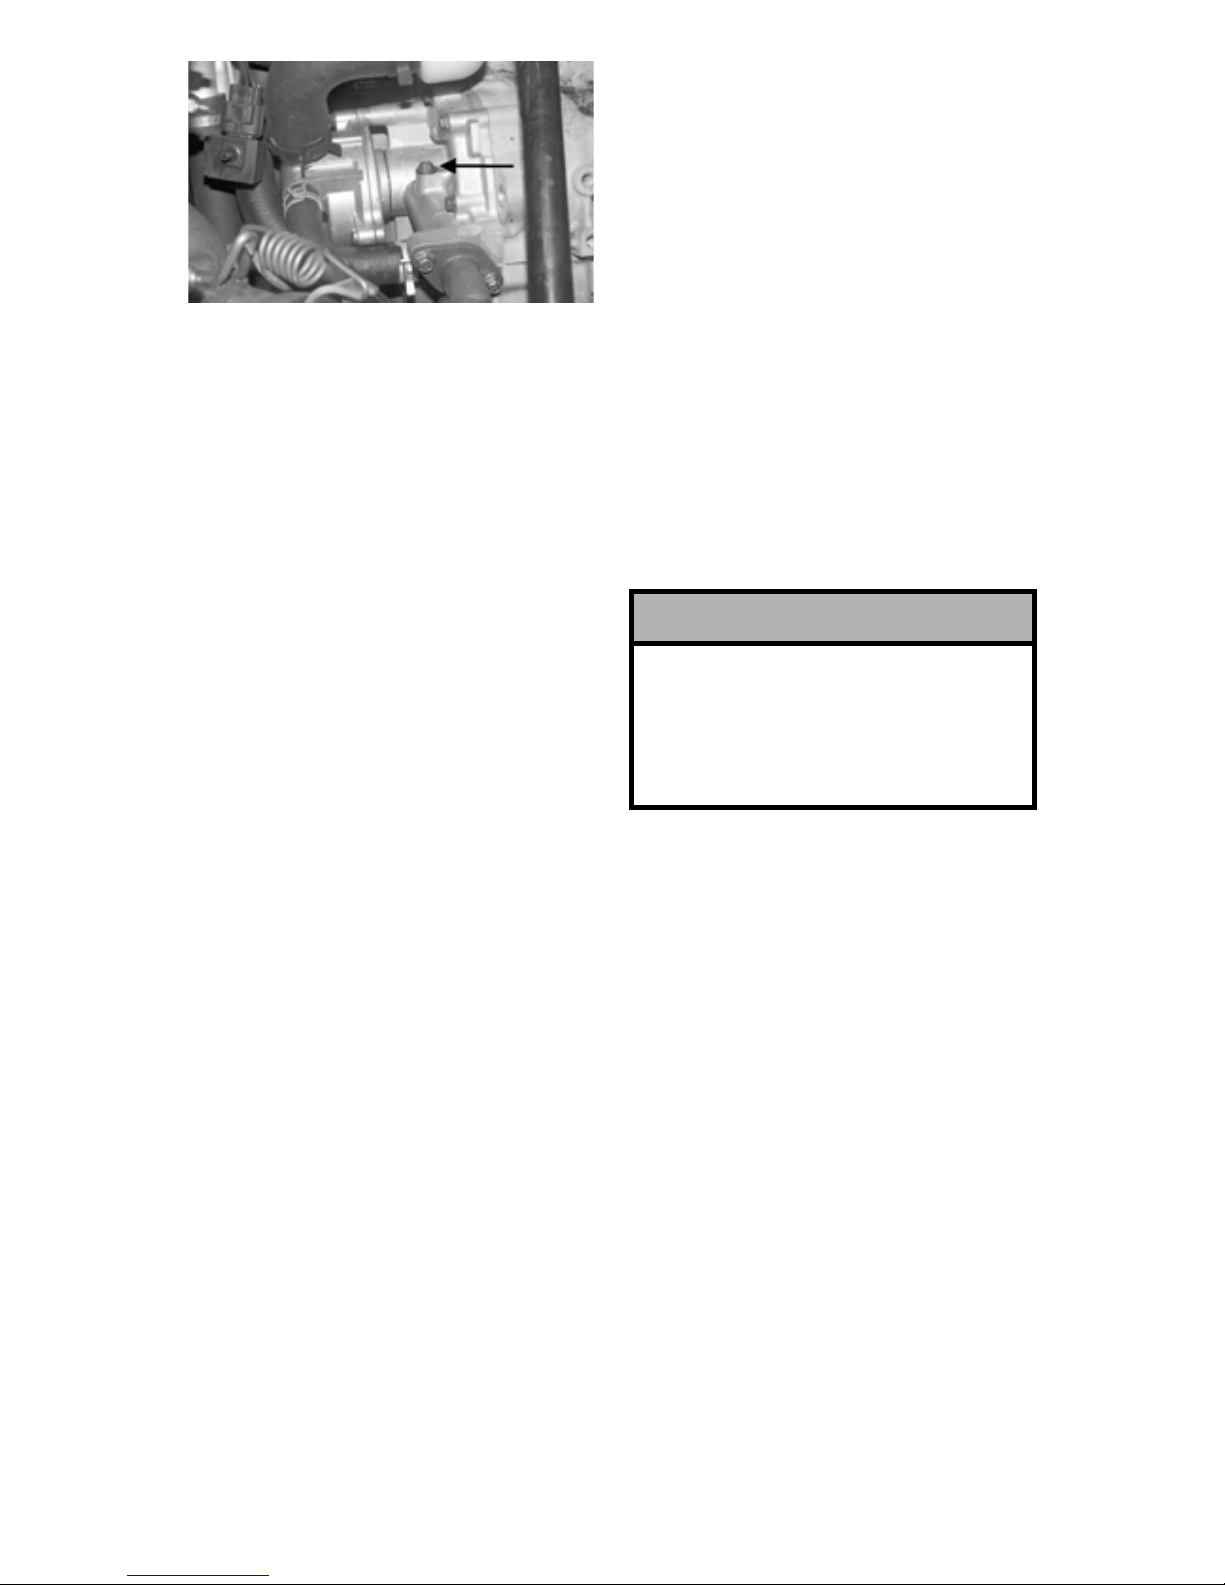
2. On the Jaguar Z1 with the engine
off, remove the engine oil level
stick and wipe it clean. Without
screwing it in, set the stick back
in the oil tank. Remove it and
observe the oil level on the stick.
If the oil level is at or below the
ADD mark on the oil level stick,
add only enough recommended
oil to raise the level to the NORMAL range. DO NOT overfill the
reservoir with oil.
3. On the Jaguar Z1, open the air
bleed bolt located on the oil pump
(beneath the coolant tank) to
purge air from the oil hose.
! CAUTION
At this point, take precautionary
measures such as changing to
loose snow terrain, shutting the
engine off (allowing the engine to
cool down), and checking coolant level. If unable to either determine or remedy the problem,
take the snowmobile to an authorized Arctic Cat Snowmobile
dealer for service.
GENERAL INFORMATION 15
ZJ004A
NOTE: When air can no longer
be heard, purging from oil pump
bleed, tighten the bleed bolt to
1.05 kg-m (7.5 ft-lb).
4. Start the engine. The warning
light shuld go out within five seconds.
If the engine does not start, take the
snowmobile to an authorized Arctic
Cat Snowmobile dealer.
Check Engine Light
The Check Engine Light is controlled
by the ECU and may illuminate for a
number of reasons.
NOTE: The light should illuminate each time the key is turned
to RUN or START, and it should
go out when the engine starts.
If the light stays illuminated or it illuminates while the engine is running,
the ECU is receiving input that is outside of its established parameters. If
the Check Engine Light illuminates,
take the snowmobile to an authorized
Arctic Cat Snowmobile dealer for service. If not under warranty, this service is at the discretion and expense of
the snowmobile owner.
DIAGNOSTIC CODES/
CHECK ENGINE (2Stroke Models)
If the coolant temperature is at or
above 80° C (176° F), the coolant temperature light will flash a warning
(alert). If the coolant temperature is at
or above 93° C (200° F), the check
engine light will cease flashing and
will remain constantly illuminated.
NOTE: At t his point , the op erator should take precautionary
measures such as changing to
loose snow terrain and/or
checking coolant level.
Additional codes are flashed by the
check engine light. Refer to the following chart for diagnostic code
sequences.
NOTE: On single-digit codes
(2, 4, etc.), the number in dicated
will flash in an uninterrupted
sequence. On double-digit
codes (1-2, 2-1, etc.), the first
number indicated will flash in an
uninterrupted sequence, there
will be a short pause, and the
second number indicated will
flash in an uninterrupted
sequence.
! CAUTION
If unable to either determine or
remedy the problem, take the
snowmobile to an authorized
Arctic Cat Snowmobile dealer for
service.

16 GENERAL INFORMATION
DIAGNOSTIC CODES/
CHECK ENGINE
(JAGUAR Z1)
These diagnostic codes are flashed by
the check engine light. Refer to the
following chart for diagnostic code
sequences.
NOTE: On single-digit codes
(2, 3, etc.), the number in dicated
will flash in an uninterrupted
sequence. On double-digit
codes (1-1, 1-2, etc.), the first
number indicated will flash in an
uninterrupted sequence, there
will be a short pause, and the
second number indicated will
flash in an uninterrupted
sequence.
Number of
Flashes
Trouble
1-2
(Check
Engine Light)
Failure in ignition coil.
1-6
(Check
Engine Light)
Incorrect adjustment/
failure in APV cable.
1-7
(Check
Engine Light)
Failure in exhaust tem-
perature sensor.
1-8
(Check
Engine Light)
Failure in servomotor.
2
(Check
Engine Light)
Failure in injector(s).
2-1
(Check
Engine Light)
Fail ure in knock sen-
sor.
2-3
(Check
Engine Light)
Fail ure in knock con-
trol system.
4
(Check
Engine Light)
Open or short circuit in
barometric pressure
sensor.
5
(Check
Engine Light)
Open or short circuit in
intake air temperature
sensor.
6
(Check
Engine Light)
Open or short circuit in
water temperature
sensor.
7
(Check
Engine Light)
Open or short circuit in
throttle position sen-
sor.
Steady Flash
(Coolant
Temperature
Light)
Coolant Temperature
Above 80° C (176° F).
Constant On
(Coolant
Temperature
Light)
Coolant Temperature
Above 93° C (200° F).
Number of
Flashes Trouble
1
(Check Engine
Light)
Failure in the fuel sys-
tem.
1-1
(Check Engine
Light)
Fail ure in speed sen-
sor.
1-2
(Check Engine
Light)
Fai lure in coil (#1).
1-3
(Check Engine
Light)
Fai lure in coil (#2).
1-4
(Check Engine
Light)
Failure in ISC valve.
1-5
(Check Engine
Light)
Fai lure in oxygen sen-
sor.
1-9
(Check Engine
Light)
Fail ure in camshaft
position sensor.
2
(Check Engine
Light)
Failure in injector (#2).
GENERAL INFORMATION 17
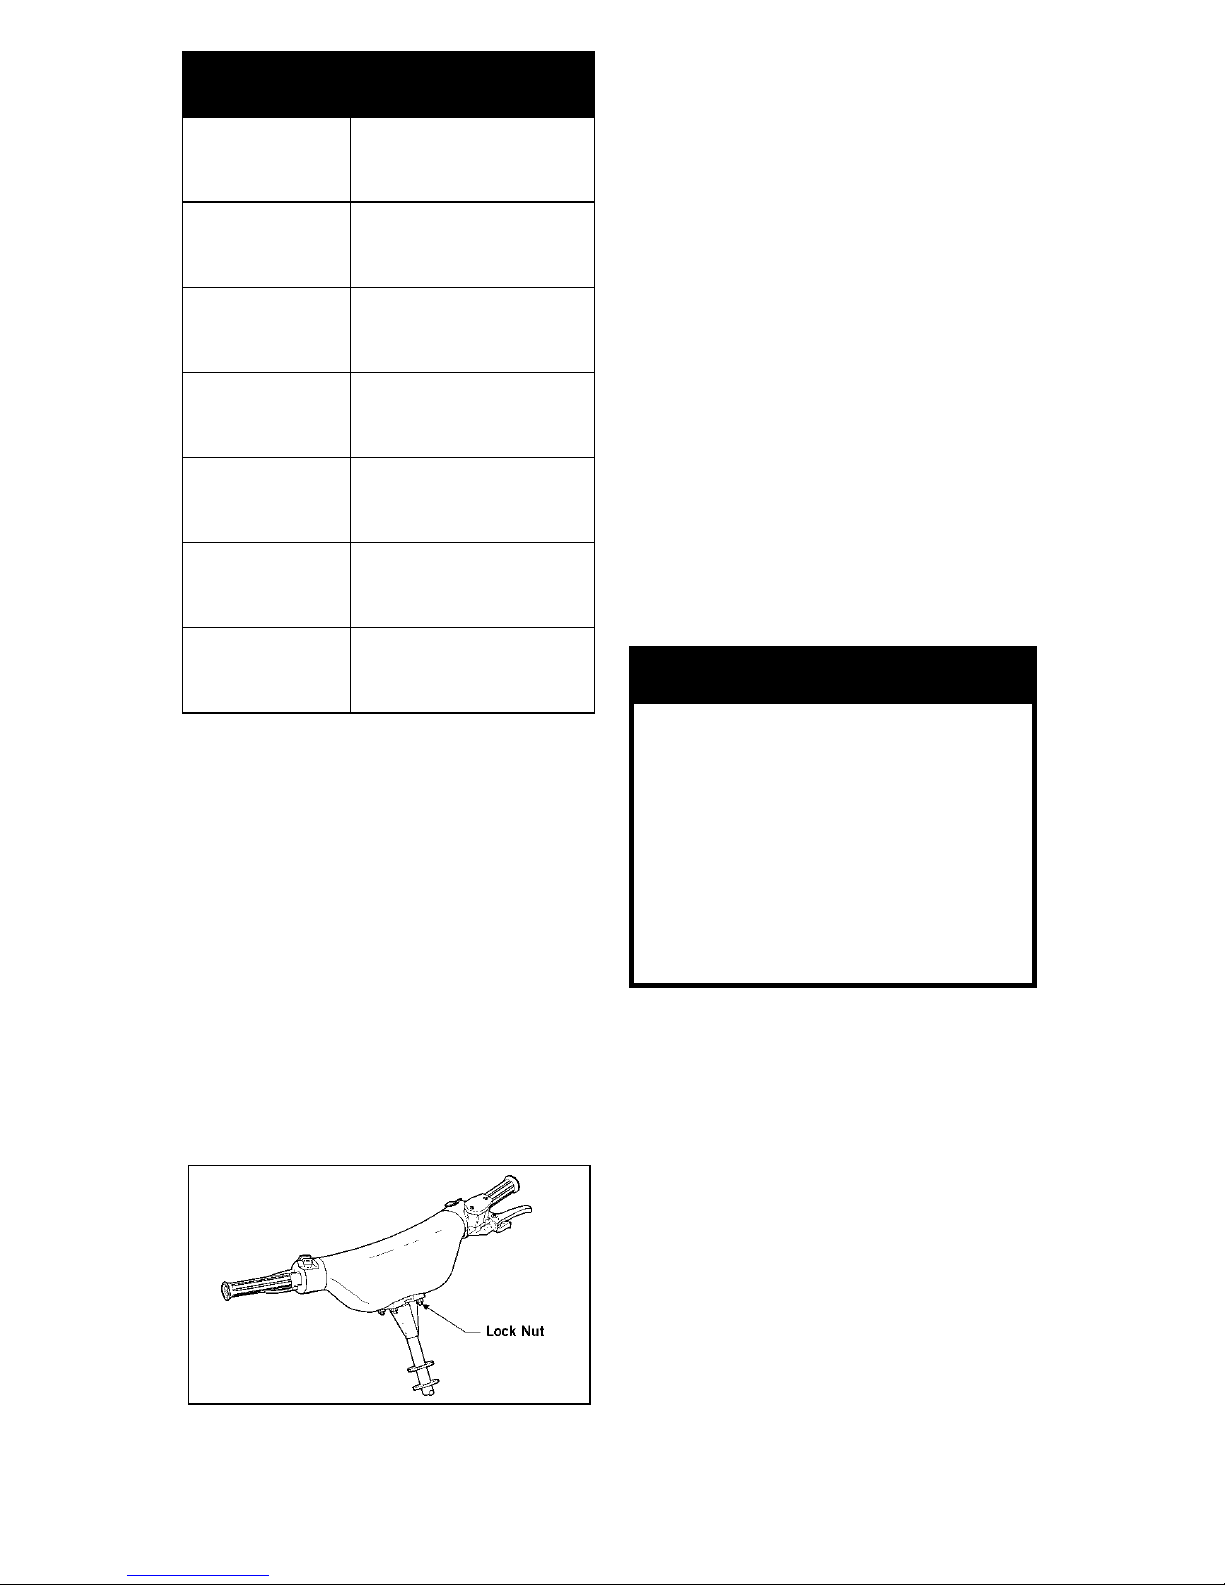
HANDLEBAR TILT
The handlebar can be adjusted to the
position providing the operator with
the most comfort. To adjust the handlebar, use the following procedure:
NOTE: It may be necessary to
remove the handlebar cover for
this procedure.
1. Loosen the four lock nuts securing the handlebar caps and block
to the steering post.
0734-406
2. Adjust the handlebar up or down
to operator’s desired tilt; then
tighten the lock nuts evenly and
securely . Check steering for maximum right/left turning capabilities.
3. Recheck lock nuts; tighten
securely.
NOTE: Recommended torque
value of loc k n uts is 2.5 kg -m (18
ft-lb).
NOTE: Do not adjust the handlebar to a position that allows
the brake fluid to be below the
low mark on either side of the
master cylinder.
HANDLEBAR TILT
(F-Series - STD)
The handlebar can be adjusted to the
operator’s preference. To adjust the
handlebar, use the following procedure:
1. Loosen the eight cap screws
securing the handlebar caps to the
riser and the riser to the steering
post.
3
(Check Engine
Light)
Failure in injector (#1).
4
(Check Engine
Light)
Failure in barometric
pressure sensor.
5
(Check Engine
Light)
Open or short circuit in
intake manifold air tem-
perature sensor.
6
(Check Engine
Light)
Open or short circuit in
water temperature sen-
sor.
7
(Check Engine
Light)
Open or short circuit in
throttle position senso r.
8
(Check Engine
Light)
Open or short circuit in
manifold air pressure
sensor.
9
(Check Engine
Light)
Failure in crankshaft
position sensor.
Number of
Flashes
Trouble
! WARNING
Tighten lock nuts according to
specifications to prevent unexpected “movement” of the handlebar during operation over
rough terrain and DO NOT position handlebar so steering (maximum right/left turning capabilities) or throttle and brake controls are affected.

18 GENERAL INFORMATION
735-501B
2. Adjust the handlebar up or down
to operator’s desired tilt, tighten
the cap screws evenly to 3.5 kg-m
(25 ft-lb), and check steering for
maximum right/left turning capabilities.
NOTE: Do not adjust the handlebar to a position that allows
the brake fluid to be below the
low mark on either side of the
master cylinder.
HANDLEBAR TILT
(F-Series LXR/Sno Pro/
Jaguar Z1)
The handlebar can be adjusted to the
operator’s preference. To adjust the
handlebar, use the following procedure:
1. Press inward on the lock pin to
release the cam lever and “flip”
the cam lever up.
0741-427
2. Adjust the handlebar up or down
and/or rotate the handlebar to
operator’s desired position; then
press down on the cam lever until
the lock pin is properly positioned
and locked. Check steering for
maximum right/left turning capabilities.
NOTE: At this point, gently lift
the cam lever without pressing
in on the lock pin. If the cam
lever cannot be lifted, the lock
pin is secure.
NOTE: Do not rotate the handlebar to a position that allows
air to enter the brake system.
3. Test the handlebar to ensure that it
does not rotate within the riser
block. If it does not rotate, proceed to step 4. If it does rotate,
release the cam lever and rotate
the cam lever clockwise; then
press down on the cam lever until
the lock pin is properly positioned
and locked. Repeat this procedure
until the handlebar is properly
secured.
! WARNING
Tighten cap screws according to
specifications to prevent unexpected “movement” of the handlebar during operation over
rough terrain. DO NOT offset the
handlebar so steering (maximum right/left turning capabilities) are altered or throttle and
brake controls will be affected.
GENERAL INFORMATION 19
4. After the handlebar is “locked” in
position, release the cam lever and
rotate it one turn clockwise; then
press down on the cam lever until
it “locks” in place.
NOTE: At this point, gently lift
the cam lever without pressing
in on the lock pin. If the cam
lever cannot be lifted, the lock
pin is secure.
EXHAUST SYSTEM
The exhaust system is designed to
reduce noise and to improve the total
performance of the engine. If any
exhaust system component is removed
from the engine and the engine is run ,
severe engine damage will result.
AIR-INTAKE SILENCER
Used in conjunction with the fuel
intake system is a specially designed
air-intake silencer. The purpose of the
silencer is to quiet the intake of fresh
air. Since the fuel intake system is calibrated with the air-intake silencer in
place, the engine must never be run
with the silencer removed. Performance will not be improved if the airintake silencer is removed. In contrast,
severe engine damage will occur.
BATTERY (Electric
Start Models)
It is extremely important that the battery be maintained at full charge at all
times and that the battery connections
be clean and tight. If charging the battery becomes necessary, refer to
Charging Battery section of this manual.
! CAUTION
If at any time the lock pin will
not engage into the locked position, do NOT operate the snowmobile. Take the snowmobile to
an authorized Arctic Cat dealer
for service.
! WARNING
Care must be taken to securely
lock the handlebar cam lever to
prevent unexpected “movement” of the handlebar during
operation over rough terrain. DO
NOT offset the handlebar so
steering (maximum right/left
turning capabilities) are altered
or throttle and brake controls
will be affected.
! CAUTION
These snowmobiles are not
designed to be operated in dusty
conditions. Operating the snowmobile in dusty conditions will
result in severe engine damage.
20 GENERAL INFORMATION
COOLING SYSTEM
(Liquid)
Some snowmobiles are equipped with
a closed liquid cooling system for
engine cooling. The cooling system
should be inspected daily for leakage
and damage. Also, the coolant level
should be checked daily. If leakage or
damage is detected, take the snowmobile to an authorized Arctic Cat Snowmobile dealer for service. If not under
warranty, this service is at the discretion and expense of the snowmobile
owner.
When filling the cooling system, use
an ethylene glycol-based coolant/
water mixture which will satisfy the
coldest anticipated weather conditions of your area in accordance with
the coolant manufacturer’s recommendations. While the cooling system is
being filled, air pockets may develop;
therefore, run the engine for five to ten
minutes after the initial fill, shut the
engine off, and then fill the cooling
system to approximately 51 mm (2 in.)
below the filler neck on 2-stroke models or to just below the FULL mark on
660 cc/1100 cc Z1 models.
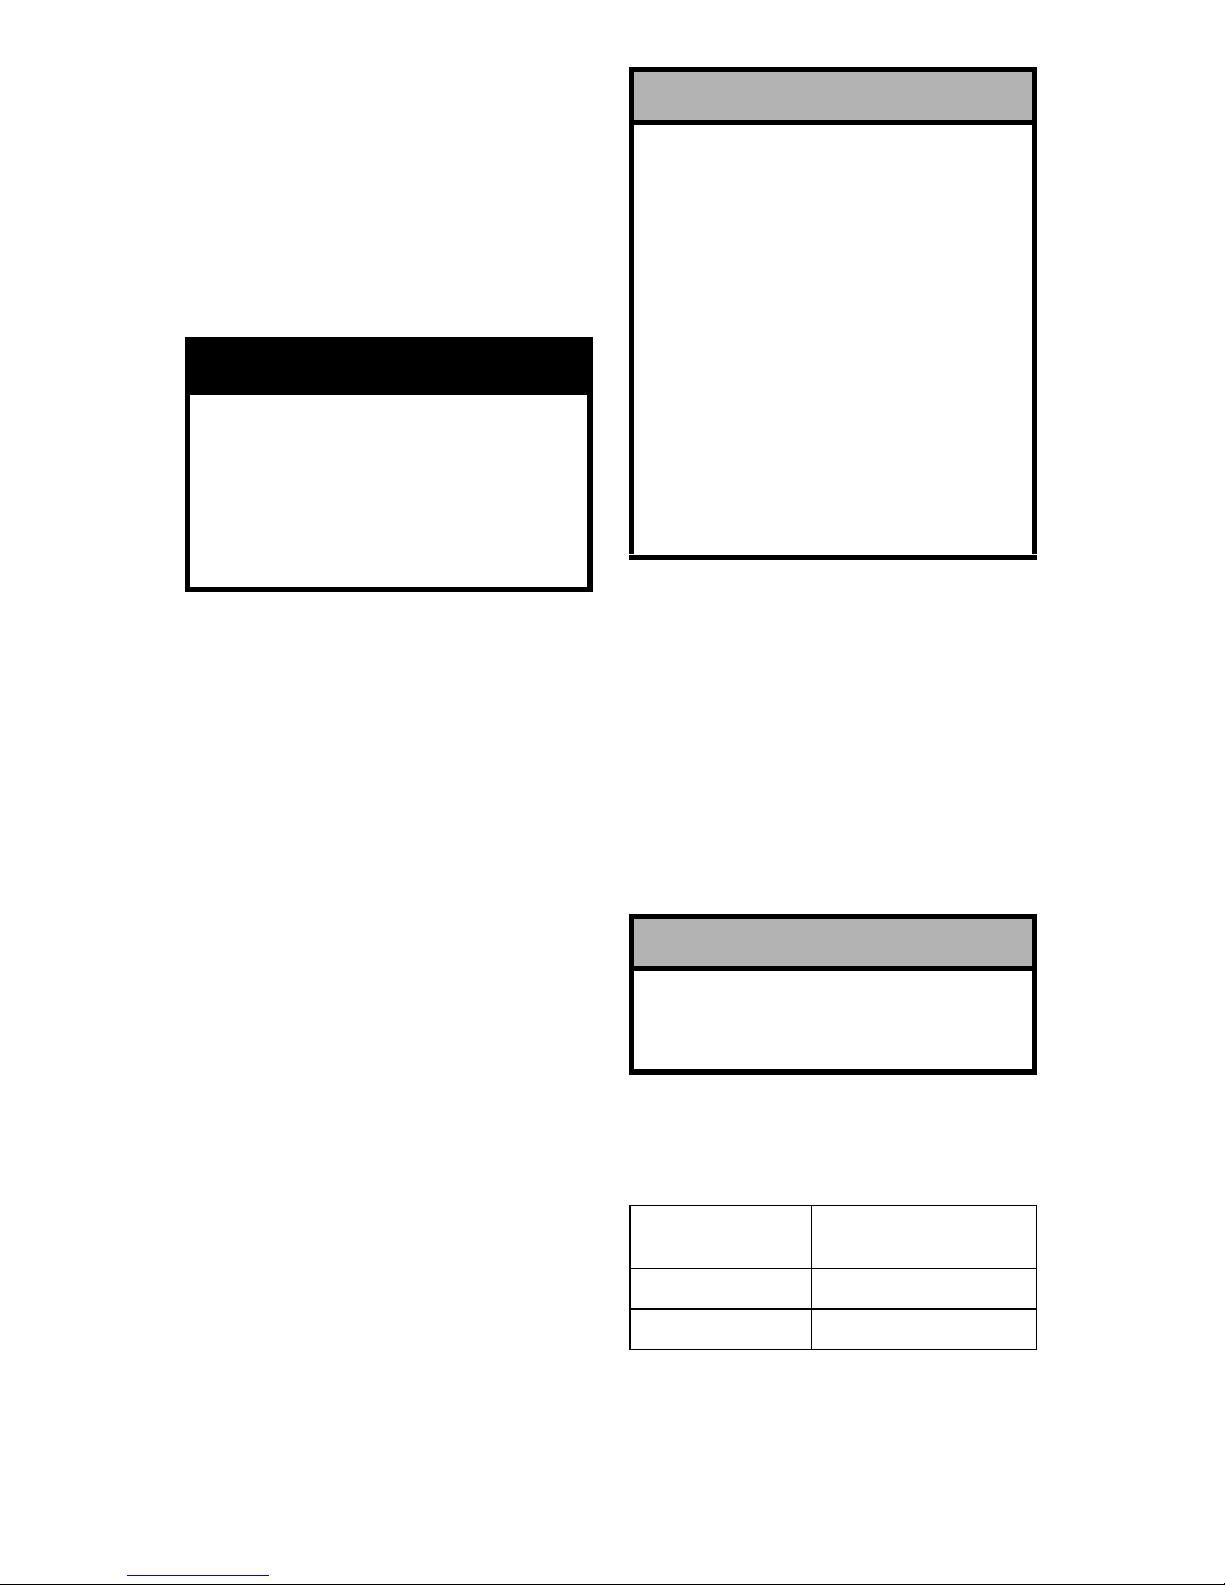
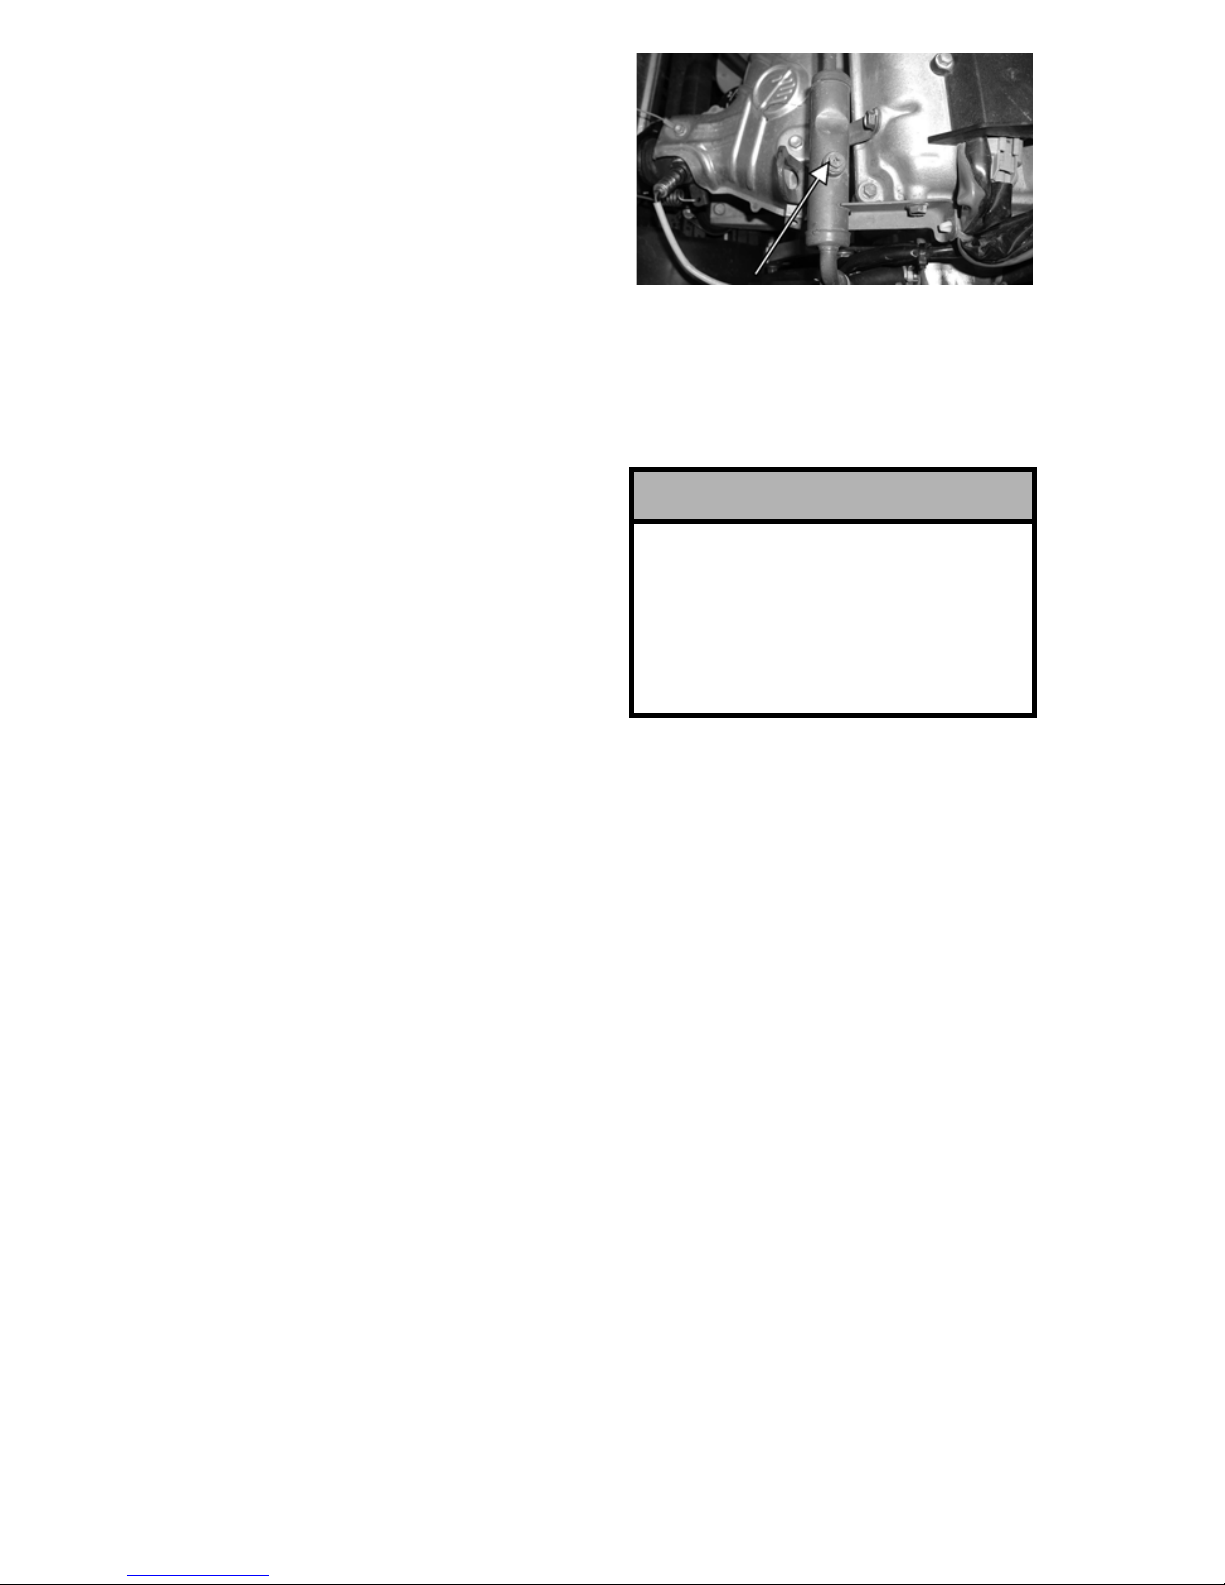
NOTE: The 660 cc models are
equipped with a coolant “bleed
screw” on the purge tank
(located on the front-top of the
engine). After starting the
engine (and with the tank cap on
and tight), open the bleed screw
slightly to allow trapped air to
escape. Continue until no air is
apparent; then tighten the
screw.
AO353A
NOTE: Use a go od qu alit y, ethylene glycol-based, automotivetype antifreeze.
DRIVE CLUTCH AND
DRIVEN PULLEY
The drive clutch and driven pulley do
not require lubrication; therefore, no
special maintenance is required by the
snowmobile owner.
However, the drive clutch and driven
pulley should be disassembled,
cleaned, and inspected by an authorized Arctic Cat Snowmobile dealer
after every 800 miles of operation or
at the end of the snowmobiling season
whichever occurs first. This service is
at the discretion and expense of the
snowmobile owner.
! CAUTION
After operating the snowmobile
for the initial 5-10 minutes, stop
the engine, allow the engine to
cool down, and check the coolant level. Add coolant as necessary.
GENERAL INFORMATION 21
When operating the snowmobile at
high altitudes, it may be necessary to
change certain component parts of the
drive clutch. See an authorized Arctic
Cat Snowmobile dealer for further
information.
DRIVE CLUTCH/
DRIVEN PULLEY
ALIGNMENT
The parallelism and the offset between
the drive clutch and driven pulley are
set at the factory. Normally, no adjustment is necessary as long as neither
the drive clutch nor the driven pulley
is removed or disassembled. However,
if premature drive belt wear is experienced or if the drive belt turns over,
the drive clutch/driven pulley alignment must be checked. Take the snowmobile to an authorized Arctic Cat
Snowmobile dealer for this service. If
not under warranty, this service is at
the discretion and expense of the
snowmobile owner.
DRIVE CHAIN
TENSION
The drive chain must be properly tensioned for proper operation to prevent
“ratcheting” and unnecessary chain/
sprocket wear. On these snowmobiles, there are two different chain tensioners in the chain case. One chain
tensioner is automatic and one is man ual. The automatic chain tensioner
will take up the slack in the chain
under most operating conditions; however, every 500 miles or whenever
repeated hard accelerations will occur,
the manual chain tensioner should be
adjusted. Arctic Cat recommends that
the chain, sprockets, and chain tensioner be checked for wear and proper
alignment and adjustment every year,
1000 miles, or whenever a drive chain
related problem is suspected. Take the
snowmobile to an authorized Arctic
Cat Snowmobile dealer for this service. If not under warranty, this service is at the discretion and expense of
the snowmobile owner. To adjust the
manual drive chain tensioner, use the
following procedure:
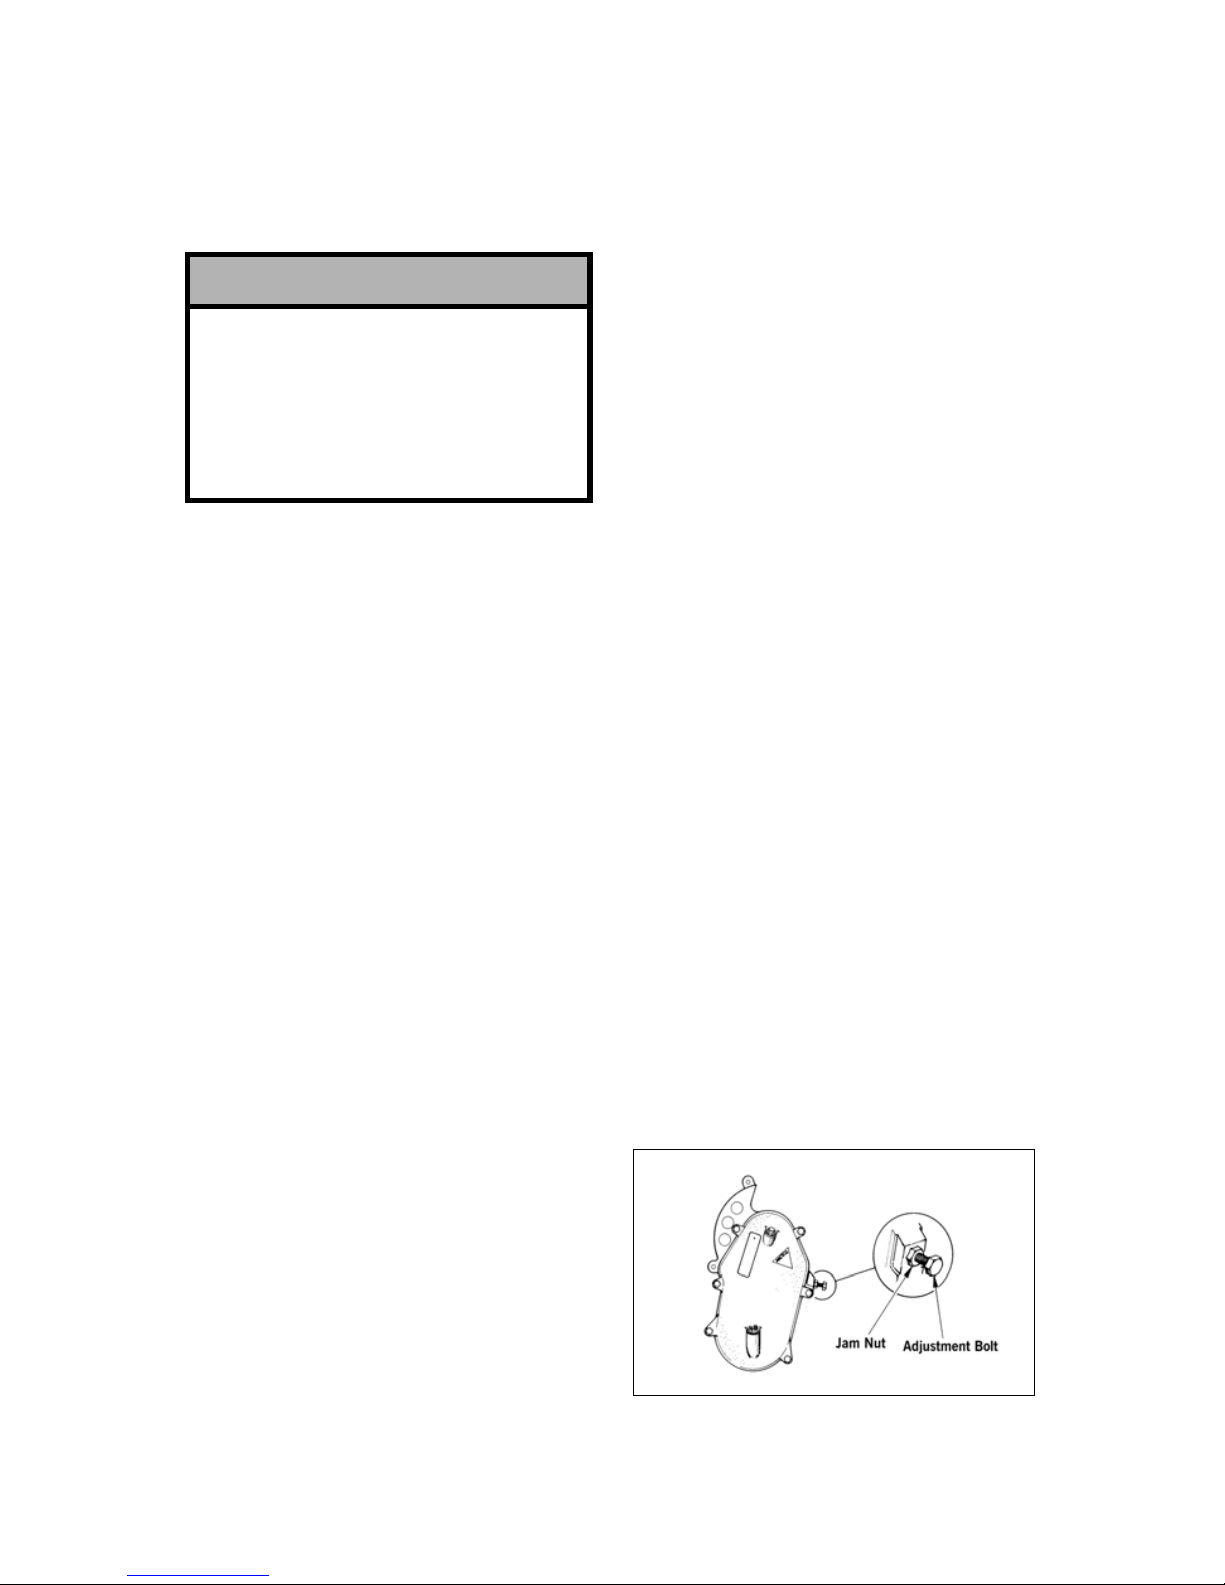
1. Loosen the jam nut on the chain
tensioner adjustment bolt.
2. Tighten the adjustment bolt finger-tight.
0730-323
! CAUTION
DO NOT attempt to service the
drive clutch and driven pulley.
The drive clutch and driven pulley must be serviced by an
authorized Arctic Cat Snowmobile dealer only.

22 GENERAL INFORMATION
NOTE: If the adjustment bolt
will not turn using the fingers
(because of dirty threads), use a
wrench to loosen the bolt; then
using the fingers, adjust the bolt
until it is finger-tight. Once the
adjustment bolt becomes difficult to turn by hand, the drive
chain is properly tensioned.
3. Lock the adjustment by bottoming the jam nut against the chain
case.
NOTE: When the head of the
adjustment bolt bottoms on the
jam nut, the drive chain is in
need of being replaced. See an
authorized Arctic Cat Snowmobile dealer for this service.
FUEL PUMP
The fuel pump is designed to provide
adequate amount of gas to the carburetors (on carbureted models) or to the
injectors (on EFI models) at all throttle settings. If a fuel delivery problem
is suspected, take the snowmobile to
an authorized Arctic Cat Snowmobile
dealer. If not under warranty, this service is at the discretion and expense of
the snowmobile owner.
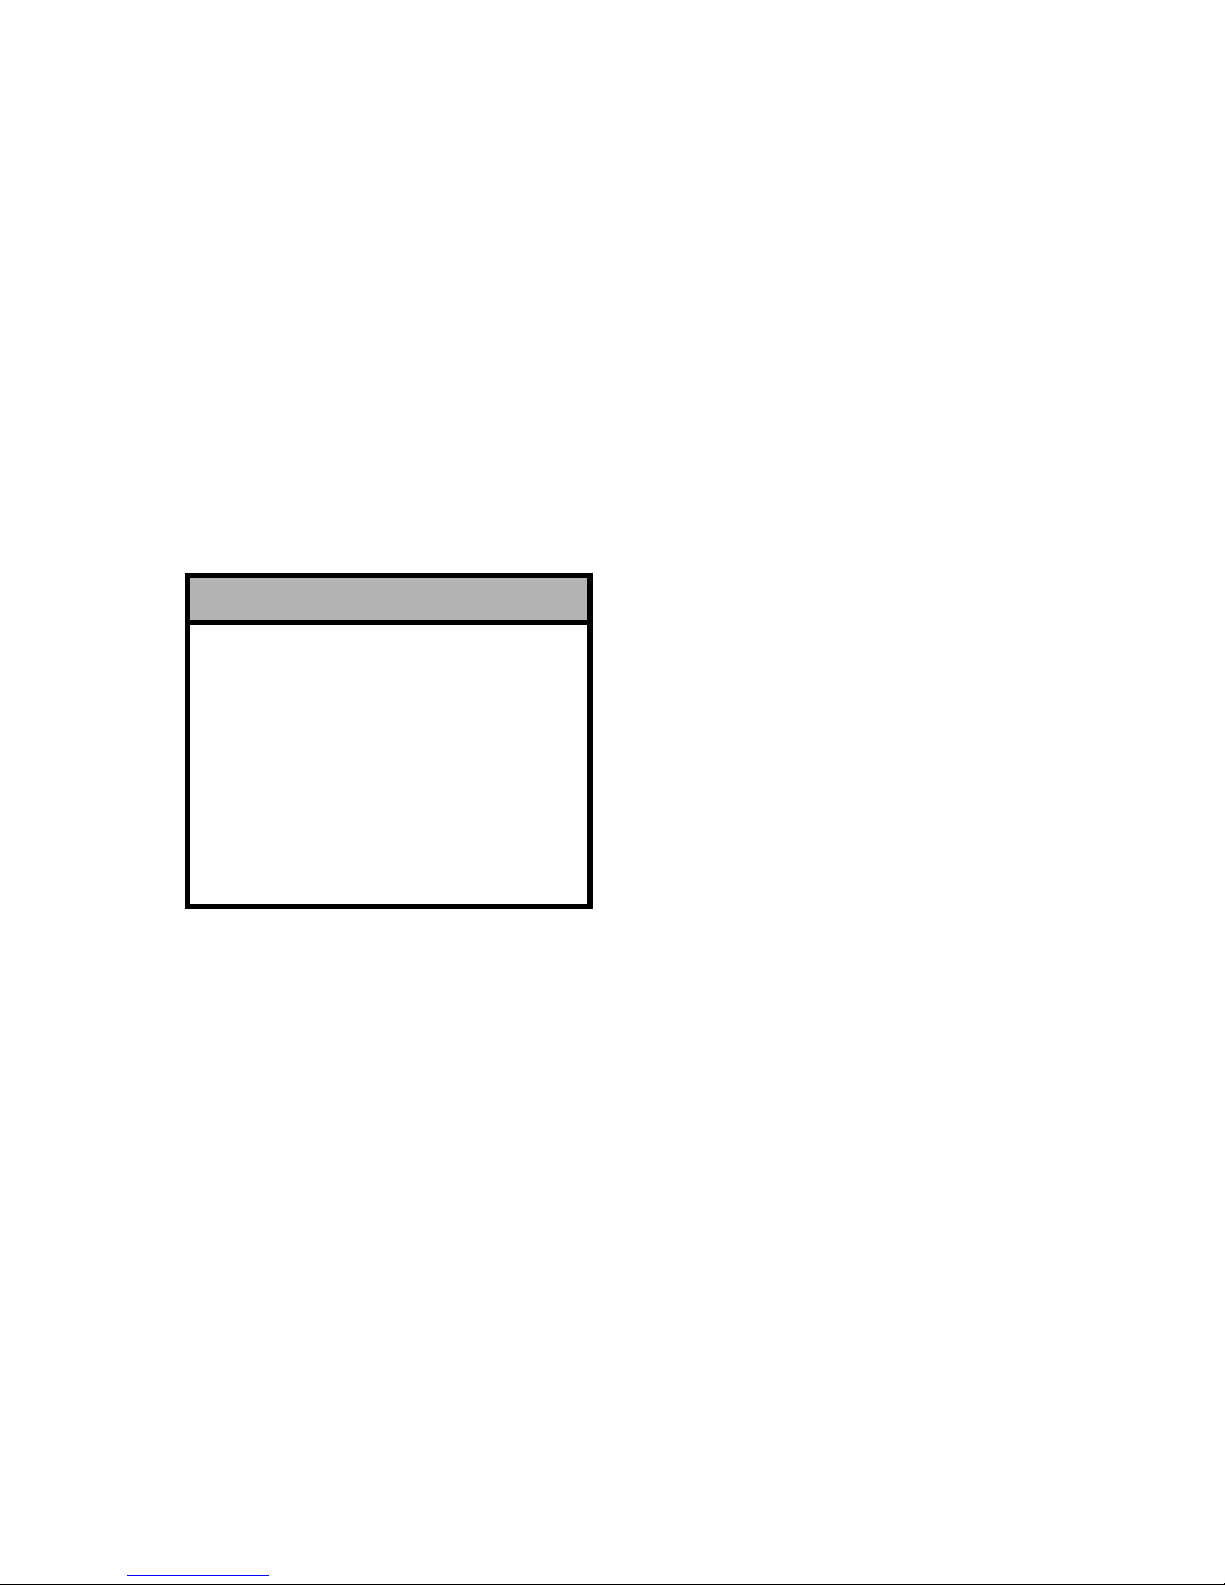
GAS TANK SHUT-OFF
VALVE
On certain models, a shut-off valve is
incorporated into the gas hose coming
from the gas tank. The valve should be
turned to the CLOSED position when
trailering or storing the snowmobile.
Turn the valve to the OPEN position
before attempting to start the engine.
NOTE: On all remaining models, there is an automatic shutoff valve incorporated into the
fuel pump which prevents gasoline flow when the engine is off.
SHOCK ABSORBERS
(Standard Gas)
Each shock absorber should be visibly
checked weekly for fluid leakage,
cracks or breaks in the lower case, or a
bent plunger. If any one of these conditions is detected, replacement is necessary. Take the snowmobile to an
authorized Arctic Cat Snowmobile
dealer for this service. If not under
warranty, this service is at the discretion and expense of the snowmobile
owner.
NOTE: When the snowmobile
is operated in extremely cold
weather (-23° C/-10° F or colder),
a small amount of leakage may
be present. Unless the leakage
is excessive, replacement is not
necessary.
SHOCK ABSORBERS
(Rebuildable Gas)
NOTE: The presence of an A CT
identifier (decal or embossed)
on a shock absorber body indicates a “rebuildable” shock
absorber.

GENERAL INFORMATION 23
NOTE: The frequency of servicing rebuildable shock absorbers will vary according to the
types of conditions and terrain
the snowmobile has been subjected to. If riding quality deteriorates (or seems to be deteriorating), take the snowmobile to
an authorized Arctic Cat Snowmobile dealer for shock
absorber evaluation and/or servicing. This service is at the discretion and expense of the
snowmobile owner.
Servicing rebuildable shock absorbers
is considered normal maintenance and
is the responsibility of the owner. Take
the snowmobile to an authorized Arctic Cat Snowmobile dealer for this service. This service is at the discretion
and expense of the snowmobile owner.
Kits are available to either stiffen or
soften gas shock valving. If changes in
shock valving are desired, see an
authorized Arctic Cat Snowmobile
dealer. This service is at the discretion
and expense of the snowmobile owner.
Each shock absorber should be visibly
checked weekly for fluid leakage,
cracks or breaks in the lower case, or a
bent plunger. If any one of these conditions is detected, replacement is necessary. Take the snowmobile to an
authorized Arctic Cat Snowmobile
dealer for this service. If not under
warranty, this service is at the discretion and expense of the snowmobile
owner.
NOTE: When the snowmobile
is operated in extremely cold
weather (-23° C/-10° F or colder),
a small amount of leakage may
be present. Unless the leakage
is excessive, replacement is not
necessary.
DEEP-LUG TRACK
Some models are equipped with a
deep-lug track which is specially
designed for use in powder snow riding conditions. When the deep-lug
track is operated in hard-packed snow
conditions, it will run slightly slower
than a standard-lug track and it will
accelerate wear strip wear. To
decrease the amount of wear strip
wear, slower speeds must be maintained when operating on hard-p acked
trails. Accelerated wear strip wear
caused by operating a deep-lug track
on hard-packed snow conditions is
NOT covered under Arctic Cat Inc.
warranty policy.
HACKSAW TRACK
Accelerated wear strip wear caused by
operating a Hacksaw Track on hardpacked snow conditions is NOT covered under Arctic Cat Inc. warranty
policy.
TRACK STUDS
NOTE: Stud or hooker plate
installation will void track and
tunnel warranty.
24 GENERAL INFORMATION
NOTE: Stud ins tallation can be
performed by the snowmobile
owner if qualified to do so. If the
owner does not feel qualified,
take the snowmobile to an
authorized Arctic Cat Snowmobile dealer for this service. Thi s
service is at the discretion and
expense of the snowmobile
owner.
For proper installation, use the following procedure:
1. Using Stud Template (p/n 2639-
903), mark the desired stud pattern to be used.
2. Using the proper-sized stud hole
drill bit, drill out the stud holes.
3. Push the stud through the hole
from inside the track; then place
the domed support plate and lock
nut on the exposed stud.
4. Using a wrench to secure the stud,
tighten the lock nut on the
exposed stud.
It is also recommended that whenever
studs are installed on a track, carbide
wear bars should be installed on the
skis. Carbide wear bars complement
the track studs to balance steering control under these conditions. The length
of the carbide on the wear bars should
be proportionate to the number of
track studs (i.e. small number of track
studs — short length of carbide...many
track studs — long length of carbide).
The proper proportion between the
number of studs and carbide length on
the wear bar will maintain steering
balance.
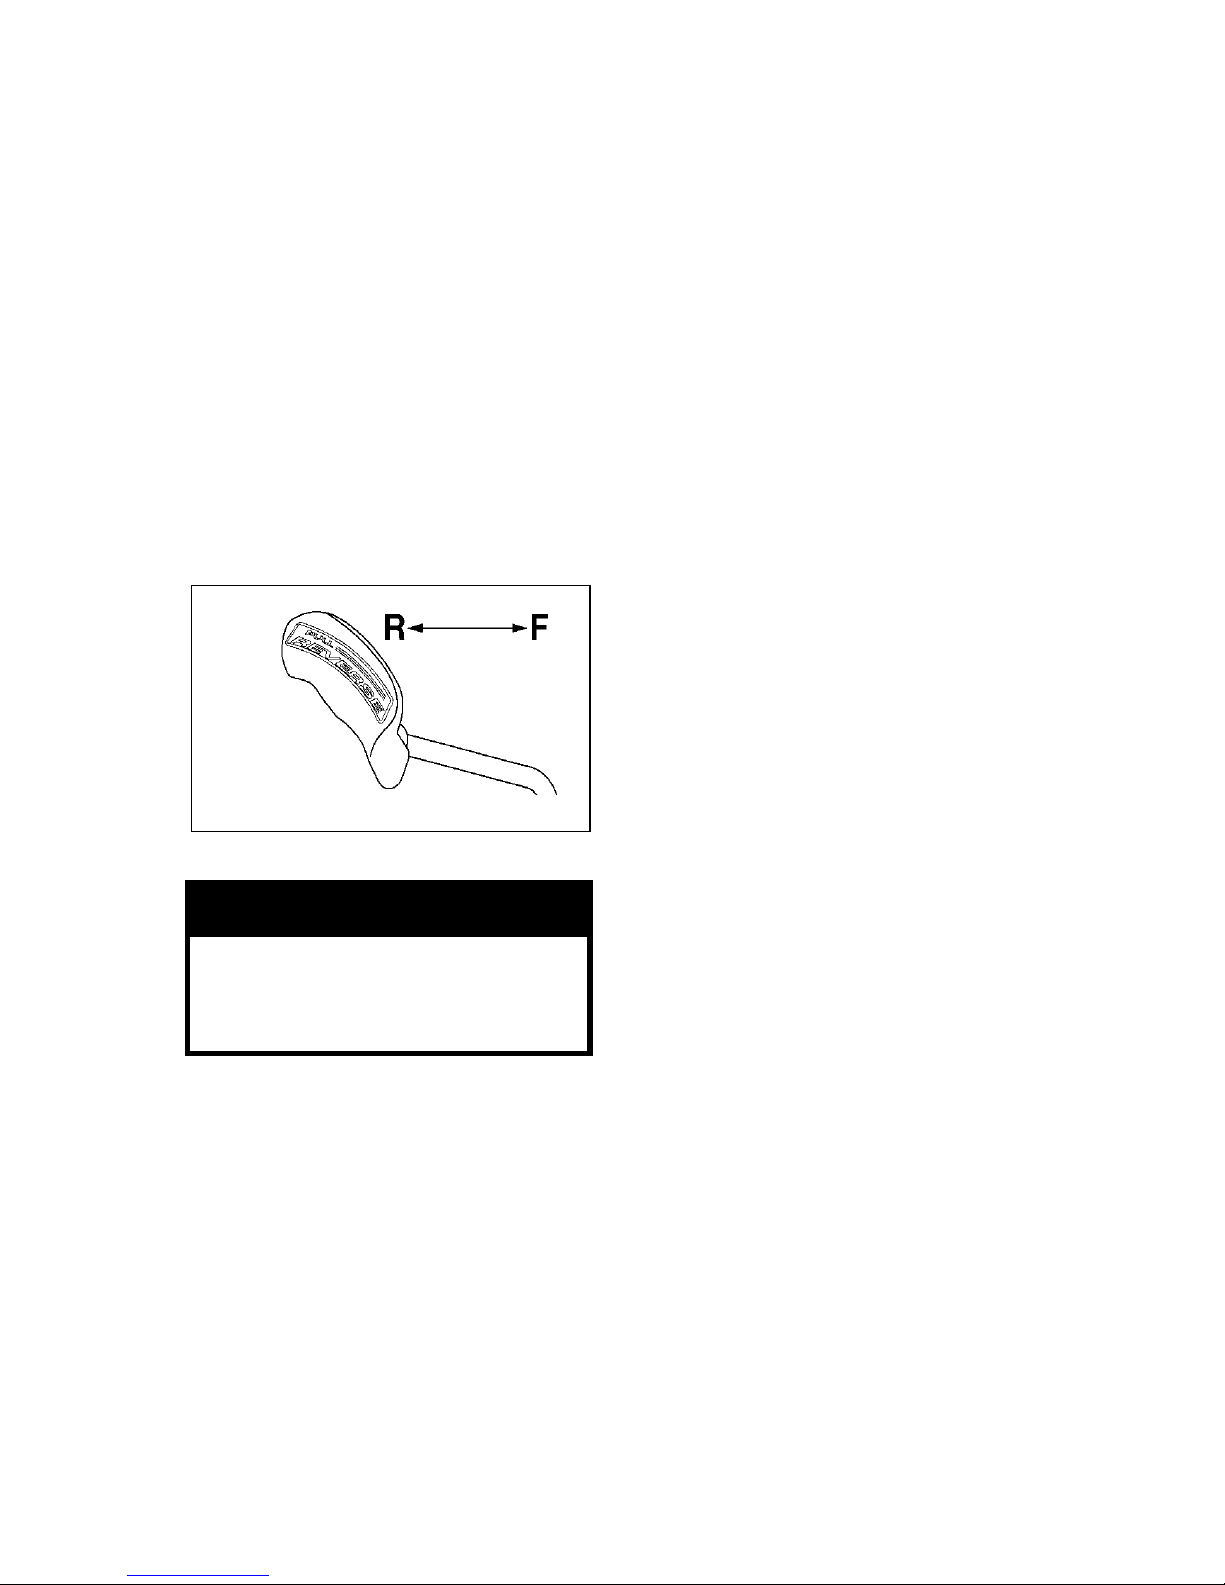
REVERSE
TRANSMISSION
The reverse transmission offers the
operator the convenience of being able
to back up the snowmobile rather than
having to turn the snowmobile around
by hand. This feature, under most situations, should not be used to free a
stuck snowmobile as it will tend to dig
the skis deeper into the snow. Before
starting the snowmobile, be sure the
shift lever is in the desired position for
either forward or reverse operation.
! WARNING
Always balance the snowmobile
with the proper proportion
between the number of studs
and carbide length on the wear
bars. Do not “over drive” conditions; use common sense in all
operating conditions.
! CAUTION
Do not use studs that are more
than 9.525 mm (0.375 in.) longer
than the track lug height.
! WARNING
Do not operate a snowmobile
with loose studs as they may be
thrown from the track. Always
use a shielded safety stand
whenever performing any maintenance or adjustments.
! WARNING
DO NOT stand behind the snowmobile or near the rotating track.
NEVER run the track at high
speed when the track is suspended.
GENERAL INFORMATION 25
Always use minimal speed when operating in reverse and come to a complete stop before shifting from either
forward to reverse or reverse to forward. Once you have shifted to a new
gear, apply slight throttle until positive
engagement of the shift has been
observed. To shift the reverse transmission, use the following procedure:
1. Come to a complete stop.
2. Either push or pull the shift lever
to the desired position; then apply
slight throttle until positive
engagement of the shift has been
observed.
737-831A
No special maintenance is required for
the reverse transmission; however, if
chattering is experienced when the
transmission is shifted into reverse,
the linkage may have to be adjusted.
Arctic Cat recommends taking the
snowmobile to an authorized Arctic
Cat Snowmobile dealer for this service. If not under warranty, this service is at the discretion and expense of
the snowmobile owner.
NOTE: A warning buzzer will
sound when the transmission is
in the reverse position; however,
always check the position of the
shift lever before accelerating.
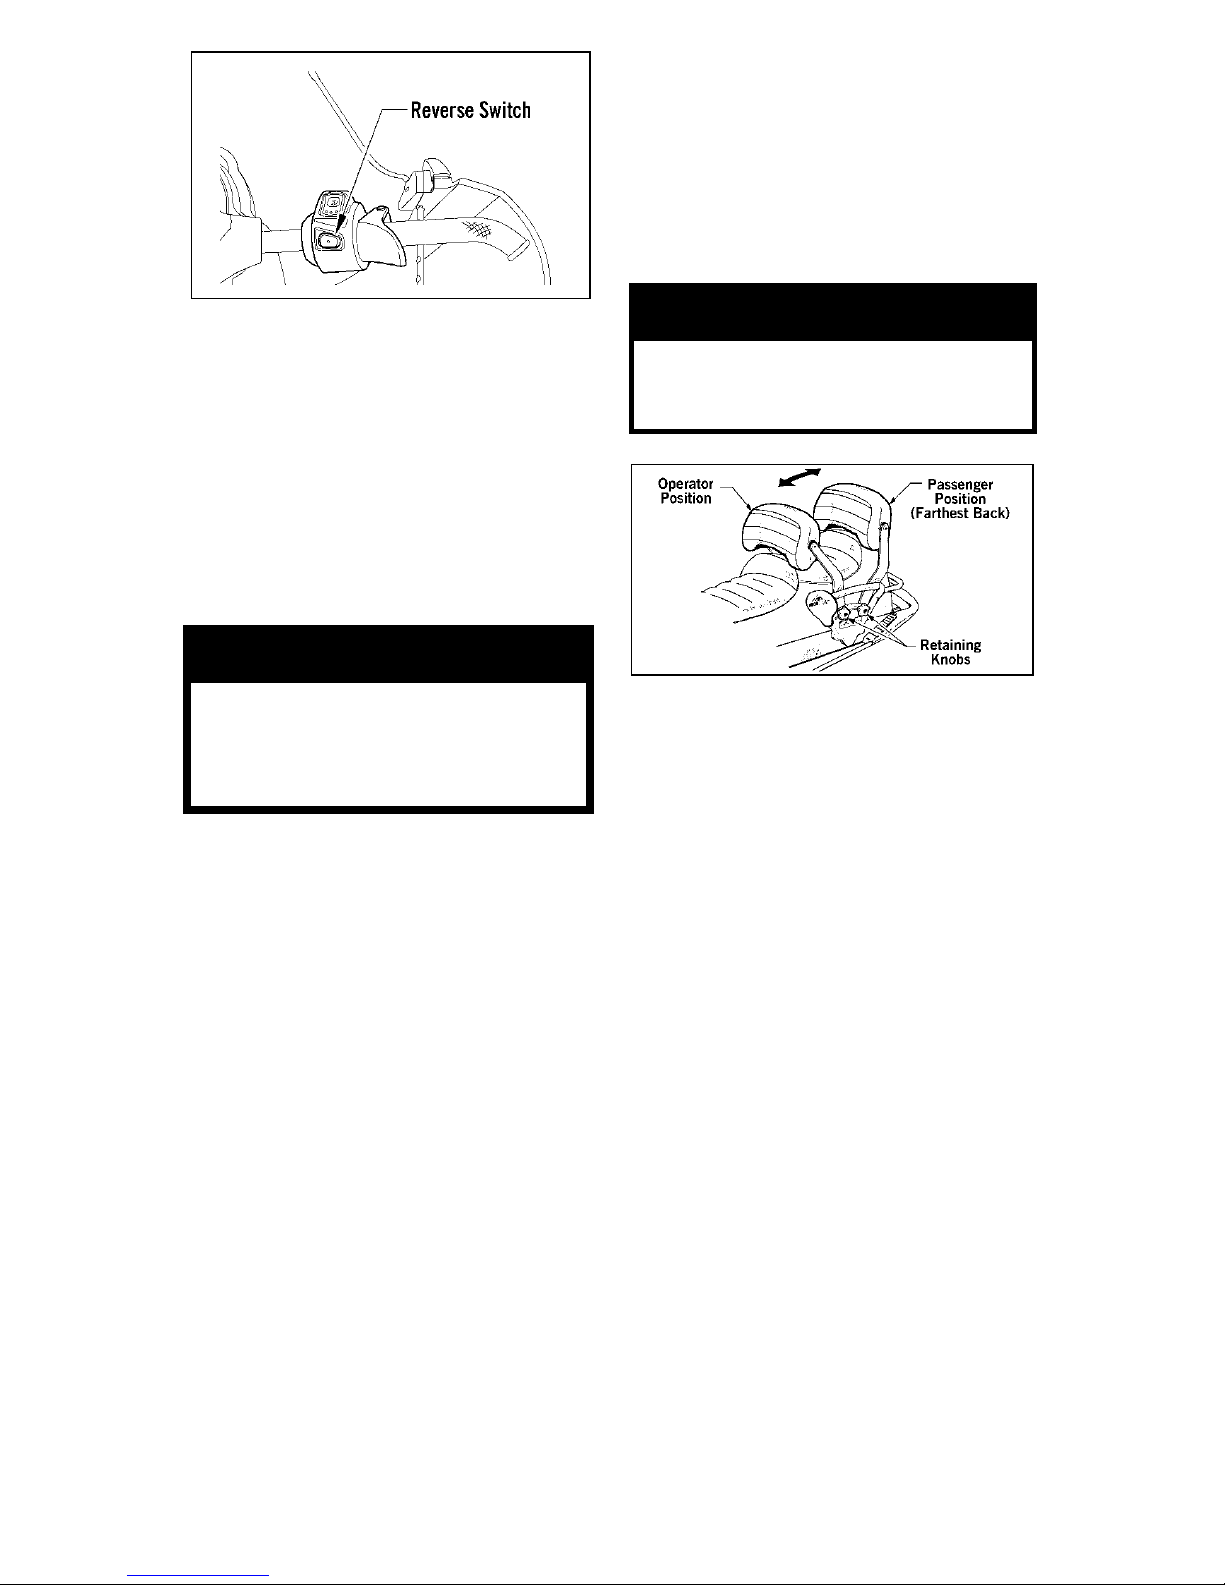
REVERSE
TRANSMISSION
(Crossfire/F-Series/
Jaguar Z1/M-Series
Models)
The reverse transmission offers the
operator the convenience of being able
to back up the snowmobile rather than
having to turn the snowmobile around
by hand. This feature, under most situations, should not be used to free a
stuck snowmobile as it will tend to dig
the skis deeper into the snow. Always
use minimal speed when operating in
reverse and come to a complete stop
before shifting from either forward to
reverse or reverse to forward. To shift
the reverse transmission, use the following procedure:
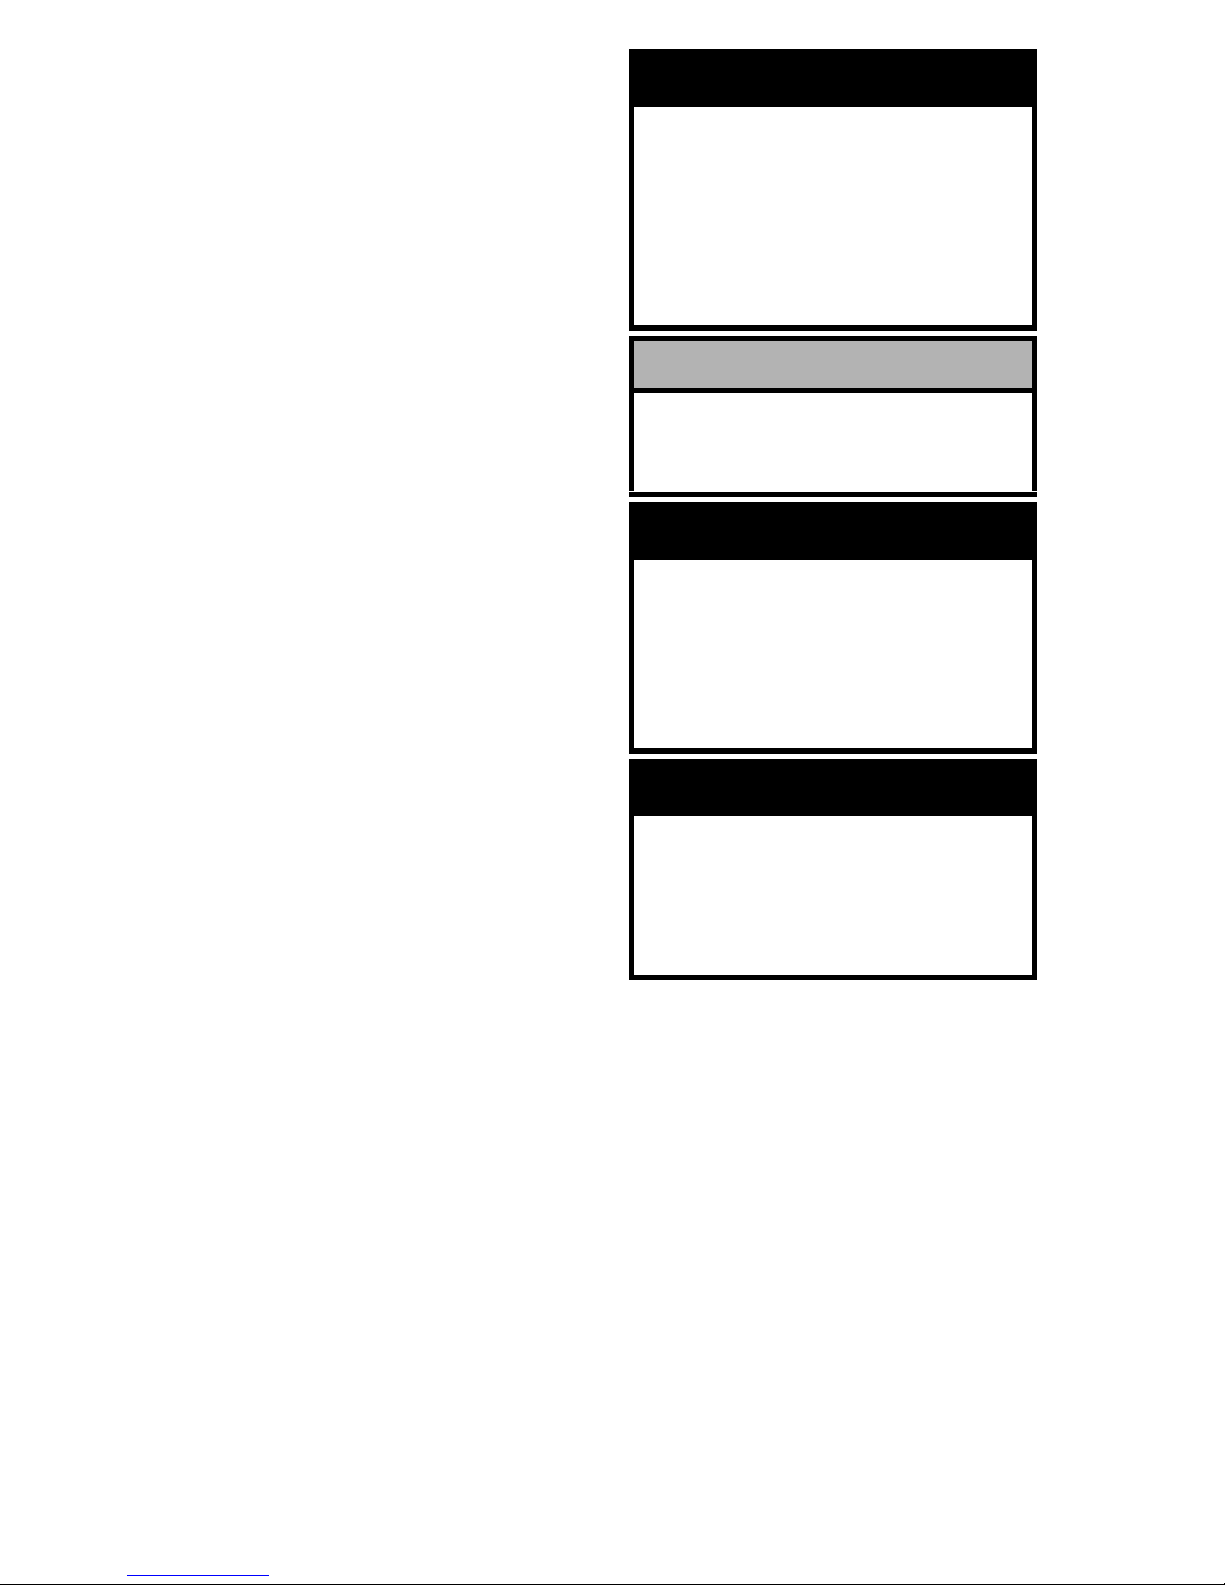
1. Come to a complete stop.
NOTE: The snowmobile must
be at a complete stop and the
engine at idle before the system
will allow shifting.
2. With the engine at idle, press the
reverse switch button; then release
the button. The reverse selection
will be complete.
! WARNING
Use caution and minimal speed
when operating the snowmobile
in reverse. Be sure the shift lever
is in the desired lever position.
26 GENERAL INFORMATION
0741-438
NOTE: The system will not
shift until the button is released.
3. To shift into forward, stop the
snowmobile and allow the engine
to idle; then press the button and
release. The forward selection will
be complete.
NOTE: A warning buzzer will
sound when the transmission is
in the reverse position.
TOWING
If the snowmobile is to be towed by
another snowmobile, do not tow u sing
the loops in the skis. The tow rope
should be attached to the spindles.
ADJUSTABLE
BACKREST
The adjustable backrest is designed
for maximum comfort and safety.
When riding double, the backrest must
be adjusted to the most rearward position.
When riding single, the backrest
should be moved forward to a positi on
comfortable to the operator. Be sure to
maintain the backrest pad in a vertical
position in all locations. Also, be sure
to tighten all retaining knobs securely
after adjusting the backrest.
0734-425
REMOVABLE REAR
SEAT
Some snowmobiles are equipped with
a removable rear seat to allow for
additional cargo space when no passenger is being carried. To remove the
rear seat, use the following procedure:
1. Move and lock the adjustable
backrest in the forward position.
2. Pull back on the seat latch handle
located at the bottom rear of the
seat.
3. Lift on the back of the seat and
move it rearward to remove it
from the tunnel.
! WARNING
Use caution and minimal speed
when operating the snowmobile in reverse. Be sure the button is in the desired position.
! WARNING
Moving the backrest forward limits the seating capacity to one
person only.
 Loading...