

Page 1
Mașină de spălat automată
APL61012BDW0
Manual de utilizare
Washing Machine
User’s Manual
Numărul documentului 1911860026_RO/ 03-01-19.(10:27)
Page 2

1 Instrucţiuni generale referitoare la siguranţă
Această secţiune include instrucţiuni privind siguranţa care pot să contribuie
la prevenirea vătămărilor corporale şi a daunelor materiale. Toate formele
de garanţie îşi pierd valabilitatea în cazul nerespectării acestor instrucţiuni.
1.1 Siguranţa vieţii şi bunurilor materiale
u
Nu amplasaţi produsul pe covor. Piesele electrice se vor supraîncălzi din
cauză că aerul nu poate să circule pe sub aparat. Acest fenomen poate
provoca probleme produsului.
u
Scoateţi produsul din priză când nu îl folosiţi.
u
Instalarea şi depanarea produsului se vor efectua numai de către agenţi de
service autorizaţi. Producătorul nu va fi răspunzător de daunele care pot
apărea datorită procedurilor executate de persoane neautorizate.
u
Furtunurile de alimentare cu apă şi de evacuare trebuie să fie fixate corect
şi să nu prezinte deteriorări. În caz contrar, pot să apară scurgeri de apă.
u
Dacă în produs a rămas apă, nu deschideţi uşa de încărcare şi nu demontaţi
filtrul. În caz contrar, există pericolul de inundare şi vătămare corporală
cauzată de apa fierbinte.
u
Nu forţaţi deschiderea uşii de încărcare când aceasta este blocată. Uşa
poate fi deschisă la câteva minute după terminarea ciclului de spălare. În
cazul forţării deschiderii uşii de încărcare, uşa şi mecanismul de închidere
se pot deteriora.
u
Folosiţi numai detergenţi, balsam şi alte produse pentru maşini de spălat
automate.
u
Respectaţi instrucţiunile de pe etichetele rufelor şi de pe ambalajul
detergentului.
1.2 Siguranţa copiilor
u
Acest produs poate fi utilizat de către copii cu vârsta de 8 ani sau mai
mari şi de persoane cu capacităţi fizice, senzoriale sau mentale reduse sau
lipsite de experienţa şi cunoştinţele necesare, dacă sunt supravegheaţi sau
instruiţi cu privire la utilizarea produsului într-o manieră sigură şi înţeleg
pericolele implicate. Copiii nu au voie să se joace cu aparatul. Curăţarea şi
întreţinerea nu trebuie efectuată de copii, cu excepţia cazului în care sunt
supravegheaţi. Copii sub vârsta de 3 ani ar trebui să fie menţinuţi departe
de aparat doar dacă aceştia sunt supravegheaţi.
2 / RO
Maăinţ de spţlat automatţ / Manual de utilizare
Page 3

u
Ambalajele pot fi periculoase pentru copii. Păstraţi ambalajele într-un loc
sigur şi departe de copii.
u
Produsele electrice sunt periculoase pentru copii. Nu permiteţi copiilor să
se apropie de produs când acesta funcţionează. Nu îi lăsaţi să se joace cu
produsul. Folosiţi funcţia de Blocare pentru copii pentru a evita intervenţia
copiilor în funcţionarea produsului.
u
Închideţi uşa de încărcare a maşinii atunci când părăsiţi încăperea în care
se află.
u
Păstraţi toţi detergenţii şi produsele auxiliare într-un loc sigur, la care copiii
nu au acces; închideţi capacul cutiei de detergent sau sigilaţi ambalajul
acestuia.
1.3 Siguranţa aparatelor electrice
u
Dacă produsul are o defecţiune nu îl utilizaţi decât după ce este remediată
de un agent de service autorizat. Pericol de şoc electric!
u
Acest produs îşi va relua funcţionarea după o pană de curent. Dacă doriţi
anularea programului, consultaţi secţiunea „Anularea programului”.
u
Conectaţi produsul la o priză împământată şi protejată cu o siguranţă de 16 A.
Instalaţia de împământare trebuie efectuată de către un electrician calificat.
Compania noastră nu îşi asumă responsabilitatea pentru daunele cauzate
de utilizarea produsului fără împământare conformă cu reglementările
locale.
u
Nu curăţaţi niciodată produsul turnând sau pulverizând apă pe acesta!
Pericol de şoc electric!
u
Nu atingeţi ştecherul cu mâinile ude! Nu trageţi de cablu pentru a scoate
maşina din priză; apucaţi întotdeauna priza cu o mână şi trageţi ştecherul
cu cealată mână.
u
Produsul trebuie scos din priză în timpul procedurilor de instalare, întreţinere,
curăţare şi reparare.
u
În cazul deteriorării cablului de alimentare, acesta trebuie înlocuit de
producător, de un service post-vânzare sau de o persoană cu calificări
similare (de preferinţă un electrician) sau de o persoană desemnată de
importator în vederea evitării potenţialelor pericole.
1.4 Siguranţa suprafeţelor fierbinţi
În timp ce spălaţi rufe la temperaturi înalte,
geamul uşii se va înfierbânta. Din acest motiv,
nu permiteţi copiilor să se apropie de uşa
maşinii în timpul ciclului de spălare, pentru a
nu o atinge.
Maăinţ de spţlat automatţ / Manual de utilizare
3 / RO
Page 4
2 Instrucţiuni importante privind mediul
2.1 Conformitatea cu directiva DEEE
Acest produs este conform cu Directiva UE DEEE (2012/19/UE). Acest produs este marcat cu
un simbol de clasificare a deşeurilor de echipamente electrice şi electronice (DEEE).
Acest produs a fost produs folosind componente şi materiale de înaltă calitate, care pot fi
refolosite şi reciclate. Nu aruncaţi produsul împreună cu gunoiul menajer sau cu alte gunoaie
la sfârşitul duratei de exploatare. Transportaţi-l la centrul de colectare pentru reciclarea
echipamentelor electrice şi electronice. Luaţi legătura cu autorităţile locale pentru detalii despre
aceste centre de colectare.
Produsul pe care l-aţi cumpărat este conform cu Directiva RoHS UE (2011/65/UE). Nu conţine materialele
dăunătoare şi interzise specificate în Directivă.
Conformitatea cu directiva RoHS:
2.2 Informaţii despre ambalaj
Ambalajele produsului sunt produse din materiale reciclabile, conform reglementărilor privind protecţia
mediului din ţara noastră. Nu aruncaţi ambalajul împreună cu gunoiul menajer sau cu alte deşeuri.
Transportaţi-l la punctele de colectare a ambalajelor desemnate de autorităţile locale.
3 Destinaţie
• Acest produs este destinat uzului casnic. Nu este destinat uzului comercial şi nu trebuie folosit în alte
scopuri.
• Produsul trebuie utilizat doar pentru spălarea şi clătirea rufelor a căror etichete permit acest lucru.
• Producătorul îşi declină orice responsabilitate pentru problemele survenite în urma utilizării incorecte sau
transportului incorect.
• Durata de funcţionare a produsului este de 10 ani. În această perioadă vor fi disponibile piese de schimb
originale pentru menţinerea aparatului în bună stare de funcţionare.
4 / RO
Maăinţ de spţlat automatţ / Manual de utilizare
Page 5
4 Specificaţii tehnice
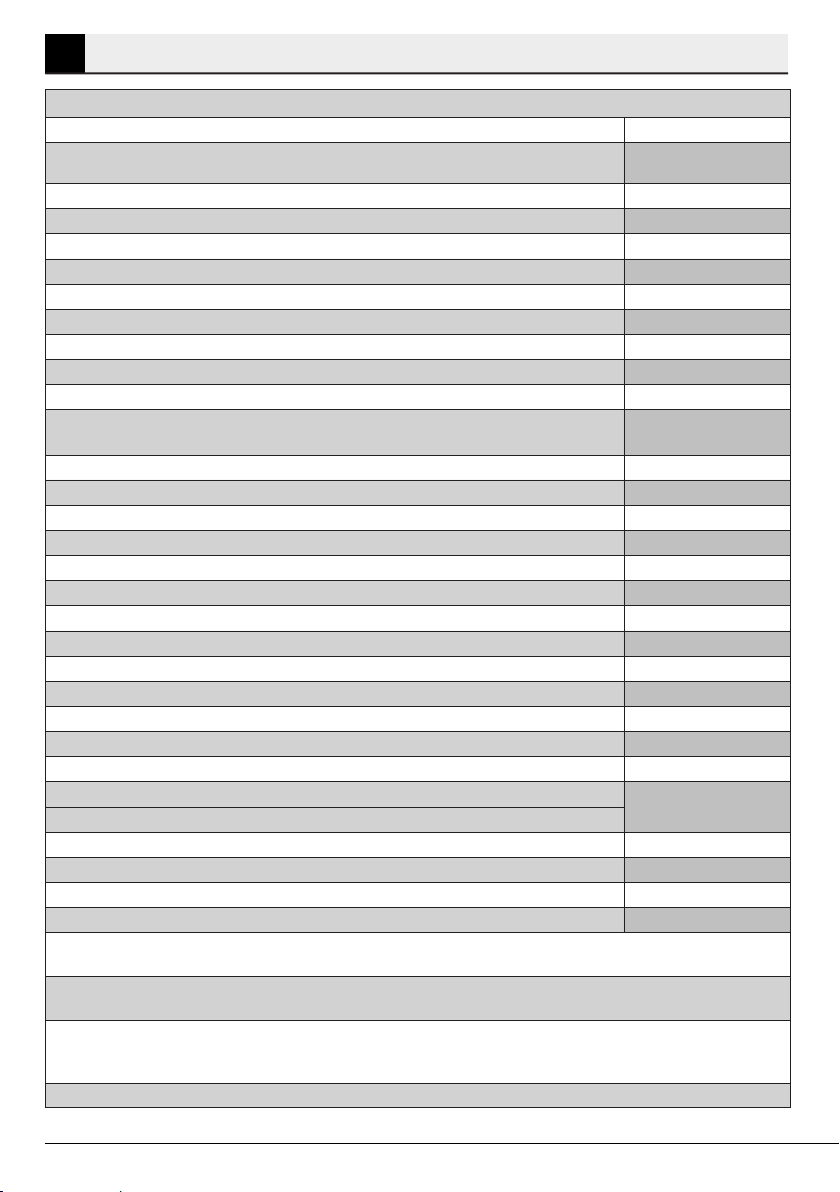
Respectarea Regulamentului Delegat al Comisiei (UE) Nr 1061/2010
Nume sau marcă comercială furnizor ARCTIC
Nume model
Capacitate nominală (kg)
Clasă de eficienţă energetică / Pe o scară de la A+++ (cea mai eficientă) la D (cea mai ineficientă) A+++
Consum anual de energie (kWh)
(1)
Consumul de energie al programului standard pentru bumbac la 60°C cu încărcare completă (kWh) 0,918
Consumul de energie al programului standard pentru bumbac la 60°C cu încărcare parţială (kWh) 0,490
Consumul de energie al programului standard pentru bumbac la 40°C cu încărcare parţială (kWh) 0,485
Consum de energie în modul “oprit” (W) 0,250
Consum de energie în modul “lăsat pornit” (W)
Consum anual de apă (l)
(2)
Clasă de eficienţă la uscare prin centrifugare / Pe o scară de la A (cea mai ineficientă) la G (cea mai
ineficientă)
Viteză de centrifugare maximă (rpm) 1000
Gradul de umiditate reziduala% 62
Program standard bumbac
(3)
Durata programului standard pentru bumbac la 60°C cu încărcare completă (min) 255
Durata programului standard pentru bumbac la 60°C cu încărcare parţială (min)
Durata programului standard pentru bumbac la 40°C cu încărcare parţială (min)
Durată mod lăsat pornit (min) N/A
Zgomot generat spălare/centrifugare (dB) 63/75
Încorporată No
Înălţime (cm) 84
Lăţime (cm)
Adâncime (cm)
Greutate netă (±4 kg.)
Intrare apă simplă / Intrare apă dublă
• Disponibil
Alimentare cu electricitate (V/Hz) 230 V / 50Hz
Curent total (A) 10
Putere totală (W) 2200
Cod principal model 9213
(1)
Consumul de energie este bazat pe 220 de cicluri de spălare standard folosind programele pentru bumbac la 60°C şi 40°C cu încărcare completă
şi parţială, şi pe consumul modurilor cu energie redusă. Consumul efectiv de energie depinde de modul de utilizare al aparatului.
(2)
Consumul de apă este bazat pe 220 de cicluri de spălare standard folosind programele pentru bumbac la 60°C şi 40°C cu încărcare completă şi
parţială. Consumul efectiv de apă depinde de modul de utilizare al aparatului.
(3)
“Programul standard bumbac 60°C” şi “Programul standard bumbac 40°C” sunt programele de spălare standard la care se referă informaţiile de
pe etichetă şi din fişă, fiind potrivite pentru spălarea rufelor din bumbac cu grad normal de murdărire şi cele mai eficiente programe sub aspectul
consumului combinat de energie şi apă.
În scopul îmbunătăţirii produsului, este posibil ca specificaţiile tehnice să fie modificate fără preaviz.
APL61012BDW0
7000040006
6
152
0,750
8799
C
Cotton Eco 60°C and 40°C
205
205
60
44
55
• / -
Maăinţ de spţlat automatţ / Manual de utilizare
5 / RO
Page 6
4.1 Instalare
• Apelaţi la un agent de service autorizat pentru instalarea produsului.
• Este responsabilitatea cumpărătorului să pregătească instalaţiile electrice, de apă curentă şi de canalizare
care vor fi folosite de maşina de spălat.
• Verificaţi cablul de alimentare şi furtunurile de alimentare şi evacuare, asigurându-vă că nu au fost pliate,
ciupite sau strivite când maşina a fost împinsă la locul ei după instalare sau curăţare.
• Asiguraţi-vă că instalarea şi racordurile electrice ale produsului sunt realizate de către service-ul autorizat.
Producătorul nu va fi responsabil pentru daunele care pot apărea datorită procedurilor executate de
persoane neautorizate.
• Înainte de instalare, verificaţi dacă produsul are avarii vizibile. Dacă descoperiţi avarii, nu instalaţi produsul.
Produsele avariate vă pun în pericol siguranţa.
4.1.1 Amplasarea corectă
• Amplasați produsul pe o podea rigidă şi plană. Nu îl amplasați pe un covor moale sau pe alte suprafeţe
similare.
• În cazul suprapunerii maşinii de spălat şi a uscătorului de rufe, greutatea totală a acestora –încărcate– este
de 180 de kilograme. Amplasați produsul pe o pardoseală solidă şi plană, care poate să susţină această
sarcină!
• Nu amplasaţi produsul pe cablul de alimentare.
• Nu instalaţi produsul în medii în care temperatura poate să scadă sub 0 ºC.
• Se recomandă lăsarea unui spațiu în părțile laterale ale maşinii pentru a reduce vibrațiile şi zgomotul
• În cazul podelelor în trepte, nu amplasaţi produsul lângă margine sau pe o platformă.
• Nu aşezați pe maşina de spălat surse de căldură precum plite, fiare de călcat, cuptoare, etc., şi nu le folosiți
pe produs.
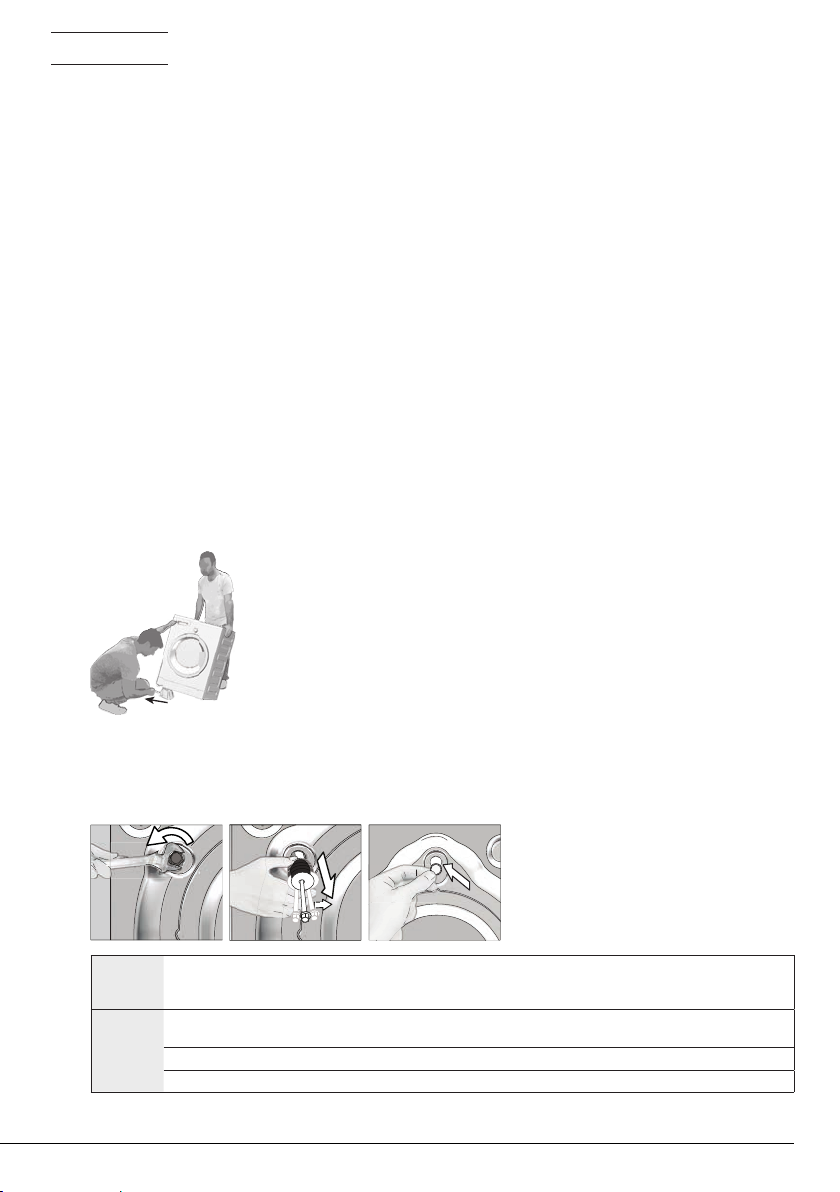
4.1.2 Demontarea ranforsării ambalajului (Dacă produsul are)
Înclinaţi maşina în spate pentru a îndepărta ranforsarea ambalajului.
Îndepărtaţi ranforsarea ambalajului trăgând de bandă. Nu efectuaţi
această operaţie de unul singur.
4.1.3 Demontarea şuruburilor de fixare pentru transport
1 Desfaceţi toate şuruburile cu o cheie până când acestea se rotesc liber.
2 Scoateţi şuruburile de fixare pentru transport răsucindu-le uşor.
3 Introduceţi capacele de plastic din punga manualului de utilizare în orificiile panoului spate.
ATENŢIE: Demontaţi şuruburile de fixare pentru transport înainte de a utiliza maşina de spălat! În caz contrar, produsul se
A
C
6 / RO
va deteriora.
Păstraţi într-un loc sigur şuruburile de fixare pentru transport, pentru a le refolosi la următoarea mutare a maşinii de spălat.
Montaţi şuruburile de fixare pentru transport în ordinea inversă demontării.
Nu mutaţi produsul fără a monta şuruburile de fixare pentru transport!
Mașină de spălat automată / Manual de utilizare
Page 7
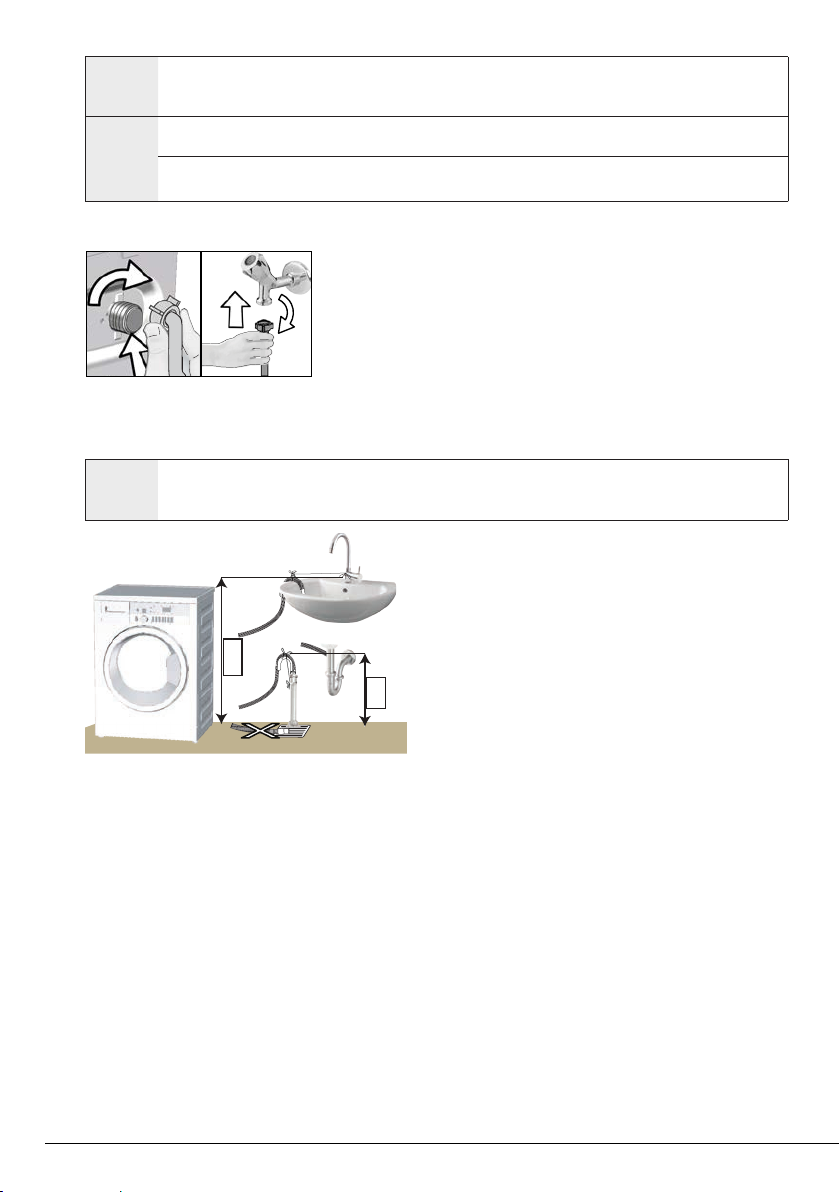
4.1.4 Conectarea la reţeaua de apă
Pentru funcţionarea produsului, presiunea sursei de alimentare cu apă trebuie să fie între 1 şi 10 bari (0,1 – 1 MPa). Pentru
ca maşina să funcţioneze corect, din robinet trebuie să curgă 10 – 80 litri de apă pe minut. Dacă presiunea apei este mai
C
A
mare, montaţi un reductor de presiune.
ATENŢIE: Modelele cu o singură priză de apă nu trebuie conectate la robinetul de apă caldă. În caz contrar, rufele vor fi
deteriorate sau funcţionarea maşinii va fi întreruptă de sistemul său de protecţie.
ATENŢIE: Nu montaţi pe produsul nou furtunuri de alimentare cu apă vechi sau folosite. Riscaţi pătarea hainelor.
1 Strângeţi manual piuliţele furtunului. Nu folosiţi instrumente pentru
strângerea piuliţelor.
2 După conectarea furtunurilor, verificaţi dacă nu există scurgeri
la punctele de conectare deschizând complet robinetele. Dacă
detectaţi scurgeri, închideţi robinetul şi desfaceţi piuliţa. Strângeţi
la loc piuliţa după ce aţi verificat garnitura. Pentru prevenirea
posibilelor scurgeri de apă şi a daunelor asociate cu acestea,
menţineţi robinetele închise atunci când nu folosiţi produsul.
4.1.5 Conectarea furtunului de evacuare la canalizare
• Ataşaţi capătul furtunului de evacuare direct la canalizare, la chiuvetă sau la cadă.
ATENŢIE: Casa dvs. va fi inundată dacă furtunul se desface din locaşul său în timpul evacuării apei. Pericol de opărire
A
datorită temperaturilor mari de spălare! Pentru a preveni aceste situaţii şi a vă asigura că maşina realizează fără probleme
procesele de alimentare cu apă şi evacuare a apei, fixaţi bine furtunul de evacuare.
• Conectaţi furtunul de evacuare la o înălţime de cel puţin
40 cm şi cel mult 100 cm.
• Dacă furtunul de evacuare este ridicat după ce a fost
100 cm
aşezat la nivelul podelei sau aproape de pământ (mai
puţin de 40 cm deasupra pământului), evacuarea apei se
face mai greu, iar hainele pot să rămână excesiv de ude.
40 cm
Respectaţi înălţimile descrise în figură.
• Pentru a preveni scurgerea apei reziduale înapoi în maşină şi pentru a uşura evacuarea, nu introduceţi
capătul furtunului în apa reziduală şi nu îl introduceţi mai mult de 15 cm în canalizare. Dacă este prea lung,
scurtaţi-l.
• Capătul furtunului nu trebuie îndoit, nu trebuie călcat şi nu trebuie strivit între canalizare şi maşină.
• Dacă furtunul este prea scurt, adăugaţi un furtun de prelungire original. Lungimea furtunului nu trebuie să
fie mai mare de 3,2 m. Pentru evitarea scurgerilor de apă, racordul dintre furtunul de prelungire şi furtunul
de evacuare al produsului trebuie realizată corect, folosind un colier adecvat pentru a se evita desprinderea
şi scurgerile.
Maăinţ de spţlat automatţ / Manual de utilizare
7 / RO
Page 8
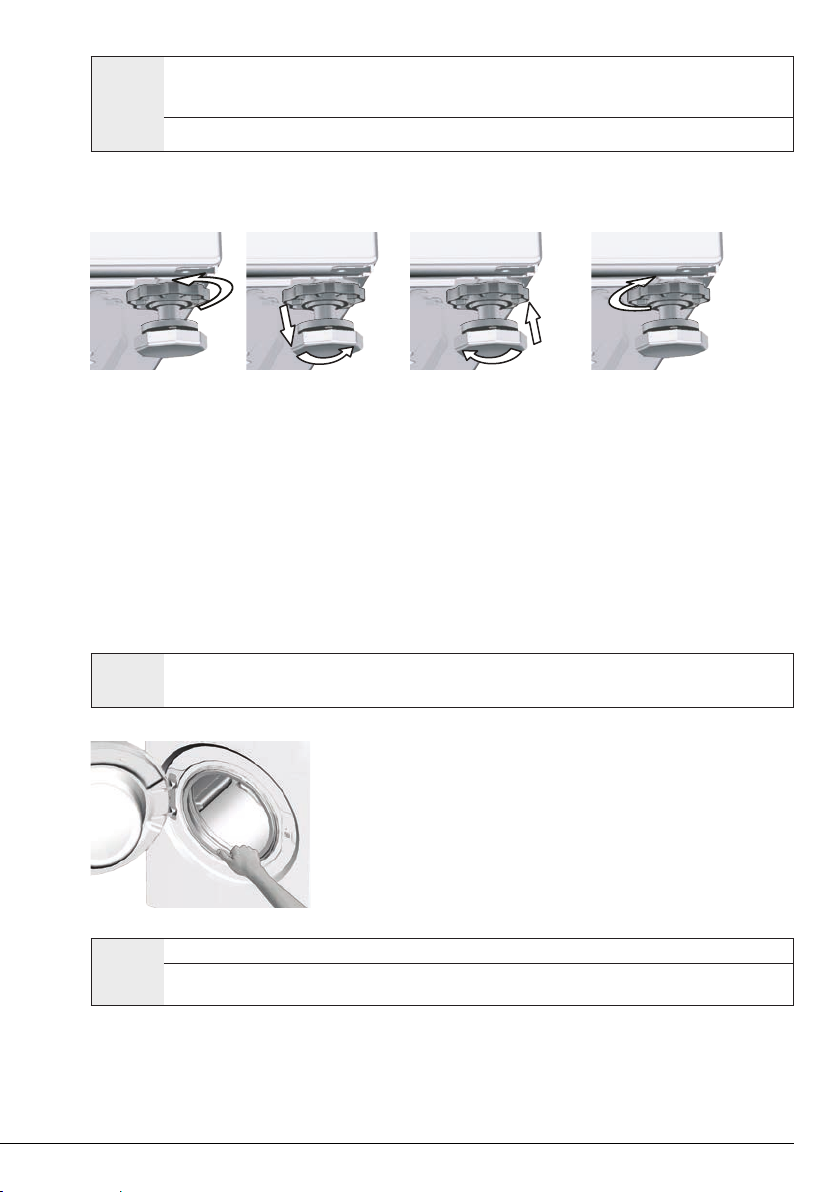
4.1.6 Reglarea picioarelor
ATENŢIE: Pentru ca produsul să funcţieze mai silenţios şi fără vibraţii, acesta trebuie să fie orizontal şi echilibrat pe
A
1 Desfaceţi manual contrapiuliţele picioarelor.
2 Reglaţi picioarele până când maşina este stabilă şi echilibrată.
3. Strângeţi manual toate contrapiuliţele.
4.1.7 Racordul electric
Conectaţi produsul la o priză împământată şi protejată cu o siguranţă de 16 A. Compania noastră nu îşi
asumă responsabilitatea pentru daunele cauzate de utilizarea produsului fără împământare conformă cu
reglementările locale.
• Racordul trebuie să respecte reglementările naţionale.
• Cablajul circuitului prizei de alimentare trebuie să fie suficient pentru cerințele aparatului. Este recomandată
utilizarea unui Întrerupător cu curent diferențial rezidual (GFCI).
• Ştecherul cablului de alimentare trebuie să fie uşor accesibil după instalare.
• Dacă siguranţa sau întreruptorul existent are o capacitate mai mică de 16 amperi, apelaţi la un electrician
calificat pentru a instala o siguranţă de 16 amperi.
• Tensiunea prizei trebuie să fie identică cu tensiunea indicată în secţiunea „Specificaţii tehnice”.
• Nu conectaţi maşina folosind prelungitoare sau triplu ştechere.
picioarele sale. Echilibraţi maşina reglându-i picioarele. În caz contrar, produsul se poate deplasa de la locul său, strivind
obiecte şi provocând probleme datorită vibraţiilor.
ATENŢIE: Nu utilizaţi unelte pentru a slăbi contrapiuliţele. În caz contrar, acestea se pot deteriora.
B
4.1.8 Prima utilizare
C
8 / RO
ATENŢIE: Cablurile de curent deteriorate trebuie înlocuite de un agent de service autorizat.
Folosiţi o soluţie anticalcar adecvată pentru maşini de spălat.
Este posibil ca în maşină să existe apă rămasă din timpul proceselor de control al calităţii. Aceasta nu afectează produsul.
Înainte de a utiliza produsul, asiguraţi-vă că aţi făcut toate pregătirile
conform instrucţiunilor din secţiunile „Instrucţiuni importante privind
siguranţa şi mediul” şi „Instalare”.
Înainte de a spăla rufe, porniţi programul Curăţare tambur. Dacă maşina
nu este prevăzută cu acest program, aplicaţi metoda descrisă în
secţiunea 4.4.2.
Mașină de spălat automată / Manual de utilizare
Page 9

4.2 Pregătire
4.2.1 Sortarea rufelor
* Sortaţi rufele în funcţie de material, culoare, grad de murdărire şi temperatură de spălare permisă.
* Respectaţi întotdeauna instrucţiunile de pe etichetele rufelor.
4.2.2 Pregătirea rufelor pentru spălare
• Rufele cu accesorii metalice, cum ar fi sutienele cu întărituri, cataramele sau nasturii metalici vor deteriora
maşina. Îndepărtaţi piesele metalice sau spălaţi hainele într-un sac pentru rufe sau o faţă de pernă.
• Scoateţi toate obiectele din buzunare, cum ar fi monedele, stilourile şi agrafele, întoarceţi buzunarele pe dos
şi periaţi-le. Astfel de obiecte pot deteriora produsul sau pot provoca zgomote.
• Puneţi articolele mici precum şosetele de copii şi ciorapii de nailon într-o pungă pentru rufe sau o faţă de
pernă.
• Plasaţi perdelele în interior fără a le comprima. Îndepărtaţi accesoriile perdelelor.
• Închideţi fermoarele, coaseţi nasturii slăbiţi şi rupturile.
• Produsele cu eticheta „Spălare la maşină” sau „Spălare manuală” se spală folosind programul adecvat.
• Nu spălaţi împreună rufe colorate şi rufe albe. Din obiectele noi de bumbac închise la culoare poate ieşi
multă vopsea. Spălaţi-le separat.
• Petele dificile trebuie tratate înainte de spălare. Dacă nu sunteţi sigur, apelaţi la o curăţătorie.
• Folosiţi doar pigmenţi şi substanţe anti-calcar adecvate pentru maşinile de spălat. Urmaţi întotdeauna
intrucţiunile de pe ambalaj.
• Spălaţi rufele delicate şi pantalonii întorşi pe dos.
• Păstraţi articolele de îmbrăcăminte din lână de Angora în congelator timp de câteva ore înainte de a le
spăla. Aceasta va reduce scămoşarea.
• Rufele care intră în contact cu substanţe cum sunt făina, praful de lămâie, lapte praf etc. trebuie scuturate
bine înainte de a fi introduse în maşină. Astfel de pulberi şi prafuri de pe rufe se pot acumula în timp pe
componentele interne ale maşinii şi pot cauza avarii.
4.2.3 Modalităţi de economisire a energiei
Informaţiile de mai jos vă vor ajuta să utilizaţi acest produs într-o manieră ecologică şi economică.
• Utilizaţi produsul la capacitatea maximă a programului selectat, însă nu îl supraîncărcaţi; vezi „Tabelul de
programe şi consumuri”. Vezi „Tabelul cu programe şi consumuri”
• Respectaţi instrucţiunile de pe ambalajul detergentului.
• Spălaţi la temperaturi joase rufele cu grad redus de murdărire.
• Folosiţi programele mai scurte pentru a spăla cantităţi mici de rufe cu grad redus de murdărire.
• Nu folosiţi ciclu de prespălare şi temperaturi mari pentru rufele care nu sunt foarte murdare sau pătate.
• Dacă urmează să uscaţi rufele într-un uscător, selectaţi cea mai mare viteză de centrifugare recomandată
pentru procesul de spălare.
• Nu depăşiţi cantitatea de detergent recomandată pe ambalajul acestuia.
4.2.4 Introducerea rufelor
1. Deschideţi uşa.
2. Introduceţi rufele în maşină fără a le presa.
3. Împingeţi şi închideţi uşa împingând-o până când auziţi un sunet de blocare. Asiguraţi-vă că nu există rufe
prinse la uşă. Uşa de serviciu este blocată în timpul programului de spălare. Uşa poate fi deschisă numai
după terminarea programului.
4.2.5 Capacitatea corectă
Capacitatea maximă depinde de tipul de rufe, de gradul de murdărire şi de programul de spălare selectat.
Maşina reglează automat cantitatea de apă în funcţie de greutatea rufelor introduse.
AVERTISMENT: Urmăriţi informaţiile din „Tabelul de programe şi consumuri”. Eficienţa spălării va scădea dacă maşina
A
Maăinţ de spţlat automatţ / Manual de utilizare
este supraîncărcată. În plus, pot apărea probleme legate de vibraţii şi zgomot.
9 / RO
Page 10
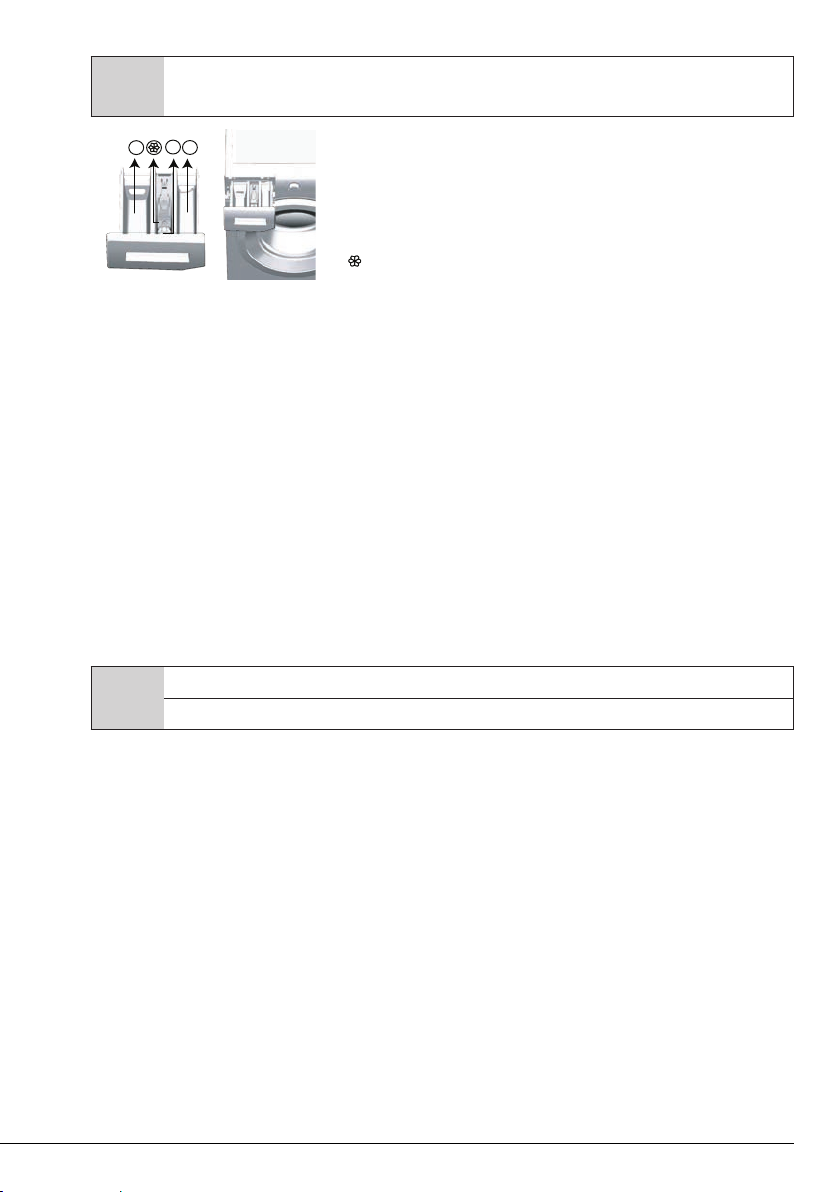
4.2.6 Utilizarea detergentului şi balsamului
Când folosiţi detergent, balsam, apret, pigment, înălbitor, decolorant sau substanţe anti-calcar, citiţi cu atenţie instrucţiunile de pe ambalaj şi
C
Detergent, balsam şi alte substanţe de curăţare
• Adăugaţi detergent şi balsam înainte de începerea programului de spălare.
• În timpul ciclului de spălare, nu lăsaţi sertarul pentru detergent deschis!
• Dacă folosiţi un program fără prespălare, nu puneţi detergent în compartimentul pentru prespălare
(compartimentul nr.„1”).
• Dacă folosiţi un program cu prespălare, nu puneţi detergent lichid în compartimentul pentru prespălare
(compartimentul nr.„1”).
• Nu selectaţi un program cu prespălare dacă folosiţi detergent în pungă sau în bilă. Amplasaţi punga sau bila
cu detergent direct între rufele din maşină.
Dacă folosiţi detergent lichid, introduceţi-l în compartimentul principal de spălare (compartimentul numărul
„2”).
Alegerea tipului de detergent
Tipul potrivit de detergent depinde de tipul şi culoarea materialului.
• Utilizaţi detergenţi diferiţi pentru rufe colorate şi rufe albe.
• Spălaţi rufele delicate numai cu detergenţi speciali (detergenţi lichizi, pentru lână etc.), utilizaţi exclusiv
pentru rufe delicate.
• Când spălaţi rufe şi cuverturi în culori închise se recomandă folosirea unui detergent lichid.
• Spălaţi rufele din lână folosind un detergent special pentru lână.
A
Dozarea detergentului
Cantitatea de detergent care trebuie folosită depinde de cantitatea de rufe, de gradul de murdărire şi de
duritatea apei.
• Nu depăşiţi cantităţile recomandate pe ambalajul detergentului pentru a evita spumarea excesivă, clătirea
insuficientă, costurile ridicate şi afectarea mediului.
• Folosiţi mai puţin detergent pentru a spăla cantităţi mici de rufe sau rufe cu grad redus de murdărire.
Utilizarea balsamului
Turnaţi balsamul în compartimentul pentru balsam al sertarului de detergent.
• Nu depăşiţi marcajul (>max<) de pe compartimentul pentru balsam.
• Dacă balsamul a devenit vâscos, diluaţi-l cu apă înainte de a-l turna în sertarul pentru detergent.
respectaţi cantităţile recomandate. Folosiţi un recipient de dozare dacă este disponibil.
1
3
2
Sertarul pentru detergent are trei compartimente:
– (1) pentru prespălare
– (2) pentru spălare
– (3) pentru balsam
) în plus, există un sifon în compartimentul pentru balsam.
– (
ATENŢIE: Folosiţi doar detergenţi pentru maşini de spălat.
ATENŢIE: Nu folosiţi praf de săpun.
10 / RO
Mașină de spălat automată / Manual de utilizare
Page 11
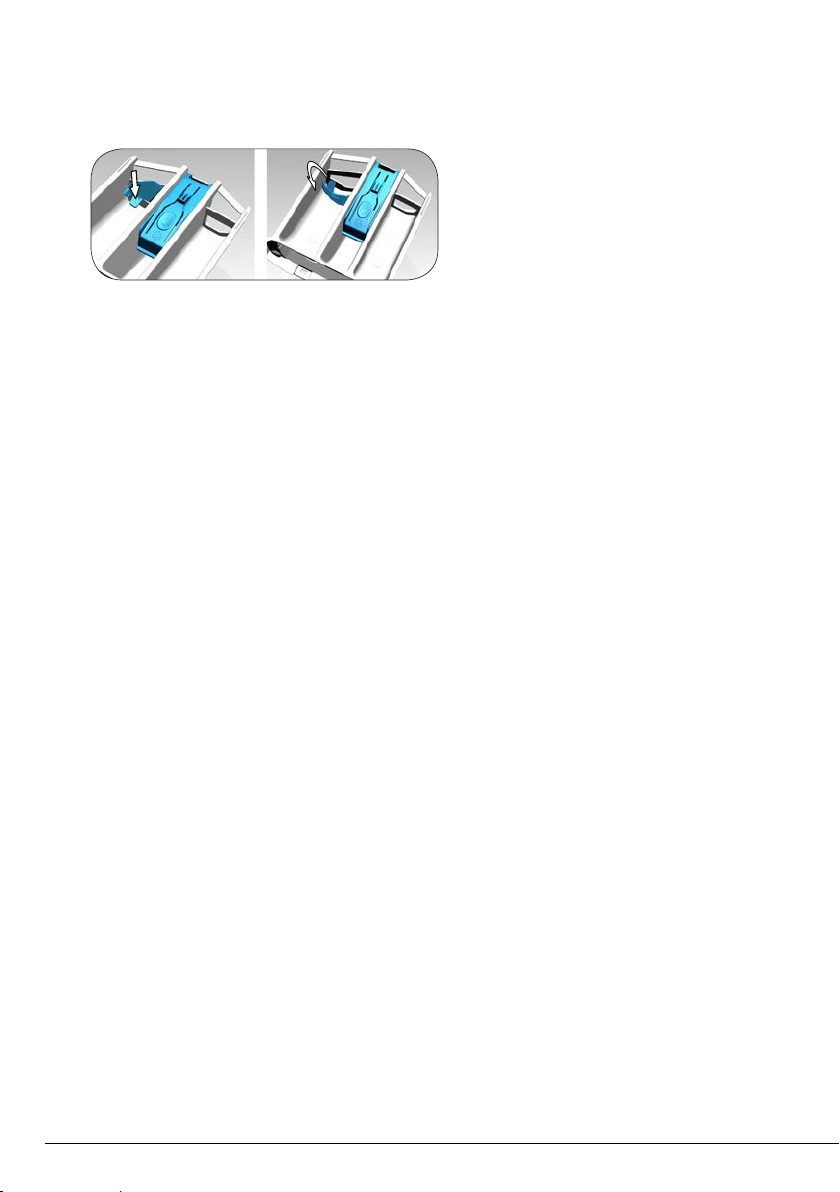
Utilizarea detergenţilor lichizi
Dacă produsul este dotat cu o piesă pentru detergent lichid:
• Când detergentul lichid este utilizat, rotiți
capacul conform indicaților din imagine.
Capacul va acționa ca o barieră atunci când
este poziționat.
• Dacă este necesar, curățați dispozitivul cu apă
atunci când este la locul său sau dacă este
îndepărtat.
• Dacă folosiți detergent pudră, dispozitivul
trebuie fixat în poziția superioară.
Dacă produsul nu conţine o cupă pentru detergent lichid:
• Nu utilizaţi detergent lichid pentru prespălare.
• Detergentul lichid pătează hainele atunci când este folosită funcţia Pornire temporizată. Dacă folosiţi funcţia
Pornire temporizată, nu folosiţi detergent lichid.
Utilizarea detergenţilor sub formă de gel şi tablete.
• Dacă detergentul gel are o consistenţă lichidă şi maşina nu are o cupă specială pentru detergent lichid,
turnaţi detergentul gel în compartimentul principal pentru detergent în timpul primei alimentări cu apă.
Dacă maşina este dotată cu o cupă pentru detergent lichid, turnaţi detergentul în cupă înainte de a porni
programul.
• Dacă detergentul gel nu are o consistenţă lichidă sau este sub formă de capsule, puneţi-l direct în tambur
înainte de începerea spălării.
• Plasaţi detergentul tabletă în compartimentul principal de spălare (compartiment nr. „2”) sau direct în
tambur înainte de spălare.
Utilizarea apretului
• Adăugaţi apretul lichid, apretul praf sau pigmentul în compartimentul pentru balsam.
Nu folosiţi împreună balsam şi apret în acelaşi ciclu de spălare.
Ştergeţi interiorul maşinii cu o cârpă umedă şi curată după ce folosiţi apret.
Utilizarea produselor anti calcar
• Dacă este cazul, folosiţi produse anti calcar destinate maşinilor de spălat.
Folosirea înălbitorilor
Adăugaţi înălbitorul la începutul ciclului de spălare selectând un program de prespălare. Nu puneţi
detergent în compartimentul pentru prespălare. Ca alternativă, selectaţi un program cu clătire suplimentară
şi adăugaţi înălbitorul în timp ce maşina se alimentează cu apă din compartimentul pentru detergent în
cursul primului ciclu de clătire.
• Nu amestecaţi înălbitorul cu detergentul.
• Folosiţi o cantitate mică (aprox. 50 ml.) de înălbitor şi clătiţi bine hainele, deoarece acesta poate cauza
iritarea pielii. Nu turnaţi înălbitorul pe rufe şi nu îl folosiţi pentru rufe colorate.
• Când utilizaţi decoloranţi pe bază de oxigen, selectaţi un program care spală rufele la temperaturi mai
scăzute.
• Decolorantul pe bază de oxigen poate fi folosit împreună cu detergentul; dacă nu au aceeaşi consistenţă,
introduceţi mai întâi detergentul în compartimentul numărul „2” al sertarului pentru detergent şi aşteptaţi
ca maşina să spele detergentul din compartiment. În timp ce maşina se alimentează în continuare cu apă,
adăugaţi decolorantul în acelaşi compartiment.
Maăinţ de spţlat automatţ / Manual de utilizare
11 / RO
Page 12
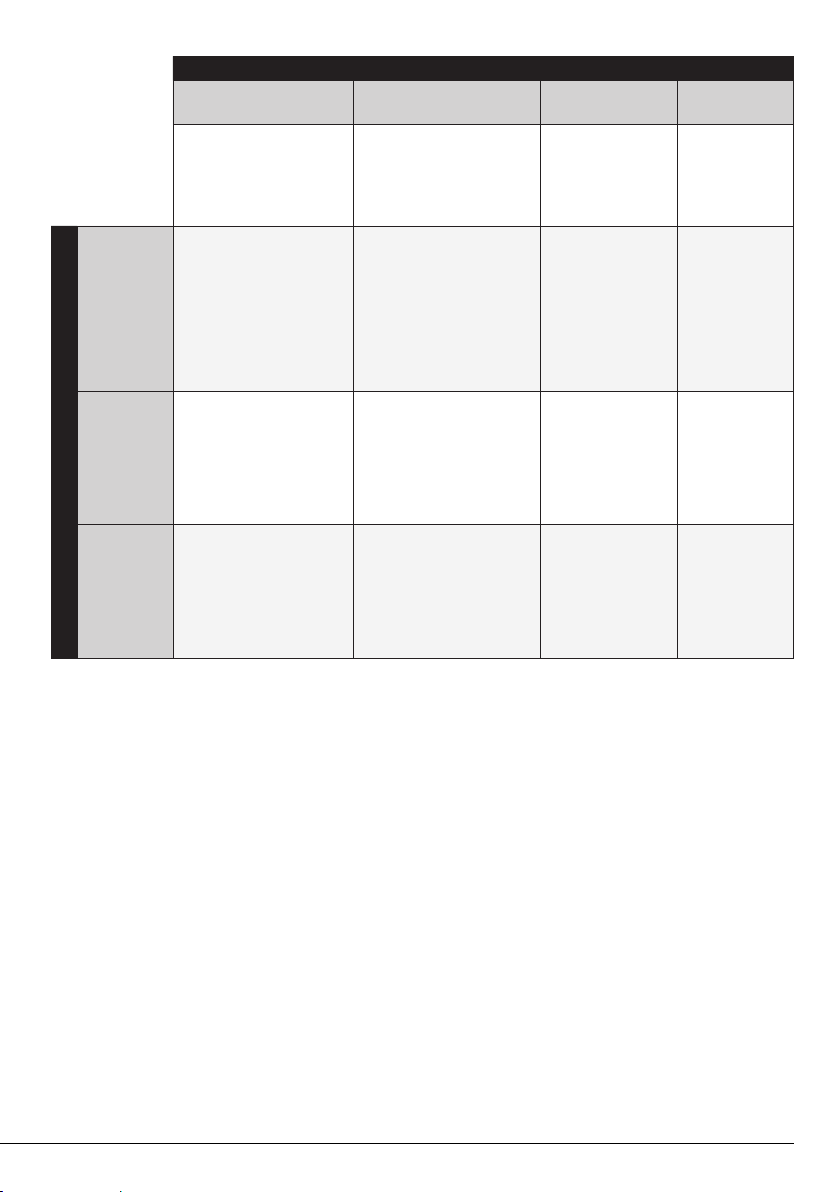
4.2.7 Sfaturi pentru spălarea eficientă
Culori deschise şi albe Colorate
(Interval de temperaturi
recomandate în funcţie de nivelul
de murdărire: 40-90 ºC)
Poate necesita tratarea prealabilă
Foarte
murdare
(pete dificile
cum ar fi iarba,
cafeaua, fructele
şi sângele.)
Grad
normal de
murdărire
(De exemplu,
urmele rămase
Nivel de murdărire
pe guler şi
manşete)
Grad
redus de
murdărire
(Fără pete
vizibile.)
a petelor sau prespălarea.
Detergenţii praf sau lichizi
recomandaţi pentru rufe albe pot
fi folosiţi în dozele recomandate
pentru haine foarte murdare. Se
recomandă folosirea detergenţilor
praf pentru curăţarea petelor de
argilă şi pământ, precum şi a
petelor sensibile la înălbitori.
Detergenţii praf sau lichizi
recomandaţi pentru rufe albe pot
fi folosiţi în dozele recomandate
pentru haine cu grad normal de
murdărire.
Detergenţii praf sau lichizi
recomandaţi pentru rufe albe pot
fi folosiţi în dozele recomandate
pentru haine cu grad redus de
murdărire.
Rufe
(Interval de temperaturi
recomandate în funcţie de nivelul
de murdărire: rece -40 ºC)
Detergenţii praf sau lichizi
recomandaţi pentru rufe colorate
pot fi folosiţi în dozele recomandate
pentru haine foarte murdare. Se
recomandă folosirea detergenţilor
praf pentru curăţarea petelor
de argilă şi pământ, precum şi
a petelor sensibile la înălbitori.
Folosiţi detergent fără înălbitori.
Detergenţii praf sau lichizi
recomandaţi pentru rufe colorate
pot fi folosiţi în dozele recomandate
pentru haine cu grad normal de
murdărire. Se vor folosi detergenţi
care nu conţin înălbitor.
Detergenţii praf sau lichizi
recomandaţi pentru rufe colorate
pot fi folosiţi în dozele recomandate
pentru haine cu grad redus de
murdărire. Se vor folosi detergenţi
care nu conţin înălbitor.
Negre/Culori
închise
(Interval de temperaturi
recomandate în funcţie
de nivelul de murdărire:
rece -40 ºC)
Detergenţii lichizi
recomandaţi pentru
rufe colorate şi culori
întunecate pot fi folosiţi
în dozele recomandate
pentru haine foarte
murdare.
Detergenţii lichizi
recomandaţi pentru
rufe colorate şi culori
întunecate pot fi folosiţi
în dozele recomandate
pentru haine cu grad
normal de murdărire.
Detergenţii lichizi
recomandaţi pentru
rufe colorate şi culori
întunecate pot fi folosiţi
în dozele recomandate
pentru haine cu grad
redus de murdărire.
Delicate/Lână/
Mătase
(Interval de
temperaturi
recomandate în
funcţie de nivelul
de murdărire: rece
-30 ºC)
Se recomandă
folosirea
detergenţilor lichizi
pentru rufe delicate.
Rufele din lână şi
mătase trebuie
spălate cu detergent
special pentru lână.
Se recomandă
folosirea
detergenţilor lichizi
pentru rufe delicate.
Rufele din lână şi
mătase trebuie
spălate cu detergent
special pentru lână.
Se recomandă
folosirea
detergenţilor lichizi
pentru rufe delicate.
Rufele din lână şi
mătase trebuie
spălate cu detergent
special pentru lână.
12 / RO
Mașină de spălat automată / Manual de utilizare
Page 13
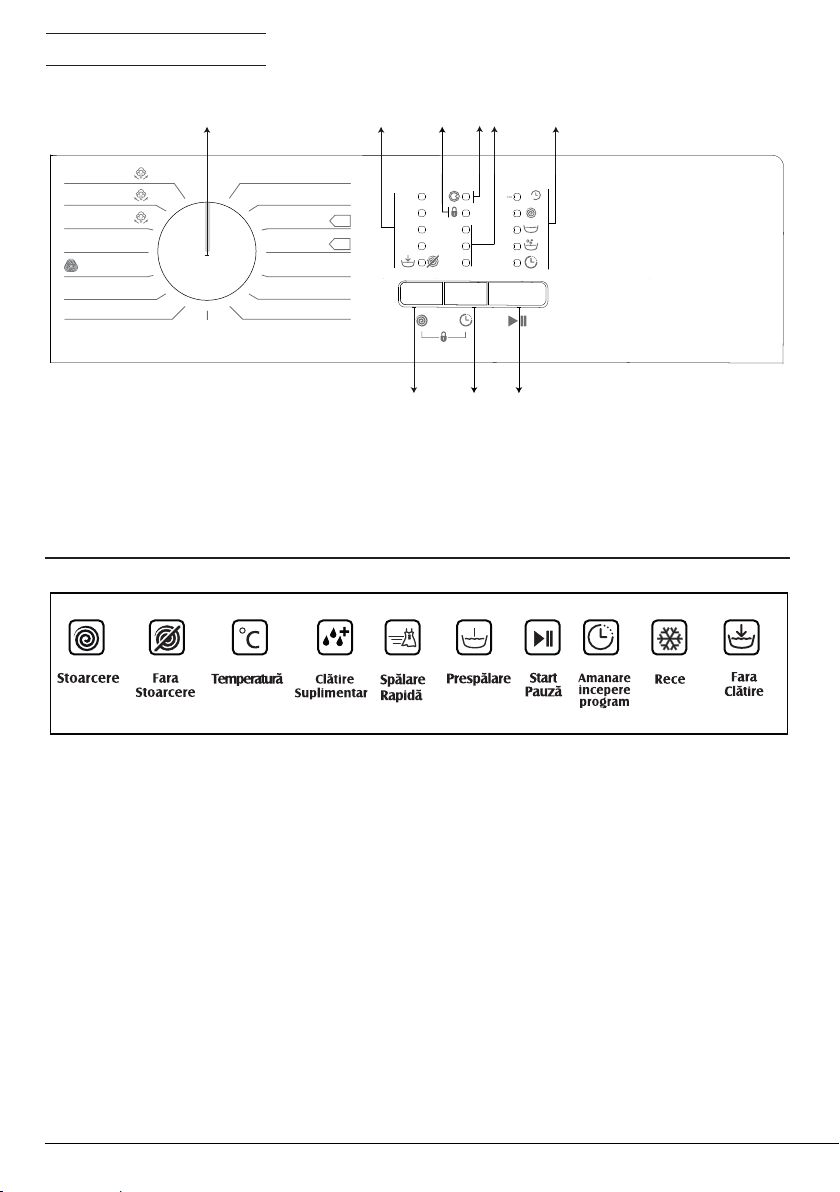
4.3 Utilizarea produsului
4.3.1 Panoul de comandă
1
Of f
CămăȘi 40°
Geci cu puf 40°
ăţare
Autocur
Spălare Rapidă 30°
Lână 40°
Plușuri
Sintetice 40°
Sintetice 20°
On/
Stoarcere
Evacuare
Bumbac 20°
Bumbac 40°
Bumbac Eco
Bumbac Eco
Bumbac 60°
cu Prespălare
Bumbac 90°
2 3 4 6
1000
40°
60°
Cl
ătire
800
600
400
5
endAnulare
9h
6h
3h
789
APL61012BDW0
1 - Buton de selectare a programului (Poziția superioară
Pornit / Oprit)
2 - Indicatoare LED viteză de centrifugare
3 - Indicator LED blocare copii activată
4 - Indicator LED blocare uşă activată
5 - Indicatoare LED Pornire Întârziată
6 - Indicatoare LED Urmărire Program
7 - Buton Pornire / Pauză
8 - Buton Setare Pornire Temporizată
9 - Buton reglare viteză de centrifugare
4.3.2 Pregătirea maşinii
1. Asigurați-vă că furtunurile sunt bine conectate.
2. Conectați maşina la rețeaua de alimentare.
3. Deschideți complet robinetul.
4. Puneți rufele în maşină.
5. Adăugați detergent şi balsam de rufe.
4.3.3 Selectarea programului şi sfaturi pentru spălarea eficientă
1. Selectați programul adecvat pentru tipul, cantitatea şi gradul de murdărire al rufelor în concordanță cu
datele din „Tabel de programe şi consumuri” şi „Temperatură” de mai jos.
2. Selectați programul dorit cu ajutorul butonului Selecție program.
Maăinţ de spţlat automatţ / Manual de utilizare
13 / RO
Page 14
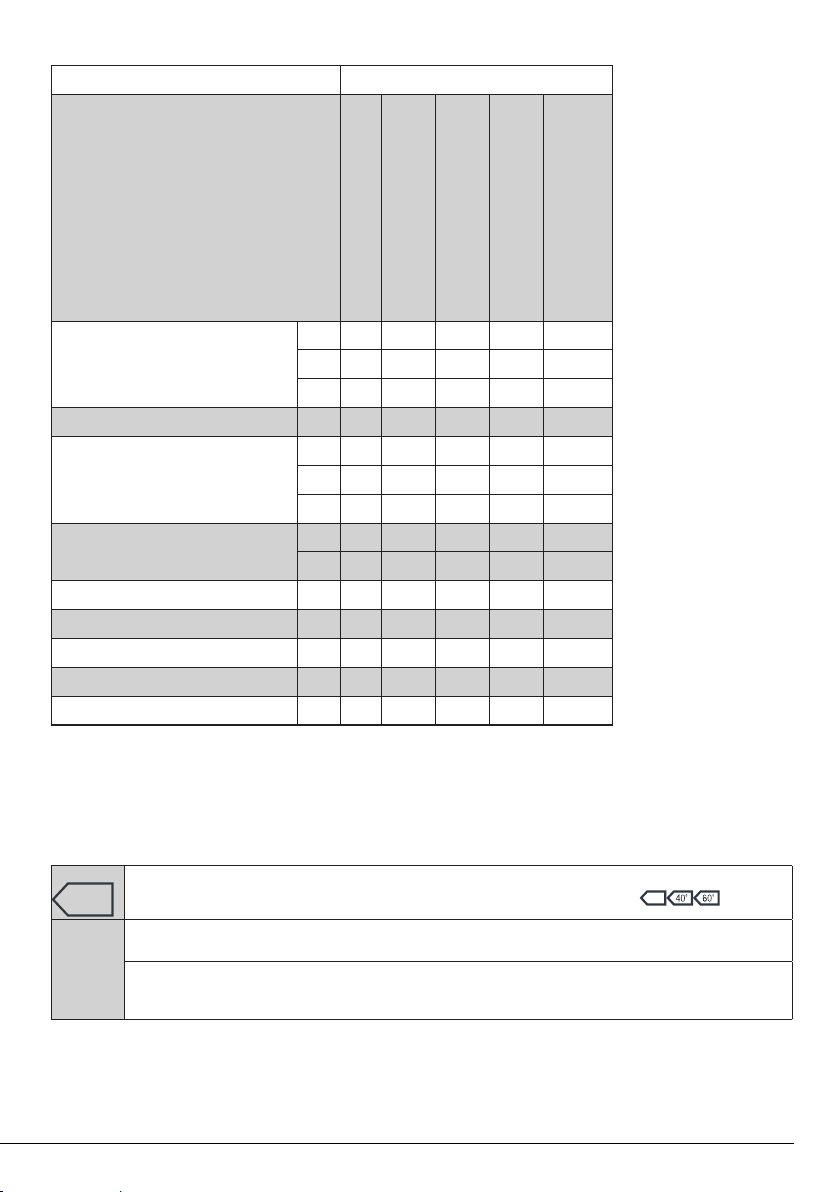
4.3.4 Tabel de programe şi consumuri
RO
Program
Bumbac
Bumbac 60° cu Prespălare 60
60**
Bumbac Eco
Sintetice
Spălare Rapidă 30
Lână / Spălare manuală 40
Steam + Geci cu puf
Steam + Cămăşi
Steam + Autocurăţare
60**
40**
25
6 180 83
90
6 180 81
40
6 180 81
20
6
6
3
3
2,5
40
2,5
20
6
1,5
40
1,5 130
2,5
40
90
-
Greutate max.(kg)
Durrată program (~min)
92
200
255 46,4 0,918
35
205
35
205
120 66 0,750
120 66 0,250
28
60 0,150
65 45
90 1,20
48
105
180
70
Consum apă (l)
,4
1,95
0,95
0,50
1,80
0,490
0,485
0,450
1,00
2,40
Consum energie (kWh)
Viteză max.***
1000
1000
1000
1000
1000
1000
1000
1000
1000
1000
1000
1000
800
600
**: Program de referință Energy Label (EN 60456 Ed.3)
***: Dacă viteza de centrifugare maximă a maşinii este mai mică decât valoarea acesteia, puteți selecta doar viteza de centrifugare maximă.
- : A se vedea descrierea programului pentru încărcare maximă.
** Programele „Bumbac Economic 40°C” şi „Bumbac Economic 60°C” sunt programe standard. Aceste programe sunt cunoscute ca
„program standard bumbac 40°C” şi „program standard bumbac 60°C” şi sunt indicate cu simbolurile pe panou.
Consumul de apă şi energie poate varia în funcție de presiunea, duritatea şi temperatura apei, temperatura ambientală, tipul şi
C
14 / RO
cantitatea rufelor, viteza de centrifugare şi variațiile de tensiune electrică.
În funcție de cantitatea de rufe pe care ați încărcat-o în maşină, poate exista o diferență de 1 – 1,5 ore între durata arătată în
Tabelul de programe şi consumuri şi durata efectivă a ciclului de spălare. Durata va fi actualizată automat la scurt timp după
începerea spălării.
Mașină de spălat automată / Manual de utilizare
Page 15
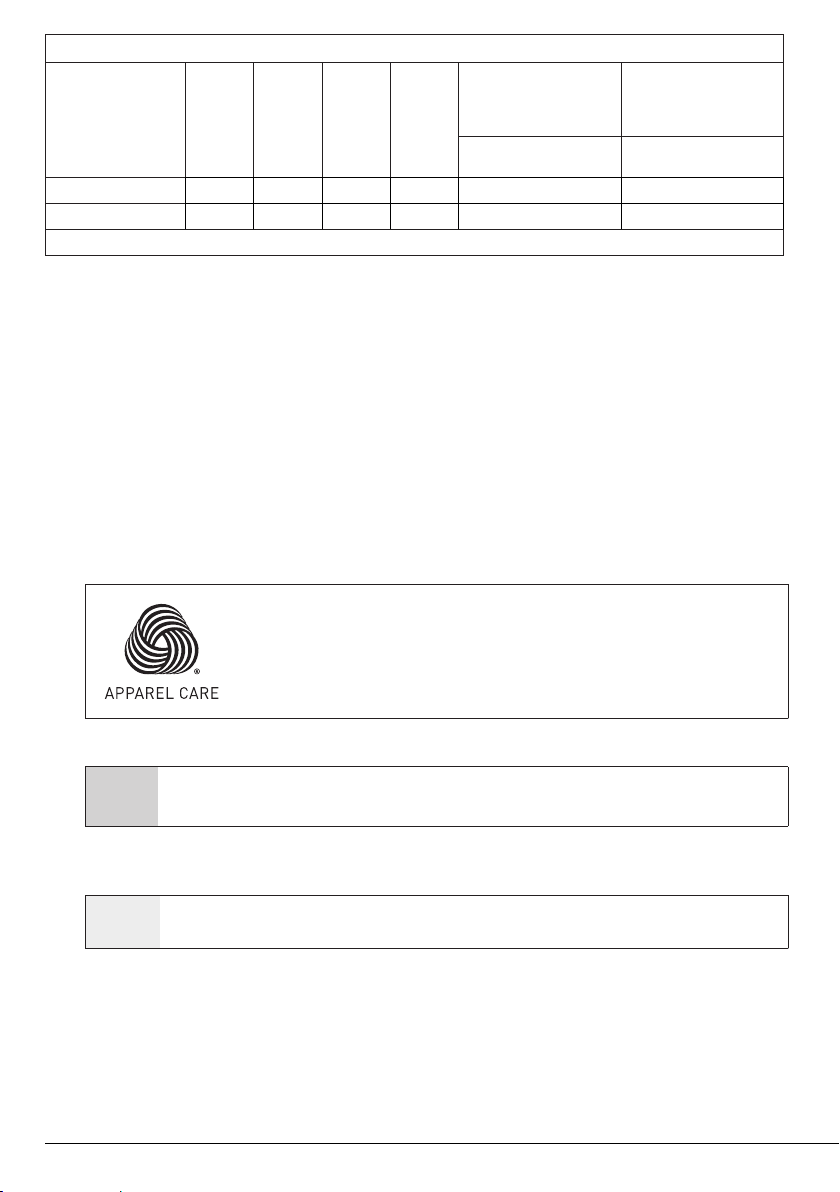
Valori orientative pentru programele de rufe sintetice
Conţinut de umezeală rămasă
Sarcină (kg)
Sintetice 40
Sintetice 20
** Conţinutul de umezeală rămasă poate să varieze în funcţie de viteza de centrifugare selectată.
2,5 66
2,5
Consum de apă (l)
66 0,250 105/140
Consum de energie
(kWh)
Durata programului
0,750 105/140
(min)
≤ 1000 rpm > 1000 rpm
(%) **
45 40
45 40
Conţinut de umezeală rămasă
(%) **
4.3.5 Programe principale
În funcție de tipul de material, utilizați următoarele programe principale de spălare.
• Bumbac
Utilizați acest program pentru rufele din bumbac (cearşafuri, lenjerii de pat, prosoape, halate de baie, lenjerie
intimă, etc.). Rufele dumneavoastră vor fi spălate utilizând o acțiune de spălare viguroasă şi un ciclu de
spălare mai lung.
• Sintetice
Utilizați acest program pentru spălarea articolelor sintetice (cămăşi, bluze, amestecuri sintetic/bumbac etc.).
Rufele dumneavoastră vor fi spălate utilizând o acțiune delicată la un ciclu de spălare mai scurt comparativ cu
programul Bumbac. Pentru perdele si tul, se recomandă utilizarea programului Sintetice 20˚C sau 40˚C.
• Lână / Spălare manuală
Utilizați acest program pentru a spăla îmbrăcămintea din lână/delicată. Rufele dumneavoastră vor fi spălate
utilizând o acțiune de spălare delicată pentru a nu deteriora îmbrăcămintea.
„Programul pentru articolele de lână este aprobat de către Compania Woolmark
pentru produsele din lână spălabile la maşină cu condiția ca produsele să fie spălate
în conformitate cu instrucțiunile de pe etichete şi cu instrucțiunile publicate de către
producătorul maşinii. M1520“
În Marea Britanie, Irlanda, Hong Kong şi India, marca comercială Woolmark este o
marcă comercială certificată.
4.3.6 Programe suplimentare
Maşina de spălat este dotată cu programe suplimentare pentru cazuri speciale.
C
Programele suplimentare pot să difere în funcție de modelul maşinii.
• Bumbac Eco
Folosiți acest program pentru spălarea prelungită a rufelor în programul Bumbac, economisind în acelaşi timp
energie electrică.
Programul Bumbac Eco consumă mai puțină energie comparativ cu alte programe pentru bumbac.
C
• Bumbac 60° cu Prespălare
Selectați acest program numai pentru rufele din bumbac foarte murdare. Adăugați detergent în
compartimentul pentru prespălare.
• Spălare Rapidă
Folosiți acest program pentru a spăla rapid haine din bumbac cu un grad scăzut de murdărire.
Maăinţ de spţlat automatţ / Manual de utilizare
15 / RO
Page 16
• Cămăşi
Acest program este folosit pentru a spăla împreună cămăşi din bumbac, materiale sintetice sau combinate.
Reduce cutele. La sfârşitul programului se utilizează abur pentru a ajuta funcția de reducere a cutelor. Profilul
special de rotire şi aburul utilizat la sfârşitul programului reduc cutele de pe cămăşile dvs. Atunci când este
selectată funcția spălare rapidă, se execută algoritmul de Pre-tratare.
• Aplicați substanța chimică de pre-tratare direct pe haine sau adăugați-o împreună cu detergentul atunci
când maşina începe să se alimenteze cu apă din compartimentul principal pentru spălare. Astfel, puteți obține
aceeaşi performanță ca la spălarea normală, într-o perioadă de timp mult mai scurtă. Durata de utilizare a
cămăşilor dvs. va creşte.
• Geci cu puf
Utilizați acest program pentru a vă spăla hainele, vestele, jachetele etc. ce conțin puf, a căror etichetă
recomandă „spălare la maşină”. Datorită profilurilor speciale de centrifugare ale acestui program, apa ajunge
în golurile de aer dintre fulgi
La sfârşitul programului se utilizează abur pentru a înmuia rufele groase precum prosoapele.
•
Autocurăţare
Utilizați cu regularitate acest program (o dată la fiecare 1-2 luni) pentru a curăța cuva şi a întreține igiena
maşinii. Aburul se utilizează înaintea programului pentru a înmuia reziduurile din cuva de spălare. Rulați
programul cu maşina complet goală. Pentru obținerea unor rezultate mai bune, puneți pulbere anti-calcar
pentru maşini de spălat în compartimentul pentru detergent nr. ”2“. După terminarea programului, lăsați uşa
întredeschisă astfel încât interiorul maşinii să se usuce.
Acesta nu este un program de spălare. Acesta este un program de întreținere.
C
Nu rulați programul în momentul în care există ceva în maşină. Dacă încercați să faceți acest lucru, maşina va detecta
existența unei încărcături în interiorul acesteia şi va abandona programul.
4.3.7 Programe speciale
Pentru aplicații specifice, selectați oricare din următoarele programe.
• Clătire
Utilizați acest program atunci când doriți să clătiți sau să apretați rufele separat.
• Stoarcere+Evacuare
Puteți utiliza această funcție pentru a stoarce hainele sau a evacua apa din maşină.
Înainte de selectarea acestui program, selectați viteza de centrifugare dorită şi apăsați butonul Pornire /
Pauză. Pentru început apa din maşină va fi evacuată. Apoi rufele vor fi stoarse la viteza de centrifugare setată
iar apa scursă din acestea va fi evacuată.
Dacă doriți evacuarea apei fără centrifugarea rufelor, selectați programul Evacuare+centrifugare apoi selectați
funcția Fără centrifugare cu ajutorul butonului pentru reglarea vitezei de centrifugare. Apăsați butonul Pornire
/ Pauză.
C
Folosiți o turație de centrifugare mai mică pentru rufe delicate.
4.3.8 Selectarea vitezei
Când selectați un program nou, viteza de centrifugare recomandată pentru programul selectat este afişată pe
indicatorul de viteză de centrifugare.
Pentru a scădea viteza de centrifugare, apăsați pe butonul pentru reglarea vitezei de centrifugare. Viteza de
centrifugare va scădea treptat. Apoi, în funcție de modelul produsului, opțiunile „Amânare clătire” şi „Fără
centrifugare” vor apărea pe afişaj. Dacă este selectat „Fără centrifugare”, luminile indicatorului pentru nivelul
de clătire nu se vor aprinde.
16 / RO
Mașină de spălat automată / Manual de utilizare
Page 17

Clătire prelungită
Dacă nu doriți să scoateți imediat rufele din maşină după ce programul s-a finalizat, puteți utiliza funcția
de amânare a clătirii pentru a menține rufele în apa finală de clătire pentru a preveni încrețirea acestora în
momentul când nu este apă în maşină. După acest proces, apăsați butonul Pornire / Pauză, dacă doriți să
evacuați apa fără a centrifuga rufele. Programul se va relua şi se va termina după evacuarea apei.
Pentru centrifugarea hainelor ținute în apă, reglați Viteza de Centrifugare şi apăsați butonul Pornire / Pauză.
Programul va reporni. Apa este evacuată, rufele sunt centrifugate şi programul se încheie.
C
Dacă programul nu a ajuns la etapa de centrifugare, puteți modifica viteza fără a comuta maşina în modul Pauză.
4.3.9 Pornire întârziată
Cu ajutorul funcției de Pornire Întârziată pornirea programului poate fi amânată cu 3, 6 şi 9 ore.
Nu folosiți detergent lichid când folosiți funcția Pornire Întârziată! Există riscul de pătare a hainelor.
C
1. Deschideți uşa de încărcare, introduceți rufele, alimentați cu detergent etc.
2. Selectați un program de spălare şi viteza de centrifugare.
3. Selectați intervalul dorit apăsând butonul de pornire întârziată. Dacă apăsați butonul o singură dată, se va
selecta pornirea întârziată cu 3 ore. Atunci când acelaşi buton este apăsat din nou, se selectează pornirea
întârziată cu 6 ore, iar atunci când este apăsat a treia oară, se selectează decalarea pornirii cu 9 ore. Dacă
apăsați butonul de pornire întârziată încă o dată, funcția de pornire întârziată va fi anulată.
4 Apăsați butonul Pornire / Pauză. Indicatorul luminos corespunzător intervalului de pornire întârziată anterior
se închide şi indicatorul luminos al următorului interval de pornire întârziată se aprinde la fiecare 3 ore.
5. La sfârşitul numărătorii inverse, toate indicatoarele luminoase de pornire întârziată se vor închide şi va porni
programul selectat.
Puteți comuta maşina în modul pauză şi adăuga rufe în timpul perioadei de pornire întârziată.
C
Modificarea intervalului de pornire întârziată
Dacă doriți să modificați intervalul în timpul numărătorii inverse, va trebui să anulați programul şi să setați din
nou timpul de întârziere.
Anularea funcției de Pornire întârziată
Dacă doriți să anulați numărătoarea inversă a pornirii întârziate şi să începeți programul imediat:
1. Rotiți butonul de Selectare a programului pentru orice program. Astfel, funcția de Pornire întârziată va fi
anulată. Indicatorul luminos Terminare/Anulare luminează intermitent.
2. Selectați apoi programul pe care doriți să îl porniți.
3. Apăsați butonul Pornire / Pauză pentru a porni programul.
4.3.10 Pornirea programului
1. Apăsați butonul Pornire / Pauză pentru a porni programul.
2. Lumina de urmărire a programului ce arată pornirea programului se va aprinde.
Maăinţ de spţlat automatţ / Manual de utilizare
17 / RO
Page 18
4.3.11 Blocare copii
Folosiți funcția Blocare pentru copii pentru a evita modificarea setărilor de către copii. Astfel, puteți evita orice
modificări aduse unui program care rulează.
Dacă butonul de selectare a programului este rotit în timp ce funcția Blocare pentru copii este activă, mesajul „Blocarea
pentru copii activată” se va aprinde de 3 ori. Blocarea pentru copii nu permite nici o modificare a programelor sau vitezei
C
Pentru activarea funcției Blocare copii:
Apăsați şi mențineți apăsate butoanele Viteză şi Pornire întârziată timp de 3 secunde. În timp ce țineți timp
de 3 secunde, „Indicatorul LED pentru Blocarea pentru copii activat“ va lumina intermitent. Puteți elibera
butoanele când LED-urile sunt aprinse continuu.
Pentru dezactivarea funcției Blocare pentru copii:
Apăsați şi mențineți apăsate butoanele de Viteză şi Pornire întârziată timp de 3 secunde în timpul derulării
oricărui program. În timp ce țineți timp de 3 secunde, „Indicatorul LED pentru Blocarea pentru copii activat“ va
lumina intermitent. Puteți elibera butoanele când LED-ul se stinge complet.
C
selectate.
Chiar dacă se selectează un alt program cu butonul de Selectare a programului, în timp ce funcția de Blocare pentru copii
este activă, programul selectat anterior va continua să deruleze.
Atunci când funcția de Blocare pentru copii este activă, iar maşina este în funcțiune, puteți comuta maşina în modul Pauză
fără a dezactiva Blocarea pentru copii, rotind butonul pentru Selectarea Programului în poziția Pornit / Oprit. Programul
poate fi repornit prin rotirea butonului de selectare a programului.
Pe lângă metoda de mai sus, pentru a dezactiva Blocarea pentru copii, rotiți butonul de Selectare a programului în poziția
Pornit / Oprit, atunci când nu rulează nici un program, şi selectați un alt program.
Blocarea pentru copii nu este dezactivată după o pană de curent sau atunci când maşina este decuplată de la rețea.
4.3.12 Evoluția programului
Evoluția unui program în derulare poate fi urmărită cu ajutorul indicatorului de urmărire a programului.
La începerea fiecărei etape a programului, indicatorul luminos aferent se aprinde şi lumina pentru etapa
terminată se stinge.
În timpul rulării unui program puteți modifica setările legate de viteză fără a opri derularea acestuia. În acest
scop, modificarea pe care urmează să o faceți trebuie să fie pentru o etapă ulterioară etapei programului
aflată în derulare. Dacă modificarea nu este permisă, indicatoarele corespunzătoare luminează de 3 ori.
Dacă maşina nu începe ciclul de centrifugare a rufelor, este posibil să fie activă funcția Clătire prelungită sau este posibil ca
C
sistemul automat de detecție a încărcării dezechilibrate să fie activat datorită distribuției inegale a rufelor în maşină.
4.3.13 Blocarea uşii
Uşa de încărcare a maşinii are un sistem de blocare care împiedică deschiderea acesteia în cazul în care
nivelul apei este nepotrivit.
Când maşina este în modul Pauză, indicatorul luminos pentru uşa de încărcare luminează intermitent. Maşina
verifică nivelul apei din interior. Dacă nivelul este corespunzător, indicatorul pentru uşa de încărcare se stinge,
iar uşa poate fi deschisă în decurs de 1-2 minute.
Dacă nivelul este nepotrivit, indicatorul uşii de încărcare se aprinde, iar aceasta nu poate fi deschisă. Dacă
este necesar să deschideți uşa de încărcare în timp ce indicatorul acesteia este aprins, trebuie să anulați
programul curent. Vezi „Anularea programului”
4.3.14 Modificarea setărilor după începerea programului
Trecerea maşinii în modul Pauză.
Pentru a comuta maşina în modul Pauză în timpul unui program, apăsați butonul "Pornire / Pauză". Indicatorul
luminos corespunzător etapei în care a ajuns maşina începe să lumineze intermitent pe indicatorul de urmărire
a programului pentru a arăta că maşina a fost comutată în modul Pauză.
În plus, când uşa de încărcare poate fi deschisă, indicatorul acesteia se stinge complet.
18 / RO
Mașină de spălat automată / Manual de utilizare
Page 19

Modificarea setărilor vitezei
Puteți modifica setările de viteză ale programului care rulează la momentul respectiv. Vezi „Selectarea vitezei“.
C
Dacă nu este posibilă nici o modificare, indicatorul corespunzător va lumina de 3 ori.
Adăugarea sau scoaterea rufelor
Puteți încărca / descărca rufe atunci când un program se execută în cazul în care nivelul apei este adecvat
pentru a deschide uşa. Pentru aceasta:
1. Apăsați butonul „Pornire / Pauză” pentru a comuta maşina în modul pauză. Indicatorul de urmărire a
programului pentru etapa corespunzătoare în timpul căreia maşina a fost comutată în modul pauză va
lumina intermitent.
2. Aşteptați până când uşa de încărcare poate fi deschisă.
3. Deschideți uşa de încărcare şi adăugați sau scoateți rufe.
4. Închideți uşa de încărcare.
5. Efectuați modificări ale setărilor vitezei, dacă este necesar.
6. Apăsați butonul „Pornire / Pauză” pentru a porni maşina.
4.3.15 Anularea programului
Pentru anularea programului, rotiți butonul de selectare a programului pentru a selecta un alt program.
Programul anterior va fi anulat. Indicatorul luminos Terminare / Anulare va lumina intermitent pentru a indica
anularea programului.
Maşina va opri programul când rotiți butonul de selectare a programului; însă, apa din maşină nu este
evacuată. Atunci când selectați şi porniți un program nou, programul nou selectat va porni în funcție de etapa
în care a fost anulat programul anterior. De exemplu, e posibil să fie adăugată apă sau să continue să spele cu
apa existentă în maşină.
Unele programe pot începe prin evacuarea apei din interiorul maşinii. În funcție de etapa în care ați anulat programul, poate
C
4.3.16 Finalizarea programului
Când se termină programul, LED-ul „End“ (Final) se aprinde pe indicatorul de urmărire a programului.
1. Aşteptați până când „LED-ul Blocarea uşii activă“ se stinge complet.
2. Pentru a opri maşina, rotiți butonul de selectare a programului spre poziția "Pornit / Oprit".
3. Scoateți rufele şi închideți uşa de încărcare. Maşina este pregătită pentru următorul ciclu de spălare.
4.3.17 Maşina dumneavoastră este prevăzută cu „Modul Pauză”.
După ce ați pornit din nou maşina cu butonul de selectare a programului (prin comutarea butonului într-o
poziție diferită de poziția Pornit-Oprit), dacă niciun program nu este pornit sau nici o altă procedură nu este
efectuată în etapa de selecție sau nici o altă acțiune nu este întreprinsă în interval de aproximativ 2 minute
după ce programul selectat se finalizează, maşina se va comuta automat în modul de economisire a energiei.
Luminozitatea luminilor indicatoarelor va scădea. De asemenea, dacă produsul dumneavoastră este prevăzut
cu un afişaj care arată timpul programului, acest afişaj va fi oprit complet. Dacă rotiți butonul de Selectare a
programului sau atingeți orice buton, luminile şi afişajul se vor comuta la starea anterioară. Selecțiile pe care
le efectuați în momentul ieşirii din eficiența energetică se pot schimba. Verificați corectitudinea selecțiilor
înainte de pornirea programului. Dacă este necesar, să efectuați setările din nou. Aceasta nu reprezintă o
eroare.
fi necesar să adăugați detergent sau balsam de rufe pentru programul nou selectat.
Maăinţ de spţlat automatţ / Manual de utilizare
19 / RO
Page 20
4.4 Întreţinerea şi curăţarea
Prin curăţarea periodică a produsului se extinde durata de folosinţă a produsului şi sunt evitate probleme
frecvente.
4.4.1 Curăţarea sertarului de detergent
Curăţaţi la intervale regulate sertarul pentru detergent (la fiecare 4-5 cicluri de
spălare) conform ilustraţiei de mai jos, pentru a preveni acumularea reziduurilor de
detergent.
Ridicaţi partea din spate a sifonului pentru a-l scoate aşa cum este ilustrat.
Dacă se adună prea mult amestec de apă şi balsam în compartimentul pentru
balsam, sifonul trebuie curăţat.
1 Apăsaţi pe butonul punctat de pe sifonul din compartimentul pentru balsam şi trageţi înspre
dumneavoastră pentru a scoate compartimentul din maşină.
2. Spălaţi în chiuvetă sertarul pentru detergent şi sifonul cu multă apă călduţă. Pentru a preveni intrarea în
contact a reziduurilor cu pielea, curăţaţi-l cu o perie în timp ce purtaţi mănuşi.
3 Introduceţi sertarul înapoi după curăţare şi asiguraţi-vă că este bine fixat.
4.4.2 Curăţarea uşii de încărcare şi a tamburului
Pentru produsele cu un program de curăţare a cuvei, vă rugăm consultaţi manualul Utilizarea produsului Programe.
Repetaţi procesul Curăţare tambur la fiecare 2 luni.
C
4.4.3 Curăţarea carcasei şi panoului de comandă
Ştergeţi carcasa maşinii cu apă cu săpun sau cu detergent gel delicat şi non-coroziv, după caz; ştergeţi apoi
carcasa cu o cârpă moale.
Folosiţi numai o cârpă moale şi umedă pentru curăţarea panoului de comandă.
4.4.4 Curăţarea filtrelor de alimentare cu apă
Filtrele sunt amplasate la capătul racordurilor de alimentare cu apă din partea posterioară a maşinii şi în
capătul dinspre robinet al furtunurilor de alimentare cu apă. Aceste filtre previn intrarea în maşina de spălat a
substanţelor străine şi impurităţilor din apă. Filtrele trebuie curăţate, deoarece se murdăresc.
Folosiţi o soluţie anticalcar adecvată pentru maşini de spălat.
După fiecare spălare, verificaţi dacă în tambur nu au rămas substanţe străine.
Dacă orificiile din burduf indicate în figură sunt înfundate, desfundaţi-le cu o
scobitoare.
Obiectele metalice străine vor provoca pete de rugină pe tambur. Curăţaţi petele de pe suprafaţa
tamburului folosind substanţe de curăţare pentru oţel inoxidabil.
Nu folosiţi bureţi de sârmă. Aceştia vor deteriora suprafeţele vopsite, cromate şi din
plastic.
1. Închideţi robinetele.
2. Demontaţi piuliţele furtunurilor de alimentare cu apă
pentru a putea accesa filtrele racordurilor de alimentare
cu apă. Curăţaţi-le cu o perie adecvată. Dacă filtrele sunt
prea murdare, scoateţi-le cu un cleşte şi curăţaţi-le.
3. Scoateţi filtrele şi garniturile din capetele plate ale
furtunurilor de alimentare cu apă şi curăţaţi-le foarte bine
sub jet de apă.
4. Montaţi la loc cu grijă garniturile şi filtrele şi strângeţi
manual piuliţele furtunului.
20 / RO
Mașină de spălat automată / Manual de utilizare
Page 21
4.4.5 Evacuarea apei rămase şi curăţarea filtrului pompei
Sistemul de filtrare al maşinii previne înfundarea pompei de evacuare a apei cu obiecte solide cum ar fi
nasturii, monedele şi fibrele de ţesături. Astfel, apa va fi evacuată fără probleme şi durata de funcţionare a
pompei va creşte.
Dacă maşina nu evacuează apa, filtrul pompei este înfundat. Filtrul trebuie curăţat de fiecare dată când se
înfundă sau la fiecare 3 luni. Apa trebuie scursă înainte de a curăţa filtrul pompei de evacuare.
În plus, înainte de transportarea maşinii (de ex. la schimbarea domiciliului) la temperaturi scăzute, pentru a
preveni îngheţarea apei, aceasta trebuie scursă complet.
ATENŢIE: Impurităţile rămase în filtrul pompei pot deteriora maşina sau pot cauza zgomote deranjante.
A
Pentru a curăţa filtrul murdar şi pentru a evacua apa:
1 Scoateţi maşina din priză.
A
2. Deschideţi capacul filtrului.
3 Urmaţi procedurile de mai jos pentru a scurge apa.
Dacă produsul nu este prevăzut cu un furtun de scurgere de urgenţă, pentru a scurge apa:
ATENŢIE: Dacă produsul nu este folosit, închideţi robinetul, detaşaţi furtunul de alimentare şi scurgeţi apa din interiorul
maşinii pentru a evita îngheţarea acesteia.
ATENŢIE: După fiecare folosire, închideţi robinetul la care este conectat furtunul de alimentare cu apă.
ATENŢIE: Temperatura apei din interiorul maşinii se poate ridica până la 90 ºC. Pentru a evita riscul de ardere, curăţaţi
filtrul după ce apa din maşină s-a răcit.
a. Amplasaţi un vas mare în faţa filtrului pentru a
colecta apa care se scurge din filtru.
b. Deşurubaţi filtrul pompei (în sens anti orar) până
când apa începe să curgă. Direcţionaţi apa în
recipientul din faţa filtrului. Păstraţi la îndemână o
cârpă pentru a şterge apa vărsată.
c Când în maşină nu a mai rămas apă, scoateţi
complet filtrul deşurubându-l.
4 Curăţaţi reziduurile din filtru precum şi fibrele din jurul rotorului pompei, dacă este cazul.
5. Montaţi la loc filtrul.
6. Dacă capacul filtrului este compus din două bucăţi, închideţi-l apăsând lamela. Dacă este fabricat dintr-o
singură piesă, aşezați mai întâi lamelele pe partea interioară în locaşul lor, apoi apăsati pe partea superioară
pentru a-l închide.
Maăinţ de spţlat automatţ / Manual de utilizare
21 / RO
Page 22
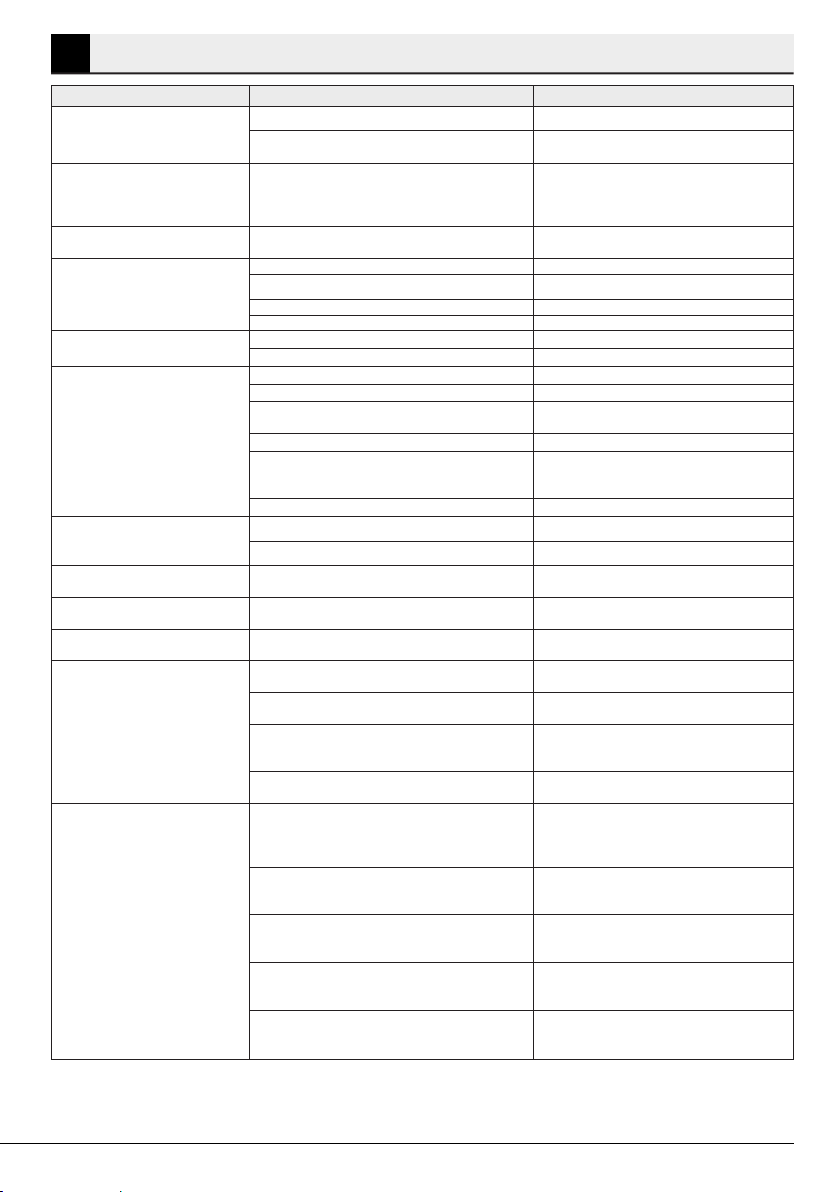
5 Depanare
Problemă Motiv Soluţie
Programul nu porneşte după
închiderea uşii.
Programul nu poate fi pornit sau
selectat.
Rămâne apă în maşină.
Maşina nu se alimentează cu apă. Robinetul este închis.
Maşina nu evacuează apa. Furtunul de evacuare a apei este înfundat sau răsucit.
Maşina vibrează sau face zgomot.
Curge apă de sub maşina de
spălat.
Maşina s-a oprit imediat după
începerea programului.
Maşina evacuează apa imediat
după alimentare.
În timpul spălării nu se vede apa
din maşină.
Uşa de încărcare nu poate fi
deschisă.
Spălarea durează mai mult decât
se specifică în manual.(*)
Butonul Pornire / Pauză / Anulare nu a fost apăsat. • *Apăsaţi butonul Pornire / Pauză / Anulare.
În caz de încărcare excesivă închiderea ușii poate fi
dificilă.
A fost activat automat modul de protecţie a mașinii
de spălat din cauza unei probleme de alimentare
(tensiune, presiunea apei etc.).
Este posibil ca în mașină să existe apă rămasă din
timpul proceselor de control al calităţii.
Furtunul de alimentare cu apă este îndoit.
Filtrul de alimentare cu apă este înfundat.
Ușa de încărcare este deschisă. • Închideţi uşa.
Filtrul pompei este înfundat.
Mașina nu este echilibrată. • Reglaţi picioarele pentru a echilibra maşina.
Filtrul pompei este obturat.
Şuruburile de fixare pentru transport nu sunt
demontate.
Sunt prea puţine rufe în mașină. • Adăugaţi mai multe rufe în maşină.
Mașina este supraîncărcată cu rufe. • Scoateţi o parte din rufe din maşină sau
Mașina atinge un obiect rigid. • Asiguraţi-vă că maşina nu atinge alte obiecte.
Furtunul de evacuare a apei este înfundat sau răsucit.
Filtrul pompei este înfundat.
Mașina de spălat se poate opri temporar din cauza
tensiunii joase.
Furtunul de evacuare este la înălţime incorectă.
Nivelul apei nu este vizibil din exteriorul mașinii de
spălat.
Ușa este blocată din cauza nivelului apei din mașină. • Evacuaţi apa folosind programul Evacuare sau
Mașina încălzește apa sau este la etapa de
centrifugare.
Este activat blocajul pentru copii. Blocajul ușii va
fi dezactivat la câteva minute după terminarea
programului.
Ușa de încărcare poate fi blocată de presiunea
exercitată asupra sa.
Presiune joasă a apei. • Maşina aşteaptă până când este alimentată cu o
Tensiunea este joasă.
Temperatură redusă a apei cu care este alimentată
mașina.
Numărul de clătiri a sporit și / sau cantitatea de apă de
clătire a sporit.
Este posibil să se fi produs spumă în exces și să se
fi activat sistemul automat de absorbţie a spumei,
datorită folosirii de detergent în exces.
• Reduceți cantitatea de rufe şi verificați că uşa se
închide în mod corespunzător.
• Pentru anularea programului, rotiţi butonul
de selectare a programului la un alt program.
Programul anterior va fi anulat. (Consultaţi
„Anularea programului”)
• Aceasta nu este o defecţiune; apa nu deteriorează
maşina.
• Porniţi robinetele.
• Îndreptaţi furtunul.
• Curătați filtrul.
• Curăţaţi sau întindeţi furtunul.
• Curăţaţi filtrul pompei.
• Curăţaţi filtrul pompei.
• Demontaţi şuruburile de fixare pentru transport.
distribuiţi-le manual omogen în maşină pentru a
o echilibra.
• Curăţaţi sau întindeţi furtunul.
• Curăţaţi filtrul pompei.
• Îşi va relua programul când tensiunea va ajunge la
un nivel normal.
• Conectaţi furtunul de evacuare conform
instrucţiunilor din manualul de utilizare.
• Acest lucru nu reprezintă o defecţiune.
Centrifugare.
• Aşteptaţi terminarea programului.
• Aşteptaţi câteva minute ca uşa să fie deblocată.
• Prindeți mânerul şi împingeți şi trageți de uşă
pentru a o elibera şi a o deschide.
cantitate suficientă de apă, pentru a evita spălarea
necorespunzătoare din cauza apei insuficiente.
Prin urmare, durata programului de spălare creşte.
• Când tensiunea este joasă, durata programului
de spălare este prelungită pentru a evita spălarea
necorespunzătoare.
• Durata de încălzire a apei creşte în sezonul rece.
De asemenea, durata programului de spălare
creşte pentru a evita spălarea necorespunzătoare.
• Maşina creşte cantitatea de apă de clătire dacă
este necesară clătirea suplimentară şi adaugă o
etapă de clătire dacă este cazul.
• Folosiţi cantitatea recomandată de detergent.
22 / RO
Maăinţ de spţlat automatţ / Manual de utilizare
Page 23
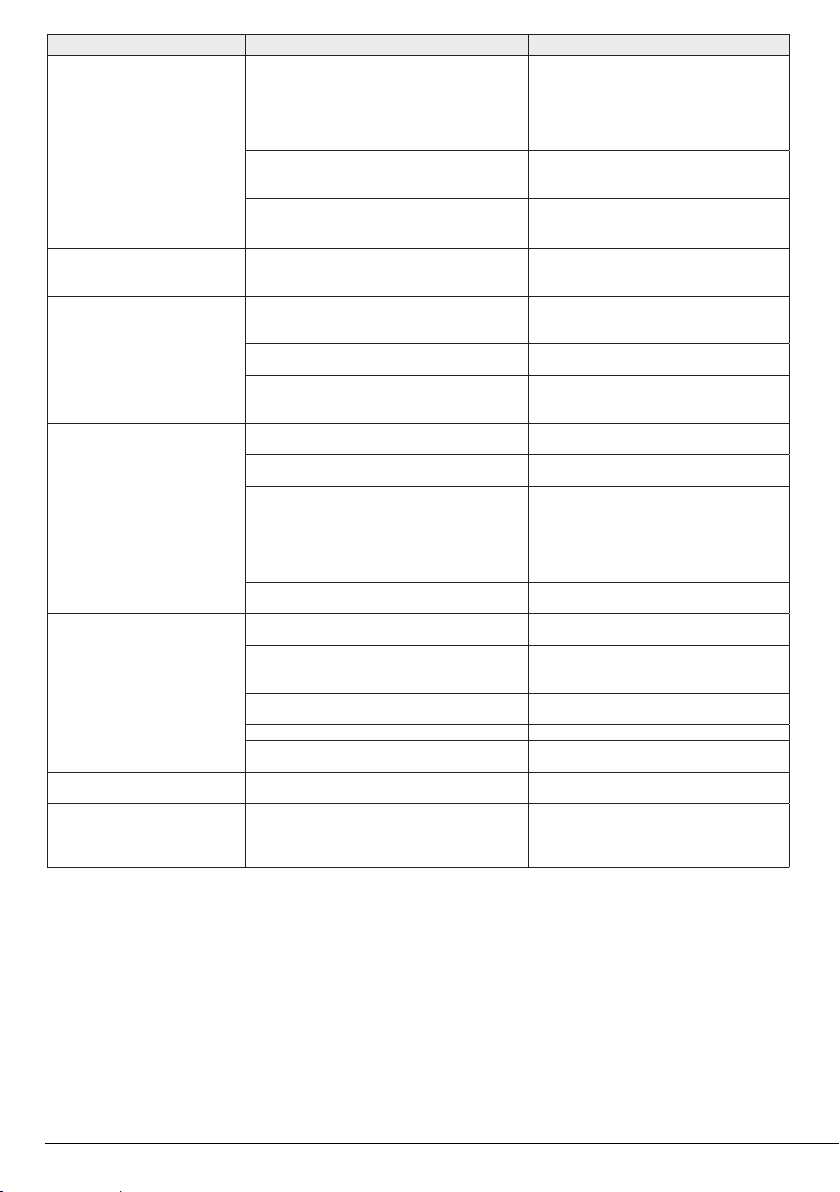
Problemă Motiv Soluţie
Cronometrul nu execută
numărătoarea inversă. (Pe
modelele cu afişaj) (*)
Cronometrul nu execută
numărătoarea inversă. (*)
Maşina nu trece la etapa de
centrifugare. (*)
Spălarea este necorespunzătoare:
rufele devin gri. (**)
Spălarea este necorespunzătoare:
petele persistă sau rufele nu sunt
albite. (**)
Spălarea este necorespunzătoare:
pe rufe apar pete uleioase. (**)
Spălarea este necorespunzătoare:
rufele au un miros neplăcut. (**)
Cronometrul se poate opri în timpul alimentării cu apă. • Cronometrul începe numărătoarea inversă doar
Cronometrul se poate opri în timpul încălzirii apei.
Cronometrul se poate opri în timpul etapei de
centrifugare.
Rufele sunt dispuse neuniform în mașină. • A fost activat sistemul de detectare automată a
Rufele sunt dispuse neuniform în mașină. • A fost activat sistemul de detectare automată a
Mașina nu centrifughează dacă apa nu este evacuată
complet.
Este posibil să se fi produs spumă în exces și să se
fi activat sistemul automat de absorbţie a spumei,
datorită folosirii de detergent în exces.
A fost folosit insuficient detergent o perioadă
îndelungată de timp.
Rufele au fost spălate la temperatură joasă o perioadă
lungă de timp.
Detergent insuficient în zone cu apă dură.
A fost folosit prea mult detergent.
A fost folosit insuficient detergent.
A fost introdusă o cantitate prea mare de rufe.
Selectare incorectă a programului și temperaturii. • Selectaţi programul şi temperatura adecvată
A fost folosit un tip incorect de detergent.
A fost folosit prea mult detergent.
Tamburul nu a fost curăţat regulat.
Pe tambur s-au format mirosuri și bacterii în urma
spălării continue la temperaturi joase și/sau cu
programe scurte.
• Cronometrul nu va afişa numărătoarea inversă
• A fost activat sistemul de detectare automată a
• Verificaţi filtrul şi furtunul de evacuare.
• Folosiţi cantitatea recomandată de detergent.
• Folosiţi cantitatea de detergent recomandată în
• Selectaţi temperatura adecvată pentru rufele de
• Utilizarea unei cantităţi insuficiente de detergent
• Folosiţi cantitatea de detergent recomandată în
• Folosiţi cantitatea de detergent recomandată în
• Nu supraîncărcaţi maşina. Introduceţi cantităţile
• Folosiţi detergent corespunzător.
• Introduceţi detergentul în compartimentul corect.
• Curăţaţi regulat tamburul. Pentru detalii, consultaţi
• Lăsaţi sertarul pentru detergent şi uşa de serviciu
după ce maşina este alimentată cu o cantitate
suficientă de apă. Pentru a asigura spălarea
optimă, maşina de spălat aşteaptă acumularea
unei cantităţi suficiente de apă. Numărătoarea
inversă este apoi reluată.
decât în momentul în care maşina ajunge la
temperatura selectată.
dezechilibrării datorită distribuirii inegale a rufelor
în tambur.
dezechilibrării datorită distribuirii inegale a rufelor
în tambur.
dezechilibrării datorită distribuirii inegale a rufelor
în tambur.
funcţie de duritatea apei şi cantitatea de rufe.
spălat.
în apa dură provoacă aderarea reziduurilor la
rufe, care devin gri în timp. După apariţia nuanţei
de gri, aceasta este dificil de îndepărtat. Folosiţi
cantitatea de detergent recomandată în funcţie de
duritatea apei şi cantitatea de rufe.
funcţie de duritatea apei şi cantitatea de rufe.
funcţie de duritatea apei şi cantitatea de rufe.
recomandate în „Tabelul de programe şi
consumuri”.
pentru rufele de spălat.
Nu amestecaţi înălbitorul cu detergentul.
4.4.2.
întredeschise după fiecare spălare. Astfel, se
va evita formarea unui mediu umed în maşină,
favorabil bacteriilor.
Maăinţ de spţlat automatţ / Manual de utilizare
23 / RO
Page 24
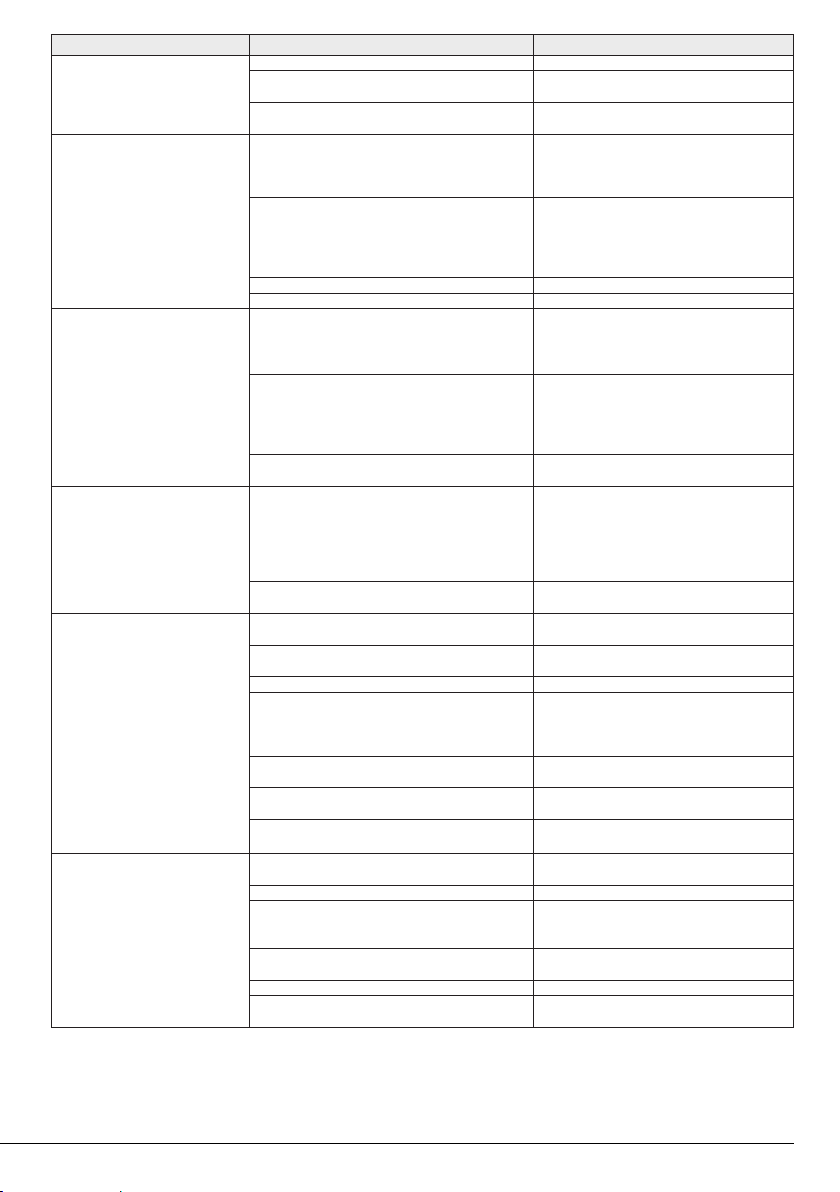
Problemă Motiv Soluţie
Rufele se decolorează. (**) A fost introdusă o cantitate prea mare de rufe. • Nu supraîncărcaţi maşina.
Maşina nu clăteşte bine.
Rufele devin rigide după spălare.
(**)
Rufele nu miros a balsam. (**) Detergentul a fost introdus în compartimentul incorect.
Reziduuri de detergent în sertarul
pentru detergent. (**)
Se formează spumă în exces în
maşină. (**)
Detergentul folosit este umed.
A fost selectată o temperatură prea mare.
Cantitatea, marca și condiţiile de depozitare ale
detergentului sunt inadecvate.
Detergentul a fost introdus în compartimentul incorect.
Filtrul pompei este înfundat. • Verificaţi filtrul.
Furtunul de evacuare este îndoit.
A fost folosit insuficient detergent.
Detergentul a fost introdus în compartimentul incorect.
Detergentul s-a amestecat cu balsamul. • Nu amestecaţi balsamul cu detergentul. Curăţaţi şi
Detergentul s-a amestecat cu balsamul. • Nu amestecaţi balsamul cu detergentul. Curăţaţi şi
Detergentul a fost introdus în sertarul ud.
Detergentul este umed.
Presiune joasă a apei.
Detergentul din compartimentul pentru spălarea
principală s-a udat în timpul alimentării cu apă
pentru prespălare. Orificiile compartimentului pentru
detergent sunt înfundate.
Există o problemă cu valvele sertarului pentru
detergent.
Detergentul s-a amestecat cu balsamul.
Tamburul nu a fost curăţat regulat.
Se folosesc detergenţi necorespunzători pentru mașina
de spălat.
A fost folosit prea mult detergent.
Detergentul a fost păstrat în condiţii improprii.
Se generează spumă excesivă din cauza texturii
materialelor cum ar fi tulul.
Detergentul a fost introdus în compartimentul incorect.
Se alimentează prea rapid cu balsam.
• Păstraţi detergentul într-un recipient închis şi
uscat şi nu îl supuneţi la temperaturi excesive.
• Selectaţi programul şi temperatura în funcţie de
tipul şi gradul de murdărire al rufelor.
• Folosiţi detergentul potrivit pentru maşina de
spălat şi pentru rufele dvs. Păstraţi detergentul
într-un recipient închis şi uscat şi nu îl supuneţi la
temperaturi excesive.
• Dacă detergentul este introdus în compartimentul
de prespălare fără a fi selectat ciclul de prespălare,
maşina va introduce în cuvă acest detergent în
timpul etapei de clătire sau tratare cu balsam.
Introduceţi detergentul în compartimentul corect.
• Verificaţi furtunul.
• Folosirea unei cantităţi insuficiente de detergent în
apa dură poate duce în timp la rigidizarea rufelor.
Folosiţi cantitatea de detergent recomandată în
funcţie de duritatea apei.
• Dacă detergentul este introdus în compartimentul
de prespălare fără a fi selectat ciclul de prespălare,
maşina va introduce în cuvă acest detergent în
timpul etapei de clătire sau tratare cu balsam.
Introduceţi detergentul în compartimentul corect.
spălaţi dozatorul cu apă fierbinte.
• Dacă detergentul este introdus în compartimentul
de prespălare fără a fi selectat ciclul de prespălare,
maşina va introduce în cuvă acest detergent în
timpul etapei de clătire sau tratare cu balsam.
Curăţaţi şi spălaţi dozatorul cu apă fierbinte.
Introduceţi detergentul în compartimentul corect.
spălaţi dozatorul cu apă fierbinte.
• Uscaţi sertarul pentru detergent înainte de a
introduce detergentul.
• Păstraţi detergentul într-un recipient închis şi
uscat şi nu îl supuneţi la temperaturi excesive.
• Verificaţi presiunea apei.
• Verificaţi orificiile şi desfundaţi-le dacă este cazul.
• Contactaţi un agent de service autorizat.
• Nu amestecaţi balsamul cu detergentul. Curăţaţi şi
spălaţi dozatorul cu apă fierbinte.
• Curăţaţi regulat tamburul. Pentru detalii, consultaţi
4.4.2.
• Folosiţi detergent corespunzător pentru maşina
de spălat.
• Folosiţi doar cantitatea recomandată de detergent.
• Păstraţi detergentul într-un recipient închis şi
uscat. Nu păstraţi detergentul în locuri excesiv de
călduroase.
• Folosiţi cantităţi reduse de detergent pentru acest
tip de materiale.
• Introduceţi detergentul în compartimentul corect.
• Posibilă problemă cu valvele sau dozatorul de
detergent. Contactaţi un agent de service autorizat.
24 / RO
Mașină de spălat automată / Manual de utilizare
Page 25
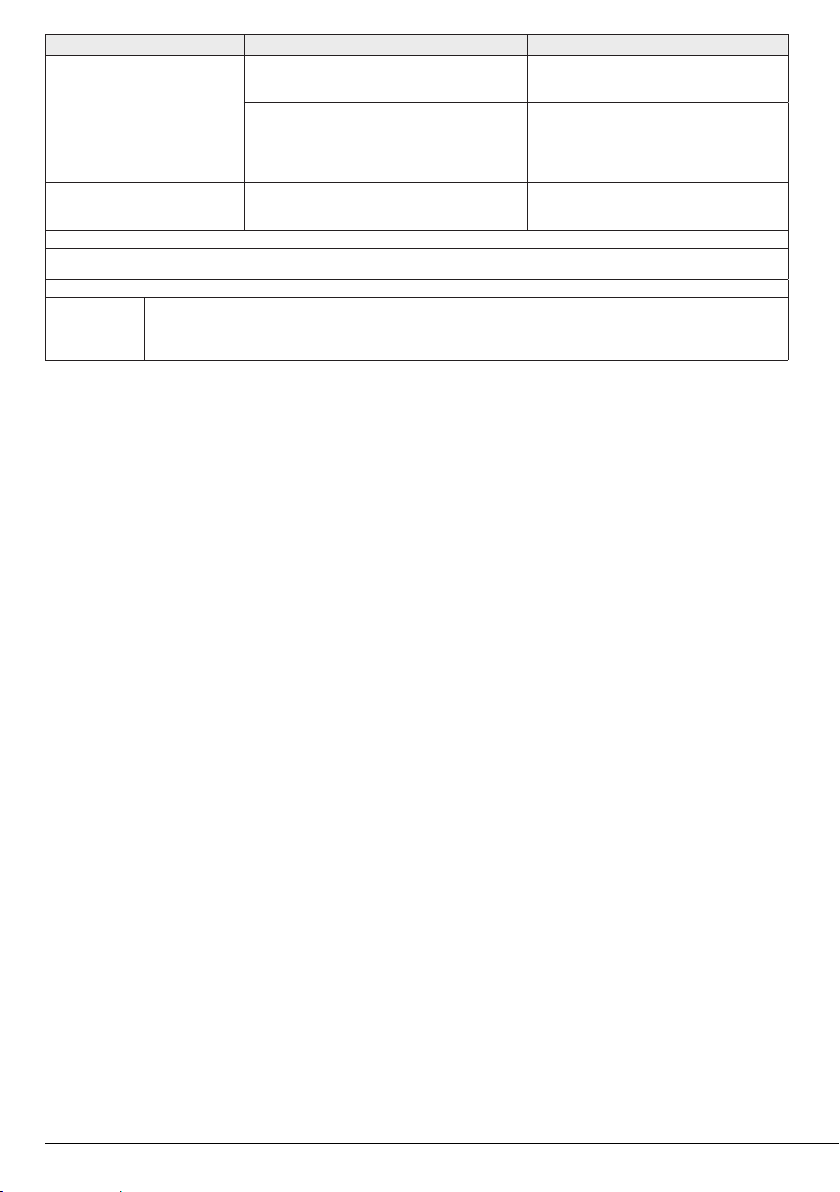
Problemă Motiv Soluţie
Se revarsă spumă din sertarul
pentru detergent.
Rufele rămân umede la finalizarea
programului. (*)
(*) Maşina nu trece la etapa de centrifugare când rufele nu sunt distribuite uniform în tambur pentru a preveni avarierea maşinii şi a
obiectelor din apropiere. Rufele trebuie aranjate şi centrifugate din nou.
(**) Nu se aplică curăţarea regulată a tamburului. Curăţaţi regulat tamburul. Consultaţi 4.4.2
A fost folosit prea mult detergent. • Amestecaţi o lingură de balsam cu ½ litru de apă
Este posibil să se fi produs spumă în exces și să se
fi activat sistemul automat de absorbţie a spumei,
datorită folosirii de detergent în exces.
şi turnaţi-l în compartimentul principal al sertarului
pentru detergent.
• Puneţi în maşină detergentul potrivit pentru
programe şi cantitatea de rufe maximă indicată în
„Tabelul de programe şi consumuri”. Când folosiţi
substanţe chimice suplimentare (de eliminat pete,
clor etc.), reduceţi cantitatea de detergent.
• Folosiţi cantitatea recomandată de detergent.
ATENŢIE: Dacă nu puteţi remedia problema, cu toate că aţi parcurs instrucţiunile din această secţiune, consultaţi dealer-ul
A
dvs. sau agentul de service autorizat. Nu încercaţi niciodată să reparaţi produsul defect pe cont propriu.
Maăinţ de spţlat automatţ / Manual de utilizare
25 / RO
Page 26

Page 27
Washing Machine
APL61012BDW0
User’s Manual
Document Number 1911860026_EN / 03-01-19.(10:44)
Page 28

1
General safety nstructons
This section includes security instructions which may help prevent
the injuries and material damage risks. All kinds of warranties shall
be invalid if these instructions are not observed.
1.1 Lfe and property safety
u
Never place the product on a carpet-covered floor. Electrical parts
will get overheated since air cannot circulate from under the device.
This will cause problems with your product.
u
Unplug the product if it is not in use.
u
Always have the installation and repairing procedures carried out by
the Authorised Service Agent. The manufacturer shall not be held
liable for damages that may arise from procedures carried out by
unauthorised persons.
u
The water supply and draining hoses must be securely fastened and
remain undamaged. Otherwise, water leak may occur.
u
While there is still water inside the product, never open the loading
door or remove the filter. Otherwise, risk of flooding and injury from
hot water will occur.
u
Do not force open the locked loading door. Door can be opened a few
minutes after the washing cycle ends. In case of forcing the loading
door to open, the door and the lock mechanism may get damaged.
u
Use detergents, softeners and supplements suitable for automatic
washing machines only.
u
Follow the instructions on the label of textiles and the detergent
package.
1.2 Chldren's safety
u
This product can be used by the children who are at the age of 8 and
over and the people whose physical, sensory or mental skills are not
fully developed or who do not have necessary required experience
and knowledge as long as they are supervised or trained about the
safe use of the product and its risks. Children should not play with the
device.
by children unless they are supervised by someone. Children of less
than 3 years should be kept away unless continuously supervised.
u
Packaging materials may be dangerous for the children. Keep
packaging materials in a safe place away from reach of the children.
28 / EN
Cleaning and maintenance works should not be performed
Washing Machine / User’s Manual
Page 29

u
Electrical products are dangerous for the children. Keep the children
away from the product when it is in use. Do not allow them to play
with the product. Use child lock to prevent children from intervening
with the product.
u
Do not forget to close the loading door when leaving the room where
the product is located.
u
Store all detergents and additives in a safe place away from the
reach of the children by closing the cover of the detergent container
or sealing the detergent package.
1.3 Electrcal safety
u
If the product has a failure, it should not be operated unless it is
repaired by the Authorised Service Agent. Risk of electric shock!
u
This product is designed to resume operating in the event of
powering on after a power interruption. If you wish to cancel the
programme, see "Cancelling the programme" section.
u
Plug the product into a grounded outlet protected by a 16 A fuse. Do
not neglect to have the grounding installation made by a qualified
electrician. Our company shall not be liable for any damages that
will arise when the product is used without grounding in accordance
with the local regulations.
u
Do not wash the product by spraying or pouring water onto it! Risk of
electric shock!
u
Never touch the power cable plug with wet hands! Do not grab the
power cord to unplug the machine, always unplug it by holding the
socket with one hand, and pulling the plug with the other hand.
u
Product should be unplugged during installation, maintenance,
cleaning and repair procedures.
u
If the power cable is damaged, it must be replaced by the
manufacturer, after sales service or a similarly qualified person
(preferably an electrician) or someone designated by the importer in
order to avoid possible risks.
1.4 Hot surface safety
Washing Machine / User’s Manual
While washing the laundry at high
temperatures, the loading door glass
will get hot. Considering this fact, during
washing operation keep the children away
from the loading door of the product to
prevent them touching it.
29 / EN
Page 30
2
Important instructions for environment
2.1 Compliance with WEEE Directive
This product complies with EU WEEE Directive (2012/19/EU). This product bears a
classification symbol for waste electrical and electronic equipment (WEEE).
This product has been manufactured with high quality parts and materials which
can be reused and are suitable for recycling. Do not dispose of the waste product
with normal domestic and other wastes at the end of its service life. Take it to the
collection center for the recycling of electrical and electronic equipment. Please
consult your local authorities to learn about these collection centers.
Compliance with RoHS Directive:
The product you have purchased complies with EU RoHS Directive (2011/65/EU). It does not
contain harmful and prohibited materials specified in the Directive.
2.2 Package information
Packaging materials of the product are manufactured from recyclable materials in accordance
with our National Environment Regulations. Do not dispose of the packaging materials together
with the domestic or other wastes. Take them to the packaging material collection points
designated by the local authorities.
3
Intended use
• This product has been designed for domestic use. It is not for commercial purposes or it should not
be used out of its intended use.
• The product must only be used for washing and rinsing of laundry that are marked accordingly.
• The manufacturer waives any responsibility arisen from incorrect usage or transportation.
• The service life of your product is 10 years. During this period, original spare parts will be available
to operate the appliance properly.
30 / EN
Washing Machine / User’s Manual
Page 31
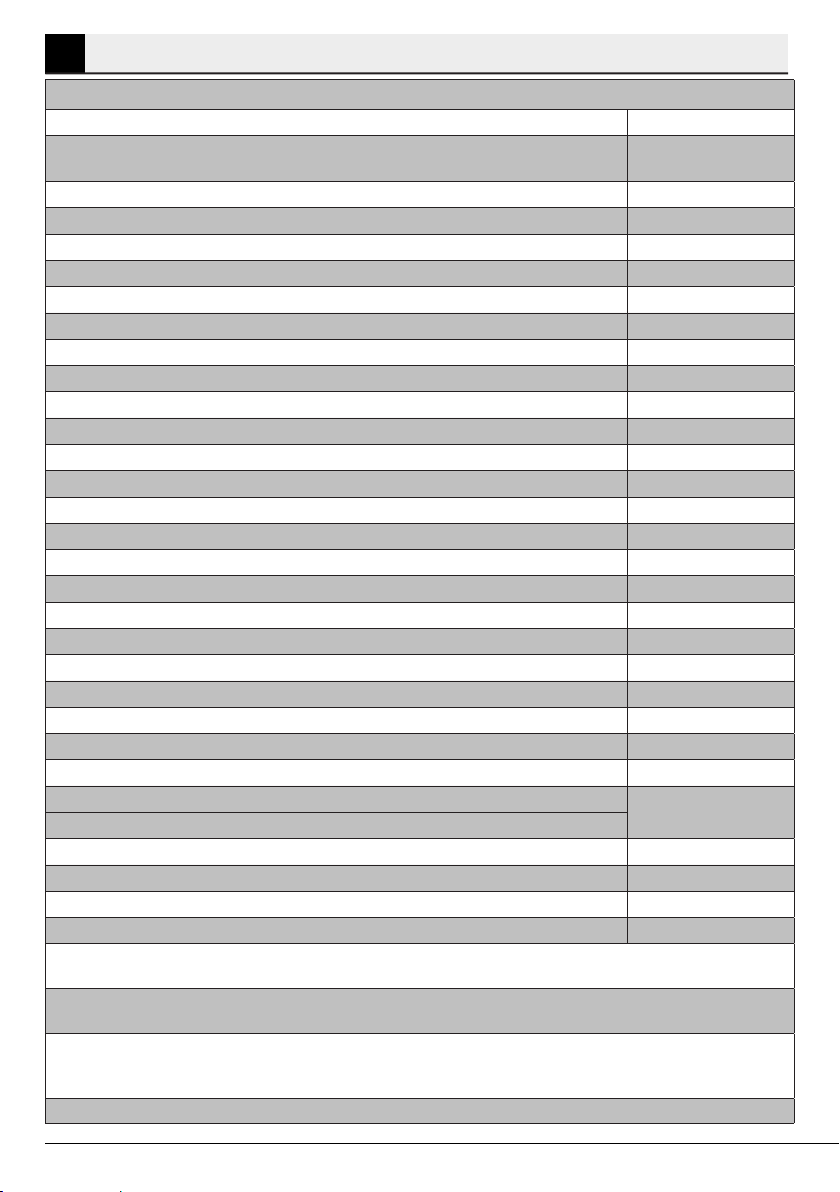
4
Technical specifications
Complying Commission Delegated Regulation (EU) No 1061/2010
Supplier name or trademark ARCTIC
Model name
Rated capacity (kg)
Energy efficiency class / Scale from A+++ (Highest Efficiency) to D (Lowest Efficiency) A+++
Annual Energy Consumption (kWh)
(1)
Energy consumption of the standard 60°C cotton programme at full load (kWh) 0.918
Energy consumption of the standard 60°C cotton programme at partial load (kWh) 0.490
Energy consumption of the standard 40°C cotton programme at partial load (kWh) 0.485
Power consumption in ‘off-mode’ (W) 0.250
Power consumption in ‘left-on mode’ (W)
Annual Water Consumption (l)
(2)
Spin-drying efficiency class / Scale from A (Highest Efficiency) to G (Lowest Efficiency) C
Maximum spin speed (rpm) 1000
Remaining moisture Content (%) 62
Standard cotton programme
(3)
Programme time of the standard 60°C cotton programme at full load (min) 255
Programme time of the standard 60°C cotton programme at partial load (min)
Programme time of the standard 40°C cotton programme at partial load (min)
Duration of the left-on mode (min) N/A
Airborne acoustical noise emissions washing/spinning (dB)
Built-in No
Height (cm) 84
Width (cm) 60
Depth (cm)
Net weight (±4 kg.)
Single Water inlet / Double Water inlet
• Available
Electrical input (V/Hz) 230 V / 50Hz
Total current (A) 10
Total power (W) 2200
Main model code 9213
(1)
Energy Consumption based on 220 standard washing cycles for cotton programmes at 60°C and 40°C at full and partial load, and the consumption
of the low-power modes. Actual energy consumption will depend on how the appliance is used.
(2)
Water consumption based on 220 standard washing cycles for cotton programmes at 60°C and 40°C at full and partial load. Actual water
consumption will depend on how the appliance is used.
(3)
“Standard 60°C cotton programme” and the “standard 40°C cotton programme” are the standard washing programmes to which the information
in the label and the fiche relates and these programmes are suitable to clean normally soiled cotton laundry and that they are the most efficient
programmes in terms of combined energy and water consumption.
Technical specifications may be changed without prior notice to improve the quality of the product.
APL61012BDW0
7000040006
6
152
0,750
8799
Cotton Eco 60°C and 40°C
205
205
63/75
44
55
• / -
Washing Machine / User’s Manual
31 / EN
Page 32
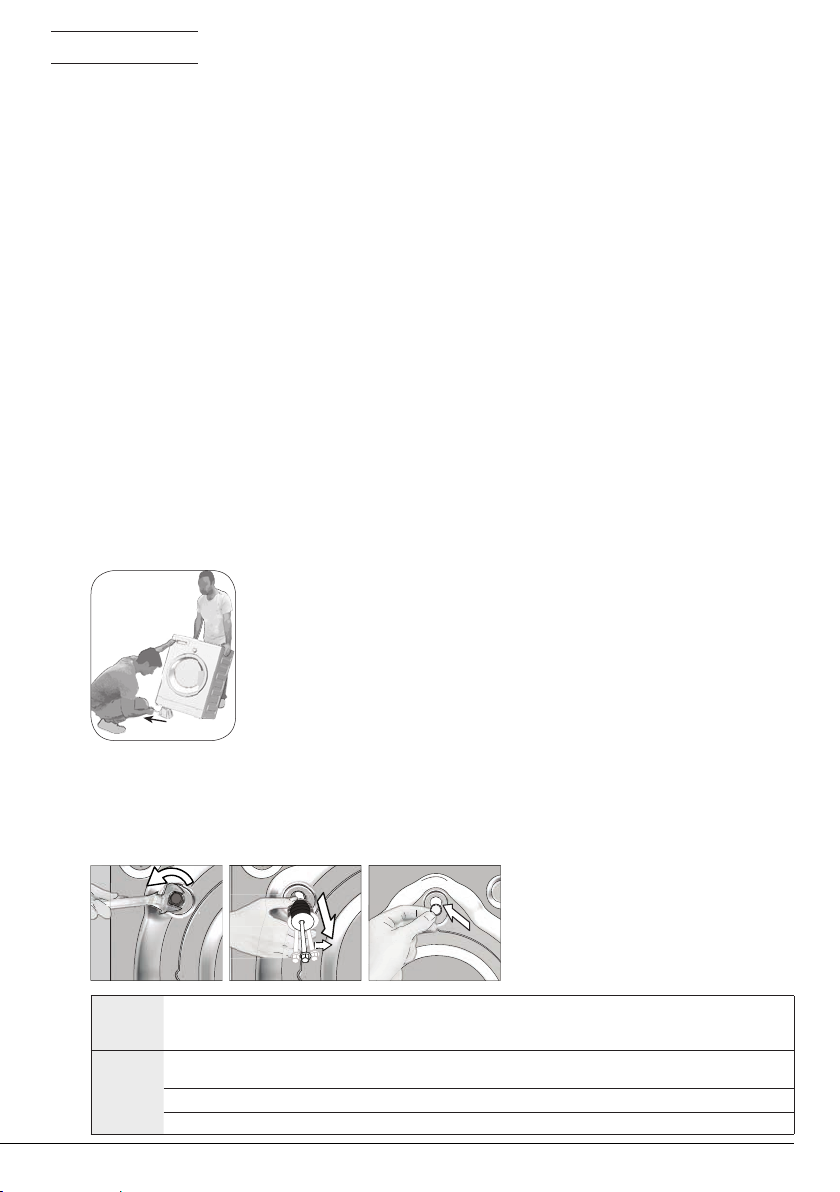
4.1 Installation
• Apply to the nearest authorised service agent for the installation of your product.
• Preparation of the location and electrical, tap water and waste water installations at the place of
installation is under customer's responsibility.
• Make sure that the water inlet and discharge hoses as well as the power cable are not folded,
pinched or crushed while pushing the product into its place after installation or cleaning
procedures.
• Make sure that the installation and electrical connections of the product are performed by
authorised service. Manufacturer shall not be held liable for damages that may arise from
procedures carried out by unauthorised persons.
• Prior to installation, visually check if the product has any defects on it. If so, do not have it installed.
Damaged products cause risks for your safety.
4.1.1 Approprate nstallaton locaton
• Place the product on a hard and level floor. Do not put it onto a carpet with high pile or other
similar surfaces.
• When the washing machine and dryer are placed on top of each other, their total weight –when
loaded– amounts to 180 kilograms. Place the product on a solid and flat floor that has sufficient
load carrying capacity!
• Do not place the product on the power cable.
• Do not install the product in the environments where the temperature falls below 0 ºC.
• Leaving a gap at the sides of the machine is suggested to reduce vibration and noise
• On a graduated floor, do not place the product next to the edge or on a platform.
• Do not place heat sources such as Hobs, Irons, Ovens, etc. on the washing machine and do not use
them on the product.
4.1.2 Removng packagng renforcement (If the product has)
Tilt the machine backwards to remove the packaging
reinforcement. Remove the packaging reinforcement by pulling the
ribbon. Do not make this operation alone by yourself.
4.1.3 Removng the transportaton locks
1 Loosen all bolts with an appropriate wrench until they turn freely.
2 Remove the transport safety bolts by turning them slightly.
3 Insert the plastic covers in the bag containing the user manual to the openings on the rear
panel.
CAUTION: Remove the transportation safety bolts before operating the washing machine! Otherwise, the
A
C
32 / EN
product will be damaged.
Keep the transportation safety bolts in a safe place to reuse when the washing machine needs to be moved again
in the future.
Install the transport safety bolts in reverse order of the disassembly procedure.
Never move the product without the transportation safety bolts properly fixed in place!
Washing Machine / User’s Manual
Page 33
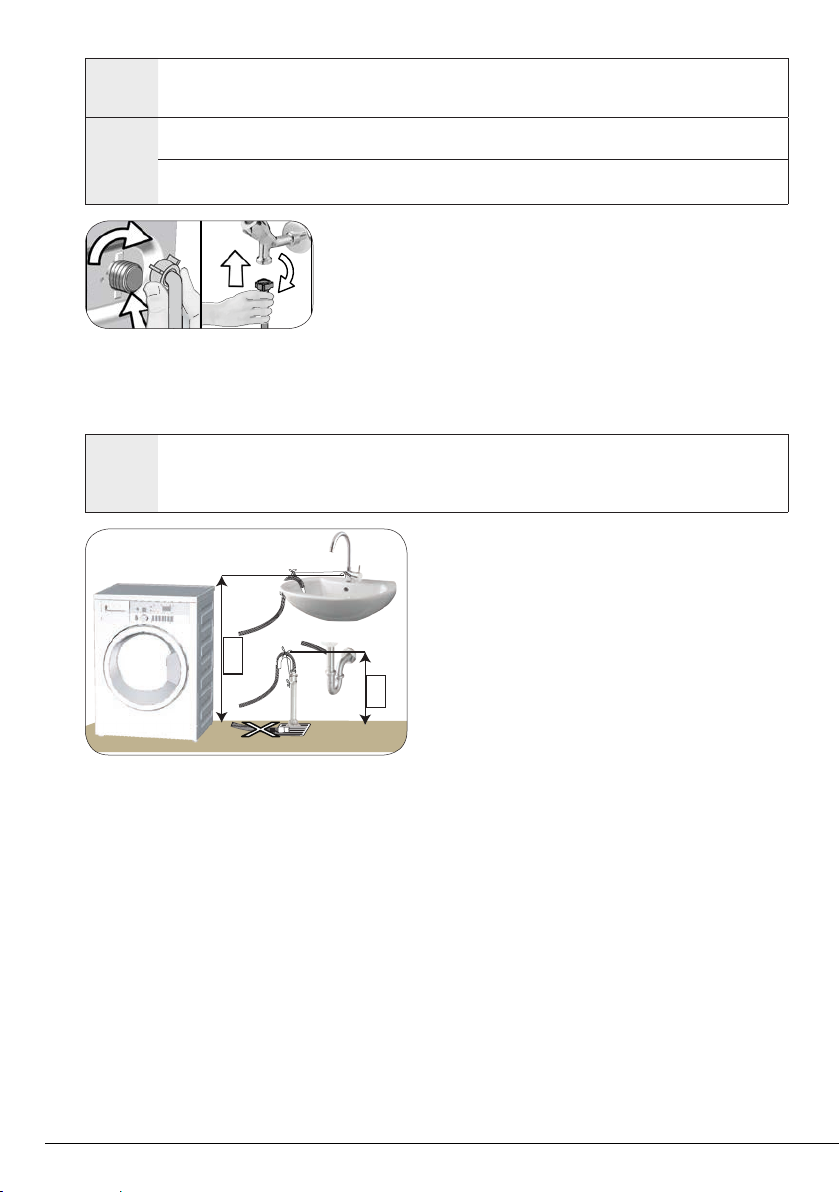
4.1.4 Connectng water supply
40 cm
100 cm
The water supply pressure required to run the product is between 1 to 10 bars (0.1 – 1 MPa). It is necessary to have
10 – 80 liters of water flowing from the fully open tap in one minute to have your machine run smoothly. Attach a
C
A
pressure reducing valve if water pressure is higher.
CAUTION: Models with a single water inlet should not be connected to the hot water tap. In such a case the
laundry will get damaged or the product will switch to protection mode and will not operate.
CAUTION: Do not use old or used water inlet hoses on the new product. It may cause stains on your laundry.
1 Tighten the nuts of the hose by hand. Never use a tool when
tightening the nuts.
2 When hose connection is completed, check whether there is
leak problems at the connection points by opening the taps
fully. If any leaks occur, turn off the tap and remove the nut.
Retighten the nut carefully after checking the seal. In order to
prevent the water leaks and resultant damages, keep the taps
closed when you do not use the product.
4.1.5 Connectng the dran hose to the dran
• Attach the end of the drain hose directly to waste water drain, lavatory or bathtub.
CAUTION: Your drain house will be flooded if the hose comes out of its housing during water discharge.
A
Moreover, there is risk of scalding due to high washing temperatures! In order to prevent such situations and
make sure that the machine performs water intake and discharge processes without any problem, fix the drain
hose securely.
• Connect the drain hose to a minimum height of 40
cm and a maximum height of 100 cm.
• In case the drain hose is elevated after laying it on
the floor level or close to the ground (less than 40 cm
above the ground), water discharge becomes more
difficult and the laundry may come out excessively
wet. Therefore, follow the heights described in the
figure.
• To prevent the waste water to go back into the machine again and to ensure easy drainage, do not
immerse the end of the hose into the waste water or do not insert it into the drain for more than
15 cm. If it is too long, cut it short.
• The end of the hose should not be bent, it should not be stepped on and the hose must not be
pinched between the drain and the machine.
• If the length of the hose is too short, use it by adding an original extension hose. Length of the
hose may not be longer than 3.2 m. To avoid water leak failures, the connection between the
extension hose and the drain hose of the product must be fitted well with an appropriate clamp as
not to come off and leak.
Washing Machine / User’s Manual
33 / EN
Page 34
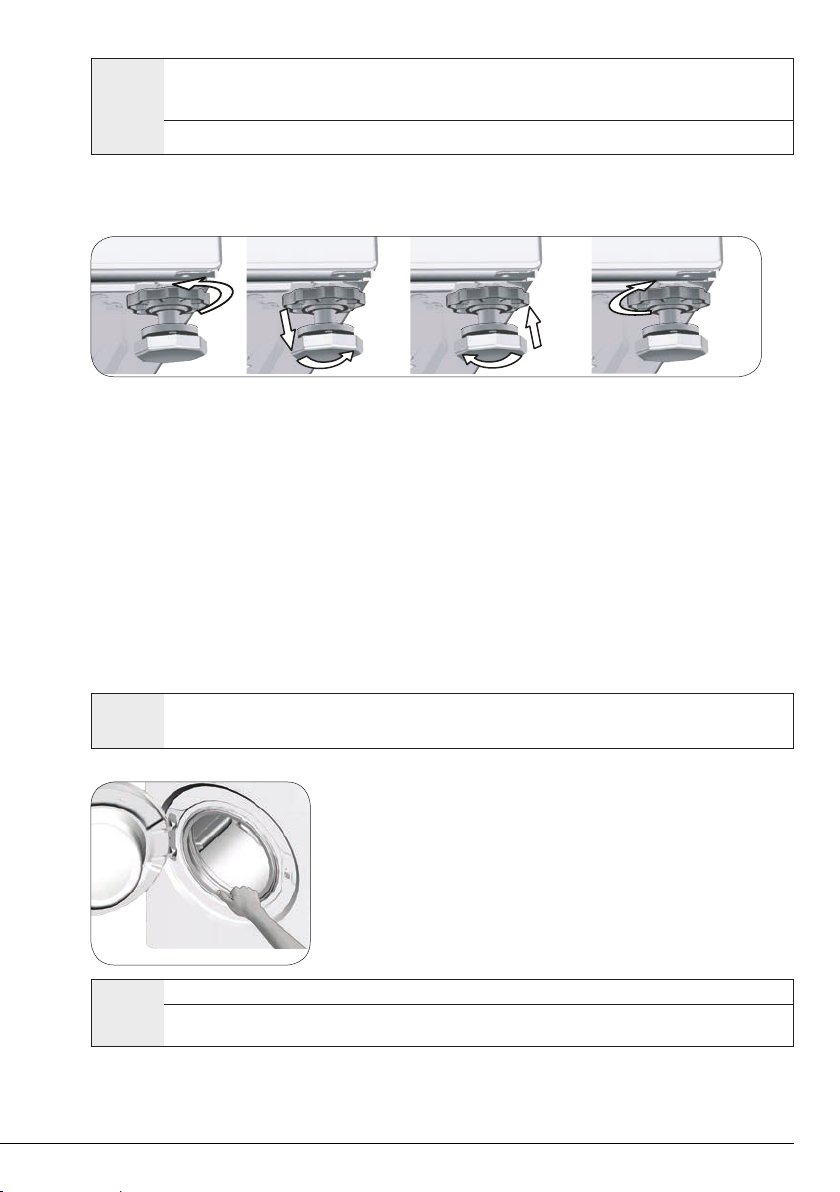
4.1.6 Adjustng the feet
CAUTION: In order to ensure that the product operates more silently and vibration-free, it must stand level
A
1 Loosen the lock nuts on the feet by hand.
2 Adjust the feet until the product stands in a stable and balanced way.
3. Tighten all lock nuts by hand again.
4.1.7 Electrcal connecton
Connect the product to a grounded outlet protected by a 16 A fuse. Our company shall not be liable
for any damages that will arise when the product is used without grounding in accordance with the
local regulations.
• Connection must comply with national regulations.
• The wiring for the electrical outlet circuit must be sufficient to meet the appliance requirements.
Use of a Groud Fault Circuit Interrupter (GFCI) is recommended.
• Power cable plug must be within easy reach after installation.
• If the current value of the fuse or breaker in the house is less than 16 Amps, have a qualified
electrician install a 16 Amp fuse.
• The voltage specified in the "Technical specifications" section must be equal to your mains
voltage.
• Do not make connections via extension cables or multi-plugs.
and balanced on its feet. Balance the machine by adjusting the feet. Otherwise, the product may move from its
place and cause crushing and vibration problems.
CAUTION: Do not use any tools to loosen the lock nuts. Otherwise, they will get damaged.
B
4.1.8 Intal use
C
34 / EN
CAUTION: Damaged power cables must be replaced by the Authorised Service Agents.
Use an anti-limescale suitable for the washing machines.
Some water might have remained in the product due to the quality control processes in the production. It is not
harmful for the product.
Before starting to use the product make sure that the preparations
are made which are in line with the “Important Safety and
Environment Instructions” and the instructions in the “Installation”
section.
To prepare the product for washing laundry, perform first operation
in Drum Cleaning programme. If this program is not available in your
machine, apply the method which is described in the section 4.4.2.
Washing Machine / User’s Manual
Page 35

4.2 Preparation
4.2.1 Sortng the laundry
* Sort laundry according to type of fabric, color, and degree of soiling and allowable water
temperature.
* Always obey the instructions given on the garment tags.
4.2.2 Preparng laundry for washng
• Laundry items with metal attachments such as, underwired bras, belt buckles or metal buttons
will damage the machine. Remove the metal pieces or wash the clothes by putting them in a
laundry bag or pillow case.
• Take out all substances in the pockets such as coins, pens and paper clips, and turn pockets inside
out and brush. Such objects may damage the product or cause noise problem.
• Put small size clothes such as infant's socks and nylon stockings in a laundry bag or pillow case.
• Place curtains in without compressing them. Remove curtain attachment items.
• Fasten zippers, sew loose buttons and mend rips and tears.
• Wash “machine washable” or “hand washable” labeled products only with an appropriate
programme.
• Do not wash colours and whites together. New, dark coloured cottons release a lot of dye. Wash
them separately.
• Tough stains must be treated properly before washing. If unsure, check with a dry cleaner.
• Only use the dyes / color changers and descaling agents which are appropriate to machine wash.
Always follow the instructions on the package.
• Wash trousers and delicate laundry turned inside out.
• Keep laundry items made of Angora wool in the freezer for a few hours before washing. This will
reduce pilling.
• Laundry that are subjected to materials such as flour, lime dust, milk powder, etc. intensely must
be shaken off before placing into the machine. Such dusts and powders on the laundry may build
up on the inner parts of the machine in time and can cause damage.
4.2.3 Thngs to be done for energy savng
Following information will help you use the product in an ecological and energy-efficient manner.
• Operate the product in the highest capacity allowed by the programme you have selected, but do
not overload; see, "Programme and consumption table". See, “Programme and consumption table"
• Always follow the instructions on the detergent packaging.
• Wash slightly soiled laundry at low temperatures.
• Use faster programmes for small quantities of lightly soiled laundry.
• Do not use prewash and high temperatures for laundry that is not heavily soiled or stained.
• If you plan to dry your laundry in a dryer, select the highest spin speed recommended during
washing process.
• Do not use more detergent than the recommended amount specified on its package.
4.2.4 Loadng the laundry
1. Open the laundry cover.
2. Put the laundry items into the machine in a loose manner.
3. Push and close the loading cover until you hear the locking sound. Ensure that no items are caught
in the door. The loading door is locked while a programme is running. The door can only be opened
a while after the programme comes to an end.
4.2.5 Correct load capacty
The maximum load capacity depends on the type of laundry, the degree of soiling and the washing
programme desired.
Machine automatically adjusts the water amount according to the weight of the laundry put inside it.
WARNING: Follow the information in the “Programme and consumption table”. When overloaded, machine's
A
Washing Machine / User’s Manual
washing performance will drop. Moreover, noise and vibration problems may occur.
35 / EN
Page 36
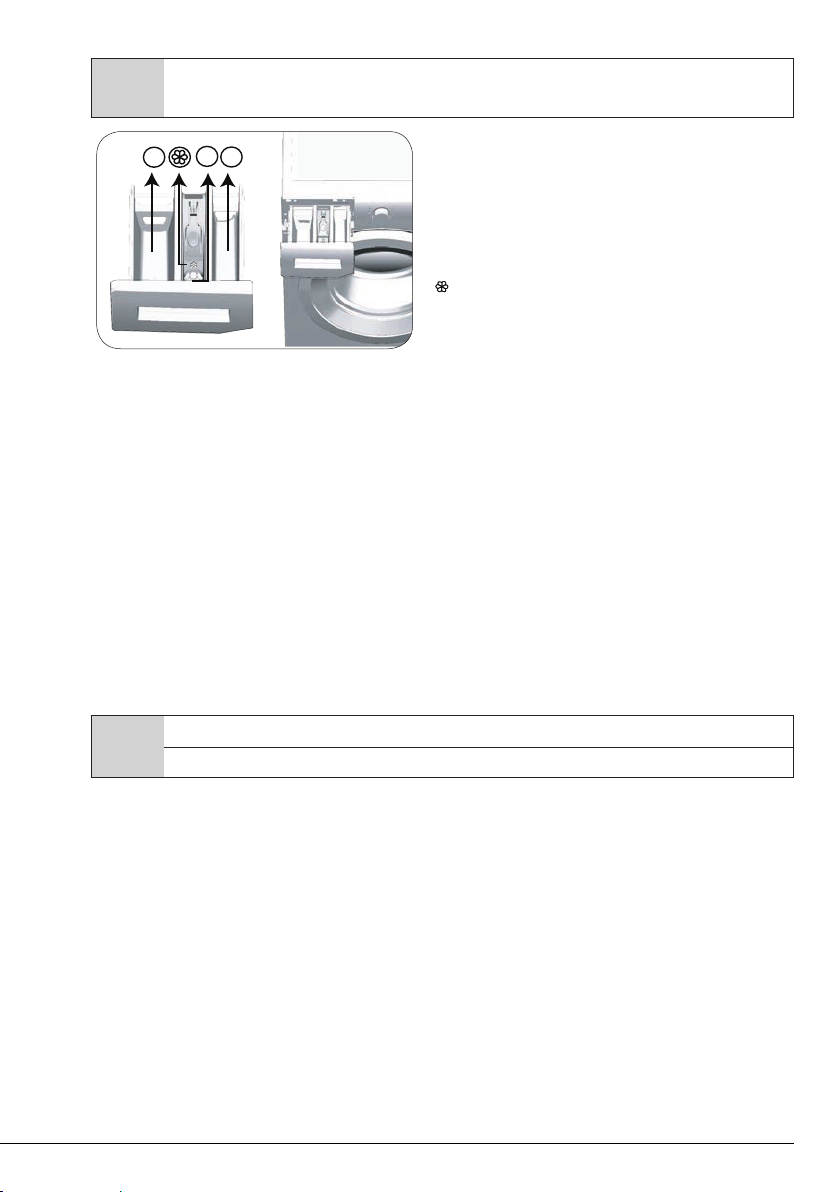
4.2.6 Usng detergent and softener
1
3
2
When using detergent, softener, starch, fabric dye, bleacher and decolorant, descaling agents; read the
manufacturer's instructions written on the package and follow the dosages specified. Use measuring cup if
C
Detergent, softener and other cleaning agents
• Add detergent and softener before starting the washing programme.
• While the washing cycle is in progress, do not leave the detergent dispenser open!
• When using a programme without prewash, do not put any detergent into the prewash
compartment (compartment nr. "1").
• In a programme with prewash, do not put liquid detergent into the prewash compartment
(compartment nr. "1").
• Do not select a programme with prewash if you are using a detergent bag or dispensing ball. Place
the detergent bag or the dispensing ball directly among the laundry in the machine.
If you are using liquid detergent, do not forget to place the liquid detergent container into the main
wash compartment (compartment number “2”).
Choosing the detergent type
Detergent type to be used depends on the fabric type and color.
• Use different detergents for coloured and white laundry.
• Wash your delicate clothes only with special detergents (liquid detergent, wool shampoo, etc.)
used solely for delicate clothes.
• When washing dark coloured clothes and quilts, it is recommended to use liquid detergent.
• Wash woolens with special detergent made specifically for woolens.
A
Adjusting detergent amount
The amount of washing detergent to be used depends on the amount of laundry, the degree of
soiling and water hardness.
• Do not use amounts exceeding the dosage quantities recommended on the detergent package
to avoid problems of excessive foam, poor rinsing, financial savings and finally, environmental
protection.
• Use lesser detergent for small amounts or lightly soiled clothes.
Using softeners
Pour the softener into the softener compartment of the detergent drawer.
• Do not exceed the (>max<) level sign on the softener compartment.
• If the softener has lost its fluidity, dilute it with water before putting it in the detergent drawer.
available.
The detergent drawer is composed of three
compartments:
– (1) for prewash
– (2) for main wash
– (3) for softener
) in addition, there is a siphon piece in the
– (
softener compartment.
CAUTION: Use only detergents manufactured specifically for washing machines.
CAUTION: Do not use soap powder.
36 / EN
Washing Machine / User’s Manual
Page 37
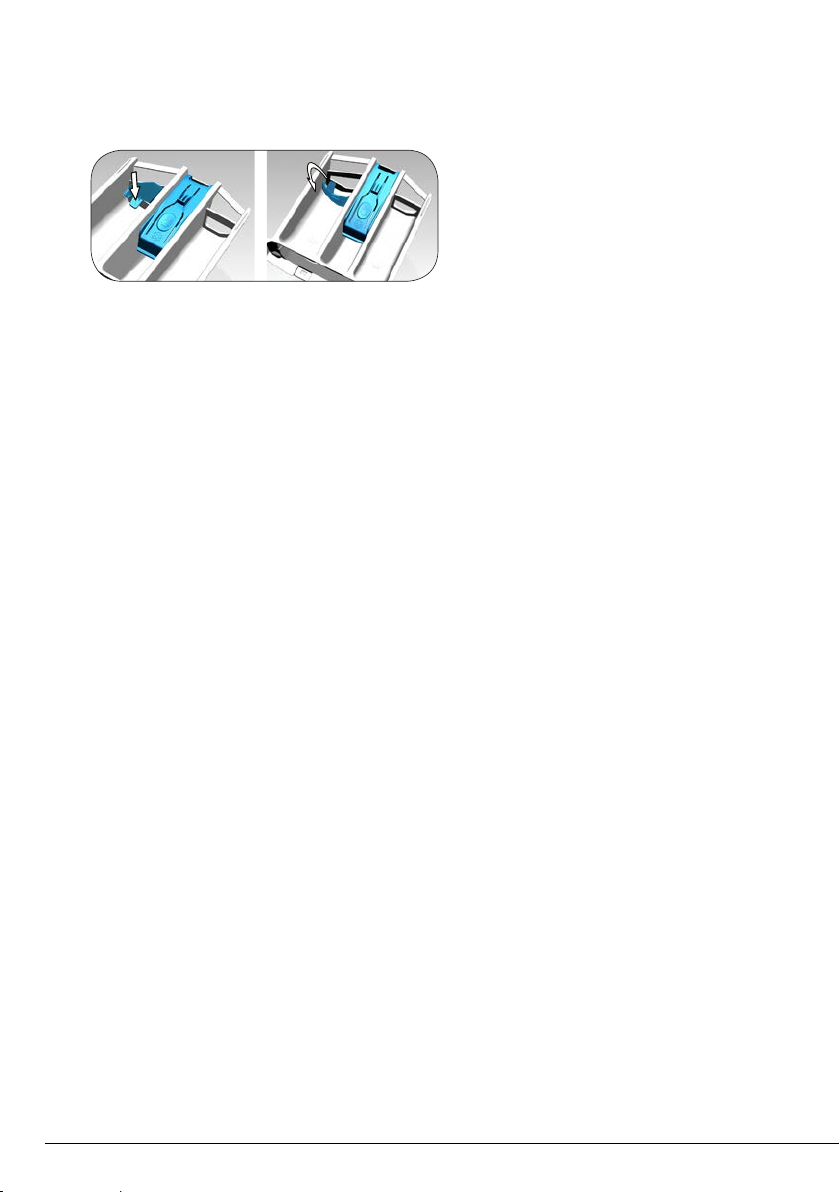
Using liquid detergents
If the product is equipped with a liquid detergent part:
• When you want to use liquid detergent,
press on the point shown to rotate
the apparatus. The part that falls off
will function as a barrier for the liquid
detergent.
• If required, clean the apparatus with water
when it is in place or by removing it.
• If you will use powder detergent, the
apparatus must be secured at top position.
If the product does not contain a liquid detergent cup:
• Do not use liquid detergent for the prewash in a programme with prewash.
• Liquid detergent stains your clothes when used with Delayed Start function. If you are going to
use the Delayed Start function, do not use liquid detergent.
Using gel and tablet detergent
• If the gel detergent thickness is fluidal and your machine does not contain a special liquid
detergent cup, put the gel detergent into the main wash detergent compartment during first
water intake. If your machine contains a liquid detergent cup, fill the detergent into this cup before
starting the programme.
• If the gel detergent thickness is not fluidal or in the shape of capsule liquid tablet, put it directly
into the drum before washing.
• Put tablet detergents into the main wash compartment (compartment nr. "2") or directly into the
drum before washing.
Using starch
• Put the liquid soda, powder soda or the fabric dye into the softener compartment.
Do not use softener and starch together in a washing cycle.
Wipe the inside of the machine with a damp and clean cloth after using starch.
Using limescale remover
• When required, use limescale removers manufactured specifically for washing machines only.
Using bleaches
Add the bleach at the beginning of the washing cycle by selecting a prewash program. Do not put
detergent in the prewash compartment. As an alternative application, select a programme with
extra rinse and add the bleaching agent while the machine is taking water from the detergent
compartment during first rinsing step.
• Do not use bleaching agent and detergent by mixing them.
• Use just a little amount (approx. 50 ml) of bleaching agent and rinse the clothes very well as it
causes skin irritation. Do not pour the bleach onto the laundry and do not use it with the colored
items.
• When using oxygen-based decolorant, select a program which washes the laundry at a low
temperature.
• Oxygen-based decolorant can be used with the detergent; however, if it is not at the same
consistence, first put detergent in the compartment number “2” in the detergent dispenser and
wait for the machine to flush the detergent when taking in water. While the machine continues
taking in water, add decolorant in the same compartment.
Washing Machine / User’s Manual
37 / EN
Page 38
4.2.7 Tps for effcent washng
Light Colours and
Whites
(Recommended temperature
range based on soiling level:
40-90 oC)
It may be necessary to pre-
Heavily
Soiled
(difficult stains
such as grass,
coffee, fruits
and blood.)
Normally
Soiled
(For example,
stains caused
Soiling Level
by body on
collars and
cuffs)
Lightly
Soiled
(No visible
stains exist.)
treat the stains or perform
prewash. Powder and liquid
detergents recommended
for whites can be used at
dosages recommended for
heavily soiled clothes. It is
recommended to use powder
detergents to clean clay and
soil stains and the stains that
are sensitive to bleaches.
Powder and liquid detergents
recommended for whites
can be used at dosages
recommended for normally
soiled clothes.
Powder and liquid detergents
recommended for whites
can be used at dosages
recommended for lightly soiled
clothes.
Clothes
Colours
(Recommended temperature
range based on soiling level:
cold -40 oC)
Powder and liquid
detergents recommended
for colors can be used at
dosages recommended for
heavily soiled clothes. It is
recommended to use powder
detergents to clean clay and
soil stains and the stains that
are sensitive to bleaches. Use
detergents without bleach.
Powder and liquid detergents
recommended for colors
can be used at dosages
recommended for normally
soiled clothes. Detergents
which do not contain bleach
should be used.
Powder and liquid detergents
recommended for colors
can be used at dosages
recommended for lightly
soiled clothes. Detergents
which do not contain bleach
should be used.
Black/Dark
Colours
(Recommended
temperature range
based on soiling level:
cold -40 oC)
Liquid detergents
suitable for colors
and dark colors can
be used at dosages
recommended for
heavily soiled clothes.
Liquid detergents
suitable for colors
and dark colors can
be used at dosages
recommended for
normally soiled
clothes.
Liquid detergents
suitable for colors
and dark colors can
be used at dosages
recommended for
lightly soiled clothes.
Delicates/
Woolens/
Silks
(Recommended
temperature range
based on soiling
level: cold -30 oC)
Prefer liquid
detergents
produced for
delicate clothes.
Woolen and silk
clothes must
be washed with
special woolen
detergents.
Prefer liquid
detergents
produced for
delicate clothes.
Woolen and silk
clothes must
be washed with
special woolen
detergents.
Prefer liquid
detergents
produced for
delicate clothes.
Woolen and silk
clothes must
be washed with
special woolen
detergents.
38 / EN
Washing Machine / User’s Manual
Page 39
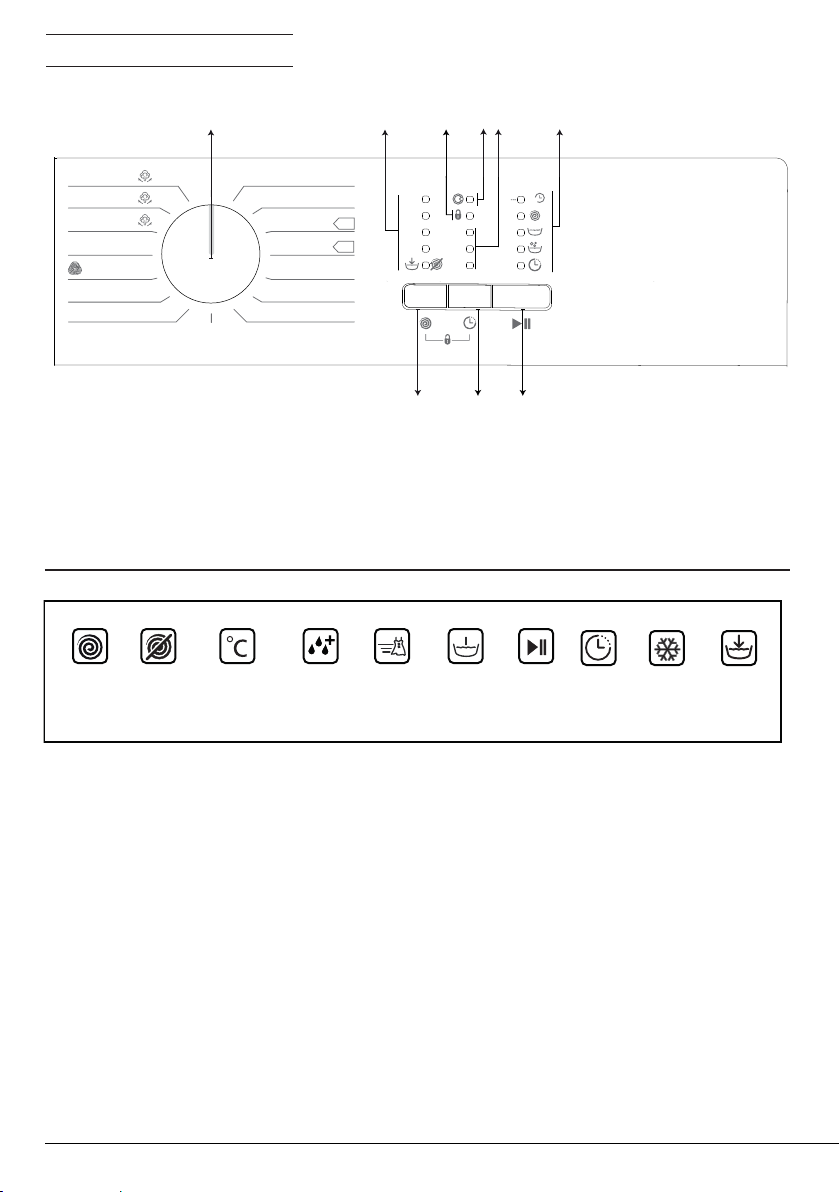
4.3 Operating the product
4.3.1 Control panel
1
Of f
CămăȘi 40°
Geci cu puf 40°
ăţare
Autocur
Spălare Rapidă 30°
Lână 40°
Plușuri
Sintetice 40°
Sintetice 20°
1 - Programme Selection knob (Uppermost
position On / Off)
2 - Spin Speed Indicator LEDs
3 - Child Lock Enabled LED
4 - Door Lock Enabled LED
On/
Stoarcere
Evacuare
Bumbac 20°
Bumbac 40°
Bumbac Eco
Bumbac Eco
Bumbac 60°
cu Prespălare
Bumbac 90°
2 3 4 6
1000
40°
60°
Cl
ătire
800
600
400
5
endAnulare
9h
6h
3h
789
5 - Delayed Start Indicator LEDs
6 - Programme Follow-up LEDs
7 - Start / Pause Button
8 - Delayed Start Setting Button
9 - Spin Speed Adjustment button
APL61012BDW0
Spin No Spin
Temperature Time
PrewashRinse plus Rinse hold
Start/Fast
Pause
Delay
4.3.2 Preparng the machne
1.Make sure that the hoses are connected tightly.
2.Plug in your machine.
3.Turn the tap on completely.
4.Place the laundry in the machine.
5.Add detergent and fabric softener.
4.3.3 Programme selecton and tps for effcent washng
1.Select the programme suitable for the type, quantity and soiling degree of the laundry in
accordance with the "Programme and consumption table" and the temperature table below.
2.Select the desired programme with the Programme Selection knob.
Washing Machine / User’s Manual
Cold
39 / EN
Page 40
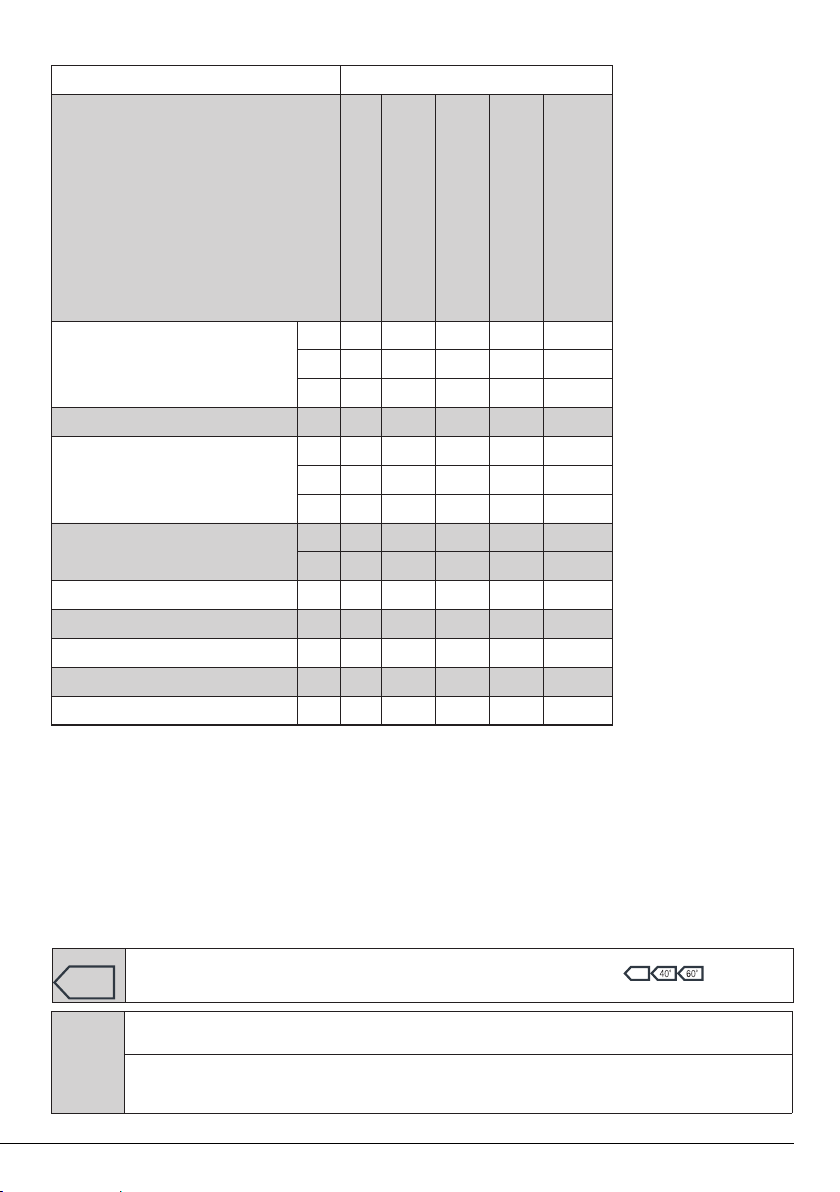
4.3.4 Programme and consumpton table
RO
Program
Bumbac
Bumbac 60° cu Prespălare 60
60**
Bumbac Eco
Sintetice
Spălare Rapidă 30
Lână / Spălare manuală 40
Steam + Geci cu puf
Steam + Cămăşi
Steam + Autocurăţare
60**
40**
25
6 180 83
90
6 180 81
40
6 180 81
20
6
6
3
3
2,5
40
2,5
20
6
1,5
40
1,5 130
2,5
40
90
-
Greutate max.(kg)
Durrată program (~min)
92
200
255 46,4 0,918
35
205
35
205
120 66 0,750
120 66 0,250
28
60 0,150
65 45
90 1,20
48
105
180
70
Consum apă (l)
,4
1,95
0,95
0,50
1,80
0,490
0,485
0,450
1,00
2,40
Consum energie (kWh)
Viteză max.***
1000
1000
1000
1000
1000
1000
1000
1000
1000
1000
1000
1000
800
600
** : Energy Label programme (EN 60456 Ed.3)
***: If maximum spin speed of the machine is lower then this value, you can only select up to the maximum spin speed.
- : See the programme description for maximum load.
** "Cotton Economic 40°C and Cotton Economic 60°C are standard programmes." These programmes are known as '40°C
cotton standard programme' and '60°C cotton standard programme' and indicated with the symbols on the
panel.
Water and power consumption may vary subject to the changes in water pressure, water hardness and temperature,
C
ambient temperature, type and amount of laundry, spin speed, and changes in electric voltage.
Depending on the amount of laundry you have loaded into your machine, there may be a difference of 1-1.5 hours
between the duration shown in the Programme and consumption table and the actual washing duration. Duration will
be automatically updated soon after the washing starts.
40 / EN
Washing Machine / User’s Manual
Page 41
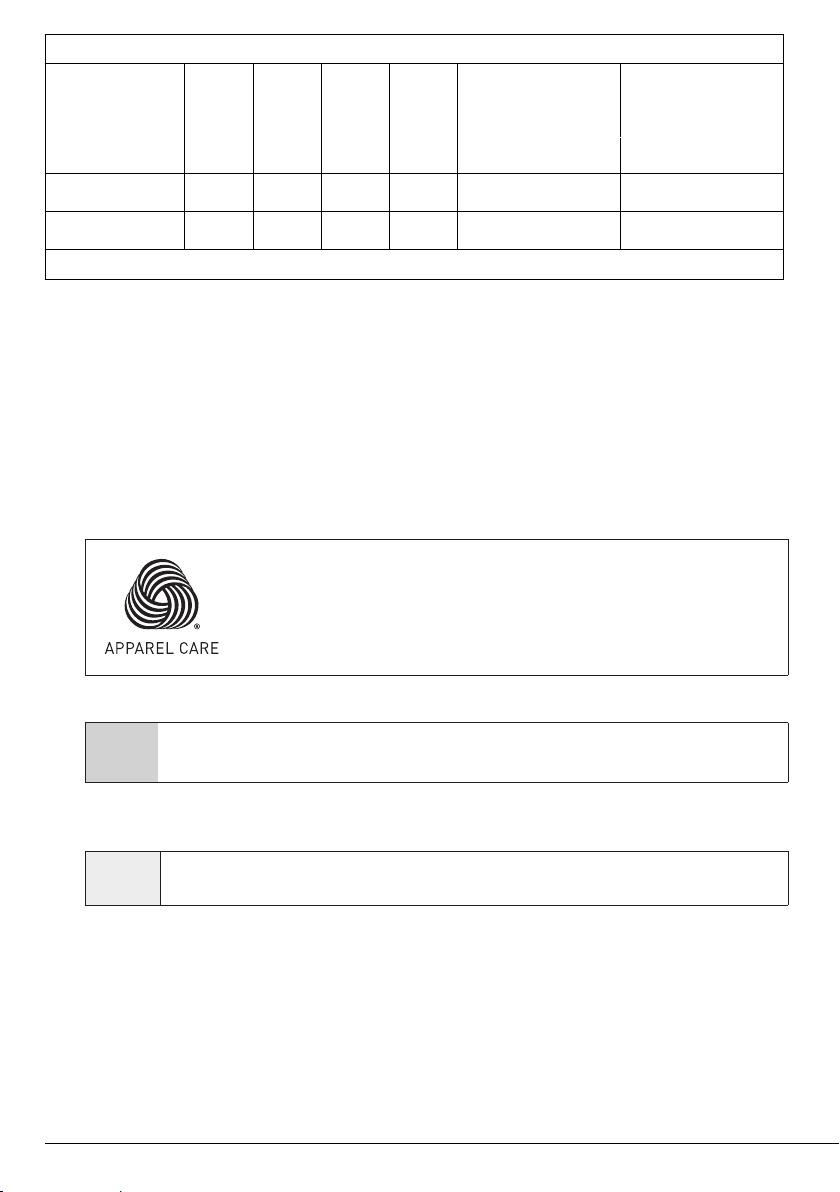
Indcatve values for Synthetcs programmes (EN)
Remaining Moisture
Content (%) **
Load (kg)
Water
Consumption
(l)
Energy
Consumption
(kWh)
Programme
Duration (min)
Synthetics 40
Synthetics 20
** Remaining moisture content values may differ according to the selected spin speed.
2,5 66
2,5 66
0,750
0,250
105/140
105/140
≤ 1000 rpm > 1000 rpm
45 40
45 40
Remaining Moisture
Content (%) **
4.3.5 Man programmes
Depending on the type of fabric, use the following main programmes.
• Bumbac (Cottons)
Use this programme for your cotton laundry (sheets, bedlinen, t
owels, bathrobes, underwear etc.).
Your laundry will be washed with vigorous washing action for a longer washing cycle.
• Sintetice (Synthetics)
Use to wash your synthetic clothes (shirts, blouses, syn
thetic/cotton blends, etc.). Your laundry
will be washed with a gentle action for a shorter washing cycle when compared to the Cottons
programme. For curtains and tulle, it is recommended to use Synthetics 20˚C or 40˚C programme.
• Lână / Spălare manuală (Woollens / Hand Wash)
Use to wash your woolen/delicate laundry. Your laundry will be w
ashed with a very gentle washing
action in order not to damage the clothes.
"Woolens programme of this machine is approved by The Woolmark Company
for washing machine-washable woolen products provided that the products
are washed in accordance with the instructions on the product tag and the
instructions published by the manufacturer of this machine. M1520"
In UK, Ireland, Hong Kong and India, the Woolmark trademark is a
Certification trademark.
4.3.6 Addtonal programmes
For special cases, additional programmes are available in the machine.
C
Additional programmes may differ according to the model of the machine.
• Bumbac Eco (Cottons Eco)
Use this programme to wash your laundry washable in cottons programme for a longer time, still
with a very good performance for saving purposes.
Cotton Eco programme consumes less energy compared to other cotton programmes.
C
• Bumbac 60° cu Prespălare (Prewash-Cottons 60°)
Use this programme only for heavily soiled cotton clothes. Add detergent into the prewash
compartment.
• Spălare Rapidă (Mini)
Use this programme to wash your lightly soiled cotton clothes in a short time.
Washing Machine / User’s Manual
41 / EN
Page 42
• Cămăși (Shirts)
This programme is used to wash the shirts made from cotton, synthetic and synthetic blended
fabrics altogether. It reduces wrinkles. Steam is applied at the end of the programme to help the
wrinkle reducing function. The special spin profile and steam applied at the end of the programme
reduce the wrinkles on your shirts. When the quick wash function is selected, the Pre-treatment
algorithm is executed.
• Apply the pre-treatment chemical on your garments directly or add it together with detergent
when the machine starts to take water from the main washing compartment. Thus, you can obtain
the same performance as you obtain with normal washing in a much shorter period of time. Usage
life of your shirts increases.
• Geci cu puf Пір‘я (Down Wear)
Use this pr
washable“ label on them. Thanks to special spinning profiles, it is ensured that the water reaches the
air gaps amongst the feathers.
Steam is applied at the end of the programme to soften bulky laundry such as towels.
Autocurăţare
•
Use regularly (once in every 1-2 months) to clean the drum and provide the required hygiene. Steam
is applied before the programme to soften the residues in the drum. Operate the programme while
the machine is completely empty. To obtain better results, put powder lime-scale remover for
washing machines into the detergent compartment no. „2“. When the programme is over, leave the
loading door ajar so that the inside of the machine gets dry.
C
ogramme to wash your coats, vest, jackets etc. containing feathers with a „machine-
(Drum Cleaning)
This is not a washing programme. It is a maintenance programme.
Do not run the programme when there is something in the machine. If you try to do so, the machine detects that
there is load inside and aborts the programme.
4.3.7 Specal programmes
For specific applications, select any of the following programmes.
• Clătire (Rinse)
Use when y
• Stoarcere+Evacuare (Spin+Pump)
Y
ou can use this function to remove the water on the garment of drain the water in the machine.
Before selecting this programme, select the desired spin speed and press Start / Pause button. First,
the machine will drain the water inside of it. Then, it will spin the laundry with the set spin speed and
drain the water coming out of them.
If you wish to drain only the water without spinning your laundry, select the Pump+Spin programme
and then select the No Spin function with the help of Spin Speed Adjustment button. Press Start /
Pause button.
ou want to rinse or starch separately.
C
Use a lower spin speed for delicate laundries.
4.3.8 Speed selecton
Whenever a new programme is selected, the recommended spin speed of the selected programme is
displayed on the spin speed indicator.
To decrease the spin speed, press the Spin Speed Adjustment button. Spin speed decreases
gradually. Then, depending on the model of the product, "Rinse Hold" and "No Spin" options appear
on the display. When "No Spin" is selected, the rinse level indicator lights will not turn on.
42 / EN
Washing Machine / User’s Manual
Page 43
Rinse hold
If you are not going to unload your clothes immediately after the programme completes, you can
use rinse hold function to keep your laundry in the final rinsing water in order to prevent them from
getting wrinkled when there is no water in the machine. Press Start / Pause button after this process
if you want to drain the water without spinning your laundry. Programme will resume and complete
after draining the water.
If you want to spin the laundry held in water, adjust the Spin Speed and press Start / Pause button.
The programme will resume. Water is drained, laundry is spun and the programme is completed.
If the programme has not reached the spinning step, you can change the speed without switching the machine
C
4.3.9 Delayed Start
With the Delayed Start function the startup of the programme may be delayed up to 3, 6 or 9 hours.
to Pause mode.
C
Do not use liquid detergents when you set Delayed Start! There is the risk of staining of the clothes.
1. Open the loading door, place the laundry and put detergent, etc.
2. Select a washing programme and spin speed.
3. Set the desired time by pressing the Delayed Start button. When the button is pressed once, 3
hours delayed start is selected. When the same button is pressed again, 6 hours delay is selected,
and when it is pressed for the third time, 9 hours delayed start is selected. If you press the Delayed
Start button once again, Delayed Start function will be canceled.
4. Press Start / Pause button. Previous delayed start time light turns off and next delayed start time
light turns on after every 3 hours.
5. At the end of the countdown, all delayed start lights will turn off and the selected programme will start.
You can switch the machine to pause mode and add laundry during the delayed start period.
C
Changing the delayed start period
If you want to change the time during countdown, you will need to cancel the programme and set
the delay time again.
Canceling the Delayed Start function
If you want to cancel the delayed start countdown and start the programme immediately:
1. Turn the Programme Selection knob to any programme. Thus, Delayed Start function will be
canceled. The End/Cancel light flashes continuously.
2. Then, select the programme you want to run again.
3. Press Start / Pause button to start the programme.
4.3.10 Startng the programme
1. Press Start / Pause button to start the programme.
2. Programme follow-up light showing the startup of the programme will turn on.
4.3.11 Chld Lock
Use Child Lock function to prevent children from tampering with the machine. Thus you can avoid
any changes in a running programme.
If the Programme Selection knob is rotated when the child lock is active, "Child Lock Enabled LED" will flash 3
C
times. The Child Lock does not allow any change in the programmes or the selected speed.
Even if another programme is selected with the Programme Selection knob while the Child Lock is active,
previously selected programme will continue running.
When the Child Lock is active and the machine is running, you can switch the machine to Pause mode without
deactivating the Child Lock by turning the Programme Selection knob to On / Off position. When you turn the
Programme Selection knob afterwards, the programme will resume.
Washing Machine / User’s Manual
43 / EN
Page 44
To activate the Child Lock:
Press and hold Speed and Delayed Start buttons for 3 seconds. While you are holding for 3 seconds,
the "Child Lock Enabled LED" will flash. You can release the buttons when the LEDs become
permanently on.
To deactivate the Child Lock:
Press and hold Speed and Delayed Start buttons for 3 seconds while any programme is running.
While you are holding for 3 seconds, the "Child Lock Enabled LED" will flash. You can release the
buttons when the LED turns off completely.
In addition to the method above, to deactivate the Child Lock, switch the Programme Selection knob to On / Off
C
4.3.12 Progress of programme
4.3.13 Loadng door lock
4.3.14 Changng the selectons after programme has started
position when no programme is running, and select another programme.
Child Lock is not deactivated after power failures or when the machine is unplugged.
Progress of a running programme can be followed from the Programme Follow-up indicator. At
the beginning of every programme step, the relevant indicator light will turn on and light of the
completed step will turn off.
You can change the speed settings without stopping the programme flow while the programme is
running. To do this, the change you are going to make must be in a step after the running programme
step. If the change is not compatible, relevant lights will flash for 3 times.
If the machine does not proceed to the spinning step, the Rinse Hold function might be active or the automatic
unbalanced load detection system might be activated due to the unbalanced distribution of the laundry in the
C
There is a locking system on the loading door of the machine that prevents opening of the loading
door in cases when the water level is unsuitable.
Loading door light will start flashing when the machine is switched to Pause mode. The machine
checks the level of the water inside. If the level is suitable, the Loading Door light turns off and the
loading door can be opened within 1-2 minutes.
If the level is unsuitable, the Loading Door light remains on and the loading door cannot be opened.
If you are obliged to open the Loading Door while the Loading Door light is on, you must cancel the
current programme. See. "Cancelling the programme"
Switching the machine to pause mode
Press the Start / Pause button to switch the machine to pause mode while a programme is running.
The light of the step which the machine is in starts flashing in the Programme Follow-up indicator to
show that the machine has been switched to the pause mode.
Additionally, when the loading door is openable, the Loading Door light turns off completely.
Changing the speed settings
You can change the speed settings of the programme that is currently running. See "Speed
selection".
machine.
C
44 / EN
If no change is allowed, the relevant light will flash 3 times.
Washing Machine / User’s Manual
Page 45

Adding or taking out laundry
You can load/unload laundry when a programme is running if the water level is appropriate to open
the door. To do this:
1. Press Start / Pause button to switch the machine to pause mode. The programme follow-up light
of the relevant step during which the machine was switched into the pause mode will flash.
2. Wait until the Loading Door can be opened.
3. Open the Loading Door and add or take out the laundry.
4. Close the Loading Door.
5. Make changes in speed settings, if necessary.
6. Press Start / Pause button to start the machine.
4.3.15 Cancellng the programme
To cancel the programme, turn the Programme Selection knob to select another programme.
Previous programme will be cancelled. End / Cancel light will flash continuously to notify that the
programme has been canceled.
Your machine will end the programme when you turn the Programme Selection knob; however, it
does not drain the water inside. When you select and start a new programme, the newly selected
programme will start depending on the step the previous programme was canceled in. For example,
it may take in additional water or continue to wash with the water inside.
Some programmes may start by discharging the water inside the machine. Depending on the step where the
programme was canceled in, you may have to put detergent and softener again for the programme you have
C
selected anew.
4.3.16 End of programme
When the programme ends, "End" LED becomes on at the Programme Follow-up indicator.
1. Wait until the "Door Lock Enabled LED" goes off completely.
2. To switch off the machine, turn the Programme Selection Knob to On/Off position.
3. Take out your laundry and close the loading door. Your machine is ready for the next washing cycle.
4.3.17 Your machne features "Pause Mode".
After you switch on your machine with the programme selection button (by switching the button
to a different position than the On/Off position), if no programme is started or no other procedure
is performed in the selection step or no action is taken within approx. 2 minutes after the selected
programme ends, your machine will switch to energy saving mode automatically. The brightness of
the indicator lights will decrease. Also, if your product has a display that shows programme time, this
display will be completely turned off. If you turn the Programme Selection knob or touch any button,
lights and display will switch back to previous condition. The selections which you make when exiting
from the energy efficiency may change. Please check the correctness of your selections before
starting the programme. If necessary, please make your settings again. This is not an error.
Washing Machine / User’s Manual
45 / EN
Page 46
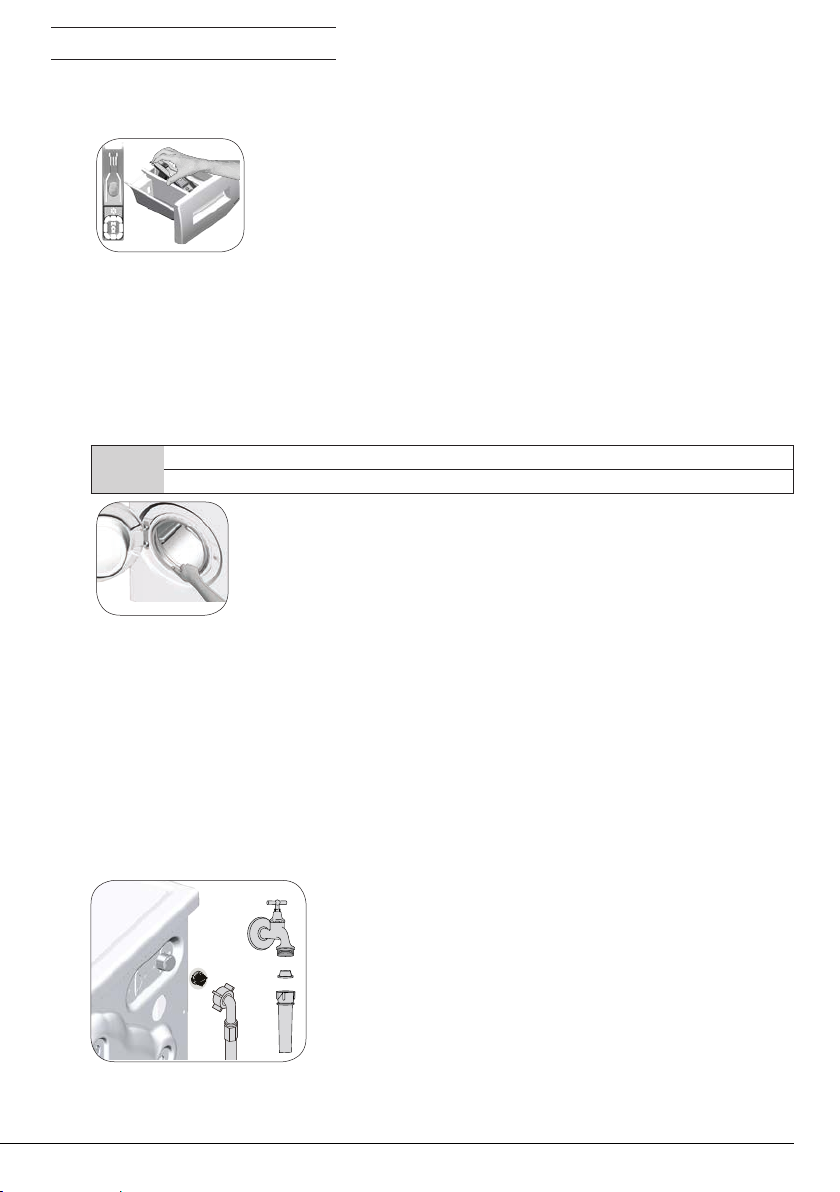
4.4 Maintenance and cleaning
Service life of product extends and frequently experienced problems will be reduced if it is cleaned at
regular intervals.
4.4.1 Cleanng the detergent drawer
Clean the detergent drawer at regular intervals (every 4-5 washing cycles)
as shown below in order to prevent accumulation of powder detergent in
time.
Lift the rear part of the siphon to remove it as illustrated.
If more than normal amount of water and softener mixture starts to gather
in the softener compartment, the siphon must be cleaned.
1 Press the dotted point on the siphon in the softener compartment and pull towards you until
the compartment is removed from the machine.
2. Wash the detergent drawer and the siphon with plenty of lukewarm water in a washbasin.
In order to prevent the residues to contact your skin, clean it with an appropriate brush by
wearing a pair of gloves.
3 Insert the drawer back into its place after cleaning and make sure that it is seated well.
4.4.2 Cleanng the loadng door and the drum
For products with drum cleaning programme, please see Operating the product - Programmes.
Repeat Drum Cleaning process in every 2 months.
C
4.4.3 Cleanng the body and control panel
Wipe the body of the machine with soapy water or non-corrosive mild gel detergents as necessary,
and dry with a soft cloth.
Use only a soft and damp cloth to clean the control panel.
4.4.4 Cleanng the water ntake flters
There is a filter at the end of each water intake valve at the rear of the machine and also at the
end of each water intake hose where they are connected to the tap. These filters prevent foreign
substances and dirt in the water to enter the washing machine. Filters should be cleaned as they do
get dirty.
Use an detergent / anti-limescale suitable for the washing machines.
After every washing make sure that no foreign substance is left in the drum.
If the holes on the bellow shown in the figure is blocked, open the holes using
a toothpick.
Foreign metal substances will cause rust stains in the drum. Clean the stains
on the drum surface by using cleaning agents for stainless steel.
Never use steel wool or wire wool. These will damage the painted, chromated
and plastic surfaces.
1. Close the taps.
2. Remove the nuts of the water intake hoses to access
the filters on the water intake valves. Clean them
with an appropriate brush. If the filters are too dirty,
remove them from their places with a pliers and clean
in this way.
3. Take out the filters on the flat ends of the water
intake hoses together with the gaskets and clean
thoroughly under running water.
4. Replace the seals and filters carefully and tighten
their nuts by hand.
46 / EN
Washing Machine / User’s Manual
Page 47
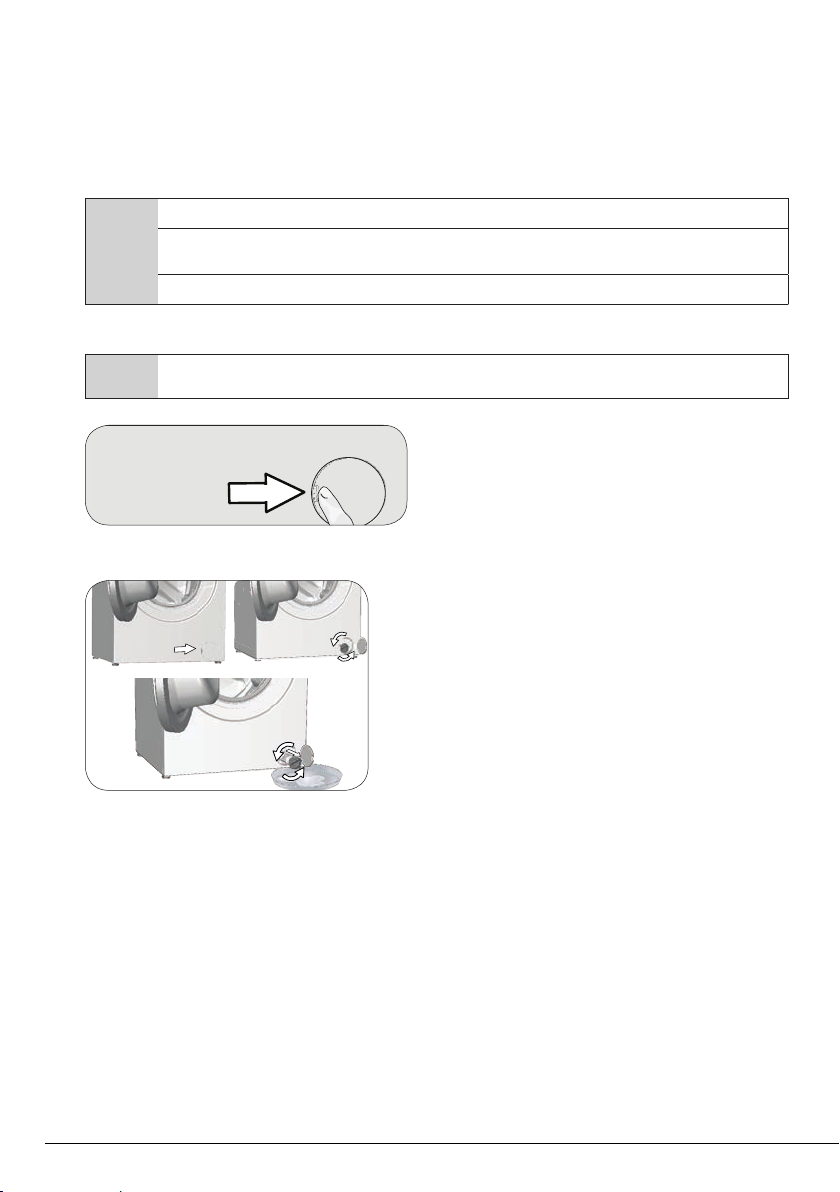
4.4.5 Dranng remanng water and cleanng the pump flter
The filter system in your machine prevents solid items such as buttons, coins and fabric fibers
clogging the pump impeller during discharge of washing water. Thus, the water will be discharged
without any problem and the service life of the pump will extend.
If the machine fails to drain water, the pump filter is clogged. Filter must be cleaned whenever it is
clogged or in every 3 months. Water must be drained off first to clean the pump filter.
In addition, prior to transporting the machine (e.g., when moving to another house) and in case of
freezing of the water, water may have to be drained completely.
CAUTION: Foreign substances left in the pump filter may damage your machine or may cause noise problem.
A
In order to clean the drty flter and dscharge the water:
1 Unplug the machine to cut off the supply power.
A
2. Open the filter cover.
3 Follow the below procedures in order to drain water.
The product does not have an emergency water dran hose, n order to dran the water:
CAUTION: If the product is not being used, shut the tap shut, remove mains pipe and drain the water inside
the machine against any likely freezing.
CAUTION: After each use, turn off the water tap to which the mains hose is connected.
CAUTION: Temperature of the water inside the machine may rise up to 90 ºC. To avoid the burning risk, clean
the filter after the water inside the machine is cooled down.
a. In order to collect the water to flow out of the
filter, place a large vessel in front of the filter.
b. Turn and loosen the pump filter until water
starts to flow (counterclockwise). Fill the
flowing water into the container you have
placed in front of the filter. Always keep a piece
of cloth handy to absorb any spilled water.
c When the water inside the machine is finished,
take out the filter completely by turning it.
4. Clean any residues inside the filter as well as fibers, if any, around the pump impeller region.
5. Replace the filter.
6. If the filter cap is composed of two pieces, close the filter cap by pressing on the tab. If it is one
piece, seat the tabs in the lower part into their places first, and then press the upper part to close.
Washing Machine / User’s Manual
47 / EN
Page 48
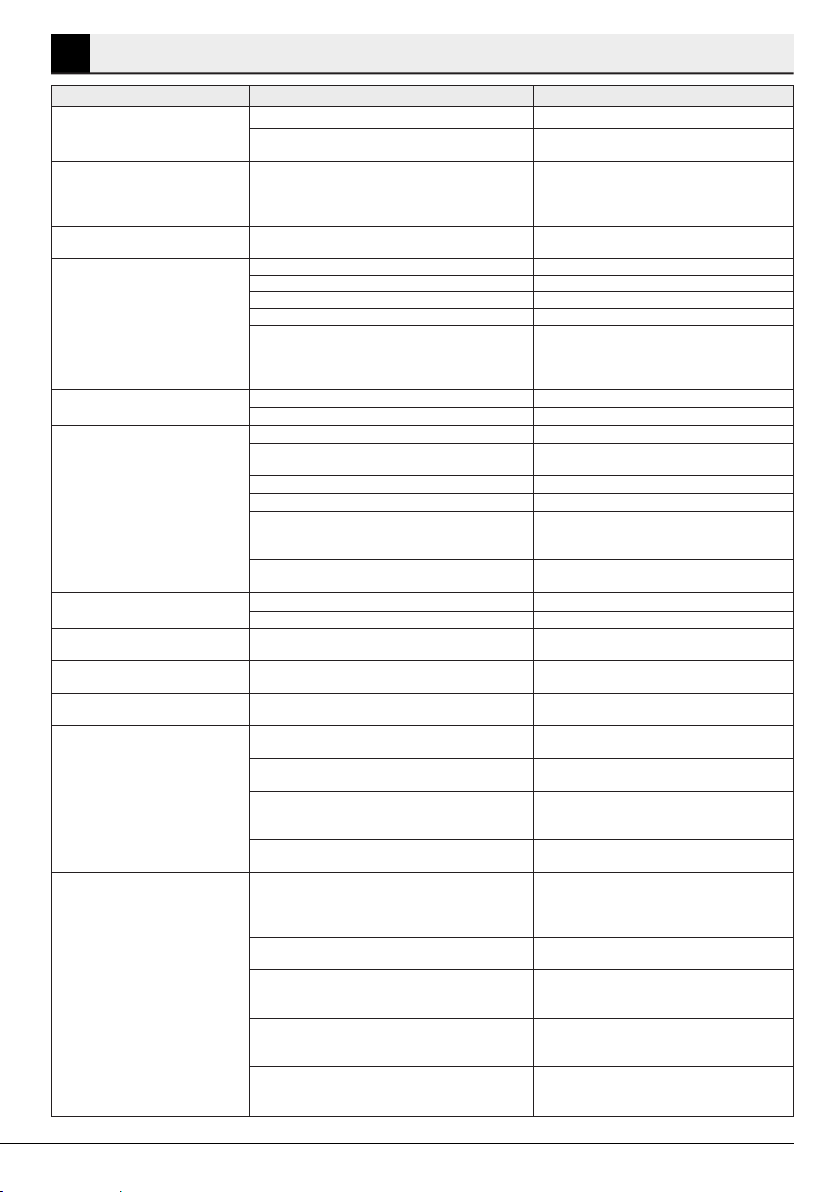
5
Troubleshooting
Problem Reason Soluton
Program does not start after
closing the door.
Programme cannot be started or
selected.
Water in the machine.
The machine enters standby
mode after the programme
starts or it does not take in
water.
Machine does not drain water.
Machine vibrates or makes noise.
There is water leaking from the
bottom of the washing machine.
Machine stopped shortly after
the programme started.
Machine directly discharges the
water it takes in.
No water can be seen in the
machine during washing.
Loading door cannot be opened.
Washing takes longer time than
specified in the manual.(*)
Start / Pause / Cancel button was not pressed. • *Press the Start / Pause / Cancel button.
It may be difficult to close the loading door in case
of excessive loading.
Washing machine has switched to self protection
mode due to a supply problem (line voltage, water
pressure, etc.).
Some water might have remained in the product due
to the quality control processes in the production.
Tap is turned off. • Turn on the taps.
Water inlet hose is bent.
Water inlet filter is clogged.
Loading door may be open.
The water connection may be wrong or water may
be cut off (When the water is cut off, washing or
rinsing LEDs flash).
Water drain hose might be clogged or twisted. • Clean or flatten the hose.
Pump filter is clogged.
Machine might be standing unbalanced. • Adjust the feet to level the machine.
A hard substance might have entered into the
pump filter.
Transportation safety bolts are not removed.
Laundry quantity in the machine might be too little.
Machine might be overloaded with laundry.
Machine might be leaning on a rigid item.
Water drain hose might be clogged or twisted. • Clean or flatten the hose.
Pump filter is clogged.
Machine might have stopped temporarily due to
low voltage.
Draining hose might not be at adequate height. • Connect the water draining hose as
The water level is not visible from outside of the
washing machine.
Door lock is activated because of the water level
in the machine.
Machine is heating up the water or it is at the
spinning cycle.
Child lock is engaged. Door lock will be deactivated
a couple of minutes after the programme has
come to an end.
Loading door may be stuck because of the
pressure it is subjected to.
Water pressure is low. • Machine waits until taking in adequate
Voltage might be low.
Input temperature of water might be low. • Required time to heat up the water extends
Number of rinses and/or amount of rinse water
might have increased.
Excessive foam might have occurred and
automatic foam absorption system might have
been activated due to too much detergent usage.
• Reduce the amount of laundry and make sure
that the loading door is closed properly.
• To cancel the programme, turn the
Programme Selection knob to select another
programme. Previous programme will be
canceled. (see. “Cancellation of program”)
• This is not a failure; water is not harmful to
the machine.
• Flatten the hose.
• Clean the filter.
• Close the door.
• Check the water connection. If the water is
cut off, press the Start/Pause key after the
water has been supplied again to resume the
operation from standby mode.
• Clean the pump filter.
• Clean the pump filter.
• Remove the transportation safety bolts.
• Add more laundry to the machine.
• Take out some of the laundry from the
machine or distribute the load by hand to
balance it homogenously in the machine.
• Make sure that the machine is not leaning
on anything.
• Clean the pump filter.
• It will resume running when the voltage
restores to the normal level.
described in the operation manual.
• This is not a failure.
• Drain the water by running the Pump or Spin
programme.
• Wait until the programme completes.
• Wait for a couple of minutes for deactivation
of the door lock.
• Grab the handle and push and pull the loading
door to release and open it.
amount of water to prevent poor washing
quality due to the decreased amount of
water. Therefore, the washing time extends.
• Washing time is prolonged to avoid poor
washing results when the supply voltage is low.
in cold seasons. Also, washing time can be
lengthened to avoid poor washing results.
• Machine increases the amount of rinse water
when good rinsing is needed and adds an
extra rinsing step if necessary.
• Use recommended amount of detergent.
48 / EN
Washing Machine / User’s Manual
Page 49
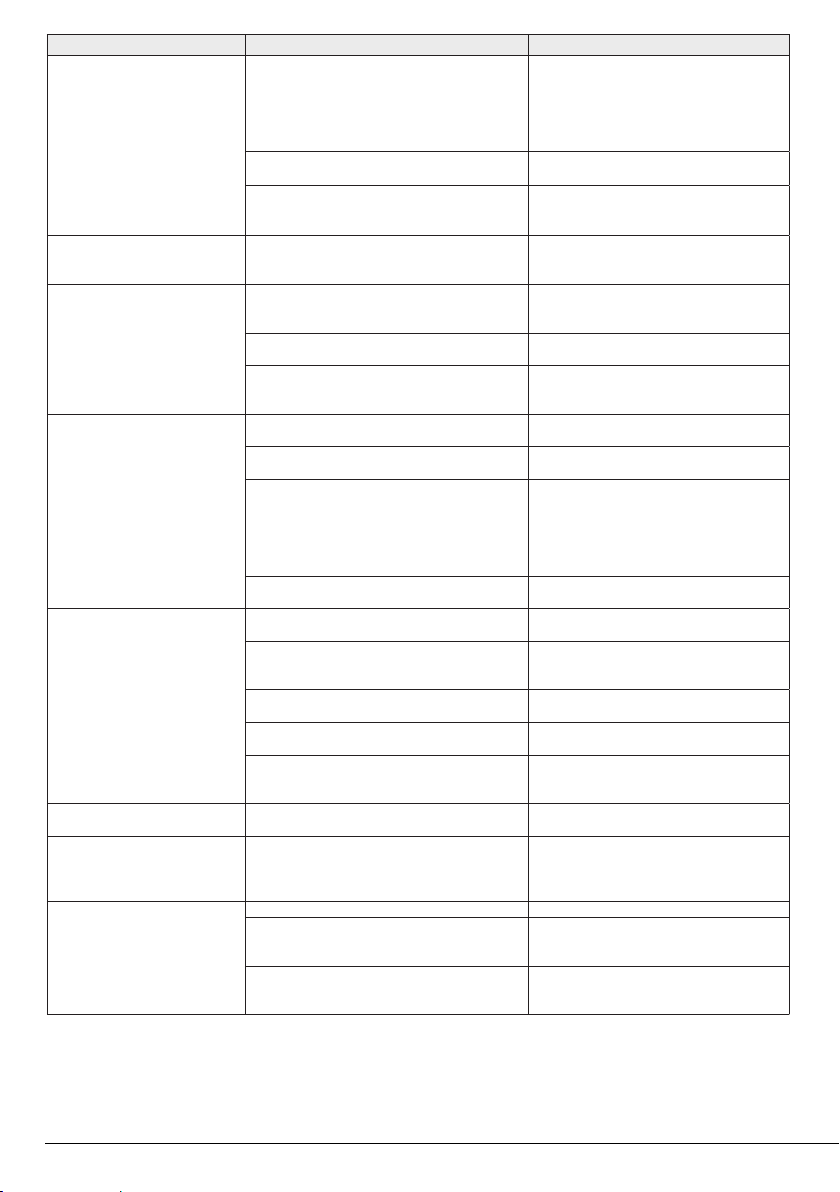
Problem Reason Soluton
Programme time does not
countdown. (On models with
display) (*)
Programme time does not
countdown. (*)
Machine does not switch to
spinning step. (*)
Washing performance is poor:
Laundry turns gray. (**)
Washing performance is poor:
Stains persist or the laundry is
not whitened. (**)
Washing performance is poor: Oily
stains appeared on the laundry. (**)
Washing performance is poor:
Clothes smell unpleasantly. (**)
Colour of the clothes faded. (**)
Timer may stop during water intake. • Timer indicator will not countdown until the
Timer may stop during heating step.
Timer may stop during spinning step.
There might be unbalanced load in the machine. • Automatic unbalanced load detection system
There might be unbalanced load in the machine. • Automatic unbalanced load detection system
The machine will not spin if water is not drained
completely.
Excessive foam might have occurred and
automatic foam absorption system might have
been activated due to too much detergent usage.
Insufficient amount of detergent has been used
over a long period of time.
Washing was made at low temperatures for a
long time.
Insufficient amount of detergent is used with
hard water.
Too much detergent is used.
Insufficient amount of detergent is used.
Excessive laundry was loaded in. • Do not load the machine in excess. Load with
Wrong programme and temperature were
selected.
Wrong type of detergent is used.
Too much detergent is used.
Regular drum cleaning is not applied. • Clean the drum regularly. For this, please
Odours and bacteria layers are formed on the
drum as a result of continuous washing at lower
temperatures and/or in short programmes.
Excessive laundry was loaded in. • Do not load the machine in excess.
Detergent in use is damp.
A higher temperature is selected.
machine takes in adequate amount of water.
The machine will wait until there is sufficient
amount of water to avoid poor washing
results due to lack of water. Timer indicator
will resume countdown after this.
• Timer indicator will not countdown until the
machine reaches the selected temperature.
• Automatic unbalanced load detection system
might be activated due to the unbalanced
distribution of the laundry in the drum.
might be activated due to the unbalanced
distribution of the laundry in the drum.
might be activated due to the unbalanced
distribution of the laundry in the drum.
• Check the filter and the draining hose.
• Use recommended amount of detergent.
• Use the recommended amount of detergent
appropriate for water hardness and the laundry.
• Select the proper temperature for the
laundry to be washed.
• Using insufficient amount of detergent with
hard water causes the soil to stick on the cloth
and this turns the cloth into gray in time. It is
difficult to eliminate graying once it happens.
Use the recommended amount of detergent
appropriate for water hardness and the laundry.
• Use the recommended amount of detergent
appropriate for water hardness and the laundry.
• Use the recommended amount of detergent
appropriate for water hardness and the laundry.
amounts recommended in the "Programme
and consumption table".
• Select the proper programme and
temperature for the laundry to be washed.
• Use original detergent appropriate for the
machine.
• Put the detergent in the correct
compartment. Do not mix the bleaching
agent and the detergent with each other.
see 4.4.2.
• Leave the detergent drawer as well as the
loading door of the machine ajar after each
washing. Thus, a humid environment favorable
for bacteria cannot occur in the machine.
• Keep detergents closed in an environment
free of humidity and do not expose them to
excessive temperatures.
• Select the proper programme and
temperature according to the type and
soiling degree of the laundry.
Washing Machine / User’s Manual
49 / EN
Page 50
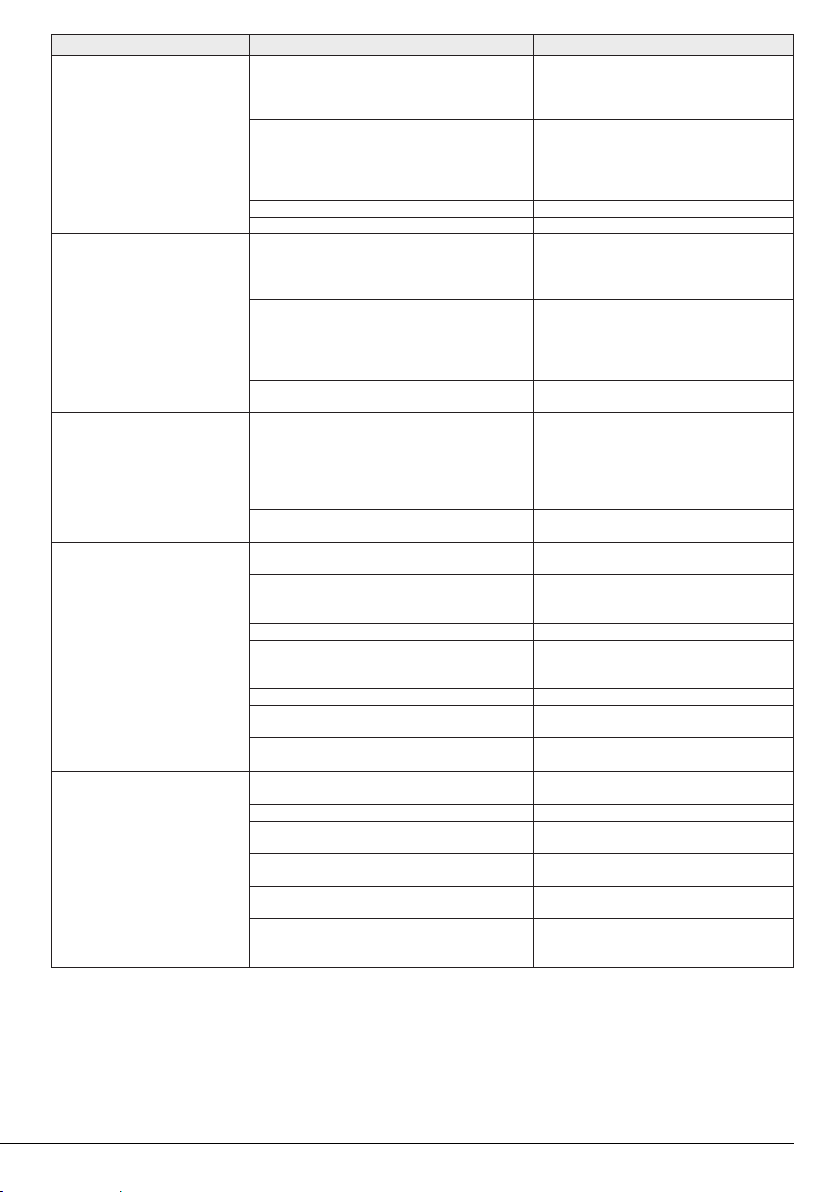
Problem Reason Soluton
It does not rinse well.
Laundry became stiff after
washing. (**)
Laundry does not smell like the
softener. (**)
Detergent residue in the
detergent drawer. (**)
Too much foam forms in the
machine. (**)
The amount, brand and storage conditions of the
detergent used are inappropriate.
Detergent is put in the wrong compartment. • If detergent is put in the prewash
Pump filter is clogged.
Drain hose is folded.
Insufficient amount of detergent is used.
Detergent is put in the wrong compartment. • If detergent is put in the prewash
Detergent might be mixed with the softener.
Detergent is put in the wrong compartment. • If detergent is put in the prewash
Detergent might be mixed with the softener.
Detergent is put in wet drawer. • Dry the detergent drawer before putting in
Detergent has gotten damp.
Water pressure is low.
The detergent in the main wash compartment got
wet while taking in the prewash water. Holes of
the detergent compartment are blocked.
There is a problem with the detergent drawer valves.
Detergent might be mixed with the softener.
Regular drum cleaning is not applied.
Improper detergents for the washing machine are
being used.
Excessive amount of detergent is used.
Detergent was stored under improper conditions.
Some meshed laundry such as tulle may foam too
much because of their texture.
Detergent is put in the wrong compartment.
Softener is being taken early.
• Use a detergent appropriate for the washing
machine and your laundry. Keep detergents
closed in an environment free of humidity and
do not expose them to excessive temperatures.
compartment although prewash cycle is not
selected, machine can take this detergent
during rinsing or softener step. Put the
detergent in the correct compartment.
• Check the filter.
• Check the drain hose.
• Using insufficient amount of detergent for
the water hardness can cause the laundry to
become stiff in time. Use appropriate amount
of detergent according to the water hardness.
compartment although prewash cycle is not
selected, machine can take this detergent
during rinsing or softener step. Put the
detergent in the correct compartment.
• Do not mix the softener with detergent.
Wash and clean the dispenser with hot water.
compartment although prewash cycle is not
selected, machine can take this detergent
during rinsing or softener step. Wash and
clean the dispenser with hot water. Put the
detergent in the correct compartment.
• Do not mix the softener with detergent.
Wash and clean the dispenser with hot water.
detergent.
• Keep detergents closed in an environment
free of humidity and do not expose them to
excessive temperatures.
• Check the water pressure.
• Check the holes and clean if they are clogged.
• Call the Authorised Service Agent.
• Do not mix the softener with detergent.
Wash and clean the dispenser with hot water.
• Clean the drum regularly. For this, please
see 4.4.2.
• Use detergents appropriate for the washing
machine.
• Use only sufficient amount of detergent.
• Store detergent in a closed and dry location.
Do not store in excessively hot places.
• Use smaller amounts of detergent for this
type of item.
• Put the detergent in the correct
compartment.
• There may be problem in the valves or in the
detergent dispenser. Call the Authorised
Service Agent.
50 / EN
Washing Machine / User’s Manual
Page 51

Problem Reason Soluton
Foam is overflowing from the
detergent drawer.
Laundry remains wet at the end
of the programme. (*)
(*) Machine does not switch to spinning step when the laundry is not evenly distributed in the drum to prevent any damage to the
machine and to its surrounding environment. Laundry should be rearranged and re-spun.
(**) Regular drum cleaning is not applied. Clean the drum regularly. See 4.4.2
Too much detergent is used. • Mix 1 tablespoonful softener and ½ l water
Excessive foam might have occurred and
automatic foam absorption system might have
been activated due to too much detergent usage.
and pour into the main wash compartment of
the detergent drawer.
• Put detergent into the machine suitable
for the programmes and maximum
loads indicated in the “Programme and
consumption table”. When you use additional
chemicals (stain removers, bleachs and etc),
reduce the amount of detergent.
• Use recommended amount of detergent.
A
CAUTION: If you cannot eliminate the problem although you follow the instructions in this section, consult your
dealer or the Authorised Service Agent. Never try to repair a nonfunctional product yourself.
Washing Machine / User’s Manual
51 / EN
Page 52

 Loading...