

Page 1
Accelero Xtreme III
Welcome Guide
ES
suppo rt .a rctic .a c/ AX3
Dear Customer,
Thank you for choosing the Accelero Xtreme III.
The Xtreme III is an upgrade cooler with an unparalleled
cooling/noise ratio, thus does not just offer superb GPU
temperatures but everything at a low noise level. A complete set
of VRM heatsinks and high performance thermal glue
completes this solution.
I hope you enjoy this GPU cooler and we at ARCTIC look
forward to further enriching your life with our products. If you
would like to share how you use ARCTIC's products please do
so at https://www.facebook.com/ARCTIC.en
ARCTIC is a fully carbon neutral company and your support
helps us to compensate every kilogram of CO we produce.
Thank You.
Sincerely,
Magnus Huber
ARCTIC CEO
2
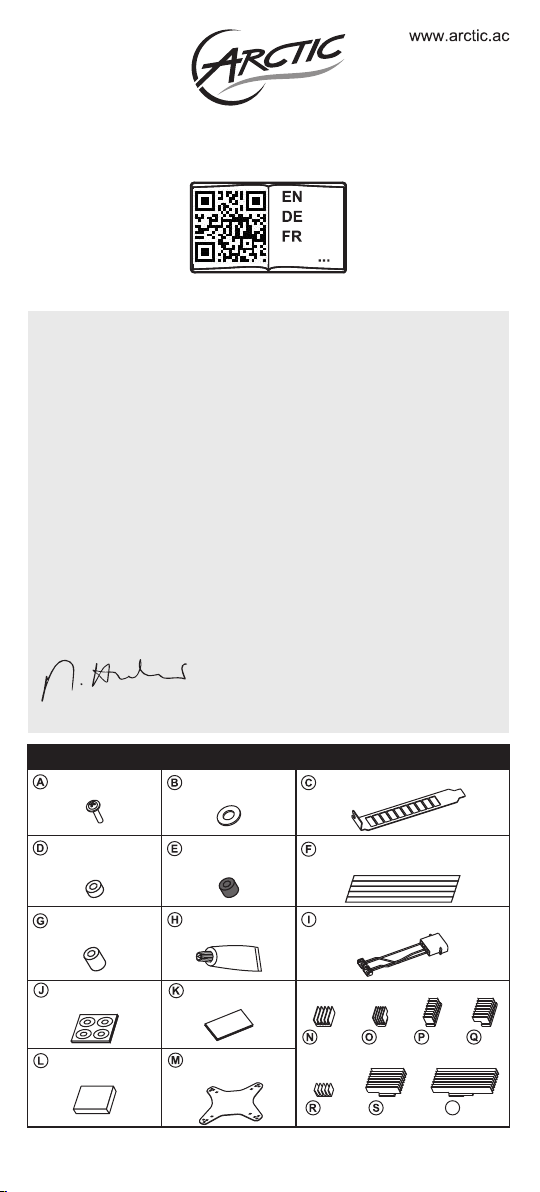
Accessories
M2 Screws
x 4
Spacers
(2.5 mm) x 4
Spacers
(4.5 mm) x 4
Adhesive
Tapes x 2
EVA Foam
x 1
*Please use the thermal adhesive immediately once opened. You may
purchase additional heatsinks and thermal adhesive at arctic.ac/AX3
Washers
x 4
Spacers
(3.5 mm) x 4
*Thermal
Adhesive (3g)
Thermal Pads
x 3
GPU Back
Plate x 1
VGA Bracket x 1
Insulation Tape
(0.5cm x 10cm each) x 5
4-pin Fan Power Adapter
x 1
Heatsinks
x 5
x 12
x 4 x 4
x 2 x 1
T
x 3
Page 2
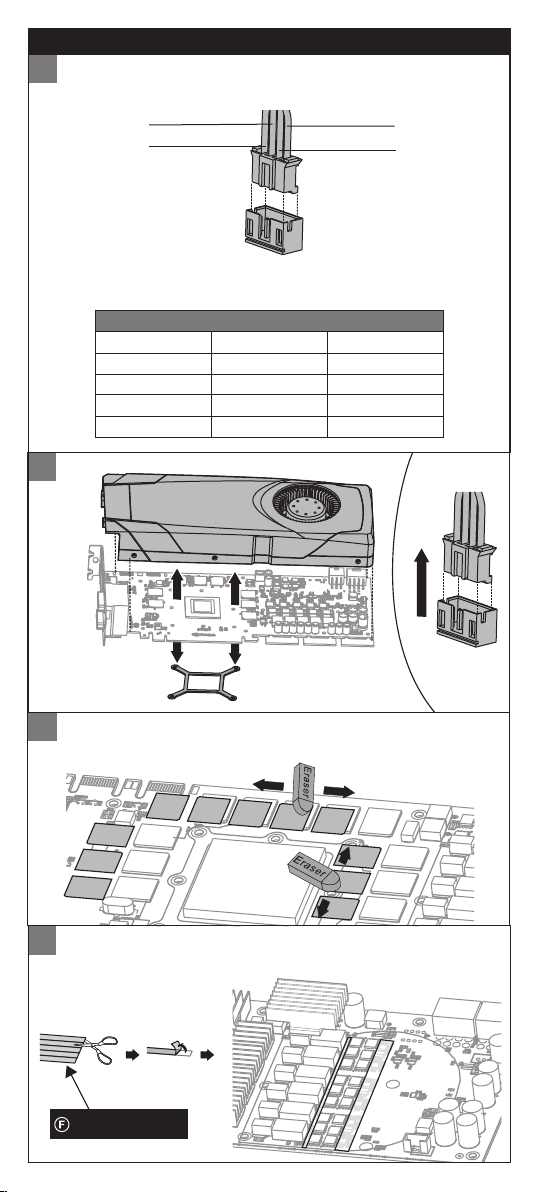
Preparation
1
Please ensure that the fan connector pin assignment on
your VGA board is in accordance with the following table.
3
4
If your power socket does not come with 4 pins, please refer
to the usage of 4-pin Fan Power Adapter at arctic.ac/4pins.
Main Cable Set
Pin No.
Pin 1
Pin 2
Pin 3
Pin 4
2
Color
Black
Red
Yellow
Blue
1
2
Description
Ground
VDC
Signal
PWM
Not cleaning circuit components thoroughly with an
3
eraser leads to no adhesiveness of the thermal
adhesive at all.
Apply the insulation tape onto the circuit components in
Apply the insulation tape onto the circuit components in
4
order to prevent short circuit caused by RAM and VR
order to prevent short circuit caused by RAM and VR
heatsink interference.
heatsink interference.
Insulation Tape
Page 3

5
Choose the correct mounting hole size and spacers.
Mounting Hole
①① 43.2 mm x 43.2 mm
②② 53.2 mm x 53.2 mm
③③ 58.4 mm x 58.4 mm
51.0 mm x 61.0 mm
Note: This table is for reference only. Please refer to your actual VGA card
holes' position during installation. Updated information is available at
arctic.ac/AX3
*Please ensure your graphic card does not come with a stacked power
socket.
Appropriate
Spacers
Spacers
2.5 mm
Spacers
2.5 mm
Spacers
2.5 mm
Spacers
4.5 mm
Spacers
4.5 mm
Compatible Models
NVIDIA GeForce:
GTX 740
NVIDIA GeForce:
GTS 450, 250, 240
AMD Radeon:
R9 290(X), R9 285, 270(X), R7 265,
HD8870, 8870, 7870(XT,GHz), 7850,
6970, 6950, 6870, 6850, 6790, 5870,
5850, 5830, 4890, 4870, 4850, 4830,
3870, 3850, 3690
NVIDIA GeForce:
GTX 980, 970, Titan X,
Titan (Black), 780 (Ti), 770, 760,
680, 670, 660 (Ti), 650 Ti boost
NVIDIA GeForce:
GTX 580, 570, 480, 470, 465
NVIDIA GeForce:
GTX 560 (Ti,SE), 550 Ti, 460 (SE)
6
Spacers (2.5 mm)
Spacers (4.5 mm)
Spacers
Adhesive
Adhesive Tapes
Tape
7
Spacers (2.5 mm)
Spacers (4.5 mm)
Page 4

8
Place the EVA foam at the
centre of the mounting
holes.
9
Spacers
(3.5 mm)
10
Place the steel plate with mylar film facing the board.
Place the steel plate with mylar film facing the board.
GPU Back
Plate x 1
11
Ensure that the RAM and VR heatsinks subsequently
attached on your VGA card do not interfere with the
mounting plate.
EVA Foam
M2 Screws
Squeeze out all the glue with pliers.
Tips of Applying Thermal Adhesive
Since the thermal adhesive can be applied once only, fit the
cooler to the card with the heatsinks accurately positioned
before you apply the thermal adhesive.
RAMRAM
*Thermal
Adhesive (3g)
Page 5

Voltage regulator
Cure time
Caution: Please ensure that the heatsinks are not in contact with any
circuit component as it may cause a short circuit to your VGA card.
Apply pressure (10 sec)Apply pressure (10 sec)
Sample installation on GTX 680
Place the heatsinks without touching the mounting plate.
1
Heatsinks
x 8
2
Heatsinks
x 4
3
Heatsinks
x 4
4
Heatsinks
x 3
5
Heatsinks
x 1
Page 6

Installation of the main cooler
1
M2 Screws
2
Secure this cooler onto the VGA card by partially fastening
each screw from A to B to C to D with two clockwise rotations.
Repeat this until you have tightened all screws. Do not
completely fasten any screw in one step.
M2 Screws
Check the pressure between the cooler's copper base and the
3
GPU. The VGA card should remain flat as shown in A.
Perform step 4 only if the VGA card is slightly bent as in B.
example A
example B
Apply the washers onto the graphic card.
4
Washers
Thermal Compound
If the cooler has to be installed a second time, we highly recommend using the MX-4 thermal
compound from ARCTIC. Only this compound guarantees optimal performance in combination with
the surface of our heatsinks.
Warranty
This ARCTIC product includes a six-year limited warranty. For further information, please consult
warranty.arctic.ac
Like us on facebook
www.facebook.com/ARCTIC.en
© 2015 ARCTIC Switzerland AG. All Rights Reserved.
No part of this manual including the products described in it, may be reproduced, transmitted, stored in a
retrieval system, or translated into any language in any form or by any means, except documentation kept by
the purchaser for backup purpose, without the express written permission of ARCTIC Switzerland AG. In no
event shall ARCTIC its directors or employees be liable for any indirect damages, incidental or consequential
damages arising from any defect or error in this manual or product.
PKMNL00020B
 Loading...