

Page 1
Beta version
UPDATING THE ARCHOS SOFTWARE
Directly on your ARCHOS
Ä
On the web at www.archos.com/firmware
Ä
The ARCHOS operating system (the system that runs your device) is periodically updated to bring new features, improvements and
bug fixes. There are two main ways to update your product’s software: directly on your ARCHOS if your device can connect to a WiFi
Menu >Settings>About device>Firmware update), or with a computer (www.archos.com/firmware).
network (
ENGLISH
?
NEED HELP?
Full Manual & FAQs: The full manual and FAQs (Frequently Asked Questions) are accessible directly from your device’s
Home screen, on one of the five panels. To access the FAQs, your device must be connected to the Internet (see: Connecting
to the WiFi). You can also find them at
Contact our Technical Support Team: Visit www.archos.com/support for e-mail support.
Please register your product before contacting Technical Support: Menu >Settings>About device>Online registration, or with a computer
(www.archos.com/register).
As we are often updating and improving our products, your device’s software may have
a slightly different appearance or modified functionality than presented in this Quick Start Guide.
www.archos.com/support.
Page 2
Beta version
ENGLISH
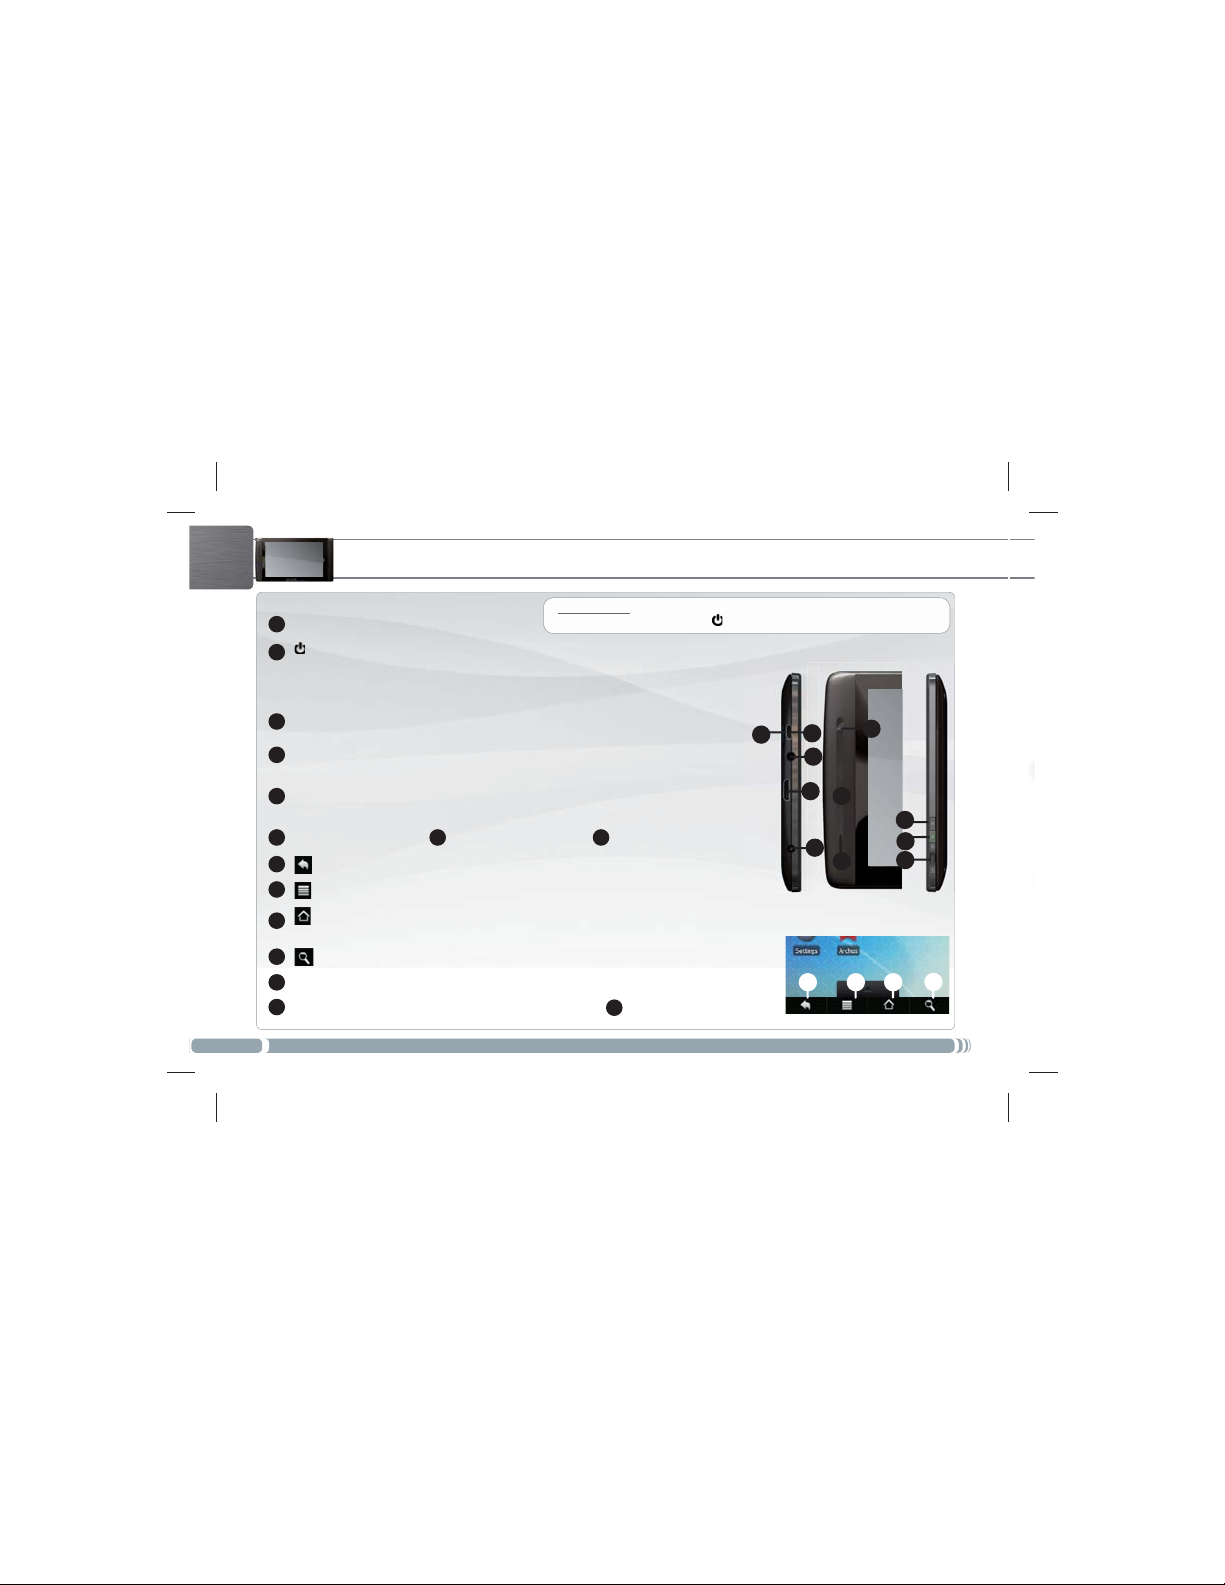
Volume buttons
1
2
To put your device in standby (and allow a quick start up), press the Power button once. When you press
and hold on the Power button, a window appears with a list of options. Tap on “Power Off” > “Power Off”
to fully shut down your ARCHOS.
Charging indicator (when power cable connected) - light on: battery charging / blinking:
3
battery charged
4
Headphones
Micro-USB port: to connect your ARCHOS to your computer, using the included USB
5
cable (to transfer files). You can also connect a keyboard, a mouse or a mass storage USB
device (for example a USB stick), using the optional USB host adapter
Built-in microphone Micro-SD card reader* Mini-HDMI video output**
6
9
10
11
applications.
12
Power connector: to connect the supplied power cable.
13
14
Loudspeaker Webcam
2
* Depending on model ** With optional Mini-HDMI to HDMI cable.
DESCRIPTION OF THE DEVICE
Hardware Reset: In the event that your ARCHOS freezes operation, you can force the
device to shut down by holding the
Power Button: press and hold to switch on/off.
7 8
Back - returns to the previous screen
Menu - gives menu options according to the current screen.
Home - Short press: return to the Home screen. Hold: jump to one of the recent
Search - allows you to search for an item on the device or on the Internet.
15
See the full user manual to learn more about the video output.
button for 10 seconds.
5
7
4
8
13
9
14
6
10 11
15
2
3
1
12
Page 3

Beta version
STARTING UP
Charging the Battery
Before using your ARCHOS for the first time, completely charge the battery:
Connect the supplied power cable to the ARCHOS Power connector and to a wall outlet. The
1
ARCHOS device will turn on and start charging.
The charging indicator light (left side of the device) is on when the battery is charging. It will blink
2
when the battery is charged.
Startup Wizard
The first time you start up your ARCHOS, the installation wizard will bring you through a few screens to help you set up the
principal settings: Language, country, time, etc.
Transferring files to your ARCHOS
Connect the supplied USB cable to the ARCHOS and to a running computer. The ARCHOS will turn on and ask you if you
1
want to connect it. Tap on
You can transfer your media files to the ARCHOS either by copy/pasting them into the respective folders using Windows®
2
Explorer (or the Finder on a Mac®), or by using Windows Media® Player (
Once all your file transfers are finished, close Windows® Explorer and any other program that may have read or written to
3
the ARCHOS. Click on the ‘safely remove’ icon in the system tray, next to the clock. You can now unplug the USB cable.
Note: You can still use the device while charging its battery.
Mount to connect it. Within a few seconds the ARCHOS will appear as an icon on your computer.
Sync tab).
ENGLISH
UK
EUR
US
See the full user manual to learn how to fully configure your ARCHOS device.
3
Page 4

Beta version
www
ENGLISH
1
2
4
5
* For free access WiFi points, there is no need to enter any special information. For secured networks, you will need either a key (a series of numbers and/or letters)
of the type WEP, WPA, or WPA2. Check with the person who manages the WiFi netw ork to obtain the exact connection parameters required.
4
CONNECTING TO THE WIFI
First of all, you need to configure a WiFi network. For this procedure to work, you need to be in a WiFi zone that will allow
you to connect to it. Every time the ARCHOS is in range of a network that you have already configured once, it will attempt
to make a connection.
To configure a new WiFi network, go on the Home screen, tap on the Menu icon , then select Settings .
Settings screen, select Wireless & networks.
In the
If the WiFi is off, tap on the
3
will scan for available WiFi networks and display them at the bottom of the screen.
Tap on the network you want to connect to. Then tap inside the
board appear. We recommend that you select
Enter the required network information*, tap on
tempt to establish a connection to that WiFi access point with the network parameters you entered.
Consult the full Manual to learn more about the Internet configuration.
Show password, to be able to see the characters you are typing.
Wi-Fi line to turn it on. Then select Wi-Fi settings. The ARCHOS
Wireless password field to make the virtual key-
Done, and then tap on Connect. Your ARCHOS will now at-
Page 5

Beta version
THE ARCHOS INTERFACE
When you rotate the product, the built-in accelerometer will automatically switch the
screen between landscape and portrait views. Your ARCHOS device is equipped with a
touchscreen. Most screen areas will react when you tap on them with your finger.
Home Screen
Notification icons: tap and hold on
the top bar until the notification
window appears, then drag it downwards to reveal the notification
messages (if any).
ź
Status icons: (Time, WiFi connection status, battery level, etc.)
ENGLISH
These are the main Android™
applications (
Web Browser, etc.). Tap on an
icon to open the corresponding
application. You can customize
the Home screen by adding/removing shortcuts and widgets,
changing the wallpaper, etc.
S
Video, Music, Gallery,
ee the full manual for further information about the interface.
Applications Tab
Tap on this icon to reveal all the
Android™ applications installed on your
ARCHOS (games, various tools, etc .). You
can copy them onto the Home screen.
You can get more Android™ applications
from the AppsLib which can be found on
the Home screen.
5
Page 6

Beta version
ENGLISH
The extended Home screen
Slide your finger horizontally on
the screen to navigate between the
5 panels of the extended Home
screen.
The main applications
6
THE ARCHOS INTERFACE
Video: Stop halfway through a video and pick up where you
were watching just by tapping on the little “+” symbol, on the
right of the le name.
Music: Slide your nger (vertically or horizontally) on the
album covers, on the left, to navigate more visually through
your albums.
Gallery: View your pictures as a photo wall and then oneby-one, or as a running slideshow. Simply drag your nger
horizontally to jump from one photo to another.
Changing the Settings: From the Home screen, tap on the Menu icon
, Sound & display, Date & time, etc.
& networks
Adding more applications: With the ARCHOS connected to the Internet, tap on the AppsLib icon
online library of free and purchasable applications has hundreds of fun games and useful applications to download and use.
See the full user manual to learn how to fully configure your ARCHOS device.
Browser: Have multiple pages open at once to jump back and
forth between them.
Email: Allows for e-mail accounts of the type POP or IMAP.
Camera: Take still image photographs or video sequences. At
any time, simply tap on the thumbnail on the top right to
display the last-taken pictures.
, tap on Settings and choose a category: Wireless
on the Home screen. This
 Loading...