

Page 1
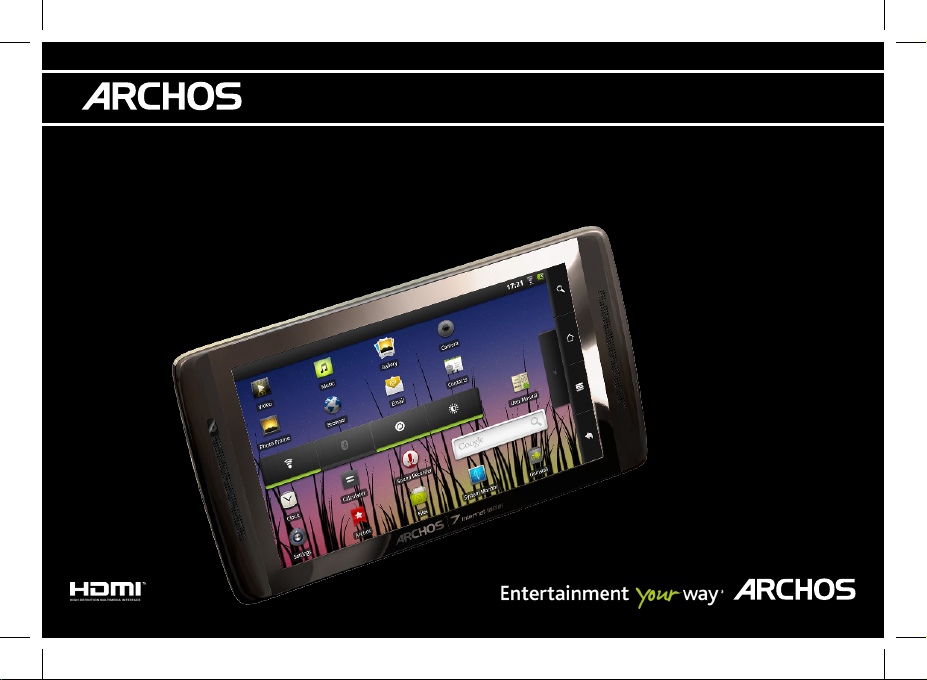
70
|
internet tablet
ENGLISH
FRANÇAIS
DEUTSCH
ESPAÑOL
ITALIANO
NEDERLANDS
TÜRKÇE
POLSKA
USER GUIDE
GUIDE D’UTILISATION
BENUTZERHANDBUCH
GUÍA DE USUARIO
GEBRUIKERSHANDLEIDING
GUIDA DELL'UTENTE
HIZLI BAŞLANGIÇ KILAVUZU
SKRÓCONA INSTRUKCJA OBSŁUGI
Page 2

* Vos loisirs, comme vous voulez
www.archos.com
All brands and product names are registered trademarks and the property of their respective owners. Windows Media® and Windows® are trademarks or registered
trademarks of Microsoft Corporation in the United States and/or other countries. Android is a trademark of Google Inc. Use of this trademark is subject to Google
Permissions. Specifications are subject to change without notice. Errors or omissions excepted. Images and illustrations may not always match contents. All the
information contained in this guide was correct at the time of publication.
COPYRIGHT ARCHOS © 2011. All rights reserved.
P/N: 109853
Page 3
UPDATING THE ARCHOS SOFTWARE
ÄDirectly on your ARCHOS
ÄOn the web at www.archos.com/firmware
The ARCHOS operating system (the system that runs your device) is periodically updated to bring new features, improvements and
bug fixes. There are two main ways to update your product’s software: directly on your ARCHOS if your device can connect to a WiFi
network (Menu >Settings>About device>Firmware update), or with a computer (www.archos.com/firmware).
ENGLISH
?
QSG_A7_IT_PN109853_book.indd 1 13/06/2011 16:58:12
NEED HELP?
Full Manual & FAQs: The full manual and FAQs (Frequently Asked Questions) are accessible directly from your device’s
Home screen, on one of the five panels. To access the FAQs, your device must be connected to the Internet (see: Connecting
to the WiFi). You can also find them at www.archos.com/support.
Contact our Technical Support Team: Visit www.archos.com/support for e-mail support.
Please register your product before contacting Technical Support: Menu >Settings>About device>Online registration, or with a computer
(www.archos.com/register).
As we are often updating and improving our products, your device’s software may have
a slightly different appearance or modified functionality than presented in this Quick Start Guide.
P/N: 109853
Page 4
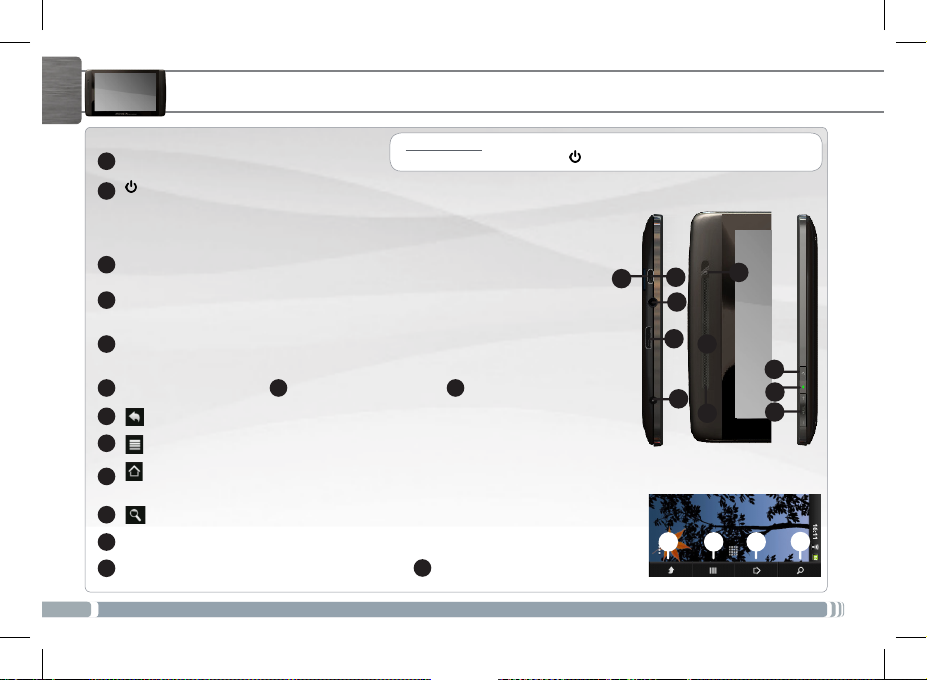
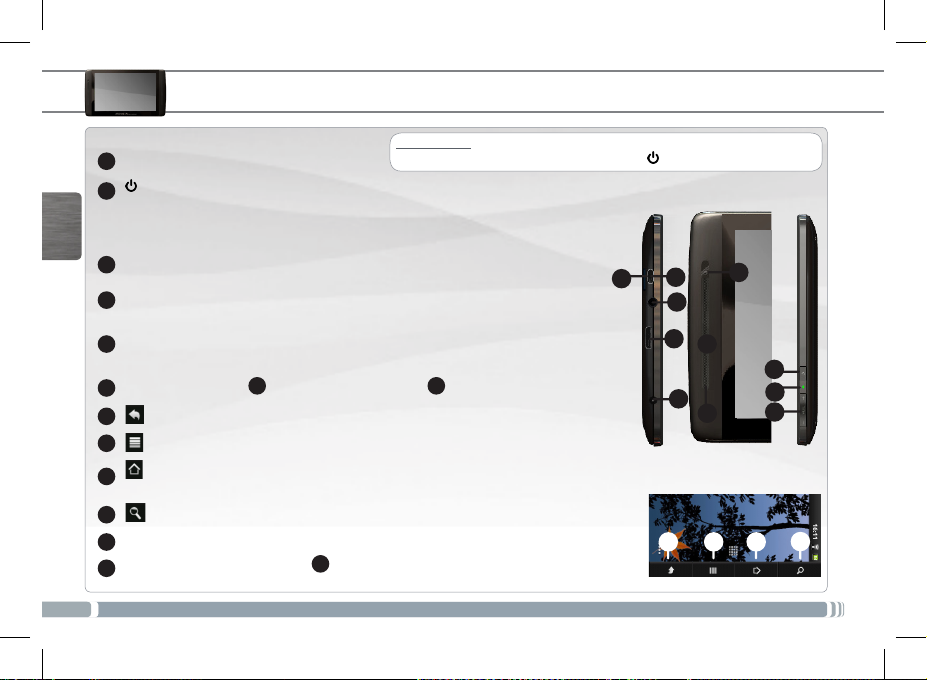
ENGLISH
Volume buttons
1
2
To put your device in standby (and allow a quick star t up), press the Power button once. When you press
and hold on the Power button, a window appears with a list of options. Tap on “Power Off” > “Power Off”
to fully shut down your ARCHOS.
Charging indicator (when power cable connected) - light on: battery charging / blinking:
3
battery charged
4
Headphones
Micro-USB port: to connect your ARCHOS to your computer, using the included USB
5
cable (to transfer files). You can also connect a keyboard, a mouse or a mass storage USB
device (for example a USB stick), using the optional USB host adapter.
Built-in microphone
6
9
10
11
applications.
12
Power connector: to connect the supplied power cable.
13
14
Loudspeaker
2
► * Depending on model ** With optional Mini-HDMI to HDMI cable.
QSG_A7_IT_PN109853_book.indd 2 13/06/2011 16:58:15
DESCRIPTION OF THE DEVICE
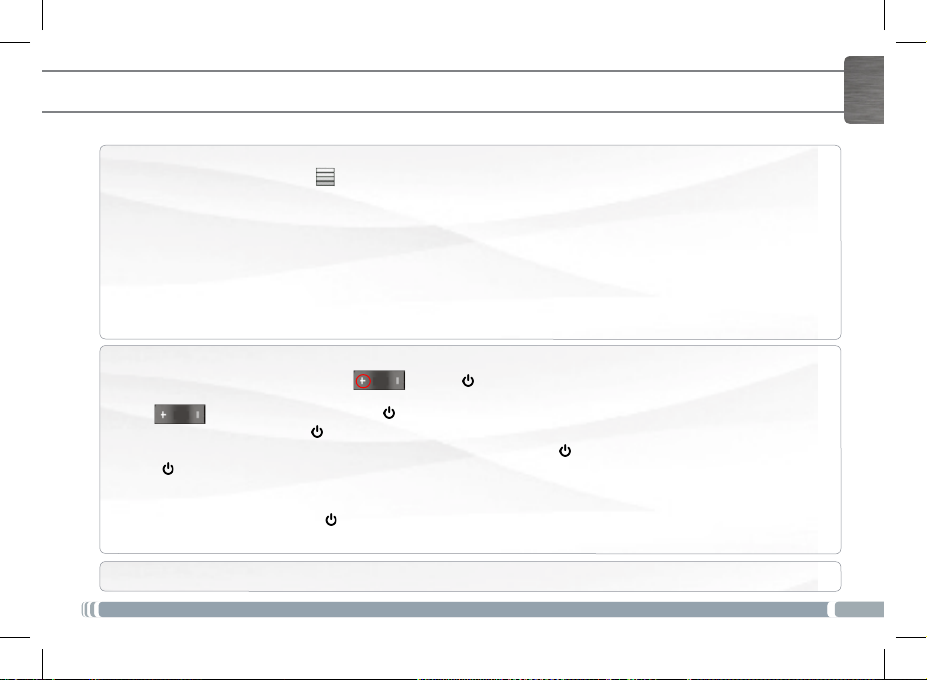
Hardware Reset: In the event that your ARCHOS freezes operation, you can force the
device to shut down by holding the button for 10 seconds.
Power Button: press and hold to switch on/off.
Micro-SD card reader* 8 Mini-HDMI video output**
7
Back - returns to the previous screen
Menu - gives menu options according to the current screen.
Home - Short press: return to the Home screen. Hold: jump to one of the recent
Search - allows you to search for an item on the device or on the Internet.
15
Webcam
See the full user manual to learn more about the video output.
5
7
15
4
8
14
2
13
6
10 11
9
3
1
12
Page 5
1
2
2
3
1
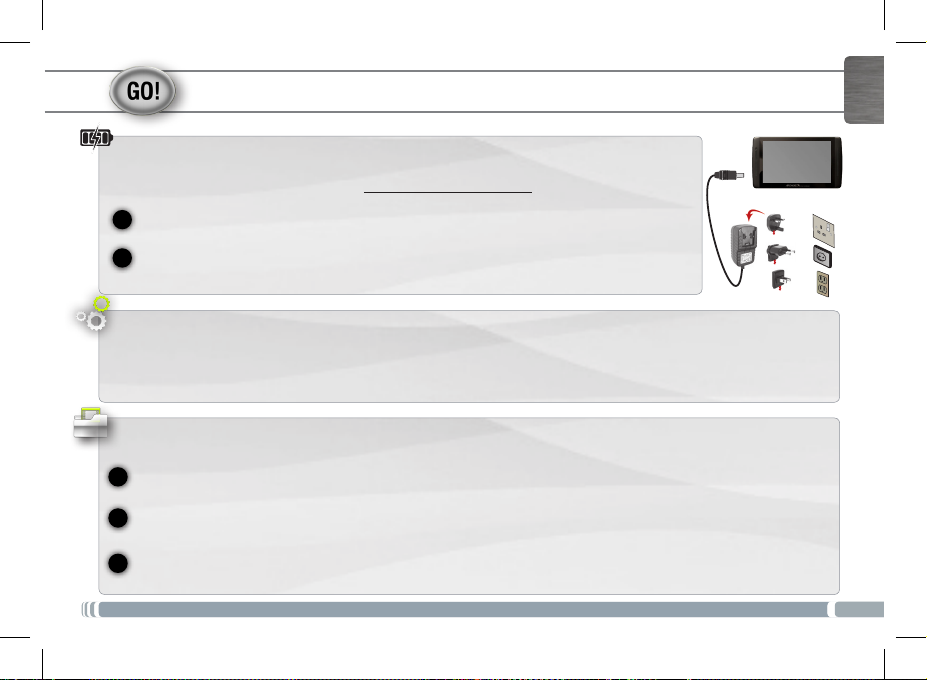
STARTING UP
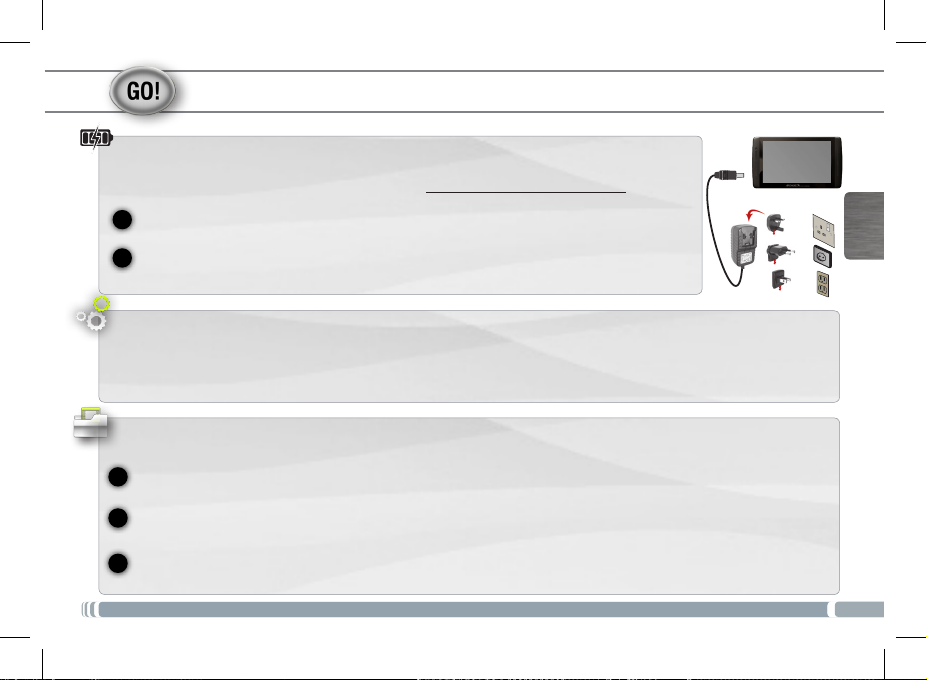
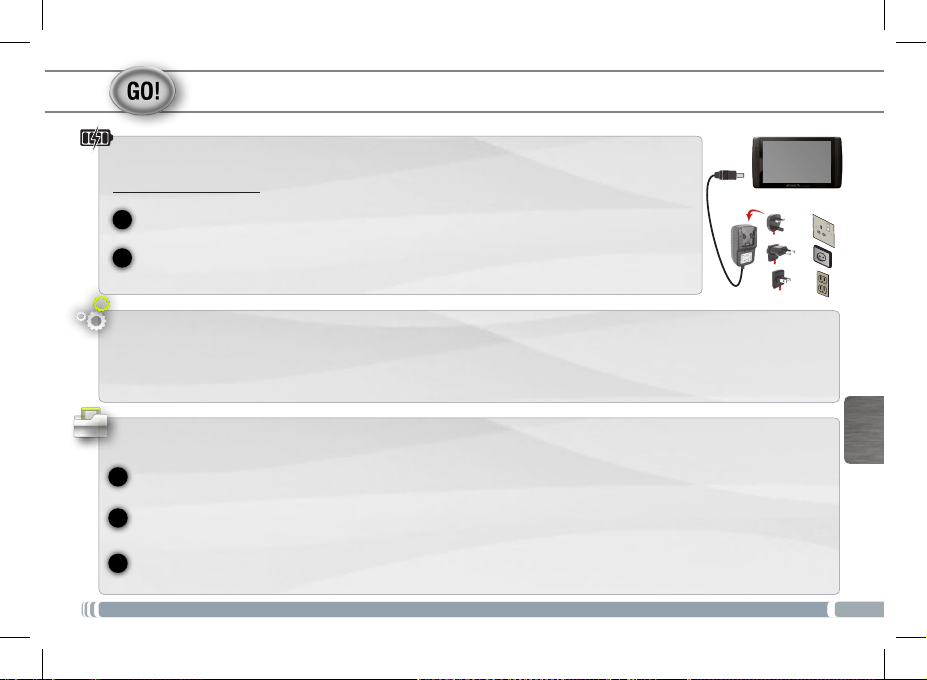
Charging the Battery
Before using your ARCHOS for the first time, completely charge the battery:
Connect the supplied power cable to the ARCHOS Power connector and to a wall outlet. The
ARCHOS device will turn on and start charging.
The charging indicator light (right side of the device) is on when the battery is charging. It will blink
when the battery is charged.
Note: You can still use the device while charging its battery.
Startup Wizard
The first time you start up your ARCHOS, the installation wizard will bring you through a few screens to help you set up the
principal settings: Language, country, time, etc.
Transferring files to your ARCHOS
Connect the supplied USB cable to the ARCHOS and to a running computer. The ARCHOS will turn on and ask you if you
want to connect it. Tap on Mount to connect it. Within a few seconds the ARCHOS will appear as an icon on your computer.
You can transfer your media files to the ARCHOS either by copy/pasting them into the respective folders using Windows®
Explorer (or the Finder on a Mac®), or by using Windows Media® Player (Sync tab).
Once all your file transfers are finished, close Windows® Explorer and any other program that may have read or written to
the ARCHOS. Click on the ‘safely remove’ icon in the system tray, next to the clock. You can now unplug the USB cable.
ENGLISH
UK
EUR
US
►
See the full user manual to learn how to fully configure your ARCHOS device.
QSG_A7_IT_PN109853_book.indd 3 13/06/2011 16:58:16
3
Page 6
1
2
3
4
5
ENGLISH
www
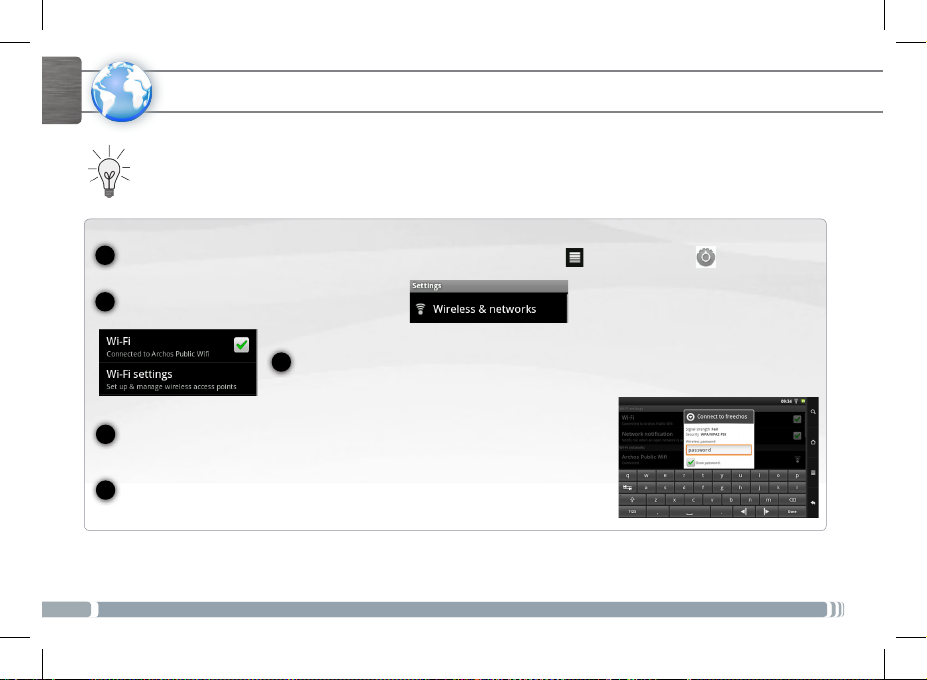
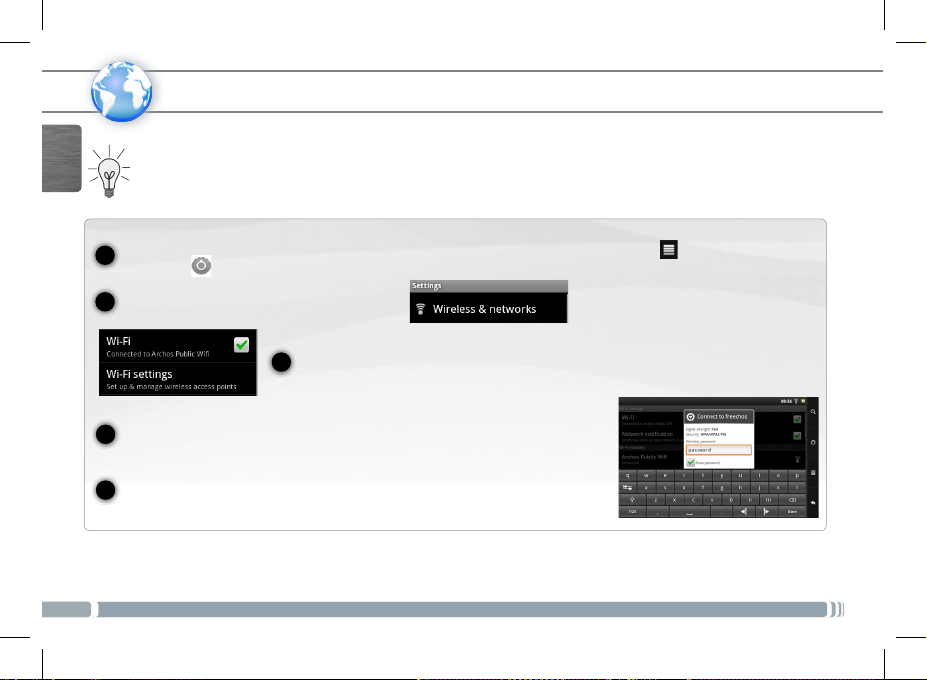
CONNECTING TO THE WIFI
First of all, you need to configure a WiFi network. For this procedure to work, you need to be in a WiFi zone that will allow
you to connect to it. Every time the ARCHOS is in range of a network that you have already configured once, it will attempt
to make a connection.
To configure a new WiFi network, go on the Home screen, tap on the Menu icon , then select Settings .
4
QSG_A7_IT_PN109853_book.indd 4 13/06/2011 16:58:18
In the Settings screen, select Wireless & networks.
If the WiFi is off, tap on the Wi-Fi line to turn it on. Then select Wi-Fi settings. The ARCHOS
will scan for available WiFi networks and display them at the bottom of the screen.
Tap on the network you want to connect to. Then tap inside the Wireless password field to
make the virtual keyboard appear. We recommend that you select Show password, to be
able to see the characters you are typing.
Enter the required network information*, tap on Done, and then tap on Connect. Your
ARCHOS will now attempt to establish a connection to that WiFi access point with
the network parameters you entered.
* For free access WiFi points, there is no need to enter any special information. For secured networks, you will need either a key (a series of numbers and/or letters)
of the type WEP, WPA, or WPA2. Check with the per son who manages the WiFi network to obtain the e xact connection parameters required.
►
Consult the full Manual to learn more about the Internet configuration.
Page 7
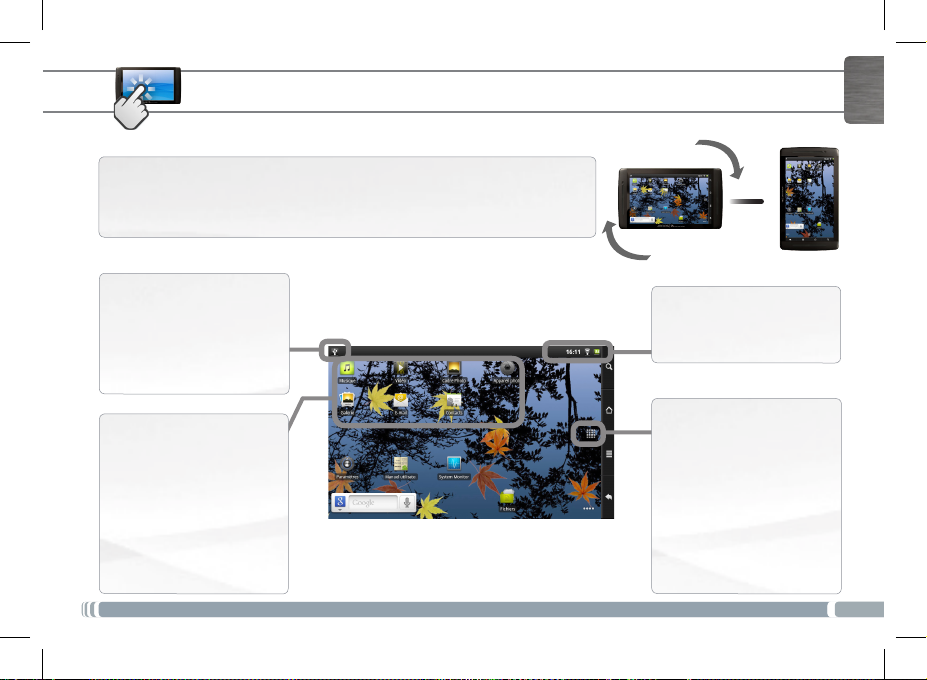
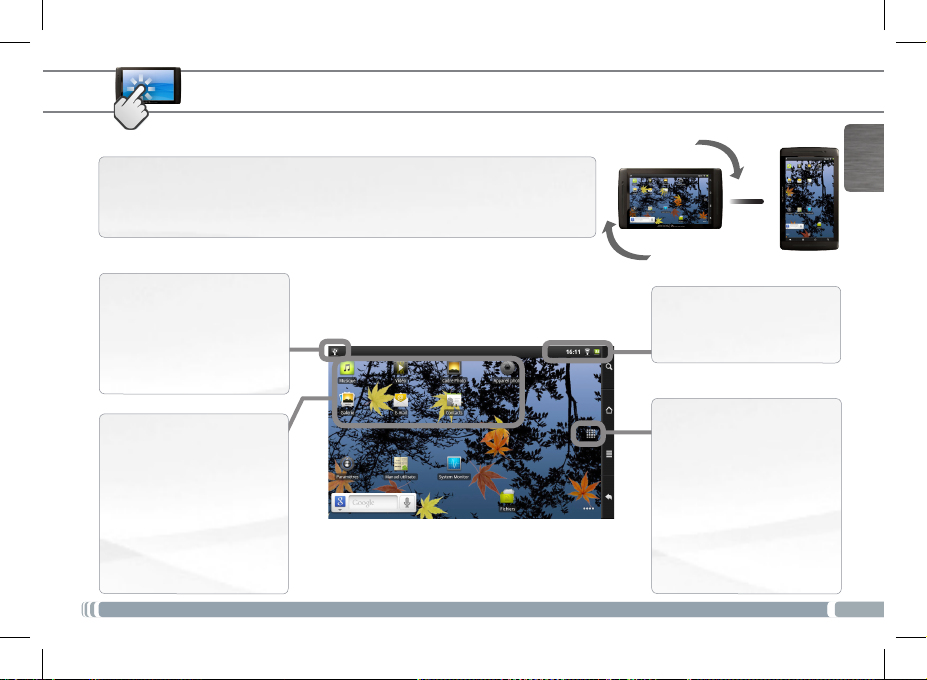
THE ARCHOS INTERFACE
When you rotate the product, the built-in accelerometer will automatically switch the
screen between landscape and portrait views. Your ARCHOS device is equipped with a
touchscreen. Most screen areas will react when you tap on them with your finger.
ENGLISH
▼
Notification icons: tap and
hold on the top bar until the
notification window appears,
then drag it downwards to
reveal the notification messages (if any).
These are the main Android™
applications (Video, Music,
Gallery, Web Browser, etc.). Tap
on an icon to open the corresponding application. You can
customize the Home screen
by adding/removing shortcuts
and widgets, changing the
wallpaper, etc.
► S
ee the full manual for further information about the interface.
QSG_A7_IT_PN109853_book.indd 5 13/06/2011 16:58:21
Home Screen
Status icons: (Time, WiFi
connection status, battery
level, etc.)
Applications Tab
Tap on this icon to reveal all
the Android™ applications
installed on your ARCHOS
(games, various tools, etc.). You
can copy them onto the Home
screen. You can get more Android™ applications from the
AppsLib which can be found on
the Home screen.
5
Page 8
ENGLISH
THE ARCHOS INTERFACE
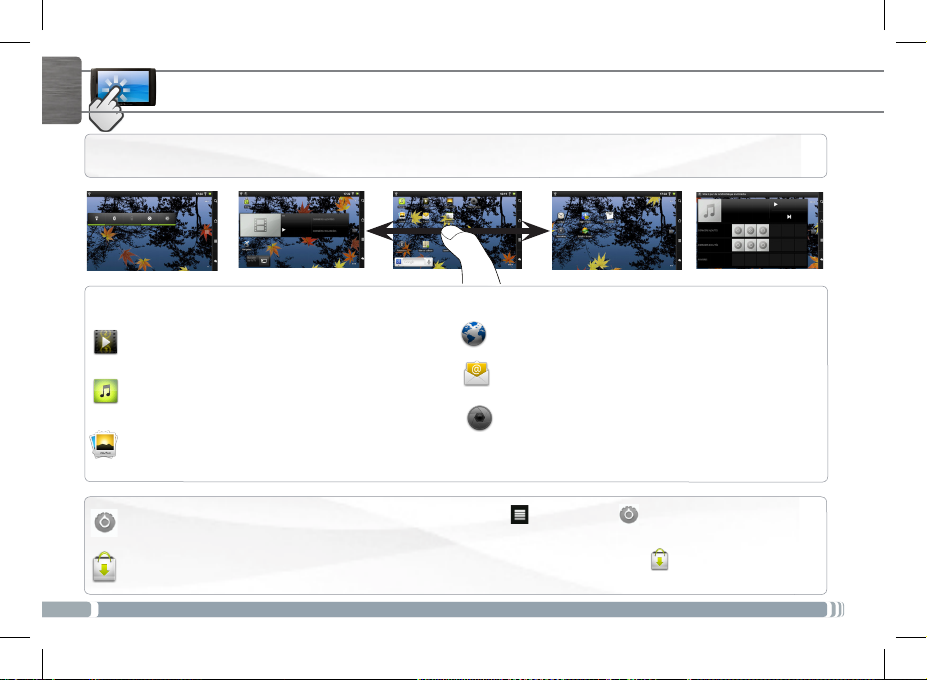
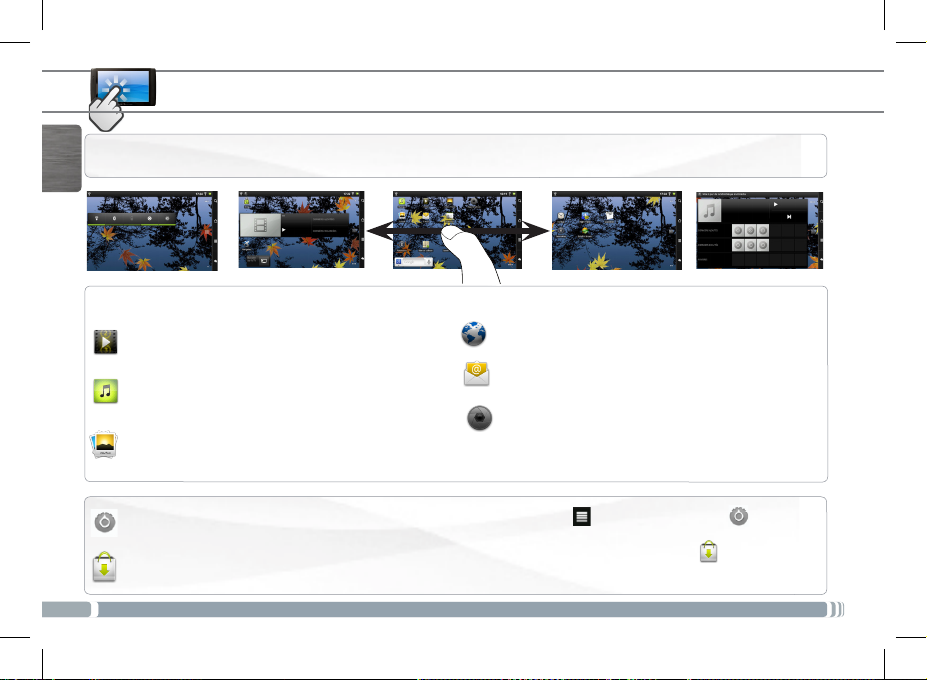
The extended Home screen: Slide your finger horizontally on the screen to navigate between the 5 panels of the extended Home
screen.
The main applications
Video: Stop halfway through a video and pick up where you
were watching just by tapping on the little “+” symbol, on the
right of the le name.
Music: Slide your nger (vertically or horizontally) on the
album covers, on the left, to navigate more visually through
your albums.
Gallery: View your pictures as a photo wall and then one-
by-one, or as a running slideshow. Simply drag your nger
horizontally to jump from one photo to another.
Browser: Have multiple pages open at once to jump back and
forth between them.
Email: Allows for e-mail accounts of the type POP or IMAP.
Camera: Take still image photographs or video sequences. At
any time, simply tap on the thumbnail on the top right to
display the last-taken pictures.
Changing the Settings: From the Home screen, tap on the Menu icon , tap on Settings and choose a category: Wireless
& networks, Sound & display, Date & time, etc.
Adding more applications: With the ARCHOS connected to the Internet, tap on the AppsLib icon on the Home screen. This
online library of free and purchasable applications has hundreds of fun games and useful applications to download and use.
6
►
See the full user manual to learn how to fully configure your ARCHOS device.
QSG_A7_IT_PN109853_book.indd 6 13/06/2011 16:58:24
Page 9
TOUCHSCREEN FUNCTIONING
When touchscreen functioning is impaired, you can recalibrate your touchscreen.
- If you can access the Android interface
1. In the device homescreen, tap on , then tap on Settings.
2. In the Settings screen, tap on Repair & Formatting at the bottom of the menu list.
3. In the Repair & Formatting screen, tap on Touchscreen Calibration.
A message will tell you to put your ARCHOS down.
4. Put the device on a at surface.
5. Tap on Calibrate the touchscreen.
The calibration of the touchscreen starts. Do not touch the product until the calibration is nished.
IMPORTANT: If you do not put the device on a at surface (e.g. Table), the touchscreen calibration will not be successful.
- If you do not have access to the Android interface
1. When turning on the device, hold down and press .
The ARCHOS Recovery screen is displayed.
Use to switch between options and to validate your selection.
2. Select Repair system and press .
3. In the Repair system screen, select Force touchscreen calibration and press .
4. Press again to conrm. And put your product on a at surface.
The calibration of the touchscreen starts. Do not touch the product until the calibration is nished.
IMPORTANT: If you do not put the device on a at surface (e.g. Table), the touchscreen calibration will not be successful.
5. At the end of the calibration, press . The ARCHOS Recovery screen is displayed.
6. Select No. Your device will reboot. The touchscreen is now recalibrated.
NOTE: For more information, Refer to the Need help chapter.
ENGLISH
7
QSG_A7_IT_PN109853_book.indd 7 13/06/2011 16:58:24
Page 10
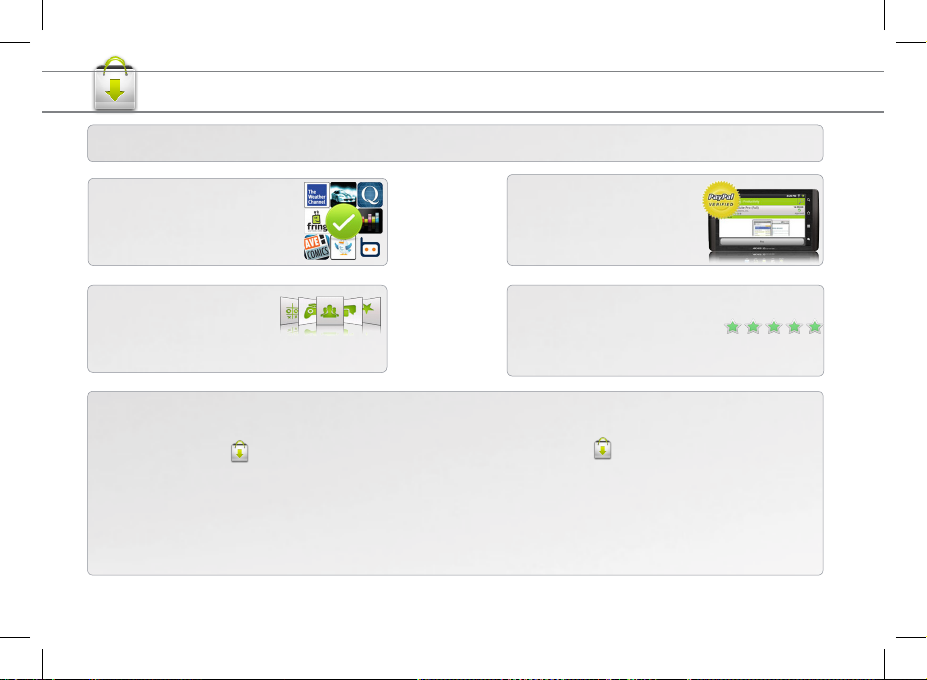
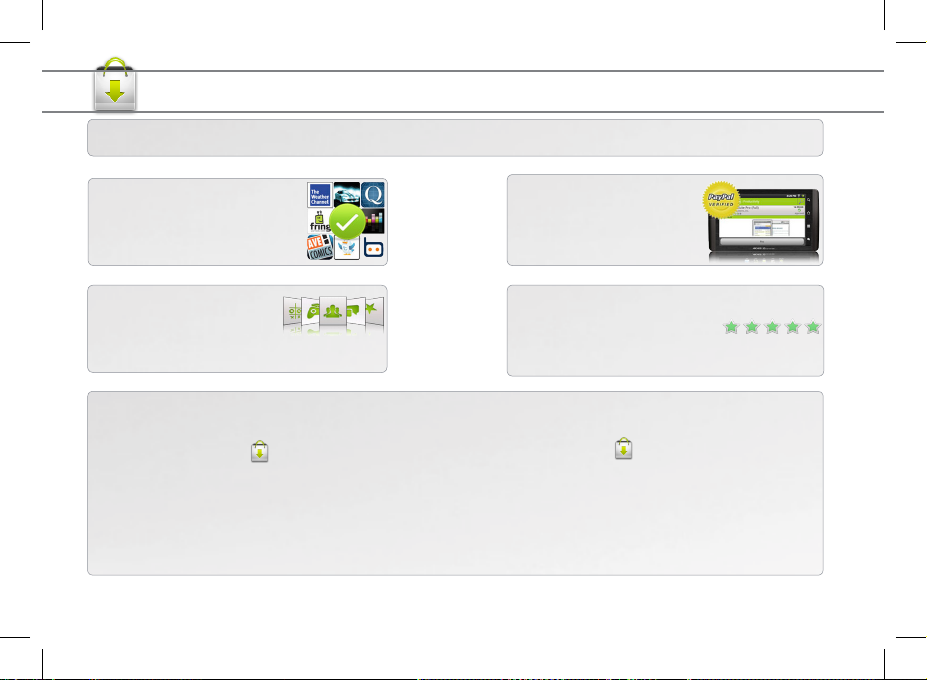
APPSLIB : APPLICATION STORE
AppsLib is the application marketplace for Android tablets. Thousands of apps available to download straight to your Android tablet.
Check out the best in free and paid-for applications.
Approved apps
Thanks to our approved stamp, you
can see which applications have
already been tested to work on your
tablet by our engineers.
All kinds of applications
Clear and unique categories such
as 3D games.
When an update is available, you can:
1.Tap on the AppsLib icon on the Home screen.
UPDATE APPSLIB now
The application is opened. An update notification is displayed.
2.Tap on Update Now. The update starts.
3.Follow the on-screen instructions.
4.At the end of the installation, tap on Open.
NOTE: Download Appslib at www.appslib.com
QSG_A7_IT_PN109853_book.indd 8 13/06/2011 16:58:25
1.Tap on the AppsLib icon on the Home screen.
The application is opened. An update notification is displayed.
2.Tap on Update Later.
You can access the application categories and download.
Appslib will be listed on your My Apps list. Tap on it to update.
As long as you do not update, a notification will be displayed
whenever you open Appslib.
Simple, secure
Completely secure payment via
Paypal. Tie your paypal account
into AppsLib for hassle free
shopping whenever you want.
Ratings and comments
Share your opinions. With AppsLib
you can rate and comment on your
applications for all the AppsLib community to see.
UPDATE APPSLIB later
Page 11
METTEZ À JOUR LE LOGICIEL ARCHOS
ÄDirectement sur votre ARCHOS
ÄSur Internet : www.archos.com/firmware
Le système d’exploitation ARCHOS (le système qui permet à votre ARCHOS de fonctionner) est périodiquement mis à jour pour apporter
de nouvelles fonctions, des améliorations et des corrections d’erreurs. Il existe deux méthodes pour mettre à jour votre produit : directement sur votre ARCHOS si vous avez une connexion WiFi (Menu >Paramètres>A propos de l’appareil>Mise à jour du logiciel), ou avec un
ordinateur (www.archos.com/firmware).
?
QSG_A7_IT_PN109853_book.indd 9 13/06/2011 16:58:26
BESOIN D’AIDE ?
Manuel complet et FAQs : Le manuel complet ainsi que les FAQs (Foire Aux Questions) sont accessibles directement depuis
l’écran d’accueil du produit, sur l’un des 5 panneaux. Pour accéder aux FAQs, votre appareil doit être connecté à Internet
(voir : Connexion WiFi). Vous pouvez également trouver ces documents sur www.archos.com/support.
Contactez notre équipe d’assistance technique : Allez sur www.archos.com/support pour une assistance par e-mail.
Veuillez enregistrer votre produit avant de contacter notre équipe d’assistance technique : Menu >Paramètres>A propos de l’appareil>
Enregistrement en ligne, ou avec un ordinateur (www.archos.com/register).
Comme nous mettons à jour et améliorons régulièrement nos produits, le logiciel de votre appareil peut présenter une
interface ou des fonctionnalités légèrement différentes de celles décrites dans ce guide.
FRANÇAIS
Page 12
DESCRIPTION DE L’APPAREIL
Réinitialisation de votre appareil : Si votre ARCHOS venait à se bloquer totalement, vous
Boutons de volume
1
FRANÇAIS
10
QSG_A7_IT_PN109853_book.indd 10 13/06/2011 16:58:41
Bouton ON/OFF : maintenez appuyé pour allumer/éteindre l’appareil.
2
Pour mettre en veille votre appareil (et permettre un redémarrage plus rapide), appuyez sur le bouton une
fois. Lorsque vous maintenez le bouton enfoncé, une fenêtre app araît avec une liste d’options. Appuyez sur
« Eteindre » > « Eteindre » pour éteindre votre ARCHOS complètement.
Témoin de charge (lorsque le câble d’alimentation est connecté) - allumé : batterie en
3
charge / clignote : batterie chargée.
Prise casque
4
Port micro-USB : pour connecter votre ARCHOS à un ordinateur, à l’aide du câble USB fourni
(pour transférer des fichiers). Vous pouvez également connecter un clavier, une souris, ou un appa-
5
reil USB de stockage de masse (MSC) tel qu’une clé USB, grâce à l’adaptateur USB hôte optionnel.
Microphone intégré 7
6
Retour - Retour à l’écran précédent.
9
Menu - vous donne accès aux options de menu disponibles.
10
Accueil - Appui court : Retour à l’écran d’accueil. Appui long : basculer vers l’une des
11
applications récentes.
Recherche - Vous permet de rechercher un élément sur l’appareil ou sur Internet.
12
Connecteur d’alimentation : pour connecter le câble d’alimentation fourni.
13
Haut-parleur 15 Webcam
14
► * Selon le modèle. ** Câble vidéo (Mini-HDMI vers HDMI) non-fourni.
Lecteur de carte micro-SD*
pouvez forcer l’arrêt du produit en appuyant sur le bouton pendant 10 secondes.
5
7
15
4
8
14
2
Sortie vidéo mini-HDMI**
8
Consultez le manuel complet pour en savoir plus sur la sortie vidéo.
13
6
10 11
9
3
1
12
Page 13

1
2
2
3
1
PREMIÈRE UTILISATION
Charger la batterie
Avant d’utiliser votre ARCHOS pour la première fois, chargez complètement sa batterie :
Branchez le câble d’alimentation fourni sur le connecteur d’alimentation de l’ARCHOS et sur une
prise secteur. Votre ARCHOS s’allume et commence à se charger.
Appuyez sur Rester en charge. Le témoin de charge (sur le côté droite de l’appareil) est allumé lorsque
que la batterie est en charge. Il clignote lorsque la batterie est complètement chargée.
toujours possible d’utiliser le produit pendant qu’il charge.
Note : Il est
Assistant de démarrage
La première fois que vous allumez l’ARCHOS, l’assistant de démarrage vous aide à configurer les principaux réglages de l’appareil :
la langue, le pays, l’heure, etc.
Transfert de fichiers sur l’ARCHOS
Connectez le câble USB fourni à votre ARCHOS et à un ordinateur allumé. L’ARCHOS s’allume et vous propose de le connecter.
Sélectionnez Monter pour le connecter. Après quelques secondes, l’ARCHOS apparaît sous la forme d’une icône sur votre ordinateur.
QSG_A7_IT_PN109853_book.indd 11 13/06/2011 16:58:42
Pour transférer vos fichiers sur l’ARCHOS, vous pouvez les copier/coller directement dans les dossiers respectifs de l’appareil (avec
Windows® Explorer sur PC ou le Finder sur Mac®), ou vous pouvez également utiliser Windows Media® Player (onglet Synchroniser).
Une fois que tous les transferts de fichiers sont terminés, fermez Windows Media® Player ou tout autre programme susceptible d’utiliser l’ARCHOS. Cliquez ensuite sur l’icône de retrait du périphérique en toute sécurité dans la barre des tâches, à
côté de l’horloge. Vous pouvez à présent débrancher le câble USB.
►
Consultez le manuel complet pour apprendre à configurer entièrement votre ARCHOS.
UK
EUR
US
FRANÇAIS
11
Page 14
1
2
3
4
www
5
FRANÇAIS
* Pour vous connecter à un réseau WiFi ouvert, il n’est pas nécessaire de saisir les informations réseau. Pour un réseau protégé, vous devrez soit entrer une
clé (une suite de chiffres et/ou de lettres) du type WEP, WPA ou WPA2. Renseignez-vous auprès de l'administrateur du réseau pour obtenir les paramètres de
connexion exacts.
12
►
QSG_A7_IT_PN109853_book.indd 12 13/06/2011 16:58:46
CONNEXION WIFI
Tout d’abord vous devez configurer un réseau WiFi. Pour suivre cette procédure, vous devez vous situer dans une zone
WiFi vous permettant de vous connecter. Chaque fois que l’ARCHOS détectera un réseau que vous avez déjà configuré, il
tentera de s’y connecter.
Pour configurer un nouveau réseau WiFi, allez sur l’écran d’accueil, appuyez sur l’icône de Menu , puis sélectionnez
Paramètres .
Dans l’écran des Paramètres, sélectionnez
Sans fil et réseaux.
Si le WiFi est désactivé, appuyez sur la ligne Wi-Fi pour l’activer. Puis, sélectionnez Wi-Fi
(configurer et gérer...). L’ARCHOS recherche les réseaux WiFi disponibles et les affiche au bas
Appuyez sur l’un des réseaux disponibles proposés. Puis, appuyez à l’intérieur du
champ Mot de passe sans fil pour faire apparaître le clavier virtuel. Nous vous recommandons de sélectionner Afficher le mot de passe pour que les caractères que vous
tapez s’affichent à l’écran.
Saisissez les informations réseau demandées*, appuyez sur OK et appuyez ensuite sur
Se conecter. Votre ARCHOS essaie alors de se connecter à ce point d’accès WiFi d’après
les paramètres réseau saisis précédemment.
Consultez le manuel complet pour en savoir plus sur la configuration Internet.
de l’écran.
Page 15
L’INTERFACE DE L’ARCHOS
Lorsque vous faites pivoter le produit, l’accéléromètre intégré bascule automatiquement l’affichage entre les modes paysage et portrait. Votre ARCHOS est équipé d’un
écran tactile. La plupart des zones de l’écran réagissent lorsque vous appuyez dessus
avec votre doigt.
Icônes de Notification : Effectuez
un appui long sur la barre supérieure jusqu’à ce que la fenêtre
des notifications apparaisse,
puis faites-la glisser vers le bas
pour afficher les messages de
notification (le cas échéant).
Ecran d’accueil
FRANÇAIS
▼
Icônes de Statut : (heure, état
de la connexion WiFi, niveau
de batterie, etc.)
Voici les applications
Android™ principales (Vidéo,
Musique, Galerie, Navigateur
Web, etc.). Appuyez sur une
icône pour ouvrir l’application
correspondante. Vous pouvez
personnaliser l’écran d’accueil
en ajoutant/supprimant des
raccourcis et des widgets, en
changeant le fond d’écran, etc.
►
Consultez le manuel complet pour plus d’informations sur l’interface.
QSG_A7_IT_PN109853_book.indd 13 13/06/2011 16:58:47
Onglet Applications
Appuyez sur cette icône pour
afficher toutes les applications
Android™ installées sur votre
ARCHOS (jeux, différents
outils, etc.). Il est possible de
les copier sur l’écran d’accueil.
Vous pouvez obtenir d’autres
applications Android™ depuis
l’AppsLib (sur l’écran d’accueil).
13
Page 16
L’INTERFACE DE L’ARCHOS
L’écran d’accueil étendu : Faites glisser votre doigt horizontalement sur l’écran pour naviguer parmi les 5 panneaux de l’écran
d’accueil étendu.
FRANÇAIS
Les applications principales
Vidéo : Reprenez la lecture de votre vidéo à l’endroit où vous
l’aviez stoppée en appuyant simplement sur le petit symbole
“+” à droite du nom du chier.
Musique : Faites glisser votre doigt (verticalement ou horizontalement) sur les pochettes d’albums, à gauche, pour naviguer
parmi vos albums de façon plus visuelle.
Galerie : Afchez vos photos sous la forme d’une mosaïque de
miniatures, une par une, ou en diaporama. Faites glisser votre
doigt horizontalement pour passer d’une photo à une autre.
Modification des paramètres : Sur l’écran d’accueil, appuyez sur l’icône de Menu , appuyez sur Paramètres et choisissez une catégorie : Sans fil et réseaux, Sons et affichage, Date et heure, etc.
Ajouter d’autres d’applications : Connectez votre ARCHOS à Internet, puis appuyez sur l’icône AppsLib sur l’écran d’ac-
cueil. Ce portail de téléchargement vous propose plusieurs centaines d’applications gratuites et payantes, telles que des jeux
amusants ou des outils pratiques. Choisissez une application et téléchargez-la. C’est aussi simple que cela !
14
►
Consultez le manuel complet pour apprendre à configurer entièrement votre ARCHOS.
QSG_A7_IT_PN109853_book.indd 14 13/06/2011 16:58:49
Navigateur Internet: Ouvrez plusieurs pages web simultanément et basculez très facilement de l’une à l’autre.
E-mail : Cette application gère les comptes e-mail de type
POP ou IMAP.
Appareil photo : Prenez des photos ou enregistrez des séquences vidéo. A tout moment, appuyez simplement sur la minia-
ture en haut à droite pour afcher les dernières photos prises.
Page 17

FONCTIONNEMENT DE L’ÉCRAN TACTILE
En cas de disfonctionnement, il est possible de recalibrer l’écran tactile.
- S’il est possible d’accéder à l’interface Adnroid
1. Sur l’écran d’accueil de l’appareil, appuyer sur , puis sur Paramètres.
2. Sur l’écran Paramètres, appuyer sur Réparation & Formatage en bas de la liste des menus.
3. Sur l’écran Réparation et Formatage, appuyer sur Calibration de l’écran tactile.
Un message vous invite à déposer votre ARCHOS.
4. Poser l’appareil sur une surface plane.
5. Appuyer sur Calibrer l’écran tactile.
La calibration de l’écran tactile débute. Ne pas toucher l’appareil pendant la calibration.
IMPORTANT: Si vous ne déposez pas l’appareil sur une surface plane (exemple: une Table), l’écran tactile ne sera pas bien calibré.
- S’il n’est pas possible d’accéder à l’interface Android
1. Lors de la mise en marche de l’appareil, maintenir enfoncé et appuyer sur .
L’écran ARCHOS Recovery est afché.
Utiliser pour naviguer entre les options et pour valider la sélection.
2. Sélectionner Repair system et appuyer sur .
3. Sur l’écran Repair system, sélectionner Force touchscreen calibration et appuyer sur .
4. Appuyer encore sur pour conrmer et poser l’appareil sur une surface plane.
La calibration de l’écran tactile débute. Ne pas toucher l’appareil pendant la calibration.
IMPORTANT: Si vous ne déposez pas l’appareil sur une surface plane (exemple: une Table), l’écran tactile ne sera pas bien calibré.
5. A la n de la calibration, appuyer sur . L’écran ARCHOS Recovery est afché.
6. Sélectionner No. L’appareil redémarre. L’écran tactile est maintenant recalibré.
NOTE: Pour plus d’informations, consulter le chapite Besoin d’aide.
QSG_A7_IT_PN109853_book.indd 15 13/06/2011 16:58:49
FRANÇAIS
15
Page 18
APPSLIB : BOUTIQUE D‘APPLICATIONS
AppsLib est une boutique d’applications pour tablettes Internet sous Android. Des milliers d’applications sont disponibles pour un
téléchargement instantané sur votre tablette. Retrouvez les meilleures applications gratuites et payantes.
Des applications certiées
Grâce à notre logo “Approuvé”, vous
pouvez voir quelles applications ont
été testées par nos ingénieurs pour un
bon fonctionnement sur votre tablette.
Une variété d’applications
Il existe une catégorisation pré-
cise et spécique des applications.
A titre d’exemple, la catégorie
Jeux en 3D.
Lorsqu’une mise à jour est disponible, il est possible de:
METTRE A JOUR APPSLIB maintenant
1.Appuyer sur l’icône AppsLib sur l’écran d’accueil.
L’application est ouverte. Une notification de mise à jour est
affichée.
2.Appuyer sur Mettre à jour maintenant. La mise à jour débute.
3.Suivre les instructions à l’écran.
4.A la fin de l’installation, appuyer sur Ouvrir.
Note: Télécharger AppsLib sur www.appslib.com
QSG_A7_IT_PN109853_book.indd 16 13/06/2011 16:58:50
Simple et sécurisé
Un paiement via PayPal totalement sécurisé. Relier votre compte
PayPal à AppsLib pour acheter
sans tracas.
Evaluations et commentaires
Partager vos impressions. Evaluer et
commenter vos applications pour les
partager avec la communauté AppsLib.
METTRE A JOUR APPSLIB plus tard
1.Appuyer sur l’icône AppsLib sur l’écran d’accueil.
L’application est ouverte. Une notification de mise à jour s’affiche.
2.Appuyer sur Mettre à jour plus tard.
Accéder ainsi aux applications et télécharger. AppsLib va s’afficher
dans la liste Mes Applications. Appuyer sur l’application pour la
mettre à jour. Tant que vous n’aurez pas mis à jour AppsLib, une
notification de mise à jour s’affiche à chaque fois vous ouvrez
l’application.
Page 19
AKTUALISIEREN DER ARCHOS-SOFTWARE
ÄDirekt auf Ihr ARCHOS-Gerät
ÄIm Internet unter www.archos.com/rmware
Das ARCHOS-Betriebssystem (das auf Ihrem Gerät laufende System) wird regelmäßig aktualisiert, um neue Funktionen, Verbesserun-
gen und Bugxes auf Ihr Gerät zu spielen. Um die Produktsoftware zu aktualisieren, sind hauptsächlich zwei Vorgehensweisen möglich:
direkt auf dem ARCHOS-Gerät, sofern eine WLAN-Verbindung möglich ist (Menü >Einstellungen>Geräteinfo>Software-Update) oder
mit einem Computer unter www.archos.com/rmware
DEUTSCH
?
Da unsere Produkte kontinuierlich aktualisiert und weiterentwickelt werden, kann die Software Ihres Geräts in Erscheinung und Funktionalität geringfügige
QSG_A7_IT_PN109853_book.indd 17 13/06/2011 16:58:51
SIE BENÖTIGEN HILFE?
Handbuch & FAQs
Desktops ihres Gerätes. Für den Zugang zu den FAQs muss Ihr Gerät einen Internet Zugang haben (siehe: WiFi-verbindung).
Sie finden diese ebenfalls unter
Kontaktieren Sie unseren technischen Kundendienst: Sie erhalten unter www.archos.com/support Hilfe per E-Mail
Bitte registrieren Sie Ihr Produkt, bevor Sie Kontakt mit dem technischen Support aufnehmen: Menü >Einstellungen>Geräteinfo>Online
Registrierung, oder mit einem Computer unter www.archos.com/register.
: Das vollständige Handbuch und FAQs (die meist auftretenden Fragen) finden sie als link auf einem der
www.archos.com/support.
.
Abweichungen zu den Darstellungen in dieser Kurzbedienungsanleitung aufweisen.
Page 20
BESCHREIBUNG DES ARCHOS
Hardware-Reset: In dem Fall, dass Ihr ARCHOS während des Betriebs einfriert, können Sie ein
Lautstärke Tasten
1
ON/OFF-Taste (EIN/AUS): gedrückt halten, um ein- und auszuschalten.
2
Wenn Sie den Power-Schalter einmal drücken, wird Ihr Gerät in den Standby-Modus (ermöglicht einen
anschließenden Schnellstart) gebracht. Wenn Sie den Power-Schalter drücken und festhalten, erscheint ein Fenster
mit einer Liste von Optionen. Tippen Sie auf “Ausschalten” > “Ausschalten”, um Ihren ARCHOS völlig auszuschalten.
DEUTSCH
QSG_A7_IT_PN109853_book.indd 18 13/06/2011 16:58:55
Ladeanzeige (wenn das Stromkabel angeschlossen ist) - Leuchtet: Akku wird geladen /
3
blinkt: Akku geladen
Kopfhöreranschluss
4
Micro USB Port: Um Ihren ARCHOS mit Ihrem Computer zu verbinden, verwenden Sie das mit-
gelieferte USB Kabel (um Dateien zu übertragen). Mit dem optionalen USB-Host-Adapter können
5
Sie eine Tastatur, eine Maus oder einen USB-Massenspeicher (z.B. einen USB-Stock) anschließen.
Eingebautes Mikro 7 Micro SD Karten Slot* 8 Mini HDMI Video Ausgang**
6
Zurück zum vorherigen Bildschirm
9
Menü: bietet Menüoptionen entsprechend des aktuellen Bildschirms.
10
Home-Taste - kurz betätigt: bringt sie jederzeit zum Haupt-Desktop zurück. Lange halten –
11
bringt sie zu der Auswahl von der neueren Applikationen. Umschalten zwischen den Applikationen.
Suchen – erlaubt das Suchen auf dem Gerät oder auf Internet Seiten.
12
Strom anschluss: zum Anschluss des mitgelieferten Stromkabels.
13
Lautsprecher 15 Webcam
14
18
►
* Je nach Model. ** Mit einem optionalen Video Kabel (HDMI / Mini HDMI). Weitere Informationen entnehmen Sie bitte dem Gesamt-Handbuch.
Herunterfahren des Geräts erzwingen, indem Sie die Taste für 10 Sekunden drücken und halten.
5
7
15
4
8
14
2
13
6
10 11
9
3
1
12
Page 21
1
2
2
3
1
STARTEN
Auaden des Akkus
Vor der erstmaligen Verwendung des ARCHOS sollte der Akku vollständig aufgeladen werden:
Verbinden Sie das mitgelieferte Stromkabel mit dem ARCHOS-Stromanschluss und mit einer
Steckdose. Daraufhin schaltet sich der ARCHOS-Player ein und startet den Ladevorgang.
Tippen sie auf Nur Laden.
der Akku vollständig aufgeladen wurde
verwenden.
Die Akku-Ladeanzeige leuchtet während der Akkuladung, sie blinkt, wenn
. Notiz: Sie können das Gerät während des Ladevorgangs w eiterhin
Installationsassistent
Wenn Sie Ihren ARCHOS das erste Mal in Betrieb nehmen, leitet Sie der Installationsassistent durch einige Bildschirme, um Ihnen
dabei zu helfen, die grundlegenden Einstellungen vorzunehmen. Sprache, Land, Uhrzeit usw.
Übertragen von Dateien
Verbinden Sie Ihren ARCHOS mit dem Computer, mit Hilfe des mitgeliefertem USB-Kabels. Daraufhin schaltet sich der
ARCHOS ein und Sie werden gefragt, ob Sie verbinden möchten. Wählen Sie die Option Bereitstellen. Innerhalb weniger
Sekunden erscheint der ARCHOS als Symbol auf Ihrem Computer.
QSG_A7_IT_PN109853_book.indd 19 13/06/2011 16:58:56
Sie können Ihre Media-Dateien durch Kopieren/Einfügen in die jeweiligen Ordner auf Ihren ARCHOS entweder mit dem
Windows® Explorer (oder mit dem Finder auf einem Mac®) übertragen oder indem Sie den Windows Media® Player
verwenden (Tab Sync [Synchronisieren]).
Sobald die Dateiübertragung beendet ist, schließen Sie den Windows® Explorer und alle anderen Programme. Klicken Sie auf
das ‘Sicher entfernen’ Icon in der Ablageleiste neben der Uhr. Sie können das USB-Kabel jetzt entfernen.
►
Eine Übersicht über die vollständige Konfigurierung Ihres ARCHOS-Geräts finden Sie in der Gesamtanleitung.
UK
EUR
US
DEUTSCH
19
Page 22

1
2
3
4
www
5
WIFI-VERBINDUNG
Zunächst müssen Sie Ihr WiFi Netzwerk konfigurieren. Dazu müssen Sie sich in Reichweite eines WiFi befinden. Der
ARCHOS wir dann jedesmal eine Verbindung mit einem der bereits konfigurierten Netzwerke herstellen.
DEUTSCH
20
QSG_A7_IT_PN109853_book.indd 20 13/06/2011 16:58:58
Um ein neues WiFi Netzwerk einzurichten, tippen Sie auf dem Desktop auf das Menü Icon und wählen anschließend
Einstellungen .
Unter Einstellungen wählen Sie Drahtlos und
Netzwerke.
Wenn das WiFi ausgeschaltet ist, tippen Sie auf die WLAN Zeile um es einzuschalten. Dann
wählen Sie WLAN-Einstellungen aus. Der ARCHOS wird die verfügbaren WiFi- Netze suchen
und sie auf dem Display anzeigen.
Tippen Sie auf das Netzwerk, mit dem Sie verbinden möchten. Tippen sie auf das
Eingabefeld Passwort für Drahtloszugang, um die virtuelle Tastatur aufzurufen. Wir
empfehlen Ihnen die Einstellung Passwort anzeigen zu aktivieren, um die Zeichen des
Passworts während der Eingabe zu sehen
Geben sie die benötigten Netzwerkparameter ein*. Tippen sie auf Fertig und anschließend auf Verbinden. Ihr ARCHOS wird nun versuchen, eine Verbindung mit diesem
WiFi-Hot Spot aufzunehmen, mit den von Ihnen eingegebenen Netzwerkparametern.
* für kostenlose WiFi-Access Points besteht kein Bedarf für das Eingeben spezieller Informationen. Für abgesicherte Netzwerke benötigen Sie entweder einen
Schlüssel (eine Serie von Zahlen und/oder Buchstaben) des Typs WEP, WPA oder WPA2. Um die exakten Verbindungsparameter zu erhalten, sprechen Sie bitte
mit der Person, die das WiFi-Netzwerk verwaltet.
►
Bei Bedarf rufen Sie das Benutzerhandbuch auf um mehr über die Internet Konfiguration zu erfahren.
Page 23

DIE ARCHOS SCHNITTSTELLE
Wenn sie das Gerät drehen wird die Bildschirmansicht vertikal oder senkrecht, durch den
Lagesensor angepasst. Ihr ARCHOS-Gerät ist mit einem Touchscreen ausgerüstet. Die
meisten Bereiche des Bildschirms reagieren, sobald Sie mit Ihrem Finger auf diese tippen.
Mitteilungs-Icons: Um die
Mitteilung zu sehen, ziehen
Sie die top bar einfach nach
unten.
Das sind die Hauptapplikationen von Android™ (Video, Mu-
sik, Galerie, Web-Browser, usw).
Tippen Sie auf ein Icon, um die
entsprechende Anwendung zu
öffnen. Sie können den Home-
Screen nach Ihren Wünschen
anpassen, indem Sie Shortcuts
und Widgets hinzufügen oder
entfernen oder das Design des
Hintergundes ändern.
► W
eitere Informationen über die Schnittstelle entnehmen Sie bitte dem Gesamt-Handbuch.
QSG_A7_IT_PN109853_book.indd 21 13/06/2011 16:58:59
Hauptfenster
Status-Icons: (Uhrzeit, WiFi Ver-
bindungsstatus, Ladezustand
der Batterie usw.)
Applikations Tab
Tippen Sie auf dieses Icon, um
alle installierten Android™Anwendungen zu sehen
(Spiele, verschiedene Tools,
usw.). Bei Bedarf können
Sie diese Anwendungen auf
Ihren Desktop kopieren. Sie
finden weitere Android™Anwendungen in der AppsLib,
die Sie auf der Startseite
finden.
▼
DEUTSCH
21
Page 24

DIE ARCHOS SCHNITTSTELLE
Der erweiterte Desktop: Streichen sie mit dem Finger horizontal über den Hauptbildschirm um zu den anderen Dekstops zu
gelangen.
DEUTSCH
Die Hauptapplikationen
Video: laufendes Video anhalten und fortsetzen durch ankli-
cken des kleinen „+“ – Zeichens, rechts vom Dateinamen.
Musik: streichen sie mit dem Finger (vertikal oder horizontal)
über die Album Covers auf der linken Seite, um visuell durch
Ihre Bibliothek zu navigieren.
Galerie: durchstöbern sie Ihre Bilder wie auf einer Fotowand
(Mehrbilderansicht) oder jedes Foto einzeln oder starten sie
eine Diashow. Streichen sie horizontal mit dem Finger über
den Bildschirm um das vorherige oder nächste Foto zu sehen.
Einstellungen ändern: Tippen Sie auf das Menü Icon anschließend auf Einstellungen und wählen Sie aus einer der
Kategorien: Drahtlos und Netzwerke, Sound und Display, Datum und Uhrzeit, usw.
Applikationen hinzufügen: Wenn Sie Ihren ARCHOS mit dem Internet verbunden haben, tippen Sie auf das AppsLib Ikon
auf der Startseite. Diese Onlinebibliothek bietet Ihnen hunderte zum Teil kostenlose Apps wie Unterhaltung, Spiele und weitere
nützliche Anwendungen zum herunterladen und verwenden.
22
►
Eine Übersicht über die vollständige Konfigurierung Ihres ARCHOS-Geräts finden Sie in der Gesamtanleitung.
QSG_A7_IT_PN109853_book.indd 22 13/06/2011 16:59:00
Browser: Mehrere Browser Fenster können gleichzeitig
geöffnet werden. Das Wechseln von einem zum anderen
Browserfenster ist hierbei gewährleistet.
E-Mail: Erlaubt die Verwaltung von mehreren E-Mail Accounts
für POP oder IMAP.
Kamera: Erlaubt die Aufnahme von Fotos und Videos. Jederzeit
können aktuell aufgenommene Fotos angezeigt werden, in
dem man rechts oben auf das Miniaturbild tippt.
Page 25

TOUCHSCREEN-BETRIEB
Als der Touchscreen-Betrieb beschädigt wird, können Sie noch einmal deinen Touchscreen kalibrieren.
- Wenn Sie auf das Android Interface zugreifen können
1. In dem Hauptbildschirm, drücken Sie auf , dann drücken Sie auf Einstellungen.
2. In dem Einstellungen Bildschirm, drücken Sie auf Reparieren und Formatieren unten der Menü Liste.
3. In dem Reparieren und Formatieren Bildschirm, drücken Sie auf Touchscreen Kalibrieren.
Eine Meldung sagt Ihnen das ARCHOS Gerät hinzulegen.
4. Legen Sie das Gerät hin.
5. Drücken Sie auf Touchscreen kalibrieren.
Die Kalibrierung des Touchscreens beginnt. Berühren Sie nicht das Gerät, bis die Kalibrierung abgeschlossen ist.
WICHTIG: Wenn Sie nicht das Gerät auf eine ebene Stelle hinlegen (z.B. Ein Tisch), wird die Kalibrierung des Touchscreens nicht
erfolgreich sein.
- Wenn Sie nicht auf das Android Interface zugreifen können
1. Als Sie das Gerät einschalten, erhalten und drücken auf .
Der ARCHOS Recovery Bildschirm wird angezeigt.
Benützen Sie um zwischen die Optionen zu ansteuern und benützen , um deine Auswahl zu bestätigen.
2. Wählen Sie Repair system aus und drücken Sie auf .
3. In dem Repair system Bildschirm wählen Sie Force touchscreen calibration aus und drücken Sie auf .
4. Drücken Sie auf noch einmal um zu validieren. Legen Sie dein Gerät auf eine ebene Stelle hin.
Die Kalibrierung des Touchscreens beginnt. Berühren Sie nicht das Gerät, bis die Kalibrierung abgeschlossen ist.
WICHTIG: Wenn Sie nicht das Gerät auf eine ebene Stelle hinlegen (z.B. Ein Tisch), wird die Kalibrierung des Touchscreens nicht
erfolgreich sein.
5. Am Ende der Kalibrierung, drücken Sie auf . Der ARCHOS Recovery Bildschirm wird angezeigt.
6. Wählen Sie No aus. Dein Gerät wird neu starten. Der Touchscreen wird noch einmal kalibriert
NOTE: Mehr Informationen in dem Sie Benötigen Hilfe Kapitel.
23
QSG_A7_IT_PN109853_book.indd 23 13/06/2011 16:59:01
DEUTSCH
Page 26

APPSLIB : APPLICATION STORE
AppsLib ist der Anwendungsmarktplatz für Android-Tablets. Es stehen hier Tausende von Anwendungen für den direkten
Download auf Ihr Android-Tablet bereit. Testen Sie die besten kostenlosen und kostenpichtigen Anwendungen.
Freigegebene Anwendungen
Dank unseres „Approved“-Stempels
können Sie erkennen, welche
Anwendungen bereits von unseren
Ingenieuren zur Ausführung auf Ihrem
Tablet getestet wurden.
Alle Arten von Anwendungen
Es gibt klare und eindeutige
Kategorien, wie z. B. 3D-Spiele.
Ein neues Update für den AppsLib store steht zur Verfügung:
AppsLib jetzt aktualisieren
1.Tippen Sie auf das AppsLib Ikon auf der Startseite.
AppsLib wird geoffnet. Eine Meldung vorschlagt ein Update.
2.Tippen Sie auf Jetzt aktualisieren. Das Update beginnt.
3.Folgen Sie den Anweisungen auf dem Bildschirm.
4.Am Ende der Installation, tippen Sie auf Offnen.
Note: um AppsLib herunterzuladen, gehen Sie zu www.Appslib.com
QSG_A7_IT_PN109853_book.indd 24 13/06/2011 16:59:02
Einfach und sicher
Sie protieren von einer sicheren
Bezahlung über PayPal. Integrieren
Sie Ihr PayPal-Konto in Ihr AppsLib
- für müheloses Einkaufen, wann
immer Sie möchten.
Bewertungen und Kommentare
Sagen Sie uns Ihre Meinung. Mit
AppsLib können Sie Ihre Anwendungen
bewerten und kommentieren, sodass
es die gesamte AppsLib-Gemeinschaft
zu sehen bekommt.
AppsLib später aktualisieren
1.Tippen Sie auf das AppsLib Ikon auf der Startseite.
AppsLib wird geoffnet. Eine Meldung vorschlagt ein Update.
2.Tippen Sie auf Später aktualisieren.
Gehen Sie zu den Kategorien und installieren Sie Ihre Auswahl.
AppsLib wird in Meine Apps angezeigt. Tippen Sie auf die
Anwendung zu aktualisieren. Wenn Sie keine Aktualisierung
machen, vorschlagt eine Meldung immer die Aktualisierung an
der offnung von AppsLib.
Page 27

ACTUALIZACIÓN DEL SOFTWARE ARCHOS
ÄDirectamente en su ARCHOS
ÄEn Internet en www.archos.com/firmware
El sistema operativo ARCHOS (el sistema que gestiona los recursos de su dispositivo) se actualiza regularmente para incorporar características nuevas, mejoras y correcciones de programación. Dispone de dos formas principales de actualizar el software de su producto: directamente en su ARCHOS si el dispositivo puede conectarse a una red WiFi (Menu >Ajustes>Acerca del dispositivo>Actualizar
software), o con un ordenador (www.archos.com/firmware).
ESPAÑOL
?
QSG_A7_IT_PN109853_book.indd 25 13/06/2011 16:59:03
¿NECESITA AYUDA?
Manual completo y preguntas frecuentes
la pantalla de inicio de su dispositivo, en uno de los cinco paneles. Para acceder a las preguntas frecuentes, el dispositivo debe
estar conectado a Internet (consulte: Conexión a WiFi). También las encontrará en
Póngase en contacto con nuestro equipo de Asistencia Técnica: Visite www.archos.com/support para la asistencia por e-mail.
Por favor, registre su producto antes de ponerse en contacto con la asistencia técnica: Menu >Ajustes>Acerca del dispositivo>Registro en
línea, o con un ordenador (www.archos.com /register).
Tenga en cuenta que como estamos actualizando y mejorando constantemente nuestros productos, el software de su dispositivo
puede variar ligeramente con respecto a lo descrito en esta Guía Rápida.
: Puede acceder al manual completo y a las preguntas frecuentes directamente desde
www.archos.com/support.
Page 28

DESCRIPCIÓN DEL ARCHOS
Botones de volumen
1
Botón ON/OFF: manténgalo pulsado para encender/apagar el dispositivo.
2
Para poner el dispositivo en espera (y poder ponerlo en funcionamiento rápidamente), pulse una vez el botón de alimentación (Power). Al pulsar y mantener pulsado el botón de alimentación, aparece una ventana
con una lista de opciones. Dé un toque en “Apagar” > “Apagar” para apagar el ARCHOS por completo.
Indicador de carga (cuando el cable de alimentación está conectado) - Encendido: batería
3
cargando / parpadeando: batería cargada
Toma de auriculares
4
ESPAÑOL
QSG_A7_IT_PN109853_book.indd 26 13/06/2011 16:59:08
Puerto micro-USB: para conectar el ARCHOS a un ordenador, mediante el cable USB incluido
(para transferir archivos). También puede conectar un teclado, un ratón o un dispositivo USB
5
de almacenamiento masivo (MSC) como una unidad USB a través del adaptador host USB.
Micrófono 7
6
Volver a la pantalla anterior
9
Menú: ofrece distintas opciones de menú en función de la pantalla en la que se encuentre.
10
Inicio - Pulsación corta: vuelve a la pantalla de inicio. Pulsación larga: pasar a una de las
11
aplicaciones recientes.
Buscar: le permite buscar un elemento en el dispositivo o en Internet.
12
Conector de alimentación: para conectar el cable de alimentación suministrado.
13
Altavoz
14
26
► * Dependiendo del modelo. ** Con un cable de vídeo opcional (HDMI / Mini-HDMI).
Lector de tarjetas micro-SD* 8 Salida de video
15
Webcam
Restablecimiento del equipo: En caso de que el ARCHOS se quede bloqueado, puede
forzar el apagado del dispositivo manteniendo pulsado el botón durante 10 segundos.
5
7
15
4
8
14
mini-HDMI**
Consulte el manual completo para obtener más información.
13
6
10 11
9
2
3
1
12
Page 29

1
2
2
3
1
ANTES DE EMPEZAR
Cargado de la batería
Antes de utilizar su ARCHOS por primera vez, cargue completamente la batería:
Conecte el cable de alimentación suministrado al conector de alimentación del ARCHOS y a una
toma eléctrica de pared. El ARCHOS se encenderá y empezará a cargarse.
Seleccione Solo recarga. La luz indicadora de carga permanece encendida mientras la batería se carga.
Parpadeará cuando la batería esté totalmente cargada.
mientras se carga su batería.
Nota: Puede seguir utilizando el dispositivo
Asistente para la instalación
La primera vez que encienda el ARCHOS, el asistente para la instalación le guiará a través de una serie de pantallas que le ayudarán a configurar los parámetros principales: idioma, país, hora, etc.
Transferencia de archivos
Conecte el cable USB suministrado al ARCHOS y a un ordenador encendido. El ARCHOS se encenderá y le preguntará si desea
conectarlo. Seleccione Activar. En unos segundos, aparecerá el icono del ARCHOS en su ordenador.
QSG_A7_IT_PN109853_book.indd 27 13/06/2011 16:59:11
Es posible transferir archivos multimedia al dispositivo ARCHOS copiándolos y pegándolos en las carpetas correspondientes mediante el Explorador de Windows® (o la función Finder en un Mac®), o bien utilizando Windows Media® Player (pestaña Sincronizar).
Una vez finalizadas todas las transferencias de archivos, cierre el Explorador de Windows® y cualquier otro programa que
pueda haber leído o escrito en el ARCHOS. Haga clic en el icono “Quitar hardware con seguridad” de la bandeja del sistema,
junto al reloj. Ahora ya puede desenchufar el cable USB.
►
Consulte el manual completo para aprender a configurar todas las funciones de su dispositivo ARCHOS.
UK
EUR
US
27
ESPAÑOL
Page 30

1
2
3
4
www
5
CONEXIÓN A WIFI
En primer lugar, deberá configurar una red WiFi. Para que este procedimiento funcione, debe encontrarse en una zona WiFi
que le permita conectarse. Cuando el ARCHOS se encuentre dentro del alcance de una red que ya haya configurado una
vez, intentará realizar una conexión.
Para configurar una red WiFi nueva, sitúese en la pantalla de inicio, dé un toque en el icono de menú y, a continuación,
ESPAÑOL
seleccione
En la pantalla
inalámbricas
Ajustes
Ajustes
.
.
, seleccione
Conexiones
Si el WiFi está desactivado, dé un toque en la línea Wi-Fi para activarlo. Después, seleccione
Configuración de Wi-Fi. El ARCHOS realizará una exploración para ver si hay redes WiFi dispo-
nibles y las mostrará en la parte inferior de la pantalla.
Pinche en la red a la que desee conectarse. A continuación pulse en el campo
Contraseña de red inalámbrica para hacer aparecer el teclado virtual. Recomendamos
que seleccione Mostrar contraseña para ver los caracteres que está escribiendo.
Introduzca la información de red requerida*, pinche en Hecho y luego pinche en
Establecer conexión. Así, el ARCHOS intentará establecer una conexión al punto de
acceso WiFi con los parámetros de red introducidos.
* Con respecto a los puntos de acceso WiFi gratuitos, no es necesario introducir ninguna información especial. En las redes protegidas, necesitará o bien una clave
(serie de caracteres alfanuméricos) de tipo WEP, WPA o WPA2. Solicite los parámetros de conexión exactos requeridos a la persona que gestione la red WiFi.
28
►
Consulte el manual completo para aprender más acerca de la configuración Internet.
QSG_A7_IT_PN109853_book.indd 28 13/06/2011 16:59:13
Page 31

LA INTERFAZ DEL ARCHOS
Al girar el producto, el acelerómetro incorporado cambiará automáticamente la pantalla entre paisajes y de retratos. El dispositivo ARCHOS está equipado con una pantalla
táctil. La mayoría de zonas de pantalla reaccionan al tocarlas con un dedo.
▼
ESPAÑOL
Iconos de Notificación:
arrastre la barra superior
hacia abajo para mostrar los
mensajes de notificación (si
hay alguno).
Estas son las principales
aplicaciones de Android
™ (Video, Música, Galería,
Navegador web, etc). Dé un
toque en un icono para abrir
la aplicación correspondiente. Puede personalizar la
pantalla de inicio añadiendo
o eliminando accesos directos y widgets, cambiando el
fondo, etc.
►
Consulte el manual completo para obtener más información acerca de la interfaz.
QSG_A7_IT_PN109853_book.indd 29 13/06/2011 16:59:14
Pantalla principal
Iconos de Estado: (hora, estado
de la conexión WiFi, nivel de la
batería, etc.)
Pestaña de aplicaciones
Dé un toque en este icono para
mostrar todas las aplicaciones
Android™ instaladas en el
ARCHOS (juegos, distintas
herramientas, etc.). Puede
copiarlas a la pantalla de inicio.
Usted puede obtener otras
aplicaciones Android™ desde la
AppsLib (en la página principal).
29
Page 32

LA INTERFAZ DEL ARCHOS
La pantalla de inicio ampliada: Deslice el dedo horizontalmente en la pantalla para navegar entre los 5 paneles de la extensión
pantalla de inicio.
Las principales aplicaciones
ESPAÑOL
QSG_A7_IT_PN109853_book.indd 30 13/06/2011 16:59:15
Video: Reanudar la reproducción de tu vídeo en el que detuvo
simplemente pulsando sobre el pequeño símbolo “+”, a la
derecha del nombre de archivo.
Música: Deslice el dedo (verticalmente o horizontalmente)
en las cubiertas del álbum, a la izquierda, para navegar en sus
álbumes de manara mas visual.
Galería: le permite ver las imágenes como un muro de foto y luego
uno por uno, o como un pase de diapositivas en ejecución. Sólo tiene que arrastrar el dedo horizontalmente para saltar de una a otra.
Navegador: Abre varias páginas en mismo tiempo y pasa de
una al otra.
Email: Este aplicacion permite la gestion de cuentas de correo
electrónico del tipo POP o IMAP.
Cámara: Toma fotografías o secuencias de vídeo. En cualquier
momento, simplemente pulse sobre la miniatura en la parte
superior derecha para mostrar las últimas fotos tomadas.
Cambio de los ajustes: En la pantalla de inicio, dé un toque en el icono de menú , dé un toque en Ajustes y elija una categoría: Conexiones inalámbricas, Sonido y pantalla, Fecha y hora, etc.
Agregar más aplicaciones
: Conecte el ARCHOS Internet, a continuación, pulse el icono de AppsLib en la pantalla principal. Esta
biblioteca en línea de aplicaciones gratis y adquiribles, tiene cientos de juegos y aplicaciones útiles para descargar y utilizar.
30
►
Consulte el manual completo para aprender a configurar todas las funciones de su dispositivo ARCHOS.
Page 33

PANTALLA DE CONTROL TÁCTIL
Cuando el funcionamiento de la pantalla táctil se desajuste, pruebe a recalibrar la pantalla.
- Si puede acceder a la interfaz Android
1. En la pantalla de inicio del dispositivo, pinche en y luego en Ajustes.
2. En la pantalla de ajustes, pinche en Reparar y formatear al nal de la lista.
3. En la pantalla de reparar y formatear, pinche en Calibración de pantalla. Un mensaje en pantalla le indicará que deje el
ARCHOS sobre una supercie.
4. Coloque el dispositivo sobre una supercie plana.
5. Pinche en Calibrar.
Se iniciará el proceso de calibración de pantalla. No toque el producto hasta que la calibración haya terminado.
IMPORTANTE: Para que la calibración de la pantalla táctil se realice correctamente, deberá dejar el dispositivo sobre una supercie
plana (por ej. una mesa).
- Si no puede acceder a la interfaz Android
1. Al encender el dispositivo, mantenga pulsado y pinche en .
Aparecerá la pantalla de recuperación del ARCHOS.
Utilice para pasar de una opción a otra y para conrmar su selección.
2. Seleccione Reparar sistema y pulse .
3. En la pantalla de reparación del sistema, seleccione Forzar calibración de pantalla y pulse .
4. Pulse de nuevo para conrmar. Y coloque el producto sobre una supercie plana.
Die Kalibrierung des Touchscreens beginnt. Berühren Sie nicht das Gerät, bis die Kalibrierung abgeschlossen ist.
IMPORTANTE: Para que la calibración de la pantalla táctil se realice correctamente, deberá dejar el dispositivo sobre una supercie
plana (por ej. una mesa).
5. Al nal de la calibración, pulse . Aparecerá la pantalla de Recuperación del ARCHOS.
6. Seleccione No para reiniciar el dispositivo. La pantalla táctil ya está calibrada.
NOTA: Para más información, consulte la sección de ayuda.
QSG_A7_IT_PN109853_book.indd 31 13/06/2011 16:59:16
ESPAÑOL
31
Page 34

APPSLIB : TIENDA DE APLICACIONES
La gran tienda de aplicaciones para tabletas Android. Descarga miles de aplicaciones directamente desde tu tableta Android.
Conoce las mejores aplicaciones, tanto gratuitas como de pago.
Aplicaciones homologadas
Gracias a nuestro sello de homologación, podrás saber qué
aplicaciones han sido ya testadas por
nuestros ingenieros para funcionar en
tu dispositivo.
Todo tipo de aplicaciones
Clasicadas en categorías
claramente denidas como
Juegos 3D.
Nueva actualización disponible para AppsLib:
Actualizar ahora
1.Pulse AppsLib icono en la pantalla de inicio.
La aplicación se abre y una notificación de cambios se muestra.
2.Pulse Actualizar ahora. La actualización se inicia.
3.Suivre las instrucciones en la pantalla.
4. Al final de la instalación, pulse Abrir.
Nota: para descargar AppsLib, vaya a www.Appslib.com
QSG_A7_IT_PN109853_book.indd 32 13/06/2011 16:59:17
Plataforma sencilla y segura
Tendrás las ventajas del pago
protegido a través de PayPal. Para
simplicar el proceso de compra,
memoriza los datos de tu cuenta
Paypal en la aplicación AppsLib.
Puntuaciones y comentarios
Comparte tus opiniones. AppsLib te
permite puntuar y comentar las aplicaciones descargadas para que puedas
compartirlo con toda la comunidad
AppsLib.
Actualización más tarde
1.Pulse AppsLib icono en la pantalla de inicio.
La aplicación se abre y una notificación de cambios se muestra.
2.Pulse Actualizar más tarde.
L’accesso alle applicazioni categorie. AppsLib aparece en la lista
Mi Apps. Como AppsLib no se actualiza, aparece un mensaje cada
vez que abre la aplicación.
Page 35

AGGIORNAMENTO DEL SOFTWARE ARCHOS
Ä Direttamente dal dispositivo ARCHOS
Ä Su Internet all'indirizzo www.archos.com/rmware
Il sistema operativo ARCHOS, ovvero il sistema che consente di eseguire il dispositivo, viene aggiornato periodicamente con nuove
funzioni, miglioramenti e risoluzioni di errori. È possibile aggiornare il software del prodotto in due modi principali: direttamente dal dispositivo ARCHOS se in grado di collegarsi a una rete WiFi (Menu >Impostazioni>Info sul dispositivo>Aggiornamento Firmware) oppure
mediante un computer (www.archos.com/rmware).
?
SERVE AIUTO?
Manuale completo e domande frequenti: È possibile accedere al manuale completo e alle domande frequenti direttamente dalla
pagina iniziale del dispositivo, su uno dei cinque pannelli. Per accedere alle domande frequenti, il dispositivo deve essere collegato
a Internet (vedere: Colle gamento al WiFi). Inoltre possono essere consultate sul sito www.archos.com/support.
ITALIANO
Contattare il nostro servizio di assistenza tecnica:
mediante posta elettronica
Registrare il prodotto prima di contattare il servizio di assistenza tecnica: Menu >Impostazioni>Info sul dispositivo>Registrazione on line,
oppure mediante un computer (www.archos.com/register).
Poiché i nostri prodotti vengono continuamente aggiornati e migliorati, è possibile che il software del dispositivo si presenti in modo leggermente diverso o
QSG_A7_IT_PN109853_book.indd 33 13/06/2011 16:59:17
.
con funzioni modificate rispetto a quanto presentato nella presente Guida rapida.
Visitare il sito Web www.archos.com/support per ricevere assistenza
Page 36

DESCRIZIONE DI ARCHOS
Ripristino hardware: qualora il dispositivo ARCHOS risulti bloccato, è possibi-
Tasti volume
1
Pulsante ON/OFF: tenere premuto per accendere/spegnere.
2
Per posizionare il dispositivo in modalità standby (ed avviare avvio rapido) premere il tasto Power una volta.
Se il tasto Power viene mantenuto premuto, appare una finestra con una lista di opzioni. Per chiudere
ARCHOS completamente passare al “Spegni” > “Spegni”.
Indicatore della ricarica (quando il cavo di alimentazione sia collegato) - Acceso: batteria in
3
carica / lampeggiante: batteria caricata.
Spinotto cuffie
4
Porta micro USB: per collegare ARCHOS al vostro PC, utilizzare il cavo USB (anche per
trasferire files). Potete anche connettere una tastiera, un mouse o una periferica USB di
5
archiviazione di massa come una chiave USB, grazie all’adattatore host USB opzionale.
ITALIANO
QSG_A7_IT_PN109853_book.indd 34 13/06/2011 16:59:21
Microfono incorporato 7 Lettore di schede micro SD* 8 Uscita video mini HDMI**
6
Consente di tornare alla schermata precedente
9
Menu: consente di accedere alle opzioni del menu in base alla schermata corrente.
10
Schermata principale – pressione breve: per tornare alla schermata principale. Tasto
11
mantenuto premuto: per saltare ad una delle applicazioni recenti.
Ricerca: consente di cercare una voce sul dispositivo o in Internet.
12
Connettore di alimentazione: per collegare il cavo di alimentazione fornito.
13
Altoparlante 15 Webcam
14
34
► * A seconda del modello. ** Con cavo video opzionale (HDMI / mini HDMI).
le forzarne lo spegnimento tenendo premuto il pulsante per 10 secondi.
5
7
15
4
8
14
2
13
6
10 11
9
Per ulteriori informazioni, consultare il manuale.
3
1
12
Page 37

1
2
2
3
1
AVVIO
Caricamento della batteria
Prima di utilizzare il dispositivo ARCHOS per la prima volta, caricare completamente la batteria:
Collegare il cavo di alimentazione fornito al connettore di alimentazione del dispositivo ARCHOS e
a una presa a muro. Il dispositivo ARCHOS si accende e viene avviata la ricarica.
Toccare su Solo ricarica. La luce dell’indicatore in carica è accesa quando la batteria si sta caricando.
Lampeggia a carica terminata. Nota: il dispositivo può essere utilizzato anche durante la ricarica della
batteria.
Installazione guidata
Al primo avvio del dispositivo ARCHOS, l'installazione guidata consentirà di impostare facilmente le impostazioni principali:
lingua, paese, ora ecc.
Trasferimento di file su ARCHOS
Collegare il cavo USB in dotazione ad il ARCHOS e ad un computer funzionante. TIl dispositivo ARCHOS si accende e verrà richiesto
se si desidera connettere il dispositivo. Selezionare Collega. Dopo qualche secondo, verrà visualizzata l'icona ARCHOS sul computer.
QSG_A7_IT_PN109853_book.indd 35 13/06/2011 16:59:23
I file multimediali possono essere trasferiti nel dispositivo ARCHOS copiandoli/incollandoli nelle rispettive cartelle usando
Windows® Explorer (o Finder su Mac®), oppure usando Windows Media® Player (scheda Sync [Sincronizzazione]).
Una volta terminati tutti i trasferimenti dei file, chiudere Windows® Explorer e tutti gli altri programmi che possano aver
letto o scritto sull’ARCHOS. Fare clic sull’icona “Rimozione sicura dell’hardware” nella barra di sistema, accanto all’orologio.
Potete adesso disconnettere il cavo USB.
►
Per ulteriori informazioni sulla configurazione completa del dispositivo ARCHOS, consultare il manuale utente.
UK
EUR
US
35
ITALIANO
Page 38

1
2
3
4
www
5
ITALIANO
* Per i punti WiFi ad accesso libero, non è necessario immettere informazioni specifiche. Per le reti protette, è necessario immettere una chiave (una serie di numeri e/o lettere) di tipo WEP, WPA o WPA2. Contattare il gestore della rete WiFi per ottenere i parametri di connessione appropriati.
36
►
QSG_A7_IT_PN109853_book.indd 36 13/06/2011 16:59:24
COLLEGAMENTO AL WIFI
E’ fondamentale configurare una rete WIFI. Per procedere è necessario trovarsi in una zona WIFI che permetta la connessione. Ogni qualvolta ARCHOS si trova in un raggio di rete che avete già configurato una volta, cercherà una connessione.
Per configurare una nuova rete WIFI, andare allo schermo principale, sfiorare sul Menu l’icona quindi selezionare
Impostazioni .
Nello schermo Impostazioni selezionare
Wireless e reti.
Se WIFI è spento, toccare la linea Wi-Fi per portarla sullo stato attivo. Quindi selezionare
Impostazioni Wi-Fi. ARCHOS inzierà la ricerca delle reti WIFI disponibili mostrandole nella
parte superiore dello schermo.
Toccare la rete a cui connettersi. Quindi toccare all’interno del campo Password wire-
less per far apparire la tastiera virtuale. Consigliamo di selezionare Mostra password, in
modo da poter vedere i caratteri digitati.
Inserire le informazioni di rete richieste*, toccare su Fine, quindi su Connetti. A questo
punto, verrà eseguito un tentativo di connessione all'hot spot WiFi con i parametri di
rete immessi.
Per ulteriori informazioni sulla configurazione Internet, consultare il manuale.
Page 39

INTERFACCIA DI ARCHOS
Quando si ruota il dispositivo, l’accelerometro integrato cambia automaticamente la
schermata fra le visualizzazioni orizzontale e verticale. Il dispositivo ARCHOS è dotato
di uno schermo a sfioramento. La maggior parte delle aree dello schermo è in grado di
rilevare il tocco delle dita.
▼
Icone di Notifica: trascinare la
barra degli strumenti verso il
basso per mostrare i messaggi
di notifica (se attivi).
Queste sono le applicazioni
Android™ principali (Video,
Musica, Galleria, Web Browser,
ecc.) - sfiorare un’icona
per aprire l’applicazione
corrispondente. E’ possibile
personalizzare lo schermo
aggiungendo /rimuovendo
scorciatoie e congegni, cambiando sfondo ecc..
►
Per ulteriori informazioni sull'interfaccia, consultare il manuale.
QSG_A7_IT_PN109853_book.indd 37 13/06/2011 16:59:25
Pagina iniziale
Icone delle Stato: ora, colle-
gamento wifi, livello batteria
ecc..
Tabella delle applicazioni
Sfiorare questa icona per mostrare le applicazioni Android™
installate sul vostro ARCHOS
(giochi, tools vari ecc..). E’
possibile copiarli direttamente
sul vostro schermo. Potete
ottenere altre applicazioni
Android™ dall’Appslib che si
trova sulla pagina iniziale dello
schermo.
37
ITALIANO
Page 40

INTERFACCIA DI ARCHOS
Schermo intero: Far scorrere il dito orizzontalmente sullo schermo per navigare fra i 5 pannelli della schermata principale estesa.
Le applicazioni principali
Video: è possibile arrestare la riproduzione in corso di un
video e riprendere la visione dallo stesso punto, toccando sul
piccolo simbolo “+” sulla destra del nome del file.
ITALIANO
QSG_A7_IT_PN109853_book.indd 38 13/06/2011 16:59:26
Musica: far scorrere il dito (in verticale o in orizzontale) sulle
copertine degli album a sinistra, per visionarle.
Galleria: è possibile visualizzare le immagini come galleria
fotografica e poi singolarmente, oppure come presentazione.
Basta far scorrere il dito orizzontalmente per passare da una
foto all’altra.
Cambio Impostazioni: Dallo schermo sfiorare l’icona menu , toccare Impostazioni e scegliere una categoria: Wireless e
reti, Audio e display, Data e ora, ecc..
Aggiungere altre applicazioni: connettete il vostro Archos a Internet, poi premete cull’icona AppsLib sulla schermata inizia-
le. Questo portale vi propone di scaricare, gratuitamente e a pagamento, diverse centinaia di applicazioni, come quelle relative a
giochi divertenti o a servizi più pratici. Scegliete un’applicazione e scaricatela.
►
Per ulteriori informazioni sulla configurazione completa del dispositivo ARCHOS, consultare il manuale utente.
38
Browser: è possibile aprire più pagine contemporaneamente e
passare fra l’una e l’altra.
Email: permette la gestione di account di posta di tipo POP
o IMAP.
Fotocamera: per scattare foto o registrare sequenze video.
Basta toccare in qualsiasi momento sull’anteprima in alto a
destra per vedere le ultime immagini scattate.
Page 41

FUNZIONAMENTO A TOUCH SCREEN
Quando la funzione di schermo a soramento è compromessa, è possibile eseguire la ricalibrazione dello schermo.
- Se è possibile accedere all’interfaccia Android
1. Nella schermata principale del dispositivo, premere su , quindi premere Settings (Impostazioni).
2. Nella schermata Settings (Impostazioni), premere Repair & formatting (Riparazione e formattazione) in fondo all’elenco a
menu.
3. Nella schermata Repair & formatting (Riparazione e formattazione), premere Touchscreen Calibration (Calibrazione schermo a
soramento). Un messaggio indicherà di disattivare ARCHOS.
4. Riporre il dispositivo su una supercie piatta.
5. Premere Calibrate the touchscreen (Calibra lo schermo a soramento).
Viene avviata la calibrazione dello schermo a soramento. Non toccare il prodotto no a quando la calibrazione è terminata.
IMPORTANTE: se il dispositivo non viene riposto su una supercie piatta (ad es. un tavolo), la calibrazione dello schermo a so-
ramento non potrà essere effettuata.
- Se non è possibile accedere all’interfaccia Android
1. Quando si attiva il dispositivo, premere e tenere premuto .
Viene visualizzata la schermata di ripristino ARCHOS.
Utilizzare per scorrere le diverse opzioni e per convalidare la selezione.
2. Selezionare Ripara sistema e premere .
3. Nella schermata Repair system (Ripara sistema), selezionare Force Touchscreen Calibration (Forza calibrazione schermo a sora-
mento) e premere .
4. Premere nuovamente per confermare. E riporre il prodotto su una supercie piatta.
Viene avviata la calibrazione dello schermo a soramento. Non toccare il prodotto no a quando la calibrazione è terminata.
IMPORTANTE: se il dispositivo non viene riposto su una supercie piatta (ad es. un tavolo), la calibrazione dello schermo a so-
ramento non potrà essere effettuata.
5. Terminata la calibrazione, premere . Viene visualizzata la schermata di ripristino ARCHOS.
6. Selezionare No. Il dispositivo viene riavviato. Lo schermo a soramento è ricalibrato.
NOTA: per ulteriori informazioni, consultare il capitolo relativo all’assistenza.
39
QSG_A7_IT_PN109853_book.indd 39 13/06/2011 16:59:27
ITALIANO
Page 42

APPSLIB : APPLICATION STORE
AppsLib è il portale che offre applicazioni per i tablet Android. Da qui è possibile scaricare migliaia di applicazioni direttamente sul
proprio tablet Android. Scopri le migliori applicazioni disponibili, gratuite o a pagamento.
Applicazioni approvate
Grazie al timbro di approvazione, è
possibile sapere quali applicazioni
sono già state testate dai nostri
ingegneri e possono essere utilizzate
sui tablet.
Tutti i tipi di applicazioni
Sono presenti diverse categorie
facilmente riconoscibili e univoche, come ad esempio giochi 3D.
Quando è disponibile un aggiornamento, è possibile:
Aggiorna Ora
1.Premere AppsLib icona sulla schermata Home.
L’applicazione si apre e una notifica degli aggiornamenti viene
visualizzato.
2.Premere Update Now. L’aggiornamento ha inizio.
3.Suivre le istruzioni sullo schermo.
4. Al termine dell’installazione, premere Open
Nota: Per scaricare AppsLib, andare a www.Appslib.com
QSG_A7_IT_PN109853_book.indd 40 13/06/2011 16:59:28
Semplice e sicuro
L’utente potrà usufruire del servizio
di pagamento sicuro tramite PayPal.
L’account PayPal può essere associato
a AppsLib per fare acquisti in tutta
quillità, ogni volta che si vuole.
tran
Valutazioni e commenti
Un luogo dove condividere le proprie
opinioni. Tutti gli utenti della community di AppsLib potranno fornire valutazioni e commenti sulle applicazioni
quello che scrivono gli altri.
e leggere
Aggiorna più tardi
1.Premere AppsLib icona sulla schermata Home.
L’applicazione si apre e una notifica degli aggiornamenti viene
visualizzato.
2.Premere Update Later.
Applicazioni, come quelle relative a giochi divertenti o a servizi
più pratici. Scegliete un’applicazione e scaricatela.
AppsLib appare nella lista My Apps.Premere la domanda per
l’aggiornamento. Finché non si aggiorna, la notifica verrà visualizzata ogni volta che si apre Appslib.
Page 43

DE ARCHOS-SOFTWARE BIJWERKEN
Ä Rechtstreeks op uw ARCHOS
Ä Op het internet op www.archos.com/rmware
Het ARCHOS-besturingssysteem (het systeem waarop uw apparaat draait) wordt regelmatig bijgewerkt om u nieuwe functies
evenals verbeteringen en oplossingen voor problemen te bieden. Er zijn twee manieren om de software van uw product bij te werken: rechtstreeks op uw ARCHOS als uw apparaat aangesloten kan worden op een WiFi-netwerk (Menu >Instellingen>Over het
apparaat>Firmware Update) of met een computer (www.archos.com/rmware).
?
Omdat we onze producten voortdurend aanpassen en verbeteren, kan de software van uw apparaat er een beetje anders uitzien of een licht gewijzigde
QSG_A7_IT_PN109853_book.indd 41 13/06/2011 16:59:28
HULP NODIG?
Complete handleiding & Veelgestelde vragen: Vanuit een van de vijf panelen van het Home-scherm van uw toestel kunt u
direct bij de complete handleiding en de veelgestelde vragen komen. Om de veelgestelde vragen te kunnen raadplegen moet
uw toestel op het internet aangesloten zijn (zie hiervoor: Verbinden met het WiFi). U kunt ze ook vinden op
www.archos.com/support.
Neem contact op met onze Technisch ondersteuning:
Registreer uw product alvorens contact op te nemen met onze Technische ondersteuning: Menu >Instellingen>Over het apparaat>Online
registreren, of met een computer (www.archos.com/register).
functionaliteit hebben dan voorgesteld in deze Snelstartgids.
Surf naar www.archos.com/support voor ondersteuning via e-mail
.
NEDER-
LANDS
Page 44

BESCHRIJVING ARCHOS
Het toestel resetten: In het geval dat uw ARCHOS geblokkeerd raakt, kunt u het ap-
Volumeknoppen
1
AAN/UIT-knop: ingedrukt houden om in/uit te schakelen.
2
Om uw toestel in stand-by te zetten (en hem zo weer snel te kunnen opstarten), drukt u eenmaal op de Power-knop.
Wanneer u de Power-knop ingedrukt blijft houden, dan verschijnt er een venster met een lijst met opties. Druk op
“Uitschakelen” > “Uitschakelen” om uw ARCHOS volledig uit te schakelen.
Laadindicator (als het netsnoer is aangesloten) - Lampje aan: batterij wordt geladen /
3
Lampje knippert: batterij is opgeladen.
Hoofdtelefoonaansluiting
4
Micro-USB-poort: met de bijgesloten USB-kabel kunt u uw ARCHOS met uw computer verbinden
(om bestanden over te brengen). U kunt ook een toetsenbord, muis of USB-apparaat voor mas-
5
saopslag (bijvoorbeeld een USB-stick) aansluiten met behulp van de optionele USB-hostadapter.
Ingebouwde microfoon 7 Micro-SD-kaartlezer* 8 Mini-HDMI-video-uitgang**
6
Terugkeren naar het vorige scherm
9
Menu: geeft menuopties in functie van het actieve scherm.
10
LANDS
NEDER-
Home – kort indrukken: terug naar het Home-scherm. Ingedrukt houden: om naar een
11
van de recente applicaties te gaan.
Zoeken – hiermee kunt u een item op het toestel of op het internet zoeken.
12
Stroomaansluiting: voor aansluiting van het meegeleverde netsnoer.
13
Luidspreker 15 Webcam
14
42
► * Afhankelijk van het model. ** Optionele videokabel (HDMI / mini-HDMI) afzonderlijk te koop.
QSG_A7_IT_PN109853_book.indd 42 13/06/2011 16:59:32
paraat uitschakelen door de knop gedurende 10 seconden ingedrukt te houden.
5
7
15
4
8
14
2
13
6
10 11
9
Zie de volledige handleiding voor meer informatie.
3
1
12
Page 45
1
2
2
3
1
OPSTARTEN
De batteren laden
Laad de batterij volledig op alvorens de ARCHOS voor de eerste maal te gebruiken:
Sluit het meegeleverde netsnoer aan op de stroomaansluiting van de ARCHOS en op een stopcontact. Uw ARCHOS zal worden ingeschakeld en starten met laden.
Druk op Alleen batterij laden. Het indicatorledje brandt terwijl de batterij oplaadt. Wanneer de batterij volledig opgeladen is, zal het gaan knipperen. Opmerking: U kunt uw toestel gewoon gebruiken
wanneer de batterij opgeladen wordt.
Installatiewizard
De eerste keer dat u uw ARCHOS opstart, zal de installatiewizard u door een paar schermen leiden om u te helpen met de voornaamste instellingen: taal, land, tijd, enz.
Bestanden overzetten op uw ARCHOS
Verbind de meegeleverde USB-kabel met de ARCHOS en met een computer die aan staat. De ARCHOS zal worden ingeschakeld en
vragen of u wilt verbinden. Selecteert u Koppelen. Binnen enkele seconden verschijnt de ARCHOS als een pictogram op uw computer.
QSG_A7_IT_PN109853_book.indd 43 13/06/2011 16:59:34
U kunt uw mediabestanden op de ARCHOS plaatsen door ze ofwel in de betreffende map te kopiëren/met behulp van
Windows® Verkenner (of met Zoeken op een Mac®) ofwel met behulp van Windows Media® Player (tabblad 'Sync').
Sluit, zodra alle bestanden overgeplaatst zijn, Windows® Verkenner en eventuele andere toepassingen die bestanden op de
ARCHOS hebben gelezen of bestanden op uw ARCHOS hebben geplaatst. Klik op het ‘VEILIG VERWIJDEREN’-pictogram in
het systeemvak, naast de klok. U kunt de USB-kabel nu loskoppelen.
►
Zie de volledige handleiding om te leren hoe u uw ARCHOS volledig kunt configureren.
UK
EUR
US
43
NEDER-
LANDS
Page 46

1
2
3
4
www
5
VERBINDEN MET HET WIFI
U dient allereerst een WiFi-netwerk te configureren. Hiervoor dient u zich in een WiFi-zone te bevinden, zodat u verbinding kunt maken. Telkens dat uw ARCHOS zich in een zone bevindt met een netwerk dat u al geconfigureerd hebt, zal het
proberen om hier verbinding mee te maken.
Om een nieuw WiFi-netwerk te configureren, gaat u naar het beginscherm, drukt u op het Menu-pictogram en selecteert u Instellingen .
In het Instellingen-scherm, selecteert u
Draadloos en netwerken.
Als WiFi uit staat, druk dan op de Wi-Fi-regel om het aan te zetten. Selecteer vervolgens Wi-
Fi-instellingen. Uw ARCHOS zal nu gaan zoeken naar beschikbare WiFi-netwerken en zal de
gevonden netwerken aan de onderkant van het scherm afbeelden.
Tik het netwerk aan waarmee u wilt verbinden. Druk vervolgens in het Sleutelveld om
LANDS
NEDER-
44
QSG_A7_IT_PN109853_book.indd 44 13/06/2011 16:59:35
het virtuele toetsenbord af te beelden. We raden u aan om Draadloos wachtwoord te
selecteren om te zien welke karakters u typt.
Voer de vereiste netwerkinformatie* in en druk op Gereed. Druk vervolgens op
Verbinden. Uw ARCHOS zal nu proberen een verbinding tot stand te brengen met die
WiFi-hotspot aan de hand van de netwerkparameters die u hebt ingevoerd.
* Voor WiFi-punten met vrije toegang hoeven geen speciale gegevens te w orden ingevoerd. Voor beveiligde netwerken moet u ofwel een sleutel (een reeks cijfers
en/of letters) van het WEP, WPA of WPA2 invoeren. Vraag de beheerder van het WiFi-netwerk om de juiste vereiste verbindingsparameters te verkrijgen.
►
Raadpleeg de volledige handleiding voor meer informatie over de internetconfiguratie.
Page 47

DE ARCHOS-INTERFACE
Wanneer u het toestel draait, zal de ingebouwde versnellingsmeter automatisch
omschakelen tussen liggende en staande weergave. Uw ARCHOS-apparaat is uitgerust
met een aanraakscherm. De meeste schermoppervlakken zullen reageren wanneer u ze
met uw vinger aantikt.
▼
Berichtgevingspictogrammen:
sleep de bovenste werkbalk
naar beneden om eventuele
berichten te zien.
Dit zijn de belangrijkste
Android™-applicaties (Video,
Muziek, Galerij, Web Browser,
enz.). Druk op een pictogram
om de betreffende applicatie te
openen. U kunt de beginpagina
personaliseren door snelkoppelingen en widgets toe te
voegen/ te verwijderen, het
wallpaper (achtergrond) te
veranderen, enz.
► Z
ie de volledige handleiding voor meer informatie over de interface.
QSG_A7_IT_PN109853_book.indd 45 13/06/2011 16:59:36
Startscherm
Statuspictogrammen: (tijd,
status WiFi-verbinding,
batterij-niveau, enz.)
Tabblad Applicaties
Druk op dit pictogram om al de
op uw ARCHOS geïnstalleerde
Android™-applicaties te zien
(games, verschillende instrumenten, enz.). U kunt deze op
uw beginpagina plakken. U kunt
meer Android™-toepassingen
ophalen uit de AppsLib die u
vindt op het Beginscherm.
45
NEDER-
LANDS
Page 48

DE ARCHOS-INTERFACE
Het uitgebreide beginscherm: Beweeg uw vinger horizontaal over het scherm om tussen de 5 panelen van het uitgebreide Homescherm te navigeren.
De belangrijkste applicaties
Video: Stop halverwege een video en begin weer waar u
gestopt was door op het kleine “+”-symbool te drukken aan
de rechterkant van de bestandsnaam.
Muziek: Beweeg uw vinger (verticaal of horizontaal) over de
hoezen van de albums aan de linkerkant, om op een meer
visuele manier door uw albums te navigeren.
Galerij: Geef uw afbeeldingen weer als een fotomuur en
daarna één voor één of als een doorlopende diavoorstelling.
LANDS
NEDER-
Beweeg uw vinger eenvoudigweg horizontaal om van de ene
foto naar de andere te gaan.
De instellingen wijzigen: Druk op het beginscherm op het menu-pictogram , druk vervolgens op Instellingen en kies
een categorie: Draadloos en netwerken, Geluid en weergave, Datum en tijd, enz.
Het toevoegen van meer toepassingen: Met de ARCHOS verbonden met het internet, druk op het pictogram AppsLib
op het startscherm. Deze online bibliotheek van gratis en betaalde toepassingen heeft honderden leuke spelletjes en nuttige
toepassingen om te downloaden en te gebruiken.
46
►
Zie de volledige handleiding om te leren hoe u uw ARCHOS volledig kunt configureren.
QSG_A7_IT_PN109853_book.indd 46 13/06/2011 16:59:38
Browser: U kunt meerdere pagina’s tegelijkertijd open hebben
en heen en weer schakelen tussen de verschillende pagina’s.
Email: Compatibel met POP- en IMAP-e-mailaccounts.
Camera: Foto’s maken en bewegende beelden opnemen. Druk
simpelweg op elk willekeurig moment op de miniatuur aan de
rechterbovenkant om de laatst genomen foto’s af te beelden.
Page 49

TOUCHSCREEN OPERATIE
Als het aanraakscherm niet meer correct functioneert, kunt u het scherm opnieuw kalibreren.
- Als u toegang hebt tot de Android-interface
1. Tik in het startscherm van het apparaat op en vervolgens op Settings [Instellingen].
2. Tik in het instellingenscherm op Repair & Formatting [Reparatie en formattering], onder in de menulijst.
3. Tik in het scherm Repair & Formatting [Reparatie en formattering] op Touchscreen Calibration [Kalibrering van aanraakscherm]. Er wordt een bericht weergegeven dat u de ARCHOS moet neerleggen.
4. Leg het apparaat op een plat oppervlak.
5. Tik op Calibrate the touchscreen [Het aanraakscherm kalibreren].
De kalibrering van het aanraakscherm begint. Raak het product pas aan wanneer de kalibrering is voltooid.
BELANGRIJK: Als u het apparaat niet op een plat oppervlak legt (zoals een tabel), wordt het aanraakscherm niet goed gekalibreerd.
- Als u geen toegang hebt tot de Android-interface
1. Houd ingedrukt terwijl u het apparaat draait, en druk op .
Het scherm ARCHOS Recovery [ARCHOS-herstel] wordt weergegeven.
Gebruik om tussen opties te schakelen en om uw selectie te bevestigen.
2. Kies Repair system [Systeem herstellen] en druk op .
3. Selecteer Force touchscreen calibration [Kalibrering van aanraakscherm forceren] in het scherm Repair system [Systeem herstellen] en druk op .
4. Druk nogmaals op om te bevestigen. Leg het product op een plat oppervlak.
De kalibrering van het aanraakscherm begint. Raak het product pas aan wanneer de kalibrering is voltooid.
BELANGRIJK: Als u het apparaat niet op een plat oppervlak legt (zoals een tabel), wordt het aanraakscherm niet goed gekalibreerd.
5. Druk aan het einde van de kalibrering op . Het scherm ARCHOS Recovery [ARCHOS-herstel] wordt weergegeven.
6. Selecteer No [Nee]. Het apparaat wordt opnieuw opgestart. Het aanraakscherm is nu opnieuw gekalibreerd.
OPMERKING: raadpleeg het hoofdstuk Need help [Hulp nodig] voor meer informatie.
47
QSG_A7_IT_PN109853_book.indd 47 13/06/2011 16:59:39
NEDER-
LANDS
Page 50

APPSLIB : APPLICATION STORE
AppsLib is de applicatiewinkel voor Android tablets. In deze library zijn duizenden applicaties verkrijgbaar die u rechtstreeks
kunt downloaden naar uw Android tablet. Ontdek nu de beste gratis en betaalde apps.
Goedgekeurde applicaties
Aan ons keurmerk kunt u zien welke
applicaties tot nu toe door onze engineers zijn getest en zijn goedgekeurd
voor uw tablet.
Veilig en eenvoudig
U kunt veilig betalen via PayPal.
Koppel uw PayPal-account aan
AppsLib om zorgeloos te kunnen
winkelen wanneer het u uitkomt.
Uitgebreid assortiment
U kunt zoeken in een groot
aantal categorieën, zoals 3D
games.
Wanneer een update beschikbaar is, is het mogelijk:
Update nu AppsLib
1.Druk op het pictogram AppsLib op het startscherm.
De toepassing wordt geopend en geeft een melding van updates.
2.Druk Update now. De update wordt gestart.
3.Volg de instructies op het scherm.
4.Aan het einde van de installatie, drukt u op Openen.
OPMERKING: Download Appslib op www.appslib.com.
QSG_A7_IT_PN109853_book.indd 48 13/06/2011 16:59:40
Beoordelingen en commentaar
Geef ons uw mening. Met Appslib
kunt u uw beoordelingen en commentaar delen met de AppsLib
community.
Update later AppsLib
1.Druk op het pictogram AppsLib op het startscherm.
De toepassing wordt geopend en geeft een melding van updates.
2.Druk Update Later.
U kunt toegang tot de applicatie categorieën. U kunt downloaden en gebruiken. AppsLib wordt weergegeven in de lijst
My Apps. Druk op de kennisgeving aan update. Zolang je geen
update, zal een melding worden weergegeven wanneer je open
Appslib.
Page 51

ARCHOS YAZILIMINI GÜNCELLEŞTİRME
ÄDoğrudan ARCHOS'unuzdan
Ä Web sitesinde www.archos.com/rmware
ARCHOS işletim sistemi (cihazınızda çalışan sistem) yeni özellikler, gelişmeler ve ek yazılımlar kazandırmak için periyodik olarak
güncelleştirilir. Ürününüzün yazılımını iki şekilde güncelleştirebilirsiniz: cihazınız bir WiFi ağına bağlanabiliyorsa doğrudan ARCHOS'unuzla
(Menü > “Settings” [Ayarlar] > “About device” [Cihaz hakkında] > “Firmware Update” [Cihaz Yazılım Güncellemesi]), ya da bir
bilgisayarla (www.archos.com/firmware).
?
QSG_A7_IT_PN109853_book.indd 49 13/06/2011 16:59:40
YARDIMA MI İHTİYACINIZ VAR?
Tam kılavuz ve Sık Sorulan Sorular: Tam kılavuza ve sık sorulan sorular kısmına direkt olarak cihazınızın ekranından beş panel
üzerinden ulaşabilirsiniz. Sık sorulan sorular kısmına girebilmek için cihazınız internete bağlı olmak zorundadır (Bakınız: WIFI
bağlantısı). Ayrıca www.archos.com/support adresindende ulaşabilirsiniz.
Teknik Destek Ekibimizle Bağlantı Kurun: E-posta desteği için www.archos.com/support adresini ziyaret edin (İngilizce,
Fransızca ve Almaca e-posta kabul ediliyor).
Teknik Destek Ekibiyle bağlantı kurmadan önce lütfen ürününüzü kaydedin: Menü > [Ayarlar] > “About device” [Cihaz hakkında] > “Online
Registration” [Çevrimiçi Kayıt]), ya da bir bilgisayarla (www.archos.com/firmware).
Mühendislerimiz yazılımı sürekli olarak güncelleştirip geliştirdiği için, cihazınızın yazılımı bu Hızlı Başlangıç Kılavuzu'nda
sunulandan biraz farklı görünüme veya değiştirilmiş işlevselliğe sahip olabilir.
TÜRKÇE
Page 52

CİHAZ TANIMI
Ses düğmeleri
1
AÇIK/KAPALI Düğmesi: Açmak/kapatmak için basılı tutun.
2
Cihazınızı beklemeye almak (ve hızlı başlangıç imkanı tanımak) için Güç düğmesine bir kez basın. Güç düğmesine uzun bastığınızda, seçenek listesi bulunan bir pencere açılır. ARCHOS‘unuzu tamamen kapatmak için
“Kapat” > “Kapat” seçeneğine dokunun.
Güç/Şarj göstergesi: Cihaz açık konumdayken açılır. Yanıp sönüyor: pil şarj oldu
3
Kulaklık çıkışı
4
Micro USB bağlantı noktası: (dosya aktarmak) birlikte verilen USB kablosunu kullanarak
5
ARCHOS‘unuzu bilgisayarınıza bağlamak için. Satın alabileceğiniz USB Host adaptor sayesinde
USB bellek, fare, klavye bağlayabilirsiniz
Bütünleşik mikrofon
6
Önceki ekrana dönüş
9
10
Menü: geçerli ekrana göre menü seçenekleri verir.
Ana ekran - Kısa süreli basmak: Ana ekrana döner. Uzun süre basılı tutmak: Çalışan
11
uygulamalardan birine atlar.
Araştırma- Cihaz yada internet üzerindeki bir öğenin araştırlmasına olanak verir.
12
TÜRKÇE
Güç kablosu: Kutunun içinden çıkan güç kablosu bu yuvaya takılır.
13
14
Hoparlör 15 Webcam
50
► * Modeline bağlı. ** Opsiyonel kablo (HDMI / Mini HDMI).
QSG_A7_IT_PN109853_book.indd 50 13/06/2011 16:59:44
Micro SD kart okuyucu* 8 Mini HDMI video çıkışı**
7
Donanımı Sıfırlama: ARCHOS'unuzun çalışırken kilitlenmesi halinde düğmesine 10 saniye
basılı tutarak cihazın kapanmasını sağlayabilirsiniz.
5
7
15
4
8
14
2
13
9
Hakkında daha fazla bilgi için el kitabına bakın.
6
10 11
3
1
12
Page 53

1
2
2
3
1
BAŞLATMA
Pili Şarj Etme
ARCHOS cihazınızı ilk kez kullanmadan önce, pili tamamen şarj edin:
ARCHOS güç kablosunun bir ucunu duvardaki prize, diğer ucunu ARCHOS’a takın. ARCHOS cihazınız
açılacak ve şarj olmaya başlayacaktır.
Ardından “Charge Only” [Sadece Şarj] seçeneğini belirleyin. Pil şarj olurken Şarj gösterge ışığı açıktır.
Pil tam şarj olduğunda gösterge yanıp sönecektir. Not: Cihaz şarj olurken bir yandan da kullanılabilir.
Kurulum Sihirbazı
ARCHOS'unuzu ilk kez çalıştırdığınızda, kurulum sihirbazı önünüze birkaç ekran çıkarıp temel ayarları yapmanıza yardımcı olur:
Language [dil], country [ülke], time [saat] vb.
ARCHOS’a dosya gönderimi
Birlikte verilen USB kablosunu ARCHOS‘a ve çalışmakta olan bilgisayara bağlayın. ARCHOS açılır ve bağlanmak mı yoksa şarj
etmek mi istediğinizi sorar. Bağlanmayı seçin. Birkaç saniye içinde ARCHOS bilgisayarınızda bir simge olarak belirir.
Medya dosyalarınızı ARCHOS’a aktarmak için Windows® Explorer (veya Macintosh için Finder) ya da Windows Media® Player
kullanarak dosyaları ilgili klasörlere kopyalayıp/yapıştırabilirsiniz.
Tüm dosya aktarımlarınız bittiğinde, Windows® Explorer ve okunmuş veya ARCHOS’a yazılmış olan diğer her türlü programı kapatın. Sistem tepsisindeki saatin yanında bulunan “güvenli kaldır” simgesini tıklatın. Şimdi USB kablonuzu çıkartabilirsiniz.
UK
EUR
US
TÜRKÇE
►
ARCHOS cihazınızın nasıl bütünüyle yapılandırılacağını öğrenmek için kullanıcı el kitabına bakın.
QSG_A7_IT_PN109853_book.indd 51 13/06/2011 16:59:45
51
Page 54

1
2
3
4
www
5
WIFI BAĞLANTISI
Öncelikle bir WiFi ağı yapılandırmanız gereklidir. Bu prosedürün işe yaraması için, bağlanmanıza imkan verecek bir WiFi
alanında olmanız gereklidir. ARCHOS daha önce bir kez yapılandırmış olduğunuz bir ağın kapsama alanında bulunduğunda,
bağlantı kurmayı deneyecektir.
Yeni bir WiFi ağı yapılandırmak için Giriş ekranına gidin, Menü simgesine dokunun, ardından “Settings” [Ayarlar] seçeneğini belirleyin.
“Settings” [Ayarlar] ekranında “Wireless &
networksw” [Kablosuz özelliği ve ağlar] seçeneğini
belirleyin.
WiFi kapalıysa, açmak için “Wi-Fi” [Kablosuz] çizgisine dokunun. Ardından “Wi-Fi settings”
[Kablosuz ayarları] seçeneğini belirleyin. ARCHOS mevcut WiFi ağlarını tarayacak ve ekranın alt
kısmında görüntüleyecektir.
Bağlanmak istediğiniz ağa dokunun. Daha sonra sanal klavyenin belirmesi için düğme
alanının içine dokunun. Yazdığınız karakterleri görebilmeniz için “Wi-Fi settings” [Şifreyi
göster] kısmını seçmenizi öneririz.
Gerekli bağlantı bilgisini girin*. ‘Bitti’a basın ve daha sonra ‘Bağlan’a basın. Şimdi
TÜRKÇE
52
QSG_A7_IT_PN109853_book.indd 52 13/06/2011 16:59:47
ARCHOS'unuz girdiğiniz ağ parametreleriyle WiFi etkin noktasıyla bağlantı kurmayı
* Ücretsiz WiFi erişim noktaları için herhangi bir özel bilgi girilmesine gerek yoktur. Güvenli ağlar için, WEP, WPA ya da WPA2 türünde bir anahtar (bir numara ve/
veya harf dizisi). Gerekli doğru bağlantı parametrelerini edinmek için WiFi ağ yöneticisine danışın.
► İnternet yapılandırması hakkında daha fazla bilgi edinmek için tam El Kitabına bakın.
Page 55

ARCHOS ARAYÜZÜ
Cihazı döndürdüğünüz zaman, entegre akselerometre yatay ve dikey görünüm arasında
otomatik olarak ekranı değiştirir. ARCHOS cihazınız dokunmatik ekranla donatılmıştır.
Parmağınızla hafifçe dokunduğunuzda ekranın çoğu bölgesi tepki verir.
▼
Bildirim simgeleri: bildirim
mesajlarını (varsa) göstermek
için üst çubuğu aşağı doğru
sürükleyin.
Bunlar ana Android uygulamaları. (“Web Browser” [Web
Tarayıcı], “EMail” [E-posta],
“Contacts” [Kişiler], vb.).
İlgili uygulamayı açmak için bir
simgeye dokunun. Kısayollar ve
pencere öğeleri ekleyerek/kaldırarak, duvar kağıdını değiştirerek
vb. Giriş ekranını özelleştirebilirsiniz.
►
A
rayüz hakkında daha fazla bilgi için el kitabına bakın.
QSG_A7_IT_PN109853_book.indd 53 13/06/2011 16:59:48
Giriş Ekranı
Durum simgeleri: (saat,
WiFi bağlantı durumu, pil
seviyesi, vb.)
Uygulamalar Sekmesi
ARCHOS‘unuza kurulan tüm
Android™ uygulamalarını
(oyunlar, çeşitli araçlar, vb.)
göstermek için bu simgeye
dokunun. Bunları Giriş ekranına kopyalayabilirsiniz. Ana
ekranda bulunan AppsLib’den
daha çok Android™ uygulaması edinebilirsiniz.
53
TÜRKÇE
Page 56

ARCHOS ARAYÜZÜ
Genişletilmiş Giriş ekranı: Uzatılmış ana ekranın 5 paneli arasında dolaşmak için ekran üzerinde parmağınızı yatay olarak kaydırın.
Ana uygulamalar
Video: Video ortasında durun ve dosya isminin sağındaki küçük
‘+’ sembolüne basarak izlediğiniz yerden ilerlemeye devam
edebilirsiniz.
Müzik: Albüm içeriği üzerinde parmağınızı yatay yada dikey
olarak kaydırabilirsiniz. Sol tarafta tüm albüm boyunca daha
görsel seyir etmek için.
Galeri: Resimlerinizi bir fotoğraf duvarı olarak teker teker yada
slayt show olarak görebilirsiniz. Parmağınızı basitçe yatay olarak
sürüyerek bir fotoğraftan diğerine atlayabilirsiniz.
Web Tarayıcı: Birden fazla sayfayı aralarında ileri-geri yaparak
aynı anda açık tutabilirsiniz
E-posta: POP, IMAP tipi e-posta hesaplarına izin verir.
Kamera: Video veya fotoğraf çekebilirsiniz. Çok basit bir şekilde
sağ üst köşeye dokunarak son çekilen resimleri görüntüleyebilirsiniz
TÜRKÇE
Ayarları değiştirme: Giriş ekranından Menü simgesine dokunun, “Settings” [Ayarlar] seçeneğine dokunun ve bir kategori
seçin: “Wireless & networksw” [Kablosuz özelliği ve ağlar], “Sound & Display” [Ses ve Görüntü], “Date & Time” [Tarih ve Saat], vb.
Daha fazla uygulama eklemek: ARCHOS internete bağlıyken ana ekrandaki AppsLib sembolüne dokunun.Bu ücretsiz ve
satın alınabilir uygulamalar kitaplığı size yüzlerce eğlenceli oyun ve uygulamayı indirip kullanma olanağı sunmaktadır.
54
►
ARCHOS cihazınızın nasıl bütünüyle yapılandırılacağını öğrenmek için kullanıcı el kitabına bakın.
QSG_A7_IT_PN109853_book.indd 54 13/06/2011 16:59:49
Page 57

DOKUNMATIK EKRAN OPERASYON
Dokunmatik ekran işlevi bozulduğunda, dokunmatik ekranınızı yeniden kalibre edebilirsiniz.
- Android arayüzüne erişim sağlayabiliyorsanız
1. Cihazın ana ekranındayken öğesine ardından Settings’e (Ayarlar) dokunun.
2. Settings (Ayarlar) ekranında, menü listesinin altındaki Repair & Formatting (Onarım ve Biçimlendirme) öğesine dokunun.
3. Repair & Formatting (Onarım ve Biçimlendirme) ekranında, Touchscreen Calibration (Dokunmatik Ekran Kalibrasyonu) öğesine
dokunun. ARCHOS’nuzu indirmenizi söyleyen bir mesaj göreceksiniz.
4. Cihazı düz bir yüzeye yerleştirin.
5. Calibrate the touchscreen (Dokunmatik ekranı kalibre et) öğesine dokunun.
Dokunmatik ekranın kalibrasyonu başlar. Kalibrasyon bitene kadar ürüne dokunmayın.
ÖNEMLİ: Cihazı düz bir yüzeye yerleştirmediyseniz (örn. Masa), dokunmatik ekran kalibrasyonu başarılı olmaz.
- Android arayüzüne erişiminiz yoksa
1. Cihazı açtığınızda öğesini basılı tutun ve öğesine basın.
ARCHOS Kurtarma ekranı görüntülenir.
Seçenekler arasında geçiş yapmak için öğesini ve seçiminizi onaylamak için öğesini ve seçiminizi onaylamak için.
2. Repair system’i (Sistemi onar) seçin ve öğesine basın.
3. Repair system (Sistemi onar) ekranında, Force touchscreen calibration’ı (dokunmatik ekran kalibrasyonunu yürüt) seçin ve öğesine
basın.
4. Onaylamak için öğesine tekrar basın. Ve ürününüzü düz bir yüzeye yerleştirin.
Dokunmatik ekranın kalibrasyonu başlar. Kalibrasyon bitene kadar ürüne dokunmayın.
ÖNEMLİ: Cihazı düz bir yüzeye yerleştirmediyseniz (örn. Masa), dokunmatik ekran kalibrasyonu başarılı olmaz.
5. Kalibrasyonun sonunda . öğesine basın. ARCHOS Kurtarma ekranı görüntülenir.
6. Seçim No. Cihazınız yeniden başlatılır. Dokunmatik ekran artık yeniden kalibre edilmiştir.
NOT: Daha fazla bilgi için, Yardım gerekli bölümüne bakın.
55
QSG_A7_IT_PN109853_book.indd 55 13/06/2011 16:59:50
TÜRKÇE
Page 58

APPSLIB : UYGULAMA MAĞAZASI
AppsLib, Android tabletler için uygulama pazarıdır. Android tabletinize doğrudan indirilecek binlerce uygulama mevcuttur.
En iyi ücretsiz ve ücretli uygulamaları kontrol edin.
Onaylı uygulamalar
Onaylı damgamız sayesinde,
tabletinizde çalışması için halihazırda
mühendislerimiz tarafından test
edilmiş uygulamaları görebilirsiniz.
Tüm uygulamalar
3D oyunları gibi açık ve benzersiz kategoriler mevcuttur.
Bir güncelleme mevcut olduğunda, bu mümkün:
AppsLib Update İÇİN
1.Basın AppsLib simgesi .
uygulaması açılır ve güncellemeleri bir bildirim görüntüler.
2.Press Now güncelleyin. Güncelleştirme başlar.
3.ekrandaki yönergeleri izleyin.
4.Aç tuşuna basın.
NOT: Download Appslib www.appslib.com gör.
QSG_A7_IT_PN109853_book.indd 56 13/06/2011 16:59:51
Basit, güvenli
PayPal ile güvenli ödemelerden
yararlanırsınız. İstediğiniz zaman
sorunsuz alış veriş yapmak için
PayPal hesabınızı AppsLib’e
bağlayın.
Değerlendirmeler ve yorumlar
Düşüncelerinizi paylaşın. AppsLib
ile tüm AppsLib topluluğunun
görmesi için uygulamalarınıza dair
değerlendirme ve yorum yapabilirsiniz.
Güncelleme AppsLib sonra
1.Basın AppsLib simgesi .
uygulaması açılır ve güncellemeleri bir bildirim görüntüler.
2.Basın Güncelleme sonrası.
You can access the application categories and download.
Appslib will be listed on your My Apps list. Tap on it to update.
As long as you do not update, a notification will be displayed
whenever you open Appslib.
Page 59

AKTUALIZACJA OPROGRAMOWANIA
Ä Bezpośrednio na twoim ARCHOS’ie*
Ä Poprzez stronę Interenetową www.archos.com/rmware
* Menu > Settings [Ustawienia] > About device [Informacje o urządzeniu] > Firmware update [Aktualizacja Oprogramowania]
?
Jako, że bardzo często aktualizujemy i udoskonalamy nasze produkty, oprogramowanie twojego urządzenia może nieznacznie różnić się wyglądem lub
QSG_A7_IT_PN109853_book.indd 57 13/06/2011 16:59:51
POTRZEBUJESZ POMOCY?
Kompletna instrukcja wraz z FAQ: kompletna instrukcja i FAQ są dostępne bezpośrednio z Menu Głównego twojego urządzenia, na
jednym z pięciu podstawowych paneli. Aby uzyskać dostęp do FAQ urządzenie musi być podłączone do Internetu (zobacz: Podłączanie
do WiFi). Powyższe dokumenty możesz również odnaleźć pod adresem internetowym: www.archos.com/support.
Kontakt z Pomocą Techniczną: aby skontaktować się poprzez e-mail musisz odwiedzić stronę internetową:
www.archos.com/support
Prosimy zarejestrować swój produkt przed kontaktem z Pomocą Techniczną: Menu > Settings [Ustawienia] > About device
[Informacje o urządzeniu] > Online registation [Rejestracja online], lub poprzez Internet: www.archos.com/register.
funkcjonalnością od przykładów podanych w niniejszej instrukcji.
POLSKA
Page 60

OPIS URZĄDZENIA
Restart urządzenia - w przypadku kiedy twoje urządzenie zawiesi się podczas działania mo-
Klawisze regulacji poziomu głośności
1
Klawisz zasilania
2
Aby wprowadzić urządzenie w stan wstrzymania (oraz aby szybko uruchomić ponownie), naciśnij jednokrotnie klawisz zasilania. Kiedy naciśniesz i przytrzymasz klawisz zasilania pojawi się okno z listą opcji. Kliknij:
„Wyłącz” > „Wyłącz” aby zupełnie wyłączyć twoje urządzenie.
Wskaźnik pracy urządzenie / ładowania baterii - dioda świeci się kiedy urządzenie jest w
3
trybie pracy. Migający: bateria całkowicie naładowana.
4
Gniazdo słuchawek
Port micro-USB: pozwala na podłączanie Twojego urządzenia do komputera przy pomocy
załączonego kabla USB (umożliwia przesyłanie plików). Z opcjonalnego adaptera USB host:
5
aby podłączyć klawaiturę, mysz lub dysk zewnętrzny, np.: pendrive.
Wbudowany mikrofon
6
Back (Powrót) - powrót do poprzedniego ekranu
9
Menu (Menu) - udostępnia opcje menu w zależności od bieżącego ekranu
10
Home (Ekran główny) - Krótkie przyciśnięcie: powrót do Ekranu głównego. Przytrzymanie:
11
przeskok do jednej z aktywnych aplikacji.
Search (Wyszukiwanie) - pozwala przeszukiwać urządzenie lub internet.
12
Złącze zasilania: podłączyć kabel zasilania.
13
Głośnik
14
POLSKA
58
►
* W zależności od modelu. ** Z opcjonalnego przewodu wideo (HDMI / mini-HDMI). Skorzystaj z kompletnej instrukcji by uzyskać więcej informacji.
QSG_A7_IT_PN109853_book.indd 58 13/06/2011 16:59:55
Port kat micro-SD* 8 Wyjście mini-HDMI typu jack**
7
15
Kamery
żesz spowodować wyłączenie urządzenia przytrzymując klawisz zasilania przez 10 sekund.
5
7
15
4
8
14
2
13
6
10 11
9
3
1
12
Page 61

1
2
2
3
1
START
Ładowanie baterii.
Przed pierwszym włączeniem swojego urządzenia kompletnie naładuj jego baterię:
Podłącz kabel zasilania do gniazda zasilania ARCHOS i do gniazdka sieci elektrycznej. Urządzenie
włączy się automatycznie i rozpocznie się ładowanie baterii.
Kliknij Charge Only [Tylko ładowanie]. Wskaźnik LED ładowania świeci się podczas ładowania baterii;
zacznie migać po zakończeniu ładowania. Zwróć uwagę: Wciąż możesz używać urządzenie podczas
ładowania baterii.
Kreator instalacji
Podczas pierwszego uruchomienia urządzenia kreator instalacji poprowadzi cię poprzez kilka ekranów by pomóc ci wybrać podstawowe
ustawienia: język, kraj, czas, itp.
Transfer plików do twojego urządzenia
Podłącz dołączony do zestawu kabel USB do urządzenia oraz do pracującego komputera. Urządzenie włączy się automatycznie i
wyświetli się na ekranie pytanie czy chcesz połączyć się z komputerem. Kliknij Mount [Podłącz] aby się połączyć. Po kilku sekundach na ekranie komputera pojawi się ikonka symbolizująca twoje urządzenie.
QSG_A7_IT_PN109853_book.indd 59 13/06/2011 16:59:56
Możesz transferować swoje pliki multimedialne do urządzenia zarówno kopiując je, jak i używając metody „przeciągnij i upuść” do wybranych
folderów, korzystając z aplikacji Windows® Explorer (aplikacji Finder w przypadku Mac®) lub używając aplikacji Windows Media® Player.
W momencie kiedy transfer plików jest już zakończony, zamknij Windows® Explorer oraz każdy inny program, który mógłby współpracować z urządzeniem. Kliknij ikonkę „safely remove (bezpieczne usuwanie)” na pasku zadań obok zegara. Teraz możesz odłączyć bezpiecznie kabel USB.
► Skorzystaj z kompletnej instrukcji by dowiedzieć się jak dokładnie skonfigurować wszystkie funkcje urządzenia.
UK
EUR
US
59
POLSKA
Page 62

1
2
3
4
www
5
PODŁĄCZANIE DO WIFI
Przede wszystkim, należy skonfigurować sieć WiFi. Aby procedura konfiguracji mogła się odbyć należy być w strefie Wi-Fi,
z którym będzie można się połączyć. Za każdym razem, kiedy twoje urządzenie będzie w zasięgu tych sieci, które zostały
już wcześniej skonfigurowane, będzie następowała automatyczna próba nawiązania połączenia.
Aby skonfigurować nową sieć WiFi, przejdź do Home (Ekranu Głównego), kliknij ikonkę Menu , następnie wybierz Ustawienia
.
Na ekranie Ustawienia wybierz Sieci zwykłe i
bezprzewodowe.
Jeśli moduł WiFi jest wyłączony, kliknij na linię Wi-Fi w podmenu by włączyć moduł. Następnie
wybierz Ustawienia WiFi. Urządzenie rozpocznie skanowanie w poszukiwaniu dostępnych sieci
WiFi, następnie wyświetli je u dołu ekranu.
Kliknij w nazwę sieci z którą chcesz się połączyć. Następnie kliknij w pole Hasło sieci bezprze-
wodowej by otworzyć wirtualną klawiaturę. Proponujemy wybrać opcję: Pokaż hasło aby mieć
możliwość podglądu używanych liter.
Wprowadź wymagane informacje dotyczące sieci, kliknij na Gotowe a następnie kliknij ikonkę
Połącz Twoje urządzenie będzie teraz starało się ustanowić połączenie z tą siecią WiFi, której
parametry zostały wcześniej wprowadzone.
* Aby połączyć się z ogólnie dostępnymi sieciami WiFi nie jest wymagane wprowadzanie specjalnych informacji. Podczas łączenia się z zabezpieczonymi sieciami
będzie wymagane podanie hasła (seria liczb i/lub cyfr) w formacie WEP, WPA, or WPA2. Skontaktuj się z osobą zarządzającą siecią WiFi aby otrzymać wymagane
dokładne dane umożliwiające połączenie.
POLSKA
60
► Skorzystaj z kompletnej instrukcji by dowiedzieć się więcej na temat konfiguracji Internetu.
QSG_A7_IT_PN109853_book.indd 60 13/06/2011 16:59:58
Page 63

INTERFEJS URZĄDZENIA
Kiedy obracasz produkt wbudowany akcelerometr automatycznie przełącza widok ekranu
pomiędzy poziomym i pionowym. Twoje urządzenie zaopatrzone jest w dotykowy ekran.
Większość obszarów ekranu będzie reagować kiedy dotkniesz je palcem.
▼
Ikony powiadamiania:
przeciągnij pasek z góry na
dół, aby odsłonić wiadomości
o powiadomieniach (jeśli
istnieją).
Są to główne aplikacje systemu
operacyjnego Android™: (Web
Browser [Internet], EMail [Poczta], Contacts [Kontakty], itp.)
Kliknij na odpowiednią ikonkę
by otworzyć powiązaną z nią
aplikację. Możesz samodzielnie
dostosowywać wygląd Ekranu
Głównego poprzez dodawanie/
usuwanie skrótów i ikonek oraz
zmianę tapety.
► Skorzystaj z kompletnej instrukcji by uzyskać więcej informacji na temat interfejsu urządzenia.
QSG_A7_IT_PN109853_book.indd 61 13/06/2011 16:59:59
Ekran główny
Ikony statusu: (Czas, status
połączenia WiFi, stan baterii,
itp.)
Zakładka aplikacji: kliknij na te
ikonkę aby wyświetlić wszystkie
aplikacje systemu operacyjnego
Android™, zainstalowane na
twoim urządzeniu (gry, różnego
rodzaju narzędzia, itp.). Możesz
przenieść te aplikacje na Ekran
Główny. Możesz pobrać więcej
takich aplikacji z AppsLib, która
znajduje się również na Ekranie
Głównym.
POLSKA
61
Page 64

INTERFEJS URZĄDZENIA
Dodatkowe panele Ekranu Głównego: Przesuwaj palec poziomo po ekranie aby nawigować pomiędzy 5 panelami dodatkowymi Menu
Głównego.
Główne aplikacje:
Video [Wideo]: Zatrzymuj w dowolnym miejscu podczas
odtwarzania lmu i przewijaj do miejsca gdzie chcesz wznowić
oglądanie używając małej ikonki “+”.
Music [Muzyka]: Przesuwaj palec (poziomo lub pionowo) po ikonach okładek po lewej stronie by nawigować poprzez wszystkie
albumy w sposób bardziej wizualny.
Gallery [Galeria]: Oglądaj swoje zdjęcia w formie “ściany zdjęć”
lub jedno po drugim lub jako pokaz slajdów. Wystarczy przeciągnąć
palcem w poziomie, aby przejść z jednego zdjęcia do drugiego.
Zmiana Ustawień : na Ekranie Głównym kliknij ikonę Menu , następnie kliknij ikone Ustawienia i wybierz kategorię: Sieci
zwykłe i bezprzewodowe, Dźwięk i wyświetlacz, Data i godzina, itd.
Dodawanie aplikacji: W momencie kiedy urządzenie będzie podłączone do Internetu kliknij na ikonę AppLib na Ekranie Głów-
POLSKA
QSG_A7_IT_PN109853_book.indd 62 13/06/2011 17:00:00
nym. To jest interenetowa biblioteka darmowych i płatnych aplikacji zawierająca setki gier i użytecznych aplikacji do pobrania.
62
► Skorzystaj z kompletnej instrukcji by dowiedzieć się jak dokładnie skonfigurować wszystkie funkcje urządzenia.
Browser [Internet]: Umożliwia otwieranie wielu stron na raz i
poruszanie się tam i z powrotem między nimi.
E-mail [Poczta]: umożliwia współpracę z kontami e-mailowymi
typu: POP, IMAP lub z serwerem Microsoft Exchange
Camera [Aparat]: umożliwia robienia zdjęć lub nagrywanie
lmów. W każdym momencie kliknij na miniaturkę w prawym
górnym rogu wyświetlacza by obejrzeć ostatnio zrobione zdjęcia.
Page 65

KALIBRACJI EKRANU DOTYKOWEGO
Jeśli ekran dotykowy nie działa poprawnie, można go ponownie skalibrować.
- Użytkownik ma dostęp do interfejsu Android
1. Dotknij na ekranie głównym urządzenia, a następnie naciśnij Settings [Ustawienia].
2. W ekranie Settings [Ustawienia] naciśnij funkcję Repair & Formatting [Naprawa i formatowanie], znajdującą się na dole listy menu.
3. Na ekranie Repair & Formatting [Naprawa i formatowanie] naciśnij Touchscreen Calibration [Kalibracja ekranu dotykowego]. Po
wyświetleniu polecenia odłóż urządzenie ARCHOS.
4. Odłóż urządzenie na płaskiej powierzchni.
5. Naciśnij Calibrate the touchscreen [Kalibruj ekran dotykowy].
Następuje uruchomienie procesu kalibracji. Przed jej ukończeniem nie należy dotykać urządzenia.
WAŻNE: Aby kalibracja się powiodła, urządzenie musi być umieszczone na płaskiej powierzchni (np. stół).
- Użytkownik nie ma dostępu do interfejsu Android
1. Włączając urządzenie, przytrzymaj dłużej przycisk i naciśnij .
Nastąpi wyświetlenie ekranu Recovery [Odzyskiwanie ustawień].
Użyj , aby przełączać się pomiędzy opcjami i , aby potwierdzić swój wybór.
2. Wybierz Repair system [Naprawa systemu] i naciśnij .
3. Na ekranie Repair system [Naprawa systemu] wybierz Force touchscreen calibration [Wymuś kalibrację ekranu dotykowego] i naciśnij .
4. Naciśnij ponownie w celu potwierdzenia. Odłóż urządzenie na płaskiej powierzchni.
Następuje uruchomienie procesu kalibracji. Przed jej ukończeniem nie należy dotykać urządzenia.
WAŻNE: Aby kalibracja się powiodła, urządzenie musi być umieszczone na płaskiej powierzchni (np. stół).
5. Po zakończeniu kalibracji naciśnij . Zostanie wyświetlony ekran Recovery [Odzyskiwanie ustawień].
6. Wybierz No [Nie]. Urządzenie uruchomi się ponownie. Ekran dotykowy jest obecnie ponownie skalibrowany.
Wybierz No [Nie]. Urządzenie uruchomi się ponownie. Ekran dotykowy jest obecnie ponownie skalibrowany.
63
QSG_A7_IT_PN109853_book.indd 63 13/06/2011 17:00:01
POLSKA
Page 66
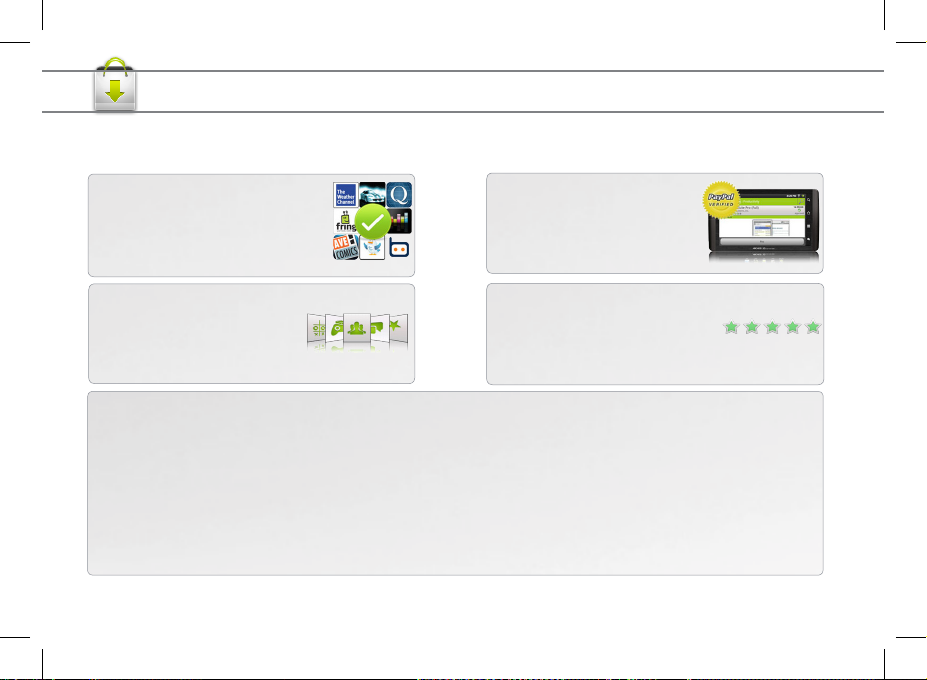
APPSLIB : BIBLIOTEKA APLIKACJI
AppsLib to miejsce zakupu aplikacji przeznaczonych do tabletów Android. Użytkownicy mogą pobierać tysiące aplikacji
bezpośrednio na swój tablet Android. Zobacz najlepsze pozycje, zarówno w kategorii aplikacji płatnych, jak i bezpłatnych.
Zatwierdzone aplikacje
Dzięki naszemu stemplowi jakości
możesz zobaczyć, które aplikacje
zostały już przetestowane przez naszych
inżynierów pod kątem prawidłowego
funkcjonowania na tablecie.
Różne rodzaje aplikacji
Aplikacje są podzielone na jednoznaczne i przejrzyste kategorie,
jak np. gry 3D.
gdy jest dostępna aktualizacja, możliwe jest:
Proste, bezpieczne zakupy
Możesz skorzystać z systemu bezpiecznych płatności w systemie PayPal. Przypisz swoje konto PayPal
w portalu AppsLib i wygodnie kupuj
aplikacje w dowolnym momencie.
System ocen i komentarzy
Podziel się swoimi opiniami. W portalu
AppsLib możesz oceniać aplikacje i
wystawiać komentarze dostępne dla
całej społeczności AppsLib.
1.Naciśnij AppsLibsur ikonę na ekranie głównym.
Aplikacja otwiera i zgłoszenie aktualizacji jest wyświetlany.
2.Naciśnij Aktualizuj teraz. Aktualizacja zaczyna.
3.Postępuj zgodnie z instrukcjami wyświetlanymi na ekranie.
4.Pod koniec instalacji, naciśnij Otwórz.
UWAGA: Pobierz Appslib na www.appslib.com.
QSG_A7_IT_PN109853_book.indd 64 13/06/2011 17:00:01
1.Naciśnij AppsLibsur ikonę na ekranie głównym.
Aplikacja otwiera i zgłoszenie aktualizacji jest wyświetlany.
2.Naciśnij Aktualizuj teraz.
You can access the application categories and download.
Appslib will be listed on your My Apps list. Tap on it to update.
As long as you do not update, a notification will be displayed
whenever you open Appslib.
Update AppsLib now
Update AppsLib later
Page 67

Declaration of Conformity
Company ARCHOS S.A.
Address 12, rue Ampere 91430 Igny
Country France
Telephone number +(86)13509217854
Telefax number +(86)13509217854
E-mail wlxie@archos.com
Certify and declare under our responsibility that the following product:
Product Description A70S Internet Tablet
Manufacturer ARCHOS S.A.
Brand Name ARCHOS
Model/Type 8700
Is tested to and conforms with the essential test suites included in the
following standards, which are in force within the EEA :
Standard Issue date Reference to report /le
EN 301 489-17 2008 CE10-RTE092703
EN 301 489-1 2008 CE10-RTE092703
EN 300 328 2006 CE10-RTE092702/ CE10-RTE092701
EN 50371 2002 CE10-RTE092705
EN 55022 2006+A1:2007 CE10-ITE092704
EN 55024 1998+A1:2001+A2:2003 CE10-ITE092704
EN 61000-3-2 2006 CE10-ITE092704
EN 61000-3-3 2008 CE10-ITE092704
EN 60950-1 2006+A11:2009 CE10-RTE0927S
And therefore complies with the essential requirements of the following directives:
Directive Name Directive number Further identication
R&TTE Directive 99/5/EC
LVD Directive 2006/95/EC
EMC Directive 2004/108/EC
The technical documentation as required by the conformity assessment
procedure is kept at the following address for a period ending at least
10 years after the last product has been manufactured at the disposal
of the relevant national authorities of any Member State for inspection:
Product is CE-marked in Europe Date 2010.07.31
65
QSG_A7_IT_PN109853_book.indd 65 13/06/2011 17:00:02
Page 68

National restrictions
This device is intended for home and ofce use in all EU countries (and other countries following the EU directive 1999/5/EC) without
any limitation except for the countries mentioned below:
Country Restriction Reason/remark
Bulgaria None General authorization required for outdoor use and
France Outdoor use limited to
10 mW e.i.r.p. within the
band 2454-2483.5 MHz
Italy None If used outside of own premises, general authoriza-
Luxembourg None General authorization required for network and
Norway Implemented This subsection does not apply for the geographical
Russian Federation None Only for indoor applications
Note: Frequency 2454-2483.5MHZ are restricted to indoor use in France.
See the declaration of conformity on http://www.archos.com/products/declaration_conformity.html
66
QSG_A7_IT_PN109853_book.indd 66 13/06/2011 17:00:02
public service
Military Radiolocation use. Refarming of the 2.4
GHz band has been ongoing in recent years to allow
current relaxed regulation. Full implementation
planned 2012
tion is required.
service supply (not for spectrum)
aera within a radius of 20 km from the centre of
Ny-Alesund
Page 69

FCC RF RADIATION EXPOSURE AND SAR STATEMENTS
SAR Statement
This device has been tested for body-worn Specic Absorption Rate (SAR) compliance. The FCC has established
detailed SAR requirements and has established that these requirements have been met for this device.
RF Exposure Information
The radio module has been evaluated under FCC Bulletin OET 65C (01-01) and found to be compliant to the
requirements as set forth in CFR 47 Sections, 2.1093, and 15.247 (b) (4) addressing RF Exposure from radio
frequency devices. This model meets the applicable government requirements for exposure to radio frequency
waves. The highest SAR level measured for this device was 0.939 W/kg.
67
QSG_A7_IT_PN109853_book.indd 67 13/06/2011 17:00:02
 Loading...