

Page 1

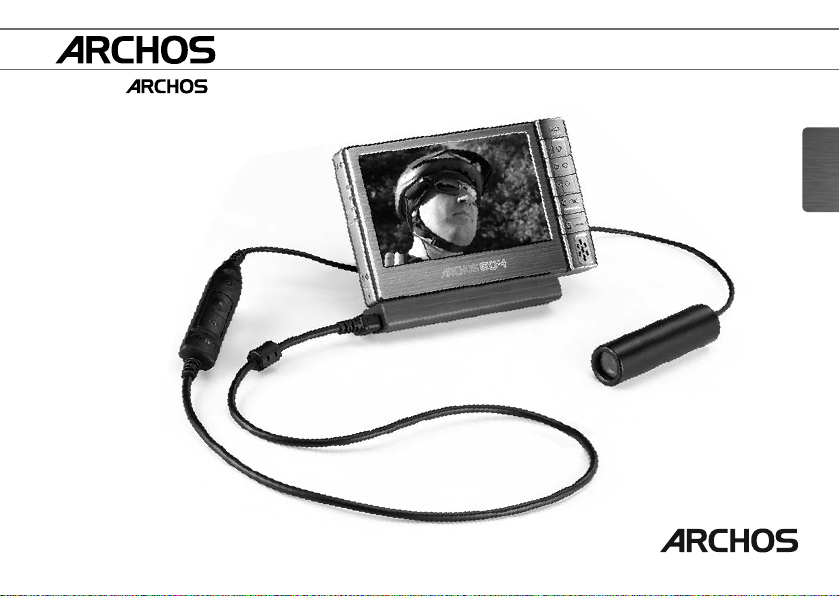
HELMET CAMCORDER
FOR 404, 504, 604 SERIES
ENGLISH - FraNçaIS - ESpañoL - DEUTSCH - ITaLIaNo - NEDErLaNDS
USER GUIDE
ARCHOS™ 604 : sold separately - vendu séparément - se vende por separado - separat erhältlich - in vendita separamente - los verkrijgbaar
Page 2

COPYRIGHT ARCHOS™ © 2006. All rights reserved.
Page 3
HELMET CAMCORDER
FOR 404, 504, 604 SERIES
ENGLISH
ENGLISH USER GUIDE
ARCHOS 604 : sold separately - VERSION 2.0 - P/N: 104983V2
Page 4
MANUAL
TABLE OF CONTENTS
ENGLISH
?
2
Box Contents ......................................................................................................................................................3
Connections ........................................................................................................................................................3
Helmet CamCorder Description ..................................................................................................................4
Making Recordings ...........................................................................................................................................5
Precautions .........................................................................................................................................................8
Register Your Product! .....................................................................................................................................9
Technical Specifi cations ..............................................................................................................................10
NEED HELP?
Here are some ways to fi nd the information you may need:
On our WebsiteOn our Website
See the Frequently Asked Questions section on www.archos.com/faqwww.archos.com/faq.
Also visit www.archos.com/manualswww.archos.com/manuals for the most recent version of this manual.
Contact our Technical Support TeamContact our Technical Support Team
www.archos.com/supportwww.archos.com/support for e-mail support.
Visit
U.S. & Canada: Call 877-300-8879 (toll free)
Page 5
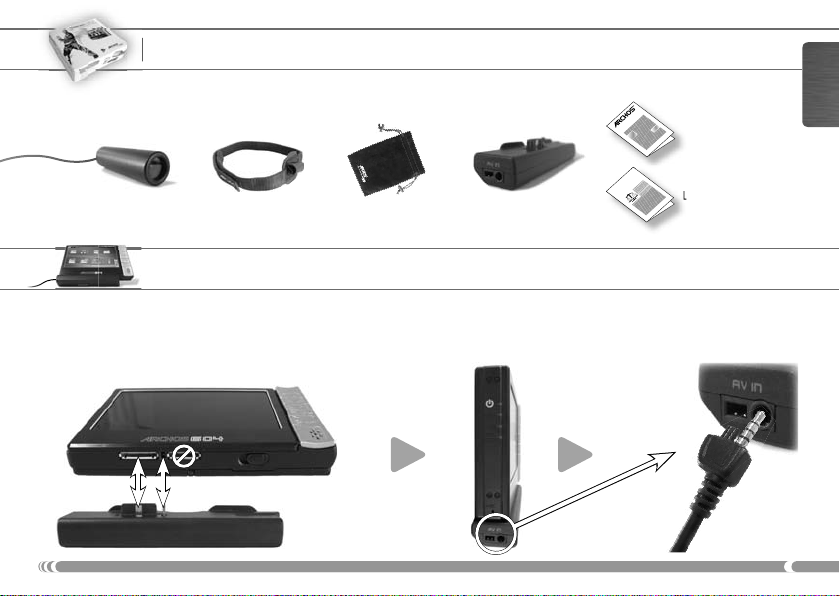
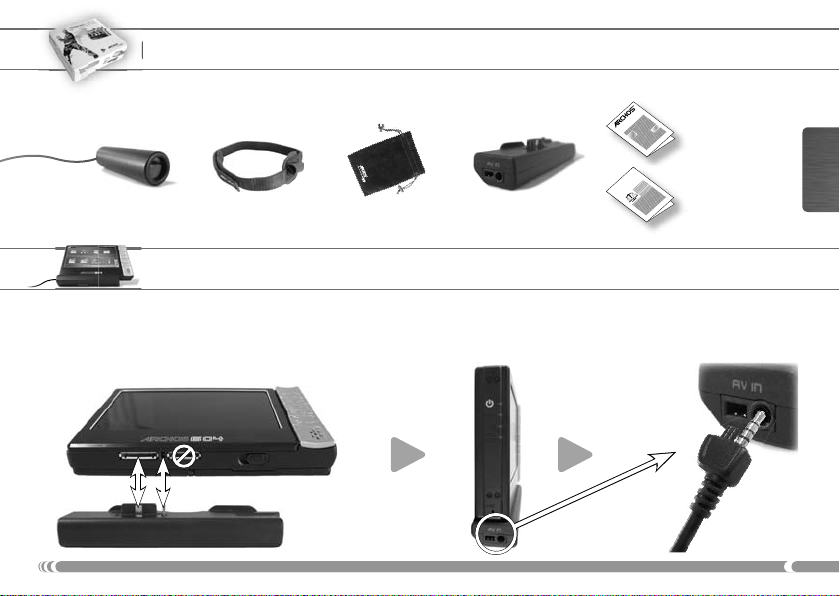
BOX CONTENTS
Please note: actual box contents may vary and are subject to change without prior notice.
ENGLISH
Helmet CamCorder DVR Travel Adapter
Headband Protective Pouch
LEGAL &
CONNECTIONS
You can make these connections before switching on the device or while it is running.
Carefully connect/disconnect the adapter to/from your ARCHOS device.
Do not force: you could break the connectors!Do not force: you could break the connectors!
MANUAL
SAFETY
This User Guide
Legal & Safety Notices
3
Page 6
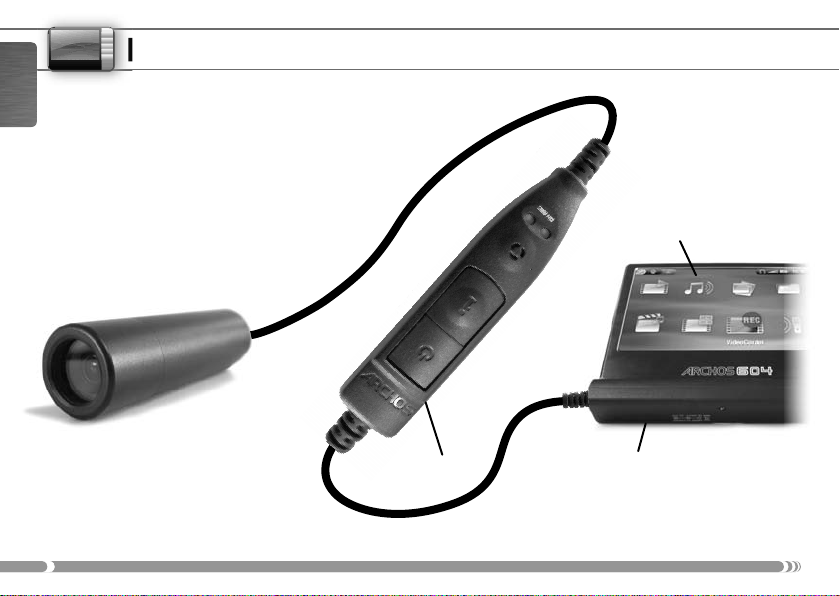
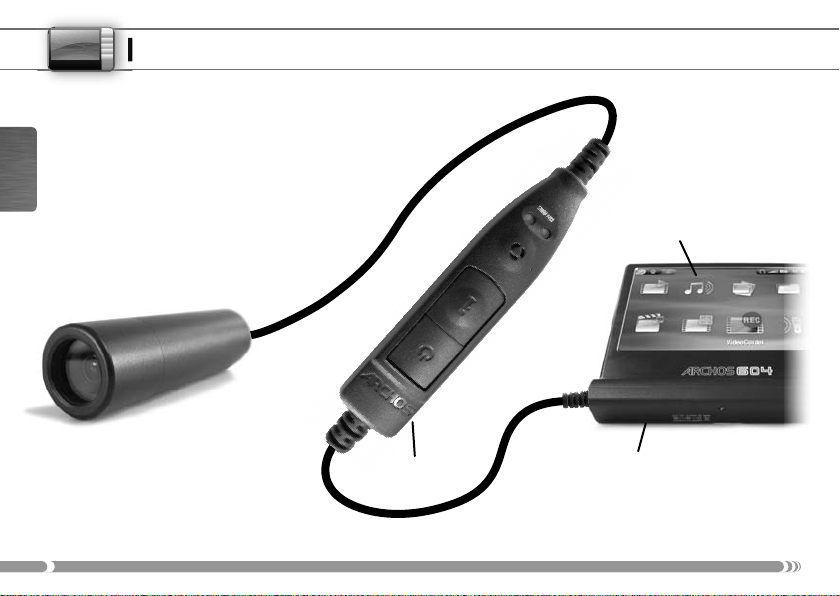
HELMET CAMCORDER DESCRIPTION
ENGLISH
a Recording status (red light)
b Connection status (green light)
c Microphone
d Status/Information button
e Start/Stop recording button
f Connector plug
a
b
c
ARCHOS device
(not included)
d
e
f
Camera Controller
4
DVR Travel Adapter
Page 7
MAKING RECORDINGS
Recording with your Archos Helmet CamCorder
Your Archos Helmet CamCorder will be powered through your ARCHOS device, so be sure to charge it
•
fully when intending to make longer recordings.
You can clip the controller of your Archos Helmet CamCorder for example onto your shirt pocket. The
•
camera itself is typically fi tted into the headband and worn so that you record what you see.
The next two sections explain the two options for making a recording:
•
using the CamCorder application of your ARCHOS deviceusing the CamCorder application of your ARCHOS device, which lets you set a number of parameters.
Making a Recording Using the Camera Controller
To start recording:To start recording:
•
Press the
on, and on the screen of your ARCHOS device, you will see a message indicating that a video signal is
detected. The image transmitted from the camera will then be displayed and the recording will start.
To stop recording:To stop recording:
•
Press the
This indicates that the recording has stopped. The ARCHOS device will now save your video fi le and
take you to the folder where the video is saved.
Note: Note: pressing the
device are locked. You can thus conveniently make a recording while carrying your ARCHOS device in
a backpack, for example.
Start/Stop
Start/Stop
button on your camera controller. The red and green lights will momentarily go
button on the camera controller again. This time, only the green light will display.
Start/Stop
button on the controller also works while the buttons of your ARCHOS
using the camera controllerusing the camera controller, or
ENGLISH
5
Page 8

Making a Recording Using the CamCorder Application of your ARCHOS Device
On the Home ScreenHome Screen, select the CamCorderCamCorder icon and press OK to open the CamCorder application.
•
Your ARCHOS device now powers the camera. On the screen, you see the image the camera is cur-
•
ENGLISH
rently seeing. This preview screen thus permits you to adjust the position or direction of the camera
before you start your recording.
SettingsSettings
•
A number of settings such as resolution and bitrate can be adjusted. Normally you need not change
these settings.
•
To access these recording parametersTo access these recording parameters, press MENU and select the SettingsSettings menu item.
•
To return to the pre-recording screenTo return to the pre-recording screen, press the ARCHOS device’s button.
•
Setting the
Note:Note: For information on the other settings, please refer to the section on making a video recording in the user
manual of your ARCHOS device. Please note that the parameter
mined by the camera. For the same reason, the parameter
•
To start recordingTo start recording, press the OK button or select the Start recordingStart recording menu item.
•
To pause and restart your recordingTo pause and restart your recording, press the OK button or select the PausePause or ResumeResume
•
To stop and save your recordingTo stop and save your recording, press the button.
Note:Note: alternatively, you can press the
the recording.
6
Time Stamp
parameter to ‘ON’ will show the date and time on the recorded image.
Format
does not exist as the setting is pre-deter-
Source
can only be set to ‘Composite’ or ‘Black & White’.
Start/Stop
button on your camera controller to start and stop
menu item.
Page 9

Checking the Status of the Archos Helmet CamCorder
In order to fi nd out whether the Helmet CamCorder is idle or recording, press the
lights will indicate the status of the ARCHOS device as shown below:
•
Red and green: Red and green: the ARCHOS device is presently making a recording.
•
Green: Green: the Helmet CamCorder is connected correctly to the ARCHOS device and a recording can be started.
•
No light: No light: the Helmet CamCorder is not connected properly to the ARCHOS device or the device is off.
Status
Button. The
Notes on the Archos Helmet CamCorder
•
Do not be concerned if the controller’s lights are not lit while your Helmet CamCorder is in use. This is normal.
•
The loudspeaker of your ARCHOS device will be disabled during the recording as this could result in
audio feedback. The microphone integrated into the camera controller will record the sound. Therefore
make sure that it is not covered in order to obtain the best possible sound for your recording.
•
If images look distorted, you might be too close to the object you are fi lming. This effect is also re-
ferred to as “fi sh eye effect”. The range for obtaining undistorted images is between 1.5 and 10 meters.
•
While the camera is connected to your ARCHOS device, the
by replaced by the
CamCorderCamCorder icon.
VideoCorderVideoCorder icon in the Home ScreenHome Screen will
ENGLISH
7
Page 10
PRECAUTIONS
!
▲
ENGLISH
Please note the following points in order to avoid damage to your Archos Helmet CamCorder:
Do not attempt to take the camera apart. There are no customer-serviceable parts inside, and you
•
could receive an electric shock.
Handle the camera with care. A violent shock, for example through a fall, could damage it.
•
Use the camera in moderate conditions. Avoid cold or hot temperatures, humidity over 85%, and dust or sand.
•
The same precautions apply to the controller.
•
Please be aware that the camera and controller are not water-proof and should be kept away from water.
•
To clean the camera only use products specifi cally designed to clean optical lenses.
•
NEVER direct the camera at the sun!
•
8
Page 11

www
REGISTER YOUR PRODUCT!
www.archos.com/register
Once you unpack your ARCHOS product, we ask that you take a few minutes to
register it. This will ensure that you have access to our help line and that we will
be able to answer your inquiries, either by telephone or e-mail in the quickest and
timeliest manner. This will also allow us to keep you informed about software
updates or special late-breaking information about your device. Please use your
Internet connection and connect to the above shown web page to register your
product.
ENGLISH
9
Page 12

TECHNICAL SPECIFICATIONS
ENGLISH
Technical Specifi cations: Archos Helmet CamCorder
ResolutionResolution ................................................................................ 420 TV Lines
CCDCCD .............................................................................................1/4-inch SONY Super HAD color CCD
LensLens ............................................................................................. Fixed Pinhole 3.6mm
Field Of ViewField Of View ........................................................................... 72.5 degrees
Depth of FieldDepth of Field ......................................................................... 1.5 to 10 meters
White balanceWhite balance .........................................................................Automatic
Light SensitivityLight Sensitivity ......................................................................1.0 Lux / F 1.2
Power SupplyPower Supply ..........................................................................Powered by ARCHOS device
Recording resolution with ARCHOS deviceRecording resolution with ARCHOS device .................512 x 384 (Optimal) or 640 x 480 (VGA)
WeightWeight ....................................................................................... approx. 100 g – 3.5 oz with DVR Travel Adapter
DimensionsDimensions .............................................................................. 20.5 mm (Ø) x 72 mm (L)
CCD resolutionCCD resolution ....................................................................... Model NTSC: 512 x 492 - Model PAL: 582 x 500
Operating temperatureOperating temperature .......................................................approx. 5°C to 35°C / approx. 41°F to 95°F
System requirementsSystem requirements ........................................................... ARCHOS 404, 504 or 604 series device
All brands and product names are registered trademarks and the property of their respective owners.
Specifi cations are subject to change without notice. Errors or omissions excepted. Images and illustrations may not always match contents.
All the information contained in this guide was correct at the time of publication.
COPYRIGHT ARCHOS
10
™
© 2006. All rights reserved.
Page 13
HELMET CAMCORDER
POUR 404, 504, 604
FRANÇAIS
FRANÇAIS GUIDE D’UTILISATION
ARCHOS 604 : vendu séparément
Page 14
MANUAL
FRANÇAIS
TABLE DES MATIÈRES
Contenu de l’emballage............................................................................................................................... 13
Connexions ...................................................................................................................................................... 13
Description du Helmet CamCorder ......................................................................................................... 14
Enregistrer ........................................................................................................................................................ 15
Précautions d’emploi .................................................................................................................................... 18
Enregistrez votre produit ! .......................................................................................................................... 19
Caractéristiques techniques ......................................................................................................................20
?
12
BESOIN D’AIDE ?
Vous cherchez des informations précises, suivez le guide :
Sur notre site WebSur notre site Web
Consultez la Foire Aux Questions (FAQ) sur www.archos.com/faqwww.archos.com/faq.
Visitez également www.archos.com/manualswww.archos.com/manuals pour télécharger la dernière version du manuel.
Contactez notre équipe d’assistance techniqueContactez notre équipe d’assistance technique
www.archos.com/supportwww.archos.com/support pour une assistance par e-mail.
Visitez
États-Unis et Canada: Appelez le 877-300-8879 (appel gratuit)
Page 15
CONTENU DE L’EMBALLAGE
Note: le contenu de l’emballage peut varier et est susceptible d’être modifi é sans préavis.
MANUAL
LEGAL &
Helmet CamCorder DVR Travel Adapter
Bandeau Étui de protection
SAFETY
CONNEXIONS
Vous pouvez effectuer ces connexions avant ou après avoir allumé le baladeur.
Connectez et déconnectez précautionneusement l’adaptateur et votre baladeur ARCHOS.
Ne forcez pas : vous pourriez endommager les connecteurs !Ne forcez pas : vous pourriez endommager les connecteurs !
Ce guide
d’utilisation
Mentions légales et
Consignes de sécurité
FRANÇAIS
13
Page 16
DESCRIPTION DU HELMET CAMCORDER
a Témoin d’enregistrement (rouge)
b Témoin de connexion (vert)
c Microphone
d Bouton d’état/information
FRANÇAIS
e Bouton de démarrage/arrêt
de l’enregistrement
f Fiche du connecteur
a
b
c
Baladeur ARCHOS
(non inclus)
d
e
f
Commande
de la caméra
14
DVR Travel Adapter
Page 17
ENREGISTRER
Enregistrer avec votre Helmet CamCorder d’Archos
•
votre Helmet CamCorder sera alimenté par votre appareil ARCHOS, assurez-vous donc d’avoir totalement rechargé ce dernier si vous avez l’intention d’effectuer de longs enregistrements.
•
Vous pouvez, par exemple, fi xer la commande de votre Helmet CamCorder d’Archos sur la poche de
votre chemise. La caméra à proprement parler est précisément fi xée au bandeau et positionnée pour
vous permettre d’enregistrer exactement ce que vous voyez.
•
Les deux chapitres suivants détaillent les deux modes d’enregistrement possibles :
commande de la caméracommande de la caméra, ou à l’aide de l’application CamCorder de votre appareil ARCHOSà l’aide de l’application CamCorder de votre appareil ARCHOS, qui vous
permet de régler un certain nombre de paramètres.
Enregistrer à l’aide de la commande de la caméra
Pour démarrer l’enregistrement :Pour démarrer l’enregistrement :
•
Appuyez sur le bouton de
rouge et vert vont temporairement s’allumer et un message apparaîtra sur l’écran de votre appareil
ARCHOS pour vous indiquer qu’un signal vidéo a été détecté. L’image transmise par la caméra sera
alors affi chée et l’enregistrement lancé.
Pour arrêter l’enregistrement :Pour arrêter l’enregistrement :
•
Appuyez sur le bouton de
vert s’allumera pour indiquer que l’enregistrement a été interrompu. L’appareil ARCHOS sauvegardera
alors votre vidéo et vous conduira directement dans le répertoire où elle se trouve.
démarrage/arrêt
démarrage/arrêt
de la commande de votre caméra. Les témoins lumineux
de la commande de votre caméra. Cette fois, seul le témoin
à l’aide de la à l’aide de la
FRANÇAIS
15
Page 18

Remarque : Remarque : vous pouvez appuyer sur le bouton de
démarrage/arrêt
de la commande de votre caméra
même lorsque les boutons de votre appareil ARCHOS sont verrouillés. En effet, ce dernier reste opérationnel et vous permet ainsi de fi lmer pendant que vous transportez votre appareil ARCHOS dans un
sac à dos par exemple.
Enregistrer à l’aide de l’application CamCorder de votre baladeur ARCHOS
Sélectionnez l’icône CamCorderCamCorder de l’écran d’accueil écran d’accueil et appuyez sur OK pour ouvrir l’application cor-
•
respondante.
FRANÇAIS
Votre ARCHOS alimente maintenant la caméra. L’image actuellement dans le viseur apparaît alors
•
à l’écran. Cet écran de prévisualisation vous permet de régler la position et la direction de la caméra
avant de lancer l’enregistrement.
ParamètresParamètres
Un certain nombre de paramètres comme la résolution et le taux d’échantillonnage peuvent être
•
réglés. Normalement, vous n’avez pas besoin de les modifi er.
•
Pour accéder à ces paramètres d’enregistrementPour accéder à ces paramètres d’enregistrement, appuyez sur MENU et sélectionnez l’élément
ParamètresParamètres .
•
Pour revenir à l’écran de pré-enregistrementPour revenir à l’écran de pré-enregistrement, appuyez sur le bouton de l’appareil ARCHOS.
•
Si le paramètre
Remarque :Remarque : pour découvrir les autres paramètres, veuillez vous référer au chapitre se rapportant à l’enregistrement
vidéo dans le manuel d’utilisation de votre appareil ARCHOS. Veuillez noter que le paramètre
étant donné qu’il est prédéterminé par la caméra. Pour la même raison, le paramètre
sur ‘Composite’ ou ‘Noir et blanc’.
16
Time Stamp
(Dateur) est activé, la date et l’heure apparaîtront sur l’image enregistrée.
Format
n’existe pas
Source
ne peut être réglé que
Page 19
Pour lancer l’enregistrementPour lancer l’enregistrement, appuyez sur OK et sélectionnez l’élément Démarrer l’enregistrement Démarrer l’enregistrement .
•
Pour le suspendre ou le reprendrePour le suspendre ou le reprendre, appuyez sur OK ou sélectionnez les éléments PausePause ou RepriseReprise
•
Pour arrêter et sauvegarder votre enregistrementPour arrêter et sauvegarder votre enregistrement, appuyez sur le bouton .
•
Remarque :Remarque : vous pouvez aussi appuyer sur le bouton de
démarrage/arrêt
de la commande de votre
caméra pour commencer ou arrêter votre enregistrement.
Vérifi er l’état du Helmet CamCorder d’Archos
Pour savoir si le Helmet CamCorder est inactif ou en cours d’enregistrement, appuyez sur le bouton
d’état. Les témoins lumineux vous préciseront l’état de l’appareil ARCHOS comme suit :
Rouge et vert : Rouge et vert : l’appareil ARCHOS effectue un enregistrement.
•
Vert : Vert : le Helmet CamCorder est correctement connecté à l’appareil ARCHOS, il est prêt à enregistrer.
•
Aucun témoin allumé : Aucun témoin allumé : le Helmet CamCorder n’est pas connecté correctement à l’ARCHOS ou
•
l’appareil est éteint.
Remarques sur le Helmet CamCorder d’Archos
Ne vous inquiétez pas si les témoins de la commande ne sont pas allumés pendant l’utilisation de votre
•
Helmet CamCorder. C’est normal.
Le haut-parleur de votre appareil ARCHOS sera désactivé pendant l’enregistrement pour empêcher un
•
effet Larsen. Le microphone intégré à la commande de la caméra se chargera d’enregistrer le son. Faites
donc attention à ce qu’il ne soit pas couvert afi n d’obtenir le meilleur son possible.
Si les images semblent déformées, il se peut que vous soyez trop près de votre sujet. Cette distorsion
•
est aussi appelée effet « fi sh eye ». Pour éviter cette déformation, la distance de mise au point doit
être comprise entre 1,5 et 10 mètres.
Pendant que la caméra est connectée à votre appareil ARCHOS, l’icône
•
d’accueild’accueil sera remplacée par celle du CamCorderCamCorder.
MagnétoscopeMagnétoscope de l’écran écran
.
FRANÇAIS
17
Page 20
PRÉCAUTIONS D’EMPLOI
!
▲
Veuillez prendre les précautions suivantes afi n d’éviter d’endommager votre Helmet CamCorder :
N’essayez pas d’ouvrir la caméra. Non seulement elle ne contient aucune pièce que l’utilisateur pour-
•
rait réparer mais vous risquez, en plus, de subir une décharge électrique.
Manipulez la caméra précautionneusement. Un choc violent, dû à une chute par exemple, pourrait
•
FRANÇAIS
l’endommager.
Utilisez la caméra dans des conditions tempérées. Évitez les températures trop froides ou trop
•
chaudes, un taux d’humidité supérieur à 85 % de même que la poussière et le sable.
Observez les mêmes précautions d’emploi pour la commande.
•
N’oubliez pas que ni la caméra ni la commande ne sont étanches et qu’elles doivent donc être tenues à
•
l’écart de l’eau.
Pour nettoyer la caméra, n’utilisez que des produits spécialement destinés au nettoyage d’optiques.
•
NE visez JAMAIS le soleil avec la caméra !
•
18
Page 21

www
ENREGISTREZ VOTRE PRODUIT !
www.archos.com/register
Une fois votre produit ARCHOS déballé, nous vous invitons à prendre quelques
minutes pour l’enregistrer. Ainsi, vous bénéfi cierez d’un accès à notre service
d’assistance qui nous permettra de répondre à vos requêtes dans les meilleurs délais,
que ce soit par téléphone ou email. Par ce biais, nous pourrons également vous tenir
au courant des mises à jour logicielles ou vous faire profi ter des dernières nouv-
elles concernant votre appareil. Veuillez vous rendre sur le site Internet à l’adresse
mentionnée ci-dessus pour enregistrer votre produit.
FRANÇAIS
19
Page 22

CARACTÉRISTIQUES TECHNIQUES
Caractéristiques techniques du Helmet CamCorder d’Archos
RésolutionRésolution ................................................................................ 420 lignes TV
CapteurCapteur ...................................................................................... CCD couleur Super HAD SONY de ¼ de pouce
FRANÇAIS
ObjectifObjectif ..................................................................................... focale fi xe 3,6 mm
Angle de champAngle de champ ..................................................................... 72,5 degrés
Profondeur de champProfondeur de champ ..........................................................de 1,5 à 10 mètres
Balance des blancsBalance des blancs ................................................................ automatique
SensibilitéSensibilité ................................................................................. 1,0 Lux / F 1,2
AlimentationAlimentation ........................................................................... via l’appareil ARCHOS
Résolution d’enregistrement avec l’appareil ARCHOSRésolution d’enregistrement avec l’appareil ARCHOS .... 512 x 384 (optimale) ou 640 x 480 (VGA)
PoidsPoids ...........................................................................................100 g environ avec le DVR Travel Adapter
DimensionsDimensions .............................................................................. 20,5 mm (Ø) x 72 mm (L)
Résolution CCDRésolution CCD ......................................................................modèle NTSC en 512 x 492 - modèle PAL en 582 x 500
Température de fonctionnementTempérature de fonctionnement ..................................... entre 5°C et 35°C environ
Confi guration requiseConfi guration requise ...........................................................baladeur ARCHOS séries 404, 504 ou 604
Toutes les marques et les noms de produits sont des marques déposées appartenant à leurs propriétaires respectifs.
Les spécifi cations peuvent changer sans préavis. Sauf erreur ou omission.
Les images et les illustrations peuvent ne pas toujours correspondre au contenu.
Toutes les informations contenues dans ce guide étaient correctes au moment de la publication.
COPYRIGHT ARCHOS
20
™
© 2006. Tous droits réservés.
Page 23

HELMET CAMCORDER
PARA 404, 504, 604
ESPAÑOL
ESPAÑOL GUÍA DE USUARIO
ARCHOS 604 : se vende por separado
Page 24

ESPAÑOL
22
MANUAL
?
INDICE
Contenido de la caja .....................................................................................................................................23
Conexiones ....................................................................................................................................................... 23
Descripción del Helmet CamCorder ....................................................................................................... 24
Realización de grabaciones ........................................................................................................................25
Precauciones ................................................................................................................................................... 28
¡Registre ahora! .............................................................................................................................................. 29
Especifi caciones técnicas ............................................................................................................................ 30
¿
NECESITA AYUDA ?
Éstas son algunas formas de encontrar la información que pueda necesitar:
En nuestro sitio webEn nuestro sitio web
Consulte la sección de preguntas más frecuentes en www.archos.com/faqwww.archos.com/faq.
Entre en www.archos.com/manualswww.archos.com/manuals para conseguir la versión más reciente del manual.
Póngase en contacto con nuestro equipo de Asistencia TécnicaPóngase en contacto con nuestro equipo de Asistencia Técnica
www.archos.com/supportwww.archos.com/support para obtener ayuda por e-mail.
Visite
EE. UU. y Canada: Llame 877-300-8879 (Llamada gratuita)
Page 25

CONTENIDO DE LA CAJA
Observación: el contenido exacto de la caja puede variar y modifi carse sin previo aviso.
Helmet CamCorder DVR Travel Adapter
Cinta para cabeza Estuche protector
MANUAL
LEGAL &
SAFETY
Esta guía de usuario
Avisos legales y
consignas de seguridad
CONEXIONES
Puede realizar estas conexiones antes de encender el dispositivo o con éste en funcionamiento.
Conecte/desconecte con cuidado el adaptador al/dek dispositivo ARCHOS.
No lo fuerce: ¡podría dañar los conectores!No lo fuerce: ¡podría dañar los conectores!
ESPAÑOL
23
Page 26

DESCRIPCIÓN DEL HELMET CAMCORDER
a Piloto de grabación (luz roja)
b Piloto de conexión (luz verde)
c Micrófono
d Botón de estado/información
e Start/Stop (Inicio/detención
de grabación)
f Enchufe conector
ESPAÑOL
a
b
c
Dispositivo ARCHOS
(no incluido)
d
e
f
24
Mando de cámara
DVR Travel Adapter
Page 27

REALIZACIÓN DE GRABACIONES
Grabaciones con su Helmet CamCorder de Archos
El Helmet CamCorder de Archos se alimenta a través del dispositivo ARCHOS, así que asegúrese de
•
cargarlo completamente cuando planee hacer grabaciones largas.
Puede sujetar el mando de su Helmet CamCorder de Archos al bolsillo de una camisa, por ejemplo. La
•
propia cámara cabe en la cinta de la cabeza, para que pueda grabar lo que está viendo.
En las dos secciones siguientes se explican las dos opciones para hacer grabaciones: con el mando de la
•
cámara o con la aplicación Videocám. del dispositivo ARCHOS, que permite ajustar una serie de parámetros.
Grabaciones con el mando de la cámara
Para empezar una grabación:Para empezar una grabación:
•
Pulse el botón
mente, y en la pantalla del dispositivo ARCHOS aparecerá un mensaje indicándole que se ha detectado una
señal de vídeo. Se visualizará, entonces, la imagen transmitida de la cámara y empezará la grabación.
Para detener una grabación:Para detener una grabación:
•
Pulse de nuevo el botón
verde. Esto indica que la grabación se ha detenido. El dispositivo ARCHOS guardará ahora el archivo de
vídeo y le llevará hasta la carpeta en donde se ha guardado.
Nota: Nota: también se puede pulsar el botón
CHOS bloqueados, lo que resulta muy práctico si, por ejemplo, está realizando una grabación mientras
lleva su ARCHOS en una mochila.
Start/Stop
en el mando de la cámara. Los pilotos rojo y verde se encenderán momentánea-
Start/Stop
en el mando de la cámara. Esta vez, sólo se iluminará el piloto
Start/Stop
del mando con los botones del dispositivo AR-
ESPAÑOL
25
Page 28

Grabaciones con la aplicación Videocám. del dispositivo ARCHOS
En la pantalla principalpantalla principal, resalte el icono Videocám.Videocám. y pulse OK para entrar en la aplicación de la videocámara.
•
Ahora, su dispositivo ARCHOS alimenta la cámara. En la pantalla verá la imagen enfocada actualmen-
•
te con la cámara. Esta pantalla de previsualización le permitirá ajustar la posición o dirección de la
cámara antes de empezar su grabación.
ParámetrosParámetros
•
Puede ajustar una serie de parámetros, como la resolución y la velocidad de bit. Aunque normalmente no necesitará hacerlo.
•
Para acceder a estos parámetros de grabaciónPara acceder a estos parámetros de grabación, pulse MENU y seleccione la opción de menú Confi guraciónConfi guración .
•
Para volver a la pantalla de pregrabaciónPara volver a la pantalla de pregrabación, pulse el botón del dispositivo ARCHOS.
ESPAÑOL
•
Si pone el parámetro
Nota:Nota: Para obtener información sobre otros parámetros, consulte la sección sobre grabaciones de vídeo en el manual
de usuario de su dispositivo ARCHOS. Tenga en cuenta que no dispondrá del parámetro
predeterminado por la cámara. Asimismo, el parámetro
•
Para empezar la grabaciónPara empezar la grabación, pulse el botón OK o seleccione la opción de menú Iniciar grabaciónIniciar grabación .
•
Para interrumpir y retomar la grabaciónPara interrumpir y retomar la grabación, pulse el botón OK o seleccione la opción de menú PausaPausa o
RetomarRetomar
•
Para detener y guardar la grabaciónPara detener y guardar la grabación, pulse el botón .
Nota:Nota: también puede pulsar el botón
grabación.
26
Marca de hora (Time Stamp)
.
Start/Stop
en “ON”, aparecerá la fecha y hora en la imagen grabada.
Formato
, ya que el valor viene
Fuente
sólo podrá ajustarse en “Compuesta” o “Blanco y negro”.
en el mando de la cámara para empezar y detener la
Page 29

Comprobación del estado del Helmet CamCorder de Archos
Para saber si el Helmet CamCorder está inactivo o grabando, pulse el botón
sos le indicarán el estado del dispositivo ARCHOS, como se indica seguidamente:
Rojo y verde: Rojo y verde: el dispositivo ARCHOS está realizando una grabación.
•
Verde: Verde: el Helmet CamCorder está conectado correctamente al dispositivo ARCHOS, listo para empezar
•
a grabar.
•
Sin luz: Sin luz: el Helmet CamCorder no está conectado correctamente al dispositivo ARCHOS o el dispositi-
vo está apagado.
Status
. Los pilotos lumino-
Notas acerca del Helmet CamCorder de Archos
No se preocupe si los pilotos luminosos del mando no están encendidos mientras utiliza el Helmet CamCor-
•
der, ya que esto es normal.
El altavoz del dispositivo ARCHOS estará deshabilitado durante la grabación, ya que podría provocar
•
interferencias por acople de sonido. El sonido se grabará mediante el micrófono integrado en el mando
de la cámara. Por tanto, asegúrese de que nada lo obstruya para obtener el mejor sonido posible en su
grabación.
Si se acerca demasiado al objeto fi lmado, puede que las imágenes aparezcan distorsionadas. Este efec-
•
to también es conocido como “ojo de pez”. Para obtener imágenes nítidas, colóquese a una distancia
de entre 1,5 y 10 metros.
Mientras la cámara esté conectada a su dispositivo ARCHOS, el icono
•
principalprincipal pasará a ser el icono Videocám.Videocám..
Graba. VídeoGraba. Vídeo de la pantalla pantalla
ESPAÑOL
27
Page 30

PRECAUCIONES
!
▲
Por favor, siga los siguientes consejos para evitar cualquier daño en su Helmet CamCorder de Archos:
No intente desmontar la cámara. En su interior, no hay piezas que puedan ser reparadas por el cliente
•
y podría recibir una descarga eléctrica.
Maneje la cámara con cuidado. Cualquier golpe violento, como una caída, podría dañarla.
•
No la utilice en condiciones ambientales extremas. Evite las temperaturas frías o calientes, las humedades por
•
encima del 85%, y el polvo o la arena.
•
Observe las mismas precauciones con el mando.
Tenga en cuenta que tanto la cámara como el mando no son sumergibles, por lo que deberá mantener-
•
ESPAÑOL
los alejados del agua.
Para limpiar la cámara utilice únicamente productos específi cos para la limpieza de lentes ópticas.
•
¡NUNCA dirija la cámara hacia el sol!
•
28
Page 31

¡
www
REGISTRE AHORA!
www.archos.com/register
Tras haber desempaquetado su producto ARCHOS, tan solo necesitará unos
pocos minutos para registrarlo. De esta forma, podrá acceder a nuestro servicio
de asistencia telefónica o por e-mail, en donde contestaremos a todas sus preguntas de la manera más rápida y oportuna. Así, también podremos mantenerle
informado acerca de las actualizaciones de software y ofrecerle información de
última hora sobre su dispositivo. Utilice Internet para conectarse a la dirección
arriba indicada y registrar su producto.
ESPAÑOL
29
Page 32

ESPECIFICACIONES TÉCNICAS
Especifi caciones técnicas: Helmet CamCorder de Archos
ResoluciónResolución ................................................................................420 líneas de TV
CCDCCD ............................................................................................. CCD de color de 1/4” Super HAD de SONY
LenteLente........................................................................................... Pinhole de 3,6 mm
Campo visualCampo visual ...........................................................................72,5 grados
Profundidad visualProfundidad visual ................................................................. 1,5 a 10 metros
Balance de blancosBalance de blancos ...............................................................Automático
ESPAÑOL
Sensibilidad de la luzSensibilidad de la luz ............................................................1,0 luxes / F 1,2
AlimentaciónAlimentación ...........................................................................A través del dispositivo ARCHOS
Resolución de grabación con el dispositivo ARCHOSResolución de grabación con el dispositivo ARCHOS ... 512 x 384 (óptima) o 640 x 480 (VGA)
PesoPeso ............................................................................................aprox. 100 g – 3,5 oz con el DVR Travel Adapter
DimensionesDimensiones ............................................................................ 20.5 mm (Ø) x 72 mm (L)
Resolución CCDResolución CCD ...................................................................... Modelo NTSC: 512 x 492 - Modelo PAL: 582 x 500
Temperatura de funcionamientoTemperatura de funcionamiento .....................................aprox. 5°C a 35°C / aprox. 41°F a 95°F
Confi guración mínimaConfi guración mínima .........................................................Dispositivo ARCHOS serie 404, 504 o 604
Todas las marcas y nombres de productos son marcas registradas, propiedad de sus respectivos titulares.
Las especifi caciones pueden modifi carse sin previo aviso. El fabricante no se hará responsable de eventuales errores u omisiones
en el presente documento. Las imágenes e ilustraciones pueden no corresponder con el contenido.
Toda la información contenida en esta guía es correcta en el momento de su publicación.
COPYRIGHT ARCHOS
30
™
© 2006. Todos los derechos reservados.
Page 33

HELMET CAMCORDER
FÜR 404, 504, 604
DEUTSCH
DEUTSCH BENUTZERHANDBUCH
ARCHOS 604 : separat erhältlich
Page 34

MANUAL
INHALTSVERZEICHNIS
Lieferumfang ...................................................................................................................................................33
Verbindungen ..................................................................................................................................................33
Beschreibung des Helmet CamCorder ...................................................................................................34
Aufnehmen ...................................................................................................................................................... 35
Vorsichtsmaßnahmen ..................................................................................................................................38
Registrieren Sie jetzt! ................................................................................................................................... 39
Technische Spezifi kationen ........................................................................................................................40
?
DEUTSCH
32
SIE BRAUCHEN HILFE?
Wo fi nden Sie nützliche Informationen?
Auf unserer WebsiteAuf unserer Website
Antworten auf häufi g gestellte Fragen fi nden Sie auf www.archos.com/faqwww.archos.com/faq.
Die neuesten Handbuchversionen stehen auf www.archos.com/manualswww.archos.com/manuals bereit.
Kontaktieren Sie unseren Technischen KundendienstKontaktieren Sie unseren Technischen Kundendienst
Für E-Mail-Support besuchen Sie bitte die Site
www.archos.com/supportwww.archos.com/support.
Page 35

LIEFERUMFANG
Wichtiger Hinweis: Lieferumfang vorbehaltlich Änderungen.
Helmet CamCorder DVR Travel Adapter
Stirnband Schutztasche
MANUAL
LEGAL &
SAFETY
Dieses Benutzerhandbuch
Rechts- und
Sicherheitshinweise
VERBINDUNGEN
Sie können diese Verbindungen herstellen, bevor Sie das Gerät einschalten oder während es in Betrieb ist.
Schließen Sie den Adapter vorsichtig an Ihr ARCHOS-Gerät an bzw. lösen Sie ihn.
Forcieren Sie dies nicht: Die Stecker könnten beschädigt werden!Forcieren Sie dies nicht: Die Stecker könnten beschädigt werden!
DEUTSCH
33
Page 36

BESCHREIBUNG DES HELMET CAMCORDER
a Aufzeichnungsstatus (rotes Licht)
b Verbindungsstatus (grünes Licht)
c Mikrofon
d Status/Informationstaste
e Aufnahme Start/Stopp-Taste
f Verbindungsstecker
a
b
c
ARCHOS-Gerät
(nicht enthalten)
d
DEUTSCH
34
e
Kamerasteuerung
f
DVR Travel Adapter
Page 37

AUFNEHMEN
Aufnehmen mit Ihrem Archos Helmet CamCorder
•
Ihr Archos Helmet CamCorder wird über das ARCHOS-Gerät betrieben, stellen Sie also sicher, dass es
voll aufgeladen ist, wenn Sie längere Aufnahmen vorhaben.
•
Sie können die Steuerung Ihres Archos Helmet CamCorder zum Beispiel an Ihrer Brusttasche befestigen. Die Kamera selbst wird typischerweise im Stirnband befestigt und damit getragen, so dass Sie
aufnehmen, was Sie sehen.
•
Die beiden folgenden Abschnitte erklären die beiden Aufnahmeoptionen:
schnitte erklären die beiden Aufnahmeoptionenschnitte erklären die beiden Aufnahmeoptionen, oder über die CamCorder-Anwendung Ihres ARCHOS-über die CamCorder-Anwendung Ihres ARCHOS-
GerätsGeräts, das Ihnen eine Reihe von Einstellungsparametern bietet.
Die beiden folgenden Ab-Die beiden folgenden Ab-
Aufnahme über die Kamerasteuerung
Um die Aufnahme zu beginnen:Um die Aufnahme zu beginnen:
•
Drücken Sie
dem Bildschirm Ihres ARCHOS-Geräts erscheint die Nachricht, dass ein Videosignal empfangen wird.
Das von der Kamera übermittelte Bild wird dann gezeigt und die Aufnahme beginnt.
Um die Aufnahme zu beenden:Um die Aufnahme zu beenden:
•
Drücken Sie wieder
Dies zeigt an, dass die Aufnahme beendet wurde. Das ARCHOS-Gerät speichert nun Ihre Videodatei
und leitet Sie zu dem Verzeichnis, in dem das Video gespeichert ist.
Anmerkung: Anmerkung: Die
CHOS-Geräts gesperrt sind. Dies ermöglicht es Ihnen, bequem eine Aufnahme zu machen, während Sie
Ihr ARCHOS-Gerät beispielsweise in einem Rucksack tragen.
Start/Stopp
Start/Stopp
Start/Stopp
Ihrer Kamerasteuerung. Das rote und grüne Licht leuchten kurz auf und auf
an der Kamerasteuerung. Dieses Mal leuchtet nur das grüne Licht auf.
-Taste an der Steuerung funktioniert auch, so lange die Tasten Ihres AR-
DEUTSCH
35
Page 38

Aufnahme über die CamCorder-Anwendung Ihres ARCHOS-Geräts
Wählen Sie auf dem Home-BildschirmHome-Bildschirm, das CamCorderCamCorder-Symbol aus und drücken Sie OK , um die Cam-
•
Corder-Anwendung zu öffnen.
Ihr ARCHOS-Gerät betreibt jetzt die Kamera. Auf dem Bildschirm sehen Sie jetzt das Bild, das die
•
Kamera gerade sieht. Diese Vorschau ermöglicht es Ihnen, Positionierung und Ausrichtung der Kamera
anzupassen, bevor Sie mit der Aufnahme beginnen.
EinstellungenEinstellungen
Eine Reihe von Einstellungen wie Aufl ösung und Bitrate können angepasst werden. Normalerweise
•
brauchen Sie diese Einstellungen nicht zu ändern.
Um zu den Aufnahmeparametern zu gelangenUm zu den Aufnahmeparametern zu gelangen, drücken Sie MENU und wählen den Menüpunkt Ein-
•
stellungen
•
Um zur Vorschau zurückzukehrenUm zur Vorschau zurückzukehren, drücken Sie auf die Taste des ARCHOS-Geräts.
•
Wenn Sie den
Anmerkung:Anmerkung: Weitere Informationen zu anderen Einstellungen fi nden Sie in dem Abschnitt zur Video-Aufnahme im
Benutzerhandbuch Ihres ARCHOS-Geräts. Bitte beachten Sie, dass es keinen Format-Parameter gibt, da die Einstel-
DEUTSCH
lung von der Kamera vorgegeben wird. Aus dem gleichen Grund kann der Ausgangsparameter nur auf ‚Kombination’
oder ‚Schwarz & Weiß’ gestellt werden.
•
Um mit der Aufnahme zu beginnenUm mit der Aufnahme zu beginnen, drücken Sie OK oder wählen den Menüpunkt Start Aufnahme Start Aufnahme aus.
•
Um die Aufnahme zu unterbrechen und fortzusetzenUm die Aufnahme zu unterbrechen und fortzusetzen, drücken Sie OK oder wählen die Menüpunkte PausePause
oder Fortsetzen Fortsetzen
•
Um die Aufnahme zu beenden und abzuspeichernUm die Aufnahme zu beenden und abzuspeichern, drücken Sie die Taste.
Anmerkung:Anmerkung: Wahlweise können Sie die Aufnahme auch mit der
rung beginnen und beenden.
36
aus.
Zeitstempel-
aus.
Parameter auf ‚EIN’ stellen, werden Datum und Zeit auf der Aufnahme angegeben.
Start/Stopp
-Taste Ihrer Kamerasteue-
Page 39

Überprüfen des Status des Archos Helmet CamCorder
Um festzustellen, ob der Helmet CamCorder aufnimmt oder nicht in Betrieb ist, drücken Sie die
tus
-Taste. Die Lichter zeigen den Status des ARCHOS-Geräts wie unten dargestellt an:
•
Rot und grün: Rot und grün: Das ARCHOS-Gerät zeichnet gerade auf.
•
Grün: Grün: Der Helmet CamCorder ist korrekt an das ARCHOS-Gerät angeschlossen, die Aufnahme kann gestar-
tet werden.
•
Kein Licht: Kein Licht: Der Helmet CamCorder ist nicht korrekt an das ARCHOS-Gerät angeschlossen oder das
Gerät ist abgeschaltet.
Sta-
Anmerkungen zum Archos Helmet CamCorder
•
Machen Sie sich keine Sorgen, wenn die Steuerungslichter nicht leuchten, wenn Ihr Helmet CamCorder
in Betrieb ist. Das ist normal.
•
Der Lautsprecher Ihres ARCHOS-Geräts ist während der Aufnahme deaktiviert, da er ansonsten ein
Audio-Feedback verursachen könnte. Das in die Kamerasteuerung integrierte Mikrofon zeichnet die
Geräusche auf. Stellen Sie daher sicher, dass es nicht verdeckt ist, damit Sie den bestmöglichen Klang
für Ihre Aufnahme erzielen.
•
Sind die Bilder verzerrt, haben Sie möglicherweise nicht genug Abstand zu dem Gegenstand, den
Sie fi lmen. Diesen Effekt bezeichnet man auch als „Fischaugeneffekt“. Die Entfernung zur Aufnahme
unverzerrter Bilder liegt zwischen 1,5 und 10 Metern.
•
So lange die Kamera mit Ihrem ARCHOS-Gerät verbunden ist, erscheint anstatt des
bols im
Home-BildschirmHome-Bildschirm das CamCorderCamCorder-Symbol.
VideoCorderVideoCorder-Sym-
DEUTSCH
37
Page 40

VORSICHTSMASSNAHMEN
!
▲
Bitte beachten Sie die folgenden Punkte, um eine Beschädigung Ihres Archos Helmet CamCorder zu vermeiden:
•
Versuchen Sie nicht, die Kamera auseinander zu nehmen. Es gibt in der Kamera keine Teile, die vom
Kunden gewartet werden können; außerdem könnten Sie einen elektrischen Schlag erhalten.
•
Gehen Sie vorsichtig mit der Kamera um. Eine starke Erschütterung, beispielsweise durch Herabfallen,
könnte sie beschädigen.
•
Benutzen Sie die Kamera unter gemäßigten Bedingungen. Vermeiden Sie kalte oder heiße Temperaturen, Luftfeuchtigkeit über 85% und Staub oder Sand.
•
Dieselben Vorsichtsmaßnahmen gelten für die Steuerung.
•
Bitte bedenken Sie, dass Kamera und Steuerung nicht wasserdicht sind und daher nicht mit Wasser in
Kontakt kommen sollten.
•
Zur Reinigung der Kamera benutzen Sie bitte nur speziell für die Reinigung optischer Linsen herg-
DEUTSCH
estellte Produkte.
•
Richten Sie die Kamera NIEMALS direkt in die Sonne!
38
Page 41

www
REGISTRIEREN SIE JETZT!
www.archos.com/register
Bitte nehmen Sie sich nach dem Auspacken Ihres ARCHOS-Produkts kurz
Zeit für die Registrierung. Damit sichern Sie Ihren Zugang zu unserem
Support-Service, und wir sind in der Lage, Ihre Anfragen telefonisch oder per
E-Mail zügiger zu bearbeiten. Außerdem besteht so die Möglichkeit, dass wir Sie
über aktuelle Software-Updates oder sonstige brandneue Informationen zu Ihrem
ARCHOS-Gerät auf dem Laufenden halten. Führen Sie die Registrierung bitte
online auf der oben genannten Website durch.
DEUTSCH
39
Page 42

TECHNISCHE SPEZIFIKATIONEN
Technische Spezifi kationen: Archos Helmet CamCorder
Aufl ösungAufl ösung.................................................................................. 420 TV Lines
CCDCCD ............................................................................................. 6,35mm SONY Super HAD Farb-CCD
LinseLinse............................................................................................Unbewegliches 3,6mm-Pinhole
SichtfeldSichtfeld .................................................................................... 72,5 Grad
SchärfentiefeSchärfentiefe ...........................................................................1,5 bis 10 Meter
WeißabgleichWeißabgleich .......................................................................... Automatisch
Lichtempfi ndlichkeitLichtempfi ndlichkeit .............................................................1,0 Lux / F 1,2
StromversorgungStromversorgung ................................................................... Betrieben über das ARCHOS-Gerät
Aufnahmeaufl ösung mit dem ARCHOS-GerätAufnahmeaufl ösung mit dem ARCHOS-Gerät ........... 512 x 384 (Optimal) oder 640 x 480 (VGA)
GewichtGewicht ..................................................................................... ca. 100 g mit dem DVR Travel Adapter
MaßeMaße .......................................................................................... 20.5 mm (Ø) x 72 mm (L)
DEUTSCH
CCD-Aufl ösungCCD-Aufl ösung ....................................................................... Model NTSC: 512 x 492 - Model PAL: 582 x 500
BetriebstemperaturBetriebstemperatur ............................................................... ca. 5°C bis 35°C / ca. 41°F bis 95°F
SystemanforderungenSystemanforderungen .......................................................... ARCHOS 404, 504 oder 604 Seriengerät
Alle Marken und Produktbezeichnungen sind das Eigentum der jeweiligen Markeninhaber.
Änderungen der technischen Daten sind ohne Vorankündigung vorbehalten. Vorbehaltlich Irrtümer oder Auslassungen.
Eine hundertprozentige Übereinstimmung der Abbildungen mit den tatsächlichen Produkten kann nicht garantiert werden.
Sämtliche Angaben in dieser Anleitung entsprechen dem Informationsstand zum Zeitpunkt der Veröffentlichung.
COPYRIGHT ARCHOS
40
™
© 2006. Alle Rechte vorbehalten.
Page 43

HELMET CAMCORDER
PER 404, 504, 604
ITALIANO
ITALIANO GUIDA DELL’UTENTE
ARCHOS 604 : in vendita separamente
Page 44

MANUAL
INDICE
Contenuto della confezione ....................................................................................................................... 43
Connections ..................................................................................................................................................... 43
Descrizione della Helmet CamCorder .................................................................................................... 44
Registrazioni ....................................................................................................................................................45
Precauzioni ....................................................................................................................................................... 48
Registra subito! ...............................................................................................................................................49
Specifi che tecniche ....................................................................................................................................... 50
?
Di seguito sono forniti alcuni suggerimenti su come trovare informazioni che possono risultare utili:
ITALIANO
42
SERVE AIUTO?
Sul nostro sito WebSul nostro sito Web
Consultare la sezione FAQ (Frequently Asked Questions) all’indirizzo www.archos.com/faq.
Inoltre, visitare il sito www.archos.com/manuals per la versione più recente del manuale.
Contattare il nostro personale di assistenza tecnicaContattare il nostro personale di assistenza tecnica
Visitare il sito www.archos.com/support per l’assistenza tramite e-mail.
Page 45

CONTENUTO DELLA CONFEZIONE
Nota: il contenuto effettivo della confezione può variare ed è soggetto a modifi ca senza preavviso.
Helmet CamCorder DVR Travel Adapter
Fascia Custodia protettiva
MANUAL
LEGAL &
SAFETY
Guida dell’utente
Informazioni legali
e sulla sicurezza
CONNESSIONI
Le connessioni possono essere eseguite prima di accendere la periferica o mentre essa è in funzione.
Collegare / scollegare con cautela l’adattatore alla / dalla periferica ARCHOS.
Non forzarlo per non rischiare di rompere i connettori!Non forzarlo per non rischiare di rompere i connettori!
ITALIANO
43
Page 46

DESCRIZIONE DELLA HELMET CAMCORDER
a Stato della registrazione (spia rossa)
b Stato della connessione (spia verde)
c Microfono
d Pulsante di stato / informazioni
e Pulsante di avvio / interruzione
della registrazione
f Spina di connessione
ITALIANO
44
e
Controller della
videocamera
a
b
c
Apparecchio ARCHOS
(non accluso)
d
f
DVR Travel Adapter
Page 47

REGISTRAZIONI
Registrazione con la Helmet CamCorder Archos
La Helmet CamCorder Archos viene alimentata tramite l’apparecchio ARCHOS: ricordare, pertanto, di
•
caricarlo completamente se si desidera effettuare registrazioni lunghe.
Il controller della Helmet CamCorder Archos può essere fermato, ad esempio, sul taschino della cami-
•
cia. La videocamera di solito viene fi ssata alla fascia e indossata in modo da registrare ciò che si vede.
Le due sezioni successive descrivono le due opzioni per eseguire una registrazione: con il controller
•
della videocamera oppure con l’applicazione CamCorder dell’apparecchio ARCHOS che consente di
impostare diversi parametri.
Registrazione con il controller della videocamera
Avvio della registrazione:Avvio della registrazione:
•
Premere il pulsante di
si illuminano brevemente e sullo schermo dell’apparecchio ARCHOS viene visualizzato un messaggio
che comunica il rilevamento di un segnale video. Poi viene visualizzata l’immagine trasmessa dalla
videocamera e comincia la registrazione.
Interruzione della registrazione:Interruzione della registrazione:
•
Premere di nuovo il pulsante di
volta s’illumina solo la spia verde. per indicare che la registrazione si è fermata. A questo punto
l’apparecchio ARCHOS salva il fi le video e apre la cartella in cui è stato salvato.
Nota: Nota: il pulsante di
ARCHOS sono bloccati. In questo modo è possibile effettuare una registrazione anche mentre, ad
esempio, l’apparecchio ARCHOS viene trasportato all’interno di uno zaino.
avvio / interruzione
avvio / interruzione
avvio / interruzione
sul controller della videocamera. La spia rossa e quella verde
sul controller della videocamera. Questa
sul controller è attivo anche quando i pulsanti dell’apparecchio
ITALIANO
45
Page 48

Registrazione con l’applicazione CamCorder dell’apparecchio ARCHOS
Nella schermata principaleschermata principale, selezionare l’icona della videocameravideocamera e premere OK per aprire
•
l’applicazione CamCorder.
Ora l’apparecchio ARCHOS alimenta la videocamera e sullo schermo viene visualizzata l’immagine
•
ripresa dalla videocamera. Questa schermata di anteprima consente di regolare la posizione o direzione della videocamera prima di avviare la registrazione.
ImpostazioniImpostazioni
•
Sono diverse le impostazioni che è possibile regolare, ad esempio la risoluzione e la velocità di
trasferimento, e di solito non è necessario modifi carle.
•
Per accedere ai parametri di registrazione modifi cabiliPer accedere ai parametri di registrazione modifi cabili, premere MENU e selezionare la voce di menu
ImpostazioniImpostazioni .
•
Per ritornare alla schermata di pre-registrazionePer ritornare alla schermata di pre-registrazione, premere il pulsante sull’apparecchio ARCHOS.
•
Se s’imposta su ON il parametro
zati la data e l’orario.
Nota:Nota: per informazioni sulle altre impostazioni, consultare la sezione con le istruzioni per eseguire una registrazione
video nel manuale dell’utente dell’apparecchio ARCHOS. Il parametro
impostazione è predeterminata dalla videocamera. Per lo stesso motivo il parametro
impostato solo su “Composite” (Composito) o “Black & White” (Bianco e nero).
ITALIANO
•
Per avviare la registrazionePer avviare la registrazione, premere il pulsante OK oppure selezionare la voce di menu Inizio registrazioneInizio registrazione .
•
Per mettere in pausa e riavviare la registrazionePer mettere in pausa e riavviare la registrazione, premere il pulsante OK oppure selezionare la voce di menu
PausaPausa o RiprendiRiprendi
•
Per fermare la registrazione e salvarlaPer fermare la registrazione e salvarla, premere il pulsante .
46
.
Time Stamp (Data / Ora)
, sull’immagine registrata vengono visualiz-
Format (Formato)
non esiste in quanto questa
Source (Sorgente)
può essere
Page 49

Nota:Nota: in alternativa, la registrazione può essere avviata e interrotta premendo il pulsante di
interruzione
sul controller della videocamera.
avvio /
Controllo dello stato della Helmet CamCorder Archos
Per sapere se la Helmet CamCorder è ferma o sta registrando, premere il pulsante
spie segnalano lo stato dell’apparecchio ARCHOS, come mostrato di seguito:
Rosso e verde: Rosso e verde: l’apparecchio ARCHOS sta eseguendo una registrazione.
•
•
Verde: Verde: la Helmet CamCorder è collegata correttamente all’apparecchio ARCHOS ed è possibile avviare una
registrazione.
•
Nessuna spia: Nessuna spia: la Helmet CamCorder non è collegata correttamente all’apparecchio ARCHOS oppure
l’apparecchio è spento.
Status (Stato)
. Le
Note sulla Helmet CamCorder Archos
•
Quando la Helmet CamCorder è in uso, è normale che le spie siano spent.
•
L’altoparlante dell’apparecchio ARCHOS viene disabilitato durante la registrazione, per evitare il rischio
di ritorni audio. Il microfono integrato nella videocamera registra i suoni. Per ottenere un audio ottimale, accertarsi, pertanto, che non sia coperto.
•
Se le immagini appaiono deformate, è possibile che il soggetto sia ripreso troppo da vicino, causando
un effetto noto anche come “fi sheye”. Per ottenere immagini prive di distorsioni, è necessario mante-
nere una distanza di 1,5 - 10 metri.
•
Quando la videocamera è collegata all’apparecchio ARCHOS, l’icona
principaleprincipale viene sostituita dall’icona CamCorderCamCorder.
VideoCorderVideoCorder della schermata schermata
ITALIANO
47
Page 50

PRECAUZIONI
!
▲
Per evitare danni alla Helmet CamCorder Archos, attenersi alle seguenti regole:
•
Non tentare di aprire la videocamera. I componenti interni non sono riparabili e ci si espone al potenziale rischio di scossa elettrica.
•
Maneggiare la videocamera con cautela. Un eventuale urto violento, ad esempio dovuto a una caduta,
può danneggiarla.
La videocamera va utilizzata in condizioni ambientali medie: evitare temperature elevate, umidità
•
superiore all’85% e polvere o sabbia.
Le stesse precauzioni valgono per il controller.
•
La videocamera e il controller non sono a tenuta stagna e non devono entrare a contatto con l’acqua.
•
Per pulire la videocamera, adoperare esclusivamente prodotti specifi ci per la pulizia di lenti ottiche.
•
Non puntare MAI la videocamera verso il sole!
•
ITALIANO
48
Page 51

www
REGISTRA SUBITO!
www.archos.com/register
Dopo aver aperto il vostro prodotto ARCHOS, vi suggeriamo di registrarlo; ci
vorranno solo pochi minuti. La registrazione vi garantirà accesso all’assistenza
tecnica e ci permetterà di rispondere alle vostre richieste sia per telefono, sia per
e-mail in maniera veloce. Inoltre vi consentirà di essere sempre informati riguardo ad aggiornamenti del software o informazioni speciali dell’ultimo minuto
circa il vostro dispositivo. Vi preghiamo di collegarvi al sito Web indicato sopra
per registrare il vostro prodotto.
ITALIANO
49
Page 52

SPECIFICHE TECNICHE
Specifi che tecniche: Helmet CamCorder Archos
RisoluzioneRisoluzione ............................................................................... 420 linee TV
CCDCCD ............................................................................................. CCD SONY Super HAD a colori da 1/4”
ObiettivoObiettivo .................................................................................. pinhole fi sso da 3,6 mm
Campo visivoCampo visivo ........................................................................... 72,5 gradi
Profondità di campoProfondità di campo ............................................................. da 1,5 a 10 metri
Bilanciamento del biancoBilanciamento del bianco ................................................... automatico
FotosensibilitàFotosensibilità .........................................................................1,0 Lux / F 1,2
AlimentazioneAlimentazione ......................................................................... mediante apparecchio ARCHOS
Risoluzione della registrazione con apparecchio ARCHOSRisoluzione della registrazione con apparecchio ARCHOS .. 512 x 384 (ottimale) o 640 x 480 (VGA)
PesoPeso ............................................................................................approx. 100 g – 3,5 once con il DVR Travel Adapter
DimensioniDimensioni ............................................................................... 20,5 mm (Ø) x 72 mm (L)
Risoluzione CCDRisoluzione CCD .....................................................................Modello NTSC: 512 x 492 - Modello PAL: 582 x 500
Temperatura di funzionamentoTemperatura di funzionamento ........................................ da circa 5 °C a 35 °C (41 –95 °F)
Requisiti di sistemaRequisiti di sistema ............................................................... Apparecchio Archos delle serie 404, 504 o 604
ITALIANO
Tutti i marchi e i nomi dei prodotti sono marchi registrati appartenenti ai rispettivi proprietari.
Le caratteristiche sono soggette a modifi che senza preavviso. Salvo errori o omissioni.
Le immagini e le illustrazioni non sempre corrispondono al contenuto.
Tutte le informazioni presenti in questo manuale devono intendersi corrette al momento della pubblicazione.
COPYRIGHT ARCHOS
50
™
© 2006. Tutti i diritti riservati.
Page 53

HELMET CAMCORDER
VOOR 404, 504, 604
NEDERLANDS
NEDERLANDS GEBRUIKERSGIDS
ARCHOS 604 : los verkrijgbaar
Page 54

MANUAL
INHOUD
Inhoud van de doos ......................................................................................................................................53
Aansluitingen .................................................................................................................................................. 53
Beschrijving van de Helmet CamCorder ............................................................................................... 54
Filmen ................................................................................................................................................................ 55
Waarschuwingen ...........................................................................................................................................58
Registreer nu! ..................................................................................................................................................59
Technische bijzonderheden ........................................................................................................................60
?
NEDERLANDS
52
HULP NODIG?
Hier vindt u enkele nuttige informatiebronnen:
Op onze websiteOp onze website
Raadpleeg het onderdeel Frequently Asked Questions op www.archos.com/faqwww.archos.com/faq.
Bezoek ook www.archos.com/manualswww.archos.com/manuals voor de meest recente versie van de gebruikersgids.
Neem contact op met ons Technisch ondersteuningsteamNeem contact op met ons Technisch ondersteuningsteam
Surf naar
www.archos.com/supportwww.archos.com/support voor ondersteuning via e-mail.
Page 55

INHOUD VAN DE DOOS
Opgelet: de eigenlijke inhoud van de doos kan variëren en kan zonder voorafgaande kennisgeving worden gewijzigd.
Helmet CamCorder DVR Travel Adapter
Hoofdband Beschermtas
MANUAL
LEGAL &
SAFETY
Deze Gebruiksaanwijzing
veiligheidsinformatie
AANSLUITINGEN
Aansluitingen kunnen plaatsvinden wanneer de camera aan is of wanneer hij loopt.
Wees voorzichtig met het aansluiten of loskoppelen van de adaptor aan de ARCHOS recorder.
Forceer niets om beschadiging van de connectoren te voorkomen!Forceer niets om beschadiging van de connectoren te voorkomen!
Juridische en
NEDERLANDS
53
Page 56

BESCHRIJVING VAN DE HELMET CAMCORDER
a Opnamestand (rood lampje)
b Verbindingsstand (groen lampje)
c Microfoon
d Stand-/Informatieknop
e Start/Stop opnameknop
f Aansluitplug
a
b
c
ARCHOS recorder
(Exclusief)
d
e
f
NEDERLANDS
54
Camerabediening
DVR Travel Adapter
Page 57

FILMEN
Opnemen met uw ARCHOS Helmet CamCorder
Uw ARCHOS Helmet CamCorder wordt gevoed via de ARCHOS recorder; zorg dus dat de batterij
•
volledig is opgeladen als u langere opnamen wilt gaan maken.
U kunt de bediening van uw ARCHOS Helmet CamCorder bijvoorbeeld aan het borstzakje van uw
•
overhemd vastmaken. De camera zelf wordt normaalgesproken in de hoofdband aangebracht en
gedragen, zodat u opnamen kunt maken van wat u ziet.
In de volgende twee hoofdstukken worden de twee manieren om een opname te maken uitgelegd:
•
Namelijk met behulp van de camerabediening, of met behulp van het cameraprogramma van uw
ARCHOS recorder, waarmee u een aantal instellingen kunt aanpassen.
Een opname maken met behulp van de camerabediening
Beginnen met de opname:Beginnen met de opname:
•
Druk de
Start-/stopknop
gaan, en op het scherm van uw ARCHOS recorder komt de melding dat er een videosignaal ontvangen
wordt. Het door de camera doorgestuurde beeld verschijnt vervolgens op het scherm en de opname
begint.
Om de opname te beëindigen:Om de opname te beëindigen:
•
Druk opnieuw op de
branden. Dit geeft aan dat de opname gestopt is. De ARCHOS recorder zal nu uw videobestand opslaan en de map tonen waarin de video wordt opgeslagen.
Opmerking: Opmerking: De
recorder vergrendeld zijn. Op deze wijze kan er ook een opname gemaakt worden als de ARCHOS
recorder bijvoorbeeld in een rugzak zit.
in op de camerabediening. Het rode en het groene lampje zullen even aan
Start-/stopknop
Start-/stopknop
van de camerabediening. Ditmaal zal alleen het groene lampje
op de afstandscamera werkt ook als de knoppen op de ARCHOS
NEDERLANDS
55
Page 58

Een opname maken met het cameraprogramma van uw ARCHOS recorder
•
Kies op het ‘Home’-scherm‘Home’-scherm, het Camerapictogram Camerapictogram en druk op OK om het cameraprogramma te openen.
•
De camera wordt nu door de ARCHOS recorder aangestuurd. Op de monitor is te zien wat de camera
nu waarneemt. Aan de hand van het beeld op de monitor kunt u de positie of richting van de camera
aanpassen voordat u met de opname begint.
InstellingenInstellingen
Instellingen zoals de resolutie en het aantal bits kunnen nu aangepast worden. Normaalgesproken
•
hoeven deze instellingen niet aangepast te worden.
•
Om naar de opname-instellingen te gaanOm naar de opname-instellingen te gaan, druk op MENU en kies het InstellingenInstellingen -menu.
•
Via de -knop van de ARCHOS recorder keert u weer terug naar het voorbereidingsscherm voor de opnameterug naar het voorbereidingsscherm voor de opname.
•
Wanneer de tijdsvermeldingskeuze ingeschakeld wordt (ON), worden de datum en tijd weergegeven
op het opgenomen beeld.
Opmerking:Opmerking: Voor informatie over de andere instellingen: zie het hoofdstuk over “opnemen” in de gebruiksaanwijzing
van uw ARCHOS recorder. U ziet dat er geen keuzemogelijkheden voor
dit al van tevoren bepaalt. Om dezelfde reden kan de keuze
(samengesteld) of ‘Black & White’ (zwart-wit).
•
Om de opname te starten Om de opname te starten moet u op de OK knop drukken, of in het menu Opname startenOpname starten kiezen.
•
Om de opname te onderbreken en weer te starten Om de opname te onderbreken en weer te starten moet u op de OK knop drukken, of in het menu PauzePauze
of Ga verderGa verder
•
Om te stoppen en uw opname op te slaan Om te stoppen en uw opname op te slaan moet u het -knopje indrukken.
NEDERLANDS
56
kiezen
.
‘Source’ (bron)
‘Format’ (afmetingen)
alleen ingesteld worden op ‘Composite’
zijn omdat de camera
Page 59

Opmerking:Opmerking: U kunt ook de
Start-/stopknop
op uw camerabediening indrukken om een opname te
starten of beëindigen.
De stand van de ARCHOS Helmet CamCorder controleren
Om te zien of de Helmet CamCorder opneemt of niet, drukt u op de knop
van de lampjes kunt u zien wat de ARCHOS recorder op dit ogenblik doet:
Rood en groen: Rood en groen: Op dit moment is de ARCHOS recorder aan het opnemen.
•
Groen: Groen: De Helmet CamCorder is op de juiste wijze met de ARCHOS recorder verbonden en er kan een
•
opname gemaakt worden.
Geen lampje: Geen lampje: De Helmet CamCorder is niet juist met de ARCHOS recorder verbonden, of de recorder
•
staat uit.
Status (stand)
. Aan de hand
Opmerkingen over de ARCHOS Helmet CamCorder
Maak u niet ongerust als de lampjes van de camerabediening niet aan zijn terwijl u de Helmet CamCorder
•
gebruikt. Dit is normaal.
De luidspreker van uw ARCHOS recorder werkt niet tijdens de opname omdat dit voor een echo zou
•
zorgen. Het microfoontje in de camerabediening neemt het geluid op. Zorg er daarom voor dat dat
niet bedekt is, zodat u een optimale opname van het geluid krijgt.
Als beelden vervormd lijken bent u wellicht te dicht bij het beeld dat u wilt fi lmen. Dit effect heet ook
•
wel het ‘fi sh eye effect’. De afstand waaronder u scherpe beelden krijgt is 1,5 tot 10 meter.
Gedurende de tijd dat de camera met de ARCHOS recorder verbonden is, zal het
•
gram op het
‘Home’-scherm‘Home’-scherm vervangen zijn door het CamerapictogramCamerapictogram.
VideoCorderVideoCorder picto-
NEDERLANDS
57
Page 60

WAARSCHUWINGEN
!
▲
Let alstublieft op de volgende punten om beschadiging van uw ARCHOS Helmet CamCorder te
voorkomen:
•
Probeer de camera niet uit elkaar te halen. Er zitten geen onderdelen in waaraan onderhoud gepleegd
moet worden en u loopt het risico onder stroom te komen staan.
•
Behandel de camera met zorg. Hij zou bijvoorbeeld door een hevige klap of val beschadigd kunnen raken.
•
Gebruik de camera onder normale omstandigheden. Vermijd kou of hitte, een vochtigheidsgraad van
boven de 85%, en stof of zand.
•
Dezelfde waarschuwingen gelden voor de camerabediening.
•
Vergeet alstublieft niet dat de camera en de camerabediening niet waterproof zijn en daarom niet nat
mogen worden.
•
Gebruik om de camera te reinigen alleen producten die specifi ek bedoeld zijn voor het schoonmaken
van optische lenzen.
•
Richt de camera NOOIT op de zon!
NEDERLANDS
58
Page 61

www
REGISTREER NU!
www.archos.com/register
Als u uw ARCHOS product heeft uitgepakt, dan vragen wij u om een paar minuten te nemen om het te registreren. Hierdoor heeft u zekerheid dat u toegang
hebt tot onze hulplijn en dat wij uw vragen kunnen beantwoorden, hetzij telefonisch, hetzij per e-mail, altijd op de snelste manier. Het stelt ons ook in staat om
u op de hoogte te houden van software updates of informatie over het laatste
nieuws betreffende uw apparaat. Gebruik uw Internetaansluiting en ga naar de
hierbovengenoemde webpagina om te registreren.
NEDERLANDS
59
Page 62

TECHNISCHE BIJZONDERHEDEN
Technische bijzonderheden: ARCHOS Helmet CamCorder
ResolutieResolutie ................................................................................... 420 TV regels
CCDCCD ............................................................................................. ¼-inch SONY Super HAD kleuren CCD
LensLens ............................................................................................. Vaste Pinhole 3,6 mm
GezichtsveldGezichtsveld ............................................................................ 72,5 graden
ScherptediepteScherptediepte .......................................................................1,5 tot 10 meter
WitbalansWitbalans .................................................................................Automatisch
LichtgevoeligheidLichtgevoeligheid ................................................................... 1.0 Lux F 1,2
VoedingVoeding ..................................................................................... Voeding via de ARCHOS recorder
Opname resolutie met de ARCHOS recorderOpname resolutie met de ARCHOS recorder ............. 512 x 384 (optimaal) of 640 x 480 (VGA)
GewichtGewicht ..................................................................................... ongeveer 100 gram met DVR Travel Adapter
AfmetingenAfmetingen .............................................................................. 20,5 mm (Ø) x 72 mm (L)
CCD resolutieCCD resolutie .......................................................................... Model NTSC: 512 x 492 – Model PAL: 582 x 500
OmgevingstemperatuurOmgevingstemperatuur ......................................................ongeveer 5°C tot 35°C (41°F tot 95°F)
SysteemeisenSysteemeisen ..........................................................................Archos recorder 404, 504 of 604 serie
Alle merken en productnamen zijn geregistreerde handelsmerken en eigendom van hun respectieve eigenaars.
Specifi caties kunnen zonder voorafgaande kennisgeving worden gewijzigd. Vergissingen en weglatingen voorbehouden.
Afbeeldingen en illustraties komen mogelijk niet altijd overeen met de inhoud.
Alle informatie in deze handleiding was correct op het moment van publicatie.
NEDERLANDS
COPYRIGHT ARCHOS
60
™
© 2006. Alle rechten voorbehouden.
Page 63

NOTES
61
Page 64

www.archos.com
register your product: www.archos.com/register
frequently asked questions: www.archos.com/faq
download the latest manual: www.archos.com/manuals
technical support: www.archos.com/support
All brands and product names are registered trademarks and the property of their respective owners.
Specications are subject to change without notice. Errors or omissions excepted. Images and illustrations may not always match contents.
All the information contained in this guide was correct at the time of publication.
COPYRIGHT ARCHOS™ © 2006. All rights reserved.
P/N: 104983 V2
 Loading...