

Page 1
English
Table of contents
Package contents........................................................................................................................
Getting started.............................................................................................................................
Description of the device..........................................................................................................
Description of the keyboard....................................................................................................
Installing the tablet with the keyboard...............................................................................
First steps.......................................................................................................................................
Connecting to a WiFi network...............................................................................................
The WindowsTM interface.........................................................................................................
Troubleshooting........................................................................................................................
As we are often updating and improving our products, your device’s software may have a slightly
different appearance or modified functionality than presented in this Quick Start Guide.
For more detailed information about how to use your device, go to the link:
http://windows.microsoft.com/en-gb.
Consult the declaration of conformity on:
http://www.archos.com/products/declaration_conformity.html
2
3
4
5
6
8
10
12
18
1
UserGuide_ARCHOS_101_Cesium_book.indd 1 30/07/2015 12:00:58
Page 2
Warranty
Home
PgDn
PgUp
End
<
>
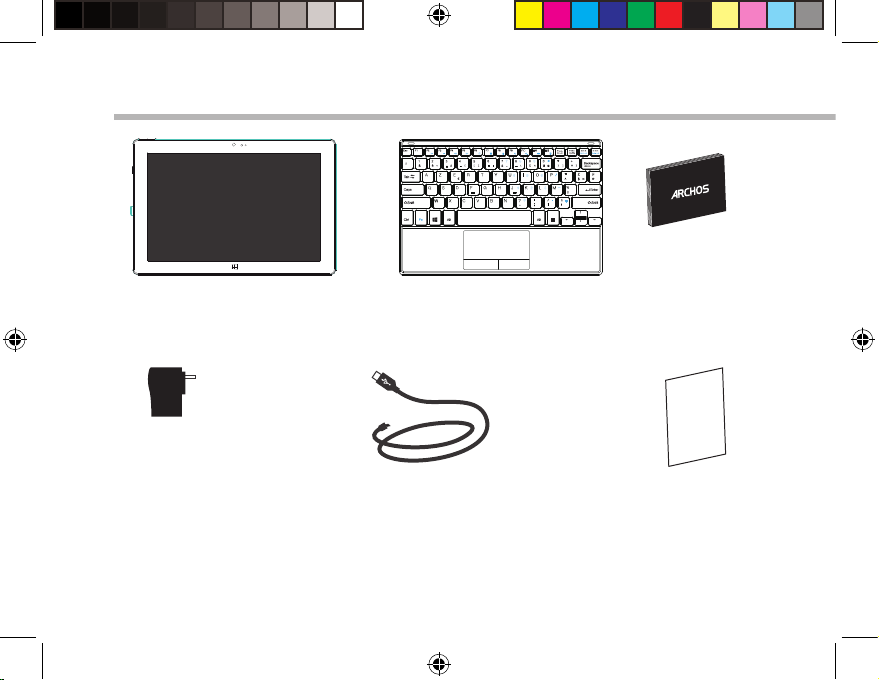
Package Content
ARCHOS 101 Cesium
Keyboard+Origami
pouch
Charger
Charging cable
2
UserGuide_ARCHOS_101_Cesium_book.indd 2 30/07/2015 12:00:59
QSG booklet
Warranty,
legal & safety
booklet
Page 3
English
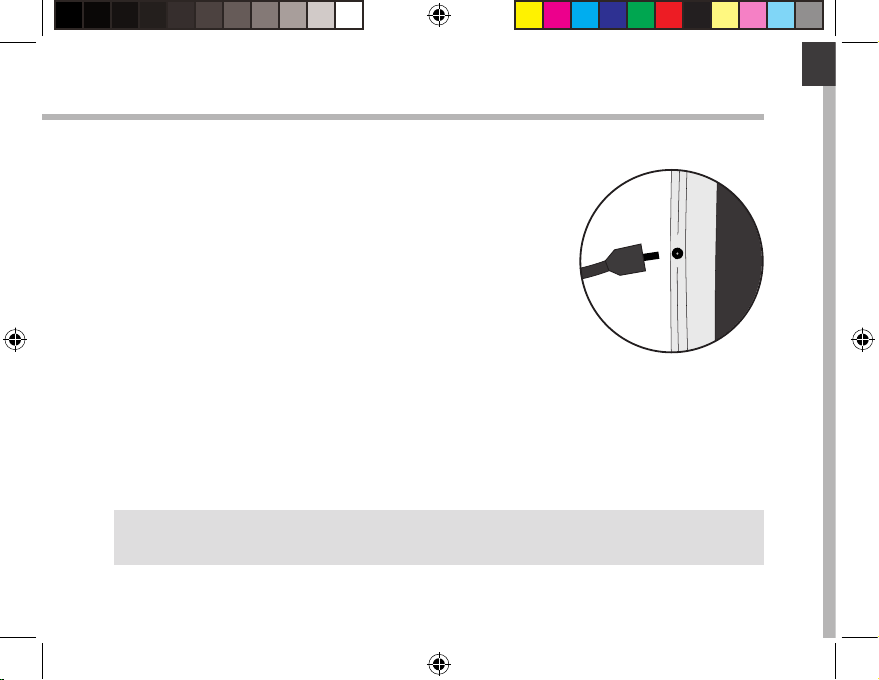
Getting Started
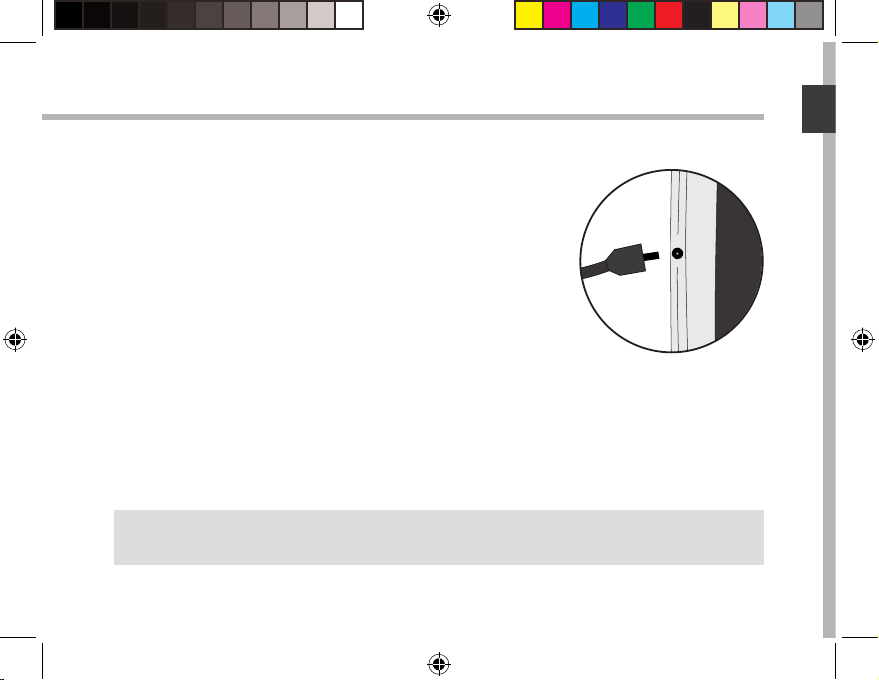
Charging
1. Charge your device by plugging your power cable into the
power connector.
The ARCHOS device will start charging.
The charging indicator light is on when the battery is
charging.
2. Press the Power button to turn on the device.
- You can use your ARCHOS whilst it charges.
- Let your device charge completely the rst time you use it.
- Use only the supplied charger.
TIP:
To receive more complete service, please register your product. From a computer, go to www.
archos.com/register.
3
UserGuide_ARCHOS_101_Cesium_book.indd 3 30/07/2015 12:00:59
Page 4

4
15
1
15
5
8
12
13
11
9
10
14
6
16
2
7
3
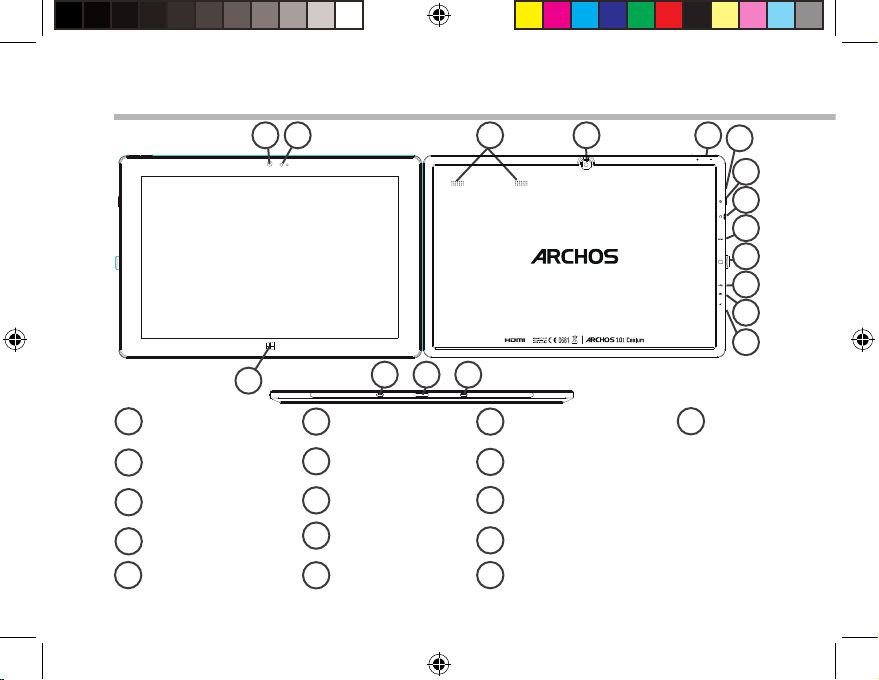
Description of the tablet
Front camera
1
Light sensor
2
Windows button
3
Loudspeaker
4
Back camera
5
Volume buttons
6
Charging indicator
7
ON/OFF button
8
Headphone jack
9
HDMI video output
10
Micro-SD card slot
11 16
Micro-USB port
12
Microphone
13
Power connector
14
*
Fixation holes
15
Keyboard connector
*
With optional HDMI cable.
4
UserGuide_ARCHOS_101_Cesium_book.indd 4 30/07/2015 12:01:00
Page 5
Home
PgDn
PgUp
End
<
>
3 54
1
2 6
English
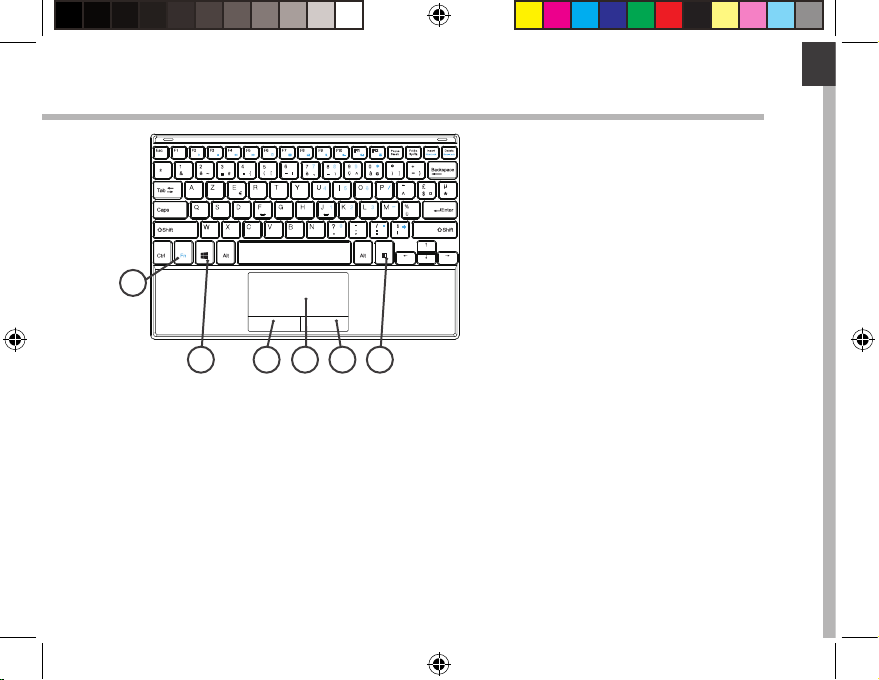
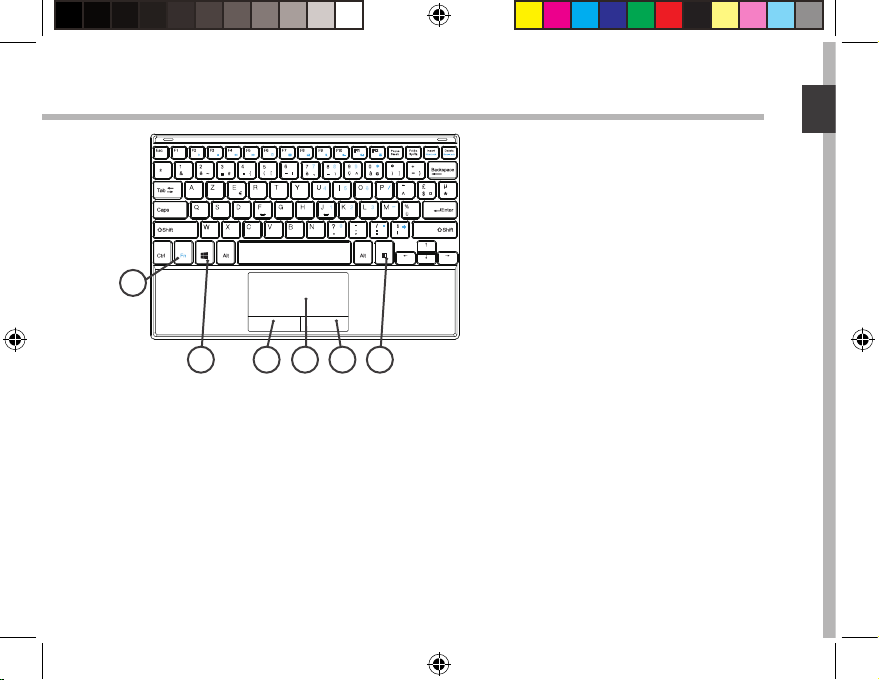
Description of the keyboard
The keyboard is automatically
connected to your tablet through the
keyboard connector.
If the keyboard is not responding when
the tablet is installed, make sure the
installation is correct.
The keyboard has the conguration of a
standard computer keyboard.
1. Fn key : activate the keys having a double function in blue.
2. Windows key: display the homescreen.
3. Left-click mouse button
4. Touchpad
5. Right-click mouse button
6. Menu key: display the menu options for the corresponding window.
5
UserGuide_ARCHOS_101_Cesium_book.indd 5 30/07/2015 12:01:00
Page 6

<
>
<
>
<
>
<
>
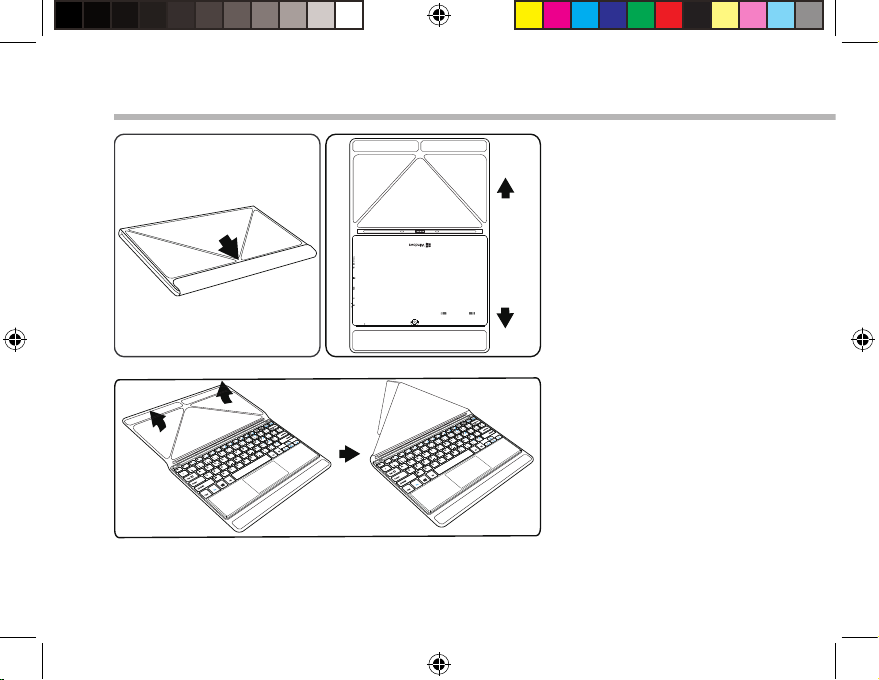
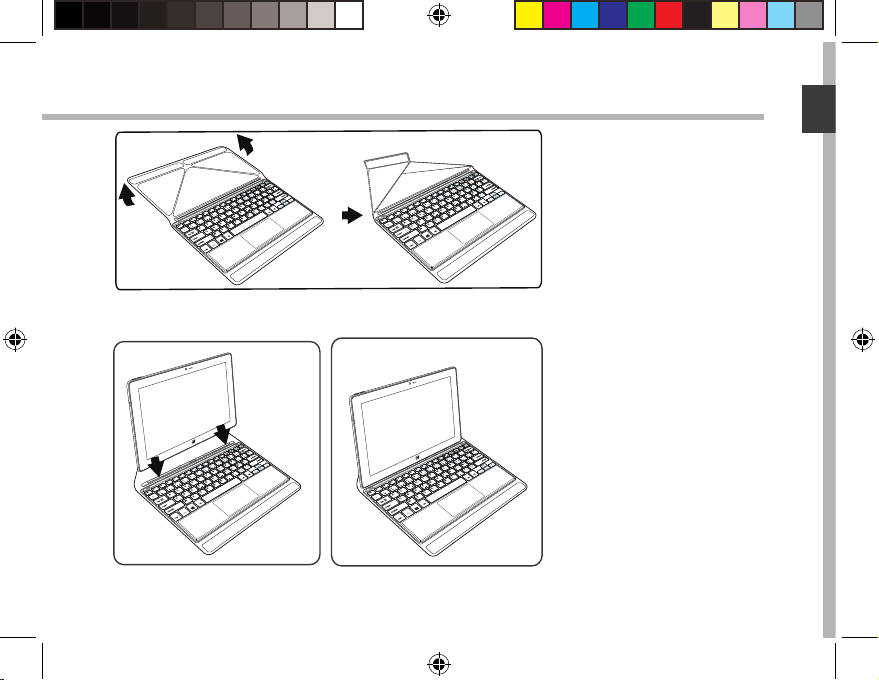
Installing the tablet with the keyboard
1. Lift the protective case to
open.
There are two types of view
angle:
- First type of view angle
6
UserGuide_ARCHOS_101_Cesium_book.indd 6 30/07/2015 12:01:04
Page 7

<
>
<
>
<
>
<
>
<
>
<
>
<
>
<
>
<
>
<
>
<
>
<
>
English
English
- Second type of view angle
2. Install the tablet on the
keyboard connector and the
xation holes.
The connection is automatic.
No setup is needed.
You tablet can now be used
with the keyboard
UserGuide_ARCHOS_101_Cesium_book.indd 7 30/07/2015 12:01:11
7
Page 8
First steps
Turning on
Hold the ON/OFF button to turn on the device.
The rst time you turn on your device, you will go through dierent screens for a
preliminary setup.
1. In Region and language, set your Region, the device language and your Time zone
and select Next.
2. Select I accept to agree to the License terms.
Through the wizard
1. In Personalize, select a color and type in a name in the PC name eld.
2. Select Next.
3. In Get online, select a WiFi network to connect to Internet and select Next.
Private networks require a password.
4. In Settings, you can choose between Express settings or Customize.
- If you are a beginner, we advise you to select Use express settings.
- If you are an advanced user, you can select Customize to make your own settings.
5. In Sign in to your Microsoft account, enter your account details.
If you don’t have an account, select Create a new account and follow the instructions
to choose between options.
8
UserGuide_ARCHOS_101_Cesium_book.indd 8 30/07/2015 12:01:11
Page 9

English
English
Help us protect your info
Microsoft helps you secure your device and your account.
1. Enter your email address in the required eld and select Next.
2. A code is sent to your email account. Open your account to see the code.
3. Enter the code you have received. If you can’t consult your email account,
select I can’t do this right now.
At the end of the setup process, the device restarts. The homescreen is displayed. Now
you can use your tablet.
Activating Microsoft Oce
A free license is provided for one year. This license, once activated, allows you to install
Microsoft Oce on two devices by connecting your Microsoft account.
1. From the tablet homescreen, select the Microsoft Oce application.
You are required to activate it.
2. Enter your Microsoft account to log in.
Your license is now linked to your account.
On a second device (computer, tablet or smartphone), you can download Microsoft
oce.
!If you restore your device to its default settings without activating your license,
you lose the benet of the free license.
9
UserGuide_ARCHOS_101_Cesium_book.indd 9 30/07/2015 12:01:11
Page 10

1
2
3
4
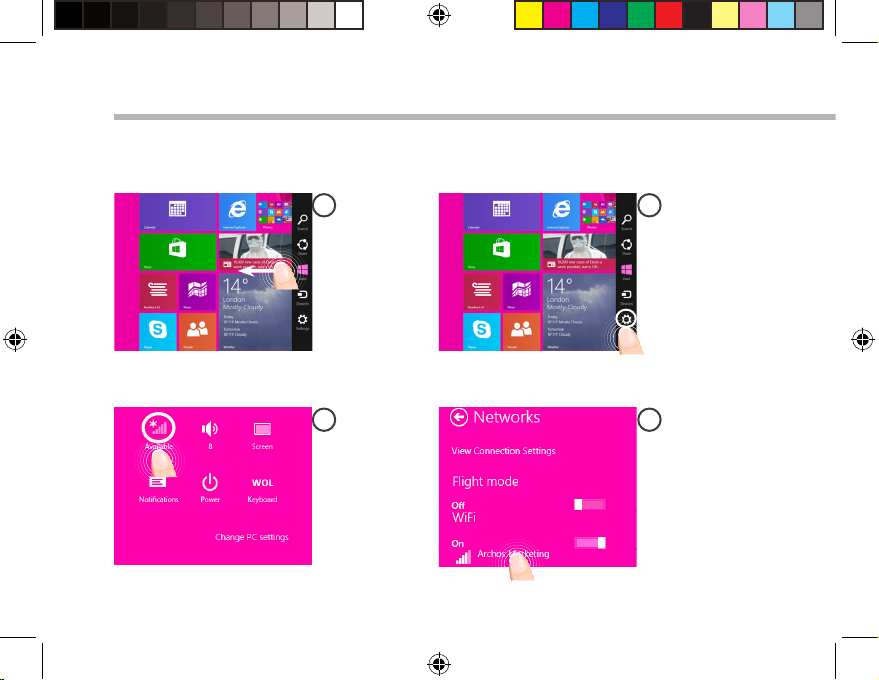
Connecting to a WiFi network
CAUTION: Make sure that you are in a WiFi zone. If you failed to connect to Internet
during the rst setup, you can follow the process below.
Swipe in from
the right edge.
Select the "WiFi"
icon.
Select the
"Settings" icon.
Touch the name
of network you
want to connect
to.
10
UserGuide_ARCHOS_101_Cesium_book.indd 10 30/07/2015 12:01:12
Page 11
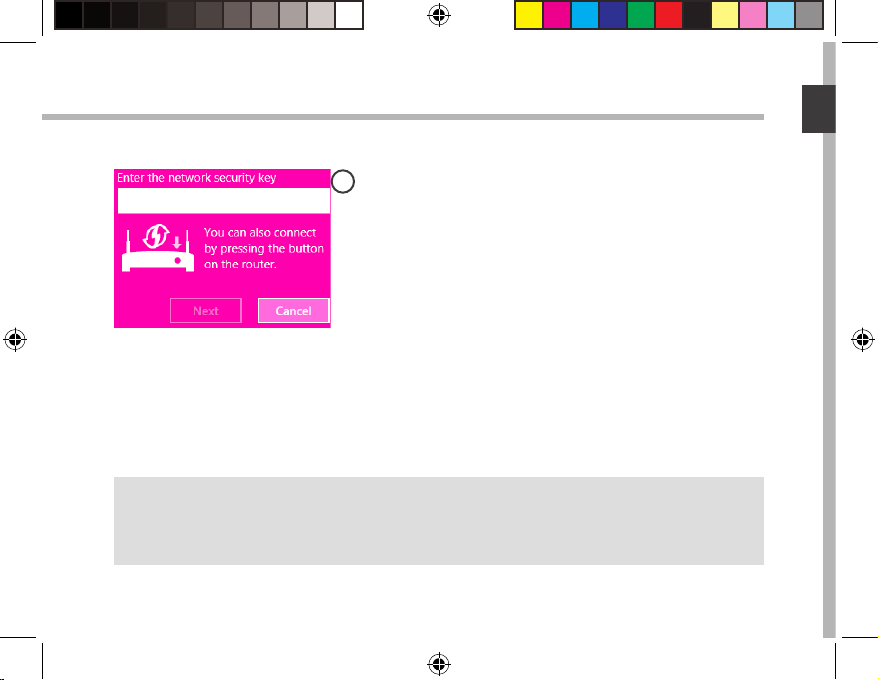
5
English
For a private network, enter the corresponding
password.
TIP:
Once you have been connected to a secured network, you can disconnect from it and connect
again without entering the password.
11
UserGuide_ARCHOS_101_Cesium_book.indd 11 30/07/2015 12:01:12
Page 12
3
1
2
The WindowsTM Interface
App icon
1
> Touch to open.
User account
2
> Touch to customize the account.
Search button
3
> Tap the Search button and enter an app
name.
12
UserGuide_ARCHOS_101_Cesium_book.indd 12 30/07/2015 12:01:12
Page 13
English
Quick settings
> Swipe in from the right edge, and then
tap the icon you want.
Search: You can use the Search button to nds things. If you’re on the Start
screen, click the Search button next to your account picture.
Share: When you’re in an app, you can use the Share button to share les,
photos, etc.
Start: The Start button takes you to the Start screen. Or if you’re already on
Start, it takes you to the last app you were using.
Devices: Use the Devices button to play, project, and print to devices.
Settings: Use the Setting button to change settings for the app you are in.
13
UserGuide_ARCHOS_101_Cesium_book.indd 13 30/07/2015 12:01:13
Page 14
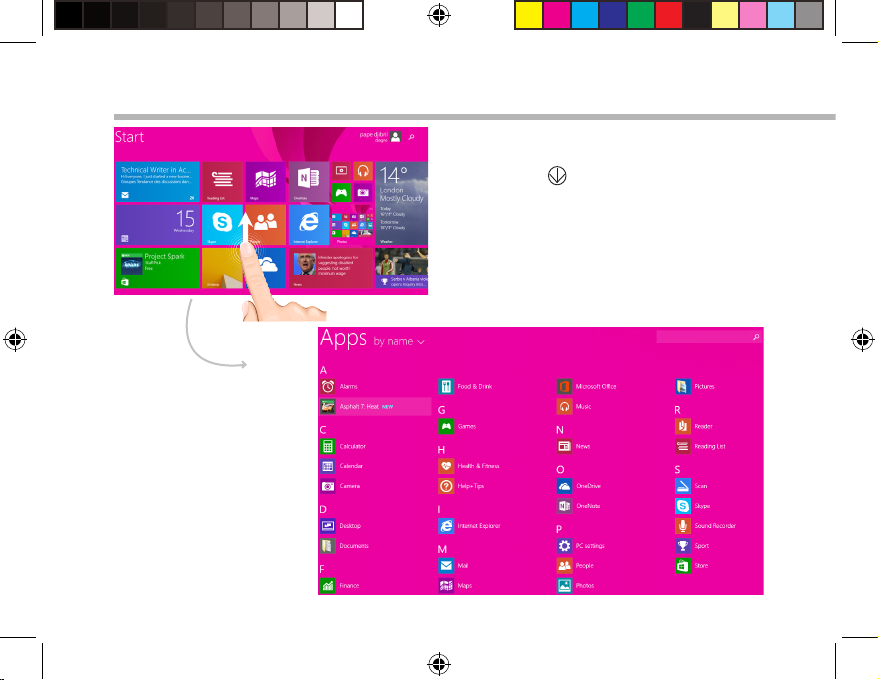
The WindowsTM Interface
All apps
> Swipe up from the center of the Start
screen or click on the lower-left of Start
to display all installed apps.
14
UserGuide_ARCHOS_101_Cesium_book.indd 14 30/07/2015 12:01:13
Page 15
English
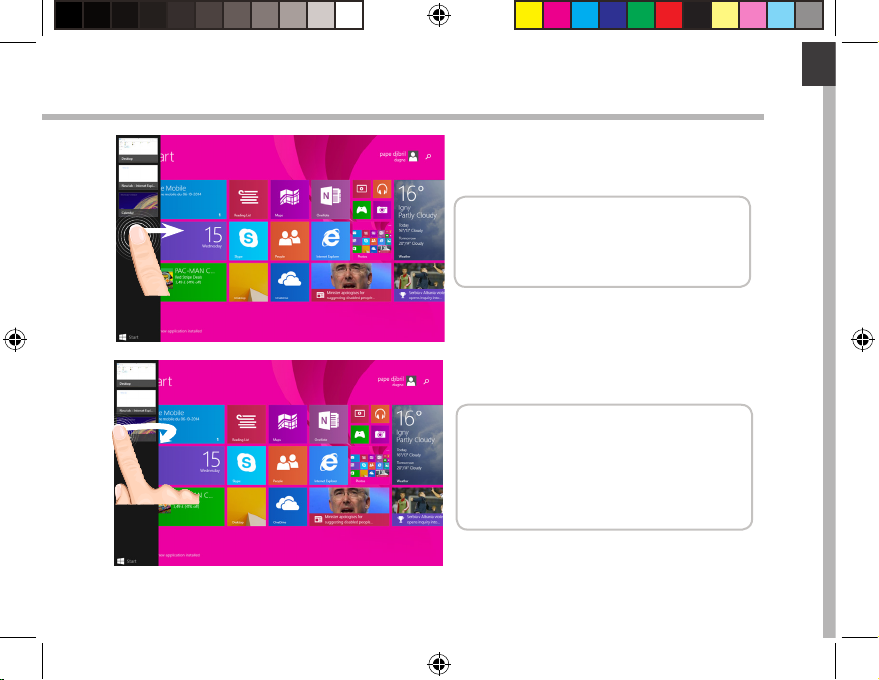
Switch between open apps: Switch
between open apps by swiping in
from the left edge of the screen.
Switch to a specic app: Swipe in
from the left edge, and with your
nger still on the screen, move it back
toward the left edge. Tap the app you
want.
15
UserGuide_ARCHOS_101_Cesium_book.indd 15 30/07/2015 12:01:14
Page 16
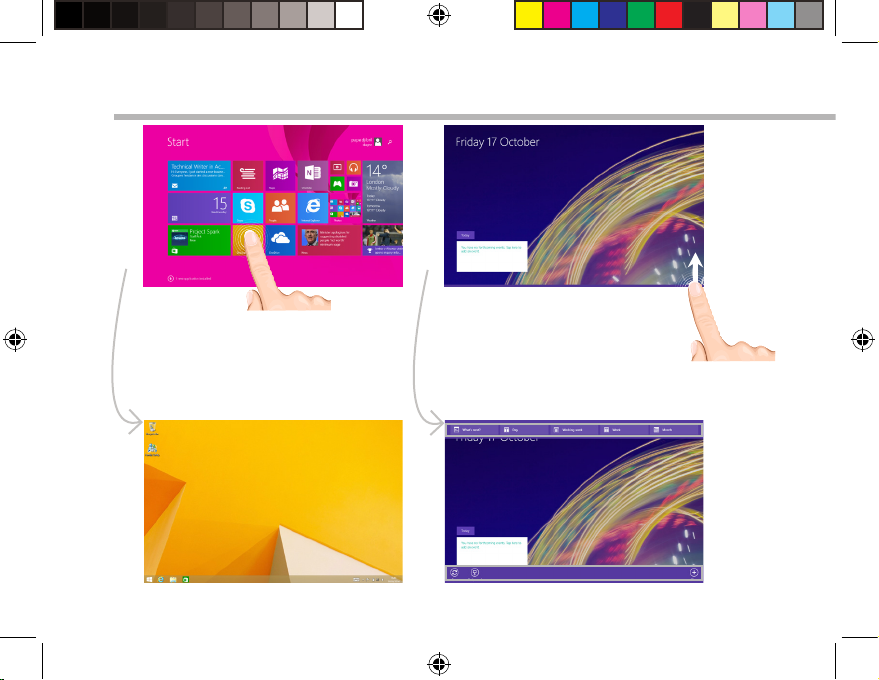
The WindowsTM Interface
App commands
The familiar desktop
The desktop is where you’ll use
desktop apps like Oce and File
Explorer. You can also pin Windows
Store apps to the taskbar.
16
UserGuide_ARCHOS_101_Cesium_book.indd 16 30/07/2015 12:01:15
In some apps, swipe up from
the bottom edge of the screen,
or down from the top edge to
display menu options.
Commands displayed
Page 17
English
To close an app
Swipe down from the top edge of the screen, and drag the app down and o the
screen.
To close desktop apps
You can close an Oce app by tapping or clicking the Close button in the title bar
To uninstall an app
From the Start screen or All apps section, tap and hold it for a couple seconds.
Tap Uninstall. If the app is a desktop app, choose the app from the list and then tap
Uninstall.
To add an email account:
1. Tap or click Mail from the Start screen.
2. Open the Settings charm, then tap or click Accounts > Add an account.
3. Choose the type of account you want to add, and then follow the on-screen
instructions. Most accounts can be added with only your user name and password. In
some cases, you’ll be asked for more details, which you can usually nd on your email
account provider’s website.
17
UserGuide_ARCHOS_101_Cesium_book.indd 17 30/07/2015 12:01:15
Page 18
Troubleshooting
If your device is frozen:
Press the ON/OFF button for 10 seconds.
If your device doesn’t turn on:
1. Charge your device.
2. Press the ON/OFF button for 10 seconds.
If you want to extend the life of your battery:
Decrease the screen brightness and turn o the wireless connections if not in use.
If your device functioning is too slow:
Close all apps which are not currently used.
If your WiFi reception is too low:
Make sure you are not far from the WiFi hotspot.
Update the rmware of the device: http://www.archos.com/support.
Reset and redene your connection parameters.
Contact your WiFi connection provider.
Why isn’t my Windows tablet detected when it’s connected to a computer?
Windows tablets work in the same way as a standard PC - as such they can’t be
detected as peripheral devices by other PC.
To transfer les to or from your Windows tablet, you will need to connect a USB drive to
the device using a USB host cable, or transfer via your Windows home network setup.
TIP:
For more detailed information about how to use your device, go to the link:
http://windows.microsoft.com/en-gb
18
UserGuide_ARCHOS_101_Cesium_book.indd 18 30/07/2015 12:01:15
Page 19
Français
Table des matières
Contenu de la boîte..................................................................................................................
20
Mise en route..............................................................................................................................
Description de l’appareil........................................................................................................
Description du clavier.............................................................................................................
Installation de la tablette sur le clavier..............................................................................
Premiers pas...............................................................................................................................
Se connecter à un réseau WiFi.............................................................................................
L’interface WindowsTM..............................................................................................................
Dépannage.................................................................................................................................
Comme nous mettons à jour et améliorons régulièrement nos produits, le logiciel de votre
appareil peut présenter une interface ou des fonctionnalités légèrement différentes de celles
décrites dans ce guide.
Pour plus de détails sur l’utilisation de votre produit, allez sur le lien suivant:
http://windows.microsoft.com/fr-fr/windows-8/features#personalize=lockscreen
Consultez la déclaration de conformité sur :
http://www.archos.com/products/declaration_conformity.html
21
22
23
24
26
28
30
36
19
UserGuide_ARCHOS_101_Cesium_book.indd 19 30/07/2015 12:01:15
Page 20

Warranty
Home
PgDn
PgUp
End
<
>
Contenu de la boîte
ARCHOS 101 Cesium
Clavier + Pochette
Origami
Chargeur
Câble de
chargement
20
UserGuide_ARCHOS_101_Cesium_book.indd 20 30/07/2015 12:01:15
Guide
d’utilisation
rapide
Guide des
garanties et des
mentions légales
Page 21
Français
Mise en route
Charger la batterie
1. Connectez le câble d’alimentation à votre produit via le
connecteur d’alimentation.
La tablette commence à se charger.
Le voyant de charge est allumé lorsque la batterie se recharge.
2. Appuyez sur le bouton On/O pour allumer l’appareil.
- Vous pouvez utiliser votre tablette pendant le chargement.
- Lors de la première utilisation, chargez complètement la
batterie.
- Utilisez uniquement le chargeur fourni.
ASTUCES:
Pour bénéficier d’une assistance complète, enregistrez votre produit.
A partir de votre ordinateur, allez sur www.archos.com/register.
21
UserGuide_ARCHOS_101_Cesium_book.indd 21 30/07/2015 12:01:15
Page 22
4
15
1
15
5
8
12
13
11
9
10
14
6
16
2
7
3
Description de l’appareil
Appareil photo avant
1
2
3
4
5
*
Câble vidéo (Micro-HDMI vers HDMI) non-fourni.
Capteur de lumière
Bouton Windows
Haut-parleur
Appareil photo arrière
Boutons de volume
6
7
8
9
10
Témoin de charge
Bouton ON/OFF
Entrée jack audio
Sortie vidéo HDMI*
Lecteur carte micro-SD
11
Port micro-USB
12
Microphone
13
Connecteur d’alimentation
14
Trous de xation
15
Connecteur
16
clavier
22
UserGuide_ARCHOS_101_Cesium_book.indd 22 30/07/2015 12:01:16
Page 23
Home
PgDn
PgUp
End
<
>
3 54
1
2 6
Français
Description du clavier
Le clavier est automatiquement
connecté à votre tablette via le
connecteur clavier. Si votre clavier
ne répond pas, vériez qu’il est bien
connecté à la tablette en le replaçant si
nécessaire.
Le clavier ache les touches d’un
clavier d’ordinateur standard.
1. Touche Fn : permet d’activer les touches ayant une double fonction en bleu.
2. Touche Windows : permet d’acher l’écran d’accueil.
3. Bouton de souris gauche
4. Pavé tactile
5. Bouton de souris droit
6. Touche Menu : permet de voir les options de menu de la fenêtre achée.
23
UserGuide_ARCHOS_101_Cesium_book.indd 23 30/07/2015 12:01:16
Page 24
<
>
<
>
<
>
<
>
Installation de la tablette sur le clavier
1. Ouvrez la pochette.
Il y a deux types d’angle de
vue :
- Première angle de vue
24
UserGuide_ARCHOS_101_Cesium_book.indd 24 30/07/2015 12:01:16
Page 25
<
>
<
>
<
>
<
>
<
>
<
>
<
>
<
>
<
>
<
>
<
>
<
>
Français
- Deuxième angle de vue
2. Installez la tablette sur le
connecteur clavier et les trous
de xation.
La connexion entre le clavier
et la tablette est automatique.
Aucun paramétrage est
nécessaire.
Vous pouvez utiliser le clavier
UserGuide_ARCHOS_101_Cesium_book.indd 25 30/07/2015 12:01:23
avec la tablette.
25
Page 26

Premiers pas
Démarrage
Maintenez le bouton ON/OFF pour allumer la tablette.
La première fois que vous allumez votre tablette, vous allez parcourir diérents an de paramétrer
votre produit.
1. Dans la section Région et Langue, sélectionnez votre localité, la langue de l’appareil ainsi que le
fuseau horaire, puis sélectionnez Suivant.
2. Sélectionnez J’accepte pour les termes du contrat de licence.
Assistant de paramétrage
1. Dans la section Personnalisation, sélectionnez une couleur et saisissez un nom pour la tablette.
2. Cliquez sur Suivant.
3. Pour la connexion sans l, sélectionnez un réseau WiFi et cliquez sur Suivant.
Les réseaux privés nécessitent un mot de passe.
4. Dans la section Paramètres, vous pouvez choisir entre Paramétrage rapide et Personnaliser.
-Si vous êtes un utilisateur débutant, sélectionnez Paramétrage rapide.
-Si vous êtes un utilisateur expérimenté, sélectionnez Personnaliser pour réaliser votre propre
paramétrage.
5. Dans la section Se connecter à votre compte Microsoft, saisissez votre Identiant et votre mot
de passe.
Si vous ne possédez pas de compte Microsoft, sélectionnez Créer un nouveau compte et suivez les
instructions.
26
UserGuide_ARCHOS_101_Cesium_book.indd 26 30/07/2015 12:01:23
Page 27
Français
Sécurité
Microsoft vous aide à sécuriser votre tablette et votre compte.
1. Saisissez votre adresse email dans le champ indiqué et cliquez sur Suivant.
Vous recevez automatique un code d’activation dans votre boîte mail.
2. Accédez à votre compte sur un autre appareil pour voir le code.
3. Entrez le code reçu.
Si vous ne pouvez pas consulter votre compte email, cliquez sur Je ne peux pas accéder à mon compte
actuellement.
A la n de l’étape, la tablette redémarre. L’écran d’accueil s’ache. Vous pouvez maintenant utiliser
votre tablette.
Activation de Microsoft Oce
Une licence gratuite d’une durée d’un an est livrée avec votre tablette. Une fois activée, cette licence
peut être installée sur deux appareils en vous connectant avec votre compte Microsoft.
1. A partir de l’écran d’accueil de la tablette, cliquez sur l’application Microsoft Oce.
Une demande d’activation est achée.
2. Saisissez vos identiants Microsoft pour vous connecter.
Votre licence Microsoft Oce est maintenant liée à votre compte Microsoft.
Sur un second appareil (ordinateur, tablette ou smartphone), vous pouvez télécharger Microsoft oce.
!Si vous restaurez les paramètres d’usine de votre appareil sans activer votre licence Microsoft
Oce, vous perdez la licence gratuite.
UserGuide_ARCHOS_101_Cesium_book.indd 27 30/07/2015 12:01:23
27
Page 28
1
2
3
4
Se connecter à un réseau WiFi
Si vous n’avez pas pu vous connecter à Internet lors du paramétrage initial, suivez le
procédé ci-dessous. Assurez-vous d’être dans une zone couverte par un réseau WiFi.
Glissez vers la
gauche à partir
du bord droit de
l’écran.
Sélectionnez
l’icône “WiFi”.
Sélectionnez
l’icône
“Paramètres”.
Sélectionnez le
nom du réseau
auquel vous
voulez vous
connecter.
28
UserGuide_ARCHOS_101_Cesium_book.indd 28 30/07/2015 12:01:23
Page 29
5
Français
Les réseaux privés sont achés avec un cadenas.
Ils nécessitent un mot de passe.
ASTUCES :
Une fois que vous vous êtes connecté à un réseau sécurisé, vous pouvez vous déconnecter et
vous reconnecter sans saisir de mot de passe.
29
UserGuide_ARCHOS_101_Cesium_book.indd 29 30/07/2015 12:01:23
Page 30

3
1
2
L’interface Windows
TM
Icône d’application
1
> Sélectionnez pour ouvrir.
Compte utilisateur
2
> Sélectionnez pour personnaliser.
Bouton Recherche
3
> Sélectionnez le bouton Recherche et tapez
votre requête.
30
UserGuide_ARCHOS_101_Cesium_book.indd 30 30/07/2015 12:01:24
Page 31

Français
Réglages rapides
> Glissez vers la gauche à partir du bord
droit de l’écran, puis sélectionnez l’icône
désirée.
Recherche : lancez une recherche sur la tablette ou sur Internet. Sur l’écran
d’accueil, sélectionnez le bouton Recherche à côté de l’icône du compte utilisateur.
Partage : partagez des chiers, des photos à partir d’une application sélectionnée.
Ecran d’accueil : appuyez sur le bouton pour retourner à l’écran d’accueil. Si vous
êtes déjà sur l’écran d’accueil, appuyez sur le bouton pour retourner à la dernière
application utilisée.
Appareils : connectez des appareils pour projeter, diuser ou imprimer.
Paramètres : utilisez le bouton Paramètres pour modier les paramètres d’une
application ouverte.
31
UserGuide_ARCHOS_101_Cesium_book.indd 31 30/07/2015 12:01:24
Page 32

L’interface Windows
TM
Toutes les applications
> Faites glisser votre doigt vers le haut
en partant du milieu de l’interface Ecran
d’accueil ou appuyez sur la èche située
tout en bas à gauche de l’écran d’accueil.
32
UserGuide_ARCHOS_101_Cesium_book.indd 32 30/07/2015 12:01:24
Page 33

Français
Navigation entre les applications :
glissez votre doigt vers la droite à partir
du bord gauche de l’écran pour acher
une application ouverte.
Rouvrir une application donnée :
glissez votre doigt vers la droite à partir
du bord gauche de l’écran, puis, tout
en gardant votre doigt appuyé sur
l’écran, retournez sur le bord gauche.
Sélectionnez l’application souhaitée.
33
UserGuide_ARCHOS_101_Cesium_book.indd 33 30/07/2015 12:01:24
Page 34

L’interface Windows
TM
Le bureau traditionnel est
l’interface où vous pouvez utiliser
des applications telles que Oce
ou Explorer. Ajoutez la boutique
d’applications à la barre de tâches.
Fonctions d’application
Dans certaines applications,
glissez vers le haut à partir du bas
de l’écran ou glissez vers le bas
à partir du haut de l’écran pour
acher des options de menu.
Des fonctions s’achent
34
UserGuide_ARCHOS_101_Cesium_book.indd 34 30/07/2015 12:01:24
Page 35

Français
Fermer une application
Dans l’application ouverte, glissez votre doigt vers le bas à partir du haut de l’écran
jusqu’à ce que l’application se réduise puis tirez l’application vers le bas pour la faire
disparaître.
Fermer une application à partir du Bureau
Fermez une application en sélectionnant le bouton Fermer dans la barre de titre.
Désinstaller une application
A partir de l’écran d’accueil ou dans la section Toutes les applications, sélectionnez une
application puis votre doigt appuyé quelques secondes. Sélectionnez Désinstaller. S’il
s’agit d’une application de l’interface Bureau, sélectionnez l’application dans la liste des
applications installées et appuyez sur Désinstaller.
Ajouter un compte email
1. Sélectionnez Email à partir de l’écran d’accueil.
2. Dans Email, accédez aux réglages rapides et sélectionnez Paramètres. Appuyez sur
Comptes > Ajouter un compte.
3. Sélectionnez le type de compte à ajouter, et suivez les instructions à l’écran. La
plupart des comptes ne requiert qu’un identiant et un mot de passe. Dans certains
cas, plus de détails vous seront demandés. Ces informations sont disponibles auprès
du fournisseur de comptes.
35
UserGuide_ARCHOS_101_Cesium_book.indd 35 30/07/2015 12:01:24
Page 36

Dépannage
Si votre appareil ne répond pas :
Appuyez sur le bouton ON/OFF pendant 10 secondes.
Si votre appareil ne s’allume pas :
1. Chargez votre appareil.
2. Appuyez sur le bouton ON/OFF pendant 10 secondes.
Si vous voulez prolonger l’autonomie de la batterie :
Diminuez la luminosité de l’écran et désactivez les connexions sans l si elles sont
inutilisées.
Si votre appareil fonctionne au ralenti :
Fermez les applications qui ne sont pas en cours d’utilisation.
Pourquoi la tablette n’est pas reconnue lorsqu’elle est connectée à mon ordinateur?
Les tablettes sous Windows sont considérées comme des ordinateurs et ne peuvent
pas être détectées comme des périphériques. Pour un transfert de chiers vers/de la
tablette, connectez une clé USB via un câble USB hôte.
Si votre réception WiFi est trop faible :
Assurez-vous de ne pas être trop loin de la borne WiFi.
Mettez à jour le logiciel du produit: http://www.archos.com/support.
Réinitialisez vos paramètres de connexion WiFi.
Contactez le fournisseur d’accès.
Pourquoi la tablette Windows n’est pas reconnue lorsqu’elle est connectée à mon
ordinateur?
Les tablettes sous Windows sont considérées comme des ordinateurs et ne peuvent
pas être détectées comme des périphériques. Pour un transfert de chiers vers/de la
tablette, connectez une clé USB via un câble USB hôte.
Pour plus de détails sur l’utilisation de votre tablette, allez sur :
http://windows.microsoft.com/fr-fr
36
UserGuide_ARCHOS_101_Cesium_book.indd 36 30/07/2015 12:01:24
Page 37

Deutsch
Polski
Inhaltsverzeichnis
Beschreibung des Packungsinhalts....................................................................................
Erste Schritte...............................................................................................................................
Beschreibung des Geräts........................................................................................................
Beschreibung der Tastatur.....................................................................................................
Installation des Tablets auf der Tastatur............................................................................
Erste Schritte mit WindowsTM................................................................................................
WiFi (WLAN)-Verbindung.......................................................................................................
Die WindowsTM Benutzeroberfläche....................................................................................
Fehlersuche.................................................................................................................................
Bitte lesen Sie diese Informationen sorgfältig, bevor Sie die Rückgabe eines Produkts erwägen.
Möglicherweise läßt sich Ihr Problem leicht lösen. Da unsere Produkte kontinuierlich aktualisiert
und weiterentwickelt werden, kann die Software Ihres Geräts in Erscheinung und Funktionalität
geringfügige Abweichungen zu den Darstellungen in dieser Kurzbedienungsanleitung aufweisen.
Weitere Informationen finden Sie unter http://windows.microsoft.com/de-de.
Konsultieren Sie die Konformitätserklärung auf:
http://www.archos.com/products/declaration_conformity.html
38
39
40
41
42
44
46
48
54
37
UserGuide_ARCHOS_101_Cesium_book.indd 37 30/07/2015 12:01:24
Page 38

Warranty
Home
PgDn
PgUp
End
<
>
Beschreibung des Packungsinhalts
Benutzerhandbuch
ARCHOS 101 Cesium
Tastatur + Origami
Tasche
Ladegerät
Ladekabel
Garantie,
Impressum und
Sicherheitshinweise
38
UserGuide_ARCHOS_101_Cesium_book.indd 38 30/07/2015 12:01:25
Page 39

Deutsch
Erste Schritte
Auaden des Akkus
1. Laden Sie das Gerät auf, indem Sie das Netzkabel an den
ARCHOS-anschluss anschließen.
Das ARCHOS-Gerät beginnt zu laden.
Die Ladeanzeige leuchtet, wenn das Gerät aufgeladen wird.
2. Drücken Sie die Ein / Aus-Taste, um das Gerät
einzuschalten.
- Sie können den ARCHOS auch während des Ladens
verwenden.
- Laden Sie Ihr Gerät vor der ersten Nutzung einmal vollständig auf.
- Verwenden Sie nur das mitgelieferte Netzgerät.
TIPP:
Um unseren Service voll nutzen zu können, empfehlen wir Ihnen, Ihr Produkt zu registrieren.
Für die Registrierung mittels Computer gehen Sie zu www.archos.com/register.
UserGuide_ARCHOS_101_Cesium_book.indd 39 30/07/2015 12:01:25
39
Page 40

4
15
1
15
5
8
12
13
11
9
10
14
6
16
2
7
3
Beschreibung des ARCHOS
Frontkamera
1
Lichtsensor
2
Windows-Taste
3
Lautsprecher
4
Rückkamera
5
Lautstärketasten
6
Ladeanzeige
7
EIN/AUS-Taste
8
Kopfhöreranschluss
9
HDMI Videoausgang
10
Micro-SD Kartenslot
11
Micro-USB-Anschluss
12
Mikrofon
13
Stromanschluss
14
*
Fixierungslöcher
15
Tastaturanschluss
16
*
Mit optionalem HDMI-Kabel.
40
UserGuide_ARCHOS_101_Cesium_book.indd 40 30/07/2015 12:01:26
Page 41

Home
PgDn
PgUp
End
<
>
3 54
1
2 6
Deutsch
Beschreibung der Tastatur
Die Tastatur wird automatisch über
den Tastaturanschluss mit dem Tablet
verbunden.
Falls die Tastatur bei angeschlossenem
Tablet nicht reagiert, prüfen Sie bitte,
ob das Tablet korrekt befestigt wurde.
Die Tastatur hat die Konguration einer
Computertastatur.
1. Fn-Taste: Aktivierung der Tasten mit blauer Doppelfunktion.
2. Windows-Taste: Anzeige des Startbildschirms.
3. Linke Maustaste
4. Touchpad
5. Rechte Maustaste
6. Menü-Taste: Anzeige der Menüoptionen für das entsprechende Fenster.
41
UserGuide_ARCHOS_101_Cesium_book.indd 41 30/07/2015 12:01:26
Page 42

<
>
<
>
<
>
<
>
Installation des Tablets auf der Tastatur
1. Heben Sie das
Schutzgehäuse an, um es zu
önen
Es gibt zwei Arten von
Bildwinkel:
- Erste Art von Bildwinkel
42
UserGuide_ARCHOS_101_Cesium_book.indd 42 30/07/2015 12:01:26
Page 43

<
>
<
>
<
>
<
>
<
>
<
>
<
>
<
>
<
>
<
>
<
>
<
>
Deutsch
- Zweite Art von Bildwinkel
2. Befestigen Sie das Tablet
auf dem Tastaturanschluss
und den Fixierungslöchern.
Die Verbindung wird
automatisch hergestellt.
Es ist keine Einrichtung
erforderlich.
Ihr Tablet kann jetzt mit der
UserGuide_ARCHOS_101_Cesium_book.indd 43 30/07/2015 12:01:33
Tastatur verwendet werden
43
Page 44

Erste Schritte mit Windows
Einschalten
Drücken und halten Sie die EIN/AUS-Taste, um das Gerät einzuschalten.
Beim ersten Einschalten des Geräts erfolgt die Voreinrichtung des Geräts über mehrere
Bildschirme hinweg.
1. Unter "Region und Sprache" legen Sie Ihre Region, die Gerätesprache und Ihre Zeitzone
fest und wählen "Weiter".
2. Wählen Sie "Ich stimme den Lizenzbedingungen zu".
Der Assistent
1. Unter "Personalisieren" wählen Sie eine Farbe aus und geben in das Feld "PC-Name"
einen Namen ein.
2. Wählen Sie "Weiter".
3. Unter "Online gehen" wählen Sie ein WLAN-Netzwerk für die Verbindung zum Internet
und wählen "Weiter".
Für private Netzwerke ist ein Passwort erforderlich.
4. Unter "Einstellungen" haben Sie die Auswahl zwischen "Expresseinstellungen" oder
"Benutzerdeniert".
- Sind Sie eher ein unerfahrener Benutzer, empfehlen wir die Auswahl von
"Expresseinstellungen verwenden".
- Sind Sie ein erfahrener Benutzer, kann "Benutzerdeniert" ausgewählt werden, um die
eigenen Einstellungen vorzunehmen.
5. Um sich bei Ihrem Microsoft-Konto anzumelden, geben Sie Ihre Kontodaten ein.
Besitzen Sie kein Konto, wählen Sie "Neues Konto erstellen" und folgen den Anweisungen,
44
UserGuide_ARCHOS_101_Cesium_book.indd 44 30/07/2015 12:01:33
TM
Page 45

Deutsch
um zwischen den Optionen auszuwählen.
Unterstützen Sie uns beim Schutz Ihrer Daten
Microsoft unterstützt Sie beim Schutz Ihres Geräts und Kontos.
1. Geben Sie Ihre E-Mail-Adresse in das entsprechende Feld ein und wählen Sie "Weiter".
2. Es wird jetzt ein Code an Ihr E-Mail-Konto gesendet. Önen Sie Ihr Konto, um den Code
anzuzeigen.
3. Geben Sie den zugesendeten Code ein. Können Sie Ihr E-Mail-Konto derzeit nicht
aufrufen, wählen Sie "Jetzt nicht".
Nach der Durchführung der Einrichtung startet das Gerät neu. Der Startbildschirm wird
angezeigt. Das Tablet kann jetzt verwendet werden.
Aktivierung von Microsoft Oce
Es wird eine für ein Jahr gültige Lizenz bereitgestellt. Diese Lizenz, einmal aktiviert,
ermöglicht Ihnen die Installation von Microsoft Oce auf zwei Geräten durch die
Verbindung zu Ihrem Microsoft-Konto.
1. Wählen Sie im Startbildschirm des Tablets die Microsoft Oce-Anwendung.
Diese muss aktiviert werden.
2. Geben Sie Ihr Microsoft-Konto ein, um sich anzumelden.
Ihre Lizenz ist jetzt mit Ihrem Konto verknüpft.
Auf einem zweiten Gerät (Computer, Tablet oder Smartphone) kann Microsoft Oce
heruntergeladen werden.
!Wird das Gerät ohne die Aktivierung der Lizenz auf seine Standardeinstellungen
zurückgesetzt, geht die kostenlose Lizenz verloren.
UserGuide_ARCHOS_101_Cesium_book.indd 45 30/07/2015 12:01:33
45
Page 46

1
2
3
4
WiFi (WLAN) Verbindung
ACHTUNG: Überprüfen Sie, ob Sie sich in einer WLAN-Zone benden.
Wischen Sie vom
rechten Rand
nach innen.
Wählen Sie das
Symbol "WLAN".
Wählen Sie
das Symbol
"Einstellungen".
Tippen Sie auf
den Namen des
Netzwerks, mit
dem verbunden
werden soll.
46
UserGuide_ARCHOS_101_Cesium_book.indd 46 30/07/2015 12:01:34
Page 47

5
Deutsch
Private Netzwerke werden mit einem Schlosssymbol
angezeigt und hier muss das Passwort eingegeben
werden.
TIPP:
Sobald Sie mit einem passwortgeschützten Netzwerk verbunden sind, kann dieses
getrennt und ohne Passworteingabe neu zu diesem verbunden werden.
47
UserGuide_ARCHOS_101_Cesium_book.indd 47 30/07/2015 12:01:34
Page 48

3
1
2
Die WindowsTM-Benutzeroberäche
App-Symbol
1
> Antippen für Önen.
Benutzerkonto
2
> Antippen für Anpassung des Kontos.
Suchen-Schaltäche
3
> Tippen Sie auf die Suchen-Schaltäche und
geben Sie den Namen der App ein.
48
UserGuide_ARCHOS_101_Cesium_book.indd 48 30/07/2015 12:01:34
Page 49

Deutsch
Schnelleinstellungen
> Wischen Sie vom rechten Rand nach
innen und tippen Sie dann auf das
gewünschte Symbol.
Suchen: Mit der Suchen-Schaltäche können Suchanfragen durchgeführt werden.
Im Startbildschirm klicken Sie auf die Suchen -Schaltäche neben Ihrem Kontobild .
Freigabe: Von der App aus verwenden Sie die Freigabe-Schaltäche für das Teilen
von Dateien, Fotos usw..
Start: Die Start-Schaltäche führt Sie zum Startbildschirm. Benden Sie sich bereits
im Startbildschirm, werden Sie zur zuletzt verwendeten Apps geleitet.
Geräte: Mit der Geräte-Schaltäche können Geräte abgespielt, dargestellt und mit
diesen gedruckt werden.
Einstellungen: Mit der Einstellungen-Schaltäche können die Einstellungen der
aktuell verwendeten App geändert werden.
49
UserGuide_ARCHOS_101_Cesium_book.indd 49 30/07/2015 12:01:34
Page 50

Die Windows
TM
Benutzeroberäche
Alle Apps
> Wischen Sie von der Mitte des
Startbildschirms nach oben oder klicken
Sie unten links-von Start für die Anzeige
aller installierten Apps.
50
UserGuide_ARCHOS_101_Cesium_book.indd 50 30/07/2015 12:01:35
Page 51

Deutsch
Umschalten zwischen geöneten
Apps: Schalten Sie um zwischen
geöneten Apps, indem Sie vom
linken Rand des Bildschirms nach
innen wischen .
Umschalten zu einer bestimmten
App: Wischen Sie vom linken Rand
nach innen und mit dem Finger
auf dem Bildschirm diesen zurück
in Richtung linken Rand bewegen.
Tippen Sie auf die gewünschte App.
51
UserGuide_ARCHOS_101_Cesium_book.indd 51 30/07/2015 12:01:35
Page 52

WindowsTM kennenlernen
Der bekannte Desktop
Auf dem Desktop verwenden Sie
Desktop-Apps, wie z. B. Oce und
den Datei-Explorer. Sie können hier
auch Apps aus dem Windows Store
an die Taskleiste anheften.
App-Befehle
Wischen Sie bei den meisten
Apps vom unteren Rand des
Bildschirms nach oben oder vom
oberen Rand nach unten, um die
Menüoptionen anzuzeigen.
Angezeigte Befehle
52
UserGuide_ARCHOS_101_Cesium_book.indd 52 30/07/2015 12:01:37
Page 53

Deutsch
Eine App schließen
Wischen Sie vom oberen Rand des Bildschirms nach unten und ziehen Sie die App
nach unten und aus dem Bildschirm.
Desktop-Apps schließen
Eine Oce-App kann durch Antippen oder Anklicken der Schließen-Schaltäche in der
Titelleiste geschlossen werden
Deinstallation einer App
Tippen Sie im Startbildschirm des Bereichs 'Alle Programme' auf die App und das
Symbol ein paar Sekunden halten.
Tippen Sie auf 'Deinstallieren'. Handelt es sich bei der App um eine Desktop-App, die
App aus der Liste wählen und auf Deinstallieren tippen.
Ein E-Mail-Konto hinzufügen
1. Tippen Sie im Startbildschirm auf 'E-Mail'.
2. Önen Sie den Charm 'Einstellungen' und tippen oder klicken Sie auf Konten >
Konto hinzufügen.
3. Wählen Sie die hinzuzufügende Kontoart aus und folgen Sie den Anweisungen auf
dem Bildschirm. Die meisten Konten können mit der Angabe von Benutzername und
Passwort hinzugefügt werden. In manchen Fällen müssen weitere Details eingegeben
werden, die Sie im Allgemeinen auf der Webseite des E-Mail-Anbieters nden.
UserGuide_ARCHOS_101_Cesium_book.indd 53 30/07/2015 12:01:37
DE
53
Page 54

Fehlersuche
Das Gerät reagiert nicht mehr:
Halten Sie die EIN/AUS-Taste 10 Sekunden lang gedrückt.
Wenn sich das Gerät nicht wieder einschaltet:
1. Laden Sie das Gerät auf.
2. Halten Sie die EIN/AUS-Taste 10 Sekunden lang gedrückt.
Akkulaufzeit verlängern:
Verringern Sie die Bildschirmhelligkeit und schalten Sie die WiFi(WLAN)-Verbindungen
aus, wenn diese nicht verwendet werden.
Das Gerät ist zu langsam:
Schließen Sie alle Anwendungen, die nicht verwendet werden.
WiFi(WLAN)-Empfang ist zu schwach:
Stellen Sie sicher, dass Sie sich in Reichweite eines WiFi(WLAN)-Hotspots benden.
Aktualisieren Sie die Firmware des Gerätes: http://www.archos.com/support.
Setzen Sie die WiFi-Verbindung zurück.
Kontaktieren Sie Ihren WiFi(WLAN)-Provider.
Ihr Computer erkennt Ihr Windows Tablet nicht, wenn es daran angeschlossen ist.
Das ist völlig normal, denn das Tablet funktioniert wie ein eigenständiger PC und wird
daher von Ihrem Windows PC nicht als Peripherie-Gerät erkannt.
Um Dateien von oder auf Ihr Windows Tablet zu übertragen, müssen Sie per USB HostKabel ein USB Speichergerät daran anschließen oder die Dateien innerhalb Ihres
Windows Heimnetzwerkes übertragen.
Weitere Informationen nden Sie unter:
http://windows.microsoft.com/de-de
54
UserGuide_ARCHOS_101_Cesium_book.indd 54 30/07/2015 12:01:37
Page 55

Español
Índice
Contenido de la caja................................................................................................................
Procedimientos iniciales.........................................................................................................
Descripción del ARCHOS........................................................................................................
Descripción del teclado...........................................................................................................
Instalación de la tableta y el teclado..................................................................................
Primeros pasos WindowsTM....................................................................................................
Conexión a una red WiFi.........................................................................................................
La interfaz WindowsTM.............................................................................................................
Solución de problemas............................................................................................................
Asegúrese de leerlos antes de considerar devolver el producto. Puede haber una solución fácil
a su problema. Tenga en cuenta que como estamos actualizando y mejorando constantemente
nuestros productos, el software de su dispositivo puede variar ligeramente con respecto a lo
descrito en esta Guía Rápida. Para obtener más información, consulte la sección:
http://windows.microsoft.com/es-es.
Consulte la declaración de conformidad en:
http://www.archos.com/products/declaration_conformity.html
56
57
58
59
60
62
64
66
72
55
UserGuide_ARCHOS_101_Cesium_book.indd 55 30/07/2015 12:01:37
Page 56

Warranty
Home
PgDn
PgUp
End
<
>
Contenido de la caja
Guía de usuario
ARCHOS 101 Cesium
Teclado + Origami
bolsa
Cargador
Cable de carga
Avisos de garantía,
legales y de seguridad
56
UserGuide_ARCHOS_101_Cesium_book.indd 56 30/07/2015 12:01:37
Page 57

Español
Procedimientos iniciales
Cargado de la batería
1. Para cargar el dispositivo, conecte el cable de alimentación al puerto
micro-USB.
El dispositivo ARCHOS iniciará la carga.
La luz de carga se enciende cuando el dispositivo se está
cargando.
2. Pulse el botón de encendido / apagado para encender el
producto.
- Puede utilizar el ARCHOS mientras se carga.
- Deje cargar completamente el dispositivo la primera vez que lo
utilice.
- Utilice únicamente el cargador suministrado.
CONSEJOS:
Para recibir una asistencia más completa, registre su producto.
Con un ordenador, vaya a www.archos.com/register.
UserGuide_ARCHOS_101_Cesium_book.indd 57 30/07/2015 12:01:37
57
Page 58

4
15
1
15
5
8
12
13
11
9
10
14
6
16
2
7
3
Descripción del ARCHOS
Cámara frontal
1
2
3
4
5
*
Con cable HDMI opcional.
58
UserGuide_ARCHOS_101_Cesium_book.indd 58 30/07/2015 12:01:37
Sensor de luz
Botón Windows
Altavoz
Cámara posterior
Botones de volumen
6
Indicador de carga
7
Botón encender/apagar
8
Toma de auriculares
9
Salida de vídeo HDMI
10 15
Ranura para tarjetas micro SD
11
Puerto micro USB
12
Micrófono
13
Conector de alimentación
14
*
Oricios de montaje
Conector de
16
teclado
Page 59

Home
PgDn
PgUp
End
<
>
3 54
1
2 6
Español
Descripción del teclado
El teclado se conecta automáticamente
a la tableta a través del conector de
teclado.
Si el teclado no responde una vez
conectado a la tableta, compruebe
que la instalación se ha realizado
correctamente.
El teclado tiene la conguración de un
teclado de computadora estándar.
1. Tecla de función: activa las teclas que tienen una doble función en azul.
2. Tecla Windows: muestra la pantalla principal.
3. Clic con el botón izquierdo del ratón
4. Panel táctil
5. Clic con el botón derecho del ratón
6. Tecla de menú: muestra las opciones de menú de la ventana correspondiente.
59
UserGuide_ARCHOS_101_Cesium_book.indd 59 30/07/2015 12:01:38
Page 60

<
>
<
>
<
>
<
>
Instalación de la tableta y el teclado
1. Levante la funda de
protección para abrirla.
Existen dos tipos de ángulo
de visualización:
- Primer ángulo de
visualización
60
UserGuide_ARCHOS_101_Cesium_book.indd 60 30/07/2015 12:01:38
Page 61

<
>
<
>
<
>
<
>
<
>
<
>
<
>
<
>
<
>
<
>
<
>
<
>
Español
- Segundo ángulo de
visualización
2. Instale la tableta en el
conector del teclado y los
oricios de montaje.
La conexión es automática,
sin necesidad de
conguración adicional.
Ya puede utilizar la tableta
con el teclado.
UserGuide_ARCHOS_101_Cesium_book.indd 61 30/07/2015 12:01:46
61
Page 62

Primeros pasos
Encendido
Mantenga pulsado el botón ON/OFF para encender el dispositivo.
La primera vez que lo encienda, diversas pantallas le guiarán a través de una conguración
preliminar.
1. Una vez seleccionados Region (Región) y Language (Idioma) en el dispositivo, así como Time
zone (Zona horaria), pulse en Next (Siguiente).
2. Seleccione I accept (Acepto) si está de acuerdo con las condiciones de la licencia de uso.
A través del asistente
1. En Personalize (Personalizar), seleccione un color e introduzca un nombre en el campo de
nombre de PC.
2. Pulse Next (Siguiente).
3. En Get online (Conexión), seleccione una red WiFi para conectarse a Internet y pulse Next
(Siguiente).
Si la red es privada, deberá introducir la contraseña correspondiente.
4. En Settings (Ajustes), elija entre ajustes rápidos (express settings) o personalizados (customize).
-A no ser que sea un usuario avanzado, le recomendamos que utilice los ajustes rápidos.
-Si es un usuario avanzado, seleccione Customize (Personalizados) para congurar sus propios
ajustes.
5. Inicie sesión con su cuenta de Microsoft introduciendo sus datos de cuenta.
Si no tiene una cuenta, seleccione Crear una nueva cuenta y siga las instrucciones para escoger
62
UserGuide_ARCHOS_101_Cesium_book.indd 62 30/07/2015 12:01:46
Page 63

Español
entre las distintas opciones.
Ayúdenos a proteger su información
Microsoft le ayuda a proteger su dispositivo y su cuenta.
1. Introduzca su dirección de correo electrónico en el campo correspondiente y seleccione
Siguiente.
2. Recibirá un código en su correo electrónico. Abra su correo para ver el código.
3. Introduzca el código que ha recibido. Si no pudiera consultar su cuenta de correo, seleccione
que no lo puede hacer en ese momento.
Terminado el proceso de conguración, el dispositivo se reinicia y aparece la pantalla principal. Ya
puede utilizar su tablet.
Activación de Microsoft Oce
Se le proporciona una licencia gratuita durante un año. Esta licencia, una vez activada, le permite
instalar Microsoft Oce en dos dispositivos mediante la conexión a su cuenta de Microsoft.
1. En la pantalla principal de la tableta, seleccione la aplicación Microsoft Oce.
Se le pedirá activarla.
2. Inicie sesión con su cuenta de Microsoft.
De esta forma, su cuenta quedará vinculada a esta licencia.
Puede descargar Microsoft Oce en un segundo dispositivo (ordenador, tableta o smartphone).
!Si restaura el dispositivo a sus ajustes predeterminados sin haber activado la licencia,
perderá la oportunidad de aprovechar esta licencia gratuita.
63
UserGuide_ARCHOS_101_Cesium_book.indd 63 30/07/2015 12:01:46
Page 64

1
2
3
4
Conexión WiFi
ATENCIÓN: Asegúrese de que se encuentra en una zona con cobertura WiFi.
Deslice el dedo
desde el borde
derecho.
Seleccione el
icono "WiFi" .
Seleccione
el icono
"Conguración"
.
Toque el nombre
de la red a la
que se desee
conectar.
64
UserGuide_ARCHOS_101_Cesium_book.indd 64 30/07/2015 12:01:46
Page 65

5
Español
Las redes privadas aparecen con un icono de candado, lo
que signica que deberá introducir una contraseña.
CONSEJOS:
Una vez conectado a una red protegida, podrá desconectarse y volver a conectarse sin tener que
introducir de nuevo la contraseña.
65
UserGuide_ARCHOS_101_Cesium_book.indd 65 30/07/2015 12:01:46
Page 66

3
1
2
La interfaz Windows
TM
Icono de aplicación
1
> Toque para abrirla.
Cuenta de usuario
2
> Toque para personalizar la cuenta.
Botón Buscar
3
> Pulse el botón Buscar e introduzca el nombre
de una aplicación.
66
UserGuide_ARCHOS_101_Cesium_book.indd 66 30/07/2015 12:01:47
Page 67

Español
Conguración rápida
> Deslice el dedo desde el borde
derecho y luego pulse en el icono
deseado.
Buscar: Utilice el botón Buscar para encontrar lo que busca. Si está en la pantalla
Inicio, haga clic en el botón Buscar junto a la foto de su cuenta.
Compartir: Una vez dentro de una aplicación, utilice el botón Compartir para
compartir archivos, fotos, etc.
Inicio: El botón Inicio le lleva a la pantalla Inicio. O si ya está en Inicio, le llevará a la
última aplicación utilizada.
Dispositivos: Utilice el botón Dispositivos para reproducir, proyectar o imprimir en
los periféricos.
Conguración: Utilice el botón Conguración para cambiar los ajustes de la
aplicación en la que se encuentre.
67
UserGuide_ARCHOS_101_Cesium_book.indd 67 30/07/2015 12:01:47
Page 68

La interfaz Windows
TM
Aplicaciones
> Deslice el dedo hacia arriba desde el
centro de la pantalla Inicio o haga clic
en la esquina inferior izquierda de
Inicio para mostrar todas las aplicaciones
instaladas.
68
UserGuide_ARCHOS_101_Cesium_book.indd 68 30/07/2015 12:01:47
Page 69

Español
Pasar de una aplicación abierta a
otra: Para pasar de una aplicación
abierta a otra deslice el dedo desde el
borde izquierdo de la pantalla.
Cambiar a una aplicación
determinada: Deslice el dedo desde
el borde izquierdo, y con el dedo sin
levantar de la pantalla, muévalo de
nuevo hacia el borde izquierdo. Pulse
en la aplicación deseada.
69
UserGuide_ARCHOS_101_Cesium_book.indd 69 30/07/2015 12:01:48
Page 70

La interfaz Windows
TM
El escritorio de siempre
En el escritorio es donde podrá utilizar
aplicaciones de escritorio como el
Oce y el Explorador de archivos.
También podrá anclar aplicaciones de
la Tienda Windows a la barra de tareas.
Comandos de aplicación
En algunas aplicaciones, deslice
el dedo hacia arriba desde el
borde inferior de la pantalla,
o hacia abajo desde el borde
superior para mostrar las
opciones de menú.
Comandos mostrados
70
UserGuide_ARCHOS_101_Cesium_book.indd 70 30/07/2015 12:01:49
Page 71

Español
Cerrar una aplicación
Deslice el dedo desde el borde superior de la pantalla y arrastre la aplicación hacia
abajo hasta salir de la pantalla.
Cerrar aplicaciones de escritorio
Para cerrar una aplicación de Oce, pulse o haga clic en el botón Cerrar de la barra de
título.
Desinstalar una aplicación
En la sección Aplicaciones de la pantalla Inicio, pulse y mantenga pulsado el icono de
aplicación durante un par de segundos.
Pulse en Desinstalar. Si se trata de una aplicación de escritorio, escoja la aplicación de
la lista y luego pulse en Desinstalar.
Añadir una cuenta de correo electrónico:
1. En la pantalla Inicio, pulse o haga clic en Correo.
2. Abra el acceso a Conguración y luego pulse o haga clic en Cuentas > Añadir una
cuenta.
3. Escoja el tipo de cuenta que desea añadir, y luego siga las instrucciones en pantalla.
En la mayoría de las cuentas, sólo se le pedirá el nombre de usuario y su contraseña. En
algunos casos, deberá introducir otra información que, en general, podrá encontrar en
el sitio web de su proveedor de correo electrónico.
UserGuide_ARCHOS_101_Cesium_book.indd 71 30/07/2015 12:01:49
ES
71
Page 72

Solución de problemas
Si el dispositivo se bloquea:
Pulse el botón ON/OFF durante 10 segundos.
Si el dispositivo no se enciende:
1. Cargue el dispositivo.
2. Pulse el botón ON/OFF durante 10 segundos.
Si desea aumentar la duración de la batería:
Disminuya el brillo de la pantalla y desactive las conexiones inalámbricas si no las utiliza.
Si el dispositivo funciona con demasiada lentitud:
Cierre todas las aplicaciones que no esté utilizando.
Si la recepción WiFi es demasiado baja:
Asegúrese de que no se encuentra lejos de la zona activa WiFi.
Actualizar el rmware del dispositivo: http://www.archos.com/support.
Restablecer la conguración de su conexión.
Póngase en contacto con el proveedor de la conexión WiFi.
¿Por qué no se detecta mi tableta Windows cuando está conectada a un ordenador?
Las tabletas Windows funcionan de la misma manera que un PC estándar - como tales,
no pueden detectarse como dispositivos periféricos por otro PC.
Para transferir archivos hacia o desde su tableta Windows, tendrá que conectar una
unidad USB al dispositivo mediante un cable host USB o transferir a través de la
conguración de su red doméstica Windows.
Para obtener más información, consulte la sección:
http://windows.microsoft.com/es-es
72
UserGuide_ARCHOS_101_Cesium_book.indd 72 30/07/2015 12:01:49
Page 73

Italiano
Sommario
Contenuto della confezione..................................................................................................
Avvio..............................................................................................................................................
Descrizione del ARCHOS........................................................................................................
Descrizione della tastiera.......................................................................................................
Installazione del tablet con la tastiera..............................................................................
Primi passi.....................................................................................................................................
Connessione a una rete WiFi .................................................................................................
L’interfaccia di WindowsTM......................................................................................................
Soluzione dei problemi..........................................................................................................
Per ulteriori informazioni, consultare http://windows.microsoft.com/it-it/windows-8. Accertarsi di
aver letto questo materiale prima di considerare l’eventuale restituzione del prodotto. Il problema
riscontrato potrebbe non essere davvero un problema! Poiché i nostri prodotti vengono
continuamente aggiornati e migliorati, è possibile che il software del dispositivo si presenti in
modo leggermente diverso o con funzioni modificate rispetto a quanto presentato nella presente
Guida rapida. Consultare http://windows.microsoft.com/it-it. Consultare la dichiarazione di
conformità su: http://www.archos.com/products/declaration_conformity.html.
74
75
76
77
78
80
82
84
90
73
UserGuide_ARCHOS_101_Cesium_book.indd 73 30/07/2015 12:01:49
Page 74

Warranty
Home
PgDn
PgUp
End
<
>
Contenuto della confezione
ARCHOS 101 Cesium
Tastiera + Borsa
origami
Caricatore
Cavo di ricarica
74
UserGuide_ARCHOS_101_Cesium_book.indd 74 30/07/2015 12:01:50
Guida dell’utente
Garanzia, note
legali e sulla
sicurezza
Page 75

Italiano
Avvio
Caricamento della batteria
1. Caricare il dispositivo collegando il cavo di alimentazione
nella porta micro-USB.
Il dispositivo ARCHOS inizierà a ricaricarsi.
La spia di ricarica è acceso quando il dispositivo è in carica.
2. Premere il pulsante On / O per accendere il prodotto.
- Durante il caricamento è possibile usare ARCHOS.
- Caricare completamente il dispositivo al primo utilizzo.
- Utilizzare solo il caricabatteria incluso.
CONSIGLI:
Per ricevere un’assistenza più completa, registrare il prodotto.
Con un computer, andare su www.archos.com/register.
UserGuide_ARCHOS_101_Cesium_book.indd 75 30/07/2015 12:01:50
75
Page 76

4
15
1
15
5
8
12
13
11
9
10
14
6
16
2
7
3
Descrizione del ARCHOS
Fotocamera anteriore
1
Sensore di luminosità
2
Pulsante Windows
3
Altoparlanti
4
Fotocamera posteriore
5 10 15
76
UserGuide_ARCHOS_101_Cesium_book.indd 76 30/07/2015 12:01:50
Pulsanti volume
6
Indicatore di carica
7
Pulsante ON/OFF
8
Spinotto cuffie
9
Uscita video HDMI
Slot per scheda micro-SD
11
Porta micro-USB
12
Microfono
13
Connettore alimentazione
14
*
Fori di fissaggio
Connettore
16
tastiera
*
Con cavo opzionale
HDMI.
Page 77

Home
PgDn
PgUp
End
<
>
3 54
1
2 6
Italiano
Descrizione della tastiera
La tastiera si connette
automaticamente al tablet tramite il
connettore della tastiera.
Se la tastiera non risponde dopo che il
tablet è stato installato, assicurarsi che
l'installazione sia corretta.
La tastiera ha la congurazione di una
tastiera di computer standard.
1. Tasto funzione: attiva i tasti con doppia funzione in blu.
2. Tasto Windows: mostra la schermata principale.
3. Pulsante sinistro del mouse
4. Touchpad
5. Pulsante destro del mouse
6. Tasto menu: mostra le opzioni di menu per la nestra corrispondente.
77
UserGuide_ARCHOS_101_Cesium_book.indd 77 30/07/2015 12:01:51
Page 78

<
>
<
>
<
>
<
>
Installazione del tablet con la tastiera
1. Sollevare la custodia
protettiva per aprire.
Due angolazioni possibili:
- Prima angolazione
78
UserGuide_ARCHOS_101_Cesium_book.indd 78 30/07/2015 12:01:51
Page 79

<
>
<
>
<
>
<
>
<
>
<
>
<
>
<
>
<
>
<
>
<
>
<
>
Italiano
- Seconda angolazione
2. Installare il tablet sul
connettore della tastiera e
sui fori di ssaggio.
La connessione è
automatica.
Non sarà necessaria alcuna
congurazione.
Ora è possibile utilizzare il
UserGuide_ARCHOS_101_Cesium_book.indd 79 30/07/2015 12:01:58
tablet con la tastiera.
79
Page 80

Primi passi
Accensione
Premere il pulsante ON/OFF (Acceso/Spento) per accendere il dispositivo.
Alla prima accensione, verranno visualizzate alcune schermate di configurazione preliminare.
1. In "Region and language" (Paese e lingua), impostare il proprio paese, la lingua del dispositivo e il
fuso orario, quindi selezionare "Next" (Avanti).
2. Selezionare "I accept" (Accetto) per accettare le Condizioni di licenza.
Procedura guidata
1. In "Personalize" (Personalizza), selezionare un colore e digitare un nome nel campo del nome del
PC.
2. Selezionare "Next" (Avanti).
3. In "Get online" ( Vai online), selezionare una rete Wi-Fi per connettersi a Internet e selezionare
"Next" (Avanti).
Le reti private richiedono una password.
4. In "Settings" (Impostazioni), è possibile scegliere tra le impostazioni rapide o personalizzate.
-Per gli utenti non esperti, si consiglia di selezionare "Use express settings" (Usa le impostazioni
rapide).
-Per gli utenti esperti, è possibile selezionare "Customize" per personalizzare le impostazioni.
5. In "Sign in to your Microsoft account" (Accedi al tuo account Microsoft), inserire i dettagli del
proprio account.
Se non si dispone di un account, selezionare "Create a new account" (Crea un nuovo account) e
80
UserGuide_ARCHOS_101_Cesium_book.indd 80 30/07/2015 12:01:58
Page 81

Italiano
seguire le istruzioni per scegliere le opzioni preferite.
Protezione delle informazioni personali
Microsoft aiuta a proteggere il dispositivo e l'account dell'utente.
1. Inserire il proprio indirizzo e-mail nel campo obbligatorio e selezionare "Next" (Avanti).
2. Verrà inviato un codice all'account e-mail. Per visualizzarlo, aprire l'account.
3. Inserire il codice ricevuto. Qualora non fosse possibile consultare il proprio account e-mail,
selezionare "I can’t do this right now." (Non posso farlo ora).
Alla fine del processo di configurazione, il dispositivo verrà riavviato. Viene visualizzata la schermata
iniziale. Ora è possibile utilizzare il tablet.
Attivazione di Microsoft Office
Viene fornita una licenza gratuita valida un anno. Tale licenza, una volta attivata, permette di
installare Microsoft Office su due dispositivi connettendoli all'account Microsoft.
1. Dalla schermata iniziale del tablet, selezionare l'applicazione Microsoft Office.
L'utente deve attivare la licenza.
2. Per accedere, inserire l'account Microsoft.
Ora la licenza è collegata al proprio account.
È possibile scaricare Microsoft Office anche su un secondo dispositivo (computer, tablet o
smartphone).
!Ripristinando il dispositivo alle impostazioni predefinite senza attivare la licenza, si
perderà la possibilità di beneficiare della licenza gratuita.
81
UserGuide_ARCHOS_101_Cesium_book.indd 81 30/07/2015 12:01:58
Page 82

1
2
3
4
Connessione a una rete wireless
ATTENZIONE: assicurarsi di essere in una zona Wi-Fi.
Scorrere il dito
dal bordo destro
verso il centro
dello schermo.
Selezionare
l'icona "WiFi".
Selezionare
l'icona "Settings"
[Impostazioni].
Toccare il nome
della rete a cui
l'utente desidera
connettersi.
82
UserGuide_ARCHOS_101_Cesium_book.indd 82 30/07/2015 12:01:58
Page 83

5
Italiano
Le reti private vengono mostrate con un'icona di blocco e
richiedono l'inserimento della password.
SUGGERIMENTO:
Una volta effettuata la connessione a una rete protetta, è possibile disconnettersi e
riconnettersi senza bisogno di inserire la password.
83
UserGuide_ARCHOS_101_Cesium_book.indd 83 30/07/2015 12:01:58
Page 84

3
1
2
L'interfaccia Windows
TM
Icona dell'applicazione
1
> Toccare per aprire l'app.
Account dell'utente
2
> Toccare per personalizzare l'account.
Pulsante Search [Cerca]
3
> Toccare il pulsante Search [Cerca] e inserire il
nome dell'applicazione.
84
UserGuide_ARCHOS_101_Cesium_book.indd 84 30/07/2015 12:01:58
Page 85

Italiano
Impostazioni rapide
> Scorrere il dito dal bordo destro verso
il centro dello schermo e toccare l'icona
desiderata.
Search [Cerca]: per eettuare una ricerca, è possibile utilizzare questo pulsante.
Dalla schermata Start, fare clic sul pulsante Search [Cerca] di anco all'immagine
dell'account.
Share [Condividi]: quando l'utente sta utilizzando un'app, può sfruttare questo
pulsante per condividere le, foto, ecc.
Start: il pulsante Start rimanda alla schermata Start oppure, se l'utente si trova già lì,
porta all'ultima applicazione utilizzata.
Devices [Dispositivi]: utilizzare questo pulsante per riprodurre, proiettare e stampare
sui dispositivi.
Settings [Impostazioni]: utilizzare questo pulsante per modicare le impostazioni
dell'applicazione in uso.
85
UserGuide_ARCHOS_101_Cesium_book.indd 85 30/07/2015 12:01:58
Page 86

L'interfaccia Windows
TM
Tutte le applicazioni
> Dal centro dello schermo far scorrere il
dito verso l'alto oppure fare clic su in
basso a sinistra di Start per visualizzare
tutte le applicazioni installate.
86
UserGuide_ARCHOS_101_Cesium_book.indd 86 30/07/2015 12:01:58
Page 87

Italiano
Navigare tra le applicazioni aperte:
per passare da un'app all'altra basta
far scorrere il dito dal bordo sinistro
verso il centro dello schermo.
Passare a un'applicazione specica:
far scorrere il dito dal bordo sinistro
verso il centro e, con il dito ancora
sullo schermo, muoverlo di nuovo
verso il bordo sinistro. Toccare l'app
desiderata.
87
UserGuide_ARCHOS_101_Cesium_book.indd 87 30/07/2015 12:01:59
Page 88

L'interfaccia Windows
TM
Comandi dell’app
Il desktop familiare
Il desktop è dove si utilizzano le
applicazioni desktop come Oce
e File Explorer. È anche possibile
salvare le app Windows Store
nella barra delle applicazioni.
88
UserGuide_ARCHOS_101_Cesium_book.indd 88 30/07/2015 12:02:01
In alcune app, scorrere
rapidamente dal basso
verso l’alto o viceversa per
visualizzare le opzioni di
menu.
Comandi visualizzati
Page 89

Italiano
Per chiudere un'applicazione
Far scorrere il dito dal bordo superiore dello schermo verso il basso e trascinare l'app in
giù e fuori dallo schermo.
Per chiudere applicazioni desktop
È possibile chiudere un'applicazione Oce toccando o facendo clic sul pulsante Close
[Chiudi] nella barra del titolo.
Per disinstallare un'applicazione
Dalla schermata Start o dalla sezione All apps [Tutte le app], toccare l'applicazione e
tenere premuto per un paio di secondi.
Toccare Uninstall [Disinstalla]. Se l'app è un'applicazione desktop, sceglierla dall'elenco
e toccare Uninstall [Disinstalla].
Per aggiungere un account e-mail:
1. Toccare o fare clic su Mail dalla schermata Start.
2. Aprire l'accesso alle impostazioni, quindi toccare o fare clic su Accounts [Account] >
Add an account [Aggiungi un account].
3. Scegliere il tipo di account da aggiungere, quindi seguire le istruzioni sullo schermo.
La maggior parte degli account si possono aggiungere solo con nome utente e
password. In alcuni casi verranno richieste ulteriori informazioni, che di solito è
possibile trovare sul sito web del provider dell'account e-mail.
UserGuide_ARCHOS_101_Cesium_book.indd 89 30/07/2015 12:02:01
IT
89
Page 90

Soluzione dei problemi
Nel caso in cui il dispositivo sembri bloccato:
Premere il pulsante ON/OFF per 10 secondi.
Nel caso in cui il dispositivo non si accenda:
1. Caricare il dispositivo.
2. Premere il pulsante ON/OFF per 10 secondi.
Se si desidera estendere la vita della batteria:
Diminuire la luminosità dello schermo e spegnere le connessioni wireless non in uso.
Se il dispositivo funziona troppo lentamente:
Chiudere tutte le applicazioni non attualmente in uso.
Se la ricezione WiFi è troppo lenta:
Accertarsi di non essere troppo lontani dal punto WiFi.
Aggiornare il rmware del dispositivo: http://www.archos.com/support.
Ripristinare le impostazioni di connessione.
Contattare il fornitore della connessione WiFi.
Perché il moi Windows Tablets non é rilevato quando lo connetto al computer ?
I Windows tablets funzionano come i normali PC, quindi, come questi, non possono
essere rilevati come dispositivo periferico da un’altro PC.
Per trasferire i le da o verso il tuo Windows Tablet devi collegare una chiavetta USB al
tuo dispositivo tramite un cavo USB Host, o trasferirli secondo le impostazioni del tuo
Windows Home Network.
Consultare:
http://windows.microsoft.com/it-it.
90
UserGuide_ARCHOS_101_Cesium_book.indd 90 30/07/2015 12:02:01
Page 91

Nederlands
Inhoudsopgave
Wat zit er in de doos?...............................................................................................................
Aan de slag..................................................................................................................................
Beschrijving ARCHOS..............................................................................................................
Beschrijving van de keyboard..............................................................................................
De tablet installeren met de keyboard..............................................................................
Eerste stappen............................................................................................................................
WiFi-netwerkverbinding.......................................................................................................
De WindowsTM-Interface.......................................................................................................
Problemen oplossen..............................................................................................................
Zorg ervoor dat u ze leest alvorens te overwegen het product te retourneren. Uw probleem
kan wel eens een probleempje blijken. Omdat we onze producten voortdurend aanpassen en
verbeteren, kan de software van uw apparaat er een beetje anders uitzien of een licht gewijzigde
functionaliteit hebben dan voorgesteld in deze Snelstartgids. Raadpleeg voor meer informatie
http://windows.microsoft.com/nl-nl. Raadpleeg de verklaring van overeenstemming op:
http://www.archos.com/products/declaration_conformity.html.
92
93
94
95
96
98
100
102
108
91
UserGuide_ARCHOS_101_Cesium_book.indd 91 30/07/2015 12:02:01
Page 92

Warranty
Home
PgDn
PgUp
End
<
>
Wat zit er in de doos?
ARCHOS 101 Cesium
keyboard + Origami
pouch
Lader
Oplaadkabel
92
UserGuide_ARCHOS_101_Cesium_book.indd 92 30/07/2015 12:02:01
Gebruikershandleiding
Garantie, wettelijke
mededelingen en
veiligheidsvoorschriftem
Page 93

Nederlands
Aan de slag
De batterijen laden
1. Laad uw apparaat op door de stekker van uw voedingskabel
in de micro USB-poort te steken.
Het ARCHOS-apparaat begint op te laden. Het oplaadlampje
wordt ingeschakeld wanneer het apparaat wordt opgeladen.
2. Druk op de aan / uit-knop om het apparaat uit.
- U kunt uw ARCHOS gebruiken terwijl hij wordt opgeladen.
- Laad het apparaat de eerste keer helemaal op.
- Gebruik uitsluitend de meegeleverde oplader.
TIPS:
Registreer uw product om de volledige service te ontvangen.
Als u een computer hebt, ga dan naar www.archos.com/register.
UserGuide_ARCHOS_101_Cesium_book.indd 93 30/07/2015 12:02:01
93
Page 94

4
15
1
15
5
8
12
13
11
9
10
14
6
16
2
7
3
Beschrijving ARCHOS
Camera aan de voorkant
1
2
3
4
5
94
6
UserGuide_ARCHOS_101_Cesium_book.indd 94 30/07/2015 12:02:02
Lichtsensor
Windows-knop
Luidspreker
Camera aan de achterkant
Volumeknoppen
Oplaadlampje
7
8
9
10
11
AAN/UIT-knop
Hoofdtelefoonaansluiting
HDMI video-uitgang
Micro-SD-kaartsleuf
Micro-USB-poort
12
Microfoon
13
Voedingsaansluiting
14
*
Bevestigingsopeningen
15
Keyboardaansluiting
16
*
Met optionele HDMI kabel.
Page 95

Home
PgDn
PgUp
End
<
>
3 54
1
2 6
Nederlands
Beschrijving van de keyboard
De keyboard wordt automatisch
op de tablet aangesloten via de
keyboardaansluiting.
Als de keyboard niet reageert na het
installeren van de tablet, controleer dan
of de installatie goed is uitgevoerd.
Het toetsenbord heeft de conguratie
van een standaard toetsenbord van de
computer.
1. Fn-toets: voor het activeren van de toetsen met een dubbele functie in het blauw.
2. Windows-toets: voor het weergeven van het beginscherm.
3. Linkermuisknop
4. Touchpad
5. Rechtermuisknop
6. Menu-toets: voor het weergeven van de menu-opties van het betreende venster.
95
UserGuide_ARCHOS_101_Cesium_book.indd 95 30/07/2015 12:02:02
Page 96

<
>
<
>
<
>
<
>
De tablet installeren met de keyboard
1. Til de klep omhoog om te
openen.
Er zijn twee
weergavehoeken:
- Eerste type weergavehoek
96
UserGuide_ARCHOS_101_Cesium_book.indd 96 30/07/2015 12:02:02
Page 97

<
>
<
>
<
>
<
>
<
>
<
>
<
>
<
>
<
>
<
>
<
>
<
>
Nederlands
- Tweede type
weergavehoek
2. Sluit de tablet aan op de
keyboardaansluiting en op
de bevestigingsopeningen.
De aansluiting wordt
automatisch uitgevoerd.
U hoeft zelf geen installatie
uit te voeren.
U kunt de tablet meteen
UserGuide_ARCHOS_101_Cesium_book.indd 97 30/07/2015 12:02:09
gebruiken met de keyboard.
97
Page 98

Eerste stappen
Inschakelen
Houd de AAN/UIT-knop ingedrukt om het apparaat in te schakelen.
De eerste keer dat u het apparaat inschakelt, wordt u door een aantal schermen geleid om het
apparaat in te stellen.
1. Bij Region and language [Land en taal] stelt u uw land, taal en tijdzone in en klikt u op Next
[Volgende].
2. Kies I accept to agree to the License terms [Ik ga akkoord met de licentievoorwaarden].
De Wizard gebruiken
1. Bij Personalize [Aanpassen] kiest u een kleur en voert u een naam in, in het veld PC name [PC-naam].
2. Kies Next [ Volgende].
3. Bij Get online [Online gaan] kiest u een WiFi-netwerk om verbinding te maken met het Internet en
kiest u Next [Volgende].
Voor privé-netwerken is een wachtwoord vereist.
4. Bij Settings [Instellingen] kunt u kiezen tussen Express settings [Aanbevolen instellingen] of
Customize [Aanpassen].
-Als u een beginner bent, raden wij u aan om Express settings [Aanbevolen instellingen] te gebruiken.
-Als u een gevorderde gebruiker bent, kunt u Customize [Aanpassen] kiezen om uw eigen instellingen
te configureren.
5. Bij Sign in to your Microsoft account [Aanmelden bij uw Microsoft-account] vult u uw
accountgegevens in.
98
UserGuide_ARCHOS_101_Cesium_book.indd 98 30/07/2015 12:02:09
Page 99

Nederlands
Als u geen account heeft, kiest u Create a new account [Account aanmaken] en volgt u de aanwijzingen
op het scherm.
Help ons om uw gegevens te beschermen
Microsoft helpt u om uw apparaat en uw account te beveiligen.
1. Voer uw e-mailadres in, in het daartoe bestemde veld en klik op Next [ Volgende].
2. Er wordt een code naar uw e-mailadres gezonden. Open uw account om de code te zien.
3. Voer de code in die u heeft ontvangen. Als u uw e-mailaccount niet kunt raadplegen, kiest u I can’t do
this right now [Ik kan dit momenteel niet doen].
Aan het einde van dit configuratieproces wordt het apparaat opnieuw opgestart. Het beginscherm
wordt weergegeven. U kunt de tablet nu gebruiken.
Microsoft Office activeren
Er is een gratis licentie voor een jaar meegeleverd. Na het activeren van de licentie kunt u Microsoft
Office op twee apparaten installeren door verbinding te maken met uw Microsoft-account.
1. In het beginscherm van de tablet kiest u de Microsoft Office-toepassing.
U moet deze activeren.
2. Voer uw Microsoft-account in om in te loggen.
Uw licentie is nu gekoppeld aan uw account.
Op een tweede apparaat (computer, tablet of smar tphone) kunt u Microsoft office downloaden.
!Wanneer u de standaardinstellingen van het apparaat herstelt zonder uw licentie te activeren,
kunt u geen gebruik meer maken van de gratis licentie.
UserGuide_ARCHOS_101_Cesium_book.indd 99 30/07/2015 12:02:09
99
Page 100

1
2
3
4
WiFi-netwerkverbinding
LET OP: Controleer of u zich in een WiFi-zone bevindt.
Veeg naar
binnen vanaf de
rechter kant.
Kies het
pictogram
"WiFi".
Kies het
pictogram
"Settings"
[Instellingen].
Tik op de naam
van het netwerk
waarmee u
verbinding wilt
maken.
100
UserGuide_ARCHOS_101_Cesium_book.indd 100 30/07/2015 12:02:09
 Loading...