

Page 1

Built-In Hob
OI 636
185261296 20.08.2011 R.AA
Page 2
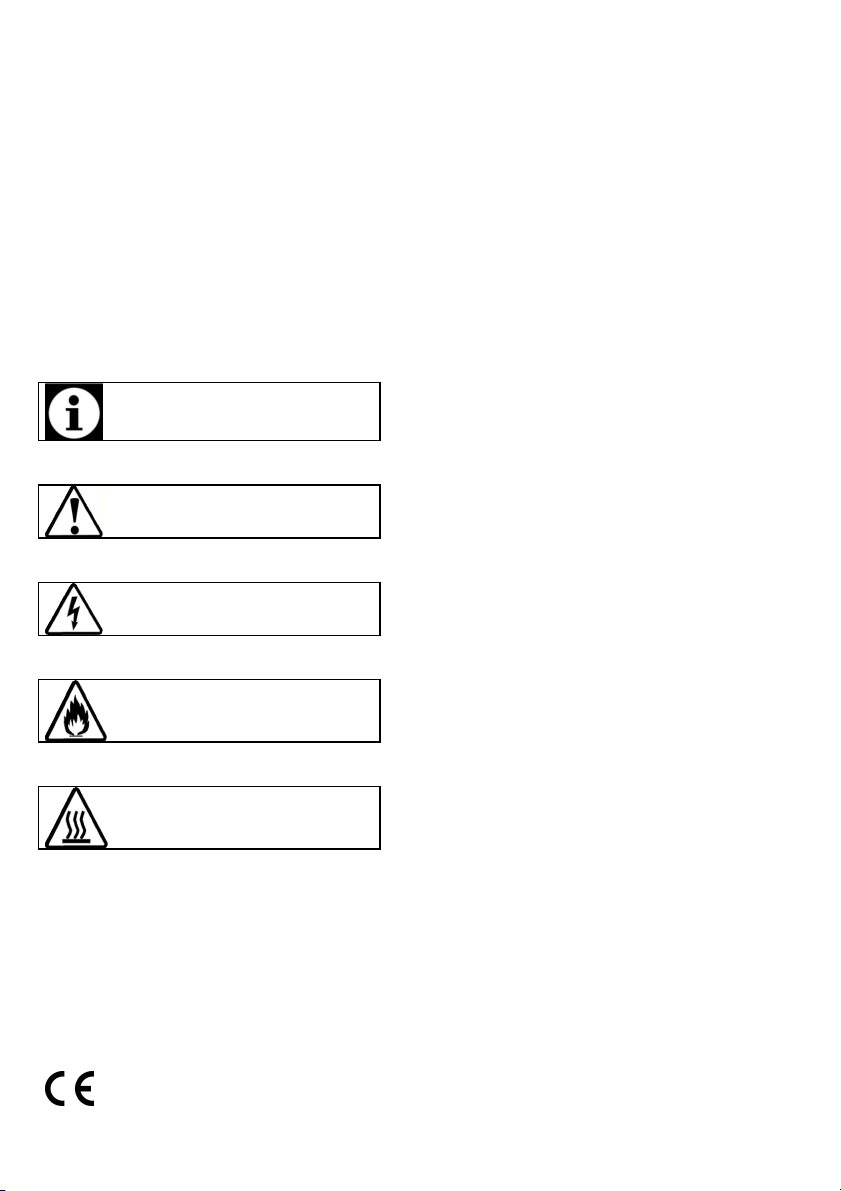
Important information or useful hints
Warning for hazardous situations with
Warning for electric shock.
Warning for risk of fire.
Warning for hot surfaces.
Please read this user manual first!
Dear Customer,
Thank you for prefering a/an Arçelik product. We hope that you get the best results from your product
which has been manufactured with high quality and state-of-the-art technology. Therefore, please read
this entire user manual and all other accompanying documents carefully before using the product and
keep it as a reference for future use. If you handover the product to someone else, give the user manual
as well. Follow all warnings and information in the user manual.
Remember that this user manual is also applicable for several other models. Differences between models
will be identified in the manual.
Explanation of symbols
Throughout this user manual the following symbols are used:
about usage.
regard to life and property.
Page 3
TABLE OF CONTENTS
1 General information 4
Overview ....................................................... 4
Technical specifications .................................. 4
2 Important safety instructions 5
General safety ................................................ 5
Intended use .................................................. 5
Safety for children .......................................... 6
Safety when working with electricity ................ 6
3 Installation 7
Before installation .......................................... 7
Installation and connection ............................. 8
Disposal ...................................................... 10
Package information ..................................... 10
Future Transportation ................................... 10
Disposing of the old product ......................... 10
4 Preparation 11
Tips for saving energy ................................. 11
Initial use .................................................... 11
First cleaning of the appliance ...................... 11
5 How to use the hob 12
General information about cooking ............... 12
Using the hobs ............................................ 13
Control panel .............................................. 14
6 Maintenance and care 18
General information ..................................... 18
Cleaning the hob ......................................... 18
7 Troubleshooting 19
3/EN
Page 4
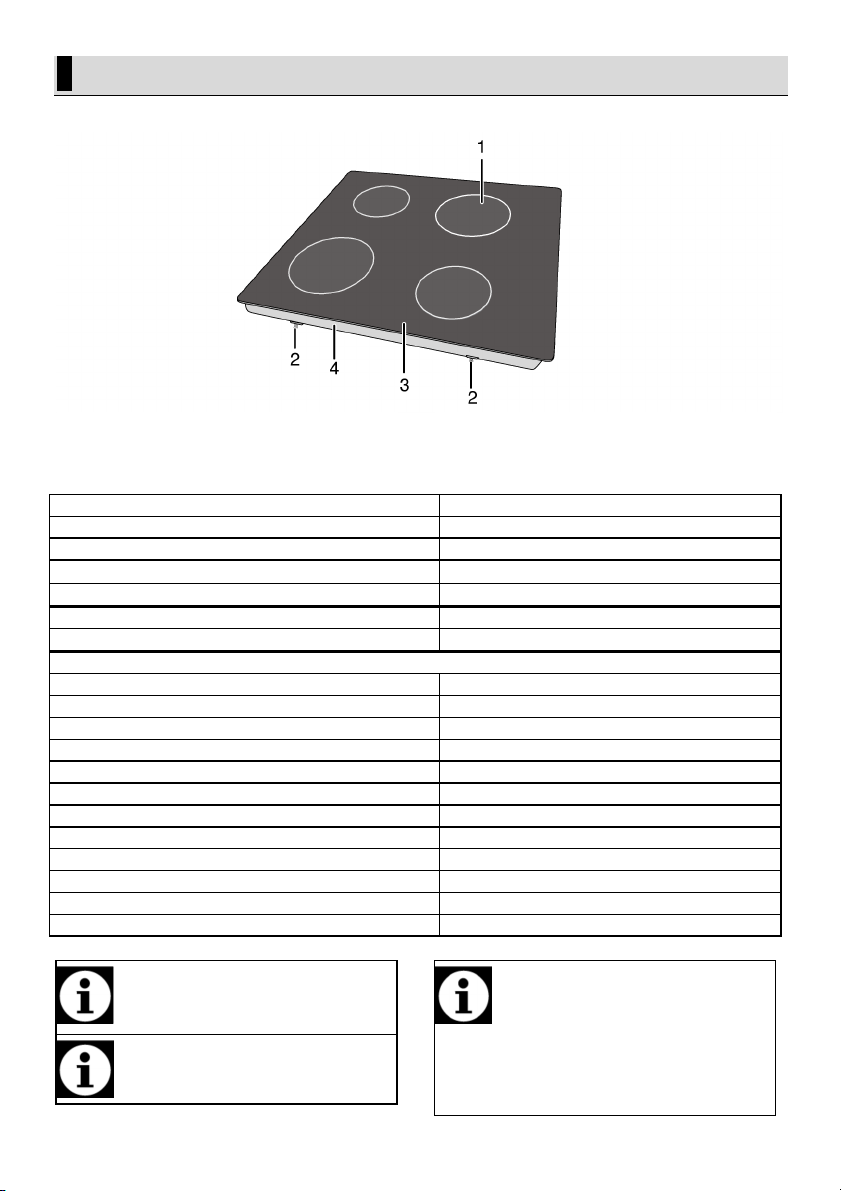
1 Induction cooking plate
2
Assembly clamp
3
Vitroceramic surface
4
Base cover
Voltage / frequency
220-240 V~/380
-
415 V 2N ~ 50
Hz
Total power consumption
max. 7200 W
Fuse min. 16 A x 2 / 32 A
Cable type / section
Cable length
max. 2 m
External dimensions (height / width / depth)
55 mm/580 mm/510 mm
Installation dimensions (width / depth)
560 mm/490 mm
Burners
Rear left
Induction cooking plate
Dimension
145 mm
Power 1600 W
Front left
Induction cooking plate
Dimension
180 mm
Power 2000W
Front right
Induction cooking plate
Dimension
145mm
Power 1600 W
Rear right
Induction cooking plate
Dimension
180 mm
Power 2000 W
Technical specifications may be changed
without prior notice to improve the quality of
Figures in this manual are schematic and
Values stated on the product labels or in the
1 General information
Overview
Technical specifications
H05VV-FG 5 x 1,5 mm2
the product.
may not exactly match your product.
4/EN
documentation accompanying it are
obtained in laboratory conditions in
accordance with relevant standards.
Depending on operational and
environmental conditions of the product,
these values may vary.
Page 5
As induction ho
bs create a magnetic field,
2 Important safety instructions
This section contains safety instructions that will
help you avoid risk of injury and damage. All
warranties will become void if you do not follow
these instructions.
General safety
• This product is not intended to be used by
persons with physical, sensory or mental
disorders or unlearned or inexperienced
people (including children) unless they are
attended by a person who will be
responsible for their safety or who will
instruct them accordingly for use of the
product.
Children must be supervised to prevent
them from tampering with the product.
• Connect the product to an earthed
outlet/line protected by a fuse of suitable
capacity as stated in the "Technical
specifications" table. Have the earthing
installation made by a qualified electrician
while using the product with or without a
transformer. Our company shall not be
liable for any problems arising due to the
product not being earthed in accordance
with the local regulations.
• If the supply cord is damaged, it must be
replaced by the manufacturer, its service
agent or similary qualified persons in order
to avoid a hazard.
• Do not operate the product if it is defective
or has any visible damage.
• Do not carry out any repairs or modifications
on the product. However, you may remedy
some troubles that do not require any
repairs or modifications. See
Troubleshooting, page 19.
• Never wash down the product with water!
There is the risk of electric shock!
• Never use the product when your judgment
or coordination is impaired by the use of
alcohol and/or drugs.
• Product must be disconnected from the
mains during installation, maintenance,
cleaning and repair procedures.
• Be careful when using alcoholic drinks in
your dishes. Alcohol evaporates at high
temperatures and may cause fire since it
can ignite when it comes into contact with
hot surfaces.
• Do not heat closed tins and glass jars in the
oven. The pressure that would build-up in
the tin/jar may cause it to burst.
• Do not place any flammable materials close
to the product as the sides may become hot
during use.
• Keep all ventilation slots clear of
obstructions.
• Make sure that the product function knobs
are switched off after every use.
• Vapour pressure that build up due to the
moisture on the hob surface or at the
bottom of the pot can cause the pot to move.
Therefore, make sure that the oven surface
and bottom of the pots are always dry.
• Hotplates of your oven are equipped with
"Induction" technology. Your induction hob
that provides both time and money savings
must be used with pots suitable for
induction cooking; otherwise hotplates will
not operate. See.General information about
cooking, page 12, selecting the pots.
they may cause harmful impacts for people
who use devices such as insulin pump or
pacemaker.
Intended use
This product is designed for domestic use.
Commercial use will void the guarantee.
"CAUTION: This appliance is for cooking
purposes only. It must not be used for other
purposes, for example room heating."
The manufacturer shall not be liable for any
damage caused by improper use or handling
errors.
Service life of your product is 10 years.
Manufacturer shall provide the required spare
parts for the product to perform as defined
during this period.
5/EN
Page 6

Safety for children
• Packaging materials are dangerous to
children. Keep packaging materials in a safe
place out of reach of children.
• Electrical and/or gas products are
dangerous to children. Keep children away
from the product when it is operating and
do not allow them to play with the product.
• Accessible parts of the appliance will
become hot whilst the appliance is in use.
Children should be kept away until the
product has cooled down.
• Do not place any items above the appliance
that children may reach for.
• The packaging materials will be dangerous
for children. Keep the packaging materials
away from children. Please dispose of all
parts of the packaging according to
environmental standards.
SAVE THESE INSTRUCTIONS
Safety when working with electricity
Defective electric equipment is one of the major
causes of house fires.
• Any work on electrical equipment and
systems should only be carried out by
authorized and qualified persons.
• In case of any damage, switch off the
product and disconnect it from the mains.
To do this, turn off the fuse at home.
• Make sure that fuse rating is compatible
with the product.
6/EN
Page 7

Preparation of location and electrical and
Prior to installation, visually check if the
* min.
3 Installation
Refer to the nearest Authorised Service Agent for
installation of the product. Make sure that the
electric and gas installations are in place before
calling the Authorised Service Agent to have the
product ready for operation. If not, call a qualified
electrician and fitter to have the required
arrangements made. The manufacturer shall not
be held responsible for damages arising from
procedures carried out by unauthorized persons
which may also void the warranty.
gas installation for the product is under
customer’s responsibility.
DANGER:
The product must be installed in
accordance with all local gas and/or
electrical regulations.
DANGER:
product has any defects on it. If so, do
not have it installed.
Damaged products cause risks for your
safety.
Before installation
The hob is designed for installation in a
commercial worktop. A safety distance must be
left between the appliance and the kitchen walls
and furniture. See figure (values in mm).
• It can also be used in a free standing
position. Allow a minimum distance of 750
mm above the hob surface.
• (*) If a cooker hood is to be installed above
the cooker, refer to cooker hood
manufacturer' instructions regarding
installation height (min 650 mm)
• Remove packaging materials and transport
locks.
• Surfaces, synthetic laminates and adhesives
used must be heat resistant (100 °C
minimum).
• The worktop must be aligned and fixed
horizontally.
• Cut aperture for the hob in worktop as per
installation dimensions.
7/EN
Page 8
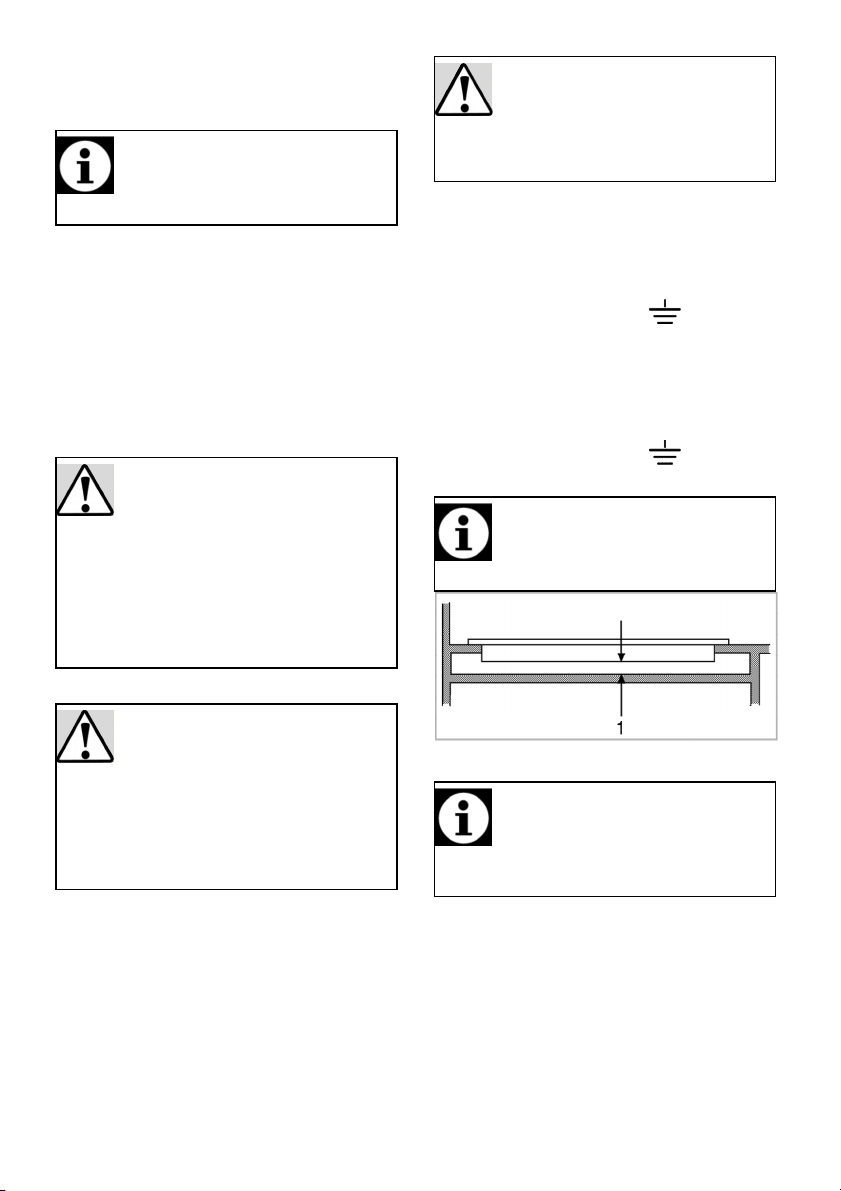
Do not install the hob on places with sharp
mains supply only by an authorised and
warranty period starts only after correct
If it is possible to touch the bottom of the
this section must be covered with a wooden
1 min. 30 mm
When installing the hob onto a cabinet, a
the cabinet from the hob as illustrated in the
Installation and connection
• The product must be installed in accordance
with all local gas and electrical regulations.
edges or corners.
There is the risk of breaking for glass
ceramic surface!
Electrical connection
Connect the product to a grounded outlet/line
protected by a fuse of suitable capacity as stated
in the "Technical specifications" table. Have the
grounding installation made by a qualified
electrician while using the product with or
without a transformer. Our company shall not be
liable for any damages that will arise due to
using the product without a grounding installation
in accordance with the local regulations.
DANGER:
The product must be connected to the
DANGER:
Before starting any work on the
electrical installation, disconnect the
product from the mains supply.
There is the risk of electric shock!
Connecting the power cable
1. For single-phase connection, connect the
wires as identified below:
• Brown/Black cable = L (Phase)
• Blue/Grey cable = N (Neutral)
• Green/yellow cable = (E) (Ground)
2. For double-phase connection, connect the
wires as identified below:
• Brown cable = L1 (Phase 1)
• Black cable = L2 (Phase 2)
• Blue/Grey cable = N (Neutral)
• Green/yellow cable = (E) (Ground)
Installing the product
qualified person. The product's
installation.
Manufacturer shall not be held responsible
for damages arising from procedures
carried out by unauthorised persons.
DANGER:
The power cable must not be clamped,
bent or trapped or come into contact
with hot parts of the product.
A damaged power cable must be replaced
by an Authorised Service Agent. Otherwise,
there is risk of electric shock, short circuit
or fire!
• Connection must comply with national
regulations.
• The mains supply data must correspond to
the data specified on the type label of the
product. Type label is at the rear housing of
the product.
• Power cable of your product must comply
with the values in "Technical specifications"
table.
product since it is installed onto a drawer,
plate.
shelf must be installed in order to separate
above figure. This is not required when
installing onto a built-in oven.
If the oven is below:
8/EN
Page 9

* min. 70
mm
* min. ** min. 70 mm
* min. 40 mm
1
Hob 2 Ins
tallation clamp
3
Counter
Making connections to different holes is not
housing that contact with the counter as
illustrated in figure.
It is required to leave a ventilation opening of
minimum 180 cm2 at the rear section of the
furniture as illustrated in the following figure.
If the board is below:
3. Center the product in the counter.
4. Using the installation clamps secure the hob
by fitting through the holes on the lower
casing.
» Rear view (connection holes)
During installation of your induction hob, place
the product parallel to the installation surface.
Also, apply sealing gasket to the parts of the hob
contacting the counter as described below in
order to prevent any liquid from penetrating
between the product and the counter.
1. Prepare the surface of the counter as shown
in the figure.
2. Apply the sealing gasket provided with the
product to the edges of the hob's lower
a good practice in terms of safety since it
can damage the gas and electrical system.
Final check
1. Plug in the power cable and switch on the
product's fuse.
2. Check the functions.
9/EN
Page 10
Check the general appearance of your
Disposal
Package information
• Packaging materials of the product are
manufactured from recyclable materials in
accordance with our National Environment
Regulations. Do not dispose of the
packaging materials together with the
domestic or other wastes. Take them to the
packaging material collection points
designated by the local authorities.
Future Transportation
• Keep the product's original carton and
transport the product in it. Follow the
instructions on the carton. If you do not
have the original carton, pack the product in
bubble wrap or thick cardboard and tape it
securely.
product for any damages that might have
occurred during transportation.
Disposing of the old product
Dispose of the old product in an environmentally
friendly manner.
This equipment bears the selective sorting
symbol for waste electrical and electronic
equipment (WEEE). This means that this
equipment must be handled pursuant to
European Directive 2002/96/EC in order to be
recycled or dismantled to minimize its impact on
the environment. For further information, please
contact local or regional authorities.
Refer to your local dealer or solid waste
collection centre in your area to learn how to
dispose of your product.
Before disposing of the product, cut off the
power cable plug and make the door lock (if any)
unusable to avoid dangerous conditions to
children.
10/EN
Page 11

The surface might get damaged by some
Do not use harsh abrasive cleaners or sharp
4 Preparation
Tips for saving energy
The following information will help you to use
your appliance in an ecological way, and to save
energy:
• Defrost frozen dishes before cooking them.
• Use pots/pans with cover for cooking. If
there is no cover, energy consumption may
increase 4 times.
• Select the burner which is suitable for the
bottom size of the pot to be used. Always
select the correct pot size for your dishes.
Larger pots require more energy.
• Pay attention to use flat bottom pots when
cooking with electric hobs.
Pots with thick bottom will provide a better
heat conduction. You can obtain energy
savings up to 1/3.
• Vessels and pots must be compatible with
the cooking zones. Bottom of the vessels or
pots must not be smaller than the hotplate.
• Keep the cooking zones and bottom of the
pots clean. Dirt will decrease the heat
conduction between the cooking zone and
bottom of the pot.
Initial use
First cleaning of the appliance
detergents or cleaning materials.
Do not use aggressive detergents, cleaning
powders/creams or any sharp objects
during cleaning.
metal scrapers to clean the oven door glass
since they can scratch the surface, which
may result in shattering of the glass.
1. Remove all packaging materials.
2. Wipe the surfaces of the appliance with a
damp cloth or sponge and dry with a cloth.
11/EN
Page 12
Never fill the pan with oil more than
S
pills may damage the
Do not use vessels with
Use only the saucepans
5 How to use the hob
General information about cooking
one third of it. Do not leave the hob
unattended when heating oil.
Overheated oils bring risk of fire. Never
attempt to extinguish a possible fire
with water! When oil catches fire,
cover it with a fire blanket or damp
cloth. Turn off the hob if it is safe to do
so and call the fire department.
• Before frying foods, always dry them well
and gently place into the hot oil. Ensure
complete thawing of frozen foods before
frying.
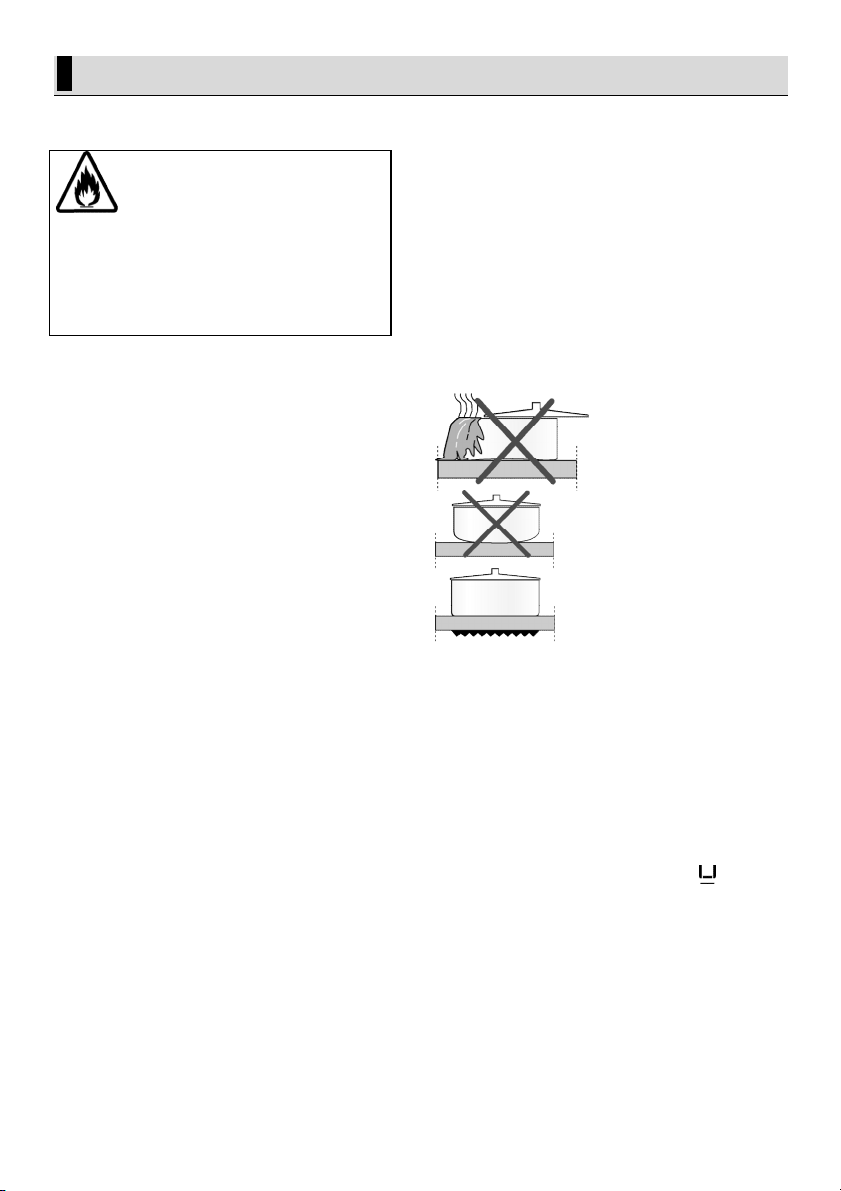
• Do not cover the vessel you use when
heating oil.
• Place the pans and saucepans in a manner
so that their handles are not over the hob to
prevent heating of the handles. Do not place
unbalanced and easily tilting vessels on the
hob.
• Do not place empty vessels and saucepans
on cooking zones that are switched on.
They might get damaged.
• Operating a cooking zone without a vessel
or saucepan on it will cause damage to the
product. Turn off the cooking zones after
the cooking is complete.
• As the surface of the product can be hot, do
not put plastic and aluminum vessels on it.
Clean any melted such materials on the
surface immediately.
Such vessels should not be used to keep
foods either.
• Use flat bottomed saucepans or vessels only.
• Put appropriate amount of food in
saucepans and pans. Thus, you will not
have to make any unnecessary cleaning by
preventing the dishes from overflowing.
Do not put covers of saucepans or pans on
cooking zones.
Place the saucepans in a manner so that
they are centered on the cooking zone.
When you want to move the saucepan onto
another cooking zone, lift and place it onto
the cooking zone you want instead of sliding
it.
Saucepan selection
• Glass ceramic surface is heatproof and is
not affected by big temperature differences.
• Do not use the glass ceramic surface as a
place of storage or as a cutting board.
• Use only the saucepans and pans with
machined bottoms. Sharp edges create
scratches on the surface.
glass ceramic surface
and cause fire.
concave or convex
bottoms.
and pans with flat
bottoms. They ensure
easier heat transfer.
For induction hobs, use only vessels suitable
for induction cooking.
Saucepan test
Use following methods to test whether your
saucepan is compatible with the induction hob or
not.
1. Your saucepan is compatible if its bottom
holds magnet.
2. Your saucepan is compatible if " " does
not flash when you place your saucepan on
cooking zone and start the hob.
You can use steel, teflon or aluminium
saucepans with special magnetic bottom that
contains labels or warnings indicating that the
saucepan is compatible with induction cooking.
Glass and ceramic vessels, pots and the
stainless steel vessels with non-magnetic
aluminium bottom should not be used.
12/EN
Page 13
If there is an oven under your hob and if it is
When the hob is running, keep items with
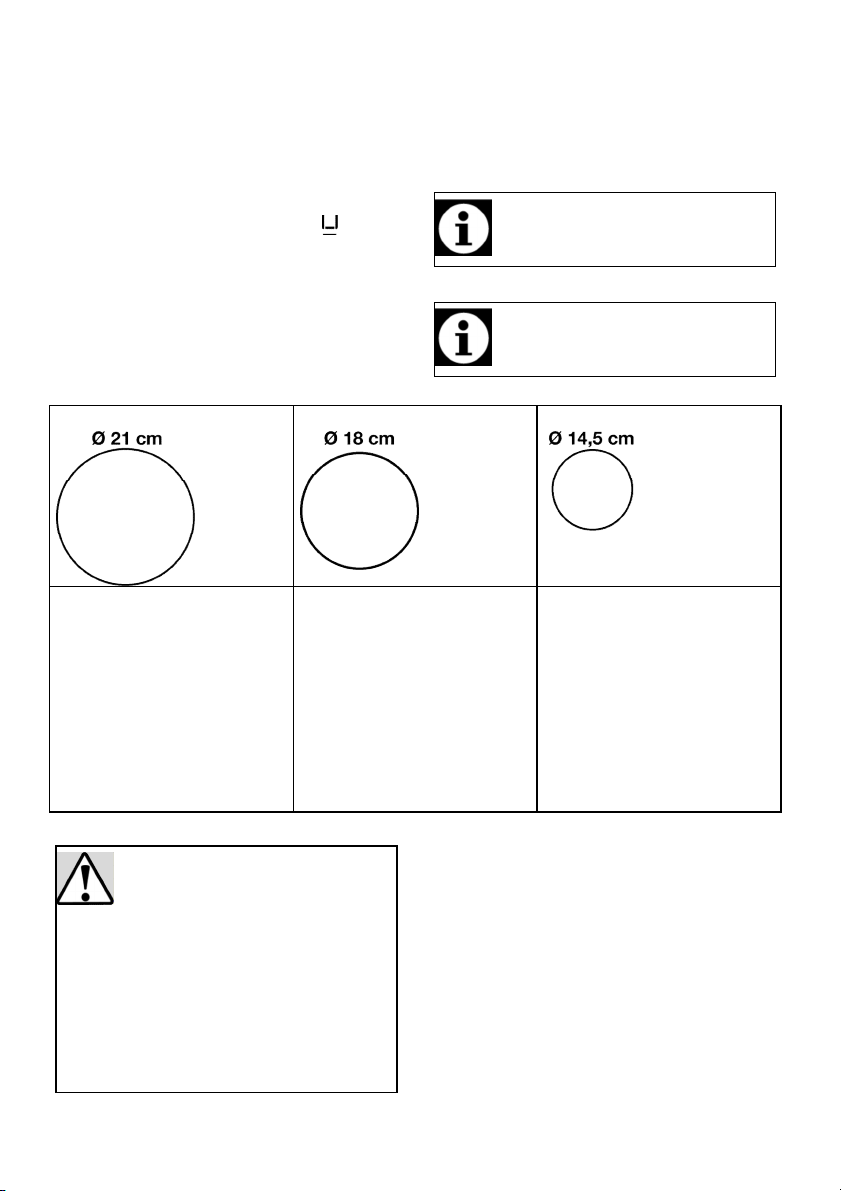
Large cooking zone
Normal cooking zone
Small cooking zone
Large cooking zone
Normal cooking zone
Small cooking zone
Saucepan recognition-focusing system
In induction cooking, only the area covered by
the vessel on the relevant cooking zone is
energised. The vessel's bottom is recognised by
the system and only this area is heated
automatically. Cooking stops if the cooking
vessel is lifted from the cooking zone during
cooking. Selected cooking zone and " " symbol
flashes alternately.
Safe use
Do not select high heating levels when you will
use a non-sticking (teflon) saucepan with no oil
or with very little oil.
Selecting cooking zone suitable to the vessel
Do not put metal items such as forks, knives or
saucepan covers onto your hob since they can
get heated.
Never use aluminium folio for cooking. Never
place food items wrapped with aluminium folio
onto the cooking zone.
running, sensors of the hob can decrease
the cooking level or turn off the oven.
magnetic properties such as credit cards or
cassettes away from the hob.
• Automatically fits to the
saucepan.
• Distributes the power
ideally.
• Provides perfect heat
distribution. Used to cook
dishes such as large
crepes or large fishes rare
or very rare.
Using the hobs
DANGER:
Do not allow any object to drop on the
hob. Even small objects such as a
saltshaker may damage the hob.
Do not use cracked hobs. Water may leak
through these cracks and cause short
circuit.
In case of any kind of damage on the
surface (eg., visible cracks), switch off the
product immediately to minimize the risk of
electric shock.
• Automatically fits to the
saucepan.
• Distributes the power
ideally.
• Provides perfect heat
distribution. Used for all
kinds of cookings.
• Used for slow cookings
(sauces, creams)
• Used to prepare small
portions or portions based
on number of persons.
13/EN
Page 14
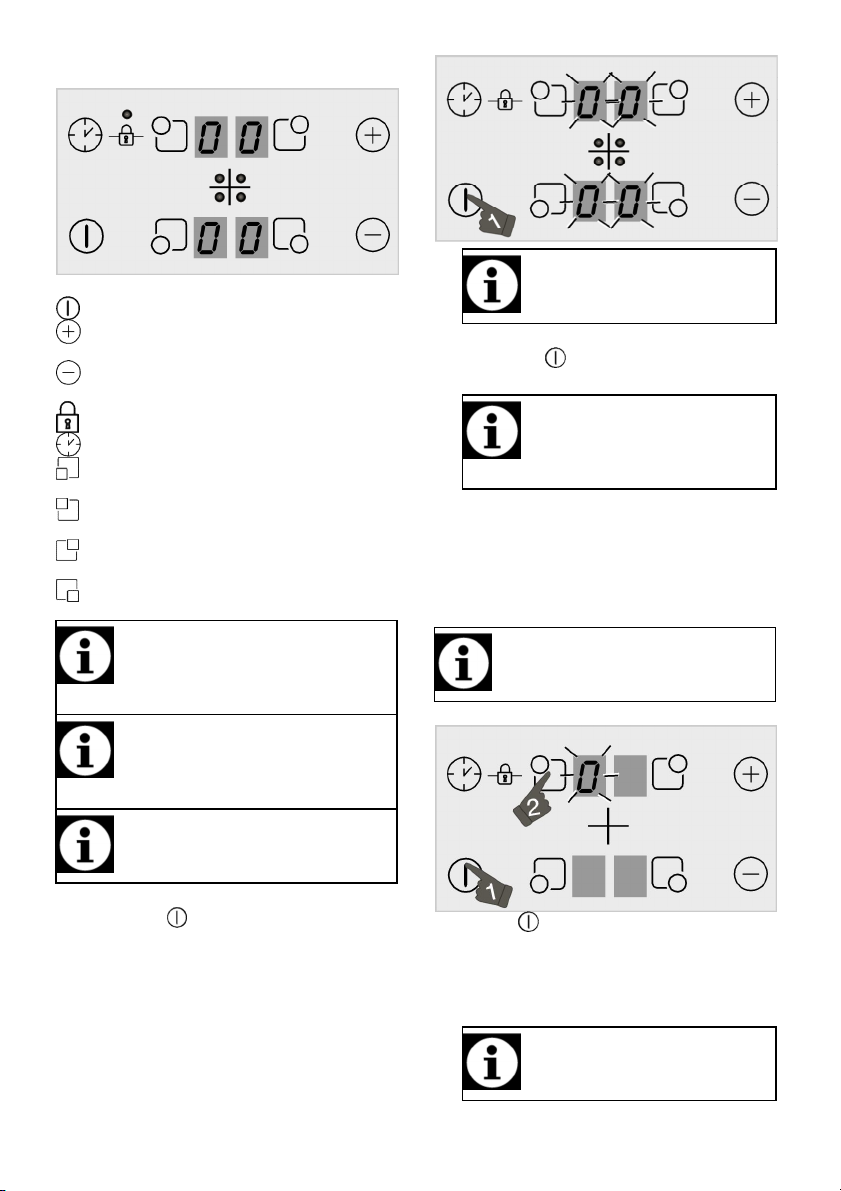
On / Off key
Temperature setting/Increasing
Temperature setting/Decreasing
Keylock
Enable/disable timer
Front Left Cooking Zone Selection
Rear Left Cooking Zone Selection
Rear Right Cooking Zone Selection
Front Right Cooking Zone Selection
Graphics and figures are for informational
purposes only. Actual displays and functions
This product is controlled with a touch
Always keep the control panel clean and
If no operation is performed within 10
"H" or
"h" symbol that appears on the
When power is cut off, residual heat
If no operation is performed within 20
Control panel
Specifications
timer
timer
key
key
key
key
seconds, the hob will automatically
return to Standby mode.
Turning off the hob
1. Touch the " " key on the control panel.
The hob will turn off and return to Standby mode.
cooking zone display indicates that the
cooking zone is still hot. Do not touch
cooking zones.
Residual heat indicator
"H" symbol that appears on the cooking zone
display indicates that the hob is still hot and may
be used to keep a small amount of food warm.
This symbol will soon turn to "h" symbol
meaning less hot.
may vary according to the model of your
hob.
control panel. Each operation you make on
your touch control panel will be confirmed
by an audible signal.
dry. Having damp and soiled surface may
cause problems in the functions.
Turning on the hob
1. Touch the " " key on the control panel.
"0" icon appears on all cooking zone displays.
14/EN
indicator will not light up and does not warn
the user against hot cooking zones.
Turning on the cooking zones
1. Touch " " key to turn on the hob.
2. Touch the selection key of the cooking zone
you want to turn on.
"0" symbol appears on the cooking zone display
and the related display illuminates more brightly.
seconds, the hob will automatically
return to Standby mode.
Page 15
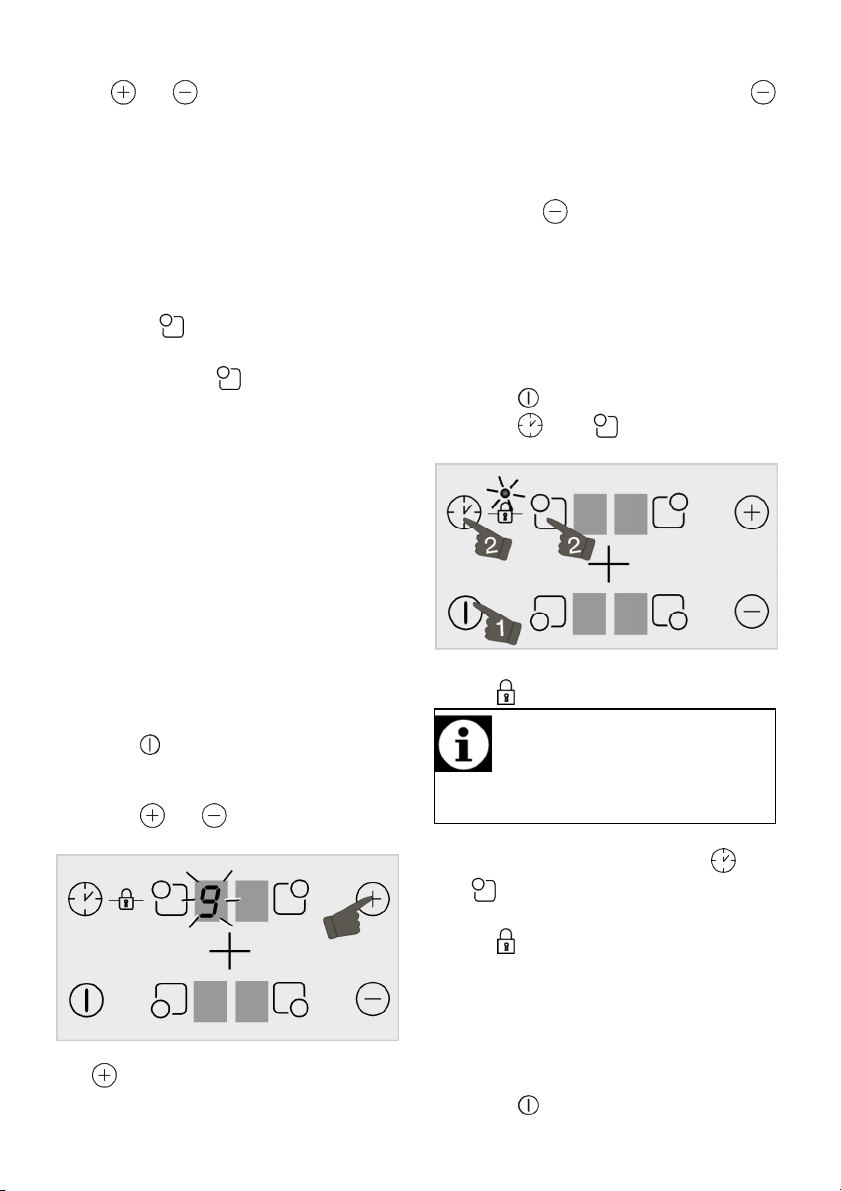
If you turn the hob off when the keys are
Setting the temperature level
Touch " " or " " keys to set the temperature
level between "1" and "9" or "9" and "1".
Turning off the cooking zones:
A cooking zone can be turned off in 3 different
ways:
1. By dropping the temperature level to "0"
You can turn the cooking zone off by
dropping the temperature adjustment to "0"
level.
2. By touching the relevant cooking zone
symbol " " for a certain time
Turn on the cooking zone by pressing
relevant symbol " " for a certain time to
drop temperature value to "0".
3. By using the turn-off on the timer option
for the desired cooking zone
When the time is over, the timer will turn off
the cooking zone assigned to it. "0" or "00"
will appear on related display.
When the time is over, an audible alarm will
sound. Touch any key on the control panel
to silence the audible alarm.
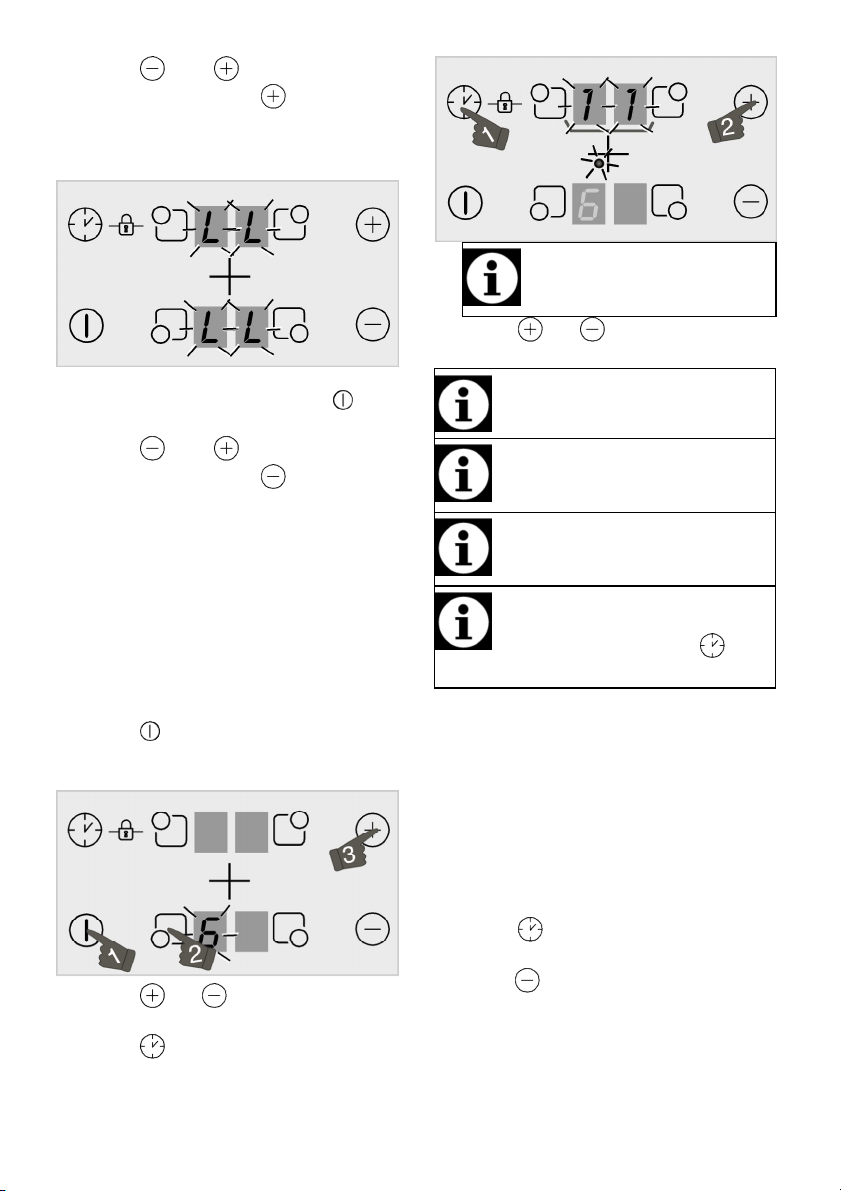
High Power (Booster)
For rapid heating, you can use booster function
“P”. However, this function is not recommended
for cooking a long time. Booster function may not
be available in all cooking zones.
Turning on High Power (Booster) :
1. Touch " " key to turn on the hob.
2. Select the desired cooking zone by touching
the cooking zone selection keys.
3. Touch " " or " " key firstly to reach the
level "9".
4. When the cooking zone is at level "9", touch
" " key once to set cooking zone
temperature to "P".
Turning off High Power (Booster) :
• To disable the Booster function, touch " "
and set the temperature to level "9".
Cooking zone goes out of booster and
continues to operate at level "9".
• You can decrease the temperature level by
touching " " or you can switch off the
cooking zone completely by decreasing the
temperature level to "0".
Keylock
You can activate the keylock to avoid changing
the functions by mistake when the hob is
operating.
Activating the keylock
1. Touch " " key to turn on the hob.
2. Touch " " and " " keys simultaneously
to activate the keylock.
» Keylock will be activated and the dot on the
symbol " " will light up.
locked, the keylock will be activated next
time you turn the hob on again. Key lock
must be deactivated in order to be able to
operate the hob.
Deactivating the keylock
1. When the keylock is active, touch " " and
" " keys simultaneously.
» Keylock will be de activated and the dot on the
symbol " " will disappear.
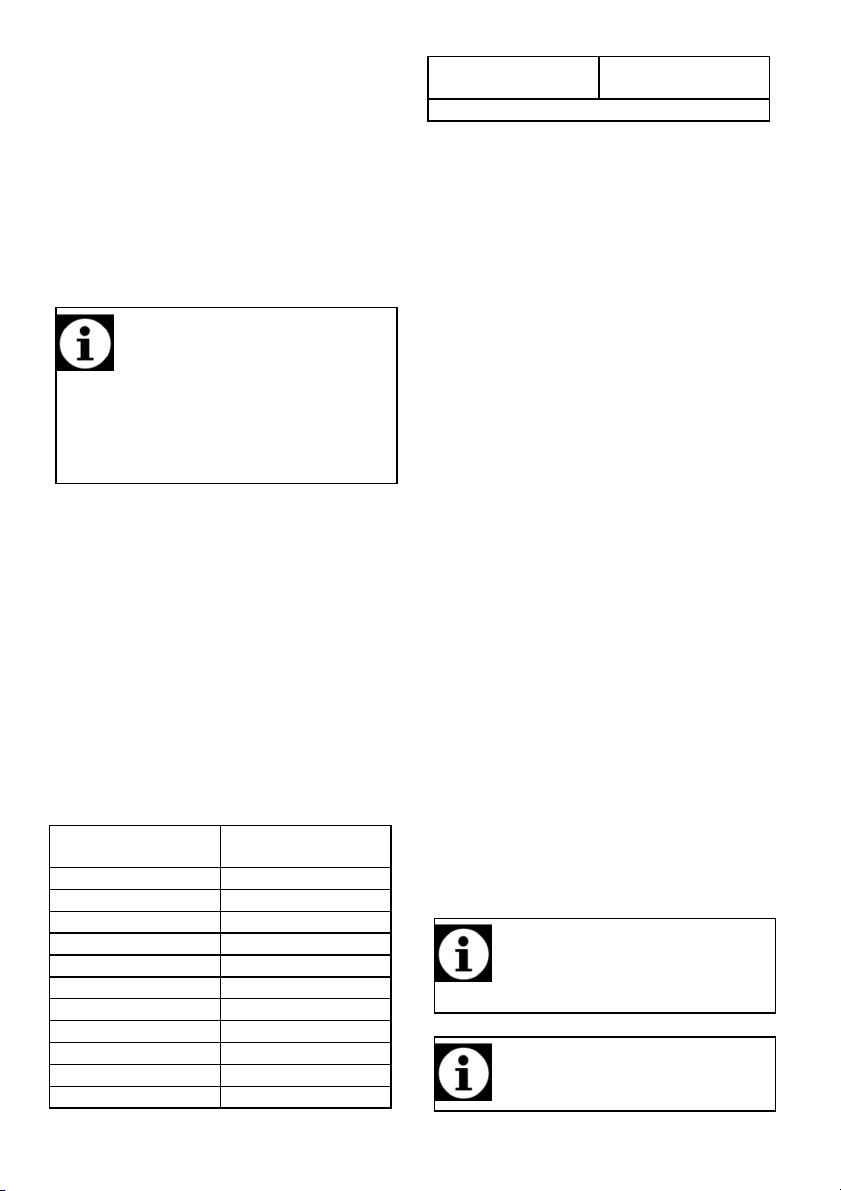
Childlock
You can protect the hob against being operated
unintentionally in order to prevent children from
turning on the cooking zone. Child Lock can only
be activated and deactivated in Standby mode.
Activating the childlock
1. Touch " " key to turn on the hob.
15/EN
Page 16
Right rear and left rear cooking zone
The timer can only be set for the cook
ing
Repeat the above procedures for the other
Timer cannot be adjusted unless the
When the cooking zone for which a timer
2. Touch " " and " " keys simultaneously
After “bip” signal touch " " to activate the
childlock.
» Childlock will be activated and "L" symbol
appears on all cooking zone display.
Deactivating the childlock
1. When the keylock is active, touch " " key to
turn on the hob.
2. Touch " " and " " keys simultaneously
After “bip” signal touch " " to deactivate
the childlock.
» Childlock will be deactivated and "L" symbol
disappears on all cooking zone display.
Timer function
This function facilitates cooking for you. It will not
be necessary to attend the oven for the whole
cooking period. Cooking zone will be turned off
automatically at the end of the time you have
selected.
Activating the timer
1. Touch " " key to turn on the hob.
2. Select the desired cooking zone by touching
the cooking zone selection keys.
3. Touch " " or " " keys to set the desired
temperature level.
4. Touch " " key to turn the timer on.
"00" symbol will illuminate on timer display and
decimal point will appear on the selected cooking
zone display.
16/EN
displays serve as timer display when
the timer is active.
5. Touch " " or " " keys to set the desired
time.
zones already in use.
cooking zones for which you wish to set the
timer.
cooking zone and the temperature value for
the cooking zone are selected.
was set is selected, you can see the
remaining time by touching the " " key
again.
Deactivating the timer
Once the set time is over, the hob will
automatically turn off and give an audible
warning.
Press any key to silence the audio warning.
Turning off the timers earlier
If you turn off the timer earlier, the hob will carry
on operating at the set temperature until it is
turned off.
1. Select the cooking zone you want to turn off.
2. Touch " " key to turn the timer on.
3. Until "00" appears on the timer screen,
touch " " to set the value to "00".
Dot shaped light on the relevant cooking zone
display itself turns off completely after having
flashed for a certain period of time and the timer
is cancelled.
Page 17
Your hob can be equipped with induction
detects each vessel placed on them. Energy
Temperature level
Operation time limit
-
0 0 1 6 2 6 3 5 4 5 5 4 6 1,5
7 1,5
8 1,5 9 20 minutes
P (Booster)
5 minutes (*)
Temperature level
Operation time limit
-
(*) The hob will drop to level 9 after 5 minutes
If the surface of the touch control panel is
Keep the surface of the touch control panel
Using induction cooking zones safely and
efficiently
Operating principles: Induction hob heats
directly the cooking vessel as a feature of its
operating principles. Therefore, it has various
advantages when compared to other hob types. It
operates more efficiently and the hob surface
does not heat up.
Induction hob is equipped with superior safety
systems that will provide you maximum usage
safety.
cooking zones with a diameter of 145, 180,
210 mm depending on the model. With
induction feature, each cooking zone
builds up only where the vessel contacts
with the cooking zone and thus, minimum
energy consumption is achieved.
Operation time constraints
The hob control is equipped with an operation
time limit. When one or more cooking zones are
left on, the cooking zone will automatically be
deactivated after a certain period of time (see
Table-1). If there is a timer assigned to the
cooking zone, the timer display will also turn off
later.
Operation time limit depends on the selected
temperature level. Maximum operation time is
applied at this temperature level.
The cooking zone may be restarted by the user
after it is turned off automatically as described
above.
Table-1: Operation time limits
hour
hour
Overheating protection
Your hob is equipped with some sensors
ensuring protection against overheating.
Following may be observed in case of
overheating:
• Active cooking zone may be turned off.
• Selected level may drop. However, this
condition cannot be seen on the indicator.
Overflow safety system
Your hob is equipped with overflow safety system.
If there is any overflow that spills onto the control
panel, system will cut the power connection
immediately and turn off your hob. "F" warning
appears on display during this period.
Precise power setting
Induction hob reacts the commands immediately
as a feature of its operating principles. It changes
the power settings very fast. Thus, you can
prevent a cooking pot (containing water, milk and
etc.) from overflowing even if it was just about to
overflow.
Operating noisy
Some noises may arise from the induction hob.
These sounds are normal and a part of induction
cooking.
• Noise becomes prominent in high
temperature levels.
• Alloy of the saucepan can cause noise.
• In low levels, a regular on/off sound can be
heard because of the operating principles.
• Noise can be heard if an empty saucepan is
heated. When you put water or food in it,
this sound will clear away.
• The noise of the fan that cools electric
system can be heard.
exposed to intense vapor, entire control
system may become deactivated and give
error signal.
clean. Erroneous operation may be
observed.
17/EN
Page 18

supply before starting maintenance and
The surface might get damaged by some
Do not use harsh abrasive cleaners or sharp
Do not use steam cleaners to clean the
Sugar-based foods such as thick cream and
waiting the surface to cool down. Otherwise,
6 Maintenance and care
General information
Service life of the product will extend and the
possibility of problems will decrease if the
product is cleaned at regular intervals.
DANGER:
Disconnect the product from mains
cleaning works.
There is the risk of electric shock!
DANGER:
Allow the product to cool down before
you clean it.
Hot surfaces may cause burns!
• Clean the product thoroughly after each use.
In this way it will be possible to remove
cooking residues more easily, thus avoiding
these from burning the next time the
appliance is used.
• No special cleaning agents are required for
cleaning the product. Use warm water with
washing liquid, a soft cloth or sponge to
clean the product and wipe it with a dry
cloth.
• Always ensure any excess liquid is
thoroughly wiped off after cleaning and any
spillage is immediately wiped dry.
• Do not use cleaning agents that contain
acid or chloride to clean the stainless or
inox surfaces and the handle. Use a soft
cloth with a liquid detergent (not abrasive) to
wipe those parts clean, paying attention to
sweep in one direction.
detergents or cleaning materials.
Do not use aggressive detergents, cleaning
powders/creams or any sharp objects
during cleaning.
metal scrapers to clean the oven door glass
since they can scratch the surface, which
may result in shattering of the glass.
appliance as this may cause an electric
shock.
Cleaning the hob
Glass ceramic surfaces
Wipe the glass ceramic surface using a piece of
cloth dampened with cold water in a manner as
not to leave any cleaning agent on it. Dry with a
soft and dry cloth. Residues may cause damage
on the glass ceramic surface when using the hob
for the next time.
Dried residues on the glass ceramic surface
should under no circumstances be scraped with
hook blades, steel wool or similar tools.
Remove calcium stains (yellow stains) by a small
amount of lime remover such as vinegar or
lemon juice. You can also use suitable
commercially available products.
If the surface is heavily soiled, apply the cleaning
agent on a sponge and wait until it is absorbed
well. Then, clean the surface of the hob with a
damp cloth.
syrup must be cleaned promptly without
18/EN
glass ceramic surface may be damaged
permanently.
Slight color fading may occur on coatings or
other surfaces in time. This will not affect
operation of the product.
Color fading and stains on the glass ceramic
surface is a normal condition, and not a defect.
Page 19
• When the metal parts are heated, they may expand and cause noise. >>>
This is not a fault.
• The mains fuse is defective or has tripped. >>>
Check fuses in the fuse box. If necessary,
Consult the Authorised Service Agent or the dealer where you have purchased the product if you can not
implemented the instructions in this section. Never attempt to repair
7 Troubleshooting
Product emits metal noises while heating and cooling.
Product does not operate.
replace or reset them.
• Product is not plugged into the (grounded) socket. >>> Check the plug connection.
• If the display does not light up when you switch the hob on again. >>> Disconnect the
appliance at the circuit breaker. Wait 20 seconds and then reconnect it.
• Overheat protection is active. >>> Allow your hob to cool down.
• The cooking pot is not suitable. >>> Check your pot.
" " symbol appears on the cooking zone display.
• You have not placed the pot on the active cooking zone. >>> Check if there is a pot on the
cooking zone.
• Your pot is not compatible with induction cooking. >>> Check if your cooking pot is compatible
with induction hob.
• The cooking pot is not centered properly or the bottom surface of the pot is not wide enough for
the cooking zone. >>> Choose a pot wide enough and center the pot on the cooking zone
properly.
• Cooking pot or cooking zone is overheated. >>> Allow them to cool down.
Selected cooking zone suddenly turns off during operation.
• Cooking time for the selected cooking zone may be over. >>> You may set a new cooking time
or finish cooking.
• Overheat protection is active. >>> Allow your hob to cool down.
• An object may be covering the touch control panel. >>> Remove the object on the panel.
The pot does not get warm even if the cooking zone is on.
• Your pot is not compatible with induction cooking. >>> Check if your cooking pot is compatible
with induction hob.
• The cooking pot is not centered properly or the bottom surface of the pot is not wide enough for
the cooking zone. >>> Choose a pot wide enough and center the pot on the cooking zone
properly.
remedy the trouble although you have
a defective product yourself.
19/EN
Page 20

Filename: 185261296.doc
Directory:
\\Arbol17\mac\A_TCTOOLBOX_Ürünler\YERLI_OCAK_TCT_2008\ARCELIK\18526129
6_OI636
Template: D:\Documents and Settings\ar720007\Application
Data\Microsoft\Templates\Normal.dotm
Title:
Subject:
Author: Arcelik BT
Keywords:
Comments:
Creation Date: 02.10.2012 08:54:00
Change Number: 4
Last Saved On: 02.10.2012 08:59:00
Last Saved By: Arcelik BT
Total Editing Time: 5 Minutes
Last Printed On: 02.10.2012 08:59:00
As of Last Complete Printing
Number of Pages: 22 (approx.)
Number of Words: 6.458 (approx.)
Number of Characters: 36.812 (approx.)
 Loading...