

Page 1
7 BAND GRAPHIC EQUALIZER
7 BAND GRAPHIC EQUALIZER
7 BAND GRAPHIC EQUALIZER WITH SUBWOOFER
7 BAND GRAPHIC EQUALIZER WITH SUBWOOFER
CROSSOVER AND LEVEL CONTROL
CROSSOVER AND LEVEL CONTROL
1
Introduction
Welcome to the Arc Audio family of performance signal processors. A blend of
Arc Audio's lengthy experience in performance car audio design combined with
our highly skilled engineering staff. You are now the proud owner of the KEQ7. A
unique combination of the highest quality components and precision
engineering. Whether you are a competitor or simply enjoy faithfully reproduced
music, you will definitely appreciate how these products make your system
sound. Before you begin read this manual cover to cover (does anyone ever
really do that?). Careful design and layout of your system and following the
instructions and suggestion in this manual will greatly simplify installation of
this product. If at any point you begin to feel overwhelmed, return to your local
Arc Audio dealer and let the trained professionals install or tune it for you.
Warning
We build all ARC Audio products to play at high volumes for extended periods
of time. Your ears however are not designed for high volume listening. This
product can easily generate volumes that can permanently damage your
hearing. We urge you to limit your exposure to very high volume sound.
You may also find your state has laws governing the volume of an audio
system in a car. Please be aware of all local and state laws in you area.
A properly tuned and operated audio system will deliver years of enjoyment
when used properly.
Warning
Please check the suitability of the installation location before you begin. Do not cut
any of the car’s structure. Pay close attention to what is behind the panels or carpet.
Often the manufacture will hide wires, computers or other electronic devices in the
exact areas you wish to install in.
If you do not have experience with automotive electrical and mechanical systems
contact a professional installer. Paying a qualified installer is almost always cheaper
then paying a dealership to repair your car.
Running the Cables
Carefully run the power and signal cables through the passenger compartment
of the vehicle. Always use a rubber grommet to prevent the power wire from
shorting and to reduce the risk of fire.
Page 2
7 BAND GRAPHIC EQUALIZER
7 BAND GRAPHIC EQUALIZER WITH SUBWOOFER
CROSSOVER AND LEVEL CONTROL
2
FEATURES ______________________________________
1. Active gain preamplifiers with adjustable input sensitivity.
2. Volume control with up to 7 VRMS of output.
3. Seven band parametric equalizer with 12db Boost/Cut.
4. Sub out with independent volume control.
5.
Radio/DVD input selector.
6.
Universal half DIN chassis for ease of installation.
Installation Information
1. The KEQ 7 needs to be installed in the signal path between your source unit
and your external amplifier(s).
2. Physically mount the KEQ 7 near the drivers listening position. Make sure the
EQ is kept clean, cool, and dry. Don't mount it under a cup holder or in a storage
box were it will be covered with the stuff that always seems to collect in our
cars.
3. Hook up +12 volt power, ground, and remote turn-on. Make sure the ground is
perfectly clean and tight. Remove all the paint and under coat before you screw
it down. Don't trust the stock ground. Make a new one.
4. Connect the front output of you head unit to the front input of the KEQ 7.
5. Don't fix the EQ permanently into place until your gains have been set.
6. Adjust the "Input Level" control on your KEQ 7 to match the source unit's
output. With the head unit volume at about 75% of Max, adjust the gain control
slowly up until you begin to hear clipping or distortion. Now turn the gain down
slightly. This is your final gain setting.
7. Now the fun begins. With the EQ still out, begin adjusting the sub crossover.
Select the switch up and down and try to determine the best setting.
8. Now start tweaking the EQ controls. It's amazing how much a tiny adjustment
to your EQ frequency can change your system.
9. Enjoy the results
3
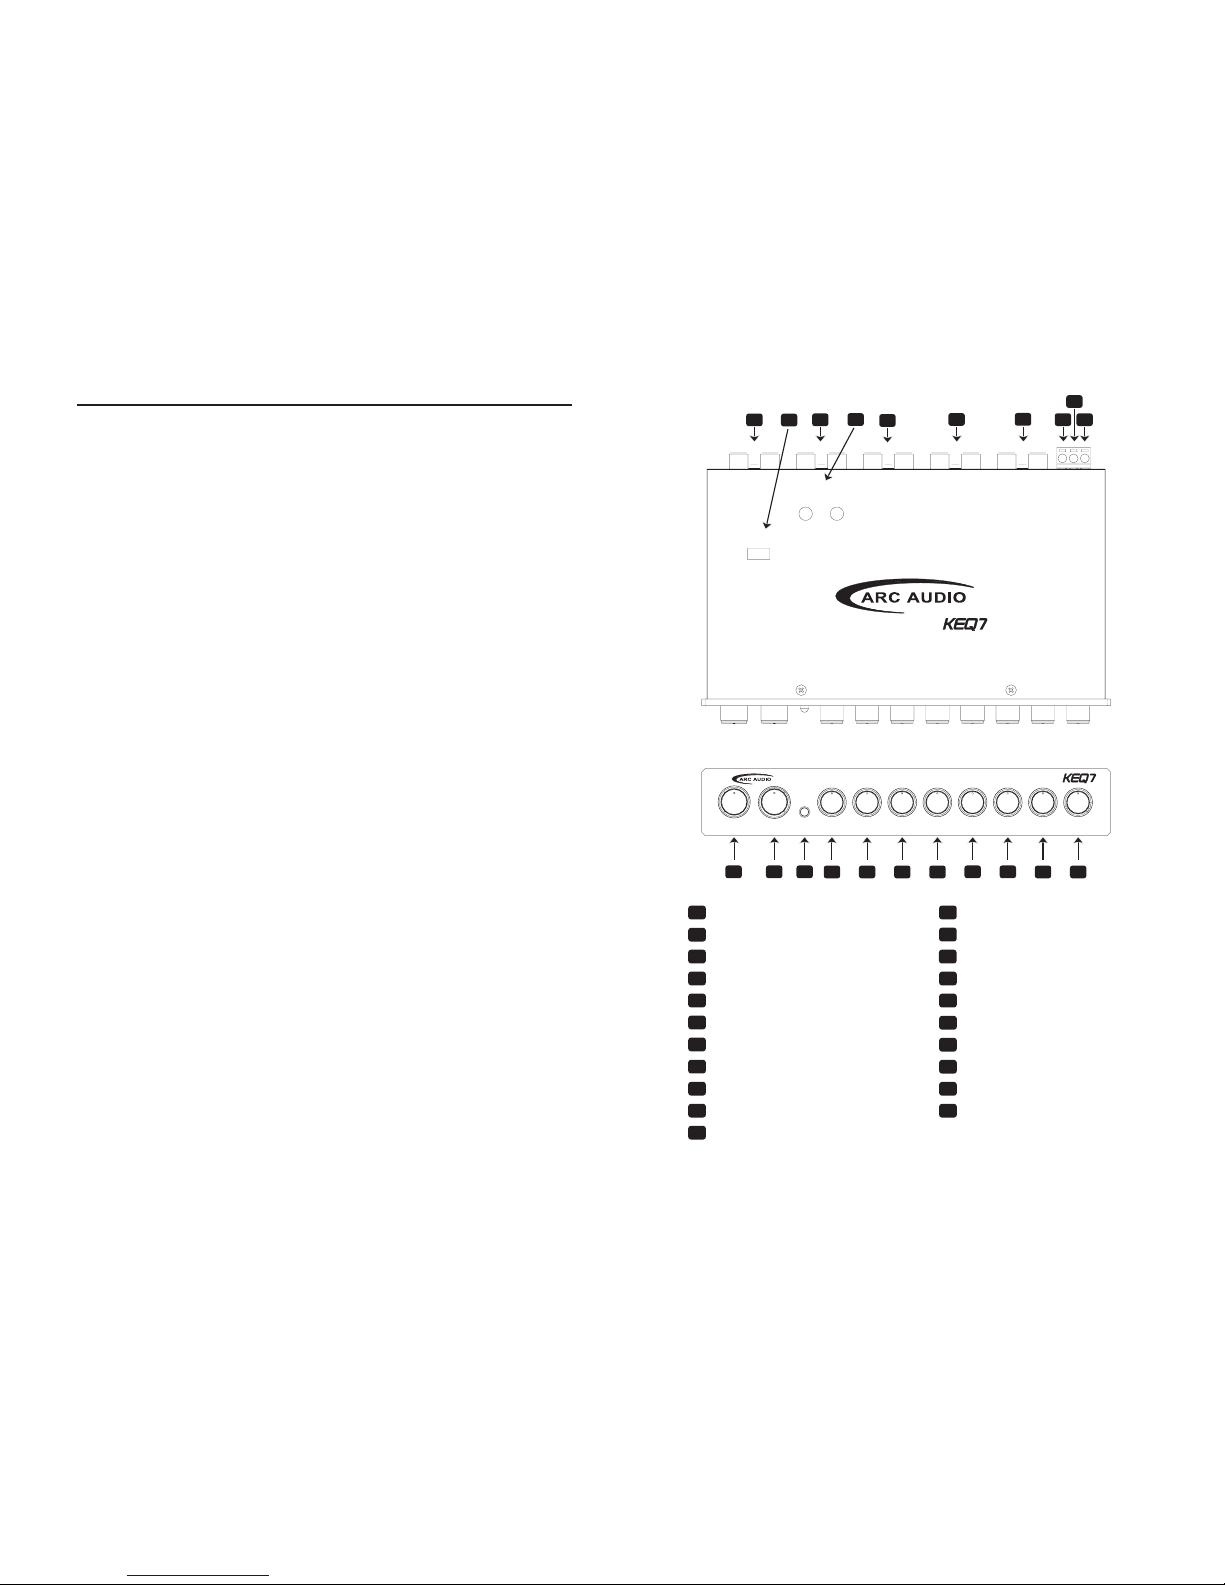
Sub Output
Low Pass Crossover
DVD (AUX) Input
DVD (AUX) Input Gain
Main Input
Rear Output
Front Output
Ground
Remote In
+12V (connect to constant power)
Sub Output Level Control
1
2
3
5
4 6 7 8
10
9
11
12
13
15
16
17
18
20
19
21
14
Master Volume Control
Input Selector Switch
Fader
50Hz (Bass) Frequency
125Hz (Mid-Bass) Frequency
315Hz (Mid Range) Frequency
750Hz (Mid Range) Frequency
2.2KHz (Mid Mid-High) Frequency
6KHz (High) Frequency
16KHz (High) Frequency
1
2
3
5
4
6
7
8
10
9
11
12
13
15
14
16
17
18
20
19
21
CONNECTIONS AND CONTROLS
SUB LEVEL
VOLUME DVD FADER 50Hz 125Hz 315Hz 750Hz 2.2KHz 6KHz 16KHz
+12 V
GND
REMOTE
SUB OUT
DVD INPUT
MAIN IN REAR OUT
FRONT OUT
LR
DVD GAIN
LOW PASS FREQ.
60Hz
90Hz
LRLRLRLR
7 BAND GRAPHIC EQUALIZER
7 BAND GRAPHIC EQUALIZER
7 BAND GRAPHIC EQUALIZER WITH SUBWOOFER CROSSOVER AND LEVEL CONTROL
7 BAND GRAPHIC EQUALIZER WITH SUBWOOFER CROSSOVER AND LEVEL CONTROL
Page 3

Typical System Configuration
(Your final configuration may very)
5
Remote Turn-on
+12 V
GND
REMOTE
SUB OUT DVD INPUT MAIN IN REAR OUT FRONT OUT
LR
DVD GAIN
LOW PASS FREQ.
60Hz 90Hz
LRLRLRLR
7 BAND GRAPHIC EQUALIZER
7 BAND GRAPHIC EQUALIZER
7 BAND GRAPHIC EQUALIZER WITH SUBWOOFER CROSSOVER AND LEVEL CONTROL
7 BAND GRAPHIC EQUALIZER WITH SUBWOOFER CROSSOVER AND LEVEL CONTROL
4
Sub Output: Connect to your Subwoofer amp or amps.
Sub Frequency Control: Be sure to make your final adjustments to the Sub
crossover before you mount the unit into the dash of your car. You will need to
complete your tuning first.
DVD Input: Connect any extra source to this input. It’s very useful for MP3 players
as well as DVD or Game consoles.
DVD Gain: The DVD gain is used to match the level of your main input.
Input: Main Input should be a full range signal from the head unit. If you are
using the Sub Direct Input the signal could be crossover but the EQ will function
better if you feed it a full range signal.
Rear Output: Just like it sounds, this is connected to the rear amp.
Front Output: Simply connect to the amplifier driving the front speakers. This is a
full range output so if you plan to run it hard you should use a crossover at this
point.
Power Connector: 12 Volt +, Remote and Ground. We recommend using a
dedicated 12 Volt+ from the battery and a fresh ground. Remember this EQ has
an volt output. It takes a good amount of current to run.
Sub Volume: Or Sub Out level, gives you total control of the Sub Gain at any
time.
Master Volume: Controls all Output including the "Sub Out". It is very handy to
have one volume under your thumb for "Fast" and easy control.
DVD Input Selector: When this button is pushed in the KEQ 7 will take its input
from the DVD input. If you have nothing connected to this input you will have no
output.
Fader: Full front/rear control to keep the people in the back seat happy.
EQ Frequency Controls: If you know what an EQ does, you most likely know
what these do. We've crammed 7 bands into the KEQ 7, for ultimate control at
your fingertips.
1
2
3
5
4
6
7
8
10
11
12
13
15
14
21
,
,
7 BAND GRAPHIC EQUALIZER
7 BAND GRAPHIC EQUALIZER WITH SUBWOOFER CROSSOVER AND LEVEL CONTROL
Page 4

Specifications
6
EQ Frequencies (Bands) 50Hz, 125Hz, 315Hz, 750Hz,
2.2KHz, 6kHz, 16kHz
Boost/Cut 12dB
S/N Ratio 100dB
Frequency Response 10Hz - 50kHz +/-1dB
Maximum Output Voltage 7VRMS
THD 0.005%
Input Sensitivity 50mV- 3VRMS
Head Room 20dB
Input Impedance 20k Ohms
Output Impedance 2k Ohms
Stereo Separation 82dB/1kHz
Operating Voltage 11V- 15V
Size 1-1/8"H x 7"W x 4"H
7 BAND GRAPHIC EQUALIZER
7 BAND GRAPHIC EQUALIZER WITH SUBWOOFER CROSSOVER AND LEVEL CONTROL
ARC Audio Warranties all new products against defects in materials and workmanship
for a period of ONE (1) YEAR from the original date of purchase from an AUTHORIZED ARC
AUDIO RETAILER.
The warranty is not transferable and applies only the original purchaser of the product
from an authorized ARC AUDIO retailer. Upon inspection by ARC AUDIO should service be
necessary under warranty for any reason due to manufacturer defects ARC AUDIO will, at its
discretion, repair or replace the defective product with new or similar condition product at no
charge.
THIS WARRANTY DOES NOT COVER INSTALLATION OR DAMAGE
RESULTING FROM ACCIDENT, MISUSE, ABUSE, IMPROPER WIRING, OPERATION
OUTSIDE OF THE MANUFACTURERS SPECIFICATIONS, OR AGAINST THE
INSTRUCTIONS IN THE OWNERS MANUAL. IN ADDITION ANY PRODUCT THAT
HAS BEEN OPENED, TAMPERED WITH OR MODIFIED, OR IF ANY SERIAL
NUMBERS HAVE BEEN REMOVED OR ALTERED WILL NOT BE COVERED BY ANY
PART OF THE MANUFACTURERS WARRANTY.
All warranty returns should be sent to ARC AUDIO freight prepaid and must be
accompanied by proof of purchase (a copy of the original sales receipt). Direct returns from
consumers or non-authorized retailers will be refused unless specifically authorized by ARC
AUDIO with a valid return authorization number.
All warranty returns must be packaged in original packaging and be accompanied
by a copy of the original printed sales receipt. Product damaged in shipment due to improper
packaging will not be covered under this warranty and the customer or retailer will be
charged full cost to repair the specific piece of product back to a like new or similar
condition.
In no event will ARC AUDIO be liable for incidental, consequential, or other damages
resulting from the use of this product. This includes, but is not limited to, damage of hearing,
property or person, damage based upon inconvenience or on loss of use of the product, and to the
extent permitted by law, damages for personal injury. This warranty gives you specific legal rights,
and you may have other rights, which vary from state to state. This warranty applies to products
sold and used in the United States of America. In all other countries please contact your distributor.
For warranty and non-warranty repairs, send to:
ARC Audio
4719 Green Leaf Cr. #4
Modesto CA, 95356
209-543-8706
 Loading...