

Page 1

FD Series
FD5000 FD6000
Installation Manual
INTRODUCTION
Thank you for choosing ARC Audio’s Foose Designs
line of hi-performance mobile audio products. We hope
you enjoy your experience with all our products and we
welcome any questions or comments you may have.
Specifications
FD5000 FD6000
Diameter 5 ¼” Diameter 6 ½”
Musical Power 140 watts Musical Power 175 watts
Nor. Power 75 watts Nor. Power 90 watts
Sensitivity 87db Sensitivity 87db
Frequency
response
IMP. 4 Ohm IMP. 4 Ohm
Protection PTC Protection PTC
Most speaker damage occurs as a result of amplifier
distortion also known as “Clipping”. Clipping occurs
when an amp is driven beyond its maximum rated
output. This kind of distortion can be hard to hear
unless you know what to listen for. Any time you hear
a harsh ear piercing sound at hi volume your amp is
probably clipping.
70hz20Khz
Frequency
response
1
CAUTION:
60hz20Khz
Page 2
Please check the suitability of the installation
location before you begin. Do not cut any of the
car’s structure. Pay attention to the mechanism of
the window and door.
If you do not have experience with automotive
electrical and mechanical systems contact a
professional installer. Paying a qualified installer is
almost always cheaper then paying a dealership to
repair your car.
THE INSTALL
Install the Woofer
After you have found the best location for the
woofer make or enlarge the mounting hole. Make
sure the opening is just large enough for the woofer
to fit tightly with no gaps. Make sure the surface is
flat and that the speaker does not bind up in the
opening. Use an awl or felt pen to mark the panel
and drill the screw holes without the speaker in
place. This will save the costly mistake of punching
a hole in one of your new speakers. Install the
woofer with the grill ring using the 4 screws
provided with this system. Firmly seat the grill into
its ring.
2
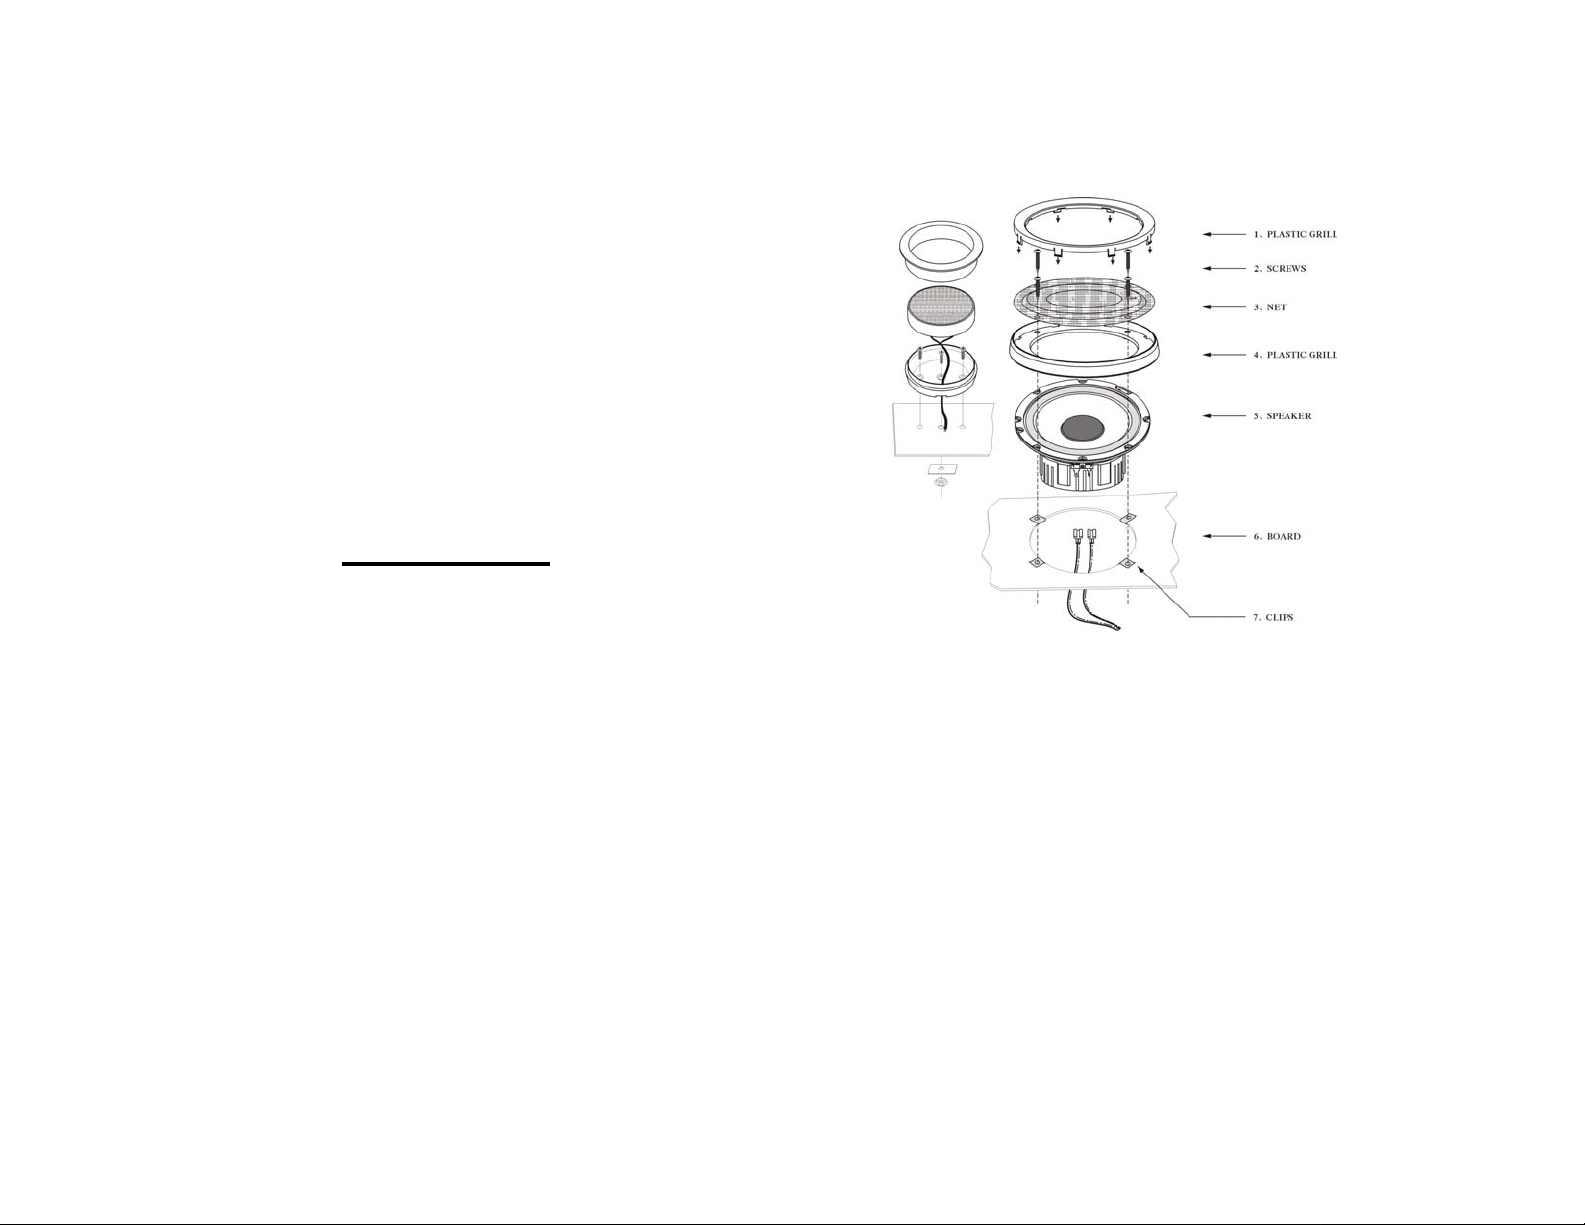
Remove the grill from the trim ring first then follow
the steps below installation.
1. Place the speaker in the opening with the
trim ring over it.
2. Screw the trim ring through the panel with
the clips beneath.
3. Install the grill into the trim ring. Add a few
drops of glue if necessary.
4. Snap in the finish ring.
3
Page 3

Install the Tweeter
The tweeter comes with 2 different types of
mounts. Flush mount and Surface mount.
Flush Mount
Cut a hole in the panel you wish to install in.
Assemble the tweeter in the mount. Make sure the
hole is large enough for the tweeter and install it
through the hole. Firmly install the retainer to the
back of the tweeter. Reinstall the panel and point
the tweeter at a location between the driver and
passenger at ear level.
Surface Mount
Hold the back piece for the mount in place and
mark the screw locations. Pre drill the screw holes
and the hole for the wire. Screw the mount to the
panel tightly. Run the wire through the hole and
gently pull it until the tweeter is fully seated in the
mount. Install the retainer and point the tweeter.
Crossovers
Install the Crossover in a dry location and secure it
firmly. Don’t just drop it in the bottom of the door.
4
Wiring
When wiring this system it is important to make all
connections carefully and securely. Follow the
instructions carefully. All audio connections have a
+ and -. If one is wired backward the system will
play but will sound strange. One speaker will play
Out of Phase (backwards) from the others. You
may notice a loss of bass response and the vocals
will not be in the center of the sound field.
Connect the Woofer
Using the wire provided with the system connect
the positive and negative to the woofer. Run these
wires to the crossover and connect them to the
terminals marked Woofer + and -.
Connect the Tweeter
Connect the positive and negative to the tweeter.
Run these wires to the crossover and connect them
to the terminals marked Tweeter + and -.
Connect the Amp
Connect the positive and negative to the amplifier
output. Run these wires to the crossover and
connect them to the terminals marked Input +and-.
5
Page 4

A Few Do’s and Don’ts
• Always use the crossovers. To leave the
crossover out will result in almost certain
damage to the component speakers.
• Care must be taken not to mix the tweeter and
woofer connections. The system will not work
and may be damaged.
• Do not add more speakers to the crossover.
The crossover is designed for the speakers
provided only.
If you have any Question about this product please
call ARC Audio Technical Service:
209-543-8706
6
LIMITED WARRANTY
Before shipping this product back for service call for a Return Authorization
number. This number must be clearly marked on the outside of the box.
Terms & Conditions: ARC Audio warranties the unit to be free of any mate rial defects
or defects in workmanship for a period of one year and will repair this unit or any part
thereof only if it proves to be defective as a result of normal use.
warranty service on this product, the owner must promptly register by filling in and
mailing the Warranty Registration Card.
Our obligation under this warranty is limited to repairing only the defective components
of the unit thereof when it is returned, shipping prepaid, to ARC Audio.
This warranty is to be considered void if the unit has been tampered with, connected
contrary to the installation instructions in the owner’s manual, altered, damaged by
improper input voltages or polarity, defaced, or treated in a negligent manner.
All returns must be sent freight prepaid, along with $10.00 to cover return shipping and
handling.
Out of warranty service is available after the warranty expires. Cost of repair is based on
current repair labor rates, plus the cost of shipping and handling. When returning for
repair, pack the unit securely and send prepaid and insured to the address below. ARC
Audio is not responsible for damage incurred during shipping.
For warranty and non-warranty repairs, send to:
ARC Audio
4719 Green Leaf Cr. #4
Modesto CA, 95356
___________________________________________
In order to receive
 Loading...