

Page 1
DXE
DIGITAL CROSSOVER EQUALIZER
MANUAL AND USER GUIDE
DXE
DIGITAL HYBRID EQ/CROSSOVER
FULLY BALANCED SIGNAL FROM
HEAD UNIT TO CONTROL UNIT.
GREEN DOT MATRIX DISPLAY
REMOTE CONTROLLER.
DUAL INPUT.
5 BAND PARAMETRIC EQ.
MICROPROCESSOR CONTROLLED.
12/24 DB HIGH PASS CROSSOVER.
3 STEREO PLUS SUMMED SUB
AND CENTER OUTPUTS.
12/24/48 DB SUB CROSSOVER.
Page 2

DXE Manual
Table of Contents
Introduction 1
Features 2
Installation Procedures 3
EQ Controls 4
Crossover Controls 6
Crossover Connections 7
Example System Active 2 way 8
Example System Active 3 way 9
Example System Active 4 way 10
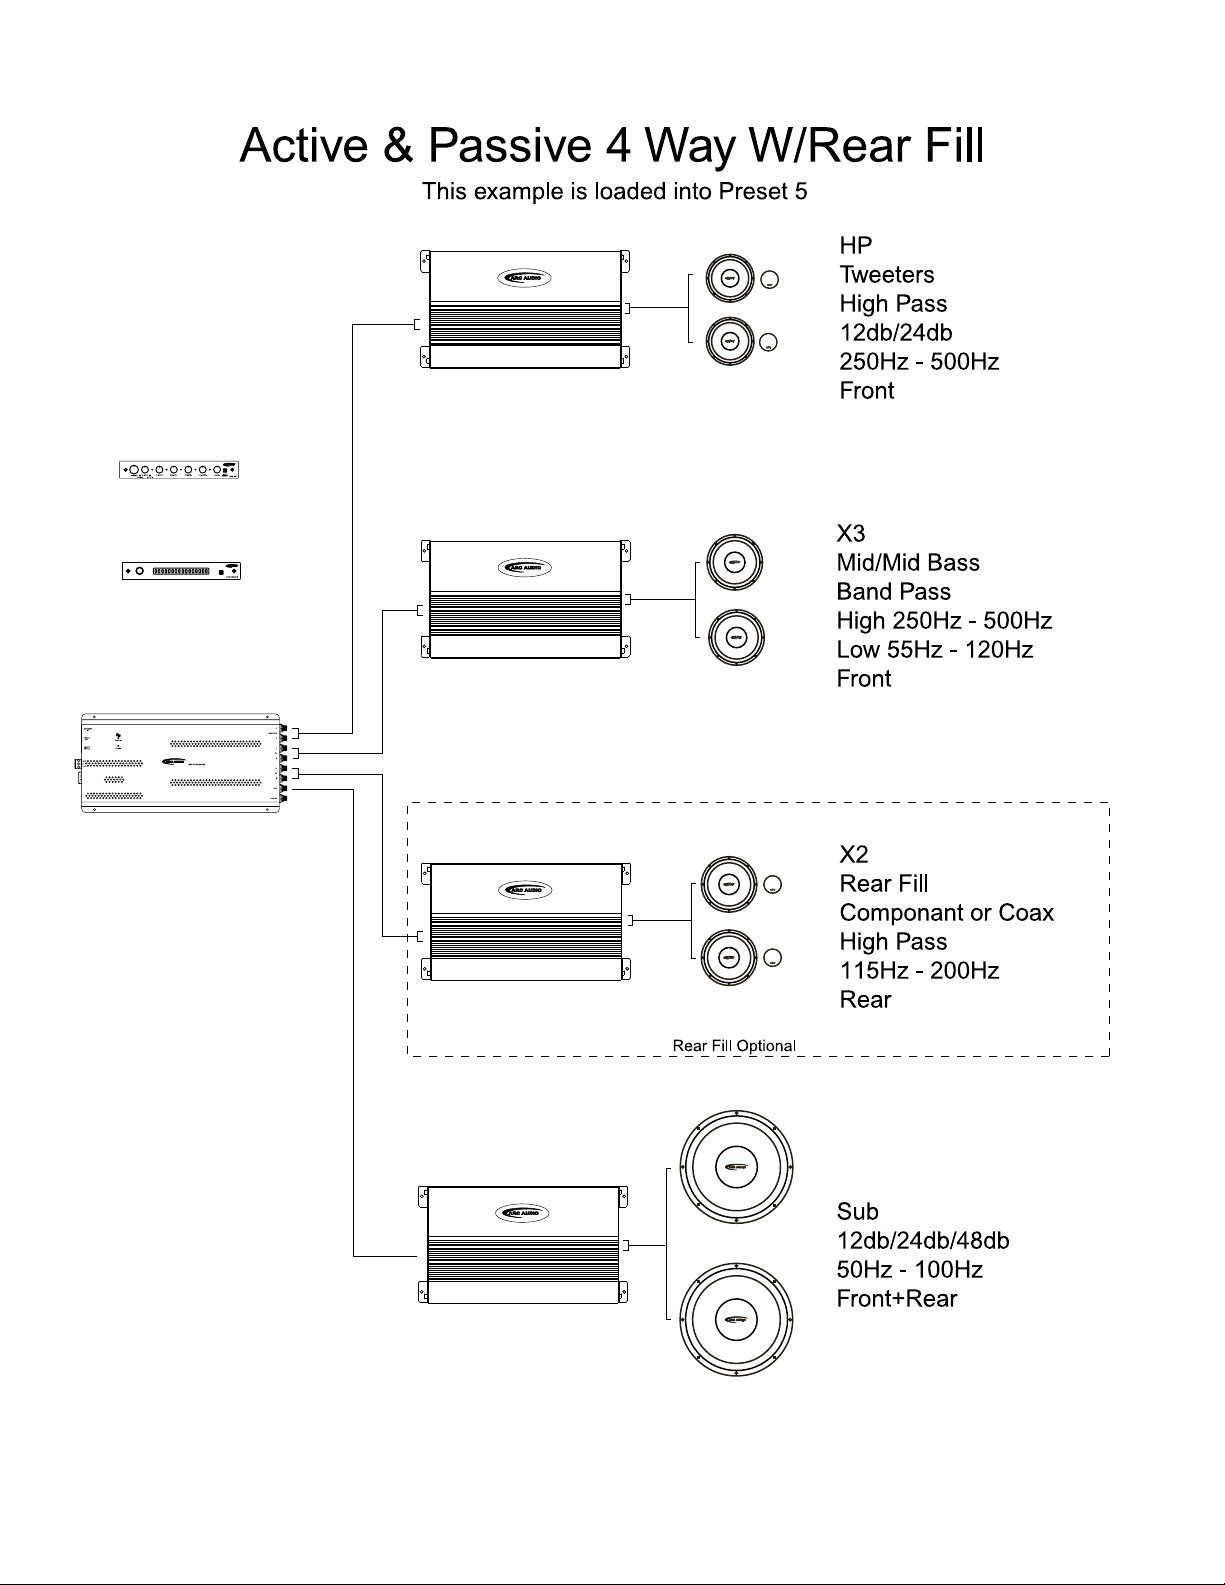
Example System Active & Passive 4 way 11
High Pass Crossover Menus 12
X3 Crossover Menus 13
X2 Crossover Menus 14
Sub Crossover Menus 15
Recalling Presets 16
Changing the Welcome Screen 16
Menu Map 17
Specifications 18
Introduction
Welcome to the Arc Audio family of performance signal processors. A blend of Arc Audio’s
lengthy experience in performance car audio design combined with the legendary engineering
skills of Robert Zeff and the staff at Nikola Engineering. You are now the proud owner of the long
anticipated DXE, A unique combination of the highest quality analog EQ-crossover and precision
digital control we call
reproduced music, you will definitely appreciate how the DXE makes your system sound.
This component isn’t the easiest to understand and use. It requires a good understanding of
audio and the terms and language used to describe it. You don’t have to be a genius but a bit of
experience and common sense will go a long way.
This manual is written in two parts
and complete the “System Configuration Worksheet” (make a bunch of copies) included in this
manual. Carefully design your system and decide on your basic crossover points. This will give
you a good starting point and a reference to return to when you begin final tuning. If at any point
you begin to feel overwhelmed, return to your local Arc Audio dealer and let the trained
professionals install or tune it for you.
Digital Hybrid
. Whether you are a competitor or simply enjoy faithfully
Installation
Configuration/Tuning
and
. Before you begin find
1
Page 3

10
Page 4
11
Page 5

Configuration and Tuning
High Pass Crossover
Crossover Frequency
Hold the Select button for 2 seconds to advance to the next menu. Repeat this step until you get to the
Frequency Menu
Crossover Slope Adjustments
Hold the Select button for 2 seconds to advance to the next menu. Repeat this step until you get to the
Range Menu
High Range Option
For Very High Frequency crossover points;
Hold the Select button for 2 seconds to advance to the next menu. Repeat this step until you get to the
Range Menu
Gain Adjustments
Hold the Select button for 2 seconds to advance to the next menu. Repeat this step until you get to the
Gain Menu
Source Assignment
Hold the Select button for 2 seconds to advance to the next menu. Repeat this step until you get to the
Source Menu
12dB/24dB pre octave.
16Hz – 7100Hz
12dB/24dB Per Octave Stereo
Tap the Select button until you reach the
.
(High Pass) Frequency.
HP:
Turn the knob either direction to raise or lower the Frequency
.
.
Tap the Select button until you reach
Turn the knob either direction to select
.
Tap the Select button until you reach the
Turn the knob either direction to Select High (167Hz – 7100Hz) or Low (16Hz – 710Hz.
the
HP Slope
HP Range
12dB
:
or
:
24dB
.
.
Tap the Select button until you reach the
Turn the knob either direction to increase or decrease the Gain.
.
Tap the Select button until you reach the
Turn the knob either direction to set the High Pass as
HP Level
HP SRC
:
:
Front
or
Rear
.
12
Page 6

Crossover 3 (X3)
High Pass = 167Hz-7100Hz
Low Pass = 167Hz-7011Hz
Band Pass High=167Hz-7100Hz
Band Pass Low= 16Hz-710Hz
Crossover Mode
Hold the Select button for 2 seconds to advance to the next menu. Repeat this step until you get to the
Range Menu
Crossover Frequency
Hold the Select button for 2 seconds to advance to the next menu. Repeat this step until you get to the
Frequency Menu
Band Pass Mode Frequency Adjustment
Hold the Select button for 2 seconds to advance to the next menu. Repeat this step until you get to the
Frequency Menu
Gain Adjustments
Hold the Select button for 2 seconds to advance to the next menu. Repeat this step until you get to the
Gain Menu
Source Assignment
Hold the Select button for 2 seconds to advance to the next menu. Repeat this step until you get to the
Source Menu
12dB per Octave
.
Tap the Select button until you reach the
Turn the knob either direction to Select;
Tap the Select button until you reach the
Pass)
Note:
adjustment.
Frequency.
In High Pass or Low Pass the Band Pass frequency option will not be available for
.
Turn the knob either direction to raise or lower the Frequency.
X3 Mode
X3 HP:
:
HIGH, LOW, BAND
(
High Pass) or
.
Tap the Select button until you reach the
Turn the knob either direction to raise or lower the Frequency.
This will adjust the point this crossover begins to filter out the High Frequencies.
Note:
Tap the Select button until you reach the
This will adjust the point this crossover begins to filter out the Low Frequencies.
Note:
Turn the knob either direction to raise or lower the Frequency.
X3 Hi:
X3 Low:
.
Tap the Select button until you reach the
Turn the knob either direction to increase or decrease the Gain.
X3 Level
:
.
Tap the Select button until you reach the
Turn the knob either direction to set the High Pass as
X3 SRC
:
Front
or
X3 LP:
or
Rear
FULL
Low
(
.
13
Page 7

Crossover 2 (X2)
High Pass = 115Hz-4900Hz
Low Pass = 115Hz-4900Hz
Band Pass Low= 16Hz-710Hz
Band Pass High=115Hz-4900Hz
12dB per Octave
Crossover Mode;
Hold the Select button for 2 seconds to advance to the next menu. Repeat this step until you get to the
Range Menu
.
Tap the Select button until you reach the
X2 Mode
:
Turn the knob either direction to Select;
HIGH, LOW, BAND
or
FULL
Crossover Frequency
Hold the Select button for 2 seconds to advance to the next menu. Repeat this step until you get to the
Frequency Menu
In High Pass or Low Pass the Band Pass frequency option will not be available for
Note:
adjustment.
.
Tap the Select button until you reach the
Pass)
Frequency.
Turn the knob either direction to raise or lower the Frequency.
X2 HP:
(High Pass) or
X2 LP:
Low
(
Band Pass Mode Frequency Adjustment
Hold the Select button for 2 seconds to advance to the next menu. Repeat this step until you get to the
Frequency Menu
This will adjust the point this crossover begins to filter out the High Frequencies.
Note:
This will adjust the point this crossover begins to filter out the Low Frequencies.
Note:
.
Tap the Select button until you reach the
Turn the knob either direction to raise or lower the Frequency.
Tap the Select button until you reach the
Turn the knob either direction to raise or lower the Frequency.
X2 Hi:
X2 Low:
Gain Adjustments
Hold the Select button for 2 seconds to advance to the next menu. Repeat this step until you get to the
Gain Menu
.
Tap the Select button until you reach the
Turn the knob either direction to increase or decrease the Gain.
X2 Level
:
Source Assignment
Hold the Select button for 2 seconds to advance to the next menu. Repeat this step until you get to the
Source Menu
.
Tap the Select button until you reach the
Turn the knob either direction to set the High Pass as
X2 SRC
:
Front
or
Rear
14
.
Page 8

The DXE Menus
Sub Crossover
12dB/24dB/48dB mono
4Hz – 152Hz
Crossover Frequency
Hold the Select button for 2 seconds to advance to the next menu. Repeat this step until you get to the
Frequency Menu
Crossover Slope Adjustments
Hold the Select button for 2 seconds to advance to the next menu. Repeat this step until you get to the
Range Menu
Adjustable Phase
To reverse the Phase of the Sub Output;
Hold the Select button for 2 seconds to advance to the next menu. Repeat this step until you get to the
Range Menu
Tap the Select button until you reach the
.
Tap the Select button until you reach the
.
Tap the Select button until you reach the
.
Sub:
Turn the knob either direction to raise or lower the Frequency.
Sub Slope
Turn the knob either direction to select
Sub Phase
(Subwoofer) Frequency
:
12dB, 24dB, 48dB
:
.
or
Full
.
Turn the knob either direction to Select
0 or
180
.
Gain Adjustments
Hold the Select button for 2 seconds to advance to the next menu. Repeat this step until you get to the
Gain Menu
.
Tap the Select button until you reach the
Turn the knob either direction to increase or decrease the Gain.
Sub Level
:
Source Assignment
Hold the Select button for 2 seconds to advance to the next menu. Repeat this step until you get to the
Source Menu.
Tap the Select button until you reach the
Turn the knob either direction to set the Sub output as
Front+ Rear
Note:
output as you fade. This is to compensate for the lose of output when the front or
rear speakers are turned down.
Front+ Rear
.
is non-fading but you will notice a slight lose of
Sub
:
Front, Rear
or
15
Page 9

To Change the Presets,
The DXE has six memory presets. With six different system
configurations, almost anything is possible.
Hold the Select button for 2 seconds to advance to the next menu. Repeat this step until
you get to the
Presets
Turn the knob either direction to select the
Tap the Select button to Recall the setting saved in this
menu.
Preset
you wish.
Preset
.
Note: No need to save your settings before you e xit. They will be saved
automatically
Personal Options Menu
Hold down the select button while you turn the unit on.
Use the knob to select from the following options.
Splash Screen
Credits
VER.1.00
To Change the (Welcome)
Hold down the select button while you turn the unit on.
Use the knob to move between letters.
When you are finished push and hold the button for 2 seconds to return to
the Crossover menus.
Factory Default
In the event that the unit should stop responding to commands or b ecome
unstable you can reset the processor by using the
command.
Software Version Information
This menu provides the Software version and date coding information.
This information may be necessary to receive service.
Factory Defaults
Splash Screen
When you have the letter you wish to change highlighted
push the button to select it.
Turn the knob up or down to change the letter.
Push the knob to set the new letter in place
Use the knob to move to the next letter.
Factory Defaults
16
Page 10

The DXE Menus
1: Freq Menu
1: Sub: 65.4 Hz
2: X2 HP 0115 Hz
3: X2 (HP)
4: X3 Hi: 3508 Hz
5: X3 Low: 0075 Hz
6: HP: 3508 Hz RH
2: Gain Menu
X2 Level: -04dB
X3 Level: -00dB
Ctr level: -90dB
Sub Level: +10dB
HP Level: -00dB
3: Range menu
X2 Mode: High
X3 Mode: Band
Sub Slope: 24dB
HP Slope: 24dB
Sub Phase: 0
HP Range: High
4: Source menu
X2 SRC: REAR
X3 SRC: FRONT
SUB FRONT+REAR
HP SRC: FRONT
5: Preset: 2
The Frequency Menu adjusts all the
crossover points that are available in
the current configuration.
In this example X2 is in high pass so
the Low frequency is not displayed.
All output gains are adjusted here.
The Sub Level has a +10db boost.
All the remaining output level range
from –90dB to –00dB.
In the Range Menu you select
crossover types and slopes. You can
also change the sub phase 0 or 180.
Select Front or Rear output. This
sets the fader control from the EQ.
Only the Sub channel has the
Front + Rear option.
To change to a new preset turn the
rotate the knob to bring up the preset
you wish to use then just tap the
button once.
When the menu changes the old
settings will be saved automatically.
17
Page 11

Specifications
Max input level 8 volts RMS
Input sensitivity 8V (0 dB), 2V (10 dB), 700mV(20 dB)
Max output level 10 volts RMS
Input impedance
Minimum output impedance 600 ohms
Harmonic distortion + Noise < .005
Frequency response +-.2dB
Separation At 1 KHz “A” weighted > 78 dB
Signal to Noise “A” weighted > 108 dB
5 Filters with +-15 dB at
Current requirements. 1.2 amps
47.5 K ohm
20Hz-50Hz with Q of 2
50Hz-100Hz with Q of 1.4
100Hz-1Khz wit Q of 1.1
1KHz-10KHz with Q of 1.1
10KHz-20KHz with Q of 1.1
18
Page 12

LIMITED WARRANTY
Before shipping this product back for service call for a Return Authorization number. This number must be clearly
marked on the outside of the box.
Terms & Conditions:
workmanship for a period of one year and will repair or replace at our discretion; this unit or any part thereof
only if it proves to be defective as a result of normal use. In order to receive warranty service on this product,
the owner must promptly register by filling in and mailing the Warranty Registration Card.
Our obligation under this warranty is limited to repairing only the defective components of the unit thereof
when it is returned, shipping prepaid, to ARC Audio.
This warranty is to be considered void if the unit has been tampered with, connected contrary to the installation
instructions in the owner’s manual, altered, damaged by improper input voltages or polarity, defaced, or treated
in a negligent manner.
All returns must be sent freight prepaid, along with $10.00 to cover return shipping and handling.
Out of warranty service is available after the warranty expires. Cost of repair is based on current repair labor
rates, plus the cost of shipping and handling. When returning for repair, pack the unit securely and send
prepaid and insured to the address below. ARC Audio is not responsible for damage incurred during shipping.
For warranty and non-warranty repairs, send to:
ARC Audio
4719 Green Leaf Cr. #4
Modesto CA, 95356
ARC Audio
warranties the unit to be free of any material defects or defects in
WWW.Arcaudio.com
Page 13

Features:
1. Fully balanced signal from EQ unit to Crossover.
2. Green dot matrix display remote controller for setting output levels,
crossover range and configuration of control unit.
3. Front-Rear fader.
4. Back lit knobs (Blue).
5. Dual input.
6. Five filters with adjustable center frequency.
7. Selectable input gain.
8. Microprocessor controlled.
9. 12/24 high pass output.
10. Two 12 dB band pass crossovers.
11. Full range summed center channel.
12. Summed Sub out with 10 dB of gain (bass Boost).
13. Sub Crossover has 12,24,48 dB and full options. 0 or 180 phase switch on
sub out.
14. High pass, Sub, Bandpass 1&2 are addressable to front or rear Fader
outputs.
15. Low noise NE5532 IC’s
16. Digitally controlled potentiometers and analog switches.
P
arametric Equalization Controls:
The DXE includes a fully adjustable parametric equalizer. With a parametric EQ you can select a
center frequency, and apply the appropriate amount of boost or cut.
Digital-Hybrid Four-way Crossover:
With digital control, the four-way electronic crossover in the DXE easily configures to optimize
almost any audio system. By simply pressing a few buttons, you can select almost any crossover
frequency imaginable. This state-of-the-art crossover offers the greatest flexibility available in an
analog crossover.
Non-volatile memories:
different crossover profiles in individual memory locations. This memory is completely nonvolatile, meaning you will never loose your setting even if the unit is disconnected from power for
a prolonged period of time.
The DXE has the ability to allow the user to set and store up to six
2
Page 14

INSTALLATION INFORMATION
1. The DXE needs to be installed in the signal path between your source unit and your
external amplifier(s).
2. Physically mount the DXE in a location that keeps it clean, cool, and dry. Don’t mount it
under a cup holder or in a storage box were it will be covered with the stuff that always
seems to collect in our cars.
3. Hook up +12 volt power, ground, and remote turn-on. Make sure the ground is perfectly
clean and tight. Remove all the paint and under coat before you screw it down.
4. Install the Crossover controller. This is optional. It can be temporarily installed for tuning
and then remove it when you’re complete.
5. Install the EQ Section into the dashboard or some other convenient location. Don’t fix it
permanently into place until your gains have been set.
6. Adjust the “Input Level” control on your DXE to match the source unit’s output. With the
head unit volume at about 75% of max, move the gain switch from 0dB to +6 dB. Look at
the input clip light on the front of the EQ. It should NOT be on. It may flash occasionally. If
it doesn’t flash, move the gains to +12dB. Unless you have a very low output head unit
the clip light will surely be flashing now. If it is move back to +6dB or +0dB.
7. Adjust the “Output Level” controls in the gain menu to match with your amplifier inputs.
The system may already be very loud. It is not uncommon to use more gain on some
amps. This is to compensate for the differences in speaker efficiency. Note: You will want
to turn the gains on your amplifiers DOWN to maximize your systems performance.
8. Complete the “System Design Worksheet” This will be you greatest asset during system
tuning
9. Enter your system setting from the worksheet. These are just a starting point. For
convenience the example systems shown in this manual have been pre-loaded into the
crossover. If you find one that suits your needs simply load the required preset and begin
final tuning.
10. Now the fun begins with the display close by start tweaking. It’s amazing how much a tiny
adjustment to your crossover frequency can change your system.
11. If at some point you feel you’re going nuts or can’t hear any difference you have become
fatigued. Just stop, your setting will automatically be saved to memory.
3
Page 15

The Connections and Controls
The Front Panel
Master Volume Level Control:
5.
system including both inputs. This offers you control over sources like DVD players that
do not have a volume control.
Preamp Clip Indicator:
6.
maximum amount of signal voltage. If the LED indicator never comes on, don’t assume
that it is not working (since LED’s rarely break) but you might consider giving it a bit more
input.
EQ Clip Indicator:
7.
clipping or distorting. The usual cause of this is having the Input Level turned up too high
or you have boosted too many frequencies on your equalizer.
EQ Controls:
8.
dial in your system. Think of it as having each EQ control built custom for your car.
Fader
9.
outputs. The Sub out can be assigned to Front, Rear or Front + Rear. This feature allows
you to fade front or back without losing bass.
10. Input Select:
Etc.
: The fader of the DXE can be assigned by the crossover to control any of the
The small hole adjusts the frequency center. This really allows you to
Select between input A or B. CD Player, Video system, Game console,
DXE has the ability to control the volume of your
This LED light indicates that you are supplying the DXE its
This convenient LED indicates when the equalizer of your DXE is
VOLUME
25-50Hz 50-100Hz 100-1KHz
PRECLIP
EQCLIP
1K-10KHz 10K-20KHz
FADER
INPUT
SELECT
DXEEQ
4
Page 16

Back Panel
Inputs:
1.
source units (CD Player and Video system). If your source unit has multiple outputs (like
a front, rear, and/or subwoofer) you should only connect the front or rear outputs to your
DXE.
Input Levels:
2.
unit that goes into your DXE to achieve maximum signal to noise. Keep in mind, that
despite what the literature says, most aftermarket source units produce a relatively low
voltage signal when it comes to playing music at normal levels.
Balanced Outputs:
3.
crossover module, be careful to plug it into the right spot.
Power Connection:
4.
removes the power supply from the EQ and moves it into the crossover were there is
room to shield it properly. As a result you get much lower noise and no chance of ground
loop.
The DXE has two RCA inputs that need to get their audio signals from the
These switches allow you to maximize the signal level from your source
This balanced line connector should be connected to the DXE
This connector looks like a Telephone cable. Well it is, but this
L R RL
INPUTA
INPUTB
GAIN
12db0db 6db 12db0db 6db
INPUTA INPUTB
5
OUTPUT
POWER
Page 17

The Crossover Display
The Plug:
1.
cable. It won’t work.
The Knob
2.
doesn’t have a stop. It will keep turning until your fingers get tired.
16 Character Display:
3.
are designed to be simple to understand but with only 16 characters to work with we had
to abbreviate.
4.
Menu Select Button
Holding the button down for 2 seconds will switch to the next menu group. A quick push
tap will select a new menu item.
This is a 10-pin flat wire cable. Do Not mistake it for the 8 pin Balanced Line
:
This is a rotary encoder. All adjustments to the crossover are made here. It
All your crossover information is displayed here. The menus
:
Use this Button to switch between menus and selections.
6
Page 18

DXE Crossover
Balanced Input
1.
Equalizer, Be careful to plug it into the right spot. This cable will plug into the remote
display port but this is a bad thing. Don’t try it.
Power Out
2.
check this connection.
Remote Display
3.
Balanced Line cable. It won’t work.
Power Connection
4.
plug. Do your self a favor. Wire the plug outside the car. This will save you a lot of trouble
if the crossover is located in a hard to reach area.
Fuse
5.
6.
7.
8.
9.
:
amp fuse.
High Pass Crossover Output
adjustable from 16Hz – 7100Hz
Crossover 3
Band Pass or Full Range, Fully adjustable to 7100Hz.
Crossover 2
Band Pass or Full Range, Fully adjustable to 4900Hz.
Sub Crossover:
in Mono.
Center Channel Output
10.
output. It has an adjustable level.
:
You should never replace this fuse with anything other then the recommended 3
:
This balanced line connector should be connected to the DXE
This powers the EQ Section. If you are not getting any lights on your EQ
:
This is a 10-pin flat wire cable. Do not mistake it for the 8 pin
:
Ground, Remote turn and 12 volt positive are connected at this
:
This is a selectable 12dB/24dB Stereo crossover
:
X3 is a 12dB stereo crossover selectable as High Pass, Low Pass,
:
X3 is a 12dB stereo crossover selectable as High Pass, Low Pass,
The Subwoofer crossover is selectable 12dB/24dB/24dB. Output is
:
The center channel is an unprocessed mono (L+R)
7
Page 19

8
Page 20

9
 Loading...