

Page 1

MULTI PURPOSE TOOL
MINI CARVER
MINI GRINDER TRADE
MIN.FG.900.00, MIN.FG.900.40
MIN.FG.910.00, MIN.FG.910.40
OWNER’S INSTRUCTION MANUAL
Double Insulation used throughout,
no provision for earthing.
Page 2
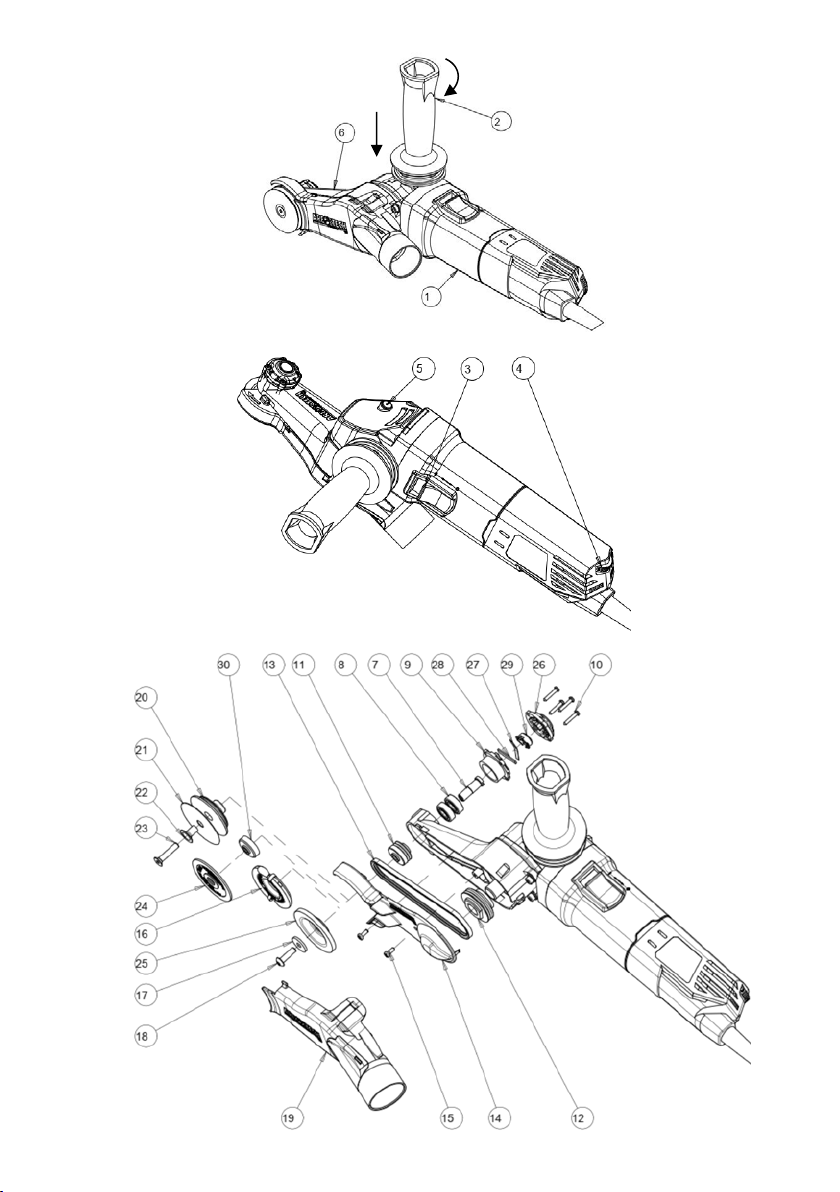
Fig. C
Fig. A
Fig. D
Fig. E
Fig. G
Fig. F
Fig. H Fig. I
Fig. B
Page 3
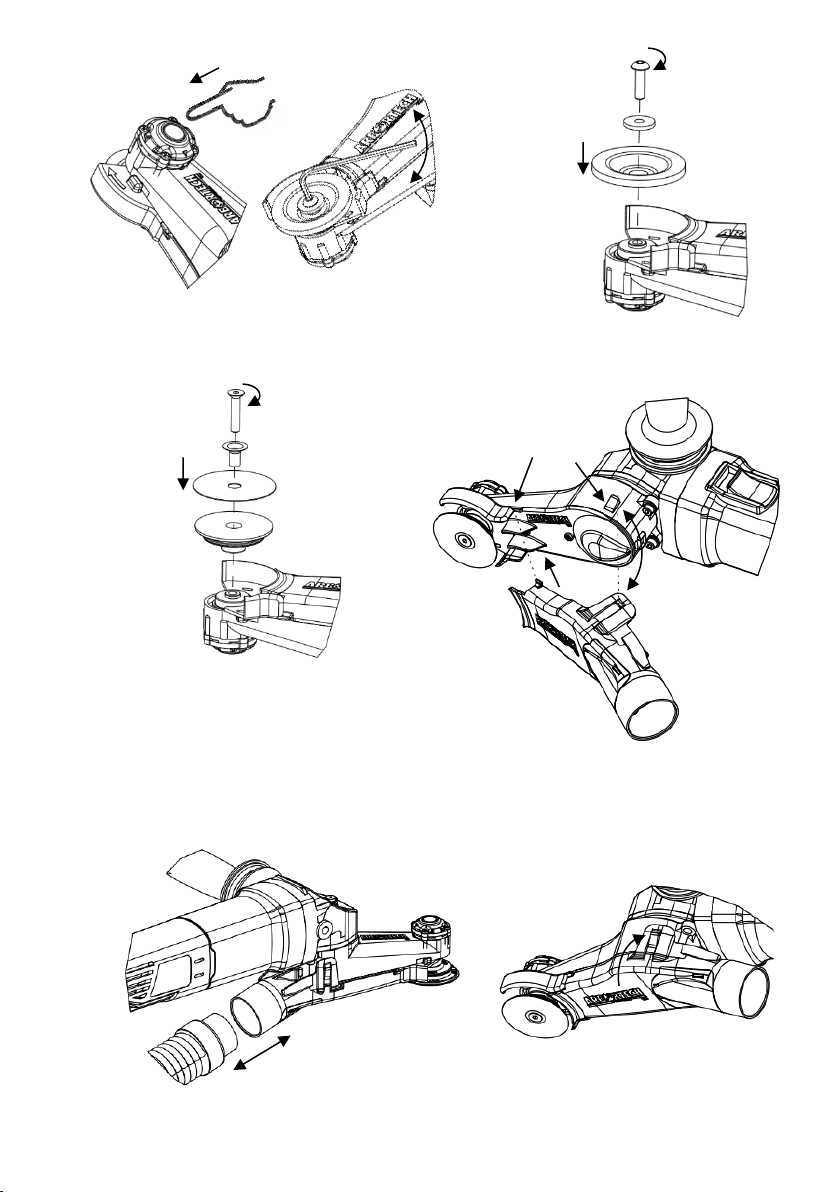
Fig. D
Fig. F
Fig. E
Fig. G
Fig. H Fig. I
Page 4
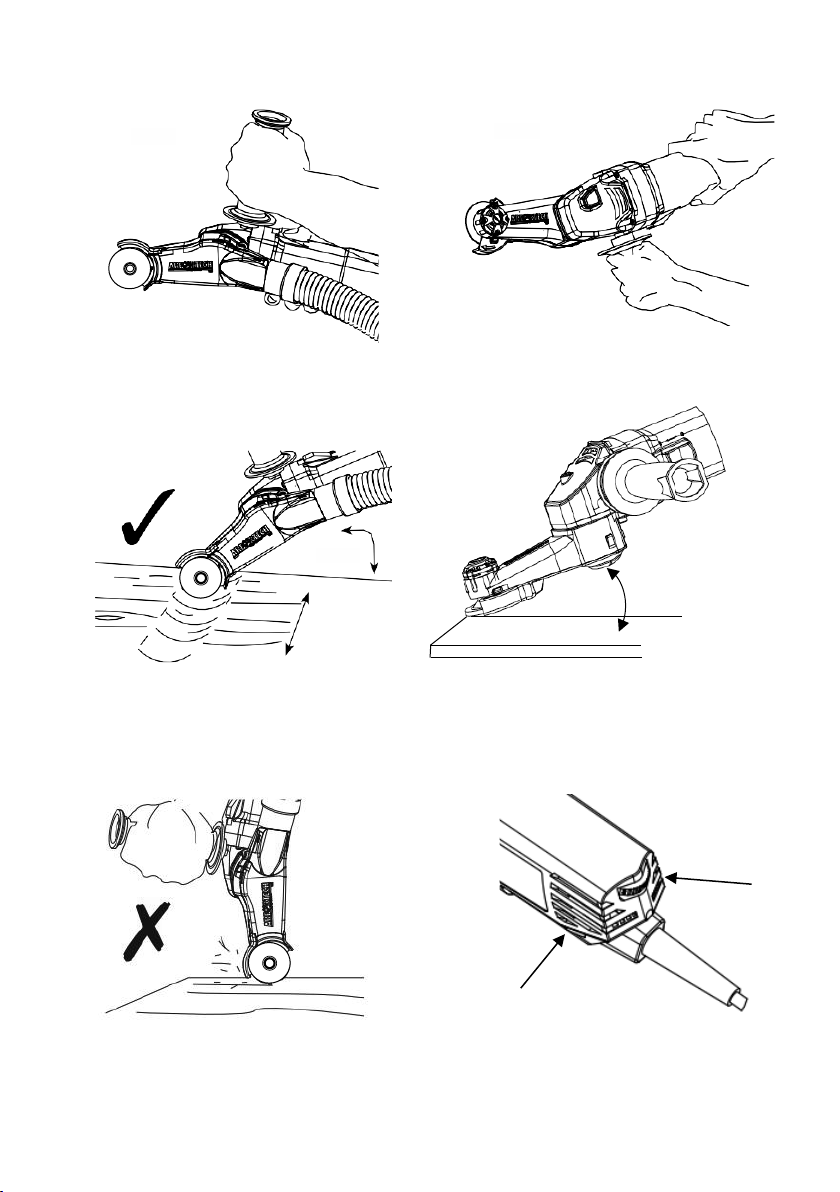
25-30°
Fig. J
Fig. K
5-30°
Fig. P Fig. Q
Fig. R
Fig. S
Fig. T
Fig. L Fig. M
Fig. N Fig. O
Page 5
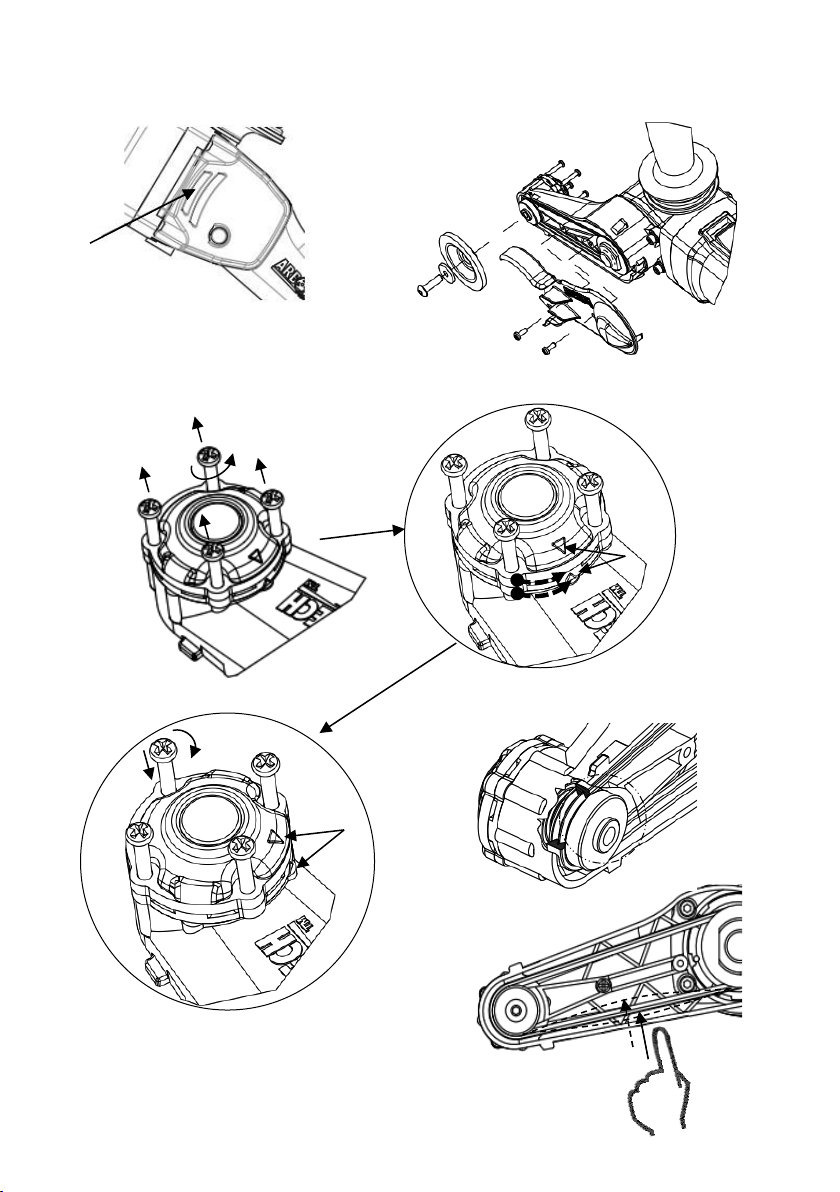
Fig. P Fig. Q
Fig. R
Fig. S
Fig. T
Page 6

GENERAL POWER TOOL
SAFETY WARNINGS
ORIGINAL
ENGLISH
WARNING - READ ALL
SAFETY WARNINGS,
INSTRUCTIONS,
ILLUSTRATIONS AND
SPECIFICATIONS PROVIDED
WITH THIS POWER TOOL.
Failure to follow all instructions listed below, may result
in electric shock, re and/or personal injury.
SAVE ALL WARNINGS AND INSTRUCTIONS FOR
FUTURE REFERENCE.
The term “power tool” in the warnings refers to your
mains-operated (corded) power tool or batteryoperated (cordless) power tool.
1) WORK AREA SAFETY
a. Keep work area well ventilated, clean and well
lit. Cluttered or dark areas invite accidents.
b. Do not operate power tools in explosive
atmospheres, such as in the presence of
ammable liquids, gases or dust. Power tools
create sparks which may ignite the dust or fumes.
c. Keep children and bystanders away while
operating a power tool. Distractions can cause
you to lose control.
2) ELECTRICAL SAFETY
a. Power tool plugs must match the outlet. Never
modify the plug in any way. Do not use any adapter
plugs with earthed (grounded) power tools.
Unmodied plugs and matching outlets will reduce
risk of electric shock.
b. Avoid body contact with earthed or grounded
surfaces, such as pipes, radiators, ranges and
refrigerators. There is an increased risk of electric
shock if your body is earthed or grounded.
c. Do not expose power tools to rain or wet
conditions. Water entering a power tool will
increase the risk of electric shock.
d. Do not abuse the cord. Never use the cord for
carrying, pulling, or unplugging the power tool.
Keep cord away from heat, oil, sharp edges
or moving parts. Damaged or entangled cords
increase the risk of electric shock.
e. When operating a power tool outdoors, use an
extension cord suitable for outdoor use. Use of
a cord suitable for outdoor use reduces the risk of
electric shock.
English
1
f. If operating a power tool in a damp location
is unavoidable, use a residual current device
(RCD) protected supply. Use of an RCD reduces
the risk of electric shock.
3) PERSONAL SAFETY
a. Stay alert, watch what you are doing and
use common sense when operating a power
tool. Do not use a power tool while you are
tired or under the inuence of drugs, alcohol
or medication. A moment of inattention while
operating power tools may result in serious
personal injury.
b. Use personal protective equipment. Always
wear eye protection. Protective equipment such
as dust mask, non-skid safety shoes, hard hat or
hearing protection used for appropriate conditions
will reduce personal injuries.
c. Prevent unintentional starting. Ensure the
switch is in the off-position before connecting
to a power source and/or battery pack, picking
up or carrying the tool. Carrying power tools with
your nger on the switch or energizing power tools
that have the switch on invites accidents.
d. Remove any adjusting key or wrench before
turning the power tool on. A wrench or a key left
attached to a rotating part of the power tool may
result in personal injury.
e. Do not overreach. Keep proper footing and
balance at all times. This enables better control of
the power tool in unexpected situations.
f. Dress properly. Do not wear loose clothing or
jewellery. Keep your hair, clothing and gloves
away from moving parts. Loose clothes, jewellery
or long hair can be caught in moving parts.
g. If devices are provided for the connection of
dust extraction and collection facilities, ensure
these are connected and properly used. Use of
dust collection can reduce dust-related hazards.
h. Do not let familiarity gained from frequent use
of tools allow you to become complacent and
ignore tool safety. A careless action can cause
severe injuries within a fraction of a second.
4) POWER TOOL USE AND CARE
a. Do not force the power tool. Use the correct tool
for your application. The correct power tool will
do the job better and safer at the rate for which it
was designed.
b. Do not use the tool if the switch does not turn
it on and off. Any power tool that cannot be
controlled with the switch is dangerous and must
be repaired.
c. Disconnect the plug from the power source and/
or the battery pack from the power tool before
making any adjustments, changing accessories,
or storing power tools. Such preventative safety
measures reduce the risk of starting the power tool
accidentally.
Page 7

d. Store idle power tools out of the reach of
children and do not allow persons unfamiliar
with the power tool or these instructions
to operate the power tool. Power tools are
dangerous in the hands of untrained users.
e. Maintain power tools and accessories. Check
for misalignment or binding of moving parts,
breakage of parts and any other condition
that may affect the power tools operation. If
damaged, have the power tool repaired before
use. Many accidents are caused by poorly
maintained power tools.
f. Keep cutting tools sharp and clean. Properly
maintained cutting tools with sharp edges are less
likely to bind and are easier to control.
g. Use the power tool, accessories and tool bits
etc. in accordance with these instructions,
taking into account the working conditions and
the work to be performed. Use of the power tool
for operations different from those intended could
result in a hazardous situation.
h. Keep handles and grasping surfaces dry, clean
and free from oil and grease. Slippery handles
and grasping surfaces do not allow for safe
handling and control of the tool in unexpected
situations.
5) SERVICE
a. Have your power tool serviced by a qualied
repair person using only identical replacement
parts. This will ensure that the safety of the
power tool is maintained.
MINI CARVER/MINI
GRINDER TRADE
SAFETY WARNINGS
SAFETY WARNINGS COMMON FOR
GRINDING, SANDING OR WOOD
CARVING OPERATIONS:
a. This power tool is intended to function as a
grinder, sander or wood carver tool. Read all
safety warnings, instructions, illustrations and
specications provided with this power tool.
Failure to follow all instructions listed below may
result in electric shock, re and/or serious injury.
b. Operations such as polishing wire brushing or
cut-off are not recommended to be performed
with this power tool. Operations for which the
power tool was not designed may create a hazard
and cause personal injury.
c. Do not use accessories which are not
specically designed and recommended by the
tool manufacturer. Just because the accessory
can be attached to your power tool, it does not
assure safe operation.
d. The rated speed of the accessory must be at
least equal to the maximum speed marked on
the power tool. Accessories running faster than
their rated speed can break and y apart.
e. The outside diameter and the thickness of your
accessory must be within the capacity rating
of your power tool. Incorrectly sized accessories
cannot be adequately guarded or controlled.
f. Threaded mounting of accessories must match
the grinder spindle thread. For accessories
mounted by anges, the arbour hole of the
accessory must t the locating diameter of the
ange. Accessories that do not match the mounting
hardware of the power tool will run out of balance,
vibrate excessively and may cause loss of control.
g. Do not use a damaged accessory. Before each
use inspect the accessory such as abrasive
wheels for chips and cracks, backing pad for
cracks, tear or excess wear, wire brush for loose
or cracked wires. If power tool or accessory
is dropped, inspect for damage or install an
undamaged accessory. After inspecting and
installing an accessory, position yourself and
bystanders away from the plane of the rotating
accessory and run the power tool at maximum
no-load speed for one minute. Damaged
accessories will normally break apart during this
test time.
h. Wear personal protective equipment. Depending
on application, use face shield, safety goggles
or safety glasses. As appropriate, wear dust
mask, hearing protectors, gloves and workshop
apron capable of stopping small abrasive or
workpiece fragments. The eye protection must
be capable of stopping ying debris generated
by various operations. The dust mask or respirator
must be capable of ltrating particles generated
by your operation. Prolonged exposure to high
intensity noise may cause hearing loss.
i. Keep bystanders a safe distance away from
work area. Anyone entering the work area must
wear personal protective equipment. Fragments
of workpiece or of a broken accessory may y
away and cause injury beyond immediate area of
operation.
j. Hold the power tool by insulated gripping
surfaces only, when performing an operation
where the cutting accessory may contact
hidden wiring or its own cord. Cutting accessory
contacting a “live” wire may make exposed metal
parts of the power tool “live” and could give the
operator an electric shock.
k. Position the cord clear of the spinning
accessory. If you lose control, the cord may be cut
or snagged and your hand or arm may be pulled
into the spinning accessory.
l. Never lay the power tool down until the
accessory has come to a complete stop. The
spinning accessory may grab the surface and pull
the power tool out of your control.
m. Do not run the power tool while carrying it at
your side. Accidental contact with the spinning
English
2
ORIGINAL
ENGLISH
Page 8

accessory could snag your clothing, pulling the
accessory into your body.
n. Regularly clean the power tool’s air vents. The
motor’s fan will draw the dust inside the housing
ORIGINAL
ENGLISH
and excessive accumulation of powdered metal
may cause electrical hazards.
o. Do not operate the power tool near ammable
materials. Sparks could ignite these materials.
p. Do not use accessories that require liquid
coolants. Using water or other liquid coolants may
result in electrocution or shock.
KICKBACK AND RELATED WARNINGS
Kickback is a sudden reaction to a pinched or
snagged rotating wheel, backing pad, brush or any
other accessory.
Pinching or snagging causes rapid stalling of
the rotating accessory which in turn causes the
uncontrolled power tool to be forced in the direction
opposite of the accessory’s rotation at the point of the
binding. For example, if an abrasive wheel is snagged
or pinched by the workpiece, the edge of the wheel that
is entering into the pinch point can dig into the surface
of the material causing the wheel to climb out or kick
out. The wheel may either jump toward or away from
the operator, depending on direction of the wheel’s
movement at the point of pinching. Abrasive wheels
may also break under these conditions. Kickback is the
result of power tool misuse and/or incorrect operating
procedures or conditions and can be avoided by taking
proper precautions as given below.
a. Maintain a rm grip on the power tool and
position your body and arm to allow you to
resist kickback forces. Always use auxiliary
handle, if provided, for maximum control over
kickback or torque reaction during start-up. The
operator can control torque reactions or kickback
forces, if proper precautions are taken.
b. Never place your hand near the rotating
accessory. Accessory may kickback over your
hand.
c. Do not position your body in the area where
power tool will move if kickback occurs.
Kickback will propel the tool in direction opposite
to the wheel’s movement at the point of snagging.
d. Use special care when working corners, sharp
edges etc. Avoid bouncing and snagging the
accessory. Corners, sharp edges or bouncing
have a tendency to snag the rotating accessory
and cause loss of control or kickback.
e. Do not attach a saw chain wood carving blade
or toothed saw blade. Such blades create
frequent kickback and loss of control.
f. Do not attach reinforced abrasive cut-off wheel.
Such tools can break-off and cause injuries.
SAFETY WARNINGS SPECIFIC FOR
GRINDING OPERATIONS:
a. Use only wheel types that are recommended for
your power tool and the specic guard designed
for the selected wheel. Wheels for which the
power tool was not designed cannot be adequately
guarded and are unsafe.
b. The grinding surface of centre depressed
wheels must be mounted below the plane of
the guard lip. An improperly mounted wheel that
projects through the plane of the guard lip cannot
be adequately protected.
c. The guard must be securely attached to the
power tool and positioned for maximum safety,
so the least amount of wheel is exposed
towards the operator. The guard helps to protect
the operator from broken wheel fragments,
accidental contact with wheel and sparks that
could ignite clothing.
d. Wheels must be used only for recommended
applications. For example: do not grind with
the side of cut-off wheel. Abrasive cut-off wheels
are intended for peripheral grinding, side forces
applied to these wheels may cause them to shatter.
e. Always use undamaged wheel anges that are
of correct size and shape for your selected
wheel. Proper wheel anges support the wheel
thus reducing the possibility of wheel breakage.
Flanges for cut-off wheels may be different from
grinding wheel anges.
f. Do not use worn down wheels from larger
power tools. Wheel intended for larger power tool
is not suitable for the higher speed of a smaller tool
and may burst.
ADDITIONAL SAFETY WARNINGS
SPECIFIC FOR SANDING OPERATIONS:
a. Do not use excessively oversized sanding disc
paper. Follow manufacturers recommendations,
when selecting sanding paper. Larger sanding
paper extending beyond the sanding pad presents
a laceration hazard and may cause snagging,
tearing of the disc or kickback.
b. Adjust the speed as recommended for sanding
applications. High speed sanding presents
laceration and burning hazard.
ADDITIONAL SAFETY
WARNINGS
Wear hearing protection; Wear eye protection; Wear
dust mask; Wear protective gloves.
a. Use suitable detectors to determine if utility
3
English
Page 9
lines are hidden in the work area or call the
local utility company for assistance. Contact
with electric lines can lead to re and electric
shock. Damaging a gas line can lead to explosion.
Penetrating a water line causes property damage
or may cause an electric shock.
b. Release the On/Off switch and set it to the off
position when the power supply is interrupted,
e. g., in case of a power failure or when the
mains plug is pulled.
c. Do not touch grinding and cutting discs before
they have cooled down. The discs can become
very hot while working.
d. Secure the workpiece. A workpiece clamped with
clamping devices or in a vice is held more secure
than by hand.
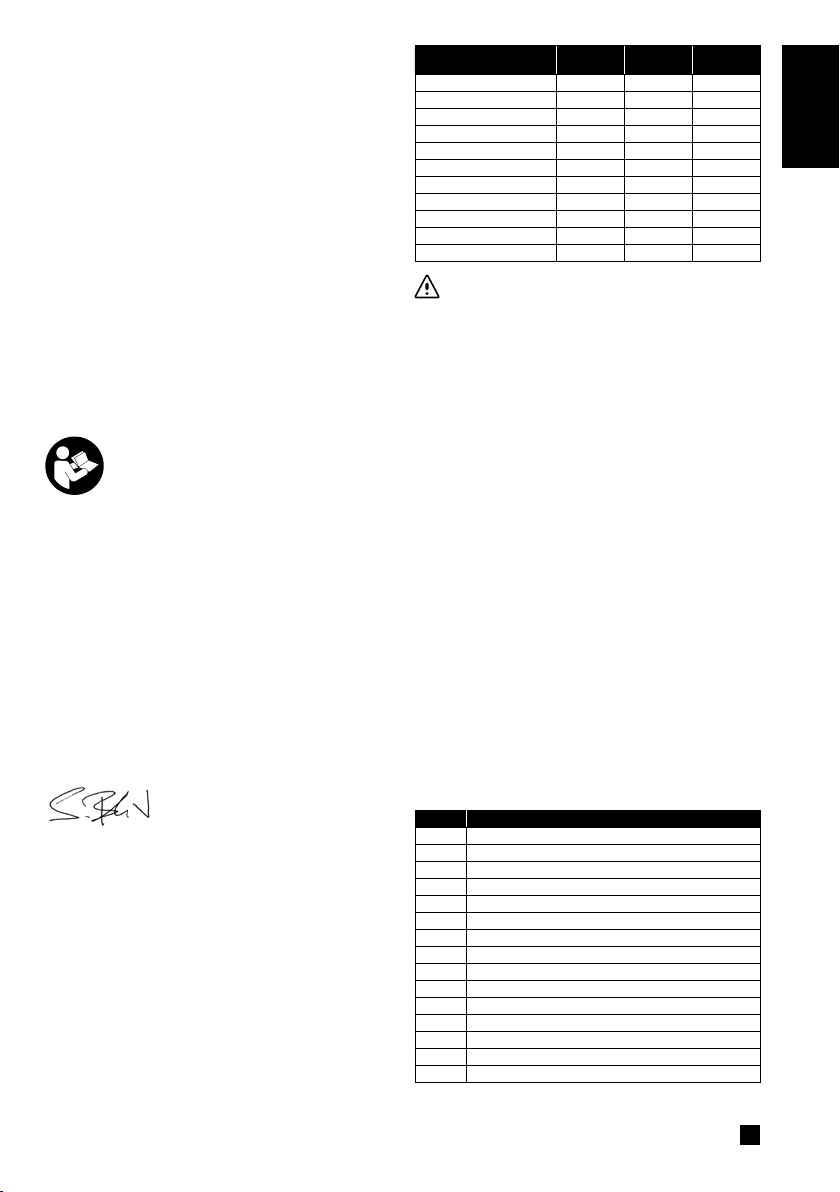
KNOWING YOUR TOOL
PRODUCT DESCRIPTION AND
SPECIFICATIONS
Read all safety warnings and all
instructions, Failure to follow the warnings
and instructions may result in electric
shock, re and/or serious injury.
UK AUS
Voltage
Power rating
Frequency
Protection class
Rated speed
Tool diameter
Mounting bore size
Mounting screw size
Weight
Vibration emission (k=1.5)
Noise emission (k=3.0)
230 230-240 V
1000 1000 W
50 50 Hz
II II II
6000-19500 6000-19500 Rpm
54 54 mm
9.5 9.5 mm
M5 M5 mm
2.35 2.35 kg
7.31 7.31 m/sec2
96 96 dB(A)
WARNING: The declared vibration emission
level represents the main applications of the
tool. However if the tool is used for different
applications, with different accessories or
insertion tools or is poorly maintained, the
vibration emission may differ. This may
signicantly increase the exposure level over the
total working period.
An estimation of the level of exposure to vibration
should also take into account the times when the tool is
switched off or when it is running but not actually doing
the job. This may signicantly reduce the exposure
level over the total working period. Identify additional
safety measures to protect the operator from the
effects of vibration.
ORIGINAL
ENGLISH
UK- Declaration of Conformity
Arbortech declares that the product described
in this manual under “Technical Specications”
is manufactured in compliance with EN 60745
standardised documents and following UK regulations:
-Supply of Machinery (Safety) Regulations 2008
-Electromagnetic Compatibility Regulations 2016
-The Restriction of the Use of Certain Hazardous
Substances in Electrical and Electronic Equipment
Regulations 2012
Technical le at: Arbortech Ltd, 67 Westchester Road,
Malaga, WA 6090, Australia
Sven Blicks
General Manager
INTENDED USE
The Mini Carver/Mini Grinder Trade is intended for
grinding, carving, and sanding of metal, stone and
wood without use of water.
Note: Text, diagrams and data are correct at time of
printing. In the interests of continuous improvement of
our products, technical specications are subject to
alteration without prior notice.
For working with applications on materials that create
dust use dust extraction accessories.
UNPACKING AND ASSEMBLY
Inspect to ensure that no damage has occurred to the
tool and accessories during transport. If damaged,
report to the retailer immediately.
Remove the auxiliary handle from the box and attach
to the tool. (Fig. A)
Ensure that the clamping screw (18) is always fully
tightened before use.
PRODUCT FEATURES AND LIST OF
COMPONENTS
ITEM Features and components
1 Mini Carver/Mini Grinder Trade Body
2 Auxiliary handle
3 ON/OFF Switch
4 Speed control
5 Drive Lock button
6 Extension arm
7 Mini shaft
8 Bearings
9 Bearing cap
10 Pan screw 4g
11 Small Pulley
12 Large Pulley
13 Belt
14 Guard cover
15 Pan screw 6g
English
4
Page 10

16 Mini Pro Blade
17 Clamping Washer
18 Clamping screw M5
19 Dust extraction cover
20 Sanding Pad
ORIGINAL
ENGLISH
21 Sandpaper
22 Clamping Bush
23 Countersunk screw
24 Diamond Cutting Disc
25 Grinding Wheel
26 Spindle lock - cover
27 Leaf spring
28 Locking bar
29 Locking button
30 Blade Spacer
1
Included with Mini Carver
2
Included with Mini Grinder Trade
1
2
2
2
PRODUCT FEATURES AND LIST OF
COMPONENTS
Fig. A, Fig. B, Fig. C
MOUNTING TOOLS AND ACCESSORIES
WARNING: To reduce the risk of serious personal
injury, turn the tool off and disconnect from the
power source before making any adjustments or
removing/ installing tools or accessories.
1. REPLACING CARVING AND
GRINDING DISCS
Press the Locking button (29) to prevent rotation, then
remove the clamping screw (18) using the Allen Key
provided with the tool (Fig. D). Replace the blade with
other Arbortech recommended product as shown on
the following diagrams.
Place the new disc over the small pulley, ensuring it is
properly centered and seated at against the pulley
face. Place the clamping washer (17) over the disc
then insert and tighten the clamping screw (18) in
order as shown (Fig. E). Ensure the marks on the disc
are visible and arrow of rotation is pointing in the same
direction as the arrow on the back of the guard.
WARNING: Failure to properly mount the discs over
the pulley could result in serious injuries or damage
the tool.
2. MOUNTING THE SANDING PAD
Follow the steps to remove the disc prescribed above
(step 1).
First position the sand paper (21) over the sanding
pad (20)then insert countersunk screw (23) into the
clamping bush (22) and together insert them into the
sanding pad centre hole. Next insert the sanding pad
over the small pulley (11) (Fig. F) and tighten the screw
onto the mini shaft.
English
5
3. MOUNTING THE DUST EXTRACTION
To t-on the dust extraction, rst insert the front lugs
of the Dust Extraction Cover (19) under the Guard
Cover cut-outs, then push down the rear end to snap
the latches over the Extension Arm side lugs as shown
in Fig.G. Fit the vacuum cleaner hose into the Dust
extraction hole (Fig. H). Dust extraction ts hose size
Ø35mm.
To remove the Dust Extraction Cover pull the dust
extraction latch sideway from the extension arm and
then pull out in reverse direction.
WARNING:
• To reduce the risk of personal injury always use
dust extraction.
• Provide for sufcient dust extraction when cutting
masonry materials.
• The vacuum cleaner must be approved for
vacuuming masonry dust
• Wear a dust respirator .
• The machine may be used only for dry cutting/
grinding.
WARNING: ALWAYS WEAR
CORRECT SAFETY CLOTHING,
INCLUDING EAR, EYE AND LUNG
PROTECTION.
DO NOT use under the wet conditions or in presence
of ammable liquids and gasses.
CAUTION: Use correct personal protection equipment
when working on materials treated or containing
toxic substances and follow local government safety
regulations.
OPERATION
Always use two hands to operate the Mini Carver/Mini
Grinder Trade placing the left hand on the auxiliary
handle and the right on the tool body ( Fig. J)
Ensure the machine is running BEFORE contacting
the material, to be worked on. To sand, grind or
woodcarving, hold the Mini Carver/Mini Grinder Trade
as shown in Fig. K
CUTTING GRIP
Use the Mini Pro Blade to cut or remove wood and
plastics.
Use the Mini Sanding Pads for cleaning and sanding
wood, plastics, metal, paint and much more.
Use the diamond blade for cutting and recessing any
masonry based material.
Use the grinding disc to grind metal.
Page 11
STARTING OPERATION
Observe correct mains voltage! The voltage of the
power source must agree with the voltage specied
on the nameplate of the machine. Power tools marked
with 230-240V can also be operated with 220 V.
SHOWING ANGLE & DIRECTION OF CUT
25-30° is a comfortable working angle.
Use the bottom edge of the blade (as shown in Fig.L /
M) and not as in Fig.N.
SWITCHING ON AND OFF
To start the power tool, push the On/Off switch (3)
forwards.
To lock the On/Off switch (3), press the On/Off switch
(3) down at the front until it latches.
To switch off the power tool, release the On/Off switch
(3), or if it is locked, briey push down the back of the
On/Off switch (3) and then release it.
- Check grinding tools before using. The grinding
tool must be mounted properly and be able to
move freely.
Test run the grinder with no load prior use. Do not use
damaged, out-of-centre or vibrating tools.
CAUTION:
Restarting protection – The restarting protection
feature prevents uncontrolled restarting of the
machine after an interruption in the power supply.
To restart the operation, switch the On/Off switch
(3) to the off position and start the machine again.
WARNING:
- Always read the safety instructions and
applicable regulations
- Support and secure the work piece to prevent
movement and loss of control.
- Do not exert pressure or strain the machine so
heavily that it comes to a standstill.
- After heavily straining the power tool, continue
to run it at no-load for several minutes to cool
down the accessory.
- Do not touch grinding and cutting discs before
they have cooled down. The discs can become
very hot while working.
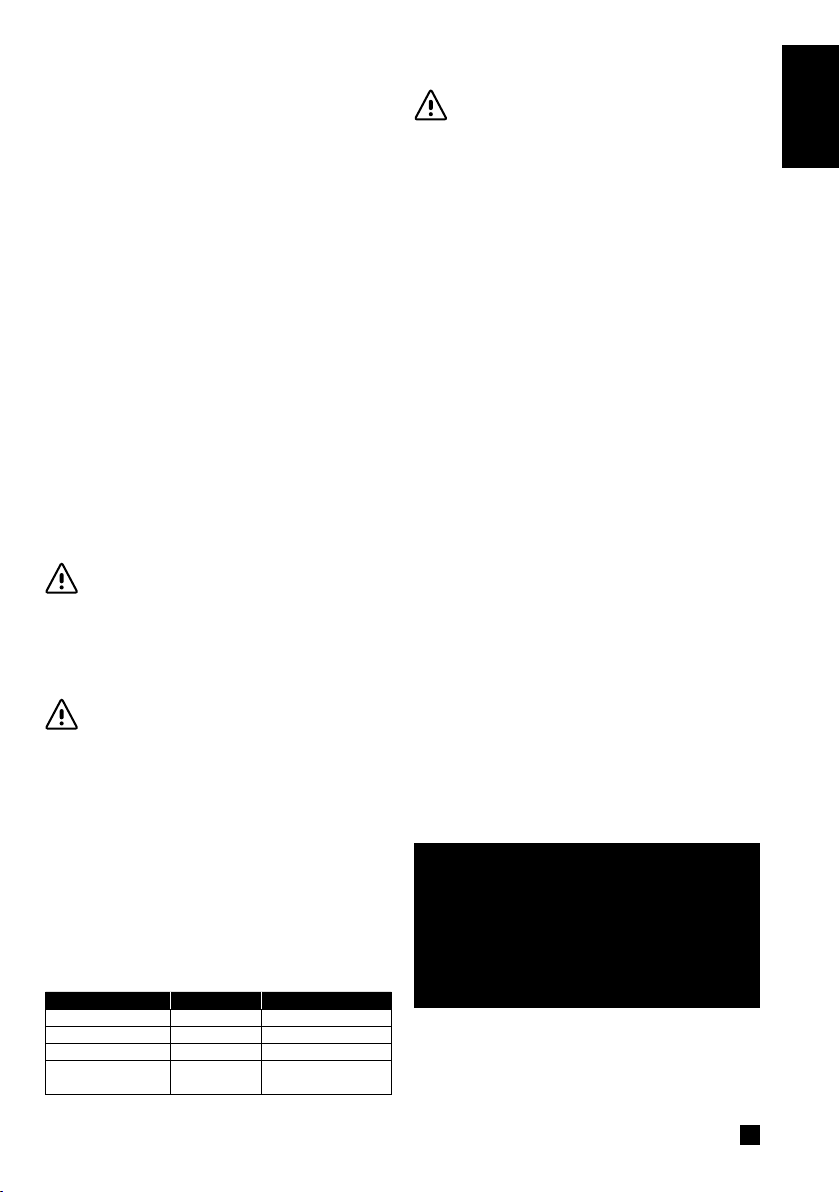
TOOL POWER SETTINGS APPLICATION
1
Mini Pro Blade
2
Diamond Disc
2
Grinding Disc
Sanding Pad 1-3
1
Included with Mini Carver
2
Included with Mini Grinder Trade
5-6 Wood carving
5-6 Grinding masonry material
5-6 Grinding metal
Sanding wood, metal and other
materials. Use lower speed for
higher grit sandpaper
MAINTENANCE
WARNING: BEFORE ANY
ADJUSTMENT, CLEANING OR
WORK ON THE MACHINE ITSELF,
DISCONNECT FROM THE POWER
SUPPLY.
CLEANING THE GRILLS AND SWITCH
Regularly check to see if any dust or foreign matter
has entered the grills positioned on the front and back
of the motor (g. O and P) or under ON/OFF switch
(Fig. A).
If so use a soft brush to remove any accumulated dust.
to clean grills and switch.
TENSIONING OR REPLACING THE BELT
Unplug the Mini Carver/Mini Grinder Trade.
Remove the blade and the guard cover (14) then lift
the back side of the guard cover and slide the cover
back and lift off (Fig. Q).
Unscrew the 4 screws (10) (g. R), until the bearing
cap (9) and spindle lock cover (26) can rotate inside
the arm.
Rotate the components 9 and 26 together
anticlockwise (Fig R) until the screws align with the
next hole position in the arm (Fig S). This will make
the small pulley to move and create tension in the
belt. Ensure the belt is correctly positioned over the
pulleys as shown in (Fig. T) and the small pulley is fully
inserted onto the spindle.
When tensioning is nished tighten the screws. Then
secure the guard cover onto the arm and install the
blade.
DO NOT OVER TENSION THE BELT
Note: clean surroundings with a soft cloth or small
brush.
Accessories & spare parts
visit www.arbortechtools.com
English
6
ORIGINAL
ENGLISH
Page 12

*Manufacturer reserves the right to change specications without notice.
**Note: Specications may differ from country to country.
NOTE: Motor may differ from that shown on box depending on
specications required for your country.
ARBORTECH PTY LTD 67 WESTCHESTER ROAD MALAGA 6090
U.S.A Ofce: 978-466-7945 U.S.A Fax: 866-515-8104
EUROPE: Tel: +49 2724-288301 Fax: +49 2724-205515
MIN.PK.BOOKB900.00 REV101122
PERTH WESTERN AUSTRALIA
Tel: 08 9249 1944 Fax: 08 9249 2936
U.S.A. -Tollfree: 866-517-7869
www.arbortechtools.com
Facebook: @arbortechtools
Email: [email protected]
 Loading...