

Page 1

Hyperprism-VST Manual
Table of Contents
Copyright ©1999 by Arboretum Systems, Inc. This documentation may not, in whole or in part, be copied, reproduced or translated without prior written consent of
Arboretum Systems.
Page 2
Hyperprism-VST for MacOS VST Plug-in Compatible Applications
Real Time Digital Audio Signal Processing Software by Arboretum Systems Inc.
This documentation current for Hyperprism-VST version 1.5.5, last updated 11/10/98.
Copyright ©1997, 1998 by Arboretum Systems, Inc. This Documentation may not, in whole or in part, be copied,
reproduced or translated without prior written consent of Arboretum Systems.
What's New in Hyperprism-VST v1.5.5:
New Harmonic Exciter, Bass Maximizer and Tube/Tape Saturation effects●
Frequency Shifter, HyperVerb, Limiter and M-S Matrix now included in Hyperprism-VST●
Improved Low Pass, High Pass Filters; no more distortion!●
Improved Compressor and Noise Gate●
New simplified Installation procedure●
Now compatible with Emagic Logic Audio 3.5.3, Opcode Vision DSP and Cakewalk Metro 4.5.1, as well as
Cubase VST
●
Fix to "long plug-in name" bug●
New In Hyperprism-VST v1.04:
New Vocoder and Doppler effects●
Contents
Software License Agreement●
Introduction
Welcome to Hyperprism-VST❍
Hyperprism-VST List of Effects❍
System Requirements & Compatibility❍
About Hyperprism-VST❍
●
Installation●
Page 3

Before You Install❍
Easy Install❍
Custom Install❍
Configuring the Host Program❍
Installation Support Notes❍
Using Hyperprism-VST
Controlling Hyperprism❍
Hyperprism-VST and Cubase-VST❍
Hyperprism-VST and Logic Audio❍
Hyperprism-VST and Metro❍
Hyperprism-VST and Vision DSP❍
●
Using Presets●
Hyperprism-VST Parameter Automation
Recording Blue Window gestures in Cubase-VST❍
Recording Blue Window gestures in Logic Audio❍
●
Effects Processes●
Troubleshooting●
About Digital Audio Files●
About This Manual
The documentation may be viewed or printed from any browser, such as Netscape Navigator or Microsoft Internet
Explorer. If the text is too small or you wish to change the background color, go into your browser's Preferences and set
them as you wish. Internet Explorer users, just hit the Larger button on your browser tool bar.
Important: For better scrolling comfort use the scroll bar, or the page up/page down keys, rather than the up and down
arrows.
It may also be viewed using the excellent HTML Viewer By Sassafras Software, a shareware program supplied on this
CD-ROM. If the text is too small, replace the HTML Viewer Prefs file in your Systems' Preference folder by the one on
this CD. You can find it by doing a "Get Info" of your HTML Viewer alias followed by a "Find Original" command.
Manual Conventions
Throughout this manual, you will see several different symbols in sections describing step-by-step operations.
Text following a right pointing arrow
invites you to execute a command with the mouse or keyboard.
Text following a down pointing arrow
describes the result produced by executing a command.
A pointing hand
indicates an important note!
Page 4

[Go to First Chapter]
If your Browser is connected to the Internet,
visit us by clicking the button below!
Page 5

License Agreement
ARBORETUM SYSTEMS SOFTWARE LICENSE AGREEMENT
Arboretum Systems ("Arboretum") is willing to license the enclosed Hyperprism, Ray Gun, HyperEngine and/or Ionizer software ("Software") only upon the
condition that you accept all the terms of this Agreement. If you do not agree to these terms, then Arboretum is unwilling to license the Software to you, in which
event you must return immediately, and in no case later than ten (10) days from the date of purchase, the unopened diskette package (and accompanying items
including manual, other documentation and container) together with your proof of purchase, to the place from which it was acquired for a refund.
LICENSE: You may use the enclosed Software on a single computer. The Software is in use when it is installed into permanent memory (such as a hard disk or
other storage device) or loaded into temporary memory (RAM) of that computer. The Software may be copy protected. In such case you may install the Software a
total of 2 (two) times into permanent memory of a single computer.
RESTRICTIONS: You may not transfer, modify, rent, lease, loan, resell, distribute, network, electronically transmit or merge the Software. You may also not
reverse engineer, decompile or disassemble the Software, or otherwise attempt to discover the Software source code. You are not permitted to copy the Software
(except to make an archival copy for back-up purposes) or any of the accompanying documentation. Any attempt to transfer any of the rights, duties or obligations
hereunder except as expressly provided for in this Agreement is void.
COPYRIGHT: The Software (including audio, music, text, images and animations incorporated into the Software) and accompanying documentation are owned by
Arboretum or its suppliers and are protected by United States copyright laws and international treaties. Unauthorized reproduction or distribution of the software or
documentation is subject to civil and criminal penalties.
LIMITED WARRANTY: Arboretum warrants for the period of thirty (30) days from the date of delivery of the Software to you, as evidenced by a copy of your
receipt, that: (1) The Software will perform substantially in accordance with the user documentation provided by Arboretum. Your sole remedy under this warranty
is that Arboretum will, at its option, either repair or replace the Software which does not meet this Limited Warranty, or refund to you the money paid for the
Software. Arboretum does not warrant that the Software will meet your requirements, that operation of the Software will be uninterrupted or error-free, or that all
software errors will be corrected. (2) The medium on which the Software is furnished will be free from defects in materials and workmanship under normal use.
Arboretum will, at its option, either repair or replace the faulty medium at no charge to you, provided you return the faulty medium with proof of purchase to
Arboretum.
This Limited Warranty is void if any failure of the Software or any damage to the medium is due to accident, disaster, abuse, misapplication, modification of the
Software and/or violation of any of the terms of the License Agreement.
The above warranties are exclusive and in lieu of all other warranties, express or implied, and Arboretum expressly disclaims all other warranties, including the
implied warranties of merchantability, fitness for a particular purpose and non-infringement. No oral or written information or advice given by Arboretum, its
employees, dealers, resellers, distributors or agents shall increase the scope of the above warranties or create any new warranties. Some states do not allow the
exclusion of implied warranties, so the above exclusion may not apply to you. In that event, any implied warranties are limited in duration to thirty (30) days from
the date of delivery of the software. This warranty gives you specific legal rights. You may have other rights, which vary from state to state.
LIMITATION OF REMEDIES: Arboretum's entire liability to you and your exclusive remedy shall be the repair or replacement of the Software, the repair or
replacement of the Software medium, or the refund of your purchase price, as set forth above. In no event shall Arboretum's liability to you or any third party
exceed the purchase price paid for the Software.
Regardless of whether any remedy set forth herein fails of its essential purpose, in no event will Arboretum or its authorized dealers, resellers or distributors be
liable to you (1) for any damages, including any lost profits, lost data, other incidental or consequential damages, arising out of the use or inability to use the
Software or any data supplied therewith, even if Arboretum has been advised of the possibility of such damages, or (2) for any claim by any other party. Some
states do not allow the limitation or exclusion of liability for incidental or consequential damages so the above limitation or exclusion may not apply to you.
GENERAL: This Agreement will be governed by the laws of the State of California, except for that body of law dealing with conflicts of law. If any provision of
this Agreement is held to be unenforceable, that provision will be removed and the remaining provisions will remain in full force. This Agreement is the complete
and exclusive statement of the agreement between us which supersedes any proposal or prior agreement, oral or written, and any other communications between us
in relation to the subject matter of this Agreement. If you have any questions concerning this Agreement, you may contact Arboretum by writing to Arboretum
Systems, 75 Aura Vista, Pacifica California 94044. Hyperprism, Ray Gun, HyperEngine and Ionizer are trademarks of Arboretum Systems.
You acknowledge that you have read this Agreement, understand it, and agree to be bound by its terms.
Page 6

Hyperprism-VST for MacOS VST Plug-in Compatible Applications
Welcome to Hyperprism-VST
Hyperprism-VST is a set of high-quality real-time audio plug-in effects. More than thirty different sound processing
modules, tailored for the needs of electronic music production, film/video post and multimedia audio production. Each can
be used from within any MacOS audio editing application that supports VST format plug-ins.
Hyperprism-VST is a component of the Hyperprism Plug-in Pack. Plug-in Pack also includes editions of Hyperprism for
the MacOS Premiere and AudioSuite plug-in formats, as well as the Windows DirectX format.
The VST audio plug-in format is a specification for adding real-time audio DSP processors to sound editing software. The
core advantages of the VST format are twofold: VST effects run in real-time, processing audio "on the fly," and VST
effects require no additional audio DSP hardware, running on the computer's CPU instead of a dedicated sound card. The
VST format was developed by Steinberg, their Cubase VST was the first program to implement the spec. In the Spring of
1998 Steinberg began licensing VST to third-party developers; Steinberg's competitors have been quick to adopt this
framework.
Applications currently accepting VST audio plug-ins include Opcode Vision DSP, Cakewalk Metro, Emagic Logic Audio
Platinum, Emu/Ensoniq Paris and Cubase VST. Support for the VST audio plug-in format is growing within the MacOS
developer community; other programs which accept VST plug-ins may already exist, and more are sure to come.
Implementations of the VST format vary between various "VST-compatible" products. Many aspects of accessing and
using plug-ins appear far different in Vision compared to Cubase, for example. The depth of VST support also varies; we'll
make note of core discrepancies between the implementations in the various programs throughout the course of this
manual.
Cubase-VST, by virtue of being the first program to offer the VST plug-in spec, serves as the general "model" for the
purposes of this manual. We'll outline the basics of getting VST plug-ins going in each of the four products we were able
to test during this development cycle: Cubase VST/24 version 4.0, Metro version 4.5.1, Logic Audio Platinum version
3.5.3 and Vision DSP version 4.1.1b3.
As of press time (11/15/98) we were still resolving technical issues surrounding Paris support; our engineering team is in
direct contact with the Paris group and Hyperprism-VST compatibility with the Paris system may well be shipping by the
time you read this. Paris-specific documentation will follow in a future version of this manual.
Metro 4.5.1 operations are documented in this guide, but at press time we were still working with the Cakewalk Metro
team to solve some lingering problems. We anticipate that the Metro support and features discussed herein will be fully
functioning by the time you read this material.
VST plug-in support is a new thing in these programs (besides Cubase.) As you'll see in the following pages, there are still
some issues to be resolved. We've attempted to note in the pages of this manual all of the known compatibility problems
and bugs as of the time of this writing. We're in regular communication with all our development partners regarding these
type of issues, we're a diligent bunch of small companies, and chances are good that many of the anomalies we've noted
here are already fixed.
Refer to your sound editing programs's manual for instructions on installing and opening audio processing plug-ins such as
Page 7

Hyperprism-VST. Also be sure to read on to the next chapter in this document, Installation, for step-by-step setup
instructions, and tips on getting running.
Hyperprism-VST List of Effects
Hyperprism-VST includes 34 different effect algorithms:
Auto Pan
Band Pass Filter
Band Reject Filter
New! Bass Maximizer
Chorus
Compressor
Doppler
Echo
EchoTranz
Flanger
New! Frequency Shifter
Hall Reverb
NEW! Harmonic Exciter
High Pass Filter
NEW! HyperVerb (TM)
New! Limiter
Low Pass Filter
M-S Matrix
More Stereo
Multi Delay
Noise Gate
Pan
Phaser
Pitch Changer
Quasi Stereo
Ring Modulator
Room Reverb
Single Delay
Sonic Decimator
Stereo Dynamics
Tremolo
NEW! Tube/Tape Saturation
Vibrato
Vocoder
System Requirements & Compatibility
Hyperprism-VST requires a Power Macintosh computer, 80 MHz or faster with MacOS 7.6 or later and one or more audio
editing programs which support the MacOS VST plug-in format. Applications which have been proven compatible with
Hyperprism-VST include Cubase VST/24 version 4.0, Logic Audio Platinum version 3.5.3 and Vision DSP version
4.1.1b3. Metro version 4.5.1 and Paris compatibility is pending as of 11/15/98; compatibility with any other MacOS
"VST-compliant" applications has not yet been demonstrated.
Page 8

About Hyperprism-VST
Hyperprism can be thought of as a "rack" of studio-quality effects processors. Each effect in the package can be selected
from a menu or insert point in the host application, previewed and adjusted in real-time and applied individually to any
track, region or file.
One advantage of the VST plug-in format is Hyperprism and other plug-ins can work in real-time, processing "live" on an
audio track. Compare this to other plug-in formats such as Premiere or AudioSuite which force you to render each process
directly to file; the VST format means you can keep making changes to your effects as you build an arrangement, without
"committing" to any process or sound until the final mix.
The key drawback of the VST plug-in format is that each active effect taxes the computer's CPU, and there's little to
prevent you from adding more effects to a session than your CPU can process in real-time. Some effects are more
processor-intensive than others; the HyperVerb and Vocoder are particularly hungry for clock cycles. If you're running out
of processor headroom you'll likely have degraded previewing, sluggish controls, error messages or even freezes and
crashes. All real-time audio applications, including Hyperprism-VST, will simply run better on faster Macintoshes.
Each plug-in instantiation takes up additional RAM, about 500k for each Hyperprism effect. Running short of RAM,
especially during preview or playback can have severe performance implications.
Naturally, Hyperprism-VST effects can process directly to file, outside of real-time, which frees up CPU bandwidth
otherwise dedicated to keeping the effect active in-line. It takes a moment or two for the process to be calculated once
you've decided to render it to file. This also means that you will be consuming additional hard disk space.
Any effect parameter can be made to follow the movement of the mouse in the Blue Window. Once you have assigned
effect parameters to mouse movements, simply click and drag the mouse within the Blue Window. As you do so, you'll
hear and see the results; as your sound is being previewed, your gestures will change the effect settings. When you find the
"spot" you like, you may process your sound with those particular effect settings. Note that most effect plug-ins only allow
you to adjust one knob or slider at a time; Hyperprism gives you access to the entire set of controls, with a single mouse
move.
You may also use your host application's automation Write and Read capabilities to record dynamic effect changes
in any Hyperprism-VST effect. These will be played back in time with your music, allowing a much more spontaneous
and creative use of effects than the tradition "set-it-and-forget-it" behavior of typical signal processors. Hyperprism-VST
can be played much like a musical instrument, changing your effects right along with the music...and it remembers and
recreates your every move! VST implementations vary between the "compatible" sound editing programs; although
Cubase-VST and Logic Audio Platinum have support for parameter automation, Vision DSP 4.1.1 and Metro 4.5.1 omit
this feature; other applications may have varying degrees of automation control. Consult your sound editing program for
complete information on parameter automation recording, editing and playback.
[Table of Contents] [Next Chapter]
Page 9
Hyperprism-VST for MacOS VST Plug-in Compatible Applications
Installing Hyperprism-VST
Before You Install●
Easy Install●
Custom Install●
Configuring the Host Program●
Installation Support Notes●
Please read this section once through entirely and then follow these steps exactly!
Before you Install
If you haven't already, install your sound editing program (specifically Cubase VST/24 version 4.0, Metro version
4.5.1, Logic Audio Platinum version 3.5.3 or Vision DSP version 4.1.1b3 or later) as per the instructions in the
manufacturer's user's guide.
You will need 12 MB of free hard disk space for each Hyperprism-VST installation you do. Installing in multiple
applications takes additional increments of 12 MB of disk space per program.
Place the Arboretum CD in your CD-ROM drive and double-click on the Hyperprism Plug-in Pack Installer.
Follow all on-screen directions. You'll be asked to Accept the License Agreement, then you'll see the Read Me. Be
sure to peruse the Read Me for important last-minute instructions which may not have made it into this manual.
After the Read Me, the following installer dialog appears:
Page 10
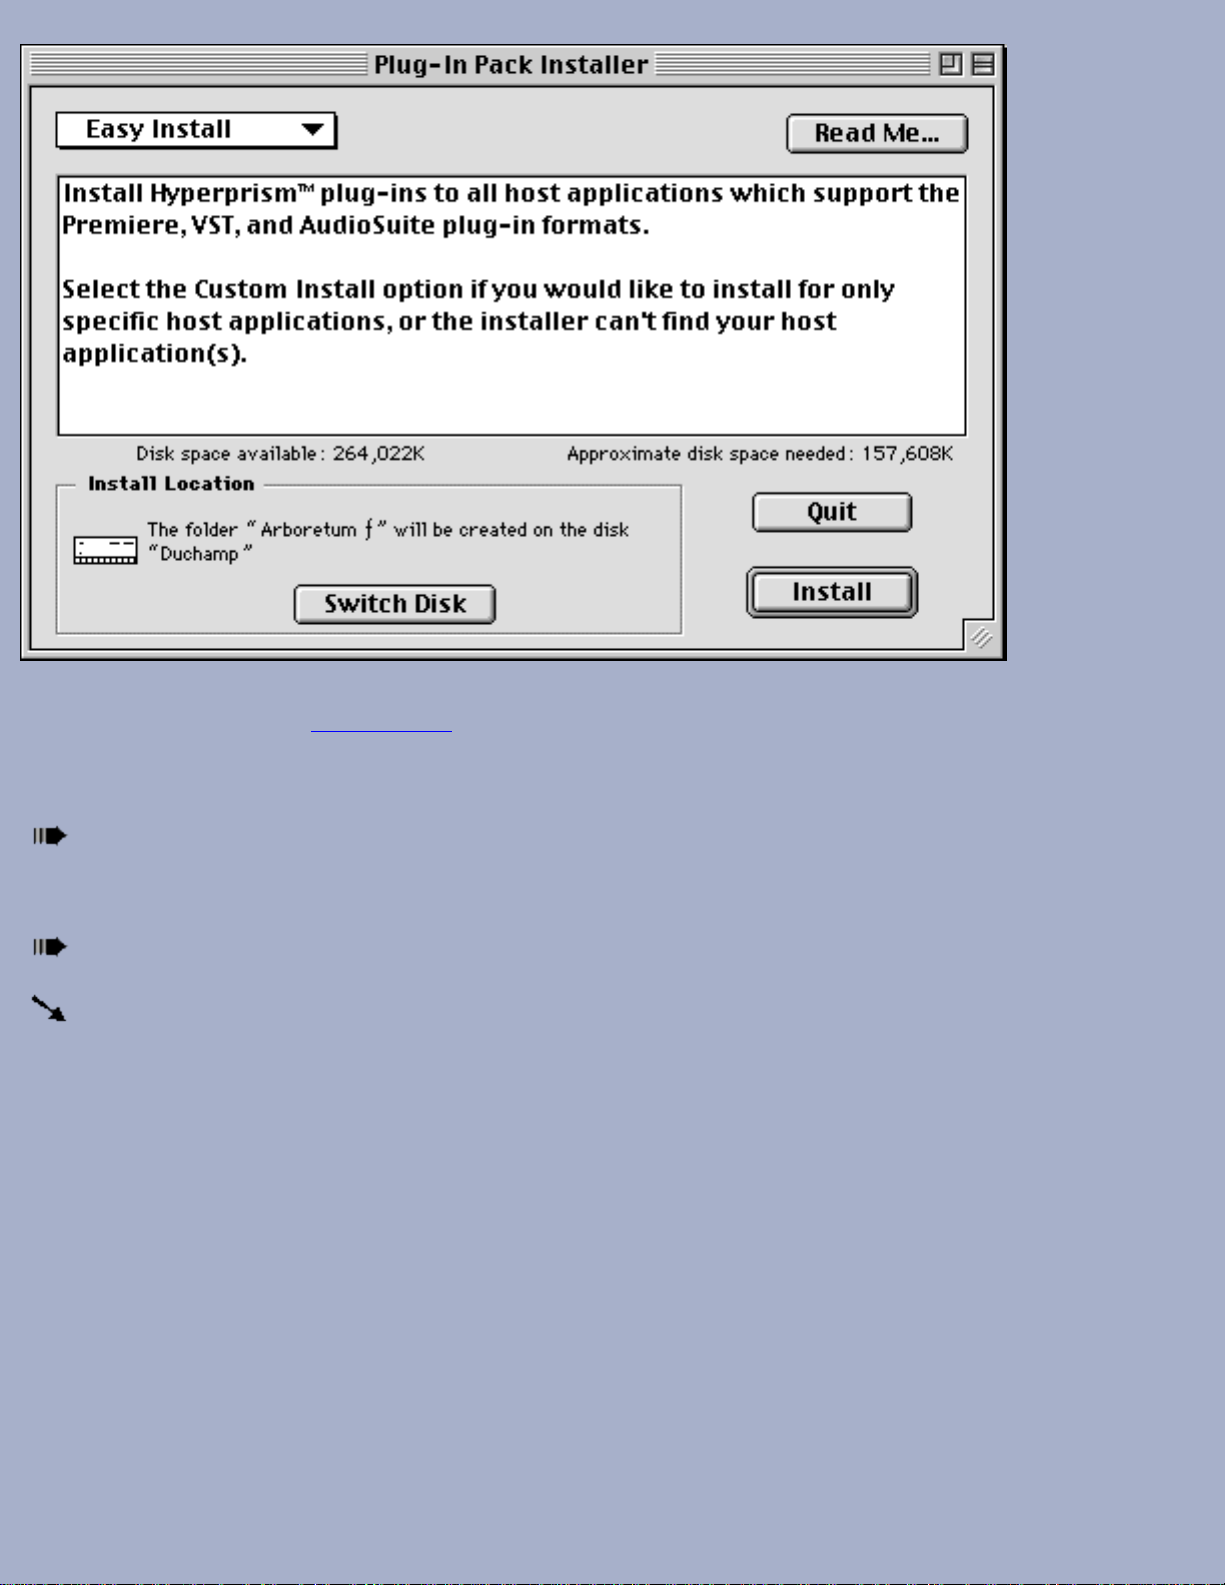
This is the Easy Install dialog. Note the pop-up menu at the upper left hand corner of this display; mouse-click on this
menu if you wish to switch to Custom Install.
Performing an Easy Install:
Check the Install Location display in the lower part of this Install dialog. Install Hyperprism onto the same hard
drive where your audio editing applications reside. Click on Switch Disk if you need to specify another drive for
installation.
Click on the Install button.
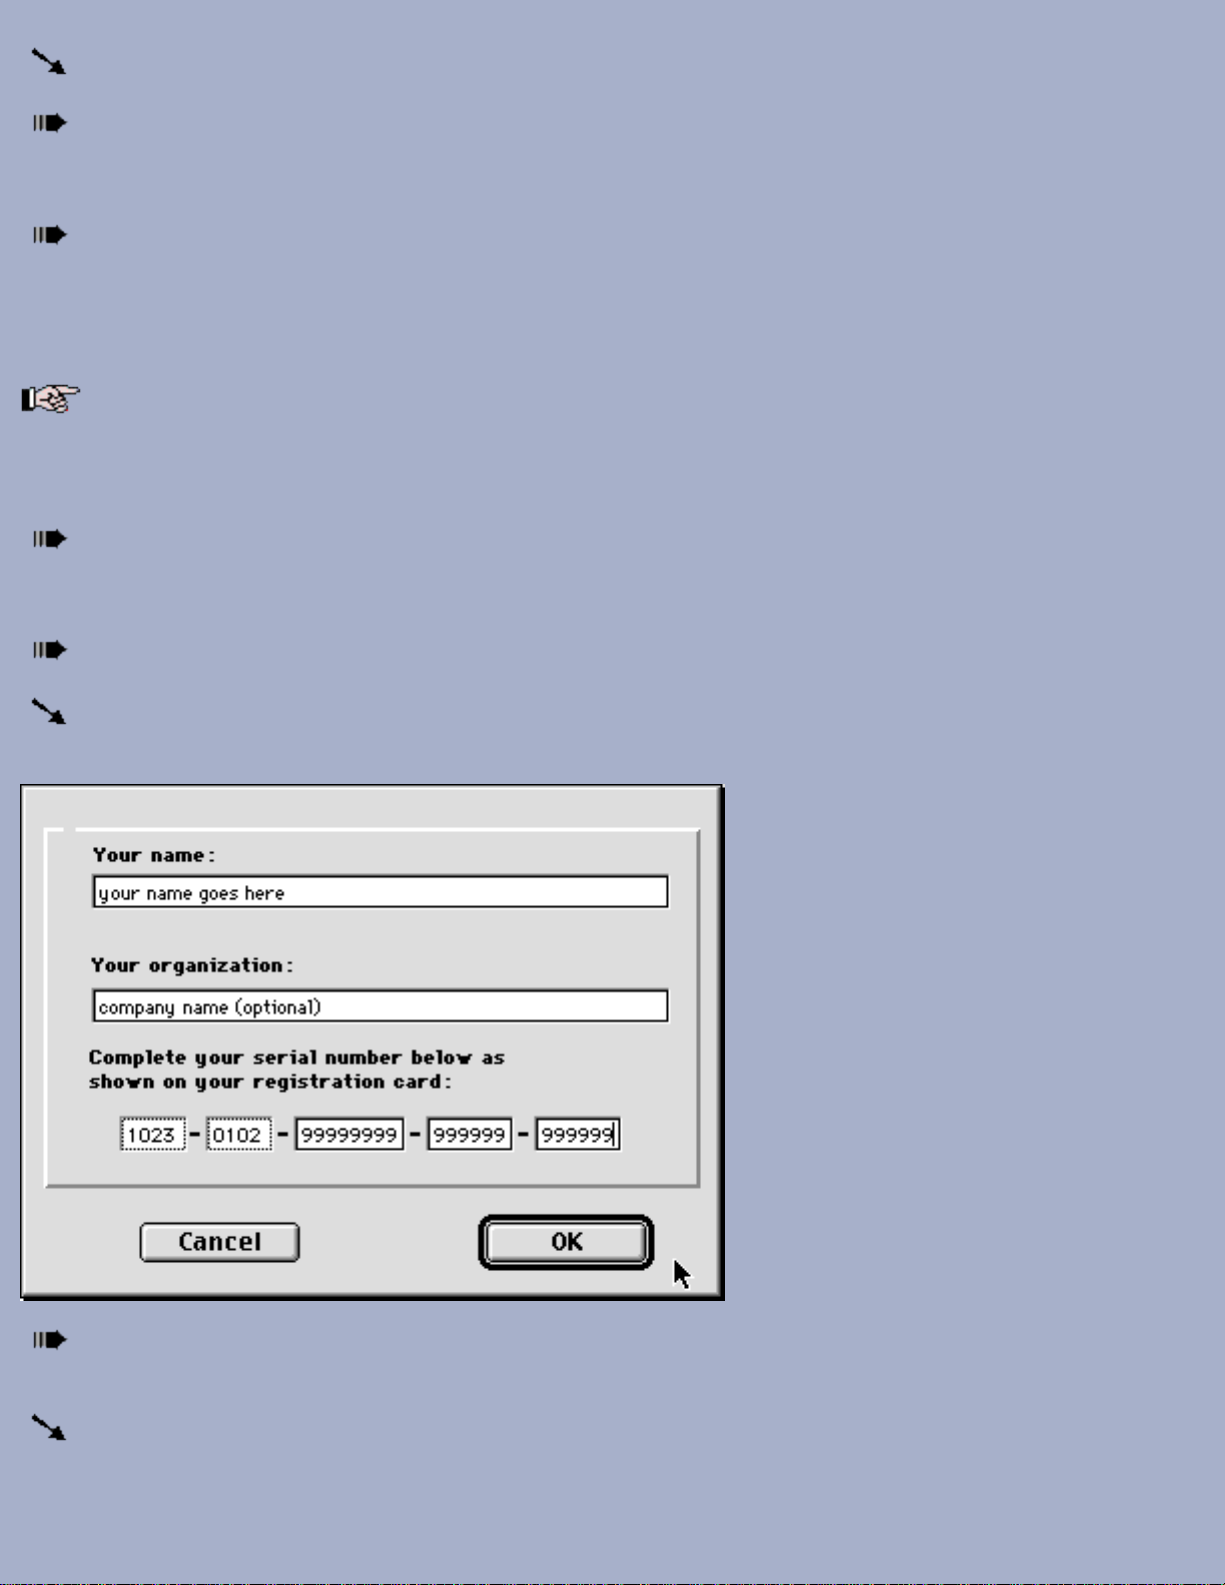
Next you'll be asked for your name (mandatory), company (optional) and Hyperprism Plug-in Pack or
Hyperprism-VST serial number. We've gone ahead and entered the first few numerals for you.
Page 11
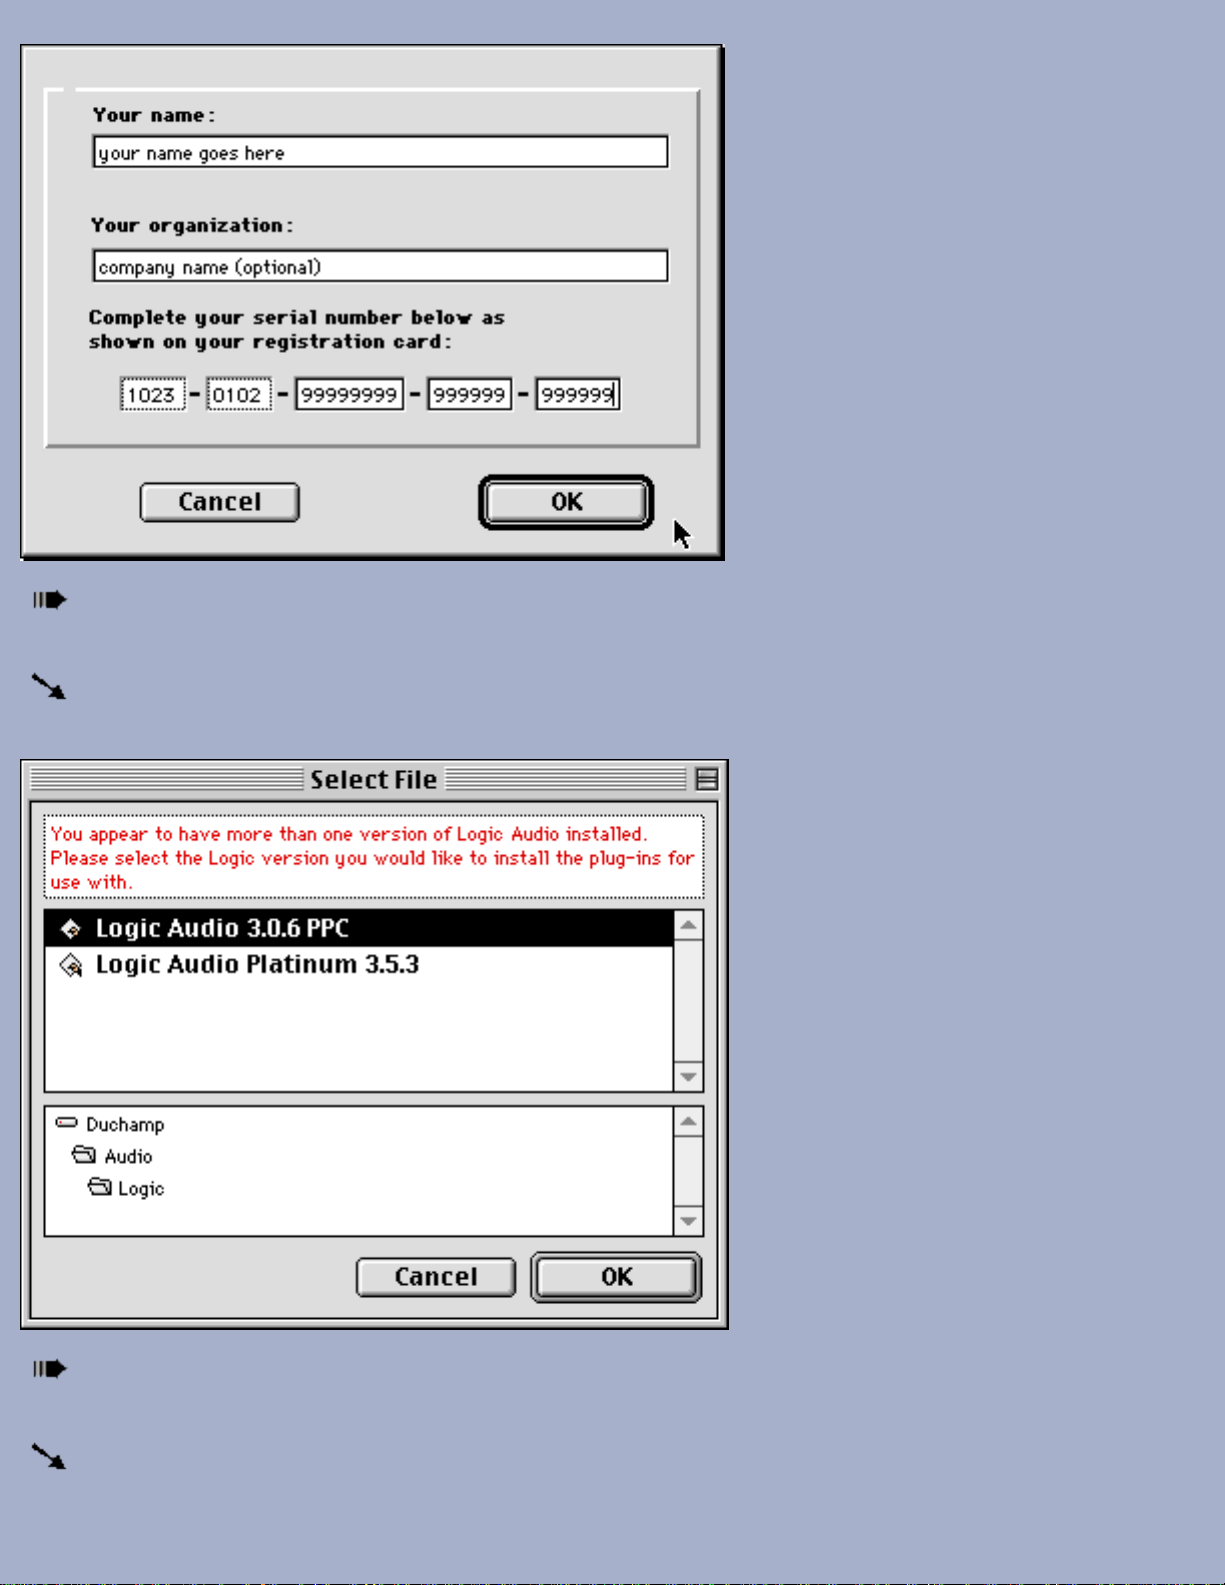
Make sure you enter your serial number accurately. Double check your entry. When all fields are complete the OK
button will highlight. Click on OK to proceed.
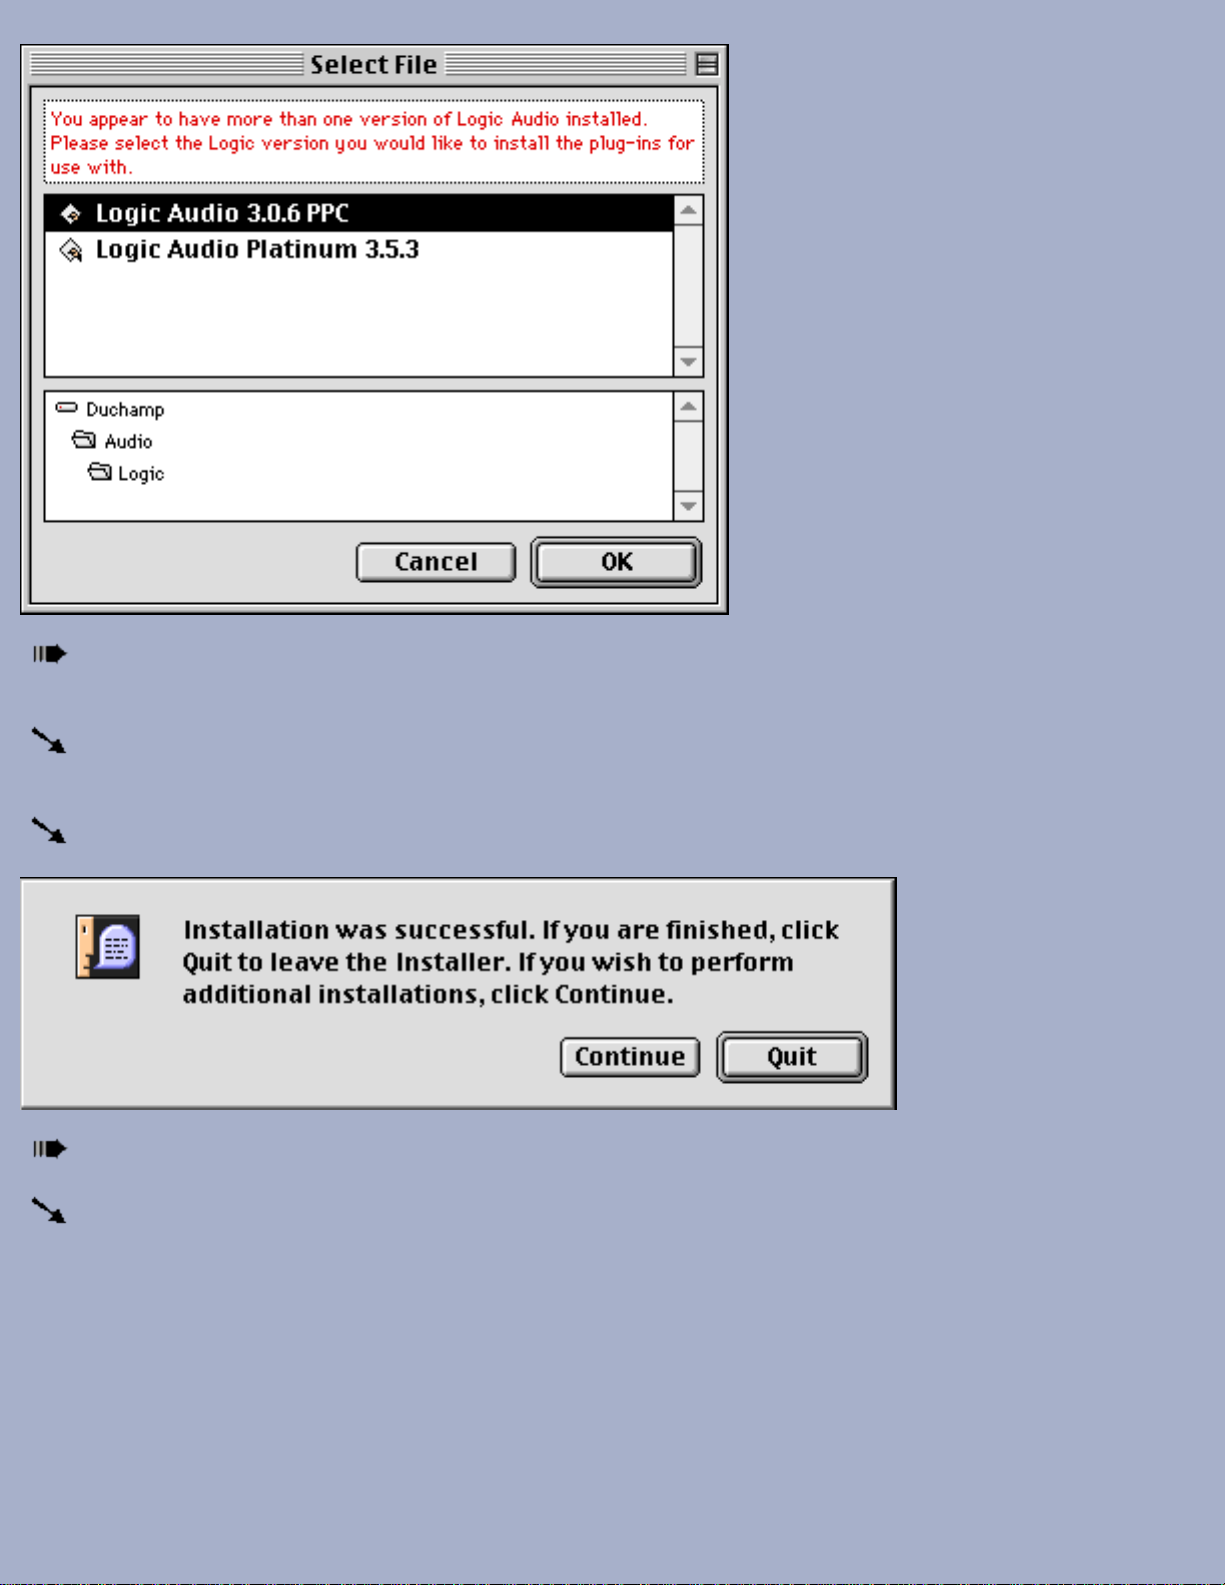
If you have more than one copy of a particular audio program installed, or different versions of a certain program,
you'll see the following dialog:
Select the program/version you wish to install Hyperprism into by clicking on the program name in the top part of
the dialog, then click on the OK button to proceed.
After the Installer has found each of the audio programs on your hard drive, and copied Hyperprism to those
programs' plug-ins folders, you'll receive a prompt much like the following, which gives you a report of the Installer's
Page 12
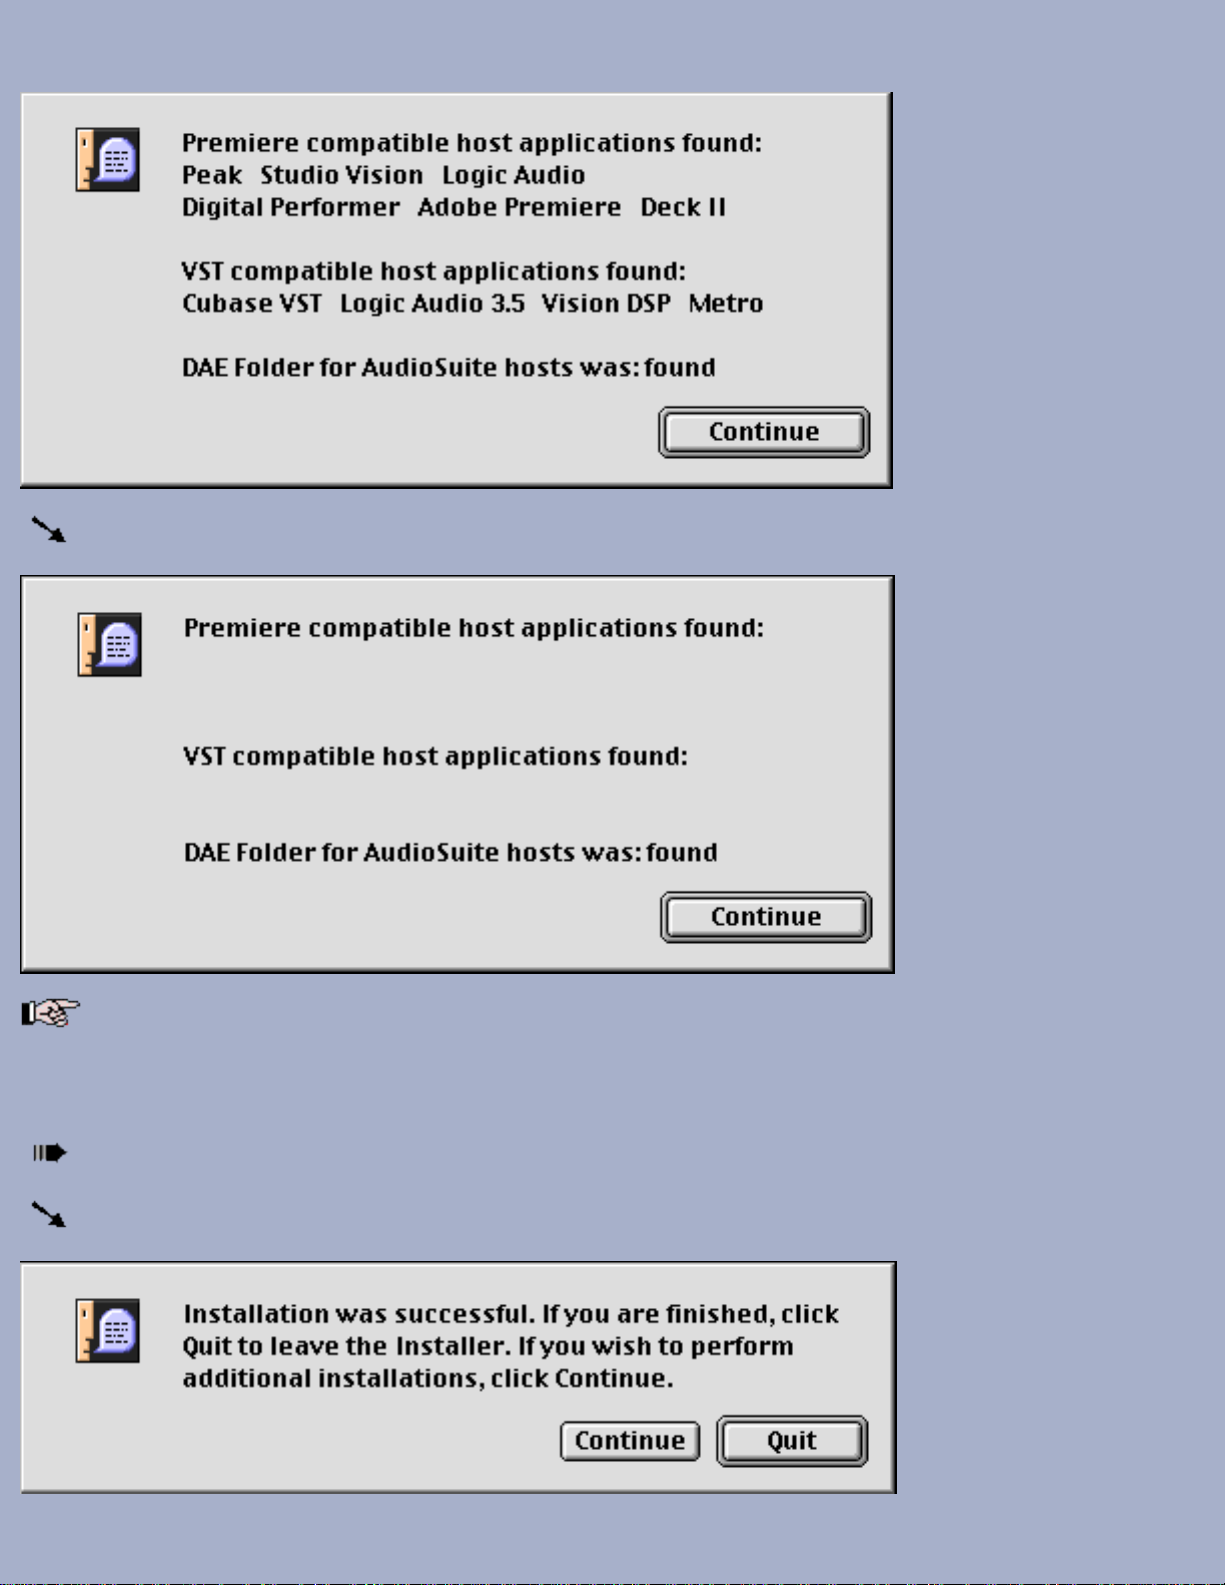
activity:
If the installer is unable to locate any Premiere or VST compatible audio programs, you'll get the following prompt:
If you're getting this message, with no program names listed after the Premiere and VST compatible entries, it
means that no Premiere or VST compatible host applications could be found. Check that you're installing Hyperprism onto
the same hard drive where your audio programs reside. Another reason for install failure could be that you've either
changed the name of an audio program, or changed the name of the default folder where that program resides.
Click on the Continue button to proceed with the installation.
Assuming all the previous steps were completed successfully, you should next see the following prompt:
Page 13
Since you're doing an Easy Install, there's probably little need to perform additional installation. Click on the Quit
button to proceed to the final stage of the installation.
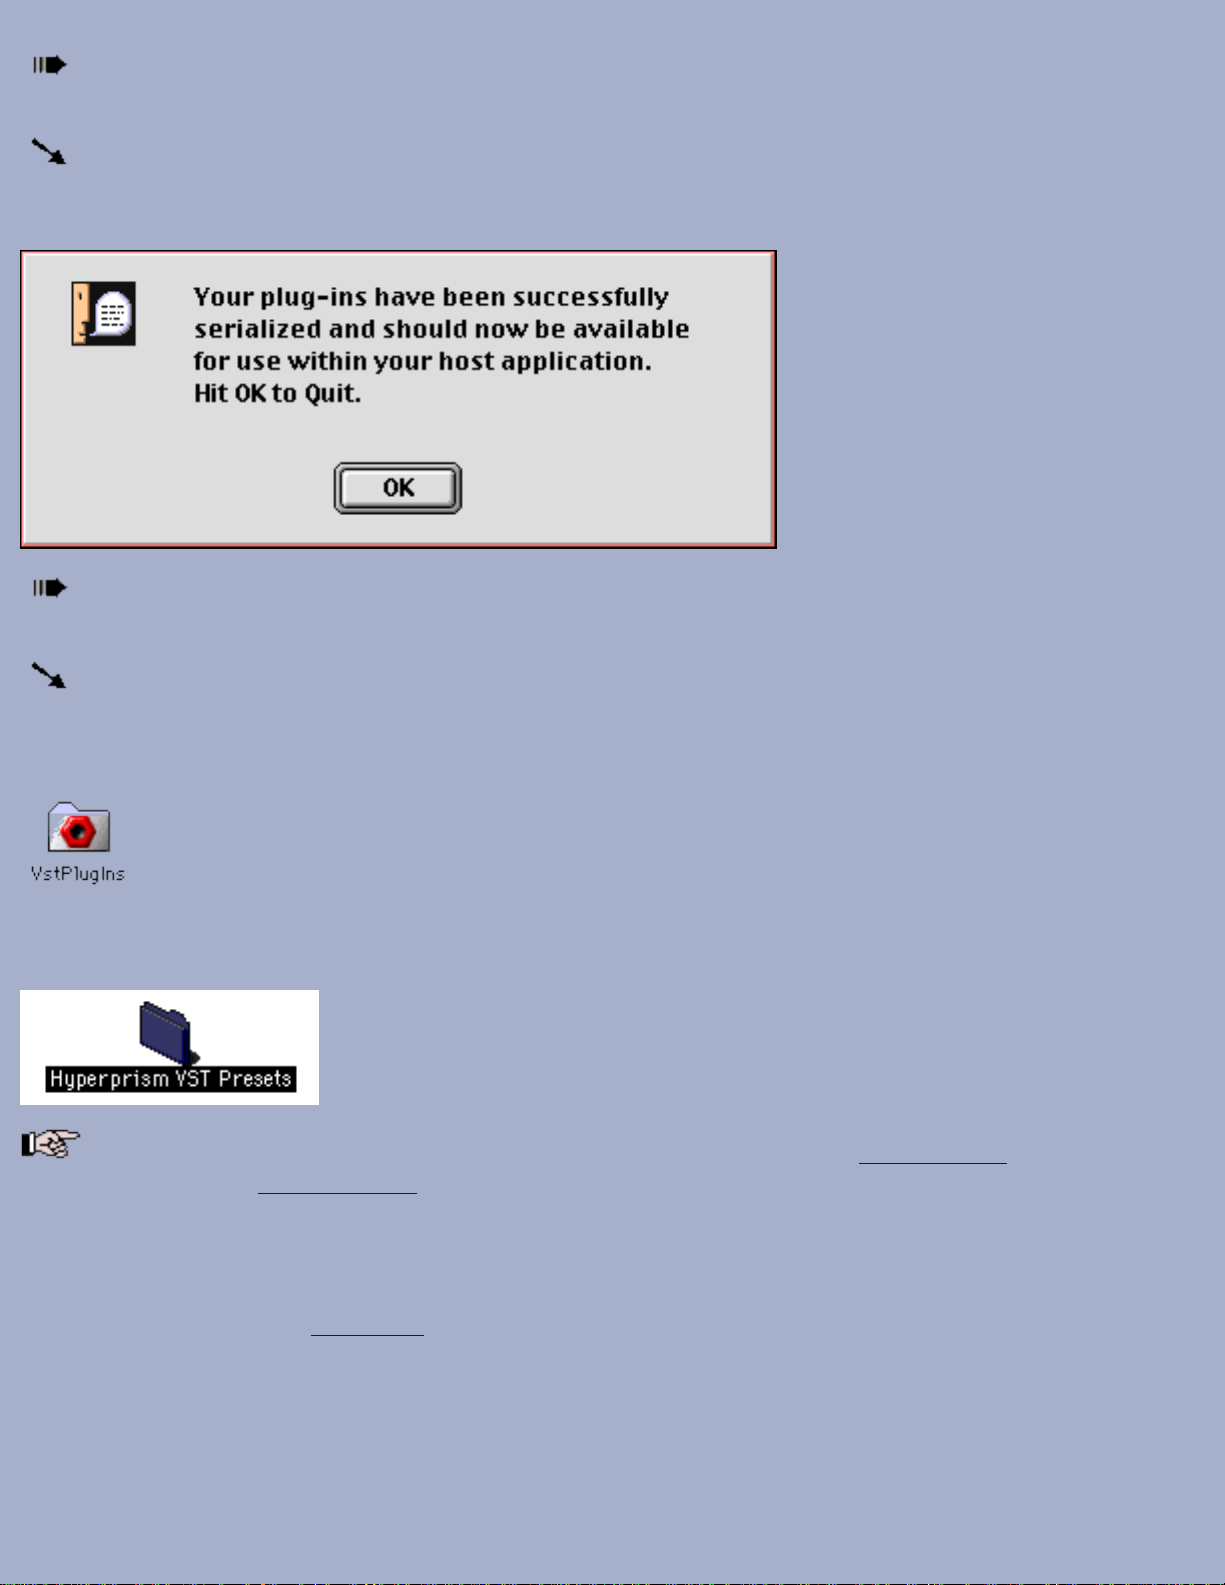
Now the Arboretum Hyperprism Serializers spring into action. The Serializers automatically apply your earlier serial
number input to each of the Hyperprism plug-ins, so as to unlock all the plug-ins prior to first usage. After each batch of
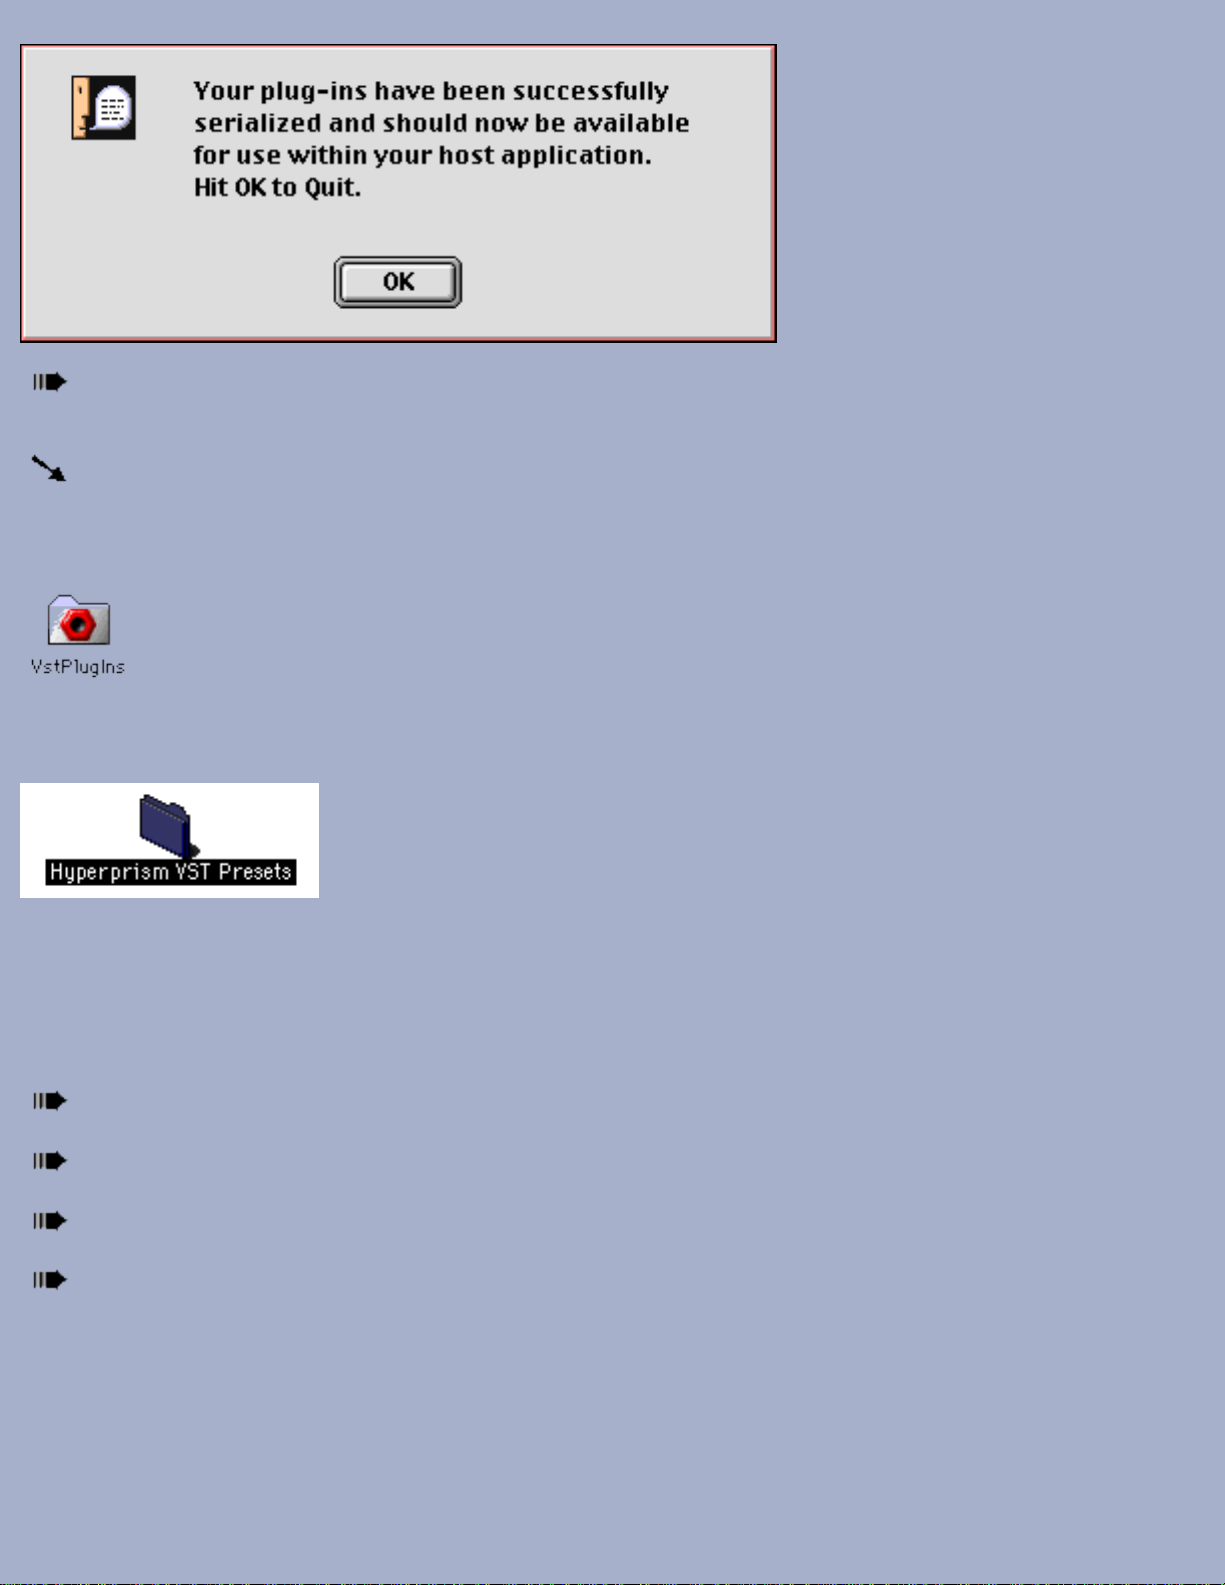
plug-ins has been serialized, you'll see the following prompt:
Click on the OK button to proceed or conclude. If you're installing Hyperprism into multiple audio programs, this
prompt will appear several times; click on OK to get through all of them.
Your Hyperprism-VST installation is now finished!
Your Hyperprism-VST plug-ins are installed into the VST plug-ins folder for your host application(s). This plug-ins folder
generally resides at the same directory level as your audio program.
In addition, you will have a new folder of Hyperprism-VST Presets. Presets are usually stored directly alongside or inside
the Plug-ins folder.
Problems? If any difficulty arises during the course of installation, check out the installation tips at the end of this
chapter, or the complete Troubleshooting section of this manual.
Performing a Custom Install:
This is the Custom Install dialog. Note the pop-up menu at the upper left hand corner of this display; mouse-click on this
menu if you wish to switch to Easy Install.
Page 14

In this window the various components of Hyperprism Plug-in Pack are segregated by plug-in format.
Hyperprism-VST is the second group of selections in the dialog's window.
Click on the arrow next to the Hyperprism-VST for the VST Plug-in Format entry to reveal the detailed list of
recognized host programs.
Page 15
Note the list of each "known" VST-compatible audio editing program (Cubase, Logic Audio, Vision DSP, Metro.)
Click on the boxes next to the programs in which you wish to use Hyperprism. For example, if you own Cubase and
Logic, just select those two applications. Alternately, you can "select all" by clicking on the top item ("Hyperprism-VST")
and the installer will search out each of the programs in the list, installing Hyperprism into those it can find.
If the audio program you own is not on the list, or if you're encountering some other difficulty with installation, you
can select the option "Other Plug-in Hosts" which will create a new folder on your hard drive called "Arboretum f" and
will then install and serialize a set of Hyperprism-VST (etc.) plug-ins in that folder. If you're selecting this option you'll
eventually have to drag your Hyperprism plug-ins into your audio program's plug-ins folder by hand once you've
completed the installation.
We suggest that you only use the "Other Plug-in Hosts" options if: 1) You have a Premiere or VST compatible
audio program which is not included in the Custom Installer's list; 2) You've changed the name of your audio editing
program or its default folder and the Hyperprism Installer can not locate them; or 3) You're instructed to do so by
Arboretum technical support. Installing to Arboretum f unnecessarily wastes hard disk space.
Check the Install Location display in the lower part of this Install dialog. Install Hyperprism onto the same hard
drive where your audio editing applications reside. Click on Switch Disk if you need to specify another drive for
installation.
Click on the Install button.
Next you'll be asked for your name (mandatory), company (optional) and Hyperprism Plug-in Pack or
Hyperprism-VST serial number. We've gone ahead and entered the first few numerals for you.
Make sure you enter your serial number accurately. Double check your entry. When all fields are complete the OK
button will highlight. Click on OK to proceed.
If you have more than one copy of a particular audio program installed, or different versions of a certain program,
you'll see the following dialog:
Page 16
Select the program/version you wish to install Hyperprism into by clicking on the program name in the top part of
the dialog, then click on the OK button to proceed.
Your installation is now in process. The installer will locate your selected audio editing programs and copy the
Hyperprism-VST plug-ins into their respective Plug-Ins folders.
Assuming all the previous steps were completed successfully, you should next see the following prompt:
Click on the Quit button to proceed to the final stage of the installation.
Now the Arboretum Hyperprism Serializers spring into action. The Serializers automatically apply your earlier serial
number input to each of the Hyperprism plug-ins, so as to unlock all the plug-ins prior to first usage. After each batch of
plug-ins has been serialized, you'll see the following prompt:
Page 17
Click on the OK button to proceed and conclude. If you're installing Hyperprism into multiple audio programs, this
prompt will appear several times; click on OK to get through all of them.
Your Hyperprism-VST installation is now finished!
Your Hyperprism-VST plug-ins are installed into the VST plug-ins folder for your host application(s). This plug-ins folder
generally resides at the same directory level as your audio program.
In addition, you will have a new folder of Hyperprism-VST Presets. Presets are usually stored directly inside the Plug-ins
folder.
Configuring the Host Program
Each Hyperprism effect that you load requires RAM in which to operate. Allocate additional RAM to your sound editing
program as necessary, we suggest increasing the Preferred setting by as much as 500 k for each Hyperprism-VST plug-in
you wish to load concurrently.
Go to the Mac Desktop and locate the host audio application on your hard disk.
Click once on the program's icon so as to select it (being careful not to double-click and launch the application).
Do a Finder "get-info" (press the keyboard shortcut Command-I).
You must increase the default Preferred Size setting of the VST host program to allow memory space for each
Hyperprism plug-in which will be loaded simultaneously. Allocate as much as 500k of RAM for each plug-in and more for
delay plug-ins. If you have the memory to spare, allocate up to 2 MB for each concurrent plug-in instantiation.
Page 18
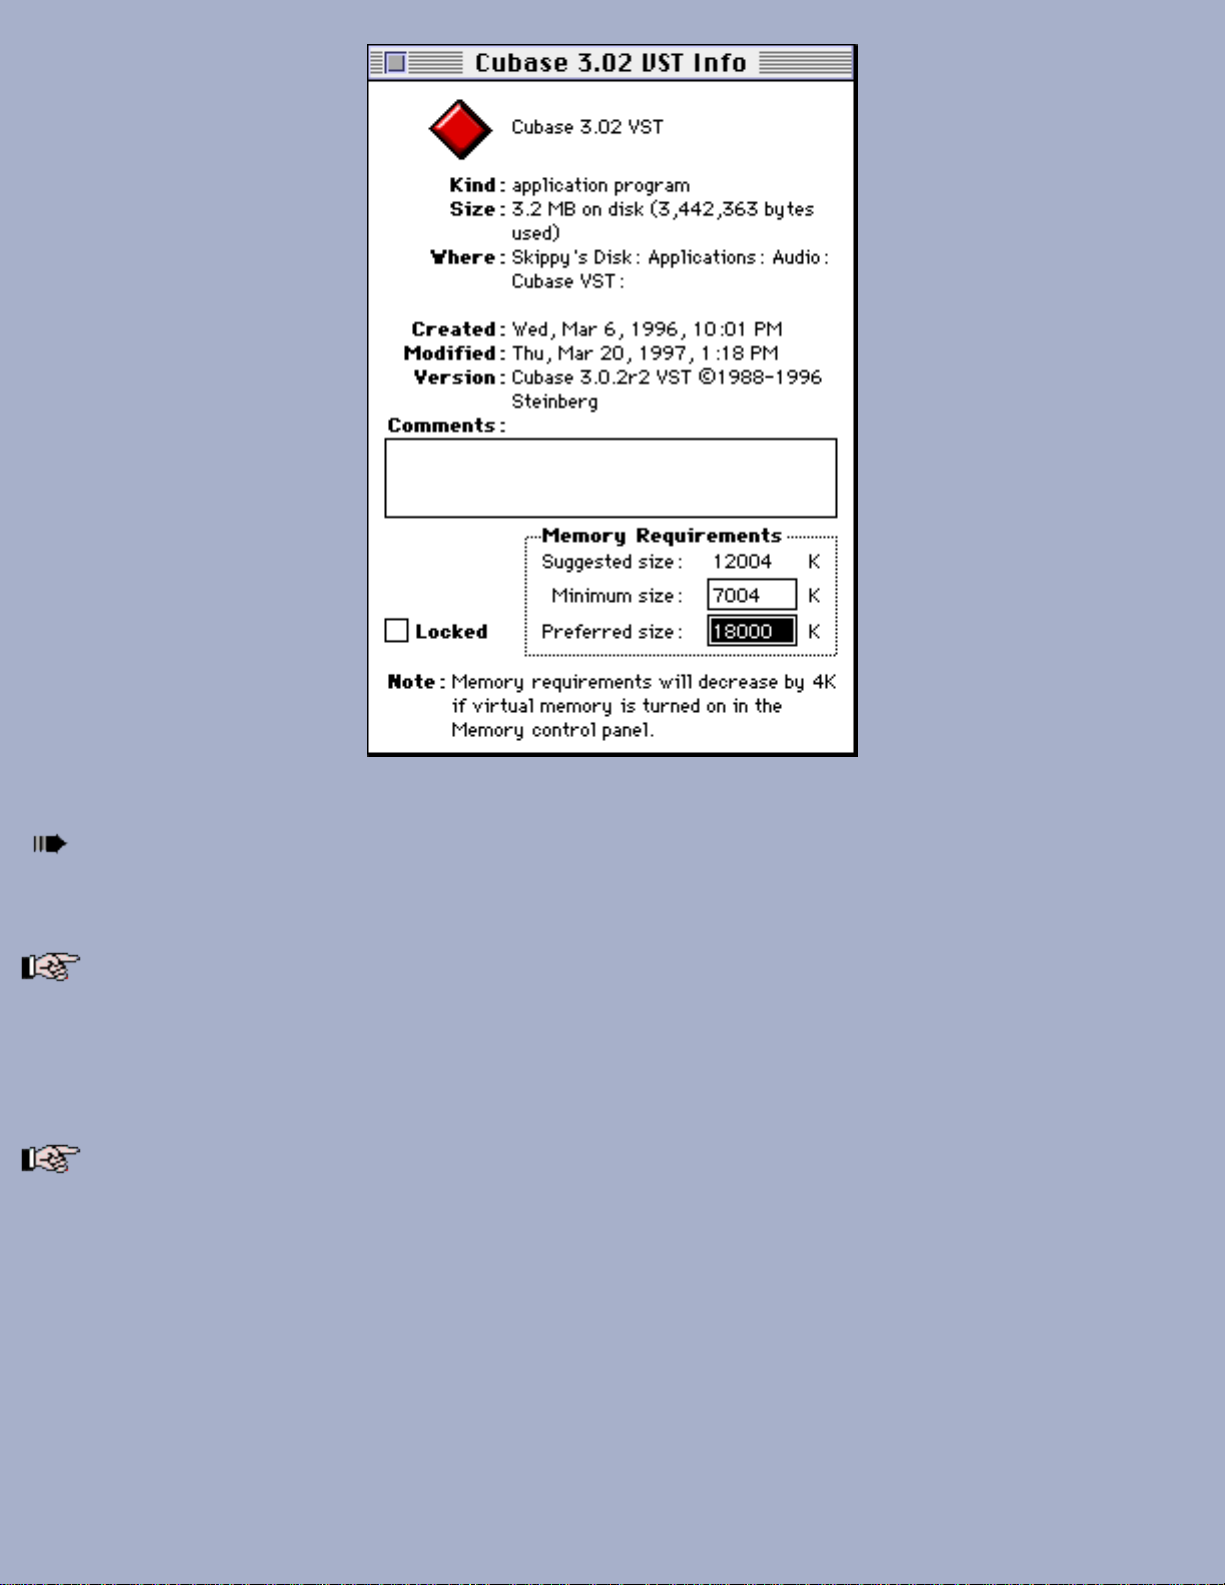
Cubase Get Info dialog (note Preferred size field is highlighted)
Close the Get Info Dialog and launch your audio editing program.
Installation Support Notes
The Arboretum installer supports all third-party VST and Premiere-compatible audio editing software packages that
are known to us to be compatible as of November 1998. If the sound editing program you own is not on our list (such is
the case with the forthcoming Bias Peak 2.0) or if you're encountering some other difficulty with installation, you can
select the option "Other Plug-in Hosts" which will create a new folder on your hard drive called "Arboretum f" and will
then install and serialize a set of Hyperprism plug-ins in that folder. If you're selecting this option you'll eventually have to
drag your Hyperprism plug-ins into your audio program's plug-ins folder by hand once you've completed the installation.
Problems? If any unexpected error messages come up during the course of installation, or if the Installer fails to
place the Hyperprism plug-ins into your target program's Plug-ins folder, immediately quit the Installer and Restart your
computer while holding the shift key down, so as to temporarily disable all Extensions and eliminate any possible system
conflicts. (If your CD ROM drive is not an Apple built-in model, you may have to eschew turning off Extensions.)
Once restarted, go into the System folder, open the Preferences folder and drag the Hyperprism Preferences file into the
Trash. Deleting the Preferences files will clear out the results of a faulty serialization procedure. Then run the Installer
again and follow the preceding installation steps as directed. Also make sure you're using the correct Arboretum product
serial number. Hyperprism 2 (for HyperEngine), Ionizer, Ray Gun, Hyperprism-TDM and Hyperprism-Plug-in Pack are
each sold separately, and each require their own unique serial numbers.
When installing Hyperprism an Arboretum Serializer utility will also be installed in the Plug-ins folder. This utility will
batch-serialize any Hyperprism plug-ins that are within the folder. When installing future updates to Hyperprism you'll be
able to simply double-click the Serializer to authenticate any new plug-ins.
Page 19

If Trouble Persists: Link over to the Troubleshooting chapter of this manual. Also take a look at the Support frame
up on the Arboretum web site <http://www.arboretum.com> for the latest technical notes and troubleshooting tips. If all
else fails either email support@arboretum.com or phone our service line during our regular weekday business hours, 10
am to 6 pm Pacific: (650) 738-4750
[Last Chapter] [Table of Contents] [Next Chapter]
Page 20
Hyperprism-VST for MacOS VST Plug-in Compatible Applications
Using Hyperprism-VST
Controlling Hyperprism●
Hyperprism-VST and Cubase-VST●
Hyperprism-VST and Logic Audio●
Hyperprism-VST and Metro●
Hyperprism-VST and Vision DSP●
Controlling Hyperprism
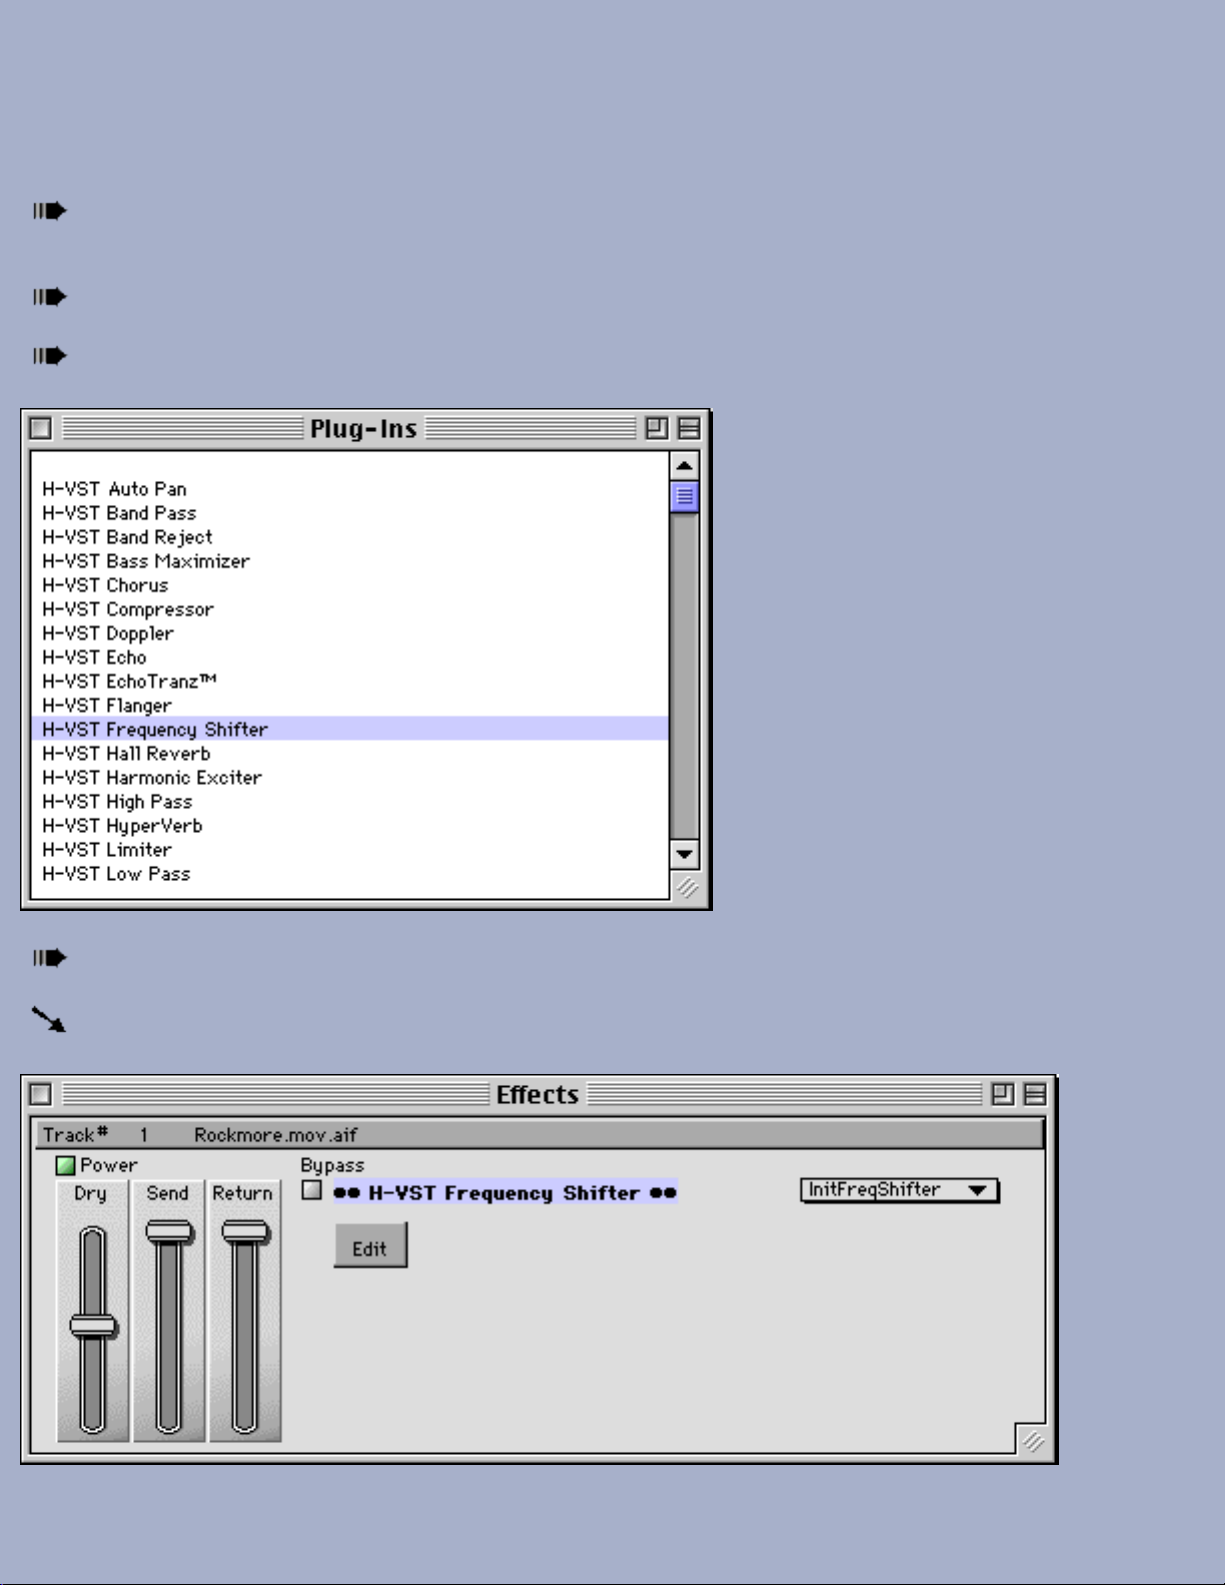
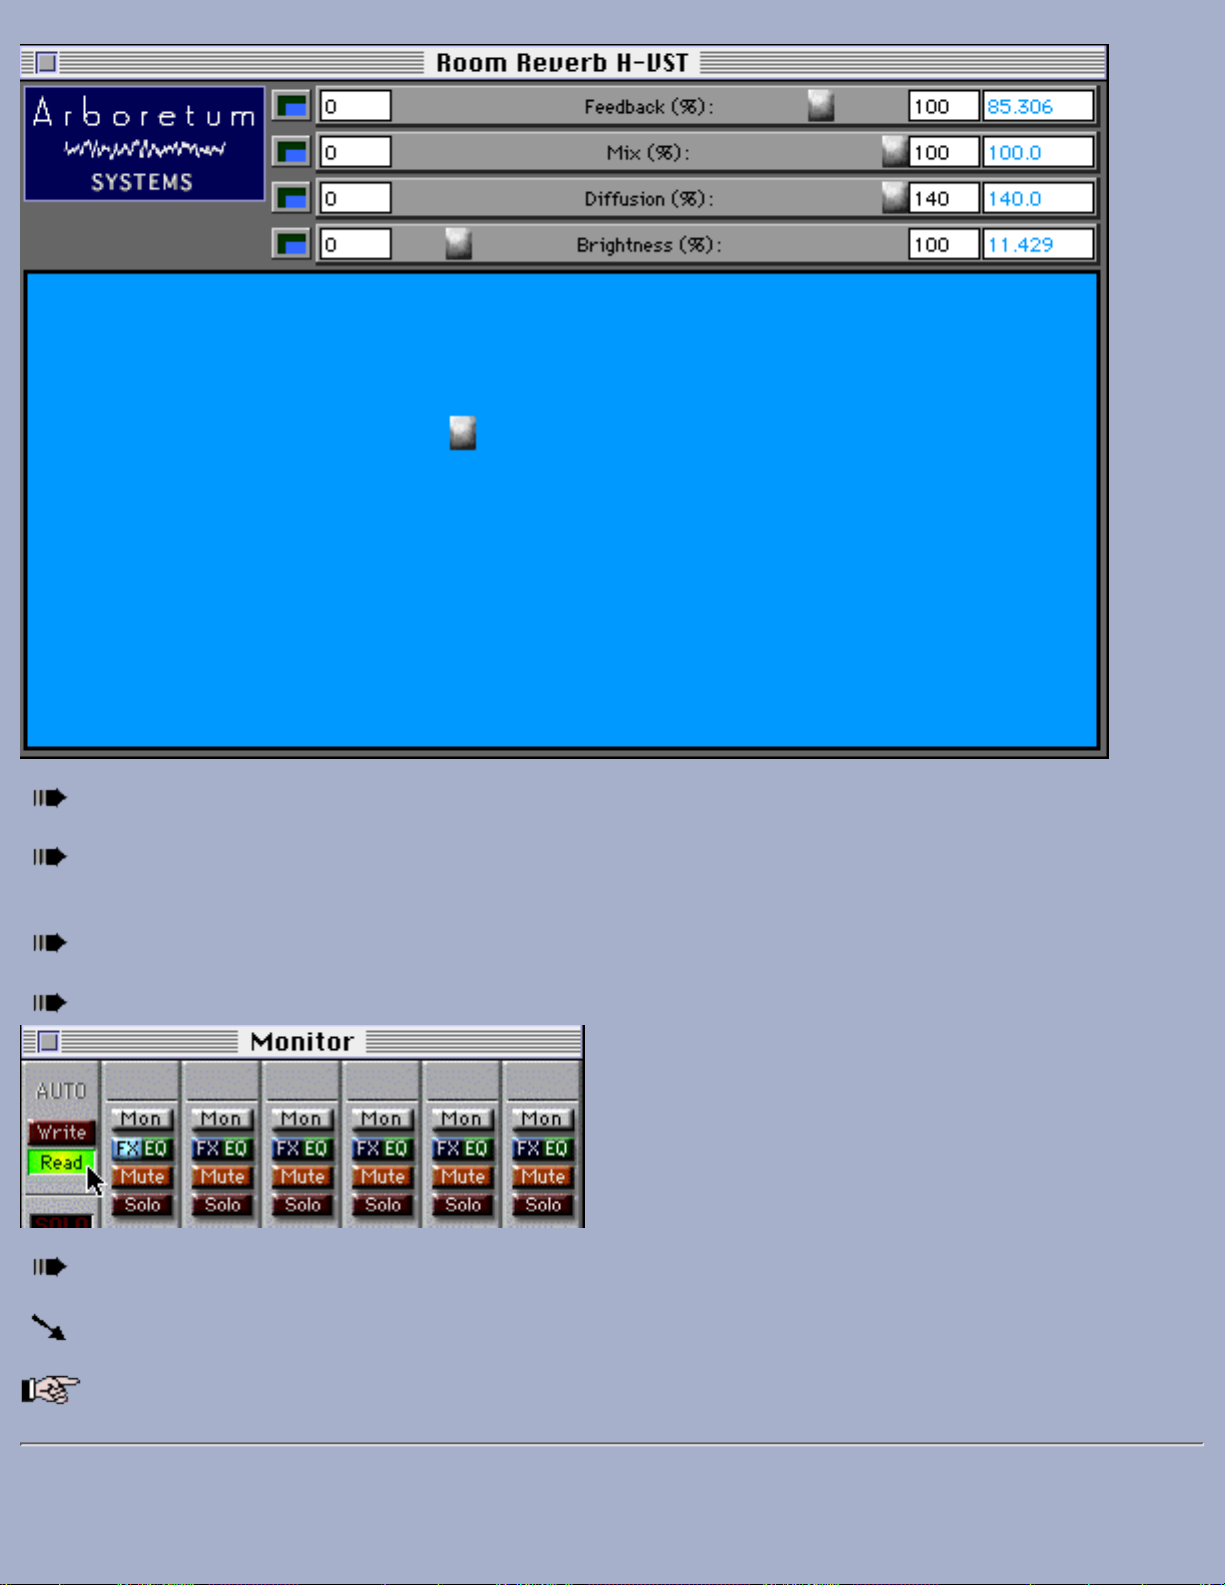
When you launch a Hyperprism-VST effect you'll see the Hyperprism display, which looks much like the Room
Reverb effect below. Note the effect parameter sliders in the top section of the screen, and the Blue Window control area.
Logic and Vision DSP add special plug-in buttons to the effect window; their functions are documented later in this
chapter. Refer to the effects reference section of the Hyperprism documentation for specifics on using each different effect.
Page 21

The Blue Window
The main part of Hyperprism-VST's edit screen is the Blue Window. By clicking and dragging your mouse in the Blue
Window's "Play Zone," you may adjust two or more effect parameters simultaneously. Some parameters may be
manipulated by horizontal mouse motions, others by vertical ones. Change these assignments to suit your working style
and the effects you are trying to achieve. The sliders at the top of the screen determine the effect parameters that are
controlled by the Blue Window.
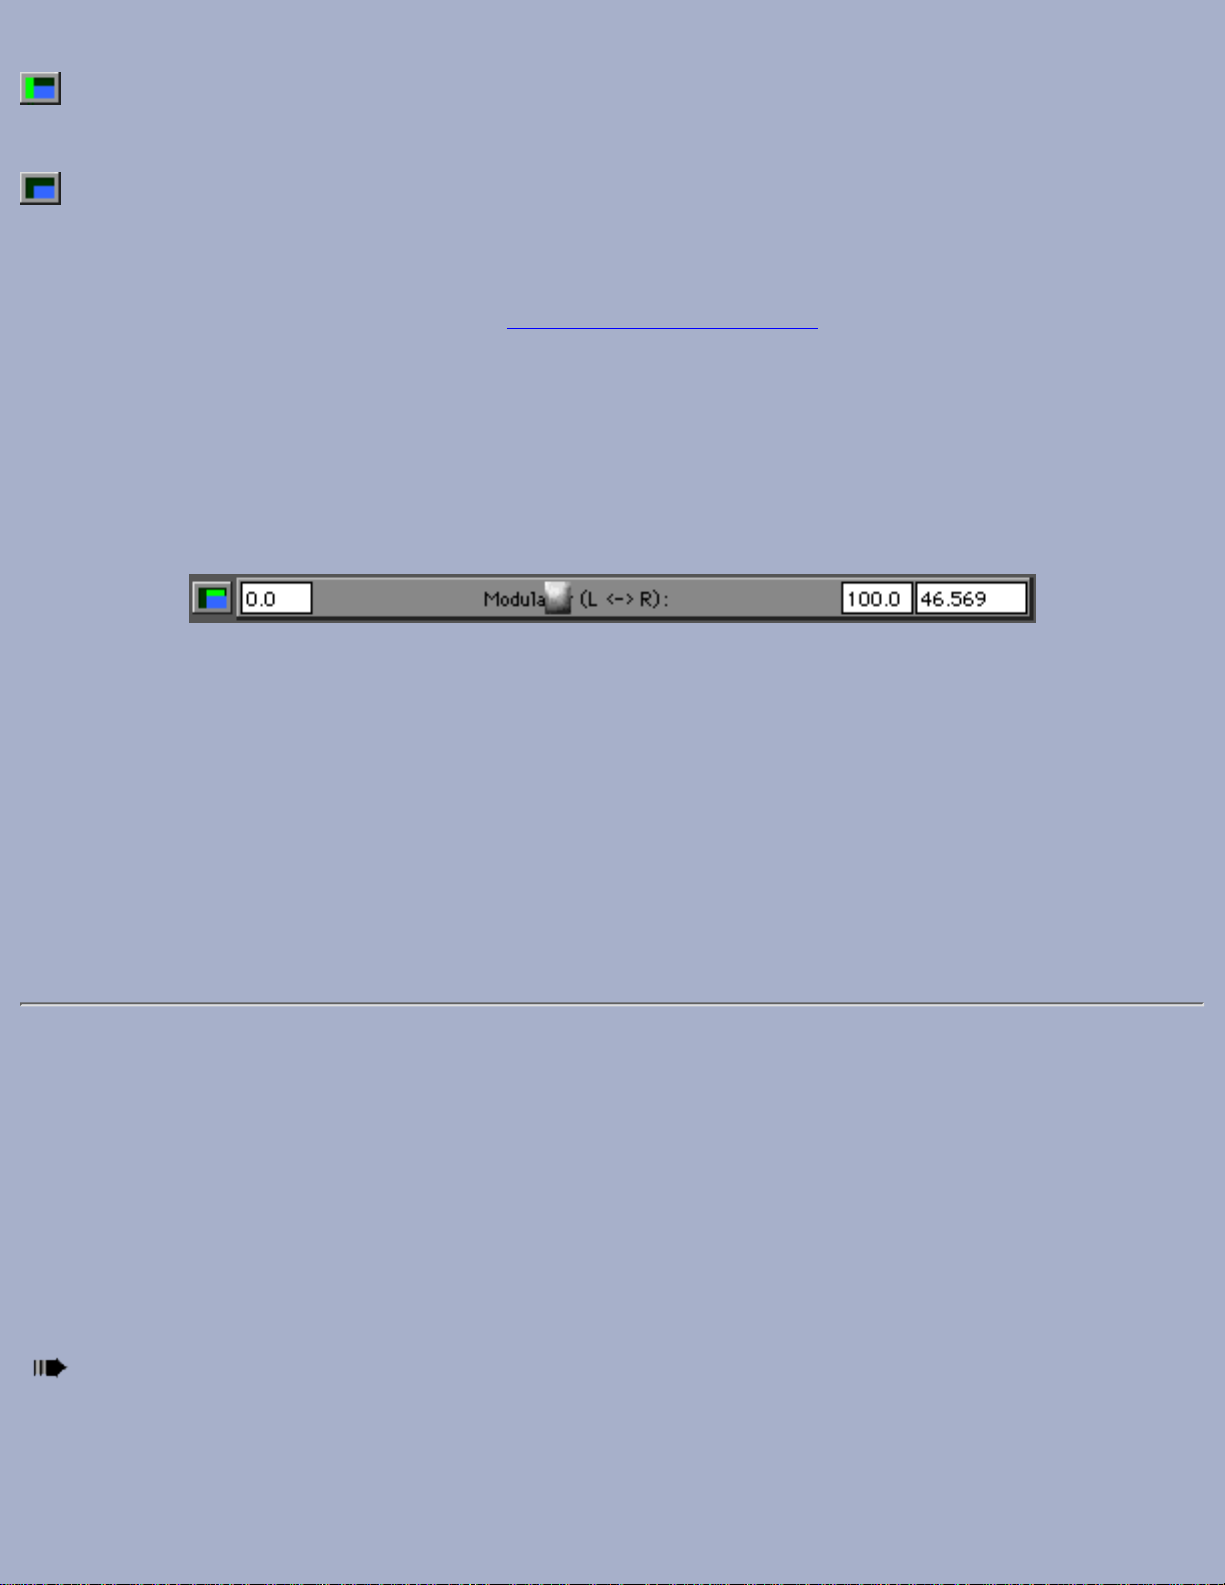
The Sliders
The Sliders are used to set effect parameters. They can be individually adjusted directly with the mouse, or they can be set
to respond to horizontal or vertical mouse movements in the Blue Window. But how?
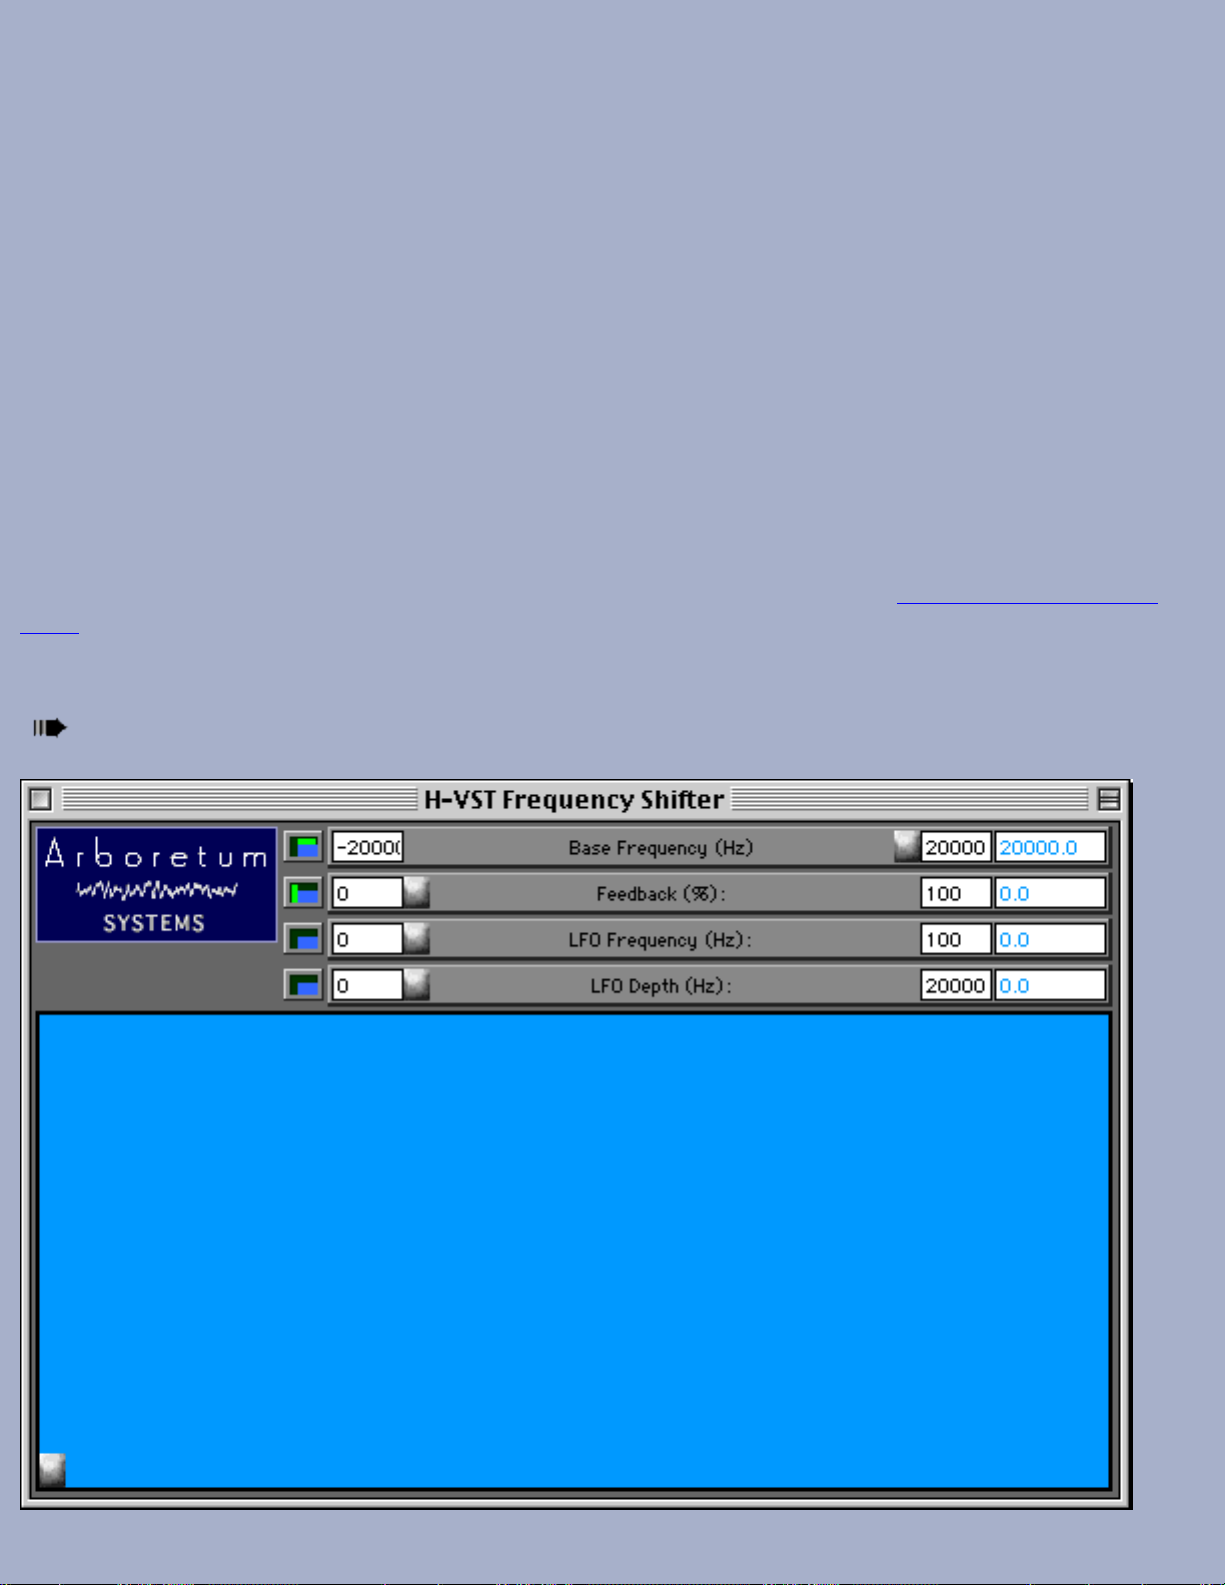
Hyperprism Slider. From left: Axis button, minimum value field, slider throw area and handle, maximum value field and
current value field.
Note the small blue button to the left of each parameter slider. Clicking this Axis button will cycle through three
possible states, shown by a small green bar. The three choices are vertical control, horizontal control or off.
When the green bar appears horizontally across the top of the Axis button, that slider will be controlled by horizontal
mouse movements in the Blue Window.
Page 22
Clicking the Axis button a second time will cause the green bar to appear vertically at the left side of the blue button
and the corresponding slider will be controlled by vertical mouse movements in the Blue Window.
Finally, clicking the Axis button once more will cause the little green bar to disappear. In this case, this slider will be
unaffected by movements in the Blue Window.
How might this feature be used? For example, you may wish to control a Reverb by assigning Diffusion and Brightness to
horizontal mouse movements while Feedback is assigned to vertical mouse movements. Use this gestural control over
multiple parameters, combined with Hyperprism's parameter automation capability, to create effects that change and move
in real-time. Design filters which "dance" with the music or effects that morph and change in unusual ways.
Changing Slider Ranges
Sometimes, the default range of values (from one end of a sliders travel to the other) may be larger or smaller than you'd
like. If so, you may alter the parameter range by changing the minimum and maximum value numeric fields at either end
of each slider. You can change the parameter's current setting by altering the current value numeric field to the far right of
the slider.
Hyperprism Slider. From left: Axis button, minimum value field, slider throw area and handle, maximum value field and
current value field.
Changing the minimum, maximum and current values is easy: click in the numeric field and drag the mouse up to increase
the value or down to decrease it. The further away you drag the mouse, the faster the value will change. Hold down the
Option (alt) key while mouse dragging to scroll by units of 100.
Stereo File Support
Hyperprism-VST includes a number of effects which require a stereo file for input. Make sure you have your stereo tracks
panned 100% left and right, otherwise you will get little or no effect with the Doppler, M-S Matrix, Vocoder and other
stereo processes.
Hyperprism-VST and Cubase-VST
Steinberg's Cubase VST was the first program to implement the VST audio plug-in format. In the Spring of 1998
Steinberg opened up the VST spec to third-party developers; Steinberg's competitors have been quick to adopt this
framework. The next section describes the basics of getting Hyperprism-VST effects going in Cubase VST 3.5 and Cubase
VST/24 4.0.
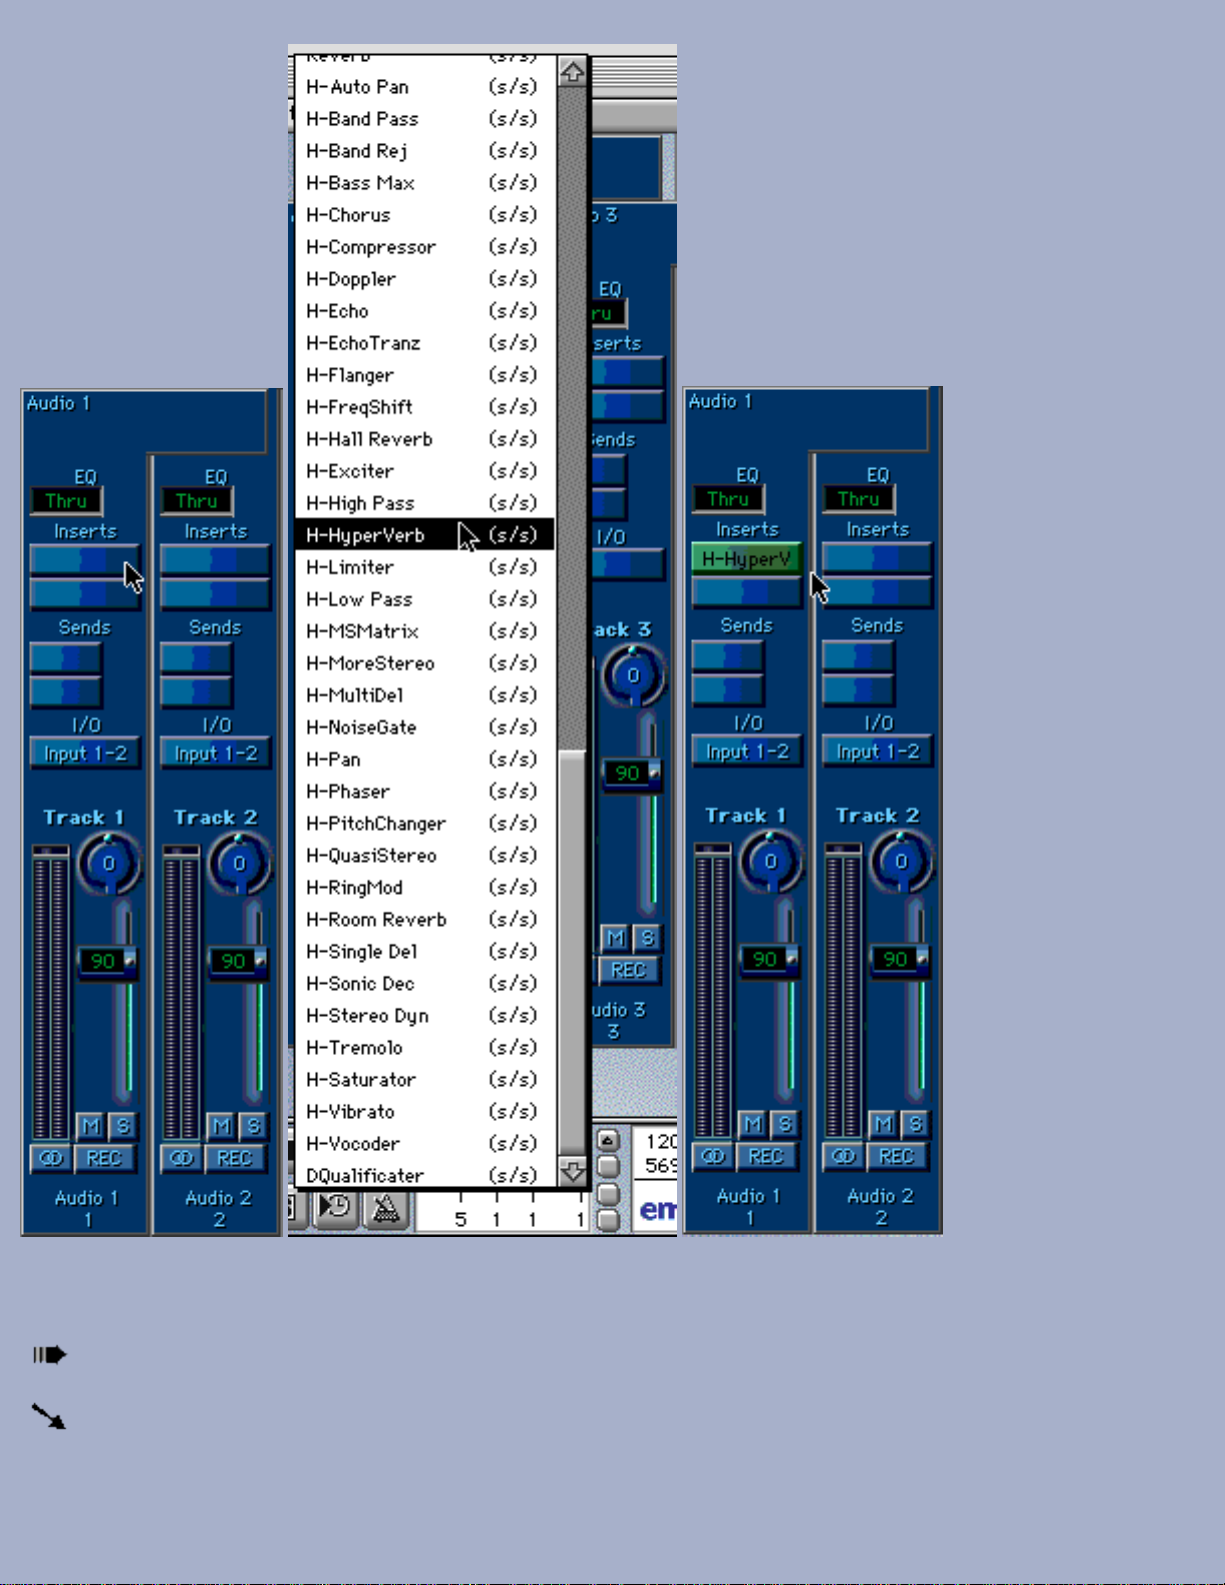
Effects in Cubase are applied to individual channels, or to the overall stereo mix. Access them from the Effects and Master
Effects racks, which can be opened from the Audio menu.
To Add effects to Individual Channels:
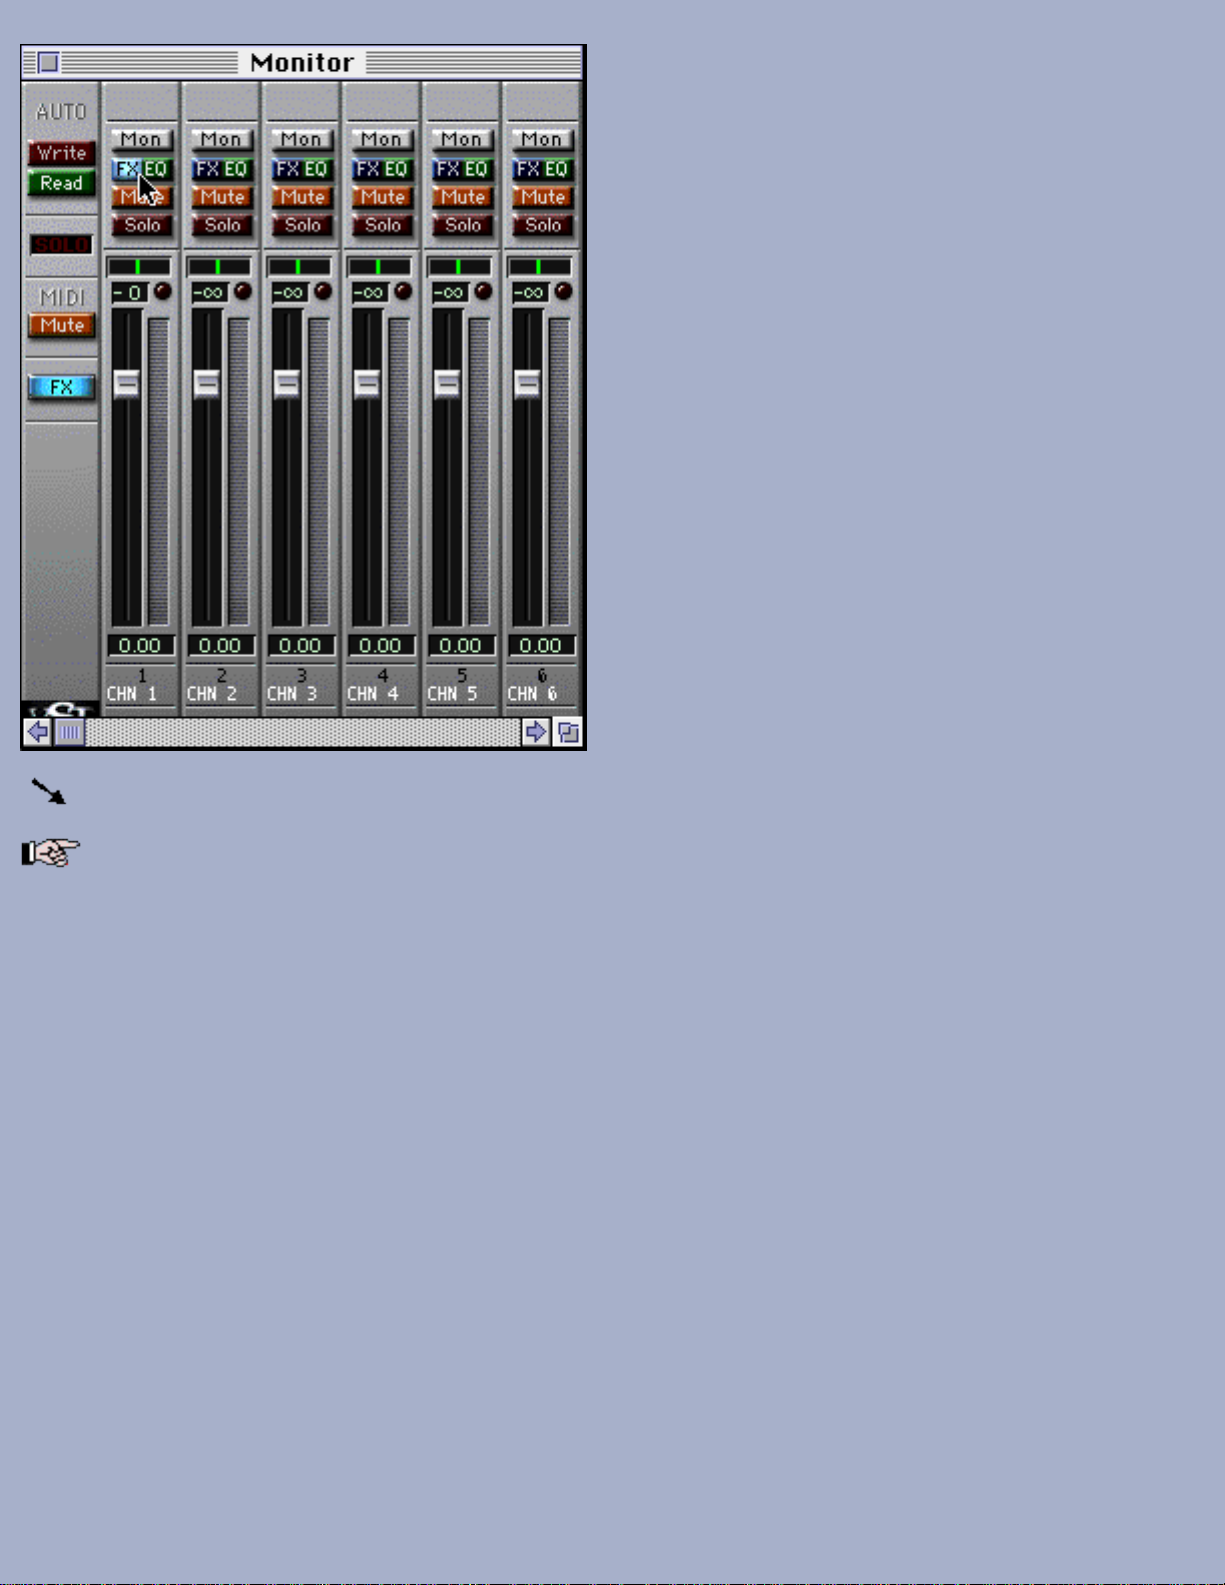
Open the Cubase Monitor window and click the "FX" button in the top portion of any channel.
Page 23
The Channel window will open.
Make sure the effect ON button is illuminated and that the effect send is turned up.
Page 24
Have your stereo tracks panned 100% left and right or you will get little or no effect with certain stereo processes.
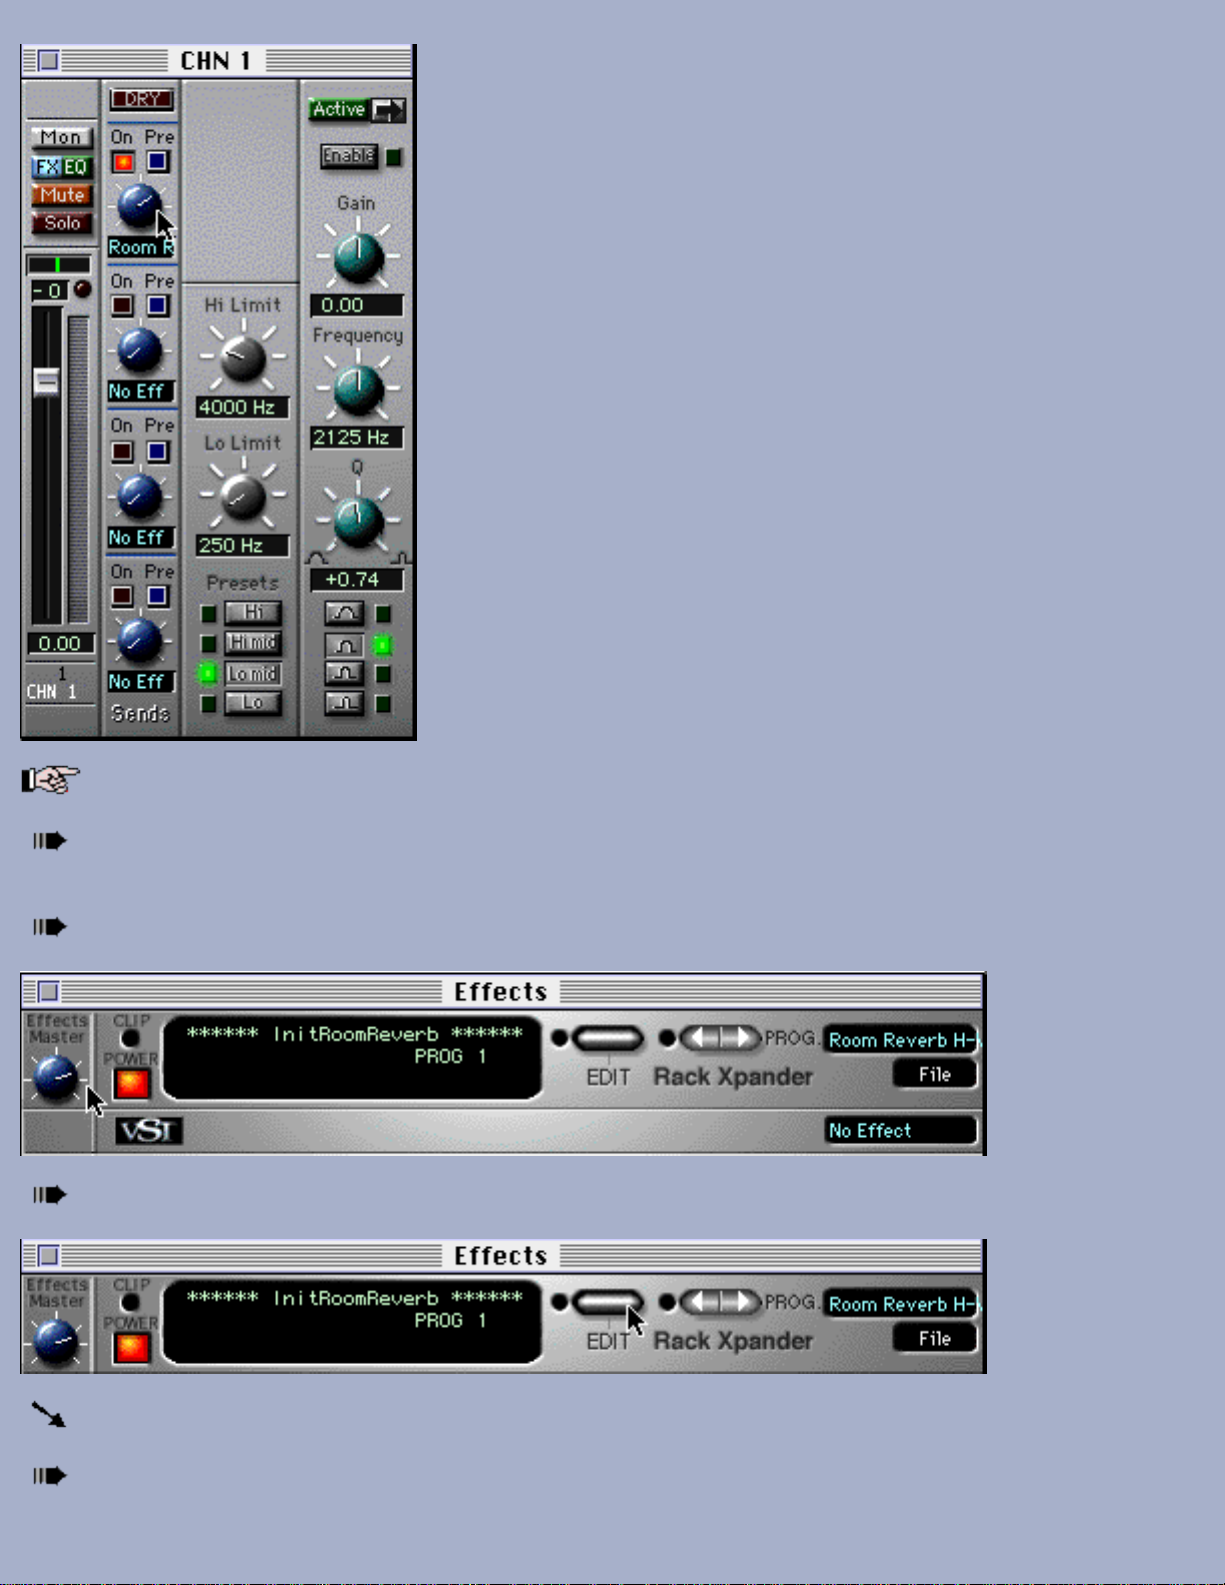
Choose the Effects rack from the Audio menu. Select any effect from the effects list pop-up menu, on the right-hand
side of the display.
Click the POWER button on and turn the Effects Master knob up part way, as shown here:
To change the effect settings (and view the Hyperprism window), click the EDIT button on the effects window.
You should now see the Hyperprism Blue Window (not shown here.)
Adjust your effect settings as desired while listening to the preview playback.
Page 25

Even when you close the Hyperprism effect window, each active effect in the rack will remain processing in-line in
the background, until the channel is muted or effect is powered off.
Hyperprism-VST and Logic Audio
Logic Audio allows VST effects to be placed on any track insert or the insert of a bus object. Track inserts allow 100% of
the signal to go through the effect. Bus inserts allow varying amount of signal to be routed to the effect. Emagic suggests
that computation-intensive effects like reverb be used on a bus rather than a track, as well as effects which are to be used
on more than one track.
Logic Audio plug-in operations (and everything else involving Logic) have been documented in painstaking detail in the
Emagic Logic Audio user's guide. Here's a quick look at how to get Hyperprism-VST started in Logic Audio 3.5:
Open the Logic Audio Track Mixer window.
Click on the Inserts button of any audio track or bus (below, left.)
Select the desired Hyperprism effect (below, center.)
You may notice that Hyperprism-VST mono effects are showing up in the m/s (mono-to-stereo) group. This is OK,
it's simply a characteristic of Logic's VST implementation. The mono Hyperprism effects will process as expected.
Release the mouse button to select the effect for insert; the effect name will now show in the Inserts button (below,
right.)
Page 26
From left to right: In the Logic Track Mixer, click-and-hold on any insert point (left) to select from the VST plug-ins list
(center.) Selected effect name is then visible on the Insert Button (right.)
Double-click on the Inserts button to edit the current effect.
You should now see the Hyperprism Blue Window (below):
Page 27
Hyperprism-VST effect window, as it appears in Logic Audio.
Adjust your effect settings as desired while listening to the preview playback.
Even when you close the Hyperprism effect window, each Inserted effect will remain active, processing in-line in
the background, until the channel is muted or effect is de-selected.
Logic Plug-in Controls
Every Logic Plug-in window includes a set of switches which function the same in all plug-ins. These buttons are
described in greater detail in the Logic manual; here's a quick summary of their functions (from left to right:)
Link: Switch off to open several plug-in windows simultaneously. Switch on to display all double-clicked plug-ins.
Bypass: Temporarily removes the effect's process from the signal chain.
Arrow: Used to access plug-in presets.
Audio Object: Use this switch to swap between tracks so as to compare or copy settings
Insert Slot Selection: Pull up other effects applied to the same audio object.
No Presets: Logic Audio 3.5.3 is unable to recognize Hyperprism-VST effect presets. It also will not create or save
presets. This appears to be a shortcoming of Emagic's implementation of the VST plug-in format. We're communicating
with the Logic team about this issue, and are hopeful that a fix may be available shortly.
Page 28
Hyperprism-VST and Metro
VST plug-ins, as implemented in Cakewalk Metro 4, are fairly straightforward to access and use. Note that
Hyperprism-VST and Ray Gun are only compatible with Metro version 4.5.1 or later.
Before accessing VST plug-ins you must make sure you have at least one audio file loaded in your current Metro
session; the Effects window will be disabled if no audio is present.
Open the Plug-ins Window by selecting it from the Windows Menu (keyboard shortcut is Command-9)
You'll see the list of available real-time effects. Scroll down the window to view the entire list.
Select the desired process by double-clicking on the effect name.
The Metro Effects window appears on screen:
Page 29
Metro Effects Window Controls
The Metro Effects window includes a number of controls which function the same in all plug-ins. These features are
described in greater detail in the Metro manual; here's a quick summary of their functions:
Track Assignment: Displays/selects the track to be processed by the current effect chain.
Power: Turns on/off the effect. Power off effects when not auditioning them to conserve CPU headroom.
Dry: Adjusts the amount of dry (un-processed signal) to be sent to the audio track's pan and volume controls (and
corresponding output bus.)
Send: Determines the amount of dry signal to be sent to the first plug-in. Think of this setting as "effect input volume."
Return: Controls the amount of wet (processed) signal to be sent to the audio track's pan and volume controls (and
corresponding output bus.)
Bypass: Temporarily removes the current effect from the signal chain.
Effect Name: Displays the name of the selected plug-in. Click and drag the name field to change the order of effects in the
signal chain; select and clear to remove an effect from the path.
Preset Menu: Save and Recall Hyperprism-VST effect settings. Be sure to see the note on Preset File incompatibility,
below.
Edit: Click on the Edit button to display and adjust the Hyperprism-VST Blue Window and sliders.
When you click on the Edit button, Hyperprism-VST's effect display will open, as shown below:
Page 30

Adjust the Hyperprism settings while listening to the preview playback until you've created an effect which is to
your liking.
Close the Hyperprism effect display; effect processing is still active in the background as long as the effect is
enabled in the Metro Effects window.
One of the core shortcomings of the VST plug-in format is the fact that each active effect taxes the CPU. If you're
comfortable with your effect settings and sound design decisions on a particular sound file or track, you can process the
effect to file. This will create a new audio file which incorporates the Hyperprism processing. Note that if you change your
mind later, you can always go back and restore the original sound file. To process an effect to file:
Select the audio file or region to be processed in the Metro waveform display.
Select the effect name from the Edit menu's Audio submenu.
A Metro Effects window will be displayed. This window is very similar to the one used for real-time processing,
with the addition of controls for previewing, processing and PPQN setting (not used here).
Click on Preview to audition the sound.
Click on the Edit button to display and adjust the Hyperprism effect display.
When you're happy with the sound click on OK to process.
The Cancel button allows you to exit the Effects dialog without calculating the effect and processing to file.
Incompatible Presets: Metro 4.5.1 is unable to recognize the original Hyperprism-VST effect presets which were
created for Cubase VST. Metro has its own unique preset file format, which is incompatible with Cubase. We've gone
ahead and re-created the "factory" presets for your use in Metro. The only consideration here is that you will not be able to
use Hyperprism-VST presets which were created in Cubase (or Vision DSP) when running Metro (and vice-versa); you'll
have to re-make by hand any custom settings you may have developed on one platform for the alternate system.
Page 31

No Parameter Automation: Unlike Cubase and Logic, Metro 4.5.1 has no provision for recording, replaying or
editing Hyperprism parameter changes and Blue Window control gestures. We're in close contact with Metro's creator
about this topic and although no Metro support for parameter automation has been announced yet, we feel confident that a
solution will eventually follow.
Hyperprism-VST and Vision DSP
Opcode debuted VST plug-in support in the new Vision DSP package. Opcode's earlier Vision, Studio Vision and Studio
Vision Pro packages accepted Premiere (and TDM) format plug-ins. During the development of Hyperprism-VST 1.5.5 we
tested with beta releases of Vision DSP 4.1.1.
Opcode's implementation of VST plug-ins requires a few extra steps to get things going; we'll outline just the basic
procedure here and refer all in-depth inquiries regarding Vision DSP features and tools to the Opcode Vision DSP user's
guide.
Open your audio session, or import a piece of audio to be processed into the current document.
Under the Windows menu, select a Console from the Consoles submenu. Here we've selected Console 1:
Vision DSP Console window
Notice the little down-arrow button, located in the left-hand part of the Console window title bar, next to the "Close"
tool:
Console title bar, note down-arrow button (left side)
Page 32

Mouse click on the down arrow button to reveal the Console pop-up menu (not shown here.)
While holding down the mouse button, drag to the Plug-ins option and select the number of plug-ins you wish to
allow per track, up to a maximum of four.
Now that you've set up the Console to accept plug-ins, direct your attention to the text field at the bottom of each
Console fader. This field is labeled as (none) below:
Channel input/output selector (bottom)
Mouse clicking on the (none) text field reveals a pop-up menu where you select channel input and output.
Click and drag in this menu (not shown) to assign Audio (input) and Output choices. For the sake of this example
we're assigning the fader to Audio 1, and directing output to Sound Manager.
Once this patching is complete, a new channel insert control appears at the top of the fader strip (see below):
Page 33

Input and Output selected, fader is now ready for plug-ins; note insert point, labeled (no plug-in).
Click on the channel insert button (labeled "no plug-in" in the above picture) and hold down the mouse button to
view your available VST plug-ins.
If you've just installed all 30+ Hyperprism-VST effects, it'll be a pretty massive list (not shown here.)
Let go of the mouse button to select any effect.
The pop up menu will disappear and the chosen effect's name will now be visible in the insert display.
Effect is now inserted in channel, note name of effect is displayed (and truncated).
You should now be able to hear your effect; the Hyperprism-VST processor is now active in-line.
Page 34

To bypass the effect, click on the "B" button above the insert point.
Note the down arrow, located top and center on the fader strip. This arrow indicates the type of channel processing
(mono to mono, mono to stereo or stereo to stereo.)
To adjust the Hyperprism settings, click on the "1" button above the insert display.
You will now be viewing the Hyperprism-VST window.
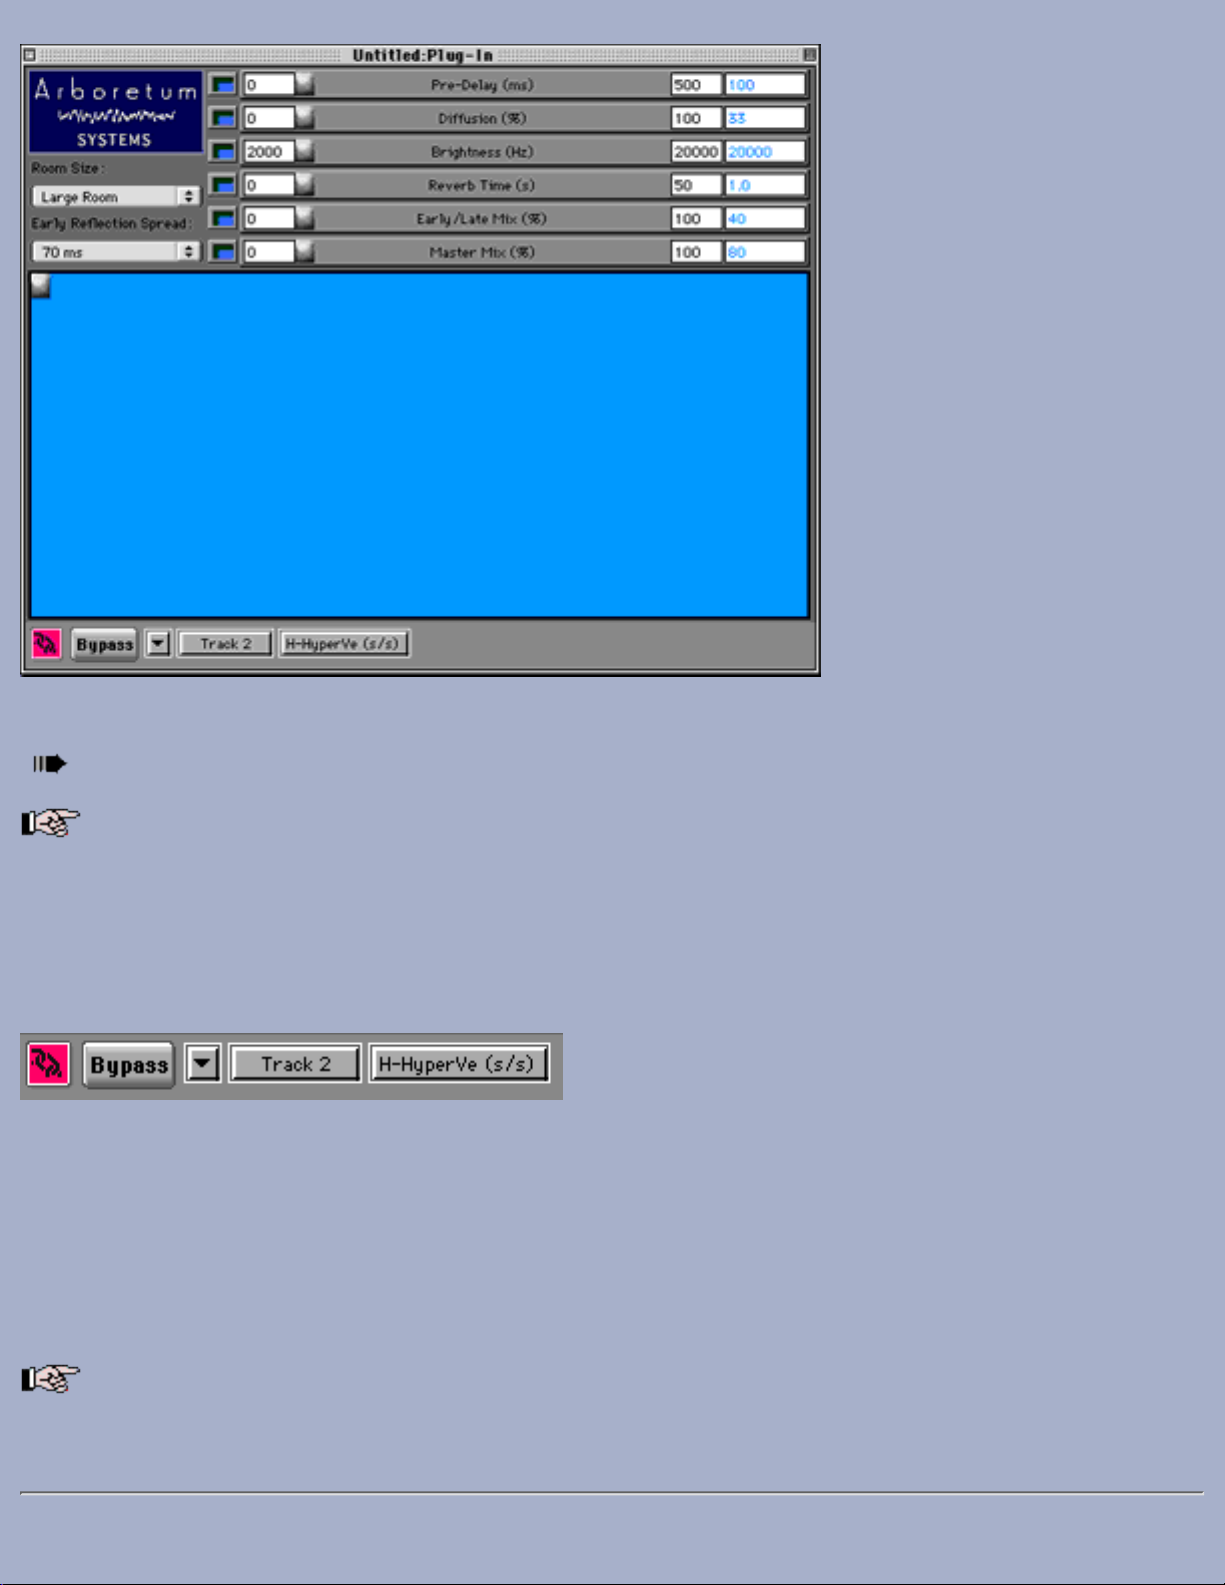
Hyperprism-VST HyperVerb window, as it appears in Vision DSP
Adjust the Hyperprism settings until you find a combination you like, then simply close the window.
The effect will remain active in the background, processing your audio in-line, in real time.
Vision DSP Plug-in Window Controls
Page 35

Vision DSP plug-in window tool bar
The Vision DSP Plug-in window includes a number of controls which function the same in all plug-ins. These features are
described in greater detail in the Vision DSP manual; here's a quick summary of their functions:
Bypass (B): Temporarily removes the plug-in from the signal chain, so you can compare before-and-after results.
Plug-In: Select from any of your available VST plug-ins from this pop up menu, which duplicates the function of the
insert display and menu in the Console.
Template: Use this pop-up menu to locate, load and save Hyperprism-VST Presets and Preset Banks.
Program: Select any Preset from the current Bank.
Channel: Select input and output assignments for the current plug-in and console channel. Duplicates the function of the
channel input/output selector in the Console display.
Slot: If you're inserting multiple effects into a single track, the Slot display allows you to view their relative position in the
signal chain, and also indicates channel processing status (mono to mono, mono to stereo, stereo to stereo).
Tool Bar Locator (up and down arrow button): Allows you to specify whether this set of plug-in window controls
appear at the top or bottom of the screen. Clicking this button and moving the tool bar will seemingly "zero out" your
current effect settings, however all is not lost! Simply click anywhere in the Blue Window to restore your current settings
after a tool bar location change.
Mono to Stereo Effects: Certain Hyperprism effects which are intended for mono to stereo processing (such as the
Auto Pan or Quasi Stereo) show up in the insert effects pop-up menu labeled under the mono to mono section. This display
anomaly is a quirk of Vision DSP. Selecting a mono to stereo effect from the mono to mono grouping may result in faulty
processing or a performance interruption. To do mono to stereo work be sure to pick the desired effect from the mono to
stereo list.
No Parameter Automation: Unlike Cubase and Logic, Vision DSP 4.1.1 appears to have no provision for
recording, replaying or editing Hyperprism parameter changes and Blue Window control gestures. We're in direct contact
with Opcode Systems about this topic and although there has been no announcement of parameter automation support at
the time of this writing (11/11/98) we remain hopeful.
This concludes our coverage of basic Hyperprism-VST operations. In the following chapters we'll examine
Hyperprism-VST presets and parameter automation control.
[Last Chapter] [Table of Contents] [Next Chapter]
Page 36

Hyperprism-VST for MacOS VST Plug-in Compatible Applications
Hyperprism-VST Presets
Presets let you store all the parameter settings of the current effect so you can restore them later or apply them to other
files. Over time you'll create a library of custom effects settings that you can reuse at will.
Hyperprism-VST includes a number of factory presets. The Hyperprism-VST Installer creates a folder named Hyperprism
VST Presets, and places these factory patches in the folder location deemed most appropriate by the manufacturer of your
audio editing software. This will generally be inside the program's main folder, either at the same directory level as the
host application itself or within the VST Plug-ins folder. The Presets are in separate sub-folders, grouped by Hyperprism
effect type.
In the VST plug-in format effect presets are handled by the "host" application. Each program which supports
Hyperprism-VST does presets a little differently. Preset implementations generally allow one to same and name the
current settings, recall a previously-saved setting or factory patch, group the presets into libraries or Banks, and delete
any preset from a bank. These functions may be named and organized slightly differently among the various programs;
fortunately it's all fairly self-evident.
The VST plug-in spec does not put any limitation on where preset files may reside; presets can be stored in folders or
volumes far removed from the host application. When loading a preset or bank you may have to do some navigating and to
locate your presets. It's a smart practice to always keep them in one place, have them clearly named and keep them
grouped according to the type of effect they serve.
There's also nothing to prevent you from loading a preset file into the wrong effect type. One could carelessly open a
Vocoder setting in a HyperVerb effect and unfortunately the result is not good. An error message or other performance
interruption will probably result. Therefore, organize your presets and navigate carefully through the preset "open" and
"save" dialogs.
Logic Audio Platinum version 3.5.3 doesn't appear to save effect presets, and does not recognize the original
Cubase-VST preset files. We're in contact with the Logic team about this issue and hope to reach an expedient resolution.
Metro 4.5.1 is unable to recognize the original Hyperprism-VST effect presets which were created for Cubase VST.
Metro has its own unique preset file format, which is incompatible with Cubase. We've gone ahead and re-created the
"factory" presets for your use in Metro. The only consideration here is that you will not be able to use Hyperprism-VST
presets which were created in Cubase (or Vision DSP) when running Metro (and vice-versa); you'll have to re-make by
hand any custom settings you may have developed on one platform for the alternate system.
Using effect presets is naturally described in some detail in the documentation that accompanied your audio editing
software. Here's how to get started with effect presets in Cubase-VST:
Page 37

To load a preset, click the File area at the lower right of the Effects window.
Choose Load Effect from the pop-up menu.
A file-open dialog box will appear
Navigate to the folder containing the Hyperprism-VST presets.
IMPORTANT: Make sure you open the effect presets folder who's name matches the effect type you currently have
open! For example, if you have the Chorus effect active, and try to open a Reverb preset, you'll get an error message.
Choose the effect you want to open and click OK. The effects settings will be loaded.
[Last Chapter] [Table of Contents] [Next Chapter]
Page 38

Hyperprism-VST for MacOS VST Plug-in Compatible Applications
Hyperprism-VST Parameter Automation
Recording Blue Window gestures in Cubase-VST●
Recording Blue Window gestures in Logic Audio●
Cubase-VST includes a mix automation feature that makes it possible to record your Blue Window gestures in any
Hyperprism-VST effect. Use this feature to create effects changes that are synchronized with elements of your music.
Create filters that dance to the beat or unusual effects which change and morph over time. Hyperprism was the first sound
design software to offer real-time parameter change automation, way back in the Mac II / Sound Tools days, and the Blue
Window is still going strong in Hyperprism-VST.
As with many other aspects of VST plug-in implementation, each VST-compliant sound editing program deals with effect
parameter automation in a different way. In this chapter we'll cover the steps necessary to create Hyperprism parameter
automation in Cubase-VST, and take a look at the corresponding features in Logic Audio.
Metro 4.5.1 and Vision DSP 4.1.1b3 have not implemented parameter change automation as of 11/11/98. We're
presently consulting with the relevant parties and anticipate that eventually all professional sound editing programs will
support parameter change automation.
Recording Blue Window gestures in Cubase-VST:
Set up the effect you want to automate following the directions in the Using Hyperprism-VST section of this
documentation.
Open the Monitor window using the Audio menu.
Page 39

Click the Write button as shown:
Open the Blue Window of the effect you want to automate
Page 40
Begin playing your song.
As the song plays, use the Blue Window or individual effect parameter sliders to alter the effect settings in time with
the music.
When you are done, stop playback.
Return to the Monitor window, and click the Read button as shown:
Play your song again.
Notice that the effect parameter moves you made during the "write" pass are dynamically recreated during playback.
Refer to your Cubase-VST documentation for further information on effects and mix down automation.
Recording Blue Window gestures in Logic Audio:
Page 41

Set up the effect you want to automate following the directions in the Using Hyperprism-VST section of this
documentation.
In the Logic Audio Arrange window click on the A - Playback track, as shown below:
Record-enable the transport:
Open the Logic Audio Track Mixer window.
Double-click on the effect name at the track insert point to open the Hyperprism display, as shown below:
Page 42

Click off Pause to begin recording:
Move the cursor around the Blue Window, or move sliders individually, to create dynamic effect changes, settings
which morph and evolve over time.
Page 43

Your parameter automation gestures are being recorded. These slider and Blue Window movements are saved by Logic
Audio as MIDI commands.
When finished, click on stop or pause to halt the automation recording.
Rewind and play to hear/view the results
Notice that the effect parameter moves you made during the "write" pass are dynamically recreated during playback.
Automation events are recorded to the A-Playback track in the Logic Audio Arrange window.
See the Emagic Logic Audio manual for complete information on automation editing, MIDI editing in general and
the Logic Hyperdraw features.
Conclusion
The next sections of this manual consist of the process reference chapters, troubleshooting guide and appendices. Each
Hyperprism-VST effect is described in detail in the following pages, and the coverage also extends to the other MacOS
Hyperprism versions in the Hyperprism Plug-in Pack, as well as the Hyperprism 2 "stand alone" edition for HyperEngine.
In leaving the VST specific sections of this guide, it's worth reflecting on the fact that industry-wide VST support is a very
recent and somewhat unusual development. Although some of the rough edges on the third-party implementations are still
Page 44

being honed down, it's a remarkable thing to see such a disparate, competitive and strong-minded group as Opcode,
Emagic, Cakewalk and Emu/Ensoniq all agreeing on a single format, and a format which their esteemed competitor
Steinberg controls, at that. Although there may yet be some die-hard hold outs among the remaining key players, it's
evident that MacOS audio developers, by and large, are willing to work together (to a degree) and can agree on some
"open" formats. As we saw a decade ago with the MIDI spec, which helped get this whole computer audio thing started.
Anyway, making real-time native-processing DSP effects more widely available at a lower cost is a fine thing in our
humble opinion. We hope you agree, and we encourage your comments, questions and suggestions.
Special Arboretum thanks to Ray Lenini, Paris product manager at Emu/Ensoniq, Jeremy Sagan, the legendary creator of
Metro, Mark Gavini, music and games evangelist at Apple and the Opcode QA team.
[Last Chapter] [Table of Contents] [Next Chapter]
Page 45

Hyperprism Processes
This chapter contains a detailed description of every Hyperprism effect. Depending on which hardware platform and/or
host application you use, you may not have every effect listed in this section. This is often because certain host-programs'
plug-in architectures may not currently support certain types of processing, for example, effects that change the duration of
a sound.
A series of small icons displayed in each effect description indicates which version of Hyperprism that effect is included
in.
Effect included in Hyperprism-2
Effect included in Hyperprism-VST (For the MacOS VST plug-in format)
Effect included in Hyperprism-MMP (Adobe Premiere-compatible plug-in format)
Effect included in Hyperprism-DAS (Digidesign Audio Suite plug-in format)
Hyperprism-TDM and Hyperprism-DX (Windows 95) processes are documented elsewhere, in the special manuals for
those specific editions of Hyperprism.
Hyperprism Filter Processes
Low Pass●
High Pass●
Band Pass●
Band Reject●
NEW! Low Shelf●
NEW! Hi Shelf●
NEW! Parametric EQ●
Hyperprism Modulation Processes
NEW! Vocoder●
NEW! Frequency Shifter●
NEW! Z-Morph●
Phaser●
Flanger●
Chorus●
Ring Modulator●
Page 46

Tremolo●
Vibrato●
Hyperprism Delay and Reverb Processes
Single Delay●
Multi Delay●
Echo●
EchoTranz●
NEW! HyperVerb (TM)●
Room Reverb●
Hall Reverb●
Hyperprism Stereo Processes
Pan●
Auto Pan●
Quasi Stereo●
Stereo Dynamics●
More Stereo●
M-S Matrix●
Hyperprism Miscellaneous Processes
NEW! Harmonic Exciter●
NEW! Bass Maximizer●
NEW! Tube/Tape Saturation●
Pitch Time Changer●
Pitch Changer●
NEW! Vari-Speed●
Noise Gate●
Compressor●
NEW! Limiter●
Sonic Decimator●
Go to Effects: [Filters] [Modulators] [Delay and Reverb] [Stereo] [Misc Effects]
Go to Table of Contents: [Hyperprism-VST]
[Troubleshooting] [About Digital Audio]
Page 47

Hyperprism Filter Processes
Low Shelf●
High Shelf●
Parametric EQ●
Low Pass●
High Pass●
Band Pass●
Band Reject●
Low Shelf
The Low Shelf filter boosts or cuts frequencies below the cutoff, and passes frequencies above the shelf cutoff with no
change made to their gain. Use this effect to enhance or diminish any amount of low frequency material in a sound.
Page 48

Low Shelf filter response characteristics at various gain levels.
Parameters
Cutoff Frequency
Ranges from 13-20,000 Hz. Indicates the midpoint of the shelf curve. The 3 dB points are roughly at twice and half the
midpoint.
Gain
Ranges from -36 to +36 dB. Determines the gain applied to the shelved frequencies.
High Shelf
The high shelf filter boosts or cuts frequencies above the cutoff, and passes frequencies below the shelf cutoff with no
change made to their gain. Use this effect to enhance or diminish any adjustable amount of high frequency material in a
sound.
Page 49

High Shelf filter response characteristics at various gain levels.
Parameters
Cutoff
Ranges from 13-20,000 Hz. Indicates the midpoint of the shelf curve. The +/- 3 dB points are roughly at twice and half the
midpoint.
Gain
Ranges from -36 to +36 dB. Determines the gain applied to the shelved frequencies.
Parametric EQ
This process is a one band parametric equalizer. It's a very flexible filter, capable of creating notches or peaks without
influencing nearby frequencies. Select a center frequency to process, the amount of gain change and the bandwidth of the
filter.
Page 50

Parametric EQ response characteristics at various gain levels.
Parameters
Center Frequency
Sets the frequency to be boosted or cut, from 13-20,000 Hz.
Q Factor
Ranges from 1-100. Determines the width of the peak/notch. Low Q's result in wide peaks/notches, and high Q's result in
sharp, resonant peaks/notches.
Boost/Cut
Controls the amount of gain applied to the selected frequencies, ranging from -36 to +36 dB.
Low Pass
A low pass filter lets you hear only low frequencies; it blocks higher frequencies. An important property of a low pass
filter is its cutoff frequency. This is the point in the frequency range at which the filter reduces the signal to -3 dB of its
original power. (In visual terms, a -3 dB reduction in a waveform displayed on your monitor will result in a signal that
appears to be half the peak-to-peak height of the original.)
Spectral components that are attenuated below the cutoff of a filter are said to be in the stop band of a filter. Those above
the half-power point are said to be in the pass band of the filter.
Page 51

In an ideally sharp filter, the cutoff frequency is a kind of brick wall: anything outside it is maximally attenuated, dividing
the frequency response neatly into a pass band and a stop band. In actual filters, the slope of the filter leading up to the
cutoff frequency is not linear (there is a slight ripple in the frequency response), and the area between the pass band and
the stop band is called the transition band.
The steepness of a filter's slope is usually specified in terms of decibels of attenuation or boost per octave, abbreviated
"dB/octave." For example, a 6 dB/octave slope on a low pass filter makes a smooth attenuation (or roll-off), while a 90
dB/octave slope makes a sharp cutoff. The use of a smooth or sharp slope depends on the musical situation. For example, a
sharp band reject filter might be needed to completely eliminate a tone centered at a particular frequency, while a gentle
low pass filter could be the most unobtrusive way of attenuating background noise in the high frequency range.
One of the shortcomings of early Hyperprism versions has been the ease with which you could overdrive the filters
with extreme cutoff frequency settings. Among the many improvements we've made in Hyperprism is that we're now
normalizing the output of our filter effects so the output stays smooth and even (and listenable) across the entire range of
cutoff frequency settings.
Parameters
Frequency
Frequency scale, from 13 Hz to 20,000 Hz. Select the cutoff frequency within this band. This parameter is called Cutoff
Frequency in Hyperprism 2 and Hyperprism-VST.
Q Factor
The Q sets the sharpness of the response of the filter, determining its +/- 3 dB band width and degree of resonance. The
greater the Q, the sharper the filter. When the Q is high, the frequency response is sharply focused around a peak
(resonant) frequency. A high Q setting will tend to reduce the total signal level coming out of the filter. Ranges from 1 to
100 in Hyperprism 2, Hyperprism-DAS and Hyperprism-VST, from 0.001 to 10 in Hyperprism-MMP
Page 52

Low pass filter response curves for different values of Q. A low Q filter has a smooth roll off. A high Q filter has a
resonance peak before the cutoff frequency.
Example
Load the example sound file Provence Ambience and Play it. You should hear crickets while a propeller plane
passes in the sky.
Select Loop playback (if necessary).
Select the Low Pass filter from the Plug-ins menu.
A Blue Window appears.
Change the Cutoff Frequency maximum setting to 2000 Hz in order to get a more accurate definition.
Set Cutoff Frequency to 450 Hz with Q factor of 2.
You should be hearing the plane only. Note that if you raise the cutoff frequency, you'll hear the crickets coming in.
Note that the overall level may have decreased. You can use the Faders to amplify the signal.
High Pass
A High Pass filter only lets you hear high frequencies. It attenuates frequencies below the specified cutoff frequency. (For
more on general properties of filters, see the description of the Low Pass filter, above.)
One of the shortcomings of early Hyperprism versions has been the ease with which you could overdrive the filters
with extreme cutoff frequency settings. Among the many improvements we've made in Hyperprism 2 is that we're now
normalizing the output of our filter effects so the output stays smooth and even (and listenable) across the entire range of
cutoff frequency settings.
Parameters
Frequency
Frequency scale from 13 to 20,000 Hz. Select the cutoff frequency within this spectrum. This parameter is called Cutoff
Frequency in Hyperprism 2.
Q Factor
(See the previous explanation of Q for the Low Pass filter.) Ranges from 1 to 100 in Hyperprism 2, Hyperprism-DAS and
Hyperprism-VST, from 0.001 to 10 in Hyperprism-MMP.
Page 53

High pass filter response curves for different values of Q. A low Q filter has a smooth roll off. A high Q filter has a
resonance peak before the cutoff frequency.
Example
Load the example sound file Provence Ambience and Play it.
You should hear crickets while a propeller plane passes in the sky.
Select Loop playback (if necessary).
Select the High Pass filter from the Plug-ins menu.
A Blue Window appears.
Change the maximum value for cutoff frequency to 5000 in order to get a more accurate definition.
Make sure you have the Q and Cutoff sliders mapped to the Blue Window axes, then click and drag the mouse in the
Blue Window.
As you move the cutoff frequency from low to high, the low frequencies are attenuated more and more until you
stop hearing the sound of the plane. Notice also how different Q settings effect the sound, high Q settings creating a
noticeable resonance, low Q settings allowing some attenuated low frequency signal to pass through.
Page 54

Note that the overall level may have gone down. You can use the Faders to amplify the signal.
Band Pass
A band pass filter lets you hear a certain band of frequencies within an upper and lower range. Frequencies above and
below this band are attenuated. The distance between the higher and lower cutoff frequencies in a band pass filter is called
the bandwidth of the filter. The center frequency of a band pass filter is the maximum point of amplitude.
Parameters
Center Frequency
Also called "Frequency" in some Hyperprism versions. Use this parameter to select the center frequency, which is the
maximum point of amplitude. This parameter ranges from 13 Hz to 20 kHz in Hyperprism 2, Hyperprism-MMP and
Hyperprism-VST, and ranges from 0-20 kHz in Hyperprism-DAS.
Q Factor
Ranges from 1 to 100 in Hyperprism 2 and Hyperprism-VST, from 0.001 to 100 in Hyperprism-MMP, from 0 to 10 in
Hyperprism-DAS. It determines the sharpness of the filter, and is akin to the resonance factor. Q can be defined precisely
for a band pass filter as the ratio of the center frequency to the spread of its -3 dB point (cutoff point) bandwidth.
where fcenter is the filter's center frequency,
fhighcutoff is the upper -3 dB point, and flowcutoff is the lower -3 dB point. When the
center frequency is constant, adjusting the Q is the same as adjusting the bandwidth.
Page 55

Band pass filter response curve for different Q values
When the Q is high, the filter will begin to resonate or ring at the center frequency. However, a high Q setting will
also tend to reduce the overall signal level coming out of the filter. The Q factor can be increased to a very high value, in
which case it generates a sinusoidal tone, amplitude of which varies according to the input signal. If this signal is loud
enough to cause distortion, reduce the level of Hyperprism-PPC's Faders.
Example
Load the example sound file Airport+1050 Hz and Play it.
You should hear an announcement recorded in the Paris Orly airport that contains an additional signal at 1050 Hz.
The Band Pass filter lets one isolate this frequency and eliminate everything else. In order to do this:
Click on Loop playback (if necessary)
Select the Band Pass filter from the Plug-ins menu.
A Blue Window appears.
Modify the frequency scale to a bandwidth between 500 and 2000 Hz, and the Q factor from 10 to 200.
Select a center frequency of 1050 Hz and a Q factor of 200.
Page 56

You should now be hearing just the 1050 Hz tone, with the announcement filtered out.
Band Reject
A band reject filter cuts out sound within a bandwidth centered around a selected frequency. It passes frequencies above
and below this bandwidth. In this sense, it is the inverse of a band pass filter, since the center frequency of a band reject
filter is the minimum point of amplitude.
Approximate response curves for the Band Reject filter at a fixed center frequency, but at various Q values. At a Q of 1,
the dip in the center is smooth.
Parameters
Center Frequency
Frequency scale selects the center frequency of the rejected band, from 13 Hz to 20 kHz. This parameter is simply called
"Frequency" in Hyperprism-MMP and Hyperprism-DAS.
Q Factor
Ranges from 1 to 1000 in Hyperprism 2, Hyperprism-VST and Hyperprism-DAS, from 0.001 to 1000 in
Hyperprism-MMP. Determines the sharpness of the cutoff of the filter. The higher the Q, the sharper the cutoff. See the
description of Q for the Band Pass filter (above).
Page 57

Example
Load the example sound file Airport+1050 Hz and Play it.
You should hear an announcement recorded in the Paris Orly airport that contains an additional signal at 1050 Hz.
The Band Reject filter lets one eliminate this frequency. In order to do this:
Click on Loop playback (if necessary)
Select the Band Reject filter from the Processes menu.
A Blue Window appears.
Attach the Center Frequency parameter to the horizontal axis, and Q to the vertical axis .
Change the Center Frequency mix/max values to 1000 and 1100 Hz in order to get a more accurate definition on the
horizontal axis.
Click in the middle of the Blue Window. Drag the mouse toward the bottom to decrease the Q factor until the 1050
Hz tone is not heard anymore. Your Q setting will be very close to zero when the tone disappears.
Go to Effects: [Filters] [Modulators] [Delay and Reverb] [Stereo] [Misc Effects]
Go to Table of Contents: [Hyperprism-VST]
[Troubleshooting] [About Digital Audio]
Page 58

Hyperprism Modulation Processes
Vocoder●
Frequency Shifter●
Z-Morph●
Phaser●
Flanger●
Chorus●
Ring Modulator●
Tremolo●
Vibrato●
Vocoder
Ah, the sweet sounds of the Vocoder. First heard as a vocal effect on Wendy Carlos and Kraftwerk recordings, still in
widespread use on the latest films and hit records. Use it to create talking guitars or merge synth pads with drum samples
for intense new loops. Special care was taken to give the Hyperprism Vocoder a real, warm, analog vocoding sound.
If you're using Hyperprism 2, Hyperprism VST, or Hyperprism-MMP you can vocode mono sources, by selecting any
other sound file to be the modulator or source for vocoding. In Hyperprism 2 (Power Mac) you can modulate any live
signal with a sound file, or even vocode two live sources against each other by modulating the left channel against the right
channel. In the AudioSuite and DirectX editions you'll vocode the left channel against the right channel.
Vocoding is the process of using one signal to create a set of filters which are applied to a second signal. The signal from
which the filters are set is called the modulator; the signal that gets filtered (and is heard) is called the carrier. The
Hyperprism Vocoder is a 26-band vocoder; compare that to other low-res software Vocoders which may only use a
handful of bands. The Vocoder looks at the modulator signal and adjusts the bands to match the spectrum of the incoming
signal. It then applies the 26-band filter to the carrier signal. Remember that the center frequency of each of the 26 filters is
fixed; the modulating signal is setting the gain for each of the filters. And either signal can be the modulator or carrier, to
varying degrees.
Hyperprism-VST users: Make sure you have your stereo tracks panned 100% left and right or you will get no
effect with this process.
Internal/External Signal
(If you're not using Hyperprism 2 (with HyperEngine), Hyperprism VST, or Hyperprism-MMP for Premiere, you can skip
Page 59

the next bit and continue below.) The Hyperprism Vocoder for Power Mac introduces the concept of the internal signal,
and the external signal. The internal signal is sound #1, the sound you have selected for processing in the host application.
This is generally a sound file which is loaded in your editing program, although if you're working with a Play-Thru
document, your internal signal can actually be live audio played in through your sound card or mic input.
The external signal is an optional 2nd sound file which you can load to vocode with the internal signal. If you have no
external signal loaded, or have switched External Off, the Vocoder will process the left channel of your internal audio
signal (file or live) against the right channel. If both sides of your stereo image are similar (or if you have a mono file as
your internal sound) you won't hear any effect. But if the left and right channel carry different program material you can
get some radical results.
Clicking on the Select External button results in a dialog where you select a sound file to be the external signal.
Note that the External signal must be a sound file; you can't use live play-thru as the "external" source, play-thru is always
an "internal" signal.
Select External sound file dialog
The Vocoder's external file function will not read 24-bit files at this time. Please check www.arboretum.com for
updates.
Once you've selected a mono or stereo file as the External source, switch the External On/Off button to the on
position, which enables modulation with the file you've just selected.
l-r: External On/Off and Select External buttons, plus External Source text display (Off and On states)
Page 60

Experiment with moving the modulation setting from one end of the scale to another; you're determining which
signal (internal or external) is the modulator, and which is the carrier. Try a heavy modulation setting, plus heavy
articulation, using a fat "analog" synth tone and a vocal part as inputs, to experiment with the popular "robot voice" effect.
If you have a mono source as the internal and you load a stereo external file, just the left channel of the external file will
modulated with the internal signal. If you have a stereo sound as an internal source and you load a mono external file, the
mono file will be modulated with both channels. If both internal and external are stereo, the left channels of each will be
modulated with each other, as will the right channels.
If you get a CPU Processor Overload error dialog when using this plug-in, try turning off the external file, playing
the internal sound for a moment, then turn the external file back on again. This should clear the problem.
Try temporarily turning off the External file, or closing unused plug-ins, to remedy this state.
Parameters
Modulator
0-100% Determines which sound is the source, and which is the modulator. O% means the left channel modulates the
right, or if using an external sound file, that the internal left channel modulates the external source. When set to 100%, the
right channel modulates the left, or the external sound modulates the internal source.
Articulation
0-100% Controls how quickly changes in the modulation sound are applied to the source sound. When set at 100%, fast
changes are applied, when at 0% no changes are applied. Turn the articulation down to smooth out the vocoded sound, or
turn it up to make the sound sharper, and speech more intelligible.
Mix
0-100% Mix of the original sound with the vocoded sound. Note that you can use this to monitor an external sound source
by setting the Modulator to 0% and the Mix to 0%.
External On/Off
Turn on and off the currently selected external source. If no external file is selected, turning this On will prompt you to
select a file. This function is in Hyperprism 2, Hyperprism VST, and Hyperprism-MMP only.
Page 61
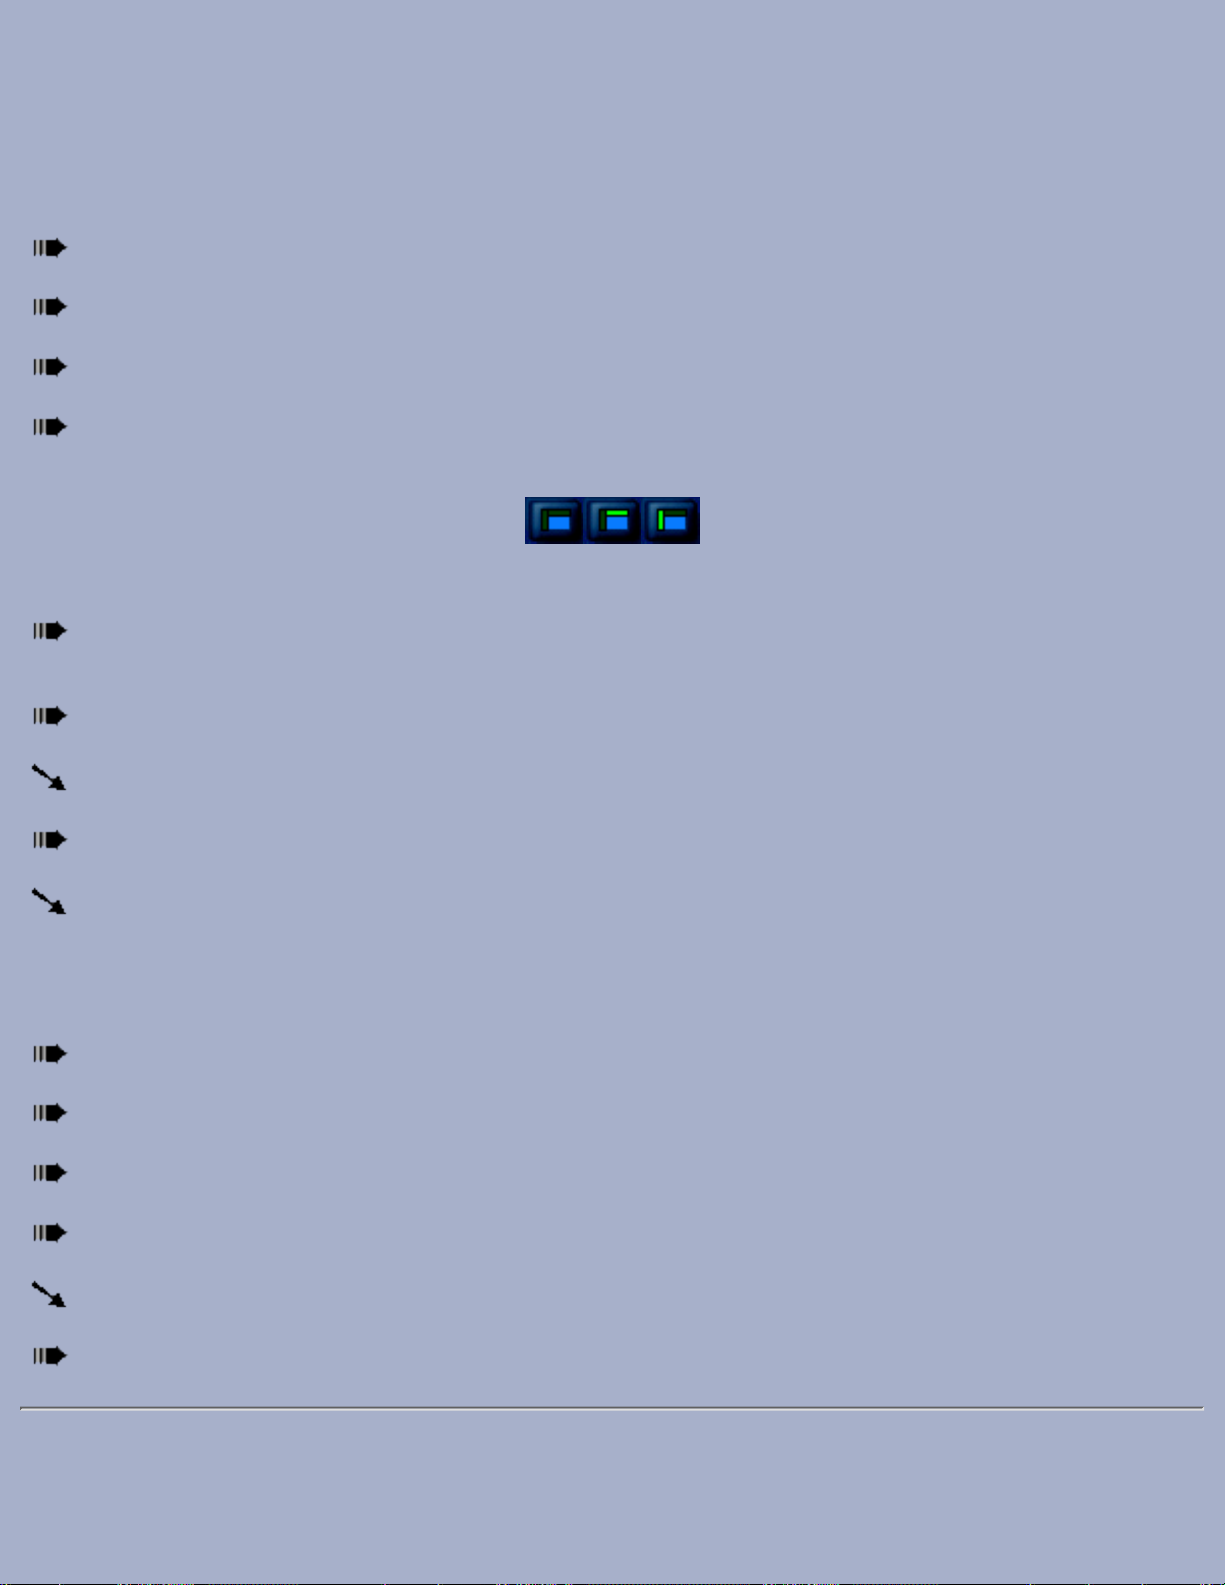
Select External
Opens a dialog where you pick a new sound file as your external sound. This function is in Hyperprism 2, Hyperprism
VST, and Hyperprism-MMP only.
Example (All Versions)
Load one of the example sounds from CD into your editor, select the "Freakazoid.aiff" file.
Once you've loaded the file, select the Vocoder. You should be in the Hyperprism Blue Window.
Turn the Mix slider to 100%, you want to hear all vocoded signal, no original.
Assign the Modulator and Articulation parameters to the X and Y axis of the Blue Window by using the tri-state
Axis switches.
select vertical or horizontal axis by using the three-way toggles
Press the spacebar to begin previewing playback, then move the mouse cursor around the Blue Window to hear how
different combinations of Modulator sources and Articulations sound.
Set the Modulator parameter to 0 (all the way left) and the Articulation to 100.
You should be hearing that classic vocoding effect.
Now try moving the Modulator to 100 (R) for an interesting switch.
With the Modulator back down at 0 (L) reduce the Articulation from 100% down to 10% to hear the smoothing of
the vocode effect.
Example (Hyperprism 2, Hyperprism VST, and Hyperprism-MMP Only)
Load the CD example sound file called "Rhythmic" into your sound editor.
Once you've loaded the file, select the Vocoder. You should be in the Hyperprism Blue Window.
Now click on the Select External button; in the resultant dialog select the example sound file "Surf Lounge."
Set Modulator to 0, Articulation to 100 and Mix to 100.
You should be hearing the guitar (from the left channel of the external signal) being mapped onto the drums.
Now try setting Modulator to 100 and hear the drums mapped into the guitar.
Page 62

Frequency Shifter
The Frequency Shifter is a great electronic-sounding process which instantly transforms any sound, adding lots of fur and
movement. This new effect shifts all frequencies of your sound up or down the spectrum by an equal amount.
It's related to the Ring Modulator, but unlike that process the number and the relative positions of the frequency
components are left unchanged. That leaves the sound far more intelligible while still imparting a metallic flavor to the
signal. The Frequency Shifter maintains the harmonic series as it moves along the spectrum, meaning the lowest frequency
in the original sound still corresponds to the lowest frequency in the new sound. No new low sidebands are created, as in
the Ring Modulator.
The movement of the spectrum is controlled by a base frequency and an additional LFO frequency. Try using the
Frequency Shifter to create robotic voices or pulsing drums.
Parameters
Base Frequency
Ranges from -20,000 to 20,000 Hz. Set the modulation frequency which your sample will be shifted to. Ranges from
-2,000 to 2,000 Hz in Hyperprism-MMP.
Feedback
Ranges from 0-100%. Adds resonant regeneration of the modulated sound.
LFO Frequency
Ranges from 0-100 Hz. Use to add movement to the modulation frequency.
LFO Depth
Ranges from 0-1000%. Determines the amount of the LFO applied to the base frequency. At the time of this writing
(11/1/98) this parameter range was mislabeled in Hyperprism-DAS, where it is represented as ranging from 0 to 20,000
Hz. We expect this to be corrected in the next edition of H-DAS.
Example
Load the example sound file "Morgan.aiff" into your sound editing software.
Select the Frequency Shifter plug-in; you should see the Blue Window.
Set the Base Frequency to -200 Hz, set all other parameters to 0.
This shifts Morgan's voice down 200 Hz.
Page 63

Z-Morph
This interesting effect models an input sound as variable number of resonant filters, and then applies that model to another
sound, morphing the "heard" sound (the carrier) into the modeled sound (modulator).
The Z-Morph operates somewhat like the Vocoder except frequency bands are not fixed. This allows the algorithm to best
fit the incoming signal. Frequency bands move depending on the incoming frequency.
Internal/External Signal
The Z-Morph introduces the concept of the internal signal, and the external signal. The internal signal is sound #1, the
sound you have selected for processing in the host application. This is generally a sound file which is loaded in your
editing program, although if you're working with a Play-Thru document, your internal signal can actually be live audio
played in through your sound card or mic input.
The external signal is an optional 2nd sound file which you can load to modulate with the internal signal. If you have no
external signal loaded, or have switched External Off, the Z-Morph will process the left channel of your internal audio
signal (file or live) against the right channel. If both sides of your stereo image are similar (or if you have a mono file as
your internal sound) you may not hear much effect. But if the left and right channel carry different program material you
can get some radical results, as with the example above.
Clicking on the Select External button results in a dialog where you select a sound file to be the external signal.
Note that the External signal must be a sound file; you can't use live play-thru as the "external" source, play-thru is always
an "internal" signal.
Select External sound file dialog
The Z-Morph's external file function will not read 24-bit files at this time. Please check www.arboretum.com for
Page 64

updates.
Once you've selected a mono or stereo file as the External source, switch the External On/Off button to the on
position, which enables modulation with the file you've just selected.
l-r: External On/Off and Select External buttons, plus External Source text display (Off and On states)
If you have a mono source as the internal and you load a stereo external file, just the left channel of the external file will
modulated with the internal signal. If you have a stereo sound as an internal source and you load a mono external file, the
mono file will be modulated with both channels. If both internal and external are stereo, the left channels of each will be
modulated with each other, as will the right channels.
If you get a CPU power error dialog when using this plug-in, try turning off the external file, playing the internal
sound for a moment, then turn the external file back on again. This should clear the problem.
Try temporarily turning off the External file, or closing unused plug-ins, to remedy this state.
Parameters
Morph
Ranges from 0-100%. Sets which way the morph is applied, and the degree of morphing. 0% means using the right
channel or external file to fully morph the left channel or internal sound, 100% means the left channel or internal file is
morphed to the right channel/external file fully.
Poles
Controls how many resonators (poles in engineering terms) are used to model the source sound. Possible settings range
from 0-128. Using one pole, the Z-Morph will pick one frequency which dominates the input sound to be the resonator,
and this will lead to a more bassy sound. The more resonators used, the more accurate the model will be, the more high
frequencies will be modeled, and therefore the more convincing the morphing sound will be. However, using more that a
few poles can quickly slow down real-time processing. If you want to use a lot of poles you may need to Process to New
File in order to hear such higher order modeling; live preview processing can easily crap out, even on the fastest
Page 65

computers, if you use dozens of poles. The amount of processing also depends on the material being used, and therefore
the number of poles usable for real-time processing will always vary. On a 100 MHz Power Mac 4 poles is the real-time
limit on average.
Filter Source
0-100%. Use to determine which sound will be modeled (the filter source) and which sound will be then be morphed to the
modeled sound. 0% means that the internal sound or left channel is the filter source, and 100% means that the right
channel or external file is the source.
External On/Off
Turn on and off the currently selected external source. If no external file is selected, turning this On will prompt you to
select a file.
Select External
Opens a dialog where you pick a new sound file as your external sound.
Examples
Create a new File reference document (command-n) and open the example sound file "Surf Lounge."
This file has guitar playing in the left channel and vocals in the right.
Now open the Z-Morph plug in, and begin previewing playback.
Set Morph to 5, Poles to 1 and Filter Source to 100%.
This gives a filtering effect similar to a wah-wah pedal.
Leave Morph a 5, Set poles between 10 and 13, and Filter Source to 100%.
This gives more of a talk box effect.
Now close this file document and create another new File reference document, opening the example sound file
"DrumLp 120 bpm."
Click on the Select External button and in the resultant dialog select the example sound file "1930 Recording."
Set Morph to 50, Poles to 4 and Filter Source to 96.
Feel free to adjust the settings as you wish, and experiment!
Phaser
The Phaser produces an effect reminiscent of old phase shifter boxes from the late 70's. Here, an all-pass filter introduces a
frequency dependent delay, resulting in phase distortion. A wide range of results can be achieved by adjusting the amount
Page 66

of this distortion and using feedback to increase the intensity of the effect.
Parameters
Frequency
Frequency is the number of delay cycles per second, from 0 to 10 Hz in Hyperprism-MMP, from 0 to 4 kHz in
Hyperprism-DAS and Hyperprism-VST, 0 to 1000 Hz in Hyperprism 2.
Depth
Depth controls the intensity of the phase shift effect, values range from 0 to 10 samples.
Feedback
The Feedback slider introduces regeneration, in which the output of the Phaser is mixed back at its input. A setting of 0%
is no feedback, 100% will lead to run-away regeneration, as the full output of the effect is constantly being routed to it's
own input.
Base Frequency
The Base Frequency slider sets the lowest frequency of the original sound that will be processed by the Phaser algorithm.
Higher settings will leave lower frequency components of the sound relatively un-effected. The range of this setting is
from 0 to 10,000 Hz.
Flanger
Flanger applies a time-varying delay to the input signal and then mixes the original signal with the delayed signal, creating
a time-varying comb filter effect. The time-variance of the delay changes according to a low-frequency sine wave
generated by Hyperprism.
Hyperprism 2 adds mono to stereo capability to this effect.
Parameters
Frequency
The number of delay cycles per second. Use low settings for classic flange effects; high settings produce bizarre "klang"
tones. Goes to 1 kHz in Hyperprism 2, to 2 kHz in Hyperprism-DAS and Hyperprism-VST, to 10 Hz in
Hyperprism-MMP.
Depth
The intensity of the flange effect, expressed in number of samples. The Flanger delay oscillates (with a sine wave shape)
between 0 and this value. Higher settings result in a more pronounced Flanging effect. The maximum setting is 100%,
which equals 1024 samples.
Feedback
The Feedback slider introduces regeneration, in which the output of the Flanger is mixed back at its input. A setting of 0%
is no feedback, 100% will lead to run-away regeneration, as the full output of the effect is constantly being routed to it's
own input.
Page 67

Mix
Controls the volume balance between original signal and flanged signal. Set it to 100% to hear only flanged sound, 0%
gives you only "dry" signal.
Chorus
A chorus effect can be heard whenever several voices sing the same note in unison. Because of slight differences in the
timing, pitch, vibrato and spectrum of the different voices, we hear an ensemble effect. Hyperprism can apply a chorus
effect to any input sound.
Pro Tools/Avid users: Although there's only one H-DAS Chorus plug-in in your DAE folder, the Chorus effect
shows up twice in the AudioSuite menu as separate Mono Chorus and Stereo Chorus selections. Choose according to the
number of audio channels to be processed. Note that there is no direct mono-to-stereo processing under the AudioSuite
format. But you can easily work around this limitation by copying any mono selection to an adjoining track, then selecting
both regions for stereo processing. The Stereo Chorus requires two-channel input or a DAE error message -7450 will result
when you attempt to process. Also note that Hyperprism stereo AudioSuite effects require the following settings: Use in
Playlist (not Region) and be in Multi-Input Mode.
Parameters
Frequency
Vibrations per second, which cause an undulating pitch variation in the delayed signal. Goes to 2 kHz in Hyperprism 2, to
1000 Hz in Hyperprism-DAS and Hyperprism-VST, to 10 Hz in Hyperprism-MMP.
Depth
The intensity of the chorus effect, expressed as number of samples. The Chorus delay oscillates (with a sine wave shape)
between 0 and this value. Higher settings result in a more pronounced chorusing and detuning effect. The maximum
setting is 100%, which equals 1024 samples.
Mix
Controls the volume balance between original and processed signals. Set Mix to 100% to hear only processed sound, 0%
gives you only "dry" signal.
Delay
Allows you to control the base time difference between the original signal and the additional "chorused" signal. Ranges
from 0 to 100 ms.
Contour
A high pass filter allowing you to control the "color" of the sound. Cut off frequency ranges from 0 to 20 kHz in
Hyperprism 2, goes to 10 kHz in Hyperprism-DAS, Hyperprism-VST and Hyperprism-MMP. Any processed signal below
the cut off will be filtered out.
Channel Switch
Page 68

If you're processing a mono source you have the option of making the output either mono or stereo. Simply click on the
Channel Switch to toggle between the two settings. If you're processing a stereo source your output will be stereo by
default; the button will default to the stereo/stereo display and be deactivated from toggling. Hyperprism 2 (Power Mac)
only.
Ring Modulator
The Ring modulator is capable of generating a wide variety of metallic and bell-like tones.
The input sound is used as a carrier signal. A second signal called a modulator frequency, is used to generate two
frequencies that are the sum and the difference of the carrier and the modulator frequencies, each at half the amplitude
value of the carrier. Thus, for an input frequency at 400 Hz and a modulator frequency at 25 Hz, the output will be a
mixture at 375 Hz and 425 Hz. It is the blending of non-harmonically related sounds that results in the effect's metallic,
sometimes harsh textures.
Parameters
Frequency
The modulator frequency in cycles per second. Goes from 0 to 20 kHz in Hyperprism 2, Hyperprism-VST and
Hyperprism-MMP, to 10 kHz in Hyperprism-DAS where's it's called "Base Frequency."
Depth (or "Mix")
Depth controls the direct/effect mix between the original sound and the Ring modulator's output, from 0% to 100%. A
setting of 100% lets you hear only the processed output signal, without any of the original source. A setting of 0% lets you
hear only the original signal, with no effect. This parameter is called "Mix" in Hyperprism-VST, Hyperprism-MMP and
Hyperprism-DAS.
LFO Frequency
A low frequency oscillator can be applied to the modulator, allowing you to create even richer sonic effects. This slider
controls the LFO frequency and ranges from 0 to 1000 Hz in Hyperprism 2, Hyperprism-VST and Hyperprism-DAS, 0 to
40 Hz in Hyperprism-MMP.
LFO Depth
Controls the amount of LFO applied to the modulator tone. Ranges from 0 to 100%.
Examples
Load the example file Bell, Play the sound, and then select the Ring Modulator process.
Click at different mouse locations and the Blue Window and hear the changes in the sound.
The Ring Modulator creates a wide range of interesting sounds.
Page 69

Tremolo
Tremolo varies the amplitude (volume) of the input sound smoothly according to a sinusoidal function. For many sustained
sounds (such as violins) a tremolo between 4 and 7 cycles per second adds expressiveness, particularly when applied in an
increasing manner over the course of the sound. (See the following figure.) Very fast oscillations (i.e. 5,000 Hz) result in
amplitude modulation effects.
Parameters
Frequency
Number of amplitude variations per second. Goes from 0 to 2 kHz in Hyperprism 2, to 1 kHz in Hyperprism-DAS and
Hyperprism-VST, to 30 Hz in Hyperprism-MMP.
Depth
Degree of amplitude variation as a percentage of the total output, from 0 to 200%. Goes to 100% in Hyperprism-MMP.
Examples
Create a New HyperEngine document for the file "Train," Play it and select a Tremolo process.
Once the Tremolo effect opens, connect the Depth parameter to the vertical axis and the Frequency parameter to the
horizontal axis.
In Loop mode, click in the Blue Window at the bottom left corner and drag the mouse toward the upper left corner,
then staying at the top of the window, move slowly to the right.
Listen as your modern Train changes into an old-time steam engine!
Tremolo works well with Vibrato in multi-pass processing or as part of a HyperEngine effect chain, particularly on
melodic instrumental sounds.
Page 70

Effect of an increasing tremolo effect on a guitar pluck. The tracer went from 0 Hz to 7 Hz on the horizontal scale, and 0
to 55% on the vertical scale.
Vibrato
Vibrato imposes a time-varying pitch change or modulation on the input signal. The modulation varies sinusoidally at a
rate controlled by the user. For many sustained sounds, a vibrato between 4 and 7 cycles per second adds expressiveness,
particularly when applied in an increasing manner over the course of the sound. Extreme settings (i.e. maximum depth,
plus frequency rates of 20 to 200 Hz result in frequency modulation-like effects.
Parameters
Frequency
The number of pitch variations per second. Goes to from 0 to 2 kHz in Hyperprism 2, to 500 kHz in Hyperprism-VST, to
30 Hz in Hyperprism-MMP, to 1000 Hz in Hyperprism-DAS.
Depth
Degree of pitch variation, from 0 to 100%.
Example
Page 71

Try applying Vibrato to the Bell sound. Process the results to a new file, and then process again using the Tremolo
effect. This gives very interesting results.
Go to Effects: [Filters] [Modulators] [Delay and Reverb] [Stereo] [Misc Effects]
Go to Table of Contents: [Hyperprism-VST]
[Troubleshooting] [About Digital Audio]
Page 72

Hyperprism Delay & Reverb Processes
Single Delay●
Multi Delay●
Echo●
EchoTranz●
HyperVerb (TM)●
Room Reverb●
Hall Reverb●
Single Delay
Single Delay lets you vary the length of time between the original sound and a delayed copy of that sound. It gives you a
single "echo" of your signal, which you presumably mix in with the original sound.
Parameters
Delay
Delay in milliseconds. By default, from 0 to 2000 ms (two seconds). In Hyperprism 2 (Power Mac) you can create delays
up to three seconds.
Mix
Mix between the original and delayed signal as a percentage, by default from 0 to 100%.
Multi Delay
Multi Delay delays the input signal three times. The user sets the first two and the program calculates the third Delay time
by adding the times of Delays 1 and 2.
Parameters
Delay 1
Delay 1 in milliseconds, by default 0 to 1000. Goes up to 2 k in Hyperprism 2.
Page 73

Delay 2
Delay 2 in milliseconds, by default 0 to 1000. Goes up to 2 k in Hyperprism 2.
Delay 3
The Multi-Delay's D3 delay time is calculated automatically by adding D1 and D2 delay times.
Mix
The Mix slider sets the balance between the original sound's volume and the overall volume of the repeats, from 0 to
100%. The remaining sliders provide volume control over the three individual repeats.
Delay 1 Attenuation
The Delay 1 Attenuation slider cuts the volume of Delay 1. The range of volume control is from 0 dB to -36 dB
attenuation.
Delay 2 Attenuation
The Delay 2 Attenuation slider cuts the volume of Delay 2. The range of volume control is from 0 dB to -36 dB
attenuation.
Delay 3 Attenuation
The Delay 3 Attenuation slider cuts the volume of Delay 3, the delay length of which is set by sum of the delay times of
Delay 1 and Delay 2. The range of volume control is from 0 dB to -36 dB attenuation.
Example
Load the example sound file Gunshot and select a Multi Delay process. Play it and you will hear a single shot fired
by a hunting rifle.
Select Loop playback.
(Hyperprism 2: Click on the Audition button before moving tracer.) Click and move the mouse slowly around in the
Page 74

Blue Window and you'll hear a Western-style shoot-out.
Limitations
Depending on the input signal, you may hear a clicking sound as you move the mouse in the Blue Window. To eliminate
this artifact of rapidly-changing delay time, decrease the value of the Parameter Speed Change. (Parameter omitted from
Hyperprism 2.)
Echo
The Echo effect lets you vary delay time, feedback and/or mix with gestures in the Blue Window. A feature of this
algorithm is the ability to specify a negative feedback. Negative feedback settings cause the echoes to build in intensity,
rather than die out. In Hyperprism 2 the Feedback range is 0% to 200%, 101% to 200% create negative feedback values.
Parameters
Delay
Delay in milliseconds, from 0 to 2000. Hyperprism 2 allows delay times up to three seconds.
Feedback
Feedback of the repeated signal, from 0 to 100%. Zero percent feedback will result in only a single repeat, while increased
feedback settings will generate numerous repeats. Entering negative values (-1 to -100%) causes the echoes to build in
intensity rather than die out. In Hyperprism 2 the negative feedback range is 101% to 200%. Negative feedback values are
not allowed in Hyperprism-MMP and Hyperprism-DAS.
Mix
The Mix slider sets the balance between the original sound's volume level and the volume level of the echoes.
EchoTranz (TM)
What's especially interesting about the EchoTranz effect are the dramatic, undulating pitch transpositions that result from
rapid changes in delay time.
Each echo is attenuated according to the vertical position of the mouse. If the feedback is 100%, for example, the echoes
will repeat indefinitely. A feature of this algorithm is the ability to specify a negative feedback, typically in the range of
-10 to -30. Negative feedback settings (or settings over 100% in Hyperprism 2) cause the echoes to build in intensity,
rather than die out. Using a combination of varying time delays and positive and negative attenuation gestures, you can
create effects reminiscent of the classic tape-delay feedback sounds used in electronic music studios of the 1960's.
Parameters
Delay
Delay in milliseconds, by default from 0 to 2000. Goes up to three seconds in Hyperprism 2.
Page 75

Sweeping through Delay values creates nasty pitch effects; this is the best part of EchoTranz. If you're using
Hyperprism 2 make sure you have a healthy Delay Rate Change setting (see below) so you can fully hear the effect.
Feedback
Feedback of the repeated signal, by default from 0 to 100%. Zero percent feedback will result in only a single repeat, while
increased feedback settings will generate numerous repeats. Negative feedback values are also accepted in most versions;
Hyperprism 2 allows you to enter feedback values above 100% instead. In both cases, these latter type of values will result
in echoes which built in intensity. It can get pretty scary.
Parameter Speed Change
When you move the mouse using this effect, this results in varying the reflection time slightly, as if the wall reflecting the
source was moving. This movement is not natural, and can introduce clicks that affect the audio quality of the processing.
The role of Parameter Speed Change is to interpolate between mouse movements in order to lessen the unwanted
side-effects.
A value of 100% makes all delay values coming from the Blue Window take effect instantaneously. This will often result
in soft clicking when rapid mouse movements are made. To avoid this, use lower values. A setting of 1% corresponds to
the slowest change possible.
Parameter Speed Change can be used as an effect in itself. Notice how the delay progresses depending on different settings
in the Parameter Speed Change parameter. High Parameter Speed Change settings can result in extreme tape-shuttling
effects.
Mix
The Mix slider sets the volume balance between the original sound and the overall volume of the repeats.
Delay Rate Change
Hyperprism 2 only. Controls how quickly the Delay time parameter moves. At a 0% setting delay rate will not change. At
low settings pitch changes will occur more slowly. At higher settings faster pitch changes will be heard when adjusting the
Delay settings.
HyperVerb (TM)
HyperVerb offers a significant improvement in sound quality over previous software reverbs. It simply sounds more
realistic than any previous attempt. The two most important improvements are significantly increased echo density and
virtually no coloration in the late response, all while running in real-time on a modest processor (e.g. 166 MHz Pentium or
120 MHz Power Mac). One or both of these deficiencies has plagued most digital reverberators since their initial
development more than 30 years ago.
HyperVerb features super smooth impulse response and sounds great on percussive tracks. HyperVerb won't color your
sound unnaturally, gives you lots of parameter control and dense reflections without ringing or metallic sounding artifacts.
Want to know more about why HyperVerb sounds better, and view hard evidence that proves it? Click here for our
report on how HyperVerb really stacks up against its competitors.
Naturally there's full Blue Window gestural control over all effect parameters, but if you're after a naturalistic effect it's
Page 76

usually better to just dial up the perfect setting, save it as a preset, then treat your file with all the parameter settings
staying constant.
Pro Tools/Avid users: Although there's only one H-DAS HyperVerb plug-in in your DAE folder, the HyperVerb
effect shows up twice in the AudioSuite menu as separate Mono HyperVerb and Stereo HyperVerb selections. Choose
according to the number of audio channels to be processed. Note that there is no direct mono-to-stereo processing under
the AudioSuite format. But you can easily work around this limitation by copying any mono selection to an adjoining
track, then selecting both regions for stereo processing. The H-DAS Stereo HyperVerb requires two-channel input or a
DAE error message -7450 will result when you attempt to process. Also note that Hyperprism stereo AudioSuite effects
require the following settings: Use in Playlist (not Region) and be in Multi-Input Mode.
Parameters:
PreDelay
Ranges from 0-500 ms. Sets the delay time of the first echo, after which reverberation begins.
Diffusion
Ranges from 0-100%. Controls how smeared out individual echoes are. High diffusion will wash them all together creating
lush sounds, and 0 diffusion gives a bouncy, tight sound.
Brightness
Adjustable from 2000-20000 Hz. Applies low pass filtering to the reverberations to create mellow or shimmering
soundscapes. At the time of this writing (11/1/98) this parameter ranges from 0 to 20 kHz in Hyperprism-DAS; this value
may be altered in a forthcoming version as settings below 2000 Hz aren't particularly useful.
Reverb Time
From 0-50 seconds. Use to set the time it takes for reverberations to fall below -60 dB. Shorter reverb times correspond to
smaller rooms. For reference, large cathedrals have reverb times of about 7 seconds, and small rooms have reverb times
under half a second.
Early/Late Reflection Mix
Ranges from 0-100%. This controls the mix of early reflection to late reflections. Late reflections contain more of the
washed reverberant sound, early reflections have more of the bouncy initial echoes. This control is called Early/Late in the
DirectX (PC/Windows) version of Hyperprism.
Master Mix
Ranges from 0-100%. Sets mix of original signal with reverberated signal.
Room Size
From small closet to large cathedral. Sets the perceived size of the reverberation space.
Early Reflection Spread
From 30-120 ms. Controls the distance between early reflection times, clustering them within the time set.
Page 77

Channel Switch
If you're processing a mono source HyperVerb gives you the option of having the output in either mono or stereo. Simply
click on the Channel Switch to toggle between the two settings. If you're processing a stereo source your output will be
stereo by default; the button will default to the stereo/stereo display and be deactivated from toggling. The channel switch
is not included in Hyperprism-MMP and Hyperprism-DAS, as the Premiere and AudioSuite plug-in formats do not allow
direct mono-to-stereo processing. In multitrack programs such as Deck or Pro Tools you can easily work around this
limitation by copying any mono selection to an adjoining track, then selecting both regions for stereo processing.
Room Reverb
Although there's a lot of excitement about the HyperVerb, we're also still offering our classic reverb algorithms, Hall and
Room. The Room has an intrinsically shorter decay time than the Hall Reverb. Both create a diffuse sound field with
variable brightness, feedback, wet/dry mix and diffusion, while utilizing a minimum of CPU cycles.
Parameters
Mix
Wet/Dry mix, in percentages from 0% (original signal only) to 100% (reverberant signal only) by default.
Feedback
Feedback, from 0% to 100%. Higher feedback settings lengthen the time it takes a give sound's reverb to decay to silence.
A setting of 0% will result in the shortest possible decay for the algorithm, 100% feedback will linger almost indefinitely.
You will typically need to increase your Post Roll value to hear the full decay created by Hyperprism's reverb
algorithms when processing a sound to a new file.
Brightness
The brightness slider simulates the loss of high frequencies due to room reflections and atmospheric absorption. In
practice, you can consider it a low pass filter applied continuously to the ongoing reverb decay.
A setting of 0% will result in very dark sounding reverbs, with very little high-frequency energy. A setting of 100% will be
very bright; all the high frequencies from the source sound will persist in the reverberant decay.
Diffusion
Diffusion controls the phase smearing of the reflected sound. The range of values is from 0 to 140% in Hyperprism 2,
Hyperprism-MMP and Hyperprism-DAS.
Low diffusion settings result in more discrete delayed repeats, while adding diffusion smears out the attacks of each repeat.
Higher diffusion results in a smooth wash of sound, without identifiable reflected attacks.
Diffusion settings over 100% will induce feedback.
Pro Tools/Avid users: Although there's only one H-DAS Room Reverb plug-in in your DAE folder, the Room
Reverb effect shows up twice in the AudioSuite menu as separate Mono Room Reverb and Stereo Room Reverb
Page 78

selections. Choose according to the number of audio channels to be processed. Note that there is no direct mono-to-stereo
processing under the AudioSuite format. But you can easily work around this limitation by copying any mono selection to
an adjoining track, then selecting both regions for stereo processing. The H-DAS Stereo Room Reverb requires
two-channel input or a DAE error message -7450 will result when you attempt to process. Also note that Hyperprism
stereo AudioSuite effects require the following settings: Use in Playlist (not Region) and be in Multi-Input Mode.
Hall Reverb
Although there's a lot of excitement about the HyperVerb, we're also still offering our classic reverb algorithms, Hall and
Room. The Hall Reverb has an intrinsically longer decay time than the Room Reverb. Both create a diffuse sound field
with variable brightness, feedback, wet/dry mix and diffusion, while utilizing a minimum of CPU cycles.
Parameters
Mix
Wet/Dry mix, in percentages from 0% (original signal only) to 100% (reverberant signal only) by default.
Feedback
Feedback, from 0% to 100% by default. Higher feedback settings lengthen the time it takes a give sound's reverb to decay
to silence. A setting of 0% will result in the shortest possible decay for the algorithm, 100% feedback will linger almost
indefinitely.
You will typically need to increase your Post Roll value to hear the full decay created by Hyperprism's reverb
algorithms when processing a sound to a new file.
Brightness
The brightness slider simulates the loss of high frequencies due to room reflections and atmospheric absorption. In
practice, you can consider it a low pass filter applied continuously to the ongoing reverb decay.
A setting of 0% will result in very dark sounding reverbs, with very little high-frequency energy. A setting of 100% will be
very bright-all the high frequencies from the source sound will persist in the reverberant decay.
Diffusion
Diffusion controls the phase smearing of the reflected sound. The range of values is from 0 to 140%.
Low diffusion settings result in more discrete delayed repeats, while adding diffusion smears out the attacks of each repeat.
Higher diffusion results in a smooth wash of sound, without identifiable reflected attacks.
Diffusion settings over 100% will induce feedback.
Pro Tools/Avid users: Although there's only one H-DAS Hall Reverb plug-in in your DAE folder, the Hall Reverb
effect shows up twice in the AudioSuite menu as separate Mono Hall Reverb and Stereo Hall Reverb selections. Choose
according to the number of audio channels to be processed. Note that there is no direct mono-to-stereo processing under
the AudioSuite format. But you can easily work around this limitation by copying any mono selection to an adjoining
track, then selecting both regions for stereo processing. The H-DAS Stereo Hall Reverb requires two-channel input or a
DAE error message -7450 will result when you attempt to process. Also note that Hyperprism stereo AudioSuite effects
require the following settings: Use in Playlist (not Region) and be in Multi-Input Mode.
Page 79

Go to Effects: [Filters] [Modulators] [Delay and Reverb] [Stereo] [Misc Effects]
Go to Table of Contents: [Hyperprism-VST]
[Troubleshooting] [About Digital Audio]
Page 80

Digital Reverberator Face Off
During the development of the HyperVerb digital reverberator we spent some time analyzing common digital reverberators, as well as
natural reverberation. This analysis, in addition to years of research, has helped us design a digital reverberator that, in certain respects,
offers a significant improvement in sound quality over previous technologies. The two most important improvements are significantly
increased echo density, and virtually no coloration in the late response, all while running in real-time on a modest processor (e.g. 150MHz
Pentium or 66MHz 56002). One or both of these deficiencies has plagued most digital reverberators since their initial development 30 plus
years ago.
The properties of high quality reverberation are very complicated, but for the purposes of this report we will limit the analysis to aspects
that can be easily and objectively measured and that are commonly problematic with most digital reverbs. Of course the most important test
is simply listening to the reverberator, though other tests can also be useful. For this reason you can also download impulse response
recordings for a number of commercial reverberators (ftp.arboretum.com/pub/demos/reverb/) and listen to them as is or convolve them with
actual sounds using a product like Sonic Foundry's Acoustic Modeler. Many of these files have large amounts of hiss and/or quantization
noise. This is generally due to the impulse recording process and was not necessarily a deficiency of the reverberator. Since this only is a
demonstration, such additional noise should not be too much of a problem. Also, since most reverberators can be made to sound "bad" if
you tweak the parameters in a certain way, we tried use a generic hall factory preset for each reverberator in an attempt to make things as
fair as possible. But since we are still biased with regard to this whole subject, we welcome you to create your own impulse responses so
you can verify our results. If you do so please send the impulse responses our way!
All of the tests performed here are based on examination of each reverberator's impulse response. An impulse response was obtained by
sending a one sample wide "click" into the reverberator and recording the output. Frequency domain and time domain plots can then be
made from the impulse response. From these plots, it is then very easy to make qualitative and even quantitative comparisons based on echo
density, coloration, amplitude envelope and other properties.
Echo density, often referred to as density or diffusion, can be defined as the number of "echoes" occurring per second. For example, an
impulse response where the energy is concentrated at a few samples (i.e.. most samples are zero) will have a low echo density, whereas an
impulse response with energy spread out in time (i.e. few samples are zero) will have a high echo density. To compare the echo density of
various reverberators, plots have been made of the first 200 milliseconds of the of the impulse response. To examine the impulse responses
in greater detail they can be downloaded and viewed with an audio editing program.
Coloration defines how the reverberator changes the frequency response of a sound. Frequency domain plots were made using Cool Edit
Pro, using a 4096 point FFT and a Blackman-Harris window. Successive FFTs were made starting at roughly 500ms to 1000ms and then
averaged to get the overall frequency response of the late reflections. Late reflections are those which occur after roughly the first 100ms. In
the case of a "well liked" concert hall or room the frequency response of the late reflections will be relatively smooth and uncolored. In
other words, there won't be any sharp peaks or valleys in the frequency response. In the case of a poor sounding digital reverberator, there
will likely be lots of coloration. For example the common problem of a "ringy" sound corresponds to a few distinct peaks in the frequency
response, where as a resonant or metallic sound quality generally corresponds to a very "rough" frequency response.
For the purposes of this report we will assume that a good digital reverberator can generate reverberation that is perceptually
indistinguishable from actual reverberation of "well liked" acoustical space (e.g. a concert hall). For a good point of reference, we will first
examine naturally occurring reverberation. Of course other "unnatural" types of reverberation may be useful in some cases. Here is the first
200ms of impulse responses from a chapel and a large hall.
Page 81

Page 82

(NOTE: Cyan = Left Channel and Magenta = Right Channel)
Looking at these plots we can observe a number of distinguishing features. Some of these features include:
Smooth decay of late reflections (i.e. little flutter)
●
Relatively uncolored frequency response of the late reflections (i.e. no ringing)●
Sharp attack (usually)●
Extremely high echo density●
While these features are generalizations, most naturally occurring reverberation has these properties, especially for rooms and halls with
"good acoustics." Now lets examine some common digital reverberators, including a TC Electronic M2000 and a Lexicon 480L.
Sound Forge Reverb:
Page 83
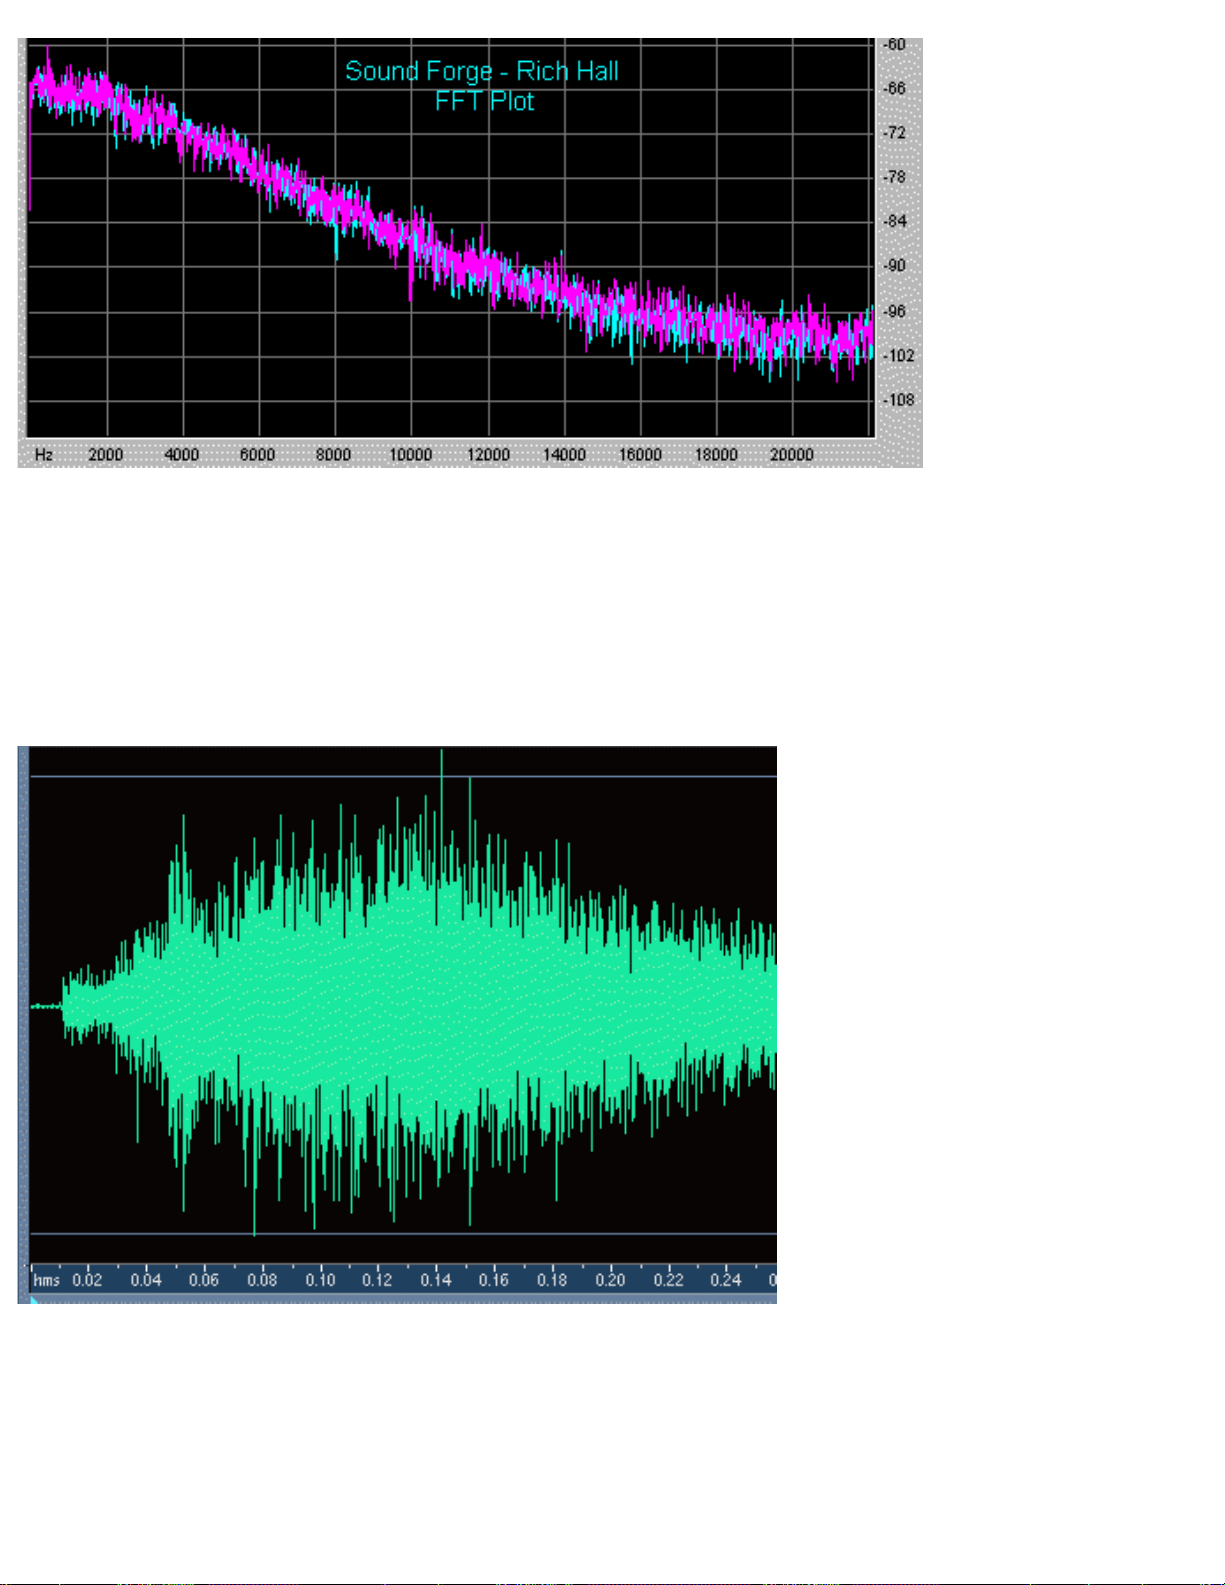
Pros:
Somewhat colorless late decay●
Cons:
Severe lack of echo density
●
Fluttery late decay●
Echo density does not increase with time●
Digitech GigaVerb:
Page 84

Pros:
High echo density●
Cons:
Very long attack time (it takes over 100ms to reach maximum amplitude)●
Highly colored late reflections (i.e. resonant and ringy)●
Power Technology DSP-FX Reverb:
Page 85

Pros:
Moderate echo density (though not always enough)●
Cons:
Highly colored late reflections (i.e. metallic and resonant)●
Lack of echo density in the early reflections (causes "chatter" for some sounds)●
TC Electronic Native Reverb:
Page 86

Pros:
Deficiencies are not a pronounced as some reverbs
●
Cons:
Echo density does not increase fast enough
●
Fluttery late decay●
Colored late reflections (i.e. resonant and ringy)●
Waves TrueVerb:
Page 87

Pros:
Moderately smooth decay of late reflections (i.e. minimal flutter)
●
Late reflections are fairly colorless●
Cons:
Lack of echo density in the early reflections (causes "chatter" for some sounds)●
TC Electronic M2000:
Page 88

Pros:
Very high density and diffusion●
Moderately smooth decay of late reflections (i.e.. minimal flutter)●
Cons:
Slightly colored late reflections (i.e.. ringy)
●
Lexicon 480L:
Page 89
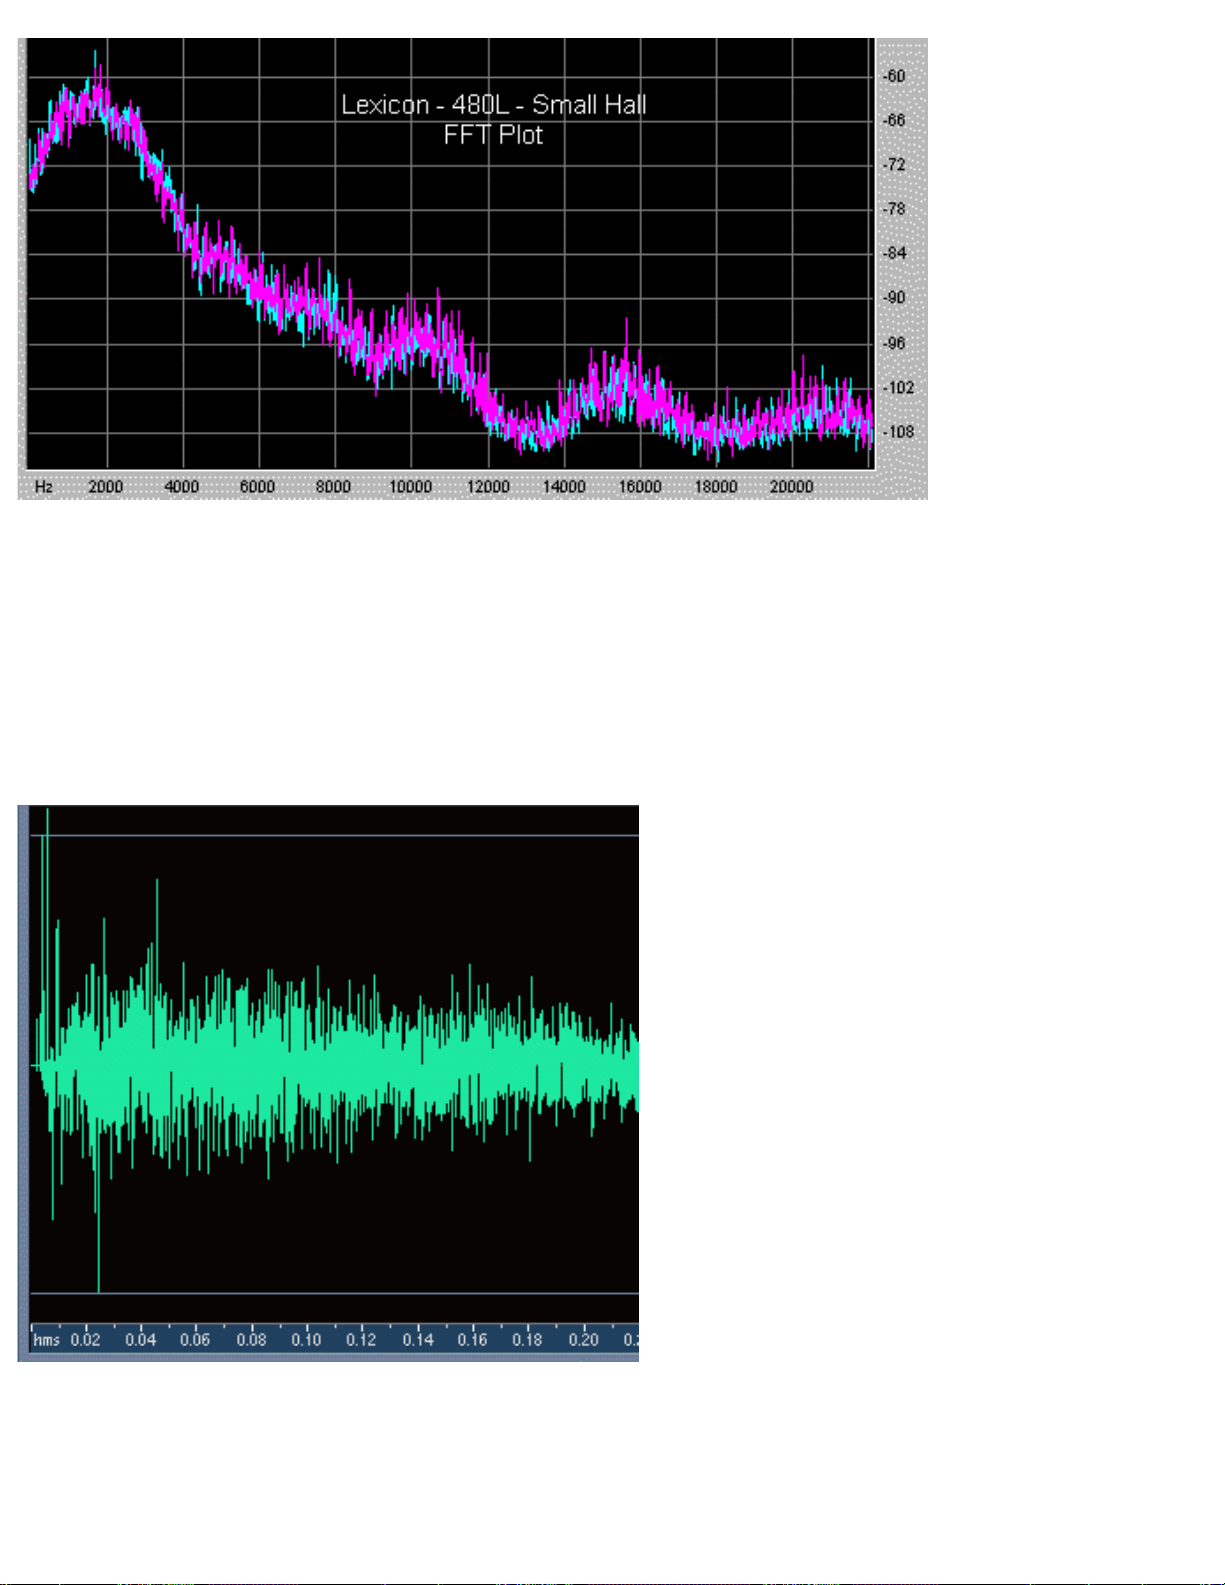
Pros:
Drastic improvement in sound quality compared to most reverbs
●
Sharp attack●
Smooth decay of late reflections (i.e. minimal flutter)●
Cons:
Slightly colored late reflections (i.e. resonant and ringy)
●
Echo density could be higher●
Arboretum Systems HyperVerb:
Page 90

Pros:
Very high echo density●
Echo density increases with time at a sufficiently high rate●
Smooth decay of late reflections (i.e. minimal flutter)●
Highly uncolored frequency response in the late reflections●
Sharp attack if desired●
Cons:
Could benefit from higher echo density for very large room sizes (easy to fix at the expense of somewhat higher processing
requirements)
●
Of course none of this "scientific" data guarantees that the HyperVerb actually sounds better than any of these reverberators, so we
welcome you to give it a serious listen. Although we don't claim that the HyperVerb is the ultimate digital reverberator, we think you will
find the level of quality very high. If you have any questions or comments regarding the HyperVerb please contact Chris Weare at
cweare@arboretum.com.
Impulse Response Files:
File Name Manufacturer Product/Type Preset
CoolEdit-ConcertHall.wav Syntrillium Cool Edit Pro Concert Hall Lite
Digitech-GigaVerb.wav DigiTech GigaVerb Studio Strat (GSP2101)
DSP-FX MediumHall.wav Power Technology DSP/FX Medium Hall
DSP-FX MediumRoom.wav Power Technology DSP/FX Medium Room
HyperVerb-MediumHall.wav Arboretum Systems HyperVerb Medium Hall
HyperVerb-MediumHall2.wav Arboretum Systems HyperVerb Medium Hall 2
HyperVerb-MediumHall3.wav Arboretum Systems HyperVerb Medium Hall 3
HyperVerb-BrightLargeHall.wav Arboretum Systems HyperVerb none
HyperVerb-StateCapitol.wav Arboretum Systems HyperVerb State Capitol
Lexicon 480L-SmallStage2.wav Lexicon 480L Small + Stage (???)
Sound Forge-RichHall.wav Sonic Foundry Sound Forge Rich Hall
TCWorks-NativeReverbDemo.wav TC Electronic Native Reverb (fixed demo preset)
TrueVerb-MediumConcert.wav Waves TrueVerb Medium Concert
WaveLab-HallReverb.wav Steinberg WaveLab (???)
These impulse response files are available from ftp.arboretum.com/pub/demos/reverb/. we have not included the impulse response for the
M2000 Hall since it is copyrighted by SEK'D. Lexicon 480L small stage impulse response file is also copyrighted by SEK'D, but it is
Page 91

available as a demo file free of charge on the SEK'D web site at http://www.sekd.com/Download/irdemo.zip, although for your
convenience we have provided it here.
Page 92

Hyperprism Stereo Manipulation Processes
Pan●
Auto Pan●
Doppler●
Quasi Stereo●
Stereo Dynamics●
More Stereo●
M-S Matrix●
Pan
Pan is similar to the "balance" control on a home stereo, determining which channel the sound comes through. It moves the
input sound from the left speaker to the right speaker, following the mouse position, and combines this with attenuation, or
gain, if desired.
Hyperprism-VST users: Make sure you have your stereo tracks panned 100% left and right or you will get no
effect with this process.
Pro Tools/Avid users: Note that there is no direct mono-to-stereo processing under the AudioSuite format. But you
can easily work around this limitation by copying any mono selection to an adjoining track, then selecting both regions for
stereo processing. The Hyperprism-DAS Pan effect requires two-channel input or a DAE error message -7450 will result
when you attempt to process. Also note that Hyperprism stereo AudioSuite effects require the following settings: Use in
Playlist (not Region) and be in Multi-Input Mode.
Parameters
Position (L <-> R)
Called LR Balance (%) in Hyperprism 2, this parameter controls the position of the sound in the plane from left to right.
This parameter ranges from -100 to +100% where 0 corresponds to the center position in Hyperprism 2. In
Hyperprism-VST, Hyperprism-MMP and Hyperprism-DAS this parameter ranges from 0 to 100%, with 50 being the
center position.
Gain (dB)
This is a volume setting. Adjust attenuation or gain of the sound from -96 dB (silence) to 0 dB. The range is measured in
percentage, with 100% equaling 0 dB.
Page 93

Application Diagram
The following example assumes you're running Hyperprism 2 or Hyperprism-VST, which support parameter automation
(otherwise you just hear the pan motion during preview in Hyperprism-MMP or Hyperprism-DAS). For a dramatic
panning motion, start with the signal attenuated in one of the channels; as you pan, put in a crescendo as the sound passes
through the center. The opposite effect, a decrescendo pan, may also be effective, since it creates a "hole in the middle"
effect. Crescendo and Decrescendo pans
This effect transforms a monaural input signal into a stereo output signal. Using the Hyperprism 2 Process to New
File... command creates a stereo sound file as the output.
The ability to apply gain to the original sound can be a very useful feature, since you can use your mouse to "ride
the gain," bringing out quiet parts of a sound. However, be aware that whenever your gain is above zero dB, a loud
passage in the sound you are processing could cause digital distortion. If this occurs, simply re-draw your path and add less
gain at that point.
If you want to use this effect to change gain, but not left/right balance, set the horizontal balance axis to "0" at both ends,
so you don't have to keep the mouse perfectly centered while drawing your gain adjustments. Alternately, you can hold
down the shift key when drawing your paths. This constrains the motion of the Tracer to vertical or horizontal movements.
Auto Pan
The Auto Pan effect moves a mono or stereo signal back and forth between the left and right channel. At lower speeds, the
effect is one of a gradual pan between speakers. At higher speeds, the effect is similar to a rotating speaker sound. At
extremely high speeds, the effect introduces interesting stereo amplitude modulation effects.
Hyperprism-VST users: Make sure you have your stereo tracks panned 100% left and right or you will get no
effect with this process.
Page 94

Pro Tools/Avid users: Note that there is no direct mono-to-stereo processing under the AudioSuite format. But you
can easily work around this limitation by copying any mono selection to an adjoining track, then selecting both regions for
stereo processing. The Hyperprism-DAS Auto Pan effect requires two-channel input or a DAE error message -7450 will
result when you attempt to process. Also note that Hyperprism stereo AudioSuite effects require the following settings:
Use in Playlist (not Region) and be in Multi-Input Mode.
Parameters
LFO Frequency
This controls the speed at which the sound is panned back and forth between channels, from 0 to 20 Hz.
LFO Depth
The Depth setting controls how pronounced the effect is, by default from 0 to 100%. At 0%, there is no effect. At 100%,
when the sound is being panned to the left channel, the right channel will be completely silent. At intermediate settings,
the sound will not be completely muted in the "quiet" channel even at the instant is at it maximum level in the opposite
channel.
Position
From 0% to 100%. In Hyperprism-DAS this parameter is called "Pan." Position determines the amount of time the panned
signal will spend in the left or right channels. Technically speaking, this parameter varies the "duty cycle" of the low
frequency oscillator that drives the Auto Pan effect. At a setting of 50%, the Auto Pan swings the sound equally between
left and right channels in a sinusoidal pattern, much like a pendulum swings back and forth evenly about it's center.
However, Position settings below 50% will cause the sound to spend correspondingly more time in the left channel, thus
appearing to alter it's "position" relative to the center of the stereo field. Position settings above 50% will cause the sound
to spend correspondingly more time in the right channel. At extreme Position settings (near 0 or 100%), the sound appears
only as a momentary "blip" in one channel or the other. This can sound especially interesting at high Depth and Frequency
settings.
Doppler
The Doppler effect simulates a sound source passing by a listener. The source may be mono or stereo, both with stereo
output resulting. The listener is always positioned at the center of the Blue Window, (X = 0, Y = 0). See the Doppler field
diagram below. As a sound source moves towards the user, the sound source's perceived amplitude and pitch increase. As
a sound source moves away from the user, the amplitude and pitch will decrease.
If you move a source away from the user, the pitch of the sound will slowly return to 0 pitch shift so that you can begin a
new sweep back towards the listener. A standard doppler shift can be created by setting the Y Axis distance to about +10
meters (in front of the listener) and sweeping the X Axis parameter. Note that this may require high value of smoothing
and a steady hand with the mouse to mimic the intended velocity of the source sound. Additional gain increase/decrease
can be done with the input gain sliders, eg. to completely eliminate the sound source after a "fly-by." Remember that all
parameter changes can be automated and saved to create repeatable, layerable effects.
Page 95

Hyperprism-VST users: Make sure you have your stereo tracks panned 100% left and right or you will get no
effect with this process.
Parameters
X Axis
The X axis parameter controls the left/right distance from the listener. Negative distances are defined to be left of the user
and positive distances to the right. This parameter ranges from -200 to 200 meters.
Y Axis
The Y axis parameter controls the front/back distance from the listener,. Negative distances are defined to be behind the
user and positive distances to be in front of the listener. This parameter ranges from -200 to +200 meters.
Quasi Stereo
Quasi Stereo accepts a monaural input signal and produces a pseudo stereo two-channel output. It divides the mono signal
path and applies complementary comb filters to each channel. These filters disperse their outputs to the left and right
channels in such a way as to create the impression of a stereo image.
Page 96

Complementary comb filters in Quasi Stereo
Hyperprism-VST users: Make sure you have your stereo tracks panned 100% left and right or you will get no
effect with this process.
Pro Tools/Avid users: Note that there is no direct mono-to-stereo processing under the AudioSuite format. But you
can easily work around this limitation by copying any mono selection to an adjoining track, then selecting both regions for
stereo processing. The Hyperprism-DAS Quasi Stereo effect requires two-channel input or a DAE error message -7450
will result when you attempt to process. Also note that Hyperprism stereo AudioSuite effects require the following
settings: Use in Playlist (not Region) and be in Multi-Input Mode.
Parameters
Depth
Width of the stereo image, where 0 means mono (the input is routed to both outputs with no change), +100 means 100%
pseudo stereo.
Low Cut
Plug-in Pack users please note: This parameter is mis-labeled "High Cut" in Hyperprism-VST, Hyperprism-MMP and
Hyperprism-DAS, it's actually controlling Low Cut. It sets the cutoff frequency for a 12 dB per octave high pass filter.
At a value of 0 the effect is switched off. As you raise the value, a high pass filter attenuates low frequencies in the range
up to 6000 Hz (up to 10 kHz in Hyperprism-DAS) before they are injected into the Quasi Stereo algorithm. These
frequencies will still be present in the final signal. By using the filter, you can reduce low-frequency artifacts at the
expense of a slightly narrower stereo image.
For an interesting spatial effect, apply Quasi Stereo to a two-channel stereo input signal. The effect acts on only the
mono (common) part of the signal. The discrete stereo channel information is added to the processed pseudo stereo signals
to form the output.
Delay Time
The comb filtering used to create the pseudo-stereo image uses a short delay. The Delay Time slider lets you adjust the
amount of the delay. A setting of 0 will cancel the effect, while higher settings make for progressively wider results. This
control goes from 0 to 100 ms.
Page 97

Stereo Dynamics
Stereo Dynamics spatializes the input sound, positioning it in a virtual space situated in front of the listener. It moves the
input sound from front to back and from left to right, depending on the position of the tracer in the Blue Window.
This effect transforms a monaural input signal into a stereo output signal. Using the Hyperprism 2 Process to New
File... command creates a stereo sound file as the output.
Pro Tools/Avid users: Note that there is no direct mono-to-stereo processing under the AudioSuite format. But you
can easily work around this limitation by copying any mono selection to an adjoining track, then selecting both regions for
stereo processing. The Hyperprism-DAS Stereo Dynamics effect requires two-channel input or a DAE error message
-7450 will result when you attempt to process. Also note that Hyperprism stereo AudioSuite effects require the following
settings: Use in Playlist (not Region) and be in Multi-Input Mode.
If you're using the VST, MMP (Premiere format) or DAS (AudioSuite format) versions of Hyperprism, the
following parameter list is for you. If you're using Hyperprism 2 for Power Mac, skip down to the special parameter list
for your version; some of the ranges are different, giving you even more control over this effect...
Hyperprism-VST users: Make sure you have your stereo tracks panned 100% left and right or you will get no
effect with this process.
Parameters
Right-Left Gain
This is "right-minus-left gain," which controls the proportion of one channel relative to the other. For example, moving the
tracer to the right will increase the proportion of the right channel in the output. The range is 0 to 100.
Right+Left Gain
This is "right-plus-left gain," controlling the overall volume level of both channels. The range is 0 to 100.
Application Diagrams
The figure below shows the layout of the play zone for the Stereo Dynamics effect, assuming R-L Gain is on the horizontal
axis and R+L Gain is on the vertical axis.
Page 98

Default layout of the play zone for Stereo Dynamics in Hyperprism-VST,
Hyperprism-MMP and Hyperprism-DAS
Notice in the figure below, that as you move the tracer from top left to bottom right, you pan the sound.
Tracer path for a panning motion
As you move from top right to bottom left, the signal is attenuated. So if you combine the two motions, as the following
figure shows, the sound appears to spin in a circle in front of the listener situated precisely between two loudspeakers. This
is also an excellent effect on headphones.
Page 99

Tracer path for a spinning motion
Hyperprism 2 Stereo Dynamics Parameters
Right-Left Gain
This is "right-minus-left gain," which controls the proportion of one channel relative to the other. For example, moving the
tracer to the right will increase the proportion of the right channel in the output. The range of values is -100 to 100.
Right+Left Gain
This is "right-plus-left gain," controlling the overall volume level of both channels. The range of values is -100 to 100.
Application Diagrams
The figure below shows the layout of the play zone for the Hyperprism 2 Stereo Dynamics effect, assuming R-L Gain is on
the horizontal axis and R+L Gain is on the vertical axis.
Page 100

Default layout of the play zone for Stereo Dynamics in Hyperprism 2
Notice in the figure below, that as you move the tracer from top left to bottom right, you pan the sound.
Tracer path for a panning motion
As you move from top right to bottom left, the signal is attenuated. So if you combine the two motions, as the following
figure shows, the sound appears to spin in a circle in front of the listener situated precisely between two loudspeakers. This
is also an excellent effect on headphones.
 Loading...