

Page 1

Arboretum Harmony Manual
Table of Contents
Copyright ©1999 by Arboretum Systems, Inc. This documentation may not, in whole or in part, be copied, reproduced or translated without prior written consent of
Arboretum Systems.
Page 2

Arboretum Harmony Manual
Table of Contents
About this Manual●
Credits●
License●
Getting Started
System Requirements●
Compatibility●
Setup Procedure●
Using Arboretum Harmony
Overview●
Quick-Start Tutorial●
Command Reference
Notes Screen●
Mixer●
Voices Display●
Process Window●
Link to HyperEngine Manual
Appendix A: Troubleshooting
About This Manual
The documentation may be viewed or printed from any browser, such as Netscape Navigator or Microsoft Internet
Explorer. If the text is too small or you wish to change the background color, go into your browser's Preferences and set
them as you wish. Internet Explorer users, just hit the Larger button on your browser tool bar.
Important: For better scrolling comfort use the scroll thumb, or the page up/page down keys, rather than the up and down
arrows.
Manual Conventions
Throughout this manual, you will see several different symbols in sections describing step-by-step operations.
Text
following a right pointing arrow invites you to execute a command with the mouse or keyboard.
Text following a down pointing arrow describes the result produced by executing a command.
A pointing hand indicates an important note!
Underlined text indicates a Hyper link; mouse-click on the link to access more information on the topic
If your Browser is connected to the Internet, you can visit us by clicking the button below to get more information and the
Page 3

latest available software and documentation updates.
For any questions, either reach us at the web site, call us at (650) 738-4750 or send us an email at:
harmony@arboretum.com
This documentation current to Arboretum Harmony version 1.0, last revised 2/17/99
Copyright ©1999 by Arboretum Systems, Inc. This documentation may not, in whole or in part, be copied, reproduced or
translated without prior written consent of Arboretum Systems
Credits
Arboretum Harmony and HyperEngine programmed by Chris Weare
Documentation by Todd Souvignier
Interface design by Georges Jaroslaw
Scales for Harmony by Aram Lindahl
For Arboretum Systems:
Georges Jaroslaw, CEO
Chris Weare, CTO
Zhi Liu, CFO
Todd Souvignier, Marketing Director
Richard Lee, Sales Director
Trevor Paglen, Office Manager
Arboretum Systems Inc. 75 Aura Vista, Pacifica California 94044
(650) 738-4750, fax (650) 738-5699, http://www.arboretum.com
ARBORETUM SYSTEMS SOFTWARE LICENSE AGREEMENT
Arboretum Systems ("Arboretum") is willing to license the enclosed HyperEngine and Arboretum Harmony software
("Software") only upon the condition that you accept all the terms of this Agreement. If you do not agree to these terms,
then Arboretum is unwilling to license the Software to you, in which event you must return immediately, and in no case
later than ten (10) days from the date of purchase, the unopened diskette package (and accompanying items including
manual, other documentation and container) together with your proof of purchase, to the place from which it was acquired
for a refund.
LICENSE: You may use the enclosed Software on a single computer. The Software is in use when it is installed into
permanent memory (such as a hard disk or other storage device) or loaded into temporary memory (RAM) of that
computer. The Software is copy protected.
RESTRICTIONS: You may not transfer, modify, rent, lease, loan, resell, distribute, network, electronically transmit or
merge the Software. You may also not reverse engineer, decompile or disassemble the Software, or otherwise attempt to
discover the Software source code. You are not permitted to copy the Software (except to make an archival copy for
back-up purposes) or any of the accompanying documentation. Any attempt to transfer any of the rights, duties or
obligations hereunder except as expressly provided for in this Agreement is void.
COPYRIGHT: The Software (including audio, music, text, images and animations incorporated into the Software) and
accompanying documentation are owned by Arboretum or its suppliers and are protected by United States copyright laws
and international treaties. Unauthorized reproduction or distribution of the software or documentation is subject to civil
and criminal penalties.
LIMITED WARRANTY: Arboretum warrants for the period of thirty (30) days from the date of delivery of the Software
to you, as evidenced by a copy of your receipt, that: (1) The Software will perform substantially in accordance with the
user documentation provided by Arboretum. Your sole remedy under this warranty is that Arboretum will, at its option,
either repair or replace the Software which does not meet this Limited Warranty, or refund to you the money paid for the
Page 4

Software. Arboretum does not warrant that the Software will meet your requirements, that operation of the Software will
be uninterrupted or error-free, or that all software errors will be corrected. (2) The medium on which the Software is
furnished will be free from defects in materials and workmanship under normal use. Arboretum will, at its option, either
repair or replace the faulty medium at no charge to you, provided you return the faulty medium with proof of purchase to
Arboretum.
This Limited Warranty is void if any failure of the Software or any damage to the medium is due to accident, disaster,
abuse, misapplication, modification of the Software and/or violation of any of the terms of the License Agreement.
The above warranties are exclusive and in lieu of all other warranties, express or implied, and Arboretum expressly
disclaims all other warranties, including the implied warranties of merchantability, fitness for a particular purpose and
non-infringement. No oral or written information or advice given by Arboretum, its employees, dealers, resellers,
distributors or agents shall increase the scope of the above warranties or create any new warranties. Some states do not
allow the exclusion of implied warranties, so the above exclusion may not apply to you. In that event, any implied
warranties are limited in duration to thirty (30) days from the date of delivery of the software. This warranty gives you
specific legal rights. You may have other rights, which vary from state to state.
LIMITATION OF REMEDIES: Arboretum's entire liability to you and your exclusive remedy shall be the repair or
replacement of the Software, the repair or replacement of the Software medium, or the refund of your purchase price, as
set forth above. In no event shall Arboretum's liability to you or any third party exceed the purchase price paid for the
Software.
Regardless of whether any remedy set forth herein fails of its essential purpose, in no event will Arboretum or its
authorized dealers, resellers or distributors be liable to you (1) for any damages, including any lost profits, lost data, other
incidental or consequential damages, arising out of the use or inability to use the Software or any data supplied therewith,
even if Arboretum has been advised of the possibility of such damages, or (2) for any claim by any other party. Some
states do not allow the limitation or exclusion of liability for incidental or consequential damages so the above limitation
or exclusion may not apply to you.
GENERAL: This Agreement will be governed by the laws of the State of California, except for that body of law dealing
with conflicts of law. If any provision of this Agreement is held to be unenforceable, that provision will be removed and
the remaining provisions will remain in full force. This Agreement is the complete and exclusive statement of the
agreement between us which supersedes any proposal or prior agreement, oral or written, and any other communications
between us in relation to the subject matter of this Agreement. If you have any questions concerning this Agreement, you
may contact Arboretum by writing to Arboretum Systems, 75 Aura Vista, Pacifica California 94044. Arboretum Harmony
and HyperEngine are trademarks of Arboretum Systems.
You acknowledge that you have read this Agreement, understand it, and agree to be bound by its terms.
[First Chapter]
Page 5

Getting Started
System Requirements●
Compatibility●
Setup Procedure●
System Requirements
Arboretum Harmony requires a 200 MHz or faster Power Macintosh (or compatible) with a minimum of 20 Megabytes of
free RAM for HyperEngine, running MacOS 7.6 or later and the Sound control panel version 8.0 or later. If you're using a
MacOS version earlier than v8.0 the Sound Manager system extension version 3.2.1 or later will also be required.
Arboretum Harmony requires HyperEngine 2.4.2 or later, which is included automatically in the Arboretum Harmony
installation.
To use new CD audio import and foreign file import/export features QuickTime 3 is required. This can be downloaded free
of charge from Apple's web site.
You should also possess a basic knowledge of the Macintosh operating system. This includes knowing how to use
the mouse, windows, menus, etc. If these terms are strange to you, please consult your Macintosh documentation.
Compatibility
HyperEngine and Arboretum Harmony have custom support for the Apple Macintosh built-in sound hardware, the Korg
1212 I/O and the Digidesign Audiomedia II and III cards. Other audio hardware, including Pro Tools systems, are
compatible with HyperEngine and Arboretum Harmony with use of manufacturer-supplied Sound Manager drivers (such
as the Digidesign Sound Drivers).
HyperEngine and Arboretum Harmony are incompatible with RAM Doubler and Virtual Memory.
HyperEngine and Arboretum Harmony are fully compatible with all other known system extensions ("Inits") and control
panels.
Arboretum Harmony requires HyperEngine 2.4.2 or later, which is included automatically in the Arboretum Harmony
installation.
Be sure to check out Appendix A-Troubleshooting for more information on optimizing performance and eliminating
system conflicts. Also take a look at the chapter on HyperEngine and the Sound Manager for information about hardware
compatibility.
HyperEngine and Arboretum Harmony support SDII and AIFF audio files and 8 and 16 bits, and a variety of sampling
rates including common multiples of 44.1 and 48 kHz, as implemented by your audio hardware. HyperEngine also
imports/exports a wide variety of file formats other than SDII and AIFF through QuickTime 3.
Setup Procedure
Before Beginning
When first opening your Arboretum Harmony package you will find the following ingredients:
Page 6
One registration card●
One CD-ROM●
One Serial Number●
Please fill out your registration card and mail or fax it to Arboretum Systems as soon as possible in order to:
receive FREE technical support●
keep up-to-date on new developments and upgrades●
help shape new features and products●
Note that in order to receive ANY telephone support or technical assistance from Arboretum Systems, you MUST be a
registered user.
Installing Arboretum Harmony and HyperEngine
HyperEngine requires no special installation and is not copy protected. Arboretum Harmony however is copy protected.
Please read this section once through entirely and then follow these steps exactly!
Insert the Arboretum CD in your CD-ROM Drive.
Double click on the folder labeled "Product Installers."
Once inside the "Product Installers" folder, double-click on the "Arboretum Harmony" Installer.
Mouse-click past the Arboretum Logo display, click on Accept to accept the terms of the software license
agreement, then after reading/printing the subsequent ReadMe display, click on OK to proceed to the installation.
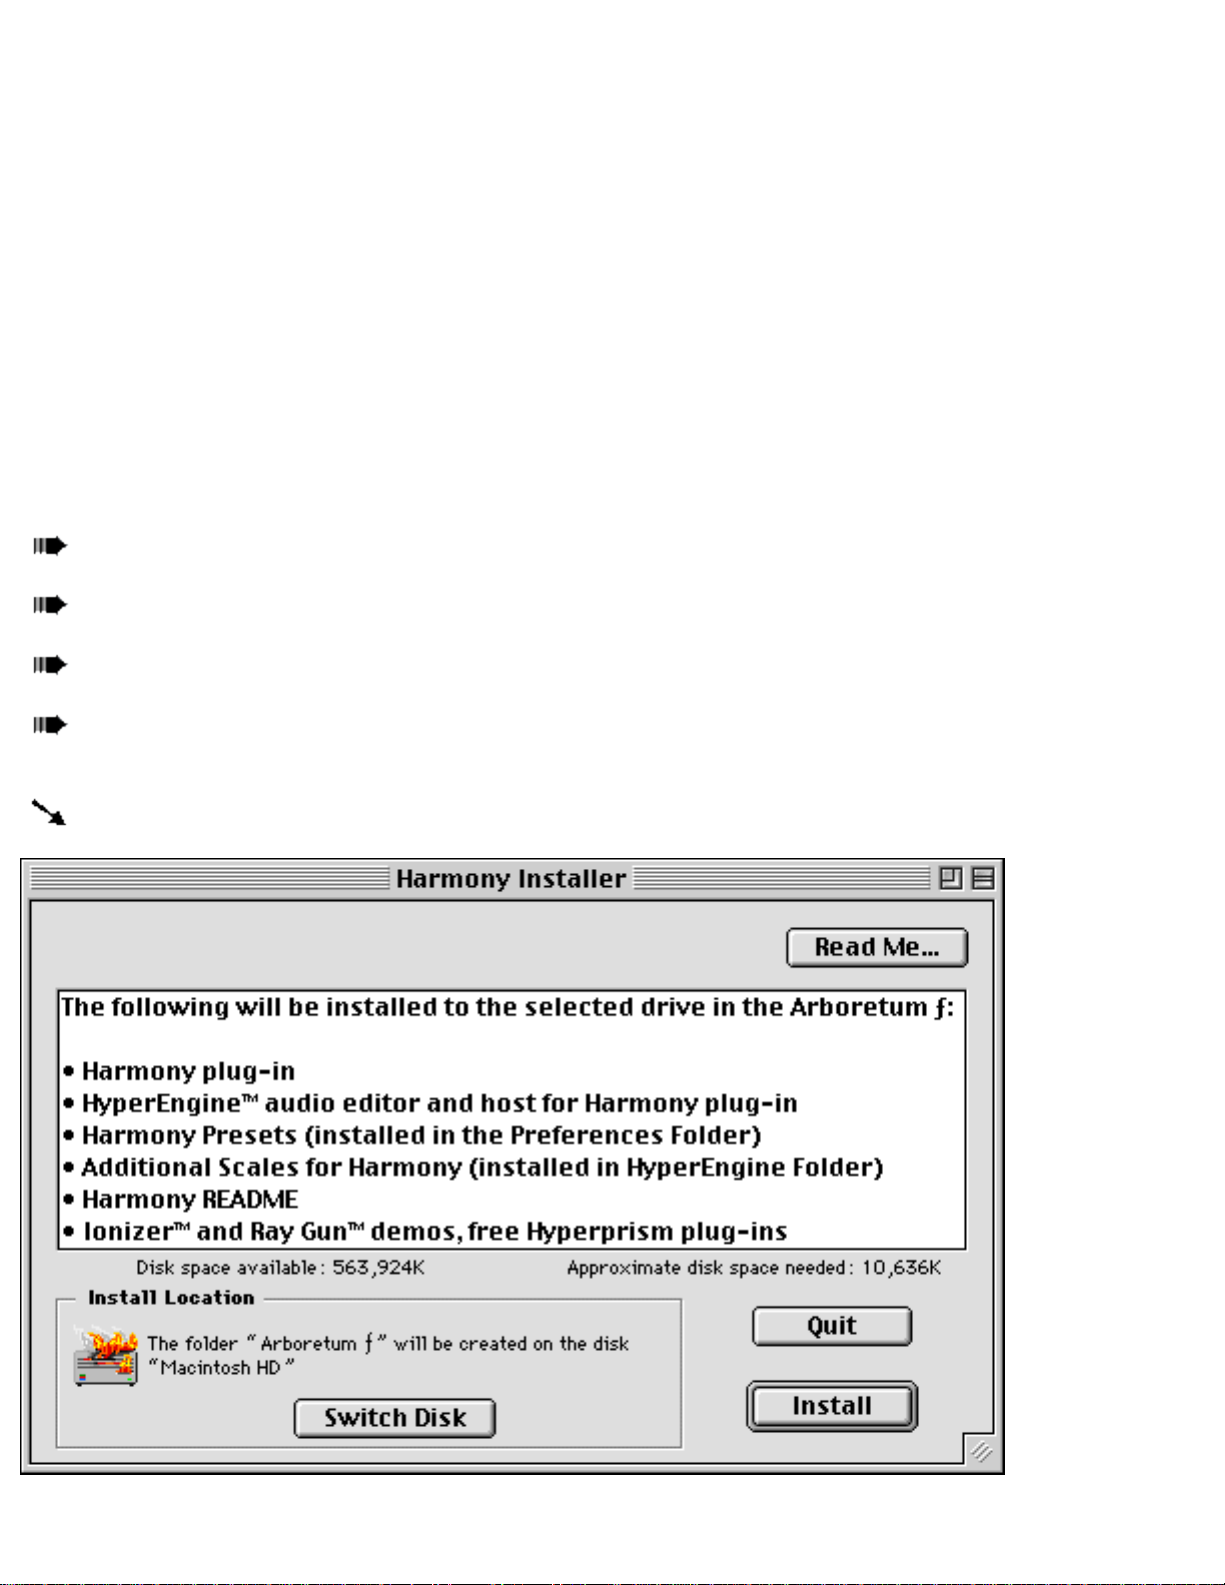
You're now at the main installation screen:
Page 7
Click on Switch Disk if you need to specify another drive for installation.
Click on the Install button.
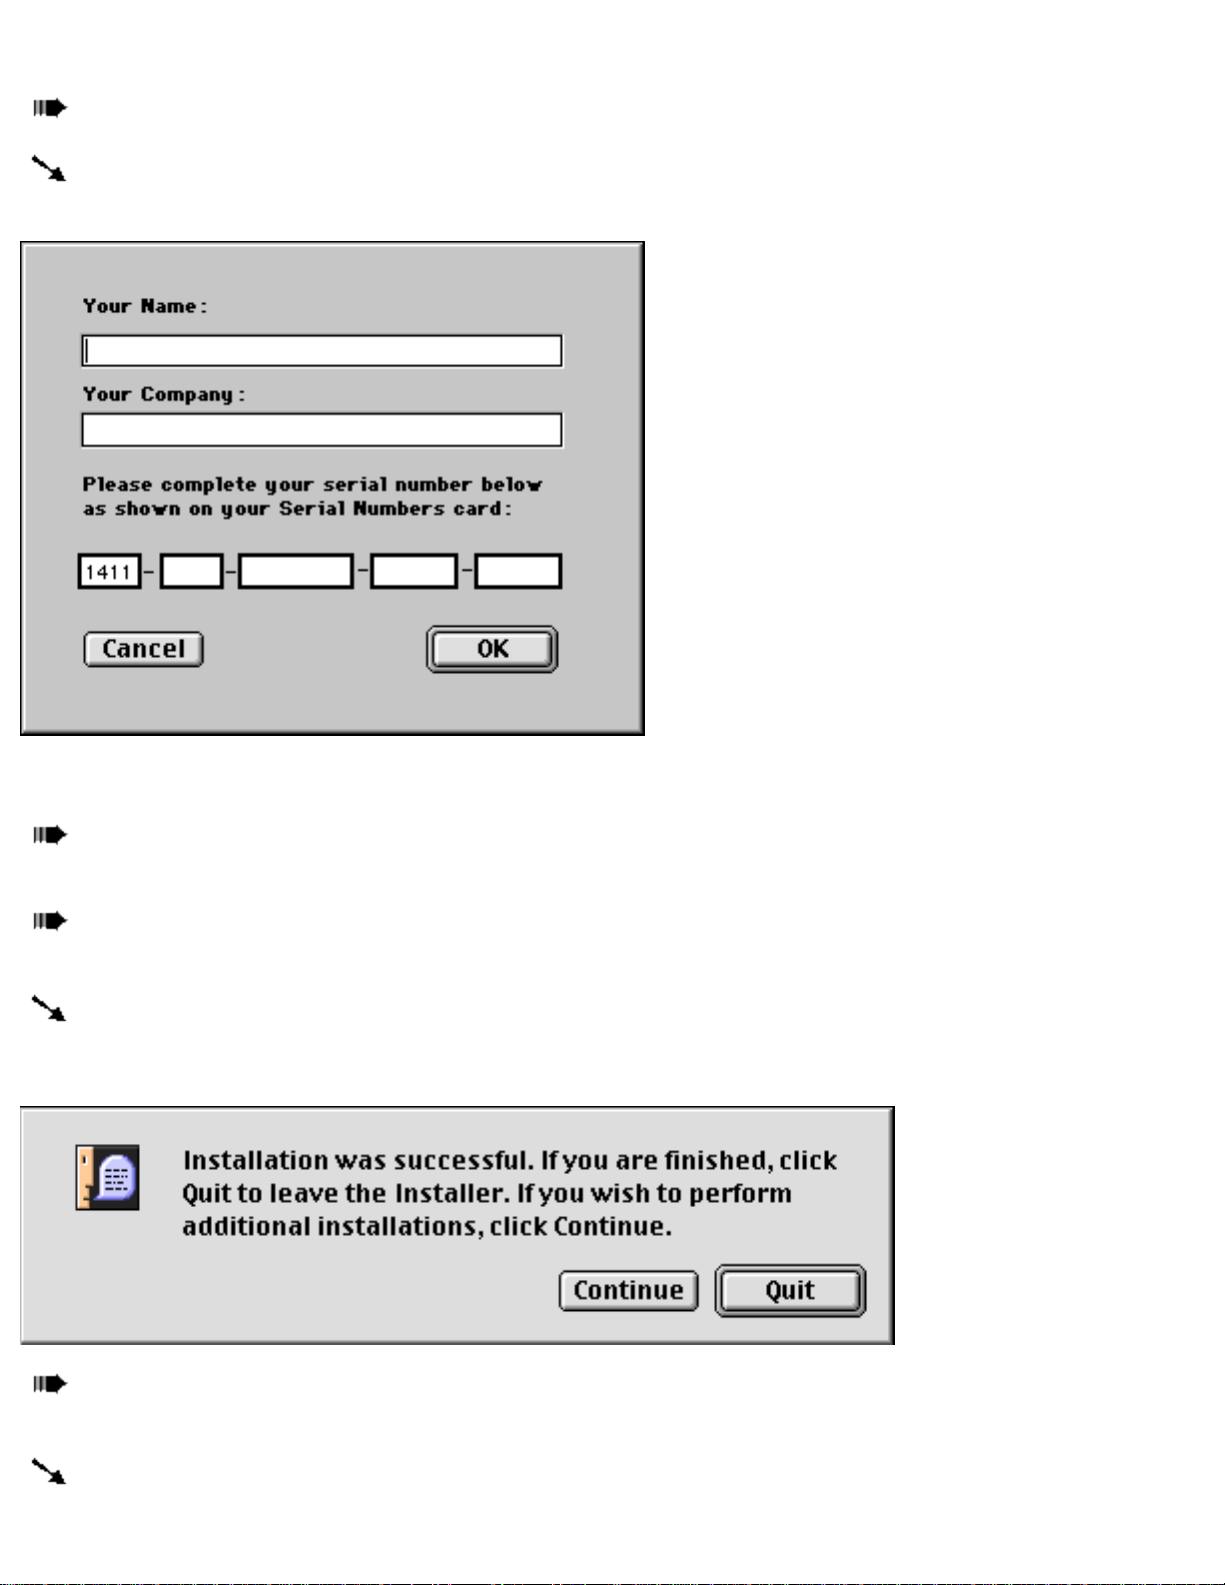
Next you'll be asked for your name (mandatory), company (optional) and Arboretum Harmony serial number
(mandatory). We've gone ahead and entered the first several numerals for you.
Make sure you're entering an Arboretum Harmony serial number. These numbers begin in every case with the
character string "1411."
Make sure you enter your serial number accurately. Double check your entry. When all fields are complete the OK
button will highlight. Click on OK to proceed.
The installer will commence with copying the Arboretum Harmony plug-in and HyperEngine application to your
hard drive. The software will be installed into a new folder called "Arboretum f." Assuming all the previous steps were
completed successfully, you should next see the following prompt:
Since you're doing an Easy Install, there's probably little need to perform additional installation. Click on the Quit
button to proceed to the final stage of the installation.
Now the Arboretum Serializer springs into action. The Serializer automatically applies your earlier serial number
Page 8
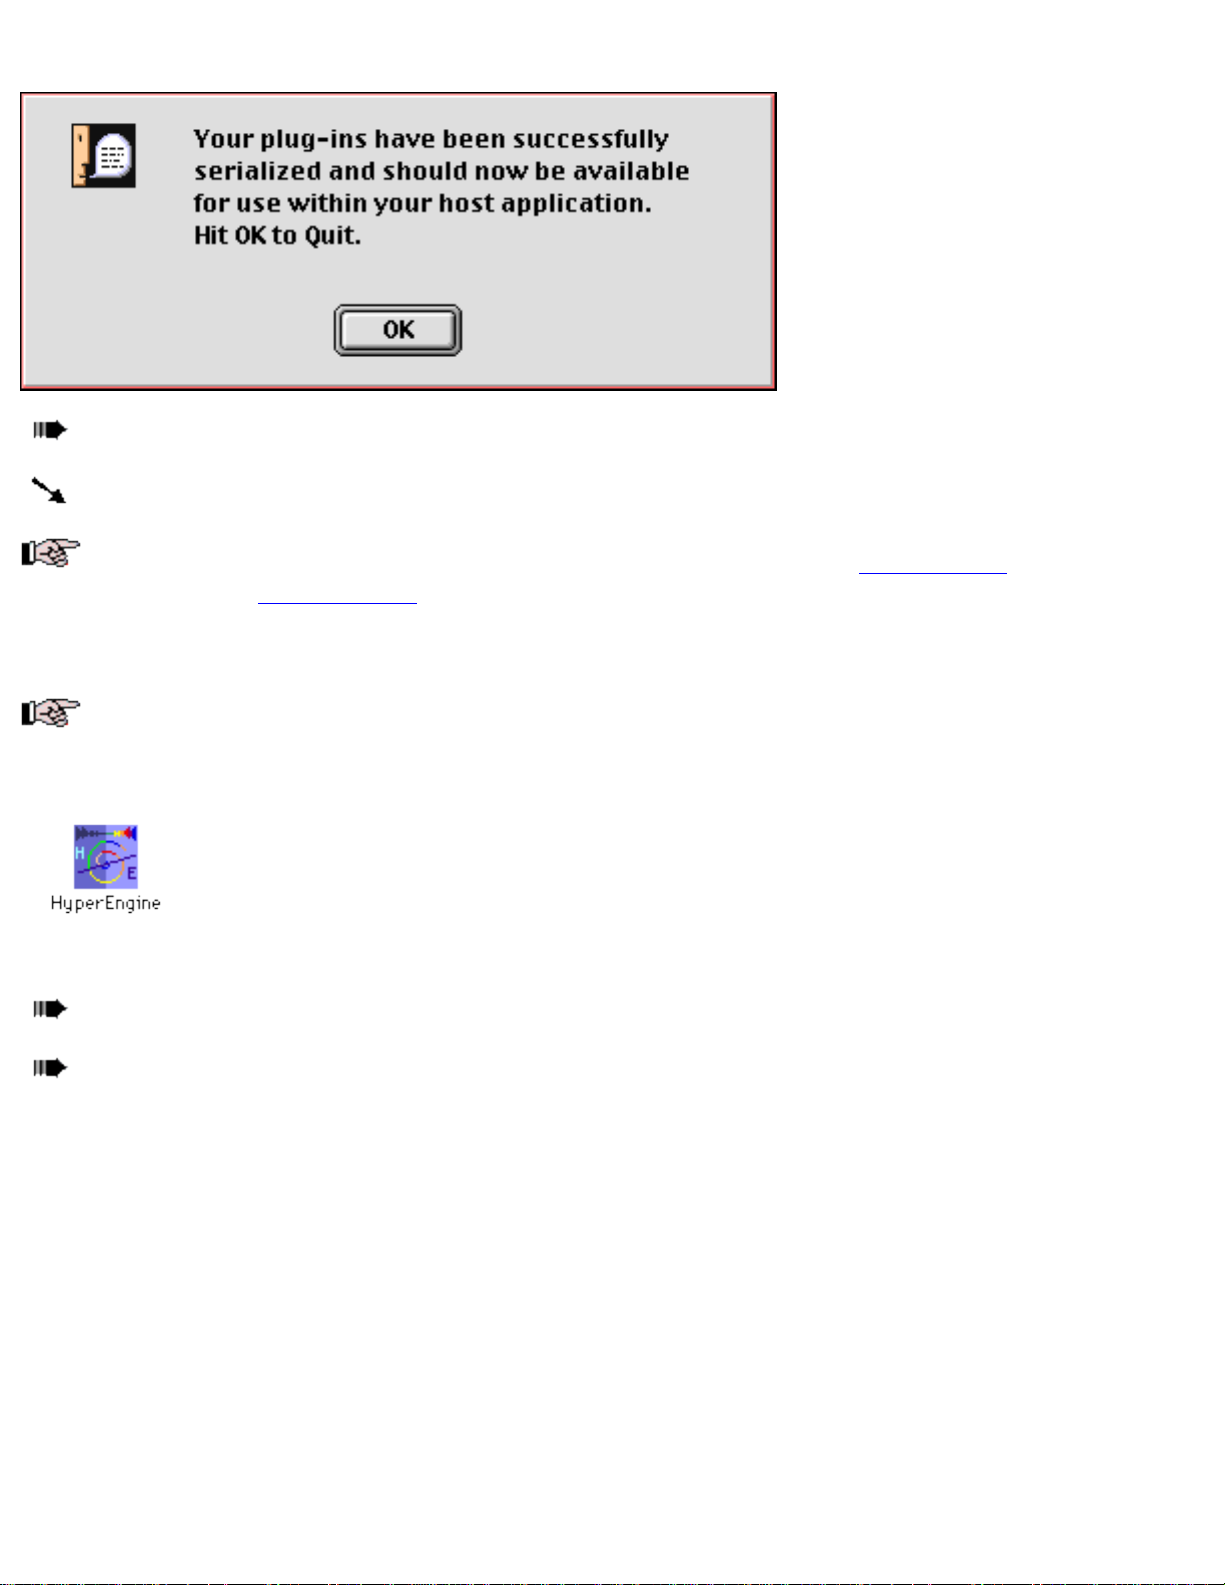
input to the Arboretum Harmony plug-in, so as to unlock the plug-in prior to first usage. You'll see the following prompt:
Click on the OK button to proceed and conclude.
Your Arboretum installation is now finished! The software will be installed into a new folder called "Arboretum f."
Problems? If any difficulty arises during the course of installation, check out the installation tips at the end of this
chapter, or the complete Troubleshooting section of this manual.
Allocating Memory to HyperEngine
As with any real-time digital audio application, HyperEngine will perform best with adequate memory. Arboretum
Harmony requires that a minimum of 20 MB of RAM be allocated to HyperEngine, preferably more. To adjust the amount
of memory (RAM) you are allocating to the HyperEngine, locate the HyperEngine application's icon.
The HyperEngine application's icon
Mouse-click once on this icon, so that it is highlighted (don't double click, or you'll launch the program.)
Next, type command-i or select Get Info from the MacOS File menu.
Page 9

The HyperEngine's Get Info dialog. Note Memory Requirements settings, lower right hand corner
The Get Info dialog allows you to set the minimum and preferred memory amounts for the program. If you have
plenty of RAM, feel free to allocate more to the HyperEngine. Ensuring that you have plenty of memory is key to smooth
performance. If you're encountering repeated crashes and freezes, the most likely cause is simply running out of program
memory.
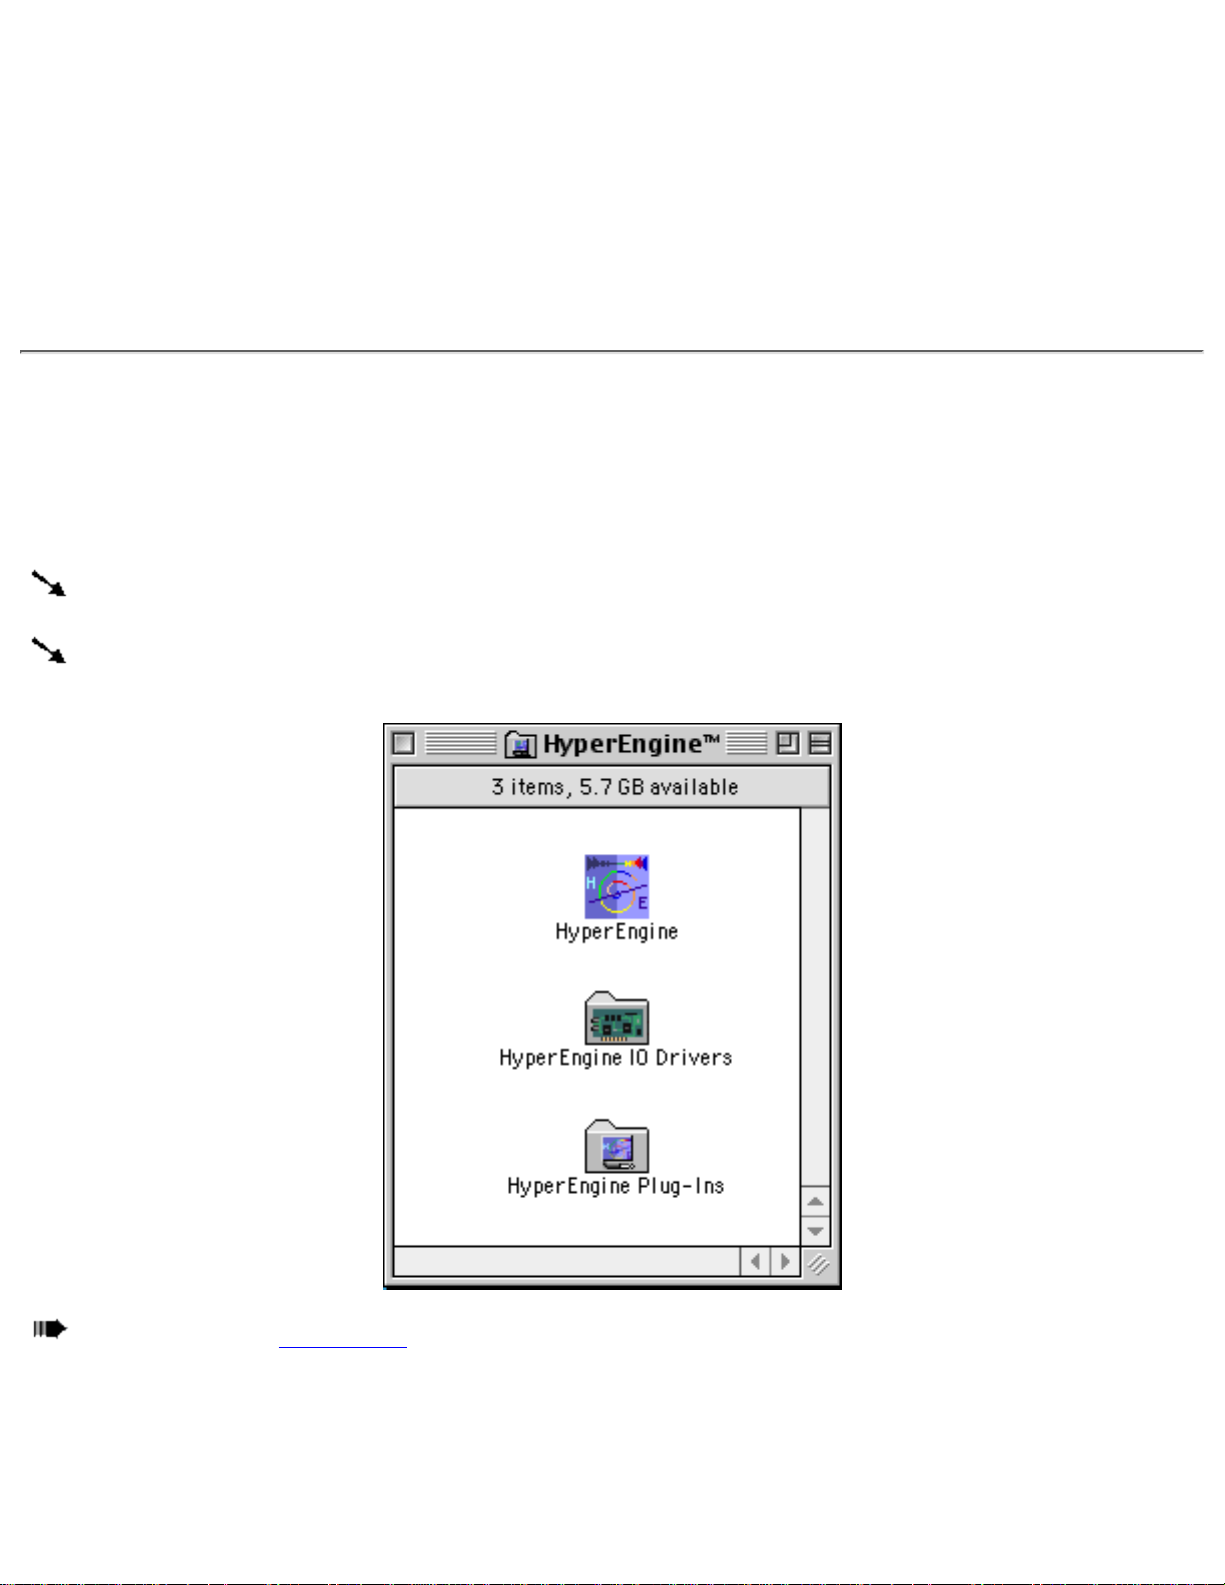
Locating HyperEngine Effects
HyperEngine places its effects plug-ins (such as Arboretum Harmony) in a folder called "HyperEngine Plug-Ins." This
folder must be in the same folder as the HyperEngine application.
This is the default configuration upon installation, and assuming you haven't moved these components around, you won't
need to worry about it further. HyperEngine also needs to see its IO Drivers folder, read the next section for details. See
the documentation on your individual plug-ins for more information on their installation and hard-disk authorization.
Installing HyperEngine Drivers
HyperEngine includes special custom drivers for the Digidesign Audiomedia II and Audiomedia III cards, plus the Korg
1212I/O card and the Apple Sound Manager. HyperEngine looks for its drivers in a folder called "HyperEngine IO
Drivers." This folder must be in the same folder, at the same directory level, as the HyperEngine application (as illustrated
above.) This is the default configuration upon installation, and assuming you haven't moved these components around, you
won't need to worry about it further.
If you have a supported sound card, these custom drivers eliminate the need for using special Sound Manager drivers, such
as the Digidesign Sound Drivers. Select the desired driver and sound hardware in HyperEngine's Preference menu. Use the
Configure Audio System dialog to set up the hardware.
Page 10

Problems? If any unexpected error messages come up during the course of installation, or if the Installer fails to place the
HyperEngine application, its IO Drivers and the Arboretum Harmony plug-in into your target drive's "Arboretum f" folder,
immediately quit the Installer and Restart your computer while holding the shift key down, so as to temporarily disable all
Extensions and eliminate any possible system conflicts. (If your CD ROM drive is not an Apple built-in model, you may
have to forego turning off Extensions.)
Once restarted, go into the System folder, open the Preferences folder and drag the Hyperprism &/or Harmony Preferences
file into the Trash. Deleting the Preferences files will clear out the results of a faulty serialization procedure. Then run the
Installer again and follow the preceding installation steps as directed. Also make sure you're using the correct Arboretum
product serial number. Arboretum Harmony, Hyperprism 2 (for HyperEngine), Ionizer, Ray Gun, Hyperprism-TDM and
Hyperprism-Plug-in Pack are each sold separately, and each require their own unique serial numbers.
If Trouble Persists: Link over to the Troubleshooting chapter of this manual. Also take a look at the Support frame up on
the Arboretum web site <http://www.arboretum.com> for the latest technical notes and troubleshooting tips. If all else fails
either email mactech@arboretum.com or phone our service line during our regular weekday business hours, 10 am to 6 pm
Pacific: (650) 738-4750
[Table of Contents] [Next Chapter]
Page 11

Using Arboretum Harmony
Overview
Arboretum Harmony was designed to provide a focused, fast-working and top-quality solution to the problems of pitch
correction, harmonization and vocal arranging. The simple graphic tools allow one to adjust an inflection or design the
most complex independent parts with a few quick mouse drags. Such ease and freedom has never before existed in any
hardware or software pitch processing tool.
These advances in interface design come on top of Arboretum's extensive research into formant-based audio processing. A
number of proprietary advances in pitch shifting, including formant preservation, make Arboretum Harmony sound more
realistic compared to other pitch changing effects. Protecting singers' natural vibrato has been a special problem for earlier
pitch correctors; Arboretum Harmony excels at maintaining that lifelike quality.
Arboretum Harmony and HyperEngine
Arboretum Harmony 1.0 runs within Arboretum's HyperEngine, which is a freely-distributed sound editing program.
HyperEngine 2.4.2 or later is required to operate Arboretum Harmony. All basic file operations, such as opening, selecting
and rendering, and all playback/record features are accessed through the HyperEngine.
We've color-coded Arboretum Harmony and HyperEngine so the components are easy to distinguish: Harmony is brown,
while the HyperEngine transport controls and edit screen are blue. All menubar items (menus such as File, Edit, Plug-ins
and Preference) are components of HyperEngine; Arboretum Harmony's own controls are all contained within the brown
plug-in window.
Detailed HyperEngine documentation is over in the HyperEngine Guide; this document will focus on Arboretum Harmony
exclusively. Important HyperEngine topics mentioned here are linked to their entries in the HyperEngine Guide.
General Usage and Organization
Arboretum Harmony will process mono (one channel) audio files; stereo files are not supported in the initial 1.0 release.
The pitch detection algorithm assumes that input will be a monophonic (one voice) melody line such as a sung vocal part
or instrumental solo. Polyphonic input, such as instrumental chords or a vocalist with accompaniment will confuse the
pitch detector and produce unpredictable results.
Arboretum Harmony is organized around a central Note Screen where graphic editing takes place. The Mixer Window
provides control over harmony voice playback; voices must be "un-muted" in the Mixer in order to be heard and edited in
the Note Screen.
Arboretum Harmony will generate up to eight individual harmony parts and will render the process to a mono or stereo
SDII or AIFF files. Up to nine part arrangements can be made if you utilize the raw input voice. The number of separate
voices which can be heard in real-time preview, while editing, is limited by your particular computer's clock speed.
Previewing with more Harmony voices active than your computer has processing power for may result in system
crashes.
Real-time performance can be improved by running in Preview mode and eschewing formant shifting. In Preview mode a
G3 350 will do 8 voices as will an iMac. 200 MHz 604e machines can preview 6 to 7 voices.
Those using slower machines can run in Preview mode, selectable in the Process window. Preview mode sacrifices some
sound quality for increased performance. In general, Normal mode requires two and a half times the processing power
required for Preview mode. For example, if you can only hear 2 voices in Normal mode then you can expect to hear 4 to 5
Page 12
simultaneous voices in Preview mode.
Arboretum's proprietary pitch shifting technology allows Arboretum Harmony to preserve the natural formant of shifted
vocal parts for greater naturalism. One may also adjust the formant so as to create cool head-shrinker effects. A Humanize
parameter is also provided for each voice to enhance the realism of vocal choirs.
Pitch Correction is an automated feature in Arboretum Harmony and several settings are provided under the Process
display to guide that operation. Pitch Correction relies on the Scale which is shown in the Notes Screen. The displayed
scale can be easily recalibrated. A selection of Preset Scales are provided, custom user scales can likewise be created.
Each one of Arboretum Harmony's functions are documented below. But before going any farther, take five minutes and
run through the following Quick Start Tutorial.
Quick-Start Tutorial
This tutorial covers the essential steps in using Arboretum Harmony and HyperEngine. It will orient you to the
HyperEngine controls and the Arboretum Harmony Note screen and Mixer display.
Launching Arboretum Harmony
Assuming you've successfully followed the Set Up procedure, the Arboretum Harmony plug-in will be installed in
the HyperEngine Plug-ins Folder, which resides inside a folder named "Arboretum f."
Inside the "Arboretum f" folder, within the HyperEngine folder, you'll find the HyperEngine application, Plug-ins
and Drivers.
Double-click on the HyperEngine program icon.
Page 13
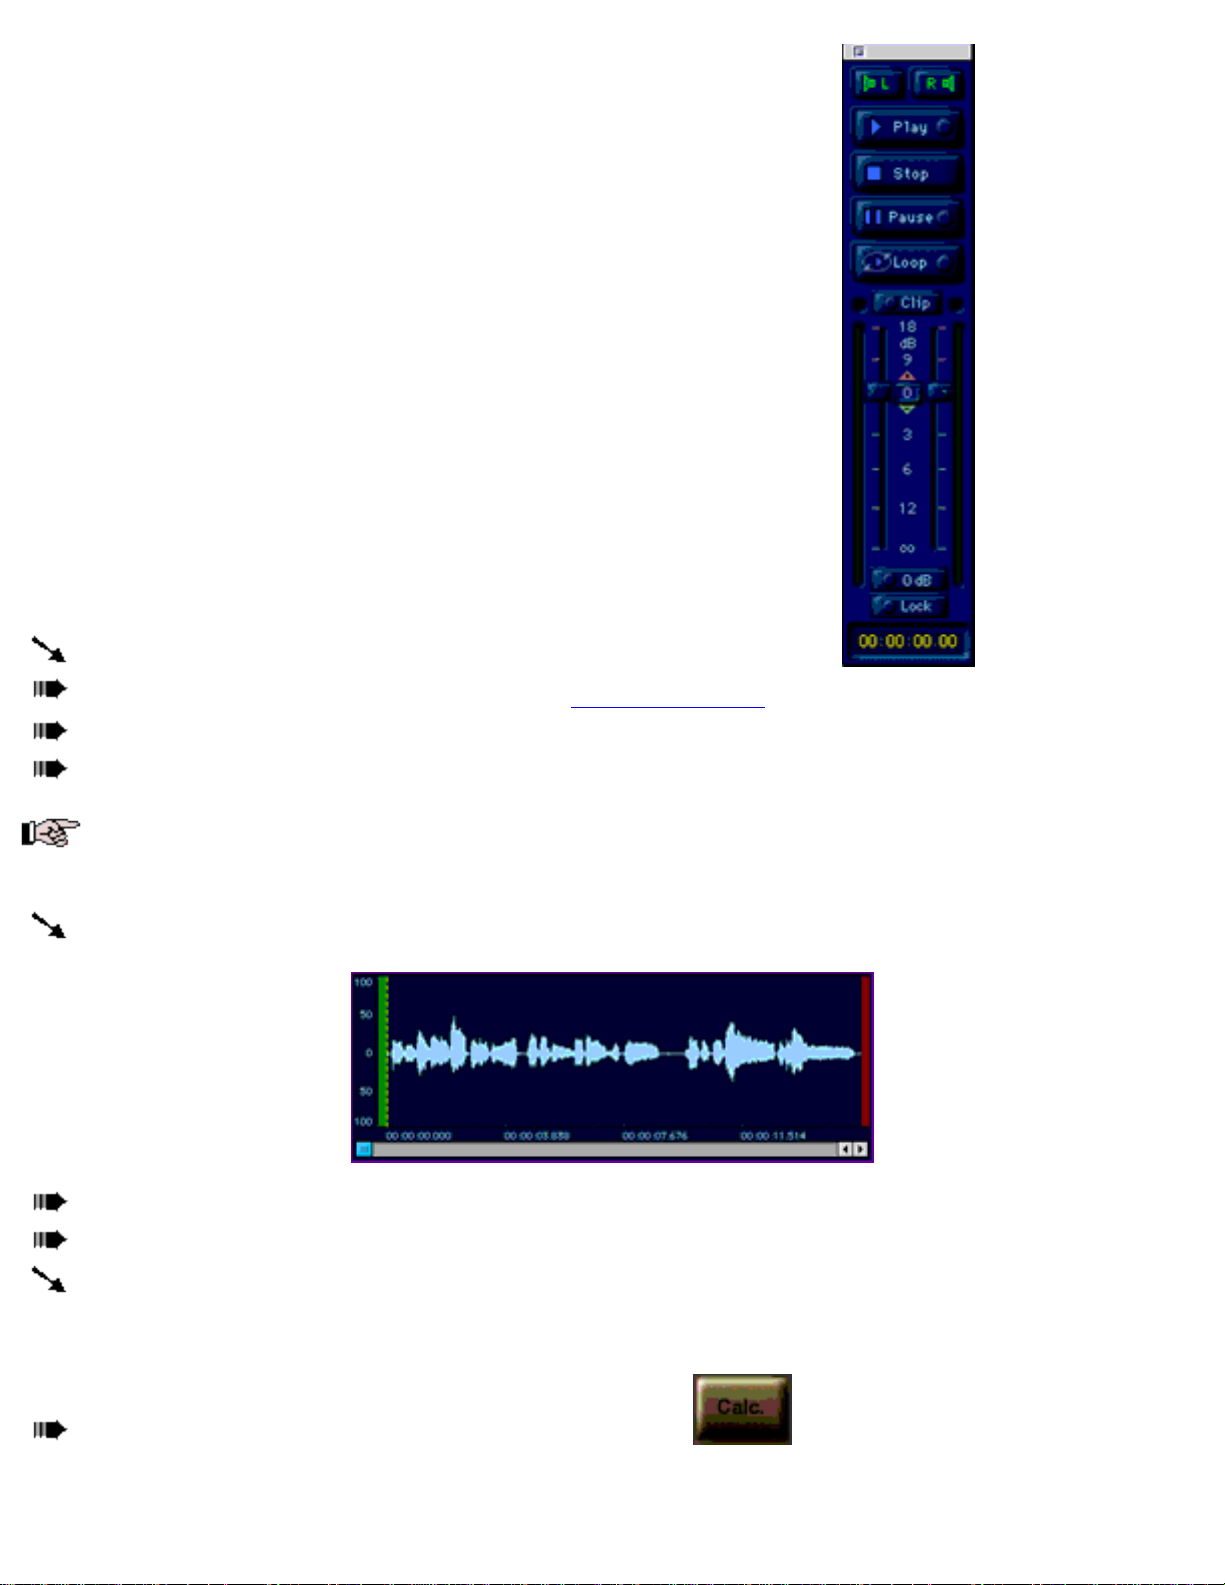
HyperEngine will launch. You'll see the HyperEngine transport palette appear:
Load a new sound file: Type command-n or select New File Document from the File menu.
Use the resultant file dialog to locate and select the desired file for processing.
For this lesson, try one of the example files on the Arboretum CD-ROM. Locate in the Sound Examples folder the
sound file named "Aram."
Remember, Arboretum Harmony is intended for use on monophonic melodic parts, such as a solo voice or
instrument. Processing polyphonic audio - such as chords, or a full band arrangement - produces unpredictable results and
is beyond the scope of the intended use.
Selected audio file will appear on screen.
Mouse drag through the waveform display to select any region for processing, or type command-a to select all.
From the Plug-ins menu (at the top of the screen) select the Arboretum Harmony plug-in.
After a moment the Arboretum Harmony plug-in will launch. The Notes Screen is shown on startup by default.
Notes Display: Pitch Correction
Mouse click on the Calc button on the top of the Notes screen.
Page 14
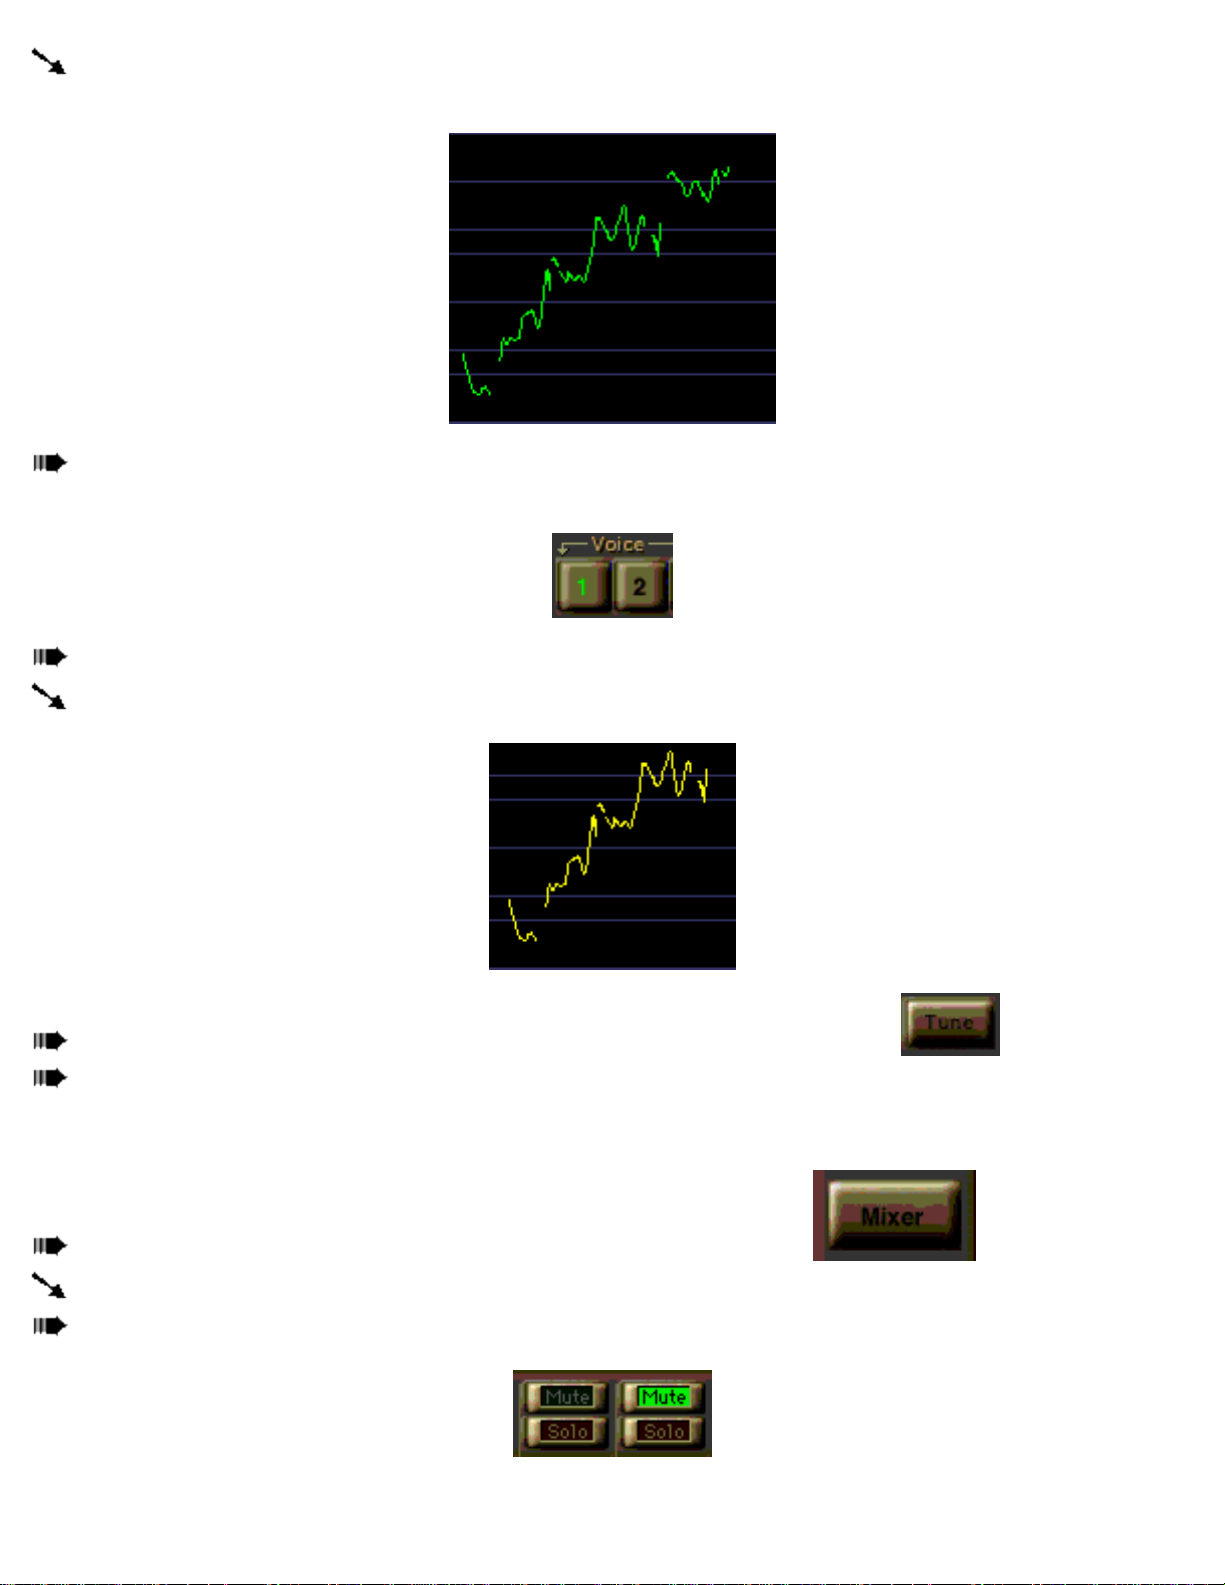
After a brief calculation period you'll see a graph representing the pitch sequence of your audio selection.This line
shows the pitch of the input melody over time, and can not be edited.
If it's not already selected, click on the Voice button labeled number 1, above the edit display. This will activate the
first harmony.
Type the keyboard shortcut command-a to select the entire sequence.
The pitch sequence for Voice 1 will now be highlighted in gold in the edit display.
Click on the Tune button to snap the harmony voice into tune with the current scale.
Hit the Enter key or space bar to start playback and hear your results.
Mixer Window: Voice Control
Click on the button labeled Mixer (screen left) to go to the Mixer Window.
Your original line is on channel 0, to the left, and your pitch-corrected version is on channel 1.
Mute/Unmute the two channels as you listen to compare the difference.
Page 15
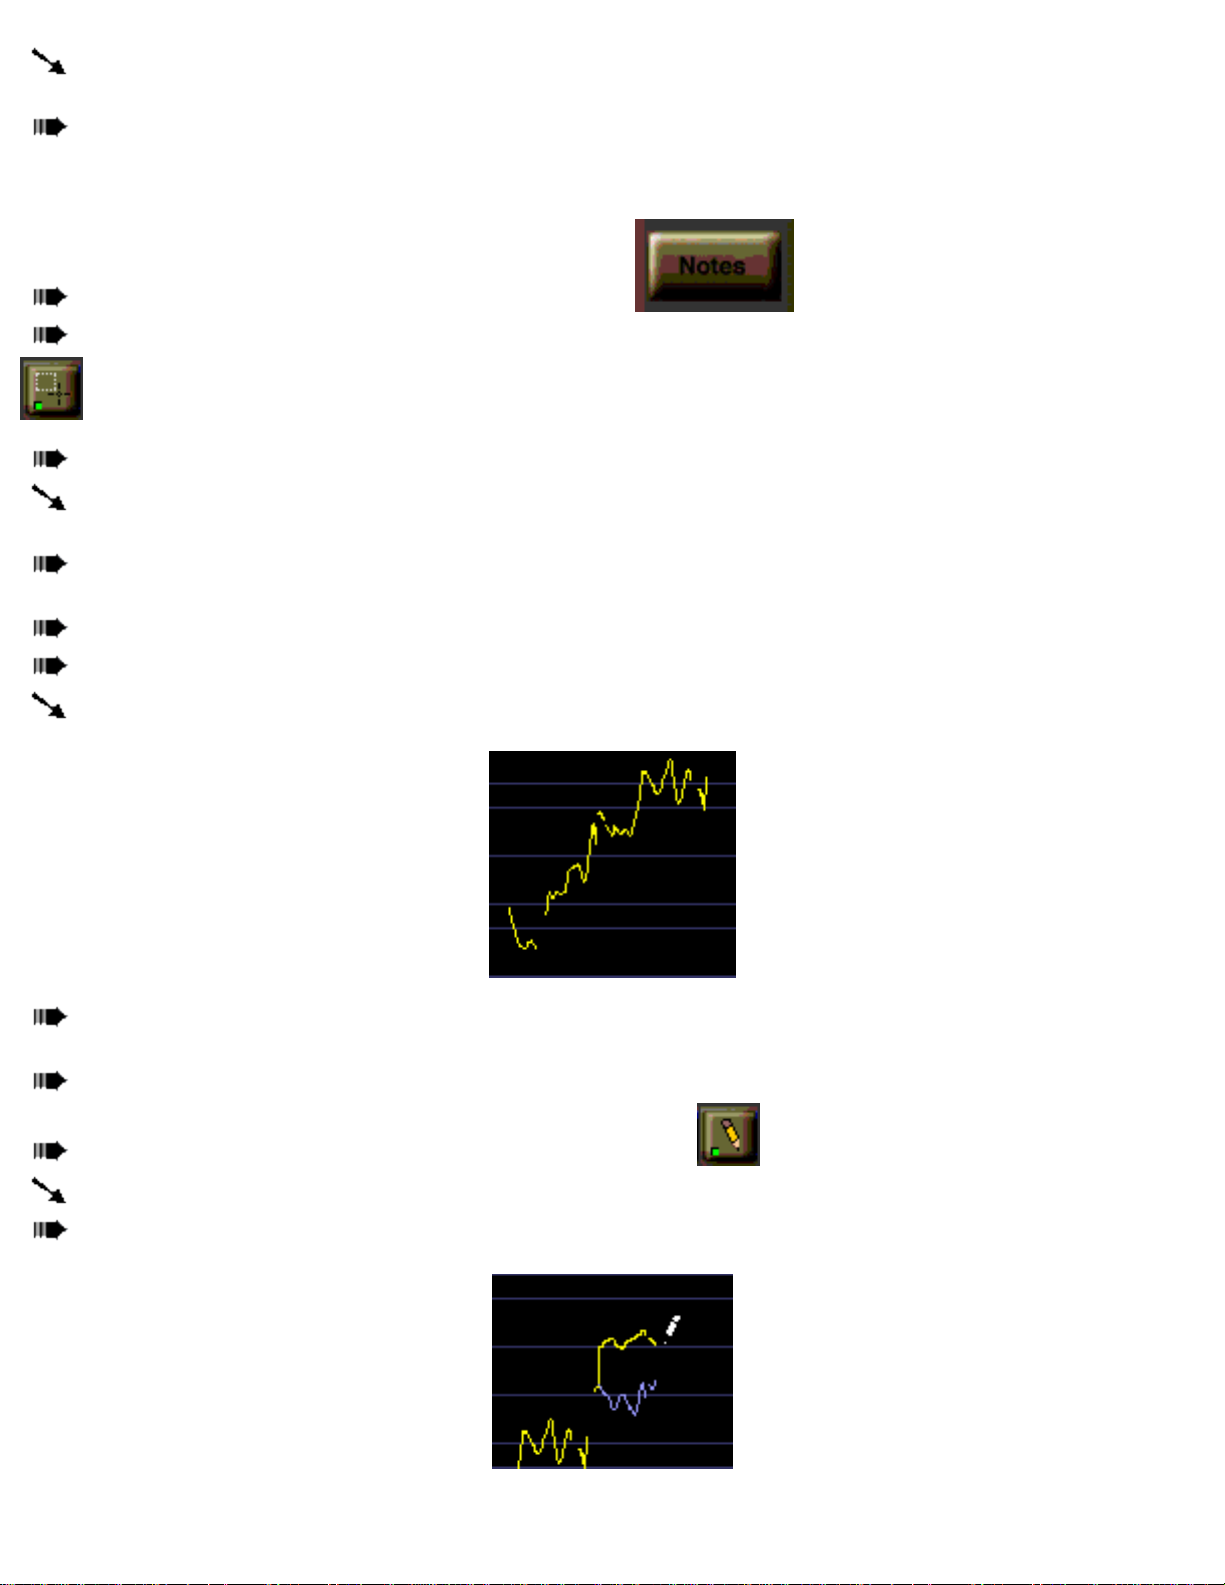
Channel is muted when the Mute button is lit up in green; channel is unmuted and may be heard when the mute
button is dark.
Unmute both channels 0 and 1 so that they can both be heard.
Notes Display: Pitch Editing
Click on the Notes button to go back to the Notes screen.
If it's not already active, click on the Selection Tool (to the left of the pencil tool) so that its button lights up green.
Drag the mouse to the edit display, WITHOUT clicking or holding the mouse button.
Watch the Selection cursor change from a crosshair (+) to a pointing hand as it crosses over the gold highlighted
pitch sequence.
With the "hand" cursor active, click on any part of the yellow line and hold down the mouse button to drag the
harmony voice to a new location along the scale. Place it a fifth or an octave above the original line.
Hit the space bar to start playback and hear your results.
Click and drag across any part of the pitch sequence to select a phrase or two.
The selected range will highlight in yellow.
Move the mouse cursor over the selection so that it turns to a pointing hand. Hold down the mouse button and drag
the phrase to a new pitch, perhaps a fifth below the original.
Hit the enter key to start playback and hear the results.
Now click on the Pencil Tool, so that its green pilot light is on.
The mouse cursor changes into a pencil as you drag it into the edit display.
Click and drag with the mouse to draw new notes for the current voice.
Page 16
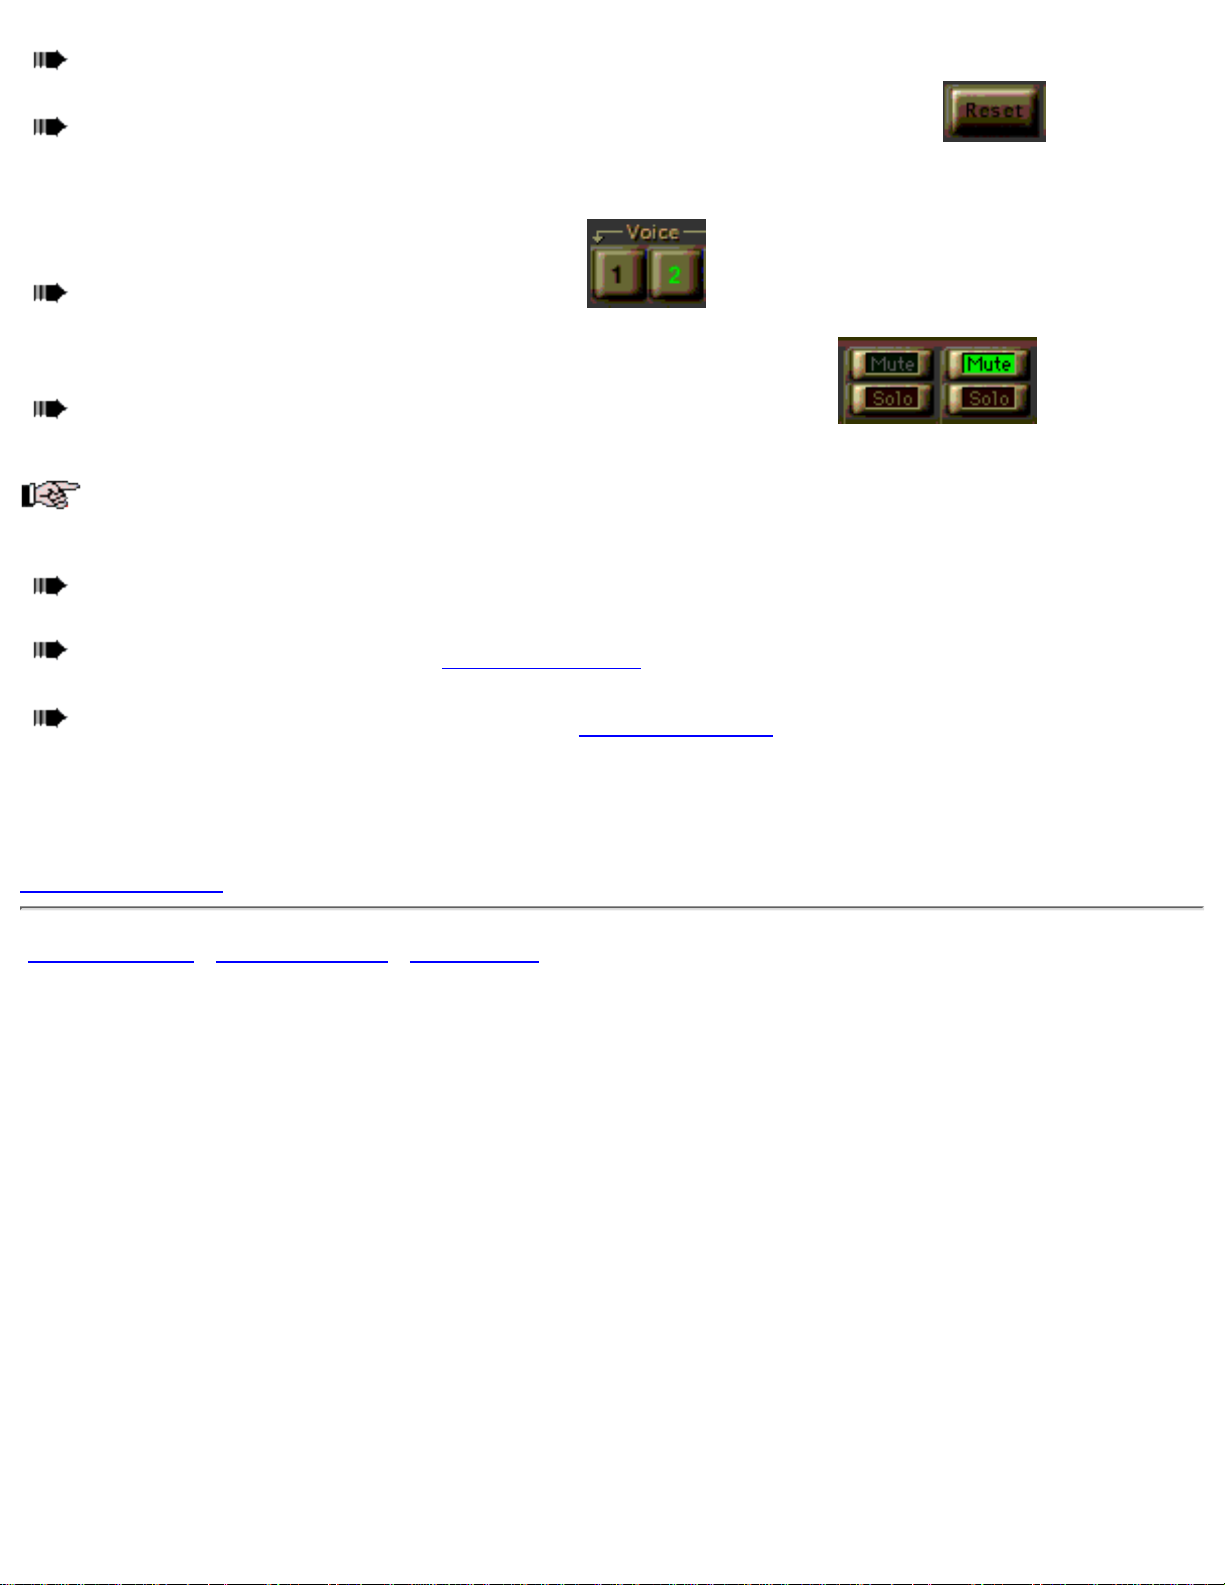
Playback the results; if you don't like what you have, simply redraw.
To start again fresh, type command-a (to select all) and mouse click on the Reset button.
Using Additional Voices
To add a voice, click on the number 2 Voice button.
Go to the Mixer Window and unmute channel 2 (mute button should be dark).
Now the pitch sequence for that channel will be editable.
If playback begins cutting out or slows down after adding a new voice, you've exceeded your CPU's capacity and
will need to scale back the number of real-time voices. Go to the Mixer window and Mute one or more harmony voices
until you're withing a stable operating range.
Once you're satisfied with your pitch arrangment, go to the Mixer window and adjust the relative channel volumes
for each voice. Presumably you'll want one voice to be lead, the rest singing backup.
To create a finished audio file, select Process to New File from the HyperEngine's File menu. A name file dialog
will ensue, followed by a brief wait as the harmonies are calculated into the new file.
To hear your new processed file, type command-n (New File Document) and select the audio file you've just
created. The file will load into HyperEngine.
This ends the tutorial section. You now know enough to get around Harmony and begin work. Naturally there's a number
of features, such as the Resize tool and the Voices and Process screen settings which we didn't cover in this brief lesson.
Explanations of those functions and more details on each tool you have just encountered are contained in the following
Command Reference section.
[Previous Chapter] [Table of Contents] [Next Chapter]
Page 17
Command Reference
Notes Screen●
Mixer●
Voices Display●
Process Window●
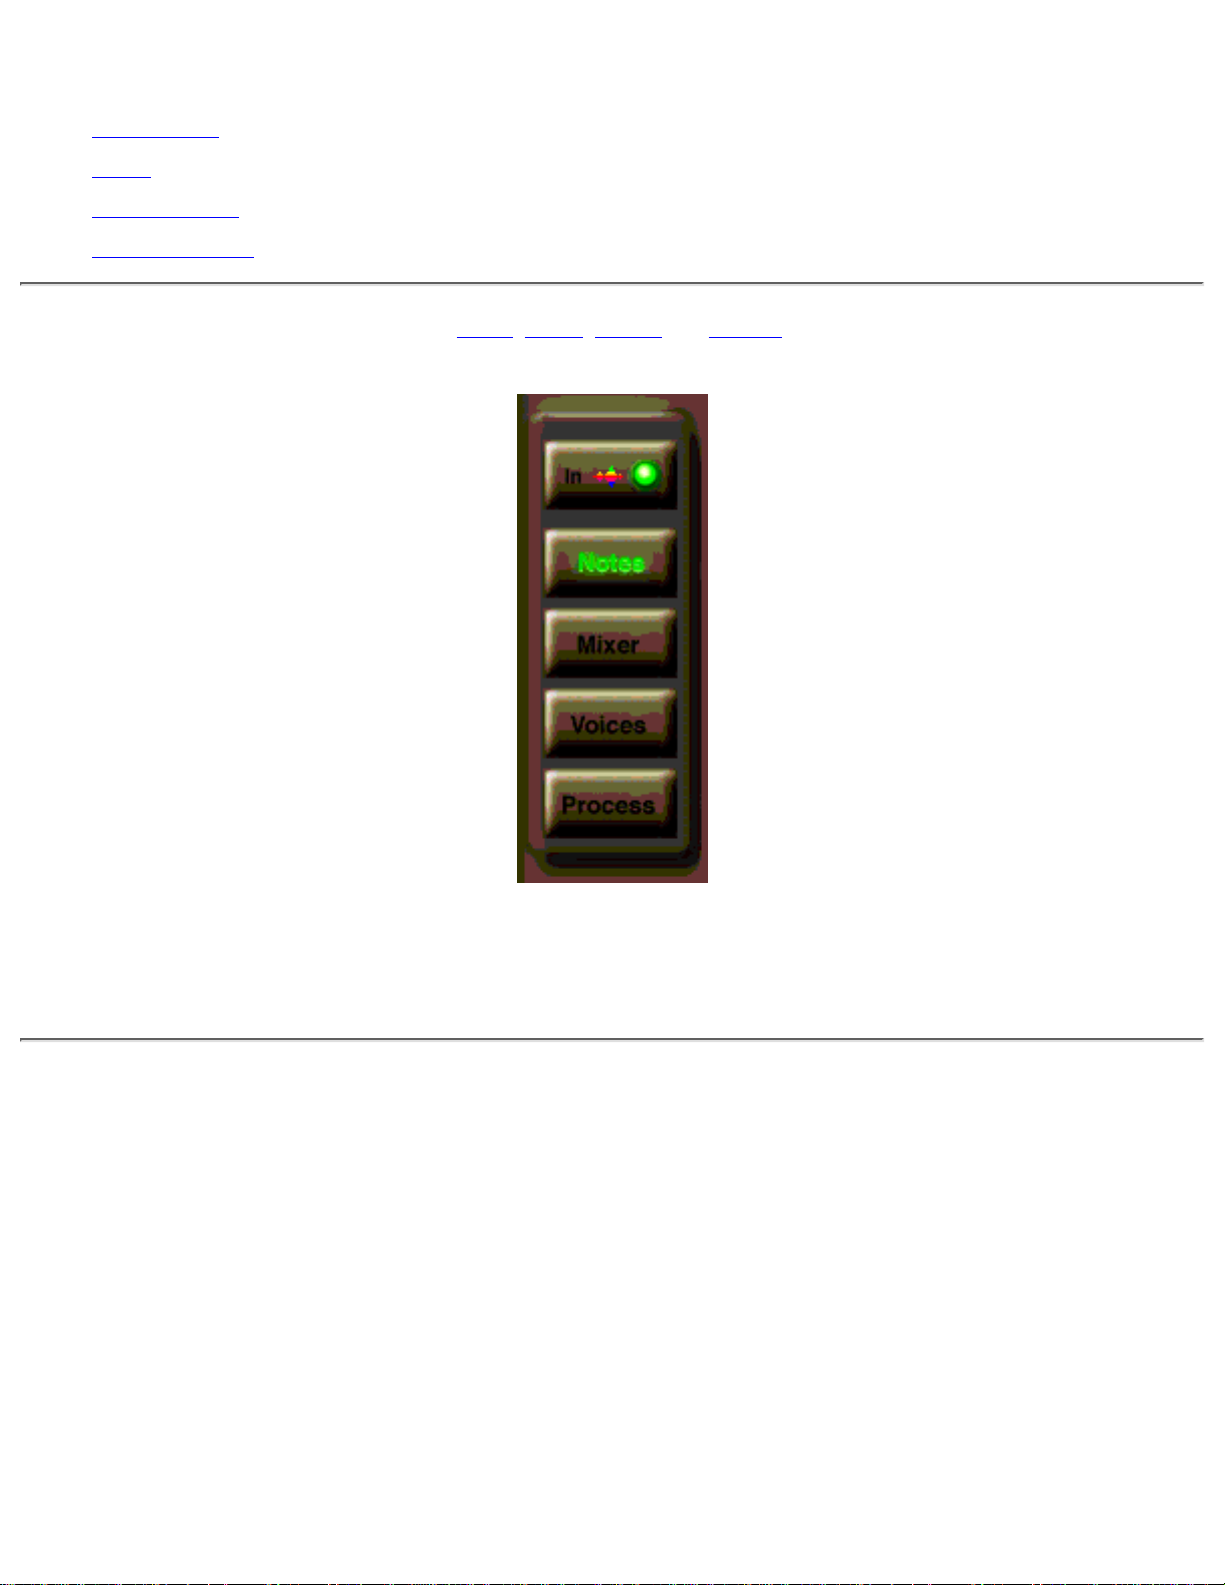
Arboretum Harmony has four main displays, Notes, Mixer, Voices and Process, which are detailed below. Access any
screen by clicking on the buttons at the left side of the window.
The Bypass switch, labeled "In," is accessible from all four screens. Toggle this button to hear the difference between the
original signal and your new processed sound. This switch duplicates the function of the HyperEngine Effect Bypass
switch, found in the process list beneath the HyperEngine waveform display. This button is not accessible during playback.
Bypassing then reengaging results in an audible glitch.
Notes Screen
The Notes Screen is the main area of Arboretum Harmony. Here you'll analyze your input signal, manipulate the Scale and
perform graphic pitch shifting, pitch correction and harmonization.
Editing Display
The editing display arranges pitch/frequency along the vertical axis and time along the horizontal axis.
Page 18
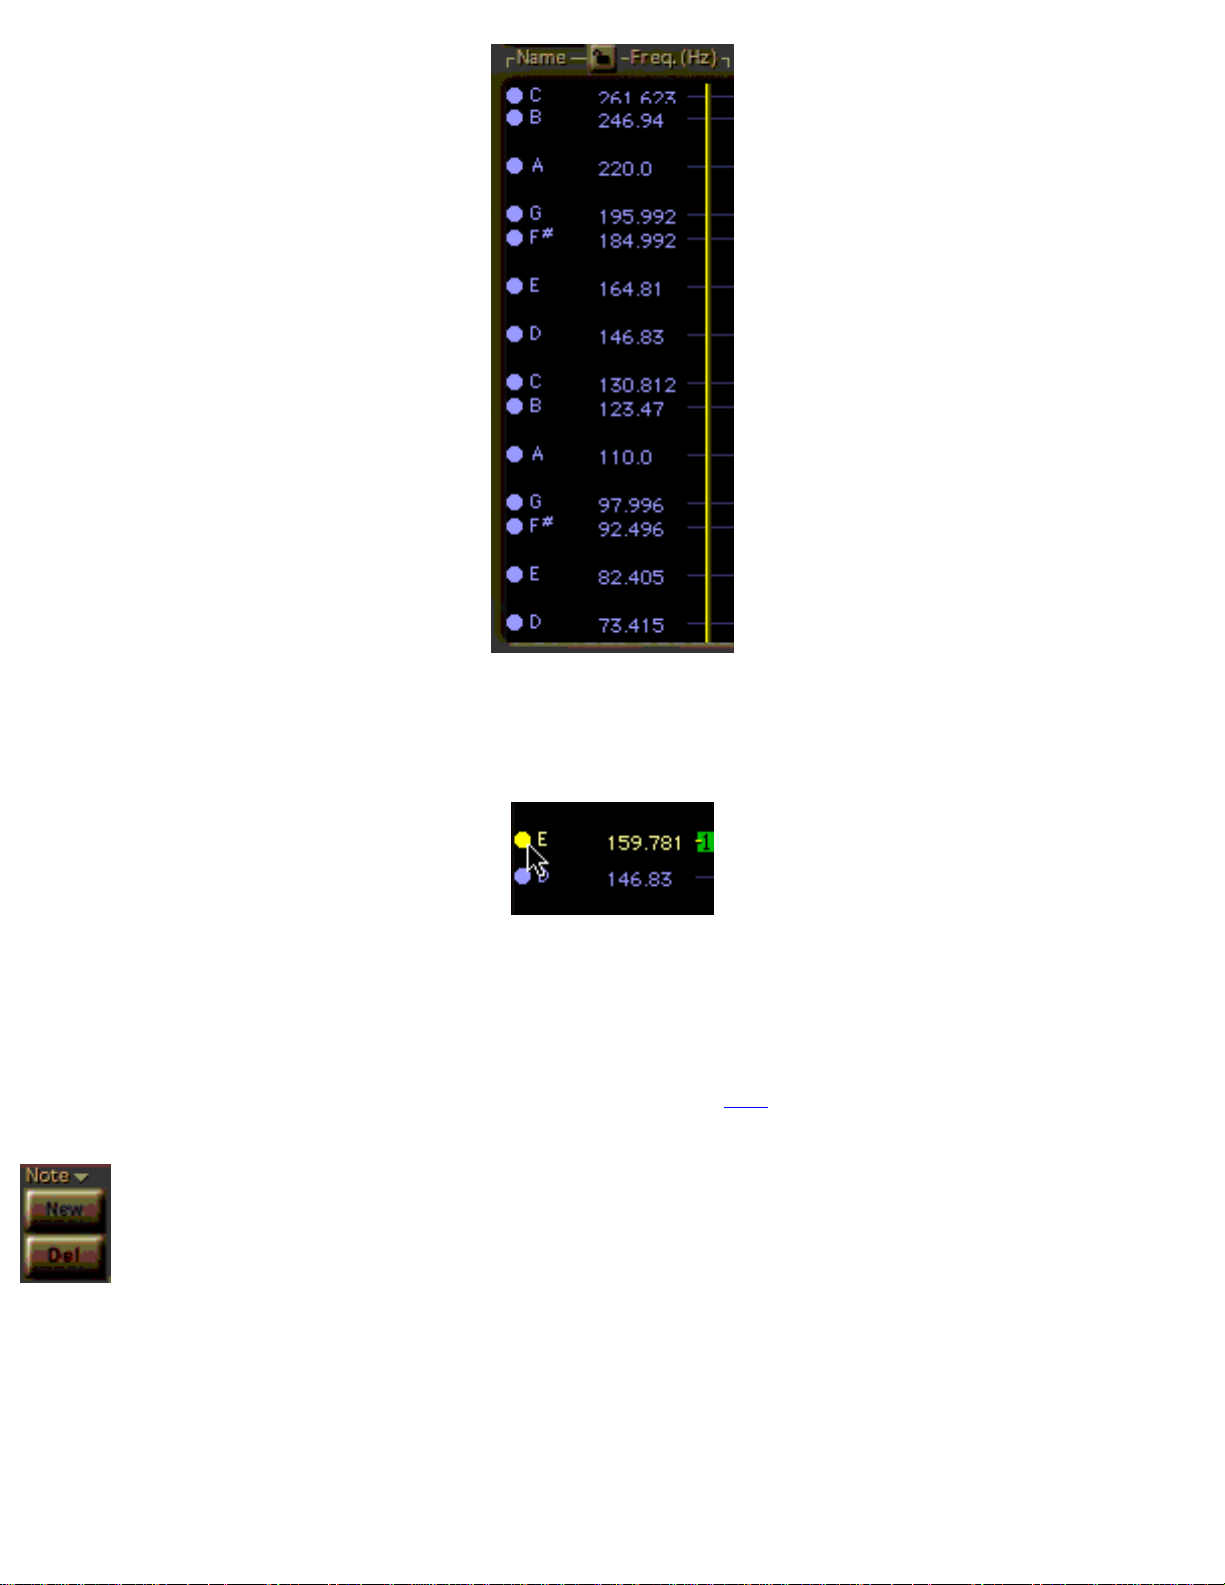
At the left side of the display are calibration markings showing note name and frequency. These are completely
user-configurable; click and hold on any frequency number then mouse drag up or down to adjust the note frequency in
Hz. Mouse click and type directly on the note name field to rename any note. You can transpose the scale relative to an
edited frequency by holding down the shift key when you hit the tab key to enter a new frequency.
To manually recalibrate any note, simply mouse-click on the dot beside the note name, and hold down the mouse while
dragging the note up or down the scale. Frequency display will update to reflect the current setting.
Hold down the option key to slow down the frequency changes of the drag by a factor of 0.1 and the control key to
decrease the change by a factor of 0.01. Holding down both gives a cumulative reduction of 0.001.
The central part of the display is the pitch editing area. The results of the Calc (Calculate Pitch) function are displayed
here, and all pitch shifting and harmony editing takes place in this display.
New Note
Click this button to add a new note to the scale currently shown in the editing display. Mouse drag on the dot at the far left
side of the note entry to position the new note.
Delete Note
Removes the currently selected note from the editing display.
Page 19

Lock
Click to lock/unlock the Notes display, preventing accidental recalibration of the edit window.
Calc (Calculate Pitch)
Mouse-clicking this button activates the pitch analysis function. Arboretum Harmony calculates the pitch of the selected
audio region and draws a visual representation of the audio in the editing display. You'll experience a brief wait while the
analysis function performs its calculation, then the editing display will update to show the pitch sequence center-screen.
Tune
Arboretum Harmony features one-touch pitch correction. Simply click the Tune button and the currently active harmony
voice is snapped to the current scale. The actions of this function are guided by the Correction Strength setting found in the
Process window.
In some cases the input may be so out of tune that Arboretum Harmony can not determine the correct scale on its
own. To tell the program what note a certain input segment should be:
Select the part in question with the selection tool.
Hold down the Option key and click on the left-most circle of the scale note you wish to assign to the selected input.
This will force the segment to the note and bring it into tune.
Reset
Resets the pitch sequence for the current voice to the original line. Use this anytime you want a "fresh start" when
designing a harmony part.
Undo (command-z)
Reverses your last edit. Clicking Undo again will re-do the edit. Arboretum Harmony has one level of Undo. Command-z
is the shortcut.
Scales Pop-up Menu
The Arboretum Harmony edit display can be configured to support any scale or tuning, from the conventional 12-step
"well-tempered" European/American standard, through the vast array of world-music and historical tunings, to the most
far-out contrived tuning imaginable. Arboretum Harmony ships with a number of Scale Presets, and allows you to create
or import your own.
Arboretum Harmony Scale presets are stored in groups, these groups are called Scale Files (or Preset Files) and may
contain as many different scales as you wish.
The Scales pop-up menu operates much like any Presets menu, allowing you to load, customize and save as many different
scales as you wish
Page 20
Scales Pop-up Menu functions:
Save - Save the current scale (as displayed in the Note Screen) to the currently loaded Scale File. Results in a dialog in
which you enter the new Scale preset name.
Rename - Alters the name of the currently loaded scale. Enter the new name into the resultant dialog.
Delete - Deletes the current scale from the Scale File.
New Scale File - Create and name a new empty Scale File.
Load Scale File - Use the resultant file dialog to locate and select any Arboretum Harmony Scale Preset File.
Load Default Scale File - Reverts to the original "factory" bank of scales.
Custom - The "Custom" display is shown whenever a change has been made to scale calibration in the Note Screen. This
is an indicator that your new tuning is not yet saved. Once you've saved a scale the pop-up will show the new name, until
the next tuning change.
Default - Note Screen reverts to its factory setting, a chromatic scale optimal for creating a wide range of user defined
scales or chromatic passages.
List of Current Scales - Indicates the Scales available in the current Scale Preset File. Select any scale from this group to
load in the Note Display.
Selection Tool
The mouse cursor has two states when Selection Tool is active:
The crosshair (+) cursor is used to create a rectangular selection area. Hold down the mouse button and drag across any
part of the Note display. Selected pitch sequences highlight in gold and become available for graphic editing.
When the cursor passes over a highlighted segment it turns into a pointing hand. Use the pointing hand to move the
selection to a new pitch while preserving it's overall contour. Dragging the segment up our down adjusts the pitch in
semi-tone intervals. Holding down the option key alows you to freely re-tune the segment.
Pressing the command key in Selection mode temporarially calls up the Pencil tool. Pressing the control key
temporarially brings up the Zoom tool. These shortcuts are for the bonzai editors who don't like to mouse around to change
tools.
The Selection edit mode is the real heart of Arboretum Harmony. As only one voice is active for editing in the notes
display at any time, you can make very discrete selections and reposition them in a snap, without changing tool modes.
Command-a is the keyboard shortcut for "select all."
Pencil (Draw Tool)
This edit mode allows you to draw in new pitch contours for the current voice. Mouse click and drag in the edit display to
alter the pitch sequence. Use the Pencil tool for a slight adjustment of inflection, or to create completely new harmony
lines. Holding down the Option key constrains drawing to a straight horizontal line. Pressing the command key in
Selection mode temporarially calls up the Pencil tool.
Resize
Page 21
Rescales the selected pitch sequence around its pitch center. Use this to accentuate or limit vibrato. Can also be applied as
an arranging tool for a wholescale remapping of the part's range.
Zoom (Magnifying Glass)
Allows you to zoom in for closer work, or zoom out to see the overview of your pitch arrangement. When Zoom mode is
active the mouse cursor changes to a Magnifying glass.
To zoom into any area of the edit display hold down the mouse key and create a rectangular selection range; the display
will resize to the selected area when the mouse button is released.
To zoom out hold down the Option key and click anywhere in the edit display.
Pressing the control key while in Selection mode temporarially brings up the Zoom tool.
Hand (Scroll Cursor)
Hand mode allows you to scroll through the Note edit display, providing a more freeform version of the scroll control
found in the horizontal and vertical scroll bars. Move the Hand cursor to the edit display and hold down the mouse button
while dragging around the screen.
Voice Selection Buttons (1 through 8)
Only one harmony voice is active at any time for editing in the notes display. Select the voice to be edited by pressing any
one of the eight voice buttons. The numbers 1 through 8 on the ascii and numeric keypads are shortcuts for these switches.
Remember, a voice must be unmuted in the Mixer window in order for it to be heard.
Status Displays (Hz, ms)
Indicates the current cursor position in the edit display in milliseconds (horizontal time scale) and Hz (vertical frequency
scale).
Scroll Bars
Use the vertical and horizontal scroll bars along the right hand edge and bottom of the Note Screen to navigate through the
edit display. These tools duplicate the function of the Hand (scroll) cursor.
Mixer
The mixer window is dominated by nine channel strips, channel 0 being the original signal and channels 1-8 dedicated to
program generated harmony voices. Use this window to control the individual volume levels of each voice.
Every strip in the mixer window has the same set of common controls:
Mute
Silences the channel. Voices must be unmuted in order to be heard. Remember, the number of voices one can hear in
Page 22
real-time is dependent on the computer processor speed. Unmute all desired voices prior to Processing to New File so that
all arranged parts may be heard.
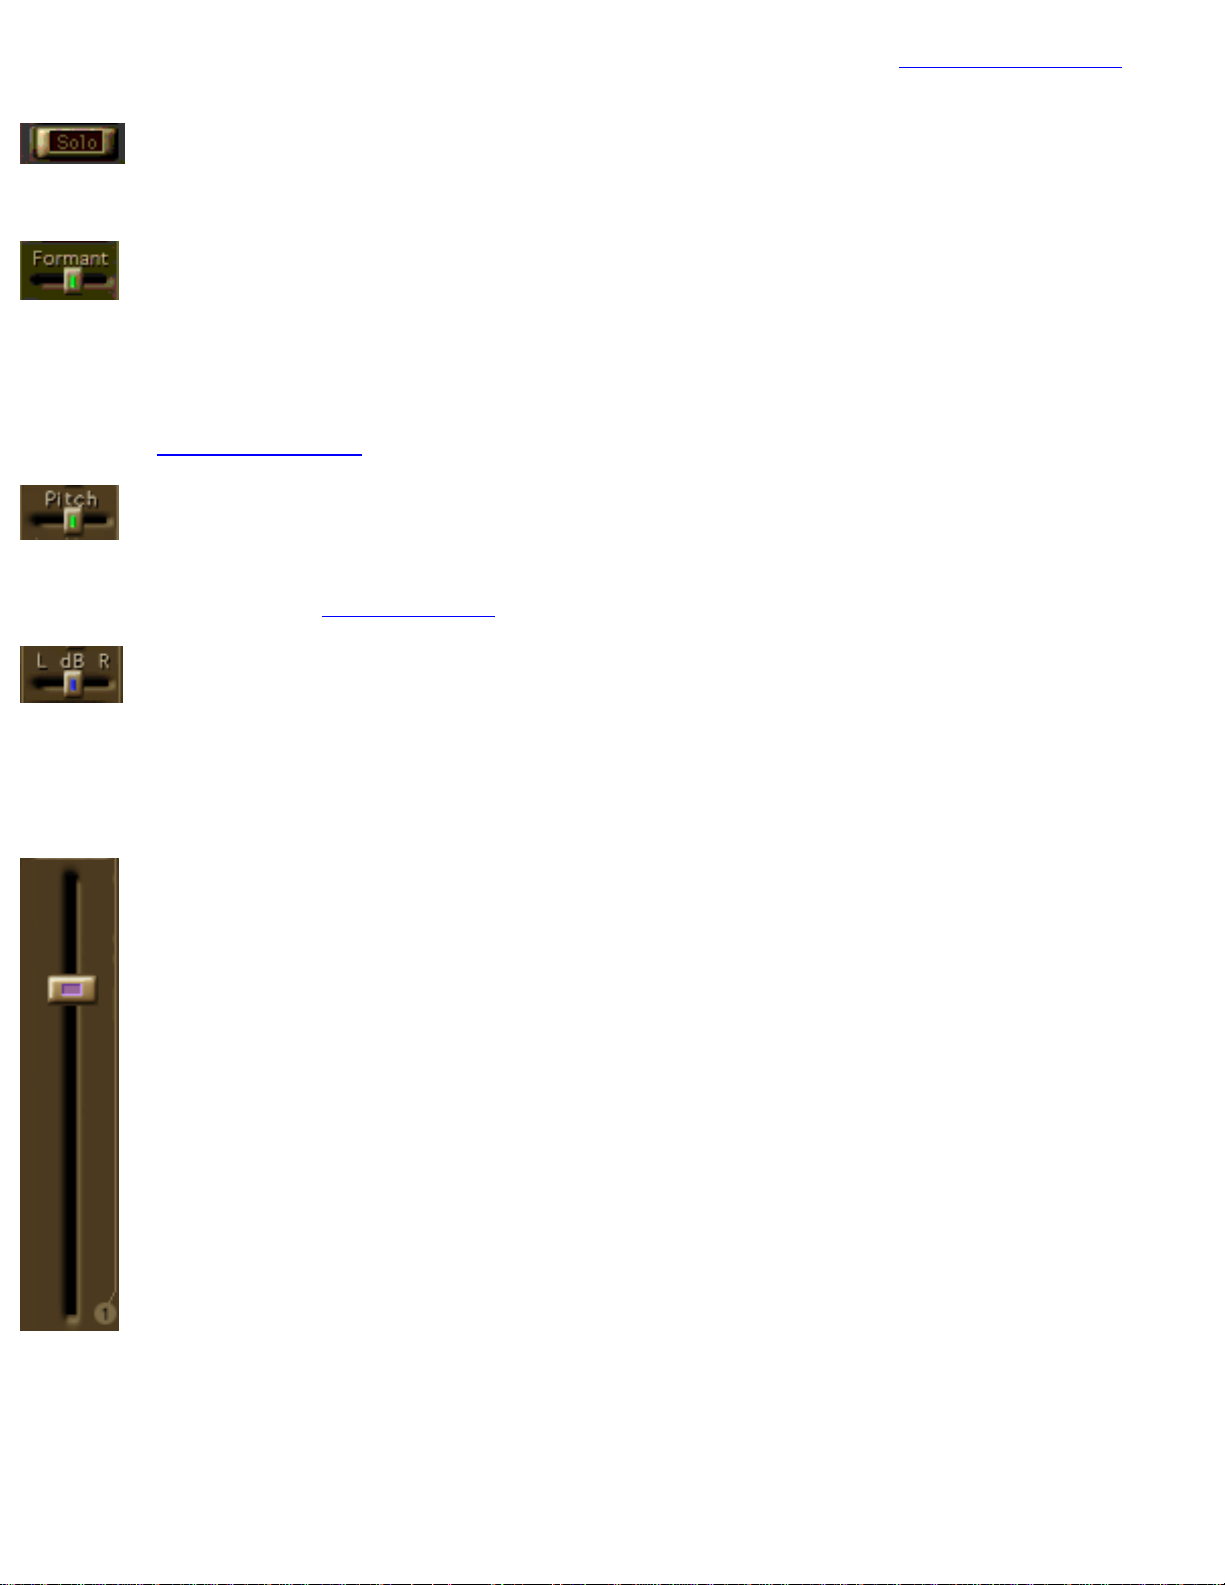
Solo
Solos the channel, muting all non-soloed channels.
Formant
The formant slider shifts the formant up or down in semi-tone intervals. The formant of the voice is the "characteristic"
portion of the voice that remains constant even when the pitch of the voice changes. Moving the formant upward makes
the persons voice sound "smaller" while moving it down increases the apparent "size" of the speaker. Extreme shifts up or
down give either the chipmunk or Darth Vader effect respectively.Calibrated in semitone (100 cent) units, from -12 to +12.
Similar to the Global Formant Shift parameter in the Voices window.
Pitch
A global pitch shift setting for the voice, independent of the Note Screen sequence. Calibrated in semitone (100 cent) units,
from -12 to +12. Similar to the Global Pitch Shift parameter in the Voices window.
Pan ( L - R )
Controls the right/left stereo position for the voice. Although Arboretum Harmony only accepts mono (one-channel) audio
files for input, it will create stereo (two-channel) results when Processing to New File. Use the pan control to give each
harmony voice its own unique position in space. Range is from -100 (all left channel) to + 100 (all right channel) with zero
equaling panned center.
Volume
Controls the volume for the channel. Measured in percentage; ranges from 0% (off) through 100% which is equivalent to 0
dB, to 200% which is equivalent to + 6 dB. Use the 0 dB Reset button at the bottom of each fader throw to quickly zero
the board.
Status display
Page 23

Indicates the value of the Mixer parameter currently being adjusted. Reflects Volume, Pan, Pitch and Formant settings.
Values update as you adjust the sliders.
0 dB Reset
Recalibrates the Volume fader to 0 dB (100%).
Output
Master control of output volume for all channels. An additional stage of gain control, before the HyperEngine output
faders.
Voices Display
Each of the eight harmony voices can be fine-tuned individually in the Voices display. Parameters in this window are
specific to each separate voice, allowing discrete control of the Humanize, Pitch Shift and Formant values. Use the sliders
to adjust values, or type new values directly into the numeric displays.
Voice Selection Buttons (1 through 8)
Select the voice to be edited by clicking on any one of the eight voice buttons. The numbers 1 through 8 on the ascii and
numeric keypads are shortcuts for these switches.
Voice Formant Shift (cents)
Duplicates the voice/channel Formant control found in the Mixer display with greater precision. Range is -1200 (down one
octave) to 1200 (up one octave) calibrated in cents.
Voice Pitch Shift (cents)
Dupicates the voice/channel Pitch control found in the Mixer display with greater precision. Range is calibrated in cents
from -1200 (down one octave) to 1200 (up one octave).
Humanize (%)
Humanize uses a propritary model of human vocalization to add a realistic "warble" like that found (to varying degrees) in
all singers. Obviously this warble is much smaller in well trained singers. Use in small amounts to break up the metallic,
comb-filtered sound that results from the harmony being too "perfect." Heavy settings make the voice sound sloppy drunk.
Range is 0 to 100%
Don't Preserve Formant
When selected, an alternate pitch shifting algorithm is used which does not preserve the natural formant during pitch
shifting. Although the results can be less realistic on large pitch shifts, this setting is quite useful for special effects. For
pitch correction tasks that require only small amounts of shifting, the "Don't Preserve Formant" feature can actually yield
better results.
Process Window
Dominated by parameter sliders, the Process window offers global controls, the settings of which affect all voices (as
opposed to the voice-specific settings in the Voices display). Numeric fields in this screen accept typed value entry as well
as slider adjustment.
Maximum Frequency
Page 24

Minimum Frequency
The Minimum and Maximum frequencies define the range of frequencies Arboretum Harmony expects to see in the signal.
In most cases Arboretum Harmony does not need to know its target frequencies for analysis, it can derive a pitch sequence
from most acceptable input as the pitch is below 4k and above 55 Hz. However, some sounds or voices may confuse the
pitch detection algorithm. If this is the case, try adjusting this range to narrow down the possible pitches. The range for
these parameters is 55 Hz to 3998 Hz.
Pitch Variation (%)
Also known as the "maximum deviance" parameter, this setting tells the pitch detector how near subsequent pitches in a
single note need to be. With this information the pitch detector can spot errant guesses and correct them even if the pitch is
far from an expected value as determined by its internal tracking model. Range is 1 to 50 percent.
Pitch Sensitivity
The pitch sensitivity parameter gives a hint to the pitch detector to help it decide if a harmonic is the true pitch or if it is a
super/sub harmonic. For sounds with very complex spectra, like the human voice, a value of 80 to 90 is typically
sufficient. With less complex sounds a lower value might be more appropriate if Arboretum Harmony is having problems.
Range is 50 to 100 percent.
Correction Strength
Correction Strength determines how strongly an out-of-tune part is brought into tune. At large values the part is snapped
into tune quite sharply and variations in the part are brought very close to the proper note. At low settings the correction is
more gentle. Out of tune parts are brought into proper intonation more gradually and more the singer's subtle variations
and vibrato are preserved. Range is 1 to 100 percent.
Global Formant Shift (cents)
Similar to the Formant Shift control in the Mixer and Voices display, this setting applies to all harmony voices. Range is
-1200 (down one octave) to 1200 (up one octave) calibrated in cents.
Global Pitch Shift (cents)
Similar to the Pitch control in the Mixer and Voices display, this setting applies to all harmony voices. Range is calibrated
in cents, from -1200 (down one octave) to 1200 (up one octave).
Process to Mono
Causes the output of Arboretum Harmony to be monophonic when creating a new audio file.
Process at Preview Quality
This uses a reduced quality Harmony engine that requires 1/2 to 1/3 times the processing power or the normal pitch
shifting engine. Compromises are made in the output sonic quality to accomplish this performance gain but it is useful
when you have run out of processing power with the normal engine.
We suggest having this setting enabled when arranging your parts so as to optimize real-time preview and hear the
most possible voices. Disable this setting prior to creating a new file with the Process to New File command to as to render
your final result at the highest possible quality.
[Previous Chapter] [Table of Contents] [Link to HyperEngine Manual]
Page 25

HyperEngine
Real-Time Signal Processing Platform
What's New In HyperEngine 2.4.4:
24 bit file support
●
Fix to "long file" bugs●
New Features in HyperEngine 2.4:
Import Split Stereo (.L/.R) files●
Import Foreign Files (Wave, QuickTime and more)●
Import CD audio tracks with supported Apple CD-ROM drives●
New file export features●
Open Transport no longer required. In fact, no system Extensions whatsoever are required under MacOS 8.0 and
later!
●
Overall improved stability●
More Troubleshooting and Configuration tips●
New Features in HyperEngine 2.3:
Drag-and-Drop Waveform Editing · Freely copy audio segments from one file to another, or within the same file.
One-touch drag-and-drop editing makes HyperEngine the fast and easy way to cut sound.
●
Live Play-Through Processing · Process input from a DAT player or other source, in real-time, without creating
and reading hard disk files. HyperEngine lets you use Ionizer, Ray Gun and Hyperprism like regular hardware
effects!
●
Record and Process at the same time! Capture those old vinyl recording to digital, and clean them up at the same
time with Ray Gun.
●
Flexible Selection Range and Viewing Tools · Simple key commands and mouse clicks allow you to navigate,
select and edit audio with speed and accuracy.
●
Direct Sound Card Support · HyperEngine includes special custom drivers for Apple Sound Manager, Korg 1212
I/O, Digidesign Audiomedia II and Audiomedia III cards. Take advantage of HyperEngine's 32-bit internal
processing, allowing you to keep your digital signals at the highest possible resolution throughout the processing
chain.
●
Page 26

Note that the new chapter on HyperEngine Reference Documents contains a lot of material, and is a real
slow-loader. The HyperEngine Command Reference chapter contains synopses of each menu function, and is heavily
hyper-linked to the detailed explanations contained in the chapter on Reference Documents. You may wish to start your
searches in the Command Reference chapter, then access the Reference Documents chapter when you need detailed
step-by-step instructions.
Contents
Introduction
About HyperEngine●
Hardware and Software Requirements●
Getting sound into HyperEngine●
Processing sound files●
Processing live audio●
Getting sound out of HyperEngine●
Installing HyperEngine
Installing HyperEngine and HyperEngine plug-ins●
Allocating Memory to HyperEngine●
Installing HyperEngine Effects●
Installing HyperEngine Drivers●
System Compatibility●
Starting HyperEngine●
Monitoring and Playback Controls
Output Toggles●
Transport Controls●
Meters & Faders●
Time display●
HyperEngine Reference Documents
Introduction: HyperEngine File Documents and Play-Thru Documents●
Processing Real-Time Audio: The Play-Thru Document●
Recording a New Audio File●
Processing While Recording●
Processing Disk Files: The File Document●
Elements of a HyperEngine File Document●
Page 27

File Document Header Information●
Time and Tool Windows●
The Waveform Editor●
Waveform Editor: Playing Sound Files●
Navigating Sound Files with the View Frame●
Tips for Fast Zooming and Navigation●
Waveform Editor Selection Tools●
File Editing: Basic Cut/Copy/Paste●
File Editing: Drag-and-Drop●
The Process List●
Using the Process List●
Removing an Effect from the Reference Document●
Naming an effect variation●
Bypassing one effect●
Changing the Order of Effects●
Process to new file●
HyperEngine Command Reference
File Menu●
Edit Menu●
Plug-ins Menu●
Wave Menu●
Windows Menu●
Preference Menu●
HyperEngine Keyboard Shortcut Summary●
HyperEngine and the Macintosh Sound Manager
Macintosh built-in sound●
Sound out●
Sound in●
Using 3rd party audio cards●
Special Direct Sound Card Support●
A Note About Latency●
Appendix A: Troubleshooting
Eliminating System Conflicts●
Page 28

Optimizing Performance●
Recording or Play-Thru Sounds Distorted●
Effect Process Sounds Distorted●
Noise Reduction Alters Original Signal●
Can't Open a Stereo Sound File in Pro Tools●
Effect Changes Seem Coarse or "Jumpy"●
Viruses and Authorization Credits●
Current 3rd-Party Support Issues●
Appendix B: About Digital Audio Files
Memory Requirements●
Sample Rates●
Bit-Depth●
Mono/Stereo●
File Formats●
About This Manual
The documentation may be viewed or printed from any browser, such as Netscape Navigator or Microsoft Internet
Explorer. If the text is too small or you wish to change the background color, go into your browser's Preferences and set
them as you wish. Internet Explorer users, just hit the Larger button on your browser tool bar.
Important: For better scrolling comfort use the scroll bar, or the page up/page down keys, rather than the up and down
arrows.
It may also be viewed using the excellent HTML Viewer By Sassafras Software, a shareware program supplied on this
CD-ROM. If the text is too small, replace the HTML Viewer Prefs file in your Systems' Preference folder by the one on
this CD. You can find it by doing a "Get Info" of your HTML Viewer alias followed by a "Find Original" command.
Manual Conventions
Throughout this manual, you will see several different symbols in sections describing step-by-step operations.
Text following a right pointing arrow
invites you to execute a command with the mouse or keyboard.
Text following a down pointing arrow
describes the result produced by executing a command.
A pointing hand
indicates an important note!
Underlined Text indicates a Hyper link; mouse-click on the link to access more information on the designated topic.
Documentation current for HyperEngine version 2.4.1 last revised 11/9/98. Manual written and edited by Todd Souvignier,
with past contributions from Georges Jaroslaw, Chris Weare, Curtis Roads and David (Rudy) Trubitt.
Copyright ©1997, 1998 by Arboretum Systems, Inc. This Documentation may not, in whole or in part, be copied,
reproduced or translated without prior written consent of Arboretum Systems.
Page 29

for Arboretum Systems, Inc.:
Georges Jaroslaw, president
Zhi Liu, chief financial officer
Christopher Weare, chief technical officer
Aram Lindahl, senior software engineer
Richard Lee, sales director
Todd Souvignier, marketing director
75 Aura Vista, Pacifica CA 94044
info@arboretum.com
www.arboretum.com
[First Chapter]
Page 30

Installing HyperEngine
Installing HyperEngine and HyperEngine plug-ins●
Allocating Memory to HyperEngine●
Locating HyperEngine Effects●
Installing HyperEngine Drivers●
System Compatibility●
Starting HyperEngine●
Installing HyperEngine and HyperEngine plug-ins
HyperEngine requires no special installation and is not copy protected. HyperEngine plug-ins (Ray Gun, Ionizer,
Harmony, Hyperprism 2) however are copy protected.
Please read this section once through entirely and then follow these steps exactly!
If you are an owner of Hyperprism 2, Ray Gun, Harmony or Ionizer, see the special installation instructions for those programs. For
your convenience HyperEngine is automatically installed when doing the "Easy" installation for any of these products.
HyperEngine is also given away freely as "shareware," and the giveaway includes a few free Hyperprism 2 effects (as a little taste of what
you'll get in Hyperprism 2). The following directions document installation of the Shareware HyperEngine.
Insert the Arboretum CD in your CD-ROM Drive.
Double click on the folder labeled "Free Software."
Once inside the "Free Software" folder, double-click on the "Free Hyperprism 2.1" Installer.
Mouse-click past the Arboretum Logo display, click on Accept to accept the terms of the software license
agreement, then after reading/printing the subsequent ReadMe display, click on OK to proceed to the installation.
You're now at the main installation screen:
Page 31

The Hyperprism 2.1 Free installer offers only the "Easy Install" option.
Check the Install Location display in the lower part of this Install dialog. Install HyperEngine and the free
Hyperprism 2.1 plug-ins onto any local hard drive. Click on Switch Disk if you need to specify another drive for
installation.
Click on the Install button.
Installation will begin. Click OK through any on-screen prompts to continue or conclude.
Your HyperEngine installation is now finished!
Problems? If any difficulty arises during the course of installation, check out the installation tips at the end of this
chapter, or the complete Troubleshooting section of this manual.
Allocating Memory to HyperEngine
As with any real-time digital audio application, HyperEngine will perform best with adequate memory. The
processing speed of your Macintosh will determine how many effects HyperEngine will be able to run at once. To adjust
the amount of memory (RAM) you are allocating to the HyperEngine, locate the HyperEngine application's icon.
The HyperEngine application's icon
Page 32

Mouse-click once on this icon, so that it is highlighted (don't double click, or you'll launch the program.)
Next, type command-i or select Get Info from the MacOS File menu.
The HyperEngine's Get Info dialog. Note Memory Requirements settings, lower R.H. corner
The Get Info dialog allows you to set the minimum and preferred memory amounts for the program. If you have a
limited amount of memory, you may wish to decrease the preferred setting. If you have plenty of RAM, feel free to
allocate more to the HyperEngine. Ensuring that you have plenty of memory is key to smooth performance. If you're
encountering repeated crashes and freezes, the most likely cause is simply running out of program memory.
Locating HyperEngine Effects
HyperEngine places its effects plug-ins in a folder called "HyperEngine Plug-Ins." This folder must be in the same folder
as the HyperEngine application, as illustrated below:
Page 33

The HyperEngine Plug-in folder and the HyperEngine IO Drivers folder must reside at the same directory level (within the
same folder) as the HyperEngine application. Hyperprism, Ionizer and Ray Gun -HE plug-ins are automatically installed
into the HyperEngine Plug-in folder . IO Drivers simply remain in the IO Drivers folder, as installed.
This is the default configuration upon installation, and assuming you haven't moved these components around, you won't
need to worry about it further. HyperEngine also needs to see its IO Drivers folder, read the next section for details. See
the documentation on your individual plug-ins for more information on their installation and hard-disk authorization.
Installing HyperEngine Drivers
HyperEngine includes special custom drivers for the Digidesign Audiomedia II and Audiomedia III cards, plus the Korg
1212I/O card and the Apple Sound Manager. HyperEngine looks for its drivers in a folder called "HyperEngine IO
Drivers." This folder must be in the same folder, at the same directory level, as the HyperEngine application (as illustrated
above.) This is the default configuration upon installation, and assuming you haven't moved these components around, you
won't need to worry about it further.
If you have a supported sound card, these custom drivers eliminate the need for using special Sound Manager drivers, such
as the Digidesign Sound Drivers. Select the desired driver and sound hardware in HyperEngine's Preference menu. Use the
Configure Audio System dialog to set up the hardware.
System Compatibility
HyperEngine requires a 120 MHz or faster Power Macintosh (or compatible) with a minimum of 16 Megabytes of free
RAM, running MacOS 7.6 or later and the Sound control panel version 8.0 or later. If you're using a MacOS version
earlier than v8.0 the Sound Manager system extension version 3.2.1 or later will also be required.
To exploit new CD audio import and foreign file import/export features QuickTime 3 is required. This can be downloaded
free of charge from Apple's web site.
Page 34

HyperEngine is officially incompatible with RAM Doubler and Virtual Memory, but several thrill-seekers we know
routinely run with Virtual Memory enabled and report few problems.
HyperEngine is compatible with most other known system extensions ("Inits") and control panels.
Certain versions of HyperEngine (2.3 and earlier) required the Open Transport extension set for operation; this is no longer
required in HE 2.4. In fact, no system Extensions whatsoever are required by HyperEngine 2.4 under MacOS 8.0 and later.
Be sure to check out Appendix A-Troubleshooting for more information on optimizing performance and eliminating
system conflicts. Also take a look at the chapter on HyperEngine and the Sound Manager for information about hardware
compatibility.
Installation Support Notes
HyperEngine requires a minimum of 16 Megabytes of free RAM. If you're running out of memory you'll likely see a "Not
Enough Memory" or type -2 error message. HyperEngine has a default preferred setting of 16 MB, which should be
adequate for opening multiple audio files and several effect windows simultaneously.
The Arboretum installer will create a new folder on your hard drive called "Arboretum f" and will then install the
HyperEngine, its drivers and it's Plug-ins folder within that folder. If you're installing new Arboretum plug-ins, such as
updates you've downloaded from our web site, you'll have to drag your new plug-in into HyperEngine's plug-ins folder by
hand.
Problems? If any unexpected error messages come up during the course of installation, or if the Installer fails to place the
HyperEngine and associated files into your Arboretum f folder, immediately quit the Installer and Restart your computer
while holding the shift key down, so as to temporarily disable all Extensions and eliminate any possible system conflicts.
(If your CD ROM drive is not an Apple built-in model, you may have to eschew turning off Extensions.)
Once restarted, go into the System folder, open the Preferences folder and drag the Hyperprism/Ray
Gun/Ionizer/HyperEngine Preferences file(s) into the Trash. Deleting the Preferences files will clear out the results of a
faulty serialization procedure. Then run the Installer again and follow the preceding installation steps as directed. Also
make sure you're using the correct Arboretum product serial number. Hyperprism 2 (for HyperEngine), Ionizer, Ray Gun,
Hyperprism-TDM and Hyperprism-Plug-in Pack are each sold separately, and each require their own unique serial
numbers.
When installing Hyperprism an Arboretum Serializer utility will also be installed in the Plug-ins folder. This utility will
batch-serialize any Hyperprism plug-ins that are within the folder. When installing future updates to Hyperprism you'll be
able to simply double-click the Serializer to authenticate any new plug-ins.
If Trouble Persists: Link over to the Troubleshooting chapter of this manual. Also take a look at the Support frame up on
the Arboretum web site <http://www.arboretum.com> for the latest technical notes and troubleshooting tips. If all else fails
either email support@arboretum.com or phone our service line during our regular weekday business hours, 10 am to 6 pm
Pacific: (650) 738-4750
Starting HyperEngine
To begin using HyperEngine, go into the new Arboretum f folder on your hard drive, open the folder and
double-click on the HyperEngine icon:
The HyperEngine application's icon
Page 35

HyperEngine will launch. After the splash screen you'll see the HyperEngine play back window appear on screen.
To load an audio file for processing, type Command-n (or select New File Document from the HyperEngine File
menu).
[Last Chapter] [Table of Contents] [Next Chapter]
Page 36

Introduction
This chapter describes:
About HyperEngine●
Hardware and Software Requirements●
Getting sound into HyperEngine●
Processing sound files●
Processing live audio●
Getting sound out of HyperEngine●
About HyperEngine
HyperEngine is a program built for real-time signal processing and sound design which also provides a framework that lets
Arboretum's plug-in effects operate independently from any third-party software. HyperEngine allows Ray Gun, Ionizer,
Hyperprism, and Harmony to run as if they were self-contained programs.
In addition to providing real-time and disk-based audio input/output services to our plug-ins, HyperEngine offers some
significant advantages over other audio host programs, so your Arboretum plug-ins can work at their maximum power:
Using HyperEngine, you can open an existing sound file from disk, record a new sound file to disk, or process real time
audio connected to the input of your Mac without creating or reading a disk file, much like any hardware effects device.
Regardless of whether the sound is disk-based or real-time, you can use HyperEngine to process the sound using as many
simultaneous effects plug-ins as your computer's speed allows.
HyperEngine processes sound non-destructively, which means that your original sound file is never changed. Instead, a
new copy of the processed file can be created. However, rather than force you to make multiple copies of your file to hear
the effects of different edits or effects, HyperEngine creates small Reference Documents that store effect parameter
settings and waveform edits which can be applied to your original sound file. The HyperEngine "Reference" document
"remembers" or more accurately, is linked to the sound file you are processing, so that when you open a previously saved
Reference document, the correct sound is loaded automatically.You may also create HyperEngine Reference documents
for storing effect settings used to process real-time audio connected to your Mac.
Once you find the effect settings you are happy with, create a processed copy of your original file using the Process
to New File command, found in the File menu.
This documentation explains how to use HyperEngine, but does not describe the functions of the plug-ins that can be used
within HyperEngine. For details on the plug-ins themselves, see the specific documentation related to each effect.
Page 37

Hardware and Software Requirements
HyperEngine requires a 120 MHz or faster Power Macintosh (or compatible) with a minimum of 16 Megabytes of free
RAM, running MacOS 7.6 or later and the Sound control panel version 8.0 or later. If you're using a MacOS version
earlier than v8.0 the Sound Manager system extension version 3.2.1 or later will also be required.
In order to really utilize HyperEngine (for more than simple recording, playback and editing) you'll need one or more
HyperEngine-compatible plug-in effects, such as Ionizer, Ray Gun, Harmony, or Hyperprism 2 from Arboretum Systems.
Note that HyperEngine is included free with these products. For more information on hardware/software requirements,
check out the compatibility issues section and the troubleshooting chapter.
Getting Sound Into HyperEngine
HyperEngine offers two modes of operation: File-based, where an audio file on your disk is used as HyperEngine's audio
input, and real-time "play-through" processing, where external audio devices can be connected to your Mac's audio input
and output for real-time effects processing.
HyperEngine with File-based processing
HyperEngine can open sounds created by other audio programs, or you can use HyperEngine to record new audio files,
from any audio source connected to your Mac.
HyperEngine will open and save sound files in both of the popular Mac sound formats: Sound Designer II (SDII) and
Audio Interchange File Format (AIFF). HyperEngine accepts 8-bit, 16-bit and 24-bit audio files at the 44.1 and 48 kHz
sample rates, as well as a number of lower sample rates (based on multiples of 44.1 and 48).
New in HyperEngine version 2.4 is special support for QuickTime 3, which allows HyperEngine to import and export
"foreign" file formats such as .Wav, QuickTime and .SND. Installing QuickTime 3 also allows HyperEngine to directly
import CD audio tracks. The new "Import Split Stereo" feature creates a new interleaved stereo file out of any .L/.R file
pair, for use in HyperEngine.
HyperEngine and Play-through processing
HyperEngine also works with "live" audio connected to the Sound Input of your Mac or audio card. This means you could
connect the output of a DAT recorder, microphone or other audio source to your sound input, play the audio through
HyperEngine for processing, and send the processed audio to your speakers or an external recording device, all in
real-time. With this method, hard disk space is never an issue, because digital audio is never stored on your drive.
By means of our custom sound drivers you can also use professional audio cards to route your signal directly in and out of
HyperEngine. We offer direct driver support for the Digidesign Audiomedia II and III cards, the Korg 1212 I/O card as
well as the Apple Sound Manager.
Getting Sound Out of HyperEngine
HyperEngine lets you store many different edits and processing settings for the same sound. Since these variations contain
only the edit decisions and effect settings, they take up very little disk space. But whether you are working on a music CD,
sound-for-picture, multimedia or other project, you'll eventually want to create new, processed sound files from
HyperEngine to incorporate in your finished work.
To do so, first open the HyperEngine Reference document you want to "export." Make sure the audio you wish to export is
selected in the waveform display and the effects you wish to hear are turned on in the HyperEngine Process List.
Then, select HyperEngine's Process to New File command (located in the File menu). This command creates a brand new
sound file based on the settings in the Reference document. Once this file is created, you can import it virtually any other
audio or multimedia software application.
Page 38

Depending on the speed of your Power Mac, you will probably be able to run several effects processes within
HyperEngine at once. And, even when you have reached the real-time performance limit of your computer, you can still
add additional effects to a HyperEngine Reference document. While you won't be able to preview all these effects
simultaneously, they all can be applied when exporting the audio with the Process to New File command.
Alternately, you could apply a large number of effects in two or more passes, exporting the intermediate stages to disc and
then applying further processing to these new sound files.
This concludes the Introduction chapter; next we'll learn how to install and configure HyperEngine, then take a look at
each of its features.
[Table of Contents] [Next Chapter]
Page 39

Monitoring and Playback Controls
When HyperEngine is launched, you will see HyperEngine's Play Back window appear at the left of your screen. It's used
to control HyperEngine's monitoring, metering and playback.
HyperEngine Play Back window
The Play Back window may be closed by clicking the small window close box in it's upper left corner. If you close
it, and then want to re-open it later, choose the Play Back item from the HyperEngine "Windows" menu.
Output Toggles
Page 40

The top two buttons route HyperEngine's audio output to your computer speakers or monitoring system. Click on either
button to turn on/off the right and/or left channels.
Note that in the case of mono (one-channel) source sound files, the setting of the left channel will apply to both left
and right channel playback. Note also that mono sounds are "panned center" on playback, so they're heard equally through
both the left and right speakers.
Transport Controls
The four main buttons in the Play Back window let you control the playback of your sound file, much like a traditional
tape transport.
Play
Clicking on the Play button begins sound file playback from the beginning of the area selected in the waveform overview
when working with a File Document. The Play button is also used to enable sound throughput when working with a
HyperEngine Play-Thru Document. The space bar is a keyboard shortcut for Play. Note that the space bar is also the Pause
shortcut.
Playback normally begins at the start of the current selection; however, if you reposition the cursor within the selection,
playback will begin at the new cursor location.
Stop
The Stop button stops HyperEngine playback and recording. When the Stop button is pressed the playback cursor returns
to the beginning of the current selection, or to the beginning of the file if there is no selection currently made.The Return
key is a shortcut for the Stop button (think of it as "Stop and Return to beginning.")
Pause
The Pause button suspends playback, and allows playback to resume from the current cursor position in the waveform
overview. The space bar is a keyboard shortcut for the Pause button.
Loop
The Loop button causes HyperEngine to play back repeatedly, returning instantly to the start of the file (or current
selection) once the end is reached. If no selection is made, HyperEngine will Loop playback of the entire file.
Page 41

Meters and Faders
HyperEngine's Play Back window is dominated by the meter and fader assembly. HyperEngine's meters show you the
current signal level (or "volume.") HyperEngine's faders allow you to control the volume levels for recording and
playback.
The left and right sides of the meters reflect energy in the left and right channels. Mono sounds are panned center by
HyperEngine, so both meters are active when playing mono files.
The meters reflect output volume when HyperEngine is playing back or processing a disk file. The meters reflect
input volume when HyperEngine is recording, or when HyperEngine is processing real-time audio with a Play-Thru
document.
At the top of the scale, red "LED" clip lights illuminate when one or more samples have been clipped.
Clip lights and Clip button
Note that there is no consensus on how may consecutively clipped samples constitute "a problem;" many devices won't
show clipping of a single sample. However, HyperEngine indicates a single clipped sample. The red clip lights remain lit
even if playback is interrupted by clicking on Pause or Stop. To turn the clip lights off, click on the Clip button at the top
of the meters (between the clip lights).
Because some effects can increase the level of your original sounds, it is possible to introduce unintended digital
distortion during processing. If this happens, you can use the faders to reduce the overall level. There's more tips on
reducing distortion in the Troubleshooting chapter.
The faders are graphic potentiometers that control the gain (volume level) of input and output signals. They are located in
between the meters. When HyperEngine is playing back or processing a disk file, the meters control HyperEngine's output.
When HyperEngine is recording audio or processing "live" sound with a Play-Thru document, the meters control input, the
level of signal being routed into HyperEngine.
The faders consist of two discrete sliders (left and right) graduated from -(infinite) dB to +18 dB. These can be used
independently or grouped together. The faders are aligned to 0 dB by default. Mouse-click and drag on either fader knob to
adjust input or output volume. To move both faders simultaneously, click the knob in the middle and drag the mouse up or
Page 42

down. To bring left and right channels to the same level, simply click the center fader control and the left and right faders
will both jump to that level.
Click on the Lock button to tie the left and right faders together,allowing you to move them jointly while preserving their
relative settings. Click on the 0 dB button to automatically reset both faders to the default 0 dB setting.
The 0 dB and Lock buttons
You can change the fader levels during recording and playback. If you want to change the gain, be prudent when
increasing the level, as you might overload your ears and loudspeakers. If you saturate the digital-to-analog converter
hardware, the red clip lights above the peak meters light up. They remain lit until you explicitly turn them off with the Clip
button at the top of the meters.
Time Display
The Time Display shows run time as a sound is recorded or played back. It displays hours, minutes, seconds and
hundredths of a second. The Time Display may not show an accurate reading when processing with a time stretch or
Vari-speed effect.
The Time Display Window
[Last Chapter] [Table of Contents] [Next Chapter]
Page 43

HyperEngine Reference Documents
This chapter describes:
Introduction: HyperEngine File Documents and Play-Thru Documents●
Processing Real-Time Audio: The Play-Thru Document●
Recording a New Audio File●
Processing While Recording●
Processing Disk Files: The File Document●
Elements of a HyperEngine File Document●
File Document Header Information●
Time and Tool Windows●
The Waveform Editor●
Waveform Editor: Playing Sound Files●
Navigating Sound Files with the View Frame●
Tips for Fast Zooming and Navigation●
Waveform Editor Selection Tools●
File Editing: Basic Cut/Copy/Paste●
File Editing: Drag-and-Drop●
The Process List●
Using the Process List●
Removing an Effect from the Reference Document●
Naming an effect variation●
Bypassing one effect●
Changing the Order of Effects●
Process to new file●
Introduction: HyperEngine File Documents and Play-Thru Documents
HyperEngine is a non-destructive sound editor, meaning edits and effects made to your audio never alter the original files.
In order to provide this type of functionality, HyperEngine has a "document-based" architecture. All edits, effects,
parameter automations and other actions are saved in a HyperEngine Reference Document. The reference document is
separate and distinct from your sound files on disk.
HyperEngine uses two types of Reference Documents: the Play-Thru Document and the File Document. Play-Thru
Page 44

Documents are used when processing live audio in real-time, and when recording new sound files to disk from a live
source. File Documents are used when processing or editing audio files which already exist on disk.
It's important to understand the distinction between the Reference Document and the sound file. A sound file contains the
actual audio. A Reference Document points to a sound file (referencing its original location, on disk or in playthrough) and
contains editing and processing data related to the sound file, but no sound samples. Sound files can be huge, hundreds of
Megabytes for longer recordings. Reference Documents are comparatively small, typically below one hundred Kbytes.
You can create many different Reference Documents for a particular sound file (or play-through track) so as to try out
different variations and combinations. You can also reassign any File Reference Document to any sound file you wish, so
as to apply one set of effects to several different files.
Reference Documents never change the original sound file, nor do they automatically create additional audio files. In order
to make a new sound file, you either use the Process to New File command (when working with a File Document) or the
Record function (when working with a Play-Thru Document). Naturally, any active effects (or file edits) will be rendered
to the new file you're creating.
When you open a new sound file, the Reference Document you've created is given a default name, consisting of the name
of the current audio file plus the suffix "-FX." Don't confuse this "-FX" File Reference Document with the actual sound
file, which retains its original name and data under all circumstances.
The remainder of this chapter will teach you to process live signals using a Play-Thru Document, how to record a new
audio file, and how to work with File Documents in order to manipulate and process sound on disk.
Processing Real-Time Audio: The Play-Thru Document
HyperEngine can process audio appearing at your Mac's Sound input device in real-time. This will allow you to use
HyperEngine much like a hardware processor, and frees you from reading and creating new sound files on disk. This
functionality makes it possible to use HyperEngine in a live performance setting, on stage or in the studio. Use the Mac's
microphone port, the inputs on your sound card, or the AppleCD Audio Player desk accessory to get live signal into
HyperEngine.
Connect the audio inputs and outputs of your Mac to the rest of your audio system. Check your Sound Control Panel
input options (from the Control Panel submenu in the Apple Menu) if necessary.
Chose New Play-Thru Document from the File menu. A HyperEngine Play-Thru document will appear on-screen:
a HyperEngine Play-Thru Document, with no active processes
Page 45

HyperEngine Play-Thru Documents allow sound to be played through the HyperEngine from any external source, allow
you to insert effects into the signal stream, and let you record incoming sound.
Begin playing audio from your DAT machine, tape deck, CD player, mic or other external sound source into your
Mac's input device.
Hit the Play button or press the spacebar to begin HyperEngine play-thru
You should now hear your live sound being played through. If not, check your connections.
Adjust input volume using the HyperEngine's Faders. When your levels are OK, click on the Stop button (or press
the Return key) to suspend play-thru and give you access to the Plug-ins menu.
Now select an effect from the Plug-ins menu.
The selected effect's interface will appear on-screen. (If you get the Serial Number dialog, you need to serialize this
plug-in. Review the Installation chapter for tips on serializing and setup.)
HyperEngine Play-Thru document with three effects added to the Process List
Effects selected for a Play-Thru document are added to the Process List, in the lower half of the reference document
window. This list displays the process name (untitled by default) along with process type and date. Note also the Bypass
toggle switches along the left hand side of this display, effects are toggled to "active" by default when first added to a
document. For more information on using and managing the Process List, see the section below.
Hit the Play button (or spacebar) again to resume play-thru and begin processing your sound in real-time. Adjust
Ray Gun, Ionizer or Hyperprism settings and you'll hear the changes made instantly to your live signal.
If you're hearing an undesirable delayed (echo) effect when doing HyperEngine play-thru, it's the result of having
Sound Manager playthrough enabled. To solve this, go into the HyperEngine Preference Menu and select Configure Audio
System from under the Hardware submenu. In this dialog, de-select (check box off) the Playthrough option. Configuring
your system this way will allow you to hear HyperEngine play-thru without the additional unwanted Sound Manager
playthrough.
Bear in mind that there's a built-in degree of latency (time lag) to all computer audio systems, and doing live effects
Page 46

processing is one application where you can really notice the inherent latency of your audio card or the Sound Manager.
Depending on the type of audio you're processing this latency may or may not present a problem in live performance
situations. Going with a smaller buffer size in the Configure Audio System dialog can make a big difference, but there's no
way to completely eliminate latency.
Recording a New Audio File
Once you have created a Play-Thru Document (see section above for details) you can record incoming live audio to a disk
file for subsequent processing, editing or archiving.
Before you begin recording new files, you should specify the type of file you want to acquire. This is done from the
Preference menu.
Go to the Preference menu, mouse drag into the Hardware submenu and select Configure Audio System. You'll be
presented with the settings dialog:
Configure Audio System (settings) dialog as it appears for the Sound Manager drivers; AMII, AMIII and 1212I/O dialogs
vary somewhat.
Select the bit depth, sample rate and number of channels (mono=1/stereo=2) for the file you're about to record.
When you're happy with your selections, click on OK to exit this dialog.
Don't understand these values? Check out the chapter on digital audio files.
You don't need to configure the settings each time you record a new file, as HyperEngine will remember your
current settings, but it's a good idea to check the settings before beginning a session, or any time you want to change your
file type.
Page 47

Make sure your Sound control panel settings for bit depth, sample rate and mono/stereo match your HyperEngine
settings; a mismatch will usually create massive digital noise during playthrough. If you only have the Monitors and Sound
control panel in your system, we suggest adding the Sound control panel so that you get direct control over these settings.
If you're recording audio for eventual use on a CD, we recommend that you always create interleaved stereo 16-bit
Sound Designer II files, sampled at 44,100 Hz. This is the file specification you'll need to create "Red Book" audio CDs,
and is what programs such as Toast and MasterList CD accept for burning audio CD-Rs. Sticking with these settings will
prevent file-conversion headaches down the road.
Now that your audio system is configured to acquire the right type of audio file, you can go ahead and set up HyperEngine
for recording.
Create a new HyperEngine Play-Thru Document from the File menu, as described above.
Begin playing audio from your DAT machine, tape deck, CD player, mic or other external sound source into your
Mac's sound input device (your sound card's inputs or your Mac's mic input).
Hit the HyperEngine Play button; you should now hear your live sound being played through. If not, check your
connections.
Adjust input volume using the HyperEngine's Faders.
When you have good levels (strong signal with no clipping) stop and rewind your external source to the beginning
of the material you wish to record. Then click on the Play-Thru Document's Record button. You'll now see the file capture
dialog:
HyperEngine file capture dialog
Specify the audio file format (SDII or AIFF), a unique name and target location on hard disk for the sound file
you're going to create. When you're done, click on the Save button.
Exiting the capture dialog returns you to the HyperEngine; note that the Record button's red light is now "on," your
new file name is listed in the "Record to file:" display and the reference document indicates the total number of minutes of
audio that you can record to the target volume.
Page 48

Recording enabled: The red Record light is on, available recording time (free disk space) is displayed and the target file
name is shown
If you don't have enough empty hard disk space to record all of your source audio, either backup and delete any
unused files from your hard drive to free up additional space or use a target volume that has adequate room. Remember
that stereo 16-bit audio sampled at 44.1 kHz takes up about 10 MB per track minute. That means you'll need about 200
MB of free disk space to record a CD-quality 20-minute stereo file (the typical length of an album side).
Click on the HyperEngine's Play button to begin recording, and start playback "from the top" at your external
source.
You are now creating a sound file on hard disk, a digital recording of the audio being played in to your Mac's sound
input device.
If you adjust the HyperEngine faders during recording, you'll alter the level of the recording being made. Remember
that the faders control input level during recording and playthrough, and output level during playback.
When you've reached the end of your recording, click on the Stop button to discontinue file acquisition.
If you wish to add additional audio to the current disk file, simply click on the Play button again. Recording will
start again, and the new audio will be appended to the earlier recording.
If you want to create another disk file, simply close the current Play-Thru document, then select the New Play-Thru
Document option from the File menu, and repeat the recording steps listed above.
Since you can only play one audio stream at a time through your Mac, it's a good idea to only have one Play-Thru
document open at a time. Avoid having multiple Play-Thru documents open simultaneously; it'll help keep both you and
HyperEngine from getting confused.
If you want to begin editing and adding effects to the audio file you've just created, click on the Open button and a
File reference document will appear, showing the waveform overview of your new file. Read on for more information on
working with File documents.
If your recorded file sounds like it's stuttering or kind of cuts out, try increasing the Buffer size in the Configure
Audio System dialog. If your recording contains nothing but massive digital noise, make sure your Sound control panel
settings for bit depth, sample rate and mono/stereo match your HyperEngine settings. Other tips on recording can be found
over in the Troubleshooting section.
Processing While Recording
One of the most powerful features of HyperEngine is its ability to do signal processing in real-time, while a file is being
recorded. This time-saving feature enables you to do things like pitch shift a singer or de-click and denoise an old
Page 49

recording on-the-fly, creating a new processed file simultaneously. To do this, simply add plug-ins such as Ray Gun,
Ionizer or Hyperprism effects from the Plug-ins menu to the Play-Thru document's process list.
Open a new HyperEngine Play-Thru Document from the File menu, as described above.
Now select an effect from the Plug-ins menu.
The selected effect's interface will appear on-screen. (If you get the Serial Number dialog, you need to serialize this
plug-in. Make sure you have retained your Arboretum Serial Number card. Review the Installation chapter for tips on
serializing and setup.)
Effects selected for a Play-Thru document are added to the Process List, in the lower half of the reference document
window:
HyperEngine Play-Thru document with three effects active in the Process List
The Process List displays the process name (untitled by default) along with process type and date. Note also the Bypass
toggle switches on the left hand side of this display, effects are toggled to "active" by default when first added to a
document. For more information on using and managing the Process List, see the section below.
Begin playing signal from your external audio source (tape deck, mic, whatever) and hit the HyperEngine Play
button; you should now hear your live sound being played through. If not, check your connections.
Alter your Ray Gun, Ionizer or Hyperprism effect parameters while listening to the signal being processed, until you
have satisfactory settings.
Adjust input volume if necessary, using the HyperEngine's Faders.
When you have good levels (strong signal with no clipping) and you like the sound of your effect settings, stop and
rewind your external source to the beginning of the material you wish to record. Then click on the Play-Thru Document's
Record button.
Use the file capture dialog to define file type, name and location (as detailed in the previous section). Click on the
Save button to exit the dialog and engage the recording function.
Click on the HyperEngine's Play button to begin recording, and start playback "from the top" at your external
source.
Page 50

You are now creating a disk file, a digital recording of the audio being played in to your Mac's sound input device,
as it's being treated by your current effect selections.
If you adjust Ray Gun, Ionizer or Hyperprism effect parameters while the signal is being recorded, your effect
changes will be heard in the resultant file.
When you've reached the end of your recording, click on the Stop button to discontinue file acquisition.
If your recorded file sounds like it's stuttering or kind of cuts out, try increasing the Buffer size in the Configure
Audio System dialog. If your recording contains nothing but massive digital noise, make sure your Sound control panel
settings for bit depth, sample rate and mono/stereo match your HyperEngine settings. Other tips on recording can be found
over in the Troubleshooting section.
Now that you understand how to process and record audio in real-time, let's examine how HyperEngine deals with audio
files which are on disk. The next section discusses the HyperEngine file document.
Processing Disk Files: The File Document
Processing disk files with HyperEngine requires the creation of a File document. This example shows how to create a File
document to process an existing sound file stored on your hard drive.
Go to the File Menu
Choose New File Document, or simply use the keyboard shortcut, command-n.
A Dialog box will appear, asking you to select a sound file to work with:
Page 51

select a sound file from your hard drive for processing
Choose a sound file and click Open (or press either the Return or Enter keys, which are the shortcuts for clicking
Open).
A New File Document reference window will appear, along with a graphic waveform overview showing the audio in
the sound file you just selected. Depending on the length of the sound file, the overview may take a few moments to
calculate.
the File Document reference window, with waveform overview displayed
You have just created a new File Document. Note that by default, it bears the name of your sound file, plus the
filename extension "-FX" which helps differentiate it from your original sound file.
Note that you can only create one File Document per sound file at a time. Opening simultaneous multiple File
Documents for a single sound file will result in unpredictable performance.
Try clicking on the triangle show/hide buttons located along the left-hand margin of the File Document window.
These allow you to hide or show the main elements of the document.
Page 52

File Document window, collapsed view. Click on the triangle buttons to show or hide elements of the display.
Naturally, all elements of the File Document, such as effect processes and selections, remain active even when you've
hidden them from view. Also note the "grow tool" in the lower right hand corner of the File Document window. This
resizing tab allows you to make the HyperEngine File Document display as large or as small as you need, to match your
particular editing needs and screen size.
Elements of a HyperEngine File Document
The File Document has four main sections, which are detailed below: The Header Information, the Time and Tool
windows, the Waveform Editor and the Process List.
File Document Header Information
The top of the File document window is a title bar which by default specifies the name of the original input sound file
appended by the suffix "-FX." This helps you differentiate between a HyperEngine File (-FX) document and the original
sound file. Below the title bar is a text field containing the following general information about the sound file:
Sound file: Name of the sound file linked to this HyperEngine document, followed by:
on: Name of the disk on which the file resides
Size on disk: in Kbytes
File Format: AIFF or SDII (Other "foreign" file formats are automatically converted to AIFF upon importing them to
HyperEngine 2.4 when QuickTime 3 is installed.)
Resolution: Number of bits per sample (8, 16 or 24)
Sample Rate: 11025, 11127, 22050, 22255, 44100 or 48000 Hz
Time and Tool Windows
Page 53

Beneath the document header are the Time and Tool Windows, which provide information about the current file or
selection, and allow you access to the viewing and navigation tools. The Time and Tool display is collapsible; use the
triangle button on the left hand side to hide or show this portion of the File Document.
Time Fields
Start: The start time of the file or the current selection, in hours, minutes, seconds and milliseconds.
Stop: The end time of the file or the current selection, in hours, minutes, seconds and milliseconds.
Selection: The time duration of the file or the current selection, in hours, minutes, seconds and milliseconds.
Post-Roll: This user-definable field adds a set amount of time to the end of any processed file or processed selection.
Adding Post-Roll is useful when adding reverb to a file, which creates a "tail" that extends beyond the original end point of
the file or selection. Also consider using post roll with any effect that has a feedback parameter, which would tend to make
a processed sound longer than it originally was.
Duration: The time duration of the file or the current selection, plus any applied Post-Roll time, in hours, minutes,
seconds and milliseconds.
Start, Stop and Selection values can be adjusted with a simple mouse gesture, by clicking and dragging through the
waveform overview to make a new selection. Alternately, you can hand-enter numeric values into these fields, and the
Post-Roll field, by clicking on any numeric field and typing in a new value from the keypad. You can also adjust Stop,
Start, Selection and Post-Roll values by mouse dragging up or down from the fields, to scroll to a new setting.
The Duration value, because it is calculated from the sum of the Selection and Post-Roll values, can not be directly altered
except by changing Selection and/or Post-Roll times.
Tool Window
The Tool window contains implements which can assist you with viewing, navigating and editing audio.
View Toggle: This button lets you switch between the "full view" and the zoomed-in view. The zoomed
view is represented and controlled by the View Frame, detailed in the next section. This button is duplicated by the Switch
to Zoom-View/Switch to Over-View command in HyperEngine's Wave menu. Also make sure to try out the keyboard
alternative, command-/ (forward-slash).
Power User Tip: Leave the View Toggle "On" all the time, so you're always in "zoomed" view, then just navigate
and zoom around the waveform display using the arrow keys.
Zoom In/Zoom Out: Gives you incremental control over the resolution of the zoomed view (and the size of
the View Frame). The functions of these buttons are duplicated by the hitting the up arrow and down arrows on your
keypad, as well as by using the command-- (hyphen/minus) and command-= (equals) keyboard alternatives. There's also
Zoom In/Out options in the HyperEngine Wave menu.
Hide/Show View Frame: The light blue View Frame, found in the Waveform Editor display is a navigating
and editing tool which allows you to control the area of the zoomed view. The Hide/Show View Frame button toggles the
View Frame on and off in the Editor display. If you're currently inside a zoomed view (looking inside the frame, as it
were) this button is disabled. For more on the View Frame, read on.
Page 54

The Waveform Editor
HyperEngine's Waveform Editor display is dominated by the waveform overview. The waveform overview is a graphic
representation of your audio file, which is used for viewing, processing and editing audio files. Let's take a close look at
the elements of the Waveform Editor display, then see how it acts when playing pieces of audio.
Elements of the Waveform Editor
When first opening a File Document, the Waveform Editor display shows the entire file (zoomed out all the way) as the
initial default display.
In this display you can navigate (zoom) through the file, from the lowest level of detail (seeing entire file) to the highest
level of resolution (viewing each sample). Navigation is assisted by the View Frame, detailed in the following section.
When you're zoomed into an audio file, the scroll bar at the bottom of the editor display becomes active, and allows you to
quickly navigate through a zoomed view. For fastest, easiest navigation just use your Mac keyboard's arrow keys.
At the far left hand side of the Waveform Editor display is a numeric scale, ranging from 0% to 100% indicating waveform
amplitude as a percentage of total system headroom.
The green band located between the amplitude scale and the beginning of the waveform overview is a marker indicating
the beginning of file. The red band located at the far right hand end of the waveform overview is another marker indicating
the end of file. The green and red bands are there for your visual reference, so you'll always know when you're at the top,
or tail end, of a particular file. They also come into play as assistants to the selection and View Frame tools, as we'll
examine later.
Along the bottom edge of the Waveform Editor is a time display indicating file time in hours, minutes, seconds and
milliseconds. Note the "tick mark" directly above the "hours" numerals, indicating the exact position of the particular time
reading.
Waveform Editor: Playing Sound Files
When you play a sound file, a dotted yellow playback cursor scrolls across the waveform overview to show you the
current file position. The playback cursor is not only a visual aid, it can be used to specify where you want playback to
begin (assuming you've made no selection in the waveform overview).
Click anywhere in the waveform overview to reset the playback cursor to a new position.
Now click on the Play button (or press the space bar) to begin waveform playback from the playback cursor
Page 55

location.
Click on the Stop button (or press the Return key) to end playback and return the playback cursor to the beginning
of the file.
Note that the Pause (spacebar) command affects the playback cursor differently than the Stop (Return) command.
Pause simply pauses playback at the current time coordinate. When you resume playback from a paused state, the playback
cursor continues from the point at which it was paused. Clicking in the waveform to reset playback cursor when in a
paused state will have no effect, playback will always resume from the point at which you paused.
To select any portion of the waveform overview for processing or editing, simply click and drag with the mouse across the
display. Selected areas will be highlighted.
Range of audio file selected in Waveform Editor
Lets examine how playback works when you have an active selection:
One-Shot Playback
Click and drag across a section of the waveform overview to create a selection.
Now click on the Play button (or press the space bar) to begin selection playback from the beginning of the
selection.
Click on the Stop button (or press the Return key) to end playback and return the playback cursor to the beginning
of the selection.
Click on the Play button again to resume playback from the beginning of the selection.
Note that here again, the Stop button (Return key) always returns the playback cursor to the beginning, except that in
this case its to the beginning of the active selection. Think of the Stop button as "stop and return."
If you play the file to its end the cursor will likewise return to the start of file.
Looped Playback
Click on the Loop Button button to make HyperEngine play the section in a loop (repeatedly).
Now click on the Play Button to begin selection playback. Note that the current selection plays over and over.
Page 56

Now click on the Pause button (or hit the spacebar) to pause playback.
Click on the spacebar (or press Play) to resume playback from the paused location.
Remember that when playing back audio, the Pause (spacebar) simply pauses playback at the current time
coordinate. When you resume playback from a paused state, the playback cursor continues from the point at which it was
paused.
Click anywhere in the waveform display to de-select, removing the active selection and allowing you to create
another selection.
Power User Tip: You can alter the waveform view or selection range while play back is going. Try zooming way in
and shift-dragging the selection start/end times to new locations while listening to the looped playback to fine-tune loops
by ear. Use the Command-[ and Command-] shortcuts to jump right to the selection start/end points.
Now that you understand the basic elements of the Waveform Editor and how to use the playback cursor and selection
range, let's next take a close look at the viewing, selection and editing tools included in HyperEngine.
Navigating Sound Files with the View Frame
The View Frame is a new tool (with version 2.3) which makes it easy to view and edit sections of your sound file in detail.
All "zoom" functions are linked to the View Frame. The View Frame defines the area being zoomed into; when you're
looking at a zoomed view, you're seeing the section of the file that's currently in the View Frame.
Manipulating the View Frame
Click on the Hide/Show View Frame button to see the View Frame in the editor display, if it's not already visible.
Page 57

File Document with View Frame visible, note "hand" cursor for View Frame resizing is active.
View Frame (detail)
Note that the mouse cursor changes into a "hand" when it is over the rectangular View Frame tabs, located along the
left, right and bottom edges of the View Frame.
The View Frame tabs allow you to alter the size and location of the View Frame with a simple mouse move.
Click and drag on the left View Frame tab to readjust the beginning of your zoom view area.
Click and drag on the right View Frame tab to readjust the end point of your zoom view area.
Click and drag on the bottom View Frame tab to move the current zoom range to a different location in the file.
Page 58

Next, let's see how the green and blue zones (file header and ending markers) can assist you with View Frame Location.
Adjust the view frame so it's open to just a small portion of your file, and move the frame to the center of the
Waveform Editor display.
Next, move your mouse cursor above the green zone, denoting the beginning of your audio file.
Notice that the mouse cursor changes to a green double-arrow when located over the green zone, as shown below:
Note green double-arrow cursor, lower left-hand side
Now mouse-click in the green zone.
Notice that the View Frame has relocated to the beginning of the file.
Next, move your mouse cursor above the red zone, denoting the end of your audio file.
Notice that the mouse cursor changes to a red double-arrow when located over the red zone, as shown below:
Note red double-arrow cursor, lower right-hand side
Now mouse-click in the red zone.
Notice that the View Frame has relocated to the end of the file.
Now that we've experimented with resizing and relocating the View Frame, let's jump into the frame and look at the zoom
view.
Navigating Within the View Frame
Click on the View Toggle button (Or try the keyboard shortcut, command-/ [forward slash]) to switch over to the
zoom view, so as to examine the range selected by the current View Frame.
Page 59

Zoom View, seen when toggling into View Frame; note that "selection" cursor is active
Note that when you're looking at a zoom view, the View Frame is no longer visible (since you're now "inside" the
frame).
Adjust the scroll bar along the bottom of the Waveform Editor display to navigate through your file, while still in
the zoom view. The scroll bar is moving the View Frame along the duration of the sound file.
Click on the Zoom In/Zoom Out buttons to incrementally alter the size of the View Frame while inside the zoom
view.
Note that the Zoom In/Out buttons are not the only way to alter the size of your View Frame. We've built in four
other alternate ways of zooming, for your convenience:
While still in the zoom view (inside the View Frame) go to HyperEngine's Wave menu and select the Zoom In or
Zoom Out menu items. View Frame will resize upon selection.
Next, try the keyboard alternates for those menu commands: Command-dash (a.k.a. hyphen or minus) to zoom out,
command-= (equal/plus sign key) to zoom in.
If you have an enhanced keypad (which includes the numeric 10-key layout) try using the equals and minus keys
there, while holding down the command key, which will also zoom your display.
Now, for fast-and-easy one-touch zooming, use the Mac arrow keys. Press the up arrow to zoom in, the down arrow
to zoom out. Keep the up or down arrow key pressed to quickly zoom through multiple resolutions.
While we're here at the arrow keys, try pressing the left arrow and then the right arrow. You'll notice that these keys
move the View Frame along the timeline, to the left and the right. Keep the left or right arrow keys depressed to scroll
smoothly through the display. Left and right arrow keys duplicate the functionality of the scroll bar, which is located along
the bottom of the Waveform Editor display.
Tips for Fast Zooming and Navigation
Power User Tip #1: Arrow Keys Once you get going with the arrow keys, using them to control the size and
location of your zoom views (as described in the preceding paragraphs), you can almost completely forget about the View
Frame. Just keep the View Toggle in "zoom" mode all the time, then do all your zooming and navigating with the arrow
keys for maximum speed and convenience. Even if you learn only one keyboard alternative in HyperEngine, make sure it's
the arrow keys. They're total time (and wrist) savers.
Power User Tip #2: Fit Selection When you're involved in sound file editing, you may frequently wish to select a
Page 60

range of your file, and view that area in detail. We've included a special function to make that happen instantly. Simply
click-and-drag across a section of the waveform overview to select a range, then use the keyboard shortcut command-\
(backslash) to fit the current selection to the zoomed view, as defined by the View Frame. This will create a new Frame
view which surrounds your active selection range.You can also use the Wave menu command "Fit Selection to Window"
to accomplish the same thing. This is probably the second most useful shortcut in HyperEngine, after the arrow keys
described previously.
The result of a Fit Selection to Window (command-\) operation
Power User Tip #3: Control-Drag This variant on tip #2 allows you to quickly set a View Frame when no
selection is active. Simply hold down the Control key while mouse-dragging across the waveform display. You'll notice
that the mouse cursor turns into a magnifying glass, a "ghosted" View Frame appears, and this frame is resized as you
mouse drag. Once you let up the mouse button you'll jump to the new view you've just defined. This feature works the
same regardless of whether you're currently looking inside or outside the View Frame.
Waveform Editor Selection Tools
When the mouse pointer is located over the Waveform Editor window, the mouse cursor turns into a little blue waveform,
with a red line bisecting it, indicating that the cursor is active for selecting. To select any portion of the waveform
overview for processing or editing, simply click and drag with the mouse across the display. Selected areas will be
highlighted.
Range of audio file selected in Waveform Editor, note "selection " active
The selection range defines the area of the waveform overview which is active for playback, editing and processing
functions. Use the command-a keyboard shortcut, or the Select All option from HyperEngine's Edit menu, to select the
entire audio file. Mouse-click anywhere in the waveform display to de-select.
The selection range can be manipulated in a variety of ways:
Resize Selection
First, click and drag across a portion of the waveform overview to create a new selection.
Now, while holding down the Shift key, mouse click again anywhere in the waveform overview to adjust the
Page 61

beginning/ending of the selection.
Remember that Shift-clicking when a selection is active lets you grow or constrain the current selection, operating
much like any graphics program.
Next, mouse-click anywhere in the waveform display to de-select, eliminating the selection range.
Hit the Return key or press the Stop button to return the playback cursor to the beginning of the file.
Now, hold down the shift key and click anywhere along the waveform display.
You'll see that a new selection is created "from the top," extending from the beginning of the audio file to the cursor
location.
Resize Selection on-the-fly
While you still have an active selection, hold down the Shift key. Then mouse-click, and while holding down the
mouse button, drag the cursor along the waveform overview.
Note that holding down the Shift key while mouse dragging allows you to smoothly reset the beginning and end
points of the current selection.
Now press the Loop and Play buttons, so as to begin looped playback of the selection range.
While your selection is playing back, hold down the Shift key and mouse-drag in the waveform display to readjust
the start/end point of the selection.
You'll notice that HyperEngine will readjust the playback range on-the-fly while you're resizing the selection. This
allows you to audition a selection while you're simultaneously creating and adjusting the selection range, in real-time.
Power User Tip:Using Loop playback and the shift key to audition selections on-the-fly is another major time
saving feature, freeing you from the trial-and-error process of selecting, auditioning, reselecting and re-auditioning.
Move Selection Left/Right
Before we go on to the editing functions, there are a few other selection manipulations we should examine. Much as
HyperEngine includes shortcuts to the zooming/View Frame functions, we've also built in some selection range helpers:
Select a small portion of the audio file, something in the middle of the display.
Now, from HyperEngine's Wave menu, try selecting the Move Selection Right or Move Selection Left functions.
Move Selection Left/Right will move the active selection range earlier, or later, in the waveform display. The
amount of movement is equal to the size of the selection range.
Now, try the keyboard shortcuts for Move Selection: Press command-; (semicolon) and command-' (apostrophe) to
shift the selection range to the left or right by the size of the range.
Power User Tip:The Move Selection shortcut is especially handy when cutting loops out of a long instrumental
performance, like a drum track, for example. It enables you to select the length of your loop (such as a measure or bar)
Page 62

then quickly cruise down the entirety of your file, auditioning each measure until you find the perfect iteration, while
always maintaining the original size of the selection range. This is an enormous time-saver, compared with re-selecting
each measure separately, and allows you to maintain a defined "block" size while auditioning and cutting loops.
Note that the playback cursor does not automatically relocate to the start of the selection range when using the Move
Selection command. Hit the Stop button or Return key after doing a Move Selection to reset playback to the new selection
beginning.
Go to Selection Start/End
One of the problems that is frequently encountered when working at high zoom resolutions is that it's easy to "misplace"
the beginning or ending of your current selection, resulting in a lot of excessive scrolling through the display, trying to find
where your start/end point was. To solve this, we've included a couple of selection locating aids:
Select a small portion of the audio file, something in the middle of the display.
Zoom deep into the display, by repeatedly pressing the up arrow key.
Type the command-[ (left bracket) key combination.
Note that the beginning point of the current selection is now center-screen.
Next, use the command-] (right bracket) shortcut.
Now you'll see the end point of the current selection center-screen.
International users please note: Some non-English Mac keypads (such as those made for the German market) do not
include bracket keys. If this is the case with your system, just utilize the corresponding menu commands found in
HyperEngine's Wave menu for the Go To Selection Start/End functions.
Fit Selection to Window
When you're involved in sound file editing, you may frequently wish to select a range of your file, and view that area in
detail. We've included a special function to make that happen instantly.
Use the keyboard shortcut command-\ (backslash) to fit the current selection to the zoomed view. You can also use
the Wave menu command "Fit Selection to Window" to accomplish the same thing.
This will create a new Frame view which surrounds your active selection range.
The result of a Fit Selection to Window (command-\) operation
Now that you understand how to make, move, view and manipulate a waveform selection range, let's use those tools for
some file chopping and explore HyperEngine's new editing functions.
Page 63

File Editing: Basic Cut/Copy/Paste
A new feature in HyperEngine 2.3 is the ability to do basic audio file editing, involving cut, copy and paste operations. Not
only can you cut/paste within a single File Document, you also have the ability to copy material between two different File
Documents.
When pasting material between different file documents, note the following restrictions: You can only copy/paste
from one mono file to another mono file, or from one stereo file to a second stereo file. You are prohibited from pasting a
mono region into a stereo file, or from copying a stereo selection into a mono file. Note also that you'll only get predictable
results when copying between files that are at the same sample rate. For instance, if you paste a 44.1k selection into a file
that is at 22.05k, that new 44.1 region will play back at "half speed" in the 22.05k File Document.
The Cut/Copy/Paste commands are located in HyperEngine's Edit menu, and are duplicated by the familiar command-x,
command-c and command-v keyboard alternatives. Here's how to use them:
Cut and Undo/Redo
Mouse-drag through a section of the waveform overview to create an active selection.
Select the Cut command from HyperEngine's Edit menu, use the command-x keyboard shortcut or simply press the
delete key on your keypad.
Your selection will be cut from the waveform display, and the remaining audio will be butt-spliced so as to cover the
gap.
Select the Undo (command-z) option from the Edit menu to undo your cut and restore the audio to its original
position.
Select the Redo (command-z) option from the Edit menu to restore your edit and take the selection back out of your
file.
Copy and Paste
Mouse-drag through a section of the waveform overview to create an active selection.
Select the Copy command from HyperEngine's Edit menu, or use the command-c keyboard shortcut.
This command copies the current selection to your Mac clipboard memory.
Click anywhere on the waveform display to select an edit insertion point
Select the Paste command from HyperEngine's Edit menu, or use the command-v shortcut.
Clipboard data is now pasted at the location you've specified.
Select any portion of the waveform overview by mouse-dragging through the display
Select the Paste command from HyperEngine's Edit menu, or use the command-v shortcut.
Clipboard data is now pasted at the location you've specified, replacing the current selection.
Page 64

Remember, you can copy and paste waveform data between two separate File Documents, as long as both
documents have the same number of channels and sample rate.
Clear
The Clear command is not currently implemented by HyperEngine, and will remain ghosted in the Edit menu.
File Editing: Drag-and-Drop
Now that you're familiar with HyperEngine's basic editing commands, let's look at a faster way to edit: The
Drag-and-Drop functions. Drag-and-Drop editing allows you to "tear off" any portion of the waveform display and move
that selection to another location in the file, or even to a separate file.
Mouse-drag through a section of the waveform overview to create an active selection.
Mouse-click within the selection range and hold down the mouse button to "grab" the selected range.
Notice that the mouse cursor changes to a "fist" denoting that the selection has been grabbed.
While keeping the mouse button depressed, move the pointer to another area in the wave display.
An outline view of the selection range is seen as you drag the selection to the new location. Notice also that the
playback cursor can be seen as you drag the selection, indicating your new "in" point.
While still keeping the mouse button depressed, position the playback cursor to your desired insertion point.
Release the mouse button and your selection will be re-located to the new insert point.
The procedure above works the same way whether editing with a single File Document, or moving audio ranges between
two different File Documents.
Drag a Copy
A variant on the Drag-and-Drop procedure is "drag a copy" which is accomplished by holding down the option (alt) key
while editing. Here's how it works:
Mouse-drag through a section of the waveform overview to create an active selection.
While holding down the option (alt) key, mouse-click within the selection range and hold down the mouse button to
"grab" the selected range.
While keeping the option key and mouse button depressed, move the selection copy to a new position in the
waveform display. When you've positioned the playback cursor to your desired insertion point, release the mouse button.
Your selection copy is now in a new position, and the original selection area remains untouched, as it was before this
edit.
Remember, you can Drag-and-Drop waveform data between two separate File Documents, as long as both
documents have the same number of channels and sample rate.
Page 65

Now that you're comfortable with all of HyperEngine's Waveform Editor features, lets examine in detail the last element of
every Reference Document, the Process List.
The Process List
Now, let's examine the Process List. This list appears, and behaves, exactly the same in both the Play-Thru Document and
File Document reference windows. When a new Reference Document is created, this list is empty. You may add
Hyperprism 2, Ionizer or Ray Gun effects by selecting them from the Plug-Ins menu. Access the effects in your document
by clicking on their entries in the List. You also engage/bypass the processing in the Process List by clicking the toggle
button to the left of each list entry.
The Process List allows you to add multiple processes to a single reference document, so you can create complex
multi-effects. And note that even when you close a Hyperprism, Ionizer or Ray Gun window, if the effect is still in the
process list, and still toggled to "engaged" (not bypassed) then the effect processing, and any associated parameter
automation, will be heard in the playback and in any processed new file.
Using the Process List
Once you have created a reference document (either a Play-Thru document or a File document) you can add one or more
HyperEngine-compatible effects to it. In this example, we will add a Ray Gun effect.
Go to the File Menu
Choose New File Document, or simply use the keyboard shortcut, command-n.
In the resultant Select Sound File dialog, choose a sound file from disk and click Open (or press either the Return or
Enter keys, which are the dialog shortcuts for clicking Open).
A New File Document reference window will appear, along with a graphic waveform overview showing the audio in
the sound file you just selected. Depending on the length of the sound file, the overview may take a few moments to
calculate.
Press the spacebar or hit the Play button to audition your sound file. When you're done auditioning, press Stop
(Return key) or Pause (spacebar) to suspend playback.
From the Plug-Ins menu, choose Ray Gun (or other HyperEngine plug-in effect).
If the Plug-Ins menu is ghosted, simply Stop or Pause playback and HyperEngine will allow you access to the
Plug-Ins menu. You are not allowed to add plug-ins to a document while playback is underway, HyperEngine will resist
giving up control over the Sound Manager until you've suspended playback. Stopping/pausing, then adding the effect and
resuming playback is the required procedure.
Page 66

The Ray Gun interface will appear on screen and Ray Gun will be added to the Process List in the document
window. The process name is "untitled" by default (as displayed below):
Use the Ray Gun (or other effect) interface to adjust your process settings, while listening to HyperEngine playback.
Enable the Loop function if you're working with a short file or selection, so playback will loop continuously as you dial in
your settings.
You may now begin experimenting with effect variations. Adjust effect settings as described in the Ionizer, Ray Gun or
Hyperprism 2 documentation supplied on the Arboretum CD.
Once you're satisfied with your effect settings you can close the Ray Gun (or other effect's) control window.
You'll still hear the effect processing "in the background" as long as the effect remains in the Process List, and is
toggled to "engaged" (not bypassed).
If you want to add additional effect to the signal chain, simply select another entry from the Plug-Ins menu.
Your new effect will be added to the bottom of the Process List, and to the tail end of the signal chain.
Removing an Effect from the Reference Document
Select the effect you want to delete by clicking on the Process List. The entry will be highlighted.
Hit the Delete key on your keypad
The effect will be deleted from the Process List and removed from the signal chain.
Note that there is no "Undo" after this function!
Naming An Effect Variation
Since you can add more than one effect variation to a reference document, you may want to use unique names to help tell
them apart.
To name an effect in the reference document process list:
Select the effect you want to name by clicking on the Process List.
Choose Get Info from the File menu.
The Process Info dialog will appear.
Page 67

Enter the new name and any optional comments and click OK.
The effect will appear with your new name in the document window's Process List.
Bypassing One Effect
It is possible to have multiple simultaneous effects active in the HyperEngine window. Each effect may be engaged or
bypassed individually. Every effect in the HyperEngine document window includes its own Bypass button. Simply click
the button to bypass or engage that particular effect. When the button is illuminated, the effect process is engaged. When
an effect's process is engaged, you'll hear its effect on the sound, even though the particular effect's screen (HyperVerb, in
this example) is closed.
The Hyperprism Vari-Speed effect named "big slowdown" is bypassed, while the HyperVerb effect called "enter optional
name" is still engaged.
Page 68

Changing the Order of Effects
HyperEngine processes run in series, from top to bottom, as displayed in the reference document's Process List. As you
add additional processes to a reference document, each new effect is added to the bottom of the list (and is thus inserted at
the end of the signal processing chain). When creating a "multi-effect" incorporating numerous processes, you may wish to
rearrange the processing chain. Rearranging the Process List is a simple drag-and-drop operation:
Click on the Process List entry for the effect you wish to move. The effect's list entry will be highlighted.
While holding down the mouse button "drag" the highlighted effect to its new position in the list.
Resequencing the Process List can have a tremendous impact on the way your processes sound. Common applications can
include placing a compressor at the "head" of the chain, followed by filters and reverb. Or perhaps you'd use a Quasi
Stereo (mono-to-stereo) process as the first stage, followed by other spatial effects.
An example of a Hyperprism multi-effect chain
Process to New File
Once you have edited your file and adjusted your effect settings to your liking, use the Process to New File command to
create a new sound file using the current File Document settings.
To use the Process to New File command:
Select the range of audio you wish to process by click-dragging in the waveform overview of the File Document
window. Use the command-a shortcut if you want to select the entire file for processing.
Select a Post-Roll value if the processing should alter the length of the file, such as in instances where a reverb
effect should add a "tail" to a sound.
Choose the Process to New File command from the File menu.
Choose the output file specifications (sample rate and bit-depth).
If exporting stereo audio select either interleaved or split stereo (.L/.R) file output.
If you're saving the sound as an 8-bit file, try the Dither and Noise Shaping options, which add a small bit of noise
to the signal to mask the audible effects of the bit reduction. These can also be used when doing straight 16-bit to 16-bit
processing; the effect is less noticeable in those situations.
If you're recording audio for eventual use on a CD, we recommend that you always create 16-bit interleaved stereo
Sound Designer II files, sampled at 44,100 Hz. This is the file specification you'll need to create "Red Book" audio CDs,
and is what programs such as Toast and MasterList CD accept for burning audio CDs. Sticking with these settings will
prevent file-conversion headaches down the road.
Page 69

The next dialog will ask you to specify file format (AIFF or SDII), a name for the file and its target location on disk.
Click "Save" (or hit the Return key) to begin the process. The selected range of audio will be written to disk.
Your original sound file will be unchanged!
This concludes our chapter on the HyperEngine Reference Documents. Read on through the next chapter for more
information on HyperEngine menu commands and key command shortcuts.
[Last Chapter] [Table of Contents] [Next Chapter]
Page 70

HyperEngine and the Macintosh Sound Manager
This document describes:
Macintosh built-in sound●
Sound out●
Sound in●
Using 3rd party audio cards●
Special Direct Sound Card Support●
A Note About Latency●
Macintosh Built-in sound
While HyperEngine supports optional high-quality audio cards, they are not required. This is because Apple's PowerMac
computers provide good-quality analog audio input and output built into each Macintosh. The input and output ports are
typically 1/8" mini stereo jacks, labeled with "mic" and "speaker" icons, although some Macintosh models have separate
left and right channel RCA jacks as well. You will have to decide if your Mac's built-in audio provides suitable fidelity for
your project.
To control this built-in hardware, Apple provides various system resources. In all likelihood, this software is already
installed on your Mac.
Sound Manager extension
For System 8.0 and later the Sound Manager Extension is no longer required by HyperEngine (version 2.4 or later). In
System 7.x please use the Sound Manager 3.2.1 or later in your Extensions folder.
Sound Out
By default, HyperEngine will play out of whatever speaker your Mac is using for system beeps and other sounds. The
sound out device is set in the Sound control panel, by selecting the Sound Out page from the Sound control panel's
pop-up menu.
Can't find your Sound control panel? Try the Monitors and Sound control panel...Later versions of the MacOS have
incorporated the sound features with the monitor controls, and omitted direct control over playthrough, bit depth and
number of channels. Using either control panel (or both) is fine. We usually have both Sound and Monitors & Sound
control panels loaded, and control all audio settings through the Sound one.
If you have any third party audio hardware, such as a Korg or Digidesign card, it should appear in addition to the
"Built-in" option (more on this in a moment). You will also find options for setting the number of channels, sample rate
and bit-resolution here.
If your Mac is not making any sound (including system alert beeps or startup sounds) double check the sound output jack
Page 71

on your Mac's back panel. When an audio plug is inserted in this jack, the Mac's internal speaker is automatically
disconnected. If you have connected a cable to your Mac's audio output, make sure your external audio system is
functioning properly.
Sound In
The Sound control panel also sets the source for sound coming into your Mac. Select the Sound In page from the pop-up
menu in the Sound control panel. HyperEngine will use the Sound In device for play-through mode, as well as when
recording files to disk for sound-file based processing.
As is the case with the Sound Out setting, if you have any third party audio hardware, such as a Digidesign card, it should
appear in addition to the "Built-in" option (more on this in a moment).
Clicking the Options... button in the Sound Control Panel (Sound Input pop-up in Monitors & Sound control panel)
lets you choose between your Mac's internal CD player (if present) and the external audio input (Microphone) connector
on the back of your Mac. If you have a built-in Apple CD-ROM drive, try using the AppleCD Audio Player control panel
to play audio CDs into HyperEngine for recording or Play-Thru processing.
Using Third-Party Audio Cards
If you have an audio card installed in your Mac, you can select that card for your Mac's audio input and output. Doing so
will give you higher fidelity than your Mac's built-in audio hardware, and may also allow you to import and export digital
audio from an external source, such as a DAT recorder.
To use an optional audio card with HyperEngine:
Install the audio card in your Macintosh following the manufacturer's directions.
Install the manufacturer-provided software. This should place an extension in your System folder to allow Sound
Manager to access the new audio hardware. For Digidesign users, this is the Digidesign Sound Drivers extension.
Note that if you're using Pro Tools we suggest using Digidesign Sound Drivers v.1.4.1 only, both earlier and later
versions have exhibited stability problems. If you're using an Audiomedia II or III card, you may omit the Digidesign
Sound Drivers completely and simply use HyperEngine's own Audiomedia II/III IO Drivers.
Open the Sound control panel, and go to the Sound Out page by selecting Sound Out from the pop-up menu.
Click on the Digidesign icon (or other manufacturer's icon, depending on the hardware you have installed).
Set the sample rate and bit-resolution controls as desired.
If you will be recording audio into the card, go to the Sound In page of the Sound Control Panel and set the Sound
In device to match your audio card.
Your audio card is now configured to work with HyperEngine and any other audio programs that use the Sound
Manager input and output device. Be sure the appropriate cables are connected to your external audio system, or you won't
be able to hear anything.
Special Direct Sound Card Support
HyperEngine now includes special custom drivers for the Digidesign Audiomedia II and Audiomedia III cards, plus the
Korg 1212I/O card. Ray Gun looks for its drivers in a folder called "HyperEngine IO Drivers." This folder should be in the
Page 72

same folder, at the same directory level, as the HyperEngine application. This is how they are installed by default, so you
generally will never need to worry about their location. If you have a supported sound card, these custom drivers eliminate
the need for using special Sound Manager drivers, such as the Digidesign Sound Drivers.
A Note About Latency
Bear in mind that there's a built-in degree of latency (time lag) to all computer audio systems, and doing live effects
processing is one application where you can really notice the inherent latency of your audio card or the Sound Manager.
Depending on the type of audio you're processing this latency may or may not present a problem in live performance
situations. Going with a smaller buffer size in the Configure Audio System dialog can make a big difference, but there's no
way to completely eliminate latency.
[Last Chapter] [Table of Contents] [Next Chapter]
Page 73

HyperEngine Command Reference
This document describes the function of each HyperEngine menu command, as well as key commands and shortcuts. Click
on any command to learn about it.
File Menu
New File Document●
New Play-Thru Document●
Open Document●
Reassign●
Import Split Stereo●
Import Foreign File●
Close●
Save●
Save As●
Process to New file●
Export Current File●
Get Info●
Quit●
Edit Menu
Undo/Redo●
Cut●
Copy●
Paste●
Clear●
Select All●
Plug-ins Menu
Wave Menu
Switch to Zoom View/Overview●
Zoom in●
Page 74

Zoom out●
Move Selection Left●
Move Selection Right●
Go To Selection Start●
Go To Selection End●
Fit Selection to Window●
Repeat Selection●
Windows Menu
Preference Menu
Configure Audio System●
Driver Selection●
Processing Preferences●
HyperEngine Keyboard Shortcut Summary
File Menu
The File Menu contains commands which allow you to open, save and manipulate HyperEngine Reference Documents.
New File Document
This creates a new HyperEngine File Document. File Documents allow you to edit and process sound files on disk,
without ever altering your original media. When you choose this command, you will be prompted to select any existing
AIFF or SDII mono or interleaved stereo sound file to open within the HyperEngine File Document. This file will not be
changed; HyperEngine always writes the modified audio to a new sound file, using the Process to New File command.
Command-n is the New File Document keyboard shortcut. For more information on understanding and using HyperEngine
File Documents, peruse the material in the previous chapter, beginning with the section called "Processing Disk Files: The
File Document." For background information on file formats, sample rates and other aspects of digital audio, click here.
New Play-Thru document
This creates a HyperEngine document that does not reference a sound file on disk. Instead, it references the live audio
signal connected to your Mac's Sound Input device. Play-Thru documents are used when recording new audio files from a
live source, and when processing real-time audio in a performance situation. For more information on understanding and
using HyperEngine Play-Thru Documents, peruse the material in the previous chapter, beginning with the section on
"Processing Real-Time Audio." For more about HyperEngine, sound cards and the Apple Sound Manager, click here.
Open Document
The Open command opens any existing HyperEngine File Document or Play-Thru Document, which you would have
created by the New Document commands described above. Command-o is the keyboard alternative.
This command will NOT open a sound file, it opens HyperEngine Reference Documents. To work with sound files,
create a New File Document (use the command-n keyboard shortcut) which will prompt you for the AIFF or Sound
Designer II file you want to work with.
For complete details on opening and using HyperEngine Reference Documents, peruse the material in the previous
Page 75

chapter.
Reassign
Every HyperEngine File Document is linked to one, and only one, sound file. However, using the Reassign command, you
can link any File Document to a new sound file. For example, you might do this if you wanted to apply a particular set of
effects to more than one sound file.
Import Split Stereo
HyperEngine has direct support for mono and interleaved stereo audio files. However, some audio editors create split
stereo files, in which the left and right channels are two discrete files. Split stereo files typically share the same file name,
with the addition of a .L or .R suffix to denote their channel position.
Selecting the Import Split Stereo option results in two dialogs in which you locate and select the .L and .R files which you
wish to import. The first dialog will ask you to locate the left channel file, the second dialog requests the right channel.
Next you'll see a dialog where you determine the name and location for the new audio file to be created. Upon pressing
OK HyperEngine will combine the .L and .R files into a new interleaved stereo file, and open that resultant file in a new
File Reference Document .
Bear in mind that the Import Split Stereo function is creating new audio files on disk which may consume substantial disk
space.
One interesting aspect of Import Split Stereo is that HyperEngine does NOT require that file names have .L/.R suffixes,
nor does it require that they have the same names at all. Moreover, you can import any two mono files, of any length, and
combine them in a new stereo file by using this function. If the mono sound files are of different lengths then the new
stereo file will have the length of the shorter file.
Import Foreign File
Import Foreign File takes advantages of the file services offered by Apple's QuickTime 3 technology. With HyperEngine
2.4 and later you may import any Wave (.WAV), QuickTime (.MOV), .System 7 Sound (.SND) or uLaw audio file. Better
still, you can import tracks from audio CDs directly into HyperEngine, if you're using a supported Apple CD-ROM drive.
Using the Import Foreign File features requires that QuickTime be loaded in your Extensions folder. QuickTime 3 includes
a number of different System extensions; for the purposes of HyperEngine we're using the QuickTime and QuickTime
Power Plug.
Selecting Import Foreign File results in a dialog where you locate the file you wish to import. While in the selection dialog
you may preview any prospective files. Once you've selected a file or CD track for import, you'll be asked to specify the
name and location for the new AIFF file that will be created. Upon Okaying these choices the import will proceed, a new
AIFF file containing the audio will be created, and the sound file will open up inside a new HyperEngine File Reference
Document.
Bear in mind that the Import Foreign File function is creating new audio files on disk which may consume substantial disk
space.
Using Import Foreign File while running QuickTime 2.5 is OK but it will automatically truncate the number of channels,
bit depth and sample rate of any CD audio imported to mono 8-bit 22050. Get QuickTime 3 by free download from
http://www.apple.com
Close
This command closes the current HyperEngine Reference Document. HyperEngine will always ask you if you want to
save all changes made to the document, prior to executing the Close command. Command-w is the keyboard shortcut.
Page 76

Save
This command saves the current HyperEngine Reference Document. When you're working with a File Document,
HyperEngine by default will name your File Document with the name of the sound file it references, followed by the
extension "-FX." If you're working with a Play-Thru Document, HyperEngine just names the document "Play-Thru" by
default. Naturally, you can rename any Reference Document with the custom name of your choice. Command-s is the
keyboard shortcut.
The Save command writes only the Reference Document to disk, it does not duplicate the sound file. Reference
Documents take up very little disk space, so don't worry about saving or copying them as often as you like.
Save as
Saves the current HyperEngine Reference Document to a new name.
Process to New File
Creates a new sound file based on the audio file referenced by the current File Document, as modified by the current
settings of all active effects in the Process List plus any edits you've performed in the Waveform Editor display. When
selecting Process to New File you'll see the Output File Parameters dialog. Here you specify your new file's sample rate
and bit-depth, choose between split setereo (.L/.R) and interleaved stereo, and you may also select Dithering and Noise
Shaping options.
Dithering and Noise Shaping are ways of masking audio artifacts which can result from converting sound from a higher bit
depth to a lower one. Dithering and Noise shaping can make a noticeable difference on audio being converted from 16 to 8
bits, and as HyperEngine does all its work at 32-bit floating point you can also dither and noise shape when rendering 24
or 16-bit files.
After the Output File Parameters dialog you will be prompted to set the file format (AIFF or SDII,) name and location of
the new file. Once you've OK'd these selections the new file will be processed and all edits and effects which are active in
the File Reference Document will be incorporated into the new audio file.
Process to New File creates only AIFF or SDII files; once you have created a processed file you can export it to other
formats such as Wave or QuickTime using the Export Current File command.
Executing this command will create a new file similar in size to the original sound file you are working with. This
could require a lot of free hard disk space! Allow 5 MB for each minute of a 16-bit mono file sampled at 44.1k, or 10 MB
for each stereo minute.
For further step-by-step instructions on processing new files, please review the related material in the previous chapter.
Export Current File
Export Current File takes advantages of the file services offered by Apple's QuickTime 3 technology. With HyperEngine
2.4 and later you may export any audio as a Wave (.WAV), QuickTime (.MOV), .System 7 Sound (.SND) or uLaw audio
file.
Using the Export Current File features requires that QuickTime be loaded in your Extensions folder. QuickTime 3 includes
a number of different System extensions; for the purposes of HyperEngine we're using the QuickTime and QuickTime
Power Plug.
Selecting Export Current File results in a dialog where you specify the name, location and file format for the new sound
file. Upon Okaying these choices the export will proceed and a new file containing the audio will be created on disk.
Page 77

Export Current File, as its name implies, exports only the current audio file. This function ignores all effects,
settings, edits and selections in the File Reference Document and merely exports the raw audio file, in its entirety. To
create new files which incorporate Hyperprism/Ionizer/Ray Gun processing, use the Process to New File command.
Bear in mind that the Export Current File function is creating new audio files on disk which may consume substantial disk
space.
Note that using Export Current File with QuickTime 2.5 is OK, but you'll only be able to export .SND or .MOV files.
QuickTime 3 is strongly recommended. Get QuickTime 3 by free download from http://www.apple.com
Get Info
The Get Info command brings up information on the currently-selected process from your File Document. Use this
function to change the names of settings or enter comments. Command-i is the shortcut. More information on Get Info
applications can be found in the previous chapter.
Quit
Exits the HyperEngine program. Command-q is the keyboard alternative.
Edit Menu
The Edit Menu contains commands which pertain to HyperEngine's waveform editing functions. Edit Menu commands are
only active when working with a HyperEngine File Document since Play-Thru documents have no provision for waveform
editing.
Undo/Redo
The Undo command allows you to reverse the last editing operation. When you execute an Undo, this menu option
changes into Redo, allowing you to reverse the previous Undo and restore your last editing change. Command-z is the
Undo/Redo keyboard shortcut. Check out the File Editing section in the previous chapter for step-by-step instructions on
using Undo/Redo.
Certain File Document functions, such as removing an effect from the Process List, can not be undone or redone.
Cut
The Cut command allows you to remove your current selection from the File Document's waveform display and copy it to
clipboard memory; remaining audio, if any, will be butt-spliced so as to close the gap created by a Cut operation.
Command-x is a keyboard shortcut for Cut. You can also simply use the Delete key for one-touch removal of any selected
waveform range, but remember that Delete does not save the selection to memory. Check out the File Editing section in
the previous chapter for step-by-step instructions on using the Cut command.
Copy
The Copy command copies the current selection from the File Document's Waveform Editor display to the Mac's clipboard
memory. Command-c is the keyboard shortcut for the Copy function.
Copy functions are generally used in conjunction with the Paste command, keep reading for more details on Paste. Check
out the File Editing section in the previous chapter for step-by-step instructions on using the Copy command.
Page 78

Remember, you can copy and paste waveform data between two separate File Documents, as long as both
documents have the same number of channels and sample rate.
If you're running out of memory, HyperEngine may not be able to execute a Copy command, especially if a long
piece of audio is selected in a low-RAM situation. If you encounter "out of memory" messages, or if Copy fails to function
properly, quit any other open applications or try allocating more system RAM to HyperEngine.
Paste
The Paste command copies the current contents of the Mac's clipboard memory to any insertion point or selection range
within the File Document's Waveform Editor Display. If you're pasting into a selection range, the Paste command will
replace the selection's contents with the clipboard memory's contents.Command-v is the keyboard shortcut for the Paste
function.
Mouse-click in the Waveform Editor display if you want to paste again at a new insert point (otherwise it just pastes into
the selection, right over the previous paste). If you want to paste multiple copies of a selection in a series, first perform the
Paste command, then select the Repeat Selection command from the Wave menu.
Paste is generally used after executing a Cut or Copy command. Check out the File Editing section in the previous chapter
for step-by-step instructions on using the Paste command.
Remember, you can copy and paste waveform data between two separate File Documents, as long as both
documents have the same number of channels and sample rate.
Clear
The Clear command is not currently implemented by HyperEngine and will remain ghosted in the Edit menu.
Select All
The Select All command allows you to select the entire duration of the audio file displayed in the File Document's
Waveform Editor window. This command serves as a quick alternative to mouse-dragging through the waveform overview
in situations where you wish to audition, edit or process the entire sound file. Command-a is the keyboard shortcut for the
Select All function.
Plug-Ins Menu
Any HyperEngine-compatible effect plug-ins that are placed in the HyperEngine Plug-ins Folder will appear in this menu.
This includes the Ray Gun and Ionizer for HyperEngine, plus the Hyperprism 2 effects set.
Once you've opened a HyperEngine File or Play-Thru document, select any plug-ins you want to work with from this
menu. Each new effect will be added to the bottom of the Process List in the current Reference Document.
If the Plug-Ins menu is ghosted, simply Stop or Pause playback and HyperEngine will allow you access to the
Plug-Ins menu. You are not allowed to add plug-ins to a document while playback is underway, HyperEngine will resist
giving up control over the Sound Manager until you've suspended playback. Stopping/pausing, then adding the effect and
resuming playback is the required procedure.
In order for HyperEngine to use effects plug-ins, these plug-ins must be "HE" compatible and must be installed in a
folder named "HyperEngine Plug-ins" which will reside in the same folder, on the same directory level, as the
HyperEngine application. Also remember that Hyperprism effects should be batch Serialized prior to launching
Page 79

HyperEngine, in order to save you inputting a LOT of serial numbers. Refer back to the HyperEngine installation chapter,
as well as the set-up and installation chapters in the documentation associated with the particular plug-ins you're using.
Wave Menu
Wave menu commands are used by the File Document's Waveform Editor display to assist you with viewing, navigating
and selecting portions of the waveform overview. Wave menu commands allow you to manipulate the View Frame
(associated with "zoom" functions) and the waveform selection range.
Switch to Zoom-View/Switch to Over-View
This command duplicates the function of the File Document's View Toggle button, allowing you to switch the Waveform
Editor display between the overview (of the entire sound file) and the zoom view, as defined by the View Frame.
Command-/ (forward slash) is the keyboard shortcut for this function. For complete step-by-step instructions on using and
manipulating Views, please peruse the View Frame coverage in the previous chapter.
Zoom In
Zoom In decreases the size of the Waveform Editor display's View Frame, allowing you to examine sections of your
waveform overview in greater detail. Command-=(equals) is a keyboard shortcut. For fast one-touch zoom-ins just press
and hold the "up arrow" key. Zoom commands can only be used when the View Toggle is engaged (when you're looking
"inside" the View Frame).
This command has the same effect as the "+" magnifying glass button located above the Waveform Editor display.
For step-by -step instructions on zooming, plus some Power User Tips, see this manual's section on Navigating Sound
Files.
Zoom out
Zoom Out increases the size of the Waveform Editor display's View Frame, allowing you to examine sections of your
waveform overview in lesser detail. Command--(minus or hyphen) is a keyboard shortcut. For fast one-touch zoom-outs
just press and hold the "down arrow" key. Zoom commands can only be used when the View Toggle is engaged (when
you're looking "inside" the View Frame).
This command has the same effect as the "-" magnifying glass button located above the Waveform Editor display.
For step-by -step instructions on zooming, plus some Power User Tips, see this manual's section on Navigating Sound
Files.
Move Selection Left
Move Selection Left will shift the active selection range to an earlier position in the waveform display. The amount of
movement is equal to the size of the selection range. Command-; (semicolon) is the keyboard shortcut for Move Selection
Left. For step-by-step instructions on using this command please peruse the material on Selection Tools in the previous
chapter.
Move Selection Right
Move Selection Right will move the active selection range to a later position in the waveform display. The amount of
movement is equal to the size of the selection range. Command-' (apostrophe) is the keyboard shortcut for Move Selection
Page 80

Right. For step-by-step instructions on using this command please peruse the material on Selection Tools in the previous
chapter.
The Move Selection Left/Right shortcuts are especially handy when cutting loops out of a long instrumental
performance, like a drum track, for example. They enable you to select the length of your loop (such as a measure or bar)
then quickly cruise down the entirety of your file, auditioning each measure until you find the perfect iteration, while
always maintaining the original size of the selection range. This is an enormous time-saver, compared with re-selecting
each measure separately, and allows you to maintain a defined "block" size while auditioning and cutting loops.
Go To Selection Start
Go To Selection Start will re-locate the Waveform Editor display's View Frame so that the beginning of your current
active selection is seen in the middle of the waveform overview display. Command-[ (left bracket) is the keyboard shortcut
for this function. The Go To Selection Start/End commands can save you a lot of scrolling-and-searching when you're
editing at a high zoom resolution. For step-by-step instructions on using this command please peruse the material on
Selection Tools in the previous chapter.
Go To Selection End
Go To Selection End will re-locate the Waveform Editor display's View Frame so that the ending of your current active
selection is seen in the middle of the waveform overview display. Command-] (right bracket) is the keyboard shortcut for
this function. The Go To Selection Start/End commands can save you a lot of scrolling-and-searching when you're editing
at a high zoom resolution. For step-by-step instructions on using this command please peruse the material on Selection
Tools in the previous chapter.
International users please note: Some non-English Mac keypads (such as those made for the German market) do not
include bracket keys. If this is the case with your system, just utilize the corresponding menu commands found in
HyperEngine's Wave menu for the Go To Selection Start/End functions.
Fit Selection to Window
Fit Selection to Window will re-size and re-locate the Waveform Editor display's View Frame so as to match the current
active selection, allowing you to view your selection in detail. This saves you from having to fiddle with the View Frame
every time you wish to view a selection at a higher resolution. Command-\ (backslash) is the keyboard shortcut for this
function. For step-by-step instructions on using this command please peruse the material on Selection Tools in the
previous chapter.
Repeat Selection
Repeat Selection is a "multiple-paste-after" command which allows you to append any number of copies of the current
selection to the end of the selection range. Use this command to create a repeating "loop" in your sound file. Simply select
(highlight) any portion of the waveform overview in the File Document's editor display, then call the Repeat Selection
command or use the command-r shortcut.
Repeat Selection is also helpful after a copy/paste operation; once you've pasted in data to any location in the waveform
display, call the Repeat Selection command. As your pasted data is still highlighted after the Paste command, there is no
need to re-select the range.
Repeat Selection will show you a simple dialog, asking you to enter the desired number of repetitions. Enter the number of
additional iterations you desire, click on the OK button, and the process will be executed. There's more information on
Copy and Paste commands as well as the basics of file editing elsewhere in this guide.
Page 81

Windows Menu
The Windows menu is a screen management tool. If you've closed the HyperEngine Play Back window, you can bring it
back on-screen by selecting it from this menu. Any Reference Document windows you have open are also listed in this
menu. Select any listed Reference Document window to bring that screen into view.
Preference Menu
The Preference Menu is where you can access various settings pertaining to audio input/output and hardware.
Hardware Submenu
The Hardware Submenu contains the Configure Audio System dialog and the sound card driver selections.
Driver Selection
Use this submenu to select your sound input/output device. Sound Manager is the default, which should be selected if
you're planning on using the Macintosh Mic input and speaker/headphone output as your audio hardware. If you have
loaded HyperEngine IO drivers for any other sound cards, they should show up under this submenu as well.
HyperEngine 2.3 currently ships with drivers for the Apple Sound Manager, the Korg 1212 I/O card and the Digidesign
Audiomedia II and Audiomedia III cards. HyperEngine sound card drivers reside in a folder named "HyperEngine IO
Drivers" which must be located within the same folder, on the same directory level, as the HyperEngine application.
Once a driver has been selected, you can set up the hardware using the Configure Audio System dialog, described next:
Configure Audio System
This option brings up a dialog where you control a number of attributes pertaining to the type of audio HyperEngine will
play, and the type of sound files that will be created when you Process to New File. Settings in this dialog will over-ride
the settings in your MacOS Sound (or Monitors and Sound) control panel, while HyperEngine is running. Quitting
HyperEngine will allow the MacOS to reset the Sound control panel to its previous state.
Configure Audio System dialog attributes vary depending on the driver and hardware currently selected. The HyperEngine
currently has direct driver support for the Apple Sound Manager, the Korg 1212 I/O card and the Digidesign Audiomedia
II and Audiomedia III cards. Configure Audio System dialog parameters are detailed below; for further information on the
Configure Audio System dialog, see the section on Recording a New Audio File.
Sound Manager IO Driver settings:
Page 82

Channels: Select either Mono (one-channel) or Stereo (two channel) audio.
Bit Depth: Select the number of bits used to describe each sample. For professional audio work, always use the 16-bit
setting. If you're exporting files for web or CD-ROM applications where bandwidth is an issue, choose the lower-quality
8-bit setting.
Sample Rate: Select the number of samples that are taken of your audio signal each second. Values are indicated in Hertz
(Hz), or "cycles per second." For professional audio work always use the 44,100 Hz (44.1 kHz) setting, which is the
CD-quality sample rate. 22,050 Hz is considered acceptable quality for many interactive multimedia applications. 11025
Hz is a low-resolution, "voice quality" sample rate.
For more information on digital audio specifications such as number of channels, bit depth and sample rate, please
peruse Appendix B: About Digital Audio Files
Playback Buffer Size: The Playback Buffer is a piece of RAM memory that holds the audio chunk currently being
processed by HyperEngine. The Playback Buffer Size pop-up menu allows you to set the size of that buffer, thereby
controlling how large or small a piece of audio HyperEngine will be working with during processing and playback. Set the
number of samples you wish the buffer to contain by selecting a value from the The Playback Buffer Size pop-up menu.
Large Playback Buffer Size settings introduce more latency (a longer time lag) in audio playback and processing and cause
a decrease in the resolution of any Hyperprism tracer automation paths you may record.
Small Playback Buffer Size settings reduce the amount of latency in playback/processing and allow for higher resolution
values when recording Hyperprism tracer automation.
If your playthrough or recorded audio sounds like its skipping, stuttering or cutting out, try increasing Buffer Size.
The Playback Buffer uses additional system RAM, beyond the amount allocated in HyperEngine's "Preferred" setting. If
you're increasing the buffer size be sure you don't gobble up all the remaining free RAM or unstable operation could result.
Playthrough: The Configure Audio System dialog's Playthrough control allows you to decide whether you want to hear
unprocessed Sound Manager playthrough (in conjunction with your processed audio) or only audio that is being processed
Page 83

by HyperEngine. Checking this option allows audio to be routed directly from your sound input device to the sound output
device. Disabling this option makes it so that you only hear audio input being played in (or recorded into) an active
HyperEngine Play-Thru Document.
Don't confuse this option with the functions associated with HyperEngine Play-Thru Documents. The Configure
Audio System dialog's Playthrough control is simply creating a direct pipeline between your sound input and output
devices. HyperEngine Play-Thru Documents are used whenever you are processing &/or recording live audio with
HyperEngine.
In most situations, we suggest leaving the Configure Audio System dialog's Playthrough control disabled (not
checked).
If you're hearing an undesirable delayed (echo) effect when doing HyperEngine play-thru or monitoring a recording
pass, it's the result of having the Configure Audio System dialog's Playthrough control enabled. To solve this, de-select
(check box off) the Playthrough option in the Configure Audio System dialog.
Korg 1212 I/O Driver settings:
Input (L,R): Select the 1212 I/O card's audio input channels. Choose between the stereo analog channels, the eight ADAT
optical channels (any of four stereo pairs), and the SPDIF channels.
Output (L,R): Select the 1212 I/O card's audio output channels. Select from the stereo analog channels, the eight ADAT
optical channels (any of four stereo pairs), and the SPDIF channels.
Sync Source: If you're locking your computer to an external time code source, such as an ADAT or other digital recorder,
you can select the external clock here. Default setting is Internal; the computer's own clock is the default sync source.
Sample Rate: Choose the desired rate for recording. Korg 1212 I/O offers 48 and 44.1 kHz sample rates.
Digidesign Audiomedia II and Audiomedia III Drivers settings:
Page 84

Slot: Select the computer slot in which the Audiomedia card you're using resides
I/O Type: Choose between Audiomedia's analog and digital inputs/output channels
Bit Depth: Select either 8- or 16-bit audio
Sync. Source: Allows you to choose between internal sync (using the Mac's own clock) or an external digital word clock.
Channels: Select mono (one channel) or stereo (two-channel) input/output.
Sample Rate: Choose any of the sample rates which are supported by your card: 48, 44.1, 22 or 11 kHz
Buffer Size: Adjust the size of the Audiomedia input buffer.
Other Options: The other options button opens a new dialog, seen below:
Page 85

Input Gain: Select the input preamp level, range of options is from - 6 dB to + 15 dB
Output Gain: This on/off checkbox allows you to add +6 dB of gain to the output signal, please make sure your board,
amp or monitors are calibrated to accept +6 signal before selecting this option.
S/PDIF I/O: Other is the default selection, select the Tascam option only if you're acquiring audio from, or laying off to, a
Tascam brand digital recorder, some models of which use an idiosyncratic implementaion of the S/PDIF protocol.
Processing Preferences
New in HyperEngine 2.4 is the Processing Preferences dialog. The processing preferences come into play when
HyperEngine is calculating time stretch processes, such as the Pitch-Time Changer or Vari-Speed effect in Hyperprism 2.
Here you can select the degree of quality (and resulting speed of calculation) for HyperEngine's internal filter and
interpolation routines. If you're doing a time slow-down, having a higher interpolation setting will smooth out the
characteristic grainy sound. Higher settings tax the CPU more, which could be a performance consideration when
previewing time effects on slower systems. Medium settings are the default; click on the pop-up menus to choose higher or
lower settings.
HyperEngine Keyboard Shortcut Summary
Most HyperEngine keyboard shortcuts duplicate functions associated with HyperEngine menu commands. However, there
are also a number of "hidden" shortcuts, including spacebar and return to control playback functions, control-drag to create
new View Frame, option-drag to paste a copy, shift-drag to resize selection and the arrow keys which control zoom
functions.
Note that these key commands & shortcuts apply only to HyperEngine, many of these commands are de-activated when
you have a plug-in such as Ionizer or Hyperprism at the top of your desktop.
Learning key commands is the secret to becoming a "Power User," and will result in increased convenience and speed.
Click on any of the links below for a more complete description of each key command's function.
Play Functions:
spacebar ? Play/Pause●
return ? Stop Playback and Return to Start●
File/Document Functions:
Page 86

command-n ? Create New File Document (open sound file)●
command-o ? Open existing File Reference Document●
command-w ? Close window●
command-s ? Save Reference Document●
command-i ? Open Process Info dialog ("Get Info")●
command-q ? Quit HyperEngine●
Editing Functions:
command-z ? Undo/Redo last edit●
command-x ? Cut current selection from waveform display●
delete ? Erase current selection from waveform display●
command-c ? Copy current selection to clipboard●
command-v ? Paste clipboard contents to current selection or cursor location●
command-a ? Select all of waveform overview●
option-mouse drag ? Copy current selection to new location, leaving original behind●
View Frame (Zoom) Functions:
control-mouse drag ? Define New View Frame (zoom area)●
command-/ (forward slash) ? Switch waveform display to Zoom View/Over-view●
command-= (equals) ? Zoom in (contract View Frame)●
up arrow ? Zoom in (contract View Frame)●
command-- (minus or hyphen) ? Zoom out (expand View Frame)●
down arrow ? Zoom out (expand View Frame)●
left arrow ? Move View Frame (zoom area) to the left●
right arrow ? Move View Frame (zoom area) to the right●
Selection Range Functions:
shift-mouse drag ? Adjust Selection Start/End●
shift-mouse click ? Extend Selection Start/End●
command-; (semicolon) ? Move Selection Range Left●
command-' (apostrophe) ? Move Selection Range Right●
command-[ (left bracket) ? Go To Selection Start●
command-] (right bracket) ? Go To Selection End●
command-\ (backslash) ? Fit Selection to Window●
command-r ? Repeat Selection (multiple paste)●
mouse click ? De-select●
Page 87

[Last Chapter] [Table of Contents] [Next Chapter]
Page 88

Appendix A-Troubleshooting
For up to date trouble shooting tips and general questions, please check our Web site at http://www.arboretum.com.
In This Chapter:
Installation Failure●
Eliminating System Conflicts●
Optimizing Performance●
Recording or Play-Thru Sounds Distorted●
Effect Process Sounds Distorted●
Noise Reduction Alters Original Signal●
Effect Changes Seem Coarse or "Jumpy"●
Current 3rd-Party Support Issues●
Installation Failure
First, make sure you're using the correct serial number. Arboretum's Harmony, Hyperprism 2, Hyperprism-TDM,
Hyperprism Plug-in Pack, Ray Gun and Ionizer products are each sold separately, and each requires a unique serial
number. Also note that Ionizer 1.3, Hyperprism Plug-in Pack 1.5 (and the component 1.5 editions of Hyperprism-MMP for
Premiere, Hyperprism-DAS for AudioSuite and Hyperprism-VST) are all paid upgrades and will require purchase of a
new serial number for installation.
The most common source of installation failure is system conflict with extensions or control panels, especially virus
detection software. If you're not installing or serializing successfully quit the Installer and restart your computer while
holding the Shift key down. This will disable all extensions and allow you to get around virus checking software or other
conflicting system resources.
The second most common source of failure is simply entering the serial number incorrectly. If you've entered a wrong
number into our Serialization dialog three times, the Serializer will quit and your plug-ins will refuse to serialize (even if
you come up with the right serial number on try number four). If this has occurred to you, quit the current application and
go to the Finder. Open the System Folder and locate the Preferences folder. Within the Preferences folder you should find
Hyperprism, Ionizer and/or Ray Gun preferences files. Select the applicable preference file and drag it to the Trash, taking
care not to delete any associated Presets files. Then re-launch the application, call the plug-in and input the correct serial
number when the Serialization dialog appears.
If the preceding fails, the next step is to deinstall and re-install the plug-ins. Go into the Preferences folder and Trash your
preferences as described in the preceding paragraph. Then throw away any Arboretum plug-ins which were unsuccessfully
installed. Next, run the Custom Install routine to copy a fresh set of plug-ins to your drive, and proceed to serialize using
the correct serial number. Make sure to check your typing before clicking on OK, because accuracy counts.
Page 89

If your host application does not have a specific installer on the Arboretum CD-ROM or if your host app does not have a
plug-ins folder (c.f. TurboMorph) then install your plug-ins to another applications plug-ins folder and move them to the
desired destination once the installation routine is successfully completed. The Installer allows you to install plug-ins into
the Arboretum f folder for just this purpose.
If you're doing everything correctly but you still can't get the software to serialize or instantiate successfully, feel free to
email support@arboretum.com or call (650) 738-4750 for further support.
Eliminating System Conflicts
Strange behavior may sometimes be caused by certain System Extensions and Control Panels. With real-time audio
programs in general, it's a good idea to remove Control Panels or Extensions that can cause interrupts in the background;
we suggest disabling your fax software and turning OFF AppleTalk and File Sharing, to ensure uninterrupted audio
recording and playback. Connectix RAM Doubler is a KNOWN CONFLICT, always restart with RAM Doubler turned
OFF before using any audio program. You should also turn OFF Virtual Memory in the Memory Control Panel. If you're
still having unstable operation, disable all unnecessary Control Panels and Inits, either by using a utility such as Extension
Manager, or simply by dragging Extensions and Control Panels to another folder (labeled "Disabled," for example) and
then restarting your Macintosh.You can then retry the configuration by re-installing the extensions one by one.
For best performance, run a "Lean" system with as few Control Panels, Extensions and other programs running in the
background as feasible.
HyperEngine editions prior to v2.4 required the Open Transport extension set; this is no longer the case with HyperEngine
2.4 and later. In fact, under MacOS 8.0 and later, no System Extensions whatsoever are required to launch HyperEngine
2.4 and the associated Ray Gun, Ionizer and Hyperprism 2 HyperEngine plug-ins. HyperEngine 2.4 requires QuickTime 3
for its advanced import/export services. Running QuickTime 2.5 is OK but it will automatically truncate the number of
channels, bit depth and sample rate of any audio imported to mono 8-bit 22050.
Although most audio programs which accept plug-ins do require that Virtual Memory be disabled, the HyperEngine is a
possible exception. Members of our development team routinely run HyperEngine and associated Hyperprism 2, Ionizer
and Ray Gun "-HE" plug-ins with Virtual Memory on and report few problems. That said, if you're experiencing frequent
freezes, crashes or unexplainable error messages we continue to recommend disabling Virtual Memory.
Optimizing Performance
Audio programs perform best on faster machines, with plenty of RAM. Make sure your hard drives are not too fragmented.
A fragmented disk makes it more difficult to read a sound file since it is scattered in small fragments. We suggest the use
of a disk optimization program, and we specifically recommend Norton Speed Disk for this purpose.
The other ways to improve performance are listed below:
Do not use Virtual Memory
●
Do not use RAM Doubler●
Use few System extensions●
Do not use AppleTalk●
MacOS 8 or higher users select "system-wide platinum appearance" in the Appearance control panel●
Close the Time Display and/or Peak Meters palettes●
Recording or Play-Thru Sounds Distorted
First, check the Meters and make sure your levels are OK. If you're constantly clipping (meters in the red) then use the
Faders to cut the input level, or reduce the output of your external signal source.
If you still are experiencing problems, make sure that the settings in your MacOS Sound control panel for bit depth,
sample rate and number of channels (stereo/mono) match the corresponding HyperEngine settings in the Configure Audio
Page 90

System dialog (or the corresponding settings in your third-party audio editing program). Having a mis-match between the
Configure Audio System and Sound control panel settings for bit depth or sample rate can result in massive amounts of
digital noise on recorded or play-through signal.
If play-thru or recorded audio sounds like its skipping, cutting out or stuttering, adjust the Buffer setting in HyperEngine's
Configure Audio System dialog (or similar input buffer setting in your third-party sound editing software). Larger input
buffers will smooth this out, but remember that the buffer takes additional free RAM, beyond the normal Preferred RAM
setting.
Effect Process Sounds Distorted
Although some Hyperprism effects are meant to destroy your sound (such as the Sonic Decimator) other effects (such as
the Filters) can create unintended distortion when adverse parameter settings are applied, or when too much gain is applied
at the HyperEngine Faders. If a Filter is distorting, adjust the Q and Cut-off settings. Rapid effect parameter changes may
also create clicking or distortion in some cases; stop moving parameter sliders for a moment and clicking/stuttering should
disappear.
Distorted processing is also a characteristic of running these products on a machine which is not fast enough to handle it.
Arboretum's Hyperprism 2, Ionizer, Ray Gun and HyperEngine software require a Power Macintosh which runs at 120
MHz or faster. The Hyperprism Plug-in Pack (and its Hyperprism-MMP for Premiere, Hyperprism-DAS for AudioSuite
and Hyperprism-VST components) need a Mac with a clock speed of 80 MHz or faster.
Noise Reduction Alters Original Signal
Ray Gun and Ionizer users can run into problems when applying too much attenuation to a noise reduction process. Try
using more moderate settings if you've lost all the brightness or introduced new artifacts into your signal.
For Ray Gun's Noise Reduction processes, try putting your Threshold at plus or minus 3 dB, with -3 dB Attenuation, as a
starting point. Ray Gun Pop/Click removal settings in the 50%-75% range seem to work best in most cases, settings
around 100% tend to stutter or cut into target signal.
Ionizer users should use the Fit command threshold settings as a starting point, then customize the threshold and Gain
Curve to find the best settings for your particular sound file. If chirping or flanging artifacts are introduced, increase the
Correlation, Attack and Release settings. Try 30% Correlation, 10% Attack and 30% Release as a starting point, then
customize your settings from there.
Finding the best "compromise" settings, where you've taken out the most noise with the least impact on your
original signal, is the real trick in noise reduction work. Experiment, and let your ears be your guide.
Effect Changes Seem Coarse or "Jumpy"
If your effect changes don't sound very smooth, here's a few things to try:
Alter the effects parameter ranges, varying a parameter over a fairly small value range often gets the best results.
●
Increase the size of the Blue Window by dragging its lower right hand corner down and to the right.●
Current 3rd-Party Support Issues 11/15/98:
G3 Upgrade Cards Not Supported: We are now able to independently verify what we long suspected, which is that G3
processor upgrade cards for older Power Macs (from manufacturers including Newer Technologies and others) exhibit a
number of incompatibilities which well may interfere with audio editing programs. The upgrade card manufacturers
themselves are beginning to acknowledge the problem; this ends the mystery surrounding a number of heretofore
unresolvable technical issues pertaining to G3 upgraded Macs. Our advisory on this topic is therefore reiterated and
intensified: We will not be able to guarantee performance on systems with CPU upgrades. Don't use an upgrade card to
extend the life of your old Mac. We suggest you consider trading up to a new factory-built G3 instead.
Page 91

Hyperprism-TDM and Studio Vision Pro, Digital Performer, Logic or Cubase: Hyperprism-TDM is not yet fully
functional in these 3rd party TDM "host" applications, due to inconsistencies in plug-in implementations and the demands
of cross-platform support. As of this writing (11/9/98) Hyperprism-TDM requires and claims only to support Digidesign
Pro Tools software version 4.1 or later.
Logic Audio Users: Ionizer AudioSuite edition keyboard shortcuts are disabled in Logic Audio. However, the Ionizer
Premiere version key commands work in Logic as documented. And on the VST plug-in side of Logic Audio, please note
that mono effects show up at Mono-to-Stereo stereo inserts, stereo effects show up on the Stereo-to-Stereo inserts.
Cakewalk Metro 4 Users: The VST version of Ray Gun, and certain new Hyperprism-VST effects require Metro 4.5.1 or
later. The Premiere format edition of Ray Gun and Hyperprism-MMP for Premiere are both compatible with Metro 4 and
4.5.
Peak Users: If you are using Hyperprism-MMP, Ray Gun or Ionizer in Bias Peak, make sure you upgrade to Peak 1.6.1 or
later.
Pro Tools Can't Open Stereo Sound File: Pro Tools may not be able to open some stereo files generated by
HyperEngine if their titles becomes too long when Pro Tools adds the suffix left or right to them (not a problem, therefore,
with mono files). This is typical when you generate a file with a default title such as Jazz Guitar-FX-Untitled Balance for
which only one more character is enough to go beyond the maximum number of characters (31) allowed by your
Macintosh System. To remedy this situation, just shorten the names of the files you generate with Hyperprism. This may
be fixed in a future version of Pro Tools.
Pro Tools users (who have Hyperprism-TDM and/or Hyperprism-DAS) need to be current and upgrade to PT version 4.1
(in addition to WaveShell 2.3.1 - see below).
Pro Tools users who are running Hyperprism-DAS, Ray Gun or Ionizer for AudioSuite will encounter DAE error -7450
when attempting to use a mono-to-stereo process (such as Quasi Stereo) on a mono track/sound file. The AudioSuite
format does not allow plug-ins to do mono-to-stereo processing. To simulate mono to stereo processing simply make a
new audio track and insert a second copy of the mono file there, then process them as a stereo pair. You will also need to
configure your plug-in for Multi-Input Mode any time you do stereo processing. Ionizer/Ray Gun users, just select either
the mono or stereo versions of these effects from the AudioSuite menu before you start processing.
Waves users: WaveShell 2.3.1 fixes earlier conflicts between Waves and Arboretum plug-ins for TDM and AudioSuite.
Download WaveShell 2.3.1 from Waves' web site.
Hyperprism-DX and Cubase VST (Windows): Make sure you're running Cubase v3.502 or higher. It fixes a number of
problems and can be downloaded from: http://www.steinberg.de
DECK II Users: Because OSC/Macromedia DECK II doesn't support interleaved stereo files (offering only mono and
split-stereo support as of version 2.6) you will not be able to use any Hyperprism effects which require two-channel input.
Therefore you will not get the Auto Pan, M-S Matrix, More Stereo, Pan, Quasi Stereo, Stereo Dynamics or Vocoder
effects when you do the Hyperprism-MMP installation for Deck. These effects won't work in Deck, so we don't bother
installing them.
This all stems from an inherent limitation of Deck's mono track architecture, and for a while there it looked like no
changes would ever be forthcoming. However, in light of the recent acquisition of Deck by the good folks at Bias, it now
appears that Deck indeed has a future and that some enhancements to plug-in implementations may be made at some later
point.
Adobe Premiere Users: Audio plug-ins including Ionizer, Ray Gun or Hyperprism-MMP should be installed in a folder
called "Adobe Premiere Plug-ins" in Premiere version 4.x. Adobe changed the name of this folder in conjunction with the
Premiere 5 upgrade, in Adobe Premiere 5.x install audio plug-ins into a folder called simply "Plug-ins".
Hyperprism-MMP (Premiere): Due to the limitations of the Premiere plug-in format, the H-MMP Quasi Stereo and
Stereo Dynamics effects won't accept a mono (one-channel) input for conversion to stereo. The work-around is to mix
your target mono file into a stereo file, then process. Because this problem stems from Adobe's Premiere plug-in
architecture, we're unsure whether any remedy will be provided.
Page 92

Hyperprism-MMP (Premiere) Stereo File Support: Hyperprism-MMP includes a number of effects (such as the M-S
Matrix) which require a stereo file for input. If your audio editing program supports interleaved stereo files (as does Bias
Peak) then you should be able to use all the stereo effects successfully. If your audio editing program only supports mono
or split stereo (.L/.R) files, which is the case in Macromedia Deck II, you simply won't be able to use these stereo effects
successfully, and Hyperprism will give you a message saying "this effect requires a stereo file."
Premiere Format/Preview is Too Short: Note that the Premiere-format Preview function can only play as much of your
audio selection as can be loaded in RAM. RAM-based preview is one of the fundamental shortcomings of the Premiere
plug-in format, and is a behavior you'll see with all Premiere compatible plug-in effects, including Hyperprism-MMP, Ray
Gun and Ionizer. If you're not hearing your entire file or selection when you Preview, don't worry. The full piece of audio
will be treated when you hit the Process button.
Many sound editing programs allow the user to adjust the size of the preview buffer, thereby increasing or decreasing the
total amount of possible preview time. When increasing the buffer remember that this will take up more RAM, in addition
to the amount you've already allocated to the program. So if you've allocated 20 MB to the program, and are running with
a 6 MB buffer, you'll need 26 MB in which to operate. This setting resides in various places; check your audio editing
program's manual details.
[Next Chapter]
Go to Table of Contents: [Arboretum Harmony]
Page 93

Appendix B: About Digital Audio Files
Memory Requirements●
Sample Rates●
Bit-Depth & Dither●
Mono/Stereo●
File Formats●
Memory Requirements
Working with computer-based digital audio requires large amounts of hard disk space. If you are planning on creating new
audio files on disk, you'll need enough hard drive space to contain them.
A good rule of thumb is:
Each minute of 16-bit stereo sound at 44.1 kHz requires about 10 Mbytes of disk space.
Thus, with an empty 200 Mbyte hard disk you can record a little less than 20 minutes of CD-quality stereo sound
(precisely, 19 minutes, 20 seconds).
Sample Rates
Sample Rate values are indicated in Hertz (Hz), or "cycles per second." For professional audio work always use the 44,100
Hz (44.1 kHz) setting, which is the CD-quality sample rate. 22,050 Hz is considered acceptable quality for many
interactive multimedia applications. 11025 Hz is a low-resolution, "voice quality" sample rate.
HyperEngine supports several different sampling rates:
48 kHz (playback and export only, not Capture)
●
44.1 kHz●
22.050 kHz●
22255 kHz *●
11.025 kHz●
11127 kHz *●
The 48 kHz sample rate is not directly supported by the Macintosh Sound Manager in most Apple Computer
models; you'll need a 3rd-party sound card to do 48 kHz work.
* These two rates were the original Macintosh "close enough" sample rates. While they are supported, they should
probably be avoided, unless your sounds will primarily be played on older Macs.
Using a lower sample rate file will proportionally reduce your disk storage requirements, i.e. a 22 kHz file will only take
half the space of the same sound stored at the audio-CD rate of 44.1 kHz. However, using a lower sample rate will reduce
Page 94

the high frequency response of your sounds.
To avoid aliasing (a metallic-sounding type of digital audio distortion), don't use high-frequency filter settings
above about 10,000 Hz when using 22 kHz sample rates, or settings above 5,000 kHz for 11 kHz sounds.
Bit-Depth & Dither
In addition to multiple sample rates, you may be working with either 24-, 16- or 8-bit files.
Lower resolution formats reduce storage space requirements. Unfortunately, lower bit depth and sample rate settings can
compromise the audio quality of your sound files. Lower sample rates lose high frequency response, and 8-bit storage
causes a reduction of your sound's dynamic range, resulting in noisier, "grainy-sounding" audio, especially during softer
passages.
If you are creating 8-bit audio (for example, for multimedia or Internet distribution), you will get best results if you do all
your signal processing at 16-bits and 44.1 or 48 kHz, and then create an 8-bit file at the end of the process.
The distortion of low-level signals can be minimized by normalizing your 16-bit file before 8-bit conversion, or by using
dynamic range compression or manual gain-riding to make soft parts of your sounds louder before reducing their
resolution.
The use of dither can improve the sound quality of 8-bit audio, although at the expense of a slightly noisier signal.
Hyperprism 2 offers dither, which can be selected when the Process to New File command is selected. Dither adds a small
bit of noise to the signal to mask the audible artifacts that occur during bit reduction.
HyperEngine's dither algorithm can also be used for 24 or 16-bit sound file processing. Here's why: HyperEngine does all
its effect processing using 32-bit floating point calculations. This has much greater resolution than 24 or 16-bit linear
digital audio sound files provide. However, the output of the effect must be converted to a 24 or 16-bit sound file. The use
of dither can make an improvement in low-level detail, just as is the case when working with 8-bit sounds. However, the
difference between a dithered and non-dithered 24 and 16-bit file is far more subtle than when working with 8-bit audio.
Use your ears to determine what sounds best to you.
HyperEngine also offers a variant on dither, which is called Noise Shaping. Noise shaping uses the math errors created in
the bit depth truncation as the source for the noise which is then dithered into the signal. Noise Shaping has a different
audible quality from regular dither, and provides superior results on musical signals.
Adding dither is most appropriate when the resulting sound won't be undergoing any further editing, gain scaling,
EQ, etc. Additional processing can result in an unwelcome increase in perceived dither noise. Therefore, if you do expect
the sounds you create with Hyperprism to be edited further, you may wish to leave dither off.
Mono/Stereo
Audio files come in three flavors: Mono (one-channel), interleaved stereo (two channels in a single file) and split-stereo
(two channels in two separate files). HyperEngine supports all three types. HyperEngine 2.4 will allow you to import
split-stereo (.L/.R) files into the same File Reference document but it requires pre-mixing the two files into a new
interleaved file prior to opening. This import process therefore will eat up significant amounts of additional hard disk
space.
File Formats
HyperEngine offers direct support for the Sound Designer II (SDII) and AIFF file formats. Arboretum's PC/Windows
products (Hyperprism-DX and Ray Gun) process Wave (.WAV) audio files. The sound quality of these three formats is
identical.
With HyperEngine 2.4 we have implemented support for QuickTime 3 features, allowing import of .WAV, .SND,
Page 95

QuickTime and audio CD tracks. Installation of QuickTime 3 required. These foreign formats are converted to AIFF upon
import.
If you're recording audio for eventual use on a CD, we recommend that you always create 16-bit stereo .WAV or
SDII files, sampled at 44,100 Hz. This is the file specification you'll need to create "Red Book" audio CDs, and is what
programs such as Toast and MasterList CD accept for burning audio CD-Rs. Sticking with these settings will prevent
file-conversion headaches down the road. Note also that most digital audio/sequencing programs have native support for
"CD-quality" SDII or .WAV files (according to whether they run under the MacOS or Windows), and allow you to open
them directly so you won't have to chew up additional hard drive space making format-converted copies. Unfortunately, a
few multitrackers (Deck, for example) won't accept interleaved stereo files without a format conversion to split-stereo,
which does use additional disk space.
HyperEngine does not support the old Sound Designer I mono file format.
[Previous Chapter]
Go to Table of Contents: [HyperEngine]
 Loading...