

Page 1
Adapter (sample)
Old smart phone
the old smart phone
SHG03
QuickStartGuide
Instruction Manual
■“Quick Start Guide” (this Manual)
“Notes on Usage”
The “Quick Start Guide” (this manual) and “Notes on Usage” available on
the homepage of the network operator you contracted describe necessary
information and precautions before using the product first time.
■“Full Instruction Manual” (Japanese)
You can check “取扱説明書 詳細版 (Full Instruction Manual)” (Japanese)
that describes detailed of various functions on the homepage of the
network operator you contracted.
•Descriptions in this manual are based on Android™ 11.
•The company names and product names appearing in this manual are
trademarks or registered trademarks of their respective holders.
•For exemptions, refer to “Notes on Usage” available on the homepage of the
network operator you contracted.
February 2021, 1st Edition
Manufactured by: SHARP CORPORATION
CellphoneandPHSoperatorscollectandrecycleunused
telephones,batteriesandbatterychargersatstoresbearing
thelogoregardlessofbrandandmanufacturertoprotect
theenvironmentandreusevaluableresources.
Turning the Power On
f (hold down for at least 2 seconds) while the product
A
is turned off.
◎ When you turn the power on for the first time after purchasing the
product, the initial setting screen is displayed automatically. For details
on the initial setting, refer to “取扱説明書 詳細版 (Full Instruction Manual)”
(Japanese).
Transferring data
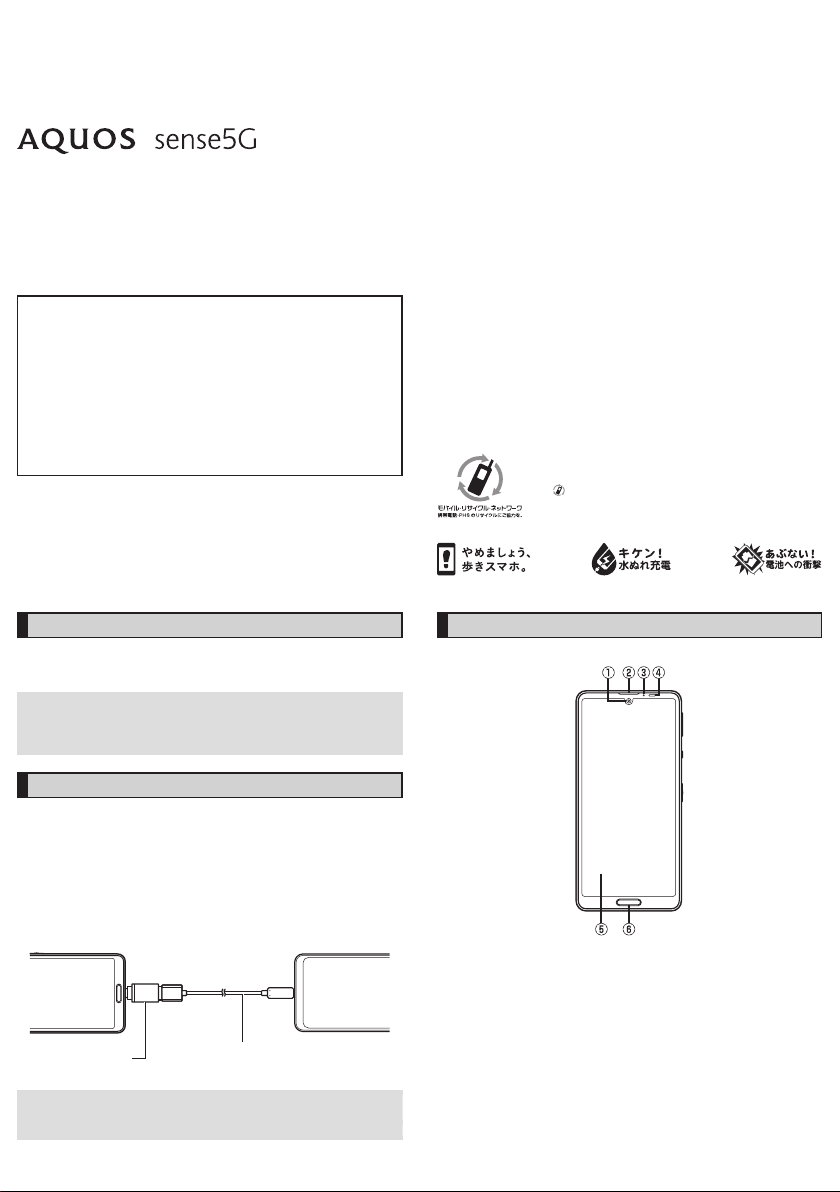
If you connect an old smart phone and the product by connecting the
included Quick Switch Adapter (sample) to the external connection jack of the
product, you can easily transfer data.
•Using “Copy apps & data” in the initial settings of the product, follow the
instructions on the screen, connect smart phones together, and transfer your
data.
Product
Quick Switch
◎ Do not use Quick Switch Adapter (sample) for intended uses other
than transferring data (charging etc.).
◎ Not all data can be transferred.
Cable used by
(Android device
or iPhone)
Names and Functions of Parts
■ Front
In camera lens
A
Earpiece (Receiver)
B
Charging/ Incoming indicator
C
Proximity sensor/ Light sensor
D
Proximity sensor prevents inadvertent operations of the touch panel during
a call.
Light sensor detects the ambient brightness and adjusts the brightness of
display.
Display (Touch panel)
E
Fingerprint sensor
F
*1
Continued on next page
Page 2
■ Back/ Top and Bottom/ Left and Right
Notch
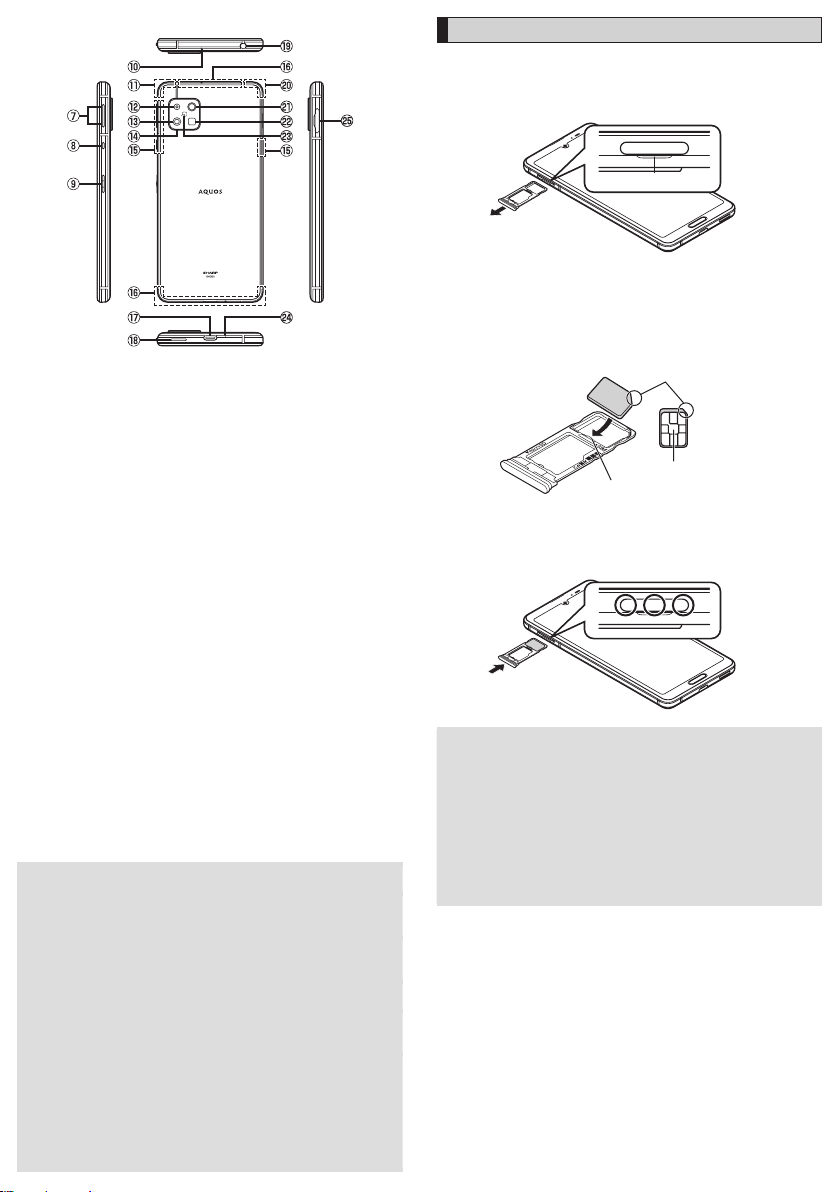
u Volume up key / d Volume down key
G
Adjust the volume. Also, set / disable manner mode.
g Assistant key
H
The key is meant to trigger the Google Assistant™.
It can also be used to trigger functions chosen by the user.
•
For details, refer to “取扱説明書 詳細版 (Full Instruction Manual)” (Japanese).
f Power key
I
Use to turn the power on / off and turn the screen on / off.
Sub microphone
J
5G / 4G / GPS antennas
K
Telephoto camera lens
L
Standard camera lens
M
Decoration of camera cover
N
Serves as an air vent
5G / 4G antennas
O
4G / UMTS antennas
P
External connection jack
Q
Use when connecting Quick Switch Adapter (sample), Type-C Common AC
Adapter 01 / 02 (sold separately), USB Type-C™ cable (commercially available),
USB cable for peripherals (commercially available), etc. to the product.
Speaker
R
Earphone/ Microphone jack
S
®
Wi-Fi
T
Wide camera lens
U
Mobile light
V
& mark
W
Mouthpiece (Microphone)
X
nano SIM Card/ microSD memory card tray
Y
*1 Covering the sections with stickers, fingers, etc. may hinder product performance.
*2 Antennas are built into the product. Do not cover with hand during calls or data
communication. Doing so may affect call/communication quality.
◎ The outer case (back) of the product cannot be removed. Removing it
forcibly may cause damage or a fault.
◎ The battery is built into the product, and cannot be removed by the
customer. To force the power off if the screen freezes etc., hold down
f for at least 8 seconds.
Proximity sensor/ Light sensor
◎ Placing stickers, etc. over the proximity sensor/ light sensor may prevent
the product from operating properly.
◎ Do not stare into proximity sensor.
May temporarily affect eyesight, leading to accidents.
Earphone/ Microphone jack
◎ An earphone / microphone with the switch or depending on the type of
the earphone / microphone, it may not be available with the product.
IMEI plate
◎ A plate with the sticker which the IMEI number (International Mobile
Equipment Identifier) is printed on is stowed near the nano SIM Card/
microSD memory card tray. Except when the IMEI number is required
such as requesting servicing or repairs, do not pull out the plate or
remove the sticker.
For details on handling IMEI plate, refer to “取扱説明書 詳細版 (Full
Instruction Manual)” (Japanese).
*1
*2
*1
for maintaining performance.
*2
*2
*1
/ Bluetooth® antenna
*2
*1
Attaching the nano SIM Card
Before attaching the nano SIM Card, turn the product off.
Also, attach it with the display side turned up.
Pull out the nano SIM Card/ microSD memory card tray
A
with your finger on the groove.
Groove
Put the nano SIM Card to the nano SIM Card/ microSD
B
memory card tray with the IC (metal) side turned down
while pressing the card against the projection of the tray.
Check the direction of the nano SIM Card and put it securely.
Not to let the nano SIM Card lift up from the card tray.
If the nano SIM Card does not fit the card tray, may cause a fault.
IC (metal)
Projection
Insert the nano SIM Card / microSD memory card tray all
C
the way to the product straight and horizontally.
Push the A areas securely and make sure there is no space between the
product and the card tray.
Attaching or removing the nano SIM Card/ microSD memory card tray
◎ When pulling out the card tray from the product, pull it slowly and
horizontally with the display side turned up.
•Pulling out the card tray forcefully or obliquely may cause damage.
◎ When attaching the card tray, insert it slowly with the display side turned
up and make sure there is no space between the product and the card
tray.
•Do not insert the card tray with the wrong side down. Failure to do so
may cause damage it.
•Inserting the card tray not deeply enough may cause impairment of the
waterproof/ dustproof property or prevent the product from functioning
properly.
 Loading...