

Page 1
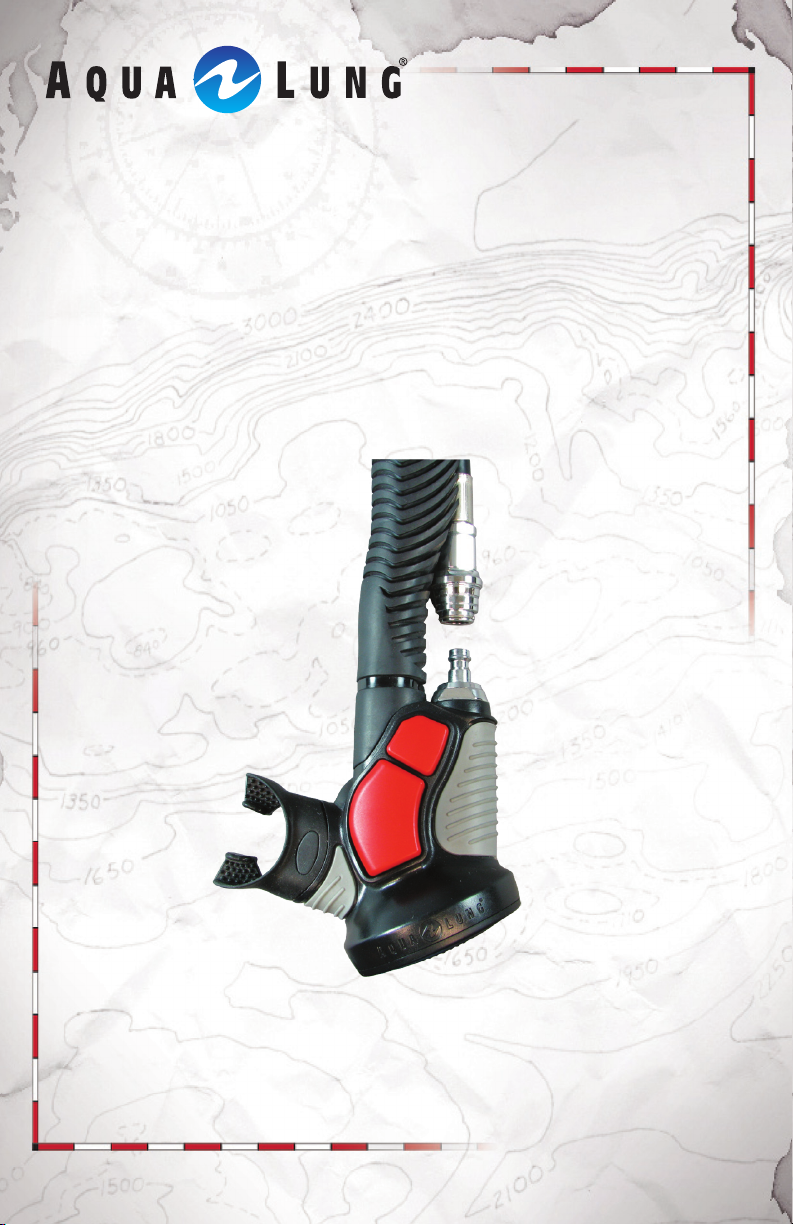
Airsource
with Quick Disconnect
Owner's Manual
Page 2
2
Copyright Notice
This manual is copyrighted, all rights reserved. It may not, in whole or in
part, be copied, photocopied, reproduced, translated or reduced to any
electronic medium or machine-readable form without prior consent in
writing from Aqua Lung International. It may not be distributed through the
internet or computer bulletin board systems without prior consent in writing
from Aqua Lung International.
Airsource with Quick Disconnect Owner’s Manual
©2010 Aqua Lung International
pn 18558 rev. 07/10
Warnings, Cautions, & Notes
Pay special attention to information provided in warnings, cautions and
notes that are accompanied by one of these symbols:
WARNINGS indicate a procedure or situation that may result in se-
rious injury or death if instructions are not followed correctly.
CAUTIONS indicate any situation or technique that will result in
potential damage to the product, or render the product unsafe if
instructions are not followed correctly.
NOTES are used to emphasize important points, tips and reminders.
WARNING: Improper use of this Airsource could result in serious
injury or death. DO NOT attempt to use this regulator until you have
completely read, understood, and followed all instructions and
safety precautions in this owner’s manual. Be certain to understand
the following guidelines and limitations.
Further, scuba diving requires specic techniques to avoid serious injury.
DO NOT attempt to use this equipment, even in shallow water, until you
have received certied scuba instruction from a recognized agency. This
includes verication of your ability to master the proper procedures for
dealing with an out-of-air emergency. If you are in doubt as to what this
means, contact your local professional scuba retailer for clarication.
If you have any questions regarding this
Airsource
or these instructions,
contact your Aqua Lung® retailer.
Page 3

Airsource with Quick Disconnect Owner's Manual
CONTENTS
AIRSOURCE QUICK REFERENCE ............................ 4
INTRODUCTION . . . . . . . . . . . . . . . . . . . . . . . . . . . . . . . . . . . . . . . . . . . . 5
WHAT IS THE AIRSOURCE? .......................................... . . 5
SAFETY INFORMATION ..................................... 5
TEMPERATURE . . . . . . . . . . . . . . . . . . . . . . . . . . . . . . . . . . . . . . . . . . . . . . . . . . . . . . . . .5
INSPECTION/LUBRICATION ........................................... . . .5
INSTALLATION . . . . . . . . . . . . . . . . . . . . . . . . . . . . . . . . . . . . . . . . . . . . . 6
ATTACHING AIRSOURCE TO BC ....................................... . . .6
ATTACHING MEDIUM PRESSURE (MP) INFLATION HOSE TO FIRST STAGE . . . .6
REMOVAL/REPLACEMENT OF AIRSOURCE FROM TRIM GRIP . . . . . . . . . . . . . . . .7
INFLATION. . . . . . . . . . . . . . . . . . . . . . . . . . . . . . . . . . . . . . . . . . . . . . . . . 9
BC INFLATION ....................................................... . . 9
MEDIUM PRESSURE (MP) POWER INFLATION. . . . . . . . . . . . . . . . . . . . . . . . . . . . . .9
ORAL INFLATION. . . . . . . . . . . . . . . . . . . . . . . . . . . . . . . . . . . . . . . . . . . . . . . . . . . . . . .10
DEFLATION . . . . . . . . . . . . . . . . . . . . . . . . . . . . . . . . . . . . . . . . . . . . . . . 11
DEFLATION BY THE RELIEF VALVE . . . . . . . . . . . . . . . . . . . . . . . . . . . . . . . . . . . . . . 11
ORAL DEFLATION ..................................................... 12
BACK UP SECOND STAGE REGULATOR. . . . . . . . . . . . . . . . . . . . . 12
INFLATION ............................................................13
DEFLATION. . . . . . . . . . . . . . . . . . . . . . . . . . . . . . . . . . . . . . . . . . . . . . . . . . . . . . . . . . . .13
PREDIVE INSPECTION PROCEDURES ....................... 14
CARE AND MAINTENANCE . . . . . . . . . . . . . . . . . . . . . . . . . . . . . . . . . 15
SCHEDULED MAINTENANCE & SERVICE . . . . . . . . . . . . . . . . . . . . 16
WARRANTY INFORMATION ................................ 17
ANNUAL SERVICE & INSPECTION RECORD .................. 18
3
Page 4
4
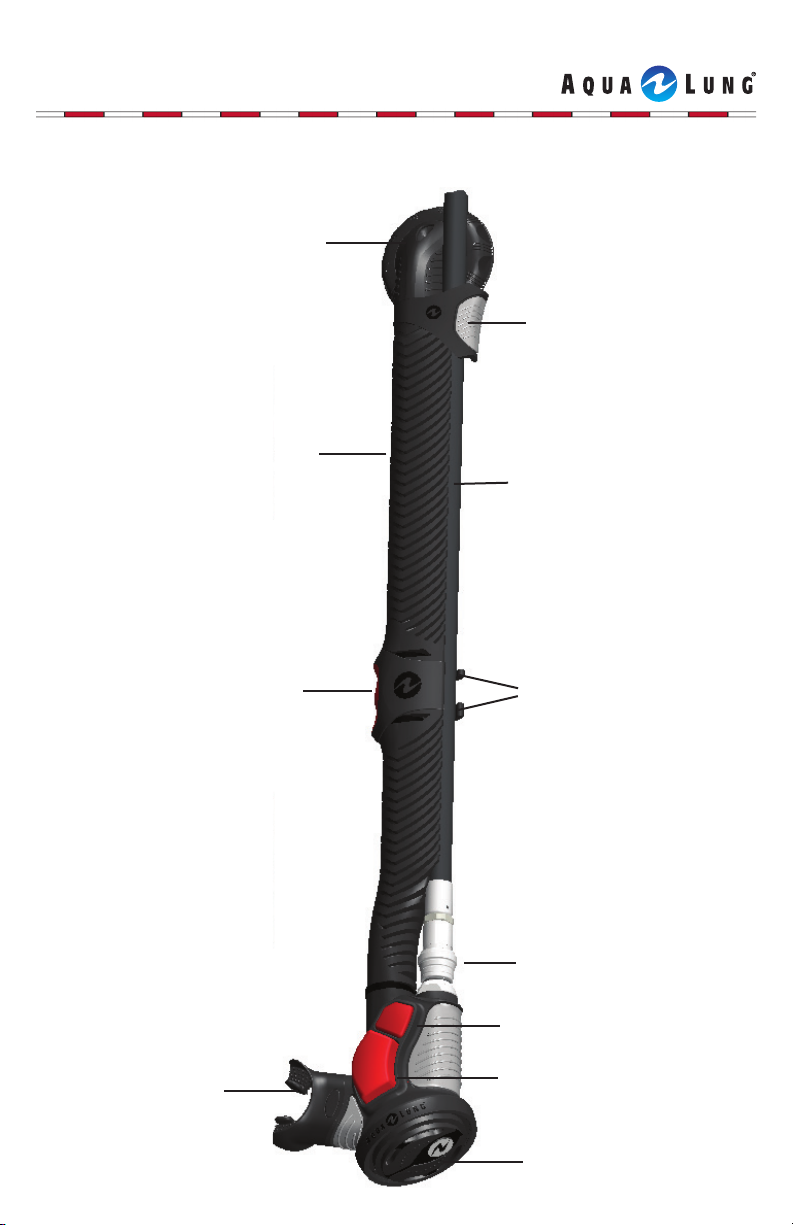
QUICK REFERENCE
Relief Valve
Upper hose guide
Corrugated
Hose
Medium Pressure
(MP) hose
Mouthpiece
Trim Grip™
Middle hose guides
Quick disconnect tting
Power ination
button
Oral ination/deation
button
Purge valve
Page 5

Airsource with Quick Disconnect Owner's Manual
INTRODUCTION
Congratulations on selecting the Airsource. This unit is the combined product
of many years of research, engineering and eld experience. The very latest in
materials and technologies have been used in the design and manufacturing of
the Airsource. All materials and components are laboratory and eld tested for
reliability and long life.
What is the Airsource?
The Airsource combines the function of your ination device with an easy
breathing second stage regulator. The Airsource thus replaces the need for a
backup second stage regulator (octopus). Combining the inator and octopus
into one integrated unit streamlines the diver and reduces bulk.
SAFETY INFORMATION
The Airsource is intended as a back up second stage for recreational scuba
diving only. Therefore, in order to protect you and your equipment, please
abide by the following guidelines and limitations.
The Airsource (tested with the Aqua Lung Legend LX regulator and Pro LT
buoyancy compensator) has successfully passed all cold water tests required
by EN1809 / EN 250:2000 standards and has received certication for this type.
The maximum operating depth limit required by the standard for certifying the
equipment is 164 feet (50 meters).
5
Temperature
TEMPERATURE LIMITATIONS: This Airsource is designed to be used in temperatures no lower than -22°F (-30°C) and no higher than 158°F (70°C).
Inspection
Inspect the Airsource for signs of damage. Do not use an Airsource that shows
visual signs of damage to the second stage or its associated hose. If the second
stage regulator presents an uncomfortable resistance to breathing, or oods after clearing underwater, do not continue to dive until the problem is resolved.
Lubrication
Do not use the Air Source if it has been lubricated with a hydrocarbon based
lubricant such as motor oil, light machine oil, or grease. Lubrication should
be performed only by qualied technicians and should only involve the use of
lubricants approved by Aqua Lung.
Page 6
6
INSTALLATION
Aqua Lung recommends that you bring your Airsource, buoyancy compen-
sator and regulator together to your authorized dealer for the installation of
your Airsource. The retailer can also answer any questions you may have
pertaining to the information in this manual. If it is not possible to return to
your authorized dealer, you may install the Airsource onto your BC and attach
the MP inator hose to your rst stage by carefully following the steps in the
following procedure.
Attaching Airsource to BC
To install, unscrew original inator assembly counterclockwise at the shoulder.
Place new Airsource assembly onto threaded portion, and screw clockwise until
tight. Make sure the gasket is in place and in good condition on the threaded
portion of the BC.
WARNING: DO NOT connect the inator hose to a high pressure (HP) port
(greater than 200 psi/14 bar). This may cause the hose to burst when pressurized, which can result in serious injury. If you are unsure which regulator
port is medium pressure (MP) or high pressure (HP), consult your regulator's owner's manual or your dealer before attaching the hose.
Attaching MP Hose to the First Stage
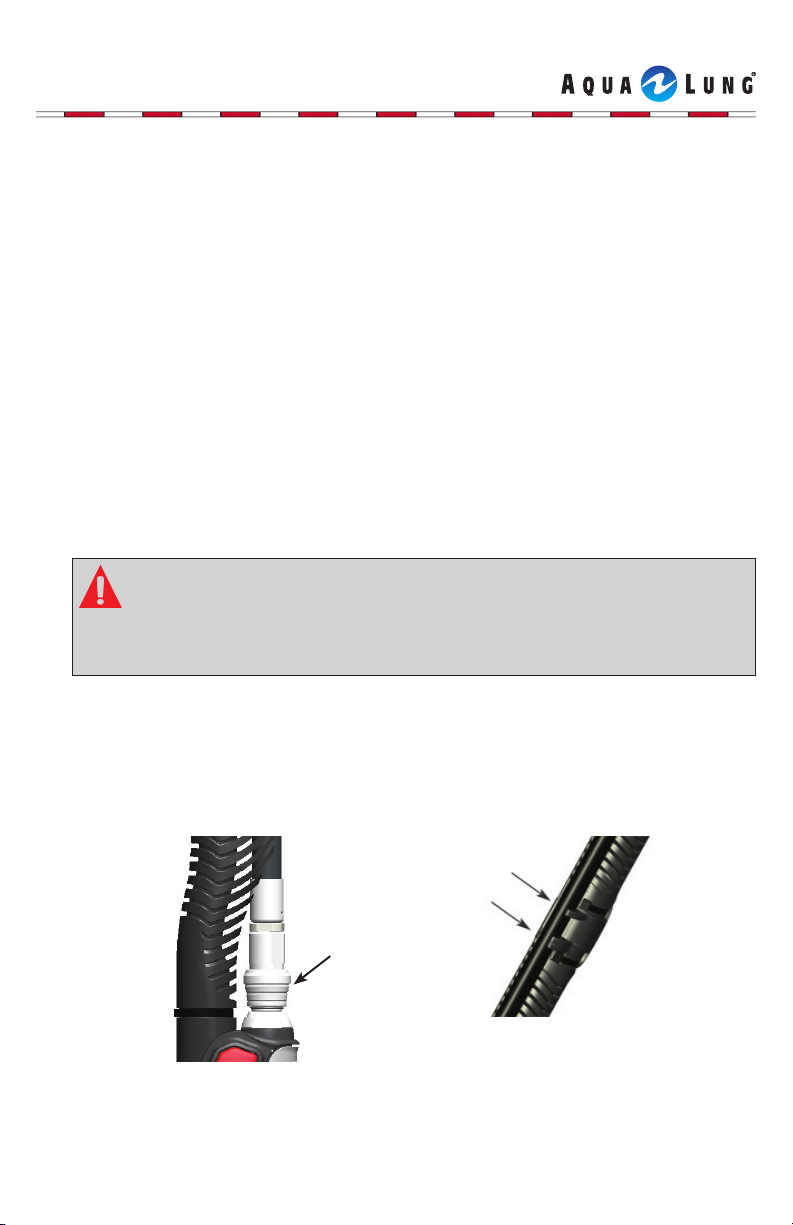
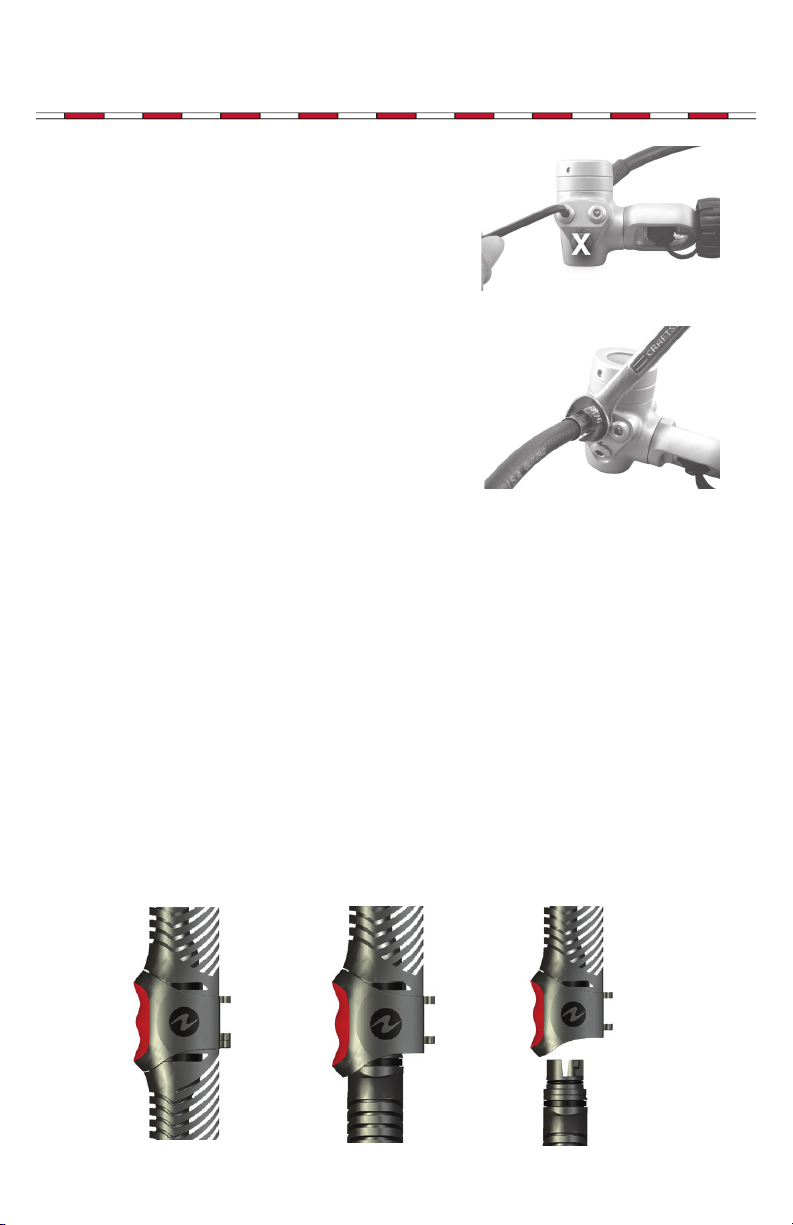
1. Remove the medium pressure (MP) inator hose from the quick disconnect
tting of the Airsource by grasping the collar of the MP inator hose and sliding it upwards (Figure 1). Detach the medium pressure (MP) inator hose
from the hose guides at the middle (Figure 2) and top hose guides.
Figure 2
Figure 1
Page 7
Airsource with Quick Disconnect Owner's Manual
2. Remove the port plug from a medium
pressure (MP) port on the regulator using
an appropriately sized wrench (Figure 3).
Figure 3
3. Check to ensure the hose o-ring is present and
in good condition, tighten the threaded end of
the hose into the port. Torque to 40 inch-pounds
(4.5 Nm) with a 9/16" wrench (Figure 4).
Figure 4
4. Secure buoyancy compensator to cylinder and attach rst stage regulator
to cylinder valve.
5. Check to ensure the connection o-ring on the lower assembly is present
and in good condition.
7
Removal/Replacement of the Airsource from the Trim Grip
The Airsource is specically designed so that the lower unit can be easily
detached and stored with your regulator.
1. While holding the molded hose steady just below the Trim Grip™ (Figure 5a),
grasp and turn the Trim Grip™ 1/4 turn clockwise (Figure 5b). Next, pull down
on the molded hose to disengage the lower assembly (Figure 5c).
Figure 5bFigure 5a Figure 5c
Page 8
8
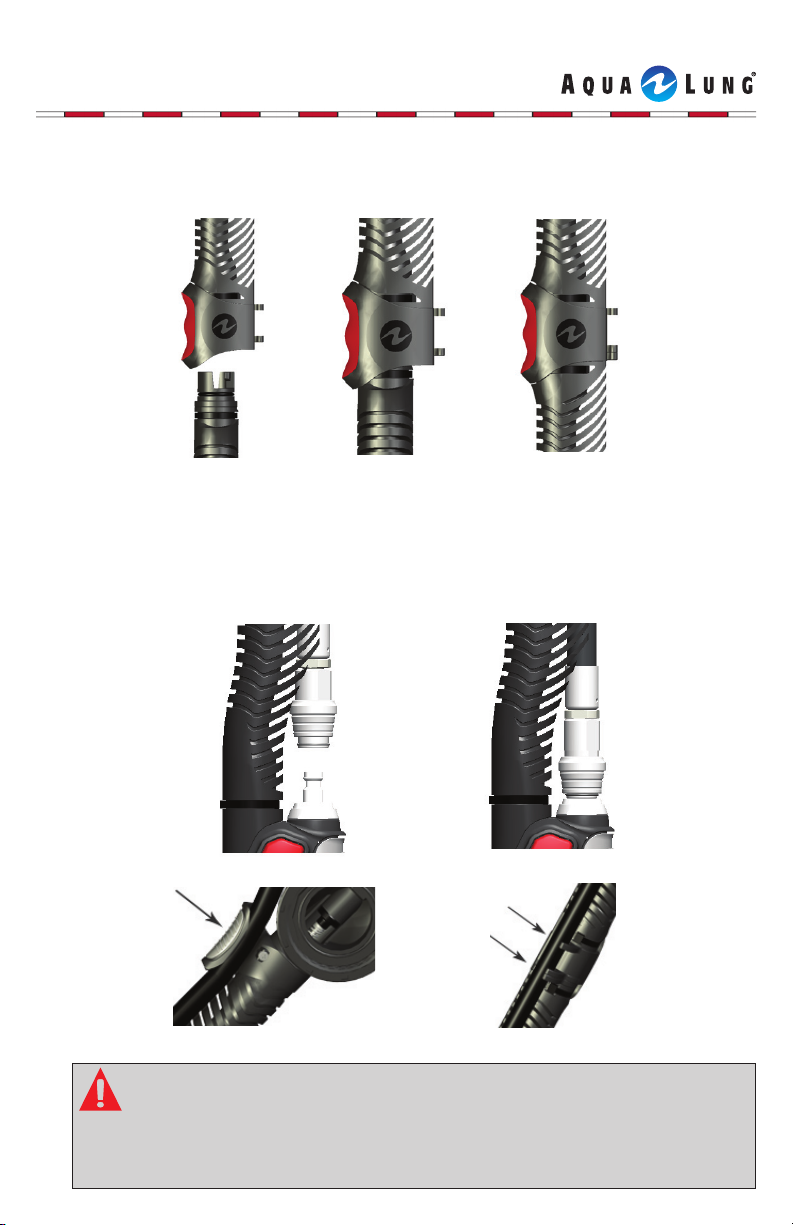
2. Hold the lower molded hose and Trim Grip steady, engage the Airsource lower as-
sembly by lining up the upper and lower connection points (Figure 6a) and carefully
turning counter-clockwise 1/4 turn (Figure 6b) until it snaps into place (Figure 6c).
Figure 6bFigure 6a Figure 6c
3. Re-attach the medium pressure (MP) inator hose to the quick dissconnect t-
ting of the Airsource by grasping the MP hose and pushing down onto the quick
disconnect tting (Figure 7a-7b). Ensure that the medium pressure (MP) inator
hose is securely attached. Slide the medium pressure (MP) inator hose into
the upper (Figure 7c) and middle hose guides (Figure 7d).
Figure 7a
Figure 7c
WARNING: DO NOT disconnect the MP inator hose while underwater
unless in an emergency situation. Disconnecting the MP inator hose
while underwater will allow water and debris to enter the regulator caus-
ing premature wear and possible freeow. If the MP inator hose is
disconnected while underwater, the Airsource must be returned to an
Authorized Aqua Lung Dealer for service.
Figure 7b
Figure 7d
Page 9
Airsource with Quick Disconnect Owner's Manual
INFLATION
BC Ination
Just as with a conventional inator, power (MP) or oral ination can be
utilized when using the Airsource. Both procedures need to be practiced to
become familiar.
Medium Pressure (MP) Power Ination
The power inator is a primary means for adding air to the otation cell. The
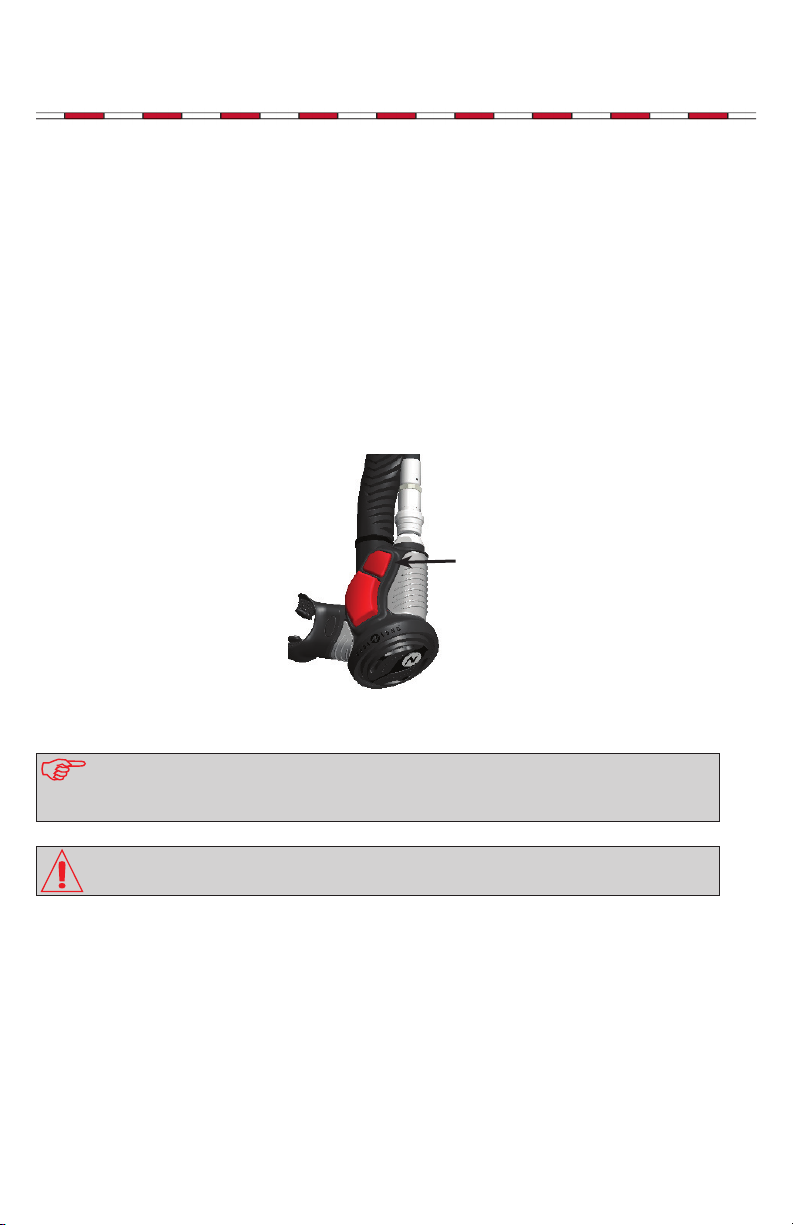
power ination system enables you to inate the BC simply by pressing the
small red ination button (Figure 8). With practice you will soon be able to
quickly make buoyancy adjustments without interrupting your diving activity.
power ination button
9
Figure 8
NOTE: Whenever inating or deating your BC, be sure to make small but
frequent adjustments. Larger adjustments make the maintenance of neutral
buoyancy difcult.
CAUTION: If when pressing the red ination button there is no airow,
conrm the medium pressure (MP) inator hose is attached securely.
Page 10
10
Oral Ination
The oral inator is a secondary means for adding air to the otation cell. It may be
used when you are unable to, or do not wish to add air with the power inator.
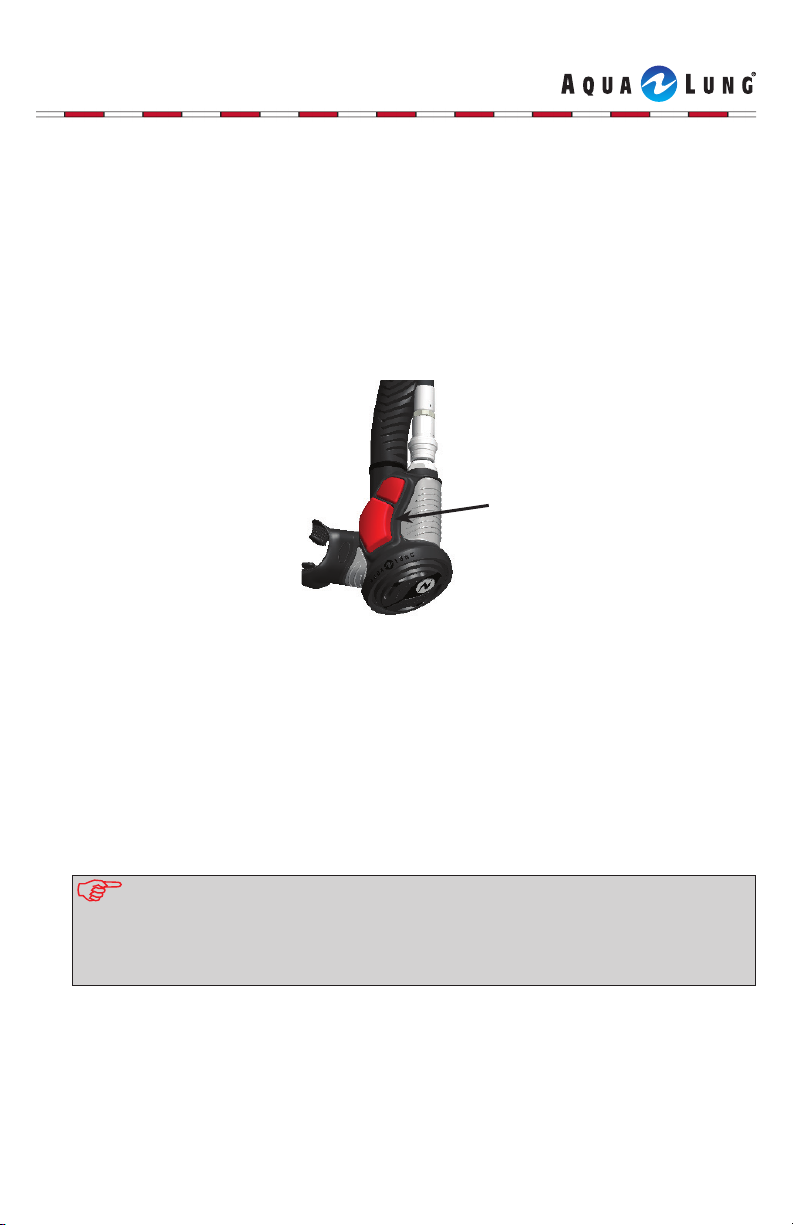
1. Before depressing the oral ination/deation button (Figure 9), exhale a small
amount of air into the mouthpiece in order to purge any water that may be trapped.
This will reduce the amount of water that may be introduced into the BC.
oral inate/deate button
Figure 9
2. After the water is purged and without removing the mouthpiece from your
mouth, immediately depress and hold down the large red oral ination/
deation button and, with the same breath, continue to exhale into the
mouthpiece. Release the oral ination button immediately after exhalation
in order to stop the release of air from the otation cell.
3. Repeat this procedure until the proper buoyancy is achieved.
NOTE: It is important to prevent sand and other debris from entering the
mouthpiece. These objects can contaminate the valve mechanism and, under
certain conditions, prevent it from closing completely. If this should occur, oper-
ate the oral inator several times while shaking it underwater. If this action is
not successful, terminate the dive until the situation is remedied.
Page 11
Airsource with Quick Disconnect Owner's Manual
DEFLATION
Normal deation of the BC should be accomplished by utilizing the Trim
Grip™, as well as dump valves. Please refer to your BC owner's manual for
model specic valve locations. Air can also be vented manually through the
mouthpiece by pressing the oral inate/deate button.
WARNING: If during your pre-dive check, or at any time during the dive
you nd that the Relief Valve will not fully close and seal or will not fully
open and vent air, DO NOT continue the dive. Continuing the dive under
these circumstances could result in serious injury or death.
WARNING: The Airsource does NOT come equipped with an Over Pres-
sure Valve. It must be rigged to a BC that features an Over Pressure
Valve. If you have questions regarding the features of your BC, ask your
local authorized Aqua Lung® dealer.
Deation by the Relief Valve
The Relief Valve provides the primary convenient means for exhausting air from
the BC. The valve opening located at the top of the BC must be above the body
when submerged for venting to occur. This is best achieved by moving toward
an upright position when venting air.
11
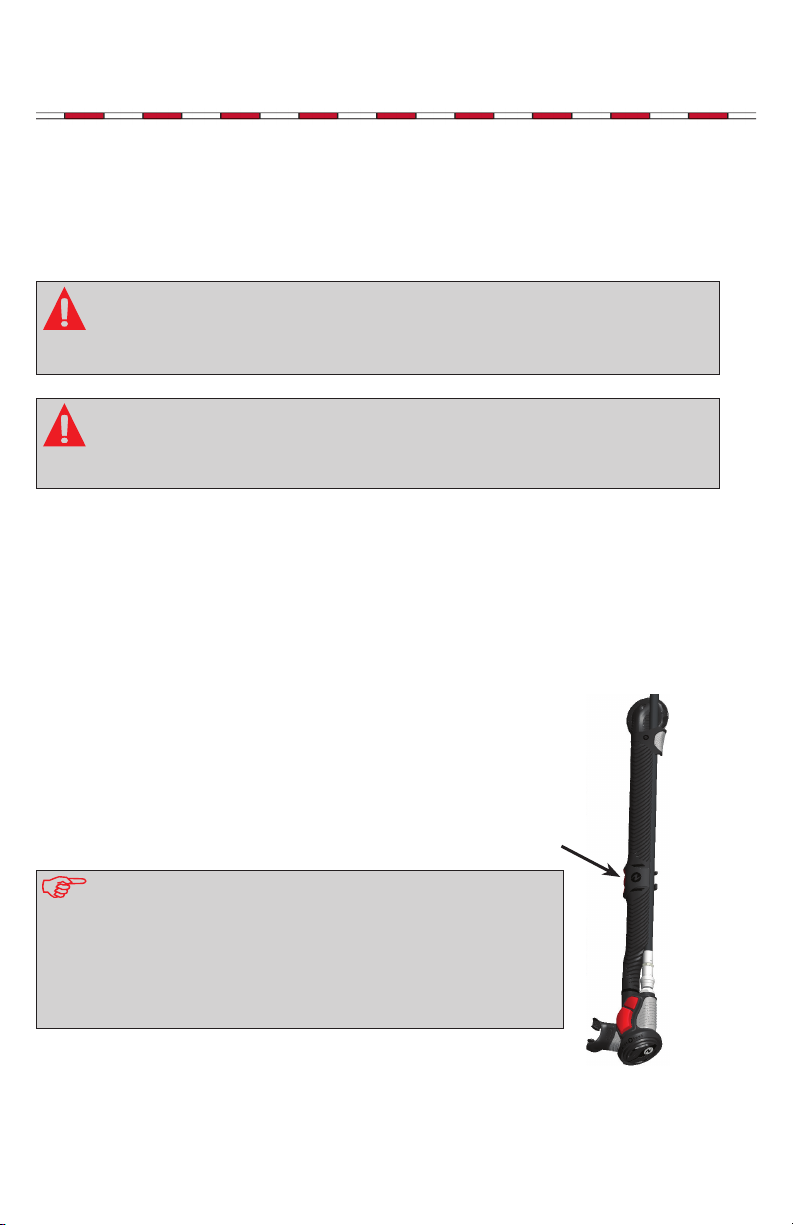
1. To activate, simply pull downward on either the Trim Grip™
or the Airsource body. (Figure 10). This action transmits
force through internal stainless steel cables and opens the
valve at the shoulder to allow air to vent from the BC.
2. Releasing the Trim Grip™/body closes the valve.
NOTE: It is not necessary to exert an excessive downward pull
to activate the Relief Valve. When you pull on the Trim Grip™,
you will feel the hose stretch, allowing the exhaust valve to open.
The travel of the valve is limited to less than 1/4". Pulling harder
will not increase the air ow. Maintain a downward pull until the
desired buoyancy is reached. It is not necessary to raise your arm
overhead when using the Relief Valve system.
Figure 10
Page 12
12
Oral Deation
The oral ination/deation valve is secondary means for venting air from the BC.
Most users vent air through the dump valves. However, you may nd it easier
to expel the last portion of air remaining in a nearly empty BC by utilizing the
oral ination valve.
1. Move into an upright position so that you can hold the Airsource above the BC.
2. With the Airsource in the left hand, raise the assembly to a position nearest
the surface of the water.
3. Depress the oral ination/deation button allowing air to exhaust in small
increments until the desired buoyancy is achieved.
4. Release the button allowing the valve to close.
NOTE: Do not hold the oral ination/deation button open after all the air has
been exhausted. Doing so may allow water to enter the BC. Also, whenever
inating or deating your BC, be sure to make small but frequent adjustments.
This will minimize the amount of water entering the BC.
BACK UP SECOND STAGE REGULATOR
The Airsource is a high performance, pneumatically balanced second stage
regulator, and it operates the same as a standard second stage regulator.
To breathe, put the mouthpiece in your mouth. Purge the water by either
pressing the purge button, or exhaling slowly and continuously. You should
test the breathing performance of the Airsource before each dive.
WARNING: The procedure to deal with an Emergency Out-of-Air situation
should be reviewed before every dive. Make sure your dive buddy is
familiar with the operation of the Airsource and what role it plays in an
out-of-air situation.
In the event of an emergency air sharing situation, the assisting diver should offer
their primary second stage to the diver requesting to share air. The Airsource then
becomes the primary regulator for the assisting diver.
While using the Airsource as your second stage regulator, all ination and
deation procedures as outlined in this manual are still applicable.
Page 13
Airsource with Quick Disconnect Owner's Manual
Ination
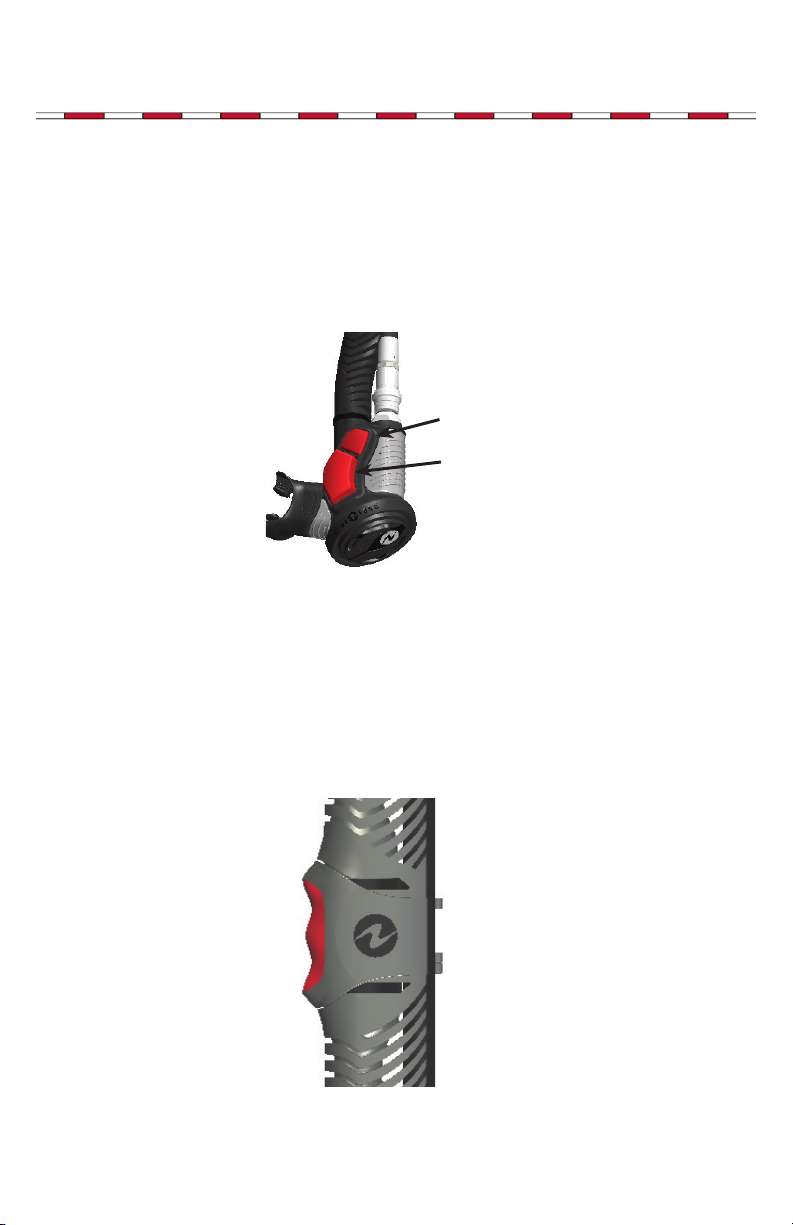
While breathing normally from the Airsource, push the power inator button to
inate the BC. For oral ination, breathe in normally through the mouthpiece, then
depress the inate/deate button and breathe back out through the mouthpiece.
Release the oral ination button immediately after exhalation in order not to allow
the air to escape from the air cell. Instead of the air escaping through the exhaust
valve, the air will be diverted into the air bladder (Figure 11).
power inator button
oral inator button
Figure 11
Deation
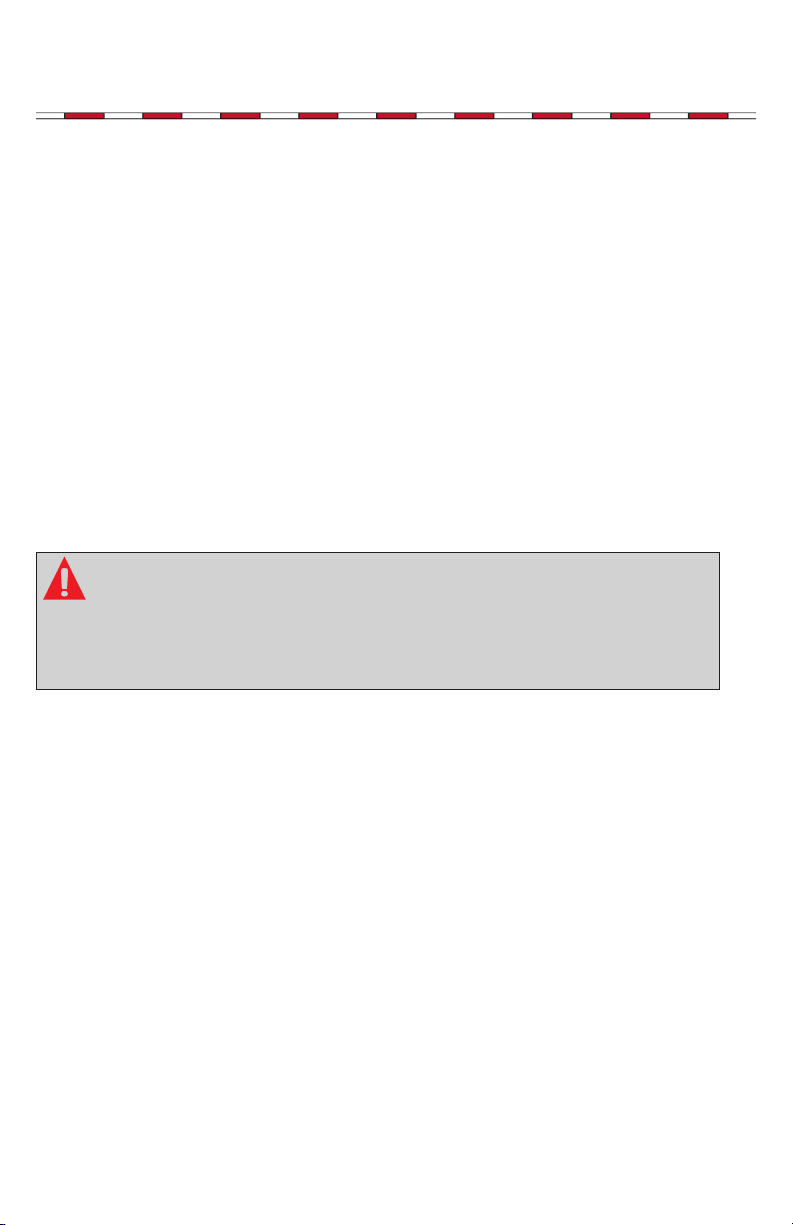
The Trim Grip™ (Figure 12) is exclusively designed to allow deation of the
BC through the Relief Valve while breathing from the Airsource. The Trim Grip
incorporates dual activating cables for the Relief Valve. This, combined with the
angled mouthpiece, allows you to pull downward on the Trim Grip hose without
removing the Airsource from your mouth. The increased hose length allows for
greater range of head movement.
13
Figure 12
Page 14

14
PREDIVE INSPECTION PROCEDURES
For your safety and to ensure the longest life of your equipment, we suggest the
following checklist to be followed each time before you enter the water:
1. Visually inspect the Airsource and the attached hoses for signs of deterioration
or damage. If such signs are present, do not dive with the equipment.
2. Slowly open the tank valve to allow air to bleed into the regulator gradually.
3. Conrm the medium pressure (MP) inator hose is attached securely. Press
the second stage purge button on the Airsource to verify sufcient air ow.
The regulator should not continue to ow after the button is released.
4. Place the Airsource in your mouth and take several slow, deep breaths.
The regulator must deliver an adequate volume of air without requiring
excessive effort. If you are in doubt regarding this test, consult your scuba
instructor or an Aqua Lung
5. Close the cylinder valve and purge the remaining air in the regulator. Try to
inhale normally from the second stage mouthpiece on the Airsource. This
should create a vacuum in the second stage, and there should be no signs
of air owing into the regulator case. Air ow may indicate a leak at the
mouthpiece, diaphragm, or exhaust valve. If a leak is detected, do not use
the Airsource until it is repaired.
6. If the Airsource passes the above predive check, reopen the cylinder valve
in preparation for the dive.
7. Once you have donned all your gear and are ready to enter the water,
always have your dive partner perform a nal inspection cross check of
the Airsource and all other gear.
®
retailer for advice.
Page 15

Airsource with Quick Disconnect Owner's Manual
CARE AND MAINTENANCE
The Airsource is constructed from carefully selected materials, which are chosen
to resist corrosion. However, the corrosive effects of the environment in which
diving equipment is often used cannot be entirely eliminated. Further, the
presence of sand and other minerals can interfere with the normal operation
of the equipment, and repeated prolonged exposure to chlorine can accelerate
deterioration of some components. Therefore, your equipment will perform
better and last longer if it is rinsed with fresh water after each day’s use.
The Airsource corrugated hose can be separated into two parts, which meet in
the middle and are connected by the Trim Grip™. The lower half (including the
MP hose) can be cleaned and stored with the rst stage of your regulator. The
upper half can be cleaned, and remain on the BC until its next use. Detach the
medium pressure (MP) inator hose from the hose guides at the top and middle
attachment points. While holding the molded hose steady just below the Trim
Grip™, grasp and turn the Trim Grip™ 1/4 turn clockwise, and pull down on
the molded hose to disengage the lower assembly. After proper cleaning, hold
the lower molded hose and Trim Grip™ steady. Engage the Airsource lower
assembly by lining up the upper and lower connection points and carefully turning
counter-clockwise 1/4 turn. Slide the medium pressure (MP) hose into the middle
and upper hose guides.
15
NOTE: When inserting the lower half of the Trim Grip™ into the upper half, make
sure to rotate counterclockwise to prevent parts from being damaged. When inserted correctly, the lower half of the Trim Grip™ will only rotate in a counterclock-
wise direction. Avoid using excessive force when connecting the two parts.
The recommended procedure for cleaning your Airsource is as follows:
1. Ideally, you should soak the entire Airsource in warm tap water (less than
°
F/40°C) to loosen mineral deposits. A large plastic trash can lled with
120
fresh water is useful for rinsing all of your diving equipment.
2. If warm water soaking is unavailable, rinse the Airsource in tap water. If no
air pressure is supplied to the Airsource, DO NOT DEPRESS THE PURGE
BUTTON! Pressing the purge button can cause water and mineral deposits
to reenter the unit, which can accelerate deterioration over time.
3. Remove any remaining excess water from the Airsource by thoroughly
wiping it dry with a soft towel. After it is dry, reconnect it to a scuba
cylinder and depress the purge button and the power inator button to
rid the unit of excess water. Do not store the Airsource with air pressure
supplied to it.
Page 16

16
4. Store the Airsource in a clean equipment box or sealed plastic bag in a cool,
dry, dark place.
NOTE: Do not use any cleaning solvents for soaking or rinsing. Do not at-
tempt to lubricate or preserve any part of the regulator with aerosol cleaners
or silicone spray. This is not necessary, and the propellant and other chemicals in these compounds can seriously damage the Airsource.
SCHEDULED MAINTENANCE & SERVICE
For your records, please ll out the dealer information. To register your Airsource,
please log on to www.aqualung.com within 30 days. Be sure to maintain records
as proof of performance of maintenance. The information below is provided for
your convenience.
The Airsource should be inspected/serviced by a qualied repair technician.
Inspections should occur annually or more frequently (every three to six
months) if used heavily, in dirty water, swimming pools, or it is not operating
correctly. Heavy use is considered to be more than 100 operational hours
within one year.
As described in the warranty statement, your annual regulator inspection and
service must be performed by a qualied Aqua Lung
best service at all times, please ll out the following service registration log,
and have your dealer sign and date it in the appropriate spaces each time the
regulator is taken for inspection or repair.
®
repair facility. To ensure
Page 17
Airsource with Quick Disconnect Owner's Manual
WARRANTY INFORMATION
All warranty transactions must be accompanied by proof of original purchase
from an authorized dealer. Be sure to save your sales receipt, and present it
whenever returning your regulator for warranty service.
Limited Lifetime Warranty
Aqua Lung warrants to the original purchaser that the product will remain free
from defects in material and workmanship throughout its useful life; provided
that it receives normal use, proper care, and prescribed dealer service subject
to those restrictions stated below.
This warranty does not apply to units subjected to misuse, abuse, neglect,
modication, or unauthorized service. This limited warranty is extended only
to the original purchaser for products purchased directly from an authorized
dealer, and is not transferable.
This warranty is limited to repair or replacement only at the discretion of Aqua
Lung America.
WARNING: It is dangerous for untrained and uncertied persons to use
the equipment covered by this warranty. Therefore, use of this equipment
by an untrained person renders any and all warranties null and void. Use
of scuba equipment by anyone who is not a trained or certied diver, or
receiving training under the supervision of an instructor, could lead to
serious injury or death.
17
Page 18
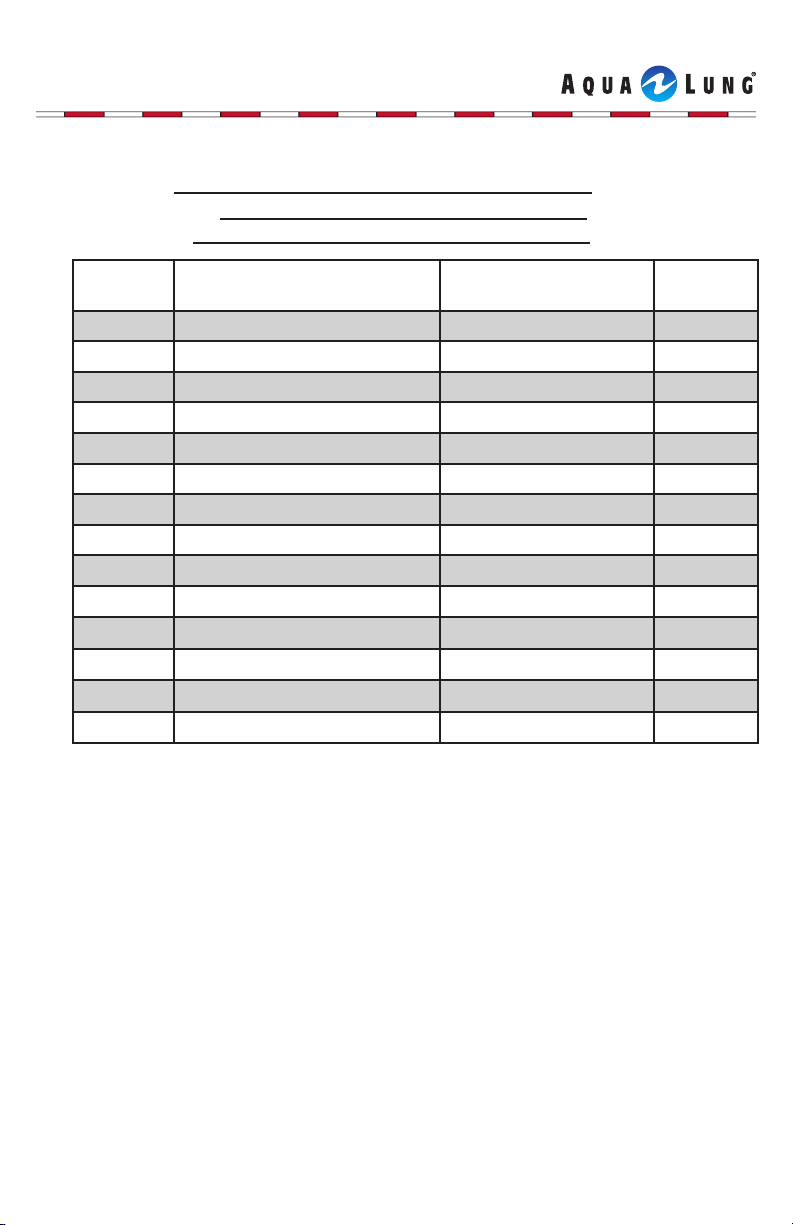
18
ANNUAL SERVICE & INSPECTION RECORD
Serial No.:
Purchase Date:
Store Name:
Date Dealer Name City, State
Tech
Initials
Page 19
Airsource
with Quick Disconnect
Owner's Manual
2340 Cousteau Court, Vista, CA 92081
(760) 597.5000 www.aqualung.com
©2010 Aqua Lung America
Literature PN 18558 Rev. 07/10
 Loading...