

Page 1

1
AquaLiv Water System – Model A305
Usage & Installation Instructions
Welcome to AquaLiv Water and congratulations! You just purchased the most complete and comprehensive water
purification and enhancement system available today.
The AquaLiv Water System produces energized, structured, alkaline water - just as nature intended. Our holistic process
naturally removes contaminates while carefully preserving the beneficial minerals that other water treatment options like
reverse osmosis strip away. The AquaLiv Water System also creates a healthful, stable alkaline pH that common water
ionizers fail to achieve. AquaLiv Water hydrates the body rapidly, boosts metabolism, increases circulation and blood
oxygen levels, and has a cleansing effect within the body. Enjoy the water!
DAILY USE
Some AquaLiv technologies require water to be moving, while others require water to be still. Therefore, it will
take 24 hours of normal use for the system to ‘charge up’ and up to a week of normal use for maximum power.
NOTE: After installation, the water may be cloudy or taste heavily of minerals and/or somewhat bitter for 2-3
weeks. This is normal as it takes some time for the filters to become conditioned to the source water. To help
alleviate this condition, AquaLiv suggests a 5-minute flush when the off-taste is noticed or daily for the first week
of use.
The Purification Module will require filter changes every 12 months or 1000 gallons – whichever comes first – or if
the water begins to flow too slowly.
To order replacement filters visit shop.aqualiv.com and select Filter Set FS300.
The AquaLiv Water Revitalizer requires no maintenance. Attempts to open the tank may damage the head and
sub-assembly. If the internal tamper seals are broken, the system warranty will be void.
Don’t forget to schedule a Filter Change Reminder! www.aqualiv.com/filter-change-reminder
pH TESTING – pH testing drops and paper strips do not work with structured water. Use a digital pH meter.
WARRANTY – Your Warranty begins with the purchase date on your receipt. Do not lose your receipt!
Your AquaLiv Water System is warrantied against material defects and errors in workmanship for a period of two (2) years. Faucets have a one (1) year
warranty. The warranty does not cover damage to the system or any property damage, including flood and/or water damage. All plumbing systems
should be inspected periodically after installation to ensure an absence of leaks that may result in damage to surrounding areas.
Page 2

2
CHECK YOUR SYSTEM
Please inspect the shipping box to ensure that all system components are accounted for. If any components are
missing or appear to have been damaged in transit, please contact us for assistance.
SYSTEM CONTENTS (PART IDENTIFICATION CHART AT END OF DOCUMENT)
(1x) Model # A305 Purification Module
(1x) AquaLiv Water Revitalizer
(1x) Filter Housing Wrench
(3x) Filter Cartridges
(2x) #10 Hex-Head Screws (to attach The Purification Module to cabinet wall)
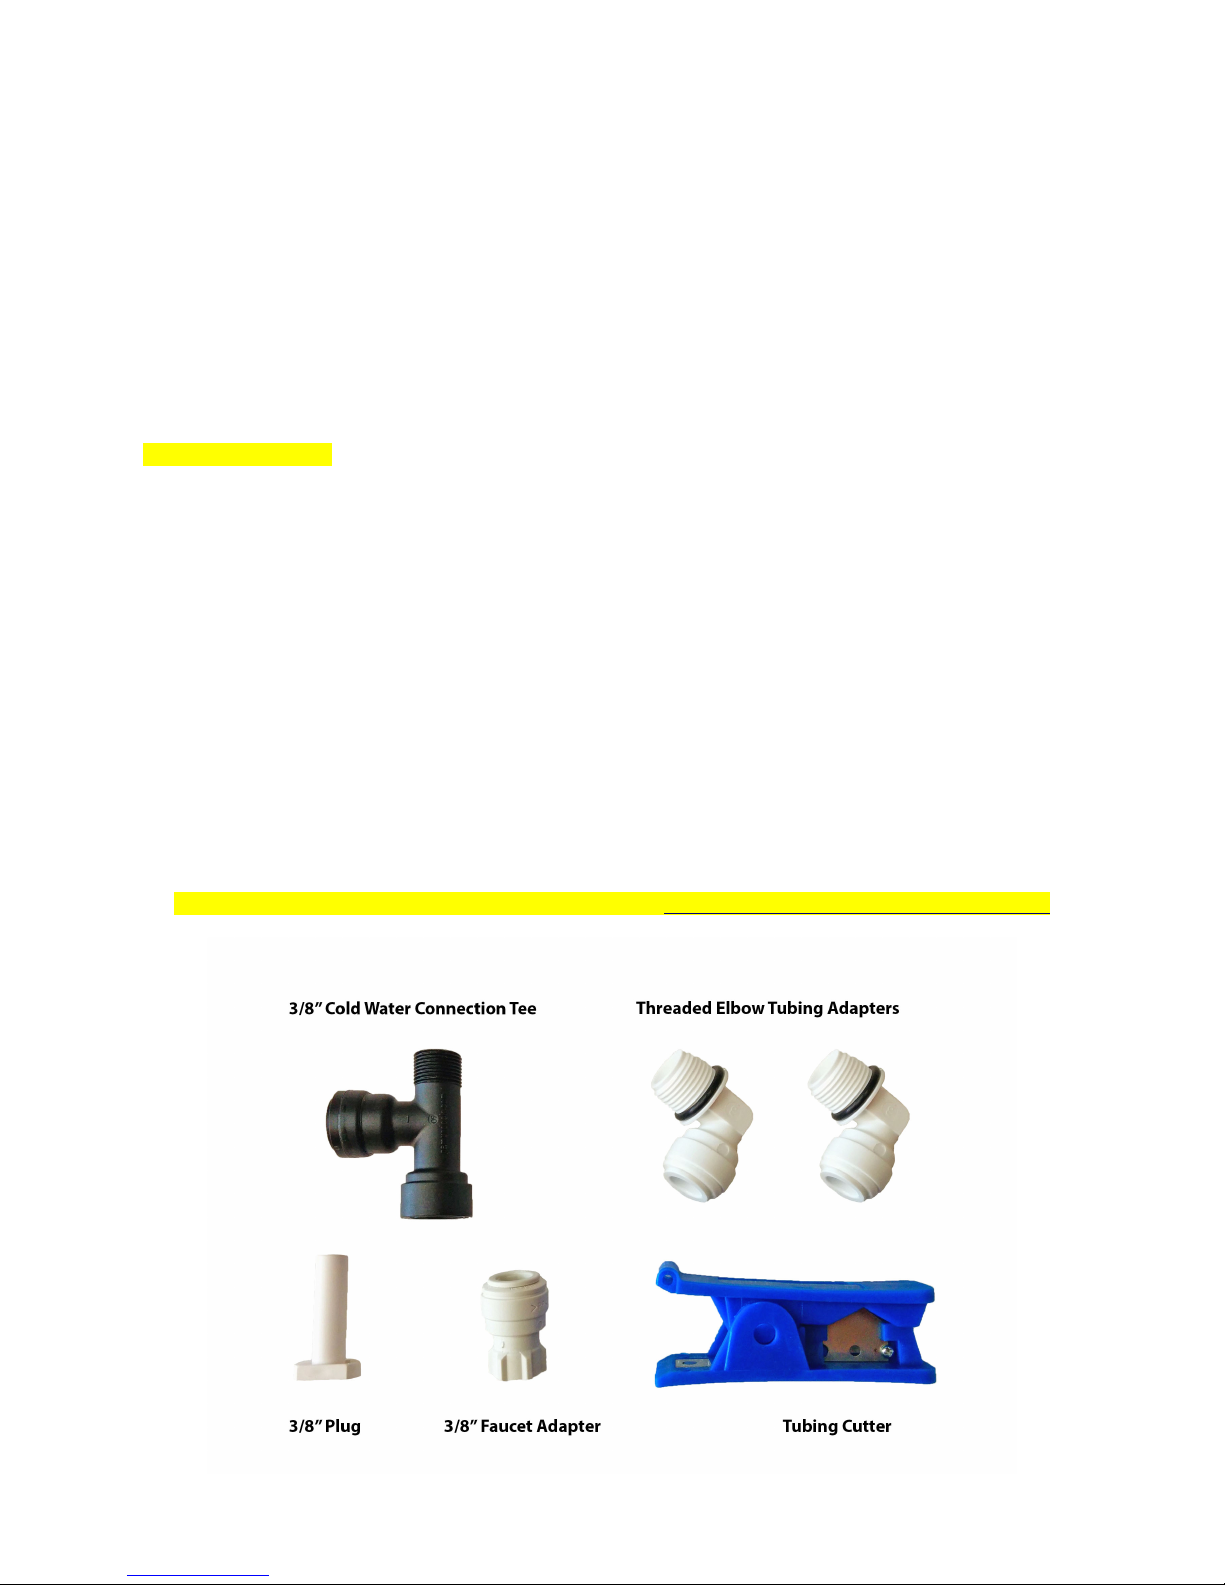
(2x) Threaded Elbow Tubing Adapters
(1x) 3/8” Faucet Adapter Fitting
(3x) 36” 3/8 OD Flexible Tubing Lengths
(1x) 3/8” Cold Water Connection Tee
(1x) 3/8” Plug
(1x) Tubing Cutter
(1x) Faucet (if ordered)
(1x) Usage & Installation Instructions
INSTALLATION OVERVIEW
AquaLiv suggests that you have the AquaLiv Water System installed by a professional plumber. However, anyone
with handy-person skills and a few basic tools can accomplish the task. It is best to remove all under-sink
contents before continuing with installation. If installing the faucet where a dishwasher air-gap/vent currently
resides, simply tie up the air-gap at the highest point available in the under-sink cabinet. Ensure this level is at
least a few inches above the drain connection point of the dishwasher.
AquaLiv is not responsible for any damage resulting from improper installation, re-routing of existing
fixtures, or violations of local plumbing codes. Only perform the installation yourself if you feel
comfortable with the job and take full responsibility for your work. If unsure, call a professional plumber
for assistance.
TOOLS REQUIRED
• Power Drill/Screwdriver w/ 5/16” Hex-Socket
• Basin Wrench (aka Faucet Wrench, available at most hardware stores)
• Drill or Hole-Cutter for Faucet (if no hole currently exists)
• Tube Cutter (included)
• Purification Module Support Block (a thick book or piece of 2x4 lumber works well – see STEP #4)
• Small adjustable wrench and/or small Chanellock-type pliers
• Plumber’s Tape
IMPORTANT NOTE
If you ever need to disconnect the system, the flexible tubing is removed from the quick-connect fittings by pulling
out on tubing while simultaneously pushing in on the collet (ring) surrounding the tubing.
Page 3
3
INSTALLATION
STEP #1: Install the Cold Water Connection Tee (do NOT use plumber’s tape)
1. Close the cold water supply valve to the kitchen faucet. Open the cold side of the kitchen faucet to relieve
pressure and then close again
2. Disconnect the cold water supply tube/hose/pipe connected to the cold water supply valve. Do not remove the
tube/hose/pipe from the kitchen faucet
3. Screw the Cold Water Connection Tee onto the cold water supply valve until you feel resistance, then turn an
additional 180°-360°. Connection should be tight, but over-tightening can break the tee
4. Connect the tube/hose/pipe from the kitchen faucet to the Cold Water Connection Tee. Do not overtighten
In the event that the Cold Water Connection Tee does not fit your water connection, please visit
shop.aqualiv.com/components for alternative installation components.
STEP #2: Install faucet
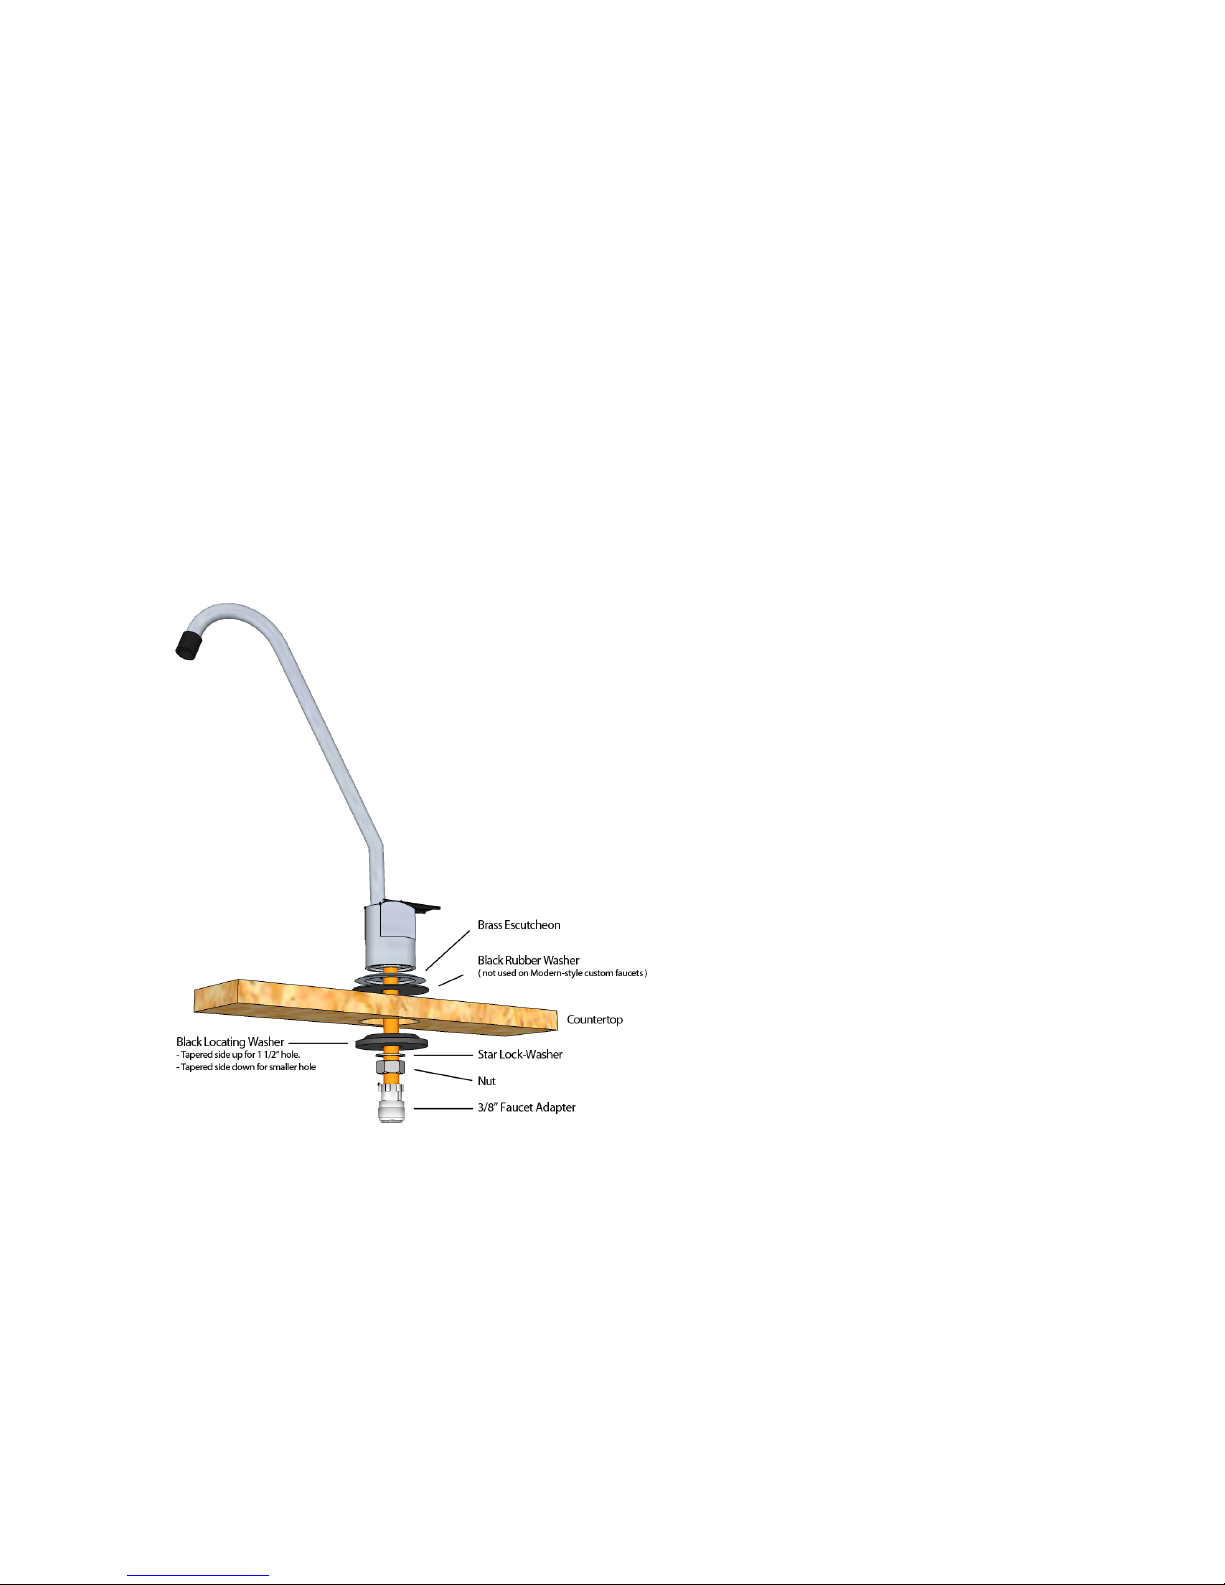
NOTE: Not all parts contained in the faucet box will be used during installation. Please refer to the diagram below.
1. Gather the parts indicated in the diagram above and discard the unused parts.
2. If drilling a hole, locate and mark the desired location and drill a 1/2” hole. If using an existing hole, remove
hole plug.
3. Assemble the Brass Escutcheon and Black Rubber Washer onto the faucet stem as shown and place in hole.
4. On the underside of the counter top, slide Black Locating Washer and Star Lock Washer up onto stem.
5. Screw Nut onto stem by hand and spin it up the stem until the faucet is held firmly in place.
6. Arrange the spout and handle to their optimal positions on the faucet base.
7. Use a 9/32” wrench or Basin Wrench to tighten the Nut down until the faucet is secure on the counter top.
8. Install the 3/8” Faucet Adapter onto the bottom of the stem. The adapter only needs to be installed finger-tight
– do not tighten with a wrench. Do not use plumber’s tape or other sealants.
9. Insert one length of the included tubing into the Faucet Adapter ensuring that 5/8” of tubing slides into the
adapter.
Page 4

4
STEP #3: Attach “Threaded Elbow Tubing Adapters” to Purification Module
1. Screw in the “Threaded Elbow Tubing Adapters” into the Purification Module inlet and outlet ports. Properly
installed Adapters should be screwed in until the o-ring is fully seated onto the module. Be careful not to
cross-thread the Adapters while screwing them in. If your installation requires the Adapters to be pointed in
any position other than where the o-ring is fully seated, use plumber’s tape on the threads. (avg. 14 wraps)
STEP #4: Situate and Arrange AquaLiv Water System Modules in Under-Sink Cabinet
1. Situate system Modules in under-sink cabinet.
2. The Purification Module is wall mounted and often best installed just a few inches back from the cabinet
opening. This will allow for easy filter changes in the future.
3. The Modules will be connected with the included flexible tubing. The Purification Module IN will be connected
to the cold water supply line. The Purification Module OUT will be connected to the Revitalizer IN. The
Revitalizer OUT will be connected to the AquaLiv faucet. Ensure the preferred position of the Modules is
possible within the length of the 36” flexible tubing units.
NOTE: Module locations must allow for gradual bends in the flexible tubing – no sharp bends or 90-degree
angles.
4. If everything looks like it will fit together without problems, please continue to Step #5. If not, re-arrange
Modules.
STEP #5: Attach Purification Module to Cabinet Wall, Install Filter Cartridges
1. Set the Purification Module on a thick book or section of 2x4 lumber (anything at least 1.5 inches high) to
raise it while attaching the bracket to cabinet wall.
IMPORTANT: The Purification Module must have at least 1.5 inches of free space below to allow for filter
cartridge installation and annual filter cartridge replacement.
2. Using a power screwdriver and hex-socket, attach the Purification Module to the cabinet wall using the
included Hex-Head screws. Use a low torque setting to prevent the screws from stripping out the holes.
3. Use the Filter Housing Wrench to loosen the three Filter Housings on the Purification Module. NOTE: The
housings unthread counter-clockwise when seen from the bottom. Facing head-on, the housings should be
turned to the left. Once loosened, the housings should be unscrewed by hand.
4. Unscrew the #1 Filter Housing from the Purification Module. Unwrap the #1 Filter Cartridge and place into the
#1 housing. Ensure the filter cartridge sits over the alignment pipe at the bottom of the housing and that both
top & bottom gaskets are in place.
5. Gently thread the housing back onto the Purification Module, making sure it screws on evenly. Tighten by
hand.
6. Repeat the previous two steps for the #2 and #3 Housings/Filters.
IMPORTANT: The molded arrow on the #2 cartridge must POINT to the OPEN END of the housing.
7. Once the housings have been hand-installed, use the Filter Housing Wrench to tighten them approximately
1/8 turn more. This will seat the o-rings properly.
STEP #6: Installing the Flexible Tubing
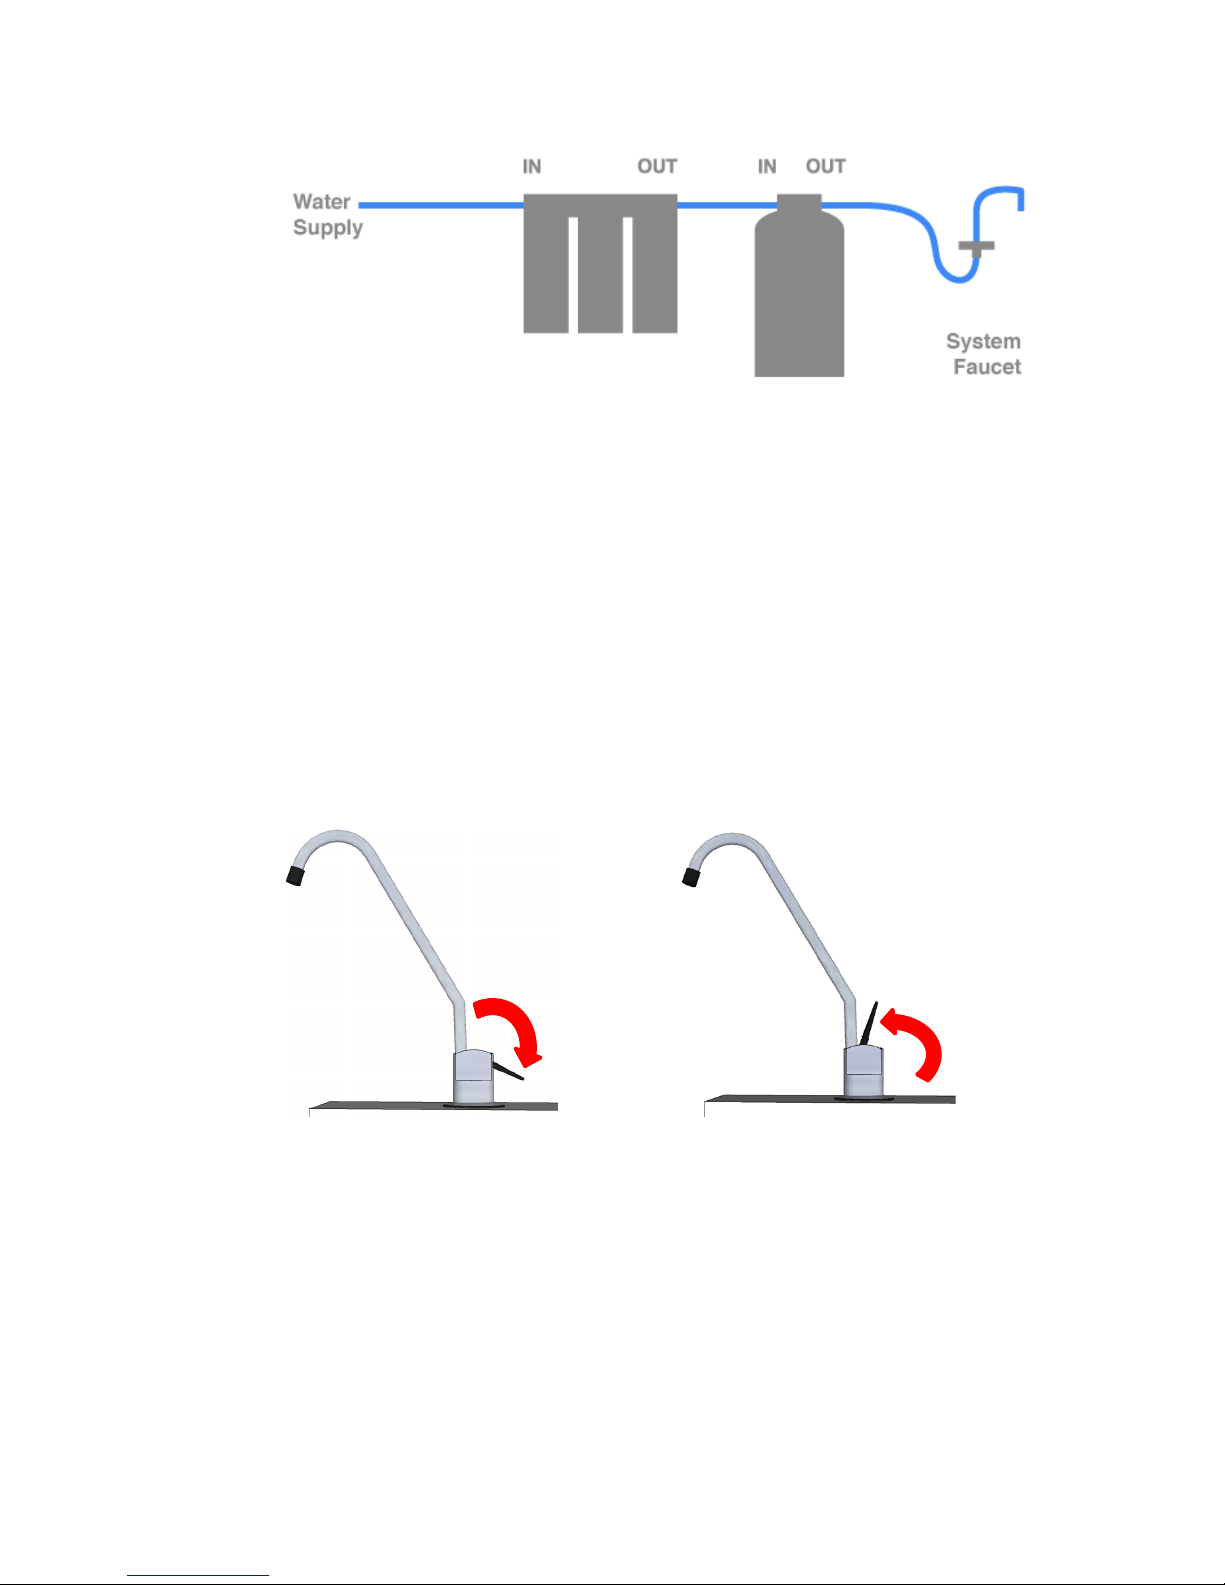
1. Connect the system components according to the diagram below:
Page 5
5
Handle'down'='momentary'flow'
Handle'up'='constant'flow'
2. Flexible tubing is installed by pushing the tubing ends into the push-fit connections on the system
components. Push in until fully seated. Approximately 5/8” of tubing will slide into the fitting.
IMPORTANT: Tubing that is not fully seated will leak.
NOTE: If required, shorten tubing with the included Tubing Cutter. Cuts must be perpendicular to tubing-length
and be burr-free. Messy cuts can damage fitting o-rings and result in leaks. Only shorten tubing if your installation
requires it.
STEP #7: Filling and Flushing AquaLiv Water System
1. Open the system faucet fully and then slowly open the cold water supply valve.
IMPORTANT: Watch for leaks and be ready to shut off the cold water supply.
NOTE: The basic faucet has a ‘constant flow’ feature that makes this step simple.
2. The system will fill for several minutes. During this time, air will be emitted from the faucet.
3. Once water comes out of the faucet, allow it to flow for TWENTY (20) minutes. During this time, dry off all
tubing and fittings with a dry cloth or paper towels. After twenty minutes, shut off the faucet. Wait five
minutes more and then feel all connections for water drops or dampness. Dampness in these areas may
indicate a loose or faulty connection.
4. If an Elbow Adapter leaks, ensure the o-ring is seated tightly against the Purification Module. If it continues to
leak, use plumber’s tape on the Elbow threads to seal it. (avg. 14 turns)
Page 6
6
STEP #8: Continue to inspect for leaks over the next few days to weeks
Leaks can develop with time. Be sure to inspect the system and entire under-sink area with a flashlight. AquaLiv
is not responsible for leaks or flood damage of any kind. Be vigilant.
CONGRATULATIONS
The AquaLiv Water System in now installed!
IN AN EMERGENCY
Should the water supply to the AquaLiv Water System need to be shut off while cold water is wanted at the
kitchen faucet:
1. Close the cold water supply valve
2. Open the AquaLiv faucet to relieve pressure, then close
3. Remove the tube supplying the AquaLiv Water System from the Cold Water Connection Tee
4. Insert the included Plug into the Tee
NOTE: After installation, the water may be cloudy or taste heavily of minerals and/or somewhat bitter for 2-3
weeks. This is normal as it takes some time for the filters to become conditioned to the source water. To help
alleviate this condition, AquaLiv suggests a 5-minute flush when the off-taste is noticed or daily for the first week
of use.
Don’t forget to schedule a Filter Change Reminder! www.aqualiv.com/filter-change-reminder
 Loading...