

Page 1
make life better
CHLORATOR SOLNY SERII CRYSTAL PRO
4, 8, 12, 16, 20, 24, 30
INSTRUKCJA INSTALACJI I OBSŁUGI
PL
Page 2
Page 3
1.
DC12V
DC 29V
Crystal Pro 4
Crystal Pro 8
Crystal Pro 12
Crystal Pro 16
Crystal Pro 20
Crystal Pro 24
Crystal Pro 30
DC24V
4
8
12 50
16 68
20 85
24 102
30 127
2700-4500PPM
8
35
Page 4
3.
11
1
6
7
8
9
2
3
4
12
5
:
Page 5
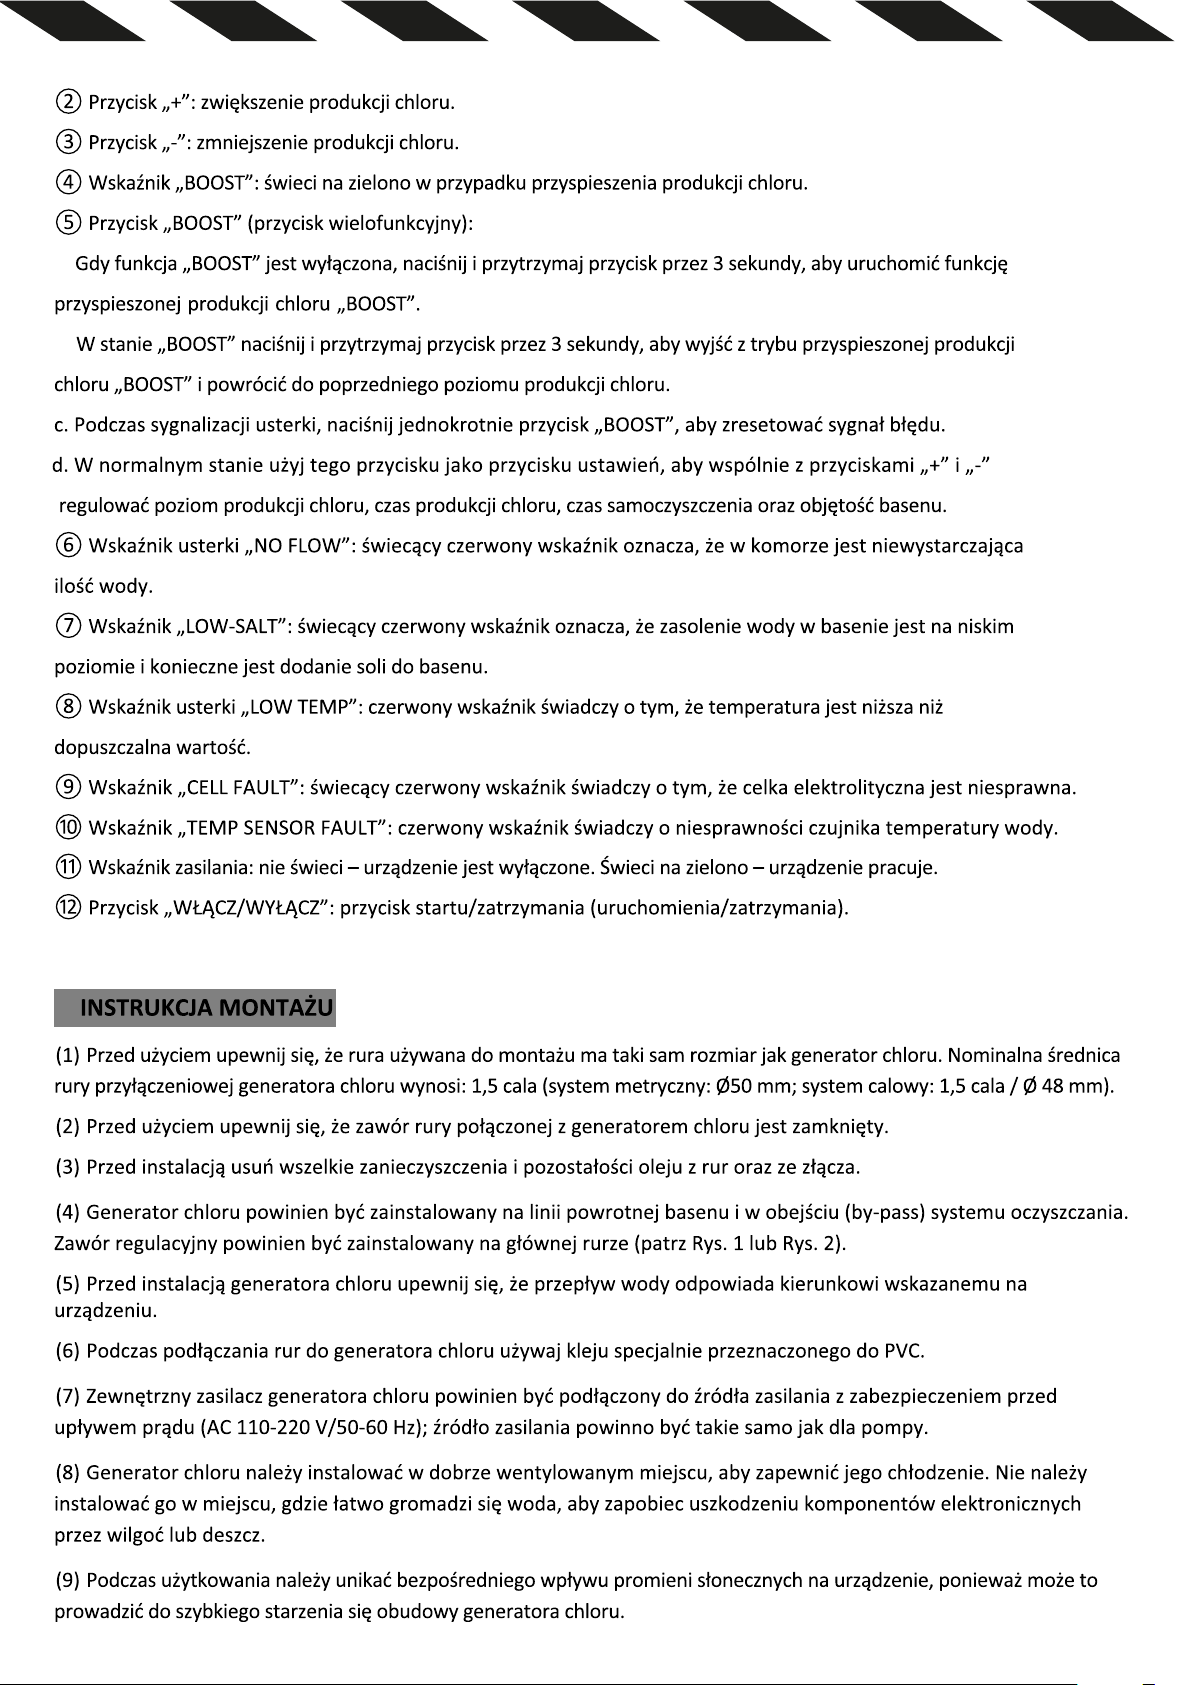
a.
b.
4.
Page 6
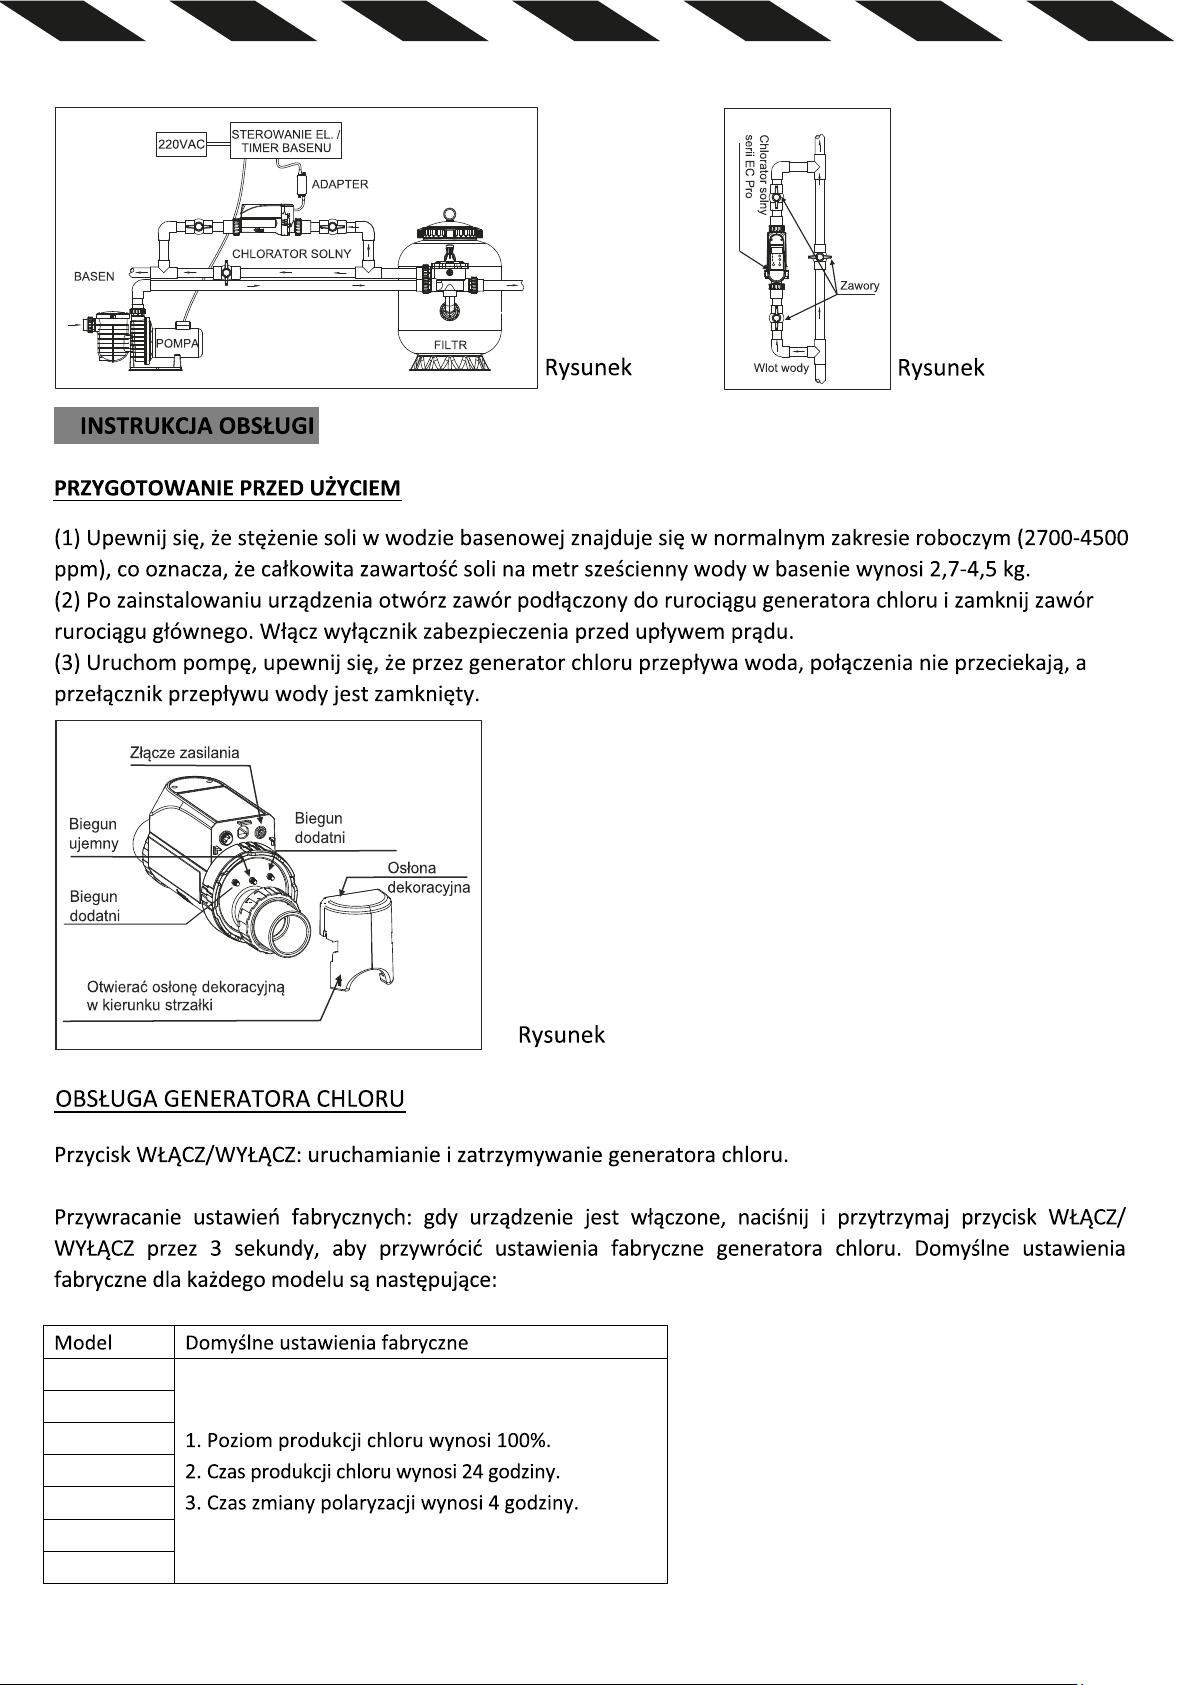
5.
1
2
Crystal Pro 4
Crystal Pro 8
Crystal Pro 12
Crystal Pro 16
Crystal Pro 20
Crystal Pro 24
Crystal Pro 30
3
Page 7
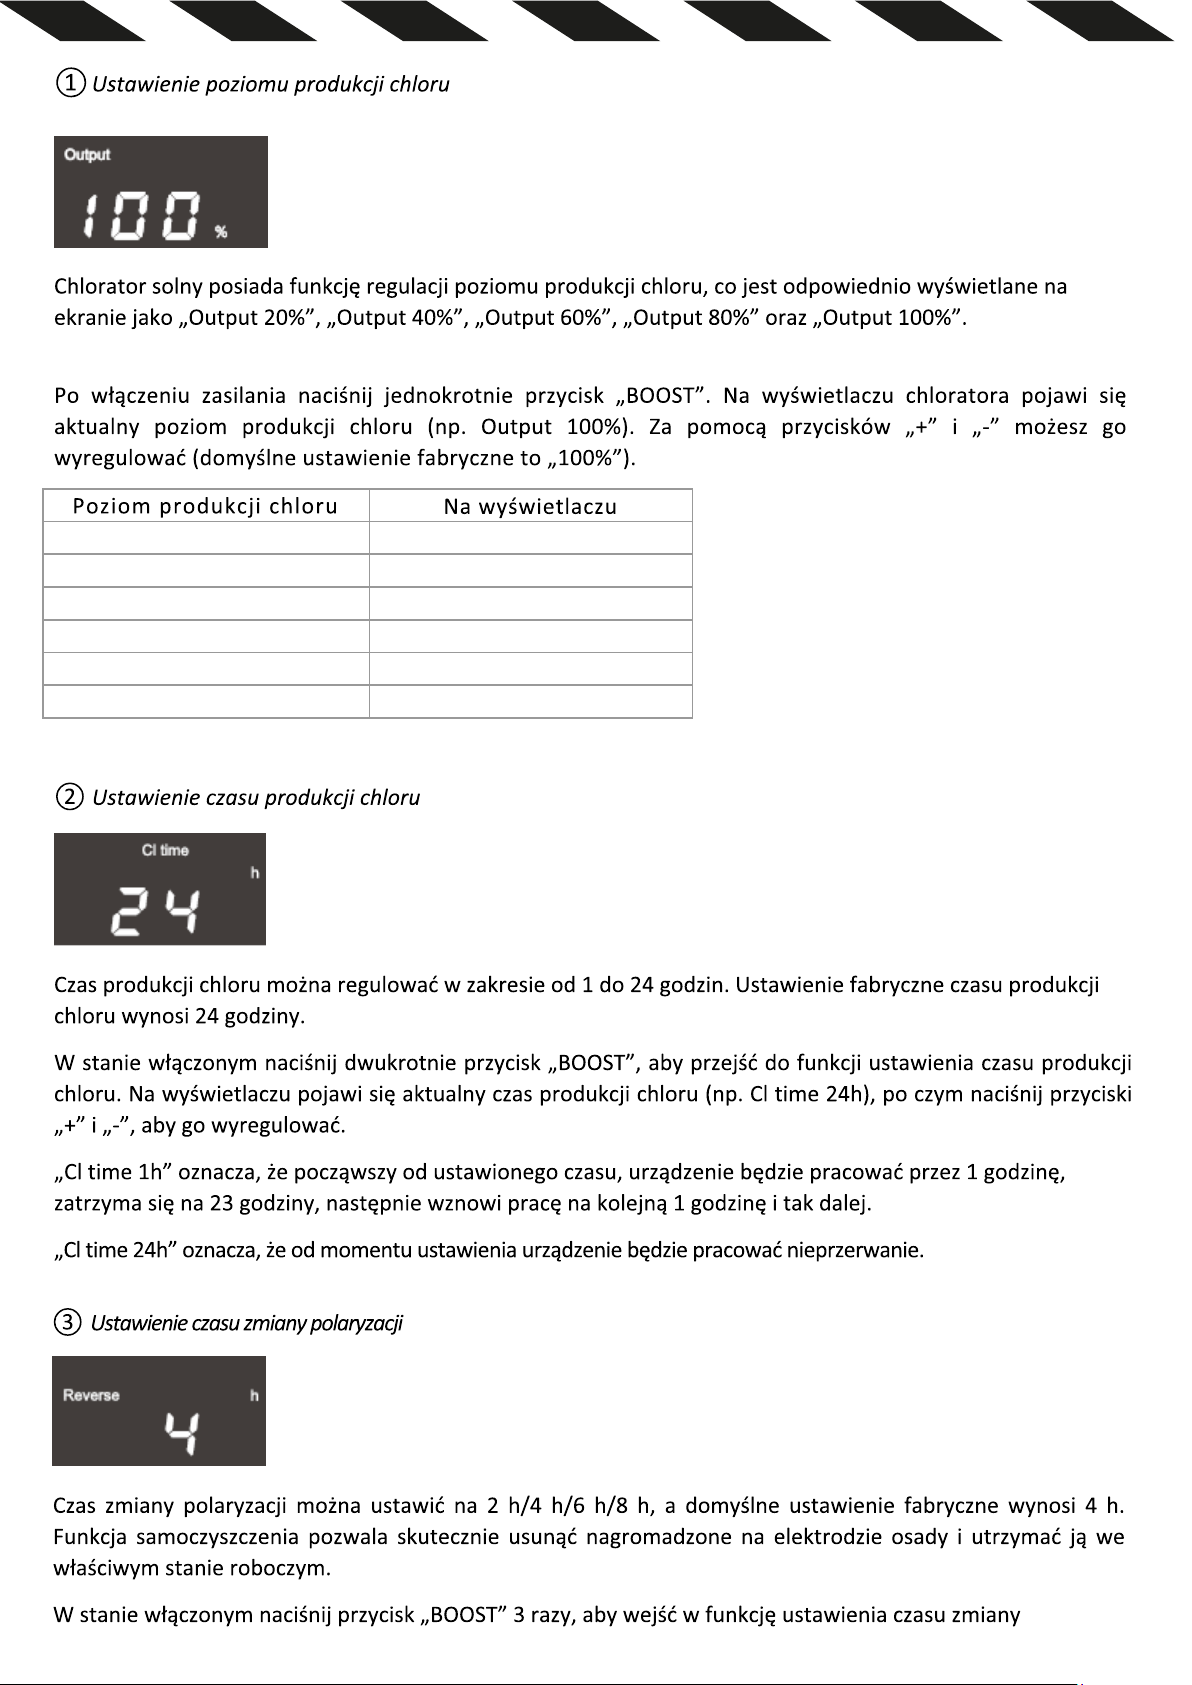
Level 1
Output 20%
Level 2
Output 40%
Level 3
Output 60%
Level 4
Output 80%
Level 5
Output 100%
Boost
Output SUP
Page 8
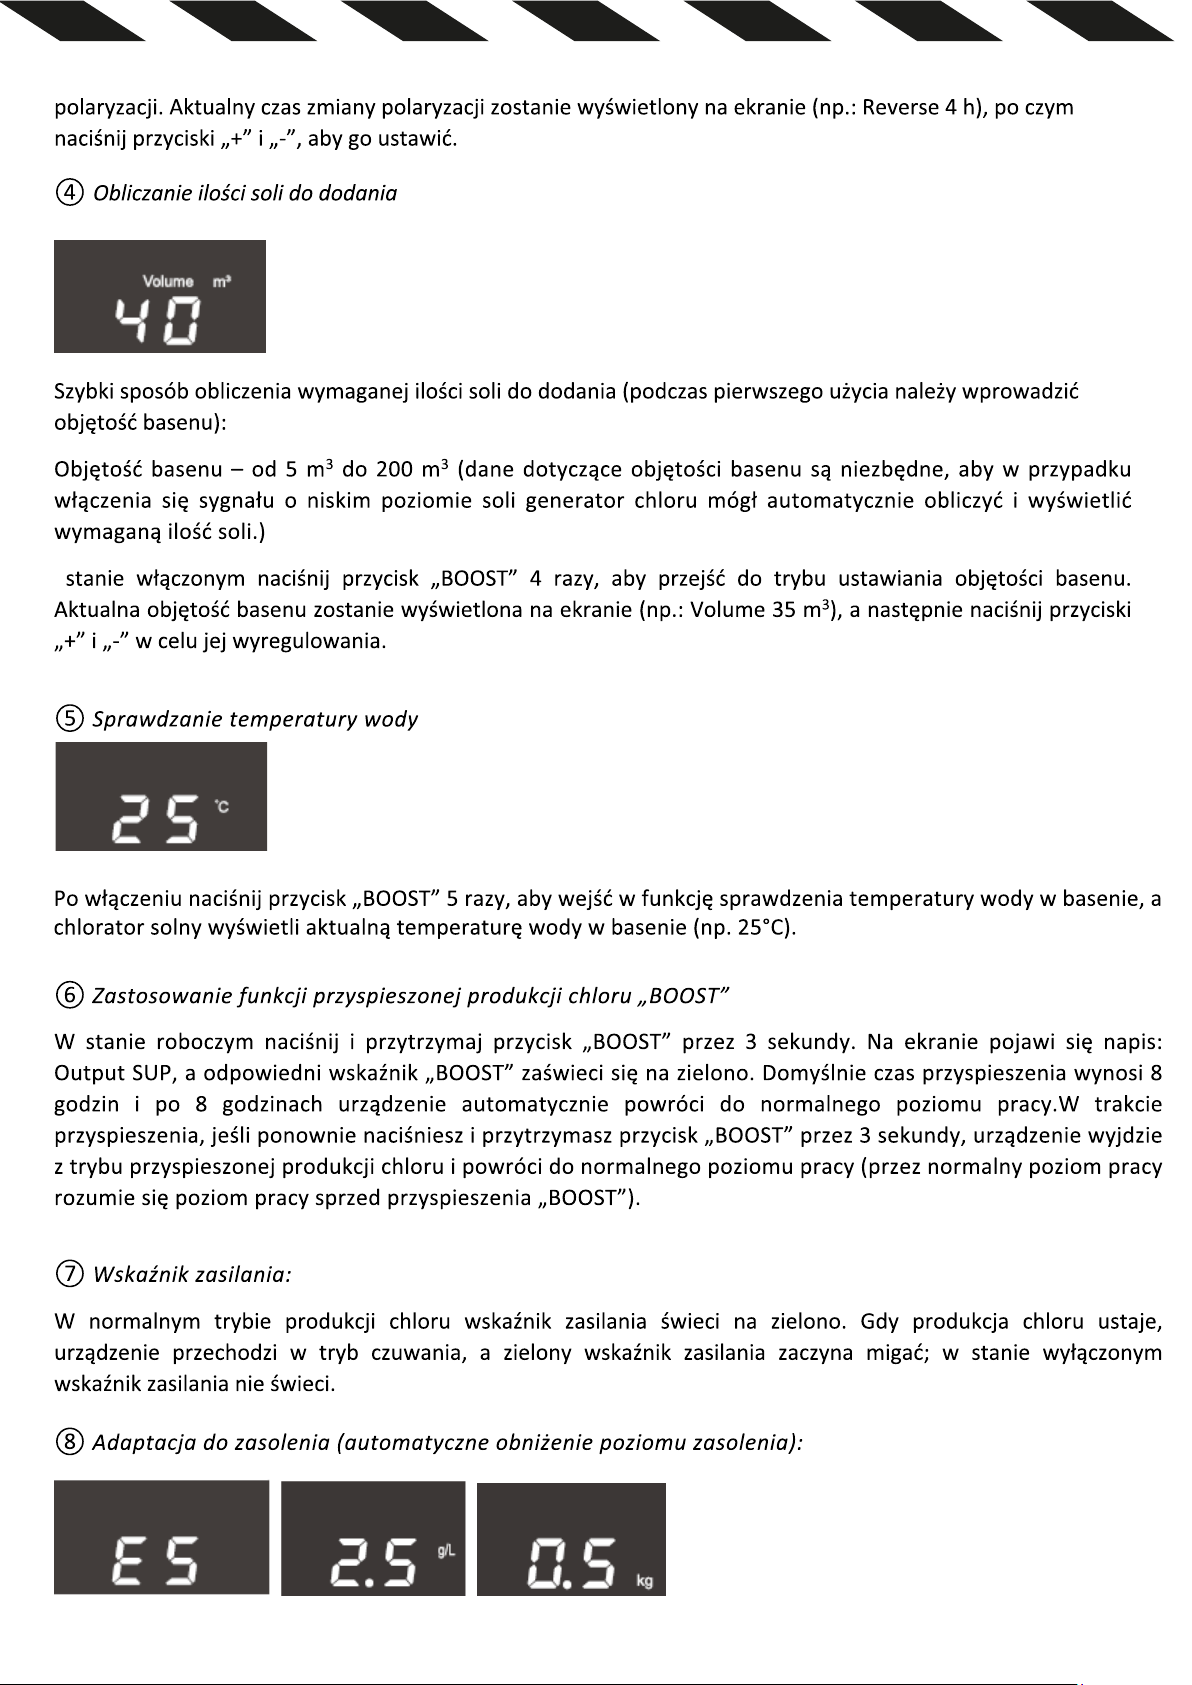
Page 9
6.
Page 10
Page 11

Page 12
Page 13
Volume
Level
Cl time
Reverse
Page 14
Page 15
E1
E2
EL
EH
E3
E5
E6
Page 16
E7
E8
EA
8.
(1)
(2).
x 0,85
Page 17
(3).
:
:
x (3500-
(4).
(5).
Page 18
INFORMACJE PRAWNE I REGULACYJNE (UE)
Producent i Importer
Producent: Guangdong LASWIM Water Environment Equipment Co.,Ltd.
NO.16 Jianye Road ,Nantou Town, Zhongshan City,Guangdong Province P.R.China
E-mail: [email protected]
Importer w UE: AQUAMONKEY Sp. Z o.o.
ul. Palisadowa 20/22 01-940 Warszawa Polska
E-mail: [email protected]
Importer do UE AQUAMONKEY Sp. Z o.o., ul. Palisadowa 20/22, 01-940, Warszawa, Polska,
oświadcza, e chlorator soli Serii Crystal Pro (Model: Pro 4, Pro 8, Pro 12, Pro 16, Pro 20, Pro
24, Pro 30) jest zgodne z dyrektywą 2014/53/UE. Pełna treść deklaracji dostępna na żądanie
pod adresem importera.
Zgodność z wymogami bezpieczeństwa i EMC
Urządzenie spełnia zasadnicze wymagania w zakresie bezpieczeństwa użytkowania oraz
kompatybilności elektromagnetycznej (EMC) określone w art. 3.1 lit. a) i b) dyrektywy
2014/53/UE.
Parametry techniczne modułu radiowego
Pasmo częstotliwości: Wi-Fi 2.4 GHz (2400–2483,5 MHz).
Maksymalna moc częstotliwości radiowej: < 20 dBm (EIRP).
Utylizacja (WEEE)
Symbol przekreślonego kosza na śmieci oznacza, że produktu nie wolno wyrzucać do
zwykłych pojemników na odpady. Zużyty sprzęt elektryczny i elektroniczny należy przekazać
do punktu zbiórki w celu recyklingu, zgodnie z dyrektywą 2012/19/UE.
Bezpieczeństwo instalacji
Instalacja musi zostać przeprowadzona zgodnie z krajowymi przepisami dotyczącymi instalacji elektrycznych. Obwód zasilający musi być wyposażony w wyłącznik różnicowoprądowy
(RCD) o znamionowym prądzie różnicowym nieprzekraczającym 30 mA.
Page 19

make life better
СОЛЬОВИЙ ХЛОРАТОР СЕРІЇ CRYSTAL PRO
4, 8, 12, 16, 20, 24, 30
UA
ІНСТРУКЦІЯ З МОНТАЖУ ТА ЕКСПЛУАТАЦІЇ
Page 20

ЗМІСТ
ВАЖЛИВЕ ЗАУВАЖЕННЯ ТА ЗАХОДИ БЕЗПЕКИ --------------------------------------------------------------- 01
1. КОРОТКИЙ ОПИС ПРОДУКТУ ----------------------------------------------------------------------------------- 02
2. РОЗМІР ПРОДУКТУ ------------------------------------------------------------------------------------------------ 02
3. ІНСТРУКЦІЯ З ЕКСПЛУАТАЦІЇ ПАНЕЛІ КЕРУВАННЯ -------------------------------------------------------- 04
4. ІНСТРУКЦІЯ З МОНТАЖУ ----------------------------------------------
5. ІНСТРУКЦІЯ З ЕКСПЛУАТАЦІЇ ------------------------------------------------------------------------------------ 06
6. ФУНКЦІЯ WIFI — КОНФІГУРАЦІЯ МЕРЕЖІ ОБЛАДНАННЯ ---------------------------------------------- 08
7. КОД ПОМИЛКИ ТА ВАРІАНТИ ВИРІШЕННЯ ----------------------------------------------------------------- 14
8. ДОДАТОК: ЕКСПЛУАТАЦІЙНІ УМОВИ ТА ТЕХНІЧНЕ ОБСЛУГОВУВАННЯ ---------------------------- 15
------------------------------------------ 05
ВАЖЛИВЕ ЗАУВАЖЕННЯ
Перш за все, дякуємо Вам за вибір сольового хлоргенератора серії Crystal Pro. Для отримання найкращих
вражень від роботи з обладнанням, запобігання нещасним випадкам, будь ласка, уважно вивчіть увесь
зміст цієї інструкції перш ніж встановлювати та використовувати пристрій. Суворо дотримуйтесь
посібника для забезпечення власної безпеки та правильної експлуатації сольового хлоратора. Нехтування
попередженням про безпеку може призвести до серйозних наслідків, таких як: важкі травми, втрата
майна і навіть загроза життю.
ВАЖЛИВI ЗАХОДИ БЕЗПЕКИ
(1) Встановлення та обслуговування мають виконуватися кваліфікованим електриком. В іншому разі
існує ризик ураження електричним струмом, отримання тяжких тілесних ушкод
небезпечних для життя наслідків.
(2) Перед початком техобслуговування або експлуатації переконайтеся, що хлоратор відключений від
мережі, всі механізми вимкнені, а джерело живлення знеструмлене.
(3) Зовнішній адаптер живлення хлоратора має бути під’єднаний до джерела живлення, що має захист
від витоку.
(4) Хлоратор має бути встановлений у місці, що добре провітрюється. Не встановлюйте його в місцях, де
електронні компоненти можуть бути пошкоджені вологою і дощем.
(5) Перш ніж встановлювати обладнання, персонал має уважно прочитати цей посібник. У разі виникнення
будь-яких неправильних або помилкових дій зверніться
до найближчого авторизованого дилера або до
служби технічної підтримки.
(6) У разі пошкодження деталей рекомендується придбати запасну частину у виробника або офіційного
дилера.
жень, втрати майна та
НЕВИКОНАННЯ ЦИХ ПОПЕРЕДЖЕНЬ МОЖЕ ПРИЗВЕСТИ ДО ПОШКОДЖЕННЯ МАЙНА, УРАЖЕННЯ
ЕЛЕКТРИЧНИМ СТРУМОМ, СЕРЙОЗНИХ ТРАВМ АБО СМЕРТІ.
Page 21

1. КОРОТКИЙ ОПИС ПРОДУКТУ
потужність
потужність
хлору
солоність
басейну (м³)
Crystal Pro 4
AC110-220В/50-60Гц
DC12V
4г/год
≤18м³
Crystal Pro 8
AC110-220В/50-60Гц
8г/год
≤35м³
Crystal Pro 16
AC110-220В/50-60Гц
16г/год
≤68м³
Crystal Pro 20
AC110-220В/50-60Гц
20г/год
≤85м³
Crystal Pro 24
AC110-220В/50-60Гц
24г/год
≤102м³
У хлоргенераторі серії Crystal Pro використовуються найпередовіші мікрокомп’ютерні технології. Він
простий в експлуатації і може управлятися за допомогою віддаленого застосунку Tuya. У ньому
реалізовано такі функції, як підказка про кількість солі, яку необхідно додати в разі її нестачі, і
автоматичне регулювання рівня виробництва хлору за низької солоності. Для досягнення цілей
ефективності та екологічності Ви можете налаштувати виробництво хлору відповідно до Ваших п
отреб.
ХАРАКТЕРИСТИКА ПРОДУКТУ:
(1) Сольовий хлоратор може управлятися за допомогою Tuya APP.
(2) Контролер і хлоратор об'єднані для спрощення установки та економії місця.
(3) Хлоратор має функцію контролю температури води (10–45 °C) та захисту від нестачі води. Це дозволяє
ефективно продовжити термін експлуатації машини.
(4) Режим низької солоності: автоматичне регулювання рівня виробництва хлору за низької солоності.
(5) Підказка про нестачу солі: У разі нестачі солі пристрій підкаже кількість солі, необхідну для додавання в
басейн. (Під час першого використання введіть об’єм басейну).
(6) Функція контролю напруги і струму. При перевищенні встановленог
о значення лунає звуковий сигнал.
(7) Функція контролю несправності електрода. У разі відмови електрода подається сигнал тривоги.
(8) У разі вимкнення і повторного ввімкнення живлення функція примусового промивання електродів може
істотно подовжити термін служби титанової пластини.
(9) Функція визначення рівня води: хлоратор працює тільки тоді, коли датчик виявляє наявність води.
(10) Функція самоочищення титанової пластини. Електрод титанової пластини міняє місцями позитивний і
негативний електроди через регулярні проміжки часу, ефективно продовжуючи термін служби титанової
пластини.
(11) Під час увімкнення живлення автоматично запускається останнє робоче налаштування з пам’яті системи.
ЗАУВАЖЕННЯ: Якщо пі
д час роботи відбудеться відключення електроенергії, пристрій автоматично
увімкнеться і запам'ятає останній робочий стан після відновлення електропостачання.
(12) Функція встановлення часу роботи. Користувачі можуть встановити час роботи пристрою відповідно до
фактичних умов води в басейні для економії енергії.
(13) Функція відновлення заводських налаштувань одним натисканням
.
2. ІНФОРМАЦІЯ ПРО ПРОДУКТ ТА РОЗМІРИ
Модель
Crystal Pro 12 AC110-220В/50-60Гц 12г/год ≤50м³
Crystal Pro 30 AC110-220В/50-60Гц DC 29V 30г/год ≤127м³
Споживана
Вихідна
DC24V
Виробництво
Ідеальна
2700-4500PPM
Рекомендований об'єм
Page 22
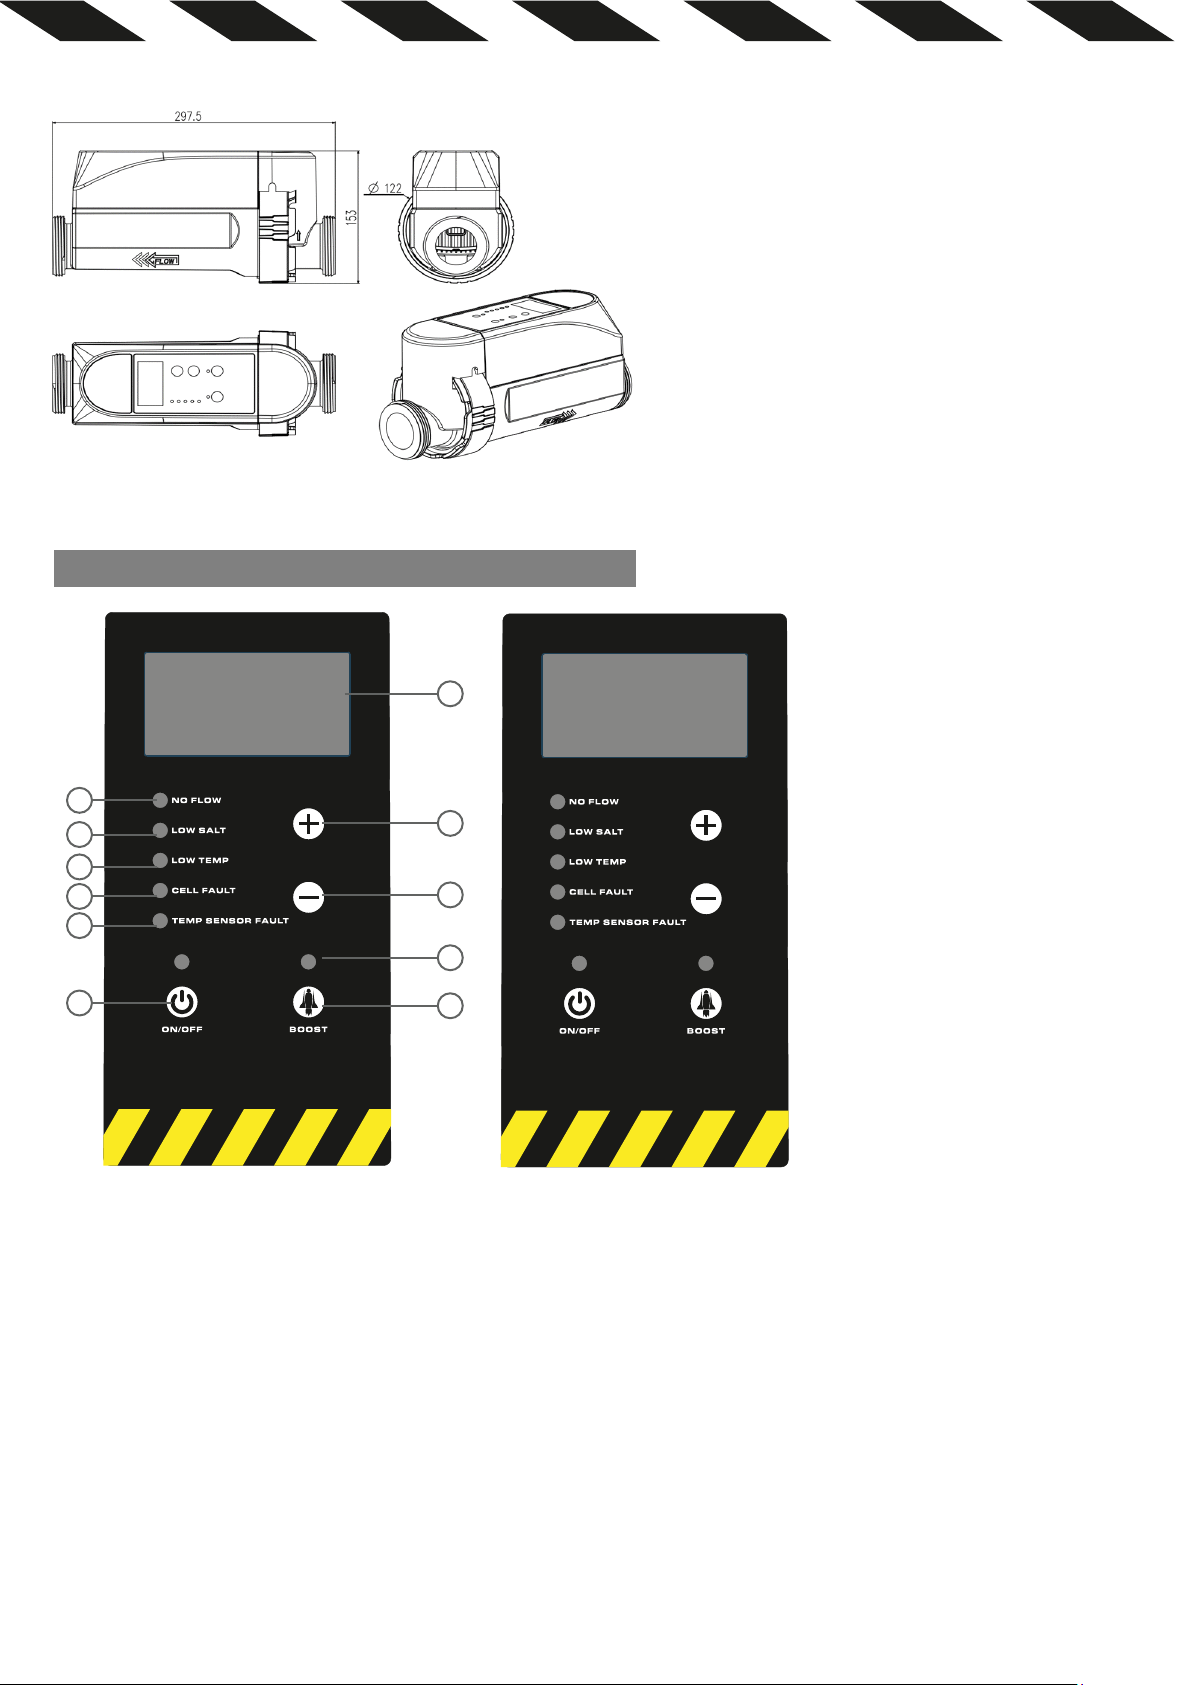
СХEMA ПРОДУКТУ
3. ІНСТРУКЦІЯ З ЕКСПЛУАТАЦІЇ ПАНЕЛІ КЕРУВАННЯ
1
6
7
8
9
11
12
2
3
4
5
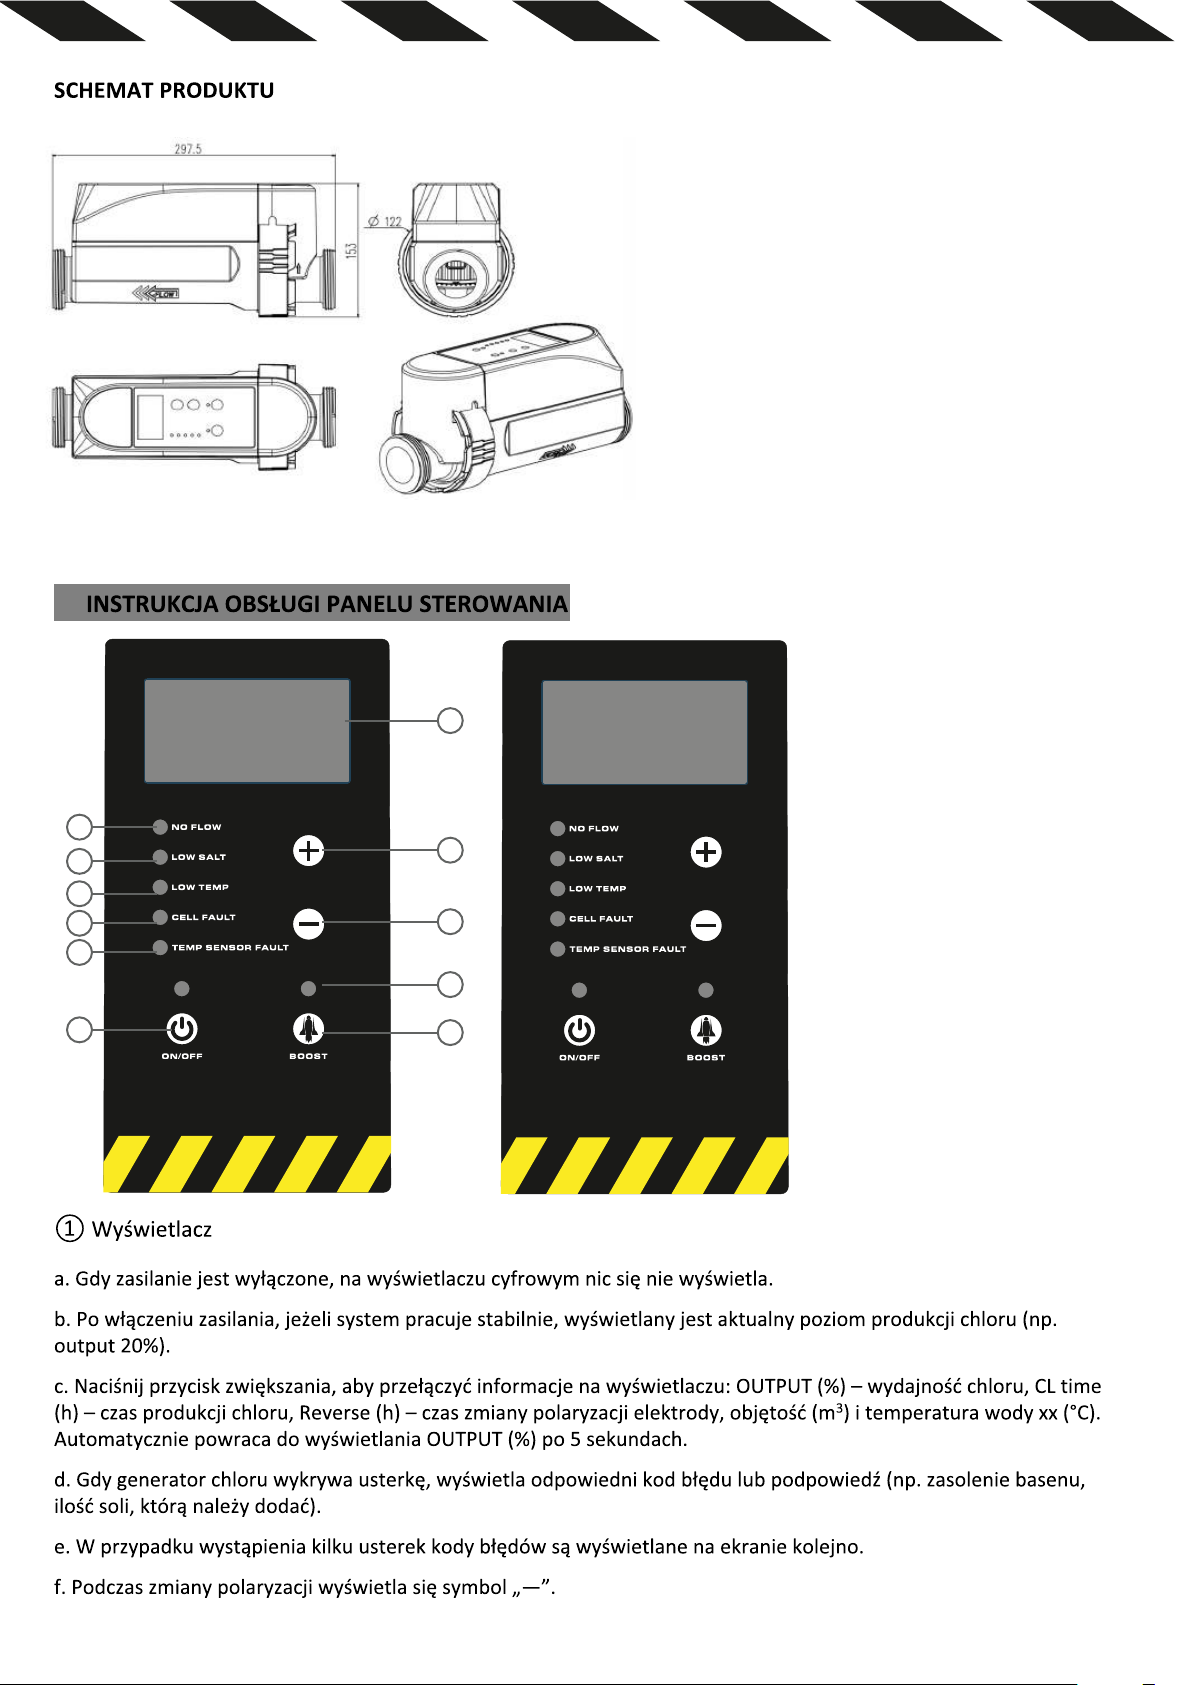
① Екран дисплея:
a
. Під час вимкнення живлення на цифровому дисплеї нічого не відображається.
b. Після увімкнення живлення відображається поточний рівень виробництва хлору (наприклад, output 20%),
якщо система працює стабільно.
c. Натисніть кнопку збільшення, аби переключити інформацію на дисплеї: OUTPUT (%) - вихід хлору, CL time (h) -
3
час виробництва хлору, Reverse (h) - час переміни електрода, об’єм (м
) і температура води xx (°C). Автоматично
повертається до відображення OUTPUT(%) через 5 секунд.
d. Коли сольовий хлоратор виявляє несправність, він відображує відповідний код помилки або підказку
(наприклад: солоність басейну, кількіс
ть солі, яку необхідно додати).
e. За наявності декількох несправностей коди помилок відображаються на екрані по черзі.
f. Під час зміни полярності відображається "—".
Page 23

② Кнопка “+”: збільшити подачу хлору.
③ Кнопка “-”: зменшити подачу хлору.
④ Світловий індикатор “BOOST”: відображається зеленим кольором у разі прискорення вироблення хлору.
⑤ Кнопка “BOOST” (багатофункціональна кнопка):
a. За вимкненої функції “BOOST” натисніть і утримуйте кнопку протягом 3 секунд, аби запустити функцію
прискореного вироблення хлору “BOOST”.
b. У стані “BOOST” натисніть і утримуйте кнопку протягом 3 секунд, аби вийти з режиму прискореного
вироблення хлору “BOOST” і пов
c. Під час сигналу про несправність один раз натисніть кнопку “BOOST”, аби скинути сигнал про помилку.
d. У нормальному стані використовуйте цю кнопку як кнопку налаштування, спільно з кнопками “+” та “-”
налаштовуйте рівень виробництва хлору, час виробництва хлору, час самоочищення та об’єм басейну.
⑥ Індикатор несправності “NO FLOW”: коли червоний індикатор світиться, це означає, що в камері
недостатньо води.
⑦ “LOW-SALT”: коли горит
низькому рівні і необхідно додати солі у басейн.
⑧ Індикатор несправності “LOW TEMP”: червоний індикатор свідчить про те, що температура нижча за
припустиме значення.
⑨ Індикатор “CELL FAULT”: червоний індикатор, що горить, свідчить про те, що комірка несправна.
⑩ Індикатор “TEMP SENSOR FAULT”: червоний індикатор свідчить про несправність датчика температури
води.
⑪ Індикатор живлення: не горить, пристрій вимкн
⑫ Кнопка “УВІМК/ВИМК”: кнопка запуску/зупинки.
ернутися до попереднього рівня вироблення хлору.
ь червоний індикатор, це означає, що солоність води у басейні знаходиться на
ено. Горить зеленим, пристрій працює.
4. ІНСТРУКЦІЯ З МОНТАЖУ
(1) Перед використанням переконайтеся, що труба, яка використовується для монтажу, має такий самий розмір,
що й сольовий хлоратор. Номінальний діаметр сполучної труби хлоратора становить: 1,5 дюйма (метрична
система: Ø50 мм; дюйми: 1,5 дюйма / Ø 48 мм).
(2) Перед використанням переконайтеся, що клапан труби, з’єднаної з хлоратором, перекритий.
(3) Перед установкою, будь ласка, видаліть усі забруднення і залишки масла з труб і з’єднувального шва.
(4) Хлоратор має
клапан має бути встановлений на основній трубі (див. Мал. 1 або Мал.2).
(5) Перед установкою хлоратора переконайтеся, що потік води відповідає напрямку, зазначеному на пристрої.
(6) Під час підключення труб до хлоратора використовуйте клей, спеціально призначений для ПВХ.
(7) Зовнішній адаптер живлення хлоратора має бути під’єднаний до джерела живлення із захистом від витоків
(AC110-220В/50-60Г
(8) Хлоратор слід встановлювати в добре провітрюваному місці, аби забезпечити його охолодження. Не
встановлюйте його в місці, де легко накопичується вода, щоб запобігти пошкодженню електронних компонентів
вологою або дощем.
(9) У процесі використання слід уникати впливу прямих сонячних променів на пристрій, оскільки це призведе до
швидкого старіння корпусу сольового хлоратора.
бути встановлений на зворотній лінії вашого басейну і в обхід очисної системи. Регулювальний
ц), джерело живлення має бути таким самим, як і для насоса.
Page 24
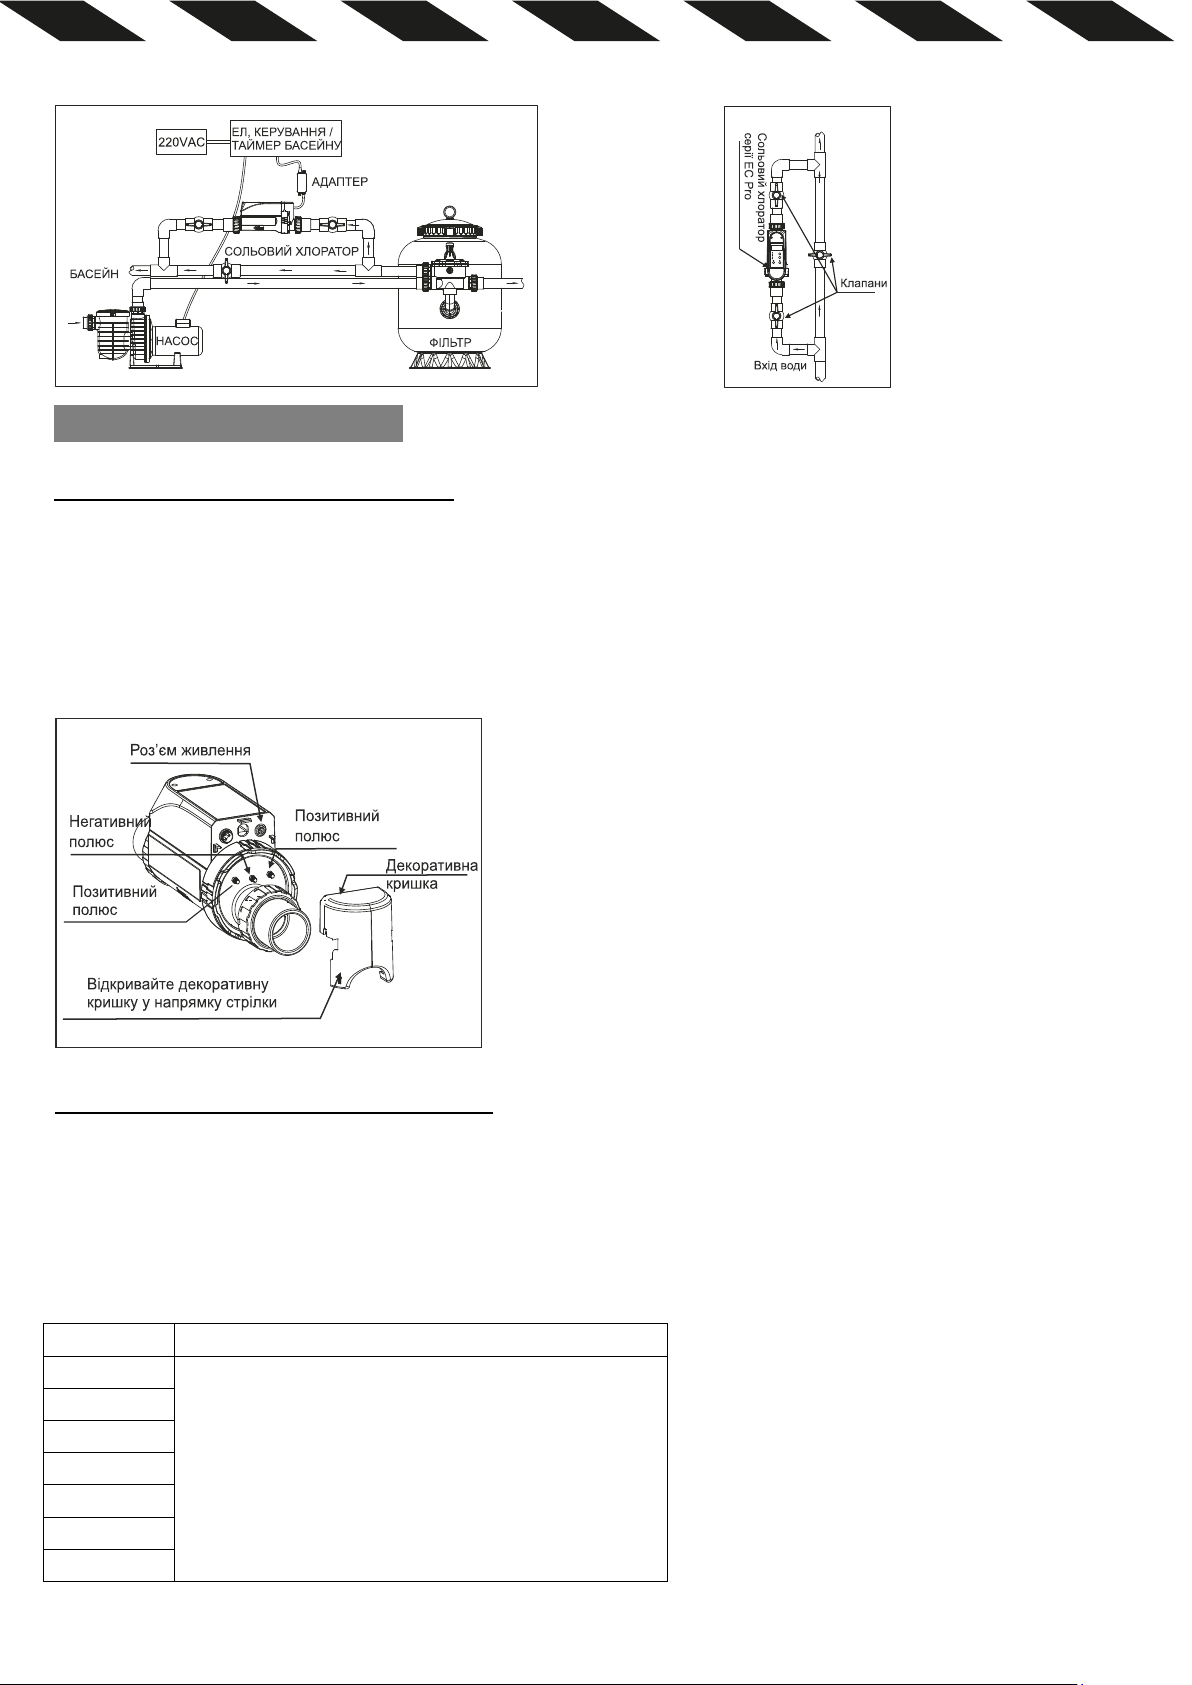
Малюнок 1
Малюнок 2
5. ІНСТРУКЦІЯ З ЕКСПЛУАТАЦІЇ
ПІДГОТОВКА ПЕРЕД ВИКОРИСТАННЯМ
(1) Переконайтеся, що концентрація солі у воді басейну перебуває у нормальному робочому діапазоні
(2700- 4500ppm), тобто загальний вміст солі на кубічний метр води у басейні становить 2,7–4,5 кг.
(2) Після встановлення пристрою відкрийте кран, підключений до трубопроводу хлоратора, та
закрийте кран основного трубопроводу. Увімкніть перемикач захисту від витоку.
(3) Запустіть насос, переконайтеся, що через хлоратор проходить потік води, з’єднання не протікають, а
перемикач потоку води закритий.
Малюнок 3
ЕКСПЛУАТАЦІЯ СОЛЬОВОГО ХЛОРАТОРА
Кнопка УВІМК/ВИМК: Запуск та зупинка хлоратора.
Відновлення заводських налаштувань: У включеному стані натисніть і утримуйте кнопку УВІМК/ВИМК
протягом 3 секунд, аби відновити заводські налаштування хлоратора. Заводські налаштування за
замовчуванням для кожної моделі є такими:
Модель Заводські налаштування за замовчуванням
Crystal Pro 4
Crystal Pro 8
Crystal Pro 12
Crystal Pro 16
Crystal Pro 20
Crystal Pro 24
Crystal Pro 30
1. Рівень виробництва хлору становить 100%.
2. Час виробництва хлору становить 24 години.
3. Час зміни полярності становить 4 години.
Page 25
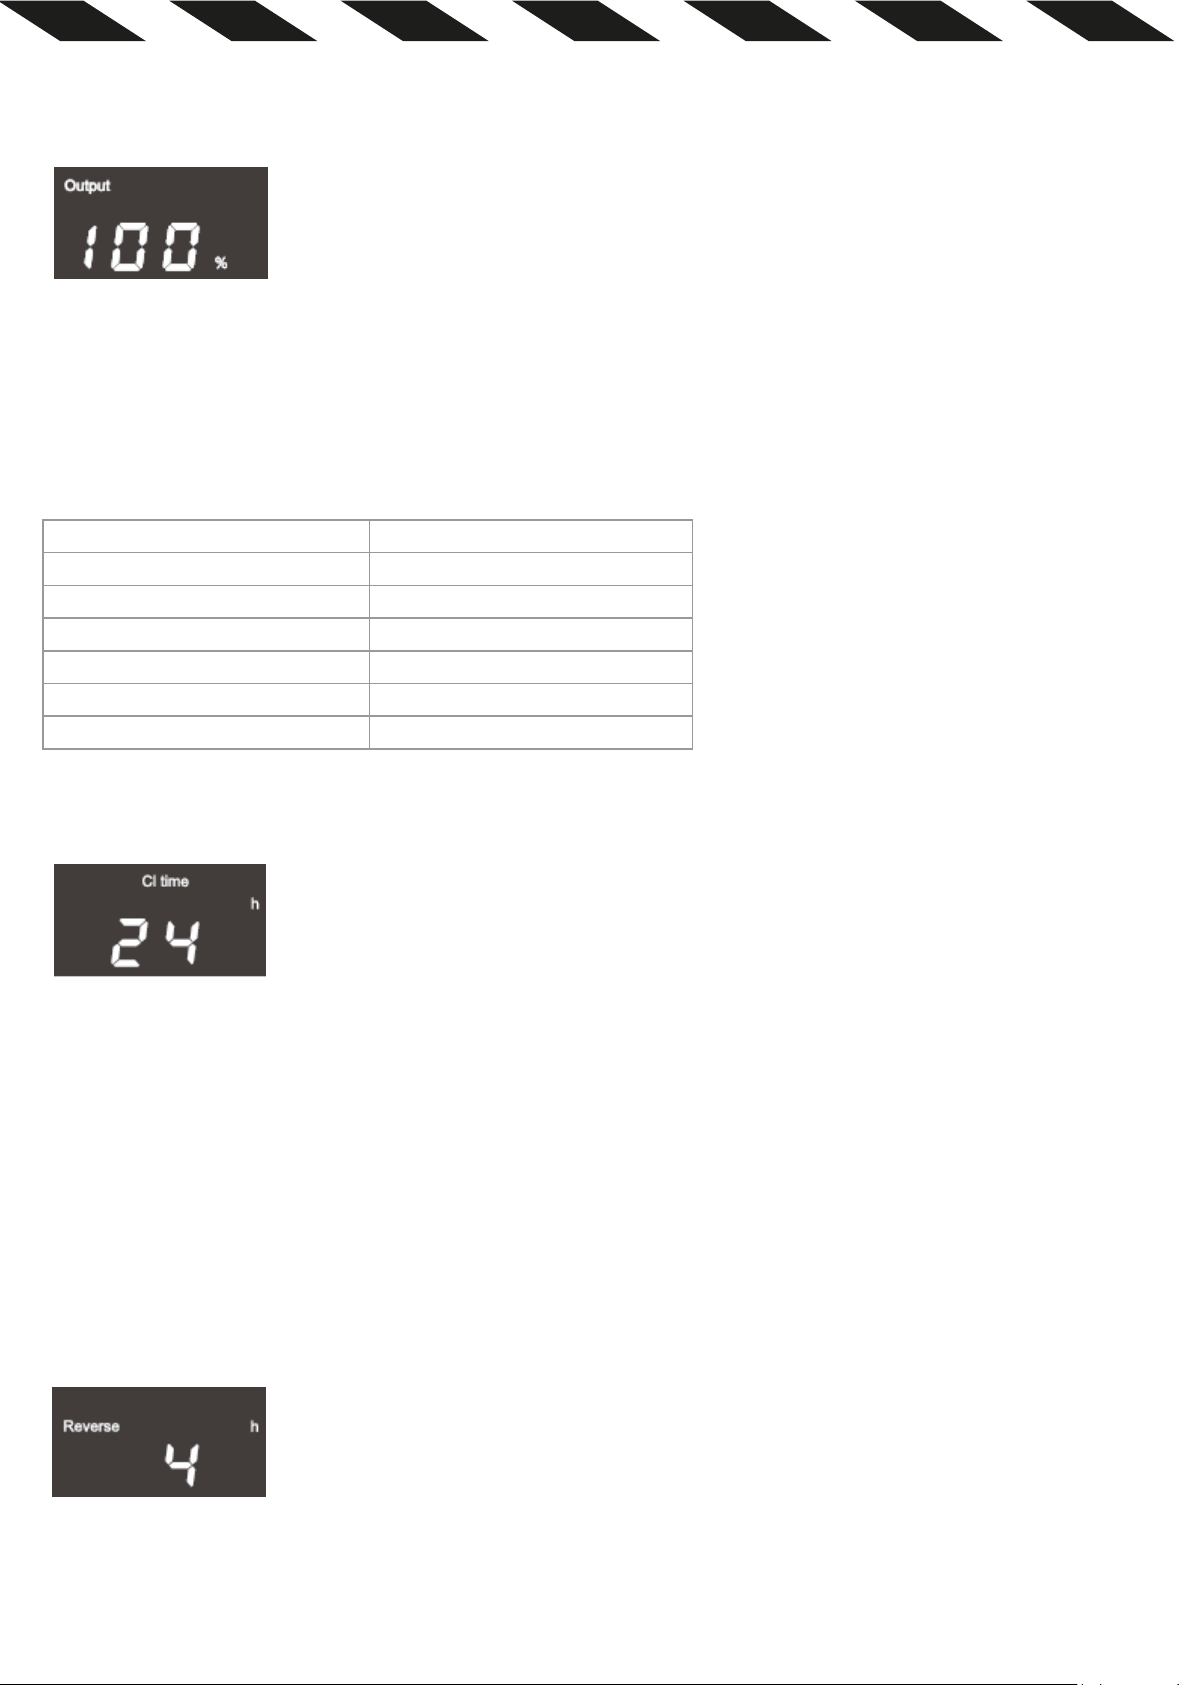
① Налаштування рівня виробництва хлору
Рівень виробництва хлору
На дисплеї
Level 1
Output 20%
Level 2
Output 40%
Level 3
Output 60%
Level 4
Output 80%
Level 5
Output 100%
Boost
Output SUP
Сольовий хлоратор має функцію налаштування рівня хлору на виході, які відповідно відображаються на
дисплеї як “Output 20%”, “Output 40%”, “Output 60%”, “Output 80%” та “Output 100%”.
Під час ввімкнення живлення натисніть кнопку «BOOST» один раз, на дисплеї хлоратора відображатиметься
поточний рівень хлору на виході (наприклад, Output 100%). За допомогою кнопок “+” та “-” ви можете
відрегулювати його (заводське налаштування за замовчуванням – “100%”).
②Налаштування часу виробництва хлору
Час виробництва хлору можна регулювати в діапазоні від 1 до 24 годин. Заводське значення часу
виробництва хлору становить 24 години.
У ввімкненому стані двічі натисніть кнопку «BOOST», аби перейти до функції налаштування часу
виробництва хлору. На дисплеї відобразиться поточний час виробництва хлору (наприклад, Cl time 24h),
після чого натисніть кнопки “+” та “-”, аби його відрегулювати.
“Cl time 1h” означає, що, починаючи зі встановленого часу, обладнання працюватиме 1 годину,
зуп
иниться на 23 години, потім відновить роботу ще на 1 годину і так далі.
“Cl time 24h” означає, що з моменту встановленого часу обладнання буде працювати безперервно.
③ Налаштування часу зміни полярності
Час зміни полярності можна встановити на 2 години/4 години/6 годин/8 годин, а заводське значення за
замовчуванням становить 4 години. Функція самоочищення дозволяє ефективно усунути накопичені на
електроді відкладення та підтримувати його в належному робочому стані.
У включеному стані натисніть кнопку «BOOST» 3 рази, щоб увійти в функцію налаштування часу зміни
Page 26
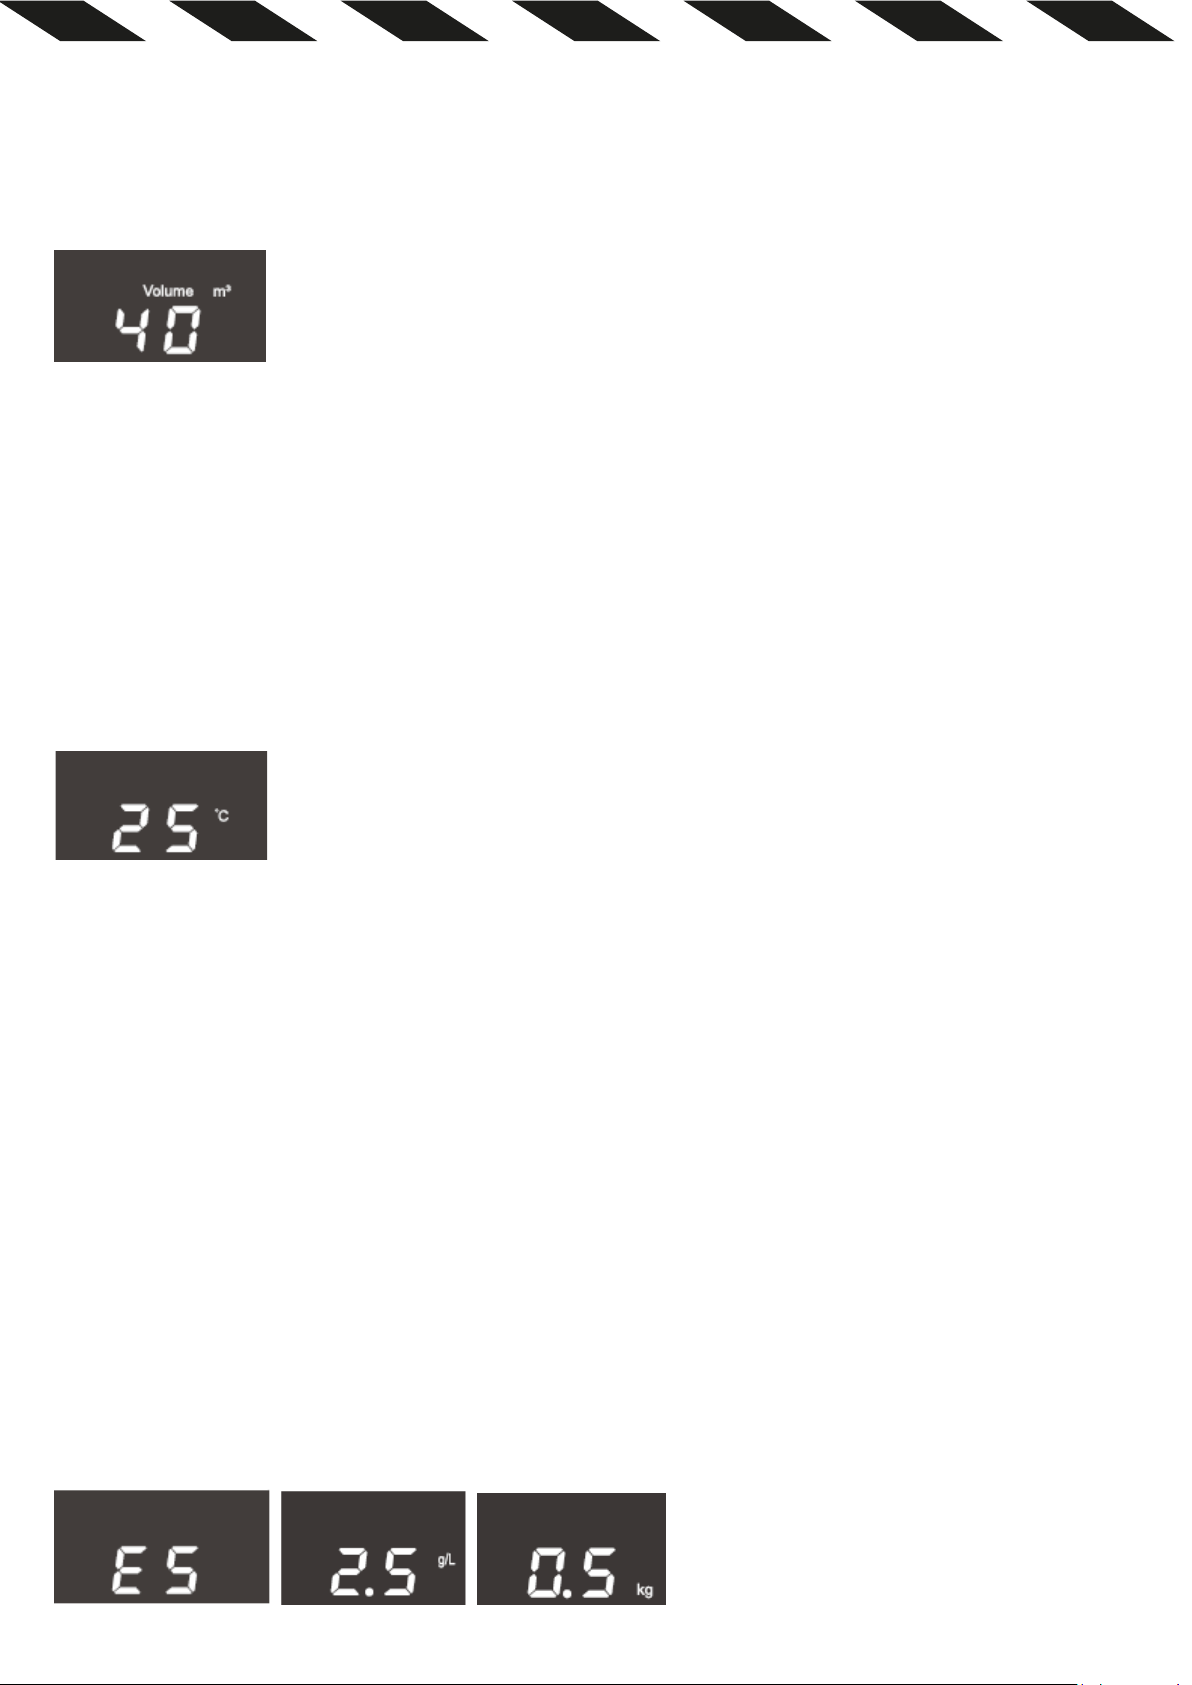
полярності. Поточний час зміни полярності буде показаний на дисплеї (наприклад: Reverse 4h), після
чого натисніть кнопки “+” та “-”, аби його налаштувати.
④ Розрахунок додавання солі
Швидкий спосіб розрахунку необхідної кількості солі, яку потрібно додати (при першому використанні
введіть об'єм басейну):
Об’єм басейну - 5 м3 - 200 м3 (дані про об’єм басейну необхідні для того, аби при спрацьовуванні сигналу
про низький рівень солі хлоратор міг автоматично розрахувати та відобразити необхідну кількість солі.)
У включеному стані натисніть кнопку «BOOST» 4 рази, аби перейти до режиму налаштування об'єму
басейну. Поточний об'єм басейну буде показаний на дисплеї (наприклад: Volume 35 м³), а потім
натисніть кнопки “+” та “-”, аби
його відрегулювати.
⑤ Запит про температуру води
Після увімкнення натисніть кнопку «BOOST» 5 разів, щоб увійти в функцію запиту температури води в
басейні, і хлоратор солі відобразить поточну температуру води в басейні (наприклад, 25 ).
⑥ Застосування функції прискоренного виробництва хлору “BOOST”
У робочому стані натисніть та утримуйте кнопку “BOOST” протягом 3 секунд. На екрані з’явиться напис:
Output SUP, а відповідний індикатор “BOOST” загориться зеленим. За замовчуванням час прискорення
становить 8 годин, і через 8 годин пристрій автоматично повернеться до нормального робочого рівня.
Під час прискорення, якщо ви знову натиснете кнопку “BOOST” на 3 секунди, прилад вийде з режиму
прискореного виробництва хлору і повернеться до нормального робочого рівня (під нормальним робочим
рівнем мається на увазі
робочий рівень до прискорення “BOOST”).
⑦ Індикатор живлення:
У нормальному режимі виробництва хлору індикатор живлення світиться зеленим кольором. Коли
виробництво хлору зупиняється, пристрій переходить у режим очікування, і зелений індикатор живлення
починає блимати; у вимкненому стані індикатор живлення не світиться.
⑧ Адаптація до солоності (автоматичне зниження рівня солоності):
Page 27
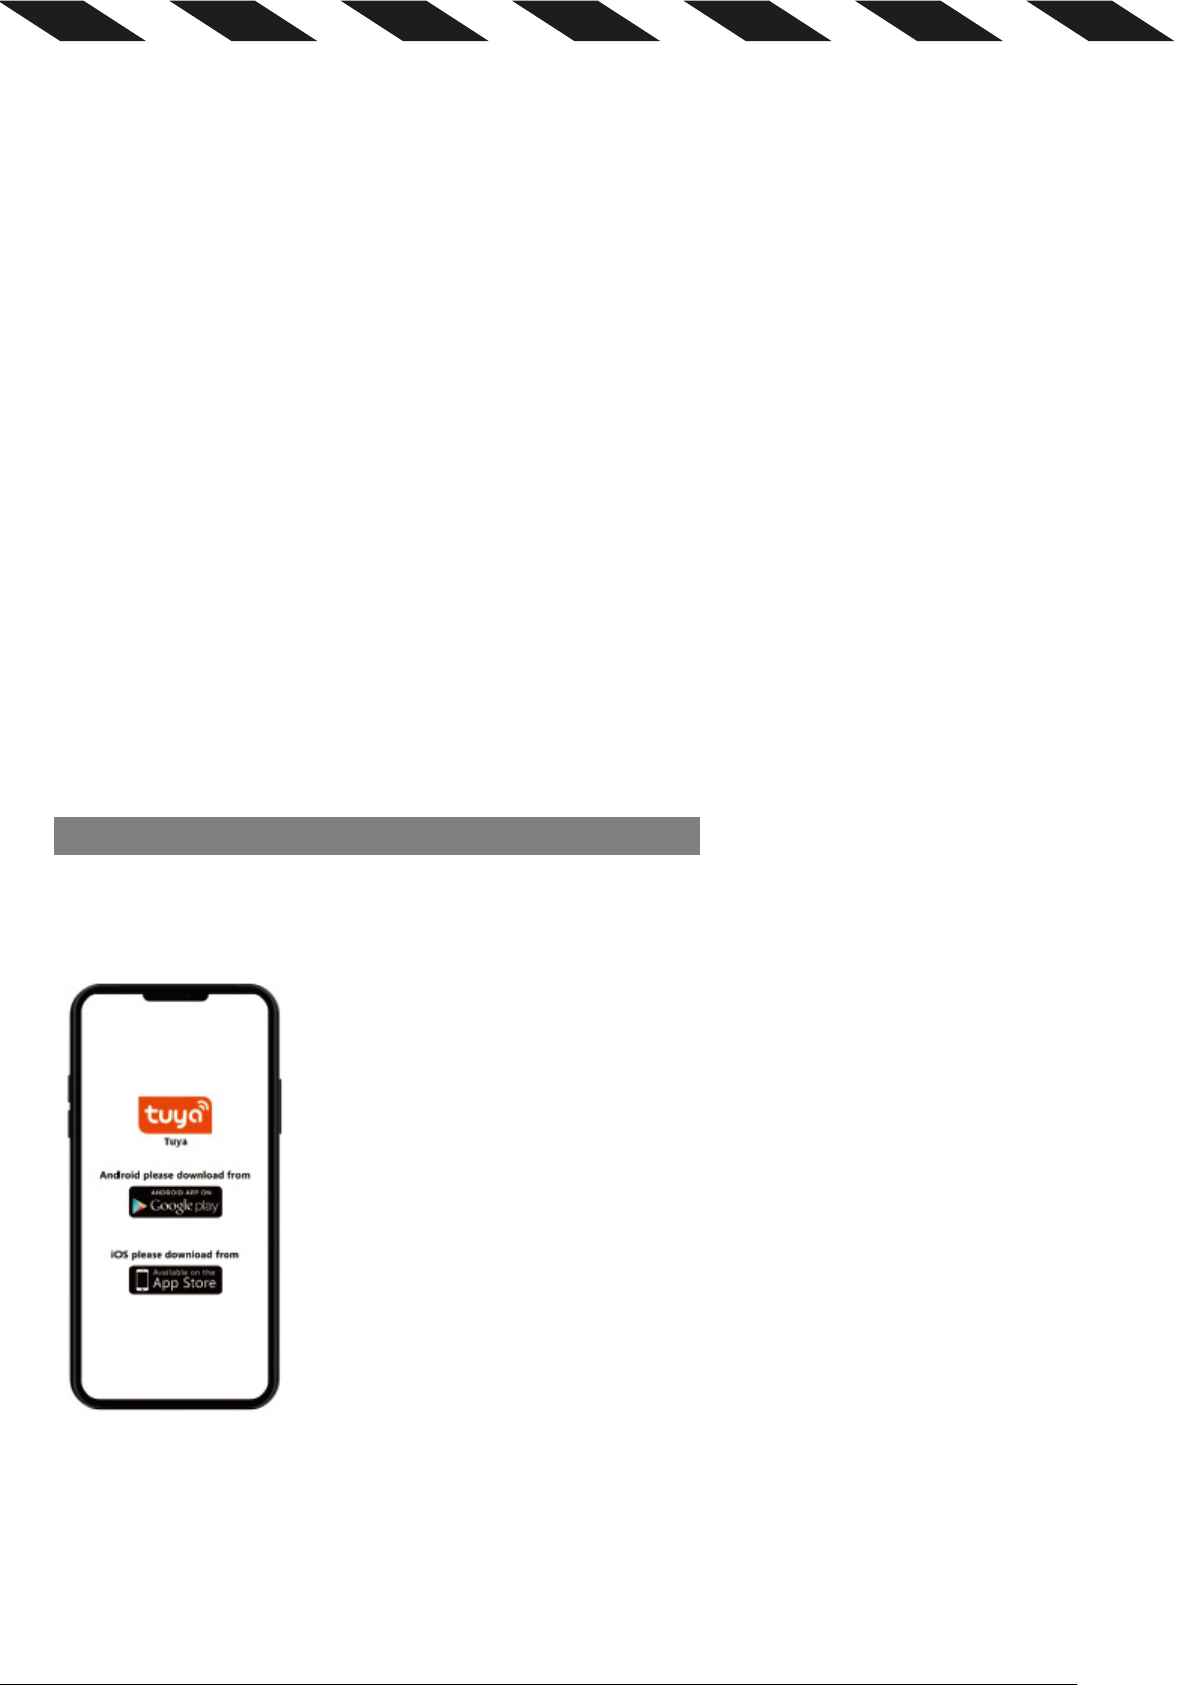
Коли хлоратор сигналізує про нестачу солі при високому рівні, він автоматично регулює рівень виробництва хлору
при низькому рівні солоності, на дисплеї почерзі відображається E5/соленість/кількість солі, яку необхідно додати
Індикатор низького рівня солі стає червоним і не подає звукового сигналу, він автоматично і поступово
знизиться до відповідного рівня через 1 хвилину. На дисплеї по черзі відображатиметься E5/солоність/
необхідність додавання солі, а індикатор ни
зького рівня солі буде залишатися червоним; якщо хлоратор
солі сигналізує про низький рівень солі на рівні 3 або нижче, на дисплеї по черзі відображатиметься E5/
солоність/необхідність додавання солі, індикатор низького рівня солі стане червоним, а звуковий сигнал
сповістить про необхідність зупинки виробництва хлору.
⑨ Функція пам'яті
A. Коли хлоратор перестає працювати через відключення електроенергії, обладнання автоматично
збереже налаштування параметрів, що були встановлені до відкл
ючення. Після відновлення
електропостачання обладнання перезапуститься відповідно до останніх налаштувань.
В. Час роботи водяного насоса повинен бути таким самим або трохи довшим за час виробництва хлору.
.
C. Якщо ви чуєте безперервні переривчасті звуки, перевірте код тривоги, що відображається на екрані,
і дотримуйтесь вказівок для усунення проблеми.
6. ФУНКЦІЯ WIFI – КОНФІГУРАЦІЯ МЕРЕЖІ ОБЛАДНАННЯ
Якщо WiFi працює в діапазоні 5G, налаштування мережі не буде успішним.
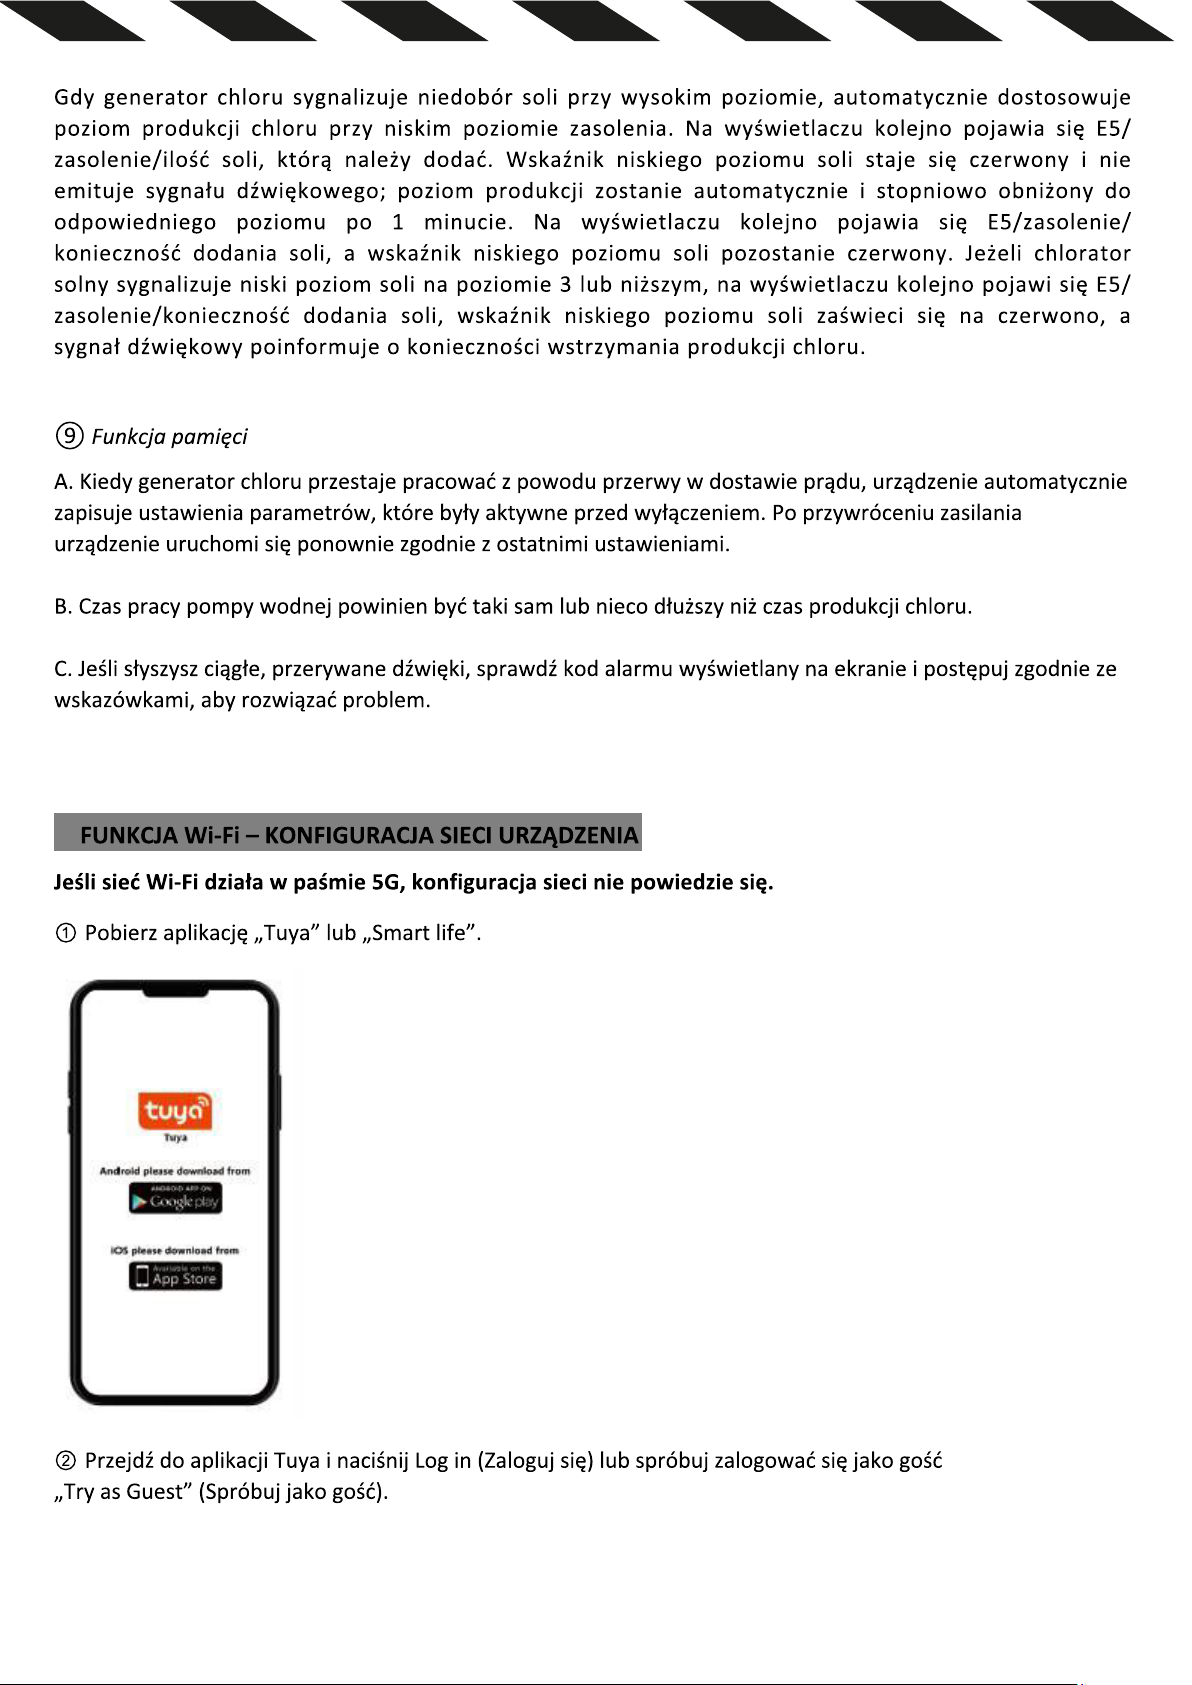
① Завантажте додаток «Tuya» або «Smart life» на мобільний телефон.
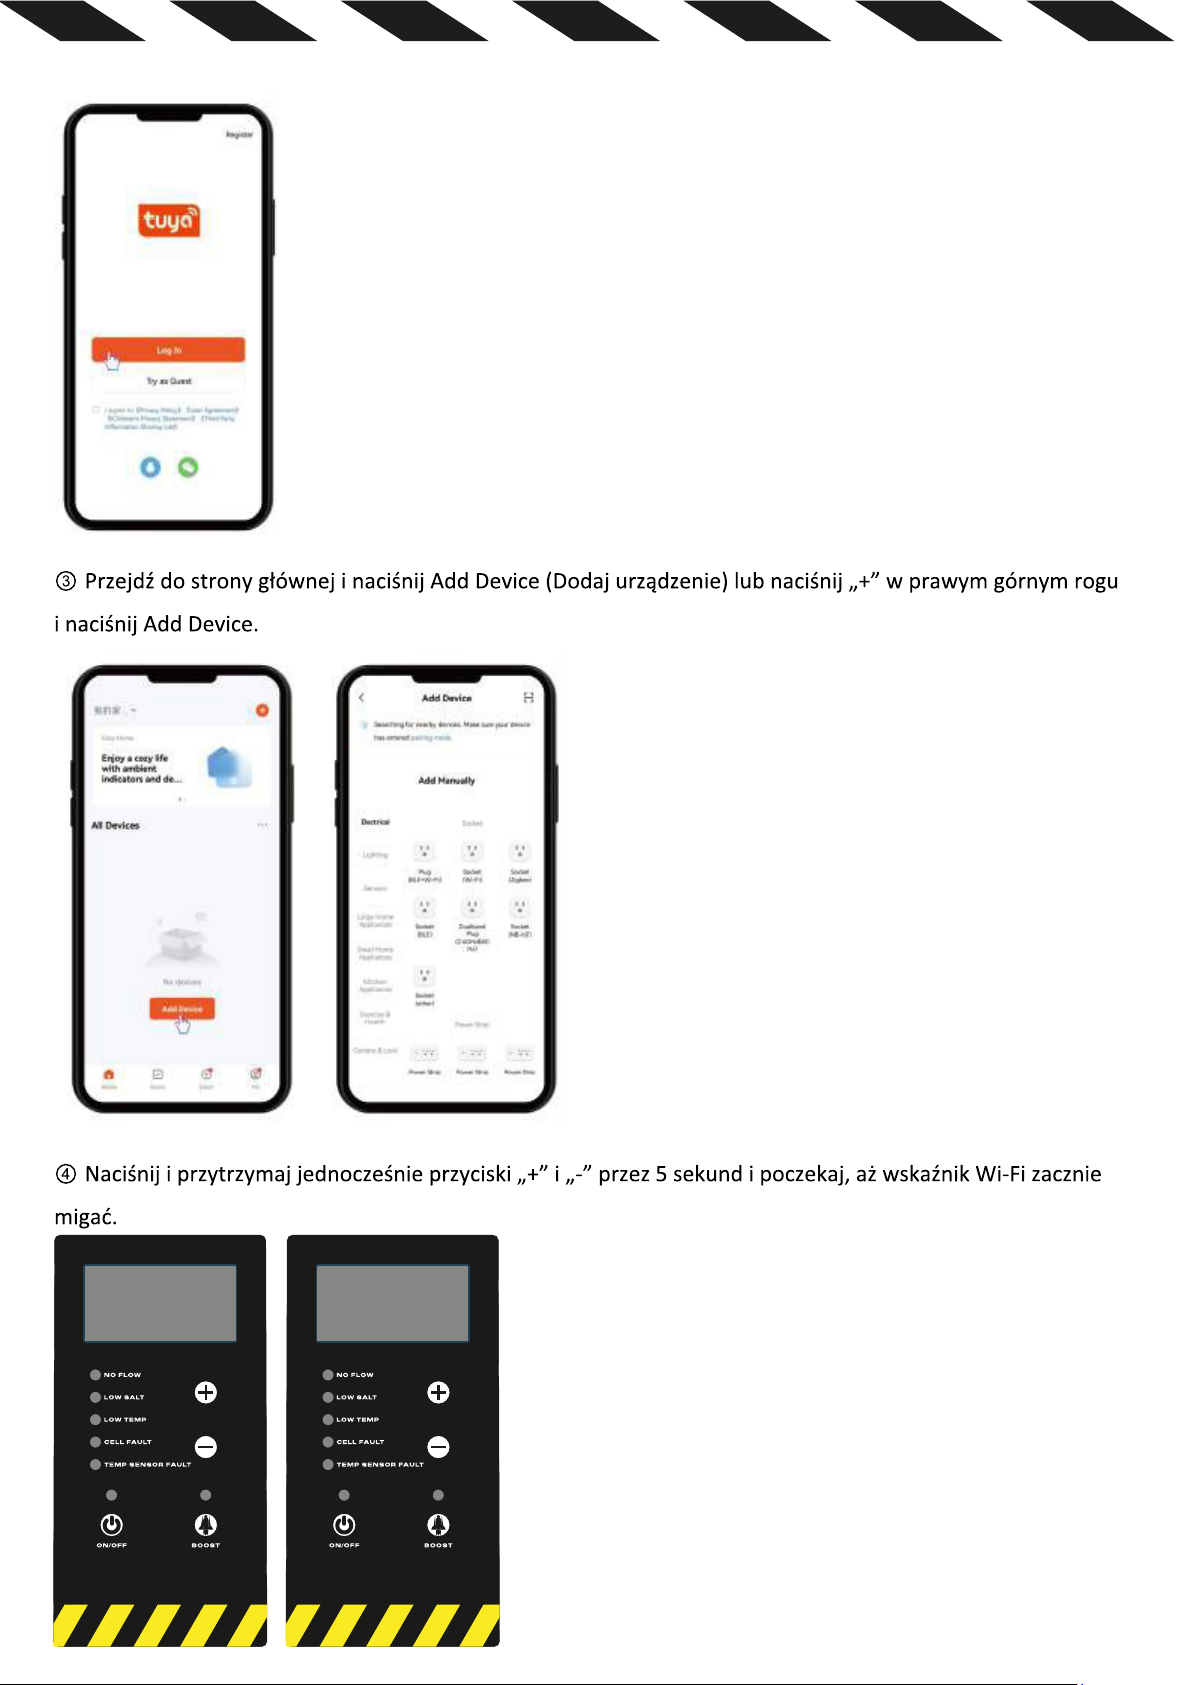
② Перейдіть до застосунку Tuya та натисніть Log in або спробуйте увійти як гість «Try as Guest».
Page 28
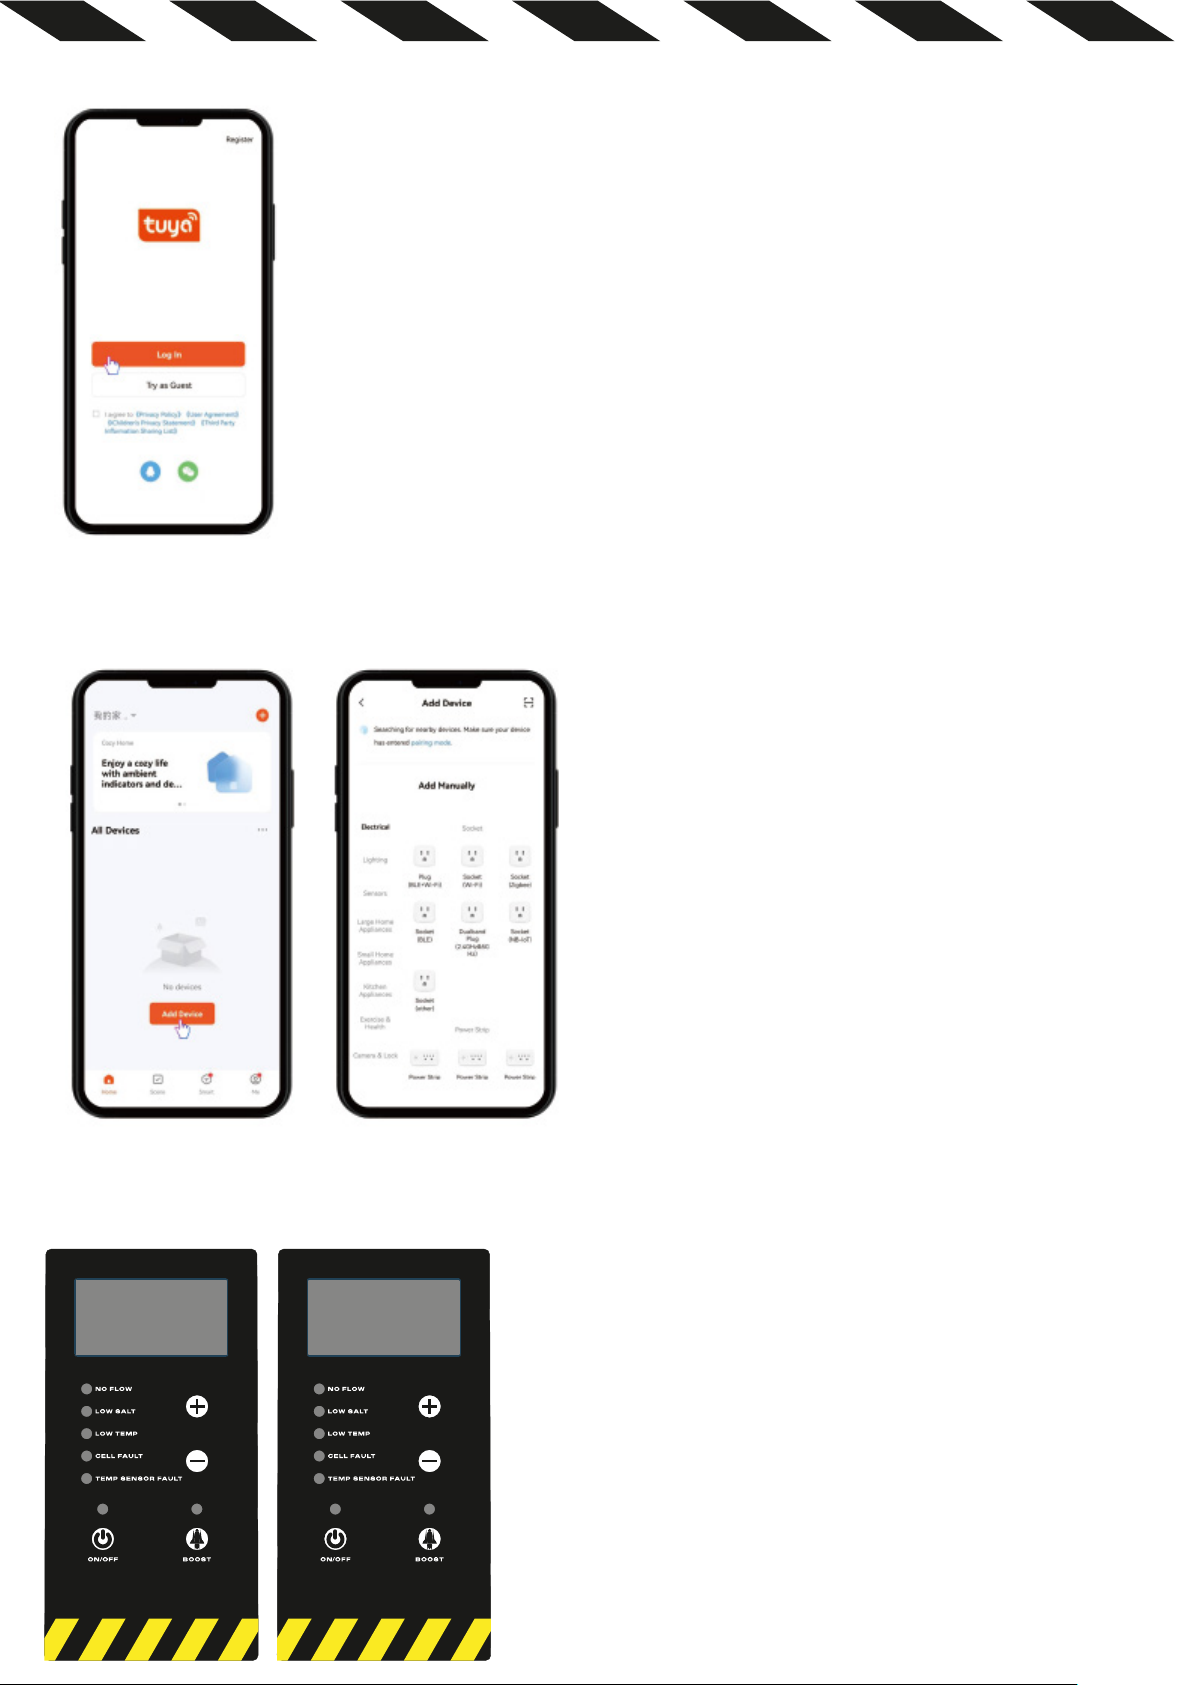
③ Перейдіть на головну сторінку та натисніть Add Device (Додати пристрій) або натисніть “+” у
верхньому правому куті та натисніть Add Device.
④ Натисніть і утримуйте кнопки “+” і “-” одночасно протягом 5 секунд і зачекайте, доки індикатор WiFi
не почне блимати.
Page 29
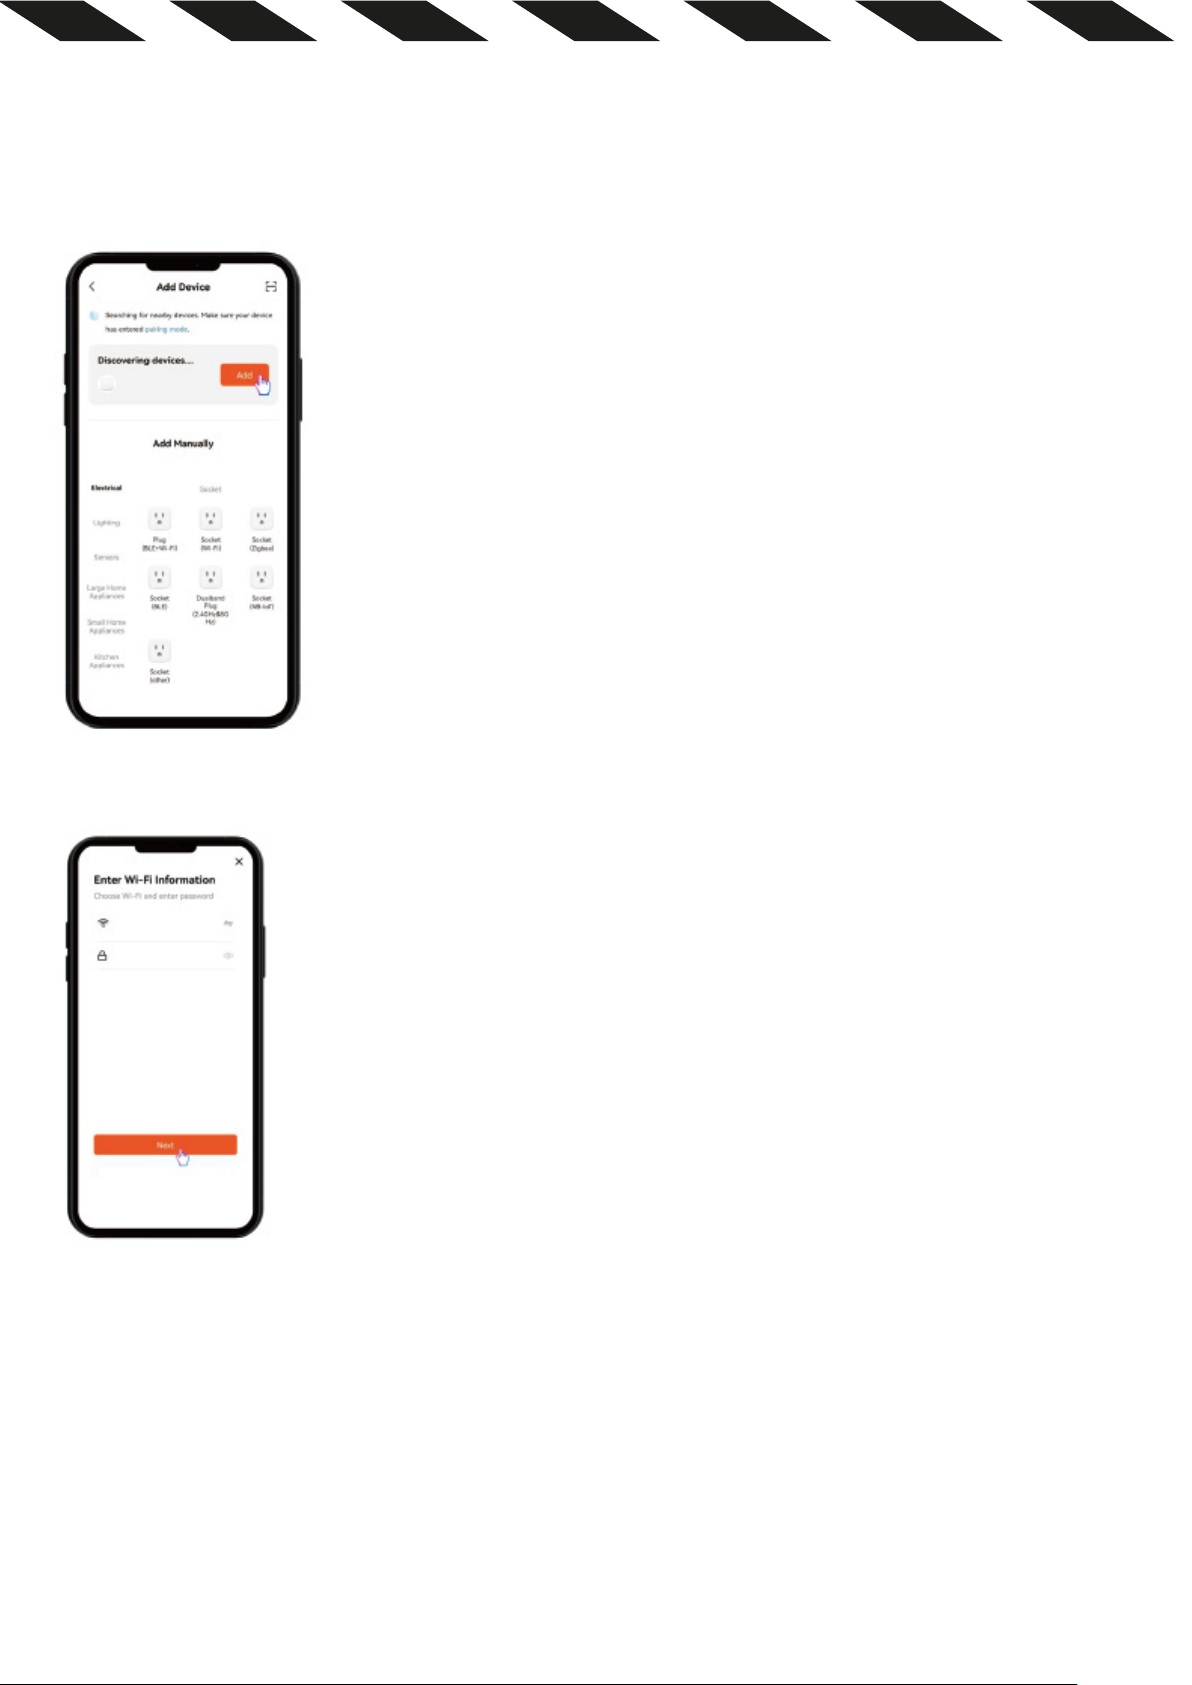
⑤ Увійдіть у режим очікування мережі, в цей час програма Tuya автоматично шукає пристрій. Коли
пристрій знайдено, натисніть “Add” (Додати), аби перейти до наступного кроку. Якщо пристрій не
вдається знайти, перевірте, чи увімкнено Bluetooth і чи не вимкнено дозвіл для застосунку.
⑥ Введіть інформацію про поточне підключення wifi.
ПРИМІТКА: Переконайтеся, що смуга пропускання Wi-Fi становить 2,4 ГГц. Якщо використовується
смуга пропускання 5 ГГц, це призведе до збою мережі.
⑦ Зачекайте кілька хвилин, аби завершити створення мережі. Після створення мережі ім’я продукту
може бути змінено. Натисніть кнопку Done (Готово), аби залишити сторінку.
Page 30
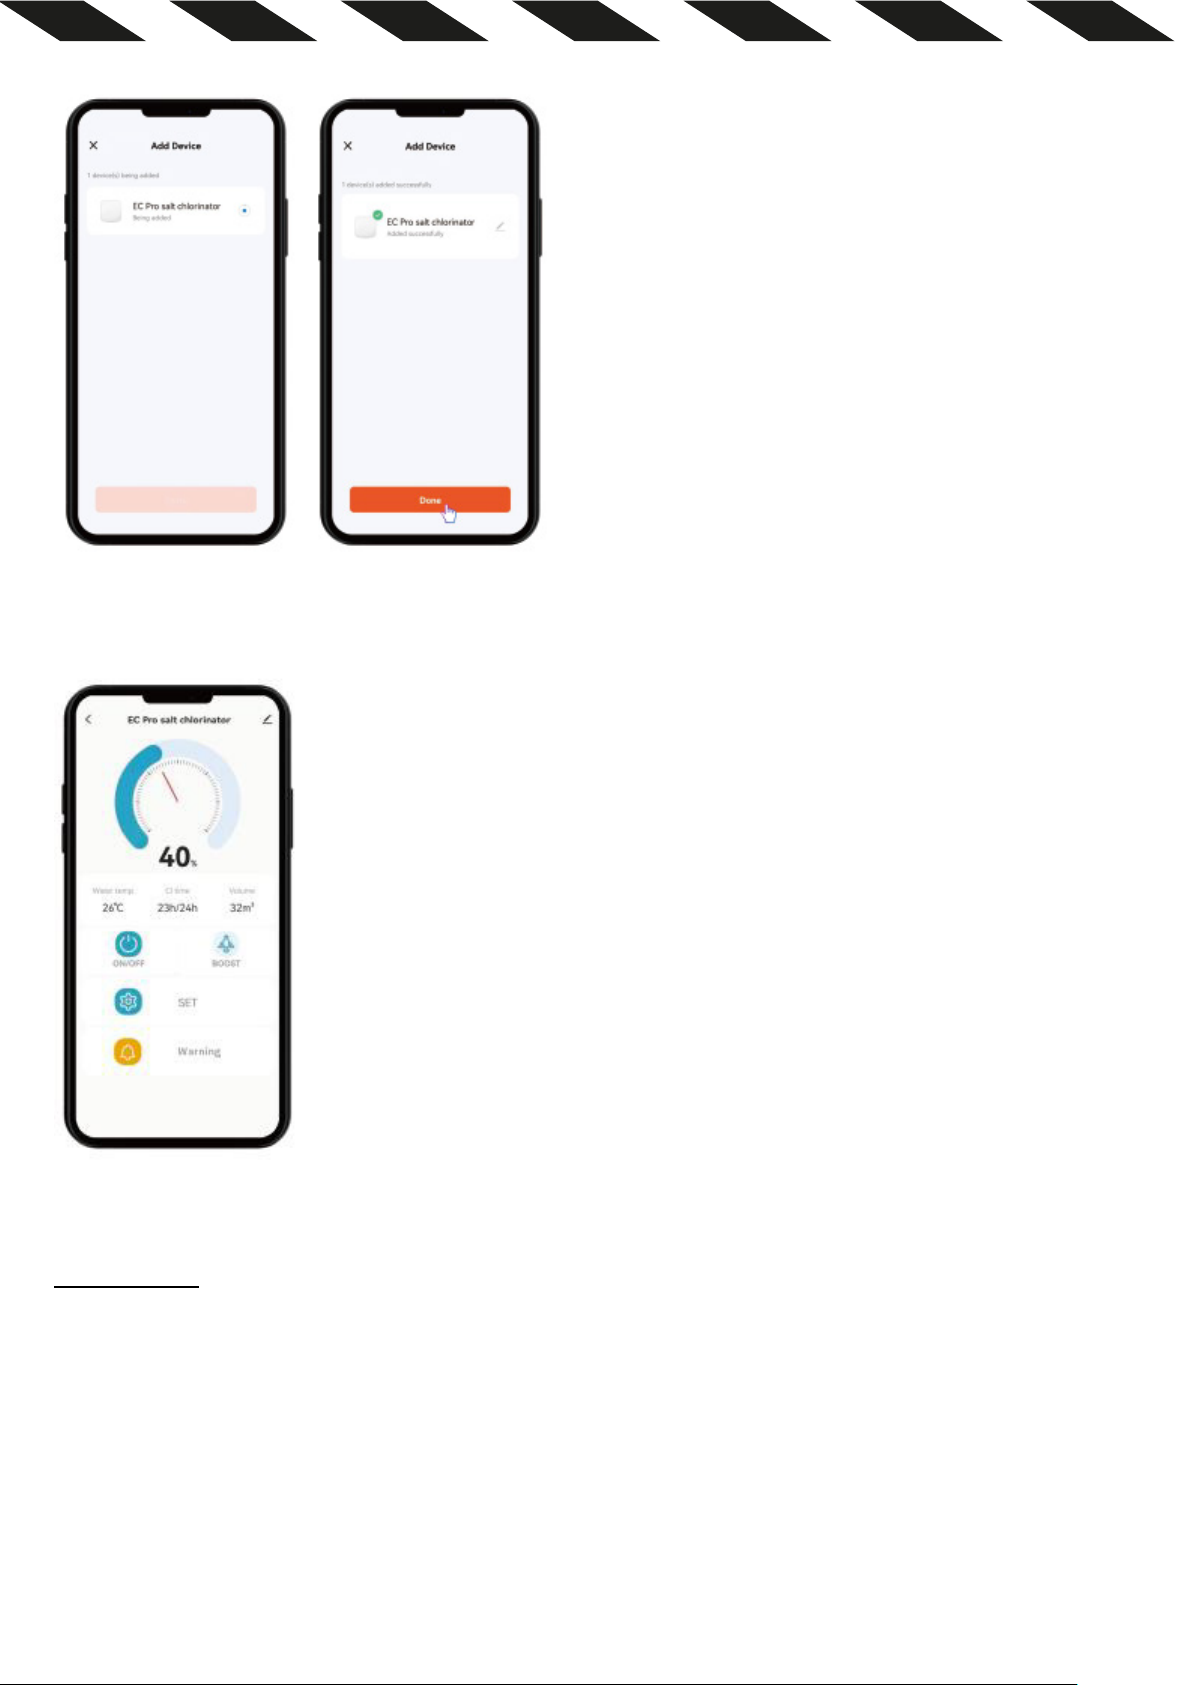
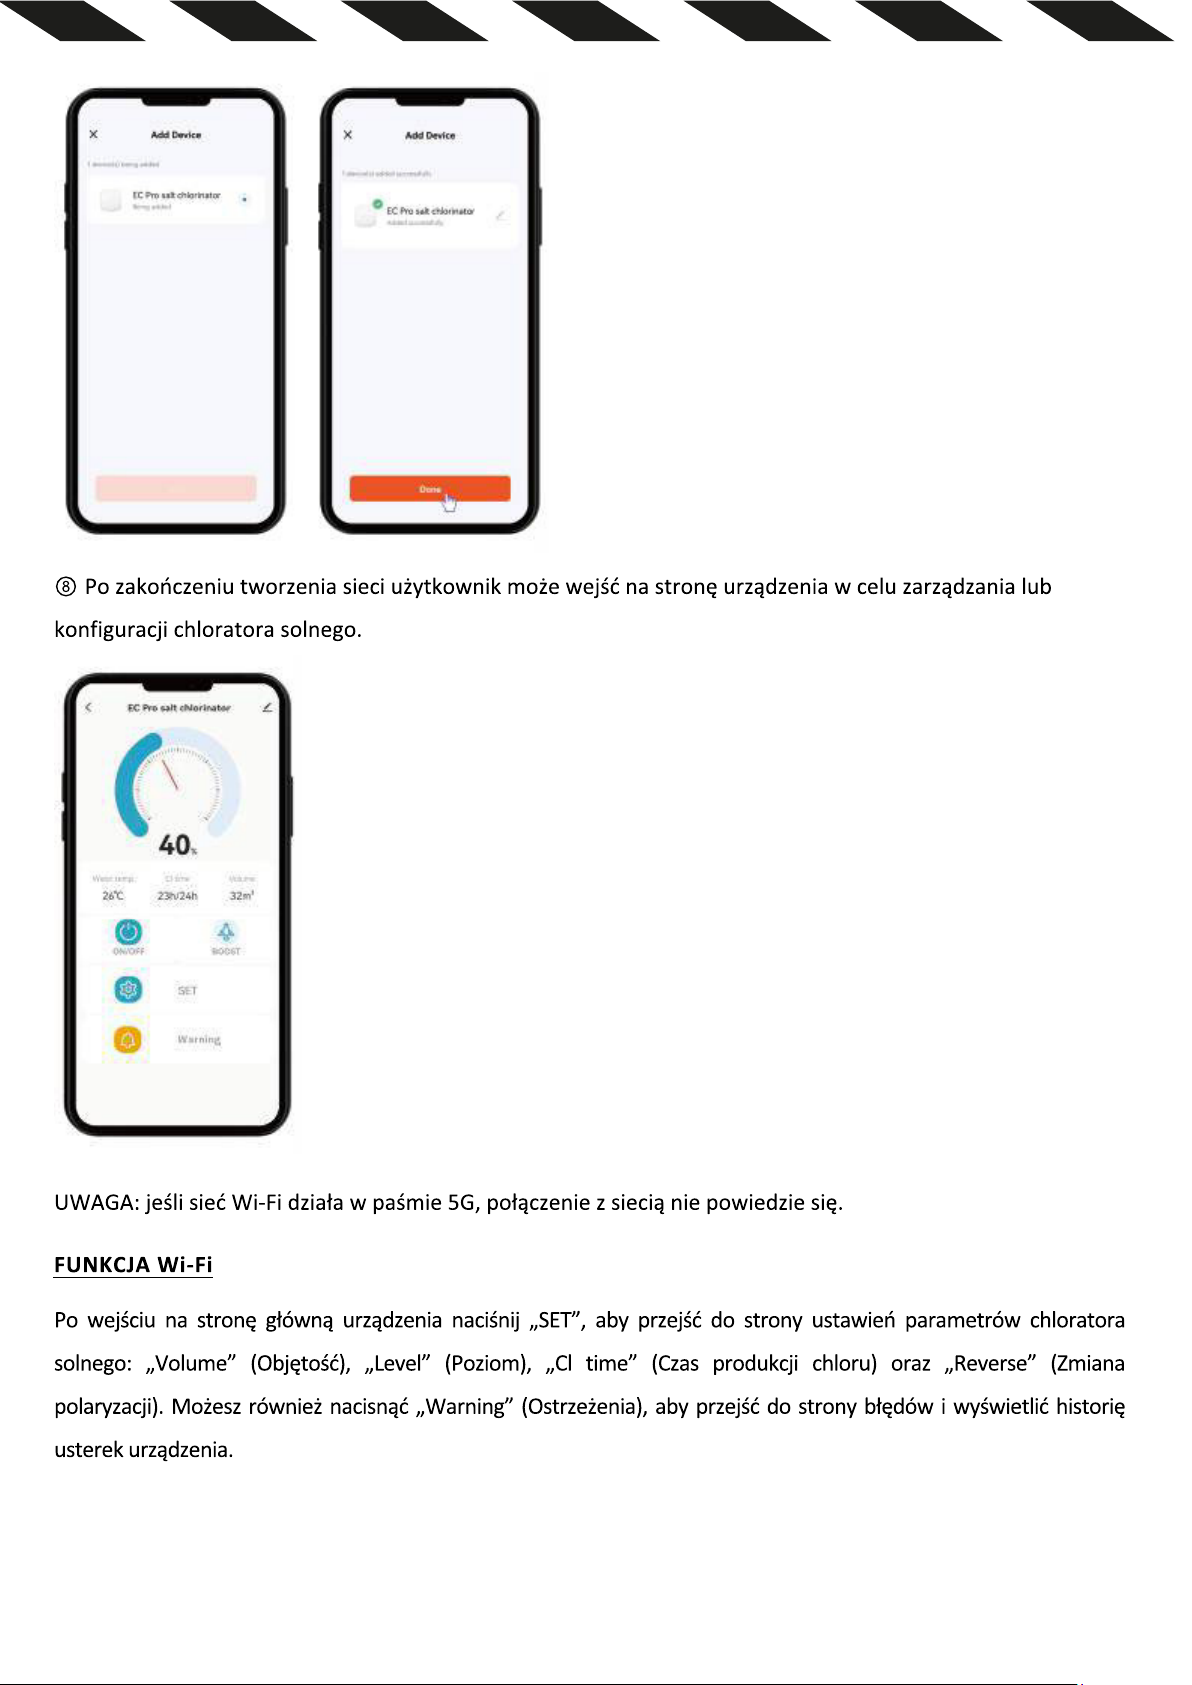
⑧ Після завершення створення розподільчої мережі користувач може увійти на сторінку обладнання
для керування або налаштування сольового хлоратора.
ПРИМІТКА: Якщо WiFi працює в діапазоні 5G, підключення до мережі не буде успішним.
ФУНКЦІЯ WIFI
Після входу на головну сторінку пристрою натисніть “SET”, аби увійти на сторінку налаштування
параметрів сольового хлоратора “Volume”, “Level”, “Cl time” та “reverse”. Ви також можете натиснути
“Warning”, щоб увійти на сторінку помилок для перегляду історії помилок пристрою.
Page 31

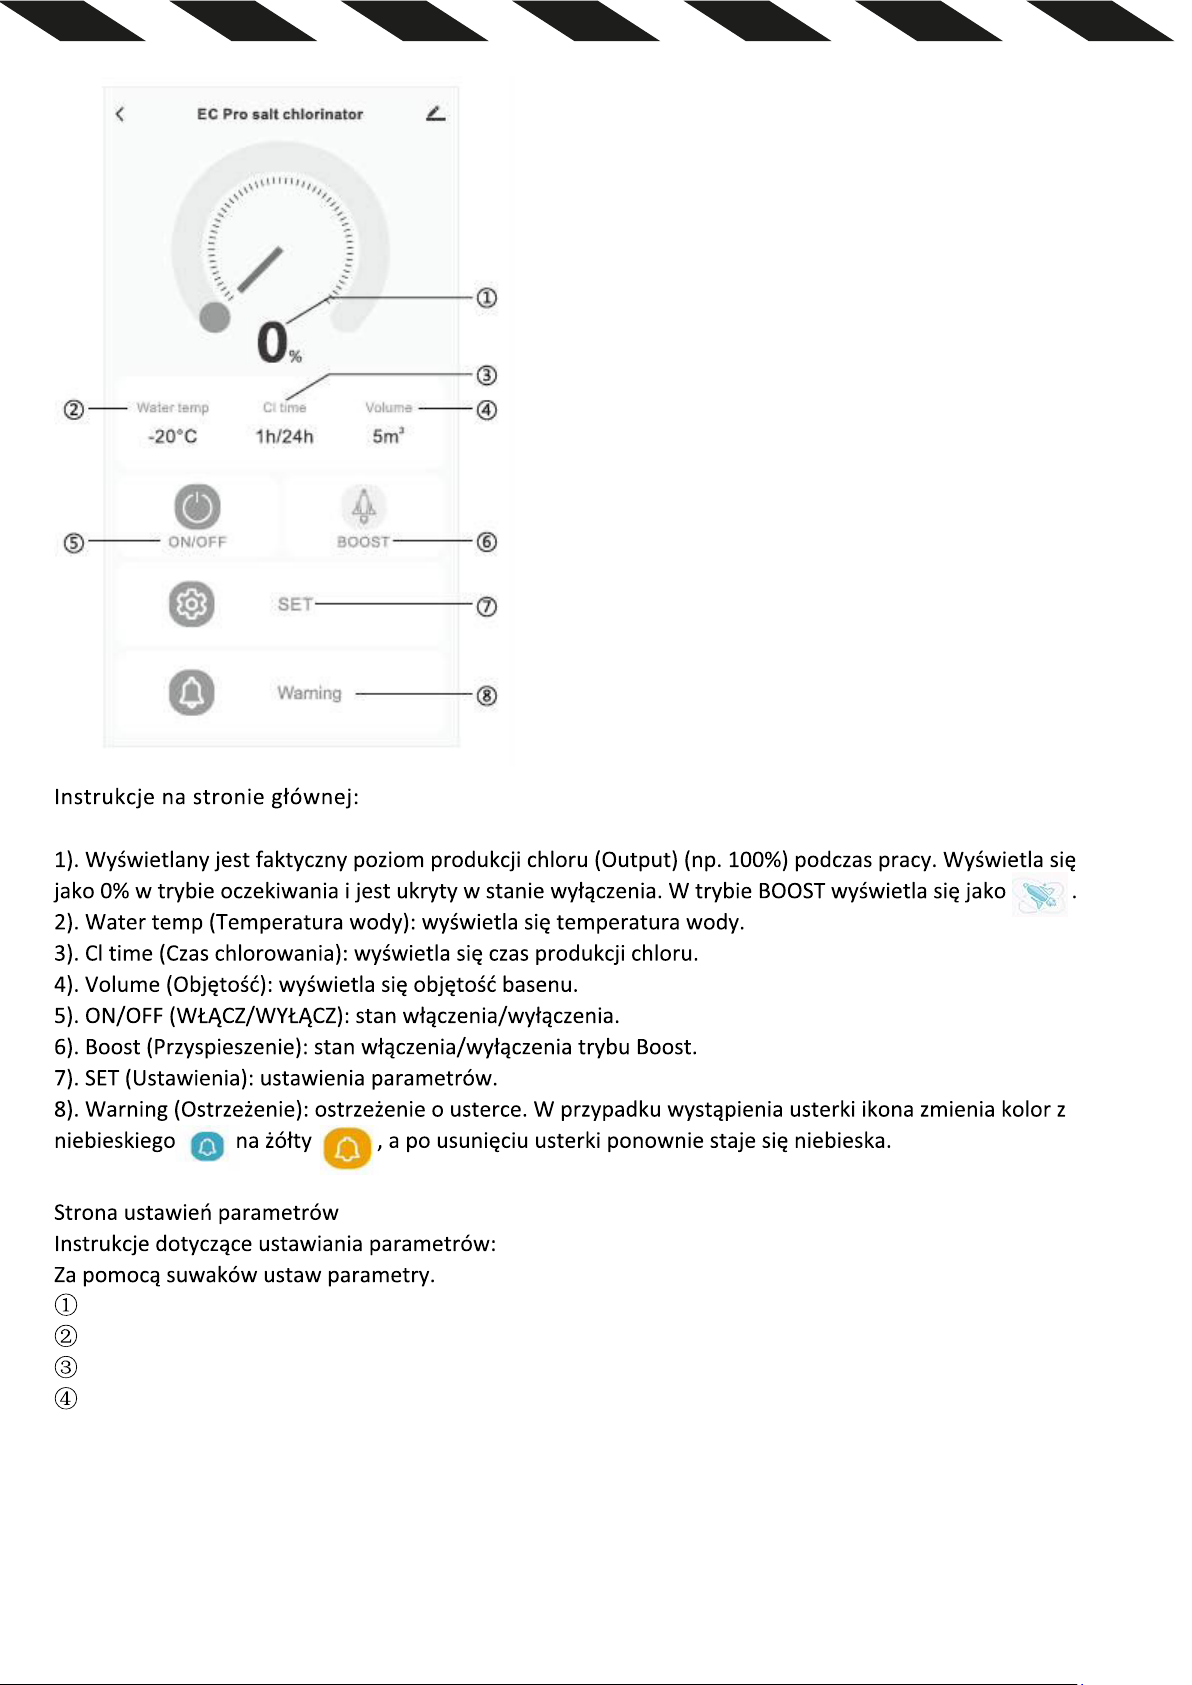
Інструкції на головній сторінці:
① Відображається фактичний рівень хлору на ВИХОДІ (наприклад, 100%) під час роботи. Він
відображається як 0% у режимі очікування та прихований у стані вимкнення. У режимі BOOST
відображається як .
② Water temp: : відображається температура води.
③ Cl time: відображається час виробництва хлору.
④ Volume: відображається об’єм басейну.
⑤ ON/OFF: стан увімкнення/вимкнення.
⑥ Boost: стан увімкнення/вимкнення режиму Boost.
⑦ SET: налаштування параметрів.
⑧ Warning: попер
синього на жовтий , після усунення несправності він знову стає синім..
Сторінка налаштування параметрів
Інструкції щодо налаштування параметрів:
За допомогою повзунків налаштуйте параметри
① Volume
② Level
③ Cl time
④ Reverse
едження про несправність. У разі виникнення несправності значок змінює колір із
Page 32
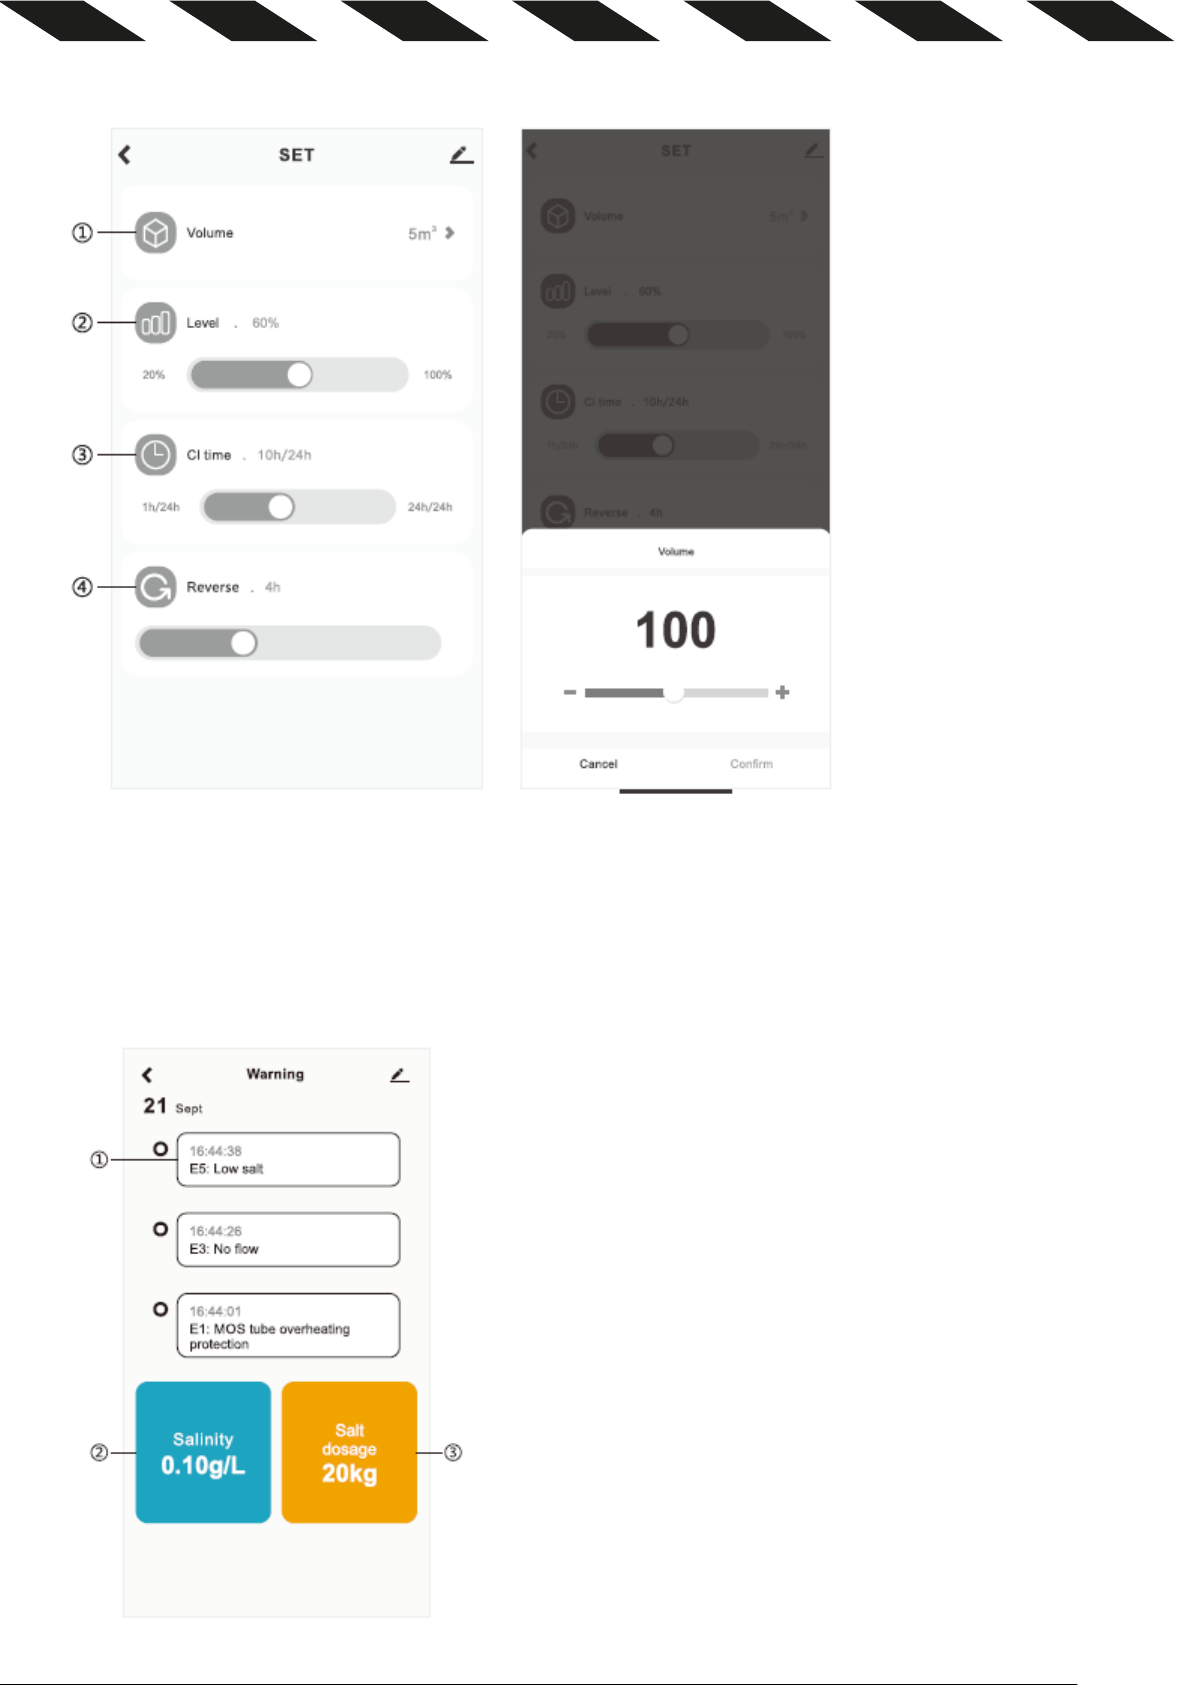
Сторінка відображення помилок:
① Запишіть причину помилки хлоратора до історії помилок.
② Відображення поточної солоності басейну. Відображається лише у стані нестачі солі (E5).
③ Відображення кількості солі, яку необхідно додати до басейну; відображається лише у стані нестачі
солі (E5).
Page 33

7. КОД ПОМИЛКИ ТА ВАРІАНТИ ВИРІШЕННЯ
Код
Опис
Примітки
Вирішення
Нормальний діапазон
За допомогою термометра перевірте, чи
За допомогою термометра перевірте, чи
холодної води.
A. Перевірте, чи працює циркуляційний насос.
D. Перевірте, чи вміст солі не перевищує 3000 ppm.
Після усунення
Код помилки автоматично
E1
E2
EL
Температура
МОП-трубки занадто
висока
Температура води
виходить за межі
нормального
діапазону
Температура води
нижче 10 ℃, але
хлоратор все ще
працює
Після усунення несправності
проблема буде вирішена
автоматично, і виробництво
хлору відновиться
автоматично
робочої температури
становить 10–45 °C. Після
повернення температури
води до нормального
діапазону код помилки
автоматично зникає. Висока
температура води зупиняє
вироблення хлору, а низька
температура води – ні.
Нормальний діапазон
робочої температури води
становить 10-45℃.
Спочатку перевірте наявність коду помилки E6. Якщо
код помилки E6 відсутній, натисніть кнопку “BOOST”
задля усунунення коду помилки, а потім перейдіть на
знижену передачу.
Спочатку перевірте наявність коду помилки E7, якщо
він є, перевірте, чи підключено датчик температури.
Якщо так, замініть датчик; Якщо код помилки E7
відсутній. Переконайтеся, що температура води
перебуває в межах нормального робочого діапазону.
температура води нижча за 10 ℃.
Якщо ні, то, можливо, датчик температури
пошкоджений. Своєчасно замініть датчик
температури.
.
EH
E3
Температура води
перевищує 45℃,
але хлоратор все ще
працює.
Рівень води
всередині хлоратора
низький
Нормальний діапазон
робочої температури води
становить 10-45℃.
Коли потік води
відновлюється, код
помилки автоматично
усувається.
несправності код помилки
автоматично видаляється.
При високому рівні хлору
E5
Концентрація солі
занадто низька
пристрій не припиняє
виробляти хлор і
автоматично переходить на
нижчу швидкість;
При низькому рівні хлору
пристрій припиняє
E6
Несправність
термістора NTC
МОП-трубки
виробляти хлор.
зникне після усунення
несправності.
температура води перевищує 45 ℃.
Якщо ні, можливо, датчик температури
пошкоджений, вчасно замініть датчик температури.
Якщо температура води занадто висока, додайте
B. Перевірте, чи надійно підключений датчик рівня
води.
C. Перевірте, чи надійно підключений роз'єм
електрода.
Рекомендується підтримувати солоність води в
басейні в межах 2700-4500 ppm. Додайте
відповідну кількість NaCl відповідно до підказок.
Після повного розчинення NaCl натисніть кнопку
«BOOST», щоб вручну усунути код помилки.
Зверніться до постачальника з питань ремонту або
заміни плати контролера.
Page 34

Код помилки буде
E. Перевірте, чи працює циркуляційний насос.
Басейн зі
E7
Несправність датчика
температури води
Несправність необхідно
усунути вручну.
Спочатку перевірте, чи підключений датчик
температури. Якщо так, замініть датчик.
E8
EA
Вхідна напруга
ненормальна
Несправність
електрода
автоматично видалений
після усунення
несправності.
Код помилки буде
автоматично видалений
після усунення
несправності.
Замініть адаптер живлення.
F. Перевірте, чи надійно підключений датчик рівня
води.
G. Перевірте, чи надійно підключений роз'єм
електрода.
A. Перевірте, чи вміст солі не перевищує 3000 ppm.
8. ДОДАТОК: УМОВИ ЕКСПЛУАТАЦІЇ ТА ОБСУГОВУВАННЯ ХЛОРАТОРА
(1) Розрахунок кількості води
Тип басейну Кубічні метри (розмір басейну в метрах)
Прямокутний басейн
Круглий басейн
Довжина (метри) x Ширина (метри) x Середня глибина (метри)
Діаметр (метри) x Діаметр (метри) x Середня глибина (метри) x 0,785
Овальний басейн
скошеними краями
Довжина (метри) x Ширина (метри) x Середня глибина (метри) x 0,893
Об'єм басейну (кубічні метри) x 0,85
(2). Тип солі
Яку сіль ви використовуєте?
Чим чистіша сіль, тим краща продуктивність електролітичної комірки. Це також продовжить термін
служби хлоратора.
Використовуйте лише сіль хлориду натрію (NaCl) з чистотою не менше 99,6%. Найкраща сіль — це
зневоднена гранульована морська сіль харчового призначення.
Також можна використовувати гранули солі для кондиціонування води (пресовані форми випареної
солі). Однак для їх розчинення знадобиться більше часу.
Не використовуйте йодовану сіль або
сіль з жовтим відтінком.
Не використовуйте кам'яну сіль. Її домішки можуть скоротити термін служби хлоратора.
Не використовуйте хлорид кальцію в якості солі.
Уникайте використання солі з додаванням ціанідів (ціаніду натрію, також відомого як YPS, він є
отруйним і корозійним), добавок, що перешкоджають утворенню грудок, така сіль може змінити колір
поверхні басейну та обладнання.
Page 35

(3). Оптимальна солоність
Більшість басейнів містить певну кількість солі, концентрація солі у воді буде змінюватись в залежності
від джерела води та стерилізуючого засобу, що використовується. Перевірити поточну концентрацію
солі в басейні можна за допомогою ручного тестера NaCI або ручки-вимірювача солоності води.
Ідеальний рівень солі у воді басейну становить 3500 ppm. (Рекомендується додавати 3,5 кг солі на
кубічний метр).
При першому використанні хлоратора, будь ласка, виміряйте початкову концентрацію солі в басейні, і
додайте відповідну кількість таким чином, аби на кожний кубічний метр води припадало 3,5 кг солі.
Наприклад:
Питання: Концентрація солі (значення в ppm) може бути виражена в грамах солі на 1 тонну води. Якщо
поточна концентрація солі в басейні об'ємом 100 м³ становить 850 ppm (можна вважати, що це 850 г на
1 тонну води), скільки солі потрібно для нормальної роботи хлоратор
Відповідь: Необхідно додати сіль (одиниця виміру: грам) = вода в басейні x (нормальна концентрація
солі при нормальній роботі басейну) = 100 x (3500-850) = 265000 грамів.
Відповідь: Потрібно 265 кг солі.
а?
(4). Додавання солі
① Увімкніть циркуляційний насос, аби розпочати циркуляцію води.
② Вимкніть живлення сольового хлоратора.
③ Перевірте поточну концентрацію солі в басейні.
④ Розрахуйте кількість солі, яку потрібно додати в басейн, згідно з відповідною таблицею.
⑤ Додайте сіль у басейн по
⑥ Не дозволяйте солі накопичуватися на дні басейну. За потреби перемішайте воду на дні басейну,
аби сіль повністю розчинилася.
⑦ Увімкніть циркуляційний насос на 24 години, аби сіль рівномірно розподілилася в басейні.
⑧ Через 24 години знову перевірте концентрацію солі в басейні, аби переконатися, що вона
досягла оптимального рівня.
⑨ Коли концентрація солі в басейні досягне бажаного рівня, увімкніть сольовий хлоратор та інше
обладнання. Після запу
до ваших потреб.
краях, щоб вона швидко і рівномірно розчинилася у воді.
ску хлоратора встановіть необхідний рівень виробництва хлору відповідно
(5). Зниження концентрації солі
Єдиний спосіб зменшити концентрацію солі – це злити частину води з басейну та замінити її прісною
водою.
Аби зменшити втрату хлору, спричинену ультрафіолетовим випромінюванням у воді відкритого басейну,
в якості стабілізатора хлору використовують від 20 до 100 мг/л ціанурової кислоти.
Page 36

ТЕХНІЧНЕ ОБСЛУГОВУВАННЯ
·
Для забезпечення безперебійної роботи сольового хлоратора електролізну комірку слід перевіряти
кожні три місяці або після очищення фільтра, залежно від того, що настане раніше.
· Перш ніж знімати електролізну комірку, хлоратор необхідно вимкнути на 5-10 хвилин, а вхідний і
вихідний клапани закрити.
· Після вилучення електролізної комірки перевірте, чи немає на внутрішній поверхні відкладень у
вигляді пластівців, сміття та світлих нашарувань. Промийте чистою водою.
· Якщо на титановій пл
астині є білі кальциновані речовини, замочіть титанову пластину в кухонному оцті
на годину або більше, аби видалити їх.
·
Якщо промивання водою не видаляє відкладення, використовуйте пластикову щітку для очищення
поверхні. Не використовуйте металеву щітку.
·
Якщо є серйозні забруднення, які неможливо видалити самостійно, зверніться до постачальника або
скористайтеся професійним засобом для чищення.
Page 37
make life better
SALT CHLORINATOR SERIES CRYSTAL PRO
4, 8, 12, 16, 20, 24, 30
INSTALLATION & USER MANUAL
EN
Page 38

TABLE OF CONTENTS
IMPORTANT WARNING AND PRECAUTION--------------------------------------------------------01
1. PRODUCT SUMMARY-------------------------------------------------------------------------------02
2. PRODUCT SIZE----------------------------------------------------------------------------------------03
3. CONTROL PANEL OPERATION INSTRUCTION--------------------------------------------------04
INSTALL ATION INSTRUCTION----------------------------------------------------------------------05
4.
5. OPERATING INSTRUCTION-------------------------------------------------------------------------06
6. WIFI FUNCTION-EQUIPMENT NETWORK CONFIGURATION-------------------------------10
7. ERROR CODE AND CORRESPONDING SOLUTION---------------------------------------------18
8. APPENDIX: THE OPERATING CONDITION AND
MAINTENANCE---------------------------19
IMPORTANT WARNING
First of all thank you for choosing EC Pro salt chlorinator. For your best experience of this product and to
prevent accidents, please read, understand and follow all instructions carefully before installing and using this
product.
Neglecting the safety warning may cause serious consequences such as : grievous injury, property loss and
may even cause life safety
threatening consequences.
IMPORTANCE PRECAUTION
(1) A licensed electrician must do the installation and maintenance. Or else there would be a risk of
electrocution, grievous injury, property loss, and may even cause life safety threatening consequences.
(2)Before any maintenance or operation, ensure that the salt chlorinator is unplugged, all machinery is turned
off and the power source is turned off.
(3)The
switch protection.
(4)The chlorinator should be installed in a well-ventilated area, to help the chlorinator to cool down. Do not
install in an area where the electronic component of the chlorinator could be damaged by moisture and rain.
(5)Installation personnel must carefully read this manual before installation. If
operation occurs, don't hesitate to get in touch with the nearest authorized dealer or contact the technical
support department.
(6)When parts are damaged, please prioritize purchasing the replacement part at the manufacturer or
authorized dealer.
FAILURE TO FOLLOW THESE WARNINGS MAY RESULT IN PROPERTY DAMAGE, ELECTRIC SHOCK,
ENTANGLEMENT OR OTHER SERIOUS INJURY OR DEATH.
external power adapter of the chlorinator must be installed to a power source that has a leakage
any improper or mistaken
Page 39

1. PRODUCT SUMMARY
AC110-220V/50-60Hz
DC12V
4g/h
≤18m³
AC110-220V/50-60Hz
12g/h
≤50m³
AC110-220V/50-60Hz
16g/h
≤68m³
AC110-220V/50-60Hz
20g/h
≤85m³
AC110-220V/50-60Hz
24g/h
≤102m³
AC110-220V/50-60Hz
DC 29V
30g/h
≤127m³
EC Pro salt chlorinator adopts advanced microcomputer technology. It is both multifunctional and easy to
operate and can be controlled through Tuya APP. It has the characteristics of prompting the amount of the
amount of salt to be added when there is a lack of salt, automatically adjusting the chlorine production level
when salinity is low, self-cleaning, and a malfunctioning alarm. You can set th
e chlorine production to match
your needs, to achieve the goal of efficiency and environmental friendliness.
PRODUCT FEATURES:
(1) The salt chlorinator can be controlled by TUYA APP.
(2) The controller and the chlorinator are integrated for easier installation and more space-saving.
(3) The chlorinator contains water temperature protection (10
-45 ) and water shortage protection. This can
effectively extend the service life of the machine.
(4) Low salinity mode: automatically adjusting the chlorine production when the salinity is low.
(5) Salt shortage prompt: when salt shortage will prompt the amount of salt needed to be added to the pool,
saving manual calculation. (Enter the pool volume for the first use).
(6) Voltage and current monitor function: there is an
alarm when the setting value is exceeded.
(7) Electrode abnormal monitor function: there is an alarm when an electrode failure occurs.
(8) When the power is turned off and on again, the function of forced flushing electrodes can effectively
protect the service life of the titanium plate.
(9) Water level detection function: the chlorinator only operates when the sensor detects the presence of
water.
(10) T
he chlorinator self-cleaning function effectively extends the service life of the titanium plate. The
titanium plate electrode reverses the positive and negative electrode at regular intervals, effectively extending
the service life of the titanium plates.
(11) When powered on automatically initiates the last work setting from system memory.
NOTE: If a power outage occurs during work, the device will automatically t
urn on and remember the last
working status after the power is restored.
(12) Operating time setting: users can set the operating time of the unit according to the actual conditions of
the pool water to save energy.
(13) One-click restoration of the default settings function.
2. PRODUCT INFORMATIONATION AND SIZE
Model Power input Power output Chlorine output Ideal salinity Recommended pool volume (m³)
Crystal Pro 4
Crystal Pro 8
Crystal Pro 12
Crystal Pro 16
Crystal Pro 20
Crystal Pro 24
Crystal Pro 30
AC110-220V/50-60Hz
DC24V
8g/h ≤35m³
2700-4500PPM
Page 40
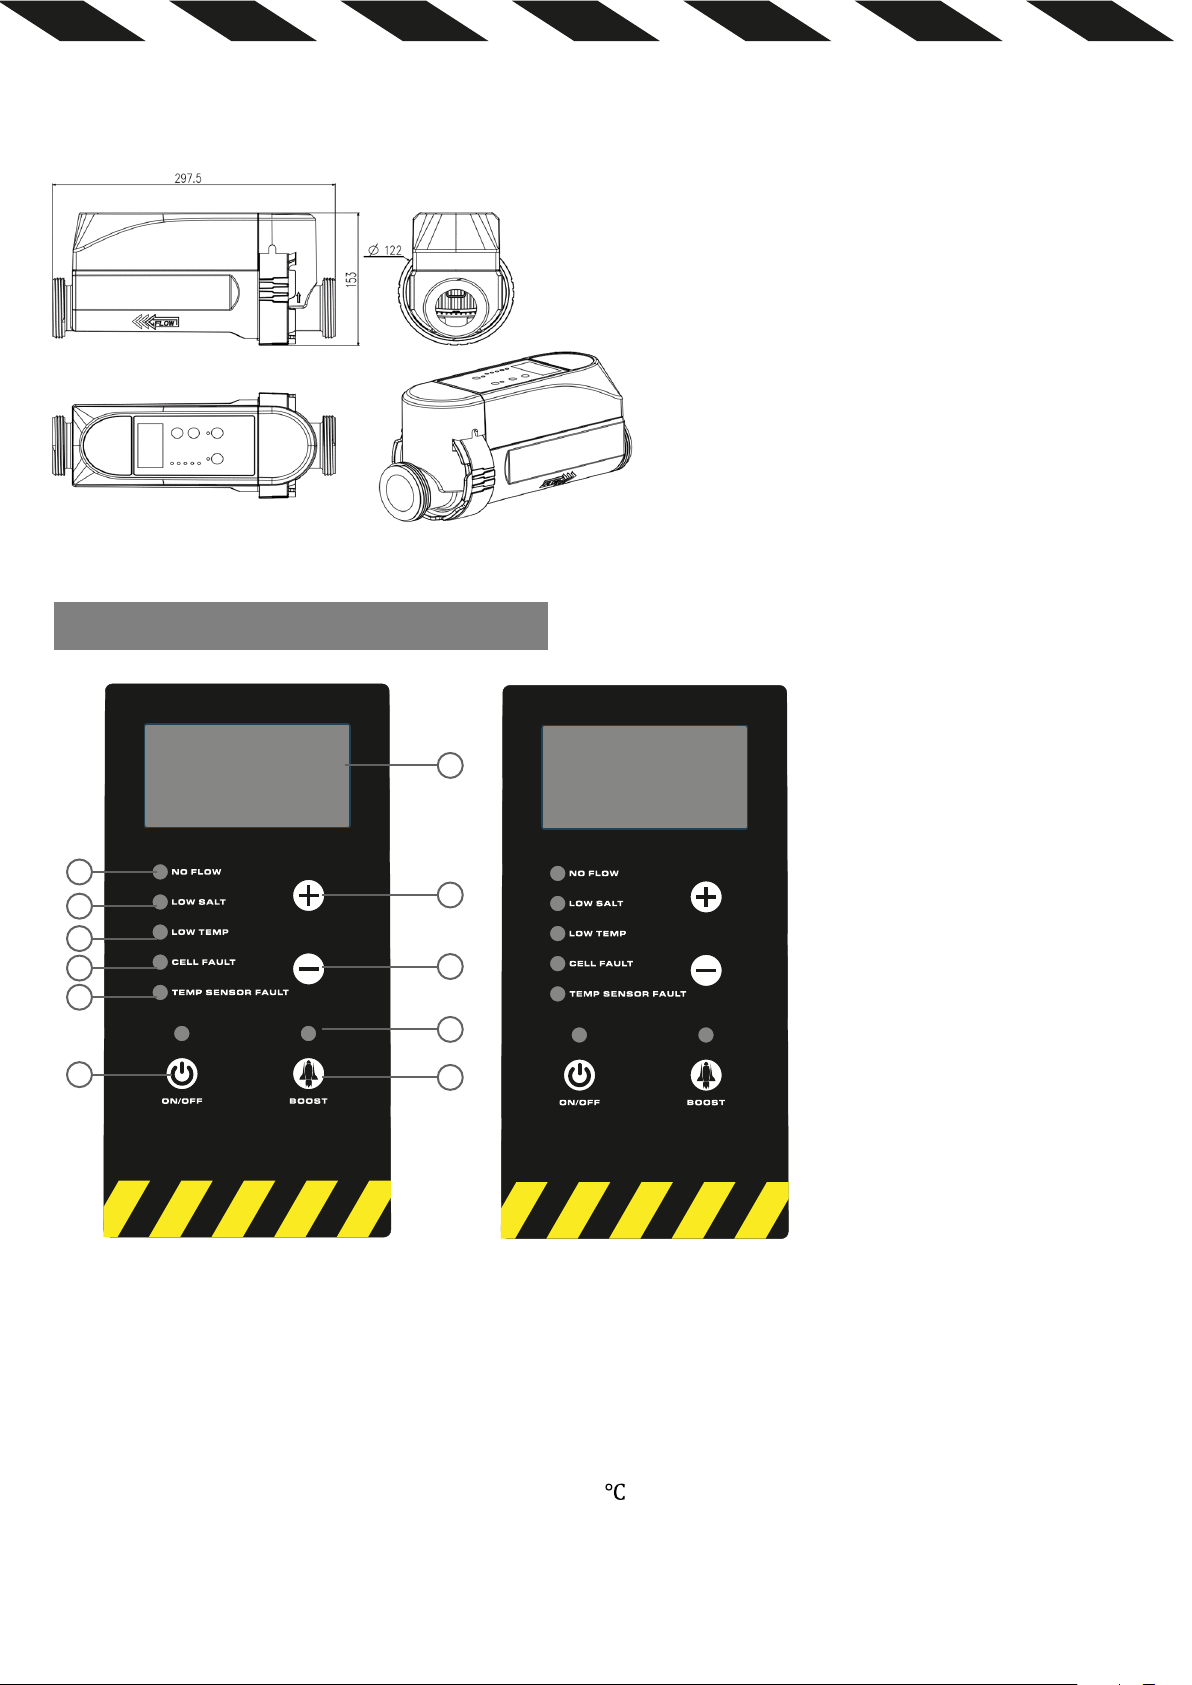
DIAGRAM OF PRODUCT
3. CONTROL PANEL OPERATION INSTRUCTION
1
6
7
8
9
11
12
2
3
4
5
①Display screen:
a. When powered off, the digital display does not show anything.
b. After powering on, the current chlorine production level (for example, Output 20%) is displayed when the
system is not faulty.
c. Press the boost button to switch the display content, which is the chlorine output (%), CL time (h), reverse
time (h), volume (m³), and the water temperatur
e xx( ). Automatically returns to OUTPUT (%) display after
5s.
d. When the salt chlorinator detects a fault, it will display the corresponding error code or prompt content (for
example, the salinity of the pool, the salt amount that needs to be added).
Page 41

e. If there are multiple faults, the error codes will display alternately.
f. During reverse polarity, it displays "---"
② "+" button: increase the chlorine output.
③ "-" button: reduce the chlorine output.
④ "BOOST" indicator light: displays green when accelerating chlorine production.
⑤ "BOOST" acceleration button (multi-function button):
a. In the non-BOOST" acceleration state, press and hold the button for 3 s
acceleration chlorine production function.
b. In the "BOOST" acceleration state, press and hold the button for 3 seconds to exit the "BOOST" acceleration
chlorine production and return to the previous chlorine production level.
c. In the fault alarm state, press the "BOOST" button once to clear the error code alarm.
d. In the normal state, short press this button to use it as a setting k
and "-" buttons to set the chlorine production level, chlorine production time, self-clean time, and swimming
pool volume.
econds to start the "BOOST"
ey, and use it in conjunction with the "+"
⑥ “NO FLOW”: when the red light is on, it means there is no enough water flow.
⑦ “LOW-SALT”: when the red light is on, it indicates that the pool salinity is at a low level and salt needs to
be added to the pool.
⑧ “LOW TEMP”: when the red light is o
⑨ “CELL FAULT”: when the red light is on, it indicates that the cell is abnormal.
⑩ “TEMP SENSOR FAULT”: when the red light is on, it indicates the water temperature sensor is abnormal.
⑪ Power indicator light: on red light, the unit is powered off; on green light, the unit is operating.
⑫ “ON/OFF” button: start/stop button.
n, it indicates the temperature is lower than the allowed scope.
4. INSTALLATION INSTRUCTION
(1) Before use, please ensure that the pipe diameter to be installation is the same size as the salt chlorinator’s.
The nominal diameter of the connection pipe of the chlorinator is 1.5” (metric: Ø50mm, imperial: 1.5”/
Ø48mm)
(2) Before use, please ensure that the valve of the pipe connecting to the salt chlorinator is turned off.
(3) Before installation, please clean any clutter or oil off of the pipes and the connection joint.
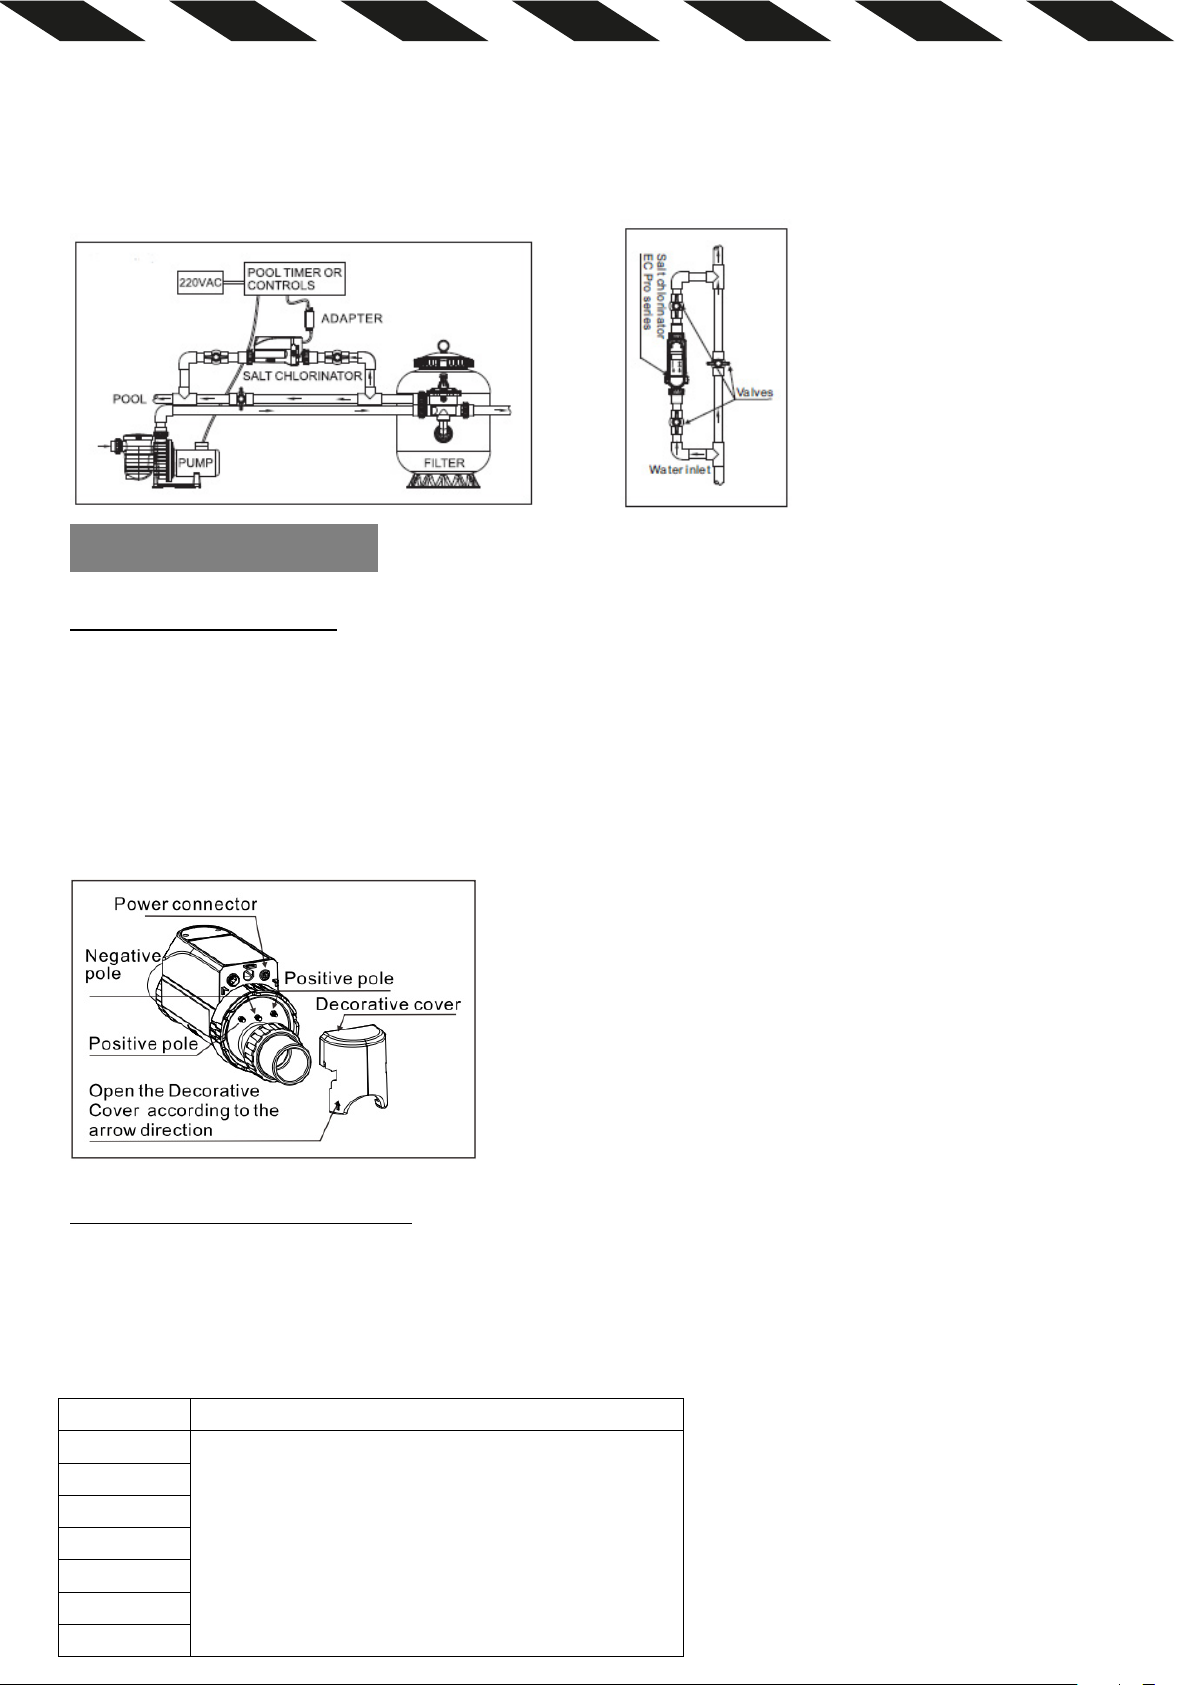
(4) The salt chlorinator should be installed on the bypass of the return pipe to the pool of the water treatment.
The regulating valve needs to be installed on the main pipe. (Figure 1 or 2)
(5) Before installing the salt chlorinator, please ensure that the water flow direction is consistent with the
direction the salt chlorinator indicator.
(6) When conne
(7) The power input of the salt chlorinator needs to be installed on a power supply with leakage switch
protection (AC110-220V/50-60Hz), which is the same power supply as the water pump.
(8) The chlorinator should be installed in a well-ventilated area, to help the chlorinator to cool down. Do not
install in a place where water is easy to accumulate, to
cting salt chlorinator pipes, please use PVC special glue.
prevent electronic components from being damaged
Page 42
by moisture or rain.
Model
Default factory settings
(9)The chlorinator should be avoided from direct sunlight during use, so as not to accelerate the aging of the
salt chlorinator shell.
Figure 1 Figure 2
5. OPERATING INSTRUCTION
PREPARATION BEFORE USE
(1)The salinity of the pool water shall be 2700-4500PPM (that is, the total salt content per cubic meter of the
pool water is 2.7kg-4.5kg).
(2)After the salt chlorinator is installed, open the valves connecting the chlorinator pipeline and close the
valves of the main pipeline. Turn on the leakage protection switch.
(3)Turn on the pump. Make sure water is flowing adequately through the salt chlorinator, no water leakage
the connecting parts, and the water flow sensor is closed.
in
Figure 3
THE USE OF SALT CHLORINATOR
ON/OFF button: Star and stop the salt chlorinator.
Restore factory settings: In the power-on state, long press ON/OFF button for 3 seconds to restore the factory
setting of the salt chlorinator. The default factory setting of each model are as follow:
Crystal Pro 4
Crystal Pro 8
Crystal Pro 12
Crystal Pro 16
Crystal Pro 20
Crystal Pro 24
Crystal Pro 30
1. Chlorine production level is 100%.
2. Chlorine production time is 24 hours.
3. Reverse polarity time is 4 hours.
Page 43
①Chlorine production level setting
Chlorine production level
Display
Level 1
Output 20%
Level 2
Output 40%
Level 3
Output 60%
Level 4
Output 80%
Level 5
Output 100%
Boost
Output SUP
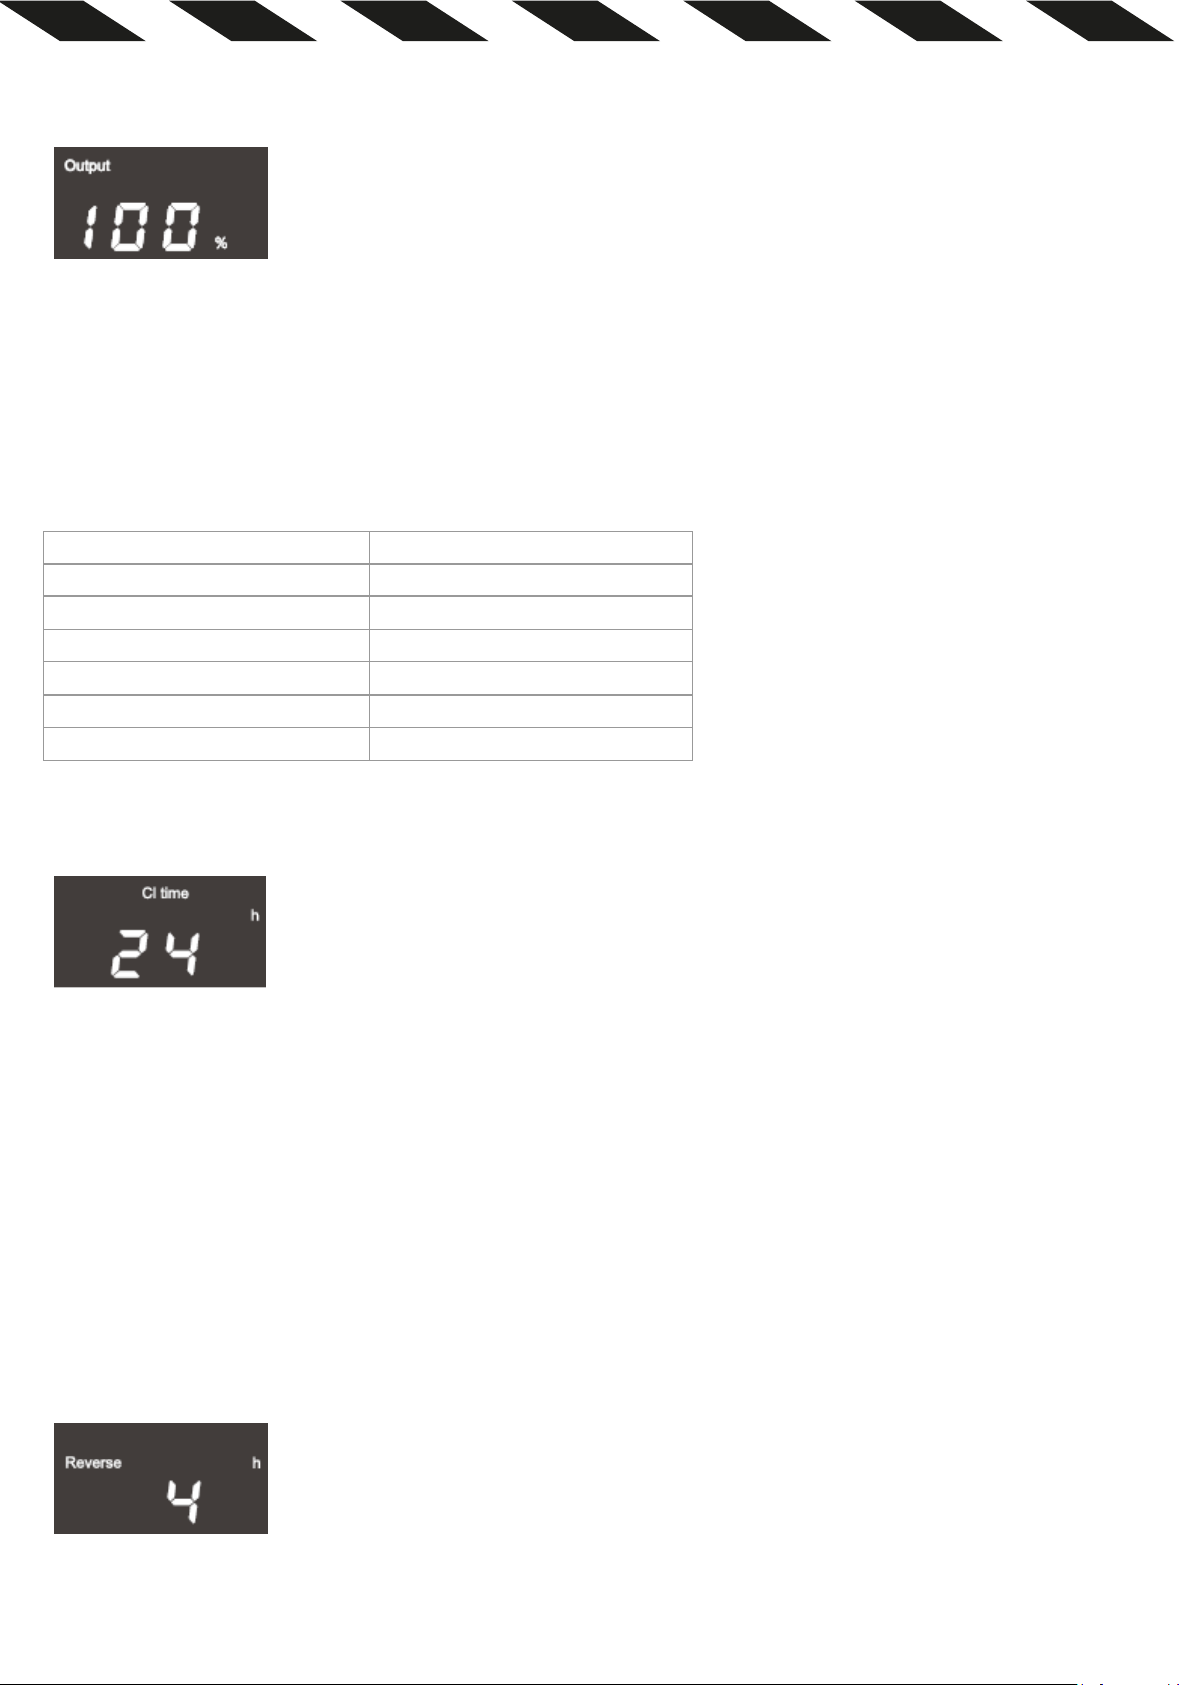
The salt chlorinator has the function of chlorine production level, which are respectively shown "Output 20%",
"Output 40%", "Output 60%", "Output 80%" and "Output 100%" on the display.
In the power-on state, press the "BOOST" button once to enter the output chlorine level setting function, and
the current output chlorine level will be displayed on the salt chlorinator (ie, Output 100%). Then press the
"+" and "-" butt
ons to adjust the chlorine production (The factory default setting is "100%").
② Chlorine production time setting
The chlorine production time setting is adjustable from 1 to 24 hours. The factory default chlorine production
time is 24 hours.
In the power-on state, press the "BOOST" button twice to enter the chlorine production tim e setting function.
The current chlorine production time will be shown on the display (for example , Cl time 24h), and then press
the "+" and "-" buttons to adjust it.
“Cl time 1h" means that from the s
etting time, the equipment will work for 1 hour, stop for 23 hours, and
then work for 1 hour, and so on.
"Cl time 24h" means that the equipment will work continuously from the setting time.
③Reverse polarity time setting
The reverse polarity time can be set to 2h/4h/6h/8h, and the factory default is 4h. The self-cleaning function
can effectively eliminate the accumulated attachments on the electrode and keep the electrode in good
working condition.
Page 44
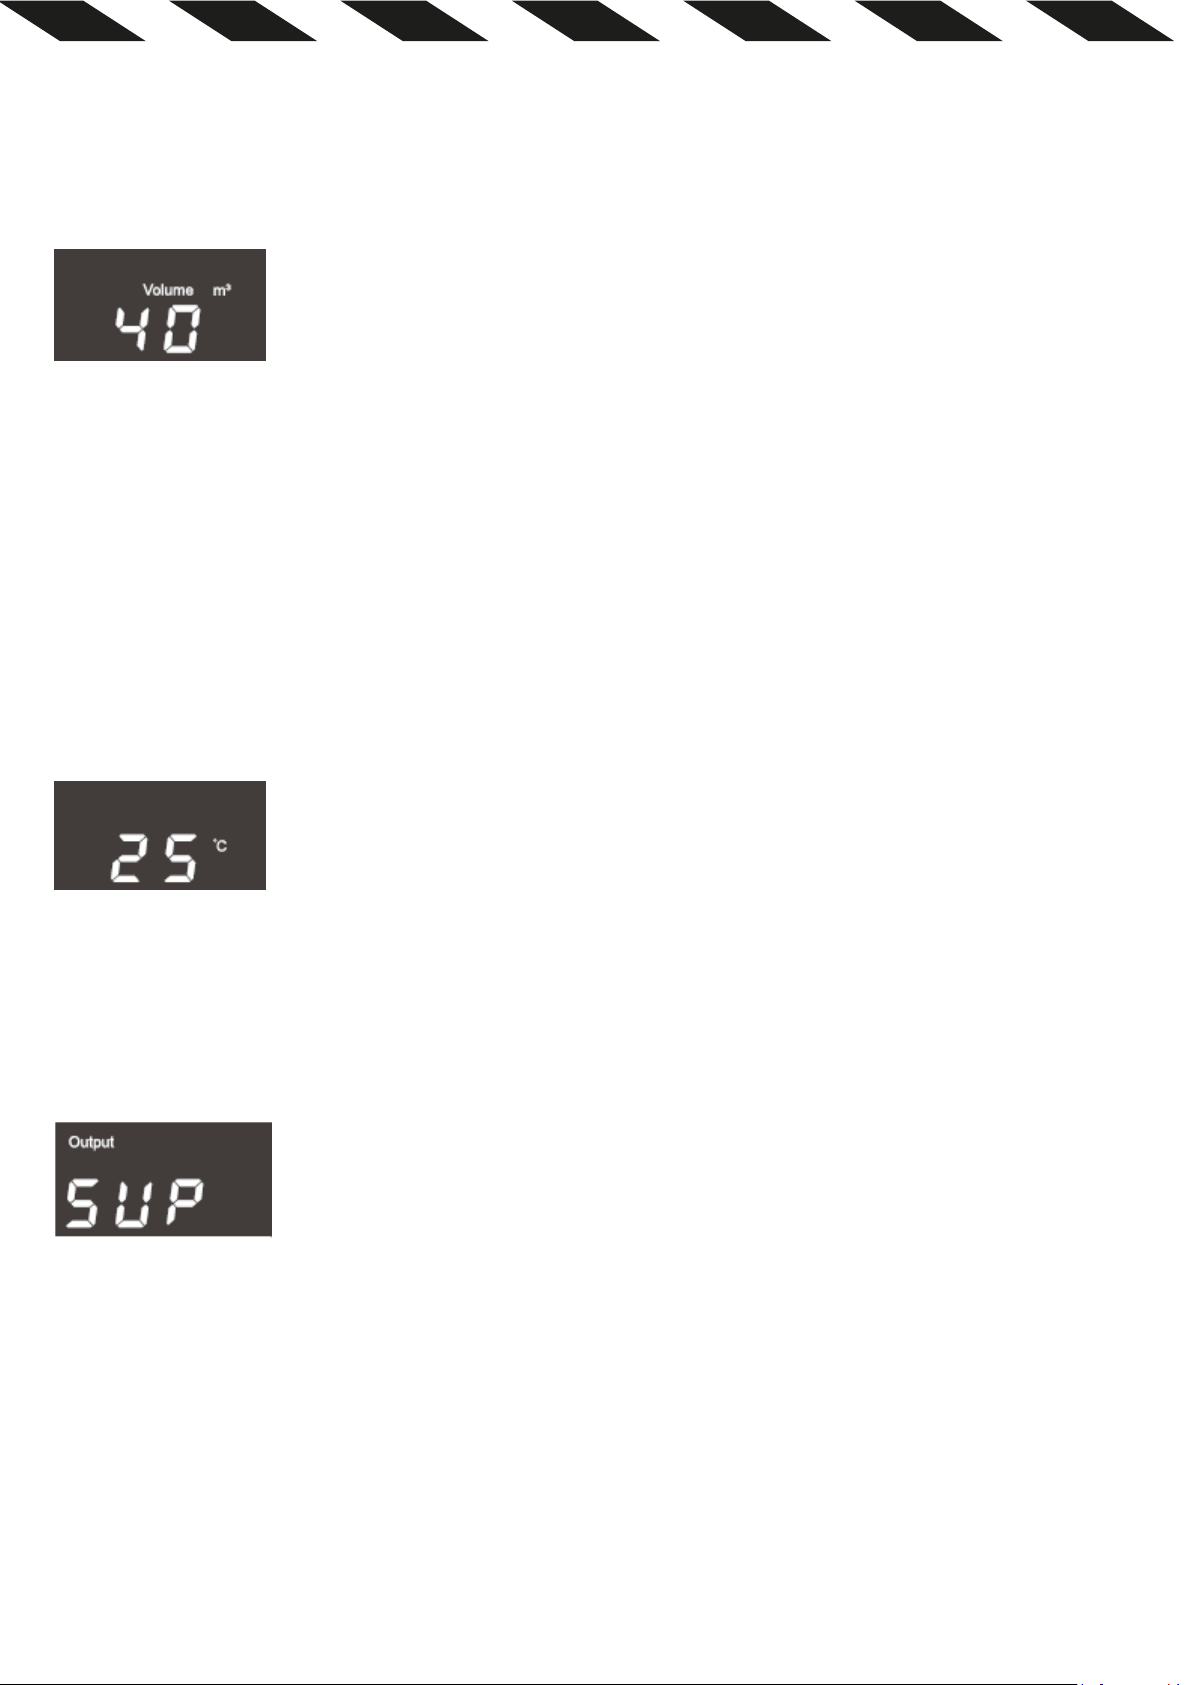
In the power-on state, press the "BOOST" button 3 times to enter the reverse polarity time setting function.
The current reverse polarity time will be shown on the display (for example: Reverse 4h), and then press the
"+" and "-" buttons to adjust it.
④ Salt adding calculation
Fast way to calculate the salt needs to be added (first-time use, please key in the volume of the pool):
The swimming pool volume allowance from 5m³ -200m³ (keying in the pool volume is so that when the low
salt alarm occurs, the salt chlorinator can automatically calculate and display the required salt amount.)
In the power-on state, press the "BOOST" button 4 times to enter to the pool volume setting state. The
ent pool volume will be shown on the display (ie: Volume 35m³), and then press the "+" and "-" buttons
curr
to adjust it.
⑤ Water temperature query
When powered on, press the "BOOST" button 5 times to enter the pool water temperature query function,
and the salt chlorinator will display the current pool water temperature (ie, 25 ).
⑥ “BOOST” instructions
In the operating state, long-press the "BOOST" button for 3 seconds. At this time, the screen displays: Output
SUP, and the corresponding "BOOST" indicator light turns green. The default acceleration is 8 hours, and it will
automatically return to the normal working level after 8 hours; during the acceleration period, if you long
press the "BOOST" button again for 3 seconds, it will exit the accelerated chlorine
production mode and
return to the normal working level (the normal working level refers to the working level before "BOOST"
acceleration).
⑦ Power indicator light:
Under normal chlorine production state, the power indicator light turns green. When the chlorine production
stops, it will be in standby mode, and the green power indicator will flash; in the powered-off state, the power
indicator will not be on.
Page 45
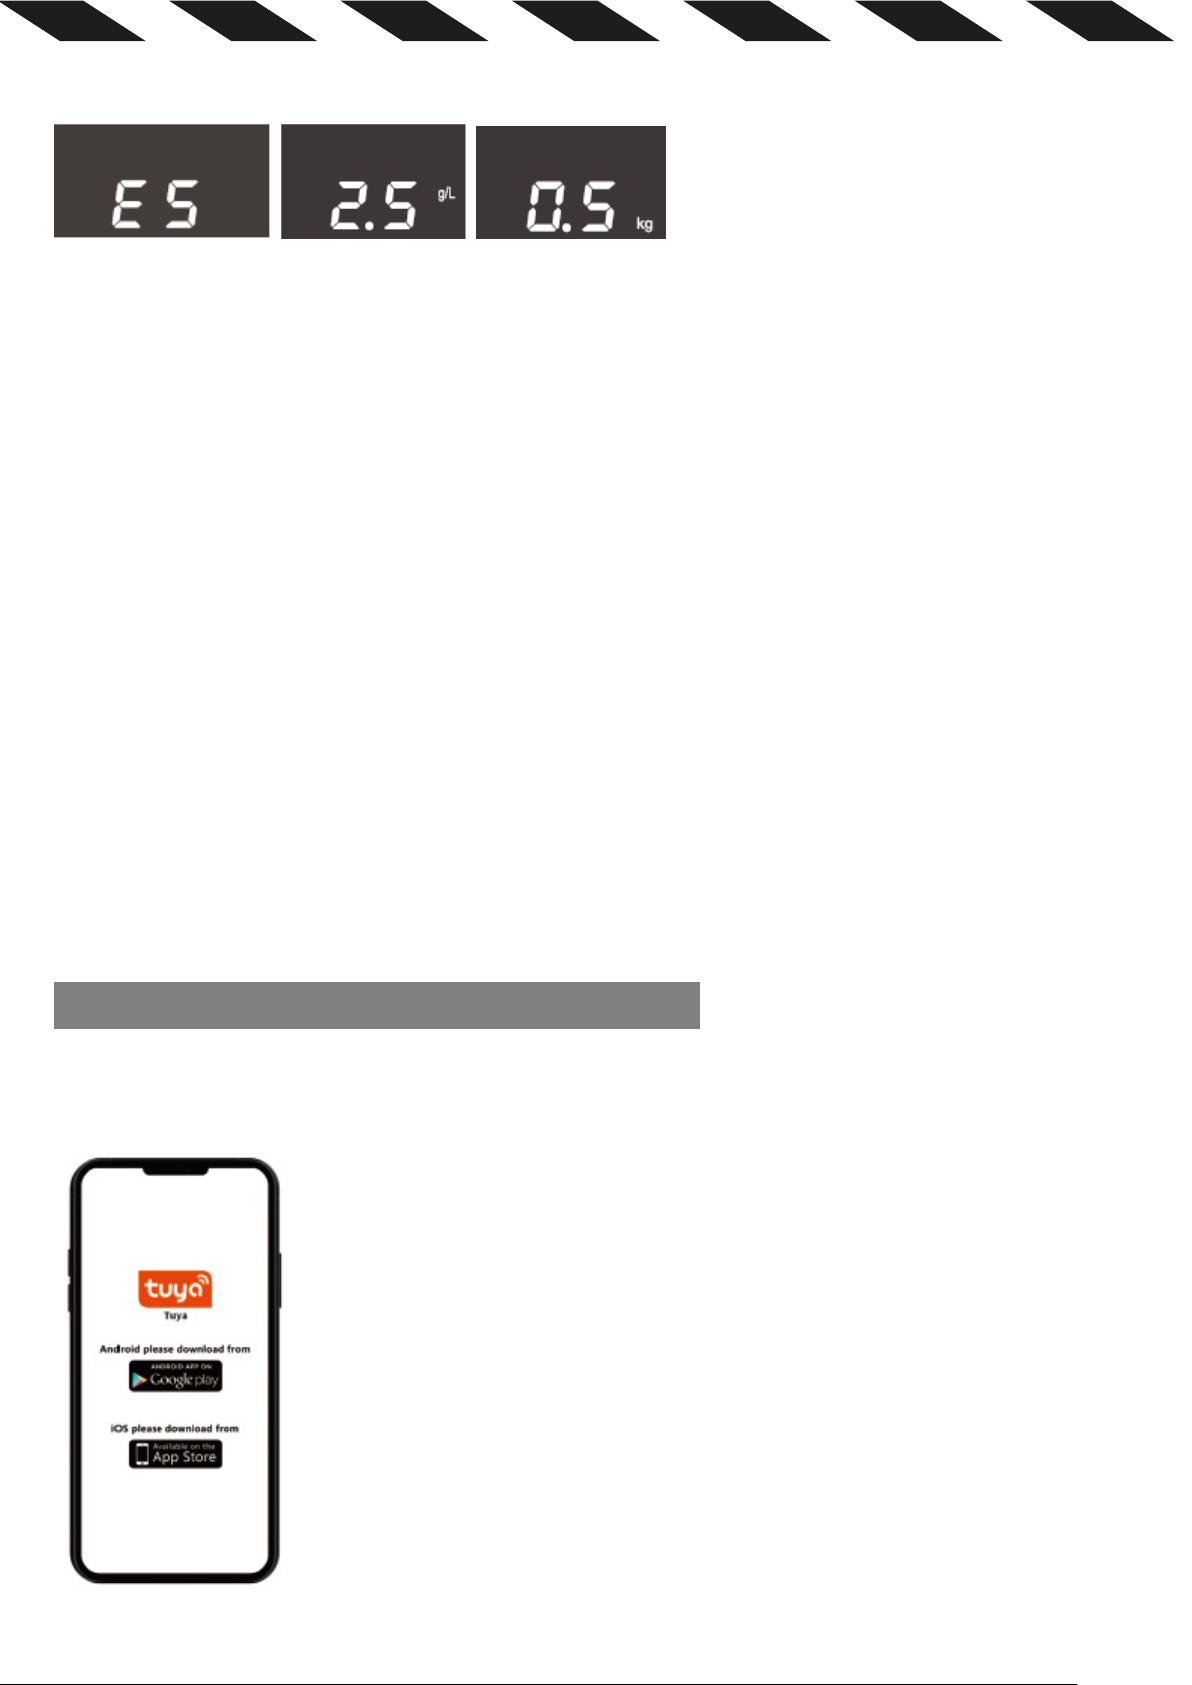
⑧ Salinity adaptive (low-salt automatic downshift):
When the salt chlorinator alarms low salt to the high level, it will automatically adjust the chlorine production
level when salinity is low and the display alternately displays the E5/salinity/salt amount that should be added.
The low-salt fault indicator turns red and no beep, it will automatically and gradually reduce to the
appropriate level after 1 minute. The display will continue to alternately display E5/salinity
/salt amount should
be added, and the low-salt fault indicator will still be in red; If the salt chlorinator alarms low salt in level 3 or
below, the display alternately displays E5/salinity/salt amount should be added, the low salt fault indicator
turns red, and the buzzer sounds to prompt and stop chlorine production.
⑨ Memory function
A. When the salt chlorinator stops working due to a power outage, the equipment
will automatically save the
parameter settings before the power outage. After power is restored, the equipment will restart according to
the last settings.
B. The water pump running time should be set the same as or slightly longer than the chlorine production
time.
C. When you hear continuous intermittent sounds, please check the displayed alarm code and follow the
prompts to resolve the problem.
6. WIFI FUNCTION-EQUIPMENT NETWORK CONFIGURATION
If the WiFi is in the 5G, the network configuration will be unsuccessful.
① Download the App “Tuya” or “Smart life” in cell phone.
② Go to the Tuya App and click on Login or try as Guest.
Page 46
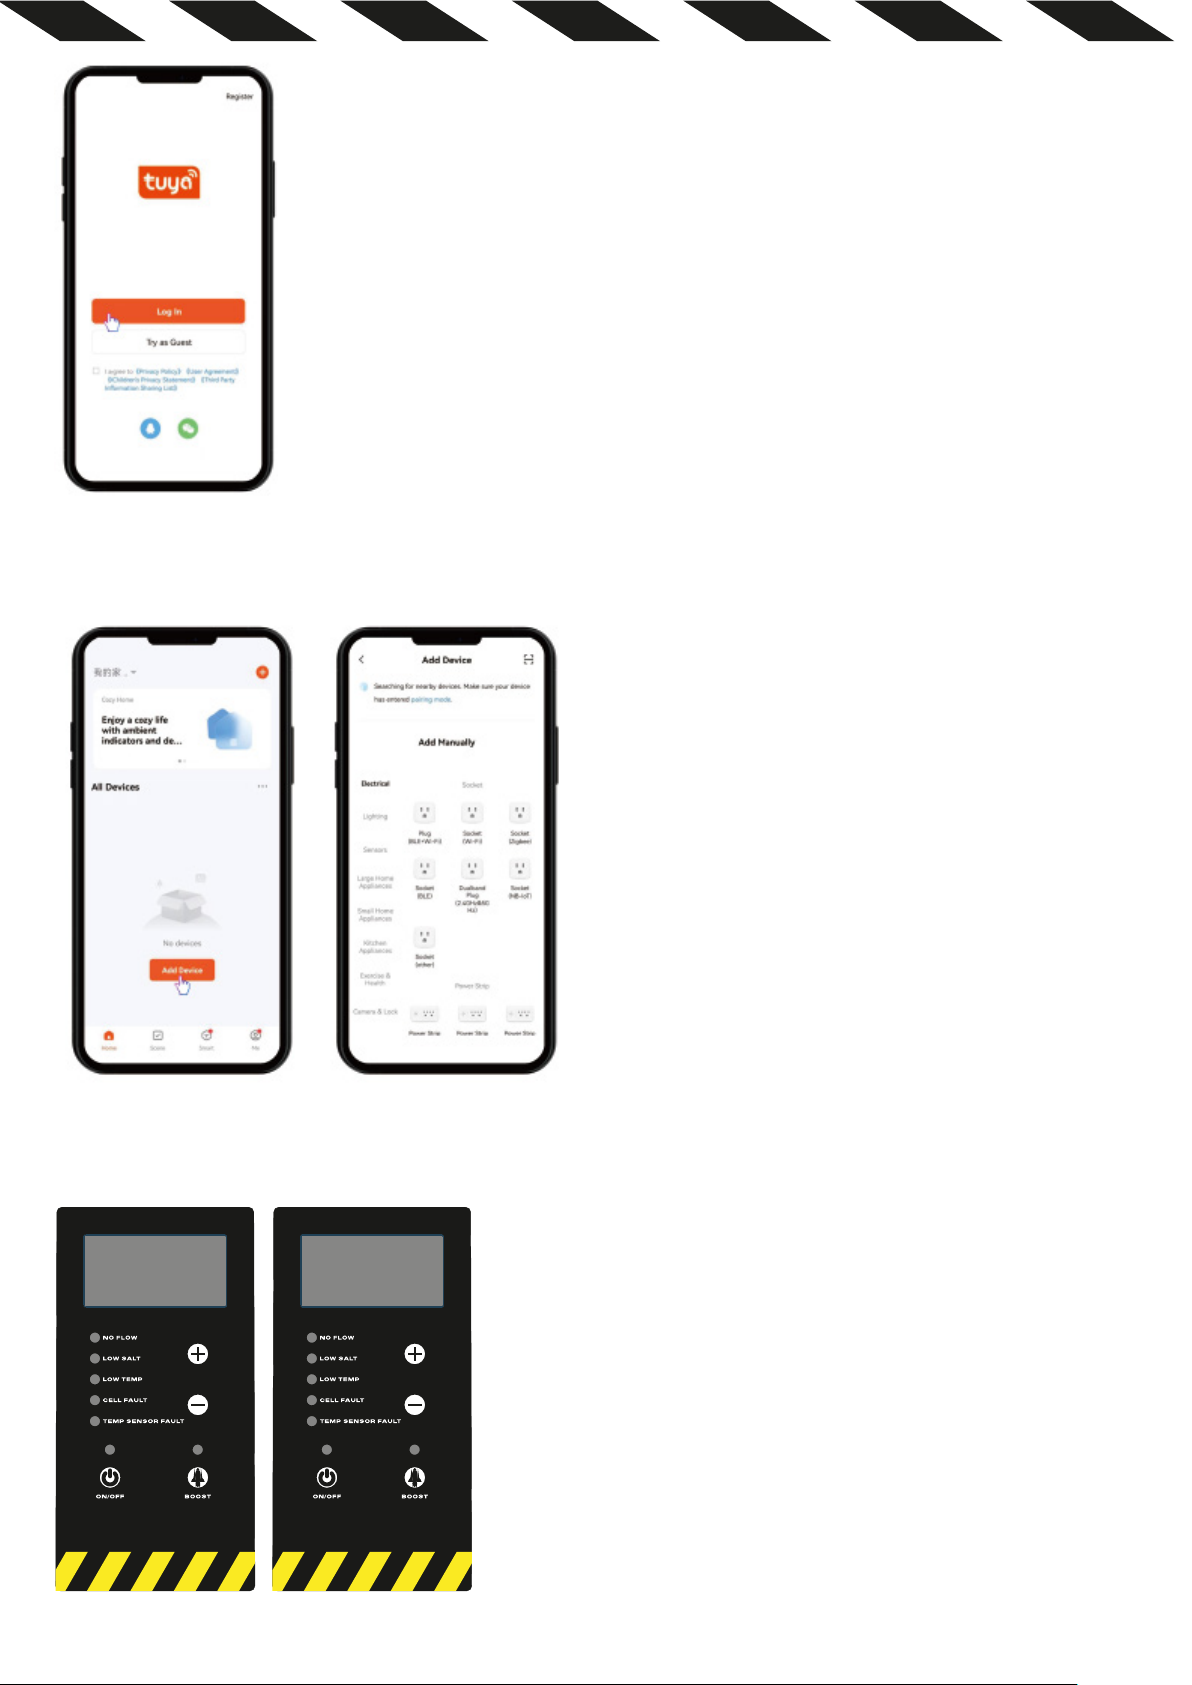
③ Go to the home page and click on Add Device or click on the + in the upper right corner and click on Add
Device.
④ Press and hold both “+” “_” buttons of the unit for 5 seconds at the same time and wait for the WiFi
indicator to flash.
⑤ Enter the pending network mode, at this time Tuya App automatically searches for the device, if the device
Page 47

is searched for, you need to click Add to enter the next step. If you can’t find the device, please check whether
the Bluetooth is on or not, and whether the App permission is disabled or not.
⑥ Fill in the information of the currently connected WiFi.
Note: Please make sure the WiFi is 2.4GHz band, if 5GHz band is used, it will lead to network failure.
⑦ Wait for a few moments to complete the network. The product name can be modified after the network is
completed, click Done to exit the page.
Page 48
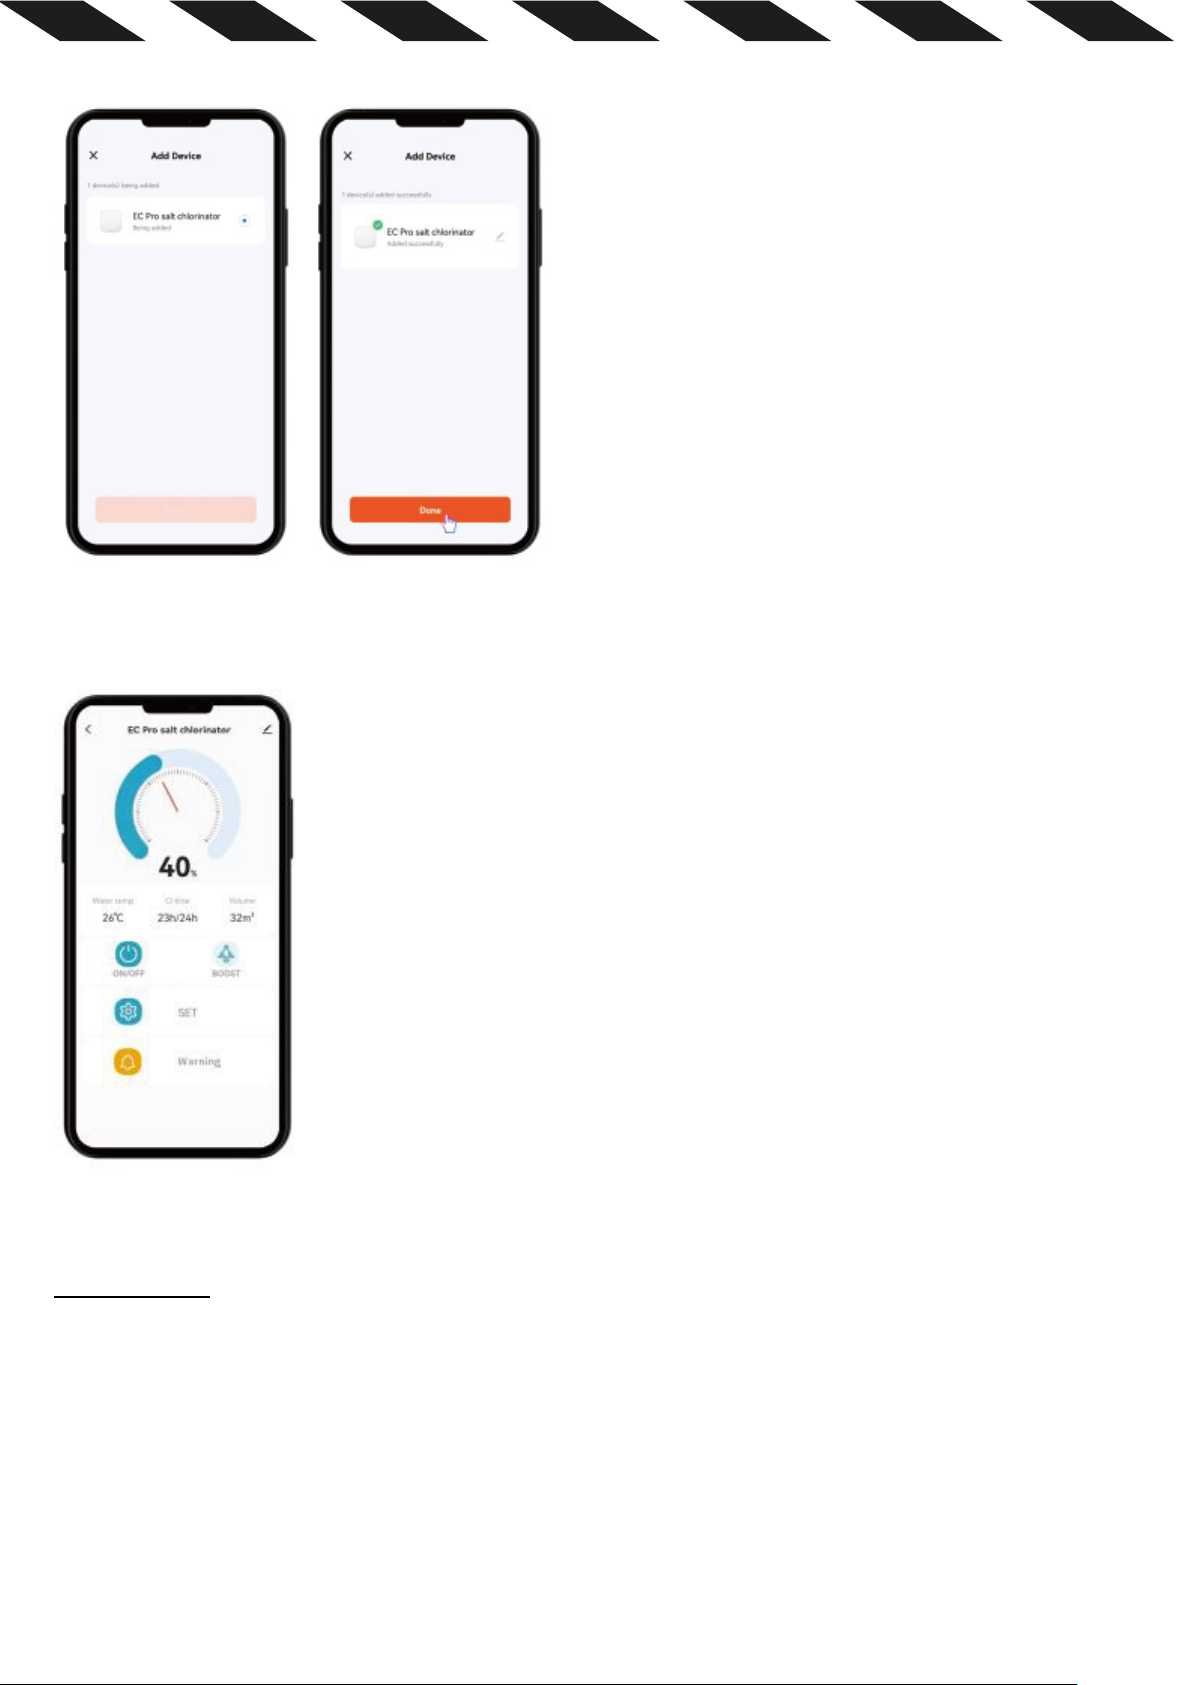
⑧ After completing the distribution network, the user can enter the equipment page to control or set up the
salt chlorinator.
NOTE: If the WiFi is in the 5G, the network paring will be unsuccessful.
WIFI FUNCTION
After entering the home page of the unit, click “SET” to enter the SETTING page. It is able to set salt
chlorinator properties “Volume”, “CI time” and “Reverse”. You can also click “Warning” to enter the error page
to view the history error information of the unit.
Page 49
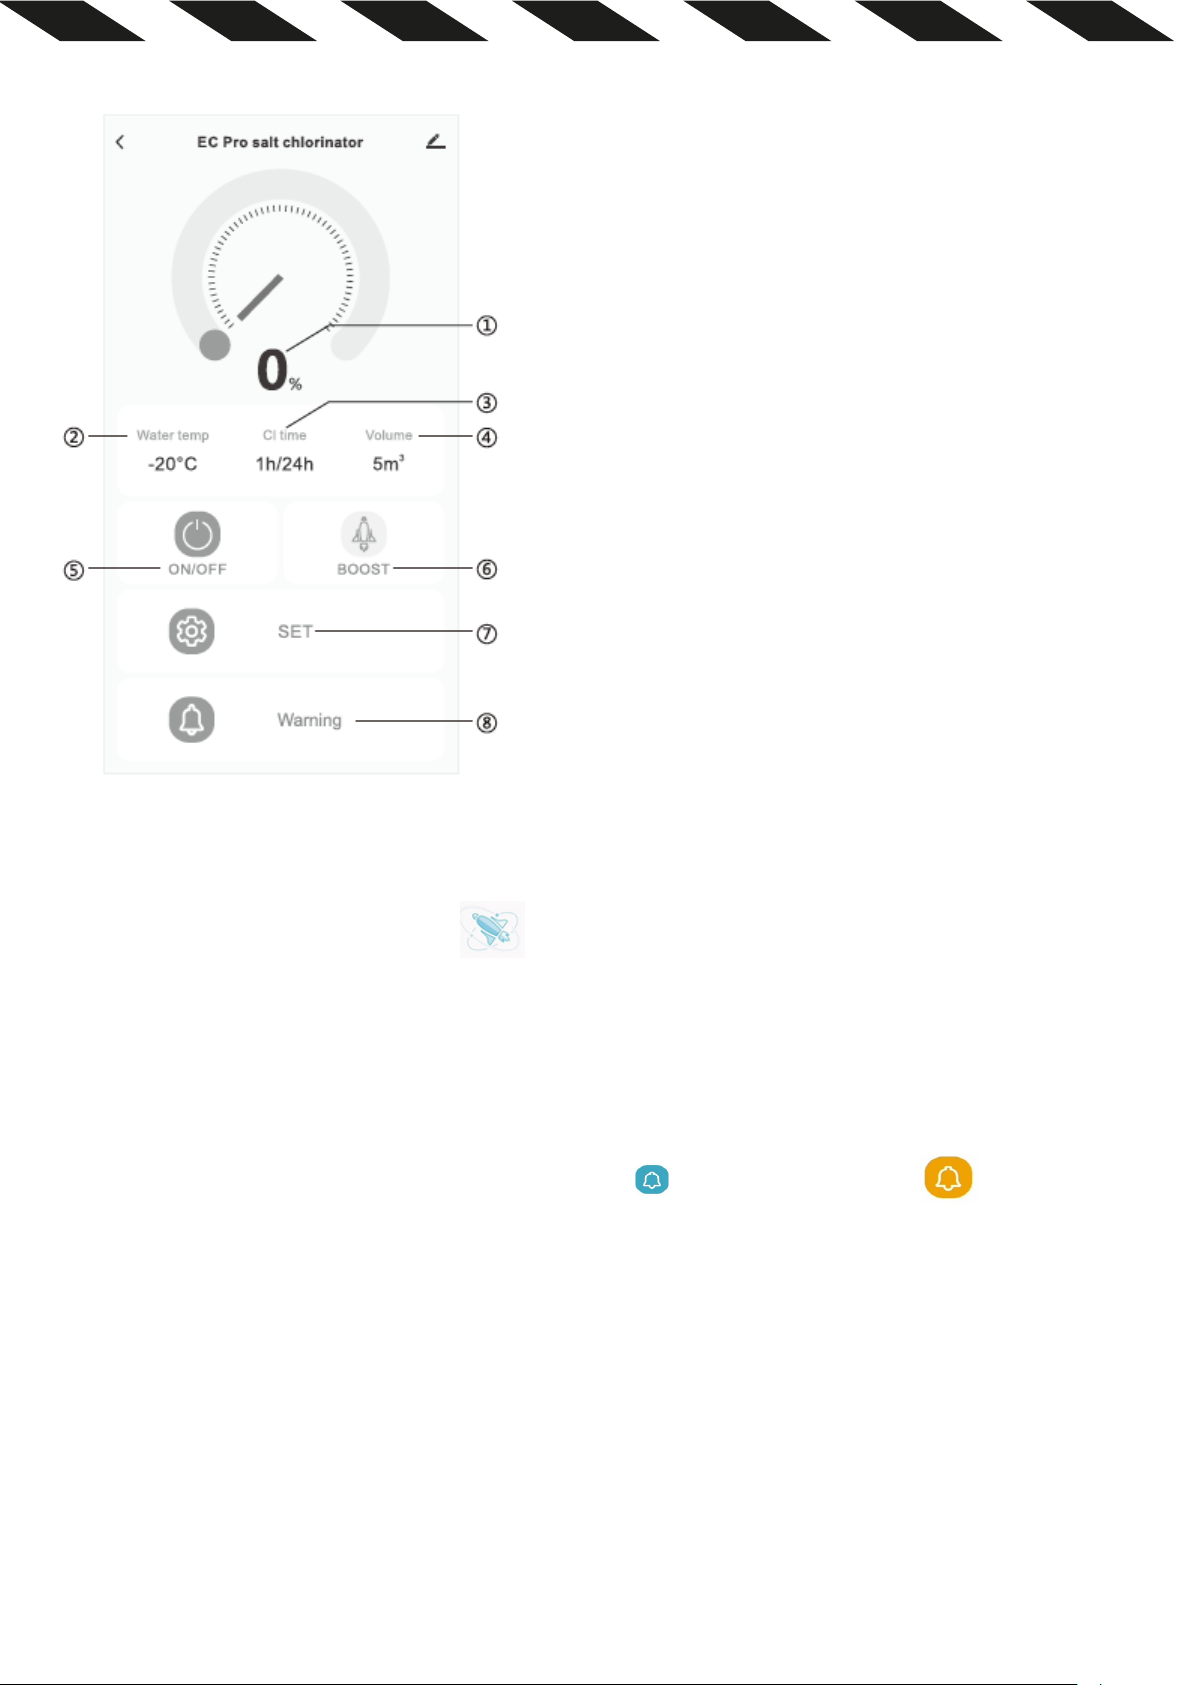
Home page instruction:
① Dashboard: displays the actual chlorine output position, such as 100% during operation, 0% during standby, and hidden
during shutdown; In boost mode, displays icon
② Water temp: Display the water temperature.
③ Cl time: Display the chlorine production time.
④ Volume: Display the set swimming pool volume.
⑤ ON/OFF: Switch on/off status.
⑥ Boost: Switch the boost on/off status.
⑦ SET: Parameter setting.
⑧ Warning: fault warning. When a fault occurs, the blue icon
restored after the fault is resolved.
.
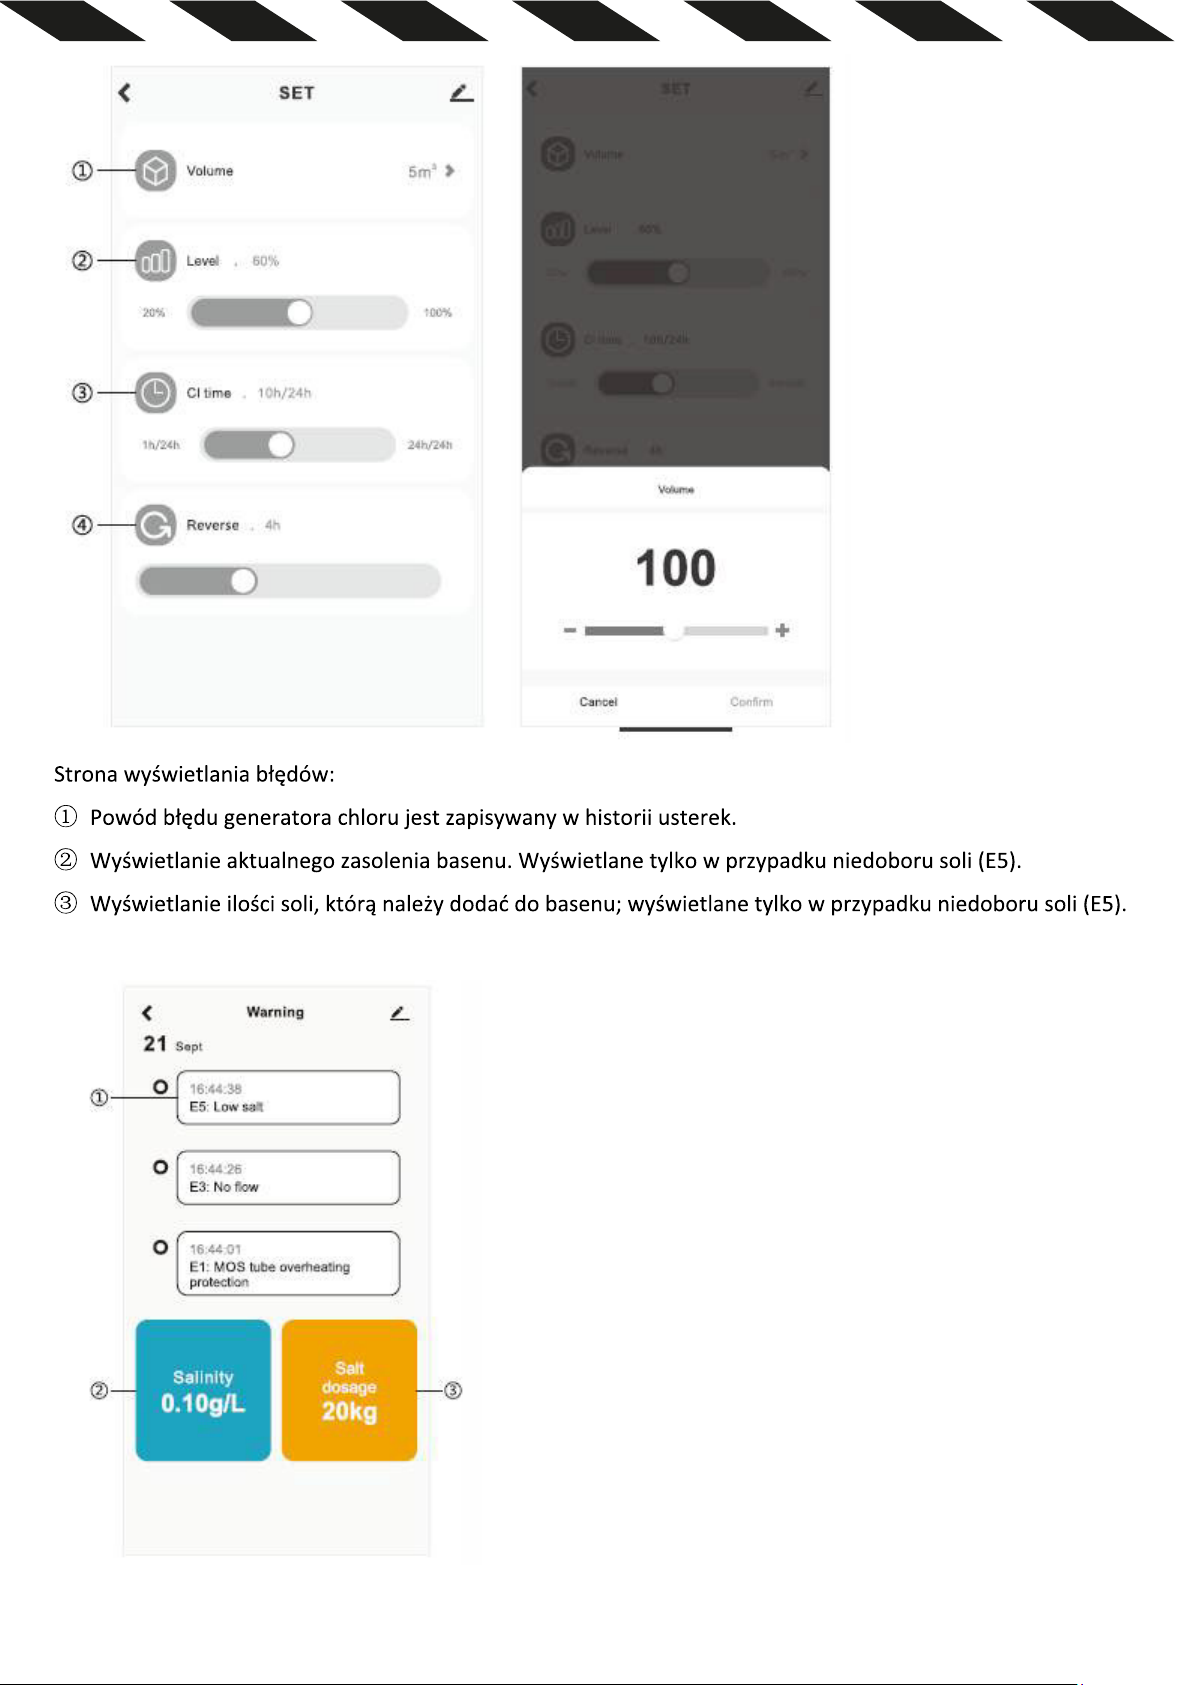
SETTING page
Parameter setting page instruction:
Drag the slider to adjust the following parameters.
① Volume
② Level
③ Cl time
④ Reverse
be displayed in orange . and it will be
Page 50
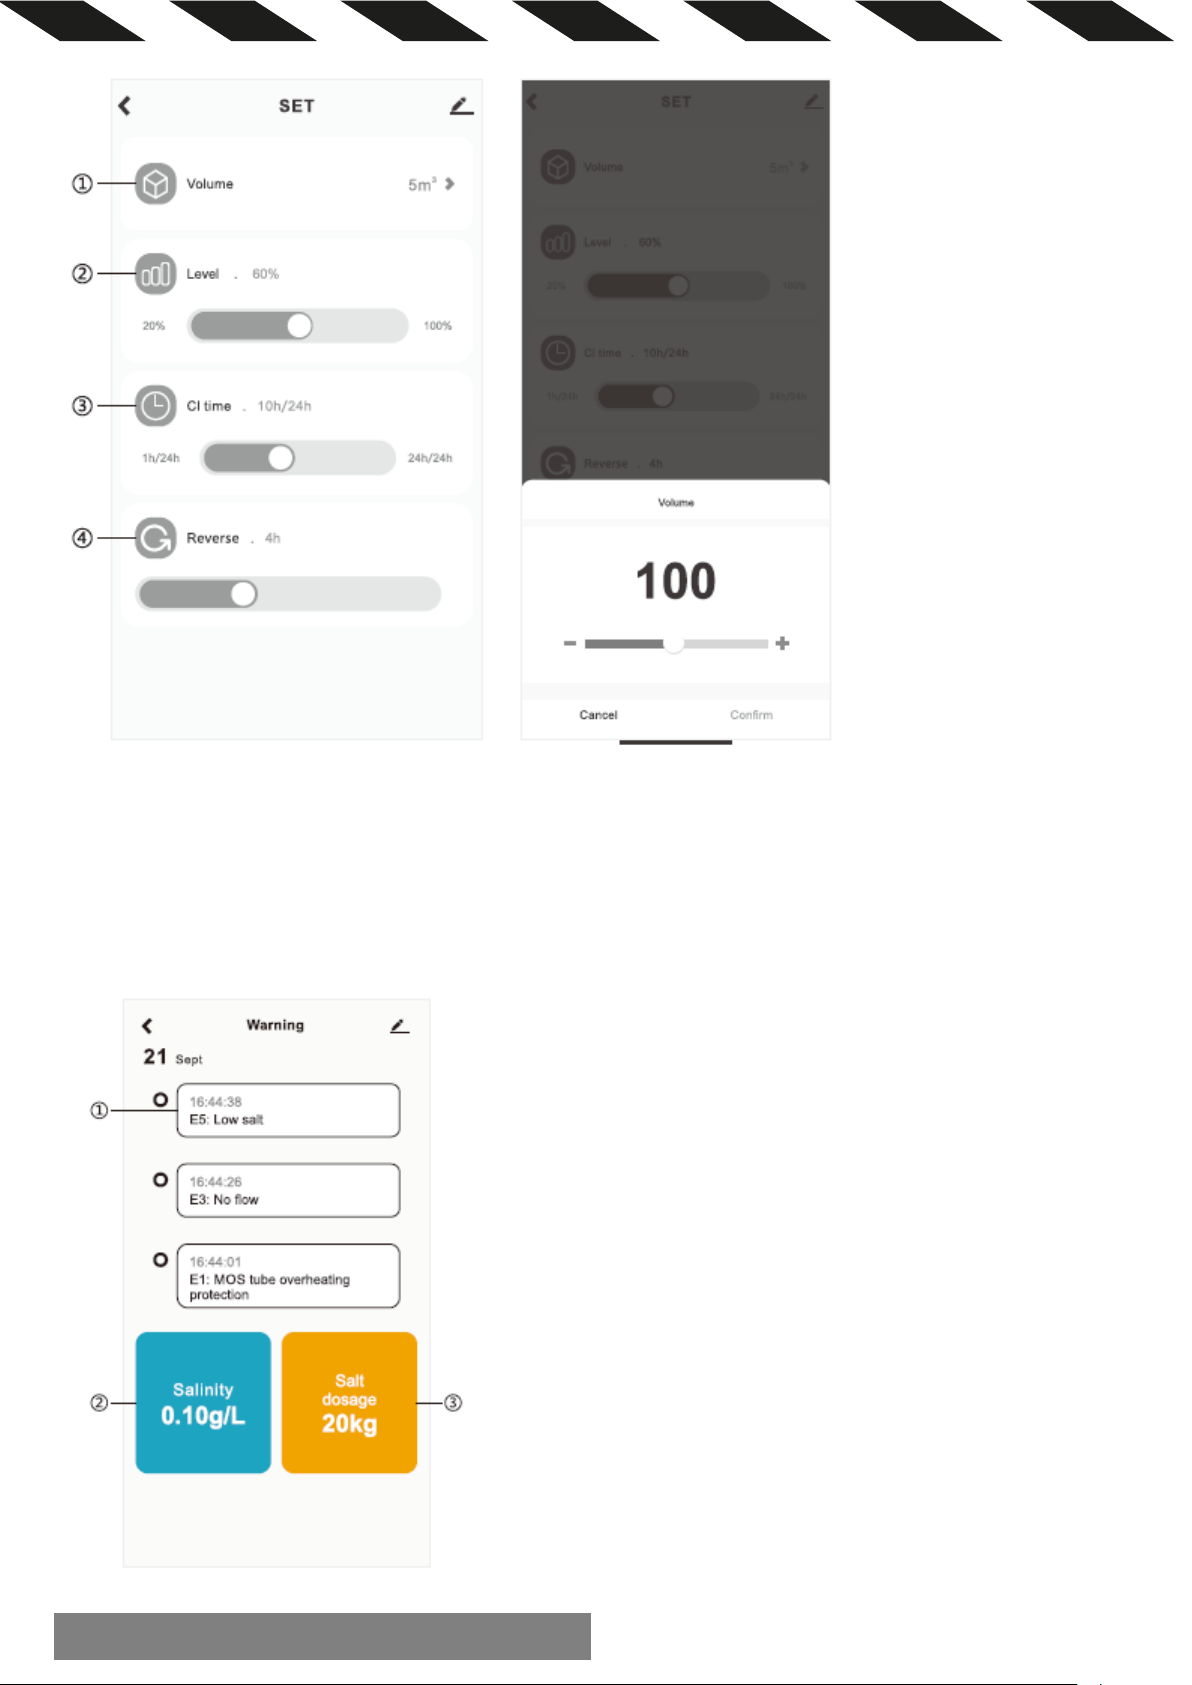
Error page instruction:
① Record the historical error of the salt chlorinator.
② Display the current salinity of the pool; Only displayed when the device is in salt shortage (E5).
③ Display the current amount of salt that needs to be added to the pool. Only displayed when the device is in salt
shortage (E5).
7. ERROR CODE AND CORRESPONDING SOLUTION
Page 51

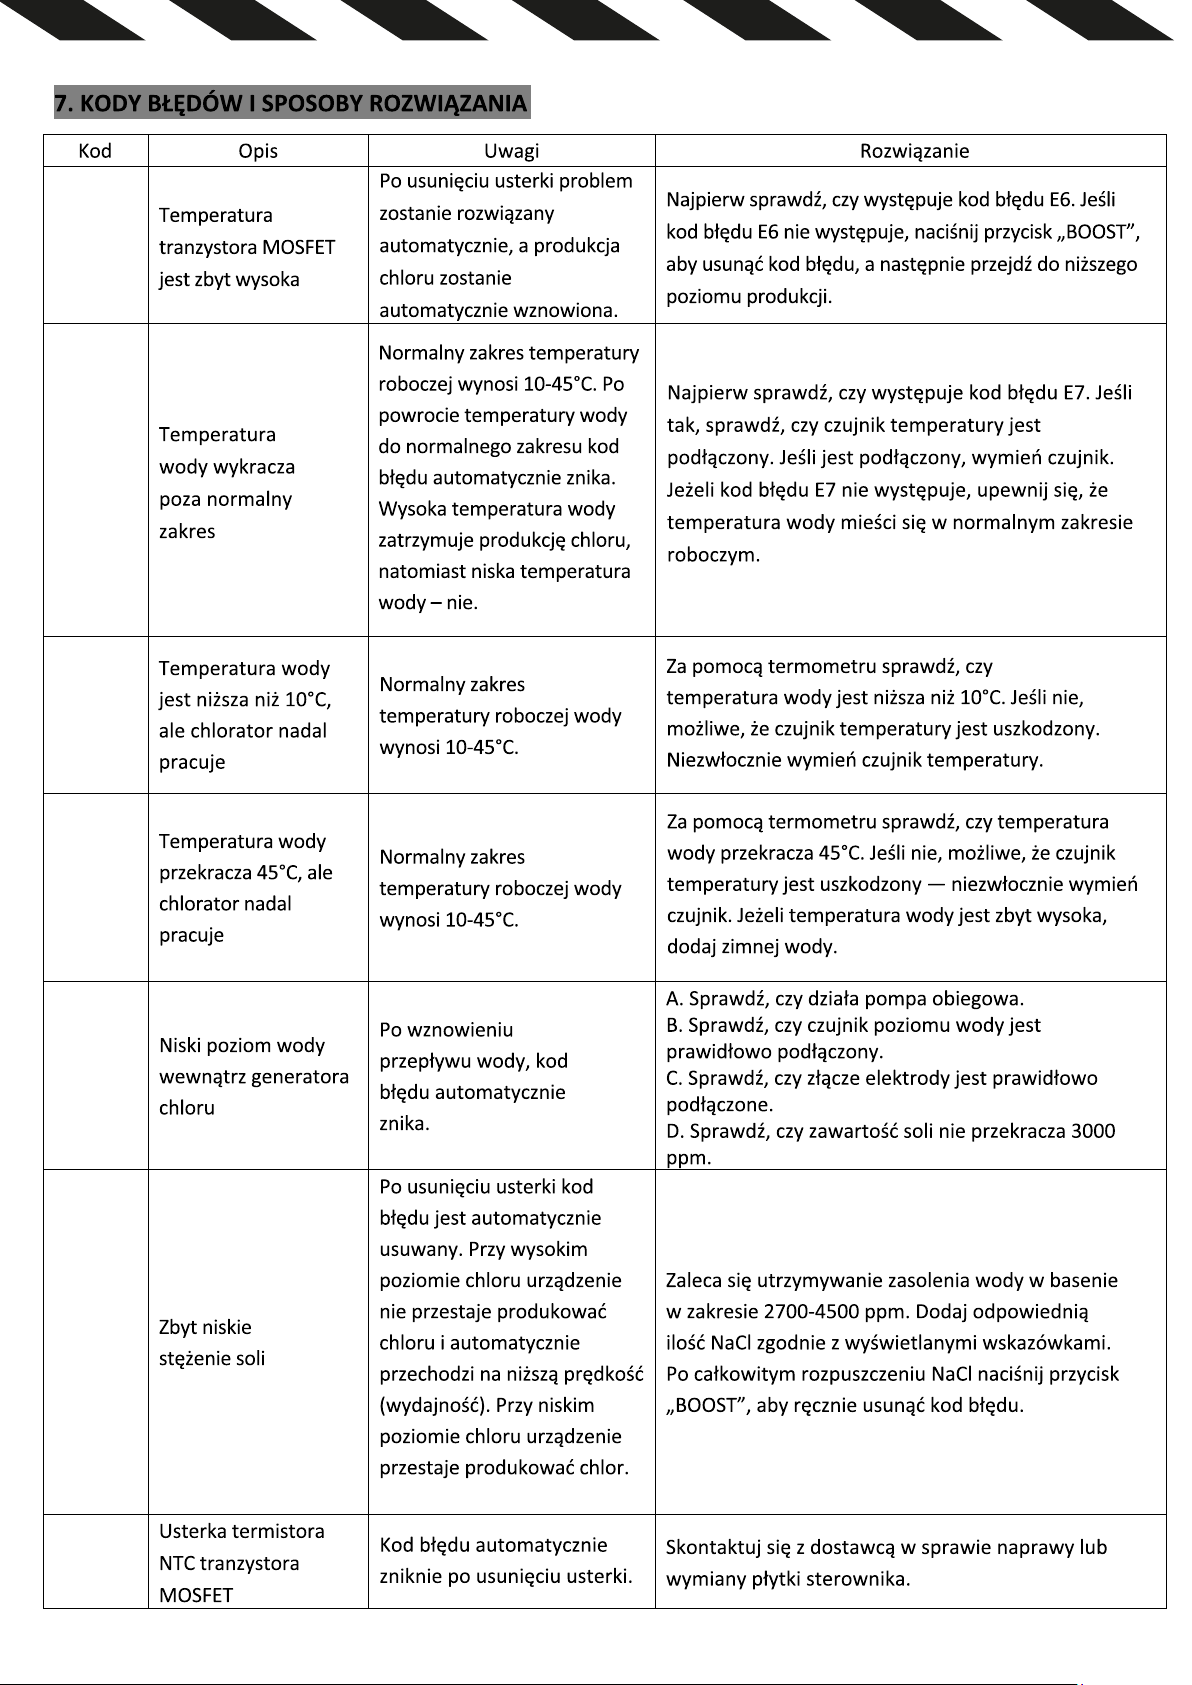
Error
code
Fault description Remark Solution
The temperature of
Automatically eliminate faults
First check if there is an E6 error code.
The normal range of operating
chlorine production.
Water temperature is
working.
Use a thermometer to check whether the water
the temperature sensor in time.
Use a thermometer to check whether the water
If the water temperature is too high, add cold water.
D. Check whether the salt content is less than 3000ppm.
chlorine.
The error code be
Water temperature
sensor failure
The malfunction must be
removed manually
First check whether the temperature sensor is attached,
if attached, replace the sensor.
The error code will be
the malfunction is solved.
the malfunction is solved.
contact.
E1
E2
EL
EH
the MOS tube is too
high
The water
temperature exceeds
the normal range.
below 10 , but the
chlorinator is still
Water temperature is
above 45
chlorinator is still
working.
, but the
and automatically resume
chlorine production
temperature is 10-45 . After
the water temperature
returns to the normal range,
the error code is automatically
eliminated. High water
temperature stops chlorine
production and low water
temperature does not stop
Normal operating water
temperature range is
10-45
Normal operating water
temperature range is
10-45
.
.
If there is no E6 error code, press the “BOOST” to
eliminate the error code and then downshift.
First check if there is an E7 error code.
If there is, check if the temperature sensor is connected.
If yes, replace the sensor.
If there is no E7 error code, check that the water
temperature is within the set water temperature range.
temperature is lower than 10 .
If not, the temperature sensor maybe damaged, replace
temperature is above than 45 .
If not, the temperature sensor maybe damaged, replace
the temperature sensor in time.
E3
E5
E6
The water level inside
the chlorinator is low
The salt concentration
is too low
MOS tube NTC
thermistor failure
When water flow resumes,
the error code is
automatically eliminated
After the malfunction is
solved, the error code is
automatically eliminated.
On high output chlorine level,
the unit will not stop
producing chlorine and
automatically downshifts;
On low output chlorine level,
the unit will stop producing
automatically eliminated after
the malfunction is solved.
A.
Check if the circulation pump is operating.
B. Check the water level detection probe wiring for poor
contact.
C. Check whether the electrode connector is in poor
contact.
It is recommended that the salinity of pool water be kept
within the range of 2700-4500ppm. Add the
corresponding NaCl according to the prompts. After the
NaCl is completely dissolved, press the “BOOST”to
manually eliminate the error code.
Contact the supplier to repair or replace the controller
circuit board.
E7
E8
EA Electrode failure
The input voltage is
abnormal
automatically eliminated after
The error code will be
automatically eliminated after
Please replace the power adapter.
A. Check whether the electrode is connected well.
B. Check whether the electrode connector is in pool
Page 52
C. Check whether the salt content of the pool water is
less than 3000 ppm.
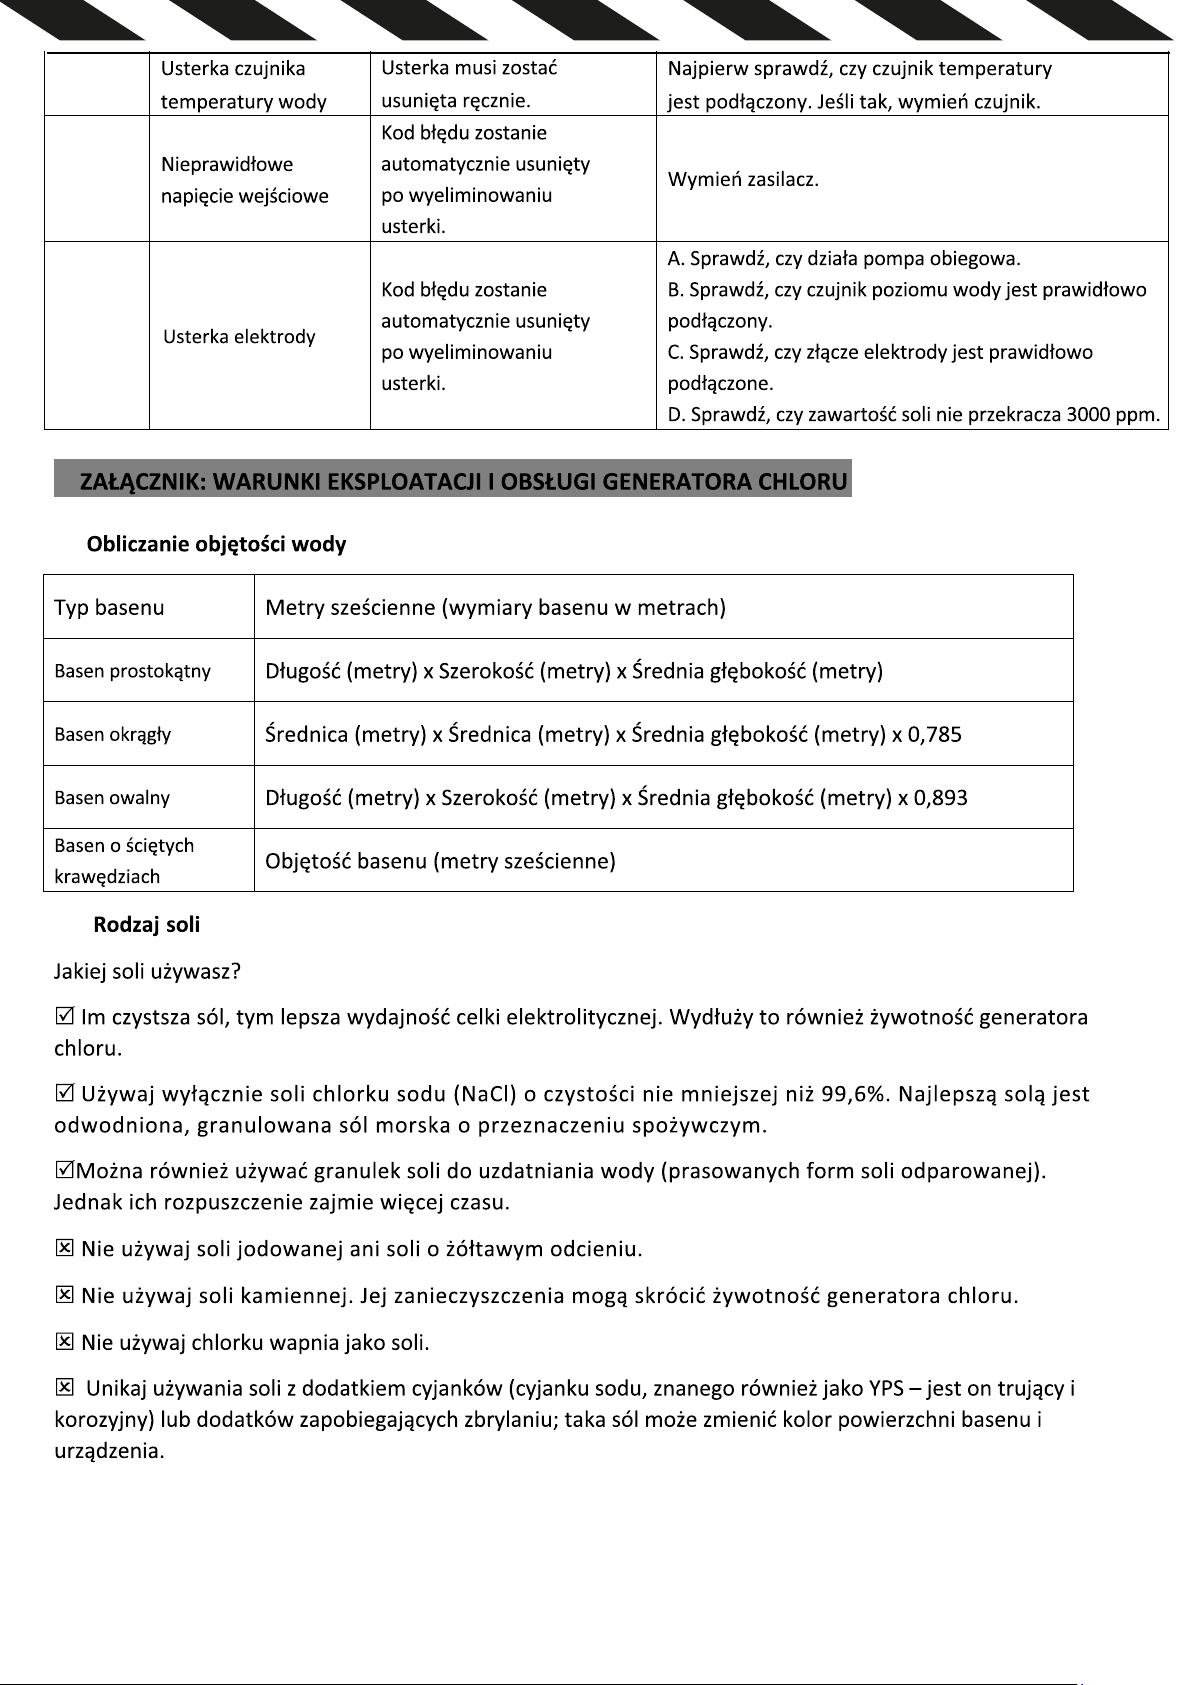
8. APPENDIX: THE OPERATING CONDITION AND MAINTENANCE
(1) Pool volume calculation
Type of pool Cubic meters (pool size in meters)
Rectangular pool Length (meter) x Width (meter) x Average Depth (meter)
Circular pool Diameter (meter) x Diameter (meter)x Average Depth (meter) x 0.785
Oval pool Length (meter) x Width (meter) x Average Depth (meter) x 0.893
Beveled pool Pool volume (cubic meter) x 0.85
(2). Salt types
What salt do you use?
The purer the salt, the better the performance of the electrolytic cell. This will also extend the service life of
the chlorinator.
Use only sodium chloride (NaCl) salt that is at least 99.6% pure. The best salt is dehydrated, granulated
food-grade sea salt.
It is also possible to use water conditioning salt pellets (the compressed forms of evaporated salt). However,
it will take a longer time to dissolve.
Do not use iodized salt or salt with a yellow appearance.
Do not use rock salt. Its impurities may shorten the service life of the chlorinator.
Do not use calcium chloride as a salt.
Avoid using anti-blocking agent (sodium cyanide, aka YPS. It is poisonous and corrosive) salt, which may
change the color of the pool surface and the internal equipment.
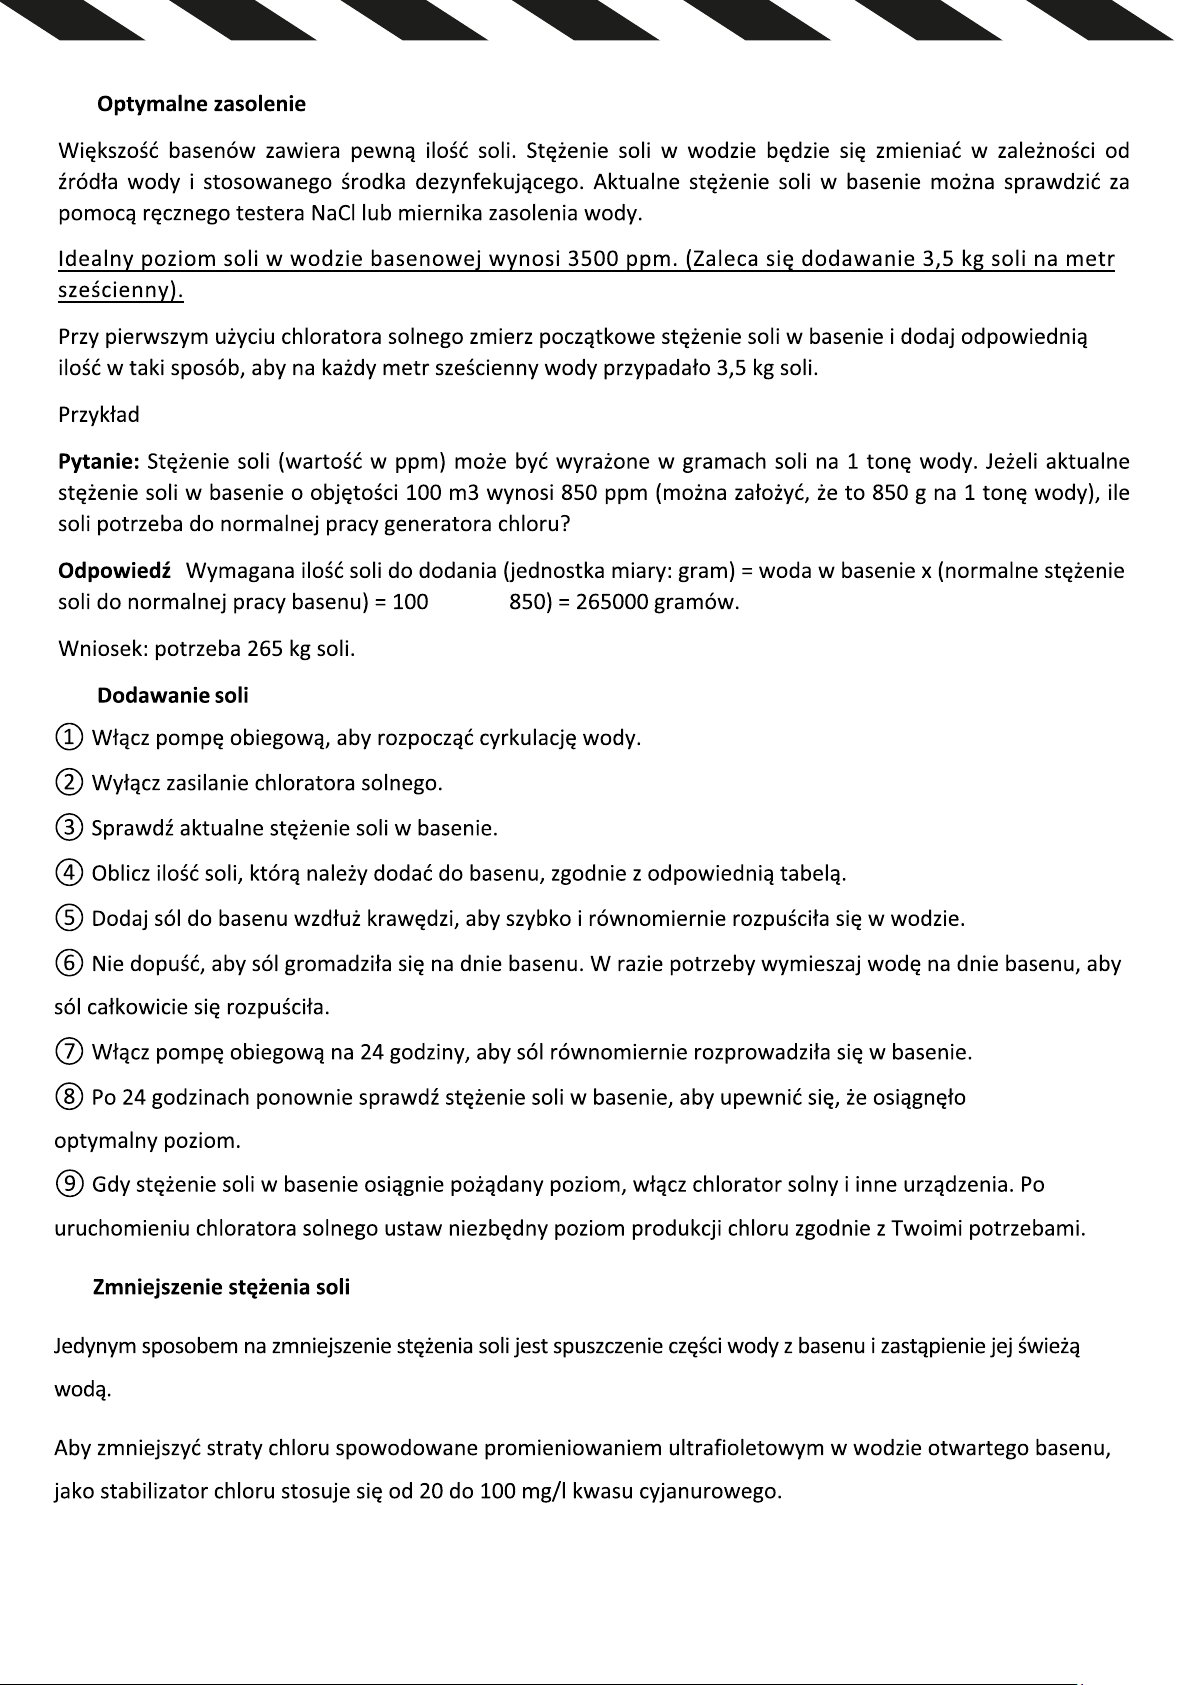
(3). Optimum salinity
Most swimming pools contain a certain amount of salt. The concentration of the salt in water will vary
depending on the water source and the sterilizing agent used. Users can use a hand-held NaCl tester or
salinity pen to test the current salt concentration of the pool.
The ideal salt level in the pool water is 3500 ppm. (It is recommended to add 3.5kg of salt per cubic meter)
When using the chlorinator for the first time, please use a salinity meter to check the original salt
concentration in the pool, and add the appropriate amount of salt to ensure 3.5kg of salt is added per cubic
meter of water.
For example:
Question: The concentration of salt (ppm value) can be seen as the grams of salt within 1 ton of water. If the
Page 53

current salt concentration of a 100m³ pool is 850ppm (can be taken as 850g in 1 ton of water), how much salt
is needed for the chlorinator to operate normally ?
Answer: Salt needs to be added (unit: gram)=water in the pool x (normal operation salt concentration current
pool salt concentration)=100x(3500-850)=265000 grams.
Answer: 265kg of salt is required.
(4). Add salt
①Turn on the circulation pump to start the water circulati
②Turn off the power of the salt chlorinator.
③Test the current salt concentration of the pool.
④Calculate the amount of salt needed to add to the pool according to the corresponding chart.
⑤Add salt to the pool around the side of the pool, so that it can quickly and evenly dilute into water. ⑥Do
not let salt accumulate on the bottom of the pool. Stir the water on the bottom of the pool if needed so the
can completely dissolve.
salt
⑦Run the circulation pump for 24 hours, so the salt can evenly distributed in the pool.
⑧24 hours later, test the salt concentration of the pool again to see if it has reached the optimum level.
⑨When the salt concentration in the pool reaches the desired level, turn on the salt chlorinator and other
equipment. Once the chlorinator is started, set the required chlorine production acc
(5). Reduce the salt concentration
The only way to decrease the salt concentration is to drain some of the pool water and refill it with fresh
water.
on.
ording to your needs.
In order to reduce the loss of chlorine caused by ultraviolet radiation in outdoor swimming pool water, 20 to
100 mg/L cyanuric acid is used as a chlorine stabilizer.
MAINTENANCE
·To ensure the smooth operation of the salt chlorinator, t
months or after cleaning the filter, whichever comes first.
·Before removing the electrolysis cell, the salt chlorinator must be closed for 5-10 minutes, and the inlet and
outlet valves must be closed.
·After removing the electrolysis cell, check if there are flake-like sediments, debris, and light-colored layering
on the inner surface. Wash with clean water.
f there are white calcified substances on the titanium plate, please soak the titanium plate in kitchen vinegar
·I
for an hour or more to remove the calcification material.
·If flushing with water does not remove the deposits, use a plastic brush to clean the surface. Do not use a
metal brush.
·If there is serious dirt that cannot be removed by yourself, please consult your supplier or seek a professional
cleanin
g solution.
he electrolysis cell should be checked every three
Page 54

LEGAL AND REGULATORY INFORMATION (EU)
Manufacturer and Importer
Manufacturer: Guangdong LASWIM Water Environment Equipment Co., Ltd.
NO.16 Jianye Road, Nantou Town, Zhongshan City, Guangdong Province, P.R. China
E-mail: [email protected]
Importer in the EU: AQUAMONKEY Sp. z o.o.
ul. Palisadowa 20/22, 01-940 Warsaw, Poland
E-mail: [email protected]
The EU importer AQUAMONKEY Sp. z o.o., ul. Palisadowa 20/22, 01-940 Warsaw, Poland, declares
that the Crystal Pro Series salt chlorinator (Model: Pro 4, Pro 8, Pro 12, Pro 16, Pro 20) complies with
Directive 2014/53/EU. The full text of the declaration is available on request at the importer’s
address.
Compliance with safety and EMC requirements
The device meets the essential safety and electromagnetic compatibility (EMC) requirements
specified in Art. 3.1 (a) and (b) of Directive 2014/53/EU.
Technical parameters of the radio module
Frequency band: Wi-Fi 2.4 GHz (2400–2483.5 MHz).
Maximum radio frequency power: < 20 dBm (EIRP).
Disposal (WEEE)
The crossed-out wheeled bin symbol indicates that the product must not be disposed of in regular
waste containers. Waste electrical and electronic equipment should be taken to a collection point for
recycling in accordance with Directive 2012/19/EU.
Installation safety
The installation must be carried out in accordance with national electrical installation regulations. The
power circuit must be equipped with a residual current device (RCD) with a rated residual operating
current not exceeding 30 mA.
 Loading...