

Page 1

POOL ROVER
SERIES 2
ROBOTIC POOL CLEANER
PRODUCT SETTINGS AND TROUBLESHOOTING GUIDE
820406
PLEASE READ CAREFULLY BEFORE
USING YOUR POOL CLEANER
Aqua Products, Inc
282 Grove Avenue
Cedar Grove, NJ 07009
United States
Page 2
PRODUCT SETTINGS and TROUBLESHOOTING
= 1 Hour Shut-off
= 2 Hour Shut-off
WARNINGS
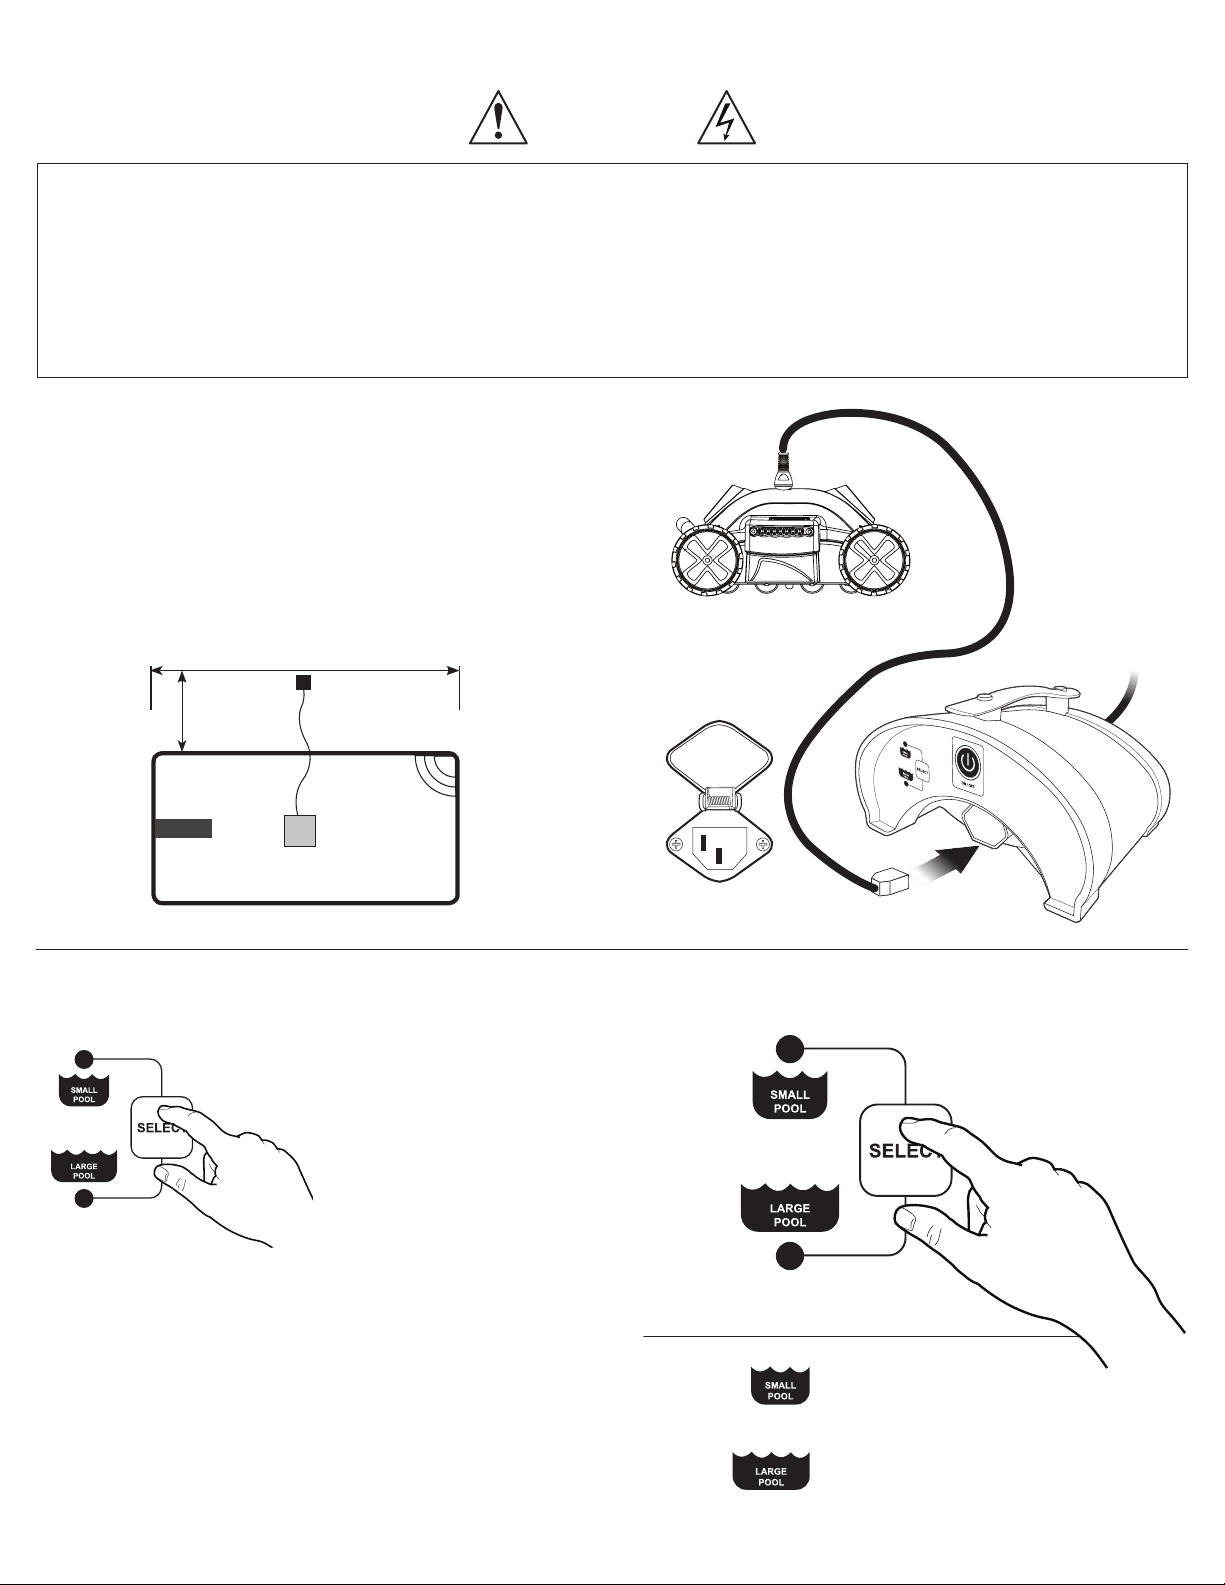
WARNING: Do not turn the Power Supply on, unless the pool cleaner is in the water.
WARNING: Do not operate your machine while people swim in the pool.
WARNING: The Power Supply must be placed at least 12 feet / 4 meters from the pool’s edge at all times! See diagram below.
WARNING: To prevent possible electric shock hazard this unit must be connected to an RCD (Residual Current Device) with a related residual operating current
not exceeding 30mA.
WARNING: Before performing any troubleshooting maintenance procedures, your Cleaner should be disconnected from the Power Supply (transformer) and
the Power Supply should be unplugged from the electrical outlet to prevent the possibility of personal injury or damage to your Cleaner!
PRODUCT SETTINGS
POWER SUPPLY
Setting up the power supply is simple. First, make sure that the power supply
is plugged into a GFCI (Ground Fault Circuit Interrupter) outlet. Then lift the
cover on the power supply outlet and connect plug on the floating cable into
the power supply.
Midpoint of the Long side of Pool
Power Supply
12ft / 4m
Cleaner
TIMER SETTINGS / POOL SIZE
To turn the power supply ON, press
and release the power button once.
To turn the power supply OFF, press
and release the power button. Light
will turn OFF
The power supply has 2 settings. Each setting is determined by the pool
size and cleanliness as well as for how long you would like to run the cleaning
cycle.
You have an option for SMALL POOL and LARGE POOL. Press the SELECT
button to get your correc t setting
Page 3
PRODUCT SETTINGS and TROUBLESHOOTING
PRODUCT SETTINGS
AXLE AND TURNING PINS
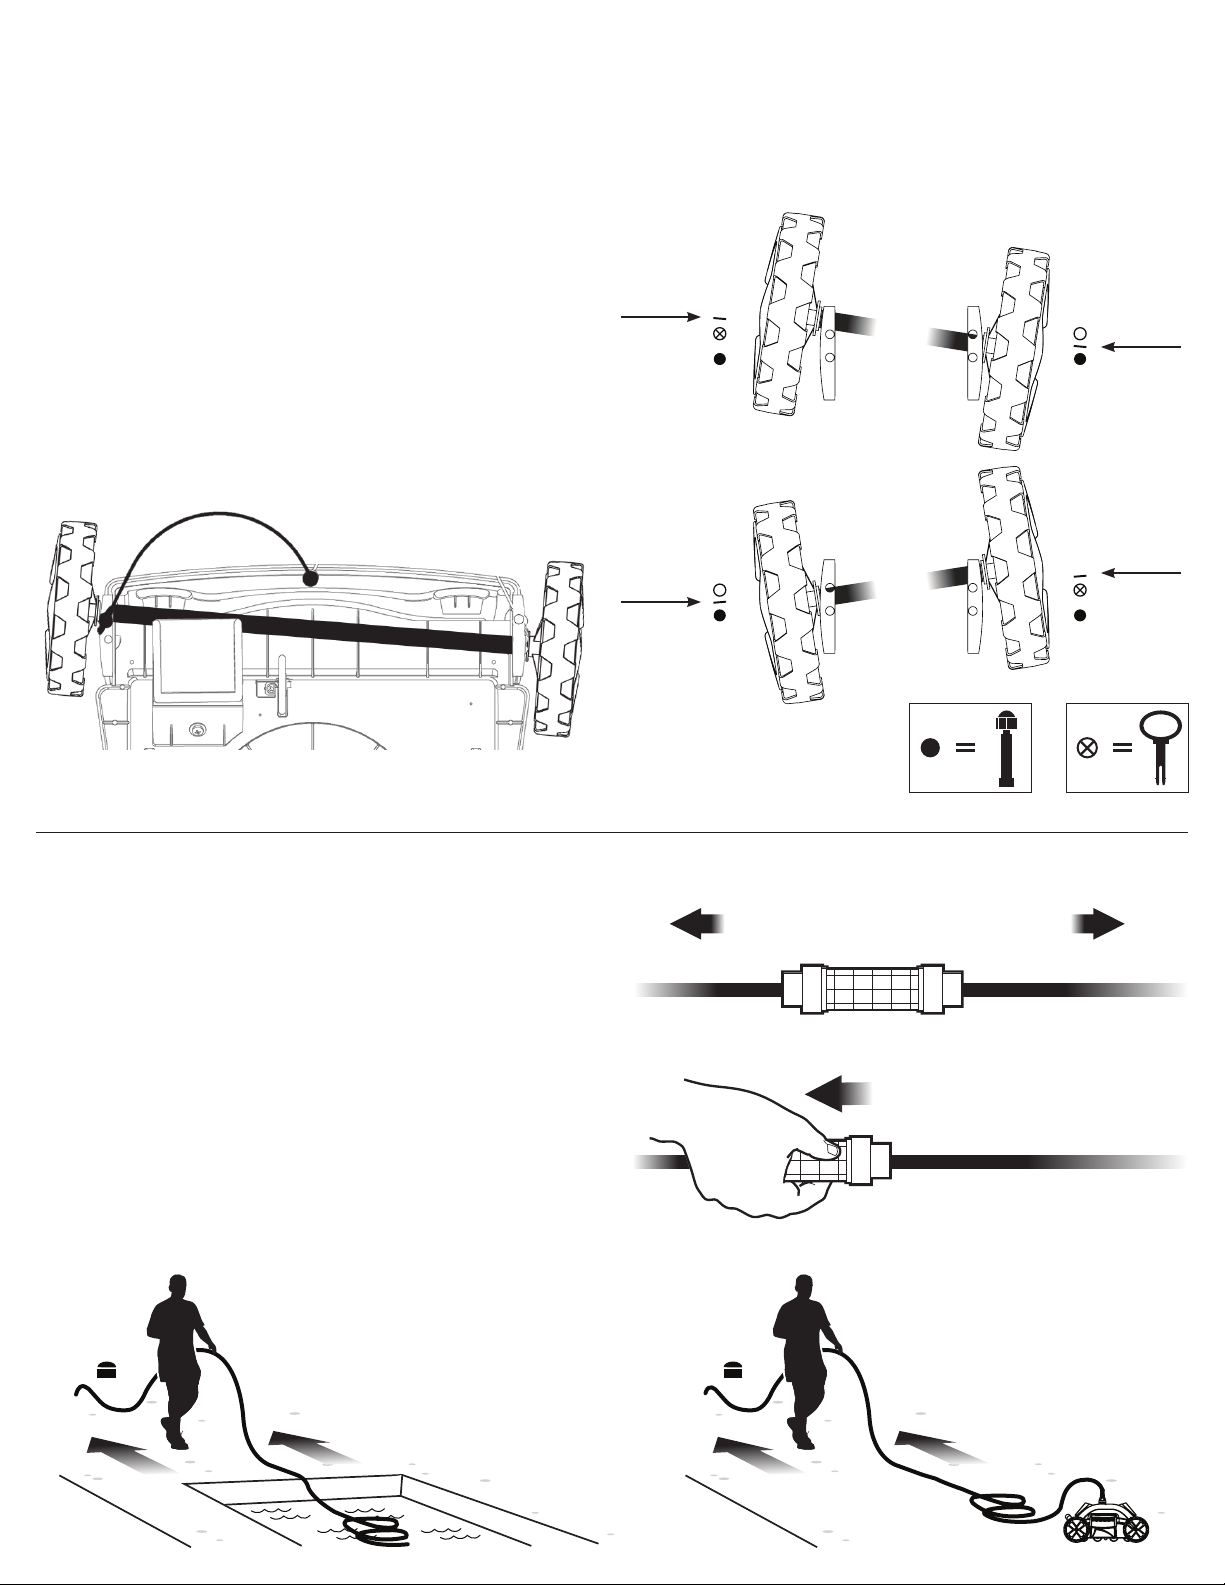
Your cleaner moves about your pool by way of 1 adjustable pin located on
each end of the axle on the bottom side of the cleaner. There are various
positions that the pins can be set. Each setting will affect how wide or tight
the cleaner turns when running in it’s cleaning cycle.
It is recommended that before every cleaning cycle you switch the pin position
(on the same sides) so that the axle is cleaning the opposite way. This is so
that your cleaner can reach all areas of the pool and prevents the cable from
tangling.
Make sure the axles are freely moving and the axle channels are clear.
There are 2 possible configurations that the axle can be locked into. With the
cleaner flipped over and movable axle furthest away, the axle must always be
set in front of the pin. See the diagram below.
Axle
Position
Axle
Position
Axle
Position
Axle
Position
HOW TO USE THE E-Z SWIVEL TO HELP UNTANGLE
FLOATING CABLE
The E-Z Swivel is a feature that will help untangle the floating cable should
this occur. To use the E-Z Swivel it is recommended that you stand outside
of the pool.
Make sure that the floating cable is disconnected from the power supply!
Now grab the large part of the grip on the floating cable. Using one hand,
pull towards the direction that is bet ween you and the power supply and walk
away from the cleaner. As you move further from the cleaner, the floating
cable will untangle itself and straighten out.
NOTE: It is recommended that you turn OFF the power supply before
entering the pool with the cleaner in the water.
Using E-Z Swivel while cleaner
is OFF and still inside pool
Direction of
Power Supply
Fixed Pin Adjustable Pin
Direction of
Cleaner
Using E-Z Swivel while cleaner is
OFF and outside pool
Page 4
PRODUCT SETTINGS and TROUBLESHOOTING
PRODUCT SETTINGS
RE-INSTALLING FILTER BAGS AFTER CLEANING
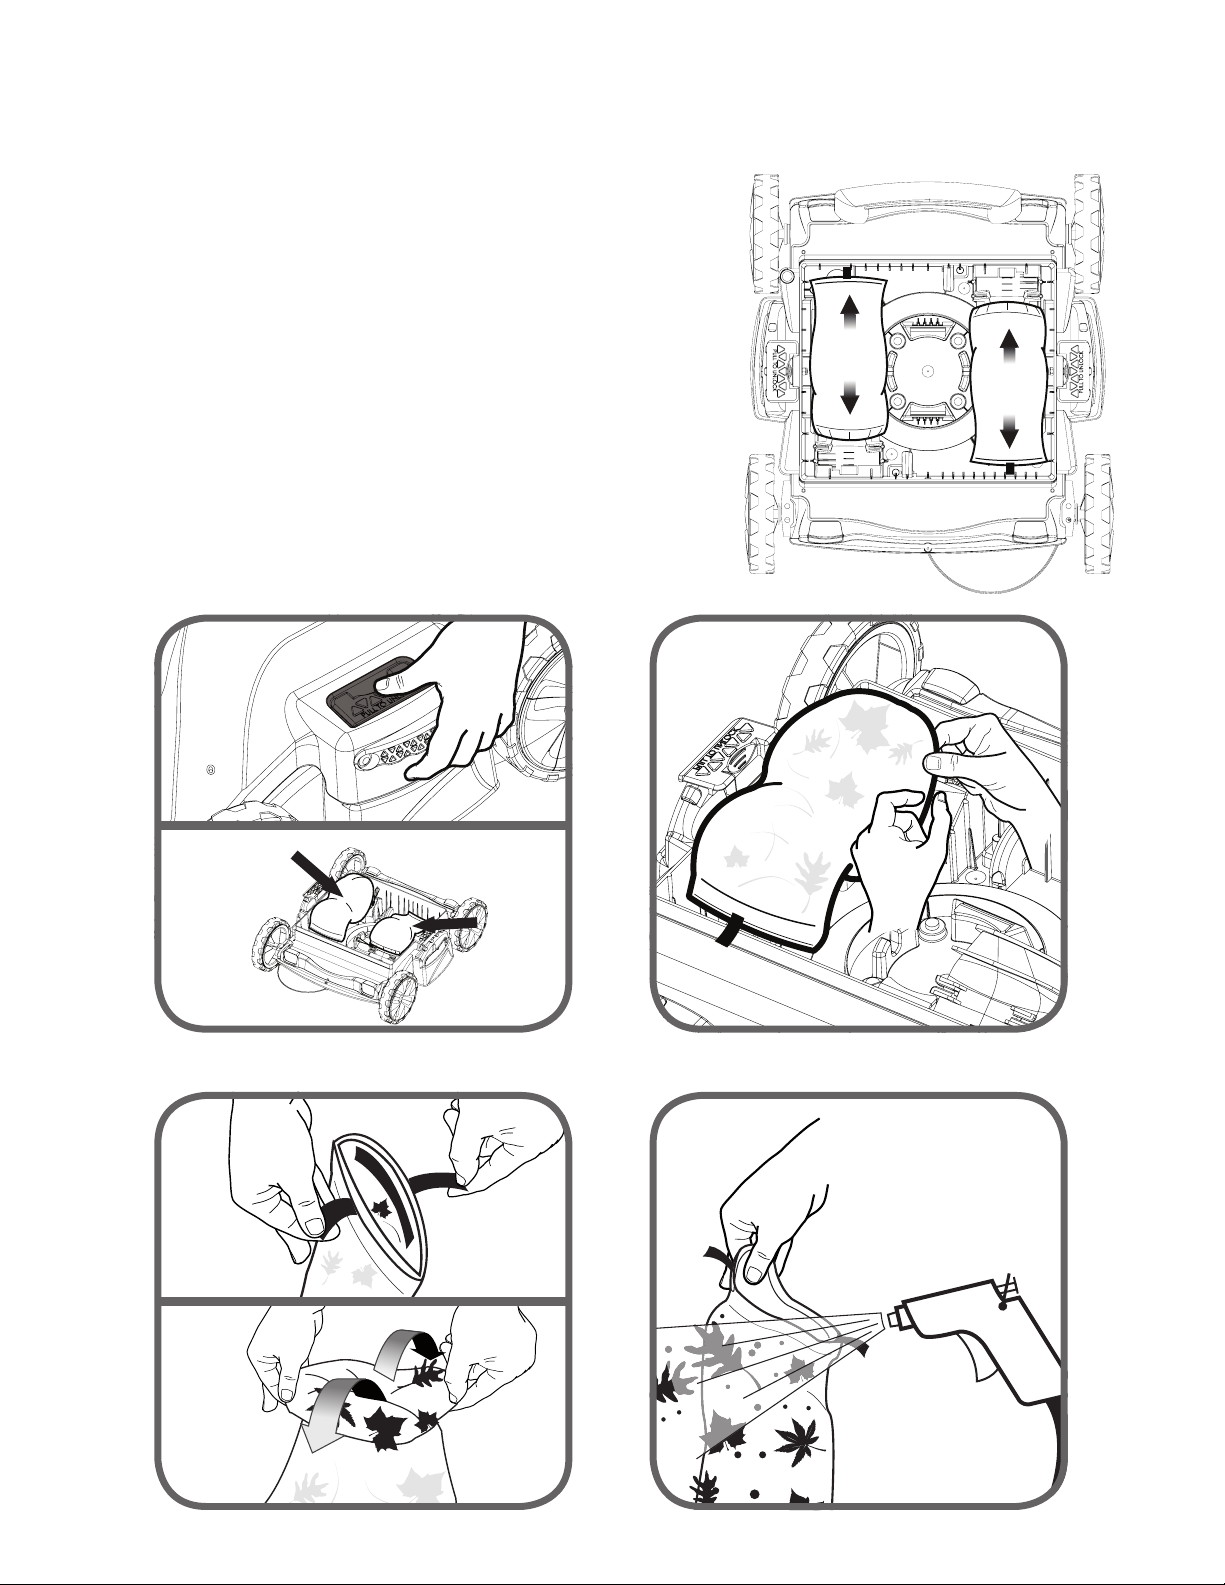
After you have cleaned the filter bags of the collected debris, you’ll need to
re-install them back into the cleaner. Make sure the elastic opening covers all
the way over the opening and that the Velco® end is secure.
The filter bag should stretch all the way out from end to end. See the diagram
for proper placement.
NOTE: Your filter bag is machine washable. Make sure you rinse off
any leaves, twigs and larger debris before doing so. Please wash in
cold water only. You may use detergent if necessary.
Top View of
Inside the cleaner
1 2
Push tabs down and outward. This will remove the cover
and expose the filter bags.
Remove filter bags from inside cleaner by gently pulling on
the elastic band around the suc tion ports.
43
Pull tabs to undo Velcro® and turn the filter bag inside out Use a garden hose to clean filter bag.
Page 5
PRODUCT SETTINGS and TROUBLESHOOTING
ADJUSTING THE SUCTION PORTS
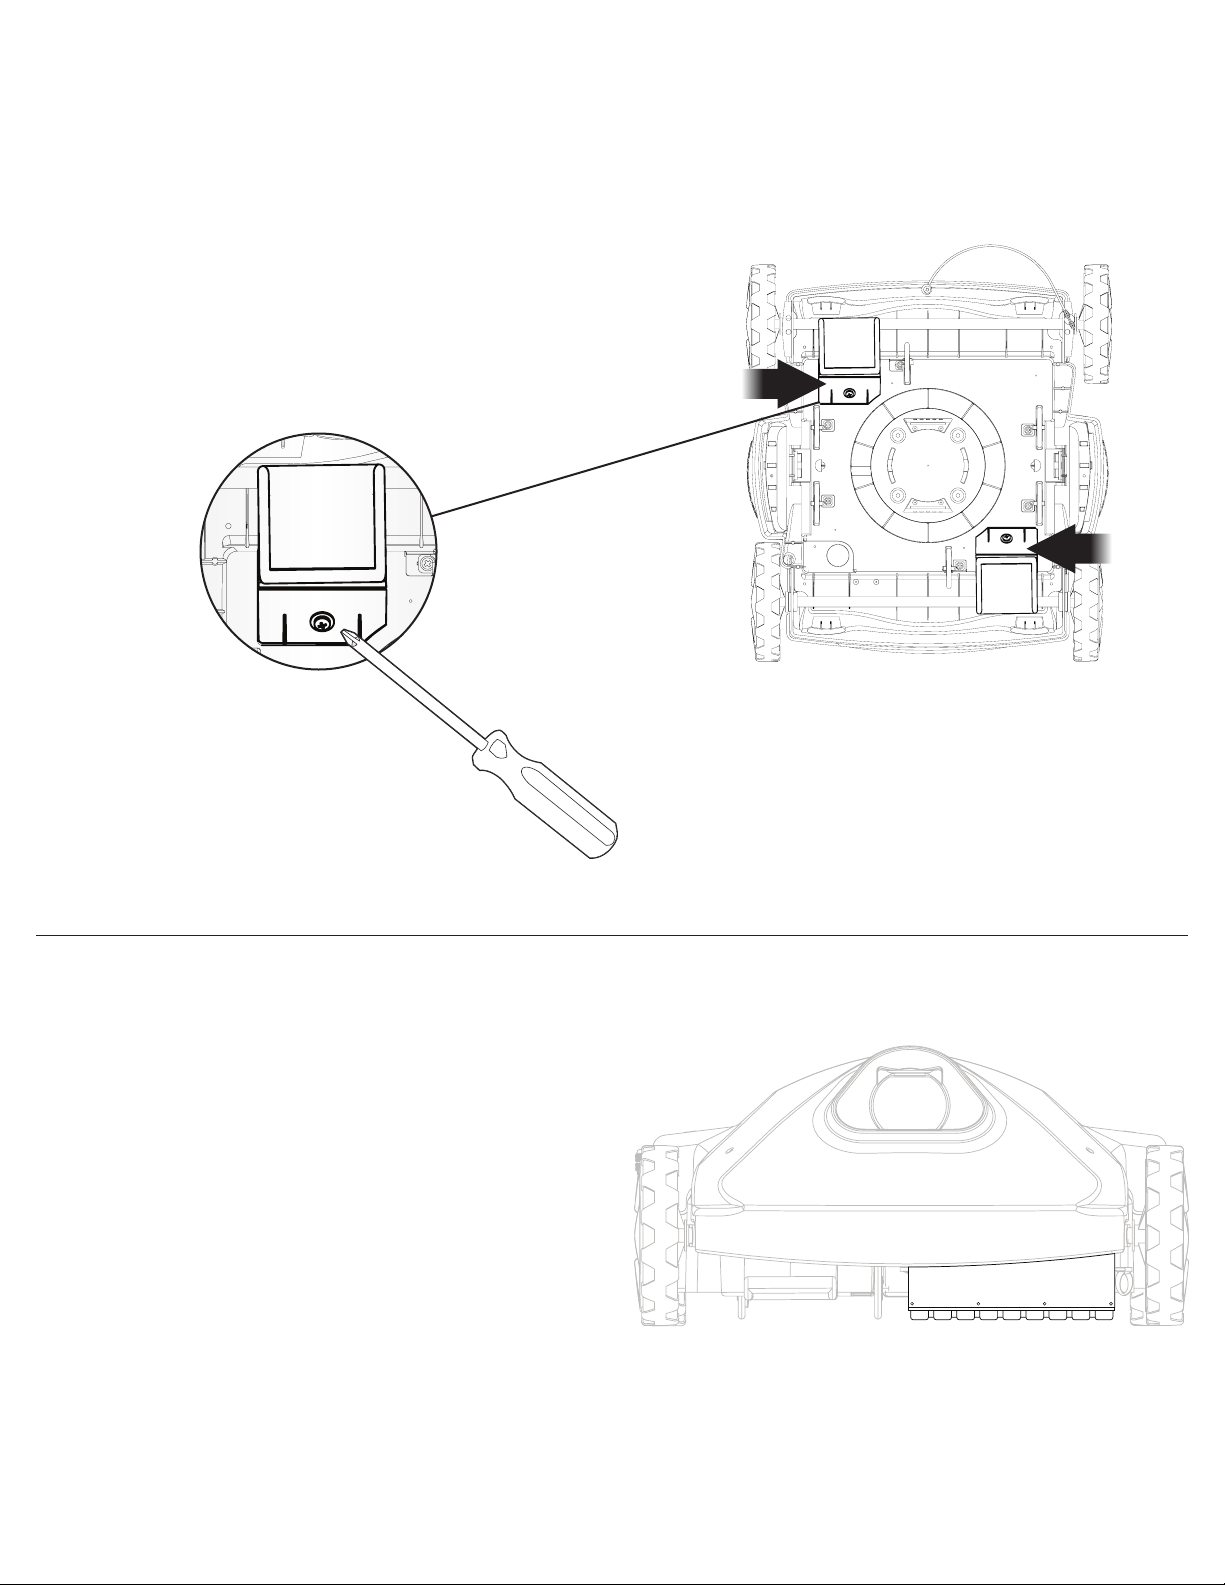
Your cleaner is equipped with t wo adjustable suction ports on the underside
of the unit. Both can be lowered to maximize the suction strength for picking
up smaller debris. The suction ports are set to the lowest position by default.
To adjust the ports, turn the cleaner over and use a Phillips head screw driver
to loosen the screw on the ports. Pull out the ports to the desired length and
tighten the screw again. Do not over tighten the screw.
Underside view of the cleaner showing
location of adjustable suction ports
PASSIVE AGITATOR BRUSH (select models)
Select models have a passive agitator brush. This brush is not a moving part
or powered by your cleaner. It is meant to pass over your pool floor and
agitate dirt and debris in order to get vacuumed up into the cleaner.
NOTE: Please do not attempt to remove this brush.
Page 6
PRODUCT SETTINGS and TROUBLESHOOTING
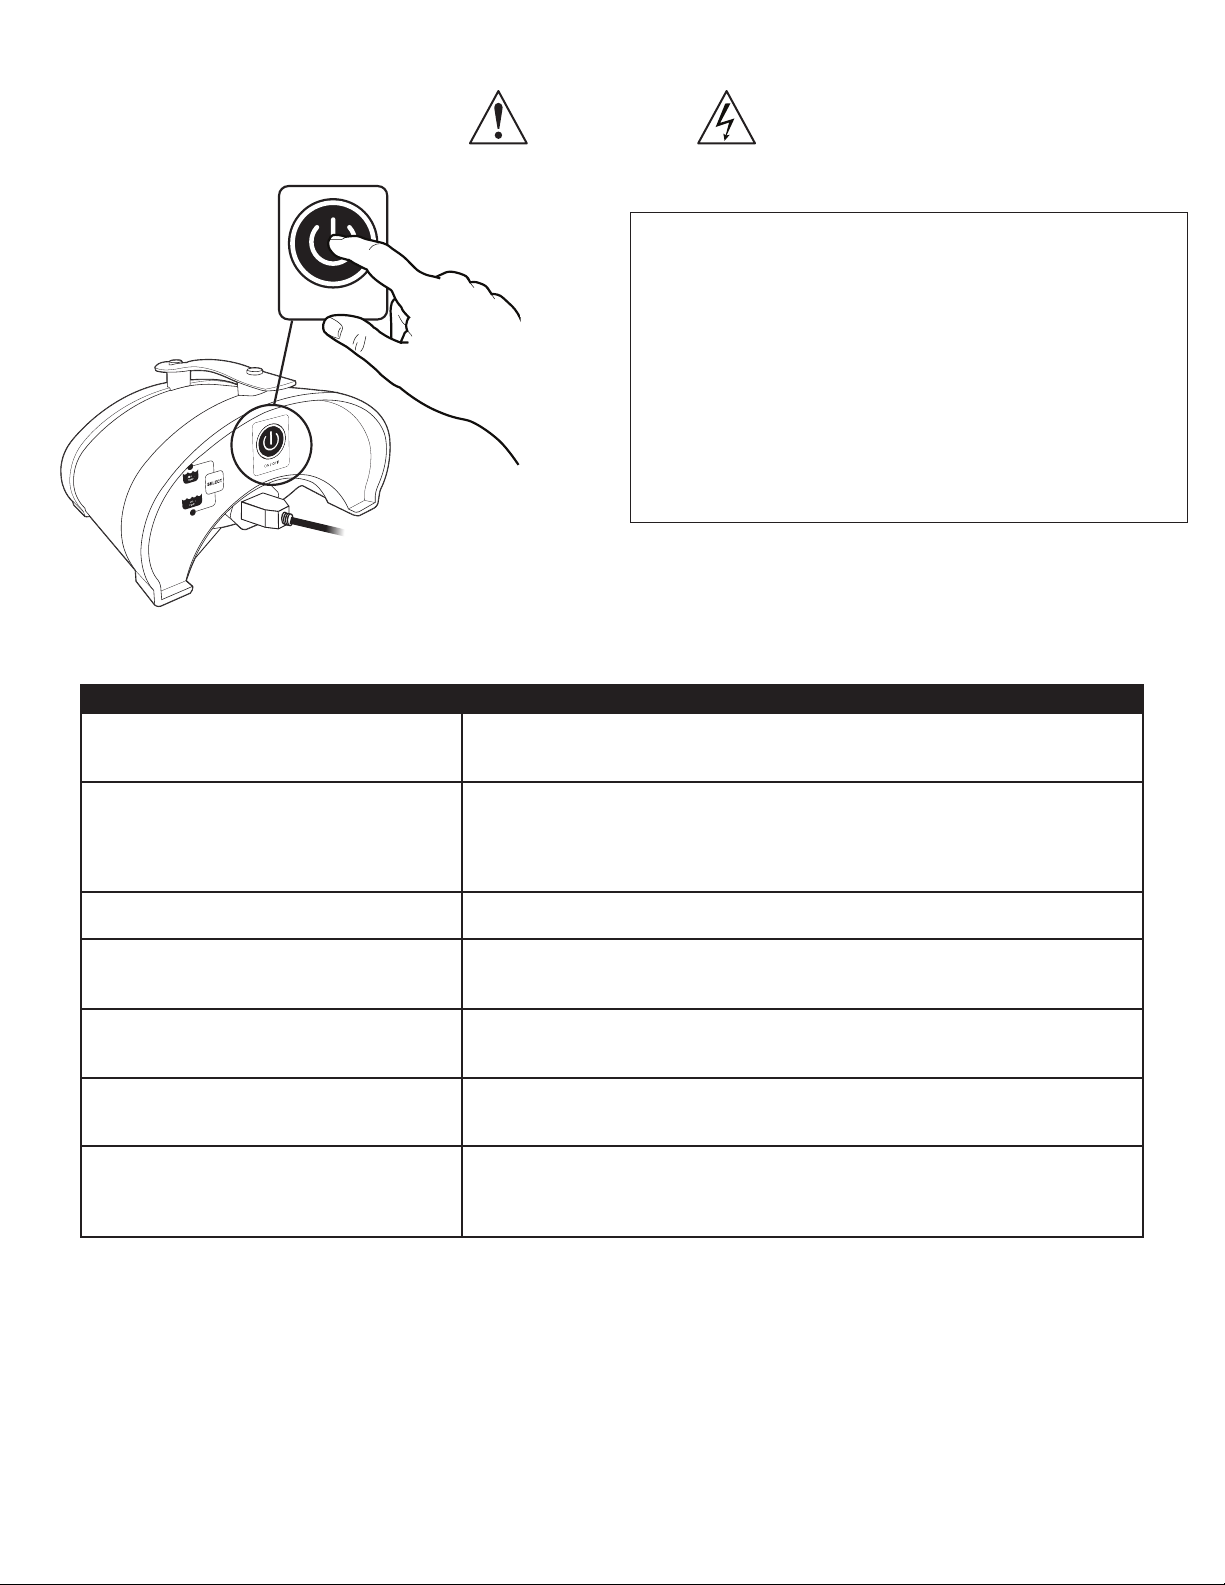
ON / OFF
WARNINGS
WARNING: Do not turn the Power Supply on, unless the pool cleaner is in
the water.
WARNING: Do not operate your machine while people swim in the pool.
WARNING: The Power Supply must be placed at least 12 feet / 4 meters
from the pool’s edge at all times! See diagram below.
WARNING: To prevent possible electric shock hazard this unit must be
connected to an RCD (Residual Current Device) with a related residual
operating current not exceeding 30mA.
WARNING: Before performing any troubleshooting maintenance
procedures, your Cleaner should be disconnected from the Power Supply
(transformer) and the Power Supply should be unplugged from the electrical
outlet to prevent the possibility of personal injury or damage to your Cleaner!
DESCRIPTIVE TROUBLESHOOTING
ISSUE RECOMMENDED SOLUTION
• This is the most common question. The solution is to make sure that the filter bag is
Moves slowly or doesn’t seam to be vacuuming
All LED lights are blinking on the power supply
The Floating Cable is coiled up
My unit is not sucking up debris
Unit is stuck in the middle of the pool but the unit
still pumps out water
My cleaner looks like it is moving in the same
area of the pool and does not clean other areas
Does not cover the entire pool
thoroughly clean
• Check to see that the suction ports are not clogged or blocked
• Check to see if the unit is out of water
• Check to see if the filter bag is stuck in the screen
• Check to see if the propellers are stuck
• To restar t, press the power button once. Cleaning program will resume from where it
left off.
• Change the axle set-up. Unit is most likely turning too sharply. Use the E-Z Swivel to
straighten out the cable
• Check to see that you’ve properly set-up the unit and power supply
• Check to see if the propellers are stuck
• Adjust the suction ports on the bottom of the unit
• Check to see that there is nothing obstructing the cleaner or that the cleaner is not
stuck on any loose objects in the pool.
• The suction por ts are far too low to the pool bottom. Adjust as necessary.
• Change the axle set up by adjusting the pin configuration. This will help move the
cleaner in a different direction to cleaner
• Check axle and turning pin configurations
• Check to see that the filter bag is thoroughly clean
• Adjust the timing cycle on the power supply
• Check to see that the axle area is not clogged
• Check axle and turning pin configurations
Should you need help with an issue that is not described in this manual, please the number below.
This guide provides descriptive troubleshooting for this unit.
CALL CUSTOMER SERVICE AT 800-221-1750
You may also download the Quick Start Guide as well as the Settings and Troubleshooting Manual at: www.Aquabot.com
Page 7

Page 8

Aqua Products, Inc
282 Grove Avenue
Cedar Grove, NJ 07009
United States
 Loading...