

Page 1
R
A Standex Company
INSTALLATION AND OPERATING INSTRUCTIONS
MODEL: RGP SERIES
INTENDED FOR OTHER THAN HOUSEHOLD USE
RETAIN THIS MANUAL FOR FUTURE REFERENCE
WARNING: Improper installation, adjustment, alteration, service or maintenance can
cause property damage, injury or death. Read the Installation, Operating and
Maintenance Instructions thoroughly before installing or servicing this equipment.
This equipment has been engineered to provide you with year-round dependable service when used
according to the instructions in this manual and standard commercial kitchen practices.
Phone: +1 (214) 421-7366
Fax: +1 (214) 565-0976
Toll Free: +1 (800) 527-2100
Website: www.apwwyott.com
E-mail: service@apwwyott.com
EPH
P/N 79900407 1/09
APW WYOTT
729 Third Avenue
Dallas, TX 75226
!!
1
Page 2

TABLE OF CONTENTS
Important Safeguards 2
Safety Precautions 3
Introduction 5
Specifications 5
Operation 5
Sandwich Preparation Guidelines 6
Cleaning 7
Parts List w/Exploded 9
Wiring Diagram 10
Troubleshooting 10
Warranty 11
IMPORTANT SAFEGUARDS
When using electrical appliances, basic safety precautions should always be followed, including the
following:
1. Read all the instructions before use.
2. Do not touch hot surfaces; use handles or knobs.
3. To avoid electric shock, do not immerse the power cord, or any part of the unit, in any liquid.
4. Close supervision is necessary when any appliance is used, especially around children.
5. Unplug appliance from the electrical outlet when not in use, and before cleaning. Allow appliance to
cool before installing or removing any parts or accessories, and before cleaning.
6. Do not operate any appliance with a damaged cord or plug, or if appliance should sustain damage, or
malfunction in any way. In this event, return appliance to the nearest authorized service facility for
examination, repair or adjustment.
7. The use of accessories and/or attachments not recommended by the appliance manufacturer may
cause injury or damage to the appliance, and may void your warranty.
8. Do not use outdoors.
9. Do not allow the power cord to hang over the edge of a table or counter, or to be exposed to hot surfaces,
as damage may occur.
10. Do not place appliance on or near a burner, or in a heated oven.
11. For appliances with removable power cords, always attach the cord to the unit before plugging into the
wall outlet.
12. To disconnect an appliance, first turn all controls to the 'off' position then unplug the power cord from the
wall outlet.
13. Do not use appliance other than for its intended use.
THIS MANUAL SHOULD BE RETAINED FOR FUTURE REFERENCE
IMMEDIATELY INSPECT FOR SHIPPING DAMAGE
All containers should be examined for damage before and during unloading. The freight carrier has
assumed responsibility for its safe transit and delivery. If equipment is received damaged, either apparent
or concealed, a claim must be made with the delivering carrier.
A) Apparent damage or loss must be noted on the freight bill at the time of delivery. It must then be signed
by the carrier representative (Driver). If this is not done, the carrier may refuse the claim. The carrier can
supply the necessary forms.
B) Concealed damage or loss if not apparent until after equipment is uncrated, a request for inspection
must be made to the carrier within 15 days. The carrier should arrange an inspection. Be certain to hold all
contents and packaging material.
Installation and start-up should be performed by a qualified installer who thoroughly read, understands and
follows these instructions.
2
Page 3
APW Wyott takes pride in the design and quality of our products. When used as intended and with proper
care and maintenance, you will experience years of reliable operation from this equipment. To ensure best
results, it is important that you read and follow the instructions in this manual carefully.
Installation and start-up should be performed by a qualified installer who thoroughly read, understands and
follows these instruction.
If you have questions concerning the installation, operation, maintenance or service of this product, write
Technical Service Department: APW/Wyott Foodservice Equipment Company, 729 Third Avenue, Dallas,
TX 75226 .
SAFETY PRECAUTIONS
Before installing and operating this equipment be sure everyone involved in its operation are fully trained
and are aware of all precautions. Accidents and problems can result by a failure to follow fundamental rules
and precautions.
The following words and symbols, found in this manual, alert you to hazards to the operator, service
personnel or the equipment. The words are defined as follows:
DANGER: This symbol warns of imminent hazard which will result in serious injury or death.
!
XXXXXXXXXXXXXXXXXXXXXXXXXXXXXXXXXXXXXXXXXXXXXXXXXXXXXXXXXXXXXXXXXXXXX
WARNING: This symbol refers to a potential hazard or unsafe practice, which could result in
!
serious injury or death.
CAUTION: This symbol refers to a potential hazard or unsafe practice, which may result in minor or
moderate injury or product or property damage.
!
NOTICE: This symbol refers to information that needs special attention or must be fully understood
even though not dangerous.
!
CAUTION: The griddle weighs 80 lbs. (58.97 kilograms). For safe handling, installer should obtain
help as needed, or employ appropriate materials handling equipment (such as a forklift, dolly, or
!
pallet jack) to remove the unit from the skid and move it to the place of installation.
CAUTION: Any stand, counter or other device on which the griddle will be located must be
!
designed to support the weight of the griddle.
CAUTION: Shipping straps are under tension and can snap back when cut.
!
!
!
!
!
!
!
!
NOTICE: The data plate is located on the back of each griddle. The griddle voltage, wattage, serial
number, wire size, and clearance specifications are on the data plate. This information should be
!
carefully read and understood before proceeding with the installation.
NOTICE: The installation of any components such as a vent hood, grease extractors, fire
extinguisher systems, etc. Must conform to their applicable National, State and locally recognized
!
installation standards.
NOTICE: During the first few hours of operation you may notice a small amount of smoke coming
off the griddle, and a faint odor from the smoke. This is normal for a new griddle and will disappear
!
after the first few hours of use.
CAUTION: Keep the area near the appliance free from combustible materials.
!
3
!
!
!
!
Page 4
CAUTION: These models are designed, built, and sold for commercial use. If these models are
positioned so the general public can use the equipment make sure that cautions, warnings, and
!
operating instructions are clearly posted near each unit so that anyone using the equipment will
use it correctly and not injure themselves or harm the equipment.
CAUTION: Always keep floor in front of equipment clean and dry. If spills occur, clean immediately,
!
to avoid the danger of slips or falls.
CAUTION: Most cleaners are harmful to the skin, eyes, mucous membranes and clothing.
Precautions should be taken to wear rubber gloves, goggles or face shield and protective clothing.
!
Carefully read the warning and follow the directions on the label of the cleaner to be used.
CAUTION: Do not use ice or water to clean the cooking surface while the griddle is hot. The grill is
!
made of cast iron and may crack from a rapid temperature change.
NOTICE: Service on this, or any other, APW Wyott appliance must be performed by qualified
personnel only. Consult your authorized service agent directory or call the factory at 1-800-733-
!
2203.
CAUTION: Use of any replacement parts other than those supplied by APW Wyott or their
authorized distributors can cause bodily injury to the operator and damage to the equipment and
!
will void all warranties.
!
!
!
!
!
!
DANGER: This appliance must be grounded at the receptacle provided. Failure to ground the
appliance could result in death.
!
WARNING: Installation of this appliance shall be done by personnel qualified to work with
commercial electrical appliances. Improper installation can cause injury to personnel and/or
!
damage to the appliance. Appliance must be installed in accordance with all applicable codes.
WARNING: Keep water and solutions out of controls, never spray controls or electrical
!
connections.
WARNING: Always hold upper grill while cleaning to prevent injury in case of grill closing
!
WARNING: High voltage is present inside this appliance when plugged into a live power source.
!
Before servicing any parts, disconnect the appliance from the electric power source.
IMPORTANT FOR FUTURE REFERENCE
Please complete this information and retain this manual for the life of the equipment. For
Warranty Service and/or Parts, this information is required.
Model Number Serial Number Date Purchased
!
!
!
!
!
4
Page 5

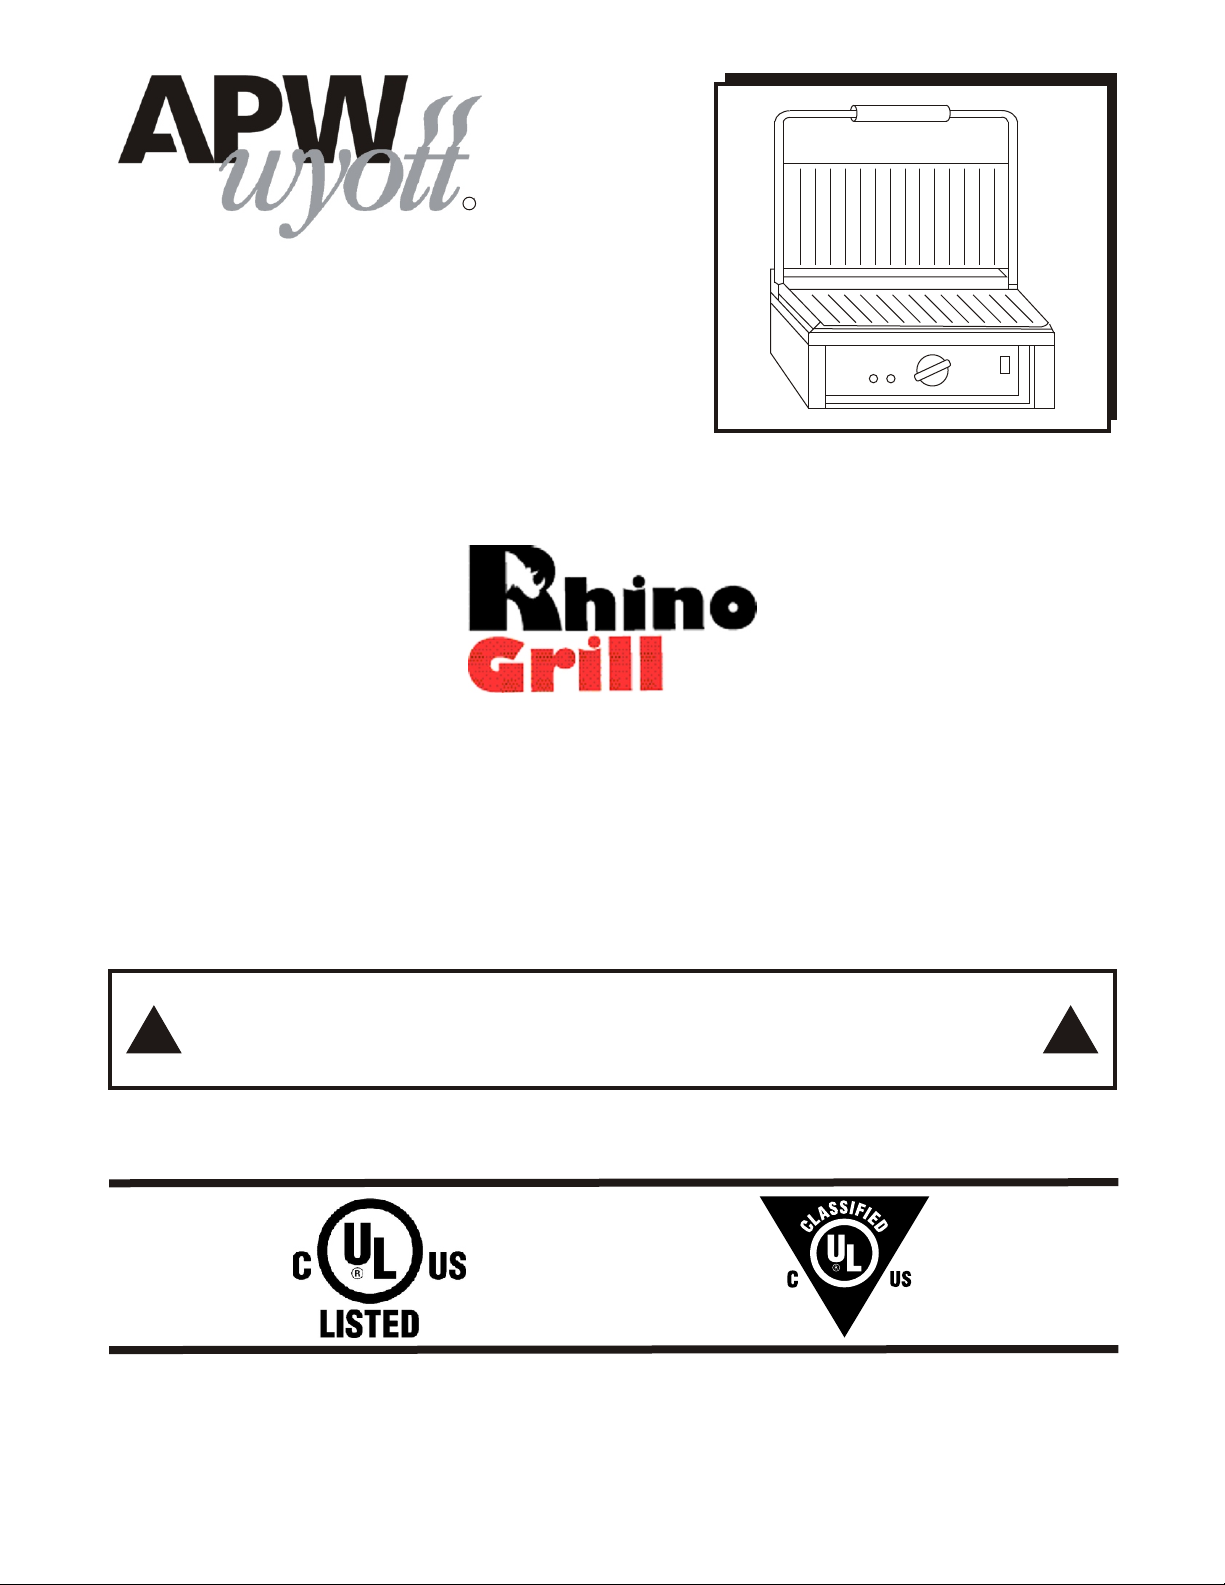
INTRODUCTION
The Model RGP is uniquely designed to offer quality cooking. These units are constructed of food
service quality stainless steel, and use fine grain cast iron top and bottom cooking surfaces. The grills are
versatile in application and easy to operate. The moveable top is spring counter-balanced. Top and bottom
heating elements are thermostatically controlled up to 570° F. The units come equipped with a removable
front drip tray and a handy scraper. All models are available with grooved or flat plates.
SPECIFICATIONS
MODEL ELECTRICAL PLUG CONFIFURATION
RGP 120/208/240 Volts, 1 Phase, 1700/3000 Watts, 14/12/14 Amps NEMA-5-15P, NEMA-6-15P
OPERATION
INITIAL SET-UP
The RGP requires the installation of the front drip tray.
Take the unit out of the box. Position it carefully on its top on a flat, non-abrasive work surface. Put the grill in
its working position. DO NOT use legs as the lever when turning the unit. Insert the drip tray into the aperture
at the front of the grill.
The grill is shipped with an application of protective oil on the upper and lower grill plates. This oil will need to
be removed prior to the seasoning process using a mild soap and water solution.
Before operating your we recommend that you season the surface of the grill plates with cooking oil
or shortening. For seasoning, wipe cooking oil or shortening onto the upper and lower grill plates using a
clean, lint-free cloth, or coat the plates with cooking oil spray. Turn the grill on with the ON/OFF switch(s) and
set the thermostat(s) to 400 F. When the grill reaches the set temperature, the red indicator light will go out.
Allow the grill to season for 10-15 minutes and then let the grill cool. It is normal for some smoke to appear
during this process. Wipe off the excess oil using a clean, lint-free cloth. Repeat seasoning process at least
one more time. Congratulations, your grill is now ready for use!
PREHEATING
After the grill plates have been properly seasoned, turn the grill on using the ON/OFF switch (the green light
will go on). The following cooking modes can be chosen:
o
! Top & Bottom Heat Only
Turn the temperature control (thermostat) knob to the desired temperature. The red light will go on and stay
on until the desired temperature is reached. The red light will then go out. The preheat time will vary
depending on the cooking temperature setting, and if only bottom heat is used rather than both top and
bottom. It will normally take 10-15 minutes for the grill to reach cooking temperature. After reaching the set
temperature, the red light will cycle on and off as the thermostat cycles, to maintain temperature. The green
light remains on until the unit is shut off with the mode switch.
COOKING
Select the cooking mode by turning the mode selector switch to the desired position. Turn the thermostat
knob to select the desired temperature. Once the red indicator light on the control panel is out, the grill is
ready to use.
! Once set temperature is reached, raise the lid (upper cooking surface) by lifting the handle to the full
upright position.
! Place the menu item in the center of the lower cooking surface.
5
Page 6

! Lower the upper cooking surface gently onto the item.
! Set the timer for the desired cooking time. When the bell sounds, raise the upper cooking surface. If the
menu item is grilled to your satisfaction, remove the item. Grilling is complete.
! Clean the upper and lower cooking surfaces with the scraping tool provided with the grill. Always clean
surfaces after each item is grilled.
! A typical panini sandwich cooks for 3 minutes at approximately 400-450º Fahrenheit (5½ on the
temperature dial).
For favorable results, porous focaccia bread is recommended, although any bread may be used.
APW Wyott Rhino Grills can be used for a wide variety of foods. Following are some suggested guidelines
for foods frequently cooked on this grill. Cooking times will vary depending on the food products,
temperature settings and desired results.
SANDWICH PREPARATION GUIDELINES
Spread
Vegetables
Cheese
Bread (Bottom)
PREPARARTION STEPS
1) Prepare, cut or slice all ingredients
2) Prepare all bread to be utilized. With focaccia bread, sheet pan size or round focaccia should be cut
horizontally with serrated knife to make two even horizontal halves.
3) Lay bread halves, side by side, open face.
4) Cover the spread lightly on the inside of both horizontally cut bread halves, just enough to coat.
5) Cover bottom first half of bread with one layer of cheese slices. (Cheese provides protection from inner
water based ingredients, such as the vegetable and meats from moistening bread)
6) Cover cheese with thin layer of meat.
7) Layer vegetables (thin sliced red onions, tomatoes, etc....).
8) Add another layer of cheese to the top of sandwich.
9) Finally place uncovered half of bread over the covered half and you have a sandwich.
10) Cut sandwich into portions (i.e. 4” x 4” for the sheet pan focaccia “pizza size slices” for the round
focaccia)
Bread (Top)
Cheese
Meat
Spread
GRILLING
1) Preheat grill to setting #5, recommended for sandwiches
2) Place sandwich portion on grill and set top grill plate on sandwich, pressing slightly.
3) Set timer for approximately 3 minutes. Sandwich grilling depends on three (3) variables that may be
adjusted for desired cooking. (a) Bread density, (b) grill temperature, and (c) time duration of cook.
Grill testing should be done to obtain desired results.
4) Remove sandwich from grill and place in either a sandwich wrap or put on plate depending upon
desired presentation.
6
Page 7

DESIRED SANDWICH CHARACTERISTICS
1) Bread should be hot and crisp on the outside, inner ingredients warm and moist on the inside.
2) Cheese should have melted thoroughly over the inner ingredients from top and bottom.
3) Inner sandwich temperature should be very warm but not hot enough to burn palate.
PRODUCT TIME TEMPERATURE
Sandwich
Wrap
Chicken Breast, 5 oz
Burger
2 - 3 minutes
1 - 2 minutes
3 - 4 minutes
2 - 4 minutes
400 - 450°F
375 - 450°F
475 - 500°F
500 - 550°F
CLEANING
WARNING: Disconnect (unplug) electric power supply before servicing
Allow the grill to cool before cleaning. Using the scraper provided or a stiff wire brush, scrape the debris
from the upper and then lower grill plates. To clean the grill, scrape or brush the debris toward yourself and
into the removable drip tray. Use a cloth dampened slightly with a soap and water mixture to clean the
stainless steel housing, upper grill covers, spring protection cover and the drip tray. Clean the grill
thoroughly at the end of each day. Failure to do so may cause hard to remove build up. In order to remove
the build up from the grill plates, use industry standard food service grade de-greasers or grease removers.
We do not recommend using soap and water to clean the grill plates, however, if soap and water are used,
the grill will need to be re-seasoned (see below). For tough to remove carbon buildup, use a commercially
available carbon remover.
DO NOT spray the unit with any cleaning liquid before unplugging it
!
DO NOT allow water to drip into the housing or around the electrical components
!
DO NOT immerse in water for cleaning
!
! WARNING: Disconnect (unplug) electrical power supply before cleaning
RE-SEASONING
It may be necessary to re-season the grill after cleaning and extended use. In order to do so, clean both
plates of the grill with a clean, lint-free cloth and scraper. Apply cooking oil or shortening onto both plates
with a lint-free cloth or coat the plates with a cooking oil spray. Wipe off excess oil with a dry, clean cloth.
Turn the grill on and set the thermostat to 400 F. Some smoking may occur during the re-seasoning
process. When the grill reaches the desired temperature (the red light will go out), turn the grill off and allow
it to cool. Wipe off the excess oil from the surface of the plates. Repeat the re-seasoning process one more
time. The grill is now re-seasoned and ready to use.
You should inspect all parts on a regular basis to ensure that all is in proper working order. If a part is
damaged, have the unit repaired by an authorized service agency prior to returning the unit to operation. If
you have trouble locating a service agency in your area, please consult our website at
http://www.apwwyott.com/
ADJUSTING HANDLE TENSION
WARNING: Disconnect (unplug) electric power supply before servicing
Allow the grill to cool. Remove the spring protection cover at the top rear of the unit by pulling it up. If this is
difficult, you may need to pry it off carefully, with a flat blade screwdriver. With a flat head screwdriver,
tighten or loosen the screws on the handle straps until the desired tension is achieved. There are four (4)
screws for each top plate, two (2) on each side. Re-install the spring protection cover prior to use. See
attached drawing.
, or call us at 1-800-733-2203 and ask for Customer Service.
7
Page 8

RHINO GRILL
Tension
Adjusting
Plate
Top Plate
Operating
Handle
Tension
Adjusting
Plate
Tension Spring
Tension Spring
Top View
Mounting Screw
Tension Adjusting Screws
Rear View
Tension Adjusting Screws
Tension
Adjusting
Plate
Tension
Adjusting
Plate
8
Page 9

PARTS LIST w/EXPLODED VIEW
RGP SERIES RHINO GRILL 120/208/240V, 1Ph, 60Hz, 1.7/3.0KW, 14/12/14A
24
25
23
32
22
20
19
18
26
21
28
17
16
1
2
34
3
27
4
5
6
33
7
8
9
10
11
12
29
15
31
Description Qty Description Qty
Black Insulated Handle
Top Plate Knob
Top Heating Element, 220V
Top Heating Element, 120V
Top Plate Guide
Double Spring Cover
Bottom Heating Element, 220V
Bottom Heating Element, 120V
Terminal Block, 3 Position
Terminal Block, 2 position
Regulating Thermostat
Drip Tray
Switch, On/Off
Knob, Thermostat
Red Pilot Light, 220V
Red Pilot Light, 120V
Green Pilot Light, 220V
Green Pilot Light, 120V
Foot
Strain Relief
Power Cord, 220V (no plug)
1
1
18
1
19
1
20
1
21
1
22
1
23
1
24
1
25
1
26
1
27
1
1
28
1
29
1
30
1
31
1
32
1
33
4
34
1
1
10
11
12
13
14
15
16
17
P/N
1
78048
2
78049
3
78083
78084
4
78085
5
78086
6
78087
78088
7
78024
8
78055
9
78025
78089
78057
78027
78028
78090
78029
78091
78058
78034
78092
Item Item
P/Ne
78093
78039
78094
78060
78061
79095
78096
78097
78098
78099
78100
78101
78102
78032
78046
78077
78104
78105
78107
78082
13
14
30
Power Cord, 120V (no plug)
Spring Girdle
Handle Strap
Double Torsion Spring
Insulating Sleeve
Handle with Thread, Right
Handle w/o Thread, Left
Handle Tip
Cover, Top
Bottom Cast Iron Plate, Grooved
Bottom Cast Iron Plate, Smooth (Option)
Top Cast Iron Plate, Grooved
Top Cast Iron Plate, Smooth (Option)
High Limit Thermostat
Timer, 5 minute
Timer Knob
Bottom Element Pressure Plate
Top Element Pressure Plate
Heat Shield
Scraper
1
1
2
1
Set
1
1
2
1
1
1
1
1
1
1
1
1
1
1
1
Note: When ordering, ALWAYS specify Part #, Model #, Serial #, Voltage/Phase &/or type of Gas. Rev. 1/09
9
Page 10

WIRING DIAGRAM
MODEL: RGP SERIES RHINO GRILL
Hi-Limit
Switch
Pilot Light
Thermostat
Green
Red
Pilot Light
Thermostat
Two Hole
Domino
Top
Heating
Element
Earth
Live
Six Hole Domino
Neutral
Live
Bottom
Heating
Element
TROUBLESHOOTING
What follows is a chart of Symptoms and Possible Causes to aid in diagnosing faults with the griddle.
Refer to the Symptoms column to locate the type of failure then to the Possible Cause for the items to be
checked. To test for a possible cause refer to the Test section and locate the Possible Cause then refer to
Test to identify test procedures.
SYMPTOM POSSIBLE CAUSE
Hood not getting hot Failed element
Section will not heat Failed element
Failed thermostat
Product burning Product is cooked too long
Failed thermostat
Product under done Failed thermostat
POSSIBLE CAUSE TEST
No power Check for correct incoming voltage
Ensure circuit breaker is not tripped
Failed pilot light Check for continuity across pilot light
leads
Failed element Remove wires from the element terminals
& check for continuity across the element
NOTICE: Service on this, or any other, APW Wyott appliance must be performed by qualified
personnel only. Consult your authorized service agent directory or call the factory at 1-800-733-
!
2203.
CAUTION: Use of any replacement parts other than those supplied by APW Wyott or their
authorized distributors can cause bodily injury to the operator and damage to the equipment and
!
will void all warranties.
10
!
!
Page 11

APW WYOTT EQUIPMENT LIMITED WARRANTY
APW Wyott Foodservice Equipment Company warrants it's equipment against defects in materials and workmanship, subject to the
following conditions:
This warranty applies to the original owner only and is not assignable.
Should any product fail to function in its intended manner under normal use within the limits defined in this warranty, at the option of
APW Wyott such product will be repaired or replaced by APW Wyott or its Authorized Service Agency. APW Wyott will only be
responsible for charges incurred or service performed by its Authorized Service Agencies. The use of other than APW Wyott
Authorized Service Agencies will void this warranty and APW Wyott will not be responsible for such work or any charges associated
with same. The closest APW Wyott Authorized Service Agent must be used.
This warranty covers products shipped into the 48 contiguous United States, Hawaii, metropolitan areas of Alaska and Canada. There
will be no labor coverage for equipment located on any island not connected by roadway to the mainland.
Warranty coverage on products used outside the 48 contiguous United States, Hawaii, and metropolitan areas of Alaska and Canada
may vary. Contact the international APW Wyott distributor, dealer, or service agency for details.
Time Period
One year for parts and one year for labor, effective from the date of purchase by the original owner. The Authorized Service Agency
may, at their option, require proof of purchase. Parts replaced under this warranty are warranted for the un-expired portion of the
original product warranty only.
Exceptions
In all cases, parts covered by extended warranty will be shipped FOB the factory after the first year.
Portable Carry In Products
Equipment weighing over 70 pounds or permanently installed will be serviced on-site as per the terms of this warranty. Equipment
weighing 70 pounds or under, and which is not permanently installed, i.e. with cord and plug, is considered portable and is subject to
the following warranty handling limitations. If portable equipment fails to operate in its intended manner on the first day of
connection, or use, at APW Wyott's option or its Authorized Service Agency, it will be serviced on site or replaced.
From day two through the conclusion of this warranty period, portable units must be taken to or sent prepaid to the APW Wyott
Authorized Service Agency for in-warranty repairs. No mileage or travel charges are allowed on portable units after the first day of use.
If the customer wants on-site service, they may receive same by paying the travel and mileage charges. Exceptions to this rule: (1)
countertop warmers and cookers, which are covered under the Enhanced Warranty Program, and (2) toasters or rollergrills which have
in store service.
Exclusions
The following conditions are not covered by warranty:
If the equipment has been changed, altered, modified or repaired by other than an Authorized Service Agency during or after the
warranty period, then the manufacturer shall not be liable for any damages to any person or to any property, which may result from the
use of the equipment thereafter.
This warranty does not cover services performed at overtime or premium labor rates. Should service be required at times which
normally involve overtime or premium labor rates, the owner shall be charged for the difference between normal service rates and such
premium rates. APW Wyott does not assume any liability for extended delays in replacing or repairing any items beyond its control.
In all cases, the use of other than APW Wyott Authorized OEM Replacement Parts will void this warranty.
This equipment is intended for commercial use only. Warranty is void if equipment is installed in other than commercial application.
Water Quality Requirements
Water supply intended for a unit that has in excess of 3.0 grains of hardness per gallon (GPG) must be treated or softened before
being used. Water containing over 3.0 GPG will decrease the efficiency and reduce the operation life of the unit.
Note: Product failure caused by liming or sediment buildup is not covered under warranty.
“THE FOREGOING WARRANTY IS IN LIEU OF ANY AND ALL OTHER WARRANTIES EXPRESSED OR IMPLIED
INCLUDING ANY IMPLIED WARRANTY OF MERCHANTABILITY OR FITNESS FOR PARTICULAR PURPOSES
AND CONSTITUTES THE ENTIRE LIABILITY OF APW WYOTT. IN NO EVENT DOES THE LIMITED WARRANTY
EXTEND BEYOND THE TERMS STATED HEREIN.”
*Gas/Electric Cookline: Models GCB, GCRB, GF, GGM, GGT, CHP-H, EF, EG, EHP. Three (3) Year Warranty on all
component parts, except switches and thermostats. (2 additional years on parts only. No labor on second or third year.)
*Broiler Briquettes,
*Heat Strips: Models FD, FDL, FDD, FDDL. Two (2) Year Warranty on element only. No labor second year.
*Glass Windows, Doors, Seals, Rubber Seals, Light Bulbs:
*Equipment failure relating to improper installation, improper utility connection or supply and problems due to
ventilation.
*Equipment that has not been properly maintained, calibration of controls, adjustments, damage from improper cleaning
and water damage to controls.
*Equipment that has not been used in an appropriate manner, or has been subject to misuse or misapplication, neglect,
abuse, accident, alteration, negligence, damage during transit, delivery or installation, fire, flood, riot or act of god.
*Equipment that has the model number or serial number removed or altered.
Rock Grates, Cooking Grates, Burner Shields, Fireboxes: 90 Day Material Only. No Labor.
90 Day Material Only. No Labor.
9/05
11
Page 12

R
A Standex Company
Phone: +1 (214) 421-7366
Fax: +1 (214) 565-0976
Toll Free: +1 (800) 527-2100
Website: www.apwwyott.com
E-mail: info@apwwyott.com
12
APW WYOTT
729 Third Avenue
Dallas, TX 75226
 Loading...