

Page 1

http://www.aprilcomputers.com
APRIL T7 2G/3G
USER MANUAL
Page 2

2
Welcome!
Thank your for choosing to buy our April Computers Tablet-Phone Series T7-2G and T7-3G, with color
screen and digital mobile phone. Model 2G is GSM quad band and GRPS/EDGE compliance and model 3G
is HSDPA compliance.
This handset is a touch screen straight phone designed for GSM network environment. In addition to making
phone calls as a basic function, this handset provides you with diversified utilities, including a camera, input
methods, phonebook, personalized 64 chords, memory card (T-flash), recorder, calculator, timed powering
on/off, etc. to facilitate your work and leisure activities. You will have an overall understanding of the use of
this handset through reading this manual. We shall preserve the right to modify the contents hereof without
any advance notice.
Contents
I. Precautions ................................................................................................................................. 4
1. Safety information ..................................................................................................................... 4
1.1 Traffic safety first .................................................................................................................... 4
1.2 Powering off while in a hospital ............................................................................................ 4
1.3 Powering off while on an airplane ........................................................................................ 4
1.4 Powering off while refueling .................................................................................................. 4
1.5 Powering off near blasting sites ........................................................................................... 4
2. Precautions for using handset ................................................................................................ 4
2.1 Interference ............................................................................................................................. 4
2.2 Proper use of handset ........................................................................................................... 4
2.3 Using qualified maintenance service ................................................................................... 4
2.4 Waterproof property ............................................................................................................... 4
2.5 Emergency calls ..................................................................................................................... 4
3. Precautions for the use of batteries ....................................................................................... 4
4. Precautions for children ........................................................................................................... 4
II. Keypad keys descriptions ........................................................................................................ 5
III. Getting started .......................................................................................................................... 5
1. Battery ........................................................................................................................................ 5
1.1 Charging the battery .............................................................................................................. 5
2. Connecting network .................................................................................................................. 6
2.1 SIM card ................................................................................................................................... 6
2.2 Inserting and removing your SIM card ................................................................................ 6
2.3 Inserting and removing your memory card ......................................................................... 6
2.4 Turning on or off your handset ............................................................................................. 6
2.5 Unblocking your SIM card ..................................................................................................... 7
2.6 Unlocking your handset ......................................................................................................... 7
2.7. Connecting to network .......................................................................................................... 8
IV. Basic functions ........................................................................................................................ 9
1. Making calls ............................................................................................................................... 9
1.1 Making domestic calls ............................................................................................................ 9
1.2 Dialing landline phone extension ......................................................................................... 9
1.3 Making international calls ...................................................................................................... 9
1.4 Making phone calls from list ............................................................................................... 10
2 Emergency calls ....................................................................................................................... 10
3. Answering phone calls ........................................................................................................... 10
4 Call records ............................................................................................................................... 10
5. Call options .............................................................................................................................. 11
V. Function menu descriptions .................................................................................................. 11
Page 3

3
1. Contacts ................................................................................................................................... 11
Adding contacts ........................................................................................................................... 11
Group ............................................................................................................................................ 11
Sharing .......................................................................................................................................... 11
2 Call records ............................................................................................................................... 12
3. Browser .................................................................................................................................... 12
4. Calculator ................................................................................................................................. 12
5. Calendar ................................................................................................................................... 12
6. Camera ..................................................................................................................................... 13
7. Clock ......................................................................................................................................... 14
8. Downloads ............................................................................................................................... 14
9. E-mail ........................................................................................................................................ 14
10. File Management .................................................................................................................. 14
11. FM Broadcast ........................................................................................................................ 15
12. Gallery .................................................................................................................................... 15
13 Setting ..................................................................................................................................... 15
13.1 SIM management ............................................................................................................... 15
13.2 Wi-Fi ..................................................................................................................................... 16
13.3 Bluetooth .............................................................................................................................. 16
13.4 Data usage .......................................................................................................................... 17
13.5 Audio profiles ...................................................................................................................... 17
13.6 Display ................................................................................................................................. 17
13.7 Application Management .................................................................................................. 17
13.8 Security ................................................................................................................................ 19
13.7.1 Handset and SIM Card…………………………………………………………...19
13.9Language & Input ................................................................................................................ 19
13.9.1 Language…………………………………………………………………………..19
13.9.2 Input Method Setting……………………………………………………………...19
13.10 Backup&rest ...................................................................................................................... 19
13.11 Date and Time Setting .................................................................................................... 19
14. Sound Recorder .................................................................................................................... 19
15 SIM Toolkit .............................................................................................................................. 20
16. Maps ....................................................................................................................................... 20
17. Search .................................................................................................................................... 20
Idle Screen Menu ........................................................................................................................ 20
1. Dialer ......................................................................................................................................... 20
2. Information ............................................................................................................................... 20
2.1. New Message ...................................................................................................................... 20
3. Music Player ............................................................................................................................ 20
4. Main Menu ............................................................................................................................... 20
VII. Quick Start Guide ................................................................................................................. 20
VIII. Annexes ................................................................................................................................ 21
IX. Technical Specifications…………………………………………………….…… ………..21
April T7-2G…………………………………………………………………………………21
April T7-3G…………………………………………………………………………………23
Page 4

4
I. Precautions
Please read these concise rules. Violation of these rules may result in danger or law breaking.
1. Safety information
1.1 Traffic safety first
Use your handset with caution while driving; in case of poor driving conditions, park your car along the curb
before using your handset.
1.2 Powering off while in a hospital
Abide by relevant provisions or regulations. Power off when you are near any medical device.
1.3 Powering off while on an airplane
Wireless devices may cause interference to the airplane. Using your handset on an airplane is not only
dangerous, but also illegal.
1.4 Powering off while refueling
Do not use your handset at a filling station. Do not use your handset near fuel or chemical products.
1.5 Powering off near blasting sites
Do not use your handset where blasting operation is carried out. Abide by relevant constraints and
provisions and execute any related provisions or regulations.
2. Precautions for using handset
2.1 Interference
All handsets are possibly subject to interference, thus affecting the call quality.
2.2 Proper use of handset
Use your handset at a normal position only. Do not touch the antenna area, unless it is absolutely
necessary.
2.3 Using qualified maintenance service
Only ask qualified maintenance personnel to install or repair this handset.
2.4 Waterproof property
Your handset does not have waterproof properties. Please keep it dry.
2.5 Emergency calls
Be sure that your handset is powered on and in the service state. Enter the emergency call number and
touch the Send key.
3. Precautions for the use of batteries
3.1 Do not place the battery near fire or throw them into fire, lest danger should occur.
3.2 Do not dispose of the used batteries in rubbish; instead, send them to the designated recycling center for
waste batteries.
4. Precautions for children
Place your handset at a place difficult to be reached by children, lest children should regard it as a toy and
cause bodily injury.
Page 5
5
II. Keypad keys descriptions
Power On/Off key
Give a short press to lock the screen and give a long press to power on/off the handset.
Volume Up/Down key
Press the Volume Up/Down key to increase or decrease the volume.
Note: In this manual, “Pressing a certain key” means pressing and releasing the key; “Long pressing a
certain key” means pressing and holding this key for 2 seconds or longer.
III. Getting started
1. Battery
In the original state, the battery is charged with about 50% of electricity, so it can be used immediately after
unpacking. For the first three charges, fully charge it after it is fully discharged before using. In this way, the
battery can achieve the best performance.
1.1 Charging the battery
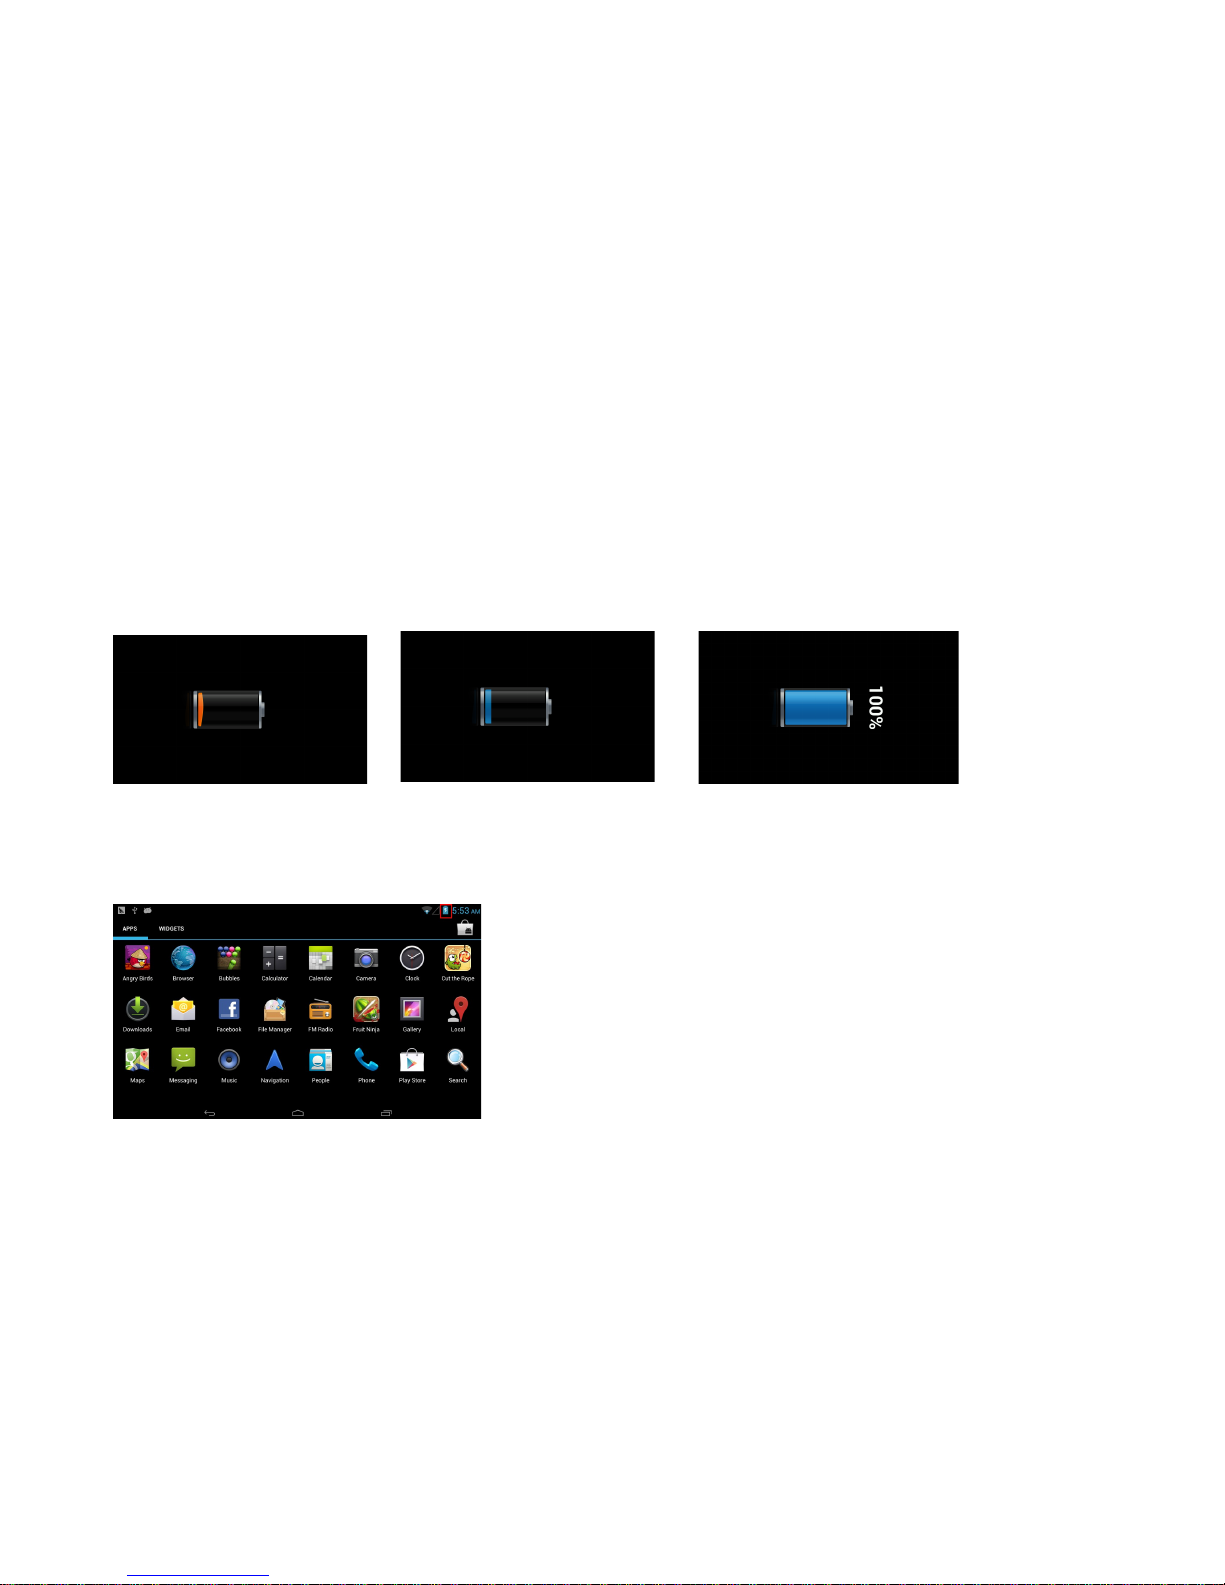
When your handset is in charging mode, Mobile phone screen icon area power indicates the charging icon
symbols show for lightning; if your handset is powered off while charging your battery, a charging indicator will
appear on the screen. In case your handset is overused when the battery level is low, it will take a period of
time for the charging indication symbol to appear on the screen after the charging process starts.
When the battery level indicator in the icon area of the screen is fully displayed and does not blink any
longer, the charging process is completed. If you are charging with your handset powered off, an indicator of
charging completion will also be displayed on the screen. Generally, the charging process takes 4 hours. It
is normal for the battery, handset and charger to get hot during charging.
After charging, disconnect the connection between the AC power outlet, handset and charger.
Note: While charging, the phone must be in a well-ventilated place with a temperature between -10-+55,
and you must use only the charger provided by the manufacturer. Use of unapproved chargers may not only
cause danger, but also violate the manufacturer’s warrantee clause. If the temperature is too high or too low
while charging, the handset will automatically give an alarm and stop charging, so as not to damage the
battery or cause danger.
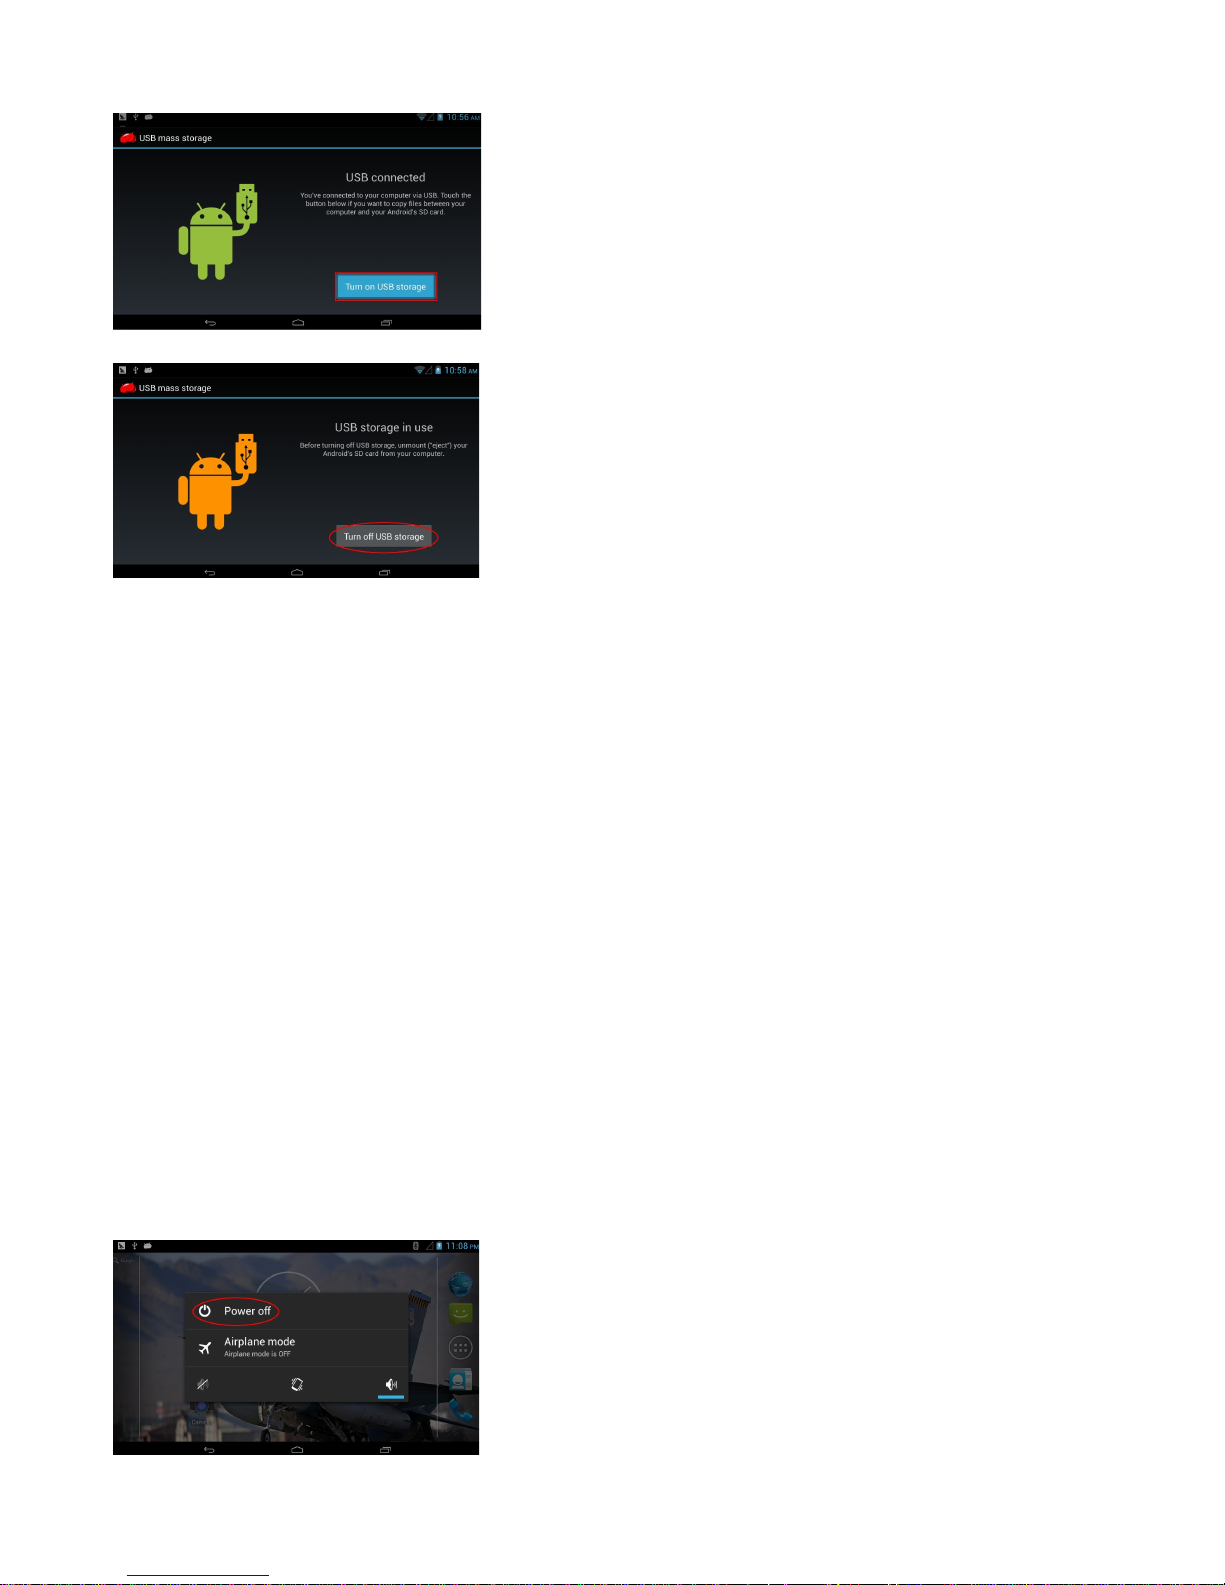
1.2 USB connected
Page 6
6
2. Connecting network
2.1 SIM card
You must insert a valid SIM (Subscriber Identity Module) card into your handset before using the handset.
All information related to establishing network connection are recorded in the chip of the SIM card, including
the names, phone numbers and SMS messages you stored in the phonebook of the SIM card. To avoid
losing or damaging the information stored in your SIM card, do not touch the metal contact surface and keep
your SIM card clear of electro-magnetic fields.
2.2 Inserting and removing your SIM card
With your handset powered off.
Insert your SIM card into the SIM card holder, as shown in the illustration.
When it is necessary to remove the SIM card, turn your handset off, and then remove the card.
Warning: Before removing your SIM card, your handset must be turned off, or your SIM card may be
damaged. 4. Connecting network
2.3 Inserting and removing your memory card
! Turn your handset off.
! Insert your memory card into the card slot as shown in the illustration.
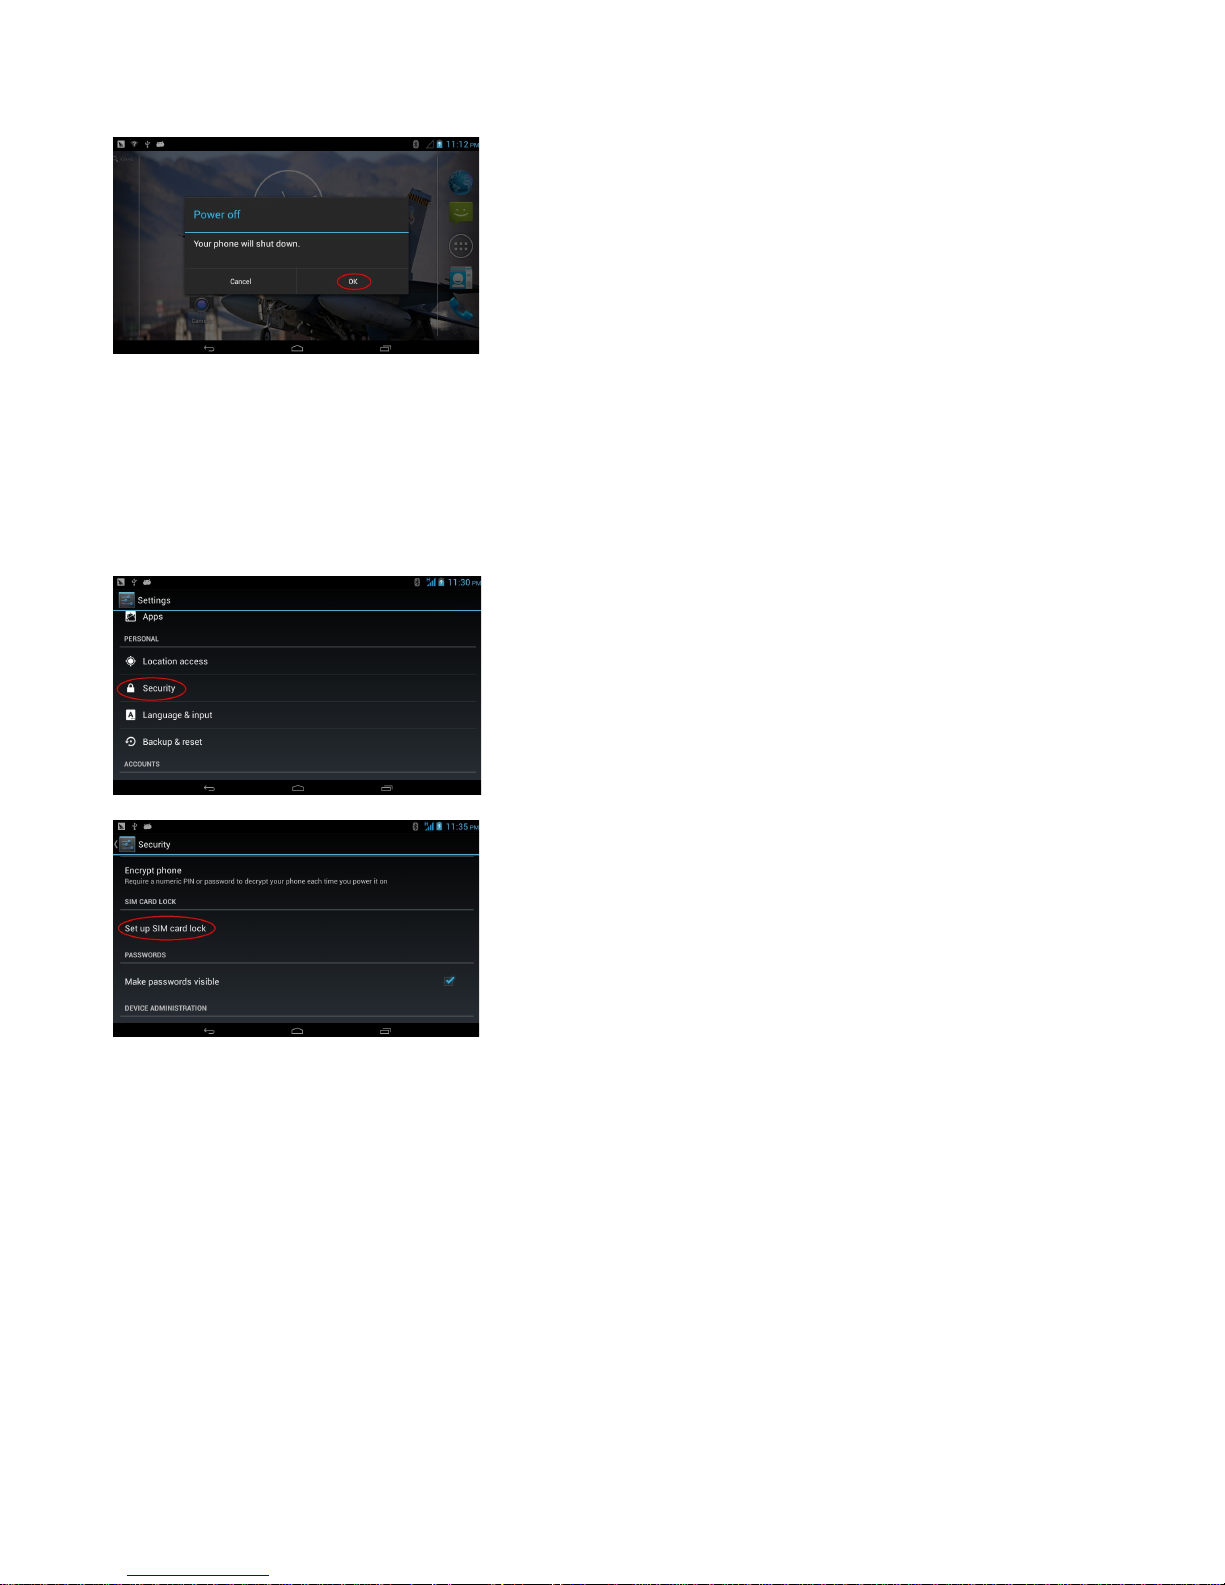
2.4 Turning on or off your handset
To turn on or off your handset, long press the Power On/Off key.
Page 7
7
If you have turned your handset on without inserting the SIM card, the handset will prompt you to “Insert SIM
card.”
After inserting the SIM card, the following prompts will appear in sequence on the screen:
Enter the phone lock code – if you have set a phone lock code.
Enter the PIN code – if you have set the SIM card code.
Search – Your handset will keep searching until an appropriate network connection is found.
2.5 Unblocking your SIM card
To prevent fraudulent use of your SIM card, it is protected by PIN (Personal Identification Number) code
encryption. With this option selected, if you have set the PIN code protection, you must enter the PIN code
each time you turn your handset on; in this way, you can unblock your SIM card and use your handset
normally.
The user may turn off the SIM card lock; but in this case, the fraudulent use of your SIM card can not be
prevented.
Enter the PIN code, use the Clear key to clear a mistake, and press the left soft key “Ok” to terminate. For
example, if the PIN is set to 1234, enter: 1, 2, 3, 4, and then press “Ok.”
If you enter your PIN incorrectly three times, your SIM card will be blocked by the network, and your handset
will ask you for the PUK code.
Note: Your network provider will set a standard PIN (4 to 8 digits) number for your SIM card. You should
change it to your private code as soon as possible.
2.6 Unlocking your handset
Page 8
8
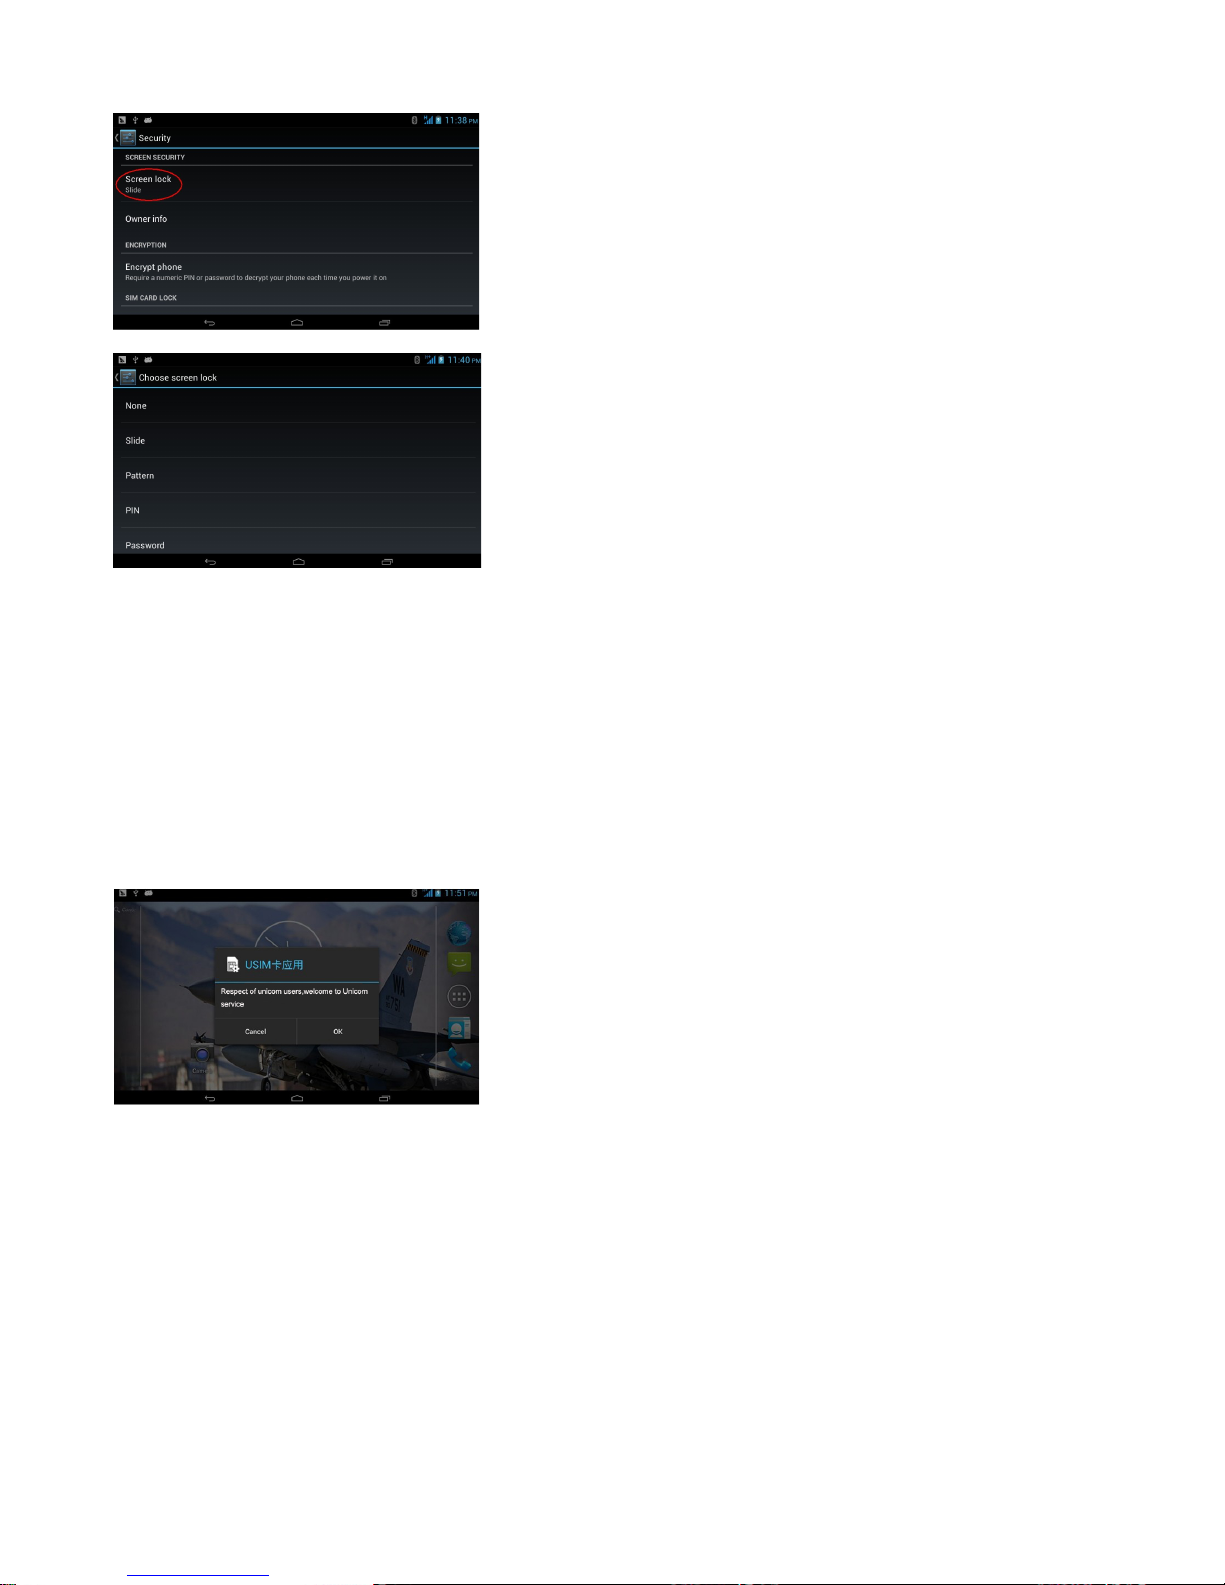
To prevent fraudulent use of your handset, you can set the phone lock code to protect it. When this feature
is selected, you must enter the phone lock code to unlock your handset for normal use of it. The user may
turn off the phone lock, but, in this case, the fraudulent use of your handset can not be prevented.
By dragging the Unlock icon on the screen onto the concerned menu icon, you can unlock your handset and
enter the corresponding menu;
Enter the phone lock code, use the Clear key to clear a mistake, and press “Ok” to terminate.
For example, if the phone lock code is set to 1122, enter: 1, 1, 2, 2, and then press “Ok.”
If you forget your phone lock code, you must contact the local authorized service center to unlock your
phone lock code.
Note: The default phone lock code is set to 1122.
2.7. Connecting to network
After your SIM card is unblocked successfully, your handset will search for available networks automatically
(displaying “Finding… ” on the screen). Once contacted, the name of the network provider will appear in the
center of the upper part of the text and graphic area. At this point, your handset is connected to the service
network.
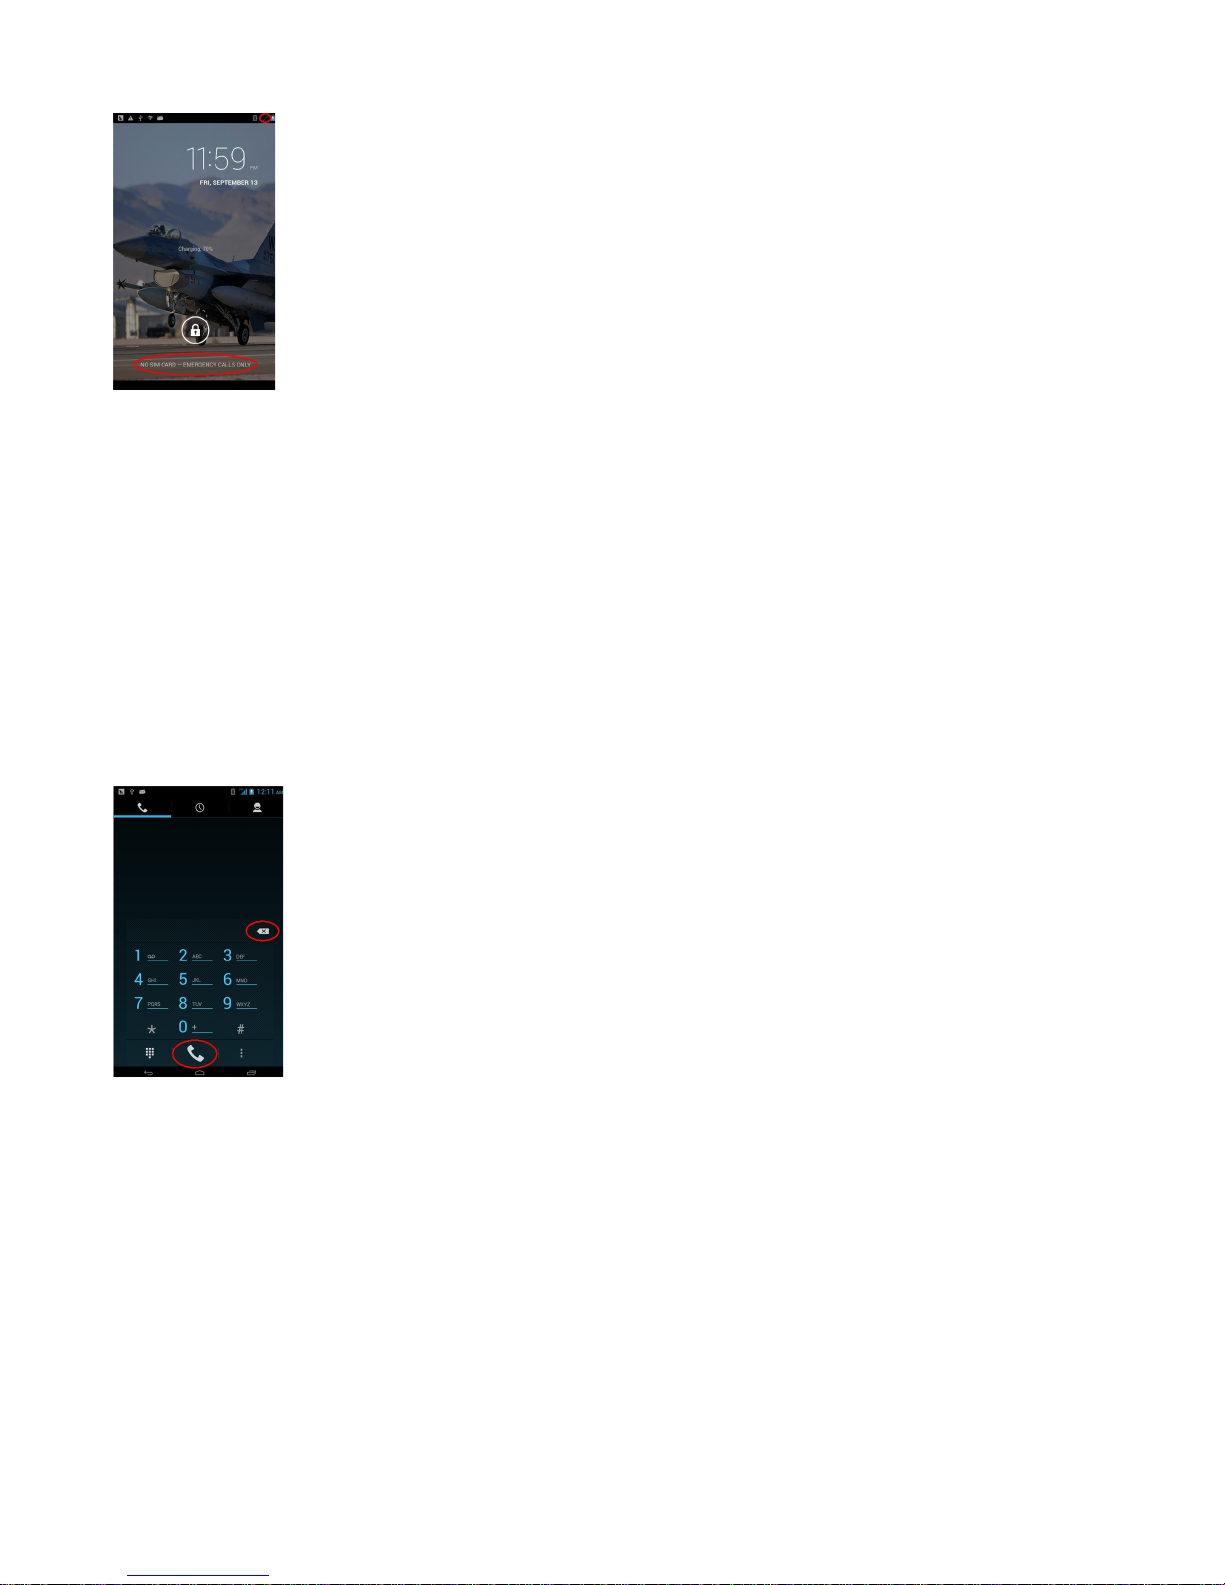
Note: If the prompt “Emergency call only” (Emergency) appears on the screen, it means that you are out of
the normal network coverage (service area), or that your SIM card fails to pass verification, but you can still
make emergency calls depending on the signal strength.
Page 9
9
IV. Basic functions
1. Making calls
When the name of the network provider appears on the screen, you may make or answer phone calls. The
information bar on the top of the display screen shows the signal strength of the network.
Since the impact of obstructions to the call quality is relatively large, moving in a small range may effectively
improve the call quality.
1.1 Making domestic calls
Enter a phone number using the Dialer, and touch the Send key to make a call. If you need to change the
phone number, use the Clear key to erase one digit at a time. While pressing the Send key, an animation for
making a call will appear on the screen. The call status information will appear on the screen if the other side
is answering your call.
1.2 Dialing landline phone extension
Some landline phone extension cannot be dialed directly. You need to dial the switchboard first, and then
press “0” for successive switching. Finally enter “P” and dial the extension number.
To dial a landline phone extension, enter in the following sequence:
Area code, switchboard number, P, extension number, and then press “Send” key.
1.3 Making international calls
To make an international call, press the “0” key to switch continuously until the prefix symbol “+” for
international long-distance call appears on the screen, this will allow you to make a phone call in any country
without knowing the local international phone number prefix (e.g. 86 in China).
To make an international call, enter from the touch screen in the following sequence: “+”, country code,
complete phone number, and then press the “Send” key.
After entering the prefix number, enter the country code and complete phone number you want to dial.
According to the usual practice, the country code of Germany is 49, Britain, 44, and Sweden, 46, and so on.
Page 10
10
Similar to making international call as usual, the “0” before the city’s area code should be omitted while
dialing.
For example, to dial the number of Shanghai Service Hotline from other countries, enter: +86 21 114
1.4 Making phone calls from list
Every phone number you dialed or answered is stored in your handset’s call records list. The recently dialed,
answered and missed phone numbers are listed in the same interface by type. When the phone number list
is full, the older number will be deleted automatically. To view the list, proceed with the following steps:
In the idle state, touch the Dialer menu and select the Call Records menu to view all call records.
All phone numbers appearing in the list can be selected and dialed by touching them from the call records.
When the phone number list appears, click the number to view details; you may further store or delete the
number and so on by touching the related options.
2 Emergency calls
You may make emergency calls whenever you are within the network coverage (determined by checking
the indicator bar for the network signal strength on the upper left corner of your handset’s screen). If your
network provider provides no roaming service in this area, “Emergency call only” (Emergency) will be
displayed on the screen. If you are within the network coverage, you can make emergency calls even if you
have no SIM card.
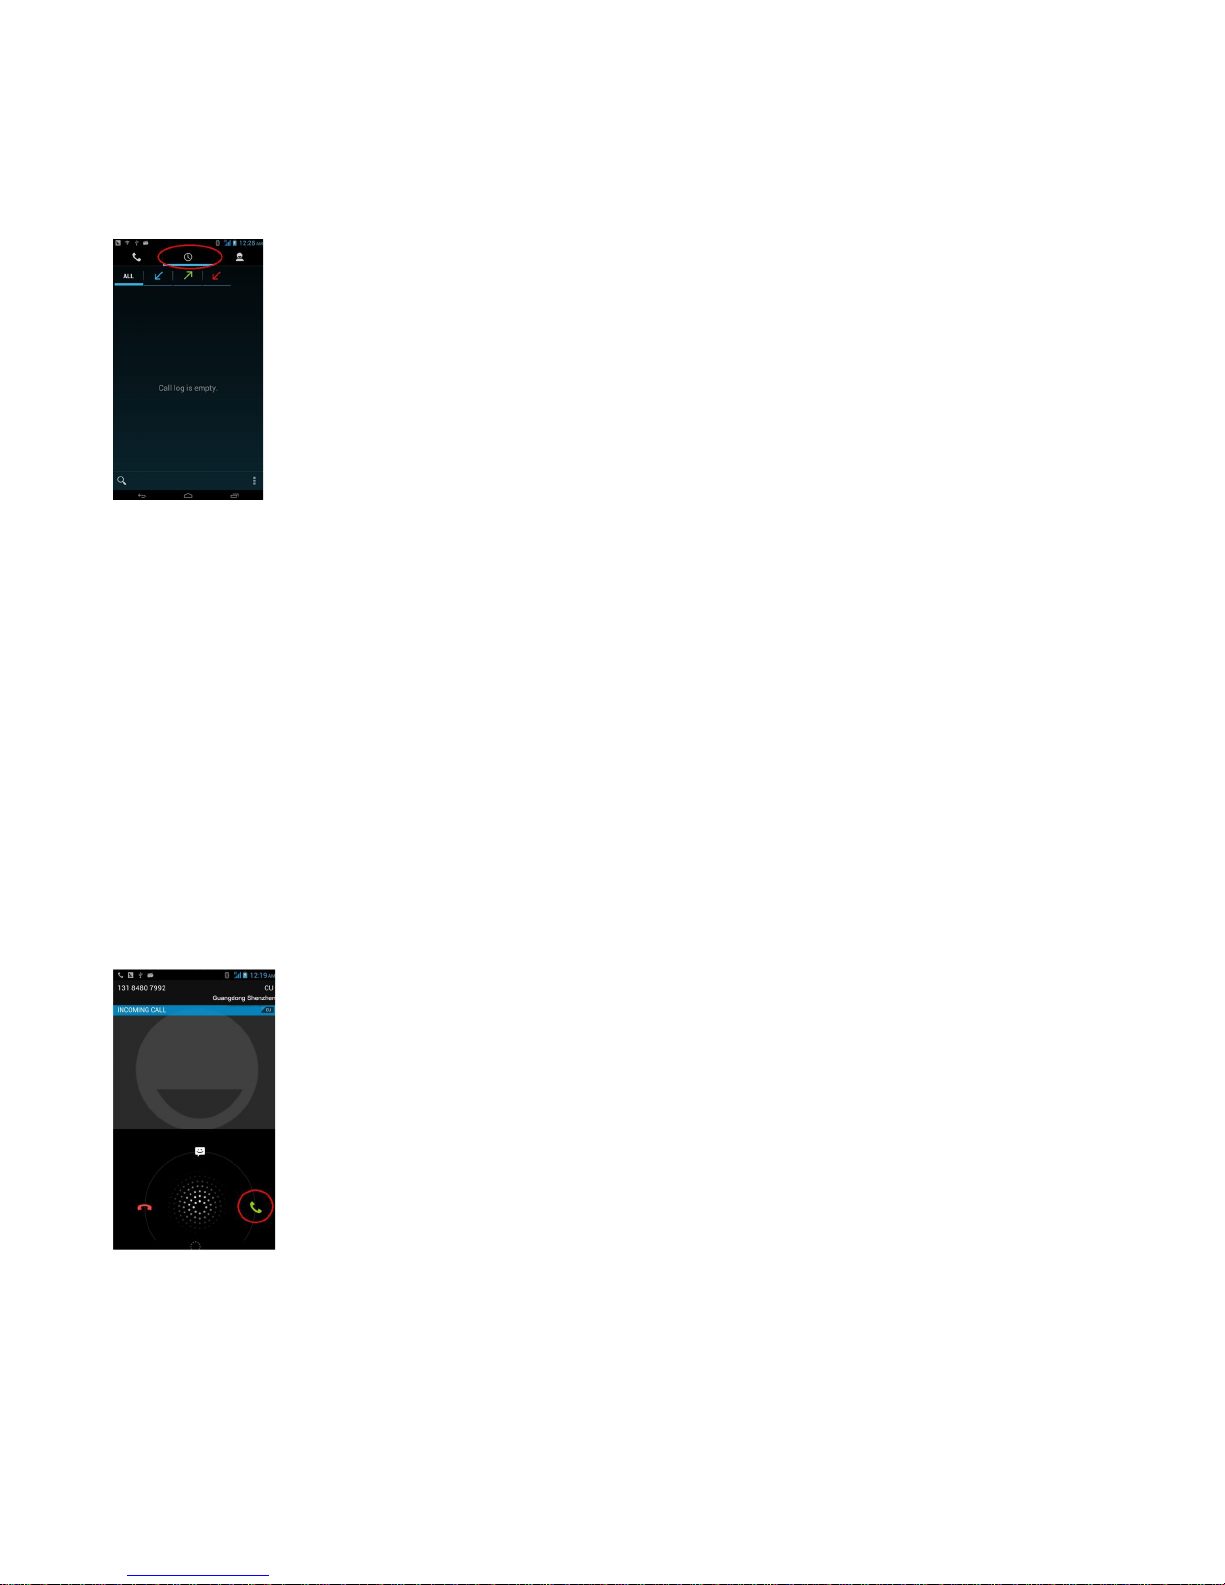
3. Answering phone calls
On the Incoming Call interface, click “Answer” to answer the incoming call; if an earphone is inserted, you
may even answer the incoming call using the key on the earphone.
4 Call records
In addition to searching for recently missed calls, answered calls and dialed calls, your handset also
summarizes the call billing, call time, SMS counts and GPRS flow for you. You can even delete the call
records.
Page 11
11
5. Call options
The call options are only visible during calling, and such features as call waiting, call holding, multi-user
conference and so on are subject to network support; please contact your network provider for details.
In the call options, you may carry out the following operations: Add call、Start recording.
V. Function menu descriptions
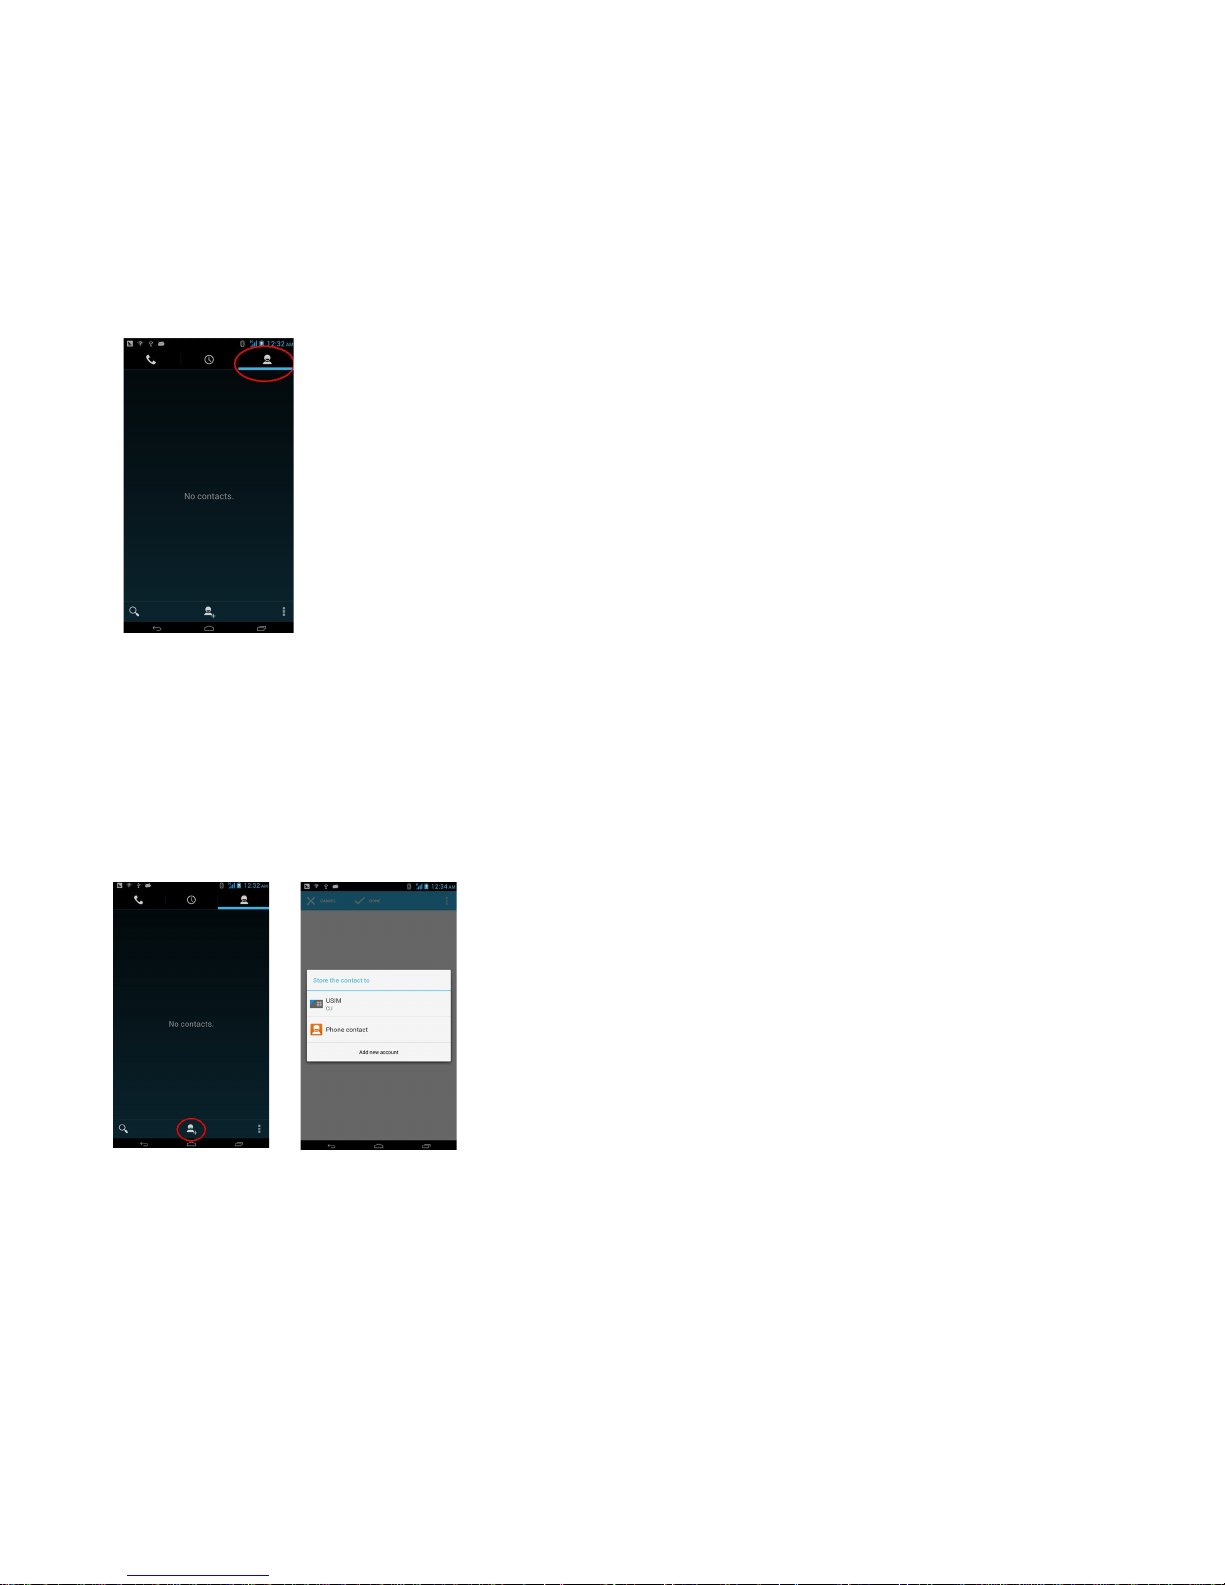
1. Contacts
This feature allows you to store such information as name, phone number, mobile phone number and so on.
Phone numbers can be stored either in your handset or in your SIM card. Your handset can store up to
1,000 phonebook entries, and the number of phone number entries allowed to be stored in the SIM card
varies depending on its capacity.
By clicking Contacts, you may view a contact's details, including name, number, etc., and you may also
make a call, send a message, edit, share, delete, copy and more.
On top of the screen, you may select Dialer, Call records and Contacts by touch. At bottom of the screen,
you may select Add contacts, Group, Share and More by touch.
Adding contacts
In the Phonebook, add a new phone number entry to the SIM card or your handset.
For the newly added phonebook entries, you may not only add name, number, e-mail, address and other
information (e.g. birthday, remarks), but also set the following contents:
Caller picture: Set a personalized caller picture for the current phone number entry. You may select preset
picture in your handset or a picture you took, or you may select a picture from the Folder under File Manager
that can be previewed successfully and is of the right size to serve as personalized caller picture.
Incoming call ring tones: You may select built-in ring tones and customized ring tones.
Incoming call groups: You may add the phone number entry stored in the phonebook to different groups by
interaction properties.
Binding SIM cards: Select master SIM card, SIM card 1 or SIM card 2.
Storage setting: Select to store in handset or SIM card 1/2.
Page 12
12
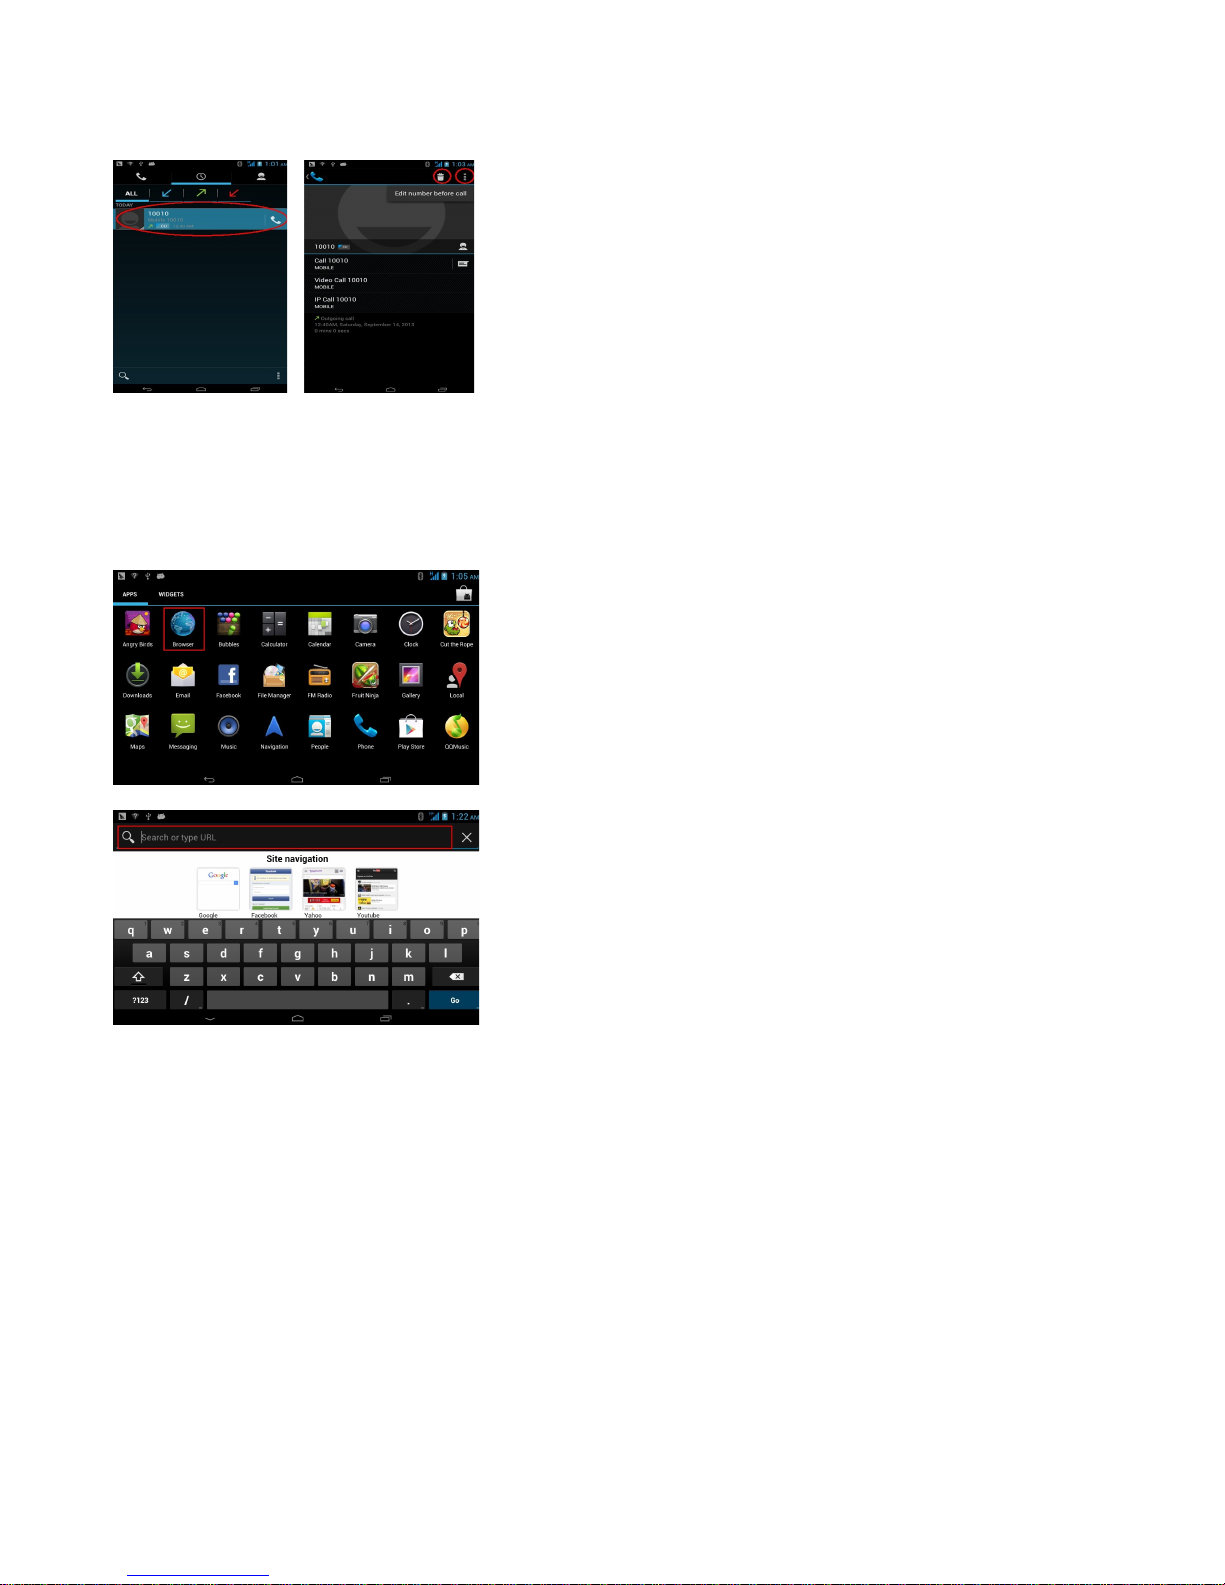
2 .Call records
Enter the Call Records interface, touch and switch the tap pages at the bottom 进 of the screen to view All
Calls and Missed Calls.
Slide your finger upwards to select a phone number and touch the number to view call type, call time, call
duration and used SIM card. At the same time, you may select Call, Edit before Call, Send SMS and Delete.
3. Browser
Using Browser, you can enjoy surfing the Web. To access this function, touch Application tab from Home
screen, then touch Browser.To go to a web page
On Browser screen touch the URL box at the top, enter the address of the web page, then confirm. Some
websites will hide the URL box automatically, you can scroll down the web page to let it be displayed.
4. Calculator
Your handset provides you with a calculator with simple functions. You may carry out calculation by touching
the symbols “+”, “-”, “*” and “/” on the screen; the advanced panel also provides some calculation functions.
Note: Due to limited accuracy, this Calculator will produce rounding errors.
5. Calendar
When entering the Calendar submenu, the calendar of the current month is displayed on the screen with the
current date marked with a background frame of special color. By touching the date directly, you may
Page 13
13
browse the date, and the calendar information on the screen updates correspondingly.
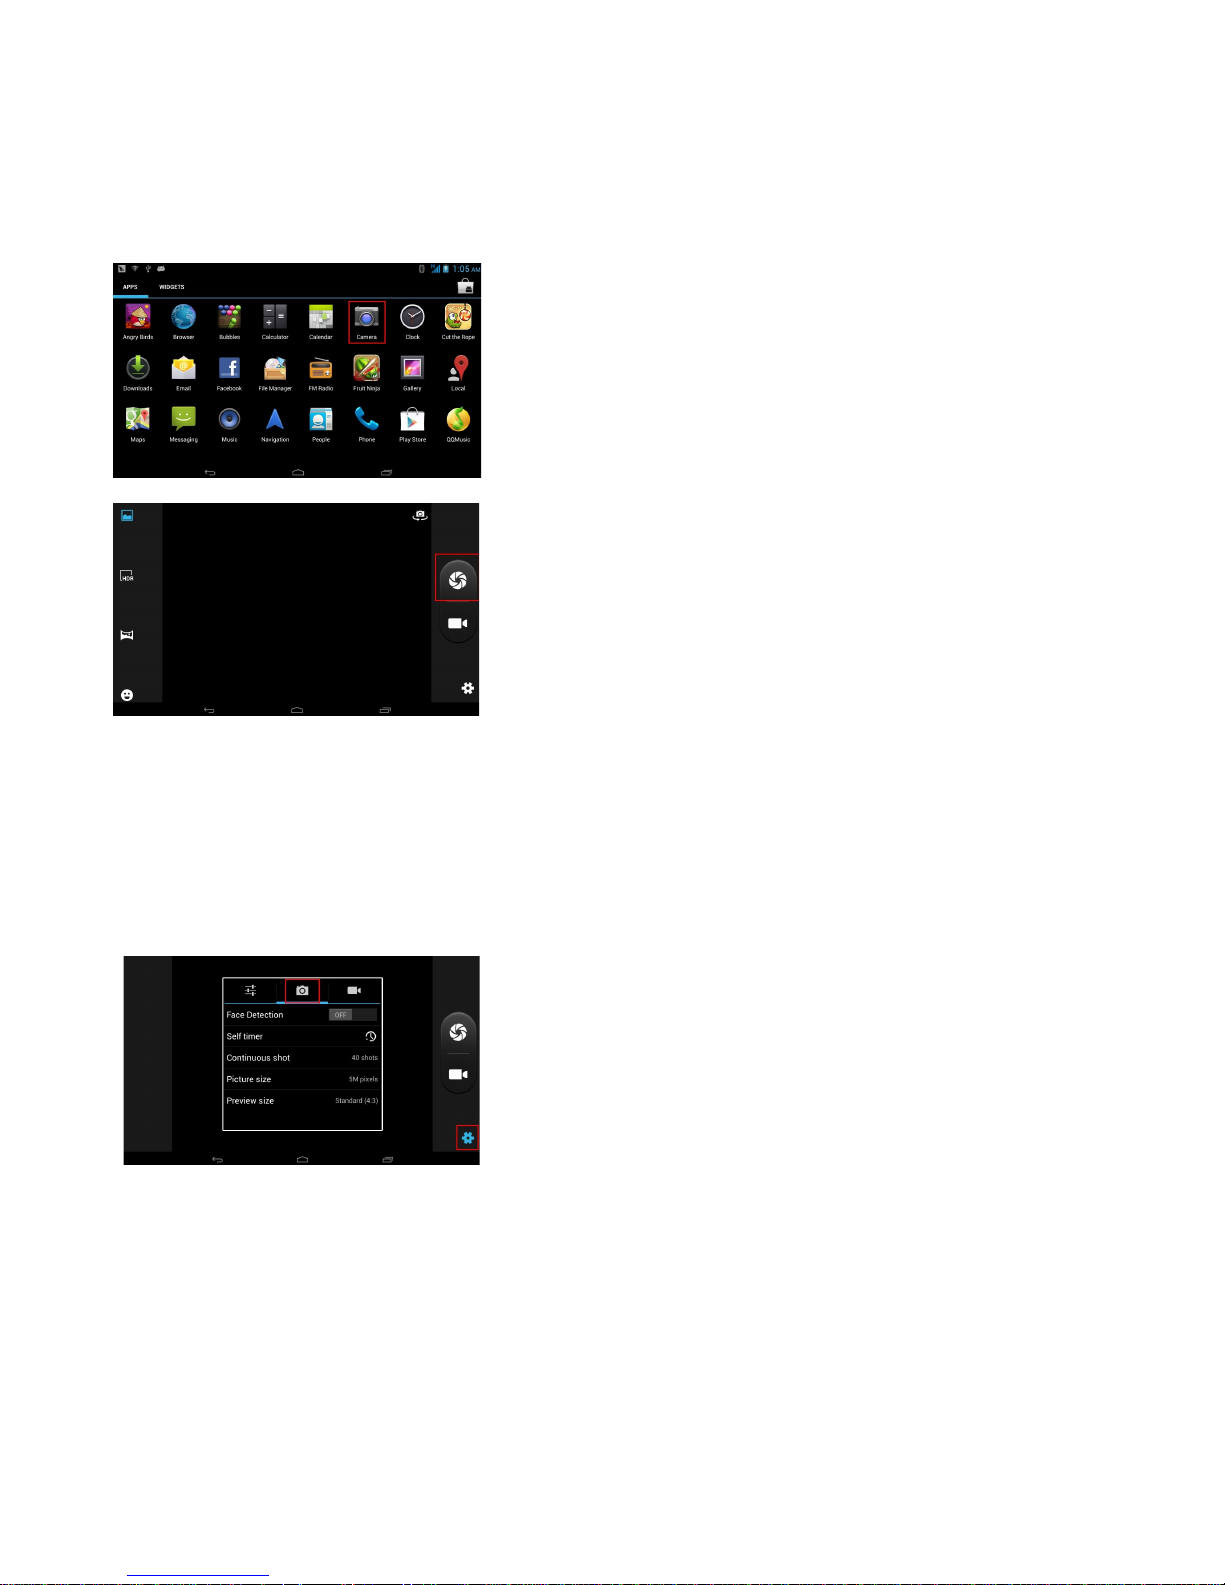
6. Camera
Select the Video Camera menu, touch the Camera / Video Camera icon and switch between options by
sliding the bar.
In the camera framing mode, the options on the left include Night Mode, Shooting Methods, White Balance,
Exposure Value, Delay Shooting and More Options. The following operations are available by touching the
More Options icon:
Picture Quality: Set the quality of picture.
Resolution: Select the resolution of the picture.
Ruler Guides: Select to open / close the ruler guides.
Shutter Sound: Select the sound effect of the shutter sound or turn off the shutter sound.
Special Effect: Select the special effect for shooting.
Avoid Flashing: Select different frequencies
Restore Default: Reset all parameters
Note: You may adjust the focal length by dragging the circle in the middle.
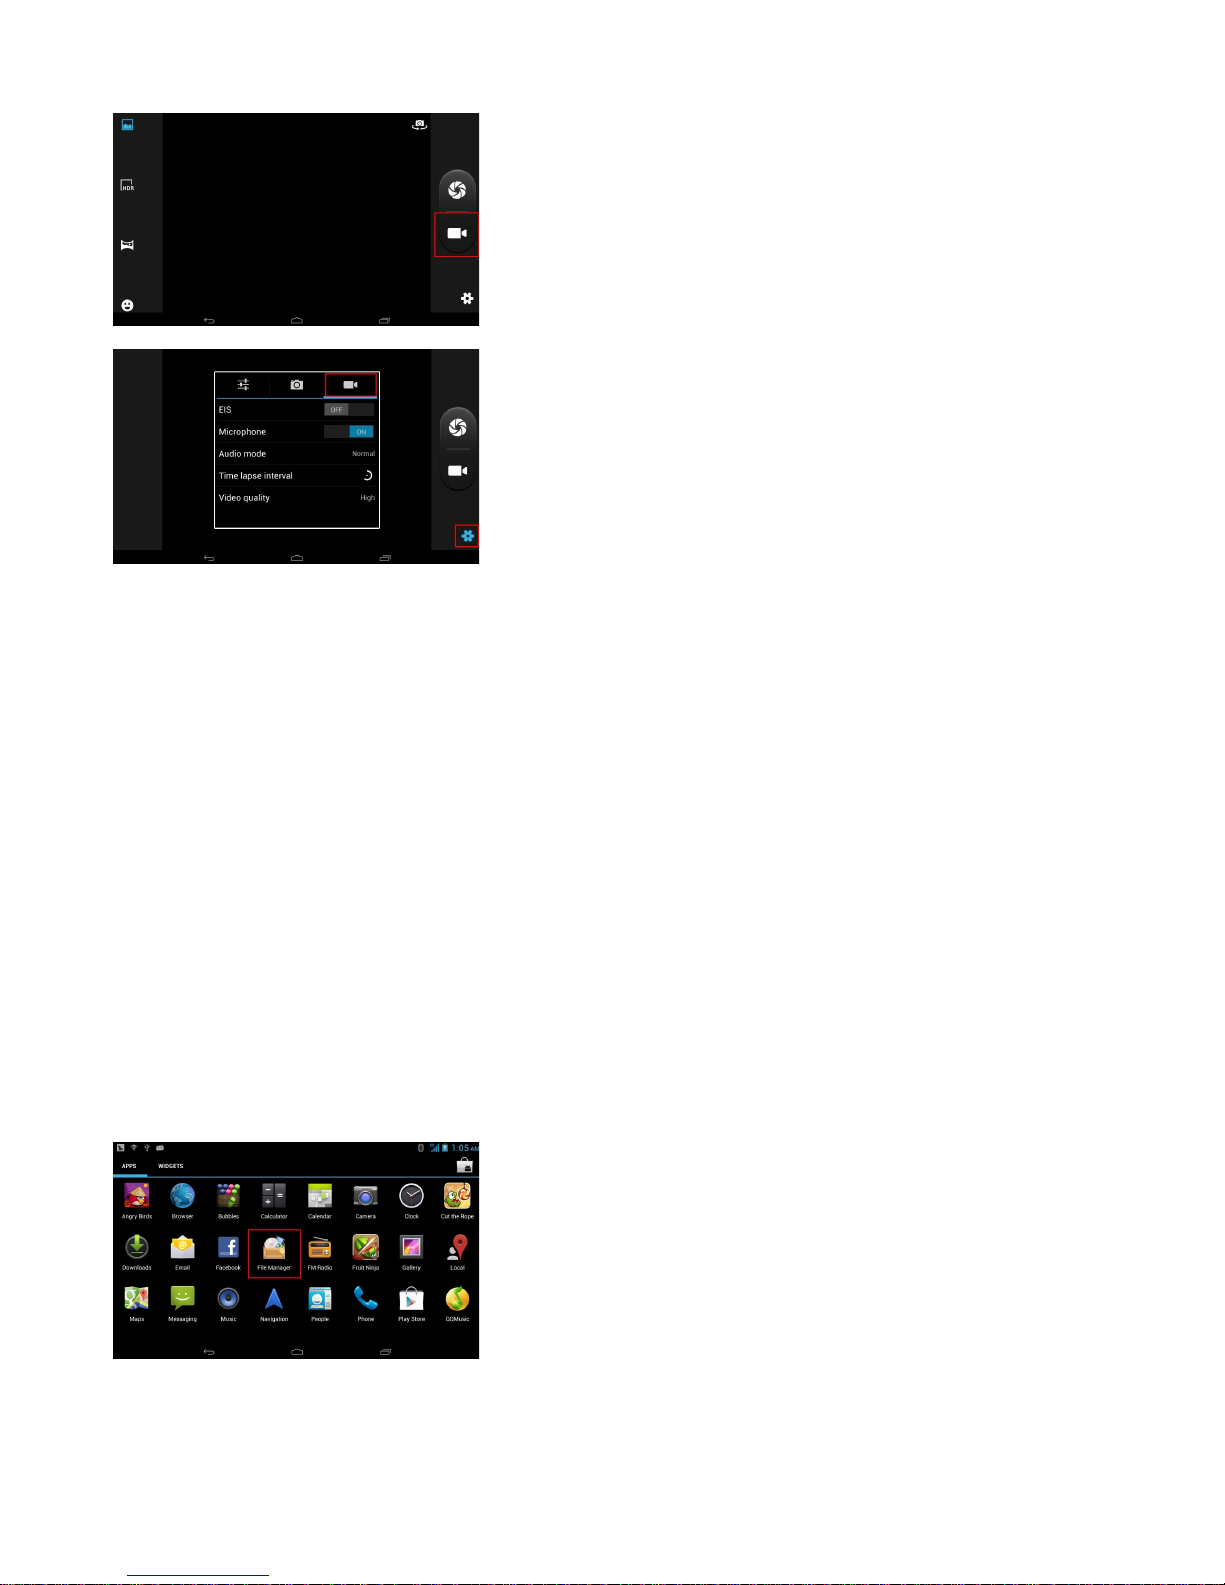
In the Video Recorder framing mode, the options on the left include Night Mode, White Balance, Exposure
Value and More Options. The following operations are available by touching the More Options icon:
Video Quality: Set the quality of video.
Storage: Select to store in the handset or SIM card.
Limit: Set the time limit for shooting.
Special Effect: Select the special effect for video shooting.
Audio: Turn on/off the audio function.
Avoid Flashing: Select different frequencies.
Restore Default: Reset all parameters.
Page 14
14
7.Clock
Enter the Clock menu and select Add to add an alarm. touch screen to set the alarm time. You may also set it
to Repeat, Ring Tone, Vibrate and Label. Select "Save" to complete the Alarm setting.
By selecting “Setting", you may set the postpone time length and the sound volume. If you want to delete the
set alarm, you may select “Delete Alarm.”
8. Downloads
It includes the contents being downloaded and already downloaded. At the same time, you may also select
Pause All and Start All.
9. E-mail
Create the desired account by selecting the E-mail Setting Wizard and entering the password to complete
creating an account.
You may then Write E-mail, Update E-mail Account and Set Overall Parameters of E-mail.
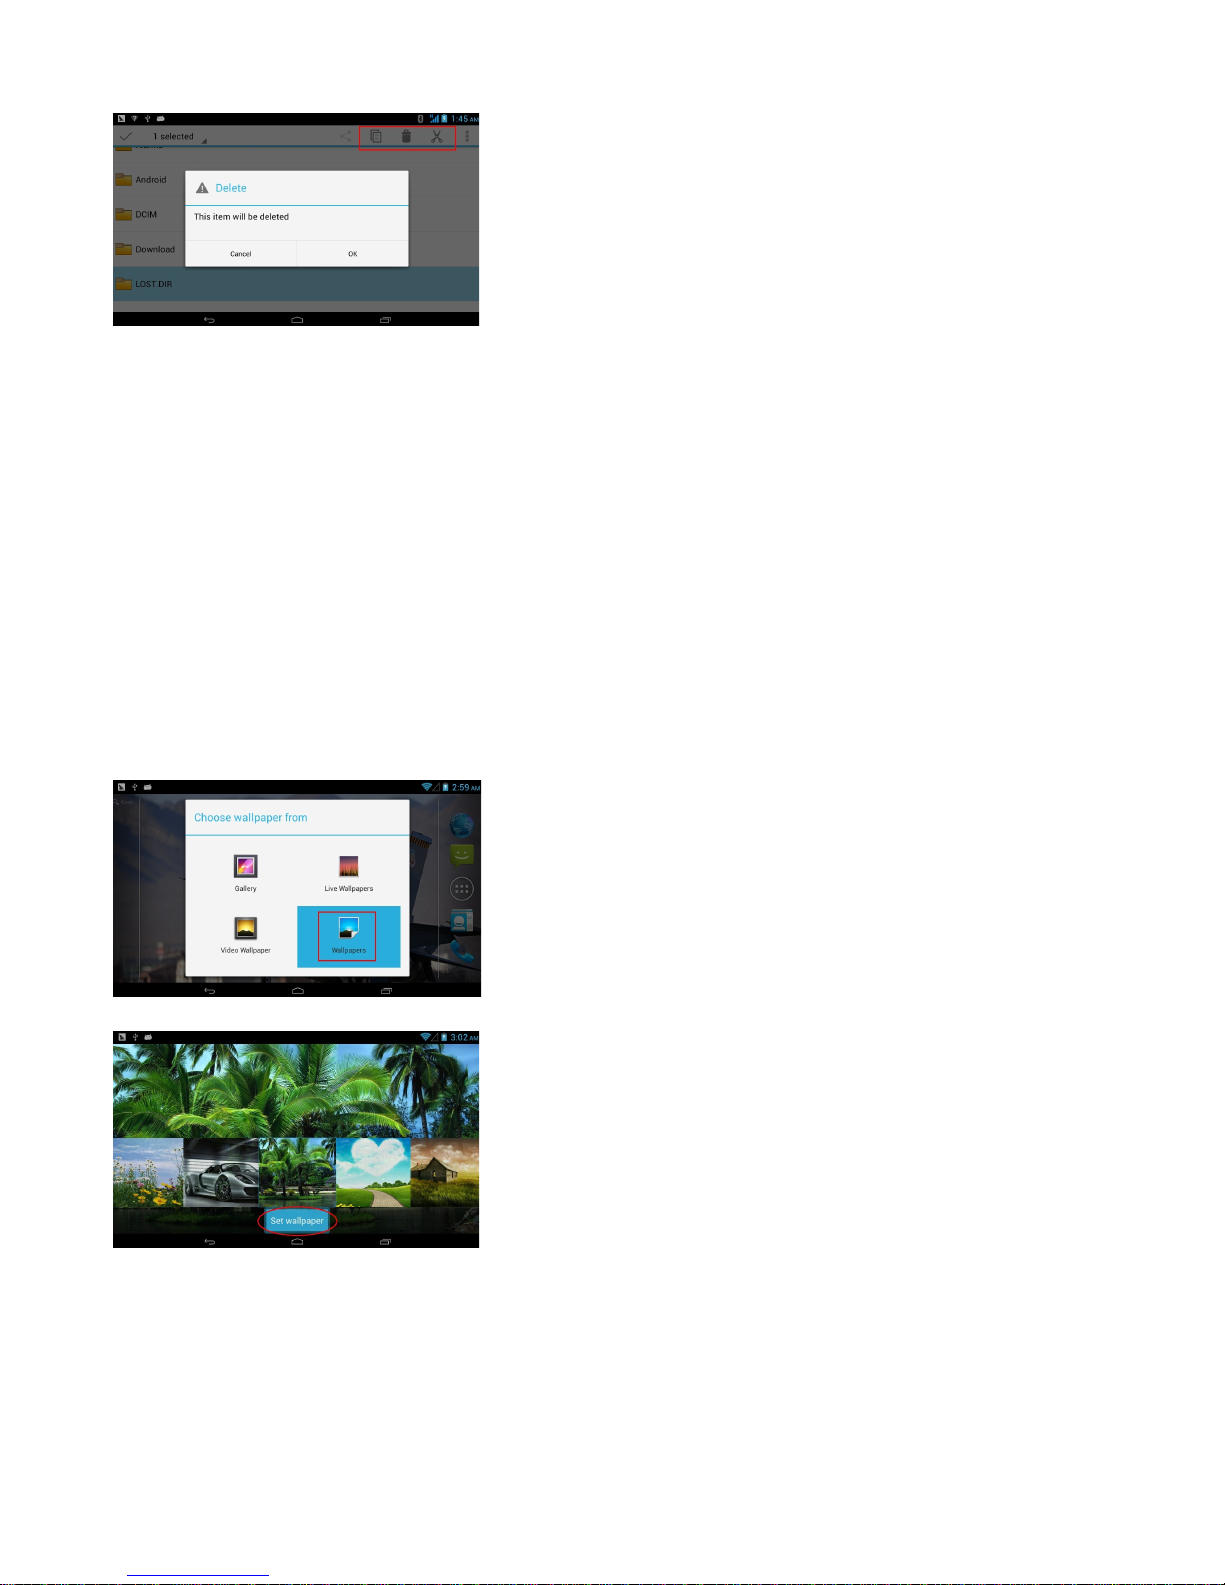
10. File Management
In "My Documents”, you may view the file information stored on your handset / memory card. Different files
are stored in different folders, and you are allowed to operate these files.
When need copy,cut,delete a folder or file,please press with finger on it, For the corresponding operation.
Page 15
15
11. FM Broadcast
In the FM Broadcast interface, click the Power On/Off icon to turn on / off the FM Broadcast. Click on the
five-pointed star icon to add the current channel to My Favorites. The left speaker enables Loud Speaker
function. The red circle on the lower left corner enables recording.
Click on the list icon at the bottom to search for channels and view My Favorites automatically. Click on the
Setting icon to set the storage location of the recording files and the recording quality.
12. Gallery
Display the Media Library information stored on your handset and memory card. It includes My Shot, My
Picture and My Video.
Also, by selecting the “Setting” at the lower part, you may set Slide Interval, Slide Effect, Random Play and
Loop Play.
13. wallpaper setting
Touch the main screen 3 to 4 seconds.
Choose wallpaper
13 Setting
Enter the Setting menu and select different submenus by touching the tabs.
13.1 SIM management
SIM card management menu items according to your chosen operators present different menu
Page 16
16
13.2 Wi-Fi
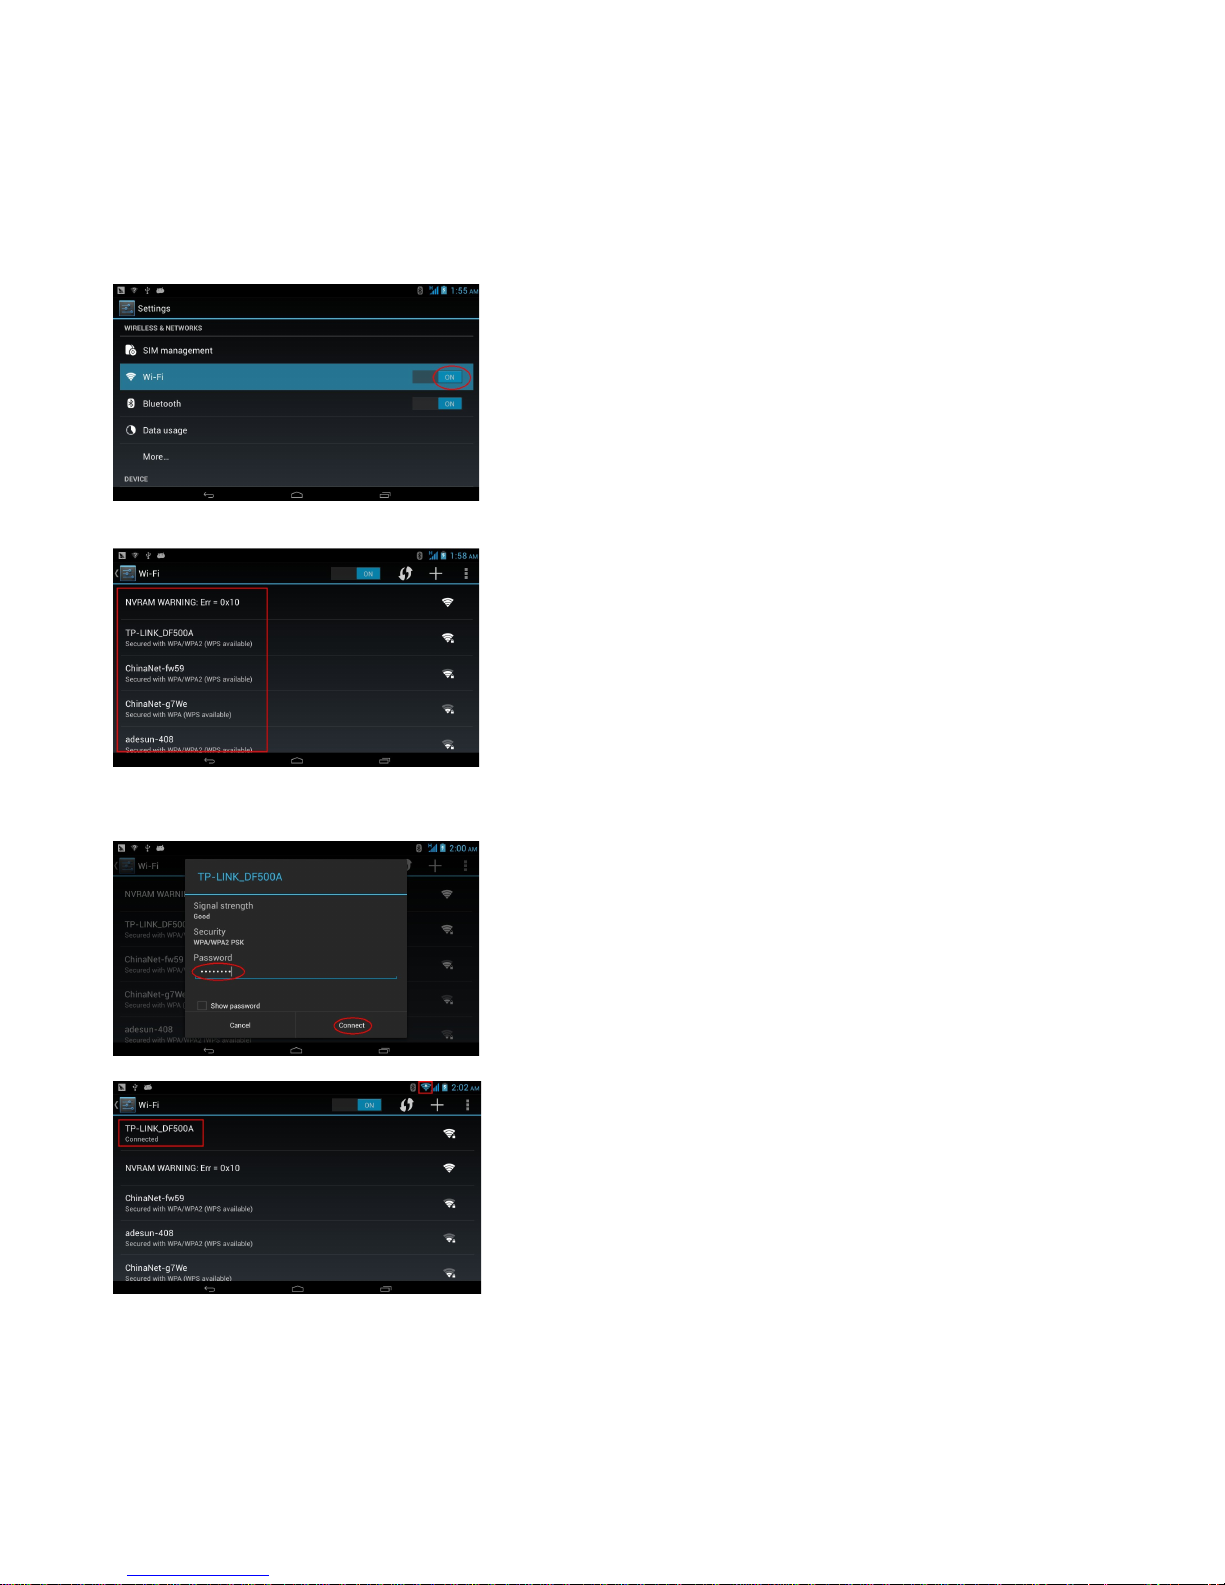
Using WLAN, you can connect to the Internet when your phone is within range of a wireless network. WLAN
can be used on the phone even without a SIM card inserted.
To turn WLAN on and connect to a wireless network
.Touch on notification panel to get to settings.
.Touch the switch beside WLAN to turn on/off WLAN。
Touch WLAN settings, detailed information of all detected WLAN networks is displayed in the WLAN
networks section.
.Touch a WLAN network to connect to it. If the network you selected is secured, you are required to enter a password
or other credentials (contact network operator for details). When finished, touch Connect.
13.3 Bluetooth
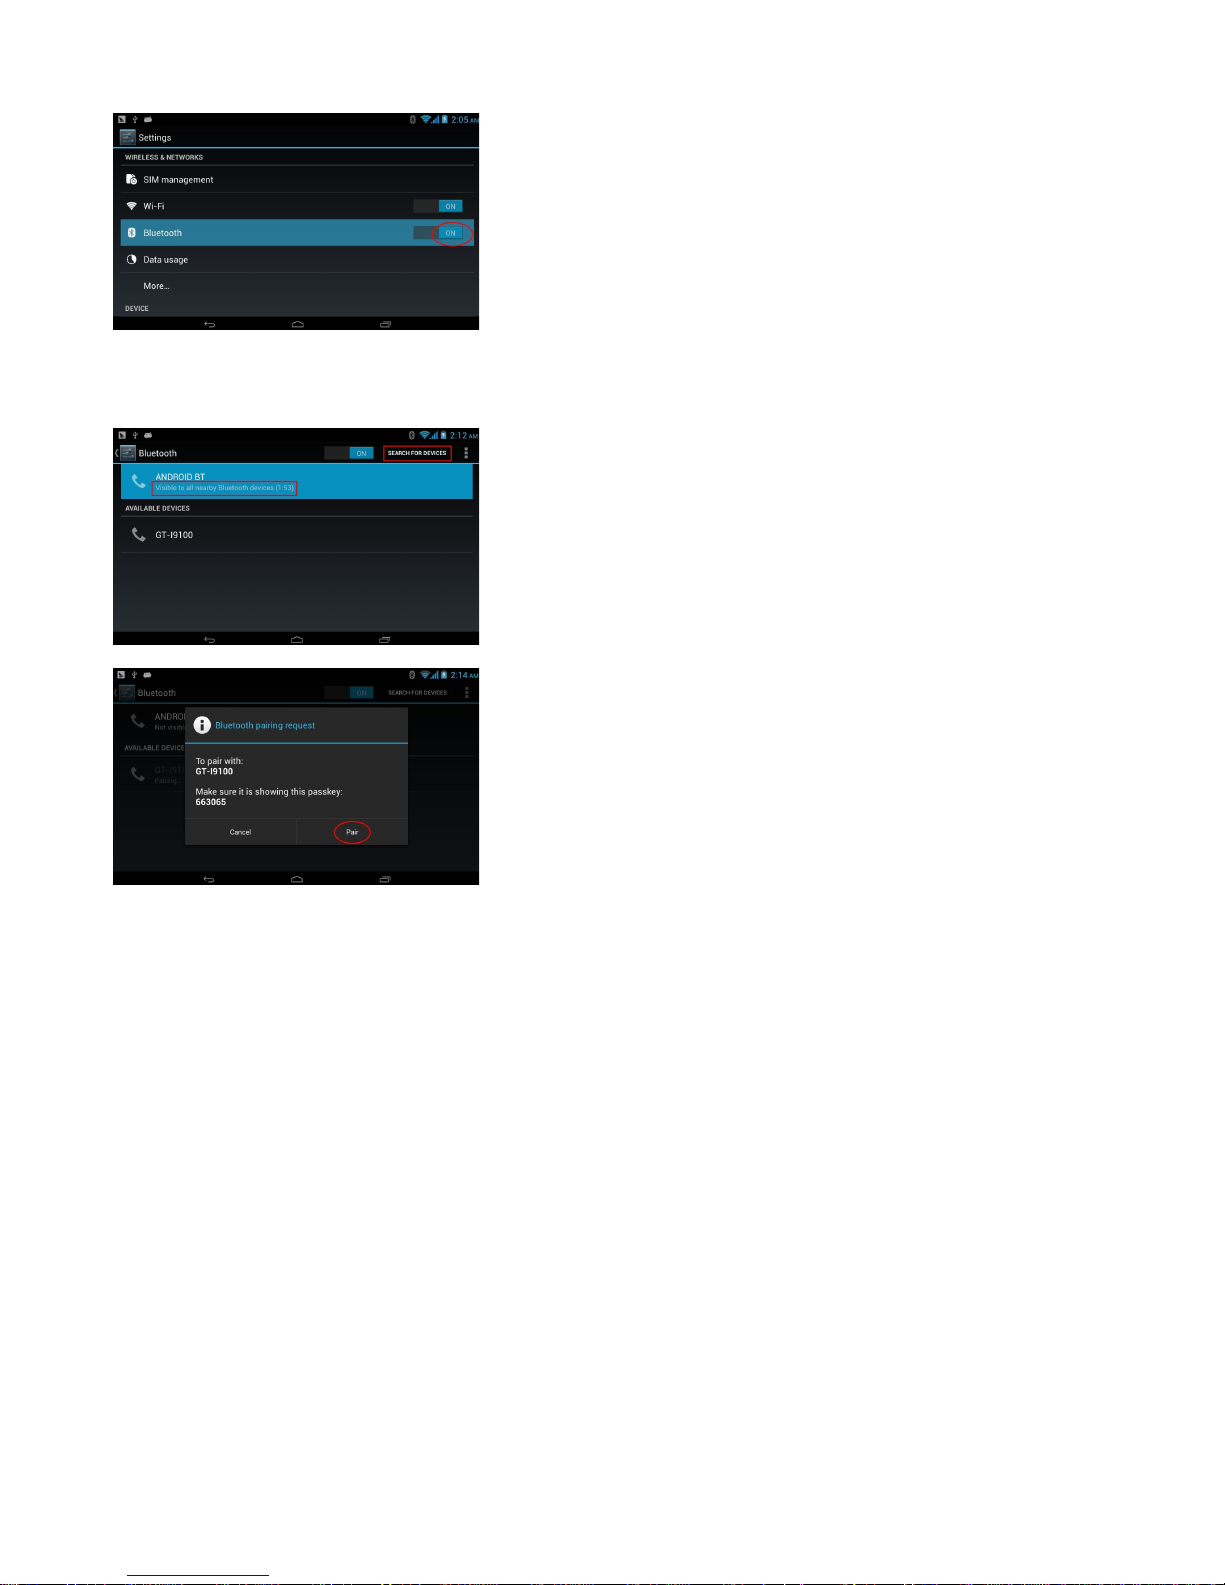
1. Touch Settings, and then select the Bluetooth check box to turn on Bluetooth. When Bluetooth is turned
on, the Bluetooth icon appears in the notification bar.
Page 17
17
2. Touch device’s name, make your mobile phone visible to other Bluetooth devices.
Pairing and Connecting a Bluetooth Device:
1. Touch Settings > Bluetooth settings. Your mobile phone will then scan for Bluetooth devices in range
(or touch SEARCH FOR DEVICES to scan for Bluetooth devices).
2. Touch the device you want to pair with your mobile phone.
13.4 Data usage
Can view, set the mobile data traffic restrictions
13.5 Audio profiles
You may carry out operations regarding Mute, Vibrate, Ring Volume, Notice Tone, New Message Tone.
13.6 Display
You may set the Wallpaper, Brightness, Auto Screen Locking.
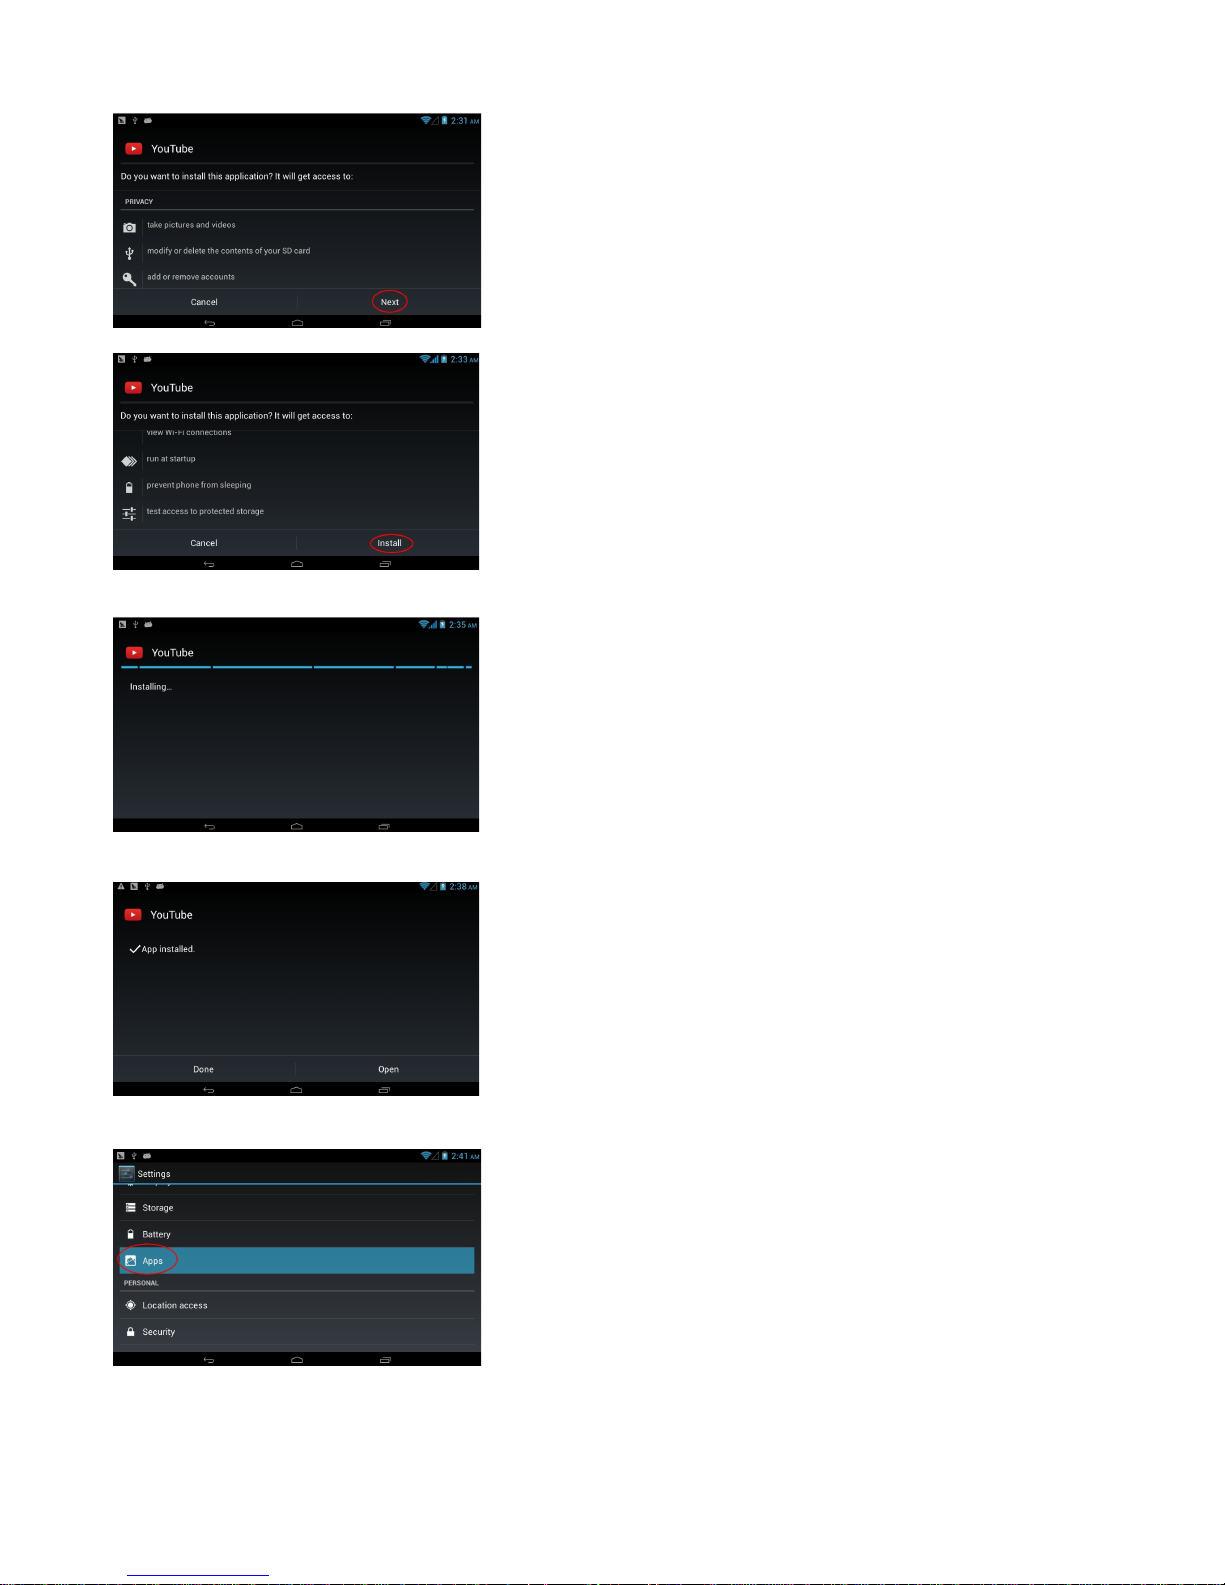
13.7 Install and uninstall application software
Select the need to install the software:
Page 18
18
Next
Installed on
Install success
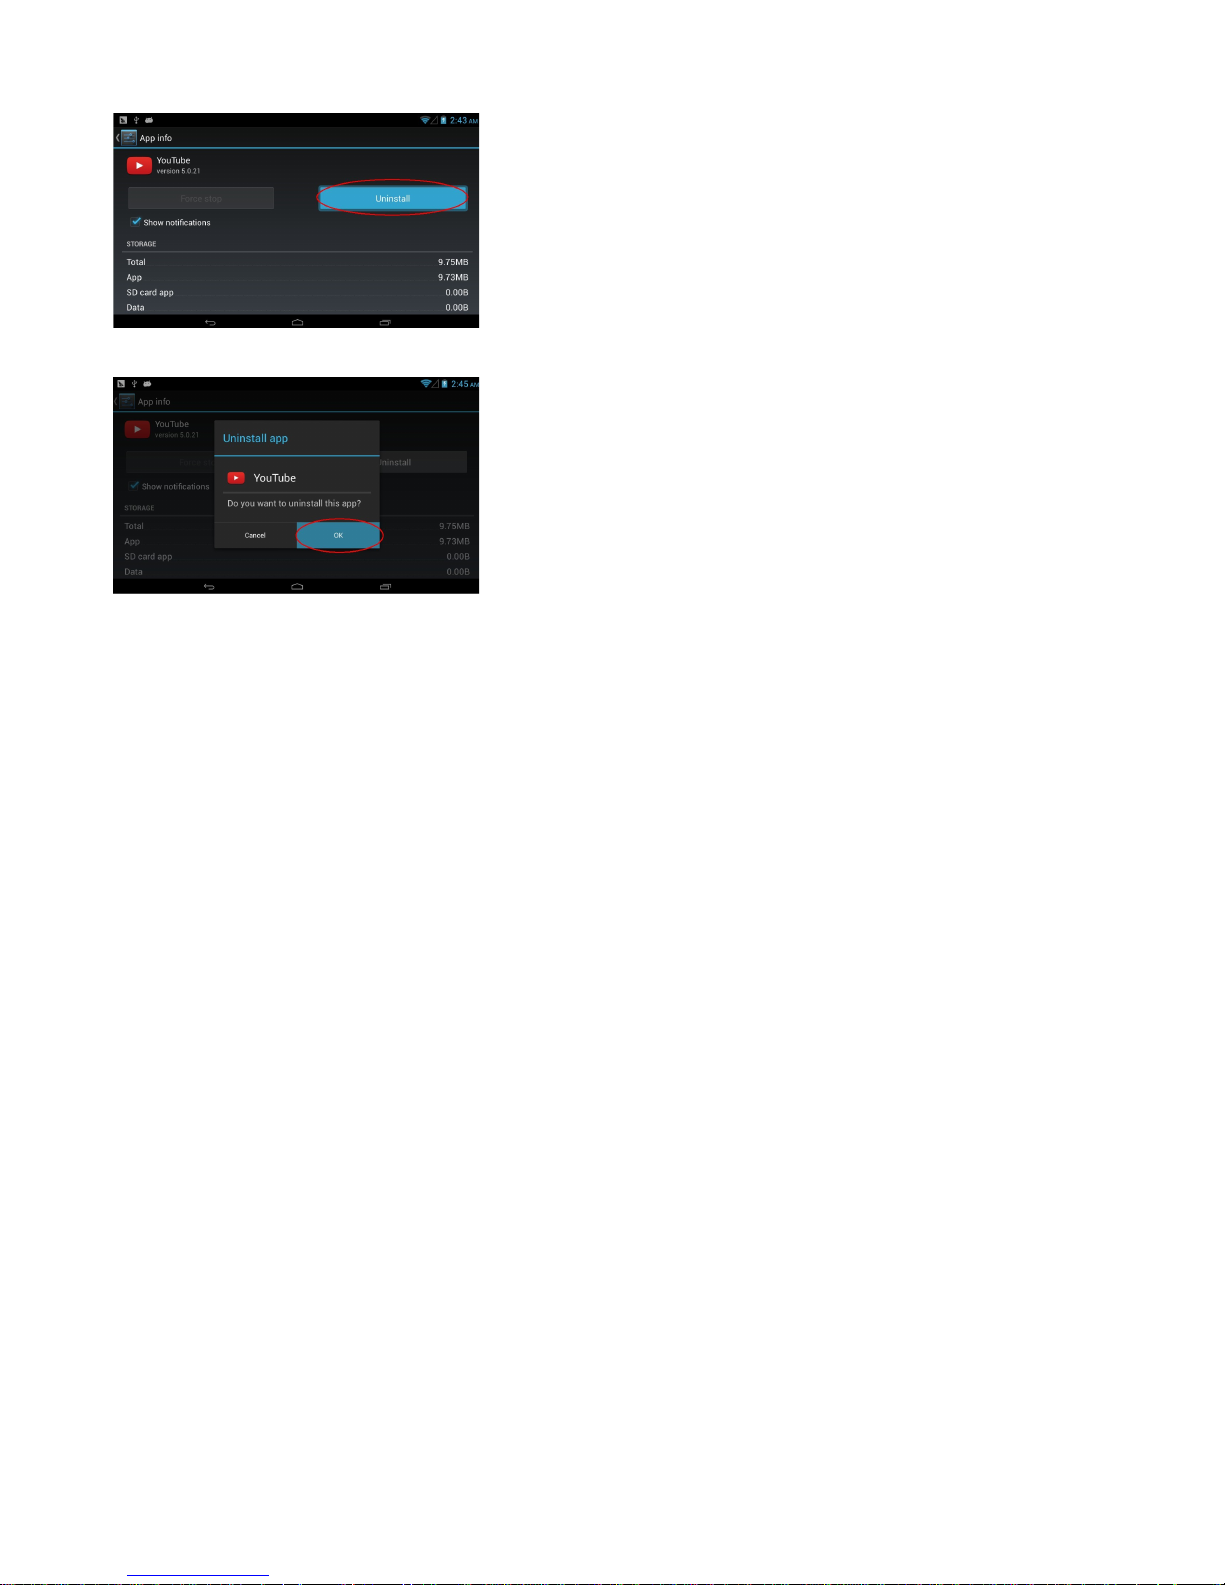
Uninstall:
Select the need to uninstall the software
Page 19
19
Next
Uninstall Complete
13.8 Security
13.7.1 Handset and SIM Card
You may set your handset’s phone lock code, changing the password; set PIN lock of SIM, change PIN
code.
13.9Language & Input
13.9.1 Language
Set the type of current language to Simplified Chinese or English.
13.9.2 Input Method Setting
It includes Preferred Input Method, Setting Cstar, Handwriting Speed and Advanced Setting. See your
handset’s menu for details.
13.10 Backup&rest
Under this menu, enter the phone lock code and confirm. You can then restore the relevant parameters of
your handset to the default value.
13.11 Date and Time Setting
You may carry out such operations as Auto Satellite Time Updating, Time Setting and Date Setting and so
on.
14. Sound Recorder
Enter the Recorder menu and click the red circle to start recording.
Page 20

20
15 SIM Toolkit
The SIM Card-based Value-added Service items have different menus depending on the operator you
selected. See your handset for specific menus.
16. Maps
By entering the Map menu, you may view your current location and find some travel routes.
17. Search
By entering this menu, you can use the Search Engine.
Idle Screen Menu
1. Dialer
Enter a phone number by touching the numeric keypad with your finger and then touch the Dialer icon to dial
the number. You may also view the call records and contacts.
2. Information
By entering the Information screen, you may view the contents of information from the screen; there are
New Information, Folder, Delete and More options.
2.1. New Message
Create a new SMS message.
Edit the SMS message contents;
You may select Emotions, Templates and Insert (Picture, Video, Audio, Name Card, Event, Task, File,
Insert Contact Name, Insert Contact Number, Enter Bookmark, Slide);
After editing, select Send to send the SMS message. Also, you may select Save, Insert and More. The More
option includes Add Subject, CC/BC.
3. Music Player
The upper part of the screen includes Song, Singer, Album and Play List. The lower part of the screen
includes Now Playing, Add To, Play All and More options.
Click the Now Playing option to play the song. The More option includes Delete Current Song and Update.
In addition, on the Now Playing screen, you may select Loop Play, Random Play, Add To My Favorites,
Setting (Sound Effect Setting, Music Database Setting).
4. Main Menu
In the Idle screen, press this key to enter the Main Menu screen.
VI. Quick Start Guide
Featured Functions
In addition to the basic functions of a mobile phone, your handset also supports rich, practical and quick
multimedia functions as follows:
Phonebook: it supports quick searching for the hit phone number entries; every phone number entry stored
on your handset may correspond to up to 4 phone numbers, the handset may store up to 1,000 phonebook
entries, and the number of phone number entries allowed to be stored in the SIM card varies depending on
its capacity; it supports sending SMS messages from Phonebook and copying a single entry to SIM card or
handset and supports duplication of phonebook entries between the SIM card and handset; it supports
Page 21

21
deleting phonebook entries from the SIM card and handset. It also supports Name Card style Phonebook,
personalized ring tones and pictures.
Call Records: Your handset will automatically store the information on call records for easy viewing; it
supports calling the phone number in the Call Records; saving the phone number in the call records to the
phone book; deleting a single call record entry and deleting the contents of all call record entries.
SMS Message: it supports saving SMS messages in the handset, inserting the SMS messages preset on
the template while writing SMS message, viewing the SMS storage capacity and the occupied space of the
SIM card and Handset, and picking up phone number(s) from SMS messages.
MP3 Play: your handset supports playing the music files of mp3 format.
Record: your handset supports call recording and non-call recording. During a call, you may select the
Record function from the Call screen to easily record the contents of a call; the created recording files are
stored in the folder “My Record” in your handset for you. The time length of the recording depends on the
current spare space.
Camera: your handset supports a Camera function, and it is possible to carry out personalized settings for
the Camera as needed.
Setting: You may personalize your handset settings as needed, including phone setting, network setting,
security setting and more; under each item are diversified functions for you to customize depending on your
preference, such as time and date, timed power on/off, phone lock, etc.
VII. Specific absorption rate (SAR)
The maximum SAR of this product is 2.0w/kg.
VIII. Technical specifications
APRIL&T7)2G&
Size
197.6*122.3*10.7mm
Color
White /black
frequency
GSM:850\900\1800\1900
Operating system
Google Android 4.2.2
Language support
Support for multiple languages (26 countries)
Processor type
MTK6572 dual-core (A7) 1.2GHZ
Standard memory
512MB DDR3
Built-in NAND FLASH
4GB
Display
7 inch (16:9)
The resolution of screen
1024*600
TOUCH PANEL
G+P Capacitive multi-touch TP, five points
Graphics system
Mali-400
External I/O port
1 MICRO USB DEVIC
1 SIM CARD slot
Micro SD slot up to 32 GB
1 3.5mm stereo headset
1 DC 5V power input
Reset button
The speaker
8 Ω /1W hi-fi loudspeaker
MIC
Built-in MIC
FM
Support
Page 22

22
Bluetooth
Support
GPS
GPS,A-GPS
WIFI
802.12b/g/n wireless LAN
Camera
Dual Camera, Front 0.3MP, Rear 0.3 MP
Video format
AVI(H.264, DIVX, DIVX, XVID, rm, rmvb, WMV, MOV, MP4(H.264,
MPEG, DIVX, XVID), DAT(VCD), VOB(DVD), MPEG, MPG, FLV(H.263
,H.264), ASF, TS, TP, 3GP, MPG etc.
Audio formats
MP3, WMA, MP2, OGG, AAC, M4A, MA4, FLAC, APE, 3GP, WAV
Picture format
JPG, JPEG, GIF, BMP, PNG
3D eBook
TXT, EPUB, PDF, WORD, EXCEL, POWER POINTS
Battery type
Polymer battery 3.7V 2800mA/h
Polymer battery 3.7V
3000mA/h
About 3.5 hours of Wi-Fi Internet
The power adapter
Input: AC100-240V.50-60HZ, output: DC5V 2A
The weight of the product
307 g
Document processing
EPUB, WORD, EXCEL, POWERPOINT, PDF, TXT
Tool
Calendar
Alarm Clock
Calculator
Note paper
Weather + clock
Sound recording
Map
Google Maps
E-book
PDF/TXT/CHM/DOC/EXCEL/EPUB/RTF/FB2
Entertainment
3D Gallery, MUSIC, YOUTUBE, VIDEO PLAYER, OTHER
Page 23

23
APRIL&T7)3G&
Size
197.6*122.3*10.7mm
Color
White/black
Frequency
2G: 850\900\1800\1900; 3G:HSDPA/HSUPA /WCDMA:850/1900
Operating system
Google Android 4.2.2
Language support
Support for multiple languages (26 countries)
Processor type
MTK6572 dual-core (A7) 1.2GHZ
Standard memory
1GB DDR3
Built-in NAND FLASH
8GB Nand Flash
Display
7 inch (16:9)
The resolution of the
display screen
1024*600
TOUCH PANEL
G+P Capacitive multi-touch TP
Graphics system
Mali-400
External I/O port
1 MICRO USB DEVIC
1 SIM slot
The 1 memory expansion card: memory capacity to support to 32GB
1 3.5mm stereo headset
1 DC5V power input
Reset button built into the motherboard
The speaker
8 Ω /1W hi-fi loudspeaker *1
MIC
Built-in MIC
FM
Support
Bluetooth
Support
GPS
GPS,A-GPS
WIFI
802.12b/g/n wireless LAN
Camera
Dual Camera, Front 0.3MP, Rear 0.3 MP
Video format
AVI(H.264, DIVX, DIVX, XVID, rm, rmvb, WMV, MOV, MP4(H.264, MPEG,
DIVX, XVID), DAT(VCD), VOB(DVD), MPEG, MPG, FLV(H.263,H.264),
ASF, TS, TP, 3GP, MPG, etc.
Audio formats
MP3, WMA, MP2, OGG, AAC, M4A, MA4, FLAC, APE, 3GP, WAV
Picture format
JPG, JPEG, GIF, BMP, PNG
3D eBook
TXT, EPUB, PDF, WORD, EXCEL, POWER POINTS
Battery type
Polymer battery 3.7V 2800mA/h
Polymer battery
About 3.5 hours of Wi-Fi Internet
The power adapter
Input: AC100-240V.50-60HZ, output: DC5V 2A
The weight of the
product
307 g
Document processing
EPUB, WORD, EXCEL, POWERPOINT, PDF, TXT
Tool
Calendar
Alarm Clock
Calculator
Note paper
Weather + clock
Sound recording
Map
Google Maps
E-book
PDF/TXT/CHM/DOC/EXCEL/EPUB/RTF/FB2
 Loading...