

Page 1
Your Apria
Sleep Therapy
User Guide For
ResMed AirSense
™
11
Use this QR link to
our Sleep Apnea page
for more information
Page 2

WELCOME
Thank you for choosing Apria Healthcare as your home medical
provider. You are receiving this package because your doctor has
diagnosed you with sleep apnea and prescribed Positive Airway
Pressure therapy. Positive Airway Pressure therapy—also known
as PAP therapy or sleep therapy—helps millions of users feel more
energized and refreshed.
We are excited to accompany you on your journey to a better
night’s sleep!
Responsive. On Time.
Apria Delivers.
With over 275 branch locations in the U.S., Apria is ready to
support patients every day and in times of need with wellestablished emergency preparedness protocols in place. Apria
has the knowledge, experience, and ability to provide excellent
home health and equipment delivery services in all types of
environments.
Mobilized Eorts: Trained staff members available around the
clock to coordinate urgent and after-hours orders and carry out
emergency services
24/7 Delivery Services: Deliveries to homes, shelters, and other
areas pre- and post-catastrophic events
275+ Locations Nationwide: Local branches with teams ready to
serve patients, day or night
Extensive Inventory: Home oxygen therapy and respiratory
services, sleep therapy and supply refills, non-invasive ventilation
therapy, and negative pressure wound therapy
Care is just around the corner.
Page 3

Make sure your home address can be easily seen from the street
during both day and night.
If you are expecting a night delivery or visit, turn on the porch
light. Check to see that your address numbers are easy to spot
and read from the street. This will allow all Apria Healthcare and
emergency services to locate your residence easily.
Follow Emergency and Natural Disaster Instructions.
In the event of an emergency or natural disaster, follow the radio
or television instructions of your local authorities.
Overview
Your doctor has prescribed PAP therapy because you have been
diagnosed with sleep apnea. Sleep apnea occurs when a person
repeatedly stops breathing for 10 or more seconds at a time while
sleeping. These events may occur hundreds of times throughout
the night, causing oxygen levels in the blood to drop, putting
stress on the heart. If left untreated, sleep apnea is linked to many
other serious conditions like high blood pressure, diabetes, heart
disease, and stroke.
This guide contains easy step-by-step instructions for using your
PAP equipment, and is designed to help you benefit from therapy
as soon as your equipment arrives. Please watch the sleep apnea
video on the enclosed DVD and review the manufacturer’s user
guides along with the other educational materials that were
included with your equipment. The sleep apnea video can also be
found on Apria Healthcare’s website at apria.com/resource-center
in the “Video Library” section located at the bottom of the screen.
Additional information is also available at apria.com/sleep-apnea.
Your Device and Settings
A licensed Apria clinician has programmed your PAP machine
with the settings prescribed by your physician. If your doctor
recommends changes to your PAP settings, please notify Apria
Healthcare immediately so that the clinician can make any
necessary adjustments.
Page 4
STEP 1
GET STARTED
Start your therapy tonight so you can feel refreshed in the morning.
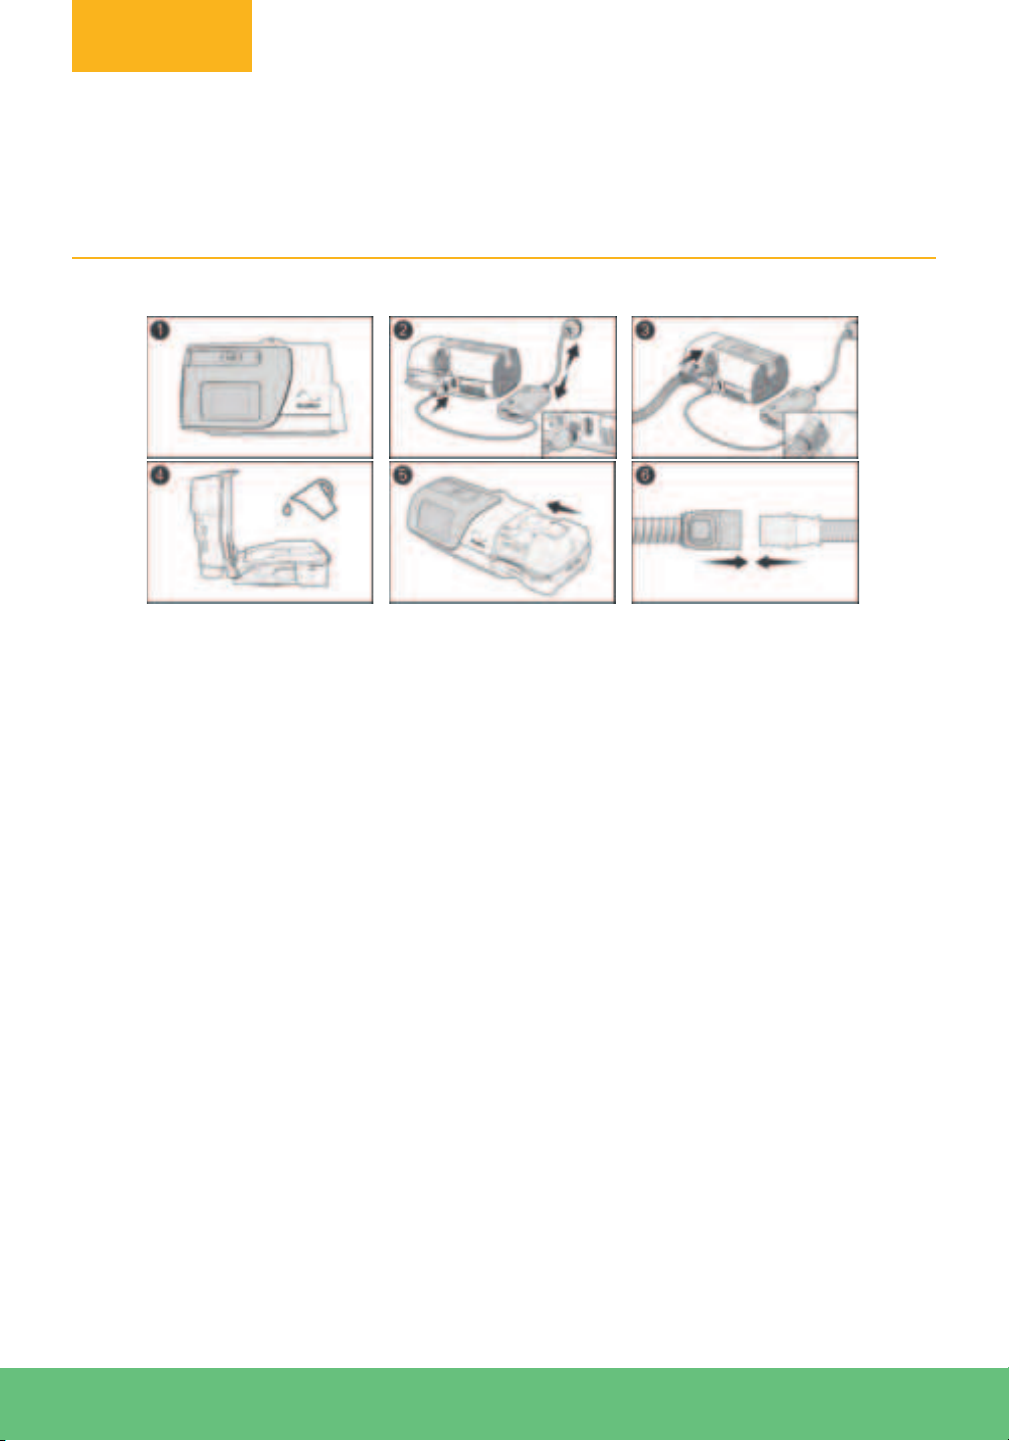
To set up the device:
1. Place the device on a stable level surface.
2. Connect the power cord into the power inlet at the rear of the device. Connect one
end of the power cord into the AC adaptor and the other end into the power outlet.
Ensure the device is set up and connected to power to enable settings to be applied
wirelessly to the device if required.
3. Connect the air tubing firmly to the outlet connector at the rear of the device.
4. Open the humidifier tub and fill it with distilled water up to the maximum water level
mark. The humidifier tub must be removed from the device before adding water. The
humidifier tub has a maximum capacity of 380 mL.
5. Close the humidifier tub and insert it into the side of the device.
6. Connect the free end of the air tubing firmly onto the assembled mask.
See the mask user guide for detailed information.
Recommended masks for use with this device are listed on ResMed.com.
Note:
• Do not insert any USB cable into the AirSense 11 device or attempt to plug the AC
adaptor into a USB device. This may cause damage to the AirSense 11 device or
USB device.
• The electrical connector end of the heated air tubing is only compatible with the air
outlet at the device end and should not be fitted to the mask.
• Do not use electrically conductive or anti-static air tubing.
4 | STEP 1: GET STARTED Questions? Call 888.452.4363
Page 5
STEP 2
GET FAMILIAR
WITH YOUR PAP
EQUIPMENT
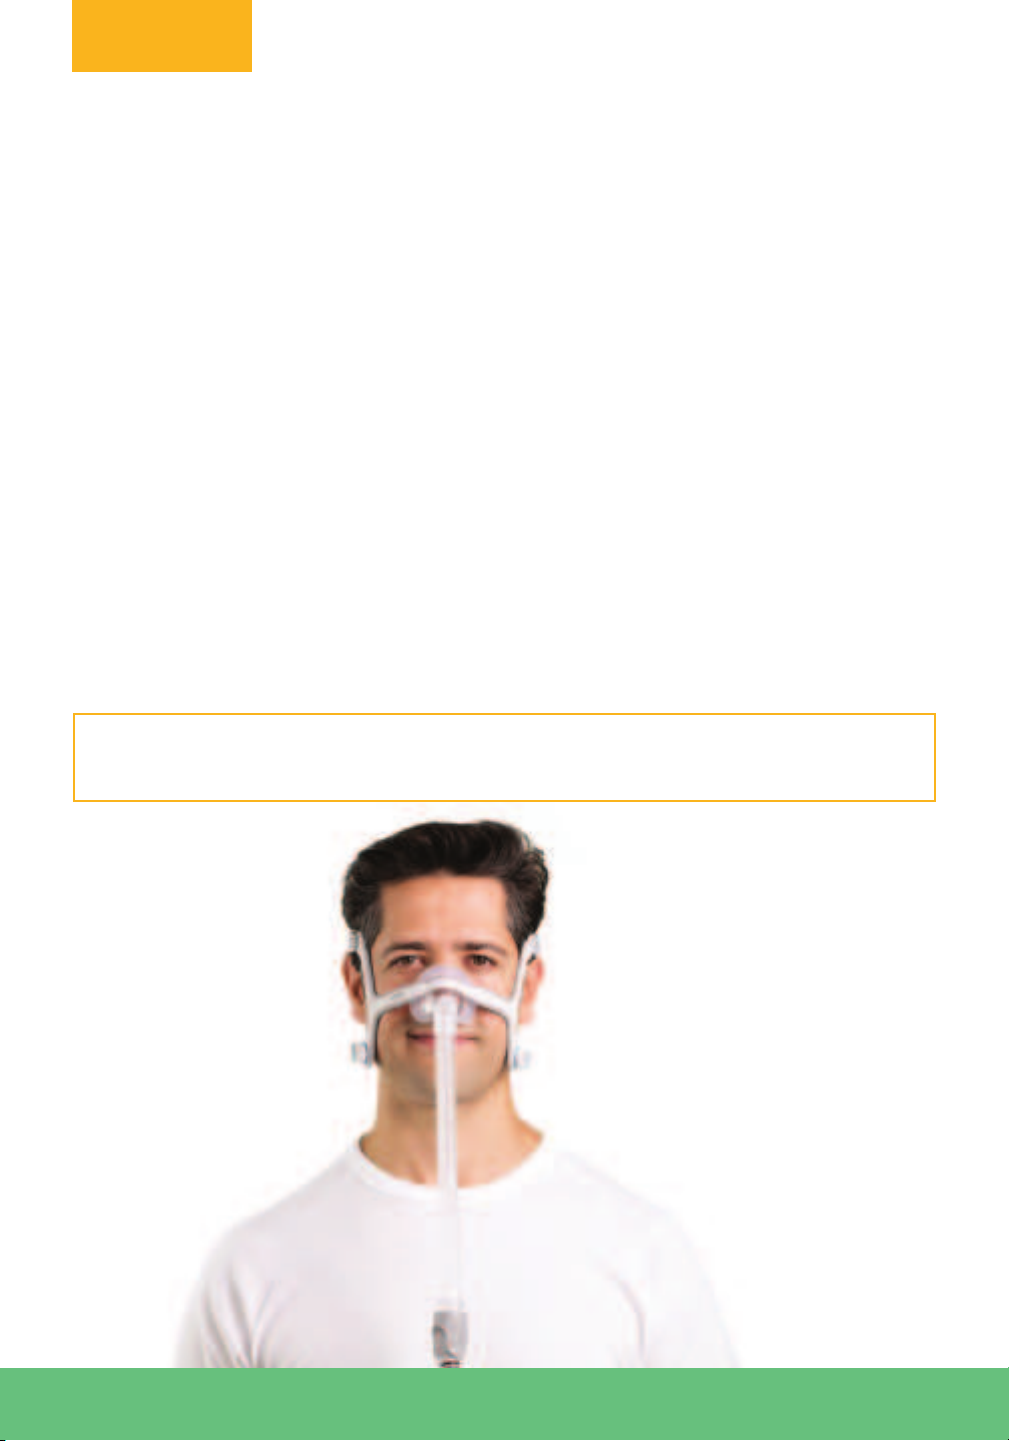
If your doctor prescribed a specific mask and size, follow the fitting instructions
provided by the manufacturer, then proceed to Step 3. If you received a mask with
multiple cushions, follow the instructions below and on the next page.
There is a mask cushion currently attached to the frame of your mask. This size fits
most patients. Once you begin therapy, if your mask is leaking or feels uncomfortable,
try removing the existing cushion and replacing it with a different size cushion. If you
are between sizes, it is best to use the larger cushion. Use the fitting template (for nasal
mask and full-face mask) and/or the manufacturer’s instructions included with your
mask for help.
myAir™ is a smartphone app that guides you through the setup process.
See page 14 of this booklet for more information.
Questions? Call 888.452.4363 STEP 2: GET FAMILIAR WITH YOUR PAP EQUIPMENT | 5
Page 6
1.
2.
3.
4.
5.
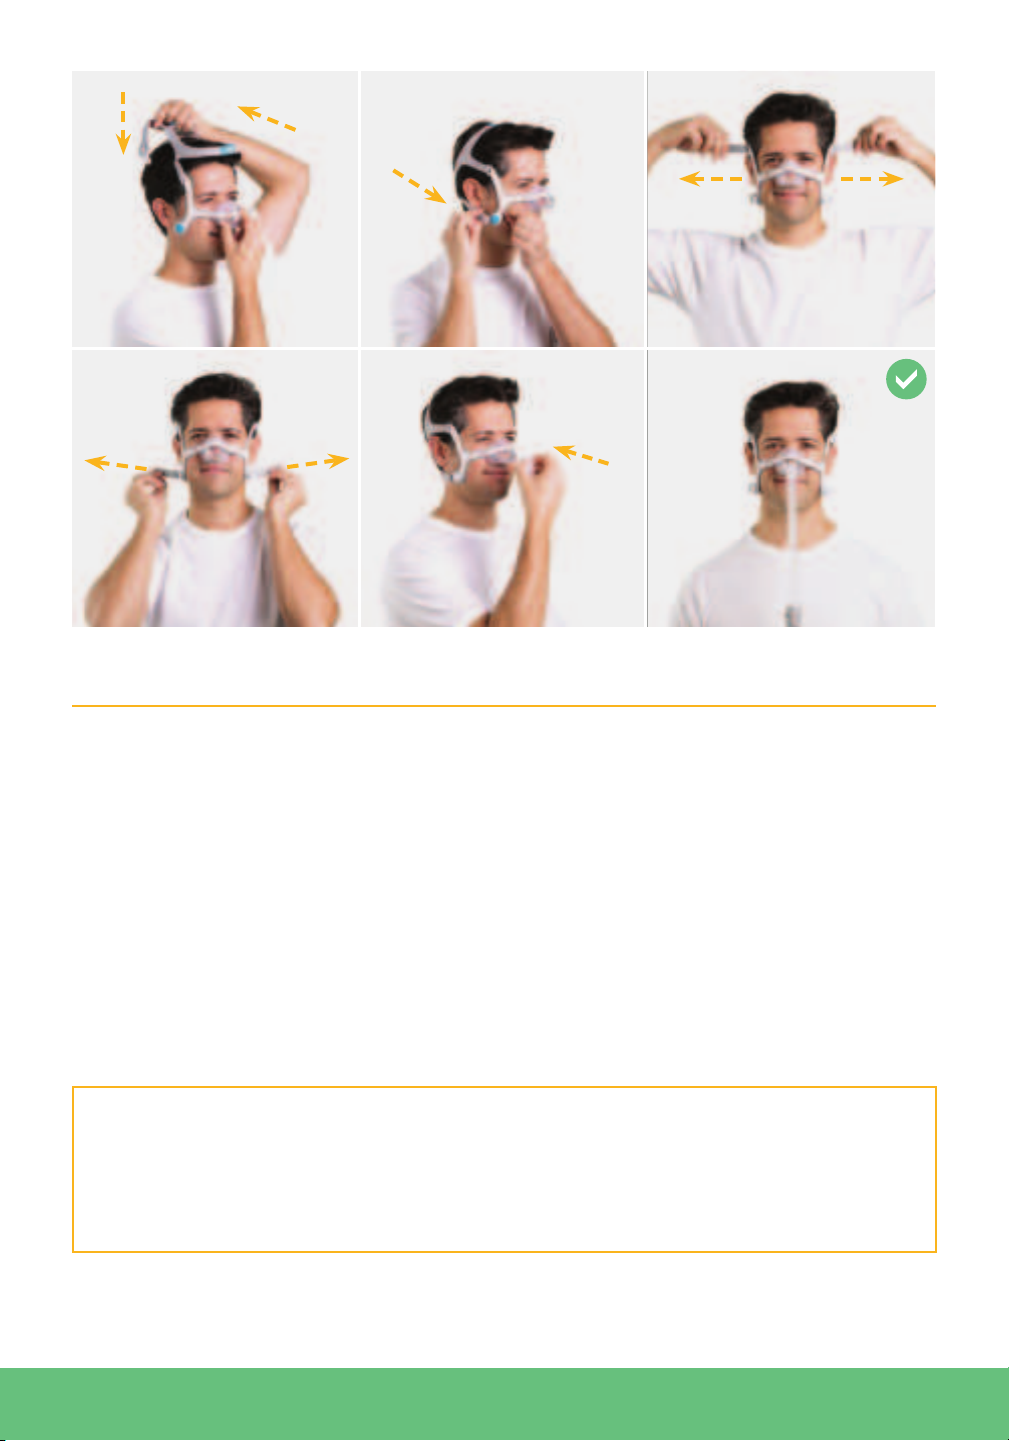
Nasal Mask
1. Release the lower strap magnets from the frame of the mask. Make sure the logo on
the headgear is facing outward. While holding the mask against your face, pull the
headgear over your head.
2. Position the lower straps so they both sit below the ears. Bring each of the magnets
up to meet their corresponding clips on the frame.
3. Adjust the fastening tabs on the upper straps until the mask feels even and stable.
Do not overtighten. Reattach the fastening tabs.
4. Repeat Step 3 with the lower straps. Reattach the fastening tabs.
5. Connect the hose to the front of the mask. Ensure that the nasal mask fits securely
over your nose. It is normal to feel some air escaping through the small air vents on
the elbow of the hose.
Please refer to the manufacturer’s instructions for additional information on topics,
such as:
• How to properly remove your mask
• How to remove and change the mask cushion
• How to adjust the length of the mask straps
6 | STEP 2: GET FAMILIAR WITH YOUR PAP EQUIPMENT Questions? Call 888.452.4363
Page 7
2.
3.1.
4.
5. 6.
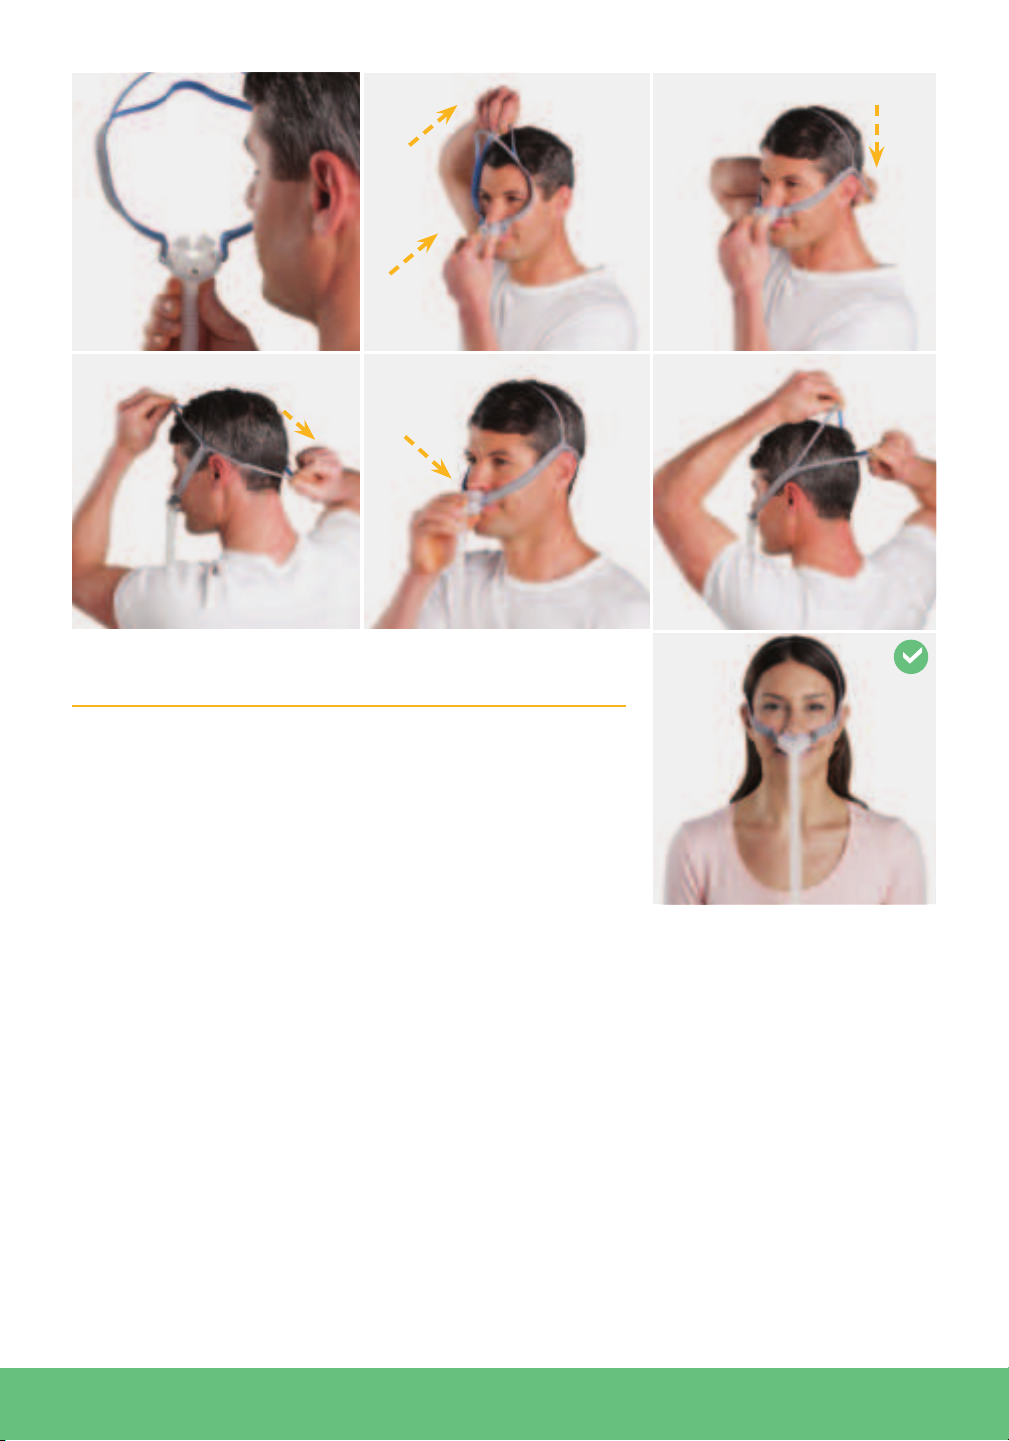
Nasal Pillow Mask
1. Hold the pillows away from your nose with the
left (L) and right (R) indicators correctly facing
towards you.
2. Guide the nasal pillows into your nostrils.
3. Pull the headgear over your head by holding the
bottom strap and stretching it around the back of
your head.
4. Adjust the top and bottom straps. The top strap should fit comfortably on the top of
your head.
5. Ensure that the nasal pillows fit securely into your nostrils with both pillows
positioned upright. If not, move the mask away from your face and then place it
back again.
6. To achieve a comfortable fit, adjust the straps. Spread the straps apart to loosen,
or draw them closer together to tighten.
7. If the headgear comes with a buckle, adjust the headgear by pulling the headgear
through the buckle to fix mask leaks. Adjust only enough for a comfortable seal
and do not over-tighten. The headgear may need to be adjusted as it can stretch
over time.
Questions? Call 888.452.4363 STEP 2: GET FAMILIAR WITH YOUR PAP EQUIPMENT | 7
Page 8
2.
3.1.
4.
5. 6.
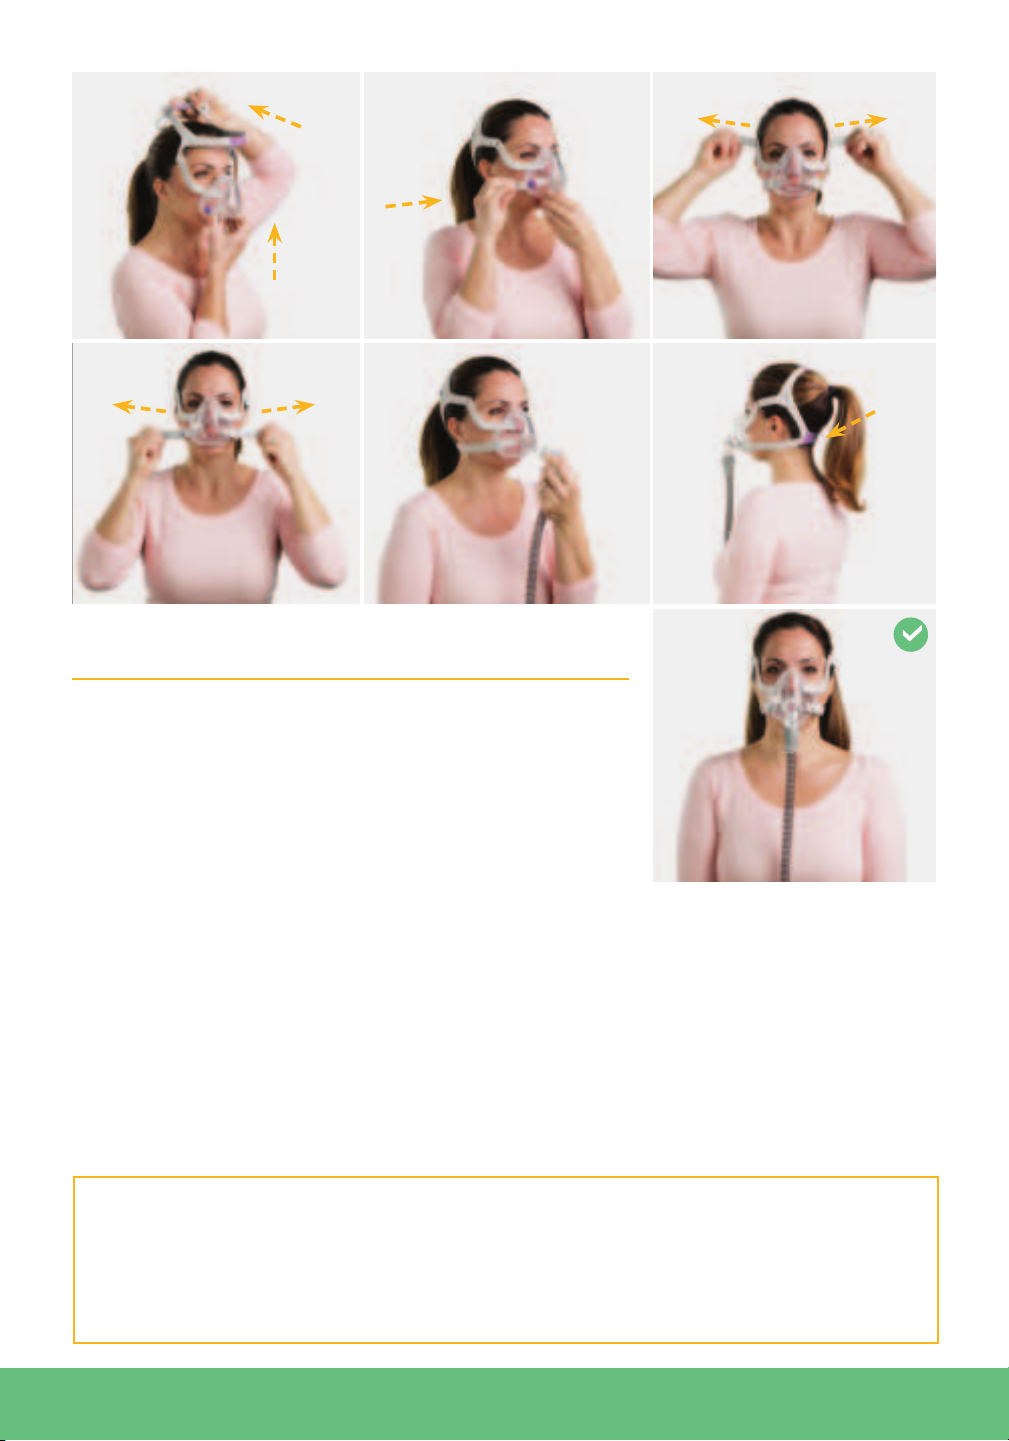
Full Face Mask
1. Twist and pull both magnetic clips away from
the frame. With the logo on the headgear facing
outward, hold the mask against your face and pull the
headgear over your head.
2. Bring the lower straps below your ears and attach the
magnetic clip to the frame.
3. Undo the fastening tabs on the upper headgear
straps. Pull the straps evenly until the mask is stable and positioned as shown in the
illustrations. Reattach the fastening tabs.
4. Undo the fastening tabs on the lower headgear straps. Pull the straps evenly until the
mask sits firmly on the chin and reattach the fastening tabs.
5. Connect the air tubing from your device to the elbow. Attach the elbow to the mask
by pressing the side buttons and pushing the elbow into the mask.
6. To achieve a comfortable fit, readjust the straps. Evenly apply only enough tension so
that a seal is achieved.
Please refer to the manufacturer’s instructions for additional information on topics,
such as:
• How to properly remove your mask
• How to remove and change the mask cushion
• How to adjust the length of the mask straps
8 | STEP 2: GET FAMILIAR WITH YOUR PAP EQUIPMENT Questions? Call 888.452.4363
Page 9
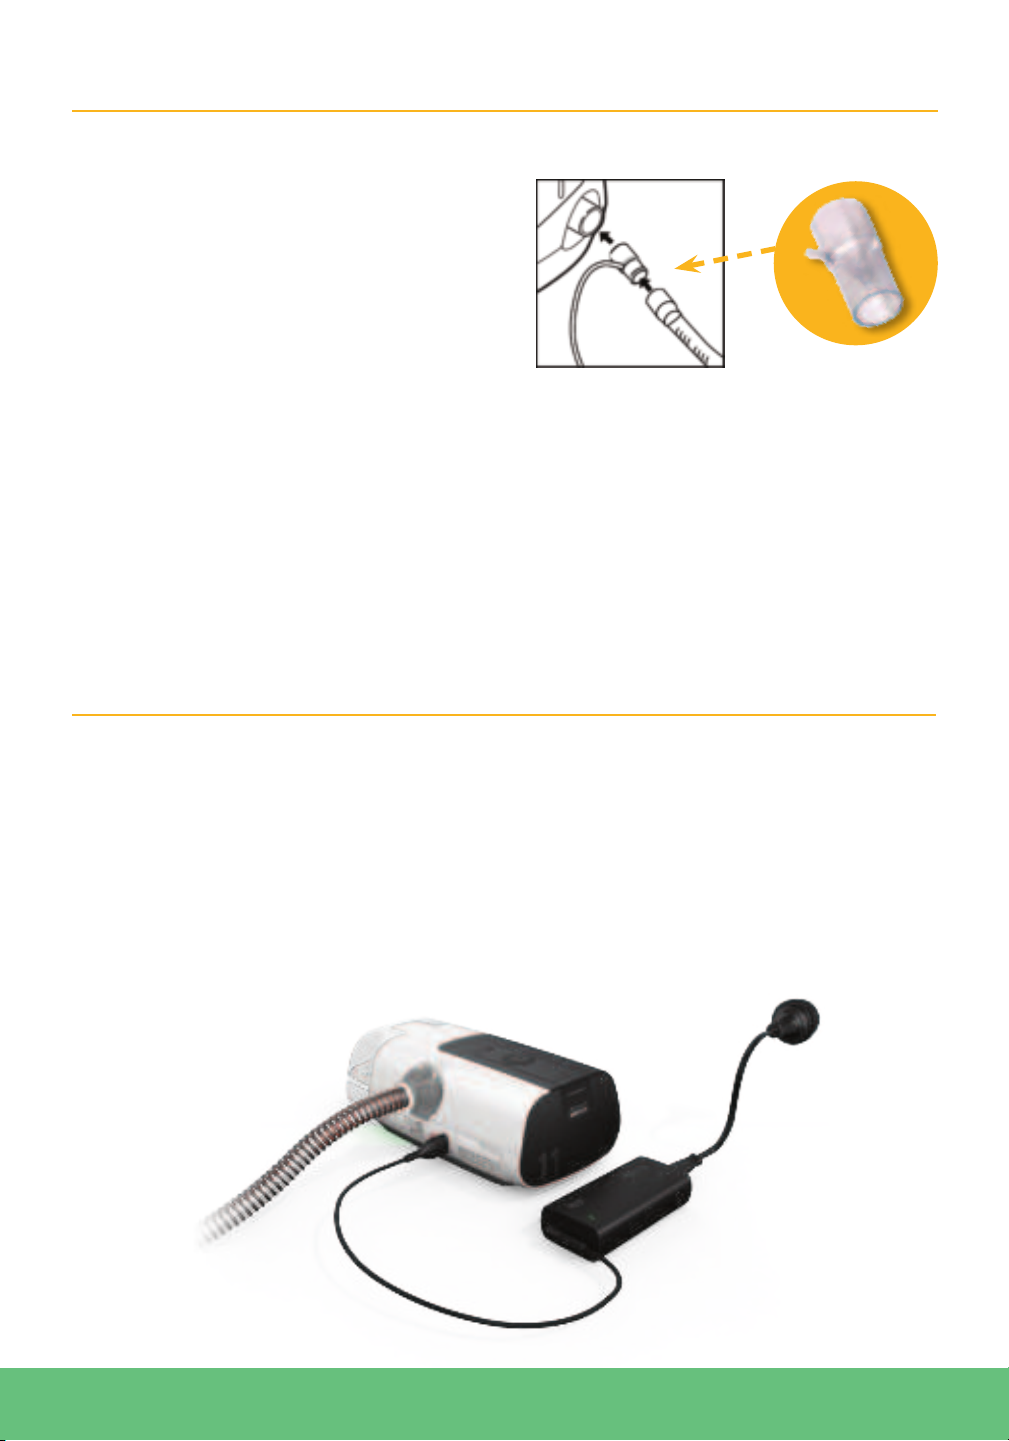
How To Attach Oxygen To Your PAP Machine
If you are using non-heated tubing,
and you are also using prescribed
oxygen, follow these instructions.
Attach the oxygen tee adapter that was
included in the box to your PAP machine.
Next, attach the large-bore PAP tubing to
the oxygen tee adapter. Finally, connect
the small-bore oxygen tubing to the
oxygen tee adapter.
For detailed instructions on oxygen use, you should also review the PAP and oxygen
manufacturer’s user guides included in your package.
IMPORTANT SAFETY NOTE: If you are using prescribed oxygen with your PAP device, be sure to observe all
the fire and safety rules associated with the use of oxygen. Follow this sequence of steps when turning your
oxygen on and off. 1. Always turn your PAP machine ON before turning ON the oxygen flow from your oxygen
source. 2. Always turn OFF the oxygen flow from your oxygen source before turning OFF the PAP machine.
Oxygen Tee Adapter
ClimateLineAir 11
The ClimateLineAir 11 is a heated tube that delivers air to a compatible mask. When used
with the device tub, ClimateLineAir 11 heated air tubing allows you to use the Climate
Control feature.
ResMed’s Climate Control solution is designed to offer relief from dryness and congestion.
When using ClimateLineAir tubing, your device will automatically default to Climate
Control Auto when you plug the tubing into the machine (unless your doctor has
prescribed a specific heat and humidity setting.)
Questions? Call 888.452.4363 STEP 2: GET FAMILIAR WITH YOUR PAP EQUIPMENT | 9
Page 10
Climate Control
Climate Control is designed to make therapy more comfortable by enabling constant
temperature and maintaining humidity. This feature:
• Delivers comfortable humidity level and temperature during therapy
• Maintains the set temperature and relative humidity during sleep to prevent
dryness in the mouth
• Can be set to either Auto or Manual
• Is only available when both the ClimateLineAir and HumidAir™ tub are attached
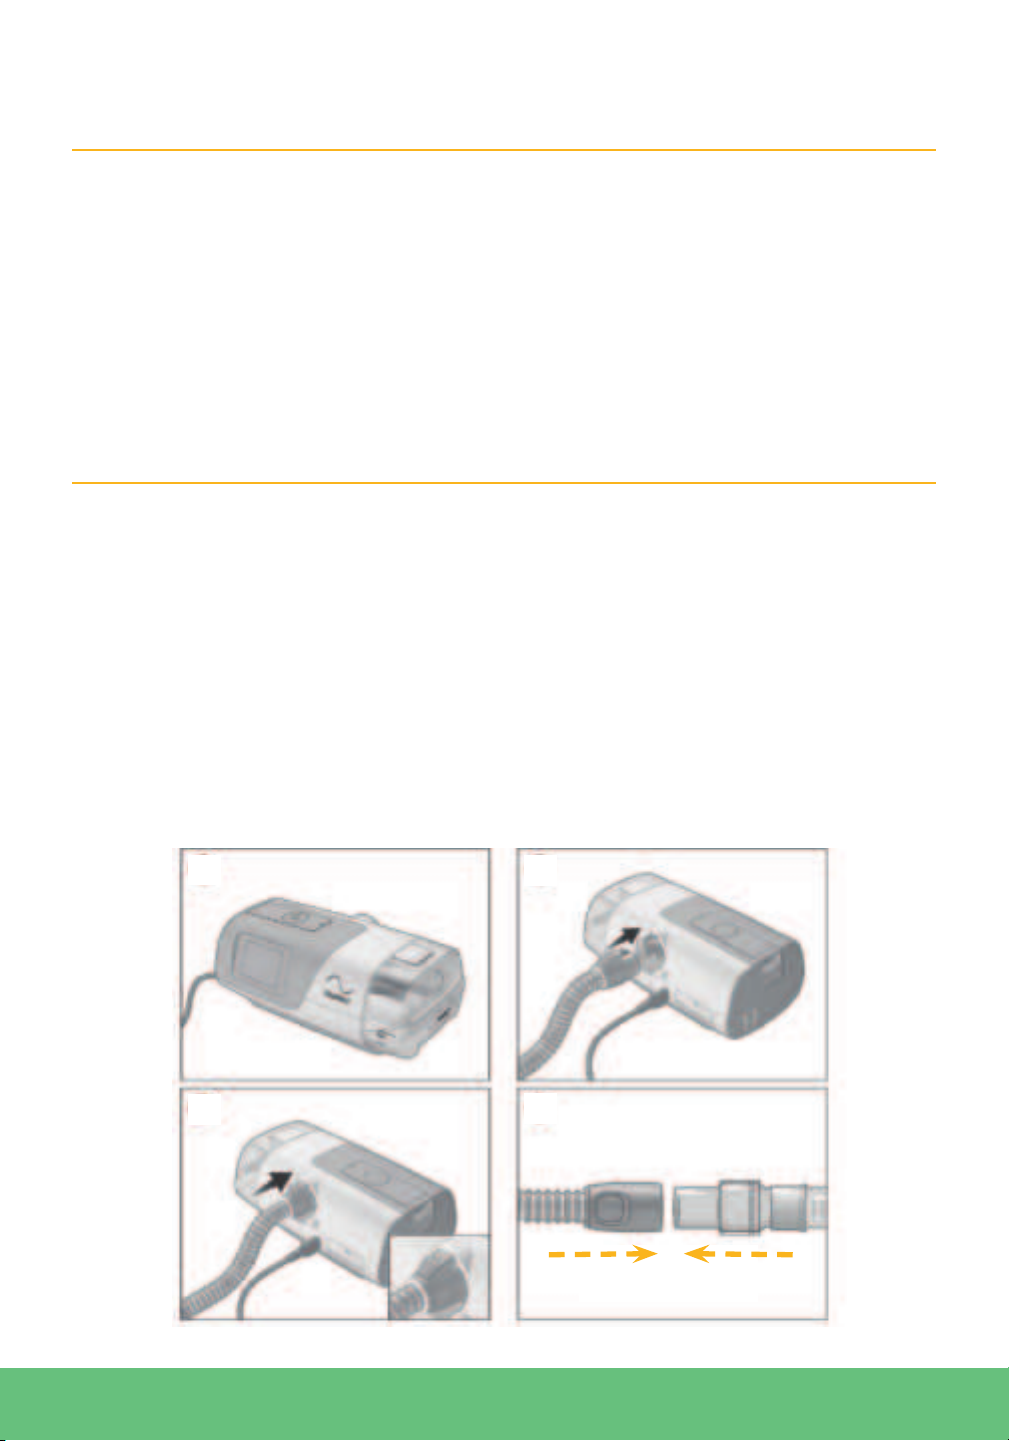
Setting Up the Device and Tubing
1. Make sure the device is turned on.
2. Hold the cuff of the heated air tubing and line up the tubing with the outlet connector
at the rear of the device.
3. Push the cuff firmly into place. ClimateLine connected will briefly display on the
device screen.
4. Connect the assembled mask to the free end of the heated air tubing.
Note: The electrical connector end of the heated air tubing is only compatible with the air
outlet at the device end and should not be fitted to the mask.
1. 2.
4.3.
10 | STEP 2: GET FAMILIAR WITH YOUR PAP EQUIPMENT Questions? Call 888.452.4363
Page 11
STEP 3
START YOUR
PAP MACHINE
To Start Therapy
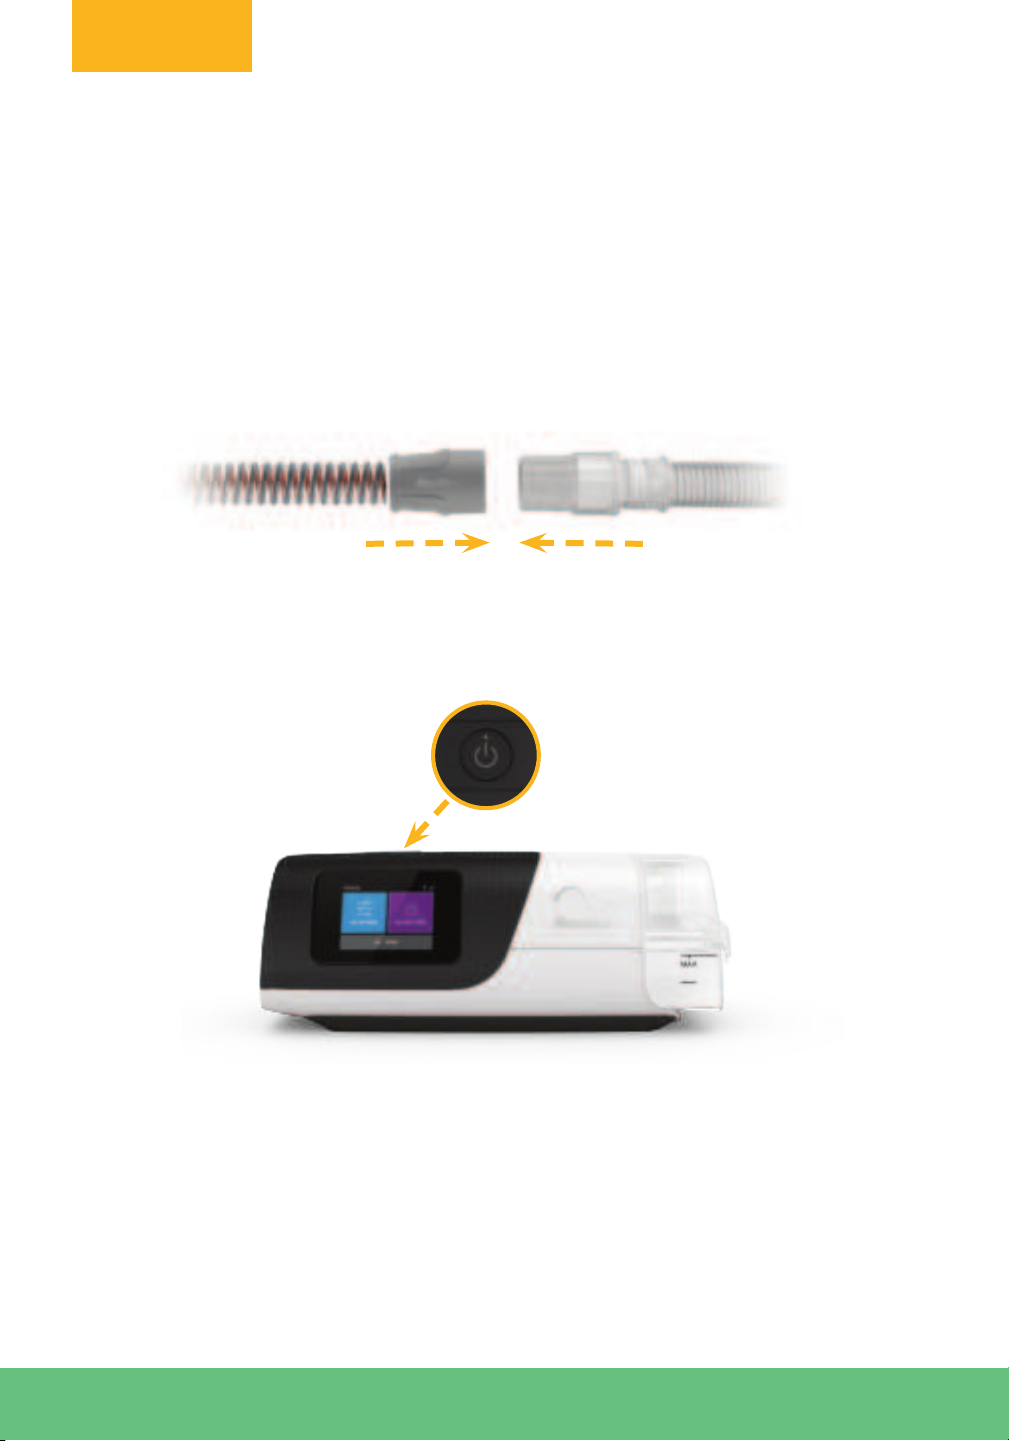
1. Fit your mask and put it on.
2. Connect the tubing to the mask.
3. Lie down and take four deep breaths. The machine should connect automatically.
If you do not hear the machine start, press the Start Therapy/Standby button.
Relax and begin to take slow breaths through your nose.
4. Check for air leaks. Small leaks are acceptable. If large leaks occur, try the following:
• Grasp the mask frame and lift it away from your face. The cushions should
also lift off your face. Lightly place the mask back on your face
• If large leaks still exist, adjust the headgear. If the headgear is either too tight or
too loose, it can cause leaks
• Additional tips for managing mask leaks are provided on the next page.
You should also review the manufacturer’s user guides provided in your package.
Questions? Call 888.452.4363 STEP 3: START YOUR PAP MACHINE | 11
Page 12

Helpful Tips
For Nasal and Full Face Masks
• To resolve leaks at the upper part of the mask, adjust the upper headgear straps.
• For leaks at the lower part, adjust the lower headgear straps.
• When adjusting straps, loosen or tighten both the left and right straps so that
adjustments are made evenly.
• Adjust only enough for a comfortable seal.
• The upper strap adjustment is the key to seal and comfort.
• Do not overtighten the lower straps. They mainly serve to keep the cushion in position.
For Nasal Pillows Masks
• Position the pillow cushion tips into your nostrils so they sit comfortably under your
nose without any gaps. Pull the mask away from your face, then place it back to get a
comfortable fit.
• Adjust the side straps evenly by pulling downwards; the mask should feel secure and
comfortable against your face. Do not overtighten.
• If leaks persist, try the next larger set of cushions.
• If the pillow is not staying in place in your nostrils, try the next smaller cushion size.
Handwashing Technique
Thorough handwashing must be done prior to all procedures. Contaminated, dirty hands are
one of the most common sources of infection.
1. Wet your hands thoroughly with warm water.
2. Use soap.
3. Scrub hands for 20 seconds using a rotary motion and friction. Wash:
• Back and palm of each hand
• Between all fingers
• Fingernails
Need a timer? Hum the “Happy Birthday” song from beginning to end twice.
4. Rinse your hands under the running water.
5. Dry on clean towel or with a paper towel.
For additional good health habits, visit our patient education section on
12 | HELPFUL TIPS Questions? Call 888.452.4363
apria.com.
Page 13

GET
COMFORTABLE
WITH YOUR
THERAPY
Use your PAP therapy during all hours of sleep, including during naps. Some people
may need up to one or two weeks to adjust to PAP therapy, but the benefits are well
worth it.
Ways to help you adjust:
• Try watching TV or reading while wearing your mask and headgear. Turn on the
PAP device for short periods of time while wearing your mask to get used to
the pressure.
• Use your equipment every night.
• Keep the device turned on for as long as you can tolerate, building up each night
until you have reached at least 4 hours per night.
• Keep practicing until you are using PAP therapy during all hours of sleep, including
during naps.
Questions? Call 888.452.4363 GET COMFORTABLE WITH YOUR THERAPY | 13
Page 14
TRACK YOUR
PROGRESS
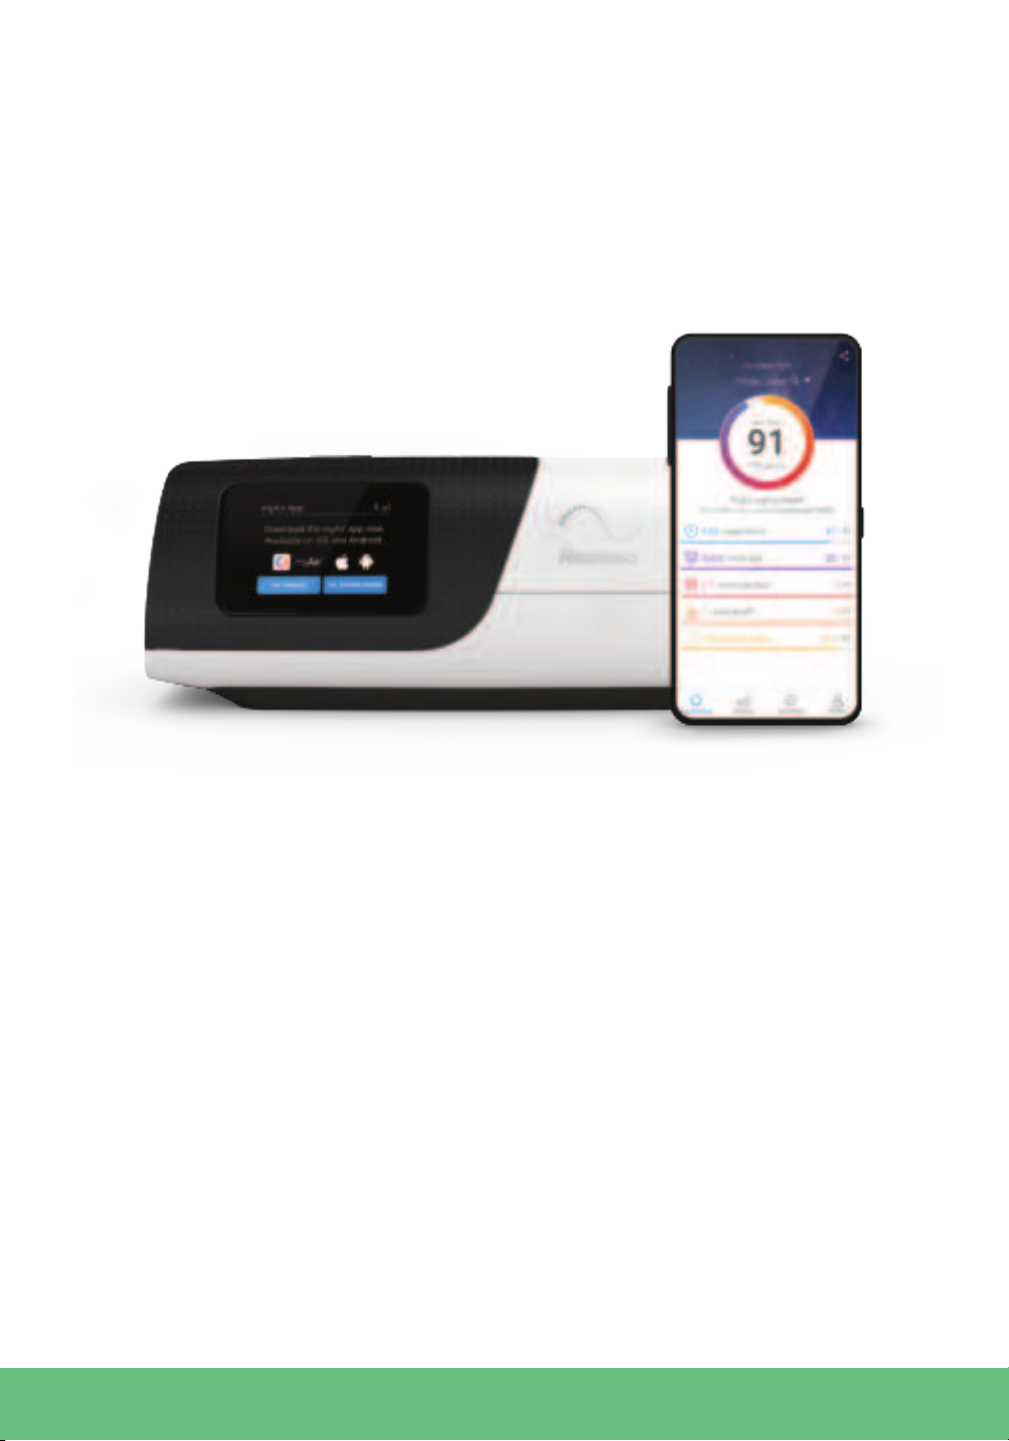
myAir™ is a smartphone app that guides you through the setup process. This includes
setup videos, mask fitting videos, trying therapy using the Test Drive Feature, and
tracking your sleep health progress.
The app is not required to set up or use the device.
The device can be used without the app, or if you choose you can decide to install the
app at a later time.
Connect to myAir™
1. Ensure your AirSense 11 device is set up correctly and plugged into a power source.
2. Launch the myAir app. Tap Continue.
3. Follow the prompts on the myAir app to complete the Bluetooth connection.
AirSense 11 is now connected to the app. The Bluetooth connection symbol appears
on the status bar to confirm the connection between the AirSense 11 device and the
smartphone.
4. Tap Done.
14 | TRACK YOUR PROGRESS Questions? Call 888.452.4363
Page 15
Questions? Call 888.452.4363
TRACK YOUR PROGRESS | 15
Page 16

16 | GET SUPPORT Questions? Call 888.452.4363
Page 17

GET SUPPORT
If you are having difficulties getting used to therapy, try using your machine’s “comfort
features” to help.
Do you have a dry nose or throat, or a runny nose?
Increase the humidity level.
Are there droplets of water or condensation inside your nose, mask, or tubing?
Decrease the humidity level. To change Humidity Level, see below.
Is the air pressure making it dicult for you to fall asleep?
Turn on the Auto Ramp or increase the Ramp Time.
Do you feel bloated?
You may be swallowing air. Turn on the Auto Ramp or increase the Ramp Time.
Do you feel like you are not getting enough air?
Turn the Ramp Time to “off.” To change Ramp Time, see below.
Do you have sore or dry eyes?
Adjust your mask or headgear. It may need to be repositioned. Refer to the instructions
provided in the manufacturer’s user guide for your mask. Also review Steps 2 and 3 in
this guide.
Are you experiencing redness on your face where the mask touches the skin?
Your mask may be too tight. Try adjusting your headgear. If redness persists, contact
Apria Healthcare.
Do you have nasal, sinus, or ear pain?
You may have a sinus or ear infection. Stop using your machine and contact
your doctor.
To update the setting for Ramp Time or Humidity Level, tap MY OPTIONS from the Home
screen, go down the list of options, and select the setting.
1. Tap Ramp Time or Humidity Level.
2. Tap the preferred setting.
3. Tap OK to save the change.
This information is intended for your general knowledge only and is not a substitute for medical advice or treatment
for a specific medical condition. Should you have any healthcare-related questions, please consult your doctor.
Questions? Call 888.452.4363
GET SUPPORT | 17
Page 18

CLEANING
YOUR PAP
EQUIPMENT
The following instructions are for home cleaning. Instructions for reprocessing devices
intended for multi-patient re-use can be found in the clinical guide.
You should clean the device, humidifier tub, air tubing, and outlet connector as described.
Daily:
1. Empty the humidifier tub and wipe it thoroughly with a clean disposable cloth.
Allow it to dry out of direct sunlight.
2. Refill the humidifier tub with distilled water.
Weekly:
1. Wash the components using one of the following options:
• Wash the humidifier tub, air tubing, and outlet connector in warm water using a
household dishwashing liquid. Components should not be washed in temperatures
higher than 149°F (65°C)
OR
• Wash the humidifier tub and outlet connector in a solution of 1 part vinegar and
9 parts water. The air tubing should be washed in warm water using a household
dishwashing liquid. The air tubing should not be washed in temperatures higher
than 149°F (65°C).
2. Rinse each component thoroughly in water.
3. Allow to dry out of direct sunlight or heat
4. Wipe the exterior of the device with a dry cloth.
Notes:
• The humidifier tub may be washed in a dishwasher on the delicate cycle (top shelf only).
• Do not wash the heated air tubing in a dishwasher or washing machine.
• The air filter is not washable or reusable.
For cleaning your mask, refer to the mask user guide for detailed instructions.
18 | CLEANING YOUR PAP EQUIPMENT Questions? Call 888.452.4363
Page 19

REPLACE
SUPPLIES
REGULARLY
Replace your sleep supplies regularly. This helps to ensure a good mask seal and
reduce buildup of bacteria, viruses, and allergens.¹ Ordering fresh, clean supplies to
replace your old items helps improve the comfort of your mask and maintains the
overall eectiveness of your therapy.
Recommended Replacement Schedule
Twice Monthly
nasal pillows
• Disposable filters
Please note that the frequency of resupply and your insurance’s coverage of supplies will
be governed by your insurance plan and may differ from the schedule provided above.
Once Monthly Every 6 MonthsEvery 3 Months
• Full-face mask cushions• Nasal mask cushions and
• Mask frame
• Tubing (standard or heated)
• Headgear and chin straps
• Humidifier water chamber
• Non-disposable filters
Source:
1. Horowitz A, Horowitz S, Chun C. CPAP Masks are Sources of Microbial Contamination. SleepHealth Centers, Div. of Sleep
Medicine, Brigham and Women’s Hospital, Harvard Medical School, Boston. APSS Poster; 2009.
Questions? Call 888.452.4363 REPLACE SUPPLIES REGULARLY | 19
Page 20

Apria’s customer service team of Kaiser
Permanente experts can be contacted 24 hours a
day, seven days a week:
888.452.4363
Apria is committed to safe, quality patient care.
We encourage you to report any concerns to your
local Apria Healthcare branch. If your concern
is not resolved, please contact the Patient
Satisfaction team at the number listed below.
800.260.8808
AirSense, ClimateLineAir, and myAir are trademarks and/or
registered trademarks of the ResMed family of companies.
©2021 Apria Healthcare Group LLC SLP-4333 08/21_v3
 Loading...