

Page 1

APRAMO ONE TM
CHILD CAR SEAT
GROUP 0+, I, II, III
www.apramo.co.uk
Page 2

Thank you for purchasing the APRAMO ONE ™ seat,
if you have any quesons regarding the installaon
and use of this seat, or require spare parts or
accessories, please contact our Customer Services
department.
Please take me to read this instrucon manual and
familiarise yourself with the seat before use.
CONTENTS
1. Important Informaon
2. Installaon Notes
3. Preparing the ONE ™ before Use
3.1 ISOFIX Set Up
3.2 Harness and headrest adjustment for Group 0+, I
3.3 Headrest adjustment for Group II, III
3.4 Recline funcon
3.5 360° rotaon funcon
.....................
.........................
..........
03-04
4. Rear Facing Installaon
4.1 Group 0+ with 5 point harness and ISOFIX+Top tether
4.2 Group 0+ with 5 point harness and vehicle belt
5. Forward Facing Installaon
5.1 Group I (9 - 18 kg)
5.1.1 With 5 point harness + ISOFIX + Top Tether
5.1.2 With 5 point harness + vehicle belt
5.2 Group II (15 - 25 Kg)
With 5 point harness + vehicle belt + Top Tether
5.3 Group II, III (15 - 36 Kg)
With vehicle belt
6. Removing the ONE ™ from the Vehicle
7. Removing the 5 Point Harness
8. Installing the 5 Point Harness
01
9. Care and Maintenance
02
9.1 Harness buckle maintenance
9.2 Cleaning the car seat covers
10. Applicable Car List .....................
.................
.............
......
..........
...........
..................
05-08
08-12
13
13-14
15-16
16-17
18-20
Page 3

1. Important Informaon
1. This child seat is suitable for children up to 36kg, (Group 0+, I, II, III – from birth to approximately 12 years of age).
2. Please follow the instrucons in this manual carefully, failure to follow the instrucons may affect your child’s safety.
3. This seat is suitable for use in vehicles fied with a 3 point retractable safety belt approved to ECE R16 or equivalent. Can also be
used with ISOFIX.
4. Never use this seat without the covers supplied. Do not replace the cover with any, other than those recommended by the
manufacturer as this may affect the safe use and performance of the seat.
5. Parts of this seat may become hot in warm weather. Shade your vehicle and the car seat from sunlight to avoid causing injury to
your child.
6. The car seat may incur wear and tear over several years use, if you require replacement parts, please contact our Customer
Service Department.
7. Ensure that any loose arcles are secured in the vehicle as these may present a hazard in the event of an accident.
8. Ensure that the seat is installed so that, under normal vehicle usage condions, no part can become jammed under, or between
any moveable seats, or in the vehicle door.
9. Do not modify, or add to the car seat in any way without the approval of a competent authority, or the manufacturer, as this will
void any warranty and may affect safety and performance.
10. Always ensure that the seat is securely fastened, even when unoccupied, a loose seat can cause injuries in the event of a collision.
11. Never leave your child unaended in the car seat.
12. Never use bleach, or other toxic cleaning fluids as these can cause illness.
13. Always replace any car seat that has been involved in an accident, however minor, as unseen damage may have occurred.
14. Do not use this car seat on a passenger seat fied with a frontal airbag.
15. The illustraons in this manual are for reference only, and may differ slightly from your seat model.
01
Page 4
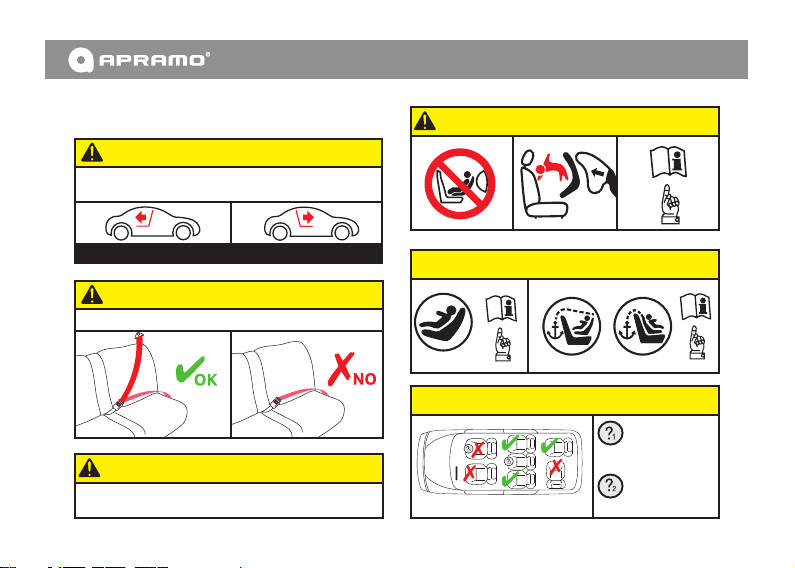
2. Installaon Notes
W A R N I N G
DO NOT USE FORWARD FACING BEFORE THE CHILD’S
WEIGHT EXCEEDS 9KG.
A I R B A G
GROUP 0+ (0-13KG)
GROUP I, II, III (9-36KG)
W A R N I N G
NEVER USE WITH A 2 POINT LAP BELT
W A R N I N G
NEVER USE ON A PASSENGER SEAT WITH A FRONTAL AIRBAG
This seat uses two fing methods:
ISOFIX SYSTEM AND TOP TETHER WHICH IS SUITABLE FOR
GROUP 0+, I (0-18KG)
CLASS B1, E
3-POINT VEHICLE BELT WHICH IS SUITABLE FOR
GROUP 0+, I, II, III (0-36KG)
Can not be used
in the passenger
seat with the
airbag acvated
Only suitable for
seats with a
3-point
vehicle belt.
02
Page 5

3. Preparing the ONE ™
before Use
3.1 ISOFIX Setup
1. If your vehicle does not have ISOFIX guide socket, please
insert the guide socket (02) into the ISOFIX anchor (01) (fig.1)
Tip: ISOFIX anchors are located between the backrest and the
seat cushion of your vehicle.
2. Pull the ISOFIX strap loop (03) out as far as it will go. (fig.2)
1 2
03
NOTE: The shoulder belts (05) must not run behind the back of
the child or at ear height or above the ears.
3
07
08
06
05
04
4
3.2 Harness and headrest adjustment for Group 0+, I, II
( GII can be used with 5-point harness)
1. Press down on the central adjuster, and pull the shoulder
straps towards you (05) (Do not pull on the shoulder pads
(06)), extending the 5 point harness as far as it will go. (fig.3)
2. Pull upwards on the adjusng ring (07), whilst pulling up, or
pushing down the headrest to the required posion (08). The
headrest (08) should be posioned so that the shoulder straps
fit level with the child’s shoulders (fig.5)
NOTE: The shoulder straps (05) must be correctly posioned
as shown in fig.5
Adjust the headrest (08) correctly to protect the child safely.
The height of headrest (08) is to make the shoulder belts (05)
to be same level with the shoulder of child. (fig.5)
03
08
05
5
Page 6
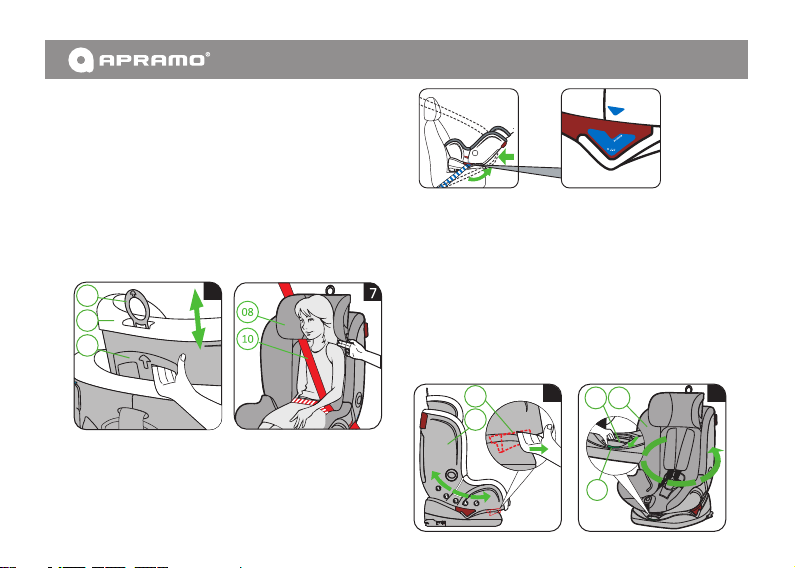
3.3 Headrest adjustment for Group II, III
GROUPE
+
GROUPE 0+
GROUPE
0+
1. Using the release handle (09), adjust the headrest(08) up or
down as required, then release the handle and the headrest
will lock into place automacally. (fig.6)
2. If required, the headrest (08) can be further adjusted by
using the adjusng ring (07), please refer to secon 3.2 for
details.
3. The headrest (08) is in the correct posion when the
diagonal poron of the vehicle seatbelt (10) sits on the child’s
shoulders, a gap of about 2 fingers width between the child’s
shoulders and the lowest edge of the headrest. (fig.7)
07
6
08
09
3.4 Recline Funcon
1. Using the release mechanism (11), adjust the seat (12) to
the desired posion then release the mechanism and the
seat will lock into place automacally. (fig.8)
CAUTION: Please adjust the seat as fullest recline posion
when rearward facing is in use for the child. The fullest
recline posion of the seat is that the triangular sign on
seat body will match with the groove on the red belt guide.
3.5 360° Rotaon funcon
1. Press the release buon (13) to release the seat (12), and
then rotate the seat to the desired posion. Release the
release buon (13) to lock the seat (12) into place
automacally. (fig.9)
CAUTION: The child seat can only be used in the forward or
rearward facing posion when travelling. Always ensure that
the indicator (14) on the base is green aer rotang the seat,
and that the seat has locked into posion correctly.
11
8
13
12
12
14
9
04
Page 7
4. Rear Facing Installaon
4.1 Group 0 (birth to approx 9 kg) with 5 Point Harness and
ISOFIX+top tether
4.1 Group 0 (birth to approx 9 kg) with 5 Point Harness and top
tether
4.1.1 Prepare the Isofix ( see secon 3.1)
4.1.2 Ensure that the 5 point harness is correctly installed (refer
to secon 8)
4.1.3 Ensure that the 5 point harness is correctly adjusted (refer
to secon 3.2)
4.1.4 Adjust the seat to the fullest recline posion ( see secon
3.4) and ensure that the recline mechanism is securely locked.
4.1.5 Rotate the seat to the rearward facing posion (see secon
3.5) and ensure that the rotaon mechanism is securely locked.
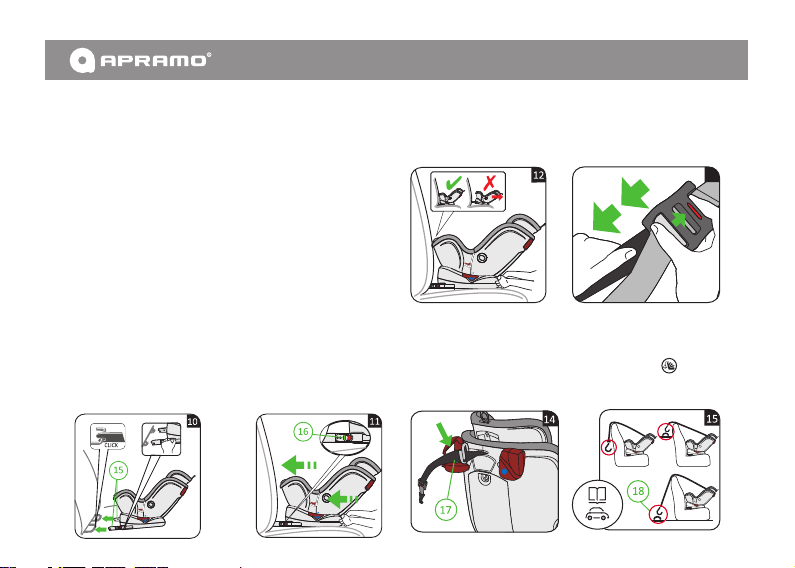
4.1.6 Place the child car seat on the vehicle seat facing the rear
of the vehicle against the direcon of travel (fig 10)
4.1.7 Insert the ISOFIX connectors (15) into the guide socket (02)
unl an audible click is heard and the indicators (16) are green
(fig 10 and 11)
CAUTION! The ISOFIX connectors (15) are secured only when
both indicators (16) are completely green.
05
4.1.8 Push the seat back unl it is in contact with the backrest of
the vehicle seat (fig 12)
4.1.9 Depress the release buon of the top tether adjuster to
release the strap (fig13)
13
4.1.10 Insert the top tether strap into the lockoff pics (17)
(fig 14)
4.1.11 Hook the snap hook (18) onto the top tether anchorage
point in your vehicle. To find this, look for this sign in your
vehicle, or check in your vehicle handbook, or with your vehicle
dealer.
Page 8
4.1.12 Pull on the free end of the top tether strap unl the
22
06
21
21
20
06
05
19
19
18
20
indicator shows green (fig 16)
4.1.13 Follow the steps in secon 4.1.14 to secure your child in
the seat with the 5 point harness.
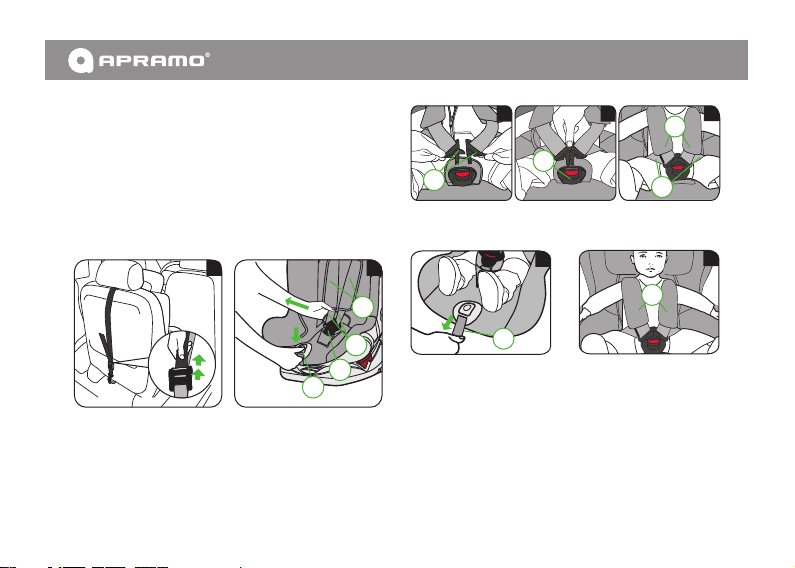
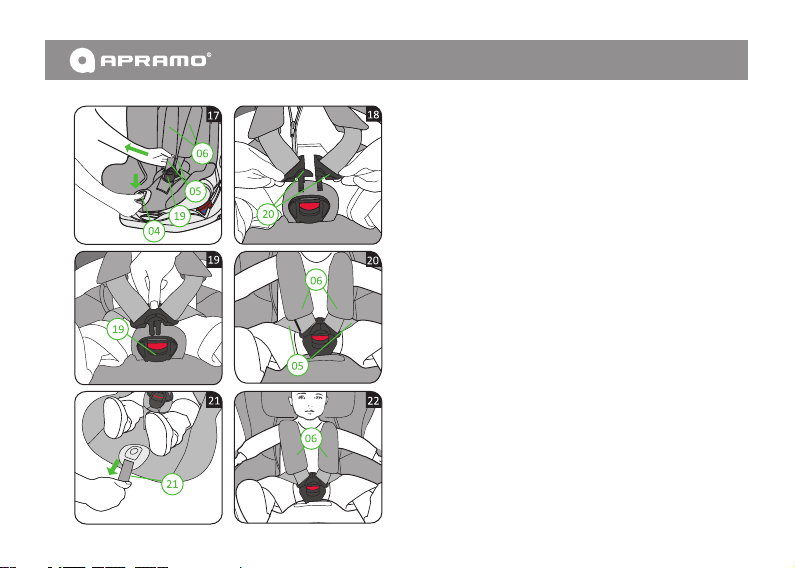
4.1.14 Using the 5 point harness
1. Depress the red buon (19) to release the buckle and press
the central adjuster (04) to pull out the shoulder straps (05)
(Do not pull on the shoulder pads(06)) (fig17)
2. Place your child in the seat.
3. Ensure that your child's back is lying flat against the backrest
of the car seat.
16
4. Guide the two buckle latches together (20) and insert into the
buckle (19) There will be an audible click when the buckle is
secured (fig 18,19,20)
5. Pull outwards on the adjuster strap (21) unl the harness is
snug against your child's body. Ensure that the harness straps
are not twisted at any point (fig. 21,22)
17
06
05
19
04
For your child’s safety, ensure that the following checks are
carried out before every journey:
• The ISOFIX connectors are securely engaged in the anchors
and the indicators are both completely green.
• The child seat is placed up against the backrest of the
vehicle seat.
• The Top Tether strap is ght and the indicator is green.
• The 5-point harness is fied snugly to the child.
• The shoulder straps are not twisted.
• The shoulder straps sit in the correct posion on the child’s
shoulders.
• The harness buckle is properly secured.
06
Page 9

4.2 Group 0+ (birth to approx. 13kg)
with 5 point harness and vehicle belt
4.2.1 Ensure that the 5 point harness is correctly installed (refer
to secon 8)
4.2.2 Ensure that the 5 point harness is correctly adjusted (refer
to secon 3.2)
4.2.3 Adjust the seat to the fullest recline posion (see secon
3.4) and ensure that the recline mechanism is securely locked.
4.2.4 Rotate the seat to the rearward facing posion (see secon
3.5) and ensure that the rotaon mechanism is securely locked.
4.2.5 Place the child car seat on the vehicle seat facing the rear
of the vehicle (against the direcon of travel) (fig.23)
4.2.6 To use the ISOFIX, see secon 4.1.1 for instrucons.
4.2.7 Pull out the vehicle seat belt as much as possible, and then
insert the lap poron of the seatbelt through the belt guides on
the base of the seat (22). Fasten the vehicle seat belt buckle (23)
and pull to remove any slack from the belt webbing. (fig. 24)
07
4.2.8 Pass the diagonal poron of the vehicle seatbelt through
the 2 belt guide rings in the lock off pics (17). (fig. 25)
4.2.9 Pull the seat belt webbing upwards as far as possible to
remove any slack, ensuring that no part of the vehicle seatbelt
is twisted, and close up the lockoff. (fig.26)
4.2.10 Using the 5 point harness
1. Depress the red buon (19) to release the buckle, and
press the central adjuster (04) to pull out the shoulder
straps (05) (Do not pull on the shoulder pads(06)) (fig.17)
2. Place your child in the seat.
3. Ensure that your child’s back is lying flat against the
backrest of the seat.
4. Guide the two buckle latches (20) together and insert into
the buckle (19) There will be an audible click when the buckle
is secured. (fig.18, 19, 20)
5. Pull outwards on the adjustor strap (21) unl the harness
is snug against your child’s body.
Ensure that the harness straps are not twisted at any point.
(fig. 21, 22)
Page 10
For your child’s safety, ensure that the following checks are
carried out before every journey:
• The vehicle belt is passed through both of the belt guide
rings
• The vehicle seat belt is taut, remove any slack if necessary
and is not twisted.
• The seat is placed up against the back of the vehicle seat,
without a gap
• The 5 point harness is fied snugly to the child
• The shoulder straps are not twisted
• The shoulder straps sit in the correct positon on the child’s
shoulders
• The harness buckle is properly secured.
5. Forward facing installaon
5.1 Group I (9-18 kg approx.)
5.1.1 With 5 point harness + ISOFIX + Top Tether
1. Set up the ISOFIX fings (see secon 3.1)
2. Ensure that the 5 point harness is correctly installed (refer
to secon 8)
3. Ensure that the 5 point harness is correctly adjusted (refer
to secon 3.2)
4. Adjust the seat to the desired recline posion (see secon
3.4) and ensure that the recline mechanism is securely locked.
5. Rotate the seat to the forward facing posion (see secon
3.5) and ensure that the rotaon mechanism is securely locked.
6. Place the child car seat on the vehicle seat facing the front
of the vehicle (in the direcon of travel) (fig.27)
08
Page 11
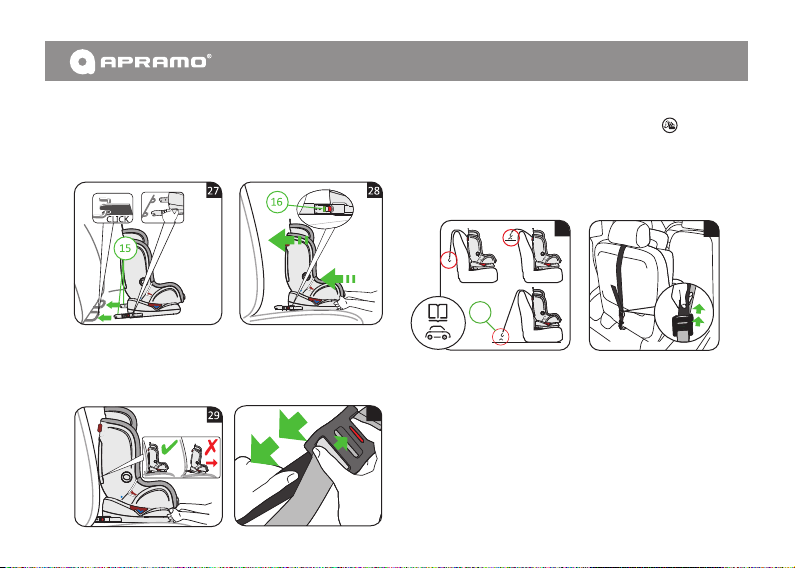
7. Insert the ISOFIX connectors (15) into the guide socket (02)
30
unl an audible click is heard and the indicators (16) are green
(fig. 27, 28)
CAUTION! The ISOFIX connectors (15) are secured only when
both indicators (16) are completely green.
8. Push the seat back unl it is flat against the backrest of the
vehicle seat, if necessary, remove the vehicle headrest to
achieve this. (fig. 29)
9. Depress the release buon of the top tether adjuster to
release the strap (fig.30)
09
10. Hook the snap hook (18) onto the Top Tether anchorage
point in your vehicle. To find this, look for this sign in your
vehicle, or check in your vehicle handbook, or with your vehicle
dealer. (fig.31)
11. Pull on the free end of the Top Tether strap ghtly unl the
indicator shows green (fig.32)
12. Follow the steps shown in secon 4.1.14 to secure your
child with the 5 point harness.
31
18
For your child’s safety, ensure that the following checks are
carried out before every journey:
• The ISOFIX connectors are securely engaged in the anchors
and the indicators are both completely green
• The child seat is sing flat against the backrest of the
vehicle seat
• The Top Tether strap is ght and the indicator is green
• The 5 point harness is fied snugly to the child
• The shoulder straps are not twisted
• The shoulder straps sit in the correct positon on the child’s
shoulders
• The harness buckle is properly secured
32
Page 12
5.1.2 Group I (9-18 kg approx.)
With 5 point harness + vehicle belt
1. Ensure that the 5 point harness is correctly installed (refer
to secon 8)
2. Ensure that the 5 point harness is correctly adjusted (refer
to secon 3.2)
3. Adjust the seat to the desired recline posion (see secon
3.4) and ensure that the recline mechanism is securely locked.
4. Rotate the seat to the forward facing posion (see secon
3.5) and ensure that the rotaon mechanism is securely locked.
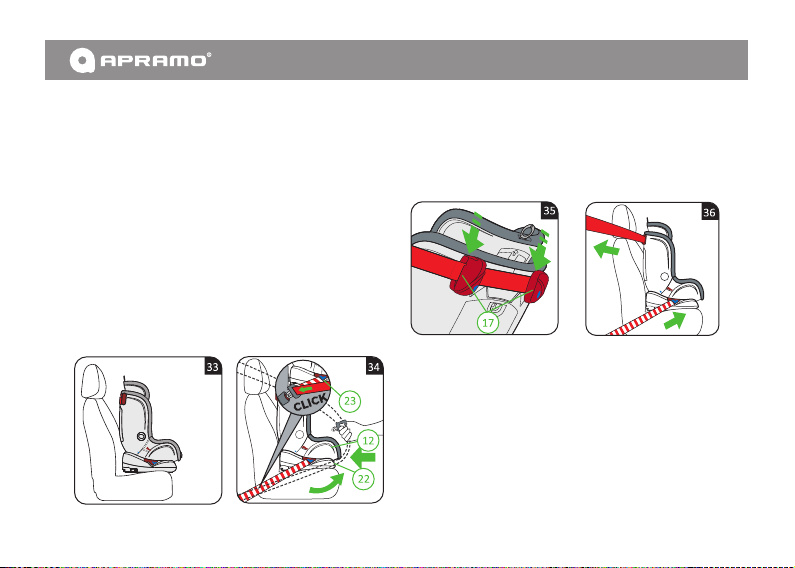
5. Place the child car seat on the vehicle seat facing the front
of the vehicle (in the direcon of travel) (fig.33)
6. Pull out the vehicle seat belt as much as possible, and then
insert the lap poron of the seatbelt through the belt guides
on the base of the seat (22). Fasten the vehicle seat belt buckle
(23) and pull to remove any slack from the belt webbing.
(fig. 34)
7. Pass the diagonal poron of the vehicle seatbelt through
the 2 belt guide rings (17) (fig. 35)
8. Pull the seat belt webbing upwards as far as possible to
remove any slack, ensuring that no part of the vehicle seatbelt
is twisted, and close up the lockoff. (fig.36)
9. Follow the steps shown in secon 4.2.10 to secure your child
with the 5 point harness.
For your child’s safety, ensure that the following checks are
carried out before every journey:
• The vehicle belt is passed through both of the belt guide
rings
• The vehicle seat belt is taut, remove any slack if necessary
and is not twisted.
• The seat is placed up against the back of the vehicle seat,
without a gap
• The 5 point harness is fied snugly to the child
• The shoulder straps are not twisted
• The shoulder straps sit in the correct positon on the child’s
shoulders
• The harness buckle is properly secured.
10
Page 13

5.2 Group II (15-25 kg approx.)
With 5 point harness + vehicle belt + Top Tether
1. Follow the steps shown in secon 5.1.2 to install the seat
using the vehicle seatbelt
2. Depress the release buon of the top tether adjuster to
release the strap (fig.37)
3. Hook the snap hook (18) onto the Top Tether anchorage
point in your vehicle. To find this, look for this sign in your
vehicle, or check in your vehicle handbook, or with your
vehicle dealer. (fig.38)
4. Pull on the free end of the Top Tether strap ghtly unl the
indicator shows green (fig.39)
5. Follow the steps shown in secon 4.2.10 to secure your child
with the 5 point harness.
37
18
For your child’s safety, ensure that the following checks are
carried out before every journey:
• The vehicle belt is passed through both of the belt guide
rings.
• The vehicle seat belt is taut, remove any slack if necessary
and is not twisted.
• The seat is placed up against the back of the vehicle seat,
without a gap.
• The top tether strap is ght and the indicator is green.
11
• The 5 point harness is fied snugly to the child
• The shoulder straps are not twisted
• The shoulder straps sit in the correct positon on the child’s
shoulders
• The harness buckle is properly secured.
5.3 Group II, III (15-36 kg approx.)
With vehicle belt
1. Ensure that the 5 point harness has been removed correctly
(see secon 7)
2. Adjust the headrest to the correct posion ( see secon 3.3)
3. Adjust the seat to the desired recline posion (see secon
3.4) and ensure that the recline mechanism is securely locked.
4. Rotate the seat to the forward facing posion (see secon 3.5)
and ensure that the rotaon mechanism is securely locked.
38
5. To use the ISOFIX, see secon 5.1.1 for instrucons
39
NOTE: For Group 2, 3 the ISOFIX is oponal; it can be used in
conjuncon with the vehicle belt to improve stability. Where
ISOFIX anchors are available, we recommend using these in
addion to the vehicle seat belt as this ensures that the seat is
secure when not in use.
6. Place the child car seat on the vehicle seat facing the front of
the vehicle (in the direcon of travel) and place the child in the
car seat.
7. Pull out the vehicle seat belt as far as possible and pass it
around the front of the child, and secure the buckle(24) ( an
audible click will be heard) (fig.40)
CAUTION: Ensure that the seatbelt is not twisted at any point
8. Pass the diagonal poron of the seatbelt (25) and the lap belt
poron (26) on the same side as the vehicle seat buckle(24)
under the armrest and through the red belt guide gap (27).
(fig. 41)
Page 14

9. Place the lap belt poron of the seatbelt on the opposite side
to the vehicle seat buckle through the red belt guide (28)
(fig.42)
10. Guide the diagonal poron of the vehicle seatbelt (29)
through the red belt guide (30) of the headrest (08), ensuring
that the vehicle seatbelt is not twisted at any point.
11. Ensure that the diagonal poron of the vehicle seatbelt sits
over the child’s collar bone and not in front of their neck
(fig.43)
TIP: If necessary, adjust the headrest to ensure that the
seatbelt is sing correctly on the child’s shoulder.
For your child’s safety, ensure that the following checks are
carried out before every journey:
• The diagonal poron of the vehicle belt (25) and the lap
belt poron (26) on the side of the vehicle seat buckle(24)
is passed through the red belt guide (27)
• The lap belt poron (26) on the opposite side to the
vehicle seat buckle is passed through the red belt guide(28)
• The diagonal poron of the vehicle seatbelt (29) is passed
through the red belt guide(30) of the headrest (08)
• The diagonal poron of the vehicle seatbelt sits over the
child’s collar bone and not in front of their neck
• The vehicle seat belt is ght and not twisted at any point.
12
Page 15
6. Removing the ONE™
from the Vehicle
1. Push back both of the ISOFIX release buons to release the
ISOFIX connectors
2. Undo the vehicle seat belt buckle, and remove the vehicle
seatbelt from the belt guide rings (17) and the lower guides (22)
3. Depress the release buon of the Top Tether strap to release
the strap and unhook from the vehicle anchorage point
4. Push the ISOFIX connectors back into the base of the child
car seat
7. Removing the 5 Point
Harness
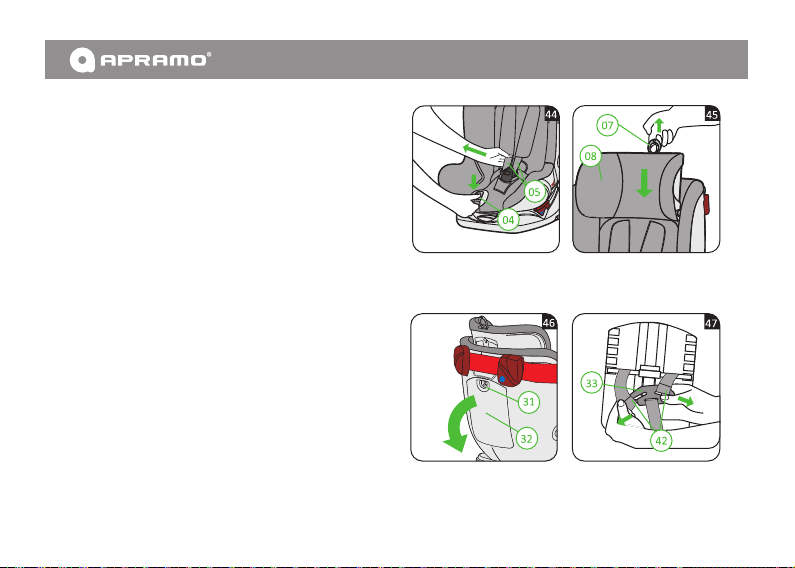
1. Press down on the central adjuster (04), and pull the shoulder
straps towards you (05) (Do not pull on the shoulder pads (06)),
extending the 5 point harness as far as it will go. (fig.44)
2. Pull the adjusng ring (07) upwards, whilst pushing the
headrest (08) downwards to its lowest posion. (fig.45)
Turn the car seat around so that the rear is facing you
13
3. Unlatch the rear cover (32) by using the cover latch (31)
(fig.46)
4. Remove the webbing from the joint plate (33) (fig. 47)
5. Place the joint plate (33) in the recess (34) in the cover (fig.48)
6. Remove the loops of the shoulder pads (35) from the headrest
lever (36) (fig.48)
7. Close the rear cover (32)
Page 16

Turn the car seat around so that the front is facing you
48
35
34
33
36
10. Open the cover (39) , place the buckle latches in the storage
(38) on each side, then replace the cover (39) (fig. 52)
49
11. Turn the metal plate (40) so that it is vercal, and remove
from the housing (41). Remove the 5 point buckle (fig. 53)
38
39
52
53
41
8. Pull out the shoulder straps (05) and shoulder pads (06) from
the harness slots (37) (fig.50)
9. Open the buckle (19) of the 5 point harness. (fig.51)
40
14
Page 17
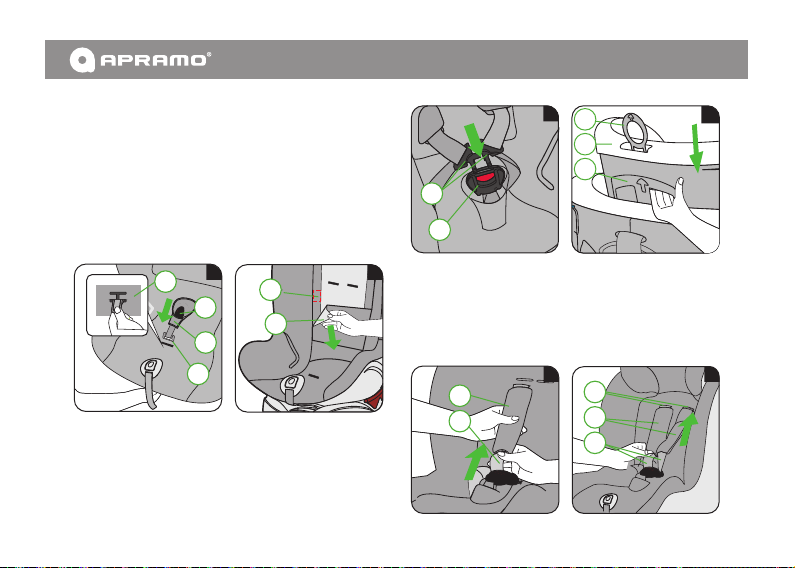
8. Installing the 5 Point
Harness
1. Place the buckle (19) into the crotch pad (43) (fig.54)
2. Turn the metal plate (40) so that it is vercal and insert in the
housing (41). Use slot A for Group 0+, 1 and slot B for Group 2
(fig. 54)
3. Open the cover(39), take the buckle latches out of the storage
on each side (38), and then refasten the cover. (fig.55)
54
A
B
4. Bring the 2 latches of the buckle (44) into the buckle (19)
(fig.56)
NOTE: Ensure that the straps are not twisted at any point
5. Pull the adjusng ring (07) upwards, whilst pushing the
headrest (08) downwards to its lowest posion. (fig.57)
15
41
19
43
40
38
39
56
07
08
09
44
19
6. Thread both of the shoulder pads (06) onto the shoulder
55
straps (05) (fig.58)
7. Thread the loops of both the shoulder straps (05) and the
shoulder pads (06) through the harness slots (37) The loop of
the shoulder pad should be beneath the loop of the shoulder
strap. (fig.59)
Turn the car seat around so that the rear is facing you
58
6
06
05
37
06
05
57
59
Page 18
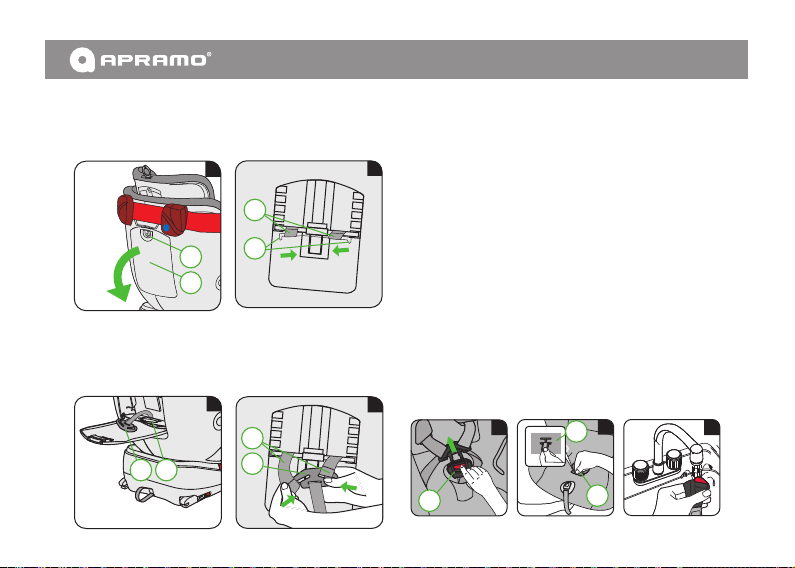
8. Unlatch the rear cover (32) by using the cover latch (31)
63
42
33
(fig.60)
9. Fix the loops of the shoulder pads (35) on the headrest lever
(36) (fig.61)
10. Remove the joint plate (33) from the recess (34) in the
cover (fig.62)
11. Place the webbing loops of the shoulder straps (42) over
the joint plate(33) (fig.63)
NOTE: Ensure that the straps are not twisted at any point
12. Close the rear cover (32)
33 34
60
35
31
32
36
62
9. Care and Maintenance
9.1 Harness buckle maintenance
Buckle failure can cause injury; do not use any oil or other
61
lubricants on any part of the buckle. Buckle malfuncons are
usually caused by a build-up of debris such as food crumbs or
other small parcles.
Signs of buckle malfuncon:
• The buckle latches are slow to release when the red release
buon is depressed
• The buckle latches will not lock into the buckle securely
• The buckle latches engage without an audible click
• The buckle latches are difficult to insert ( any resistance is felt)
• The buckle opens only when extreme force is applied.
To clean the harness buckle
1. Follow steps shown in secon 7 to remove the buckle from
the seat (figs.51, 53)
2. Soak the harness buckle in warm water with mild washing up
liquid only for at least an hour. Rinse and allow to air dry
thoroughly before replacing the buckle on the seat. (fig.64)
51
19
40
53
41
40
64
16
Page 19

9.2 Cleaning the car seat covers
The seat covers are removable and washable; please refer to the fabric care label on the seat cover for full instrucons.
To remove the seat covers
1. Adjust the headrest to the highest posion (fig.65)
2. Remove the cover of the headrest first
3. Remove the remaining seat covers
To refit the seat covers
Repeat the above steps in reverse order
Ensure all covers and trim are replaced correctly (fig.66)
CAUTION: Never use the child car seat without the covers supplied, always ensure that the covers and harness straps
are correctly installed. In case of doubt, please contact our Customer Service Department for advice.
17
07
08
09
65
66
45
Page 20
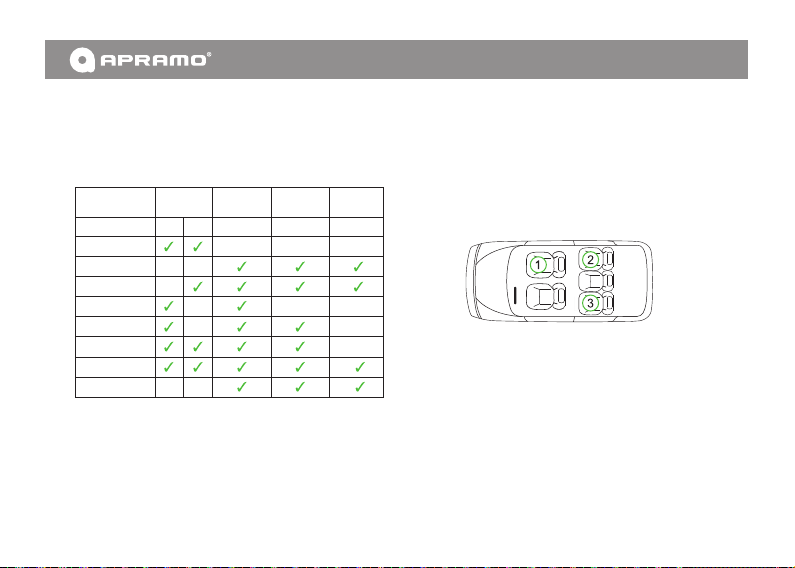
10. Applicable Car List
10.1 The category of child car seat
The APRAMO ONE™ seat is classified for "Universal" and
"Semi-universal" use, the suitable fing methods as below:
GROUP
Category
Rearward Facing
Forward Facing
3-Point Vechicle
Belt with retractor
ISOFIX
Top Tether
5-Point Say Harness
Adjustable Headrest
Adjustable Recline
GROUP 0+
GROUP I
0-13KG
9-18KG
(APPR 0~18M)
Semiuniversal
(APPR 9M~4Y)
universal
GROUP II
15-25KG
(APPR 3~6Y)
Universal UniversalSemi-uni versal
GROUP II,III
15-36KG
(APPR 3~12Y)
10.2 As a "Universal" child car seat, it will fit most, but not
all car seat posions for general use in vehicles that the
vehicle is capable of accepng a "Universal" child car seat for
this age group in the vehicle handbook.
10.3 As a "Semi-universal" child car seat, it is suitable for
fixing into the seat posions of the following cars:
18
Page 21

19
Car Manufacture Model
Alfa Romeo
Guiliea (2010>)
Mito (2009>)
Audi
A1 (2011>)
A1 Sportback (2012>)
A4 Allroad (2009>)
A4 Av ant (2008>)
A4 S4 (2009>)
A5 (2007>)
A5 Sportback (2009>)
A6 (2011>)
A6 Allroad (2011>)
A6 Avant (2011>)
A6 S6 (2011>)
A7 Sportback (2011>)
A8 (2011>)
A8 S8 (2011>)
Q3 (2013>)
Q5 (2009>)
Q7 (2006>)
Bentley
Connental GT (2003-2011)
Connental GTC (2005-2012)
Mulsanne (2010>)
ISOFIX
3-Point
Vechicle Belt
Page 22

Car Manufacture Model Car Manufacture Model
BMW
1 Series Converble (2008>)
1 Series Coupe (2008>)
3 Series Coupe (2007>)
5 Series (2011>)
6 Series Coupe (2011>)
7 Series (2010>)
X3 F25 (2011>)
X5 (2007>)
X6 (2008>)
Cadillac
Chevrolet
Chrysler
Fiat
Abarth Grande Punto (2008-2011)
5-GT (2010>)
BLS Saloon (2006-2011)
Aveo 3dr (2012>)
Aveo 5dr (2012>)
Capva (2007>)
Cruze (2009>)
Spark (2009>)
Volt (2008>)
A4 S4 (2011>)
Grand Voyager (2008>)
Ypsilon (2011>)
300 C (2012>)
500 C (2009>)
500 L (2013>)
Panda (2012>)
ISOFIX
3-Point
Vechicle Belt
Ford
Mercedec Benz
Nissan
Volvo
REMARKS: Applicable Not Applicable
Noce:
Seat posions in other cars may also be suitable to accept this child
car seat. If in doubt, consult either our Customer Services
Department or the retailers.
B Max (2012>)
Fiesta (2008>)
Focus (2010>)
KA (2009>)
Kuga (2013>)
A Class (2013>)
B Class (2012>)
C Class (2008>)
CLA (2013>)
E Class (2009>)
GL Class (2006-2012)
R Class (2006-2012)
S Class (2006-2013)
Juke (2010>)
X-Trail (2007>)
C30 (2007-2012)
S80 (2007>)
V40 (2012>)
V60 (2011>)
V70 (2008>)
XC70 (2008>)
ISOFIX
3-Point
Vechicle Belt
20
Page 23

More than Safety
Page 24

Apramo UK Ltd.
PO Box 17001 Tamworth B77 9NQ, UK
Tel/Fax: +44 (0) 1827 50646
 Loading...