

Page 1
IMPORTANT: This booklet should be
given to the customer after
installation and demonstration.
Applied Energy Products Limited
Page 2
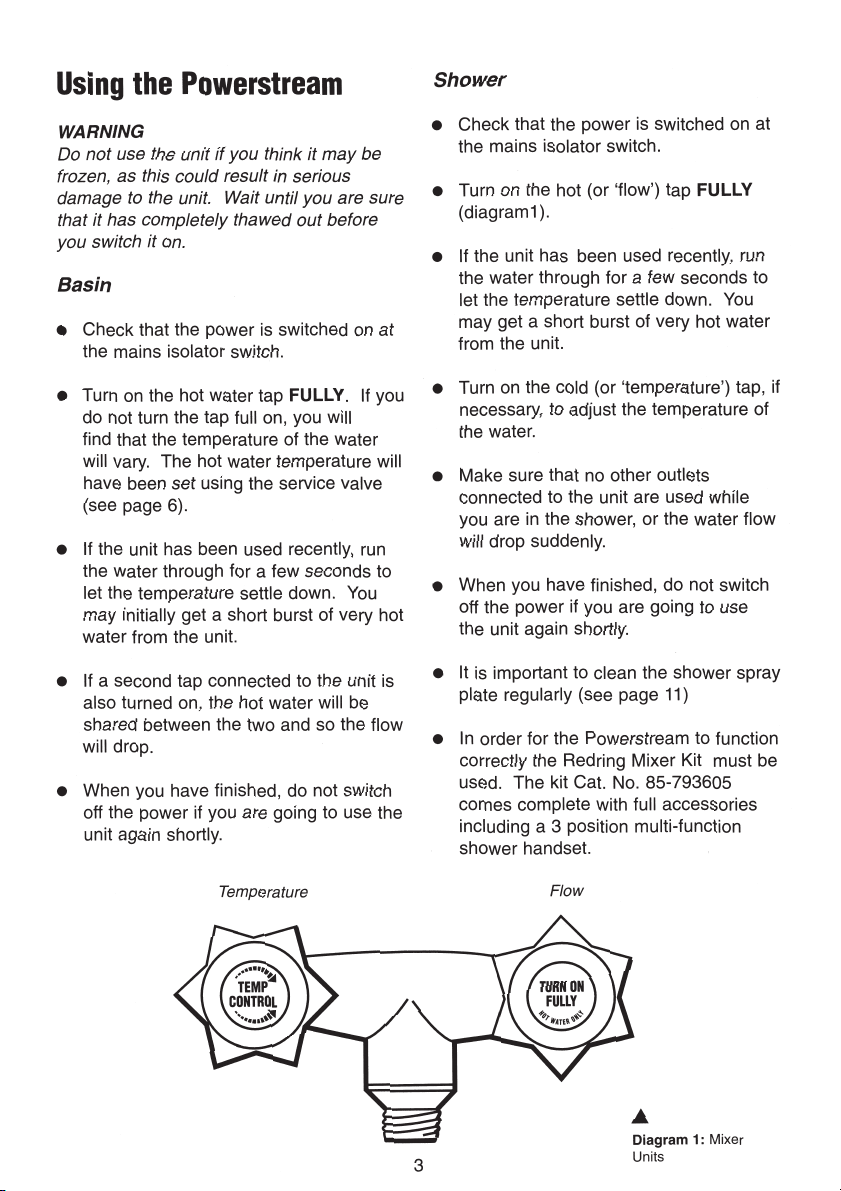
Page 3
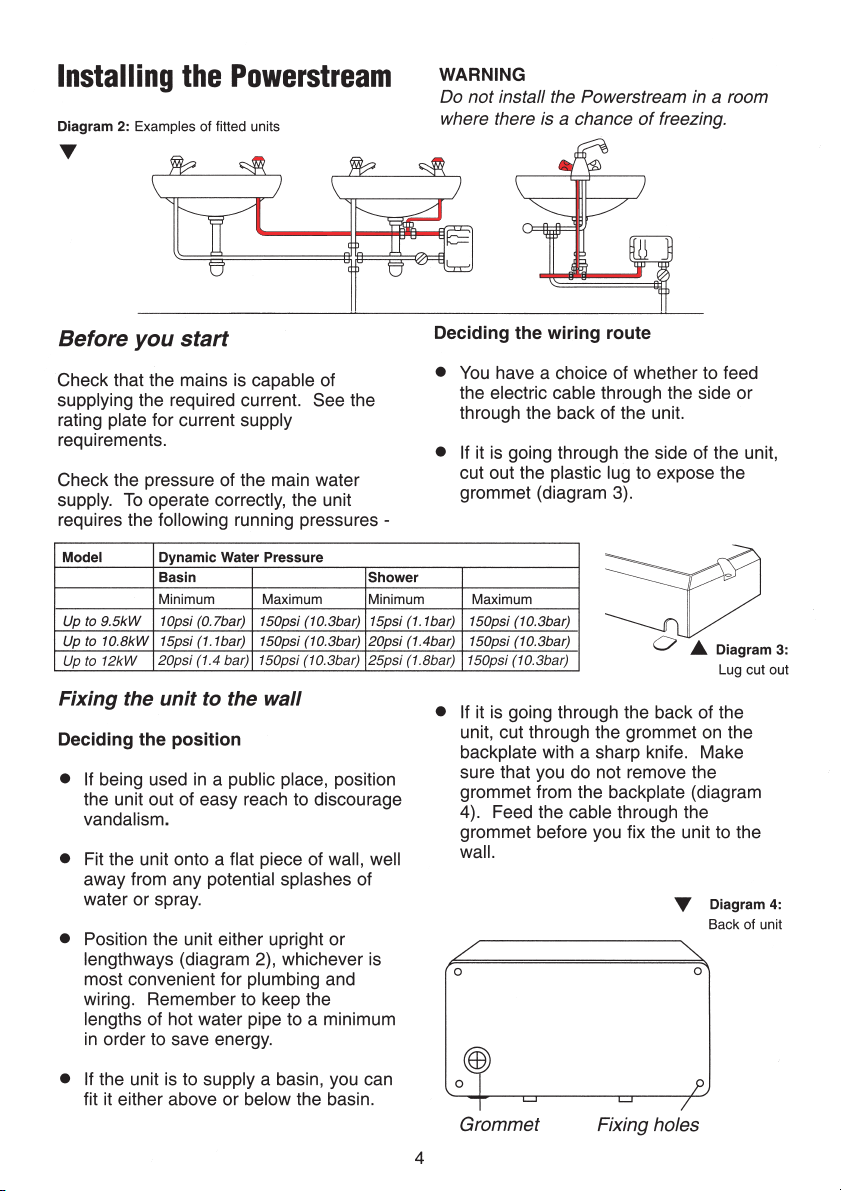
Page 4
Page 5

Fixing to the wall
● Undo the retaining nuts and take the
front cover off the unit. Hold the
backplate in position against the wall
while you mark the four fixing holes.
● Drill the holes and fix the unit to the wall
using the four No 8 x 38mm wood
screws supplied.
Plumbing the unit
In some cases it may be worth fitting a
second unit.
● If the unit is to supply more than one
basin outlet, the head should be the
same at each outlet if they are to be
used at the same time. If not, one
outlet will take all the water.
● When the pipework has been plumbed
on, flush it through with water before you
connect the unit, to remove any swarf
or loose particles.
Warning
- Do not use a non-return valve in
the inlet feed to the unit.
- Do not fit the unit within 2 metres
of a stop valve.
Fitting the pipes
● The unit should be connected directly to
the main cold water supply.
Connecting the unit to the pipes
● The inlet and outlet are clearly marked
on the unit. They each have a
3
/8" NPT
connector.
● Tw o
3
/8" NPT x 15mm adapters are
included with the unit to attach it to the
inlet and outlet pipes.
(Model 45-793270: See addendum
sheet for local installation requirements).
● We recommend that you use 15mm
copper or stainless steel pipe for the
inlet and outlet connections.
(See addendum sheet for local
installation requirements).
● Use PTFE tape for making screw joints.
Do NOT use a jointing compound.
● Remember to keep the hot water
pipe runs as short as possible.
● The unit comes with a service valve
(diagram 6) which should be fitted on
the inlet of the unit. You can do this
using the inlet adaptor provided. The
valve can be used to turn off the water
supply to the unit if it needs servicing,
or to reduce the main supply pressure if
it is too high.
Page 6

Diagram 6:
Service valve supplied with:
UK Models
Service valve supplied with:
Export Models
finish and
●
●
●
:
6
Page 7

cubicle or bath.
The installation should be supervised by
a qualified electrician.
For further details, including a
comprehensive list of accessories and
spares for all Redring products, contact
your local dealer, or call Redring's sales
office on 01733 456700.
For non UK customers please contact
your local distributor.
Page 8

If you have any queries
See page 10, then call the Redring
Technical Advisory Hotline on
01733 456999. For non UK customers
please contact your local distributor. If you
need further information, we will be glad to
help you with any installation enquiries.
- IMPORTANT
Demonstrate the unit to the user
and give them this guide.
Page 9

Flow rate (litres/min) 3.0 4.0 6.0
Summer temp oC-54o43
Winter temp oC50o39
o
28
Flow rate (litres/min) 4.0 5.0 6.0
Summer temp oC-51o46
Winter temp oC44o36
o
31
Flow rate (litres/min) 5.0 6.0 7.0
Summer temp oC54o49
Winter temp oC39o34
o
44
o
30
o
o
o
o
o
o
Page 10

For the Installer
Symptom
Little or no water flows neon light off.
Cold water only
- neon light off.
Water too cold
- neon light on.
Water flow too low, or
temperature too high.
Water goes from
hot to cold.
Cause What to do
The water pressure is very low.
The filter is blocked or there is dirt in
the unit.
The main water supply is connected
to the OUTLET of the unit.
The water pressure is too low.
The thermal cut-out has triggered.
The flow switch is not working.
The power select screw set to ‘LO’.
(neon dim).
One element is not working
(neon dim).
The Power Supply Voltage has
dropped.
The flow switch is not set correctly.
The service valve is fitted to the
OUTLET.
There are constrictions in
the plumbing.
The service valve is fitted to the
OUTLET.
Use a pump to boost the supply
from a storage tank.
Disconnect the unit and flush it
through. Clean the filter as described
on page 9.
Reconnect the main supply to the
INLET (marked in blue).
Use a pump to boost the supply
from a storage tank.
Reset it by opening the unit and
pushing the button on the cut-out
(diagram 10.) Before you do this you must
remove the cause of the problem.
Contact Redring.
Change the power select screw to ‘HI’
(see page 7).
Switch off the electricity supply & check the
resistance of the elements.You should
get the following readings:
Loading kW Resistance Ω
9.5
10.8
12
The Heater should draw the following
currents;
40 amps for the 9.5kW model
45 amps for the 10.8kW model
50 amps for the 12 kW model
Change the brass jet for one with a
smaller hole.
Fit the service valve to the INLET of the unit.
Check the plumbing. Only use PTFE tape
for making pipe joints.
Fit the service valve valve to the
INLET of the unit.
12
10.6
9.6
Page 11

For the User
Symptom
Little or no water flows The main water supply is turned off. Turn on the main supply fully at the
Cold water only
- neon light off.
Water too cold
- neon light on.
Water flow too
low, or temperature
too high
Water goes from
hot to cold
Shower spray pattern
deteriorates
The person who initially installed the unit is probably the best one to contact for help.
Cause What to do
stop valve.
The main water supply is not
turned on enough.
The filter is blocked or the brass jet is
wrongly positioned
The water flow rate is too high.
The inlet water temperature
has dropped.
The main supply water flow is too
low.
The hot tap is not fully open.
The water flow or pressure is too
low, and the thermal cut-out is
operating.
The filter is blocked.
A second outlet has been turned on.
The shower handset is clogged. Clean the handset - using descaling
If the problem persists
You can also call Redring’s Technical Advisory Hotline on 01733 456999.
Please have this guide with you when you call.
For non UK customers please contact your local distributor.
Turn on the main supply fully at the
stop valve.
Clean and reassemble the filter as
described on page 9.
Adjust the service valve (see page 7).
Adjust the service valve (see page 7).
For a shower, adjust the spray pattern
available on the multi-mode handset.
Increase the supply water flow. Make
sure that the service valve is correctly
adjusted.
Adjust the service valve so that the
water is at the right temperature with the
tap fully open (see page 7).
Always turn the hot tap full on.
Increase the supply water flow.
Make sure that the service valve is
correctly adjusted.
Clean it (see page 9).
Do not use the basin while using the
shower.
solution if required (see pages 7&8).
Page 12

Guarantee
We, Applied Energy Products Ltd., guarantee that should this
Powerstream unit prove to be defective by reason of faulty
workmanship or material within 36 months (outside the UK,
please contact your local distributor) of the date of purchase or
commencement of hire we will replace the defective parts FREE
OF CHARGE on condition that:
a) The appliance has been correctly installed and used only on the
supply circuit or voltage stamped on the rating plate.
b) The appliance has been used in accordance with these instructions
and has not been tampered with or otherwise subject to misuse,
neglect or accident.
c) The appliance has not been taken apart, modified or repaired
except by a person authorised by us.
d) Evidence of the date of purchase in the form of an invoice, receipt
(hire purchase documents) is included with the appliance if
returned under guarantee.
e) For non UK customers please contact your local distributor.
‘This guarantee does not affect your statutory rights’
Full details of Terms and Conditions of guarantee are available on request from:–
Applied Energy Products Ltd., Morley Way, Peterborough, PE2 9JJ. U.K.
Telephone: +44 (0)1733 456789. Fax: +44 (0)1733 310606
Website: www.redring.co.uk
579 2152 12A
 Loading...