

Page 1

USER MANUAL
Page 2

2
Information in this manual is subject to change without notice and does not represent a commitment on
the part of Applied Acoustics Systems DVM Inc. The software described in this manual is furnished under a
license agreement. The software may be used only in accordance of the terms of this license agreement. It is
against the law to copy this software on any medium except as specifically allowed in the license agreement.
No part of this manual may be copied, photocopied, reproduced, translated, distributed or converted to any
electronic or machine-readable form in whole or in part without prior written approval of Applied Acoustics
Systems DVM Inc.
Copyrightc2016 Applied Acoustics Systems DVM Inc. All rights reserved. Printed in Canada.
Program Copyrightc2011-2016 Applied Acoustics Systems, Inc. All right reserved.
Chromaphone is a registered Trademark of Applied Acoustics Systems DVM Inc. Windows and Windows Vista are registered trademarks of Microsoft Corporation in the United States and other countries.
Mac OS and Audio Units are registered trademarks of Apple Corporation. VST Instruments and ASIO
are trademarks of Steinberg Soft Und Hardware GmbH. RTAS and AAX are registered trademarks of Avid
Technology Inc. All other product and company names are either trademarks or registered trademarks of
their respective owner. Unauthorized copying, renting or lending of the software is strictly prohibited.
Visit Applied Acoustics Systems DVM Inc. on the World Wide Web at
www.applied-acoustics.com
Page 3

Contents
1 Introduction 7
1.1 System Requirements . . . . . . . . . . . . . . . . . . . . . . . . . . . . . . . . . 7
1.2 Installation . . . . . . . . . . . . . . . . . . . . . . . . . . . . . . . . . . . . . . 8
1.3 Authorization and Registration . . . . . . . . . . . . . . . . . . . . . . . . . . . . 8
1.3.1 Your Computer is Online . . . . . . . . . . . . . . . . . . . . . . . . . . . 8
1.3.2 Your Computer is Offline . . . . . . . . . . . . . . . . . . . . . . . . . . . 9
1.4 Getting Started . . . . . . . . . . . . . . . . . . . . . . . . . . . . . . . . . . . . 11
1.4.1 Using Chromaphone in Standalone Mode . . . . . . . . . . . . . . . . . . 11
1.4.2 Exploring the Factory Sounds . . . . . . . . . . . . . . . . . . . . . . . . 11
1.4.3 Using Chromaphone as a Plug-in . . . . . . . . . . . . . . . . . . . . . . 12
1.5 Getting Help . . . . . . . . . . . . . . . . . . . . . . . . . . . . . . . . . . . . . . 12
1.6 About this Manual . . . . . . . . . . . . . . . . . . . . . . . . . . . . . . . . . . 12
2 Architecture of Chromaphone 13
2.1 General Organization and Signal Flow . . . . . . . . . . . . . . . . . . . . . . . . 13
2.2 Interface . . . . . . . . . . . . . . . . . . . . . . . . . . . . . . . . . . . . . . . . 14
2.2.1 The Play View . . . . . . . . . . . . . . . . . . . . . . . . . . . . . . . . 14
2.2.2 The Edit View . . . . . . . . . . . . . . . . . . . . . . . . . . . . . . . . 15
2.2.3 The FX view . . . . . . . . . . . . . . . . . . . . . . . . . . . . . . . . . 15
3 Bank and Program Management 17
3.1 Banks and Programs . . . . . . . . . . . . . . . . . . . . . . . . . . . . . . . . . 17
3.2 Saving Programs . . . . . . . . . . . . . . . . . . . . . . . . . . . . . . . . . . . 17
3.3 The Bank Manager . . . . . . . . . . . . . . . . . . . . . . . . . . . . . . . . . . 17
3.4 Using MIDI Bank and Program Changes . . . . . . . . . . . . . . . . . . . . . . . 19
3.5 Backups of Banks and Programs . . . . . . . . . . . . . . . . . . . . . . . . . . . 19
3.6 Exchanging Banks and Programs . . . . . . . . . . . . . . . . . . . . . . . . . . . 19
3.7 Restoring the Factory Library . . . . . . . . . . . . . . . . . . . . . . . . . . . . . 20
3.8 Importing Programs from Chromaphone 1 . . . . . . . . . . . . . . . . . . . . . . 20
Page 4

4 CONTENTS
4 Parameters 21
4.1 General Functioning of the Interface . . . . . . . . . . . . . . . . . . . . . . . . . 21
4.1.1 Knobs . . . . . . . . . . . . . . . . . . . . . . . . . . . . . . . . . . . . . 21
4.1.2 Switches . . . . . . . . . . . . . . . . . . . . . . . . . . . . . . . . . . . 21
4.1.3 Drop-down Menus . . . . . . . . . . . . . . . . . . . . . . . . . . . . . . 21
4.1.4 Modulation Signals . . . . . . . . . . . . . . . . . . . . . . . . . . . . . . 21
4.1.5 Synchronisation . . . . . . . . . . . . . . . . . . . . . . . . . . . . . . . 22
4.2 General Notions of Acoustics . . . . . . . . . . . . . . . . . . . . . . . . . . . . . 23
4.2.1 Normal Modes . . . . . . . . . . . . . . . . . . . . . . . . . . . . . . . . 23
4.2.2 Coupling of Resonators . . . . . . . . . . . . . . . . . . . . . . . . . . . 25
4.3 The Edit View . . . . . . . . . . . . . . . . . . . . . . . . . . . . . . . . . . . . . 26
4.4 The Mixer Module . . . . . . . . . . . . . . . . . . . . . . . . . . . . . . . . . . 26
4.5 The Mallet Module . . . . . . . . . . . . . . . . . . . . . . . . . . . . . . . . . . 26
4.6 The Noise Module . . . . . . . . . . . . . . . . . . . . . . . . . . . . . . . . . . 27
4.7 The Resonator Module . . . . . . . . . . . . . . . . . . . . . . . . . . . . . . . . 28
4.8 The Noise Envelope Module . . . . . . . . . . . . . . . . . . . . . . . . . . . . . 32
4.9 The LFO Module . . . . . . . . . . . . . . . . . . . . . . . . . . . . . . . . . . . 34
4.10 The FX View . . . . . . . . . . . . . . . . . . . . . . . . . . . . . . . . . . . . . 35
4.10.1 EQ . . . . . . . . . . . . . . . . . . . . . . . . . . . . . . . . . . . . . . 35
4.10.2 Compressor . . . . . . . . . . . . . . . . . . . . . . . . . . . . . . . . . . 37
4.10.3 Delay . . . . . . . . . . . . . . . . . . . . . . . . . . . . . . . . . . . . . 38
4.10.4 Distortion . . . . . . . . . . . . . . . . . . . . . . . . . . . . . . . . . . . 39
4.10.5 Chorus . . . . . . . . . . . . . . . . . . . . . . . . . . . . . . . . . . . . 39
4.10.6 Flanger . . . . . . . . . . . . . . . . . . . . . . . . . . . . . . . . . . . . 41
4.10.7 Phaser . . . . . . . . . . . . . . . . . . . . . . . . . . . . . . . . . . . . . 43
4.10.8 Wah . . . . . . . . . . . . . . . . . . . . . . . . . . . . . . . . . . . . . . 45
4.10.9 Notch Filter . . . . . . . . . . . . . . . . . . . . . . . . . . . . . . . . . . 45
4.10.10 Reverb . . . . . . . . . . . . . . . . . . . . . . . . . . . . . . . . . . . . 46
4.11 The Play View . . . . . . . . . . . . . . . . . . . . . . . . . . . . . . . . . . . . . 48
4.11.1 The Clock Module . . . . . . . . . . . . . . . . . . . . . . . . . . . . . . 48
4.11.2 Unison . . . . . . . . . . . . . . . . . . . . . . . . . . . . . . . . . . . . 49
4.11.3 The Vibrato Module . . . . . . . . . . . . . . . . . . . . . . . . . . . . . 49
Page 5

CONTENTS 5
4.11.4 The Arpeggiator Module . . . . . . . . . . . . . . . . . . . . . . . . . . . 49
4.11.5 Pitch Wheel . . . . . . . . . . . . . . . . . . . . . . . . . . . . . . . . . . 51
4.11.6 Modulation Wheel . . . . . . . . . . . . . . . . . . . . . . . . . . . . . . 51
4.11.7 Ribbon . . . . . . . . . . . . . . . . . . . . . . . . . . . . . . . . . . . . 51
5 Utility Section 52
5.1 The MIDI LED . . . . . . . . . . . . . . . . . . . . . . . . . . . . . . . . . . . . 52
5.2 Polyphony . . . . . . . . . . . . . . . . . . . . . . . . . . . . . . . . . . . . . . . 52
5.3 Tuning . . . . . . . . . . . . . . . . . . . . . . . . . . . . . . . . . . . . . . . . . 52
5.4 History and Compare . . . . . . . . . . . . . . . . . . . . . . . . . . . . . . . . . 53
5.5 Volume . . . . . . . . . . . . . . . . . . . . . . . . . . . . . . . . . . . . . . . . 53
5.6 Level Meter . . . . . . . . . . . . . . . . . . . . . . . . . . . . . . . . . . . . . . 53
5.7 The About Box . . . . . . . . . . . . . . . . . . . . . . . . . . . . . . . . . . . . 54
6 Audio and MIDI Settings 55
6.1 Audio Configuration . . . . . . . . . . . . . . . . . . . . . . . . . . . . . . . . . 55
6.1.1 Selecting an Audio Device . . . . . . . . . . . . . . . . . . . . . . . . . . 55
6.1.2 Latency . . . . . . . . . . . . . . . . . . . . . . . . . . . . . . . . . . . . 55
6.2 MIDI Configuration . . . . . . . . . . . . . . . . . . . . . . . . . . . . . . . . . . 56
6.2.1 Selecting a MIDI Device . . . . . . . . . . . . . . . . . . . . . . . . . . . 56
6.2.2 Creating MIDI Links . . . . . . . . . . . . . . . . . . . . . . . . . . . . . 56
6.2.3 Creating a default MIDI Map . . . . . . . . . . . . . . . . . . . . . . . . 56
6.2.4 MIDI Program Changes . . . . . . . . . . . . . . . . . . . . . . . . . . . 57
6.2.5 MIDI Bank Changes . . . . . . . . . . . . . . . . . . . . . . . . . . . . . 57
6.2.6 Pitch bend . . . . . . . . . . . . . . . . . . . . . . . . . . . . . . . . . . 57
6.2.7 Modulation wheel . . . . . . . . . . . . . . . . . . . . . . . . . . . . . . 57
7 Using Chromaphone as a Plug-In 58
7.1 Audio and MIDI Configuration . . . . . . . . . . . . . . . . . . . . . . . . . . . . 58
7.2 Automation . . . . . . . . . . . . . . . . . . . . . . . . . . . . . . . . . . . . . . 58
7.3 Multiple Instances . . . . . . . . . . . . . . . . . . . . . . . . . . . . . . . . . . . 58
7.4 MIDI Program Change . . . . . . . . . . . . . . . . . . . . . . . . . . . . . . . . 58
7.5 Saving Projects . . . . . . . . . . . . . . . . . . . . . . . . . . . . . . . . . . . . 58
7.6 Performance . . . . . . . . . . . . . . . . . . . . . . . . . . . . . . . . . . . . . . 59
Page 6

6 CONTENTS
8 License Agreement 60
Page 7

Introduction 7
1 Introduction
Chromaphone is a synthesizer dedicated to the creation of acoustic instruments. It is based on
the combination of acoustic resonators to create drums, percussion, string and hybrid synth-like
instruments. Membranes, bars, marimbas, plates, strings, and tubes form pairs that are excited
by a mallet and a flexible noise source. Access to different parameters such as the material of
the resonators, their tuning and hit position allow for the creation of a vast range of realistic and
creative instruments and sonic colors.
Chromaphone is entirely based on Applied Acoustics Systems (AAS) physical modeling technology and uses no sampling nor wave tables. Sound is produced by solving, on the fly, mathematical equations modeling the different types of resonators and how they interact. This elaborate
synthesis engine responds dynamically to the control signals it receives while you play reproducing
the richness and responsiveness of real acoustic instruments. Chromaphone features a brand-new
coupling technology allowing an accurate description of the exchange of energy between the resonators resulting in rich and natural sounding tones.
Before discussing the synthesizer in more detail, we would like to take this opportunity to thank
you for choosing an AAS product. We sincerely hope that this product will bring you inspiration,
pleasure and fulfill your creative needs.
1.1 System Requirements
The following minimum computer configuration is necessary to run Chromaphone:
Mac OS
• Mac OS X 10.7 or later
• Intel Core processor or later
• 512 MB of RAM
• 70 MB of free hard drive space
• 1024 x 768 screen resolution
• Built-in audio interface
Windows
• Windows 7 or later 32-bit/64-bit
• Intel Core or equivalent processor
Page 8

8 Introduction
• 512 MB of RAM
• 70 MB of free hard drive space
• 1024 x 768 screen resolution
• Windows-compatible audio interface
• Windows-compatible MIDI interface/keyboard
Keep in mind that the computational power required by Chromaphone depends on the number
of voices of polyphony and the sampling rate used. These computer configurations will enable
you to play the factory sounds with a reasonable number of voices but performances will vary
depending on your specific computer configuration.
1.2 Installation
Simply double-click on the installer file that you have downloaded and follow the instructions of
the installer.
1.3 Authorization and Registration
Chromaphone uses a proprietary challenge/response copy protection system which requires authorization of the product. A challenge code is a long string of capital letters and numbers that is
generated uniquely for each machine during the registration process. The response code is another
unique string of capital letters and numbers generated from the data encrypted in the challenge
code. As the keys are unique to each machine, it is necessary to go through this procedure every
time the program is installed on a new computer.
Note that it is possible to use the program during 15 days before completing the authorization
process. After that period, the program will not function unless it is authorized.
1.3.1 Your Computer is Online
The authorization process is very simple if your music computer is connected to the internet since
the Chromaphone program will connect to the AAS server and take care of the key exchange
automatically.
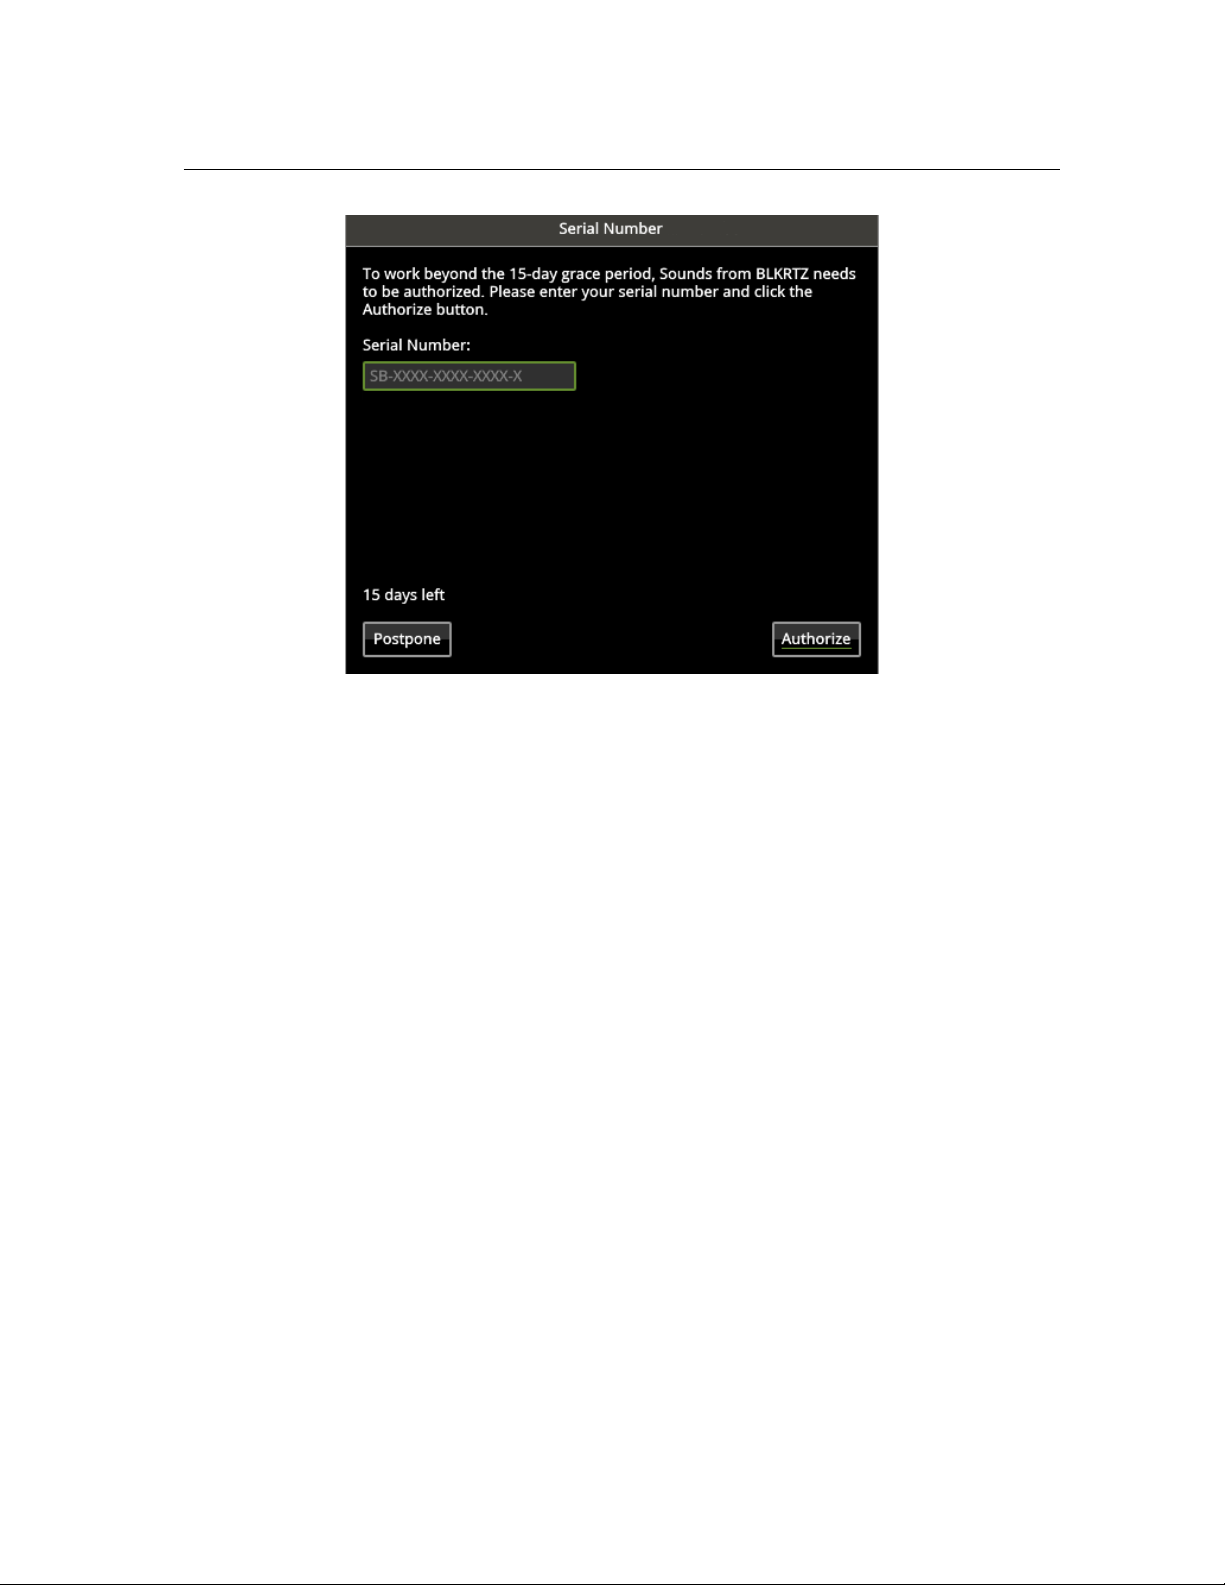
After starting the application, a message will appear telling you that the application needs to be
authorized as shown in Figure 1. Enter your serial number and click on the Authorize button. The
program will then connect to the AAS server and complete the authorization process.
If this is the first AAS product that you authorize on your computer, or if no registration information can be related to your serial number by our server, you will be asked to provide your name
Page 9
1.3 Authorization and Registration 9
Figure 1: Online Authorization.
and email address for registration purposes. Note that only a valid email address is required to register your product. Registration of your product will entitle you to receive support and download
updates when available, as well as take advantage of special upgrade prices offered from time to
time to registered AAS users.
1.3.2 Your Computer is Offline
If your music computer is not connected to the internet you will need to obtain the response code
from an internet connected computer or by contacting AAS.
After starting the application, a message will appear telling you that the application needs to
be authorized. After clicking on the Authorize button, a pop-up window will appear as shown in
Figure 1. Enter your serial number and click on the Authorize button. The program will then inform
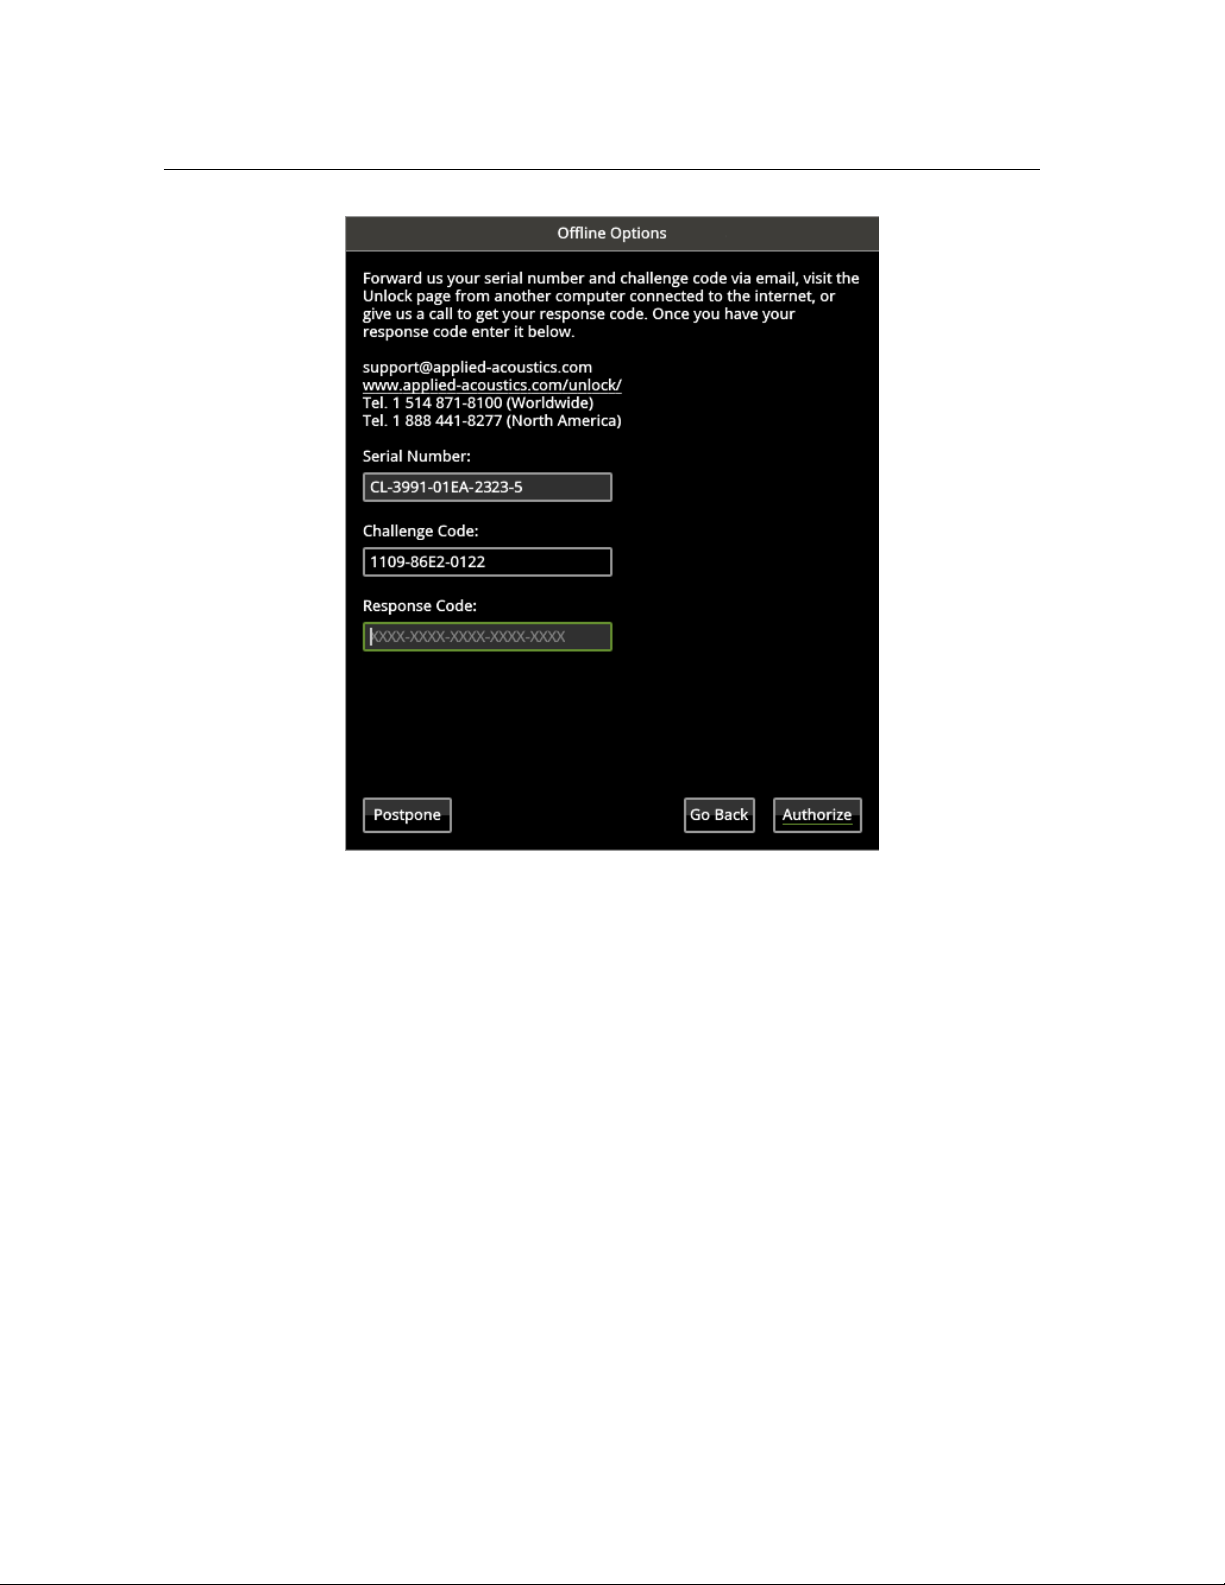
you that your computer is not connected to the internet, click on the Offline Options button and a
new pop-up window will appear as shown in Figure 2.
Your serial number as well as the automatically generated challenge code are displayed but you
need to obtain the response code. To do so, take note of your serial number and challenge code
and proceed to an internet connected computer. Launch your browser and go to the unlock page of
the AAS website located at:
www.applied-acoustics.com/unlock/
Enter your serial number and challenge code in the form, follow the instructions, and the re-
sponse code will appear on screen. Write it down, go back to your music computer, and enter the
Page 10
10 Introduction
Figure 2: Offline Authorization.
response code in the authorization pop-up window. This will complete the authorization procedure.
If you prefer, you can also contact us by email at support@applied-acoustics.com with your
serial number and challenge code and we will send you back your response code.
Should you not have access to the internet, AAS support representatives are available to assist
you in the unlock and registration process Monday to Friday, 9am to 6pm EST. You may contact
us by phone at:
• North America Toll-free number: 1-888-441-8277
• Outside North America: 1-514-871-8100
Page 11

1.4 Getting Started 11
1.4 Getting Started
1.4.1 Using Chromaphone in Standalone Mode
Chromaphone comes with a standalone versions allowing you to play it without having to open
your sequencer. This can be convenient to explore Chromaphone and its library, play it live or do
some sound design work. To start Chromaphone in standalone mode, simply follow the instructions
below:
• Windows - Double-click on the Chromaphone icon located on your desktop or select Chroma-
phone from the Start > All Programs > menu.
• Mac OS - Double-click on the Chromaphone icon located in the Applications folder.
Before you start exploring the program, take a moment to set up you audio and MIDI configuration as explained below.
Audio and MIDI Configuration
Audio and MIDI configuration tools are available by clicking on the Audio Setup button located
in the lower left corner of the Chromaphone interface. The Audio Setup dialog first allows you to
select an audio output device from those available on your computer. Multi-channel interfaces will
have their outputs listed as stereo pairs.
On Windows, the audio output list is organized by driver type. The device type is first selected
from the Audio Device Type drop-down list. If you have ASIO drivers available, these should be
selected for optimum performance. The Configure Audio Device button allows you to open the
manufacturer’s setup program for your audio interface when available.
Once the audio input has been selected, you can then select a sampling rate and a buffer size
from those offered by your audio interface.
The list of available MIDI inputs appears at the bottom of the dialog. Click on the checkbox
corresponding to any of the inputs you wish to use.
1.4.2 Exploring the Factory Sounds
Chromaphone comes with a wide range of factory programs right out of the box which amounts
to a huge range of sounds before you have even turned a single knob. As you would expect, the
best way of coming to grips with the possibilities Chromaphone offers is simply to go through the
programs one at a time.
Chromaphone uses the notions of Banks and Programs to organize and classify sounds. A
program or preset is a stored set of parameters corresponding to a given sound. The programs are
grouped and organized in banks.
Page 12

12 Introduction
The name of the currently loaded bank and program are displayed at the top of the interface.
One navigates among the different banks and programs by using the arrows in each of the corresponding boxes or by opening the associated drop-down menu by clicking inside these boxes.
Banks and programs are managed using the Bank Manager which is revealed by clicking on the
Manage button appearing above the right-top corner of the Bank box. Playing programs and organizing them is pretty straightforward, please refer to Chapter 3 for a complete description of the
bank and program management operations.
1.4.3 Using Chromaphone as a Plug-in
Chromaphone integrates seamlessly into the industry’s most popular multi-track recording and
sequencing environments as a virtual instrument plug-in. Chromaphone works as any other plug-in
in these environments so we recommend that you refer to your sequencer documentation in case
you have problems running Chromaphone as a plug-in. Note that in plug-in mode the audio and
MIDI inputs, sampling rate, and buffer size are determined by the host sequencer.
1.5 Getting Help
AAS technical support representatives are on hand from Monday to Friday, 9am to 6pm EST.
Whether you have a question on Chromaphone, or need a hand getting it up and running as a
plug-in in your favorite sequencer, we are here to help. Contact us by phone or email at:
• North America Toll Free: 1-888-441-8277
• Worldwide: 1-514-871-8100
• Email: support@applied-acoustics.com
Our online support pages contain downloads of the most recent product updates, and answers
to frequently asked questions on all AAS products. The support pages are located at:
1.6 About this Manual
Throughout this manual, the following conventions are used:
• Bold characters are used to name modules, commands and menu names.
• Italic characters are used to name controls on the interface.
• Windows and Mac OS keyboard shortcuts are written as Windows shortcut/Mac OS shortcut.
Page 13
Architecture of Chromaphone 13
2 Architecture of Chromaphone
Chromaphone is synthesizer built around the combination of acoustic resonators. The resulting instruments are played using a mallet or the signal from a noise source. It is very simple yet the range
of sounds it is capable of is surprisingly wide, from realistic reproductions of acoustic percussion
instruments to creative and innovative tones simply not possible with traditional synthesizers.
2.1 General Organization and Signal Flow
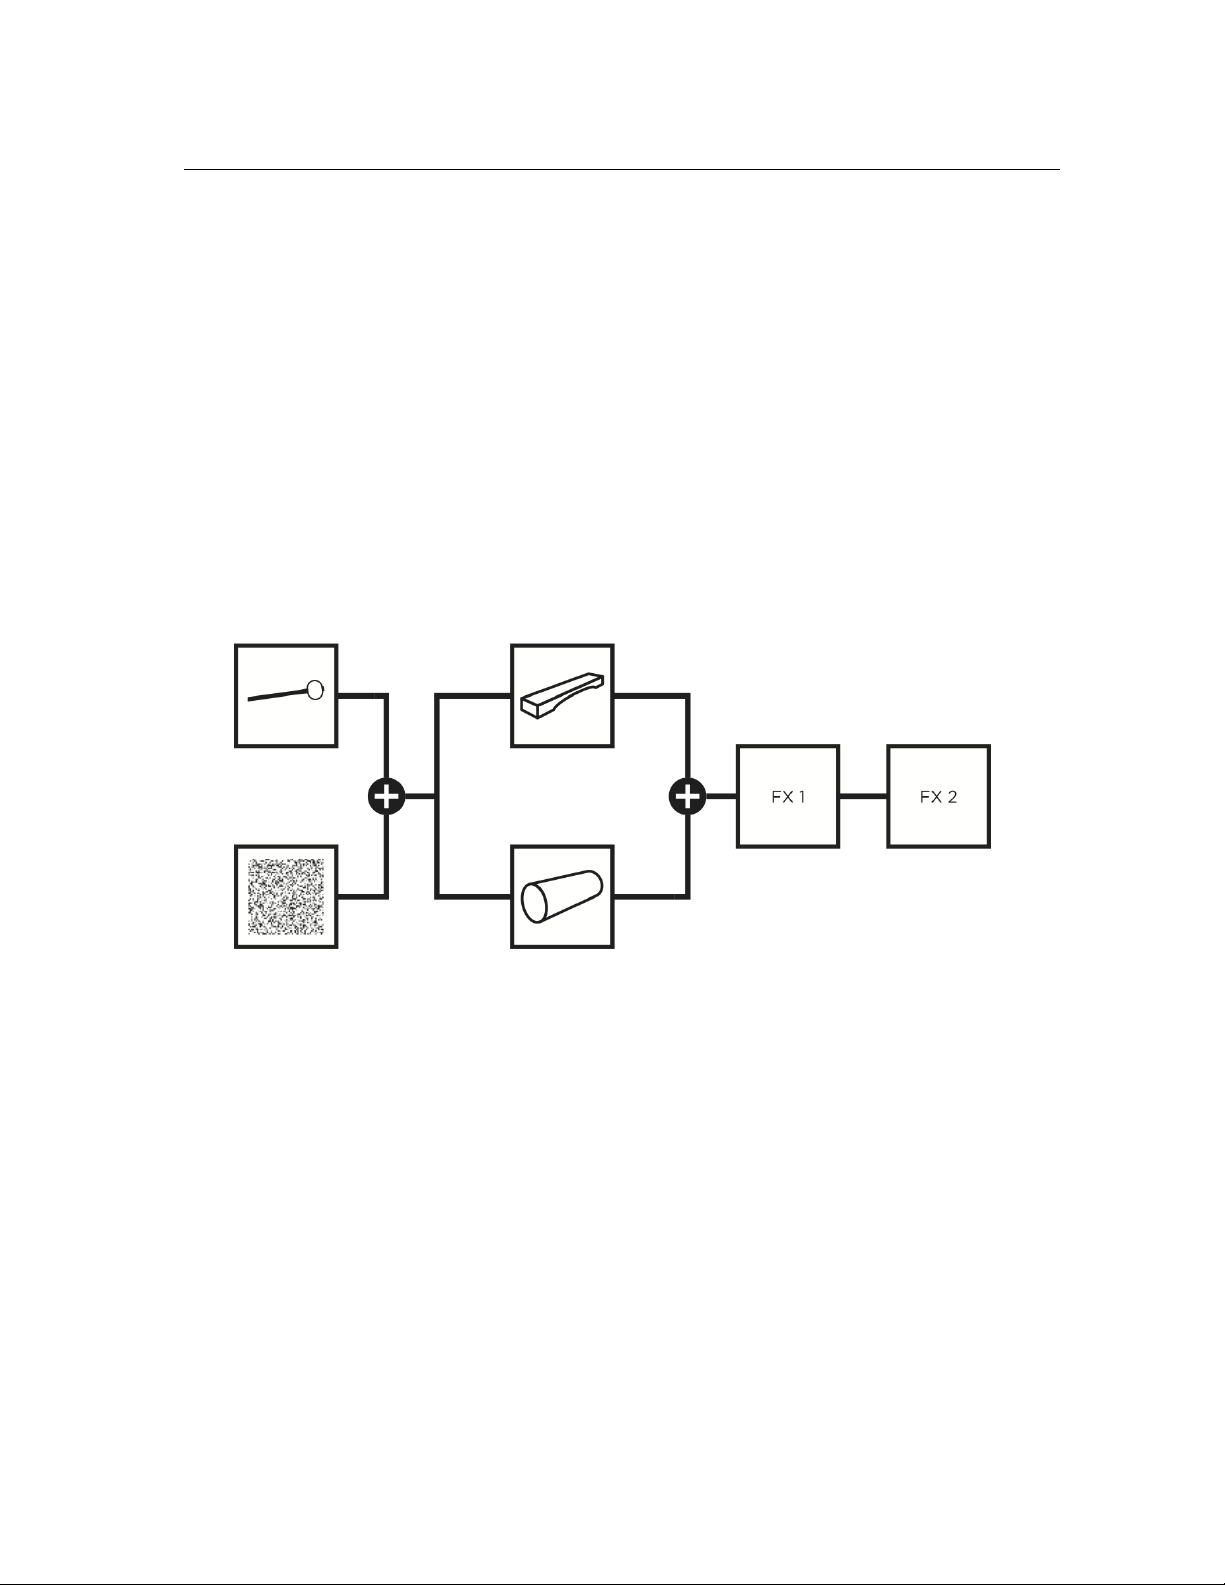
Available resonator types are: string, open and closed tube, plate, drumhead, membrane, bar,
marimba bar and a manual mode. Resonators can be configured to be in parallel or coupled mode
as shown in Figures 3 and 4.
Figure 3: Signal flow of Chromaphone. Resonators in parallel mode.
In parallel mode, both resonators are excited by the sources and the output signal from the
resonators is a simple mix between the output of both resonators, the balance between the sources
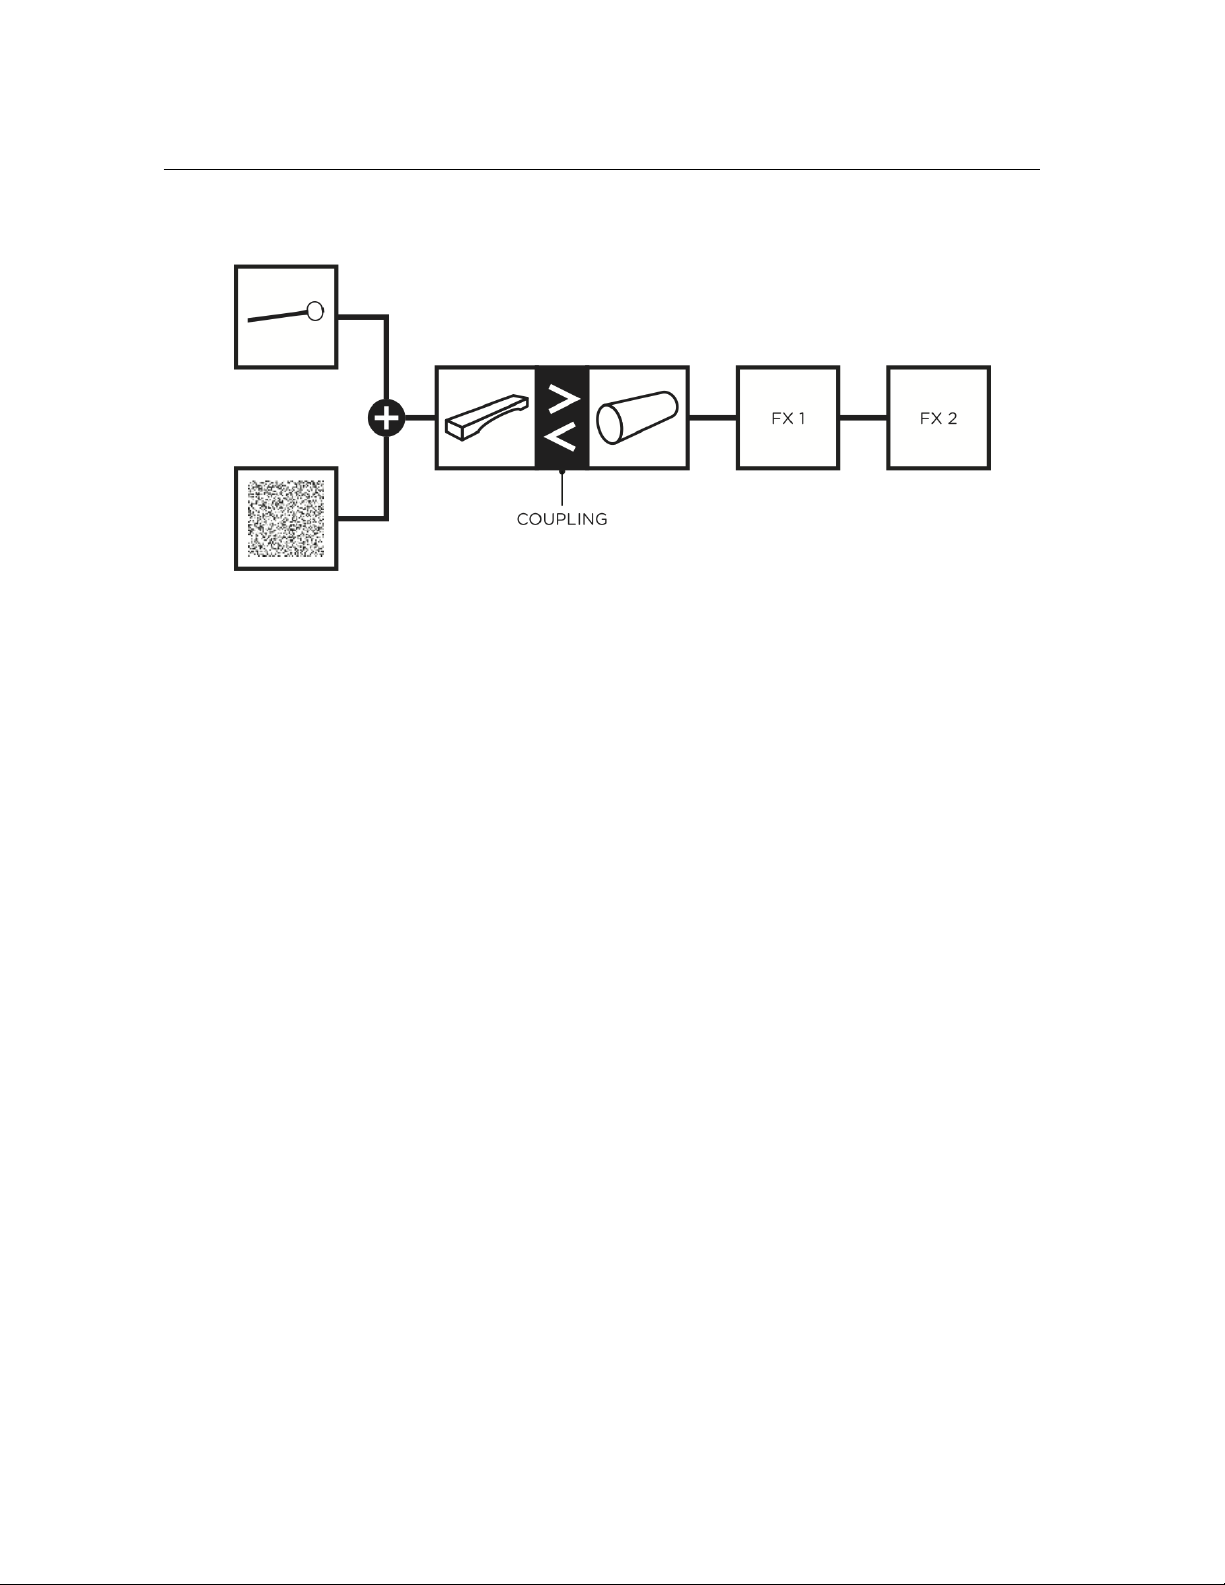
being determined by the position of the Balance slider. In coupled mode, resonator A is excited and
energy is transmitted to the second resonator at their junction point. At first sight this configuration
could appear like a simple series configuration in which the signal from Resonator A is sent to
Resonator B but Chromaphone really takes into account the bidirectional nature of the energy flow
that occurs in real life when two objects are coupled. In other words, once energy is received
by Resonator B, it starts to vibrate which in return influences the motion of Resonator A. The
modeling of these complex interactions results in tones and timbres that reproduce the richness
of sounds from real acoustic instruments. The amount of coupling between the two resonators is
controlled with the help of the Balance slider.
Page 14
14 Architecture of Chromaphone
Figure 4: Signal flow of Chromaphone. Resonators in coupling mode.
2.2 Interface
The graphical user interface has been organized around three different views as shown in Figures 5,
6 and 7.
The first view, called the Play view of the instrument, gives access to different performance
parameters as well as to a step sequencer. The second and third views, called the Edit and FX
views respectively, are used for in-depth editing of the synthesis and effect parameters.
One can switch from one view to the other by using the Play, Edit and FX buttons located in the
Utility section at the top of the interface. This section of the interface is common to all the views
and includes the bank manager, used to access and manage sounds, as well as general settings and
indicators. These tools are described in details in Chapter 3 and Chapter 5 respectively.
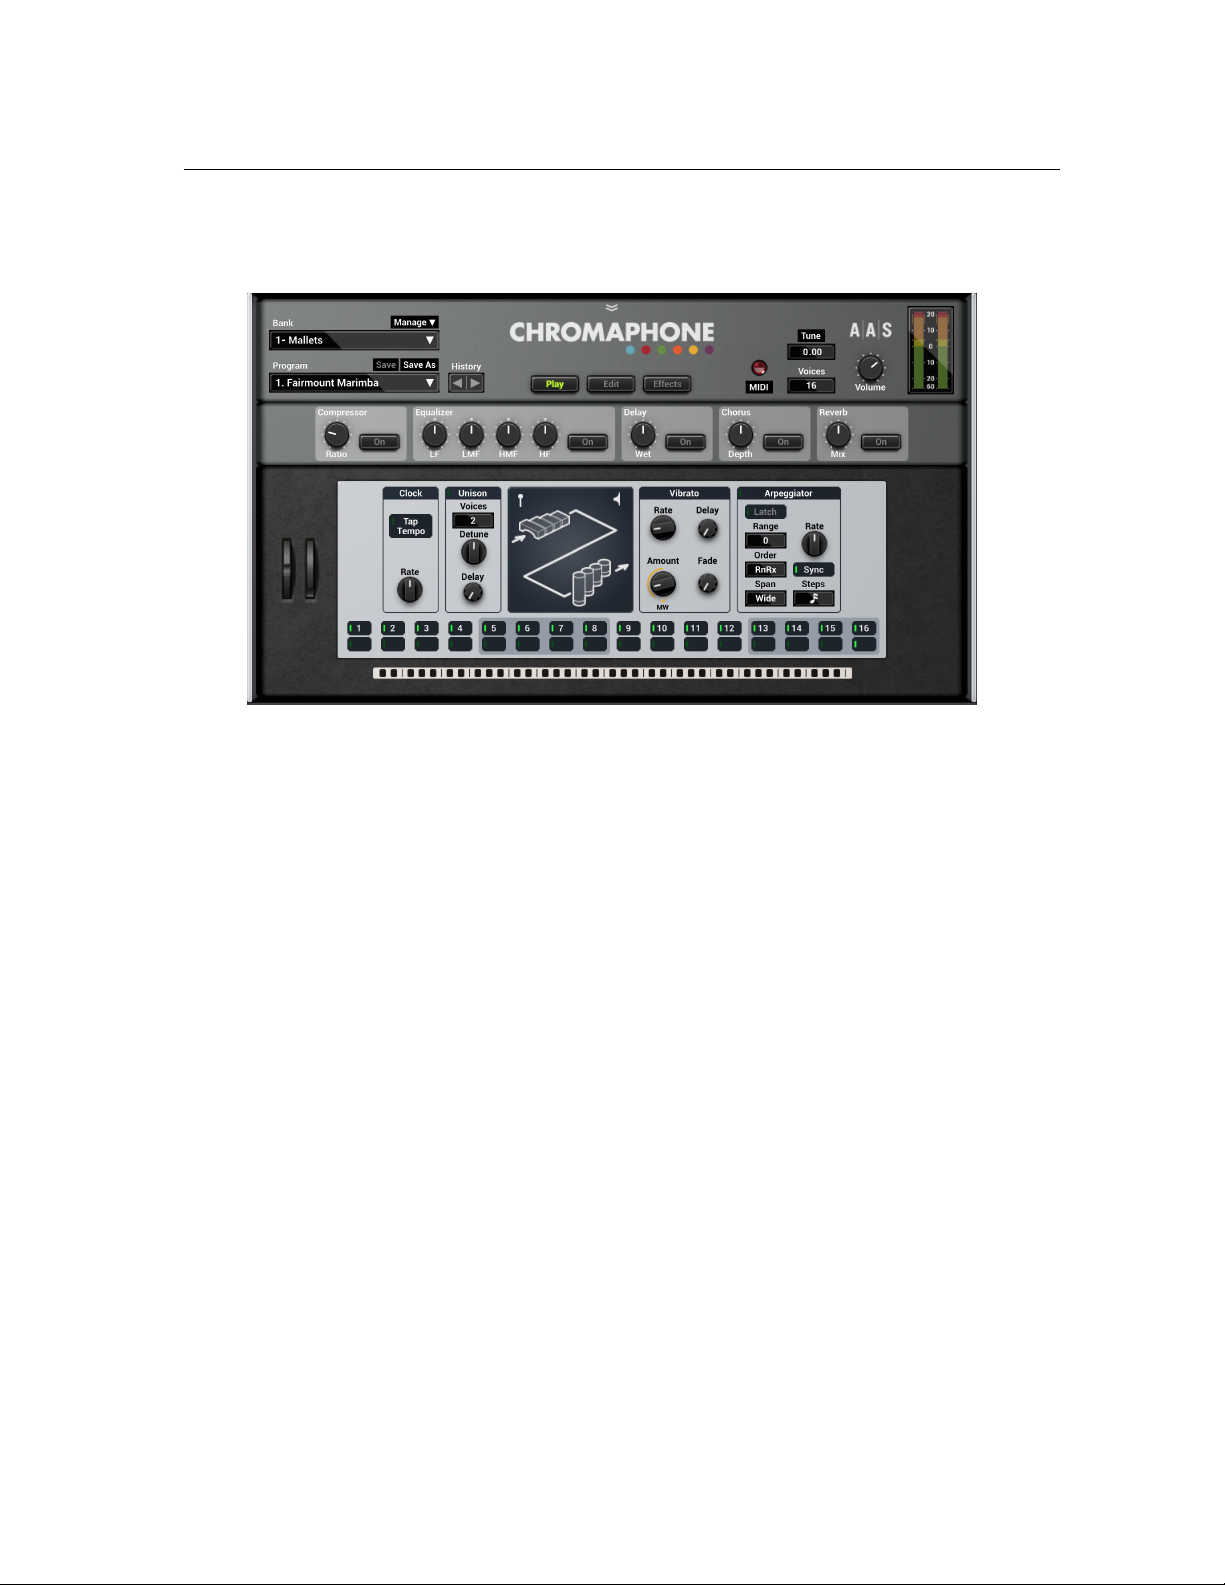
2.2.1 The Play View
The lower section of this view includes a master clock, unisson, vibrato and arpeggiator modules
which will be described in more details in Chapter 4. This part also includes a resonator display
giving information on the type of resonators used in the instrument currently being played and its
configuration.
On the left of these parameters, one finds a pitch bend wheel and a modulation wheel. The
modulation wheel is normally used to control the amount of vibrato in the sound but it can also be
used to adjust any other parameter through MIDI links which will be described in Chapter 6. Just
below is a clickable eight octave ribbon allowing one to play different notes on the range of the
piano which can be useful when no MIDI keyboard is connected to the computer.
Page 15
2.2 Interface 15
The middle section of this view allows one to turn the effects from the multi-effects module,
compression and equalizer on and off and to rapidly adjust their main parameters.
Figure 5: The Play view.
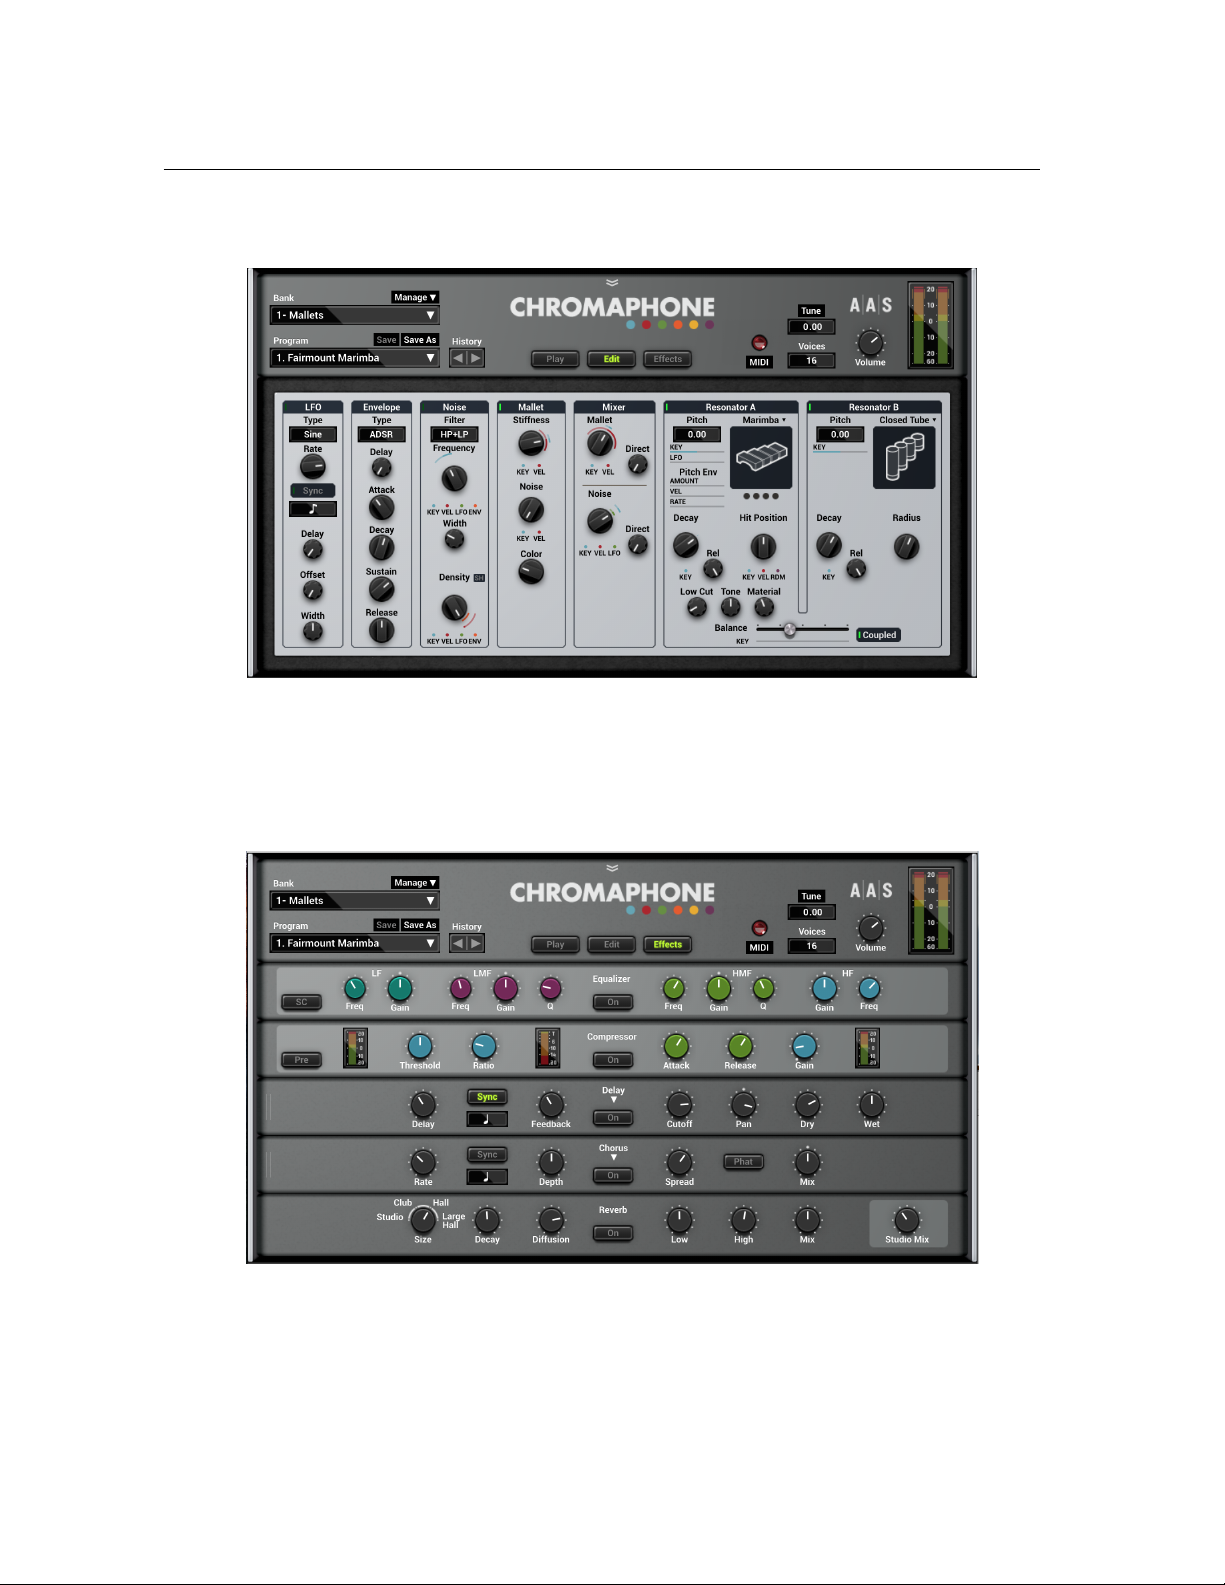
2.2.2 The Edit View
The Edit view gives access to the synthesis parameters described in details in Chapter 4 and allows
one to really go under the hood. In this view, one can choose the sound source, the type of resonators used and how they are configured. All module parameters and modulations are adjusted in
this view.
2.2.3 The FX view
The FX view includes an equalizer, a compressor a multi-effects, and a reverb module. The multieffects module consists in two effects in series. The effect list includes a delay, distortion, chorus,
flanger, phaser, wah wah, auto wah, tremolo, and a notch filter. The functioning of the effect
modules is described in details in Chapter 4.
Page 16
16 Architecture of Chromaphone
Figure 6: The Edit view.
Figure 7: The FX view.
Page 17

Bank and Program Management 17
3 Bank and Program Management
Chromaphone comes with several factory presets, called programs, covering a wide range of
sounds. This collection of programs lets you play and familiarize yourself with this synthesizer
without having to tweak a single knob. Soon, however, you will be experimenting and creating
your own sounds and projects that you will need to archive or exchange with other users. In this
section, we review the management of programs.
3.1 Banks and Programs
Sounds are stored in banks contaning so-called programs. The name of the currently selected bank
is shown in the Bank drop-down display located at the top of the Chromaphone interface. The list
of available banks is viewed by clicking on the Bank display. A bank can be selected by navigating
in the list of banks using the left and right-pointing arrows in the display or by clicking on its name
when the list of banks is open. Clicking on the bank display brings focus on this section of the
interface, the display is then outlined by an orange line, and one can then navigate through the list
of banks using the up, down, left, or right arrows of the computer keyboard.
The list of programs included in the currently selected bank can be viewed by clicking on the
Program display located below the Bank display. A program is selected by using the left and right-
pointing arrows or by clicking directly on its name. Once a program is selected, the value of the
different parameters of the synthesizer are updated and it can then be played. As for the bank list,
one can navigate through the program list using the computer arrows after clicking on the Program
display.
3.2 Saving Programs
Programs are saved by clicking on the Save button located on the top of the Program display. When
a program has just been loaded, this command is greyed and therefore inactive. It is activated as
soon as a parameter of the interface is modified. Clicking on this command replaces the stored
version of the program with the new one.
The Save As command is activated by clicking on the corresponding button which opens the
Save Program pop-up window. It is then possible to save the program under a new name or its
current one in any of the available program banks. Note that if the original name of the program
is used, a new program with the same name will be created at the end of the program list meaning
that the original program is not erased. This also implies that it is possible to have many programs
with the same name in the same bank.
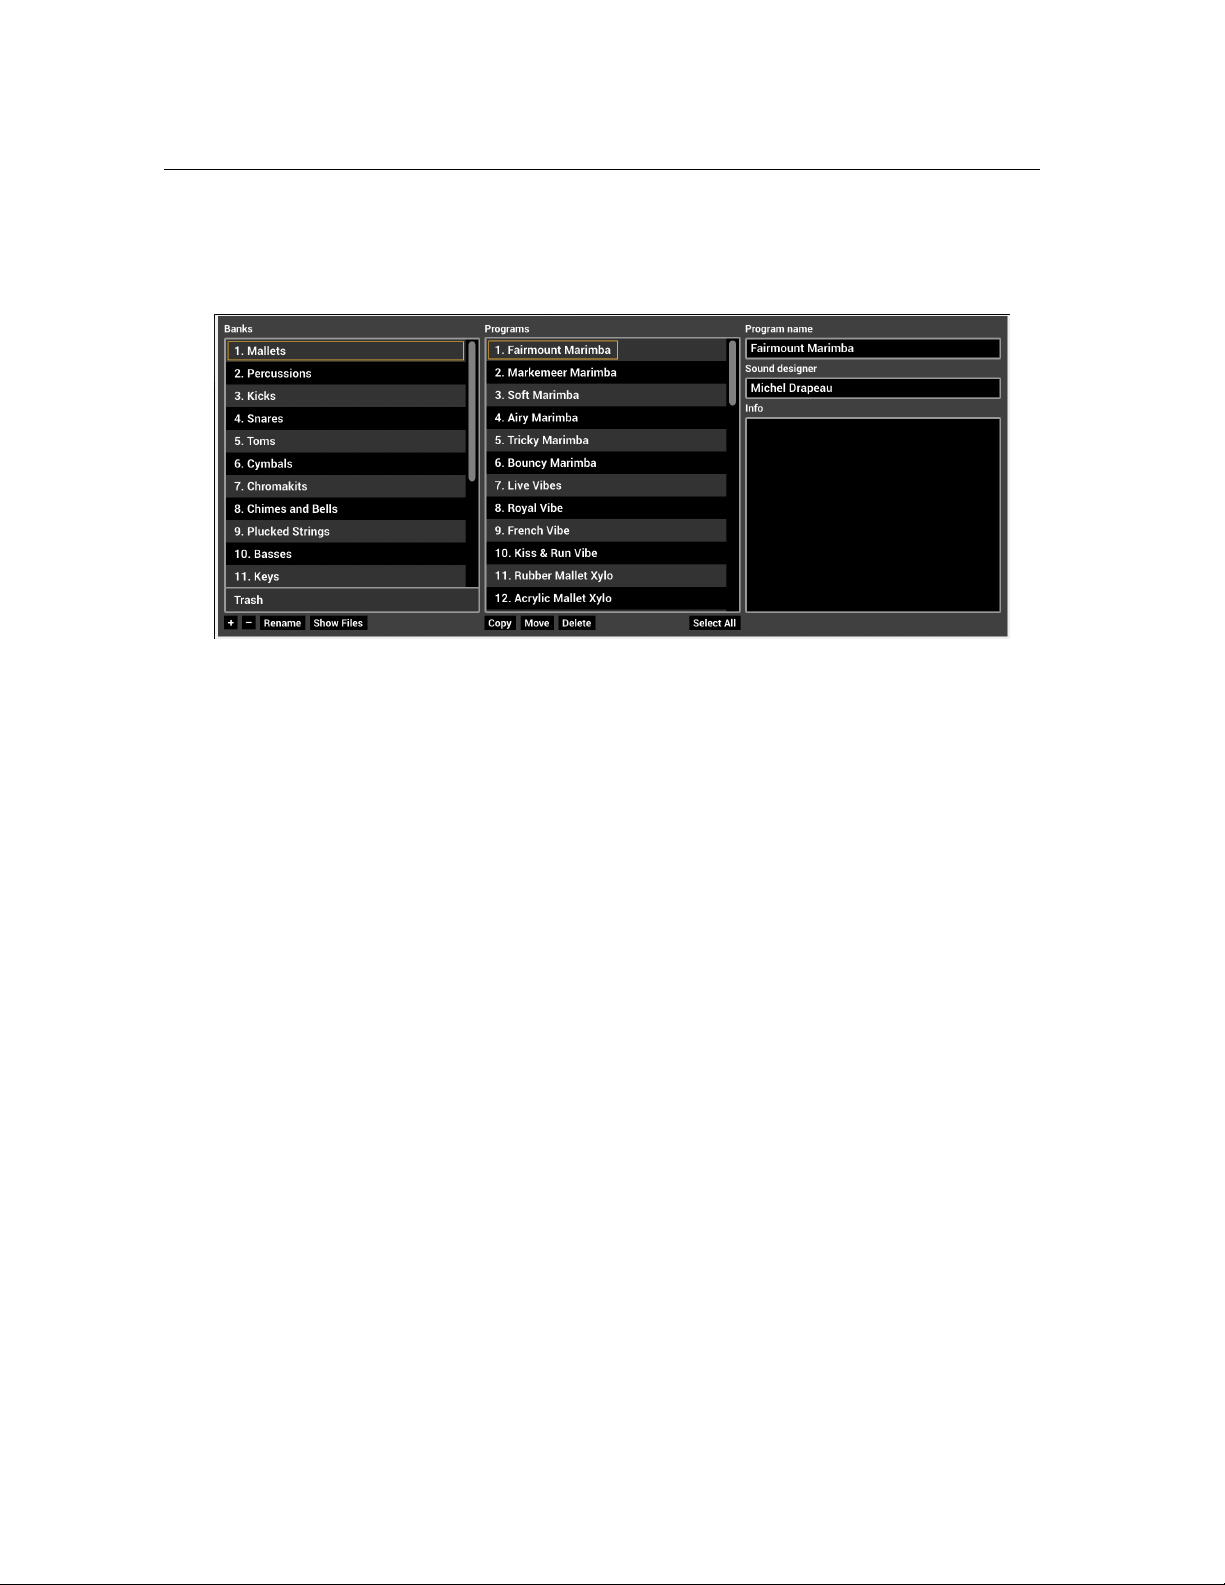
3.3 The Bank Manager
Banks and Programs can be edited using the Bank Manager. The manager window is displayed
by clicking on the Manager button located above the Bank display. It is closed by clicking again
Page 18
18 Bank and Program Management
on the same button. On the left of the window, one finds the list of banks. Clicking on a bank name
fills the list of programs located in the center of the window with the name of these included in the
selected bank.
Figure 8: Bank and program manager window.
A new bank can be created by clicking on the + button below the bank list. This opens the
Create New Bank window in which the name of the new bank can be entered. A bank can be
deleted by first selecting it in the bank list and then clicking on the - button. Be careful, this
command erases a bank and all the programs it contains; this operation is permanent and can not
be undone. In order to rename a bank, simply click on the Rename button and enter a new name.
Banks and the information corresponding to each of its programs is stored in a simple text file
on your computer hard disk. In order to view these bank files, click on the Show Files button under
the bank list. On Windows, this command will open an Explorer window at the location where the
files are stored. On Mac OSX, the command has a similar effect and opens a Finder window. All
the bank file names follow the same format and begin with the bank name. These files can be used
for backups or to exchange presets with other users.
The list of programs included in the selected bank is displayed in the program list in the center
of the manager window. Presets are selected by clicking on their name which updates the program
information appearing on the right of the preset list. Program information includes the name of the
preset, its author and comments. This information can be updated by clicking on the corresponding
box which opens an edition window. Note that multiple presets can be updated simultaneously by
selecting more than one preset at once and clicking on a preset information box.
A multiple selection consisting of adjacent programs is obtained by holding down the Shift key
on the computer keyboard and then clicking on the name of the first program to be copied and then
the last one. A non-adjacent multiple selection is obtained by holding down the Ctrl/command
computer key and clicking on the name of the different programs to be copied. It is also possible
to select all programs at once by clicking on the Select All button at the bottom of the program list.
Programs can be copied to another bank by clicking on the Copy button. A program must first
Page 19

3.4 Using MIDI Bank and Program Changes 19
be selected by clicking on its name on the program list; it is then copied by moving the mouse to
a given bank in the Bank list on the right and clicking on the bank name. The Move command is
activated by clicking on the Move button; it copies a preset to a new bank but also erases it in the
original bank. A multiple selection of programs can be used with the Copy and Move commands
Programs can be deleted from a bank by first selecting them and then clicking on the Delete
button. This will move the programs to a special bank called Trash which is located below the
regular list of banks. This means that deleted programs can always be recuperated as long as they
are not deleted from the Trash bank. The content of the Trash bank is viewed by clicking on its
name; the different programs can then be moved to the other banks as explained above. The Trash
bank can be emptied by clicking on the Empty Trash button which appears below the program list
when the Trash bank is selected. Be careful as this command can not be undone.
3.4 Using MIDI Bank and Program Changes
Banks and programs can be changed using MIDI bank and program change commands. For more
information on how to use these commands, please refer to sections 6.2.4 and 6.2.5.
3.5 Backups of Banks and Programs
User banks are stored on disk as simple text files located in the following folders:
On Mac OS:
/Users/[user name]/Library/Application Support/Applied Acoustics Systems/Chromaphone 2/Banks
On Windows:
%AppData%\Applied Acoustics Systems\Chromaphone 2\Banks
The bank files saved by Chromaphone are named using the following convention:
[name of bank].Chromaphone 2 Bank
These file contain all the information corresponding to the programs they include. These files can
be displayed directly from Chromaphone by opening the Bank manager and clicking on the Show
Files button. This will open an Explorer or Finder window on Windows or Mac OS respectively at
the right location.
The simplest way to create a backup of banks and programs is to make a copy on an external
media of the above mentioned folders. Individual banks can be backed-up by making copies of
individual bank files.
3.6 Exchanging Banks and Programs
Banks and programs can easily be shared with other Chromaphone users. This operation simply
involves the exchange of the above mentioned user bank files. When a new bank file is copied to
the bank folder, it is automatically available to Chromaphone.
Page 20

20 Bank and Program Management
Note that individual programs can not be exported. They always appear inside a bank file. If
you only wish to share a few programs, create a new bank, copy the programs you wish to exchange
to this bank and share the corresponding bank file.
3.7 Restoring the Factory Library
If necessary, it is possible to restore the original factory library of banks and programs. The original
factory bank files are located in the following folders:
On Windows 64-bit:
C:\Program Files (x86)\Applied Acoustics Systems\Chromaphone 2\Factory Library
On Windows 32-bit:
C:\Program Files\Applied Acoustics Systems\Chromaphone 2\Factory Library
On Mac OS startup disk:
/Library/Application Support/Applied Acoustics Systems/Chromaphone 2/Factory Library
Restoring the factory library simply involves copying the files contained in these folders and
pasting them in the user bank folders listed in Section 3.5. The user bank folders can be opened
directly in an Explorer or Finder window, on Windows and Mac OS respectively, or by using the
Show Files command directly from the Chromaphone bank manager.
Note that if you have bank files with the original factory bank names in your user bank folder,
they will be replaced by the original factory files. This means that you will lose programs that you
would have modified or created in these banks. This operation must therefore be done with caution
and it is recommended that you make copies or rename your user banks before proceeding with the
restore.
3.8 Importing Programs from Chromaphone 1
Chromaphone 2 includes a converter allowing one to import programs from version 1 to version
2. The conversion itself is automatic but first involves to copy program bank files from the folder
where version 1 banks are stored to the folder where version 2 banks are stored.
Banks are stored in the folders mentioned in section 3.5. The simplest way to access them,
consists in using the Show Files button in the bank manager of each product version which will
open a Finder or Explorer window on Mac OS X or Windows respectively at the right location.
Bank files that are to be converted then simply need to be copied from the version 1 bank folder to
that corresponding to version 2.
Page 21

Parameters 21
4 Parameters
This section can be used as a reference for the different controls appearing on the Chromaphone
graphical interface. We begin by describing the behavior of the different types of controls appearing
on the interface and then describe the parameters of each module of the synthesizer.
4.1 General Functioning of the Interface
4.1.1 Knobs
The synthesizer parameters are adjusted using controls such as knobs, switches and numerical
displays. A specific control is selected by clicking on it. A coarse adjustment is obtained by clickholding the parameter and moving the mouse, or the finger on a track pad, either upwards and
downwards or leftwards and rightwards. The value of the parameter replaces its label while it is
being adjusted.
Fine adjustment of a control is obtained by holding down a modifier key of the computer
keyboard (Shift, Ctrl, Command or Alt key) while adjusting the parameter. Precise values can
also be entered manually by clicking on the parameter label and typing the value on the computer
keyboard.
Double clicking on a knob brings it back to its default value when available.
4.1.2 Switches
Switches are turned on or off by clicking on them. They are used to activate or deactivate modules
and the sync feature of some parameters.
4.1.3 Drop-down Menus
Some displays reveal a drop-down menu when clicking on them. Adjustment of the control is
obtained by clicking on a selection.
4.1.4 Modulation Signals
Some parameters of the synthesizer can be modulated by different signals. The modulation controls
appear as colored dots or lines below or next to their corresponding parameter. Modulations sources
include the MIDI pitch, velocity, and Modulation Wheel signals (Key, Vel and MW labels), the
signal from the Noise Envelope and LFO modules (Env and LFO labels), as well as a random
signal (RDM label).
A modulation can be viewed as the variation of a parameter around its current value controlled
by a modulation signal. The different modulation controls act as gain parameters which multiply
Page 22

22 Parameters
the modulation signal by a certain factor. The amount of modulation is adjusted by click-holding
on a modulation dot or line (or its label) and and moving the mouse (or the finger on a track pad)
either upwards and downwards or leftwards and rightwards. The amount of modulation is indicated
by colored rings or lines that appear around or along the parameter control, the length of the ring
or line being proportional to the amount of gain applied to the modulation signal.
Note that the colored rings (or line in the case of the Balance control) appear in a bold and light
shade. A bold segment indicates a variation of the parameter when the value of the modulation
signal is positive while a light shade indicates the direction of the change when the modulation
signal is negative.
The Key modulation are used to modulate a parameter depending on the note played on the
keyboard. When there is no modulation (no color ring), the value of the corresponding parameter
is equal across the whole range of the keyboard.
The variations are applied relative to the middle C (C4, MIDI note 60) for which the parameter
value is always that corresponding to the actual parameter knob. The value of the parameter then
varies up or down linearly with ascending or descending pitch depending on the direction of the
modulation. A bold blue ring segment indicates the direction of the parameter value change when
playing high notes while a light blue segment indicates the direction of the change when playing
low notes.
The Vel modulations are used to modulate the value of a parameter depending on the MIDI
velocity signal received from the keyboard so that the value of a parameter increases or decreases
as notes are played harder on the keyboard. The direction of the change is indicated by a red ring
segment. In the case of the MIDI velocity modulation, the zero position corresponds to a MIDI
velocity value of 64. Values from 63 to 0 will therefore follow a light colored segment while the
values from 65 to 127 will follow bold segments.
Modulations using the signal from the LFO and Env modules are controlled using the LFO and
Env dots and are displayed by green and orange rings respectively around the modulated parameter.
The amplitude of the LFO modulation is proportional to the length of the green ring and it can be
positive or negative depending on the orientation of the bold and light colors on the ring. In the
case of the Env modulation, the amplitude of the modulation is proportional to the length of the
orange ring segment and its direction follows its orientation.
4.1.5 Synchronisation
The rate of the Arpeggiator, LFO and certain effect modules can be synchronized to the clock of
a host sequencer when the program in used in plug-in mode. To do so, simply turn on their Sync
switch. Synchronization values are adjusted with the Sync Rate parameter and range from 4 whole
notes (16 quarter notes) to a thirty-second note (1/8 of a quarter note) where the duration of the
whole note is determined by the host sequencer clock. The effect can also be synced to a triplet or
dotted note. To adjust this parameter, click on the Sync Rate button and choose a rate value from
the drop-down menu.
Page 23

4.2 General Notions of Acoustics 23
In standalone mode, when the Sync switch of an effect of module is switched on, the duration
of a whole note is adjusted using the Rate control of the Clock module on the Play view.
4.2 General Notions of Acoustics
4.2.1 Normal Modes
Exciting an object such as the skin of a drum by hitting it with a mallet results in a complex vibrational motion. It is this vibration of the object that will create pressure waves in the surrounding
air which will propagate to our ears as sound waves.
Mathematically, a complex vibrational motion can be decomposed into elementary motion patterns called the normal modes of the object. Under a normal mode, all the parts of the structure
move in phase and at the same frequency in a sinusoidal motion. In other words, this complex
motion results from the fact that objects naturally oscillate at many different frequencies at once,
each frequency being related to a normal mode of vibration. These frequencies are called partials;
the lowest partial is called the fundamental and the higher ones are referred to as overtones. When
relating to music, the fundamental corresponds to the note played and the overtones are called
harmonics as in most musical instruments their frequency is a multiple integer (or almost) of the
fundamental.
As an example, the vibration motion associated with two normal modes of a rectangular plate is
illustrated in Figures 9 and 10. In the first figure, one can see the vibration motion associated with
two different normal modes of the plate (modes [1,1] and [3,2]). Over one period of oscillation,
all the points go up and down in phase. The principle remains the same for all mode, the motion
pattern only becoming more and more complex as the order of the mode increases. The full motion
of a plate, however complicated, will always correspond to a combination of all its normal modes.
Figure 10 is a top view of the plate and shows contour lines corresponding to the same normal
modes. A contour line groups points that oscillate with the same amplitude. In particular, the
straight lines in the second graph of this figure, corresponds to so-called nodal lines where the
amplitude of the motion is zero and therefore where the plate is still.
The relative frequencies or ratio of the frequency of the overtones to the fundamental frequency
is specific to the type of the object and its boundary conditions (whether its boundaries are free to
vibrate or are fixed). In other words this distribution of partials is characteristic of the type of object
and could be viewed as its tonal signature; it allows us to distinguish, for example, a vibrating
plate from a drumhead. The specific frequency of the partials, related to the sensation of pitch, is
determined by the dimensions of the object, for example a small plate will have a higher pitch than
an larger one.
But this is not all, we can distinguish different types of objects, such as a vibrating plate and a
beam, but also two objects of the same type but made out of different material. For example a metal
plate will sound brighter and have a longer decay than a wooden plate. This is due to the fact that
the physical properties of an object depend on its material which determine the relative amplitude
and phase of the different partials as well as their damping, a measure of how fast they will decay
Page 24

24 Parameters
Figure 9: Motion corresponding to normal mode [1,1] and [3,2] of a plate.
Figure 10: Contour plot corresponding to normal mode [1,1] and [3,2] of a plate.
once excited. The specific amplitude, phase and damping of each partial therefore determine the
specific tone of the object as well as how it evolves with time.
There is finally one more parameter which affects how an object sounds, it is the point of
excitation. Indeed, a drumhead does not sound the same if it is hit in the middle or near the rim
of the drum. This can be understood by the fact that exciting an object on a point located on a
nodal line of a mode (a line where amplitude of the motion associated with a mode is zero) does
not allow the transfer energy to that specific mode and its corresponding partial will not be excited.
The effect will not be as pronounced but will still exist as the excitation point is moved around the
nodal lines which explains how the excitation point influences the relative amplitude of the partials
and therefore the tone.
Page 25

4.2 General Notions of Acoustics 25
4.2.2 Coupling of Resonators
One of the key features of Chromaphone is that it allows one to couple objects together, in other
words to take into account the interaction between objects as opposed to simply feeding the signal
from one object to the other. This is very interesting because this interaction between components
results into a new object which, while being related to its original elements, behaves and sounds
differently. In fact, musical instruments are based on combinations of objects such as a string and
a soundboard for a guitar, a bar and a tube in the case of a vibraphone or a skin and a column of air
in a drum.
The coupling of objects results in a bidirectional transfer of energy between the objects. In
physical terms, the amount of exchange is determined by the relative value of the mechanical
impedance of the different objects. The impedance is a notion which measures how much an
object opposes motion when subjected to a force. It is a frequency domain function as the response
of an object can vary greatly with frequency. For example the amplitude of the motion of an object
will be much greater when excited at a resonance frequency.
In simpler terms, the effect of coupling can be understood by considering how rigid one object
is compared to the other which determines how much energy can be transferred from the first object
to the second one. Let’s imagine a string attached to a very stiff sound board. While some energy
will be transmitted to the sound board through the bridge, it will not greatly affect the motion
of the string; most of the energy will be reflected back into the string at the bridge resulting in
a standing wave in the string and a long decay. Now let’s imagine that the soundboard becomes
much less rigid. The string can now set it into motion more easily at the bridge. This implies that
more energy will be able to flow from the string to the soundboard resulting in a shorter decay as
less energy is reflected back into the string. But the soundboard also moves according to its own
vibration modes which are different from that of the string. This motion interacts with that of the
string which modifies the tone that we hear. One could say that we now hear more the soundboard
in the resulting sound. The amount of coupling between the resonators therefore affects both the
resulting tone and its decay time.
The material of the objects is not the only thing to consider. Their respective tuning, which
can be related to their geometry, also greatly influences the response of the combined objects. For
example if the objects are tuned at the same fundamental frequency, their respective motion will
be synchronized and result in a sound having a large amplitude. For example, in a vibraphone,
the tubes are tuned to the fundamental of the bar above them in order to amplify the fundamental.
But there is also another effect which might seem contradictory at first. The fact that energy is
well transmitted from the bar to the tube also implies a faster decay of the oscillations. Hence,
the overall effect of the combination of the bar and the tube is to amplify the fundamental while
decreasing the decay time of the note.
As we can see, the overall effect of coupling can be quite complex as many factors must be
taken into account. As a rule of thumb, in traditional musical instruments, a first resonating object
with a long decay is usually coupled to a second resonator having a very short decay time (try
knocking on the sound board of a guitar) in order to avoid unpleasant resonance effects.
Page 26

26 Parameters
4.3 The Edit View
4.4 The Mixer Module
The two Chromaphone resonators can be excited by a mallet and a noise
source. The Mixer module is used to adjust the amplitude of both of these
sources. The Mallet knob is used to adjust the amplitude of the force impact
from the mallet while the Noise knob controls the amplitude of the noise source.
Both of these parameter can be modulated with pitch and MIDI velocity. The
noise source can also be modulated with the LFO module. The two Direct knobs
are used to add signal from the mallet or noise source to the output signal from
the resonators. When in their leftmost position, there is no extra source sound
added to the output signal and the source component that is present in the output
sound is the original sound from the sources filtered by the resonator(s). Turning
these knobs clockwise adds an increasing amount of direct source signal in the output sound.
4.5 The Mallet Module
The Mallet module is used to simulate the force impact produced by a mallet
striking an object. The force of the impact is adjusted with the Mallet knob from
the Mixer module as described above while the stiffness of the mallet (related
to its material) is varied with the Stiffness knob. Figure 11 shows the effect of
the adjustment of the stiffness on the output signal. As the stiffness is increased
the excitation signal becomes narrower. The effect of the amplitude of the force
impact is also shown in the same figure. The Stiffness parameter can be modulated
with the MIDI velocity and the note played. These modulation, combined with
a corresponding modulation of the Mallet parameter from the Mixer module are
usually used to get a stronger impact with increasing keyboard velocity and to make
the mallet softer as the impact velocity increases, a behavior one observes, for
example, on piano hammer heads due to the non-linearity of the felt.
Figure 11: Effect of the Stiffness and amplitude of the force impact (Mallet knob from the Mixer
module) on the output from the Mallet module.
Page 27

4.6 The Noise Module 27
Noise can also be added to the impact sound allowing for some interesting effects. The amount
of noise is controlled with the Noise control. In its leftmost position there is no noise added to the
signal and one only hears the impact noise. Turning this knob clockwise gradually increases the
amount of noise. The frequency content of the noise can be adjusted with the help of the Color
control. Turning this knob clockwise increases the cut-off frequency of a high-pass filter.
4.6 The Noise Module
The Noise module is an alternate way to excite the resonator. This module can
be used to add noise to the impact signals from the Mallet module but, with its
associated envelope generator, it also allows one to produce long excitation signals,
very different from the impact-like signals from the Mallet module, and add sustain
to the sound.
The source of this module is a white noise generator whose output can be filtered using the different filters available from the Filter drop-down list at the top of
the module. Available filter types are: resonant low-pass, resonant high-pass, bandpass, and low-pass and high-pass in cascade allowing for a flat response in the pass
band. There is also a graphic mode allowing for precise multi-band shaping of the
noise source.
The amplitude of the noise source is controlled using the Noise knob from the
Mixer module and the envelope signal from the Envelope module. This parameter
can further be modulated with the pitch or velocity signal from the keyboard or with
the output from the LFO module.
The Frequency control is used to adjust the cut-off or center frequency depending on the type
of filter used to shape the noise source. This parameter can be modulated with the the pitch or
velocity signal from the keyboard or with the output from the Noise Envelope or LFO module.
The third control for this module has different values depending on the type of filtering applied
to the noise source. When a resonant filter is chosen, the label for this parameter is Q and the
parameter controls the resonance or quality factor of the filter. In the case where a combination of
low-pass and high-pass filter is chosen, the label is Width and the parameter controls the width of
the pass-band of the resulting filter.
In the case when the Graphic option is chosen in Filter list, the noise source is shaped by a
filter bank. The Frequency and Q knobs are replaced by ten sliders each one being associated with
a specific frequency band. The different bands are controlled by a band-pass filter except for the
first and last bands which are controlled by a low and high pass filter respectively. The amplitude
of each band can be adjusted from −∞ to zero dB. When all the sliders are in their rightmost or
0 dB position, the spectrum of the noise source is flat. Moving any slider to the left decreases the
amplitude of the noise source in the corresponding frequency band until it is completely removed
when the slider reaches its leftmost position. Another way to work with these filters is to put all
the sliders in their leftmost position, equivalent to switching off the noise source, and then adding
noise in the desired frequency bands.
Page 28

28 Parameters
The last parameter of the module is called Density and it is used to control the rate at which
random samples are fired by the module. When this control is in its left position, the density is low
and one can clearly hear individual random noise samples which may sound like individual particles
hitting the surface of the resonators. Increasing the noise density by turning the knob clockwise
increases the number of clicks generated in a given interval of time until the output starts to become
continuous. This parameter can be used to produce interesting effects by exciting the resonators
randomly. This parameter can be modulated with the the pitch or velocity signal from the keyboard
or with the output from the Noise Envelope or LFO module. The density parameter also has a
sample and hold feature which is turned On using the sh switch to the right of the Density knob.
When activated, a noise sample is held until a new one is triggered. This features affects the color
of the noise but is mainly there for compatibility reason with presets from version 1.
4.7 The Resonator Module
In Chromaphone, instruments are created by forming pairs of acoustic resonators. The excitation
signal from the Mallet and/or Noise source modules is sent to the resonators which can be arranged
in a series or parallel configuration. Resonator A and B can be turned On or Off by clicking on the
green led in the top-left corner of each module.
Page 29

4.7 The Resonator Module 29
The Resonator selector allows one to choose the type of resonator used. The
resonator type can be changed by clicking on the resonator icons or by using the
drop-down menu at the top of the icon display. The list of resonators include the
main type of objects used in the making of musical instruments. Available types
are:
• String: a perfectly elastic string,
• Beam: a rectangular beam with constant cross-section,
• Marimba: a beam with variable section allowing one to obtain partials having a quasi-
harmonic ratio,
• Plate: a rectangular plate,
• Drumhead: circular membrane,
• Membrane: rectangular membrane,
• Open Tube: a cylindrical tube with both ends open allowing one to obtain the complete
harmonic series (even and odd harmonics),
• Closed Tube: a cylindrical tube with one end closed allowing one to obtain only odd har-
monics,
• Manual: In this mode, one can create a custom resonator by selecting up to four partials (see
Quality control). The rank of each partial is fixed using the Partial 1 to Partial 4 selectors.
The Quality control is located just below the resonator selector and is represented by big dots.
It allows one to adjust the number of modes taken into account in the synthesis and therefore the
richness and complexity of the sound. This control has four positions corresponding to 4, 16, 30
and 70 modes. When the resonator is a Tube, this control is deactivated and all modes are taken
into account. Note that the CPU time required by a resonator is proportional to the number of
modes calculated; the higher the number of modes used, the higher the CPU load. In the particular
case where the Manual resonator type is selected, this control is used to determine how many of
the four available partials will be used to form the resonator.
The reference pitch of a resonator, or in other words the frequency of its first
partial, is adjusted using the Pitch parameter. This control is composed of two
numbers separated by a dot. The first number indicates a value in semi-tones while
the second one indicates a value in cents (one hundredth of a semi-tone). When the
semi-tone and cent controls have a value of zero, the reference pitch of the object
is the middle C of the piano (C4 = 261.62 Hz). The value of the reference pitch can
be adjusted by click-dragging on the semi-tone and cent controls. Double clicking
on these controls brings back their value to zero.
Page 30

30 Parameters
The Key control determines how the pitch varies as a function of the note played on the keyboard. When this parameter is zero, the pitch does not vary and therefore it is the same whatever
the note played on the keyboard. When this control has a value of 1.00:1 (one semi-tone for each
semi-tone on the keyboard), the pitch of the object follows the pitch of the note played on the
keyboard or in other words, the pitch variation is tempered. Using values smaller or higher than
1.00:1 results in intervals smaller or greater than a semi-tone when adjacent notes are played on
the keyboard. The pitch can also be modulated using the signal from the LFO module. The LFO
control is used to adjust the amount of gain applied to the signal from the LFO.
The Level and Rate controls are used to obtain a modulation of the pitch when a note is played.
The Level control is used to determine the amount by which a note is detuned when it is triggered.
The Rate control sets the amount of time before the note reaches its normal pitch. Note that the
value of the Level control can be positive or negative allowing the note to start above or below its
real pitch. It can also be modulated by the MIDI keyboard velocity. This adjustment is obtained
using the Vel control.
The decay time of the partials of the object is determined by the Decay control. The Key
modulation parameter associated with this control allows one to adjust this parameter as a function
of the note played on the keyboard. Note that in the case of a Tube object, the decay time of
the sound is also affected by the Radius parameter. In that case, the total decay time will be
determined by the cumulative effect of the Decay and Radius parameters. Note that the decay time
of instruments with coupled resonators also depends on the amount of coupling.
The Rel parameter is used to simulate the effect of dampers on the object when a note is
released. The release time is calculated as a percentage of the total decay time of the object as
set by the Decay parameter.
The Material control allows one to fix the decay time of partials as a function of frequency
with respect to that of the fundamental. This is a parameter characteristic of the material of the
object. When this parameter is set to a value of zero, all partials decay at the same rate, that fixed
by the position of the Decay control. Adjusting the Material control to a negative value favors low
frequencies by decreasing more and more the decay time of partials as their frequency increases.
When this control is set to a value of -1, the decay time will be inversely proportional to the
frequency of the partial. Thus a partial with a frequency twice as great as that of the fundamental
will have a decay twice as short as that of the fundamental, a partial with a frequency three time as
great will have a decay time three times shorter and so on. Using a positive value for this parameter
has an opposite effect as the low partials then decay more rapidly than the higher ones. When this
parameter is set to a value of 1, the decay time is proportional to the frequency of the partial. For
example, the decay time of a partial with a frequency twice as great as that of the fundamental will
have a decay twice as long as that of the fundamental and so on.
The Tone control is used to adjust the amplitude of the partials as a function of frequency with
respect to that of the fundamental. When this control is adjusted to a value of zero, all partials have
the same amplitude. When this control is set to a negative value, the high partials have a smaller
amplitude than the low ones. For example, a value of -6dB/octave results in the amplitude of the
partials being inversely proportional to their frequency. Thus a partial having a frequency twice
Page 31

4.7 The Resonator Module 31
as great as that of the fundamental will have an amplitude twice as small (-6 dB), a partial with a
frequency four times that of the frequency will have an amplitude 4 times smaller (-12 dB) and so
on. When this control has a positive value, the effect is inverted. The low frequency partials then
have a smaller amplitude than the higher ones. For example, when this parameter is set to a value
of +6 dB/octave, the amplitude of the partial is proportional to its frequency. Thus a partial with
a frequency twice that of the fundamental will have an amplitude twice as great (+6 dB) as that
of the fundamental and so on. Note that these amplitude values can further be modulated by the
excitation position (see Hit Position control) which is a parameter affecting the relative amplitude
of the partials.
The Low Cut parameter gives additional control on the low frequency response of the resonator
by applying a -24 dB per octave low-cut filter. This control is useful when clearer sounds are desired. The Low Cut knob is used to adjust the cut-off frequency of the filter. In its leftmost position,
the low cut filter is inactive and the sound is not affected. Turning the knob clockwise displaces the
cut-off frequency towards higher frequencies following steps corresponding to harmonics numbers
thereby removing more and more low frequency content in the sound.
The Radius parameter replaces the Material control when a Tube object is selected. In fact,
standing waves in a tube do not result from the vibrations of the walls of the tube but rather by
vibrations of the air column inside the tube. The material of the tube is therefore not a relevant
parameter in that case. The effect of the Radius parameter can be viewed as that of a low-pass
filter with the cut-off frequency of the filter increasing as the radius is decreased. In other words,
the smaller the radius, the brighter the sound. The radius of the tube also affects the total decay
time of the object, the decay time being shorter for large radii as a result of larger radiation losses
at the open ends of the tube. The Radius control on the interface has been adjusted to follow the
same behavior as that of the Decay one, in other words to obtain longer decay time as it is turned
clockwise. Even if this may seem contradictory at first, this implies that the actual radius of the
object decreases has the value of the parameter is increased.
The Hit Position controls where the excitation signal is applied on a resonator. This is an important parameter as it affects the relative amplitude of the different partials of the resonator and
therefore the spectrum of the sound it radiates as explained in Section 4.2.1. This position is indicated as a percentage of the total size of the object. The minimum value of the control corresponds
to an excitation applied on the border of the object while the maximum value corresponds to an
excitation applied at its center. In the case where both resonators are coupled, the Hit Position setting of resonator A represents the location where the excitation signal is applied while this setting
on resonator B represents the point where the extremity of Resonator A is coupled to resonator B.
As the tone of the resonator varies with the excitation position, it is interesting to modulate this
position while playing. This is possible using the Vel, Key controls which are used to adjust the
amount of modulation from the keyboard velocity, pitch signal respectively and the Rnd control
which applies a random modulation.
The Coupling selector is used to determine if the two resonators are coupled or not. In the Off
position, the resonators are not coupled and excited simultaneously. They are, in other words, in
a parallel configuration. The output signal is then a mix of the signals from the two resonators in
Page 32

32 Parameters
a proportion determined by the setting of the Balance slider. When in its center position, an equal
amount of signal from resonator A and B is present in the mix. More signal from resonator A or B
is obtained by adjusting the balance slider up or down.
The two resonators are coupled when the Coupling control is in the On position. In this case,
resonator A receives the excitation signal and energy is exchanged between the two resonators
through coupling which creates a new object whose characteristics depend on the parameters of the
two objects. In coupling mode, the Balance slider is used to adjust the impedance ratio, in other
words how easy it is to set one object into motion compared to the other. In the A position, the
impedance of resonator A is lower than that of resonator B implying that resonator B is very stiff
compared to resonator A. As a result, most of the energy is reflected back into a at the junction point
and resonator A is not much affected by resonator B; one mostly hears resonator A. Increasing this
parameter decreases the impedance of resonator B with respect to that of resonator A affecting
more and more the functioning of the first resonator. Below the center position, the impedance
of resonator B is lower than that of resonator A resulting in a change in the limit conditions of
resonator A and hence the frequency of its fundamental and partials depending on the settings of
resonator B. In other words, one starts to hear resonator B more and more in the final sound. The
amount of coupling or balance (in the case where they are in parallel mode) between the resonators,
can be modulated with the pitch of the note played with the Key control.
4.8 The Noise Envelope Module
This module is an envelope generator used to modulate the amplitude of the noise
source as well as its Frequency and Density controls. The envelope generator can be
operated in ADSR or AHD mode. The Type drop-down control is used to select
between these options.
In ADSR mode, the envelope is divided in four phases: Attack, Decay, Sustain
and Release as illustrated in Figure 12. During the attack phase, the envelope signal
goes from a value of zero to a value of 1 in a laps of time controlled by the A knob.
The decay phase then begins and the signal goes from 1 to the sustain value of the
signal in a laps of time controlled by the D knob. The level of the sustain portion of
the modulation signal is adjusted using the S knob. This value is held as long as a
note is depressed. Upon release of the note, the signal then decreases from its sustain
value to zero in a laps of time controlled by the R knob. If the note is released during
the attack or decay phase, it will switch to the release phase and decay to zero. The
Delay knob of this module is used to add a delay between the triggering of a note and
the start of the envelope. This is useful to add noise to the excitation signal following the initial
impact noise from the Mallet module.
The AHD mode is used to create envelopes for short attack sounds such as in one-shots. In this
mode, the envelope is divided in three phases: Attack, Hold, and Decay as illustrated in Figure 13.
Once triggered, the complete envelope signal is generated even if the note is released before the
end of the envelope itself. During the attack phase, the envelope signal goes from a value of zero
Page 33

4.8 The Noise Envelope Module 33
Figure 12: ADSR Response curve.
Figure 13: AHD envelope response curve.
Page 34

34 Parameters
to a value of 1 in a time interval controlled by the A knob. The envelope signal then remains at this
peak value during a time determined by the H knob. The signal then decreases from this value to
zero in a lapse of time controlled by the D knob.
4.9 The LFO Module
The LFO module is used as a modulation source for the Noise source module.
The waveform of the LFO is selected with the Shape drop-down menu on the top of
the module. The possible values are Sine, Triangular, Square, Random and Random
Ramp. The shape of the triangular and square waveform can be varied using the Width
parameter. In the case of the triangular wave, the waveform is thus varied gradually
from a triangular shape in the middle position to a sawtooth shape starting at its lowest
value and going up when the knob is turned to its leftmost position to a sawtooth
starting from its maximum point and going down when the knob is fully turned to the
right. In the case where the square wave is selected, the waveform is square when the
knob is in its center position and is transformed gradually to a smaller and smaller
pulse as the knob is moved anti-clockwise and to a an increasingly rectangular wave
when moving the knob clockwise from its center position. When the waveform is
set to Random, the LFO module outputs random values at the rate determined by the
Sync control or the Rate knob. In this case, the output value from the LFO module
remains constant until a new random value is introduced. The Random Ramp mode reacts almost
like the preceding mode except that the LFO module ramps up or down between successive random
values instead of switching instantly to the new value.
There are two ways to adjust the rate, or frequency, of the output of the LFO module. If the
Sync control is in its off position, the rate is fixed with the Rate knob. When the Sync control is on,
the frequency of the oscillator is fixed relative to the frequency (tempo) of the host sequencer and
the value set by the Sync control. Sync values range from 16 quarter notes (4 whole notes) to 1/8
of a quarter note (a thirty-second note) where the duration of the whole note is determined by the
host sequencer. The LFO module can also be synced to a triplet (t) or a dotted note (d).
The Delay control allows one to insert a delay between the moment a note is played and the
triggering of the LFO module. Finally the Offset parameter determines the point in the waveform
from which the LFO module is triggered. In its left position, there is no offset and the waveform
starts with with a zero phase. Increasing the Offset parameter moves the starting point later in
the waveform. For example, if a sine wave is selected and the offset adjusted to a value of 25%,
the starting point will correspond to a quarter of a period and therefore to a positive peak of the
waveform and the signal will start decreasing. A value of 75% would correspond to three quarter
of a period and therefore a negative peak and the signal value would then start increasing.
Page 35

4.10 The FX View 35
4.10 The FX View
The FX view is displayed by clicking on the FX button in the utility section at the top of the
interface and is based around a Multi-effects module.
The Multi-Effects module allows one to process and shape the signal from the piano before
sending it to the output. This module comprises an EQ and a Compressor in series with two
configurable effect processors and a Reverb. The configuration of the EQ and the Compressor
module depends on the position of the SC and Pre butons of these modules as will be explained
below. The two effect processors can be set to a different type by using the drop-down menu
located at the center of each module for a wide range of possibilities. The effect list includes a
Delay, Distortion, Chorus, Flanger, Phaser, Wah Wah, Auto Wah and a Notch filter.
The Multi-Effects module is also visible from the Play view just below the utility section. This
allows one to see rapidly which effects are selected for a given sound, turn the effects on or off and
rapidly adjust the amount of each effect. The Compressor, Equalizer and Reverb can also be
adjusted from this view.
4.10.1 EQ
The EQ module provides equalization over the low, mid, and high frequency bands. It is composed
of a low shelf filter, two peak filters, and a high shelf filter in series, labelled LF, LMF, HMF, and
HF respectively.
The functioning of the low shelf filter is depicted in Figure 14. The filter applies a gain factor to
low frequency components located below a cutoff frequency while leaving those above unchanged.
The cutoff frequency of this filter is adjusted using the Freq knob and can vary between 40 and 400
Hz. The Gain knob is used to adjust the gain factor applied to the signal in a ±15dB range. In
its center position there is no attenuation (0 dB). Turning it clockwise boosts the amplitude of low
frequencies while turning it anti-clockwise reduces it.
The high frequency content of the signal is controlled with a high shelf filter that works in
the opposite manner as the low shelf filter as illustrated in Figure 14. The filter applies a gain
factor to components located above a cutoff frequency while leaving those below unchanged. The
cutoff frequency of this filter, located above 1 kHz, is adjusted with the help of the Freq knob
while the gain factor applied to the signal, in a ±15dB range, is adjusted using Gain knob. In its
center position there is no attenuation (0 dB). Turning it clockwise boosts the amplitude of high
frequencies while turning it anti-clockwise reduces it.
The EQ module features two peak filters, labeled LMF and HMF, allowing to shape the signal
in two frequency bands as illustrated in Figure 15. The filters apply a gain factor to frequency
components in a band located around the cutoff frequency of the filters. This cutoff frequency is
Page 36

36 Parameters
Figure 14: Low and high shelf filters.
adjusted using the Freq knob and can vary between 100 Hz and 10 kHz. The gain factor applied
a the cutoff frequency is controlled by the Gain knob and can vary in a ±15 dB range. When
in its center position there is no attenuation (0 dB). Turning it clockwise boosts the amplitude of
frequencies located around the cutoff frequency while turning it anti-clockwise reduces it. The
Q knob is used to adjust the so-called quality factor of the filter which controls the width of the
frequency band on which the filter is active. In its leftmost position, the frequency band is wide
and it gets narrower as the knob is turned clockwise.
Figure 15: Peak filter.
The SC button (side-chain) is used to determine if the output from the EQ module is to be used
as the control signal of the Compressor module as described in Section 4.10.2. Finally, note that
all the gain knobs from this module can be accessed directly from the Play view.
Page 37

4.10 The FX View 37
4.10.2 Compressor
The Compressor module is used to automatically compress, in other words reduce, the dynamics
of a signal. This module receives two input signals. The first one is the signal to be compressed
while the second one is a control signal which triggers the compression process when it rises above
a given level.
Tuning
The level at which the Compressor starts to enter into action is determined by the value of the
Threshold parameter. This value is in dB and corresponds to the amplitude of the input signal as
monitored by the first level meter of the module.
The amount of compression applied to the part of the signal exceeding the threshold value
depends on the Ratio parameter which varies between value of 1:1 and 1:16. This parameter
represents the ratio, in dB, between the portion of the output signal from the compressor above
the threshold value and the portion of its input signal also exceeding the threshold value. As one
might expect, increasing the ratio also increases the amount of compression applied to the signal.
For example, a ratio of 1:5 means that if the input signal exceeds the threshold by 5 dB, the output
signal will exceed the threshold by only 1 dB. Note that the Ratio parameter can also be adjusted
from the Play view.
Two other controls affect the behavior of the Compressor. The Attack knob is used to set the
time, in milliseconds, before the Compressor fully kicks in after the level of the input has exceeded
the threshold value. A short value means that the compressor will reach the amount of compression
as set by the Ratio knob rapidly. With a longer attack, this amount will be reached more gradually.
In other words, the attack time is a measure of the attack transient time of the compression effect.
The Release parameter is similar and represents the amount of time taken by the Compressor to
stop compressing once the amplitude of the input signal falls below the threshold value.
The Makeup knob is used to adjust the overall level at the output of the Compressor module
and is used to compensate from an overall change in signal level due to the compression effect.
The location of the Compressor in the signal path depends on the setting of the Pre button.
When this knob is on, the Compressor is located at the output from the piano, just before the EQ
module. In this position, the input signal of the Compressor and its control signal are both the
output signal from the piano. When the Pre button is off, the Compressor is located after the EQ
module. In this configuration, the control signal of the Compressor is then the output signal from
the EQ module. The input signal to the compressor is determined by the position of the SC button.
When it is on, the Compressor is in a side-chain configuration. The input of the Compressor is
Page 38

38 Parameters
then the output signal from the piano. When it is off, the input of the Compressor is the output
signal from the EQ module.
Using the compressor in side chain configuration is useful when one wants to trigger the compressor using other criteria than the general level of the signal to be compressed. For example, a
sound with a lot of bass would easily trigger the Compressor when playing low notes. In order
to avoid that, the EQ module would be set to filter out low frequency components. This signal
would then be used to control the Compressor while the input signal to the Compressor would
still include these low frequency components.
The attenuation or gain reduction level meter, located in the middle of the module, indicates
the amount of compression applied by the module. It is the difference between the input and output
signals of the module before makeup gain is applied.
4.10.3 Delay
The Delay module consists in a stereo feedback loop with a variable delay in the feedback. It is
used to produce an echo effect when the delay time is long (greater than 100 ms) or to color the
sound when the delay time is short (smaller than 100 ms).
The Delay knob is used to adjust the amount of delay, in seconds, introduced by the effect.
Turning this knob clockwise increases the delay. The Feedback parameter is a gain factor, varying
in the range between 0 and 1, applied to the signal at the end of the delay lines. It controls the
amount of signal that is re-injected in the feedback loop. In its leftmost position, the value of this
parameter is 0 and no signal is re-introduced in the delay line which means that the signal is only
delayed once. Turning the knob clockwise increases the amount of signal re-injected at the end of
the feedback loop and therefore allows one to control the duration of the echo for a given delay
time. In its rightmost position, the gain coefficient is equal to 1 which means that all the signal is
re-injected into the feedback loop and that the echo will not stop. In addition to this gain factor,
low pass filtering can also be applied to the signal re-injected into the feedback loop. The cutoff
frequency of this filter is controlled using the Cutoff knob.
The Pan knob is used to balance the input signal between the left and right channels. In its
leftmost position, signal will only be fed into the left delay line and one will hear clearly defined
echo first from the left channel and then from the right channel and so on. In its rightmost position,
the behavior will be similar but with the first echo coming from the right channel. These two
extreme position correspond to the standard ping pong effect but a a less extreme behavior can be
obtained by choosing an intermediate position. In particular when the Pan knob is in its center
position, an equal amount of signal is sent in both channels.
The output signal from the Delay module can include a mix of input signal (dry) and delayed
signal (wet). The Wet and Dry knobs are used to adjust the amplitude of each component in the
Page 39

4.10 The FX View 39
final output. The amplitude of each component is increased by turning the corresponding knob
clockwise from no signal to an amplitude of +6dB. Note that the Wet parameter is also adjustable
from the Play view.
4.10.4 Distortion
The Multi-Effect module includes three different types of distortion which are selected using the
Shape selector knob. The Warm Tube effect applies a smooth symmetrical wave shaping to the
input signal resulting in the introduction of odd harmonics in the signal. The Metal distortion is
similar to the Warm Tube effect but is slightly asymmetrical resulting in the introduction of even
and odd harmonics in the signal. The Solid State distortion applies an aggressive symmetrical
clipping to the signal thereby adding high frequency harmonics and resulting in a harsh sound.
The Drive control is a gain knob acting on the input signal. This parameter allows one to adjust
the amount of distortion introduced in the signal by controlling how rapidly the signal reaches
the non-linear portion of the distortion curve applied on the signal. In its leftmost position, the
amplitude of the input signal is reduced by -6 dB; turning this knob clockwise allows one to increase
its amplitude. Note that the Drive parameter is also adjustable from the Play view.
The Tone knob is used to adjust the color of the signal after the distortion algorithm has been
applied. In its leftmost position, high frequencies will be attenuated in the signal while in its
rightmost position low frequencies will be filtered out from the signal. In its center position, the
signal will be left unchanged.
The Volume knob is a gain knob acting on the amplitude of the distorted signal. Finally, the Mix
knob allows one to control the amount of dry and wet (distorted) signal in the final output signal
from the Distortion module. In its leftmost position, there is only dry signal in the output while
in its rightmost position one only hears the distorted signal. In its center position, there is an equal
amount of dry and wet signal in the output.
4.10.5 Chorus
The chorus effect is used to make a source sound like many similar sources played in unison. It
simulates the slight variations in timing and pitch of different performers executing the same part.
The effect is obtained by mixing the original signal with delayed version obtained from the output
of delay lines as shown in Figure 16. In the case of a chorus effect, the length of the delay lines must
be short in order for the delayed signals to blend with the original signal rather than be perceived as
a distinct echo. The length of the delay line can be modulated introducing a slight perceived pitch
shift between the voices.
Page 40

40 Parameters
Figure 16: Chorus module.
Tuning
The amount of modulation of the length of the delay lines is adjusted using the Depth knob. In the
left position, there is no modulation and the length of the delay lines remains constant. As the knob
is turned to the right, the length of the delay line starts to oscillate by an amount which increases
as the knob is turned clockwise thereby increasing the amount by which the different voices are
detuned. The frequency of the modulation is fixed with the Rate knob.
The Fat button is used to control the number of voices in the chorus effect. Switching this button
on increases the number of voices. The Spread knob is used to adjust the amount of dispersion of
the different voices in the stereo field. When in its leftmost position, there is an equal amount of left
and right output signal on each channel. In other words the signal is the same on both channels. In
its rightmost position, there is complete separation between the channels, the left output from the
chorus is only sent to the left channel while the right output of the chorus is only sent to the right
channel. Finally, the Mix knob allows one to mix the dry and wet signals. In its leftmost position,
there is no output signal from the chorus and one only ears the dry input signals. In its rightmost
position, one only ears the wet signal from the chorus module. In its center position, there is an
equal amount of dry and wet signal in the output signal from the module.
Page 41

4.10 The FX View 41
4.10.6 Flanger
The Flanger module implements the effect known as flanging which colors the sound with a false
pitch effect caused by the addition of a signal of varying delay to the original signal.
The algorithm implemented in this module is shown in Figure 17. The input signal is sent into
a variable delay line. The output of this delay is then mixed with the dry signal and re-injected into
the delay line with a feedback coefficient.
Figure 17: Flanger algorithm.
The effect of the Flanger module is to introduce rejection in the spectrum of the input signal at
frequencies located at odd harmonic intervals of a fundamental frequency as shown in Figure 18.
The location of the fundamental frequency f 0 and the spacing between the valleys and peaks of
the frequency response is determined by the length of the delay line (f 0 = 1/(2delay)), the longer
the delay, the lower is f 0 and the smaller the spacing between the harmonics while decreasing the
delay increases f 0 and hence the distance between the harmonics.
The amount of effect is determined by the ratio of wet and dry signal mixed together as shown
in Figure 19. As the amount of wet signal sent to the output is increased, the amount of rejection
increases. Finally, the shape of the frequency response of the Flanger module is also influenced
by the amount of wet signal re-injected into the feedback loop as shown in Figure 20. Increasing
the feedback enhances frequency components least affected by the delay line and located at even
harmonic intervals of the fundamental frequency. As the feedback is increased, these peaks become
sharper resulting in an apparent change in the pitch of the signal.
Page 42

42 Parameters
Figure 18: Frequency response of a Flanger module. Effect of the length of the delay line.
Figure 19: Effect of the mix between wet and dry signal on the frequency response of a Flanger
module
Figure 20: Effect of the amount of feedback on the frequency response of a Flanger module.
Page 43

4.10 The FX View 43
Tuning
The delay length, in milliseconds, is adjusted with the Delay knob. The length of this delay can be
modulated by a certain amount depending on the adjustment of the Depth knob. In the left position,
there is no modulation and the length of the delay line remains constant. As the knob is turned to
the right, the length of the delay line starts to oscillate by an amount which increases as the knob is
turned clockwise and at a frequency fixed with the Rate knob. The Feedback knob is a gain knob
used to fix the ratio of wet signal re-injected into the delay. Finally, the Mix knob determines the
amount of dry and wet signal in the output signal from the module. When this knob is adjusted in
its leftmost position, only dry signal is sent to the output, in its center position, there is an equal
amount of dry and wet signal in the output signal while in its rightmost position, only wet signal is
sent to the output. Note that the Depth parameter is also adjustable from the Play view.
4.10.7 Phaser
The Phaser module implements the effect known as phasing which colors a signal by removing
frequency bands from its spectrum. The effect is obtained by changing the phase of the frequency
components of a signal using an all-pass filter and adding this new signal to the original one.
The algorithm implemented in this module is shown in Figure 21. The input signal is sent into a
variable all-pass filter. This wet signal is then mixed down with the original dry signal. A feedback
line allows the resulting signal to be re-injected into the filter. The effect of the Phaser module is
to introduce rejection in the spectrum of the input signal depending on the tuning of the filter.
The all-pass filter modifies a signal by delaying its frequency components with a delay which
increases with the frequency. This phase variations will introduce a certain amount of cancellation
when this wet signal is mixed down with the original dry signal as shown in Figure 22. The
rejection is maximum when the phase delay is equal to 180 degrees and a given component is out
of phase with that of the original signal. The amount of effect is determined by the ratio of wet and
dry signal mixed together as shown in Figure 22. As the amount of wet signal sent to the output is
reduced, the amount of rejection increases. The shape of the frequency of the Phaser module is also
influenced by the amount of wet signal re-injected into the feedback loop. Increasing the feedback
enhances frequency components least affected by the all-pass filter. As the feedback is increased,
these peaks become sharper. The functioning of the Phaser is very similar to that of the Flanger
module. The filtering effect is different however, since the Phaser module only introduces rejection
around a limited number of frequencies which, in addition, are not in an harmonic relationship.
Page 44

44 Parameters
Figure 21: Phaser algorithm.
Figure 22: Frequency response of a Phaser module. Effect of the mix between wet and dry signal
on the frequency response.
Tuning
The location of the first notch in the frequency response of the module is adjusted with the Frequency knob This frequency can be modulated by an amount controlled with the Depth knob. In its
leftmost position, the location of the first notch is fixed but it starts to oscillate by an amount which
increases as the Depth knob is turned clockwise. The frequency of the modulation is controlled
Page 45

4.10 The FX View 45
using the the Rate knob. The feedback knob is used to fix the amount of wet signal re-injected into
the delay. Finally, the Mix knob determines the amount of dry and wet signal sent to the output.
When this knob is adjusted in the left position, only dry signal is sent to the output, in its center
position, there is an equal amount of dry and wet signal in the output and in the right position, only
wet signal is sent to the output.
4.10.8 Wah
The Multi-Effect module includes 2 different types of Wah effects: wah wah, and auto wah. These
effects are used to enhance a frequency band around a varying center frequency using a bandpass
filter. In the wah wah effect, the center frequency of the bandpass filter varies at a rate fixed by
the user. In the case of the auto-wah, the variations of the center frequency is controlled by the
amplitude envelope of the incoming signal.
The Freq knob is used to control the central frequency of the filter. Turning this knob clockwise
increases the center frequency. In the case of the Wah Wah effect, the center frequency will oscillate
around the value fixed by the Freq knob while with the Auto Wah effect, the setting of the Freq will
fix the starting point value of the varying center frequency.
The Depth knob controls the excursion of the center frequency of the filter. In the case of
the Wah Wah effect, this excursion is applied around the value fixed by the Freq knob while in
Auto Wah effect the value of the center frequency increases from the value fixed by the Freq knob.
Turning this knob clockwise increases the excursion of the center frequency. Note that the Depth
parameter is also adjustable from the Play view.
Finally, the Rate knob controls the frequency or rate of the modulation of the center frequency
of the filter. In the case of the Wah Wah effect, turning this knob clockwise increases the rate of
the modulation. In the case of the Auto Wah filter, this knob is labeled Speed and controls the time
constant of the envelope follower. Turning this knob clockwise decreases the time constant, or in
other words the reaction time, of the envelope follower.
4.10.9 Notch Filter
The Notch Filter does essentially the opposite of a band-pass filter. It attenuates the frequencies
in a band located around the center frequency and leaves those outside of this band unchanged as
shown in Figure 23. As was the case for the Wah Wah effect, the filter can be modulated.
Page 46

46 Parameters
The Freq knobs is used to control the central frequency of the filter. Turning this knob clockwise increases the center frequency. The Depth knob controls the excursion of the center frequency
of the filter around its center frequency. Turning this knob clockwise increases the excursion of the
center frequency. Finally, the Rate knob controls the frequency or rate of the modulation of the
center frequency of the filter. Turning this knob clockwise increases the rate of the modulation.
Note that the Depth parameter is also adjustable from the Play view.
Figure 23: Frequency response of a notch filter.
4.10.10 Reverb
The Reverb effect is used to recreate the effect of reflections of sound on the walls of a room or
hall. These reflections add space to the sound and make it warmer, deeper, as well as more realistic
since we always listen to instruments in a room and thus with a room effect.
Impulse Response of a Room
The best way to evaluate the response of a room is to clap hands and to listen to the resulting
sound. Figure 24 shows the amplitude of the impulse response of a room versus time. The first
part of the response is the clap itself, the direct sound, while the remaining of the response is the
effect of the room which can itself be divided in two parts. Following the direct sound, one can
Page 47

4.10 The FX View 47
observe a certain amount of echoes which gradually become closer and closer until they can not be
distinguished anymore and can be assimilated to an exponentially decaying signal. The first part
of the room response is called the early reflexion while the second is called the late reverberation.
The total duration of the room response is called the reverberation time (RT).
Figure 24: Impulse response of a room.
Adjusting the room effect
The size of a room strongly affects the reverberation effect. The Size selector is used to choose between the Studio, Club, Hall and Large Hall settings each reproducing spaces of different volumes
from smaller to larger.
The duration of the reverberation time depends on both the size of the room and the absorption
of the walls, which is controlled with the Decay knob. In a real room the reverberation time is not
constant over the whole frequency range. As the walls are often more absorbent in the very low and
in the high frequencies the reverberation time is shorter for these frequencies. These parameters
are adjusted with the Low and High knobs respectively.
Another parameter which affects the response of a room is its geometry; the more complex
the geometry of a room, the more reflexion are observed per unit of time. This quantity is known
as the time density and can be set trough the Diffusion knob. In a concert hall, the time density
is supposed to be quite high in order not to hear separate echoes which are characteristic of poor
sounding rooms. The last parameter which affects our listening experience in a room, is the distance
between the sound source and the listener. While the room response is quite constant regardless of
Page 48

48 Parameters
the position of the source and the listener, the direct sound (the sound which comes directly from
the source) depends strongly on the position of the listener. The farther we are from the sound
source the quieter is the direct sound relatively to the room response. The ratio between the direct
sound and the room response is adjusted with the Mix knob which in other words is used to adjust
the perceived distance between the source and the listener. In its leftmost position, only the direct
sound is heard while when fully turned to the right, one only hears the room response. Note that
the Mix parameter is also adjustable from the Play view.
4.11 The Play View
The Play view is where the main performance oriented modules are located. Key parameters from
the Edit and FX view are also included for quick access. This view is loaded when starting the
instrument and can be accessed from another view by clicking on the Play button on the top part
of the interface.
The middle section of this view allows one to switch on and off the EQ, Compressor and
Reverb as well as the active effect modules. Key effect parameters are also adjustable as presented
in the description of the different effect modules in section 4.10
4.11.1 The Clock Module
This module is used to control the tempo of the different effects of the FX section
as well as that of the LFO and Arpeggiator modules when their respective sync button
is switched on. When Chromaphone is launched in standalone mode the clock tempo,
in bpm, is set by using the Rate knob. The tempo can also be adjusted by clicking at the
desired tempo on the Tap Tempo pad of the module. Once the new tempo is detected,
the value of the Rate knob is automatically adjusted.
When using Chromaphone in plugin mode, the Tap Tempo pad is replaced by a Sync To Host
switch. In its on position, the rate is synchronized with that of the host sequencer. When switched
off, the tempo is determined by the value of the Rate knob.
Page 49

4.11 The Play View 49
4.11.2 Unison
The unison mode allows one to stack voices, in other words, play two or four voices
for each note played on the keyboard. This mode creates the impression that several
instruments are playing the same note together, adding depth to the sound.
Each voice can be slightly detuned relatively to the others by using the Detune knob.
Turning this knob clockwise increases the amplitude of the error. Furthermore, voices
can be desynchronized by adding a small time lag between their triggering with the
Delay knob. There is no delay when the knob is in its leftmost position and it increases (units in
ms) as it is turned clockwise.
4.11.3 The Vibrato Module
The vibrato effect is equivalent to a periodic low frequency pitch modulation. This effect is generally obtained by using an LFO to modulate the pitch signal of an oscillator. In Chromaphone, a
dedicated module is provided for this effect. The vibrato module is hard wired and affects the pitch
of both oscillators.
The Rate knob sets the frequency of the vibrato effect from 0.3 Hz to 10 Hz.
The Amount knob sets the depth of the effect, or in other words the amplitude of
the frequency variations. In its leftmost position, there is no vibrato and turning
the knob clockwise increases the amount of pitch variation. The MW gain knob is
used to determine the effect of the keyboard modulation wheel on the depth of the
vibrato. When this knob is fully turned to the left, the modulation wheel has no
effect but as it is turned clockwise the depth of the vibrato increases when the modulation wheel is
used. The increase is always relative to the position of the Amount knob and becomes greater as
the MW knob is turned clockwise.
The vibrato can be adjusted not to start at the beginning of a note but with a little lag. This lag,
in seconds, is set by the Delay knob. The Fade knob allows you to set the amount of time taken by
the amplitude of the vibrato effect to grow from zero to the amount set by the Amount knob.
4.11.4 The Arpeggiator Module
The Arpeggiator module allows one to play sequentially all the notes that are
played on the keyboard. In other words, arpeggios are played rather than chords.
The modules allows one to produce a wide range of arpeggios and rhythmic
patterns and to sync the effects to the tempo of an external sequencer.
Page 50

50 Parameters
Arpeggio Patterns
The arpeggio pattern is set by the combination of the value of the Range, Span
and Order controls. The Range control is used to select the number of octaves
across which the pattern is repeated. When the range is set to 0, there is no transposition and only
the notes currently depressed are played. If set to a value between 1 and 4 (its maximum value), the
notes played are transposed and played sequentially, over a range of one or more octaves depending
on the value of the Range parameter. The direction of the transposition is set with the Span dropdown menu. This parameter can be adjusted to Low for downwards transposition, to High for
upwards transposition or wide for transposing both upwards and downwards. Finally, the Order
control sets the order in which the notes are played, therefore determining the arpeggio pattern.
When set to Forward, the notes are played from the lowest to the highest. When set to Backward
the notes are played from the highest to the lowest. In the two last modes, Rock and Roll exclusive
and Rock and Roll inclusive, the notes are played forward from the lowest to the highest and then
backward from the highest down to the lowest. When using the RnR exclusive mode, the highest
and the lowest notes are not repeated when switching direction but in RnR inclusive mode these
notes are repeated. Finally, in Chord mode, all the notes are played at once.
Rhythmic Patterns
Rhythmic patterns can be added to the arpeggio pattern by using the 16-step Pattern display. Notes
are played as the step display is scanned and the corresponding step is selected (red button on).
Notes are played regularly when all the steps of the display are turned on and rhythmic patterns
are created by selecting only certain steps. The arrow button below each step is used to fix looping
points from which the rhythmic pattern starts being played again from the beginning.
Rate and Synchronization
The rate at which the arpeggiator pattern is scanned is set by the Rate knob of the Arpeggiator
module or can be synced to the master clock of the Clock module. The Rate knob is only effective
when the Sync control is set to off. When the Sync control is on, the rate (tempo) is fixed by the
master Clock module (see 4.11.1) in standalone mode or the host sequencer in plugin mode. The
rhythmic value of each step is set using the Steps parameter. Values can range between a quarter
note and a thirty-second note with binary and ternary beat division options. One can then fix the
metric of the pattern by setting the loop point of the step display appropriately.
Page 51

4.11 The Play View 51
Latch mode
The Arpeggiator module is toggled in latch mode by clicking the Latch button to its on position. In
this mode, the Arpeggiator keeps playing its pattern when the notes on the keyboard are released
and until a new chord is played.
4.11.5 Pitch Wheel
The MIDI pitch wheel allows one to vary the pitch of the note played. The pitch wheel can be
moved with the mouse but it is also automatically connected to the pitch wheel signal received
from your MIDI keyboard.
The range of the pitch bend is 2 semi-tones up or down by default but can be changed. To adjust
the range of the pitch bend, open the MIDI configuration window by clicking on the MIDI button
located just below the MIDI led in the top part of the interface and use the Pitch Bend Range
drop-down menu to select the range in semi-tones.
4.11.6 Modulation Wheel
The modulation wheel is linked to the Amount parameter of the Vibrato module. It can be activated
on screen or from the modulation wheel of your MIDI controller (MIDI controller number 1). The
MW gain knob of the Vibrato module is used to control the sensitivity of the vibrato amplitude
to the modulation wheel. Note that other parameters can be linked to the modulation wheel using
MIDI links as explained in Section 6.
4.11.7 Ribbon
The lower part of this view includes a ribbon controller. The ribbon covers seven octaves and notes
are played when clicking on the ribbon. The ribbon is useful to test sounds when no MIDI keyboard
is connected to your computer.
Page 52

52 Utility Section
5 Utility Section
The utility section is located at the top of the Chromaphone interface and it includes important
parameters and monitoring tools. For information on Banks and Programs please refer to Chapter 3
5.1 The MIDI LED
The MIDI LED is located on the left of the level-meter. The LED blinks when the synthesizer
receives MIDI signal. If the application is not receiving MIDI signal, make sure that the host
sequencer is sending MIDI to Chromaphone. If you are running in standalone mode, make sure
that the MIDI controller you wish to use is well connected to your computer and that it is selected
as explained in Section 6.
5.2 Polyphony
The Voices control located in the upper left corner of this section allows one to adjust the number
of polyphony voices used by Chromaphone. The number of voices is adjusted by clicking on
the control and selecting the desired number of voices. In general, a higher number of voices is
desirable but keep in mind that the CPU load is proportional to the number of voices used.
5.3 Tuning
The Tune control, located to the right of the MIDI LED, is used to transpose the frequency of the
keyboard. This control is composed of two numbers separated by a dot. The first number indicates
a value in semi-tones while the second one indicates a value in cents (one hundredth of a semitone). The amount of transposition can be adjusted by click-dragging upward or downward on the
semi-tone and cent controls. Double clicking on these controls brings back their value to zero.
When the value of the Tune parameters is set to 0.00, the frequency of notes are calculated relative
to A4 with a frequency of 440Hz.
An interesting feature of Chromaphone is that it can be tuned using different temperaments
using Scala micro-tuning files. Temperament files are loaded by clicking on the Tune button which
opens the Tuning pop-up window and displays the list of available tuning temperament files available.
By default, Chromaphone is set to equal temperament. Other files can be added to the list by
copying them to the following folders:
Page 53

5.4 History and Compare 53
On Mac OS:
/Users/[user name]/Library/Application Support/Applied Acoustics Systems/Scala Tunings/
On Windows:
%AppData%\Applied Acoustics Systems\Scala Tunings\
These folders can be displayed directly from Chromaphone by clicking on the Show Tuning
Files button at the bottom of the Tuning pop-up window.
Selecting a Scala file in the list automatically triggers the loading of the corresponding temperament. The reference note that will be used as the base note for the scale described in the Scala file
can be set using the Reference Note control appearing at the bottom of the Tuning window. The
frequency of this reference note is calculated relative to the settings of the Tune control. Please note
that the reference note does not appear in the window when the default temperament is chosen, it
only appears once a Scala file is loaded.
5.4 History and Compare
The History control allows one to go back through all the modifications that were made to programs
since the application was started. In order to travel back and forth in time, use the left and rightpointing arrows respectively. The application will switch between different program states and
indicate the time at which they were modified.
The Compare button, located above the Program display, is used to switch between Edit and
Compare mode. This button is visible only once a modification is applied to a given program. It
allows one to revert to the original version of a program in order to compare it with the current
version. When in Compare mode, edition is blocked and it is therefore not possible to modify any
parameter. The Compare mode must then be switched off by clicking on the Compare button in
order to resume edition.
5.5 Volume
The Volume knob is the master volume of the application. It is used to adjust the overall level of
the output signal from the synthesizer. General level is increased by turning the knob clockwise.
5.6 Level Meter
The level meter allows one to monitor peak and RMS (root means square) level of the left (L) and
right (R) output channels from the synthesizer. As a limiter is located at the output of Chroma-
phone, it is important to make sure that the amplitude of the signal remains within values that
ensure that no distortion is introduced in the signal at the output.
The 0 dB mark on the level meter has been adjusted to correspond to -20 dBFS (full scale). This
means that at that level, the signal is -20 dB below the maximum allowed value. This 0 dB level
Page 54

54 Utility Section
mark should typically correspond to playing at mezzo forte (moderately loud) level. This ensures
a headroom of 20 dB which should be more than enough to cover the dynamics of most playing
situations and therefore guarantee that no additional distortion is added in the output signal.
A peak value mark allows one to follow the maximum level values reached by the output signal.
The limiter is triggered when this mark enters the red zone of the level meter (17 dB) and it remains
active while the side vertical bars at the top of the lever meter are switched On.
5.7 The About Box
The About box is open by clicking on the chevrons located at the very top of the interface or on
the product or company logo. The box is closed by clicking again on the chevrons or outside the
box. Useful information is displayed in this box such as the program’s version number, the serial
number that was used for the authorization and the the email address that was used for registration.
The box also includes a link to the pdf version of this manual.
Page 55

Audio and MIDI Settings 55
6 Audio and MIDI Settings
This chapter explains how to select and configure Audio and MIDI devices used by Chromaphone.
Audio and MIDI configuration tools are accessed by clicking on the Audio Setup button located
in the lower left corner of the Chromaphone interface and the MIDI button located just below the
MIDI led in upper part of the interface.
Note that in plug-in mode the audio and MIDI inputs, sampling rate, and buffer size are set by
the host sequencer.
6.1 Audio Configuration
6.1.1 Selecting an Audio Device
Audio configuration tools are available by clicking on the Audio Setup button located in the lower
left corner of the Chromaphone interface. The Audio Setup dialog first allows you to select an
audio output device from those available on your computer. Multi-channel interfaces will have
their outputs listed as stereo pairs.
On Windows, the audio output list is organized by driver type. The device type is first selected
from the Audio Device Type drop-down list. If you have ASIO drivers available, these should be
selected for optimum performance. The Configure Audio Device button allows you to open the
manufacturer’s setup program for your audio interface when available.
Once the audio input has been selected, you can then select a sampling rate and a buffer size
from those offered by your audio interface.
6.1.2 Latency
The latency is the time delay between the moment you send a control signal to your computer (for
example when you hit a key on your MIDI keyboard) and the moment when you hear the effect.
Roughly, the latency will be equal to the duration of the buffers used by the application and the
sound card to play audio and MIDI. To calculate the total time required to play a buffer, just divide
the number of samples per buffer by the sampling frequency. For example, 256 samples played
at 48 kHz represent a time of 5.3 ms. Doubling the number of samples and keeping the sampling
frequency constant will double this time while changing the sampling frequency to 96 kHz and
keeping the buffer size constant will reduce the latency to 2.7 ms.
It is of course desirable to have as little latency as possible. Chromaphone however requires a
certain amount of time to be able to calculate sound samples in a continuous manner. This time
depends on the power of the computer used, the preset played, the sampling rate, and the number
of voices of polyphony used. Note that it will literally take twice as much CPU power to process
audio at a sampling rate of 96 kHz as it would to process the same data at 48 kHz, simply because
it is necessary to calculate twice as many samples in the same amount of time.
Page 56

56 Audio and MIDI Settings
Depending on your machine you should choose, for a given sampling frequency, the smallest
buffer size that allows you to keep real-time for a reasonable number of voices of polyphony.
6.2 MIDI Configuration
6.2.1 Selecting a MIDI Device
The list of available MIDI inputs appears at the bottom of the Audio Setup dialog. Click on the
Audio Setup button located in the lower left corner of the Chromaphone interface and then click on
the checkbox corresponding to any of the inputs you wish to use.
6.2.2 Creating MIDI Links
Every control on the Chromaphone interface can be manipulated by an external MIDI controller
through MIDI control change assignments. In most cases this is much more convenient than using
the mouse, especially if you want to move many controllers at once. For example, you can map the
motion of a knob on the interface to a real knob on a knob box or to the modulation wheel from
your keyboard. As you use the specified MIDI controllers, you will see the controls move on the
Chromaphone interface just as if you had used the mouse.
In order to assign a MIDI link to a controller:
• On the Chromaphone interface, right-click/Control-click on a control (knob, button) and
select the MIDI Learn command.
• Move a knob or slider on your MIDI controller (this can be a keyboard, a knob box, or
any device that sends MIDI). This will link the control of the Chromaphone to the MIDI
controller you just moved.
To deactivate a MIDI link, simply righ-click/Control-click on the corresponding control on the
Chromaphone interface and select the MIDI Forget command.
6.2.3 Creating a default MIDI Map
It is possible to define a a set of MIDI links, called a MIDI map, that will be loaded automatically
when Chromaphone is launched. Once you have defined a set of MIDI links that you wish to save,
click on MIDI button to open the MIDI configuration window and click on the Save Current as
Default button.
If you make changes to MIDI links after opening the program and wish to revert to the default
MIDI map click on MIDI button to open the MIDI configuration window and click on the Load
Default button.
If you wish to deactivate all the MIDI links at once open the MIDI configuration window and
click on the Clear MIDI Map button.
Page 57

6.2 MIDI Configuration 57
6.2.4 MIDI Program Changes
Chromaphone responds to MIDI program changes. When a program change is received, the current
program is changed to the program having the same number as that of the program change message
in the currently loaded bank.
If you do not wish Chromaphone to respond to MIDI program changes, open the MIDI configuration window by clicking on the MIDI button and uncheck the Enable Program Changes
option.
6.2.5 MIDI Bank Changes
In general, MIDI bank numbers are coded using two signals: the MSB (most significant byte) and
LSB (least significant byte) transmitted using MIDI CC (continuous controller) number 0 and 32
respectively. The way these signals are used differs with different manufacturers.
In the case of Chromaphone, the value of the MSB signal is expected to be zero while the value
of the LSB signal represents the bank number. Banks are therefore numbered from 0 to 127 with
this number corresponding to the position of a bank within the list of banks as displayed by the
Bank manager (see Section 3.3). For example, an LSB value of 0 corresponds to the first bank in
the bank list while an LSB value of 10 corresponds to the eleventh bank in the list. Note that a bank
change only becomes effective after the reception of a new MIDI program change signal.
If you do not wish Chromaphone to respond to MIDI bank changes, open the MIDI configuration window by clicking on the MIDI button and uncheck the Enable Bank Changes option.
6.2.6 Pitch bend
The MIDI pitch wheel allows one to vary the pitch of Chromaphone. The pitch wheel can be moved
with the mouse but it is also automatically connected to the pitch wheel signal received from your
MIDI keyboard.
The range of the pitch bend is 2 semi-tones up or down by default but can be changed. To adjust
the range of the pitch bend, open the MIDI configuration window by clicking on the MIDI button
located just below the MIDI led in the top part of the interface and use the Pitch Bend Range
drop-down list to select the range in semi-tones.
6.2.7 Modulation wheel
Chromaphone responds to MIDI modulation (MIDI controller number 1). For more details, please
refer to Section 4.11.6.
Page 58

58 Using Chromaphone as a Plug-In
7 Using Chromaphone as a Plug-In
Chromaphone is available in VST, RTAS and AudioUnit formats and integrates seamlessly into the
industry most popular multi-track recording and sequencing environments as a virtual instrument
plug-in. Chromaphone works as any other plug-in in these environments so we recommend that
you refer to your sequencer documentation in case you have problems running it as a plug-in. We
review here some general points to keep in mind when using a plug-in version of Chromaphone.
7.1 Audio and MIDI Configuration
When Chromaphone is used as a plug-in, the audio and MIDI ports, sampling rate, buffer size, and
audio format are determined by the host sequencer.
7.2 Automation
Chromaphone supports automation functions of host sequencers. All parameters visible on the
interface can be automatized except for the Polyphony, Bank, Program and History commands.
7.3 Multiple Instances
Multiple instances of Chromaphone can be launched simultaneously in a host sequencer.
7.4 MIDI Program Change
MIDI program changes are supported in Chromaphone. When a MIDI program change is received
by the application, the current program used by the synthesis engine is changed to that having the
same number, in the currently loaded bank, as that of the MIDI program change message.
7.5 Saving Projects
When saving a project in a host sequencer, the currently loaded program is saved with the project
in order to make sure that the instrument will be in the same state as when you saved the project
when you re-open it. Note that banks of programs are not saved with the project which implies that
if you are using MIDI program changes in your project, you must make sure that the bank you are
using in your project still exists on your disk when you reload the project. The programs must also
exist and be in the same order as when the project was saved.
Page 59

7.6 Performance 59
7.6 Performance
Using a plug-in in a host sequencer requires CPU processing for both applications. The load on the
CPU is even higher when multiple instances of a plug-in or numerous different plug-ins are used.
To decrease CPU usage, remember that you can use the freeze or bounce to track functions of the
host sequencer in order to render to audio the part played by a plug-in instead of recalculating it
every time it is played.
Page 60

60 License Agreement
8 License Agreement
IMPORTANT! CAREFULLY READ ALL THE TERMS AND CONDITIONS OF THIS AGREEMENT BEFORE OPENING THIS PACKAGE. OPENING THIS PACKAGE INDICATES YOUR
ACCEPTANCE OF THESE TERMS AND CONDITIONS. IF YOU DO NOT AGREE WITH
THE TERMS AND CONDITIONS OF THIS AGREEMENT, PROMPTLY RETURN THE UNOPENED PACKAGE AND ALL COMPONENTS THERETO TO THE PARTY FROM WHOM
IT WAS ACQUIRED, FOR A FULL REFUND OF ANY CONSIDERATION PAID.
This software program, any printed materials, any on-line or electronic documentation, and any
and all copies of such software program and materials (the “Software”) are the copyrighted work
of Applied Acoustics Systems DVM Inc. (“AAS”), its subsidiaries, licensors and/or its suppliers.
1. LICENSE TO USE. The Licensee is granted a personal, non-exclusive and non-transferable
license to install and to use one copy of the Software on a single computer solely for the
personal use of the Licensee. Use of the Software is subject to this Agreement.
2. RESTRICTIONS ON USE. The Licensee may not nor permit third parties to (i) make copies
of any portion of the Software, other than as expressly permitted under this Agreement; (ii)
modify, translate, disassemble, decompile, reverse engineer or create derivative and/or competitive products based on any portion of the Software; (iii) provide use of the Software in a
network, timesharing, interactive cable television, multiple CPU service bureau or multiple
user arrangement to users not individually licensed by AAS, other than as expressly permitted by the terms of this license. The Software is licensed to you as a single product. Its
component parts may not be separated for use on more than one computer.
3. OWNERSHIP. AAS retains title to the Software, including but not limited to any titles,
computer code, themes, objects dialog concepts, artwork, animations, sounds, audio effects,
methods of operation, moral rights, any related documentation and “applets” incorporated
into the Software. AAS retains ownership of and title to all intellectual property rights in the
Software, underlying technology, related written materials, logos, names and other support
materials furnished either with the Software or as a result of this Agreement, including but
not limited to trade secrets, patents, trademarks and copyrights therein. Licensee shall not
remove or alter any copyright or other proprietary rights notices contained on or within the
Software and shall reproduce such notices on all copies thereof permitted under this Agreement or associated documentation.
4. LIMITED WARRANTY. Except for the foregoing, THE SOFTWARE IS provided “AS IS”
without warranty or condition of any kind. AAS disclaims all warranties or conditions, written or oral, statutory, express or implied, including but not limited to the implied warranties of
merchantable quality or fitness for a particular purpose, title and non-infringement of rights
of any other person. AAS does not warrant that THE SOFTWARE will meet the Licensee’s
requirements or that the operation of the software will be uninterrupted or ERROR-FREE.
Page 61

License Agreement 61
5. LIMITATION OF LIABILITY. TO THE MAXIMUM EXTENT PERMITTED BY APPLICABLE LAW, IN NO EVENT WILL AAS BE LIABLE TO THE LICENSEE OR ANY
THIRD PARTY FOR ANY INDIRECT, SPECIAL, CONSEQUENTIAL, INCIDENTAL
OR EXEMPLARY DAMAGES WHATSOEVER, INCLUDING BUT NOT LIMITED TO
LOSS OF REVENUE OR PROFIT, LOST OR DAMAGED DATA, BUSINESS INTERRUPTION OR ANY OTHER PECUNIARY LOSS WHETHER BASED IN CONTRACT,
TORT OR OTHER CAUSE OF ACTION, EVEN IF AAS HAS BEEN ADVISED OF THE
POSSIBILITY OF SUCH DAMAGES, EXCEPT IN RELATION TO GROSS NEGLIGENCE
OR WILFUL BREACH OF THIS AGREEMENT BY AAS. NO AAS AGENT, REPRESENTATIVE OR DEALER IS AUTHORIZED TO EXTEND, MODIFY OR ADD TO THIS
WARRANTY ON BEHALF OF AAS. THE TOTAL LIABILITY OF AAS FOR DAMAGES, WHETHER IN CONTRACT OR TORT, UNDER OR RELATED IN ANY WAY TO
THIS AGREEMENT SHALL BE LIMITED TO THE LICENSE FEES ACTUALLY PAID
BY LICENSEE TO AAS, OR IF NO FEES WERE PAID, AAS’ LIST PRICE FOR THE
SOFTWARE COVERED BY THIS LICENSE. THE EXCLUSION OF IMPLIED WARRANTIES AND/OR THE LIMITATION OF LIABILITY IS NOT PERMITTED IN SOME
JURISDICTIONS, AND SOME OR ALL OF THESE EXCLUSIONS MAY THEREFORE
NOT APPLY.
6. TERMINATION. This License also shall extend to the Software and any updates or new
releases thereof obtained by the Licensee, if any, subject to any changes to this License made
by AAS from time to time and provided to the Licensee, provided AAS is under a separate
obligation to provide to Licensee such updates or upgrades and Licensee continues to have a
valid license which is in effect at the time of receipt of each such update or new release. This
License shall remain in effect until terminated. The Licensee may terminate this Agreement
at any time, upon notification to AAS. This Agreement will terminate immediately without
notice from AAS if the Licensee fails to comply with any provision of this License. Any
such termination by AAS shall be in addition to and without prejudice to such rights and
remedies as may be available, including injunction and other equitable remedies. Upon
receipt of notice of termination from AAS, the Licensee must (a) immediately cease to use
the Software; (b) destroy all copies of the Software, as well as copies of all documentation,
specifications and magnetic media relating thereto in Licensee’s possession or control; and
(c) return all original versions of the Software and associated documentation. The provisions
of Sections 1, 3, and 5 shall survive the termination of this Agreement.
7. GOVERNING LAW. This Agreement shall be governed by and construed in accordance with
the laws of the Province of Quebec, without regard to the United Nations Convention On
Contracts for the International Sale of Goods and conflict of laws provisions, if applicable,
and the parties hereby irrevocably attorn to the jurisdiction of the courts of that province. Les
parties sont d’accord`a ce que cette convention soit r´edig´ee en langue anglaise. The parties
have agreed that this agreement be drafted in the English language.
8. SEVERABILITY. If any of the above provisions are held to be illegal, invalid or unenforceable, such provision shall be severed from this Agreement and this Agreement shall not be
Page 62

62 License Agreement
rendered inoperative but the remaining provisions shall continue in full force and effect.
9. ENTIRE AGREEMENT. This Agreement is the entire agreement between AAS and the
Licensee relating to the Software and: (i) supersedes all prior or contemporaneous oral or
written communications, proposals and representations with respect to its subject matter; and
(ii) prevails over any conflicting or additional terms of any quote, order, acknowledgement,
or similar communication between the parties during the term of this Agreement except as
otherwise expressly agreed by the parties. No modification to the Agreement will be binding,
unless in writing and signed by a duly authorized representative of each party.
10. NON-WAIVER. No delay or failure to take any action or exercise any rights under this
Agreement shall constitute a waiver or consent unless expressly waived or consented to in
writing by a duly authorized representative of AAS. A waiver of any event does not apply to
any other event, even if in relation to the same subject-matter.
Page 63

Index
about, 54
adsr, 32
ahd, 32
architecture, 13
arpeggiator, 49
latch, 51
looping, 50
pattern, 50
rate, 50
rhythmic pattern, 50
synchronization, 50
audio, 55
configuration, 11, 55
device, 55
latency, 55
authorization, 8
auto-wah, 15, 35, 45
backup, 19
bank, 17
backup, 19
create, 17
delete, 17
factory library, 20
importing, 20
rename, 17
sharing, 19
bank manager, 17
beam, 28
buffer size, 11, 55
contact, 12
cpu load, 52
default MIDI map, 56
delay, 15, 35, 38
distortion, 15, 39, 53
drop-down menus, 21
drumhead, 28
edit view, 15, 26
effect view, 15
effects
master clock, 48
synchronization, 22
envelope, 32
EQ, 15, 35
equalizer, 15, 35
factory library, 11
fine tuning, 21
flanger, 15, 35, 41
fx view, 15, 35
help, 11, 12
history, 53
installation, 8
interface, 14, 21
drop-down menus, 21
knobs, 21
numerical displays, 21
switches, 21
challenge code, 8
chorus, 15, 35, 39
mono, 39
stereo, 39
clock, 22, 48
closed tube, 28
coarse, 21
compare, 53
compressor, 15, 35, 37
keyboard
unison, 49
knobs, 21
latency, 55
level meter, 53
lfo, 34
rate, 34
synchronization, 22
Page 64

64 INDEX
wave shape, 34
library
importing, 20
restore, 20
limiter, 53
mallet, 26
manual, 54
manual mode, 28
marimba, 28
master clock, 48
master volume, 53
membrane, 28
micro-tuning, 52
MIDI, 55
bank change, 57
configuration, 11, 56
device, 56
link map, 56
links, 56
pitch bend, 51, 57
program change, 17, 19, 57
receiving, 52
MIDI controller, 56
MIDI led, 52
minimum system requirements, 7
mixer, 26
modulation, 21, 34
modulation wheel, 14, 51
modules, 21
multi-effect, 15, 35
auto wah, 45
chorus, 39
delay, 38
distortion, 39
EQ, 35
flanger, 41
notch filter, 45
phaser, 43
reverb, 46
synchronization, 22
wah wah, 45
noise, 26, 27
envelope, 32
noise source, 27
notch filter, 15, 35, 45
numerical displays, 21
open tube, 28
overdrive, 39
parameters, 21
peak, 53
phaser, 15, 35, 43
pitch bend, 14, 57
pitch wheel, 51
plate, 28
play view, 14, 48
plug-in, 12
audio configuration, 58
automation, 58
formats, 58
MIDI configuration, 58
MIDI program change, 58
multiple instances, 58
performance, 59
saving projects, 58
polyphony, 8, 52
programs, 11, 17
backup, 19
bank manager, 17
copy, 17
factory library, 20
importing, 20
move, 17
saving, 17
sharing, 19
registration, 8
resonator, 28
response code, 8
restore factory library, 20
reverb, 15, 46
ribbon, 14, 51
sampling rate, 8, 11
Page 65

INDEX 65
save, 17
save as, 17
sc, 37
scala files, 52
signal flow, 13
solid state, 39
standalone, 11
start-up, 11
string, 28
switches, 21
synchronization, 22, 48
synchronization to a host, 48
system requirements, 7
transpose, 52
tremolo, 15, 35
tube, 28
tuning, 52
unlocking, 8
utility section, 52
vibrato, 14, 49
voices, 52
volume, 53
VU meter, 53
wah wah, 15, 35, 45
warm tube, 39
 Loading...