

Page 1
Mercmaster Jr.™ Dimensions: 35, 50, 70, 100 and 150 Watt,
INSTRUCTION SHEET
654031-001
Mercmaster Jr.™Enclosed and
Gasketed HPS Lighting Fixtures.
High Pressure Sodium. Suitable for Use in Wet Locations.
Unilets®for use with Threaded Metal Conduit.
120V Integral Ballast. Medium Base Socket for Medium Base Lamps.
Applications
•
Inexpensive HID integrally ballasted
fixture for use in hazardous locations –
inexpensive to buy and inexpensive to
operate (uses one-fifth as much electrical
energy as incandescent and three quarters
as much as fluorescent).
•
Enclosed and gasketed HID lighting
fixtures for use in tunnels, walkways,
bridges, storage facilities, processing plants,
parking lots, foundries, manufacturing plants,
power plants and other locations where
moisture, dirt, dust or corrosive atmospheres are encountered.
Features
•
“Wireless” design. Threading of fixture
unit onto mounting hood makes electrical
connection. Only wiring required is attaching
two wires to connection block in mounting
hood.
•
Safe, easy servicing without disconnecting
any wiring. “Wireless” fixture unit easily
threads off mounting hood for convenient
servicing.
•
Quick, easy conversion from Appleton V-51
incandescent installation to Mercmaster Jr.
HID. Just remove V-51 fixture unit and
thread Mercmaster Jr. fixture unit onto
existing V-51 mounting hood.
Standard Materials
•
Mounting Hoods: copper-free aluminum
(4/10 of 1% max. copper content) or
malleable iron.
•
Ballast bodies: copper-free aluminum
(4/10 of 1% max. copper content).
•
Reflectors: fiberglass-reinforced polyester or porcelain.
•
Globe: 35W-100W, threaded prismatic
glass and threaded polycarbonate: 150W
threaded heat-resistant prismatic glass.
•
Refractor: heat-resistant prismatic glass.
Standard Finishes
•
Ballast bodies, aluminum guard and VMA,
VXHA-A, OBVW1-A, OBV1-A. JBW1-A,
JB1-A, GSW2, and MS mounting hoods:
epoxy power coat finish. Two coat baked finish, electrostatically applied for complete,
uniform surface protection.
•
VA, VXHA, OBVW1, OBV1, GS-2, JBW1,
AND JB1 malleable iron mounting hoods:
triple coat – (1) zinc electroplate; (2) dichromate; and (3) aluminum polymer enamel.
•
Steel guard: zinc electroplate
Options
•
Fuses for fixtures. Factory installed.
Compliances
•
UL Standard 1572, 844 and 1598A.
•
Suitable for use in wet locations.
•
NEMA 4X.
Class I Div. 2 Groups A, B, C, and D
Temperature identification numbers of Mercmaster Jr.
Fixtures
With Globe or with With 8"
Globe & Reflector Refractor
UL/NEC Temp. UL/NEC Temp.
Ident. No. Ident No.
Lamp Nameplate Temperature Nameplate Temperature
Watt Marking Range Marking Range
035 T3C 136-160
0
C T3C 136-1600C
050 T2D 201-2150C T2D 201-2150C
070 T2B 231-260
0
C T2B 231-2600C
100 T2A 261-2800C T2A 261-2800C
150 T2 281-3000CT2 281-3000C
Class II Div.1 & 2 Groups E, F and G
Temperature Identification Numbers
With Globe, with Globe & Reflector
or With 8" Refractor
UL/NEC Temp.
Ident. No.
Lamp Nameplate Temperature
Watts Marking Range Groups
035 T4A 101-120
0
C E, F, G
050 T3C 136-1600C E, F, G
070 T3A 166-1800C E, F
100 – –
150 – – –
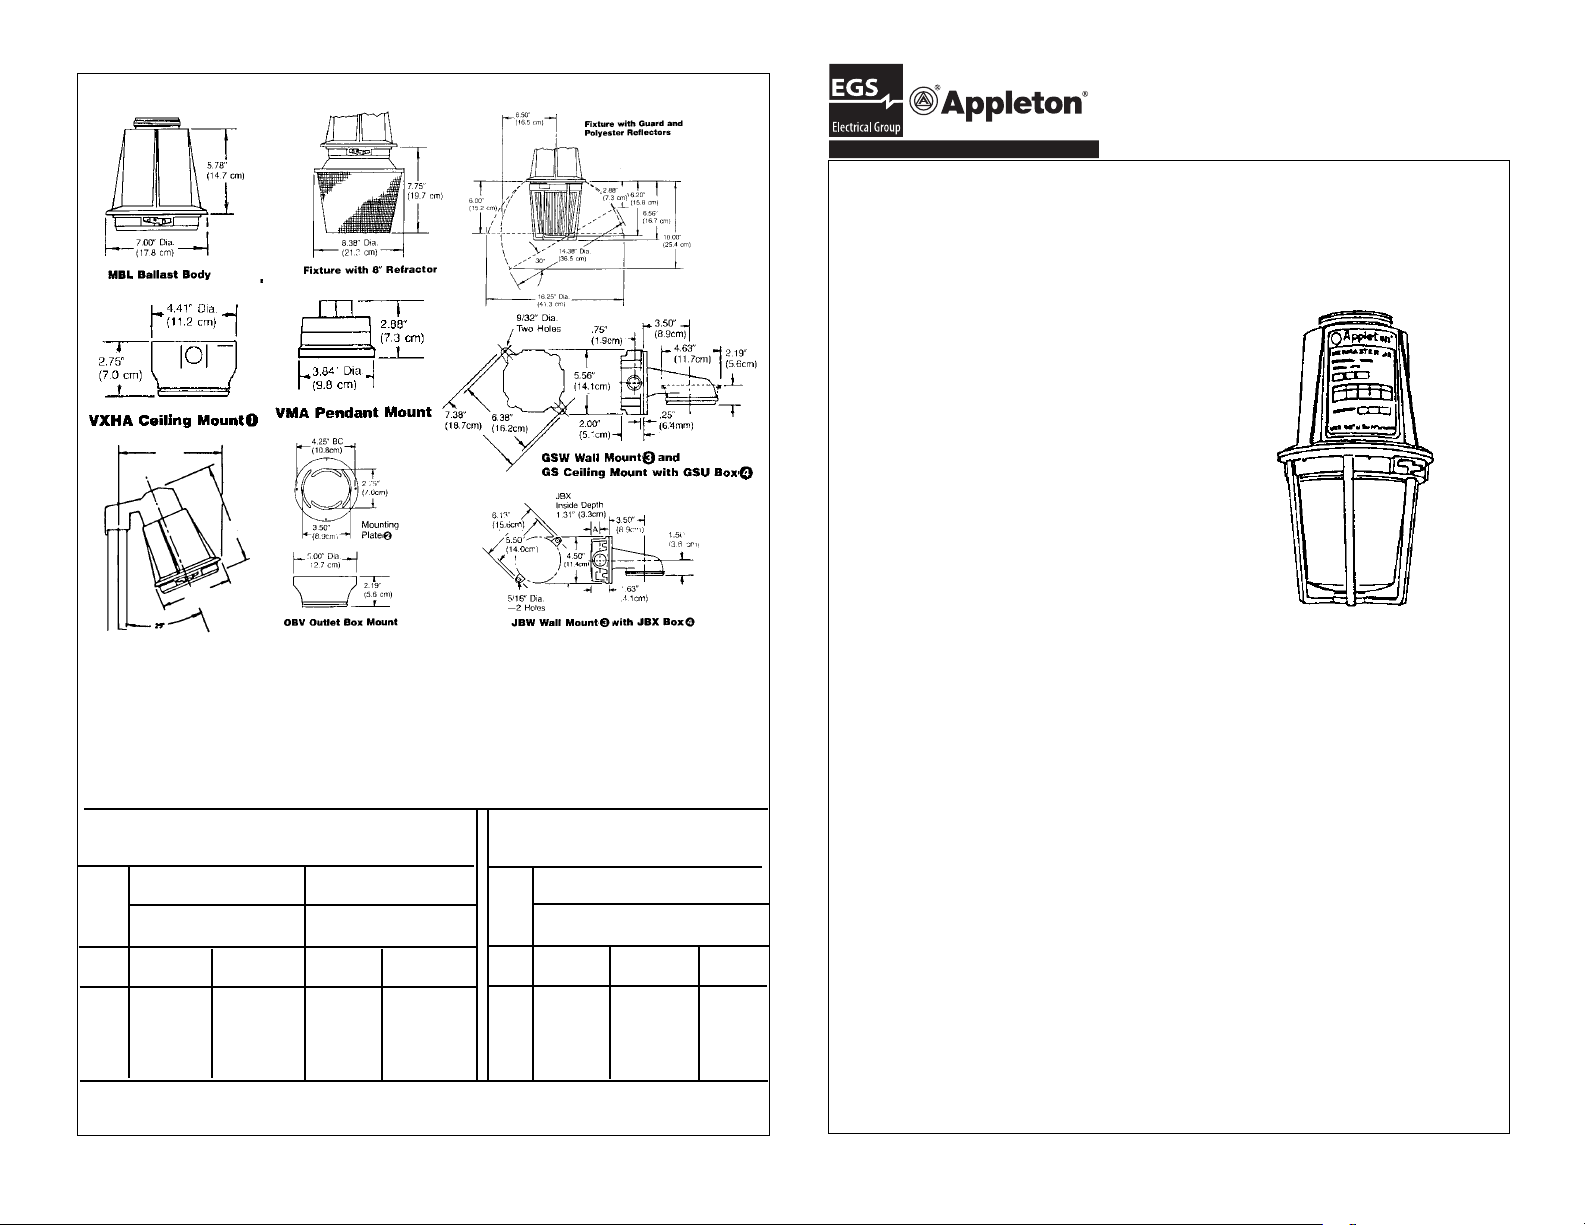
1Mounting holes 9/32" diameter on 5-1/8'' centers
2Mounting Plate is a separate piece furnished with Outlet Box Mount fixture. The 2.75" dimension is for
mounting on 3-1/4" octagonal boxes and the 3.50" dimension is for 4" octagonal boxes.
3Wall Mount fixtures provide the following wall clearances: with GSU box—2" from wall with globe and
1-5/16" from wall with refractor; with JBX box—1-5/8" from wall with globe and 15/16" from wall with refractor. Reflectors cannot be used with Wall Mount fixtures.
4Order GSU or JBX Box separately.
5Standard dome or 30" angle reflectors can be used with Stanchion Mount.
7.00"
17.8 cm
10.00"
25.4 cm
9.61"
25.3 cm
Page 2
MERMASTER JR.
FIXTURE FOR HAZARDOUS LOCATIONS
AND MARINE OUTSIDE (SALTWATER) APPLICATIONS
INSTALLATION AND MAINTENANCE INSTRUCTIONS
(Read carefully before beginning installation)
1. Verify that the supply line is a 120 Volt, 60 Hertz system.
2. Verify that the fixture operating temperature marked on nameplate complies with temperature
restrictions of hazardous area.
3. Use supply wire rated for temperature noted on nameplate.
INSTALLATION OF MOUNTING ACCESSORIES
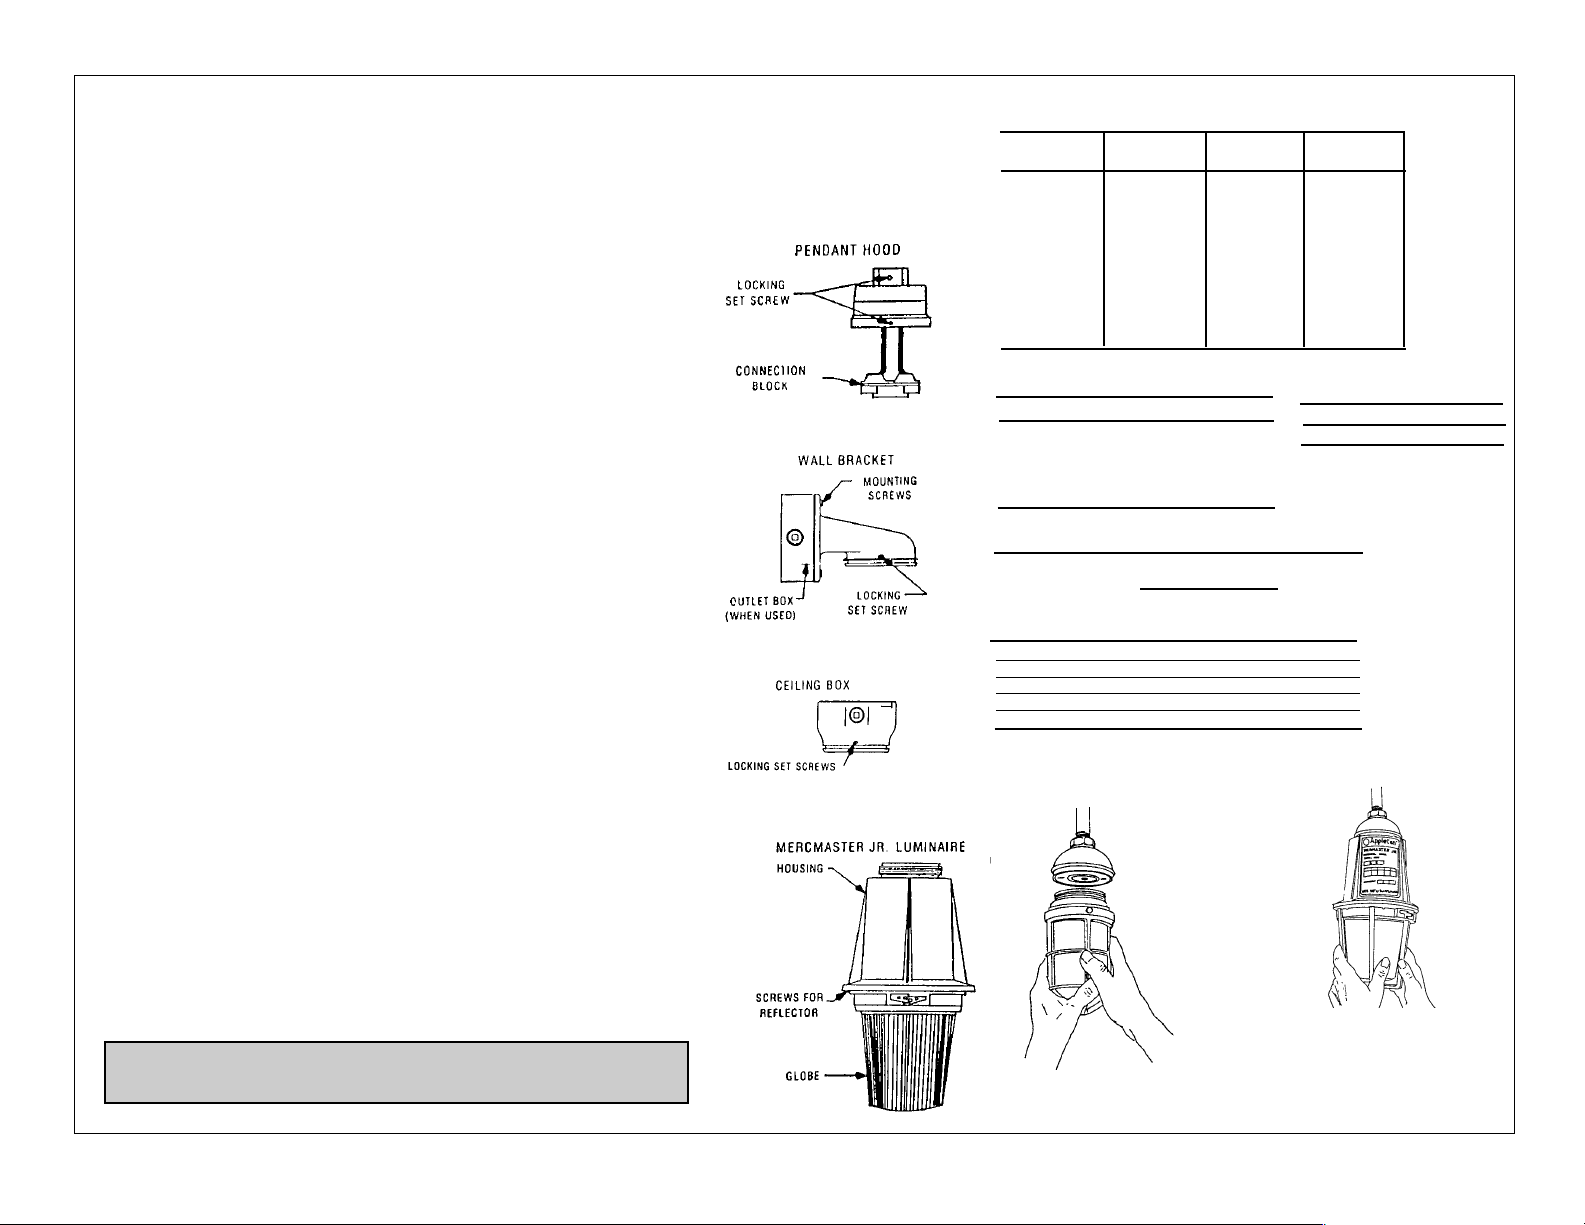
1. Pendant Hood
Remove connection block from hood by loosening two mounting screws. Connect the threaded hood onto conduit and tighten locking set screw. Connect the ground wire to green screw
provided in hood. Connect supply wires to connection block. Replace connection block in
mounting hood and tighten securely.
2. Wall Bracket
Install wall bracket onto support surface or outlet box with the required bolts through the external mounting holes. Remove connection block and connect supply wires. Replace connection
block onto mounting hood and tighten securely.
3. Ceiling Box
Install ceiling box on support surface with two bolts through two external mounting holes.
Remove connection block and connect electrically as described under wall bracket.
INSTALLATION OF FIXTURE
1. Fixture is completely wired, needing no additional field wiring.
2. Installation of Lamp, Globe and Refractor:
Check lamp type and wattage against fixture nameplate, then install lamp, making sure lamp
is fully seated into the socket. Rethread the globe or refractor tightly to housing.
3. Installing Fixture on Mounting Accessory:
Thread assembled fixture into mounting accessory, electrical contacts will automatically
engage. Insure that fixture is tightly threaded, then tighten locking set screw in bottom of
mounting accessory.
4. Installation of Reflector and Guard:
To install reflector, mount onto three mounting screws located at the flange area of the housing, using the mounting clips attached to the reflector. Turn reflector clockwise until it is
locked into place and tighten mounting screws. To install guard, push upward and twist clockwise until it snaps into place.
5. Cleaning Fixture
To maintain good lighting efficiency, globe and reflector should be cleaned periodically. Use a
mild detergent and rinse with clean water.
6. Relamping:
To relamp after disconnecting power, remove globe (or refractor) and old lamp. Install new
lamp as described in item #2 “Installation of Lamps. Globe and Refractor”.
CAUTION:
Disconnect fixture from supply circuit before opening to service. Keep tightly closed
when in operation.
▲
REPLACEMENT PARTS
CATALOG NO. WATTS AND BALLAST SOCKET
LAMP TYPE PART NO.
MBL35-120 35W HPS 661174-201 662016-001
MUL35-120 35W HPS 661174-201 662016-001
MBL50-120 50W HPS 661174-203 662016-001
MUL50-120 50W HPS 661174-203 662016-001
MBL70-120 70W HPS 661174-205 662016-001
MUL70-120 70W HPS 661174-205 662016-001
MBL100-120 100W HPS 661174-207 662016-001
MUL100-120 100W HPS 661174-207 662016-001
MBL150-120 150W HPS 661174-209 662016-001
MUL150-120 150W HPS 661174-209 662016-001
CONNECT BLOCK ASSEMBLY
(COMMON TO ALL CATALOG NUMBERS)
DESCRIPTION PART NUMBER
Connection Block 607471-001
#6-32 x 1/4 Tap Screw P05647-000
#6-32 x 1/4 Screw P01533-000
White Wire Assembly 660005-005
Black Wire Assembly 660004-005
Ambient Suitability of
Mercmaster Jr. Fixtures
35W 50W 70W 100W
40
0
C400C250C250C
All fixtures suitable for operation
at -40
0
F.
Electrical Specifications (Reactor Ballast)
Line Current
In Amperes
Line
Lamp Voltage Starting Operating Input
Watts 60Hz HPF HPF Watts
35 120 0.40 0.40 43
50 120 0.68 0.54 60
70 120 0.90 0.75 83
100 120 1.20 1.00 117
150 120 2.20 1.50 171
Conversion from Appleton V-51 incandescent installation to HID Mercmaster Jr.
is easy and fast.
Step No. 2: Thread
Mercmaster Jr. HID fixture
unit onto existing V-51
mounting hood – and
conversion is completed.
Step No. 1:After power
is shut off, remove present incandescent V-51
fixture unit from existing
V-51 mounting hood.
 Loading...