

Appleton Instruction Sheet: Industrial Baymaster HL LED Luminaire (Pendant Mount), 650546-000 | Appleton Manuals & Guides

650546-000 INSTRUCTION SHEET
Installation Instructions for Appleton™ Industrial Baymaster™ HL
LED Luminaire - Pendant Mount
FOR PROPER AND SAFE INSTALLATION OF THIS PRODUCT, PLEASE READ THE FOLLOWING INSTRUCTIONS.
Product Safety
Signal Words Defined
DANGER indicates a hazardous situation which, if not avoided, will result in death or serious injury. WARNING indicates a hazardous
situation which, if not avoided, could result in death or serious injury. CAUTION indicates a hazardous situation which, if not avoided,
could result in minor or moderate injury. NOTICE is used to address practices not related to physical injury.
Safety Instructions
WARNING:
• Do not open or remove luminaire with the circuit energized.
• Do not remove or replace fuse when luminaire is energized.
• Do not use this luminaire on ungrounded systems. Failure to ground this luminaire can result in an electric shock, which may be fatal.
• Do not use on ungrounded 480 Volt circuits.
CAUTION:
• Do not look directly at the LEDs when energized.
• Risk of re
NOTICE:
• Do not touch the LEDs; touching could leave oily deposits, causing hot spots and potential premature failure.
• This luminaire is designed for and should be installed in accordance with the National Electrical Code®/Canadian Electrical Code
and all applicable local codes.
• This product must be installed in accordance with the applicable installation code by a person familiar with the construction and
operation of the product and the hazards involved.
• A brace is required on conduit stems longer than 12 inches. (NEC requirements)
Marine Locations
CAUTION/ATTENTION:
• Make sure to tighten unused close-up plugs to 400 in.-lb. after applying TLNC4 grease. TLNC4 grease shall be applied in 3 lines,
spaced approximately 120 degrees apart, perpendicular to the threads.
• Where exible cord is used, it should be approved for extra hard, wet location usage and shall have a separate ground conductor.
Agency Ratings:
• Wet Locations
• Marine Outside Type (Salt Water) (For installation in USA only)
• Type 3R, 4, & 4X
• IP66 & IP67
Appleton • 1.800.621.1506 • www.appletonelec.com 650546-000 Rev. B 05/17/17 • Page 1 of 12
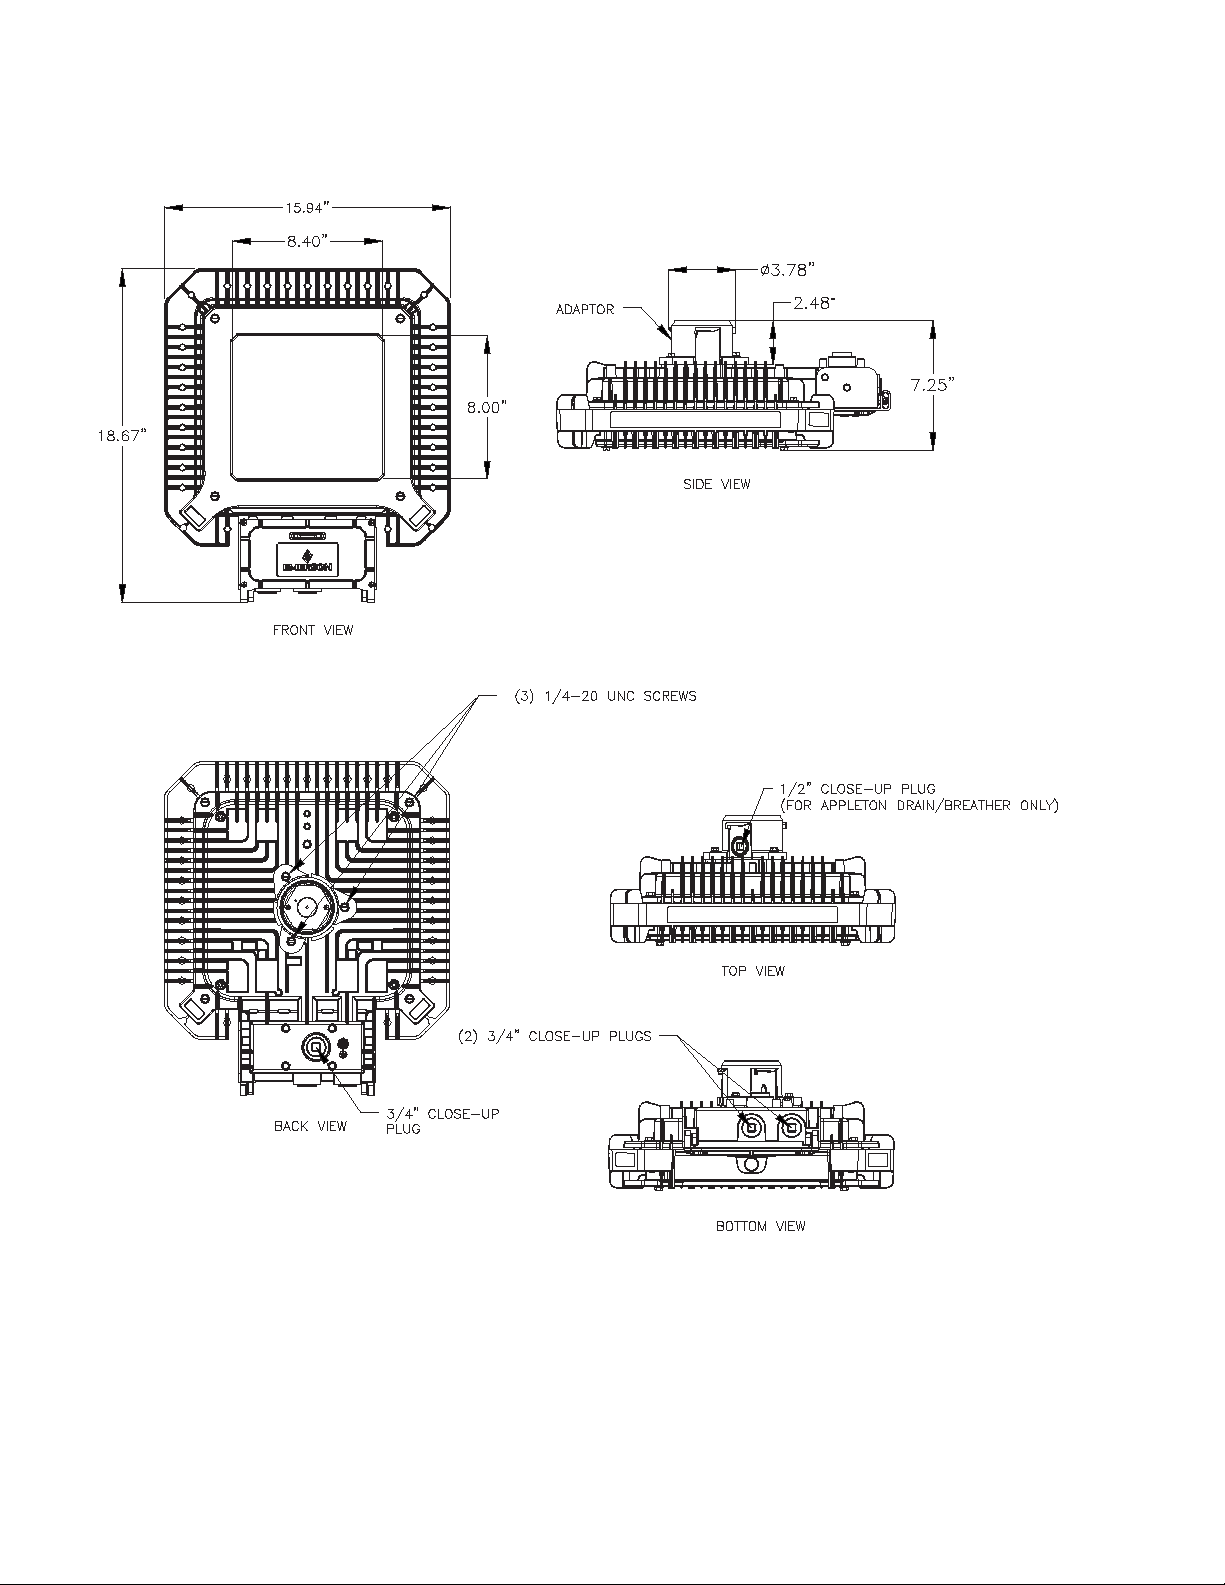
Dimensions
Figure 1: Industrial Baymaster HL LED Luminaire Dimensions
Appleton • 1.800.621.1506 • www.appletonelec.com 650546-000 Rev. B 05/17/17 • Page 2 of 12

Wiring of Pendant Hood
WARNING: The luminaire must be grounded as required by the National Electrical Code (Paragraph 410-21 and Article 250) or
Canadian Electrical Code (Rule 30-500 and Section 10). Verify that ground continuity has been established by using an Ohm meter
or other suitable testing equipment before energizing the luminaire. Failure to properly ground the luminaire will create an electric
shock hazard, which can cause serious injury or death.
Wiring the Industrial Baymaster HL LED Luminaire
1. Remove terminal block from pendant hood by loosening the two mounting screws.
2. Connect the threaded pendant hood onto the conduit and tighten the locking set screw to the conduit.
3. Connect the ground wire to the green grounding screw provided in the pendant hood.
4. Connect supply wires to the terminal block.
5. Reinstall the terminal block in the pendant hood and tighten down the two mounting screws.
Figure 2: Pendant Hood Wiring
Luminaire Assembly to Pendant Hood
1. Switch off the power to the pendant hood.
2. Align the arrows of the adaptor and pendant hood as shown in Figure 3 (d) below.
3. Push the luminaire in the direction of the arrow as shown in Figure 3 (c).
4. Rotate the luminaire in the direction of the arrow (counter-clockwise) as shown in Figure 3 (e) until you feel it snap and click into
place. The arrows on the pendant hood and adaptor will align as in Figure 3 (f).
5. Tighten the locking set screw with a torque of 37 in-lbs.
6. Power can now be applied to the luminaire.
Figure 3: Installation of Luminaire to Pendant Hood
Appleton • 1.800.621.1506 • www.appletonelec.com 650546-000 Rev. B 05/17/17 • Page 3 of 12

Figure 4: Completed Luminaire
Figure 5: Wiring Compartment
Appleton • 1.800.621.1506 • www.appletonelec.com 650546-000 Rev. B 05/17/17 • Page 4 of 12
 Loading...