

Appleton ATX FNES LED Series Self-Contained Emergency Lighting with Self-Test System, 250054402 Instruction Sheet
Page 1

NT 250 0544/02
A 2 M8 X 14
L
218
145
LAIRAGE DE SECOURS
EC
ERGENECY LIGHTING
EM
UMBRADO DE EMERGICIA
AL
- SÉ
- SE
- SE
RIE
FNES (VE
RIES
FNES (VE
RIE
FNES (VE
RSION
RSION
RSÃO
BAES)
BAES)
BAES)
В ПОЖАРНОМ ОСВЕЩЕНИИ -СЕРИЯ FNES (BАРИАНТ BAES)
Equipement / Equipement II3G II3D
Niveau de protection / Protection level EPL Gc EPL Dc
Mode de protection / Protection mode Ex nA IIC Ex nR IIC Ex t IIIC
Classe de température / Temperature class T4 T6 ou/or T4
Température ambiante / Ambiante Temperature - 20°C ≤ Ta ≤ + 55°C
Température de surface/ Surface temperature / / T75°C
Certificat ATEX / ATEX certificate LCIE 03 ATEX 6072
Certificat IECEx / IECEx certificate IECEx LCI 04.0021
Codes IP & IK / IP & IK Codes IP66/67 - IK10
Equipement / Equipement II2D
Niveau de protection / Protection level /
Mode de protection / Protection mode Ex tD21
Classe de température / Temperature class
Température ambiante / Ambiante Temperature - 40°C ≤ Ta ≤ + 55°C
Température de surface/ Surface temperature T75°C
Certificat ATEX / ATEX certificate LCIE 02 ATEX 6067
Certificat IECEx / IECEx certificate IECEx LCIE 11.0065
Codes IP & IK / IP & IK Codes IP66 - IK10
UTILISATION - USE - UTILIZAÇÃO - ИСПОЛЬЗОВАНИЕ
1
FR
Les produits faisant l’objet de la présente notice ne doivent être utilisés que dans
les zones et les conditions pour lesquelles ils ont été certifiés (voir tableau ci-dessus).
Les accessoires montés sur les parois d’enveloppe, tels que : entrées de câble,
bouchons etc., doivent être certifiés avec le matériel ou d’un type compatible avec la
certification du matériel.
Corrosion : Il convient de s’assurer que les matériaux des appareils sont compatibles
avec votre environnement (exemple : polyester en présence de benzène).
T
P
s produtos objeto destas instruções devem
O
e segundo as condições para as quais foram
acessórios
Os
prensa-cabos,
ser com
orrosão :
C
seu am
2
3
montados
bornes,
bujões,
patíveis com
biente (ex.: poliéster em
a certificação da caixa.
Deve-se assegurar que o m
CONDITIONS SPÉCIALES - SPECIAL CONDITIONS - CONDIÇÕES ESPECIAIS - ОСОБЫЕ УСЛОВИЯ
INSTALLATION - INSTALLATION - INSTALAÇÃO - МOHTAЖ
interior
no
etc.
botoeiras
presença de benzeno).
ser utilizados unicam
certificados (ver tabela acim
nas
ou
ser
devem
aterial do equipam
laterais
certificados
das
ento é com
ente nas áreas
caixas,
caixa
a
com
a).
tais
devem
ou
patível com
GB
zones and conditions for which they have been certified (see the table above).The
accessories mounted in or on the sides of the enclosures, such as : cable glands,
blanking plugs, terminals, push buttons etc. must be certified with the enclosure or
must be compatible with the certification of the enclosure.
Corrosion : You should make sure that the material of the equipment is compatible with
your environment (e.g. polyester in presence of benzene).
RU
исключительно в тех местах и условиях, для которых они были сертифицированы
(см. таблицу ниже).
como:
Аксессуары, смонтированные в стенках корпуса, такие как: входные отверстия для
кабеля, заглушки и т.д., должны быть сертифицированы для работы с
оборудованием или быть совместимого с сертификацией оборудования типа.
o
Кoppoзия : Следует убедиться, что материалы, из которых сделаны аппараты,
совместимы с вашими внешними факторами (например: сложный полиэфир в
присутствии бензола).
Products covered under this technical instructions leaflet shall only be used in the
Изделия, представленные в настоящей инструкции, должны использоваться
Batterie Batería
Battery батарея
+ 5°C --> + 25°C
• Côtes d’encombrement
• Overall dimensions
• Dimensões externas
• Габаритные размеры
FNESLEDEU
FNESLEDEUW
L A
785 400
1/10
Page 2

3
0
°
4
Nm
ø
42 / 49 mm
3
0
0
.2
,5
,2
4
5
1
0
5
M8
50
30
Ø
5
4
Ø1
0,2
MAX.
Ø
9
62
8
4
2
0
M
8
1
3
M
A
X.
8
232
200
M8
ø20
128
152
12
140
ø10,5
200
4
3
0
75°
42
5
9
5,9
13 MAX.
M8
• Non permanent adressable • Not maintened, adressable
• Não permanente endereçável • Не поддерживает адресацию
Réf. / Ref. / Коды Puissance lampe / Lamp power / Lampvermogen / Мощность ламп
FNESLEDEU
FNESLEDEUW
Flux nominal 45 lm
Nominal flux 45 lm
LED
Fluxo nominal: 45 lm
Номинальная светимость 45 лм
Autonomie 1 h
1 hr standby time
Autonomia: 1 h
Автономная работа 1час3
Alimentation : 230V 50Hz
Alimentation : 230V 50Hz
Alimentação: 230 V - 50 Hz
Питани : 230В 50Гц
Consommation : 0,7 W
Consumption : 0,7 W
Consumo: 0,7 W
Расход электроэнергии: 0,7 Вт
FR
Le matériel doit être sélectionné conformément aux exigences définies dans la
Directive utilisateur 99/92/CE.
La zone d’installation doit être en adéquation avec la catégorie du produit.
L’installation du matériel doit être réalisée selon les prescriptions de la norme d’installation
EN/IEC 60079-14.
Le personnel intervenant doit être qualifié pour l’activité considérée (EN/IEC 60079-14
Annexe A)
Le raccordement des conducteurs doit être réalisé selon les règles de l’art en tenant
compte de la densité de courant maximale admissible.
Ne procéder à aucune opération de perçage sur les enveloppes, celle-ci effectuée
sans notre accord formel nous dégagerait de toute responsabilité.
PT
O material deve ser seleccionado consoante os requisitos definidos na Directiva
utilizador 99/92/CE.
A zona de instalação deve ser adequada à categoria do produto.
A instalação do material deve ser realizada segundo as prescrições da norma de
instalação EN/IEC 60079-14.
O pessoal interveniente deve ser qualificado para a actividade considerada (EN/IEC
60079-14 anexo A).
A ligação dos condutores deve ser realizada segundo as regras da arte tendo em conta
a densidade de corrente máxima admissível.
Não proceder a nenhuma operação de perfuração nas caixas, se esta for efectuada
sem o nosso acordo formal, anula a garantia.
• Accessoires de fixation
• Fixing accessories
• Acessórios de fixação
• Крепежные аксессуары
GB
All equipment shall be selected in compliance with the requirements stipulated in
Directive 99/92/EC for users
The product category shall match the installation zone.
All hardware shall be installed as stipulated under electrical installations standard EN/IEC
60079-14.
All personnel involved in the installation process shall be qualified for the roles performed
(EN/IEC 60079-14 Annexe A).
Equipment must be connected as stipulated by the regulations in force in accordance with
the maximum permissible current-carrying capacity.
We shall be absolved from all responsibility for drilling operations performed on enclosures without our formal consent.
RU
Оборудование должно подбираться в соответствии с требованиями,
установленными в Директиве 99/92/CE.
Зона установки должна быть адекватна категории продукции.
Установка оборудования должна выполняться согласно стандарту EN/IEC 60079-14.
Рабочий персонал должен иметь профессиональную квалификацию,
соответствующую данному роду деятельности (EN/IEC 60079-14 приложение A).
Соединение проводов должно быть выполнено по всем правилам с учетом
максимальной допустимой плотности тока.
Не делать никаких отверстий в корпусах; такие операции, выполненные без
наш ег о фор мальн ог о согл ас ия осв об ождаю т н ас от вс якой
ответственности.
FEFBZ - FEFBS
FEHW49Z - FEHC60Z
FEWMG
FERBM
8
Z
FESBA - FESBS
FEHBA - FEHBS
2/10
Page 3
1
0
4
2,5 mm2
(B)
--
+
(A)
PE
230 V
NU
NL
±±
C
L
IC
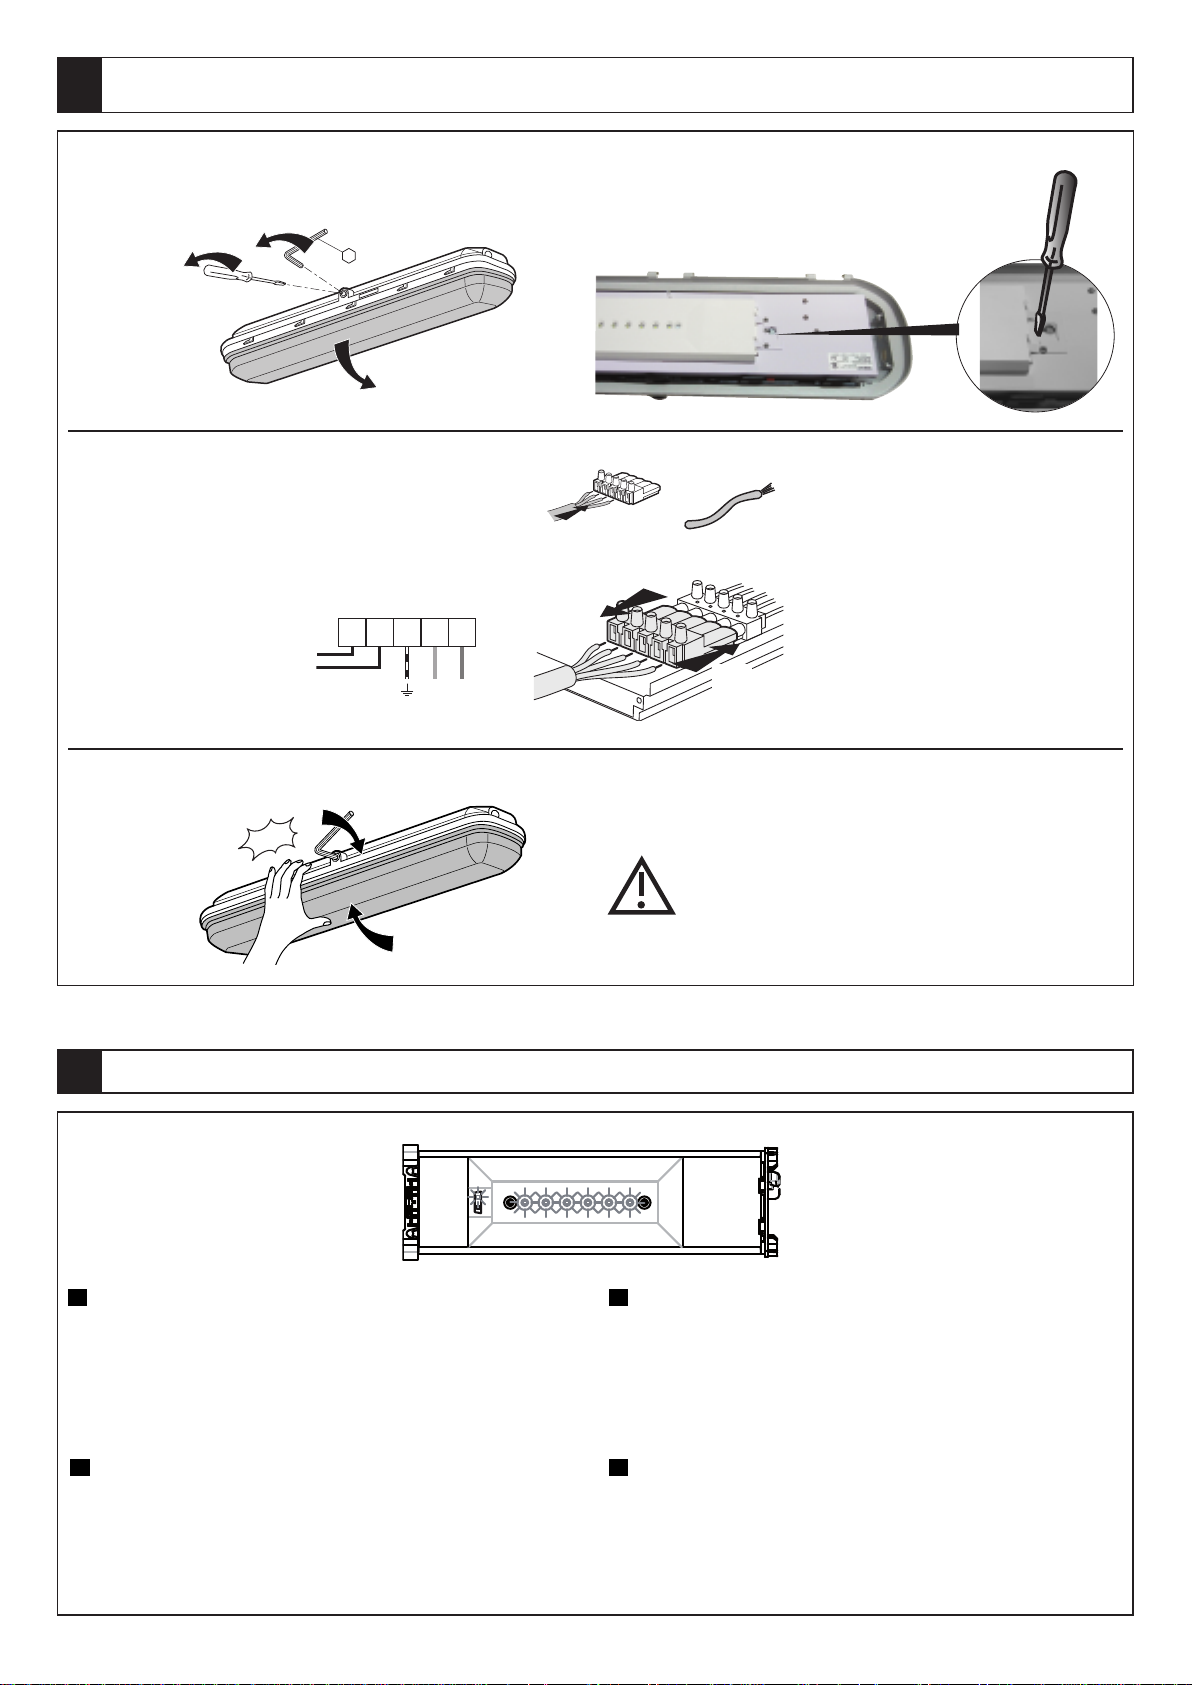
MONTAGE / DÉMONTAGE - ASSEMBLY / DISASSEMBLY - MONTAGEM / DESMONTAGEM - СБОРКА / РАЗБОРКА
Ouverture
Opening
Abertura
Открывание
Raccordement télécommande
Remote control wiring
Fios do controle remoto
Подключение дистанционного управления
Dévisser le réflecteur
Unscrew the réflector
Desparafusar o refletor
Отвинтить рефлектор
D
c
e
n
n
o
c
s
i
D
ta
c
e
n
o
c
s
e
D
ит
ин
д
е
о
с
т
О
Raccorder au réseau
Wire connexions
Conexões dos fios
Подключить к сети
Rebrocher le bornier.
Reconnecting the terminal block.
Reconectar o bloco de terminal
Снова подсоединить клеммную колодку
r
te
e
th
g
n
ti
o
c
o
l
b
o
r
м
м
е
л
к
ь
r
e
i
n
r
o
b
e
l
r
e
h
c
o
r
b
é
k
c
o
l
b
l
a
n
i
m
d
н
l
a
n
i
m
r
te
e
у
к
д
о
л
о
к
ю
у
Fermeture
Closing
Fechamento
Закрывание
5
FR
allumées à faible puissance.
Nota : dans le cas d’un stockage prolongé des blocs, le clignotement des leds dure
jusqu’à ce que les accumulateurs aient retrouvé leur tension.
Ensuite la led verte clignote seule jusqu’à ce que les accumulateurs soient
complètement chargés. Une fois chargés, la led verte s’allume en fixe.
MISE EN SERVICE - PUTTING INTO SERVICE - COLOCANDO EM OPERAÇÃO - ВВОД В ЭКСПЛУАТАЦИЮ
Mettre sous tension. Le voyant SATI vert clignote durant 28h. 6 diodes centrales
Positionnement du joint à la fermeture
Position of the gasket when closing
Posição da junta ao fechar
Положение стыка при закрывании
GB
Switch on, Green SATI indicator flashes during 28h. 6 central LEDs light at low
power.
Note : if the units have been stored a long time, the LED flashing lasts until the
batteries recover their voltage.
Then the green LED flashes alone until the batteries are fully charged. Once charged,
the green LED switches to steady.
PT
Ao ligar, o dispositivo SATI verde pisca durante 28h. 6 diodos centrais acesos em
baixa potência.
Obs.: Caso as unid ade s tenham sido armaze nad as por um longo período, os
dispositivos piscarão até que as baterias recuperem a sua carga.
Em seguida o dispositivo VERDE piscará sozinho até que as baterias estejam
totalmente recarregadas. Uma vez carregadas, o dispositivo VERDE ficará estável e
aceso.
RU
Включить, Зеленый SATI индикатор мигает в течении 28 часов. Загораются 6
центральных светодиодов в режиме малой мощности.
Примечание: пос ле дли тельного х ра нения бл ок ов миг ание индикато ро в
продолжается, пока аккумуляторы не наберут минимальный заряд.
Затем до полной зарядки аккумуляторов мигает только зеленый индикатор.
После полной зарядки индикатор постоянно горит зеленым.
3/10
Page 4

Principe de fonctionnement - Operating principle - Início da Operação - Принцип действия
EXTINCTION
ALLUMAGE
OFF
ON
O
FF
O
N
OFF
ON
FR
Etat de veille (secteur présent, charge batterie, led verte allumée + 6 LEDS allumées).
GB
Standby status (mains power present, battery charge, green led switches + 6 LEDs ligh)
PT
Modo de Espera (ligado, bateria em carregamento, dispositivo VERDE aceso + 6 leds acesas.
RU
Дежурный режим (основное питание подключено, батарея заряжается, зеленый светодиод
мигает + горят все 6 светодиодов в режиме малой мощности)
FR
Etat de fonctionnement (secteur absent, pas de charge batterie, 6 LEDS forte puissance.
GB
Operating status (no mains power, no battery charge, 6 leds high power).
PT
Modo de operação (desligado, bateria sem carregamento, 6 leds de forte potência)
RU
Рабочий режим (основное питание отсутствует, батарея не заряжается, 6 светодиодов в
режиме максимальной мощности)
FR
Etat de repos (secteur absent, pas de charge batterie, LEDS éteintes.
GB
Rest status (no mains power, no battery charge, LEDs off).
PT
Modo de repouso (desligado, bateria sem carregamento, dispositivos desligados)
RU
Выключенное состояние (сеть есть, зарядки батареи нет, индикаторы не горят).
FR
Le bloc peut être mis au repos ou rallumé par action sur les poussoirs ALLUMAGE et EXTINCTION du coffret de télécommande 039 01.Au retour du secteur le bloc se
remet en veille après 30 secondes..
GB
The self-contained emergency lighting unit can be put ion the rest mode or switched on again again by pushing ont the ON and OFF pushbuttons of the remote control unit
039 01. The self-contained emergency lighting luminaire will go back to the rest mode after 30 seconds.
PT
A unidade de iluminação de emergência pode ser colocada no modo de repouso ou ligada novamente apertando os botões ON e OFF da Unidade de controle remoto 039
01.A unidade de iluminação de emergência retornará ao modo de repouso após 30 segundos.
RU
Блок может быть отключен и включен нажатием на кнопки ВКЛЮЧЕНИЕ и ВЫКЛЮЧЕНИЕ коробки дистанционного управления 039 01. При подключении к сети
блок через 30 секунд переходит в режим ожидания.
FR
Contrôle général de l’installation
A tout moment il est possible d’effectuer l’allumage de tous les
blocs pour vérifier visuellement leur bon fonctionnement sans
interrompre l’activité de l’établissement (réception installation, visite
GB
General installation check
All the units can be switched on at any time to check correct
op erat io n vi sual ly wit hou t in terr up ting th e a ctiv it y of the
establishment (installation acceptance, inspectors visit, etc).
de contrôleur...).
- Appuyer une fois sur la touche ALLUMAGE du coffret de télécommande 039 01, la
led s’allume pendant 6 secondes,
3 secondes après, le bloc passe en état de fonctionnement.
- Pour arrêter le contrôle, appuyer sur la touche EXTINCTION du 039 01.
- Press the ON button on remote control 039 01, the LED switches
on for 6 seconds, after 3 seconds, the unit switches to operating status.
- To stop the check, press the OFF button of 039 01.
Note : this operation has no effect on the LED signalling of the units.
Nota : cette opération n’a aucune incidence sur la signalisation des leds des blocs.
PT
Verificação geral das instalações:
Todas as unidades podem ser ligadas a qualquer momento a fim
de verificar visualmente a operação correta sem interromper a
atividade do estabelecimento (instalações, visita dos inspetores,
etc.).
- Aperte o botão ON na unidade de controle remoto 039 01, o dispositivo acenderá
por 6 segundos, após 3 segundos, a unidade alterará para modo de operação.
- Para interromper a verificação, aperte o botão OFF da unidade de controle remoto
039 01.
Obs.: esta operação não terá nenhum efeito nos dispositivos de sinalização das
unidades.
RU
Общий контроль оборудования
В любой момент есть возможность включить все блоки для
визуальной проверки из работы, не нарушая деятельности
предприятия (приемка оборудования, визит проверяющего…
).
- Наж ать один раз на к ла вишу ВКЛ ЮЧ ЕН ИЕ на к ор об ке диста нц ио нного
управления 039 01, при этом на 6 секунд загорится индикатор, а 3 спустя 3
секунды блок перейдет в рабочий режим.
- Для остановки контроля нажать на ОТКЛЮЧЕНИЕ коробки 039 01.
Примечание: эта операция никак не влияет на показания индикаторов блоков.
FR
Mise en repos par le coffret de télécommande
Secteur absent : une pression sur le poussoir EXTINCTION met le bloc au repos.
Une pression sur le poussoir ALLUMAGE remet le bloc en fonctionnement.
Retour du secteur : le bloc se remet en veille après 30 secondes.
PT
Para fixar no modo de repouso utilizando a unidade de controle remoto.
Desligado: aperte o botão OFF uma vez e fixe a unidade para o modo de repouso.
Apertando o botão uma vez reiniciará a operação da unidade.
Ligado: a unidade acenderá para modo de espera (standby) após 30 segundos.
GB
Setting to rest using remote control
With no mains power : pressing the OFF button once sets the unit to rest.
Pressing the ON button once resets the unit to operation.
Restoration of mains power: the unit switches to standby after 30 seconds.
RU
Отключение при помощи коробки дистанционного управления
Сети нет: нажатие на кнопку ВЫКЛЮЧЕНИЕ отключает блок.
Нажатие на кнопку ВКЛЮЧЕНИЕ переводит его в рабочий режим.
При включении сети: блок переходит в режим ожидания через 30 секунд.
4/10
Page 5

FR
EXTINCTION
ALLUMAGE
Tests automatiques
Ce bloc possède un microprocesseur et une horloge interne qui lui permettent de
s’auto-tester :
- Tous les 7 jours : test des lampes pendant 6 secondes. Le bloc choisit un jour pour
réaliser le test des lampes. Toutes les semaines, le même jour à la même heure le
test lampe sera effectué.
- Tous les 70 jours : test des lampes et des accumulateurs pendant 1 heure, un
générateur aléatoire choisit le jour. L’heure de test sera l’heure de la première mise
sous tension du bloc (les accumulateurs ayant une tension suffisante).
- Le bloc choisit une semaine dans le trimestre pour réaliser un test d’autonomie en
plus du test lampe. Pendant les tests la led clignote en vert.
Elle passera en vert fixe lorsque le test sera correct et le bloc à nouveau opérationnel
(charge de 12 heures après la fin d’un test autonomie).
- Aucune autre opération n’est à réaliser.
Nota : si malgré la génération aléatoire du jour de test, 2 blocs voisins ont leurs tests
réalisés simultanément, signalé par le clignotement de leur led verte, il est nécessaire
de décaler l’un d’eux (voir paragraphe “choix de l’heure du test, choix de l’heure par
bloc”).
GB
Automatic tests
The unit has a microprocessor and internal clock for automatic testing :
- Every 7 days : 6 second lamp test. The unit selects a day to perform lamp tests.
Every week on the same day at the same time the lamp test will be performed.
- Every 70 days : 1 hour test of lamps and batteries, a random number generator
selects the day. The test time will be the time of first supplying power to the unit
(batteries having enough voltage).
- The unit selects one week in the quarter to perform an autonomy test in addition to
the lamp test. During the tests the LED flashes green. It switches to steady green
when the test is correct and the unit is again operational (12 hour charge after the end
of the autonomy test).
- No other operation has to be performed.
Note : if despite the random generation of the test day, 2 neighbouring units have their
tests performed simultaneously, signalled by their green LED flashing, it is necessary to
offset one from the other (see paragraph "choice of test time, choice of time by unit")
PT
T
est
es aut
om
át
i
A
unidade t
-
A
c
ada
dia par
T
oda s
em
-
A
c
ada 70 dias
de núm
c
ar
r
egam
- A
u
n
i
d
a
l
é
m
d
es
tabiliz
em
operaç
- Nenhum
O
bs.:
s
s
e
u
s
t
n
e
c
e
s
s
es
c
olha do m
7
a r
ealiz
ana no m
er
os
ent
a
d
e
o
t
e
arão
ão (12 horas
a outra operaç
e
apes
e
s
t
e
á
ri
o
cos
em
um
m
ic
dias
:
r
ealiz
ar
os
t
es
es
m
:
s
er
á r
aleat
ór
ios
o da unidade (
s
e
l
e
c
i
o
n
a
s
t
e
d
a
l
â
m
no
VERDE
ar
da
geraç
s
r
e
a
l
i
z
a
d
u
m
a
c
o
m
p
om
ento por unidade”).
r
opr
oc
ar
á
6
t
es
na lâm
o dia e m
ealiz
s
elec
rá
u
m
p
a
d
quando
de c
ão prec
ão
o
s
s
i
m
e
n
s
a
r
es
s
s
egundos
ado 1 hor
ionar
c
om
a
s
a
.
D
arregam
aleatória
u
l
a
Exploitation particulière
Special usage
Uso especial
Особые режимы эксплуатации
FR
Choix de l’heure des tests
Dans certains cas, pour des raisons d’exploitation, il est nécessaire d’imposer une heure de test. Avant toute opération, s’assurer que tous les blocs
ont leur led verte allumée en fixe ou clignotant. Si après 24 heures de charge, les leds de l’un des blocs clignotent toujours alternativement vert/orange,
remplacer ses accumulateurs.
ador
pada.
es
á o dia.
as
e
m
a
u
r
a
o
is
ará s
t
a
n
o
u
tra
e r
elógio int
de
m
o hor
a de t
bat
er
n
a
n
n
t
e
o
tes
te
ento após
er realiz
do
e
a
me
(v
e
RU
Автоматическое тестирование
er
no par
a t
es
t
e aut
om
át
ic
t
es
t
e
na
lâm
pada.
A
unidade
s
o:
elec
iona
Данный блок имеет микропроцессор и внутренние часы, которые ему позволяют
производить авто-тест.
um
- Каждую неделю: тест ламп в течение 6 секунд. Блок определяет день для теста
ár
io s
er
á r
ealiz
ado o t
es
t
e da lâm
es
t
e nas
lâm
padas
p
a
ra
i
s
p
e
aç
e bat
es
t
e s
uf
ic
ient
re
a
l
i
o
s
i
t
i
v
a
unidade
ão do tes
er
á dur
e)
.
z
a
r
o
s
O
O
m
om
ent
ias
o
es
o do t
c
om
c
ar
ga s
tri
m
e
s
tre
t
e
s
t
e
o
s
d
tiv
er
c
orreto
a finaliz
er
ias
,
um
ant
e o pr
u
m
te
s
te
s
d
i
s
p
o
es
tiv
er
te autônom
s
nov
pada
ger
a
u
i
t
i
o).
tô
v
am
im
n
o
ada.
ламп. Тест ламп будет выполняться каждую неделю в один день и час.
- Ка жд ые 70 дн ей: те ст л ам п и акку мул ят оро в в тече ние 1 часа ; де нь
ador
определяется генератором с лучайных чисел. Временем теста будет время
eir
o
первой подачи напряжения на блок (подача достаточного
напряжения на аккумуляторы).
o
m
o
- Блок выбирает неделю в квартале, чтобы провести тест на автономность, а
s
s
e
также тест ламп. Во время тестов индикатор мигает зеленым.
ente
После удачного теста индикатор загорится постоянным зеленым, а блок вновь
перейдет в рабочее состояние (12-часовя зарядка после теста на автономность).
- Никаких других операций не требуется.
dia
do
tes
te,
2
unidades
v
iz
inhas
tiv
erem
os
n
t
e
,
s
i
n
a
l
i
z
a
d
a
s
p
e
l
o
V
E
R
D
E
p
i
s
c
a
j
a
p
a
rá
g
ra
fo
“e
s
c
o
l
h
a
d
o
m
o
m
n
e
n
to
d
o
te
Примечание: если несмотря на случайную генерацию дня теста 2 соседних
t
e
,
é
блока начали выполнять тесты одновременно, о чем будут сигнализировать их
s
te
,
мигающие зеленые индикаторы, необходимо перенести время теста для одного
из них (см. параграф “выбор времени теста, выбор времени для блока”).
1) Choix global pour toute l’installation
Tous les blocs sont testés à la même heure. Cette programmation n’est possible que sur une installation équipée de la télécommande par coffret
réf. 039 01. (voir catalogue LEGRAND). Le choix se fait secteur présent sur les blocs.
Nota : la télécommande réf.039 01 doit être placée hors zone à risque d’explosion.
- A l’heure choisie pour le test, appuyer sur la touche ALLUMAGE du coffret de télécommande 039 01, la led verte s’allume 6 secondes et s’éteint.
- Avant 3 secondes, appuyer une seconde fois sur la touche ALLUMAGE du 039 01, la led verte s’allume 6 secondes et s’éteint.
- 3 secondes après, les leds des blocs clignotent alternativement vert/orange pendant 5 secondes, puis la led verte est fixe ou clignotante suivant l’état précédent. Les résultats
des tests précédents sont effacés.
Nota : dans le cas d’une installation panachée ayant certains blocs non testables automatiquement, attendre 3 secondes puis terminer par une
impulsion sur EXTINCTION.
Tous les blocs sont en veille. Les blocs à test automatique seront testés à l’heure choisie (le jour sera différent suivant les blocs).
2) Choix de l’heure bloc par bloc
Tous les blocs doivent être programmés unitairement par action sur chaque appareil. A l’heure choisie :
a) Couper l’alimentation secteur de l’appareil (ou de la ligne d’appareil).
b) Agir sur l’interrupteur batterie en ouvrant et fermant le couvercle.
c) Remettre l’appareil sous tension.
Après 5 secondes, la led orange s’éteint, la led verte est fixe ou clignotante suivant l’état précédent.
Les résultats des tests précédents sont effacés. Le bloc sera testé à l’heure choisie (le jour sera différent selon les blocs).
Nota : ce choix est possible même si l’installation a déja été programmée comme en 1.
Mémorisation des résultats
Les résultats des tests sont mémorisés jusqu’à la réalisation d’un test identique bon, et jusqu’à remplacement de l’organe défectueux et la validation du dépannage.
5/10
Page 6

GB
OFF
ON
O
FF
ON
OFF
ON
OFF
ON
OFF
ON
OFF
ON
Choice of test times
In some cases, because of use, it is necessary to set a test time. Befo re any
operation, make sure that all the units have their green LED switched on either steady
or flashing. If after 24 hours charge, the LEDs of one o f the units still flashes
alternately green/orange, replace the batteries.
1) Overall choice for whole installation
All units are tested at the same time. This programming is only possible with an
installation fitted with remote control unit Cat No. 039 01. Choice is made with mains
power present to all units.
Note : the remote control, Cat No. 039 01, must be placed outside the explosion
hazard zone.
- At the time chosen for the test, press the ON button
of the remote control 039 01, the green LED switches on for
6 seconds and switches off.
- Before 3 seconds , press the ON button of 0 39 01 a
second time, the green LED switches on for 6 seconds and
switches off.
- 3 seconds after, the LEDs on the units flash alternately
green/orange for 5 seconds, then the green LED is on steady or flashing according to
its previous state. Previous test results are deleted.
Note : if the installation is mixed, having some units not
tested automatically, wait 3 seconds then end by pressing
OFF.
All units are on standby. The units to be tested automatically
will be tested at the chosen time (the day will be different
according to the units).
2) Choice of time unit by unit
All units must b e programmed singly by operat ing on each d evice. At the time
chosen :
a) Cut the mains power supply to the device (or the device line).
b) Reach the battery switch by opening and closing the cover.
c) Return power supply to the device ;
After 5 seconds, the orange LED switches off, the green LED is on steady or flashing
according to the previous state.
The previous test results will be deleted. The unit will be tested at the chosen time
(the day will be different according to the units).
Note : this choice is possible even if the installation has already been programmed as in 1
Results storage
Test results are stored until the performance of an identical correct test, and until
replacement of the faulty item and validation of the repair.
PT
Escolha do momento dos testes
Em alguns casos , devido à utilização, é necessário programar um momento para o
teste. Antes de qualquer operação, assegure-se de que todas as unidades estão com
seus dispositivos VERDES acesos , não podem estar parados ou piscando. Se após
24 horas de carregamento, os dispositiv os de uma das unidades ainda estiver
piscando alternadamente verde/laranja, substitua as baterias.
1) Escolha para instalações no geral
Todas as unidades devem ser testadas ao mesmo tempo. Esta programação somente
é possível com uma instalação equipada com a unidade de controle remoto Cat. Nro
039 01. A escolha será feita com todas as unidades ligadas.
Obs.: a unidade de controle remoto Cat. Nro. 039 01 , deve
ser colocada do lado de fora da área explosiva.
- No momento escolhido para o teste, aperte o botão ON da
unidade de controle remoto 039 01, o dispositivo VERDE
acenderá por 6 segundos e desligará.
- Antes de 3 segundos, aperte o botão ON da unidade de
controle remoto 039 01 pela segunda vez, os dispositivos piscarão alternadamente
verde/laranja durante 5 segundos. Em seguida o dispositivo VERDE ficará parado ou
piscando de acordo com o seu estado anterior. Os resultados do teste anterior serão
apagados.
RU
Выбор времени выполнения тестов
В некоторых случаях, по эксплуатационным причинам необходимо задать время
про ведения тес та. Перед любой операцией н ужно убедиться, что зеленый
индикатор горит постоянно или мигает на всех блоках. Если после 24 часов
зарядки индикат ор ы одного из блоко в пос тоянно миг аю т то зеленым, то
оранжевым, поменять аккумуляторы.
1) Общий выбор для всего прибора
Все блоки тестируются в одно время. Такое программирование возможно только
на приборе, оборудованном дистанционным управлением посредством коробки
код 039 01 (см. каталог LEGRAND).
Выбор делается при блоках, включенных в сеть.
Примечание: дистанционное управление код 039 01 должно быть установлено
вне взрывоопасной зоны.
- В выбранное для теста время нажать на
клавишу
ВКЛЮЧЕНИЕ коробки дистанционного управления 039
01, при этом зеленый индикатор загорится на 6 секунд и
погаснет.
- За 3 сек унды до этог о нажа ть во вт оро й раз на
ВКЛ ЮЧЕ НИЕ кор обк и 0 39 01 , пр и э том зе ле ный
индикатор загорится на 6 секунд и погаснет.
- 3 секунды спустя индикаторы блоков поочередно будут мигать зеленым и
оранжевым в течение 5 секунд, затем остается гореть или мигать зеленый
индикатор, в зависимости от предыдущего состояния.
Результаты предыдущего теста будут стерты.
Obs.: se a instalação for mista, incluindo algumas unidades
qu e nã o s ão te st ada s au tomat icame nte, agua rd e 3
segundos e em seguida pressione OFF.
Todas as unidades ficarão em repouso (standby). As unidades a
serem testadas automaticamente serão testadas na hora
escolhida (o dia será diferente de acordo com as unidades).
2) Escolha o momento de unidade por unidade
Todas as unidades devem ser programadas separadamente para cada aparelho em
funcionamento. No momento da escolha:
a) Desligue a fonte de alimentação do aparelho (ou da linha de aparelhos)
b) Pegue o interruptor da bateria abrindo e fechando a tampa
c) Ligue novamente o aparelho à fonte de alimentação
Após 5 segundos, o dispositivo LARANJA desligará, o dispositivo VERDE ficará
parado ou piscando de acordo com seu estado anterior.
Obs.: esta escolha é possível mesmo se a instalação já tenha sido programada
conforme item 1.
Resultados armazenados
Os resultados ficarão armazenados até a realização de um mesmo teste executado
corretamente ou até a substituição do item com defeito e validação do reparo.
Примечание: в случае со смешанными приборам и,
имеющим некоторые блоки,
которые не тестируются автоматически, подождать 3
секунды, затем закончить нажатием на ВЫКЛЮЧЕНИЕ.
Все б лок и буд ут в р еж име о жид ан ия . Б локи ,
тестируемые автоматиче ски , будут тес тир ова тьс я в
установленное время (в день, в зависимости от блоков).
2) Выбор времени для каждого блока
Необходимо программировать все блоки вместе, работая с каждым аппаратом. В
выбранное время:
a) Отключите питание аппарата от сети (или всей линии аппаратов).
b) Используйте выключатель батареи, закрыв и открыв крышку.
c) Снова включите аппарат в сеть.
Через 5 с ек унд оранже вый светод ио д погаснет , а зеленый бу де т гореть
постоянно или мигать, в зависимости от предыдущего состояния.
Результаты предыдущих тестов стерты. Блок будет протестирован в выбранное
время (день будет различаться для каждого блока).
При ме чани е: выб ор воз мо же н, д аж е е сл и и нс тал ля ция у же б ыла
запрограммирована, как вп.1.
Запоминание результатов
Результаты тестов запоминаются до выполнения удачного теста и до замены
поврежденного узла и подтверждения устранения поломки.
6/10
Page 7

6
R
F
L
rt a
- Ve
r
e
V
-
n
to
u
a
r
e
V
-
p
e
c
ré
u
a
- J
u
a
- J
u
a
- J
a
h
C
*
a
h
C
*
*
e
s
n
e
n
E
*
*
*
t
u
o
T
p
m
Re
e
p
s
re
a
t
o
N
t
c
n
o
f
rt/o
e
v
a
t
o
N
rg
a
h
c
i
d
n
'i
L
i
l
ti
u
’
d
e
A c
o
s
e
L
obtur
d'
ant toute i
Av
o
c
s
e
l
m
Les
sp
n
i
’
d
e
s
rè
p
t de la r
Il es
cisé
ré
p
ce
n
o
c
des
i
S
d
s
e
l
l
e
gle
è
R
u
c
e
v
a
a
t
o
/
t
ti
e
n
e
n
e
n
n
n
rv
v
a
l
c
o
i
ra
2
e
e
c
a
s
t e
ri
n
e
t d
rn
M
i
s
u
l
l
cl
m
u
a
j
n
o
a
c
c
e
g
e
g
c
i
y
o
p
p
c
a
e
té
1
n
n
:
d
d
o
ti
fe
f
i
f
ati
si
atéri
cti
e
é
ex
v
i
o
de
c
n
g
i
e
i
d
e
e
:
n
g
e
c
on.
g
é
s d
s.
m
g
n
l
i
l
i
l
r l
r
e
a
.
le
e
n
o
i
e
s
h
NTENANCE
AI
o
ti
a
c
fi
i
n
l
= b
é
n
a
t
o
n
te
n
u
u
o
n
g
i
l
c
e
té
e
n
u
’
x
fi
e
m
u
l
n
ta
o
n
g
n
ta
o
n
g
m
a
l
s
e
tte
a
b
a
l
o
l
b
e
r l
re
l
i
re
a
b
a
l
r
chaque
à
t
n
e
m
e
0
3
e
d
e
u
a
f
é
d
m
u
c
c
a
s
e
t
o
r
p
a
m
u
d
a
g
s
e
t, l
n
o
n
s
e
nterv
s
e
d
s
e
n
ns
i
s
el
n
so
n
).
e
é
l
l
i
ta
pons
es
s la
n
a
es
genc
tre
t ê
n
ité
ur
c
é
u
h
n
ffo
i
M
-
u
e
d
s
e
d
n
t d
ta
é
n
e
c
o
n
e
st
e
t
:
t
t.
s
e
=
t
n
a
t
o
n
a
m
m
o
c
é
l
u
fa
é
= d
e
é
t = d
n
e
t l
= d
e
d
i
p
t ra
c
fe
é
d
s
e
p
l
b
u
d
e
ri
ra
a
p
ré
n
e
c
fe
é
d
u
n
n
o
c
s
u
o
t
e
i
r
e
t
t
mise
s
d
e
l
s
e
d
s
e
d
n
o
c
e
s
ille
ve
e
d
t
.
rs
u
te
a
l
u
'e
l
e
d
n
o
i
t
c
.
l
e
ri
té
d
s
re
tu
i
rn
d
s
é
s
i
l
i
t
u
l
ur
on s
enti
m
té
ri
u
c
é
doi
és
l
tal
s d
vu
ré
t p
abilité de l’utilis
rme
o
n
e
it
d
es
onal
nati
s.
e
é
rv
e
s
b
o
n
o
ti
n
tte
A
:
.
e
d
i
m
NTENANCE
AI
s
e
d
o
i
d
x
ti
c
n
fo
e
s
r
u
co
e
d
o
m
n
ti
x
e
’
d
e
d
e
b
tu
u
t d
tte
a
t b
u
fa
e
t d
u
fa
é
.
s
e
s
u
e
tu
re
i
fa
re
,
c
o
.
n
o
ti
x
u
e
tu
c
a
4
s
e
l
ension
t
sous
r
é
v
t
s
e
.
e
n
se
u
p
p
o
l
e
v
n
i
é
h
c
n
ta
é
'
ê
t
n
e
v
i
o
pem
équi
es
é
n
n
o
ti
n
e
ent être péri
v
n
a
s l
n
a
o
f
n
e
,
ém
uppl
s
a
h
c
x
u
a
é
p
o
o
“
n
d
ri
n
i
e
té
t
e
o
rg
l
n
u
c
c
e
e
’
l
l
d
s
a
i
f
e
d
re
s
rm
n
entai
tro
c
e
e
n
b
s
a
l
o
ti
s
*
*
e
l
é
s
e
t
i
o
u
o
b
t
u
P
I
(
o
m
i
ents
. (N
e
ateur
io
ct
s
e
W
-
m
u
l
n
e
m
e
t
t
t
a
u
q
i
s
n
e
n
u
o
c
e
n
tro
c
é
p
o
tre
ê
è
d
ou
r
g
e
l
e
r
t
ê
i
o
d
)
t ê
n
e
v
i
ra
é
p
l
, i
P
E
odi
/IE
N
E
de mettr
e
d
n
res
tro
c
é
l
é
ARTUNG
s
e
n
i
rm
o
t n
e
i
r
a
,
”
e
s
ré
p
*
rs
e
u
q
i
o
ti
ra
p
ré
u
q
s
chaque
e
c
â
q
vu
r
t
ê
t
tre
e
v
i
t
onv
c
OU
S
A
quem
6
C
s mo
a norm
à l
q
ti
s
te
n
e
c
.
l
a
p
e
r
n
e
t
t
i
u
q
c
s
e
c
n
e
*
*
*
m
o
c
s
n
e
l
ré
a
u
'a
l
e
n
u
à
o
h
e
u
s
é
r
p
e
n
i
a
m
t
n
e
m
ent de res
i
R
V
ent i
7
0
0
e en oeuv
s d
e
d
E
.
s
e
u
s
e
t
f
e
r
te
IR
ns
9
e E
o
e
M
-
s
e
se
i
r
e
m
te
c
e
e
m
l
p
o
n
in
p
d
s
v
r
u
n
b
o
S
pec
7
-1
p
e
u
s
s
ANTENI
a
t l
d
t
n
r.
u
o
l
s
u
e
i
m
de
o
i
r
é
la
e
p
é
e
s
e
ré
u
t
pec
OU
tés
n
(i
ro
/IE
N
r
e
y
s
e
d
rs
ra
t
d
e
s
S
sp
e
t
l
ENTO
M
:
te
n
a
v
i
u
e
g
r
a
ch
h
1
t
n
a
r
u
re
p
a
l
e
d
n
e
m
e
d
i
p
e
l
a
n
i
m
o
n
ect
r
cor
est
i
l
c
e
d
e
e
d
io
r
é
p
u
o
t
t
n
a
d
n
ta
é
n
o
b
n
s
e
d
r
a
p
p
ru
c
s
ter
ION
S
N
TE
(3) ni
s
roi
. T
vi
n
o
cti
e
ins
es
e c
r
e
d
n
io
ct
60079-17 ex
C
e
u
q
s
a
v
a
a
e
m
t
n
n
g
e
d
e
t
t.
b
l
u
su
s ma
n
u
p
u
p
'e
,
o
o
e
)
pec
i
M
-
s
è
r
d
e
r
re
è
i
s
s
o
t
s
le
m
e
t
ise
r
p
d
a
l
c
u
e
s
u
v
e
l
l
e
tions
é
t
s
i
e
u
q
ANUTENÇÃO
e
n
u
a
l
e
e
s
i
m
.
e
l
b
i
s
u
l
p
bon
t
n
e
e
d
e
é
r
u
s
n
o
h
t
n
e
m
eaux
e
, d
,
ls
rie
tent,
t
n
e
m
СЛ
Б
О
-
B
G
G
e
th
- G
p
a
G
m
u
l
fro
Y
-
Y
-
Y
-
C
*
C
*
*
*
*
*
n
A
e
R
s
re
o
N
p
o
ote
N
a
b
Th
u
d
Th
n
U
e
B
ry c
e
v
The hardware i
0
6
It i
th
to
n
A
e
b
af
S
n
o
s
e
Th
L
n
e
re
tte
a
b
L
n
e
re
r fa
e
w
o
y
/
n
e
e
r
re
i
a
n
i
re
e
th
m
L
w
o
l
l
e
L
w
o
l
l
e
L
w
o
l
l
e
e
g
n
a
h
e
g
n
a
h
d
n
e
S
p
p
a
y
e
c
a
l
p
te
c
e
p
1 : w
te
n
o
ti
ra
e
: th
2
s
e
ri
tte
ro
p
e
o
n
o
ti
ra
re
fo
re
e
c
d
e
s
u
c
re
fo
re
a
7
-1
9
7
0
the us
s
ro
p
e
o
ti
a
n
y
p
m
o
c
y rules : B
et
d
e
b
y
l
i
n
g
i
D
E
h
c
ry
fl
D
E
re
u
l
i
w
o
l
l
e
th
,
s
o
m
o
D
E
fl
D
E
fl
D
E
e
th
e
th
b
e
th
c
n
a
i
l
e
th
.
d
e
h
f th
o
s
e
.
ti
c
te
f th
e
th
e
b
a
i
rry
a
y o
l
l
fu
o
l
(c
er's
ti
c
te
l
l
a
n
w
d
e
i
l
e
n
o
fi
l
e
d
b
e
l
n
y
w
a
n
ta
s
У
c
t
i
a
te
a
a
a
e
b
e
o
-e
g
s
o
-s
Ж
a
o
rg
s
.
L
e
s
n
s
s
e
a
tte
a
e
L
n
n
m
e
b
e
res
n
th
i
i
ti
i
h
E
c
= e
h
h
fe
tte
f
tte
v
d
a
n
o
se
ns
-u
m
e
th
ВАНИ
И
o
p
n
g
n
n
i
D
a
fl
n
o
n
i
n
i
c
ry
u
o
r
e
E
b
n
i
te
a
i
l
tri
u
tal
p
pons
t re
.
ewar
s
n
c
g
f
s
m
g
g
ti
ry
n
ry
D
y
n
e
ta
rv
a
o
o
o
e
a
l
tro
v
p
h
t
s
l
d
ri
g
s
n
e
l
d
q
rm
o
: te
h
e
s
q
p
d
c
a
e
a
fi
m
ed s
n
e
m
Е
f th
n
a
rre
s
n
i
h
s
g
n
i
fo
l
e
rg
w
o
l
c
i
u
a
l
e
c
a
k
c
a
o
t
e
v
e
u
e
n
a
p
m
fo
x
.
l
n
tti
s
u
w
y
(D
d
n
i
d
bi
i
o
s
re
i
u
e of el
w
e
e
c
t u
g
L
r a
n
l
k
m
k
fo
n
b
fa
o
hal
l
f th
m
tw
e
tl
y
l
; re
b
ry
i
g
t b
rk
O N
-d
ty
i
e
E
c
y
p
t
r
e
o
y
tl
n
y
e
d
n
r
e
t
l
a
s
D
m
ti
tu
y
= b
= e
.
s
o
d
r re
e
d
e
4
p
s
i
h
c
e
t c
l
u
e
th
u
m
s
s
e
n
o
OT OP
be i
l
th
p
e
to ens
e
e
ts
n
e
ec
o
l
t c
c
e
l
e
th
:
ro
r p
i
t
a
n
i
d
n
i
e
p
e
fa
e
b
ry
tte
a
tro
c
e
l
e
th
r.
i
a
p
c
e
f
a
e
y
e
w
o
k
c
e
o
n
a
n
e
t b
s
e
l
a
e
e
th
ns
su
vi
p
i
u
q
p
p
a
os
tr
.
th
i
m
u
l
tro
o
f-c
l
e
s
o
s
s
re
g
o
f
:
y
l
e
v
a
th
te
a
c
f o
o
d
o
ri
t *
l
u
t*
l
u
fa
h
c
c
i
n
d
e
c
ro
p
h
s
e
v
i
t
w
r
o
rs
p
u
d
re
a
y
b
d
e
e
b
y
l
n
u
s
o
l
c
n
i
a
m
e
b
th
i
w
d
p
i
u
q
e
WITH
N
E
ted on a regul
pec
sp
n
i
l
a
ure thes
t h
n
e
m
e
l
b
a
c
i
l
dis
tatic
n
u
l
d
e
n
i
ta
n
re
ry
tte
a
r b
d
r
a
d
n
a
t
s
r
n
i
m
u
l
e
th
t
r w
u
o
h
e
n
*
r fa
e
v
-o
e
g
n
a
r th
fo
s
a
re
u
e
r
e
b
d
l
u
o
n
e
th
n
e
h
e
h
t
t
a
r
o
d
n
o
c
e
s
0
3
ts
u
o
n
e
e
s
m
)
(I P
re
g
n
i
d
e
n
te
p
g
n
i
k
n
a
l
e
th
t,
n
e
m
OWE
P
p
) s
n
o
ti
c
e
ti
pec
ns
e i
n
i
re
a
w
rd
a
f s
o
p
to
n
o
. W
ges
har
c
m
s
e
i
u
o
l
c
a
h
p
o
p
d
u
e
ons
s
i
c
e
i
m
n
e
s
o
g
te
i
R
ar s
c
ta
ta
ipi
re
i
a
n
rg
a
h
o
c
-
f
l
h
re
m
e
l
i
t*
l
u
rs
fi
e
e
r
i
a
a
n
i
f
o
d
o
ri
e
e
th
e
b
t
o
c
d
.
s
s
d
ON
c
s th
e
fi
i
are i
d
e
l
l
a
d
n
ng away
s
i
n
i
t
n
s
a
i
a
*
*
t p
a
d
l
e
o
d
e
p
k
d
n
fe
a
)
hedul
.
rd
o
a
g
n
i
a
c
re
p
s
n
u
s
to
u
a
h
c
a
f fl
o
ri
p
e
o
ti
i
ty
re
m
E
ra
e
p
fte
e
d
e
v
i
e
w
o
g
n
tti
i
u
q
o
n
o
c
h
s
a
fo
d
fo
t
.
n
s
n
i
e. S
n
i
e
em
pl
/IE
N
the dif
g
n
ti
u
d
r a
g
r
e
m
th
d
e
r.
e
s
n
i
y
l
k
c
y
m
t
c
rre
g
g
n
i
a
h
r c
th
r
ti
c
tru
tandard E
c
e
sp
ented ac
0
6
C
n
e
a
i
re
ti
ra
e
s
e
o
0
fus
o
e
rv
s
e
t
rg
n
o
d
n
a
y
l
l
a
rm
r
t o
s
te
n
o
ti
g
n
i
t
h
g
i
l
y
c
n
n
o
ti
a
rm
fo
n
i
.
e
c
i
.
e
l
b
i
s
s
o
p
r
e
g
n
o
l
o
n
t
c
rre
o
c
,
t
s
.
e
g
n
ra
/o
n
e
e
th
g
n
i
te
e
l
p
m
o
c
e
b
t
s
u
m
s
C
N/IE
.
s
l
e
v
e
l
n
ng
ordi
c
l
l
a
h
s
7
-1
9
7
hould
s
er
:
g
n
i
w
o
l
l
fo
e
th
s
i
s
e
d
o
i
t d
n
e
c
s
e
:
rie
tte
de la ba
ge
onta
t rem
e
rie
tte
ba
ge de la
onta
m
Dé
s
vi
s 2
e
r l
sse
i
v
é
D
r
ie
rn
o
b
er le
ch
ro
Déb
Dans le cadre de la directive DEEE, décret 2005-829 du 20/07/05,
ATX pe ut vous proposer d es filières de val or is at io n et de
tr aitement des pr oduits c on ce rnés. Ceux-ci sont ident if iés
réglementairement avec le logo
Merci de contacter notre Service Après Vente au 03 22 54 27 54.
+ 5
C
°
--> + 2
oving the battery
m
Re
e
R
o
m
a
s
w
scre
2
e
th
e
v
:
ttery
ba
fitting the
nd re
C
°
5
Disconnecting the terminal block
In the case of the DEEE Directive, decree 2005-829 from the
20/07/05, ATX can offer you enhanced procedures and treatment of
the products concerned. These are identified as standard with the
logo.
Please contact our After Sales service on: + (33) 3 22 54 27 54.
°
5
+
C -->
°C
25
+
7/10
Page 8

PT
O significado dos dois diodos eletroluminescentes é o seguinte:
- Dispositivo Verde Aceso permanentemente: a luminária está operando normalmente
e a bateria carregando corretamente.
- Dispositivo Verde Piscando: teste em andamento ou bateria recarregando após o
teste ou falha na fonte de alimentação.
- Dispositivo Verde/Amarelo Piscando alternadamente: para as lumi nár ias de
emergência padrão, estes dispositivos piscando indicam que a luminária recebeu a
informação da unidade de controle remoto por um período de uma hora enquanto
ligada à fonte de alimentação
- Dispositivo Amarelo ligado = falha na lâmpada de emergência*
- Dispositivo Amarelo Piscando Devagar = falha na bateria **
- Dispositivo Amarelo Piscando Rapidamente = falha na mudança de operação***
* Substitua as lâmpadas defeituosas
** Substitua a bateria, refaça os procedimentos conforme a primeira operação
*** Envie a bateria para reparo
Obs. 1: Sempre que a unidade for ligada ou no f inal de cada teste realizad o
corretamente, é possível verificar a operação correta de cada dispositivo por um
período de 30 segundos através do dispositivo verde/laranja piscante.
Obs. 2: A falha da lâmpada standby somente pode ser vista fora do período de
carregamento das baterias.
O índice de protecção da caixa (IP) deve ser preservado durante o período de
utilização do material. Para este efeito, os anéis de vedação devem ser mantidos em
bom estado de funcionamento.
As entradas não utilizadas devem ser, obrigatoriamente tampadas com bujões.
Antes de proceder a qualquer intervenção nos equipamentos, convém respeitar
rigosamente as instruções de segurança mencionadas.
Os materiais instalados devem ser controlados periodicamente. A norma EN/IEC
60079-17 prevê três níveis de inspecção (inspecção visual, de perto e detalhada).
Compete ao utilizador efectuar estas inspecções indicadas na dita norma, consoante
os modos de protecção dos materiais em questão.
Caso existam requisitos nacionais suplementares à norma EN/IEC 60079-17, os
mesmos devem ser respeitados.
Regra de segurança : Cuidado com as descargas eletrostáticas. A limpeza do
difusor deve ser feita utilizando-se apenas de um pano úmido
RU
Два светодиода имеют следующее значения :
- Горит зеленый: блок в нормальном рабочем состоянии.
- Зеленый мигает: выполняется тест, либо батарея заряжается после теста на
автономность или простого теста.
- Мигает зеленый и желтый: в «классическом» режиме означает
подтверждение в течение 1 часа с момента получения дистанционной
команды на выключение при наличии сети/в адресном режиме работы
указывает на отсутствие подключения к коробке интерфейса.
- Горит желтый = неисправность лампы аварийного освещения*
- Редко мигает желтый = неисправность батареи**
- Часто мигает желтый = неисправность электроники***
* Замените неисправные лампы.
**Замените батарею блока, снова проделайте операции, как при первом вводе в
эксплуатацию
*** Отправите блок на ремонт.
Любой аппарат, признанный неисправным, должен быть отремонтирован как
можно скорее. Меняйте батарею каждые 4 года, либо при сокращении
номинального времени автономной работы.
римечание 1:
П
окончании удачного теста правильная работа индикаторов может быть
проверена благодаря 30-секундному периоду мигания зеленым и
оранжевым.
римечание 2:
П
только после того, как зарядятся аккумуляторы.
Степень защиты изоляционных материалов (IP) должна сохраняться на
протяжении всего времени использования оборудования
Для этого необходимо поддерживать сальники в хорошем состоянии.
Неиспользуемые отверстия обязательно должны быть закрыты заглушками.
Перед любым обслуживанием оборудования следует тщательно соблюсти упомянутые правила техники безопасности.
Установленное оборудование подлежит периодической проверке. Стандартом
EN/IEC 60079-17 предусматривается 3 уровня проверки (внешняя, вблизи и детальная).
На пользователе лежит ответственность за проведение проверок, перечисленных
в данном стандарте, в соответствии со способами защиты данного типа оборудования.
При наличии национальных требований, дополняющих стандарт EN/IEC 60079-17,
их соблюдение также является обязательным.
при каждом подключении к сети или при каждом
неисправность лампы режима ожидания можно увидеть
Правило безопасности : Опасайтесь статических зарядов. Протирать плафон
только влажной тряпкой
Removendo a bateria e recolocando a bateria : Демонтаж батареи и Монтаж батареи :
Remova os 2 parafusos e remova os dois fios
+ 5°C --> + 25°C + 5°C --> + 25°C
Desconectar o bloco de terminal
Отвинтить 2 винта и Отсоединить 2 провода
Отсоединить клеммную колодку
No caso da Diretriz DEEE, decreto 2005-829 de 20/07/05. A ATX
pode oferecer procedimentos de melhoria e tratamentos dos produtos
em referência. Estes são identificados como padrão com o logo
Favor contatar nosso serviço de Pós-Vendas no tel: +33 3 22 54 27 54.
В рамках Директивы DEEE, постановления 2005-829 от 20/07/05,
ATX может предложить Вам сети приемки отходовна вторичную
переработку для соответствующих продуктов. Это в обязательном порядке обозначается логотипом
Обратитесь, пожалуйста, в нашу службу гарантийного
обслуживания по телефонам : + (33) 3 22 54 27 54.
8/10
Page 9

Pièces de maintenance :
- Vasque avec joint
- Douilles
- Ballast électronique
- Kit d’ouverture/fermeture
- Batterie 2,4 V - 1,5Ah (Z00882)
- Platine évacuation Sati (Z00883)
Maintenance spares :
- Bowl with gasket
- Lamp holders
- Electronic ballast
- Opening/closing kit
- Battery 2,4 V - 1,5Ah (Z00882)
- SATI luminaire for escape (route lighting) Z00883
Peças de reposição:
- Difusor com junta
- Soquetes
- Reator eletrônico
- Kit para abertura/fechamento
- Bateria 2,4 V - 1,5Ah (Z00882)
- Platina evacuação SATI (Z00883)
7
FR
PT
RÉPARATION - REPAIRS - REPARAÇÃO - РЕМОНТ
Aucune réparation, non confirmée par ATX, n’est admissible.
Não é permitida nenhuma reparação sem a conformação de ATX.
Запасные части для техобслуживания :
- Плафон с прокладкой
- Патроны
- Электронный дроссель стартера
- Комплект для открывания/закрывания
- батареи 2,4 V - 1,5Ah (Z00882)
- SATI светильник для освещения пути эвакуации (Z00883)
GB
It is forbidden to perform repair work without first confirming with ATX.
RU
Любой ремонт, не одобренный ATX, не допускается.
9/10
Page 10

10/10
 Loading...