


MIC |
|
|
|
|
PROGRAM A |
|
|
0 |
2 |
4 |
6 |
8 |
10 |
|
PROGRAM B |
|
|
|
|
HOUSE |
|
PAN |
|
PHONES |
|
||||||
|
LINE 2 |
1 |
USB |
|
|
|
|
+12 |
|
|
|
|
|
|
B |
+12 |
|
|
|
|
LINE 2 |
1 |
USB |
|
|
PGM |
CUE |
|
|
|
|
4 |
6 |
1 |
|
2 |
|
|
4 |
6 |
|
|
|
|
|
|
|
|
4 |
6 |
|
|
1 |
|
2 |
4 |
6 |
4 |
6 |
|
|||
|
|
|
|
0 |
|
|
|
|
|
|
0 |
|
|
|
|
|
|
|
|||||||||||||
|
|
|
|
|
|
|
|
|
|
|
|
|
|
|
|
|
|
|
|
|
|
|
|
|
|
|
|
|
MP 4 |
||
2 |
8 |
|
|
|
|
2 |
|
8 |
–12 |
|
|
|
|
|
|
|
-12 |
2 |
|
8 |
|
|
|
2 |
|
8 |
|
2 |
|
8 |
|
|
|
|
|
|
|
|
|
|
|
|
|
|
|
|
|
|
|
|
MIXER |
||||||||||||
|
|
|
|
|
|
|
|
|
–24 |
A |
|
|
|
|
|
|
-24 |
|
|
|
|
|
|
|
|
|
|
|
|
|
|
0 |
10 |
|
|
|
–12 +12 |
–12 +12 |
0 |
10 |
|
|
|
|
|
|
0 |
10 |
–12 +12 |
–12 +12 |
|
|
|
0 |
10 |
|
|
0 |
10 |
|
|||
|
|
|
|
|
|
|
|
|
|
|
|
|
|
A |
CUE B |
|
|||||||||||||||
MIC LEVEL OL |
INPUT |
LOW |
HIGH |
A LEVEL |
|
|
10 |
8 |
6 |
4 |
2 |
0 |
|
B LEVEL |
LOW |
HIGH |
INPUT |
LEVEL |
LEVEL |
POWER |
|||||||||||
17357 SCRATCHLIVE MP 4 OPERATORS MANUAL 1.7.4

Important Safety Instructions |
Introduction |
|||||
1. Read these instructions. |
Refer to the separate Quick Start guide that was included in the |
|||||
2. Keep these instructions. |
box. If you lose yours, a new copy (along with this manual and all |
|||||
3. Heed all warnings. |
other documentation) may be downloaded at |
|||||
4. Follow all instructions. |
www.rane.com/mp4.html. To keep up with the latest tips, and |
|||||
5. Do not use this apparatus near water. |
||||||
to check for software updates for your MP 4, visit the official |
||||||
6. Clean only with a dry cloth. |
||||||
Scratch LIVE Forum at scratchlive.net |
||||||
7. Do not block any ventilation openings. Install in accordance |
||||||
For the questions that the Quick Start guide doesn't answer, |
||||||
with manufacturer’s instructions. |
||||||
please read through these operating instructions so you will know |
||||||
8.Donotinstallnearanyheatsourcessuchasradiators,registers, |
||||||
stoves, or other apparatus (including amplifiers) that produce heat. |
how to get the most from your MP 4 and the included Scratch |
|||||
9. Do not defeat the safety purpose of the polarized or grounding- |
LIVE software. Keep this manual in a safe place. |
|||||
type plug. A polarized plug has two blades with one wider than |
|
|
|
|||
the other. A grounding-type plug has two blades and a third |
Minimum system requirements |
|||||
grounding prong. The wide blade or third prong is provided for |
• ComputerwithUSB1portsupportingFullSpeedMode(USB1.1). |
|||||
your safety. If the provided plug does not fit into your outlet, |
• Screen resolution 1024 x 768 or higher. |
|||||
consult an electrician for replacement of the obsolete outlet. |
• Hard drive space for storing music. |
|||||
10. Protect the power cord and plug from being walked on or |
||||||
• |
PC |
Windows XP with Service Pack 2 or Vista |
||||
pinched particularly at plugs, convenience receptacles, and the |
||||||
|
|
(64-bit XP not supported) |
||||
point where it exits from the apparatus. |
|
|
||||
|
|
Pentium 4 / 1.5 GHz |
||||
11. Only use attachments and accessories specified by Rane. |
|
|
||||
|
|
1 GB RAM. |
||||
12. Use only with the cart, stand, tripod, bracket, or table |
|
|
||||
specified by the manufacturer, or sold with the apparatus. |
• |
Mac |
OSX 10.3 |
|||
When a cart is used, use caution when moving the cart/ |
|
|
G4 / 1 GHz |
|||
apparatus combination to avoid injury from tip-over. |
|
|
1 GB RAM. |
|||
13. Unplug this apparatus during lightning storms or when |
Scratch LIVE is compatible with Intel-based Mac computers. |
|||||
unused for long periods of time. |
Note: no sound card is necessary. |
|||||
14. Refer all servicing to qualified service personnel. Servicing is |
|
|
|
|||
required when the apparatus has been damaged in any way, |
Check List |
|
||||
such as power supply cord or plug is damaged, liquid has been |
|
|||||
These items are included with the MP 4 in the box: |
||||||
spilled or objects have fallen into the apparatus, the apparatus |
||||||
• Scratch LIVE software install disc. |
||||||
has been exposed to rain or moisture, does not operate |
||||||
• |
1 USB cable. |
|||||
normally, or has been dropped. |
||||||
• IEC C5 line cord. |
||||||
15. The plug on the power cord is the AC mains disconnect |
||||||
device and must remain readily operable. |
• Package of 4 rubber feet. |
|||||
16. This apparatus shall be connected to a mains socket outlet |
• |
Quick Start Guide. |
||||
with a protective earthing connection. |
• |
This manual. |
||||
17. When permanently connected, an all-pole mains switch with |
|
|
|
|||
a contact separation of at least 3 mm in each pole shall be |
Copyright notices |
|||||
incorporated in the electrical installation of the building. |
© 2007 Rane Corporation. All rights reserved. Scratch LIVE and |
|||||
18. If rackmounting, provide adequate ventilation. Equipment |
the Scratch LIVE logo are trademarks of Serato Audio Research. |
|||||
may be located above or below this apparatus, but some |
||||||
Trademarked in the U.S. and other countries. Licensed exclu- |
||||||
equipment (like large power amplifiers) may cause an |
||||||
sively to Rane Corporation. This software is based in part on the |
||||||
unacceptable amount of hum or may generate too much heat |
||||||
work of the Independent JPEG Group, and uses libpng code, |
||||||
and degrade the performance of this apparatus. |
||||||
copyright © 2000-2002 Glenn Randers-Pehrson. Control vinyl |
||||||
19. This apparatus may be installed in an industry standard |
||||||
equipment rack. Use screws through all mounting holes to |
and CDs are available for single use only — any further copying |
|||||
provide the best support. |
or unauthorized reproduction is strictly prohibited. Windows |
|||||
WARNING: To reduce the risk of fire or electric shock, do not |
XP and Vista is either a registered trademark or a trademark of |
|||||
expose this apparatus to rain or moisture. Apparatus shall not |
Microsoft Corporation in the United States and/or other coun- |
|||||
be exposed to dripping or splashing and no objects filled with |
tries. Apple, Mac, Macintosh and iTunes are trademarks of Apple |
|||||
liquids, such as vases, shall be placed on the apparatus. |
Computer, Inc., registered in the US and/or other countries. |
|||||
|
|
|
||||
|
WARNING |
The symbols shown below are internationally accepted symbols that |
||||
|
|
|
warn of potential hazards with electrical products. |
|||
|
CAUTION |
|
|
|
This symbol indicates that a dangerous voltage |
|
|
|
|
|
|
constituting a risk of electric shock is present |
|
|
RISK OF ELECTRIC SHOCK |
|
|
|
||
|
DO NOT OPEN |
|
|
|
within this unit. |
|
|
|
|
|
|
|
|
To reduce the risk of electrical shock, do not open the unit. |
|
|
This symbol indicates that there are important |
|||
No user serviceable parts inside. Refer servicing to qualified |
|
|
operating and maintenance instructions in the |
|||
service personnel. |
|
|
literature accompanying this unit. |
|||

MP 4 MIXER
OPERATOR’S MANUAL
Version 1.7.4
Contents
MP 4 Overview............................................. |
2 |
Front Panel Description................................ |
3 |
Rear Panel Description................................. |
4 |
Fader Cleaning............................................. |
4 |
Getting started on Mac OS X........................ |
5 |
Getting started on Windows XP or Vista....... |
5 |
Third-Party Software.................................. |
6 |
Playing your first track................................. |
7 |
Loading tracks........................................... |
7 |
Supported file types.................................. |
7 |
Using tool tips........................................... |
7 |
Preparing your files...................................... |
7 |
Build overviews......................................... |
7 |
Set auto BPM............................................. |
7 |
Reset track gain......................................... |
7 |
Virtual Deck................................................. |
7 |
Mixing with the MP 4................................... |
8 |
Censor....................................................... |
9 |
Fader start................................................. |
9 |
Key lock..................................................... |
9 |
Cue points................................................. |
9 |
Looping................................................... |
10 |
Autoplay.................................................. |
10 |
Repeat..................................................... |
10 |
Visual aids.................................................. |
11 |
Track Overview display............................ |
11 |
Tempo Matching display.......................... |
11 |
Main Waveform display............................ |
12 |
Beat Matching display............................. |
12 |
Gain adjustment...................................... |
12 |
Master gain............................................. |
12 |
Tap Tempo............................................... |
12 |
Organizing your music............................... |
13 |
Grouping tracks into crates...................... |
13 |
Sorting your files..................................... |
13 |
Using the song browser........................... |
14 |
Searching................................................ |
14 |
Prepare window....................................... |
15 |
Review window....................................... |
15 |
Editing ID3 tags....................................... |
15 |
Status icons............................................. |
15 |
Display album art..................................... |
15 |
Playing tracks direct from audio CD......... |
16 |
Previewing tracks.................................... |
16 |
Recording................................................... |
16 |
Keyboard shortcuts.................................... |
17 |
Additional setup......................................... |
18 |
Audio cache............................................. |
18 |
Horizontal waveforms.............................. |
18 |
Maximum screen updates......................... |
18 |
Instant doubles........................................ |
18 |
Play from first cue point.......................... |
18 |
Play from start......................................... |
18 |
Sort cues chronologically......................... |
18 |
Track end warning................................... |
18 |
Playback keys use shift............................ |
18 |
Lock playing deck.................................... |
18 |
Braking.................................................... |
18 |
Audio output........................................... |
18 |
Set auto gain........................................... |
19 |
Read iTunes™ library............................... |
19 |
Auto fill overviews................................... |
19 |
Center on selected song........................... |
19 |
Hi0fi resampler........................................ |
19 |
Rescan ID3 tags....................................... |
19 |
Protect library.......................................... |
19 |
Show all file types................................... |
19 |
Include subcrate tracks............................ |
19 |
Troubleshooting and FAQ........................... |
20 |
Appendix: Block Diagram........................... |
20 |
Corrupt file descriptions and diagnoses...... |
22 |
WEAR PARTS: This product contains the following wear part subject to the ninety (90) day warranty period described on page Warranty-1:
(1) Active Crossfader #11646.
Manual-1
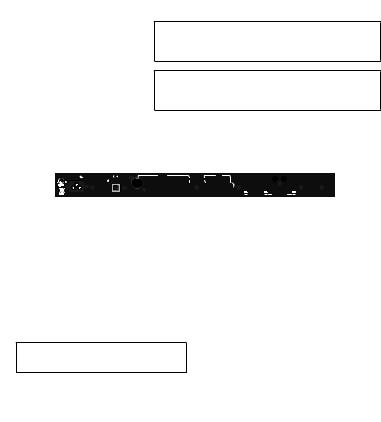
MP 4 Overview
The MP 4 combines Rane mixer technology and Serato Scratch LIVE software. The result is a mixer with the flexibility of playing digital music directly from your computer while still supporting traditional analog inputs. This two-bus mixer is able to simulta- neously play stereo analog sources, play stereo digital files, and digitally record Mic, Program A, Program B or Main-mix. You can also operate the MP 4 as a stand-alone analog mixer without a computer, or use it as a high-quality six-channel sound card with Serato Scratch LIVE software, without analog sources.
The MP 4 is targeted at mobile DJ, night club, remix project studio and post production applications. The Scratch LIVE MP 4 control screen includes many advanced features that enhance its ability to mix and blend:
•Play / pause control, both forward and reverse
•Pitch ± and bend controls for fine tuning beat matching
•Fast forward and reverse
•Multiple cue points per track
•Censor (reverse a section without losing play position)
•Fader Start; Scrub track with mouse; Autoplay Crate… and more.
The MP 4 is not a performance scratch mixer. It does not use control vinyl or CDs and does not have a scratch fader.
While the MP 4 may be used as a generic sound card with other software applications, for best performance and support we highly recommend using Scratch LIVE. Performance using other applications may vary and compatibility is not guaranteed.
The computer sees the MP 4 as three USB audio devices (two stereo play and one stereo record). ASIO (for PC) and CoreAudio (for Mac) drivers are included. The digital audio format is 24-bit, 3-byte PCM with a 48 kHz sample rate.
Inputs
PROGRAM A and B INPUT switches select between the two LINE and two USB Inputs. LINE 1 and LINE 2 are set for PHONO level or LINE level using the associated push switch on the rear panel.
PROGRAM A and B each feature LOW and HIGH tone and LEVEL controls. Four-segment program level meters indicate signals from –24 to +12. Clipping occurs at +22.
The balanced MIC input features a full-range LEVEL control and is mixed with the Main-mix post-crossfader.
Outputs
Two stereo analog outputs are provided. The HOUSE output is available on both balanced XLR and balanced ¼"TRS connec- tors. The AUX output is available on balanced ¼"TRS connec- tors and has an independent rear panel LEVEL control.
Recording
One USB stereo output is available for recording. Scratch LIVE software allows selecting Mic, Program A, Program B or Mainmix as the source. (see page Manual-15). The MICTO USB RECORD switch located on the rear panel determines if the Mic is included in the USB Main-mix record output. The ability to record lets you archive your analog sources, record samples to use in your performance or to record your performance.
Cueing
Headphone Cueing allows independent selection of the Program A or Program B input, making it possible to Cue any source
(digital or analog) with the push of a switch. The PAN PGM / CUE control lets you Pan between the selected Cue input (pre-Cross- fader) and the Main-mix (post-Crossfader).
Two CD players or Two Turntables or One of Each.
100-240V |
MP 4 |
|
|
HOUSE |
|
|
AUX |
|
|
PHONO |
L |
MIC |
|
50/60 Hz 7 WATTS MADE IN U.S.A. |
|
|
|
BALANCED OUTPUTS: TIP = (+), RING = (–), SLEEVE = SIGNAL GROUND |
|
|
GROUND |
BALANCED INPUT |
|||||
|
RANE CORP. |
ACN 001 345 482 |
|
|
|
|
|
|
MIC TO |
|
|
|
|
|
|
|
|
|
|
|
|
|
|
|
|
|
|
|
|
|
|
|
|
|
|
|
USB RECORD |
|
|
|
|
|
|
|
|
|
|
|
|
|
LEVEL |
|
|
R |
|
|
FOR CONTINUED |
|
|
|
|
|
|
|
|
|
|
|
|
|
GROUNDING PROTECTION |
USB |
RIGHT |
LEFT |
RIGHT |
LEFT |
RIGHT |
LEFT |
NO |
LINE |
|
IN 2 IN 1 |
LINE |
|
DO NOT REMOVE SCREW |
YES |
PHONO |
|
PHONO |
||||||||
Zone 1 Amp |
|
|
|
|
|
Zone 2 Amp |
|
|
|
|
|
|
|
|
|
|
|
|
|
|
Manual-2

Front Panel Description
|
|
|
|
|
|
|
|
|
|
|
|
6 |
|
|
|
|
|
|
|
|
|
|
|
|
|
9 |
|
|
|
MIC |
|
|
|
PROGRAM A |
|
0 |
2 |
4 |
6 |
8 |
10 |
|
PROGRAM B |
|
|
|
HOUSE |
|
PAN |
|
PHONES |
|
|||||||
|
LINE 2 1 |
USB |
|
|
|
|
+12 |
|
|
|
|
|
|
B |
+12 |
|
|
|
|
LINE 2 1 |
USB |
|
|
PGM |
CUE |
|
|
|
|
4 |
6 |
1 |
2 |
|
|
4 |
6 |
|
|
|
|
|
|
|
|
4 |
6 |
|
|
1 |
2 |
4 |
6 |
4 |
6 |
|
|||
|
|
|
0 |
|
|
|
|
|
|
0 |
|
|
|
|
|
|
|||||||||||||
|
|
|
|
|
|
|
|
|
|
|
|
|
|
|
|
|
|
|
|
|
|
|
|
|
|
|
MP 4 |
||
2 |
8 |
|
|
|
2 |
|
8 |
–12 |
|
|
|
|
|
|
|
-12 |
2 |
|
8 |
|
|
2 |
|
8 |
|
2 |
|
8 |
|
|
|
|
|
|
|
|
|
|
|
|
|
|
|
|
|
|
MIXER |
||||||||||||
|
|
|
|
|
|
|
|
–24 |
A |
|
|
|
|
|
|
-24 |
|
|
|
|
|
|
|
|
|
|
|
|
|
0 |
10 |
|
|
–12 +12 |
–12 +12 |
0 10 |
|
|
|
|
|
|
0 |
10 |
–12 +12 |
–12 +12 |
|
|
0 |
10 |
|
|
0 |
10 |
|
||||
|
|
|
|
|
|
|
|
|
|
|
|
A CUE B |
|
||||||||||||||||
MIC LEVEL OL |
INPUT |
LOW |
HIGH |
A LEVEL |
|
10 |
8 |
6 |
4 |
2 |
0 |
|
|
B LEVEL |
LOW |
HIGH |
INPUT |
LEVEL |
LEVEL |
POWER |
|||||||||
|
1 |
2 |
|
3 |
4 |
5 |
|
|
|
|
|
|
|
5 |
4 |
3 |
2 |
|
7 |
|
8 |
10 |
11 |
||||||
1 MIC LEVEL control: Adjusts the Level of the MIC Input. The OL (overload) indicator lights when the maximum mic level has been reached, 3 dB before clipping. If this lights up, either turn the MIC LEVEL down, or stop yelling.
2 Program INPUT selectors: Provide selection of LINE 1, LINE 2, USB 1 or USB 2 Inputs for each of the PROGRAM A or PROGRAM B channels. LINE Inputs may each be set for PHONO or LINE level via the rear panel switch (see Rear Panel 6).
3 Program LOW and HIGH tone controls: adjust the equalization for each of the PROGRAM channels. Pointing these controls straight up at their center detents takes the tone controls out of the signal path. This is not designed to be the only equalizer in the system, this is intended to provide EQ between varying program materials. We recommend an external graphic equalizer for the best system sound, connected between the HOUSE OUTPUTS and the amplifier.
4 Program LEVEL controls: set the volume of each PROGRAM INPUT, as you would expect! These controls are pre-Crossfader, so both Program Level controls also depend on the Crossfader setting (see 6).
5 Program meter: This four-segment meter shows signal presence (at -24), optimum signal level (at around 0), and a warning to turn down the associated LEVEL control if the +12 indicator lights up.
6 Active Crossfader: Controls the mix of PROGRAM A and B LEVELS in a logical manner. When the Crossfader is all the way left, only PROGRAM A is heard. When it's all the way right, only PROGRAM B is heard. When it's in the middle, both PROGRAM A and B are mixed together equally. This is an Active Crossfader™ which uses a VCA to deliver an extended life with reduced travel noise, but to insure trouble-free operation, see Fader Cleaning on page Manual-4.
7 HOUSE LEVEL control: Adjusts the Output Level of the Main-mix to the HOUSE Outputs.
8 CUE switches: Select Program A or B in any combination to the PHONES. The associated yellow indicator lights when a CUE is activated and pressed in. Depressing a button sends Program signals to the CUE side of the PAN control. For example, when the
Crossfader is to the left (playing Program A to the House), listen to CUE B (Program B) on the headphones to audition, match beats or prepare a starting point.
9 PAN control: Changes the relative levels of the Cue and Program mixed together in stereo to the PHONES. Adjust this control anywhere between Program and Cue:
PGM follows the Main-mix (House) Output.
CUE is determined by the CUE switches and only goes to the headphones.
0 PHONES LEVEL and headphone jack: As you guessed, plug your headphones in here and adjust the overall volume with the
LEVEL control. CUE 8 and PAN 9 select the source.
Q POWER indicator: Illuminates to let you know the MP 4 is plugged in and ready to go.
Manual-3

Rear Panel Description
|
|
|
|
|
|
|
3 |
|
|
4 |
|
|
|
|
|
EQUIPMENT 24TJ |
|
100-240V |
MP 4 |
|
|
HOUSE |
|
|
AUX |
|
|
|
|
MIC |
|
COMMERCIAL AUDIO |
|
|
|
|
|
|
|
|
|
|
|
|
|
|
|
|
50/60 Hz 7 WATTS |
MADE IN U.S.A. |
|
|
|
BALANCED OUTPUTS: TIP = (+), RING = (–), SLEEVE = SIGNAL GROUND |
|
|
PHONO |
L |
BALANCED INPUT |
||||
|
|
|
|
|
|
GROUND |
|||||||||
|
|
|
RANE CORP. |
ACN 001 345 482 |
|
|
|
|
|
|
MIC TO |
|
|
|
|
R |
|
|
|
|
|
|
|
|
|
|
|
|
|
|
|
|
|
|
|
|
|
|
|
|
|
|
USB RECORD |
|
|
|
|
|
|
|
|
|
|
|
|
|
|
|
LEVEL |
|
|
R |
|
|
|
|
FOR CONTINUED |
|
|
|
|
|
|
|
|
|
|
|
|
|
|
|
GROUNDING PROTECTION |
USB |
RIGHT |
LEFT |
RIGHT |
LEFT |
RIGHT |
LEFT |
NO |
LINE |
|
IN 2 IN 1 |
LINE |
|
|
|
DO NOT REMOVE SCREW |
YES |
PHONO |
|
PHONO |
||||||||
|
|
1 |
|
2 |
|
|
|
|
|
|
5 |
|
|
6 |
7 |
1 Universal Voltage Input: via a miniature IEC 60320 C6 appliance inlet. This mates with an IEC 60320 C5 line cord (USA domestic). Do not lift the ground connection!
2 USB connection: Attach the included USB cable from here to the computer. The blue LED illuminates when the cable is connected and receiving power. USB delivers two stereo inputs from the computer to the mixer (USB 1 and USB 2), and one stereo record signal from the mixer to the computer.
3 HOUSE Output: The front panel HOUSE LEVEL control affects the volume at this Output. Connect either the XLR or ¼" TRS (tip-ring-sleeve) jacks to a balanced equalizer or amplifier. Both Output types may be used simultaneously if needed. Though not recommended, unbalanced ¼" TS (tip-sleeve) cables may be used for short runs (under 3 meters [10 feet]) to an amplifier with unbalanced inputs. See the RaneNote “Sound System Interconnection” for wiring recommendations.
4 AUX Output: This delivers the same signal as the HOUSE Output, but has its own rear panel LEVEL control. This Output is not affected by the front panel HOUSE LEVEL control. These balanced ¼" TRS (tip-ring-sleeve) Outputs connect to a balanced equalizer or amplifier (for a possible second listening zone) and follow the same interconnection rules as above.
5 MIC TO USB RECORD switch: In the YES position the Mic signal along with the Program mix is routed to the USB record output. In the NO position only the Program mix is sent to the USB record output.
6 INPUTS 1 & 2: These stereo Inputs are each switchable from a PHONO (RIAA) stage for magnetic cartridges (switch in) to a LINE level Input suitable for any line level device such as a CD player (switch out). Each of these may be assigned to PROGRAM A or
B using the front panel INPUT selectors. The PHONO GROUND screw connects those extra wires coming out of the turntables.
7 MIC Input jack: Accepts either a ¼" balanced (TRS) or unbalanced (TS) microphone plug, controlled by the front panel MIC LEVEL control.
Fader Cleaning
With heavy use in harsh environments, the fader may need lu- brication. This treatment extends longevity and can make a used fader as good as new. The fader assembly must be removed from the MP 4 for proper cleaning. We recommend any of the follow- ing cleaning solutions:
Caig DeoxIT FaderLube F100 spray lubricant (www.caig.com) Caig DeoxIT FaderLube F5 spray cleaner (www.caig.com)
CRC 2-26 (www.crcindustries.com)
Order CaiLube MCL® from: CAIG Laboratories, Inc. 12200 Thatcher Ct.
Poway, CA 92064
Phone 858-486-8388
Fax 858-486-8398 Web www.caig.com
CLEANING INSTRUCTIONS
A.Fader assembly replacement (part #11646)
1. Unplug the MP 4.
2. Remove the bottom cover.
3. Remove the fader screws from the front panel.
4. Draw fader assembly out through the bottom.
5. Remove ribbon cable from old fader.
6. Attach ribbon cable to new fader, screw onto front panel and replace bottom cover.
B.Fader cleaning
1.Hold the fader assembly away from the mixer.
2.Position the fader at mid-travel.
3.Spray cleaner/lubricant into both ends of the fader in sufficient amounts to flush debris.
4.Move the fader over its full travel back and forth a few times.
5.Shake excess fluid from the fader assembly.
6.Wipe off excess fluid.
Manual-4

Getting started on Mac OS X
Before you install the Scratch LIVE software, check for free software updates at scratchlive.net. The software version that came with your MP 4 is printed on the installation CD. The Scratch
LIVE software is updated frequently, all updates are free, and available at scratchlive.net.
To install the software, double-click on the installer icon from the CD-ROM, or the installer you just downloaded from scratchlive.net.
When you connect your MP 4 to your Mac, it will appear to the Mac operating system as multiple sound outputs and inputs.
Go to the audio section of the system preferences panel to select the desired settings.
On the output tab, choose MP 4 USB1 Out or MP 4 USB2 Out, and on the MP 4 select the same USB 1 or 2 INPUT.
On the input tab, you will see four MP 4 devices listed.
They are, in order:
1.The Main-mix output
2.Program A
3.Program B
4.Microphone
The MP 4 can be used with third party software, as well as the Scratch LIVE software included with it. On the Mac, you can use the MP 4 with any audio application, though technical support is limited to Scratch LIVE.
Getting started on Windows
Windows XP
1.Disconnect any unneccessary USB devices from your PC.
2.Connect the MP 4 to your computer with the supplied USB cable.
3.The Found New Hardware bubbles appear:
MP 4
USB Composite Device
MP 4 USB1 Out
USB Audio Device
MP 4 USB2 Out
USB Audio Device
MP 4 Line In
USB Audio Device
MP 4
USB Human Interface Device
Your new hardware is installed and ready to use.
4.Before you install the Scratch LIVE software, check for free software updates at scratchlive.net. The software version that came with your MP 4 is printed on the installation CD. The
Scratch LIVE software is updated frequently, and all updates are free.To install the software, double-click on the installer icon from the CD-ROM, or the installer you just downloaded from scratchlive.net. Follow the on-screen instructions.
5.Click “Next” to continue the install, or choose custom if you wish to change the install directory or choose not to install the
ASIO driver.
6.Windows may complain that the software driver is not digitally signed. Defy Microsoft and choose Continue Anyway.
Manual-5
7.Click Finish once installation is complete. Scratch Live appears in the Start Menu under All Programs > Serato > Scratch Live.
Windows XP treats each USB port individually. You might like to install Scratch LIVE on all of your USB ports, so you can connect the hardware to any port.
As soon as you install the device driver, the operating system does not see the MP 4. That means you can either [A] not install anything, and windows will see the MP 4, or [B] install Scratch LIVE and the ASIO driver, and then you can use the MP 4 with Scratch LIVE or an ASIO application only.
Windows Vista
When you plug in your hardware:
1.A Found New Hardware wizard will pop up.
2.Choose "Locate and install driver software"
3.After Windows looks for the driver it will say "Windows couldn't find driver software for your device. Choose "Browse my computer for driver software"
4.Browse to the location that you extracted the ScratchLIVE .zip file to. Choose the Drivers folder.
5.Click next and Windows will say "Windows can't verify the publisher of this driver software". Click "Install this driver software anyway".
6.When you see the bubble "Your new hardware is installed and ready to use," proceed to install the Scratch LIVE driver.
Windows Troubleshooting
If you have a USB PCI card, your computer may have allocated bandwith to other devices, including your mouse, preventing Scratch LIVE from recognising the MP 4. Unplug unneccesary devices and install Scratch LIVE again. You may need to temporarily move your mouse to the built-in USB port. After installation, reconnect USB units as needed.
If other USB devices steal bandwidth, you may get a “interface disconnected” message when launching Scratch LIVE, try unplugging and re-plugging in the MP 4.
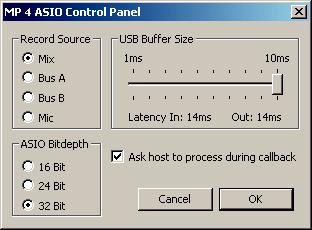
The ASIO Bit Depth and “Ask host to process during callback” settings should not be adjusted unless you are having problems.
Uncheck “Ask host to process during callback” if you have audio dropouts. Your application may not support an ASIO bitdepth of 32-bit. If this is the case, there will be no audio sent to the MP 4.
Third-Party Software
The MP 4 can be used with third party software, as well as the Scratch LIVE software that comes with it. When you install Scratch LIVE, an ASIO driver will also be installed. You can use the MP 4 as a sound card for any third party software that sup- ports the ASIO standard. Go to the audio interface control panel in the third party software, and choose the MP 4 Driver. Launch Control Panel to access more settings for the MP 4 ASIO driver.
You can reduce the USB Buffer Size for lower latency.
Manual-6
 Loading...