

Page 1

Apple LED Cinema Display
Page 2

Apple Inc.
© 2010 Apple Inc. All rights reserved.
Under the copyright laws, this manual may not be copied, in whole
or in part, without the written consent of Apple.
The Apple logo is a trademark of Apple Inc., registered in the U.S.
and other countries. Use of the “keyboard” Apple logo (OptionShift-K) for commercial purposes without the prior written consent
of Apple may constitute trademark infringement and unfair
competition in violation of federal and state laws.
Every eort has been made to ensure that the information in
this manual is accurate. Apple is not responsible for printing or
clerical errors.
Apple
1 Innite Loop
Cupertino, CA 95014
408-996-1010
www.apple.com
Apple, the Apple logo, Apple Cinema Display, iChat, iMovie,
iPhone, iPod, iSight, Mac, MacBook, MagSafe, and Photo Booth are
trademarks of Apple Inc., registered in the U.S. and other countries.
Apple Store is a service mark of Apple Inc., registered in the U.S.
and other countries.
ENERGY STAR® is a U.S. registered trademark.
The Bluetooth® word mark and logos are registered trademarks
owned by Bluetooth SIG, Inc. and any use of such marks by Apple
is under license.
Other company and product names mentioned herein may be
trademarks of their respective companies. Mention of third-party
products is for informational purposes only and constitutes
neither an endorsement nor a recommendation. Apple assumes
no responsibility with regard to the performance or use of these
products.
Page 3

Contents
5 Getting Started
6 Setting Up Your Display
8 Using Your Display
12 Care and Safety
14 Ergonomics
15 Troubleshooting Your Display
16 Learning More, Service, and Support
17 Specications
18 Premiers contacts
19 Installation du moniteur
21 Utilisation du moniteur
25 Entretien et sécurité
27 Ergonomie
28 Dépannage du moniteur
30 Informations, services et assistance
31 Spécications
32 Primeros pasos
33 Instalación de la pantalla
35 Utilización de la pantalla
3
Page 4

39 Mantenimiento y seguridad
41 Ergonomía
42 Solución de problemas con la pantalla
44 Más información, servicio y soporte
45 Especicaciones
46 Introdução
47 Como Congurar o seu Monitor
49 Como usar o seu monitor
53 Cuidado e Segurança
55 Ergonomia
56 Como solucionar os problemas do seu Monitor
58 Mais informações, serviços e suporte
59 Especicações
60 Regulatory Compliance Information
61 Apple and the Environment
4
Page 5

Getting Started
YourAppleLEDCinemaDisplayisdesignedtoworkseamlessly
withMaccomputersthathaveaMiniDisplayPortconnector.
ItfeaturesanLED-backlitwidescreendisplay,aMagSafe
connectortochargeyourMacBookcomputer,abuilt-iniSight
camera,amicrophone,andaspeakersystem.
The instructions on the following pages help you set up and use your new display.
Learn how to:
 Connect your display to your computer
 Use your display’s camera, microphone, speaker system, and USB ports
 Adjust your display’s settings
Note: You can connect your Apple LED Cinema Display to a Mac desktop computer
that has a Mini DisplayPort.
Important: Carefully read all the installation instructions (and the safety information
starting on page 12) before you set up and use your display.
For information about the specic computers and graphics cards that are compatible
with your display, go to www.apple.com/displays.
5English
Page 6

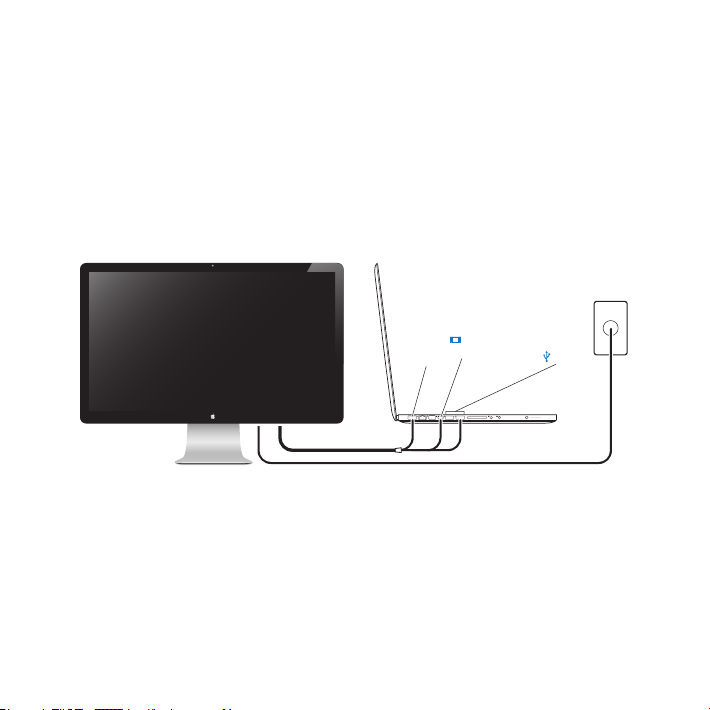
SettingUpYourDisplay
Apple LED Cinema Display
Follow these steps to set up your Apple LED Cinema Display:
1 Remove the protective lm from the display and cables.
2 Insert the power cord into the display, and then insert the AC plug into a grounded
power outlet.
3 Plug the MagSafe connector into the MagSafe power port on your MacBook to charge
the battery and provide power to your computer.
MacBook
Mini
MagSafe USB
4 Connect the USB cable to your computer to use the display’s built-in iSight camera,
DisplayPort
power outlet
microphone, speaker system, and USB ports.
5 Connect the Mini DisplayPort cable to your computer.
6 Press the power (®) button on your computer to start it up. The display turns on
automatically when you start up your computer.
6 English
Grounded
Page 7

Setting Up Your MacBook with the Lid Closed
You can close the lid of your MacBook and use just your Apple LED Cinema Display.
Follow the setup instructions on the previous page and make sure the MagSafe
connector from the display is plugged into the MagSafe power port on your MacBook.
To use your Apple LED Cinema Display with your MacBook lid closed:
1 Connect an external USB keyboard and mouse to a USB port on your display, or use the
Bluetooth® Setup Assistant to set up a wireless keyboard and mouse.
2 Make sure your MacBook is turned on.
3 Close the lid on your MacBook to put it to sleep.
4 Wait a few seconds, and then press any key on the external keyboard or click the
mouse to wake your MacBook.
7English
Page 8
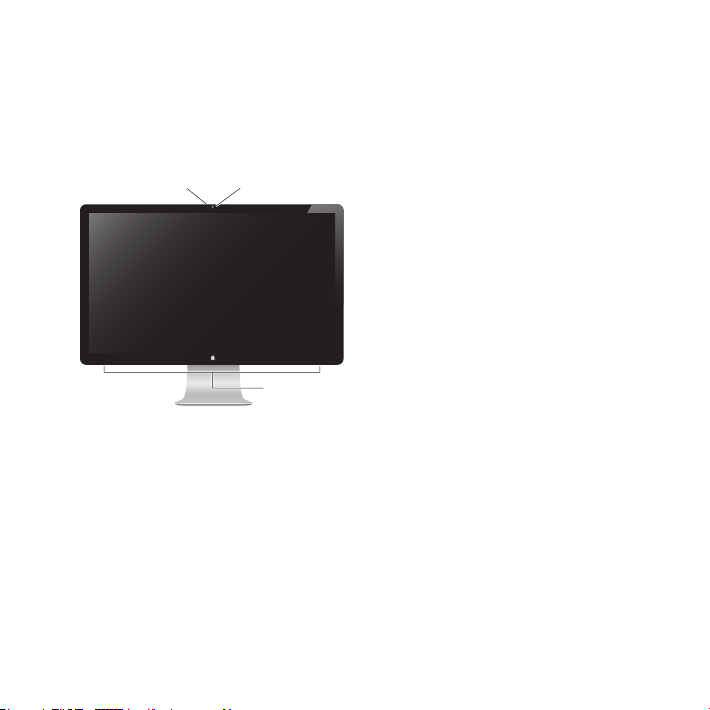
UsingYourDisplay
Built-in
Your Apple LED Cinema Display has a built-in iSight camera, microphone, and speaker
system. The USB connection between the display and your computer is required for
these features.
Microphone
iSight camera
Speaker system
Using the Built-in iSight Camera and Microphone
You can use the built-in iSight camera and microphone to capture still images, video,
and sound using applications such as iChat, iMovie, and Photo Booth.
To set up the camera and microphone with iChat:
1 Click the iChat icon in the Dock to open the iChat application.
2 Choose iChat > Preferences, and then click Audio/Video.
3 Choose Display iSight from the Camera pop-up menu.
4 Choose Display Audio from the Microphone pop-up menu.
8 English
Page 9

Setting Up Sound Input and Output
You can listen to music, movies, games, and multimedia les through the speaker
system on your display. You can use the microphone to record sounds, or talk with
friends using iChat. Use Sound preferences to manage sound input and output.
To set up sound input:
1 Choose Apple () > System Preferences, and then click Sound.
2 Click the Input tab in Sound preferences.
3 Choose Display Audio to input sound through your display’s microphone.
To set up sound output:
1 Choose Apple () > System Preferences, and then click Sound.
2 Click the Output tab in Sound preferences.
3 Choose Display Audio to hear sound through your display’s speaker system.
If your Mac computer supports sound output through the Mini DisplayPort in addition
to the USB port, you can choose either Mini DisplayPort or USB Audio for audio output.
These sound settings are used whenever your computer is connected to your display.
They remain in eect until you change them.
9English
Page 10

Setting Up Your Apple LED Cinema Display as an Additional Display
When you leave the lid on your MacBook open, you can mirror the same desktop
image on both displays or use the additional display as an extension of your desktop.
Use Displays preferences to set up video mirroring or extended desktop.
To set up video mirroring or extended desktop:
1 Choose Apple () > System Preferences, and then click Displays.
2 Click the Arrangement tab and follow the onscreen instructions.
Adjusting the Resolution, Brightness, and Color
Your Apple LED Cinema Display can automatically adjust the screen brightness for
current light conditions using the built-in ambient light sensor. You can turn autobrightness on or o in Displays preferences.
To change the resolution or brightness:
1 Choose Apple () > System Preferences, and then click Displays.
2 Choose a resolution or drag the Brightness slider.
You can also use the brightness keys on an external Apple Keyboard to increase ( ) or
decrease ( ) the brightness of your display.
To change the display color prole or calibrate your display:
1 Click the Color tab in Displays preferences.
2 Choose a display color prole, or click Calibrate to open the Display Calibrator Assistant.
For more information about calibrating your display, choose Help > Mac Help in the
menu bar and search for “calibrate.”
10 English
Page 11
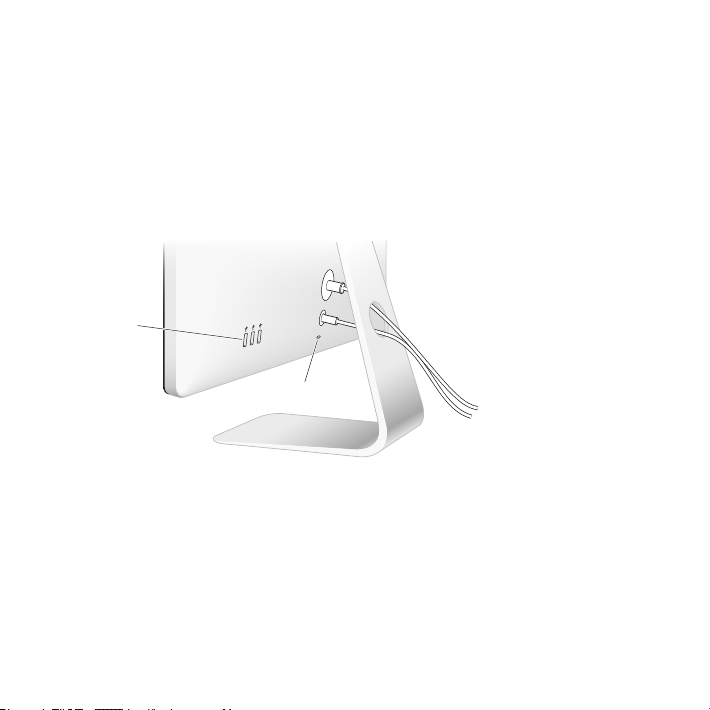
Using the USB Ports and Security Slot
Your Apple LED Cinema Display has three powered USB ports on the back. Use these
ports to connect a mouse, keyboard, iPhone, iPod, or other USB peripheral.
Important: You can use these USB ports to charge your iPhone or iPod, even when
your display isn’t connected to a computer. If you use one of these ports to sync
information between your computer and an iPhone or iPod, make sure the display’s
USB cable is connected to your computer.
USB ports
Security slot
To secure your display, attach a locking cable to the security slot.
11English
Page 12

Using a VESA Mounting Solution with Your Display
You can attach your display to an alternative mounting solution, using the VESA Mount
Adapter Kit available from the Apple Online Store at www.apple.com/store. Use the
kit to attach your display to any available VESA-compatible mounting solution. Simply
follow the instructions included with the kit.
CareandSafety
Before you lift or reposition your display, you may need to disconnect the cables and
power cord. Use correct lifting techniques when positioning the display. When lifting or
carrying the display, hold it by the edges. Don’t lift the display by the stand or the cord.
To clean the screen on your display:
1 Disconnect the power cord.
2 Use the cloth that came with your display, or another soft, dry cloth, to wipe dust from
the screen.
WARNING: Don’t clean the screen with a cleaner containing alcohol or acetone. Use a
cleaner intended for use with a screen or display. Never spray cleaner directly on the
screen. It may drip inside the display and cause damage.
12 English
Page 13
Don’t operate your display in areas with signicant amounts of airborne dust, or smoke
from cigarettes, cigars, ashtrays, stoves, or replaces, or near an ultrasonic humidier
using unltered tap water. Tiny airborne particles produced by smoking, cooking,
burning, or using an ultrasonic humidier with unltered water may, in rare instances,
enter the ventilation openings of your display and, under certain conditions, result in a
slight haze on the inside surface of the glass panel that covers the display.
Follow these safety guidelines for using your display:
 The only way to completely disconnect power is to unplug the power cord. Be sure to
pull the plug, not the cord.
 Disconnect power immediately if the power cord is frayed or damaged, if you spill
something on the display, or if the display falls or is damaged in some other way.
WARNING: Use only the power cord that came with your display. The power cord has
a three-wire grounding plug (a plug that has a third grounding pin) that ts only a
grounded AC outlet. If you are unable to insert the plug into an outlet because the
outlet is not grounded, contact a licensed electrician to replace the outlet with a
properly grounded outlet.
WARNING: Your display is a high-voltage component and should not be opened for
any reason, even when it’s unplugged. If your display needs service, see “Learning
More, Service, and Support” on page 16.
13English
Page 14

Ergonomics
Top of the screen at or
Here are some guidelines for adjusting your display to reduce glare and to
accommodate your physical size and shape.
 Arrange the display so that the top of the screen is slightly below your eye level
when you’re sitting at the keyboard. The best distance from your eyes to the screen is
up to you, although most people tend to prefer 18 to 28 inches (45 to 70 cm).
 Position the display by tilting it up or down to minimize glare and reections from
overhead lights and nearby windows.
Shoulders
relaxed
Forearms and
hands in a
straight line
Forearms level
or tilted slightly
Lower back
supported
Thighs tilted
slightly
18–28 in. (45–70 cm)
For more information about health, safety, and maintenance, go to the Apple
ergonomic website at www.apple.com/about/ergonomics.
slightly below eye level
(You may need to adjust
the height of your display
by raising or lowering
your work surface)
Screen positioned to
avoid reflected glare
Clearance under
work surface
Feet flat on the floor
or on a footrest
14 English
Page 15

TroubleshootingYourDisplay
Before performing any of these steps, make sure your computer is turned on, the
display is plugged into an outlet, all the cables are connected properly to your
computer and display, and your computer is not in sleep mode.
If the screen doesn’t have an image:
 Check the cables and connectors again to make sure they are connected properly to
your computer and the display.
 Make sure your computer is turned on and is not in sleep mode. If the lid on your
MacBook is closed, use the external keyboard or mouse to wake the MacBook from
sleep.
 Unplug the display’s power cord from the grounded power outlet, wait a few
minutes, then plug it in again.
 Reset the PRAM by restarting your computer while holding down the Command (x),
Option, P, and R keys until you hear the startup sound a second time.
If the screen is dim:
 Make sure the display brightness is set properly. Choose Apple () > System
Preferences and click Displays. Drag the Brightness slider to adjust the brightness.
 If the colors on the display are too saturated or not correct, you may need to calibrate
your display. Open Displays preferences, click the Color tab, click Calibrate, and follow
the instructions.
If your MacBook isn’t charging:
Make sure the MagSafe connector from your display is seated properly in the MagSafe
power port on your MacBook.
15English
Page 16
If the built-in iSight camera, microphone, speaker system, or USB ports on the
display aren’t working:
Make sure the USB cable from the display is rmly plugged into the USB port on your
computer. The display’s camera, microphone, speaker system, and USB ports work only
when this cable is connected to your computer.
More Troubleshooting Information
You can nd more troubleshooting information on the Displays support website at:
www.apple.com/support/displays
LearningMore,Service,andSupport
You can nd more information about your display on the Apple website and in
Mac Help.
To learn about See
Using your display Mac Help and search for “displays.”
Display service, support,
discussions, troubleshooting,
and software downloads
The latest information about
displays
Registering your display The Apple Product Registration site at www.apple.com/register.
The Displays Support site at www.apple.com/support/displays.
The Apple Display site at www.apple.com/displays.
16 English
Page 17

Specications
 Model number: A1316
 Resolution: 2560 x 1440 @ 60 Hz
 Ports: Three high-speed USB 2.0 ports on the back
 Camera and microphone: Built-in iSight camera with microphone
 Speakers: Built-in 2.1 speakers with 49 W output
Dimensions:
 Weight: 23.5 lb. (10.7 kg)
 Height: 19.2 inches (488.1 mm)
 Width: 25.65 inches (651.7 mm)
 Depth (with stand): 8.2 inches (208.13 mm)
 Viewable: 27 inches (685.8 mm) diagonal
Operating environment:
 Operating temperature: 50° to 95° F (10° to 35° C)
 Relative humidity: 20% to 80% (noncondensing)
 Altitude: 0 to 10,000 feet (0 to 3048 meters)
17English
Page 18

Premiers contacts
VotremoniteurAppleLEDCinemaDisplayestconçupour
fonctionnerparfaitementaveclesordinateursMacpossédant
unconnecteurMiniDisplayPort.Ilcomprendunmoniteurà
écranlargeàrétro-éclairagepardiodeélectroluminescente,
unconnecteurMagSafepourrechargervotreordinateur
MacBook,unecaméraiSightintégrée,unmicroetun
systèmedehaut-parleurs.
Les instructions des pages suivantes vous permettent de congurer et d’utiliser votre
nouveau moniteur. Pour :
 Connecter votre moniteur à votre ordinateur
 Utiliser la caméra, le micro, le système de haut-parleurs et les ports USB de votre
moniteur
 Régler votre moniteur
Remarque : vous pouvez connecter votre moniteur Apple LED Cinema Display à un
ordinateur de bureau Mac qui possède un connecteur Mini DisplayPort.
Important : lisez soigneusement toutes les instructions d’installation (et les consignes
de sécurité à partir de la page 25) avant de congurer et d’utiliser votre moniteur pour
la première fois.
Pour en savoir plus sur les ordinateurs et les cartes graphiques compatibles avec votre
moniteur, rendez-vous sur www.apple.com/fr/displays.
18 Français
Page 19
Installationdumoniteur
Moniteur Apple LED Cinema Display
Suivez les étapes suivantes pour congurer votre Apple LED Cinema Display :
1 Retirez le lm protecteur du moniteur et des câbles.
2 Branchez le câble d’alimentation sur le moniteur, puis la che CA dans une prise de
courant avec mise à la terre.
3 Branchez le connecteur MagSafe sur le port secteur MagSafe de votre MacBook pour
recharger la batterie et alimenter votre ordinateur.
MacBook
Mini
MagSafe USB
4 Branchez le câble USB sur votre ordinateur pour utiliser la caméra iSight, le système
DisplayPort
de haut-parleurs, le micro et les ports USB intégrés du moniteur.
5 Branchez le câble Mini DisplayPort sur votre ordinateur.
6 Appuyez sur le bouton d’alimentation (®) de l’ordinateur pour l’allumer. Le moniteur
s’allume automatiquement lorsque vous mettez l’ordinateur sous tension.
Prise de courant
avec mise à la terre
19Français
Page 20

Installation de votre MacBook avec le couvercle fermé
Vous pouvez fermer le couvercle de votre MacBook et utiliser votre Apple LED Cinema
Display. Suivez les instructions d’installation à la page précédente et assurez-vous que
le connecteur MagSafe du moniteur est branché sur le port secteur MagSafe de votre
MacBook.
Pour utiliser votre Apple LED Cinema Display avec le couvercle de votre MacBook
fermé:
1 Branchez un clavier et une souris USB sur le port USB de votre moniteur ou utilisez
l’Assistant de réglages Bluetooth® pour installer un clavier et une souris sans l.
2 Assurez-vous que votre MacBook est activé.
3 Fermez le couvercle de votre MacBook pour le mettre en mode veille.
4 Attendez quelques secondes, puis appuyez sur n’importe quelle touche du clavier
externe ou cliquez sur la souris pour réactiver votre MacBook.
20 Français
Page 21

Utilisationdumoniteur
Caméra iSight
Votre moniteur Apple LED Cinema Display intègre une caméra iSight, un micro et un
système de haut-parleurs. La connexion USB entre le moniteur et votre ordinateur est
nécessaire pour activer ces fonctionnalités.
Microphone
intégrée
Système de haut-parleurs
Utilisation de la caméra iSight et du micro intégrés
La caméra iSight et le microphone intégrés vous permettent de capturer des images,
de la vidéo et du son avec des applications comme iChat, iMovie et Photo Booth.
Pour congurer la caméra et le micro avec iChat :
1 Cliquez sur l’icône iChat dans le Dock pour ouvrir l’application iChat.
2 Choisissez iChat > Préférences, puis cliquez sur Audio/Vidéo.
3 Choisissez iSight du moniteur dans le menu local Caméra.
4 Choisissez Audio du moniteur dans le menu local Micro.
21Français
Page 22

Conguration de l’entrée et de la sortie audio
Vous pouvez écouter de la musique, des lms, des jeux et des chiers multimédia grâce
au système de haut-parleurs de votre moniteur. Le micro vous permet d’enregistrer
des sons ou de parler avec des amis à l’aide d’iChat. Utilisez les Préférences audio
pour gérer l’entrée et la sortie audio.
Pour congurer l’entrée audio :
1 Sélectionnez le menu Pomme () > Préférences Système puis cliquez sur Son.
2 Cliquez sur l’onglet Entrée dans Préférences audio.
3 Sélectionnez Audio du moniteur pour utiliser le micro de votre moniteur comme
entrée audio.
Pour congurer la sortie audio :
1 Sélectionnez le menu Pomme () > Préférences Système puis cliquez sur Son.
2 Cliquez sur l’onglet Sortie dans Préférences audio.
3 Sélectionnez Audio du moniteur pour utiliser le système de haut-parleurs de votre
moniteur comme sortie audio.
Si votre Mac prend en charge la sortie audio via Mini DisplayPort en plus du port USB,
vous pouvez choisir Mini DisplayPort ou Audio USB comme sortie audio.
Ces réglages sonores sont utilisés chaque fois que votre ordinateur est connecté
à votre moniteur. Ils restent actifs jusqu’à ce que vous les modiez.
22 Français
Page 23

Conguration de votre Apple LED Cinema Display comme moniteur
supplémentaire
Lorsque vous gardez le moniteur de votre MacBook ouvert, vous pouvez acher la
même image du bureau sur les deux moniteurs ou utiliser le moniteur supplémentaire
comme extension de votre bureau. Utilisez Préférences Moniteurs pour congurer la
recopie vidéo ou le bureau étendu.
Pour congurer la recopie vidéo ou le bureau étendu :
1 Sélectionnez le menu Pomme () > Préférences Système puis cliquez sur Moniteurs.
2 Cliquez sur l'onglet Disposition et suivez les instructions à l’écran.
Réglage de la résolution, de la couleur et de la luminosité
Votre moniteur Apple LED Cinema Display peut ajuster automatiquement la luminosité
en fonction de l’éclairage du moment en utilisant le capteur de lumière ambiante
intégré.Vous pouvez activer ou désactiver le réglage automatique de la luminosité
dans les préférences Moniteurs.
Pour modier la résolution ou la luminosité :
1 Sélectionnez le menu Pomme () > Préférences Système puis cliquez sur Moniteurs.
2 Choisissez une résolution ou faites glisser le curseur Luminosité.
Vous pouvez également utiliser les touches de réglages de la luminosité sur un clavier
externe Apple pour augmenter (
Pour changer le prol de couleur du moniteur ou étalonner votre moniteur :
1 Cliquez sur l’onglet Couleur dans Préférences Moniteurs.
2 Choisissez un prol de couleur du moniteur ou cliquez sur Étalonner pour ouvrir
l’assistant de l’outil d’étalonnage du moniteur.
) ou réduire ( ) la luminosité de votre moniteur.
23Français
Page 24

Pour en savoir plus sur l’étalonnage de votre moniteur, sélectionnez Aide > Aide Mac
dans la barre des menus et eectuez une recherche sur « étalonner ».
Utilisation des ports USB et du logement de sécurité
Votre moniteur Apple LED Cinema Display présente trois ports USB à l’arrière. Utilisez-les
pour brancher une souris, un clavier, un iPhone, un iPod ou d’autres périphériques USB.
Important : vous pouvez utiliser ces ports USB pour recharger votre iPhone ou votre
iPod, même lorsque votre moniteur n’est pas connecté à un ordinateur. Si vous utilisez
l’un de ces ports pour synchroniser des informations entre votre ordinateur et un iPhone
ou un iPod, assurez-vous que le câble USB du moniteur soit connecté à votre ordinateur.
Ports USB
Logement de sécurité
Pour protéger votre moniteur, utilisez un câble de sécurité sur le logement de sécurité.
24 Français
Page 25

Utilisation d’une solution de montage VESA avec votre moniteur
Il est possible d’utiliser d’autres congurations de montage à l’aide du kit VESA Mount
Adapter en vente sur l’Apple Store en ligne à l’adresse www.apple.com/fr/store. Utilisez
ce kit pour connecter votre moniteur à n’importe quelle conguration de montage
compatible avec la norme VESA. Suivez les instructions qui accompagnent le kit
de montage.
Entretienetsécurité
Avant de soulever ou déplacer votre moniteur, il peut s’avérer nécessaire de débrancher
les diérents câbles, dont le câble d’alimentation. Lorsque vous soulevez ou déplacez
le moniteur, utilisez la méthode la plus adéquate. Tenez-le toujours par les côtés, jamais
par le support ou le câble d’alimentation.
Pour nettoyer votre écran, procédez comme suit :
1 Débranchez le câble d’alimentation.
2 Utilisez le tissu fourni avec le moniteur ou tout autre tissu doux et sec pour
dépoussiérer l’écran.
AVERTISSEMENT : ne nettoyez pas l’écran à l’aide d’un produit nettoyant contenant
de l’alcool ou de l’acétone. Utilisez un produit destiné à nettoyer les écrans.
Ne projetez jamais directement le produit nettoyant directement sur l’écran.
Le produit risque de s’inltrer à l’intérieur du moniteur et d’entraîner des dégâts.
25Français
Page 26

Veillez à ne pas utiliser votre moniteur dans des espaces contaminés par de la poussière
aérogène ou de la fumée de cigarettes, cigares, cendriers, poêles ou cheminées ou à
proximité d'un humidicateur à ultrasons utilisant de l'eau du robinet non ltrée. Les
minuscules particules dans l'air générées par la fumée de cigarettes, les vapeurs de cuisine
ou l'utilisation d'un humidicateur à ultrasons d'eau non ltrée peut, dans de rares cas,
pénétrer dans les orices de ventilation de votre moniteur et, dans certaines conditions,
créer un léger résidu sur la surface interne du panneau de verre qui couvre le moniteur.
Suivez ces consignes de sécurité lors de l’utilisation de votre moniteur :
 Le seul moyen de couper entièrement l’alimentation est de débrancher le
câble d’alimentation. Ce faisant, veillez à tirer sur la prise et non sur le câble.
 Coupez immédiatement l’alimentation si le câble d’alimentation est détérioré, si vous
avez renversé un liquide sur le moniteur, ou si ce dernier est tombé ou a subi une
détérioration.
AVERTISSEMENT : utilisez uniquement le câble d’alimentation fourni avec votre
moniteur. Le câble d’alimentation est constitué d’une prise de terre à trois ls (une
prise équipée d’une troisième broche reliée à la masse) que vous ne pouvez brancher
qu’à une prise de courant alternatif. Si vous ne parvenez pas à insérer la che dans
une prise parce que celle-ci n’est pas mise à la terre, contactez un électricien agréé
qui se chargera de remplacer la prise par une prise mise à la terre adéquate.
AVERTISSEMENT : votre moniteur est un composant haute tension et ne doit être
ouvert ou démonté sous aucun prétexte, même s’il est débranché. Si votre moniteur
nécessite une réparation, consultez la section « Informations, services et assistance »
à la page 30.
26 Français
Page 27

Ergonomie
Haut de l’écran au niveau
peut-être ajuster la hauteur
Veuillez trouver ci-après quelques recommandations pour régler votre moniteur
pour réduire la luminosité et pour placer le moniteur de façon à respecter votre
morphologie.
 Disposez le moniteur de façon à ce que la partie supérieure soit située légèrement en
dessous de vos yeux lorsque vous êtes assis(e) devant le clavier de l’ordinateur. Il vous
appartient de juger de la meilleure distance entre vos yeux et l’écran. Elle se situe en
général entre 45 et 70 cm.
 Positionnez le moniteur en le faisant pivoter vers le haut ou le bas pour limiter tout
éblouissement ou reet sur l’écran, notamment lorsque l’écran est placé sous un
éclairage ou près d’une fenêtre.
Épaules
détendues
Mains dans le
prolongement
des avant-bras
Avant-bras à
l’horizontale ou
légèrement relevés
Dossier soutenant
la région lombaire
légèrement inclinées
Cuisses
45–70 cm
des yeux ou légèrement
en dessous. (Vous devrez
du moniteur en surélevant
votre plan de travail ou
le moniteur lui-même.)
Écran orienté de manière
à réduire les reflets
Espace dégagé sous
le plan de travail
Pieds à plat sur le sol
ou sur un repose-pied
27Français
Page 28

Pour en savoir plus sur la santé, la sécurité et l’entretien du moniteur,
rendez-vous sur le site web d’Apple consacré à l’ergonomie à l’adresse
www.apple.com/about/ergonomics.
Dépannagedumoniteur
Avant d’eectuer les étapes ci-dessous, vériez que votre ordinateur est allumé, que le
moniteur est branché sur une prise, que tous les câbles sont correctement branchés
entre votre ordinateur et le moniteur et que l’ordinateur n’est pas en mode veille.
Si aucune image n’apparaît à l’écran :
 Vériez à nouveau que les câbles et les connecteurs sont correctement branchés sur
l’ordinateur et le moniteur.
 Assurez-vous que votre ordinateur est allumé et non en mode veille. Si le couvercle
de votre MacBook est fermé, utilisez le clavier ou la souris externe pour le réactiver.
 Débranchez le cordon d'alimentation du moniteur de la prise murale, patientez
quelques minutes, puis rebranchez-le.
 Réinitialisez la PRAM en redémarrant votre ordinateur tout en maintenant les touches
Commande (x), Option, P, et R enfoncées jusqu’à ce que vous entendiez le signal de
démarrage une seconde fois.
Si l’écran n’est pas susamment éclairé :
 Vériez que les commandes de luminosité du moniteur sont correctement réglées.
Sélectionnez le menu Pomme () > Préférences Système, puis cliquez sur Moniteurs.
Faites glisser le curseur pour régler la luminosité.
28 Français
Page 29

 Si les couleurs s’achant sur le moniteur sont trop saturées ou sont incorrectes, il
peut s’avérer judicieux de l’étalonner. Ouvrez les préférences Moniteurs, cliquez sur
l'onglet Couleur, puis sur Étalonner et suivez les instructions.
Si votre MacBook ne se recharge pas :
Assurez-vous que le connecteur MagSafe de votre moniteur est correctement branché
sur le port secteur MagSafe de votre MacBook.
Si la caméra iSight, le micro, le système de haut-parleurs et les ports USB intégrés
au moniteur ne fonctionnent pas :
Assurez-vous que le câble USB du moniteur est correctement branché sur le port USB
de votre ordinateur. La caméra, le micro, le système de haut-parleurs et les ports USB
du moniteur ne fonctionnent que lorsque ce câble est connecté à votre ordinateur.
Autres informations de dépannage
D’autres renseignements concernant le dépannage sont disponibles sur le site web
d’assistance des moniteurs à l’adresse suivante : www.apple.com/fr/support/displays.
29Français
Page 30

Informations,servicesetassistance
Vous trouverez des renseignements complémentaires à propos de votre moniteur sur
le site web d’Apple et dans l’Aide Mac.
Pour Consultez
Utilisation du moniteur
Service, assistance, forums
de discussion, dépannage et
téléchargements de logiciels
pour les moniteurs
Les toutes dernières
informations sur les
moniteurs
Enregistrement du moniteur
Aide Mac et recherchez le terme « moniteurs ».
Le site d'assistance des moniteurs à l'adresse
www.apple.com/fr/support/displays.
La page Moniteurs Apple à l'adresse
www.apple.com/fr/displays.
La page d'enregistrement des produits Apple à l'adresse
www.apple.com/fr/register.
30 Français
Page 31

Spécications
 Numéro de modèle : A1316
 Résolution : 2560 x 1440 à 60 Hz
 Ports : trois ports USB 2.0 à haut débit à l’arrière
 Caméra et micro : caméra iSight intégrée avec micro
 Haut-parleurs : haut-parleurs 2.1 intégrés avec sortie de 49 W
Dimensions :
 Poids : 10,7 kg (23.5 livres)
 Hauteur : 488,1 mm (19,2 pouces)
 Largeur : 651,7 mm (25,65 pouces)
 Profondeur (support compris): 208,13 mm (8,2 pouces)
 Diagonale visible : 685,8 mm (27 pouces)
Environnement de fonctionnement :
 Température de fonctionnement : 10° à 35° C
 Humidité relative : 20 % à 80 % (sans condensation)
 Altitude : 0 à 3 048 mètres (0 à 10 000 pieds)
31Français
Page 32

Primeros pasos
LapantallaAppleLEDCinemaDisplayestádiseñadapara
utilizarseconordenadoresMacequipadosconunconector
MiniDisplayPort.IncorporaunapantallaLEDpanorámica,
unconectorMagSafepararecargarelMacBook,unacámara
iSightintegrada,unmicrófonoyunsistemadealtavoces.
Las instrucciones que guran en las próximas páginas le ayudarán a instalar y usar
su nueva pantalla, y en concreto a:
 conectar la pantalla al ordenador;
 usar la cámara, el micrófono, el sistema de altavoces y los puertos USB de la pantalla;
 congurar los ajustes de la pantalla.
Nota: Puede conectar la pantalla Apple LED Cinema Display a un Mac de sobremesa
que tenga un puerto Mini DisplayPort.
Importante: Lea detenidamente todas las instrucciones de instalación (así como la
información sobre seguridad de la página 39) antes de congurar y usar la pantalla.
Para obtener más información acerca de determinados modelos de ordenadores y
de tarjetas grácas compatibles con su pantalla, visite www.apple.com/es/displays.
32 Español
Page 33

Instalacióndelapantalla
Pantalla Apple LED Cinema Display
Siga estos pasos para congurar la pantalla Apple LED Cinema Display:
1 Retire el plástico protector de la pantalla y de los cables.
2 Conecte el cable de alimentación a la pantalla y enchúfelo en una toma de corriente
con toma de tierra.
3 Inserte el conector MagSafe en el puerto de alimentación MagSafe de su MacBook
para cargar la batería y proporcionar alimentación al ordenador.
MacBook
Mini
MagSafe USB
4 Conecte el cable USB al ordenador para usar la cámara iSight integrada, el micrófono,
DisplayPort
Toma de corriente
con toma de tierra
los altavoces y los puertos USB de la pantalla.
5 Conecte el cable Mini DisplayPort al ordenador.
6 Pulse el botón de arranque (®) del ordenador para encenderlo. La pantalla se
encenderá automáticamente cuando se encienda el ordenador.
33Español
Page 34

Conguración del MacBook con la pantalla integrada cerrada
Puede cerrar la pantalla integrada del MacBook y usar únicamente la pantalla
Apple LED Cinema Display. Siga las instrucciones de instalación de la página anterior
y asegúrese de que el conector MagSafe de la pantalla esté conectado al puerto de
alimentación MagSafe del MacBook.
Para usar la pantalla Apple LED Cinema Display con la pantalla integrada del
MacBook cerrada:
1 Conecte un teclado y un ratón USB externos a un puerto USB de la pantalla o utilice el
Asistente Conguración Bluetooth® para congurar un teclado y un ratón inalámbricos.
2 Asegúrese de que el MacBook esté encendido.
3 Cierre la pantalla integrada del MacBook para ponerlo en reposo.
4 Espere unos segundos y, a continuación, pulse cualquier tecla del teclado externo
o haga clic con el ratón para activar el MacBook.
34 Español
Page 35

Utilizacióndelapantalla
Cámara iSight
La pantalla Apple LED Cinema Display incorpora una cámara iSight integrada,
un micrófono y un sistema de altavoces. La conexión USB entre la pantalla y el
ordenador es necesaria para el funcionamiento de estas funciones.
Micrófono
integrada
Sistema de altavoces
Uso de la cámara iSight integrada y el micrófono
Puede usar la cámara iSight integrada y el micrófono para capturar imágenes estáticas,
vídeo y sonido con diversas aplicaciones, como iChat, iMovie y Photo Booth.
Para congurar la cámara y el micrófono con iChat:
1 Haga clic en el icono de iChat situado en el Dock para abrir la aplicación iChat.
2 Seleccione iChat > Preferencias y, a continuación, haga clic en Audio/Vídeo.
3 Seleccione “iSight de la pantalla” en el menú local Cámara.
4 Seleccione “Audio de la pantalla” en el menú local Micrófono.
35Español
Page 36

Conguración de la entrada y la salida de sonido
Puede escuchar música, películas, juegos y archivos multimedia a través del sistema
de altavoces de la pantalla. Puede usar el micrófono para grabar sonidos o hablar con
sus amigos mediante iChat. Utilice el panel de preferencias Sonido para congurar la
entrada y la salida de sonido.
Para congurar la entrada de sonido:
1 Seleccione Apple () > Preferencias del Sistema y haga clic en Sonido.
2 Haga clic en la pestaña Entrada del panel de preferencias Sonido.
3 Seleccione la opción “Audio de la pantalla” para utilizar el micrófono de la pantalla
como entrada de audio.
Para congurar la salida de sonido:
1 Seleccione Apple () > Preferencias del Sistema y haga clic en Sonido.
2 Haga clic en la pestaña Salida del panel de preferencias Sonido.
3 Seleccione “Audio de la pantalla” para escuchar el sonido a través del sistema de
altavoces de la pantalla.
Si su ordenador Mac admite la salida de sonido a través del puerto Mini DisplayPort
además del puerto USB, puede seleccionar “Mini DisplayPort” o “Audio USB” para la
salida de audio.
Estos ajustes de sonido se usarán siempre que la pantalla esté conectada al ordenador.
Si no los cambia, se mantendrán de forma permanente.
36 Español
Page 37

Conguración de la pantalla Apple LED Cinema Display como pantalla
adicional
Si deja la pantalla integrada del MacBook abierta, podrá ver la misma imagen del
escritorio en ambas pantallas o bien usar esta pantalla adicional para ampliar el
escritorio. Para congurar estas dos modalidades (duplicado de vídeo o escritorio
ampliado), utilice el panel de preferencias Pantallas.
Para congurar la modalidad de duplicado de vídeo o la de escritorio ampliado:
1 Seleccione Apple () > Preferencias del Sistema y haga clic en Pantallas.
2 Haga clic en la pestaña Alineación y siga las instrucciones que aparecen en pantalla.
Ajuste de la resolución, el brillo y el color
El brillo de la pantalla Apple LED Cinema Display puede ajustarse automáticamente
en función de las condiciones de luz existentes mediante el sensor de luz ambiental
integrado. Puede activar o desactivar el ajuste automático del brillo en el panel de
preferencias Pantallas.
Para cambiar la resolución o el brillo:
1 Seleccione Apple () > Preferencias del Sistema y haga clic en Pantallas.
2 Seleccione una resolución o arrastre el regulador de brillo.
También puede usar las teclas de brillo de un teclado Apple Keyboard externo
para aumentar (
Para cambiar el perl de color de la pantalla o para calibrarla:
1 Haga clic en la pestaña Color del panel de preferencias Pantallas.
2 Seleccione un perl de color o haga clic en Calibrar para abrir el Asistente del
Calibrador de Pantalla.
) o reducir ( ) el brillo de la pantalla.
37Español
Page 38

Para obtener más información acerca de cómo calibrar su pantalla, seleccione Ayuda >
“Ayuda Mac” en la barra de menús y, a continuación, busque “calibrar”.
Uso de los puertos USB y de la ranura de seguridad
La pantalla Apple LED Cinema Display tiene tres puertos USB en la parte posterior.
Úselos para conectar un ratón, un teclado, un iPhone, un iPod u otro dispositivo
periférico USB.
Importante: Puede utilizar estos puertos USB para cargar el iPhone o el iPod, incluso
aunque la pantalla no esté conectada a un ordenador. No obstante, si utiliza uno de
estos puertos para sincronizar información entre el ordenador y un iPhone o iPod,
asegúrese de que el cable USB de la pantalla está conectado al ordenador.
Puertos USB
Ranura de seguridad
Para proteger la pantalla, inserte un cable de seguridad en la ranura de seguridad.
38 Español
Page 39

Utilización de una solución de montaje VESA con la pantalla
Puede colocar su pantalla en otros soportes alternativos mediante el kit de adaptadores
de montaje VESA, que puede adquirirse a través de la tienda Apple Store en Internet
(www.apple.com/es/store). Con este kit podrá usar diversos soportes compatibles con
el estándar VESA con su pantalla. Sólo tiene que seguir las instrucciones del kit.
Mantenimientoyseguridad
Antes de levantar la pantalla o cambiarla de lugar, debe desconectar los cables y el cable
de alimentación. Cuando levante la pantalla, hágalo de la forma adecuada. Sosténgala
siempre por los bordes para levantarla o trasladarla. No la levante por el pie o el cable.
Para limpiar la pantalla:
1 Desconecte el cable de alimentación.
2 Use el paño que venía con la pantalla u otro paño suave y seco para quitarle el polvo.
ADVERTENCIA: No utilice ningún producto que contenga alcohol o acetona.
Use un limpiador especíco para pantallas y no lo aplique directamente sobre ella,
pues podría ltrarse hacia el interior de la pantalla y provocar daños.
39Español
Page 40

No utilice la pantalla en lugares con grandes cantidades de polvo en el aire o de humo
de cigarrillos, puros, ceniceros, estufas o chimeneas, ni cerca de un humidicador
ultrasónico con agua del grifo no ltrada. En casos excepcionales, las pequeñas partículas
suspendidas en el aire producidas por el humo del tabaco, de la cocina o de algún
tipo de combustión, o por el uso de un humidicador ultrasónico con agua del grifo
no ltrada, penetran en las aberturas de ventilación de la pantalla y, en determinadas
circunstancias, producen una ligera neblina en el interior de la supercie del panel de
cristal que cubre la pantalla.
Siga estas instrucciones de seguridad para usar la pantalla:
 La única manera de desconectar completamente la pantalla de la corriente es
desenchufar el cable de alimentación. Recuerde tirar del enchufe, no del cable.
 Desconecte el ordenador de la corriente inmediatamente si el cable de alimentación
está roto o dañado, si se derrama líquido sobre la pantalla o si ésta sufre una caída
o está dañada.
ADVERTENCIA: Utilice únicamente el cable de alimentación que venía con la pantalla.
El cable de alimentación tiene un enchufe con toma de tierra y sólo puede acoplarse
a una toma de CA del mismo tipo. Si no puede introducir el enchufe en la toma de
corriente porque ésta no posee toma de tierra, póngase en contacto con un electricista
para sustituir la toma de corriente por una adecuada.
ADVERTENCIA: La pantalla es un componente de alto voltaje y por ello no debe abrirse
bajo ninguna circunstancia, incluso aunque esté desenchufada. Si es necesario reparar
la pantalla, consulte el apartado “Más información, servicio y soporte” de la página 44.
40 Español
Page 41

Ergonomía
Nivel superior de la pantalla
Siga estos consejos para eliminar los reejos de la pantalla y colocarla de la manera
que le resulte más cómoda y adecuada.
 Coloque la pantalla de forma que la parte superior quede ligeramente por debajo de
la altura de sus ojos cuando esté sentado ante el teclado. La distancia desde sus ojos
a la pantalla depende de sus preferencias, aunque la mayoría de los usuarios se sitúan
a una distancia de entre 45 y 70 cm.
 Ajuste la posición de la pantalla inclinándola hacia arriba o hacia abajo para minimizar
los reejos causados por la luz procedente de lámparas de techo y ventanas cercanas.
Hombros relajados
Antebrazos y
manos formando
una línea recta
Nivel de los
antebrazos recto
y ligeramente
inclinado
hacia arriba
Zona lumbar
perfectamente
apoyada
Muslos en
posición horizontal
De 45 a 70 cm
ligeramente inferior al de
los ojos (es posible que
deba ajustar la altura del
monitor colocando una
base o elevando la
superficie de trabajo)
Pantalla colocada para
evitar los efectos del
deslumbramiento
Espacio debajo de la
superficie de trabajo
Pies apoyados
totalmente
en el suelo
Si desea más información sobre salud, seguridad y mantenimiento, visite el sitio web de
Apple sobre ergonomía (www.apple.com/about/ergonomics).
41Español
Page 42

Solucióndeproblemasconlapantalla
Antes de realizar alguna de las acciones que indicamos en este apartado, compruebe
que el ordenador esté encendido, que la pantalla esté enchufada a una toma de
corriente, que todos los cables estén conectados adecuadamente al ordenador
y a la pantalla, y que el ordenador no esté en modo de reposo.
Si no se ve nada en la pantalla:
 Vuelva a comprobar los cables y los conectores para asegurarse de que estén bien
conectados al ordenador y a la pantalla.
 Asegúrese de que el ordenador esté encendido y no se encuentre en modo reposo.
Si la pantalla integrada de su MacBook está cerrada, use el teclado o el ratón externos
para activar el MacBook si estaba en reposo.
 Desenchufe el cable de alimentación de la pantalla de la toma de corriente con toma
de tierra, espere unos minutos y vuelva a enchufarlo.
 Reinicialice la PRAM reiniciando el ordenador mientras pulsa las teclas Comando (x),
Opción, P y R simultáneamente hasta que oiga el sonido de arranque por segunda vez.
Si la pantalla se ve oscura:
 Compruebe también que el brillo de la pantalla esté ajustado correctamente.
Seleccione Apple () > Preferencias del Sistema y haga clic en Pantallas. Arrastre
el regulador de brillo para ajustar el brillo de la pantalla.
 Si los colores de la pantalla están demasiado saturados o no se visualizan
correctamente, puede que sea necesario calibrar la pantalla. Abra el panel de
preferencias Pantallas, haga clic en la pestaña Color, haga clic en Calibrar y siga
las instrucciones.
42 Español
Page 43

Si su MacBook no se está cargando:
Asegúrese de que el conector MagSafe de la pantalla esté conectado correctamente
al puerto de alimentación MagSafe del MacBook.
Si la cámara iSight integrada, el micrófono, el sistema de altavoces o los puertos USB
de la pantalla no funcionan:
Asegúrese de que el cable USB de la pantalla esté conectado rmemente al puerto USB
del ordenador. La cámara, el micrófono, el sistema de altavoces y los puertos USB de la
pantalla solo funcionan si este cable está conectado al ordenador.
Información adicional sobre solución de problemas
Puede encontrar más información sobre la solución de problemas en la página web
de soporte para pantallas www.apple.com/es/support/displays.
43Español
Page 44

Másinformación,servicioysoporte
Puede encontrar más información sobre su pantalla en la página web de Apple y en la
Ayuda Mac.
Para obtener información
sobre...
Utilización de la pantalla
Servicio, soporte, foros de
debate, solución de problemas
y descargas de software
relacionadas con las pantallas
La información más reciente
sobre pantallas
Registro de la pantalla
44 Español
Consulte
La Ayuda Mac y busque “pantallas”.
El sitio de soporte para pantallas en
www.apple.com/es/support/displays.
El sitio de Apple sobre pantallas en
www.apple.com/es/displays.
El sitio de registro de productos Apple en
www.apple.com/es/register.
Page 45

Especicaciones
 Número de modelo: A1316
 Resolución: 2560 x 1440 a 60 Hz
 Puertos: tres puertos USB 2.0 de alta velocidad en la parte posterior
 Cámara y micrófono: cámara iSight integrada con micrófono
 Altavoces: altavoces 2.1 integrados con una salida de 49 W
Dimensiones:
 Peso: 10,7 kg
 Altura: 488,1 mm
 Anchura: 651,7 mm
 Profundidad (con soporte): 208,13 mm
 Tamaño de la pantalla: 27 pulgadas (685,8 mm) en diagonal
Entorno operativo
 Temperatura operativa: de 10 a 35 ºC
 Humedad relativa: 20–80% (sin condensación)
 Altitud: de 0 a 3048 metros
45Español
Page 46

Introdução
SeumonitorAppleLEDCinemaDisplayestádesenhado
parafuncionarperfeitamentecomcomputadoresMacque
possuemumconectorMiniDisplayPort.Eletrazummonitorde
formatopanorâmicocomLEDderetroiluminação,umconector
MagSafeparacarregarseucomputadorMacBook,umacâmera
iSightintegrada,ummicrofoneeumsistemadealto-falantes.
As instruções das páginas seguintes ajudarão você a congurar e utilizar seu novo
monitor. Aprenda como:
 Conectar o seu monitor ao seu computador
 Utilizar a câmera, microfone, sistemas de alto-falantes e portas USB do seu monitor
 Congurar os ajustes do seu monitor
Nota: Você pode conectar o seu monitor Apple LED Cinema Display a um computador
de mesa Mac que possua uma porta Mini DisplayPort.
Importante: Leia com atenção todas as instruções de instalação (e as informações
de segurança que começam na página 53) antes de congurar e utilizar seu monitor.
Para obter informações sobre os computadores e placas grácas especícas que
são compatíveis com o seu monitor, visite o site www.apple.com/br/displays.
46 PortuguêsdoBrasil
Page 47

ComoConguraroseuMonitor
Monitor Apple LED Cinema Display
Siga esses passos para congurar seu monitor Apple LED Cinema Display:
1 Remova a película protetora do monitor e dos cabos.
2 Insira o cabo de alimentação no monitor e depois insira o plugue em uma tomada
elétrica aterrada.
3 Conecte o conector MagSafe na porta de alimentação MagSafe do seu MacBook para
carregar a bateria e fornecer energia ao seu computador.
MacBook
Mini
MagSafe USB
4 Conecte o cabo USB ao seu computador para usar a câmera iSight integrada,
microfone, sistema de alto-falantes e portas USB do monitor.
5 Conecte o cabo Mini DisplayPort ao seu computador.
6 Pressione o botão de força (®) do seu computador para iniciá-lo. O monitor se ativa
automaticamente quando você inicializa o seu computador.
DisplayPort
Tomada
elétrica
aterrada
47PortuguêsdoBrasil
Page 48

Como Congurar o seu MacBook com a Tela Fechada
Você pode fechar a tela do seu MacBook e utilizar apenas o monitor Apple LED Cinema
Display. Siga as instruções de conguração da página anterior e certique-se de que
o conector MagSafe do monitor esteja conectado à porta de alimentação MagSafe
do seu MacBook.
Para utilizar o monitor Apple LED Cinema Display com a tela do seu MacBook fechada:
1 Conecte um teclado e mouse USB externos a uma porta USB do seu monitor ou use o
Assistente de Conguração Bluetooth® para congurar um teclado e mouse sem o.
2 Certique-se de que o seu MacBook esteja ligado.
3 Feche a tela do seu MacBook para colocá-lo em repouso.
4 Espere alguns segundos e depois pressione qualquer tecla do teclado externo
ou clique no mouse para interromper o repouso do seu MacBook.
48 PortuguêsdoBrasil
Page 49

Comousaroseumonitor
Câmera iSight
Seu monitor Apple LED Cinema Display possui uma câmera iSight integrada, um
microfone e um sistema de alto-falantes. A conexão USB entre o monitor e o seu
computador é necessária para estes recursos.
Microfone
integrada
Sistema de alto-falantes
Como Utilizar a Câmera iSight Integrada e o Microfone
Você pode utilizar a câmera iSight integrada e o microfone para capturar imagens
estáticas, vídeo e som usando aplicativos tais como o iChat, iMovie e Photo Booth.
Para congurar a câmera e o microfone com o iChat:
1 Clique no ícone do iChat no Dock para abrir o aplicativo iChat.
2 Escolha iChat > Preferências e depois clique em Áudio/Vídeo.
3 Escolha iSight do Monitor no menu Câmera.
4 Escolha Áudio do Monitor no menu Microfone.
49PortuguêsdoBrasil
Page 50

Como congurar a entrada e a saída de som
Você pode ouvir músicas, lmes, jogos e arquivos de multimídia através do sistema
de alto-falantes do seu monitor. Você pode usar o microfone para gravar sons ou para
conversar com seus amigos usando o iChat. Use o painel de preferências Som para
gerenciar a entrada e a saída do som.
Para congurar a entrada de som:
1 Escolha Apple () > Preferências do Sistema e depois clique em Som.
2 Clique na aba Entrada no painel de preferências Som.
3 Escolha Áudio do Monitor para que o som entre através do microfone do seu monitor.
Para congurar a saída de som:
1 Escolha Apple () > Preferências do Sistema e depois clique em Som.
2 Clique na aba Saída no painel de preferências Som.
3 Escolha Áudio do Monitor para ouvir o som através do sistema de alto-falantes
do seu monitor.
Se o seu computador Mac for compatível com a saída de som através da Mini DisplayPort,
além da porta USB, você pode escolher a Mini DisplayPort ou Áudio USB como porta de
saída de áudio.
Estes ajustes de som são utilizados sempre que o seu computador esteja conectado
ao seu monitor. Eles serão efetivos até que você os altere.
50 PortuguêsdoBrasil
Page 51

Como Congurar seu monitor Apple LED Cinema Display como um
Monitor Adicional
Quando você deixa a tela do seu MacBook aberta, você pode espelhar a mesma
imagem da mesa em ambos monitores ou pode utilizar o monitor adicional como
uma extensão da sua mesa. Use o painel de preferências Monitores para congurar
o espelhamento de vídeo ou a mesa estendida.
Para denir o espelhamento de vídeo ou a mesa estendida:
1 Escolha Apple () > Preferências do Sistema e depois clique em Monitores.
2 Clique na aba Arranjo e siga as instruções da tela.
Como Ajustar a Resolução, o Brilho e a Cor
O seu monitor Apple LED Cinema Display pode ajustar o brilho da tela automaticamente
de acordo com a iluminação atual usando o sensor de luz ambiente integrado. Você
pode ativar ou desativar o brilho automático na preferência Monitores.
Para alterar a resolução ou o brilho:
1 Escolha Apple () > Preferências do Sistema e depois clique em Monitores.
2 Escolha uma resolução ou arraste o controle Brilho.
Você também pode utilizar as teclas de brilho em um teclado Apple Keyboard
para aumentar (
Para alterar o perl de cor do monitor ou para calibrar a sua tela:
1 Clique na aba Cores da preferência Monitores.
2 Escolha um perl de cor do monitor ou clique em Calibrar para abrir o Assistente
do Calibrador de Tela.
) ou reduzir ( ) o brilho do seu monitor.
51PortuguêsdoBrasil
Page 52

Para obter mais informações sobre como calibrar o seu monitor, escolha Ajuda >
Ajuda Mac na barra de menus e busque “calibrar”.
Como usar as portas USB e o slot de segurança
Seu monitor Apple LED Cinema Display possui três portas USB de alta velocidade na
parte posterior. Use estas portas para conectar um mouse, teclado, iPhone, iPod ou
outro periférico USB.
Importante: Você pode usar essas portas USB para carregar o seu iPhone ou iPod,
mesmo quando o monitor não estiver conectado a um computador. Se você utilizar uma
dessas portas para sincronizar informações entre o seu computador e um iPhone ou iPod,
certique-se de que o cabo USB do monitor está conectado no seu computador.
Portas USB
Ranhura de segurança
Para garantir a segurança do seu monitor, conecte um cabo de bloqueio ao slot
de segurança.
52 PortuguêsdoBrasil
Page 53

Como usar a solução de montagem VESA com o seu monitor
Você pode anexar uma solução de montagem alternativa usando o kit adaptador de
montagem VESA disponível na loja on-line da Apple no site www.apple.com/br/store.
Use o kit para anexar o seu monitor a qualquer solução de montagem VESA compatível.
Basta seguir as instruções incluídas com o kit.
CuidadoeSegurança
Antes de levantar ou reposicionar o seu monitor, você deve desconectar os cabos,
incluindo o de alimentação. Use as técnicas corretas de levantamento ao posicionar
o monitor. Ao levantar ou carregar o monitor, segure-o pelas bordas. Não levante o
monitor pela base ou pelo cabo.
Para limpar a tela do seu monitor:
1 Desconecte o cabo de alimentação.
2 Use o pano fornecido com o seu monitor ou outro pano suave e seco para limpar
o pó da tela.
AVISO: Não limpe a tela com produtos de limpeza que contenham álcool ou acetona.
Use um produto de limpeza destinado para o uso em telas ou monitores. Nunca
borrife o produto de limpeza diretamente na tela. Ele pode cair dentro do monitor
e causar danos.
53PortuguêsdoBrasil
Page 54

Não utilize o seu monitor em áreas com quantidades signicativas de poeira em
suspensão ou fumaça de cigarro, charutos, cinzeiros, fogões ou lareiras, ou próximo
a um umidicador ultra-sônico que utilize água de torneira não ltrada. Partículas
minúsculas em suspensão produzidas por fumo, elaboração de comida, queima ou
pelo uso de umidicador com água não ltrada pode, em raras ocasiões, entrar pelas
aberturas de ventilação do seu monitor e, sob determinadas condições, resultar em
uma leve umidade na superfície interna do painel de vidro que cobre o monitor.
Siga estas diretrizes de segurança ao utilizar o seu monitor:
 A única maneira de desligar completamente a energia é desconectando o cabo de
alimentação. Certique-se de puxar o plugue, não o cabo.
 Desconecte imediatamente a energia se o cabo de alimentação estiver desgastado
ou danicado, se você derrubou algo no monitor ou se o monitor caiu ou está
danicado de alguma outra forma.
AVISO: Use apenas o cabo de alimentação fornecido com o seu monitor. O cabo
de alimentação possui um plugue aterrado de três os (um plugue que possui
um terceiro pino aterrado) que se encaixa somente em uma tomada de corrente
alternada aterrada. Se não conseguir inserir o plugue a uma tomada porque esta
não está aterrada, entre em contato com um eletricista licenciado para substituir
a tomada por uma adequadamente aterrada.
AVISO: Seu monitor é um componente de alta voltagem e não deve ser aberto por
nenhuma razão, mesmo quando estiver desconectado. Caso seu monitor necessite
serviço, consulte “Mais informações, Serviço e Suporte” na página 58.
54 PortuguêsdoBrasil
Page 55

Ergonomia
Parte superior da tela na
alvez você tenha
Aqui existem algumas instruções para ajustar o seu monitor a m de reduzir o brilho
intenso e acomodar-se à sua forma e tamanho físico.
 Acomode o monitor de forma que a parte superior da tela esteja ligeiramente abaixo
do nível dos seus olhos quando estiver sentado ao teclado. É você quem decide qual é
a melhor distância dos seus olhos à tela, embora a maioria das pessoas parece preferir
de 45 a 70 cm.
 Posicione o monitor inclinando-o para cima ou para baixo, para minimizar o
ofuscamento e os reexos produzidos pelas luzes acima de sua cabeça e pelas
janelas próximas.
Ombros
relaxados
Antebraços e
mãos formando
uma linha reta
Antebraços em
ângulo reto
ou levemente
inclinados
Zona lombar
apoiada
Coxas
levemente
inclinadas
45–70 cm
mesma altura dos olhos
ou a um nível levemente
inferior (T
que ajustar a altura do
monitor levantando ou
abaixando a superfície
de trabalho).
Tela posicionada
para evitar reflexos
Espaço livre debaixo
da superfície de trabalho
Pés apoiados totalmente
no chão ou em um apoio
para pés
55PortuguêsdoBrasil
Page 56

Para obter mais informações sobre saúde, segurança e manutenção, visite o site
de ergonomia da Apple em www.apple.com/about/ergonomics.
ComosolucionarosproblemasdoseuMonitor
Antes de realizar qualquer um destes passos, certique-se de que o seu computador
esteja ligado, que o monitor esteja conectado a uma tomada, que todos os cabos
estejam conectados adequadamente ao seu computador e monitor, e que o seu
computador não esteja no modo de repouso.
Se a tela não possui uma imagem:
 Verique os cabos e conectores novamente para certicar-se de que eles estejam
conectados adequadamente ao seu computador e ao monitor.
 Certique-se de que o seu computador está ligado e que não está no modo de
repouso. Se a tela do seu MacBook estiver fechada, utilize o teclado ou o mouse
externo para interromper o repouso do MacBook.
 Desconecte o cabo de alimentação do monitor da tomada elétrica aterrada, espere
alguns minutos e depois conecte-o novamente.
 Redena o PRAM reiniciando o computador enquanto mantém pressionada as teclas
Comando (x), Opção, P e R até ouvir o som de inicialização uma segunda vez.
Se a tela estiver escurecida:
 Certique-se de que o brilho do monitor está ajustado adequadamente. Escolha
Apple () > Preferências do Sistema e clique em Monitores. Arraste o controle
de Brilho para ajustar o brilho.
56 PortuguêsdoBrasil
Page 57

 Se as cores do monitor estiverem muito saturadas ou não estiverem corretas, talvez
você tenha que calibrar a sua tela. Abra a preferência Monitores, clique na aba Cores,
clique em Calibrar e siga as instruções.
Se o seu MacBook não carregar:
Certique-se de que o conector MagSafe do seu monitor esteja adequadamente
conectado à porta de alimentação MagSafe do seu MacBook.
Se a câmera iSight integrada, o microfone, sistema de alto-falantes ou portas USB
do monitor não estiverem funcionando:
Certique-se de que o cabo USB do monitor esteja conectado rmemente à porta USB
do seu computador. A câmera, microfone, sistema de alto-falantes e portas USB do
monitor somente funcionam quando este cabo está conectado ao seu computador.
Mais informações sobre solução de problemas
Você pode encontrar mais informações para a solução de problemas no site de suporte
para monitores em: www.apple.com/support/displays
57PortuguêsdoBrasil
Page 58

Maisinformações,serviçosesuporte
Você pode encontrar mais informações sobre o seu monitor no site da Apple e na
Ajuda Mac.
Informações sobre Consulte
Como usar o seu monitor
Serviço, suporte, discussões,
solução de problemas
e transferências de
software de monitores
As informações mais recentes
sobre monitores
Como registrar o seu monitor
Ajuda Mac e busque “monitores”
O site de Suporte a Monitores em
www.apple.com/br/support/displays.
O site de Monitores da Apple em www.apple.com/br/displays.
O site de Registro de Produtos da Apple em
www.apple.com/register.
58 PortuguêsdoBrasil
Page 59

Especicações
 Número do modelo: A1316
 Resolução: 2560 x 1440 @ 60 Hz
 Portas: Três portas USB 2.0 de alta velocidade na parte posterior
 Câmera e microfone: Câmera iSight integrada com microfone
 Alto-falantes: Alto-falantes 2.1 integrados com saída de 49 W
Dimensões:
 Peso: 23,5 lb. (10,7 kg)
 Altura: 19,2 polegadas (488,1 mm)
 Largura: 25,65 polegadas (651,70 mm)
 Profundidade (com suporte): 8,2 polegadas (208,13 mm)
 Visível: 27 polegadas (685,8 mm) diagonal
Ambiente de funcionamento:
 Temperatura de funcionamento: 10° a 35° C
 Umidade relativa: 20% a 80% (não condensada)
 Altitude: 0 a 3048 metros
59PortuguêsdoBrasil
Page 60

Regulatory Compliance InformationRegulatory Compliance Information
FCC Compliance Statement
This equipment has been tested and found to comply with the
limits for a Class B digital device, pursuant to part 15 of the FCC
Rules. These limits are designed to provide reasonable protection
against harmful interference in a residential installation.
This equipment generates, uses, and can radiate radio
frequency energy and, if not installed and used in accordance
with the instructions, may cause harmful interference to radio
communications. However, there is no guarantee that interference
will not occur in a particular installation. If this equipment does
cause harmful interference to radio or television reception, which
can be determined by turning the equipment o and on, the user
is encouraged to try to correct the interference by one or more of
the following measures:
• Reorient or relocate the receiving antenna.
• Increase the separation between the equipment and receiver.
• Connect the equipment into an outlet on a circuit dierent from
that to which the receiver is connected.
• Consult the dealer or an experienced radio/TV technician for
help.
If necessary, consult an Apple Authorized Service Provider or
Apple. See the service and support information that came with
your Apple product. Or, consult an experienced radio/television
technician for additional suggestions.
Important: Changes or modications to this product not
authorized by Apple Inc. could void the EMC compliance and
negate your authority to operate the product.
This product has demonstrated EMC compliance under conditions
that included the use of compliant peripheral devices and shielded
cables between system components. It is important that you use
compliant peripheral devices and shielded cables between system
components to reduce the possibility of causing interference to
radios, television sets, and other electronic devices.
Responsible party (contact for FCC matters only):
Apple Inc. Corporate Compliance
1 Innite Loop, MS 26-A
Cupertino, CA 95014
Industry Canada Statement
This equipment complies with the Canadian ICES-003 Class B
specications. Cet appareil numérique de la classe B est conforme
à la norme NMB-003 du Canada.
VCCI Class B Statement
Russia
Korea KCC Statement
Korea Class B Statement
60
Page 61

Europe–EU Declaration of Conformity
See www.apple.com/euro/compliance.
High-Risk Activities Warning
This display is not intended for use in the operation of nuclear
facilities, aircraft navigation or communications systems, or air
trac control machines, or for any other uses where the failure of
the computer system could lead to death, personal injury or severe
environmental damage.
ENERGY STAR®
As an ENERGY STAR® partner, Apple has determined that this
product meets the ENERGY STAR® requirements for energy
eciency. The ENERGY STAR® program is a partnership with
electronic equipment manufacturers to promote energy-ecient
products. Improving energy eciency of products saves money
and helps conserve valuable resources.
This display is shipped with power management enabled, which
allows the display to save power by decreasing luminance
when used in a room with low ambient lighting. This automatic
brightness control feature is enabled as a default setting in
Displays preferences. To adjust your display luminance manually,
use the display brightness keys on your keyboard or the brightness
adjustment in Displays preferences.
For more information about ENERGY STAR®, visit: www.energystar.gov
Apple and the Environment
Apple Inc. recognizes its responsibility to minimize the
environmental impacts of its operations and products. More
information is available on the web:
www.apple.com/environment
Turkey
61
Page 62

Disposal and Recycling Information
This symbol indicates that your product must be disposed of
properly according to local laws and regulations. When your
product reaches its end of life, contact Apple or your local
authorities to learn about recycling options.
For information about Apple’s recycling program, go to
www.apple.com/recycling.
Brasil: Informações sobre descarte e reciclagem
O símbo indica que este produto e/ou sua bateria não devem
ser descartadas no lixo doméstico. Quando decidir descartar
este produto e/ou sua bateria, faça-o de acordo com as leis e
diretrizes ambientais locais. Para informações sobre o programa de
reciclagem da Apple, pontos de coleta e telefone de informações,
visite: www.apple.com/br/environment
European Union—Disposal Information
The symbol above means that according to local laws and
regulations your product should be disposed of separately from
household waste. When this product reaches its end of life, take
it to a collection point designated by local authorities. Some
collection points accept products for free. The separate collection
and recycling of your product at the time of disposal will help
conserve natural resources and ensure that it is recycled in a
manner that protects human health and the environment.
Union Européenne: informations sur l’élimination
Le symbole ci-dessus signie que vous devez vous débarasser
de votre produit sans le mélanger avec les ordures ménagères,
selon les normes et la législation de votre pays. Lorsque ce produit
n’est plus utilisable, portez-le dans un centre de traitement des
déchets agréé par les autorités locales. Certains centres acceptent
les produits gratuitement. Le traitement et le recyclage séparé
de votre produit lors de son élimination aideront à préserver les
ressources naturelles et à protéger l’environnement et la santé
des êtres humains.
Europäische Union – Informationen zur Entsorgung
Das Symbol oben bedeutet, dass dieses Produkt entsprechend den
geltenden gesetzlichen Vorschriften und getrennt vom Hausmüll
entsorgt werden muss. Geben Sie dieses Produkt zur Entsorgung
bei einer oziellen Sammelstelle ab. Bei einigen Sammelstellen
können Produkte zur Entsorgung unentgeltlich abgegeben
werden. Durch das separate Sammeln und Recycling werden die
natürlichen Ressourcen geschont und es ist sichergestellt, dass
beim Recycling des Produkts alle Bestimmungen zum Schutz von
Gesundheit und Umwelt beachtet werden.
Unione Europea: informazioni per lo smaltimento
Il simbolo qui sopra signica che, in base alle leggi e alle norme
locali, il prodotto dovrebbe essere smaltito separatamente dai
riuti casalinghi. Quando il prodotto diventa inutilizzabile, portalo
nel punto di raccolta stabilito dalle autorità locali. Alcuni punti di
raccolta accettano i prodotti gratuitamente. La raccolta separata e
il riciclaggio del prodotto al momento dello smaltimento aiutano
a conservare le risorse naturali e assicurano che venga riciclato nel
rispetto della salute umana e dell’ambiente.
Europeiska unionen – uttjänta produkter
Symbolen ovan betyder att produkten enligt lokala lagar och
bestämmelser inte får kastas tillsammans med hushållsavfallet. När
produkten har tjänat ut måste den tas till en återvinningsstation
som utsetts av lokala myndigheter. Vissa återvinningsstationer
tar kostnadsfritt hand om uttjänta produkter. Genom att låta den
uttjänta produkten tas om hand för återvinning hjälper du till att
spara naturresurser och skydda hälsa och miljö.
62
Page 63

Page 64

 Loading...