

Page 1

iBook (Dual USB), (Late 2001), (16 VRAM), (14.1 LCD), (14.1 LCD 16 VRAM)
Keyboard
Replacement Instructions
Follow the instructions in this sheet carefully. Failure to follow these instructions could
damage your equipment and void its warranty.
Note:
Written and video instructions covering customer-installable parts are available at
http://www.info.apple.com/installparts/.
Warning: During this procedure, keep small parts away from children.
Tools Required
• Coin
• #0 Phillips screwdriver
• Jeweler’s flat-b lade scre wdriver (if keyboard is locked)
• Small soft cloth (if an optional AirPort Card is installed)
Opening the Computer
Warning: Always shut down your computer before opening it to avoid damaging its
internal components or causing injury. After you shut down the computer, the
internal components can be very hot. Let the computer cool down before
continuing.
1. Place your computer on a clean, flat surface.
2. Shut down your computer and wait thirty minutes before continuing.
3. Disconnect the power cord and any other cables connected to the computer.
073-0614 Rev. E
Page 2
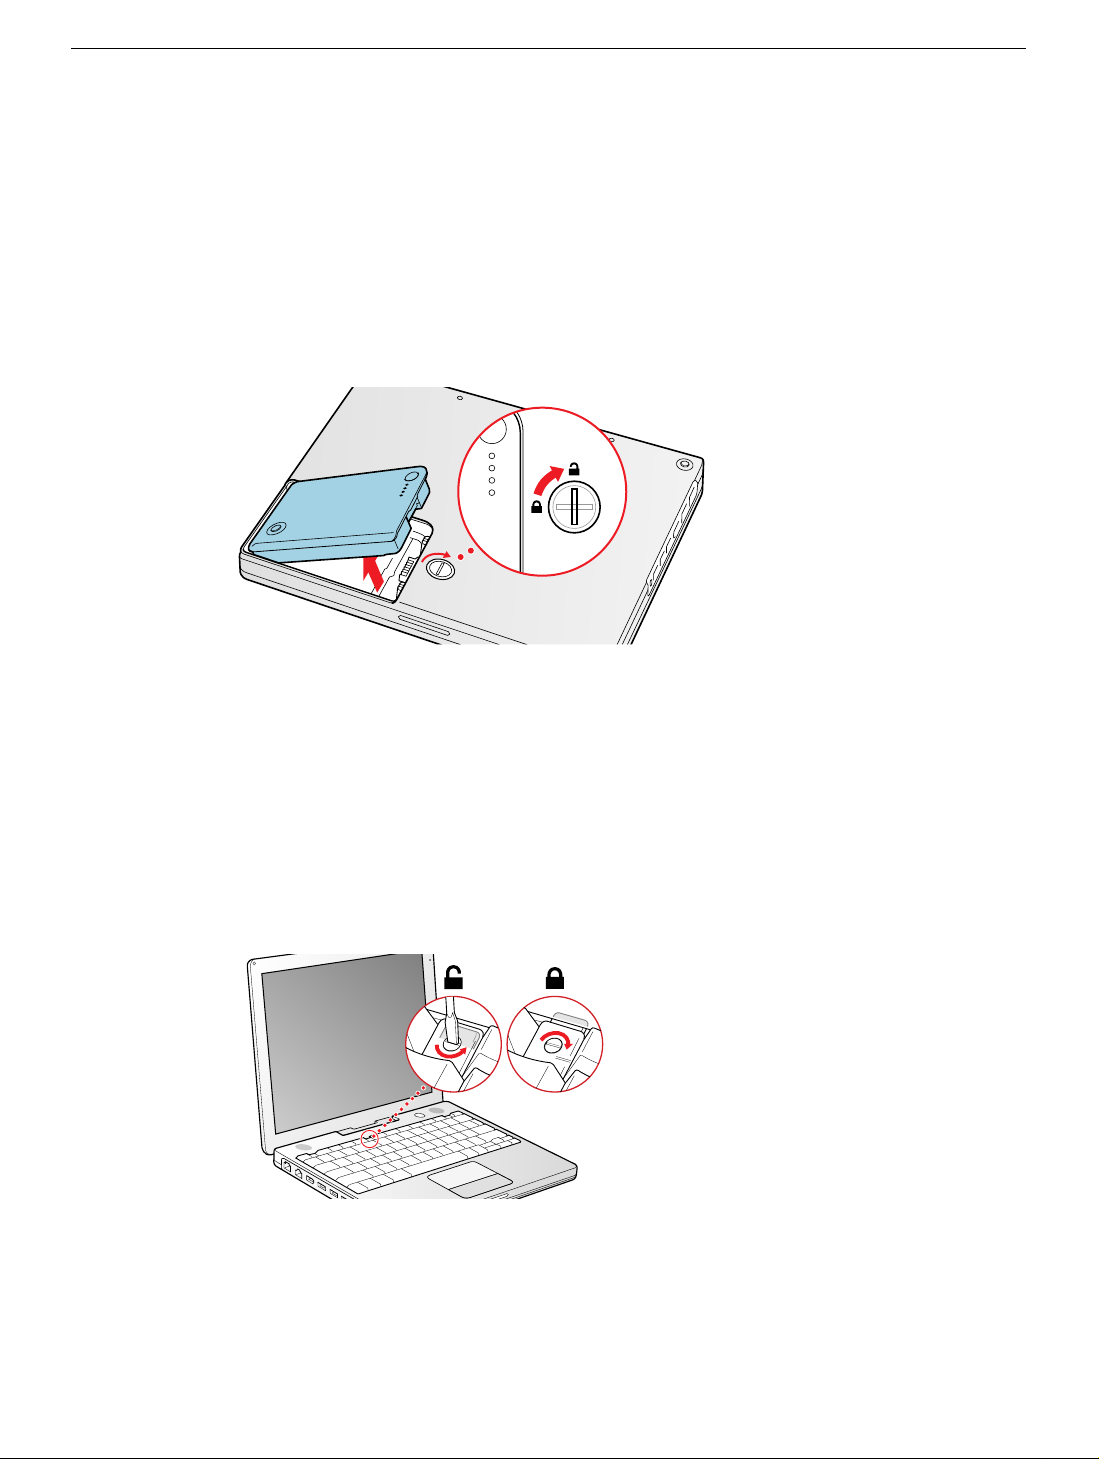
4. Close the computer, turn it over, and locate the battery latch.
Use a coin to turn the battery latch 1/4 turn clockwise to unlock the battery. Gently
remove the battery.
Removing the battery will prevent you from accidentally turning on the computer.
Warning: Removing the battery before shutting down your computer may
result in data loss.
Figure 1
5. Turn over the computer.
(Figure 1)
6. Raise the display so you can access the keyboard.
7. Make sure the keyboard loc king scre w, located in the small plastic tab to the left of the
Num Lock key
keyboard unlock ed, so unless y ou or someone else loc ked the k e yboard, y ou can skip
this step.
To unlock the keyboard, turn the screw 1/2 turn.
Figure 2
(Figure 2)
, is not in the locked position. Your iBook comes with the
iBook (Dual USB), (Late 2001), (16 VRAM), (14.1 LCD), (14.1 LCD 16 VRAM) Keyboard -
2
Page 3
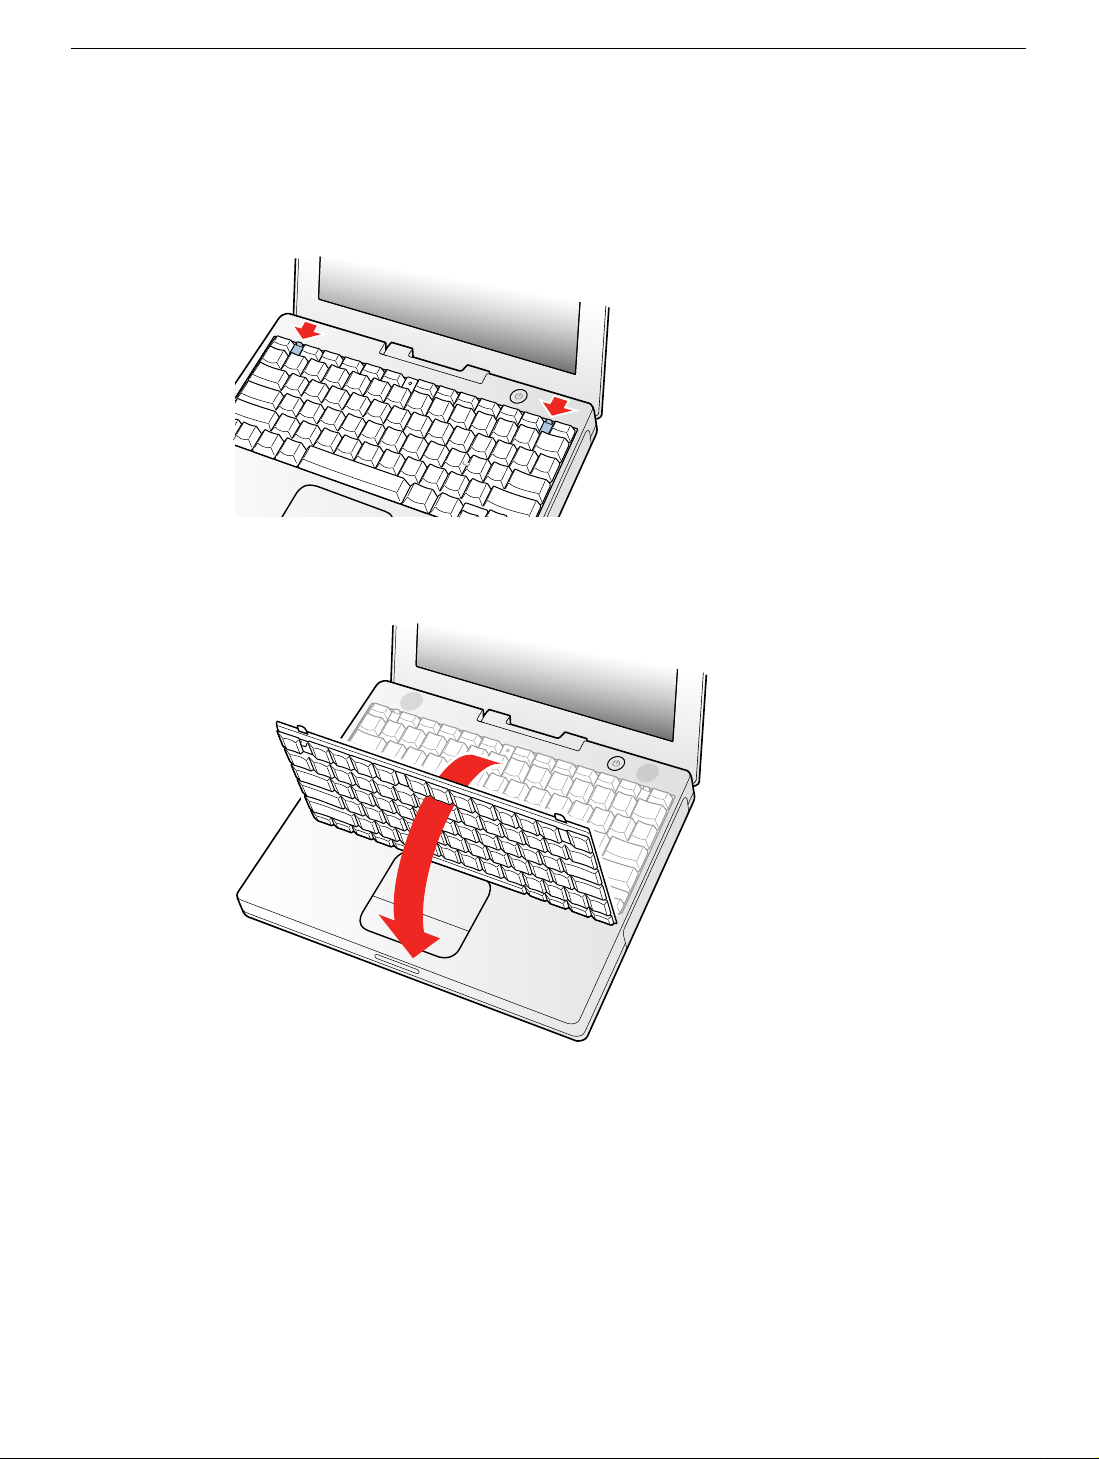
8. Release the keyboard by pulling do wn on the ke yboard release tabs (located to the left
of the F1 and F12 keys)
and toward the display.
Figure 3
(Figure 3)
, then lift the top portion of the keyboard up slightly,
9. Flip the keyboard over and lay it on the palm rests and trackpad.
Figure 4
(Figure 4)
iBook (Dual USB), (Late 2001), (16 VRAM), (14.1 LCD), (14.1 LCD 16 VRAM) Keyboard -
3
Page 4
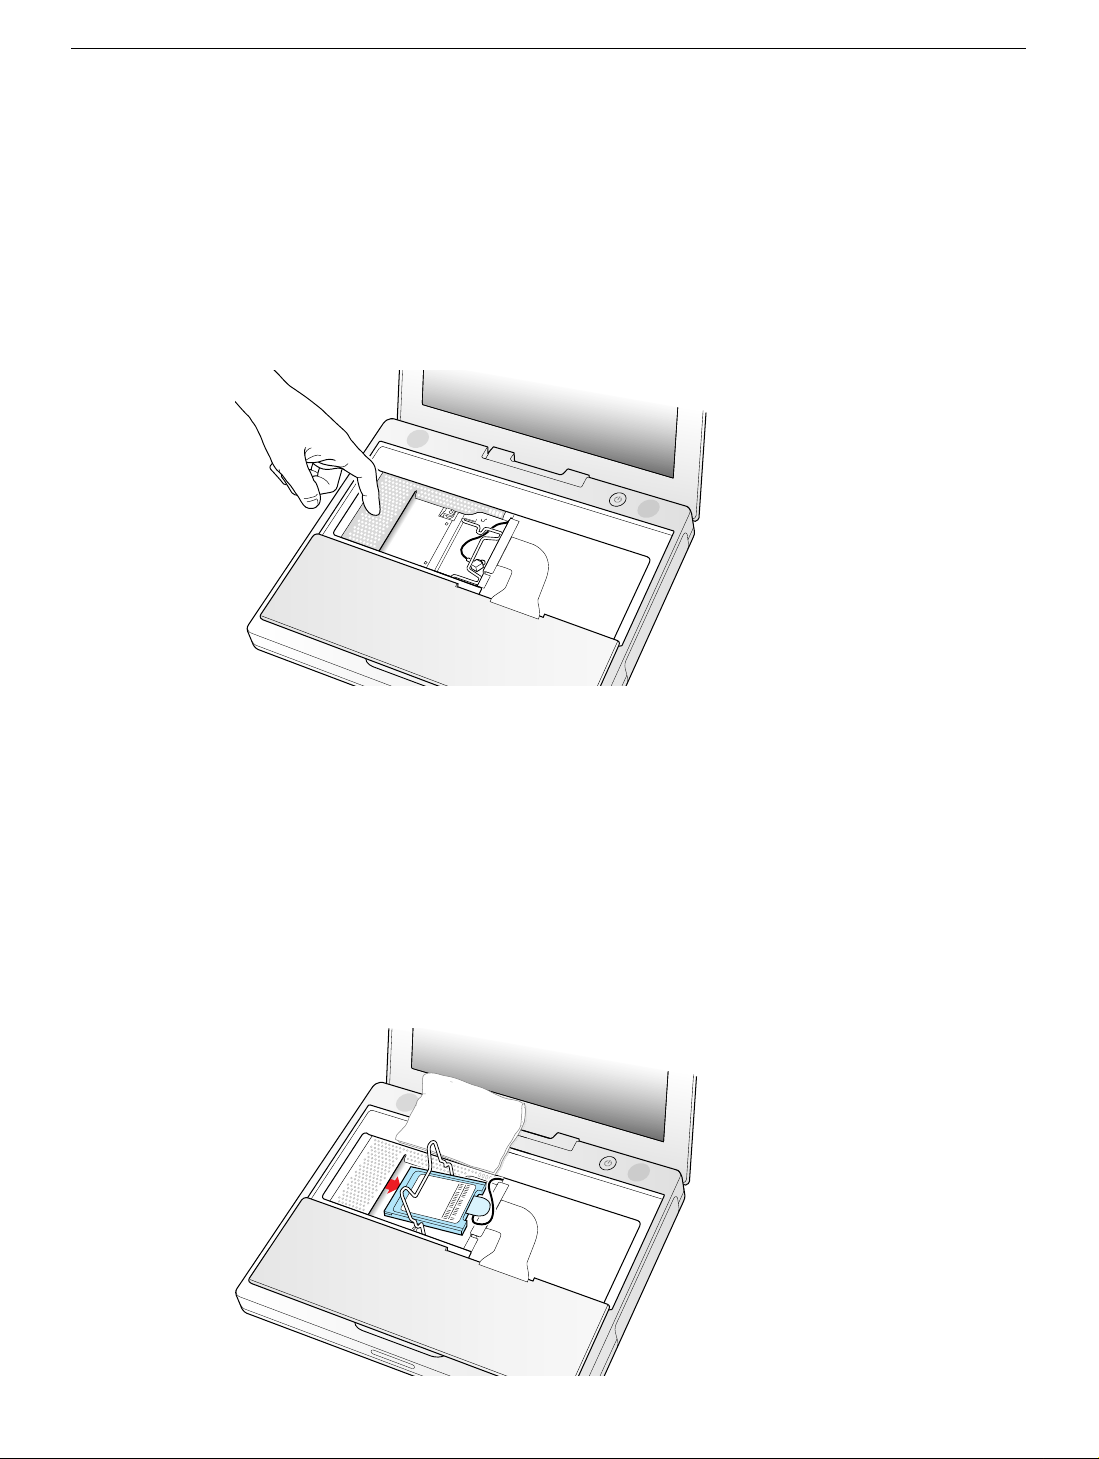
10. Touch a metal surface on the inside of the computer to discharge any static electricity,
as shown.
(Figure 5)
Important:
touching the computer’s framework before you touch any parts or install any
components inside the computer. To avoid static electricity building back up in your
body, do not walk around the room until you have completed the installation and
closed the computer.
Figure 5
To avoid electrostatic discharge damage, always ground yourself by
Removing the Installed Keyboard
1. If your computer has the optional AirPort Card installed, unlatch the flexible wire
holder that secures the card.
2. Use the pull-tab on the card to remove it from the slot. (You do not need to disconnect
the antenna.)
Note:
To avoid scratching the computer’s case, place a soft cloth between the
AirPort Card and the surface of your iBook.
Figure 6
(Figure 6)
iBook (Dual USB), (Late 2001), (16 VRAM), (14.1 LCD), (14.1 LCD 16 VRAM) Keyboard -
4
Page 5
3. If an AirPort Card is not installed, unlatch the flexible wire holder to release the AirPort
Card antenna cable.
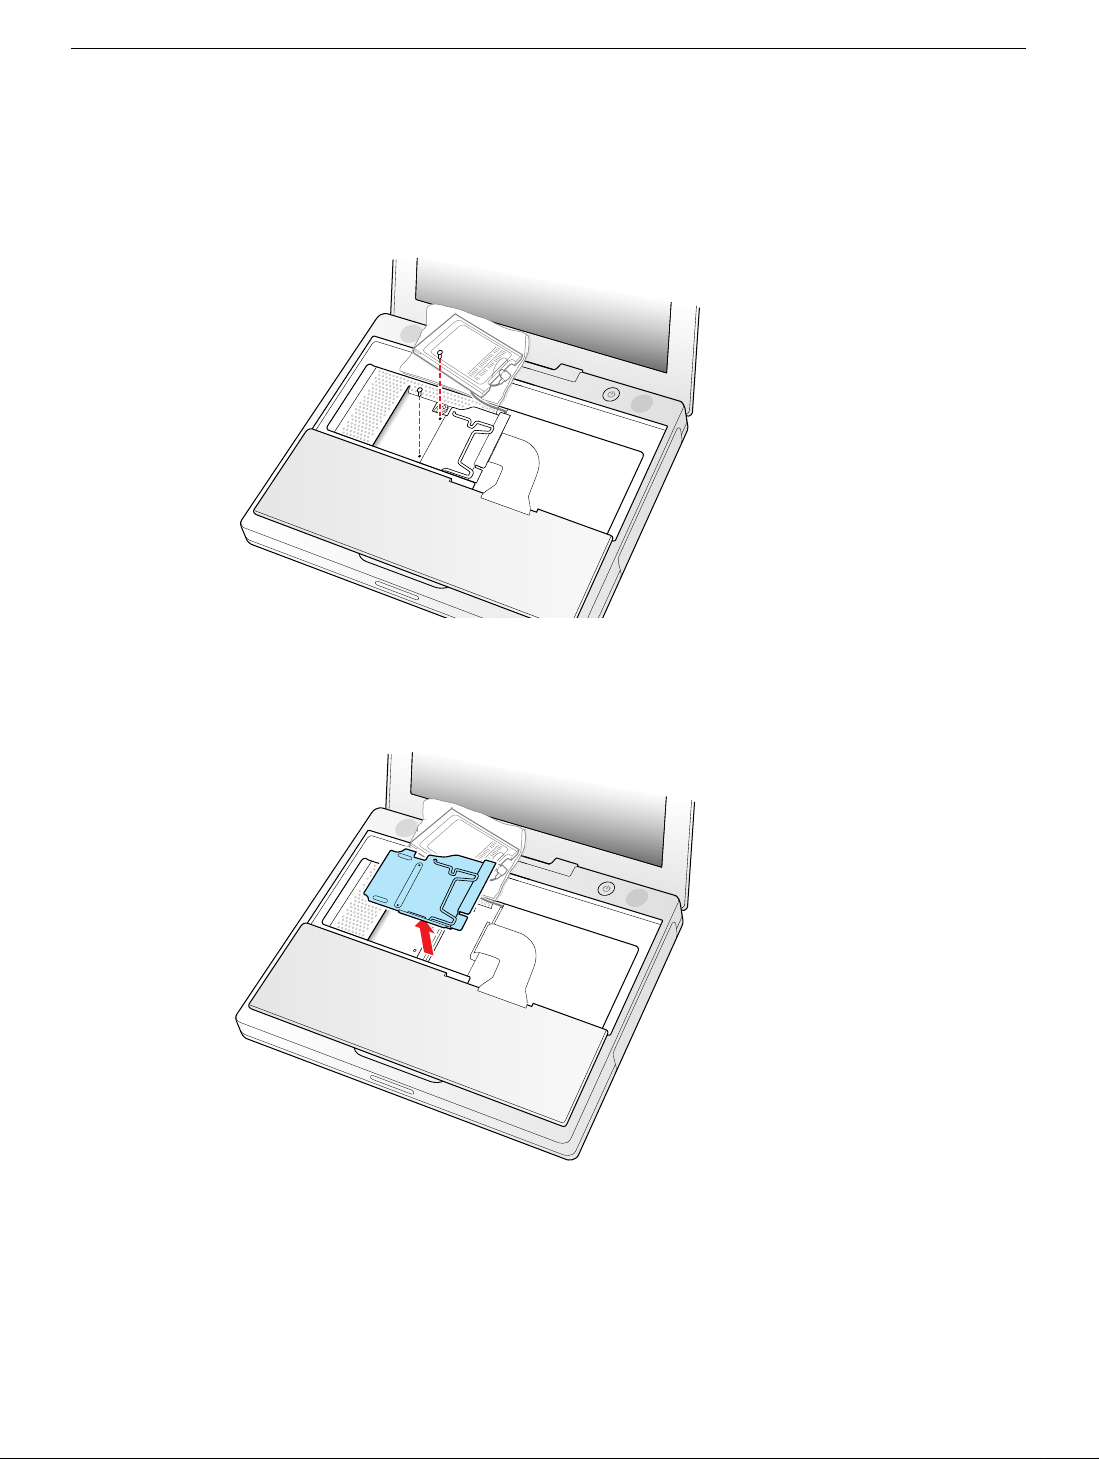
4. Remove the screws that secure the RAM shield.
Figure 7
5. Lift the RAM shield out of the computer. Carefully pulling up on the wire holder may
help to remove the shield.
Figure 8
(Figure 8)
(Figure 7)
iBook (Dual USB), (Late 2001), (16 VRAM), (14.1 LCD), (14.1 LCD 16 VRAM) Keyboard -
5
Page 6
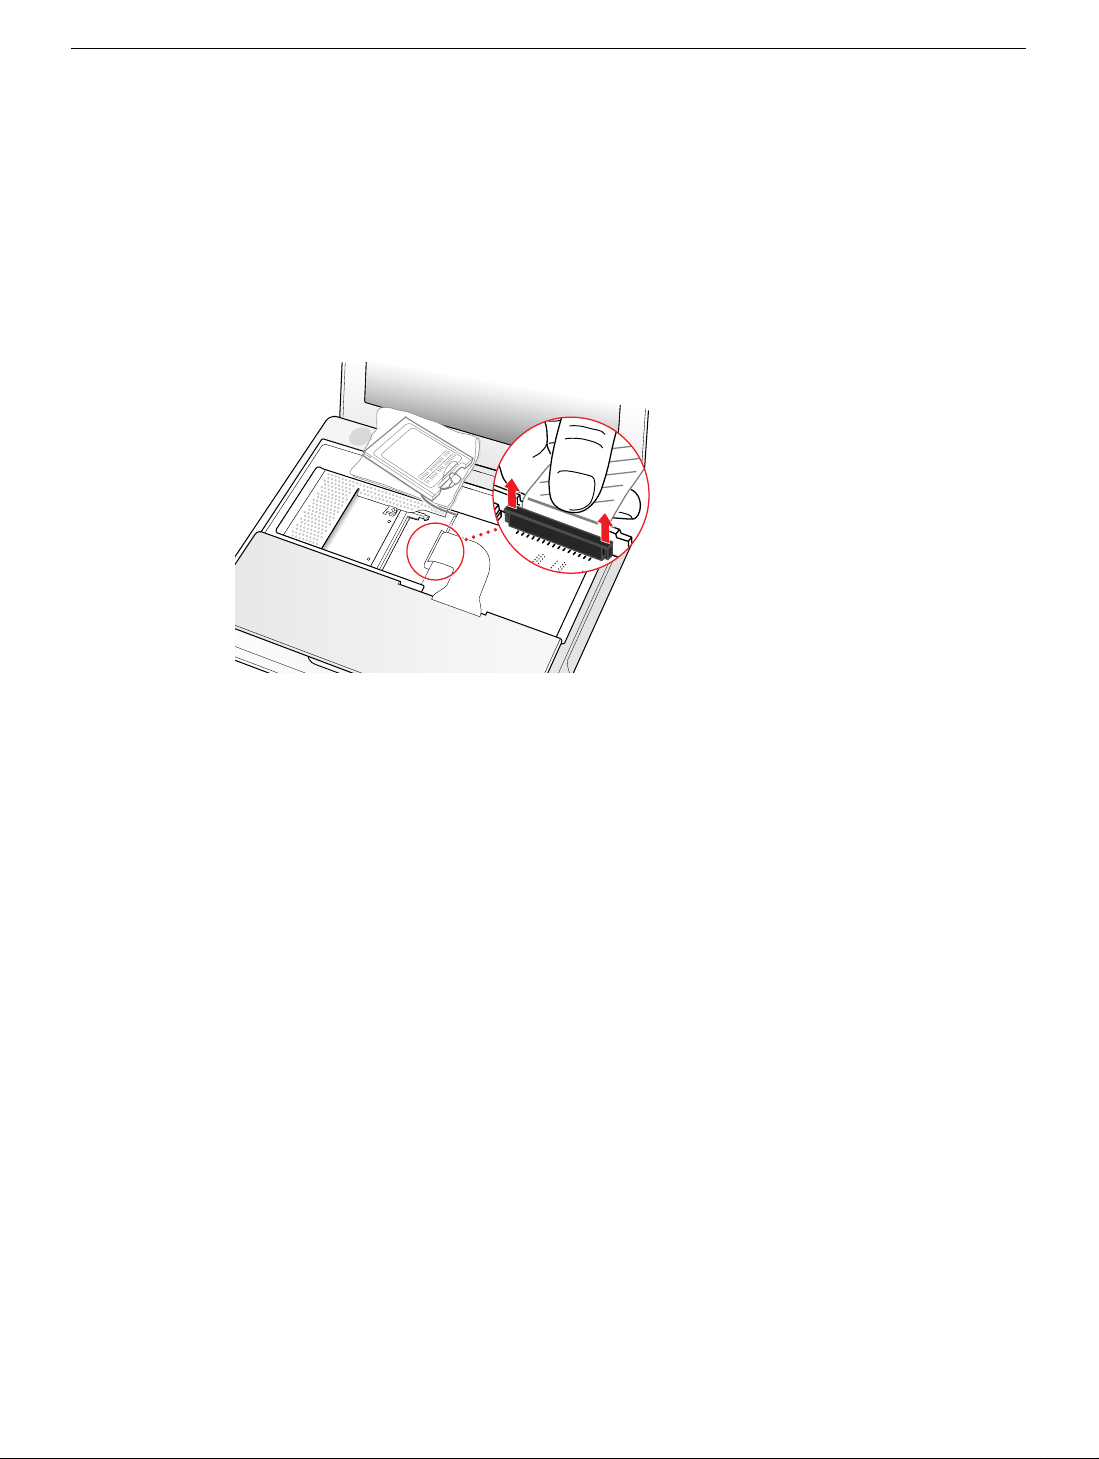
6. Locate the keyboard cable connector.
7. Firmly grasp the cable as shown in the illustration.
8. Carefully pull straight up on the cable until the connector releases.
(Figure 9)
Important:
Note:
Figure 9
9. Set the keyboard aside.
Pull straight up, do not twist or pull the cable sideways.
If needed, use your fingers to pry up the connector from side to side.
Installing the Replacement Keyboard
1. Lay the replacement keyboard in the correct orientation over the keyboard opening,
then flip it toward you and la y it f ace down on the palm rests and trac kpad to e xpose its
connector cable.
2. Firmly insert the keyboard cable connector into its connector on the computer.
iBook (Dual USB), (Late 2001), (16 VRAM), (14.1 LCD), (14.1 LCD 16 VRAM) Keyboard -
6
Page 7
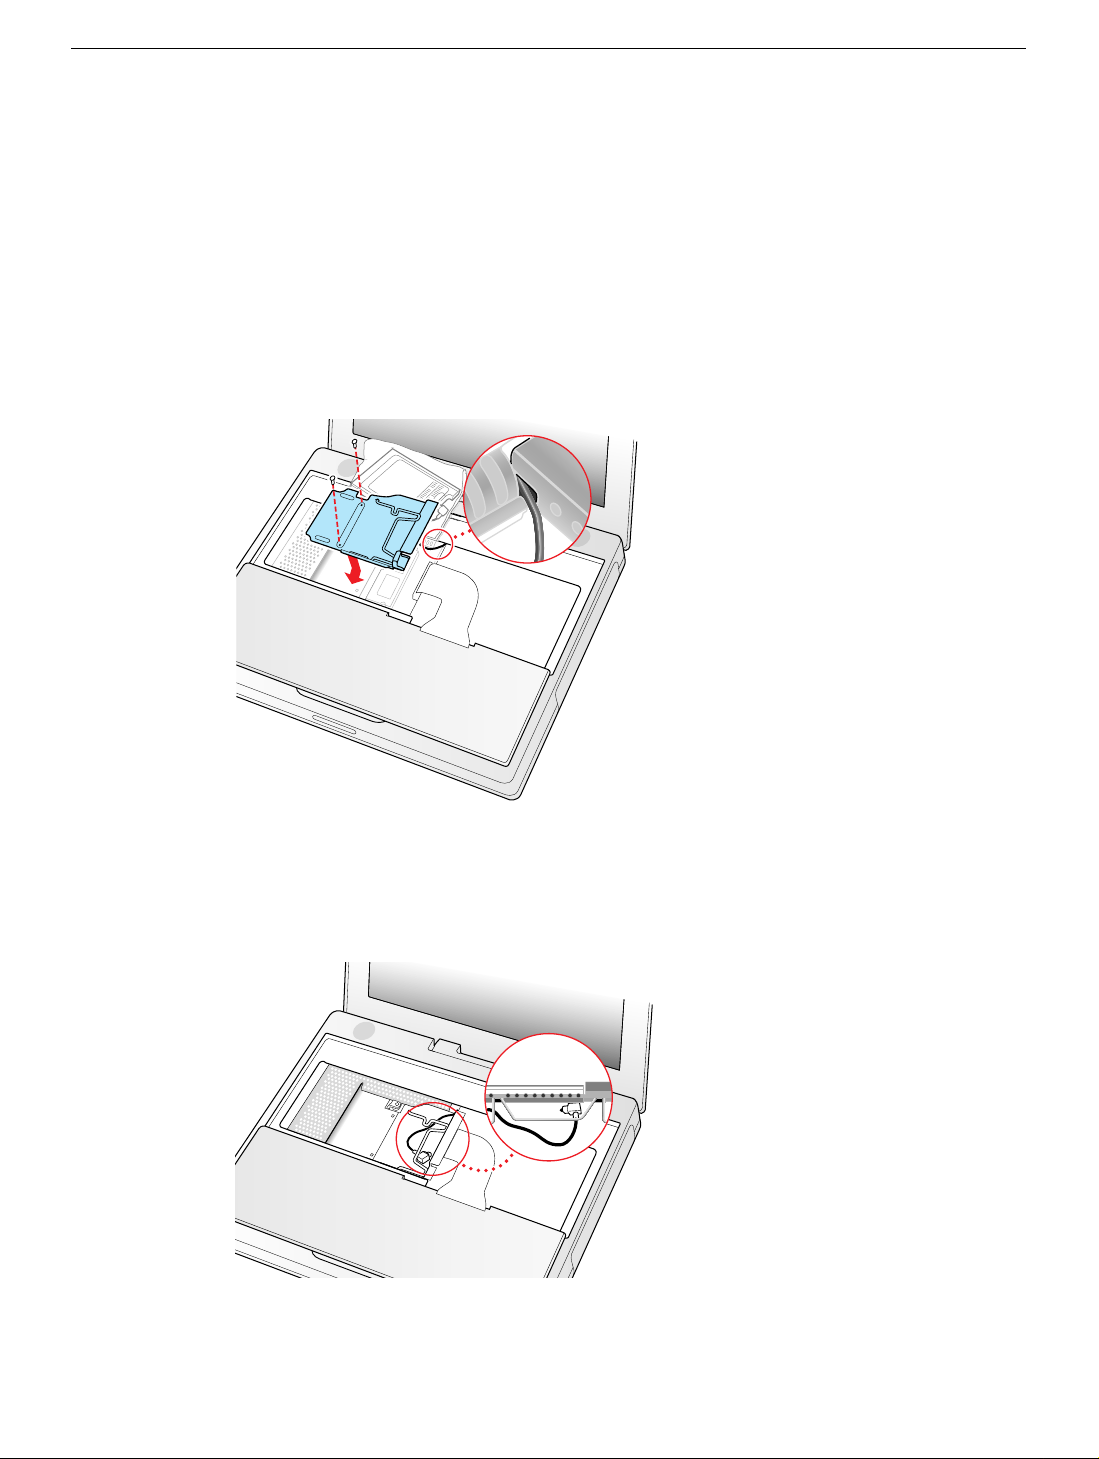
3. Insert the RAM shield.
4. Verify that the end of the wire of the wire holder (where it is attached to the RAM
shield, on the keyboard side) does not catch on the side of the compartment. The
screw holes on the shield and computer should align and the shield should lay
uniformly flat.
5. Verify that the AirPort antenna cable routes through the notch in the RAM shield
without pinching.
6. Replace the RAM shield screws.
Figure 10
(Figure 10)
7. If you do not have an AirPort Card, flip down the wire holder over the AirPort Card
antenna cable and secure it by inserting the prongs of the holder into the slots in the
RAM shield.
Figure 11
(Figure 11)
iBook (Dual USB), (Late 2001), (16 VRAM), (14.1 LCD), (14.1 LCD 16 VRAM) Keyboard -
7
Page 8
8. If you have an AirPort Card, gently slide it (with the AirPort ID number and bar code
45
facing up) under the wire bracket and securely into the AirPort Card slot.
9. Use the wire holder to secure the AirPort Card in place by inserting its prongs into the
slots in the RAM shield.
Figure 12
(Figure 12)
Closing the Computer
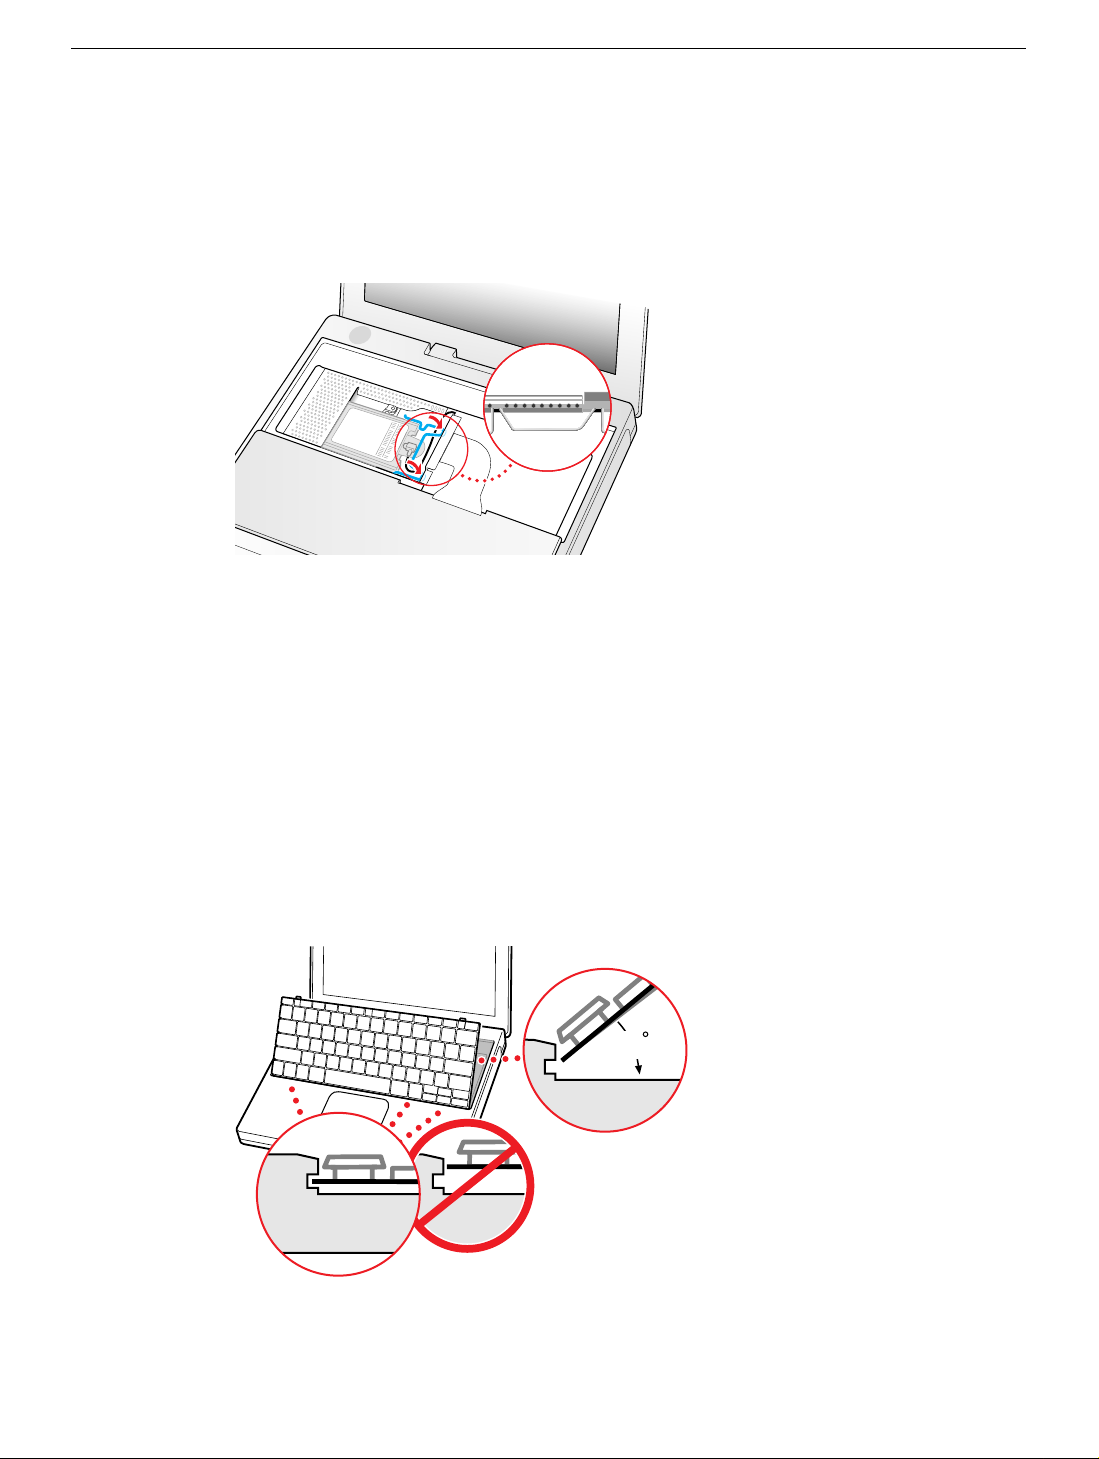
1. Flip the keyboard back toward the keyboard opening in the case.
2. Hold the keyboard at a 45-degree angle above the keyboard opening, and insert the
tabs on the bottom edge of the keyboard into the slot under the edge of the opening.
(Figure 13)
Important:
against the edge of the opening.
3. Lay the keyboard flat into the keyboard opening.
Figure 13
Make sure that all the tabs are seated and that the keyboard rests flush
iBook (Dual USB), (Late 2001), (16 VRAM), (14.1 LCD), (14.1 LCD 16 VRAM) Keyboard -
8
Page 9
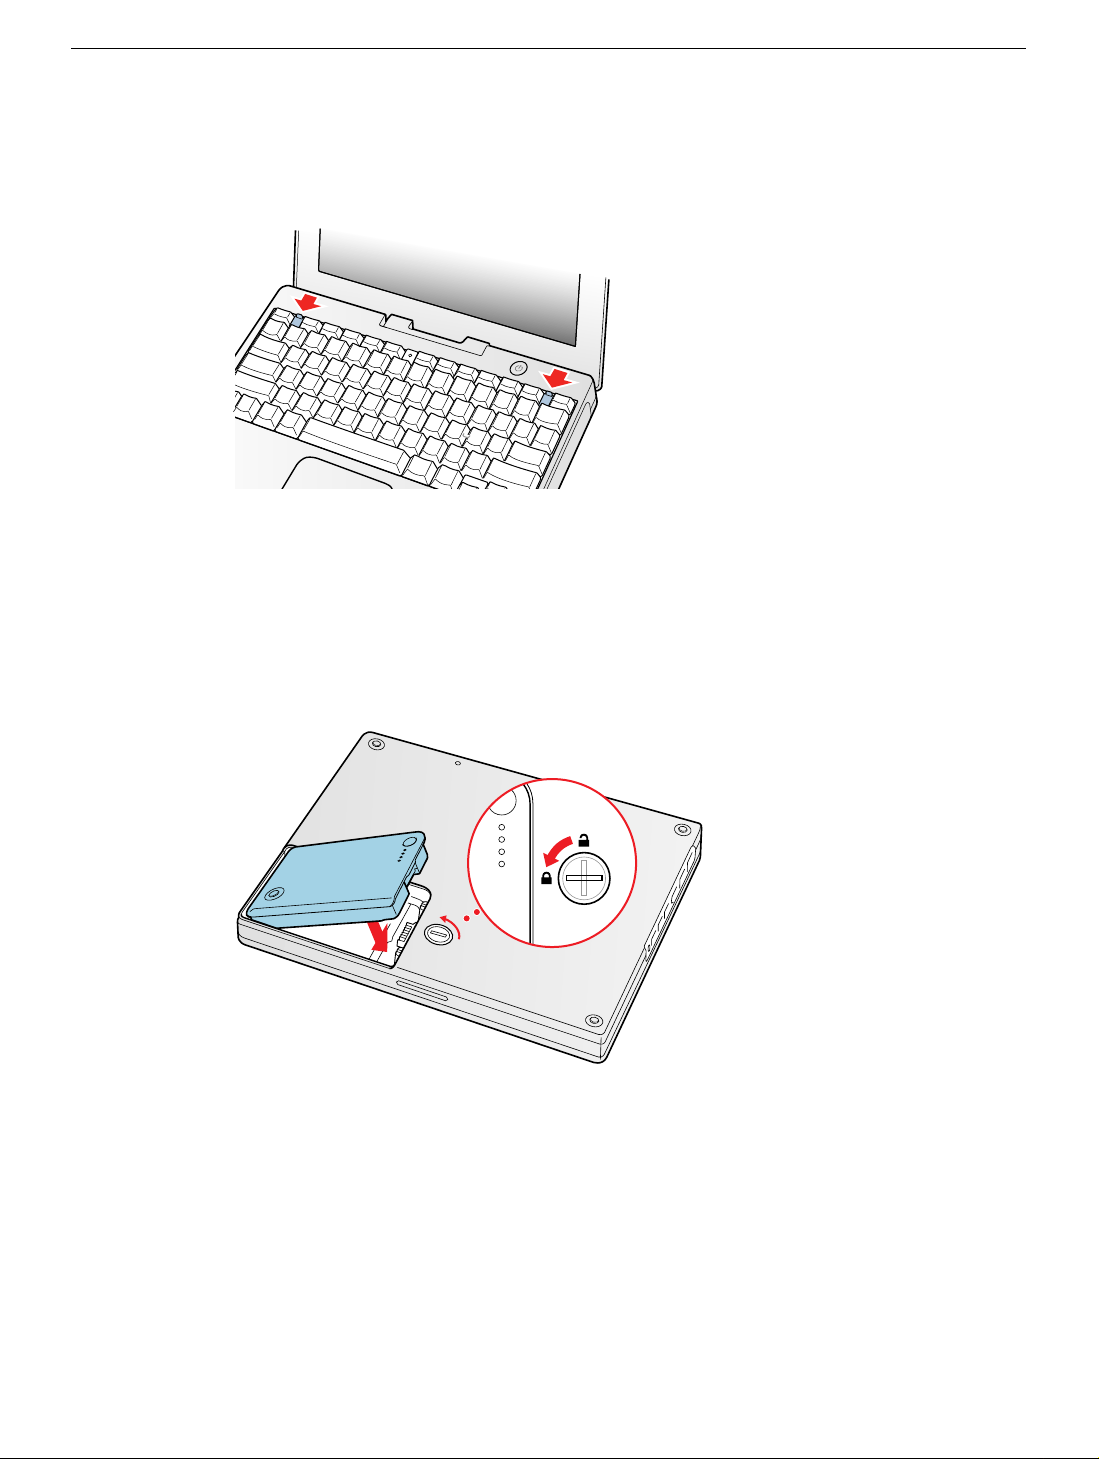
4. Pull down on the keyboard release tabs and then press do wn on the top portion of the
keyboard.
Figure 14
5. Let go of the keyboard release tabs to secure the keyboard in place.
6. Close the display and turn the iBook over.
7. Replace the battery into the battery compartment. Hold the battery flush and use a
coin to turn the latch counterclockwise 1/4 turn to lock the battery into place.
(Figure 15)
(Figure 14)
Figure 15
8. Turn your iBook over and open the display.
9. Reconnect the power cord and any other cables that w ere connected and restart your
computer.
Note:
You may need to reset the date and time (using the Date & Time control
panel).
Warning: Never turn on your computer unless all of its internal and external
parts are in place and it is fully reassembled. Operating the computer when it is
missing parts can damage your computer or cause injury.
iBook (Dual USB), (Late 2001), (16 VRAM), (14.1 LCD), (14.1 LCD 16 VRAM) Keyboard -
9
Page 10

Apple Computer, Inc.
© 2002 Apple Computer, Inc. All rights reserved.
This document is protected under U.S. Copyright Law and International Treaties, and no
part of this document may be reproduced in any form without written permission from
Apple.
Apple is not responsible for typographical, printing, or inadvertent errors.
Apple Computer, Inc.
1 Infinite Loop
Cupertino, CA 95014-2084
USA
+ 1 408 996 1010
http://www.apple.com
Apple and the Apple logo are trademarks of Apple Computer, Inc., registered in the U.S.
and other countries. iBook is a trademark of Apple Computer, Inc.
iBook (Dual USB), (Late 2001), (16 VRAM), (14.1 LCD), (14.1 LCD 16 VRAM) Keyboard -
10
 Loading...