

USER MANUAL
Calendar 365
“Calendar View & Functionalities”
Version: 5.4
Compatibility:
Microsoft Dynamics CRM 2016(v8.0) and above (online and on-premises) and PowerApps
Browser Compatibility:
Edge (v12) and above
Firefox (v29) and above
Chrome (v33) and above
Safari (v7.1) and above
Opera (v20) and above

Calendar 365- “Installation & Configuration”
BIZ/UMP/G1 Public 2
TABLE OF CONTENTS
Introduction ........................................................................................................................ 4
Pre-requisites ...................................................................................................................... 4
New changes V5.4 ............................................................................................................... 4
Calendar Management........................................................................................................ 5
Calendar 365 ............................................................................................................................... 6
Resources .................................................................................................................................... 7
Related Entities ........................................................................................................................... 9
Owner wise Colorized activity ................................................................................................... 10
Activity Details ........................................................................................................................... 11
Upcoming Events ....................................................................................................................... 16
Refresh ...................................................................................................................................... 16
Save and Share Calendar Views ................................................................................................ 17
View Saved Calendar list .................................................................................................................... 18
Edit & Update Calendar ...................................................................................................................... 20
Share ‘Saved Calendar’ Views ............................................................................................................ 21
Share Appointment Activity ............................................................................................................... 24
Activity Grid View of Calendar .................................................................................................. 25
Set Regarding under Grid View .......................................................................................................... 26
Resource Scheduler (Manage Working Hours) ......................................................................... 27
Calendar Activities ............................................................................................................. 35
Create an Activity ...................................................................................................................... 36
All day event for Appointment .................................................................................................. 41
Create a Custom Activity ........................................................................................................... 42
Location selection...................................................................................................................... 44
Attachment for Activity ............................................................................................................. 44
View & Manage Activity ............................................................................................................ 46
View Note ........................................................................................................................................... 47
Edit Activity ......................................................................................................................................... 48
Copy Activity ....................................................................................................................................... 49
Share Activity ...................................................................................................................................... 50

Calendar 365- “Installation & Configuration”
BIZ/UMP/G1 Public 3
Re-assigning Activity ........................................................................................................................... 51
View Activity ....................................................................................................................................... 52
Delete Activity .................................................................................................................................... 52
Search Activity ........................................................................................................................... 53
Recurring Appointment ............................................................................................................. 53
Share Activity ............................................................................................................................. 55
Overdue Activities ..................................................................................................................... 56
Conflict Management ................................................................................................................ 57
Unscheduled Activities .............................................................................................................. 58
Print Calendar ............................................................................................................................ 60
Activity Action ................................................................................................................... 61
Calendar Views .................................................................................................................. 67
Time Slot Duration View ............................................................................................................ 67
Top Down View .......................................................................................................................... 70
Gantt View ................................................................................................................................. 72
Timeline View ............................................................................................................................ 75
Agenda View .............................................................................................................................. 77
Resource Scheduler ................................................................................................................... 79
Contact Us ......................................................................................................................... 80

Calendar 365- “Installation & Configuration”
BIZ/UMP/G1 Public 4
Introduction
Calendar 365 from AppJetty is a calendar solution for Dynamics CRM. This solution by AppJetty helps you
to manage your activities. It also lets you create and manage your own desired activities through Custom
Activities.
With this plugin Admin User can manage the activities and the tasks in two different calendars namely
Resource Calendars for the users and the Customer calendar for the customers (clients).
Apart from managing activities, you can view holidays of the country specified by the admin. Later, if the
activity related actions are performed, you can Complete or Cancel the activities.
Pre-requisites
• Following steps must be followed before starting the Plugin installation:
• First, you should be logged into Dynamics CRM Online.
New changes V5.4
As per the version 5.4 of Calendar 365, the following topics are updated or newly added:
➢ Owner Color Configuration: Color configuration for the individual CRM users
➢ Business Unit: By enabling this option, display and manage the activities for the “Business Unit”
on the Calendar 365.
➢ Minimum/Maximum Time Slot: Select the time slots to display the slot duration or working
duration on the Calendar.
➢ All Day Event: Enable the All Day event for Appointment activity

Calendar 365- “Installation & Configuration”
BIZ/UMP/G1 Public 5
Calendar Management
Calendar Management: You can check how to manage the activities and the functionalities of Calendar.
o Resources
▪ Resource Calendar
▪ Customer Calendar
▪ Related Entities
o Activity Details
▪ Tooltip view
▪ Detail view
o Left side Panel
▪ Activities
▪ Status
▪ Priority
▪ Weekend & Holidays
▪ Upcoming Events
o Refresh
o Save and Share Calendar Views
▪ Update Calendar
▪ Share Saved Calendar View
▪ Move Shared Calendar to Save Calendars list
o Activity Grid View of Calendar
o Set Regarding
o Resource Scheduler (Manage Working Hours)
o Add the Working hours in AppJetty Calendar
o Dynamic Date Format
Calendar 365- “Installation & Configuration”
BIZ/UMP/G1 Public 6
Calendar 365
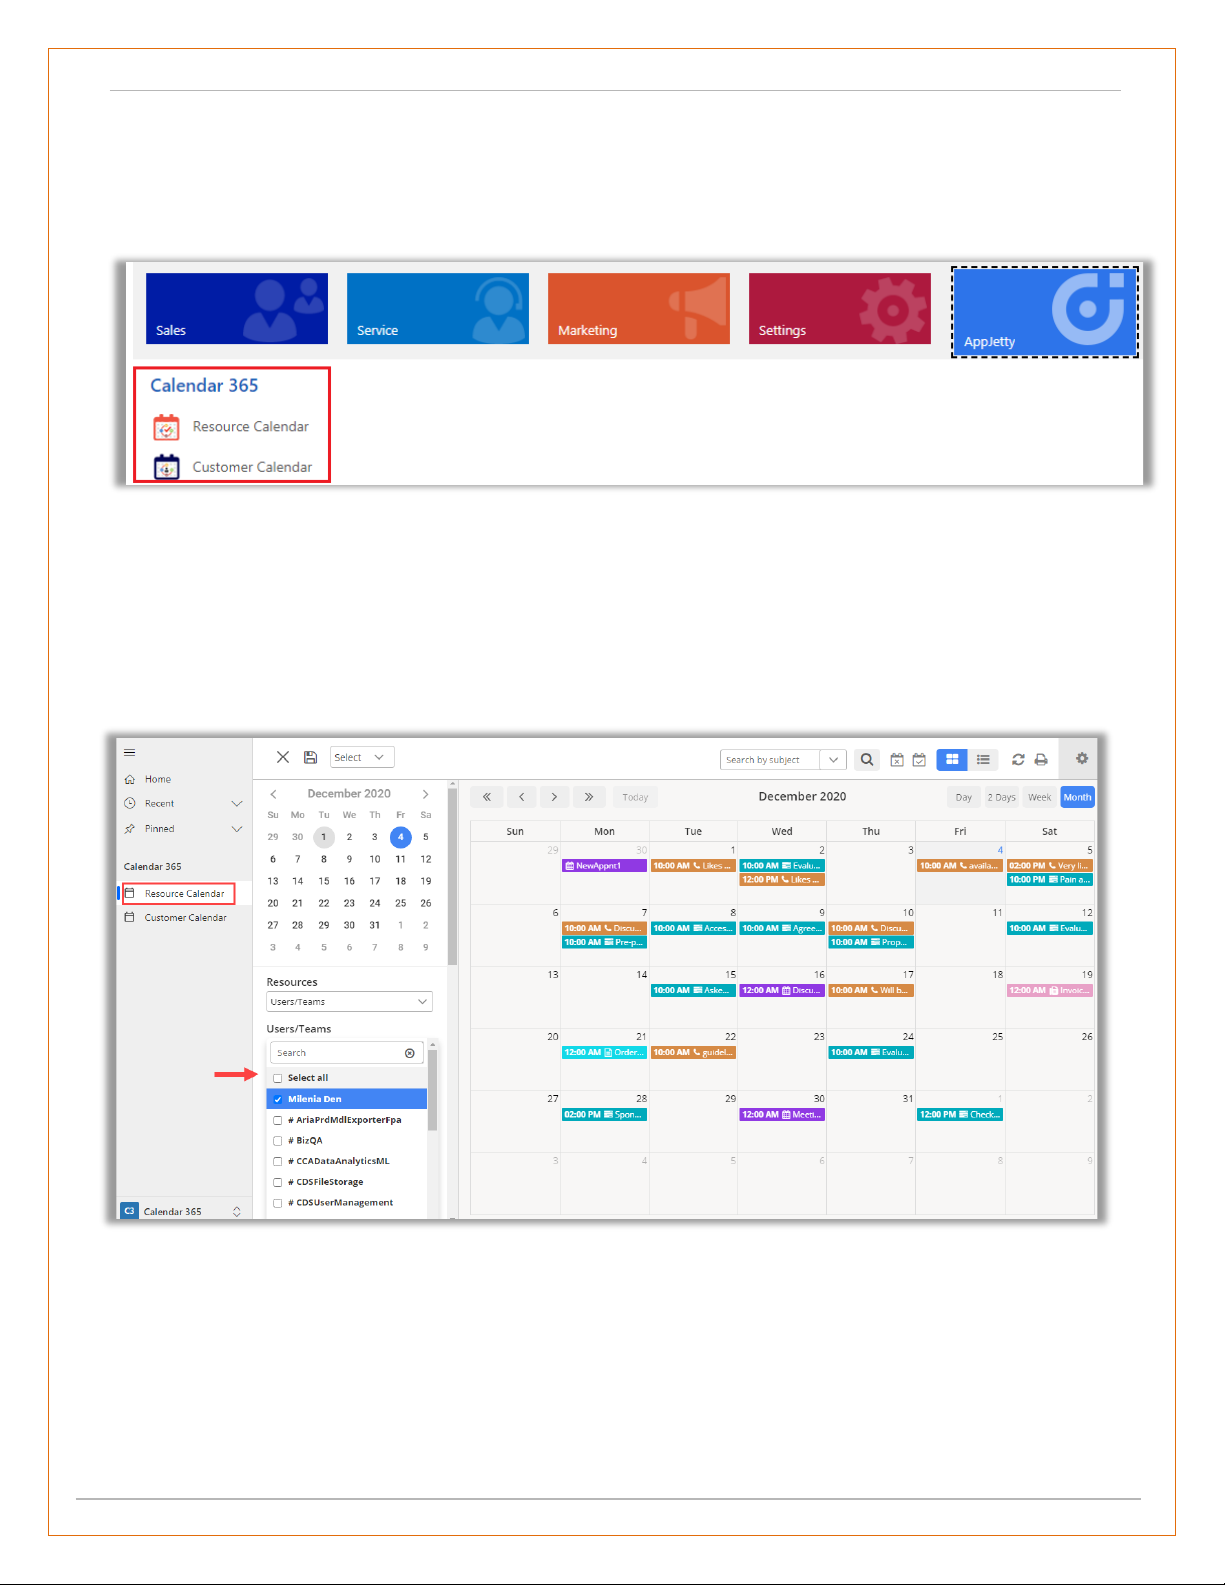
• To open the Calendar 365, following steps must be followed:
• Go to AppJetty -> Calendar 365
• Here, you get two calendars: Resource Calendar & Customer Calendar.
o Resource Calendar: It is for User and Facility/Equipment.
o Customer Calendar: It is for Contacts and Accounts.
• If you want to manage activities for the Users/Teams, Bookable Resource or Facilities/Equipment,
select Resource Calendar while to manage activities for Contacts/Accounts (clients), select
Customer Calendar.
• Calendar page would load, and all the activities will be displayed in the calendar as per the default
configuration made from the settings.
Calendar 365- “Installation & Configuration”
BIZ/UMP/G1 Public 7
Resources
• The calendar is separated in two: Resources Calendar and Customer Calendar.
• To view the navigate to ‘Resources’ section on the left-hand side of the calendar
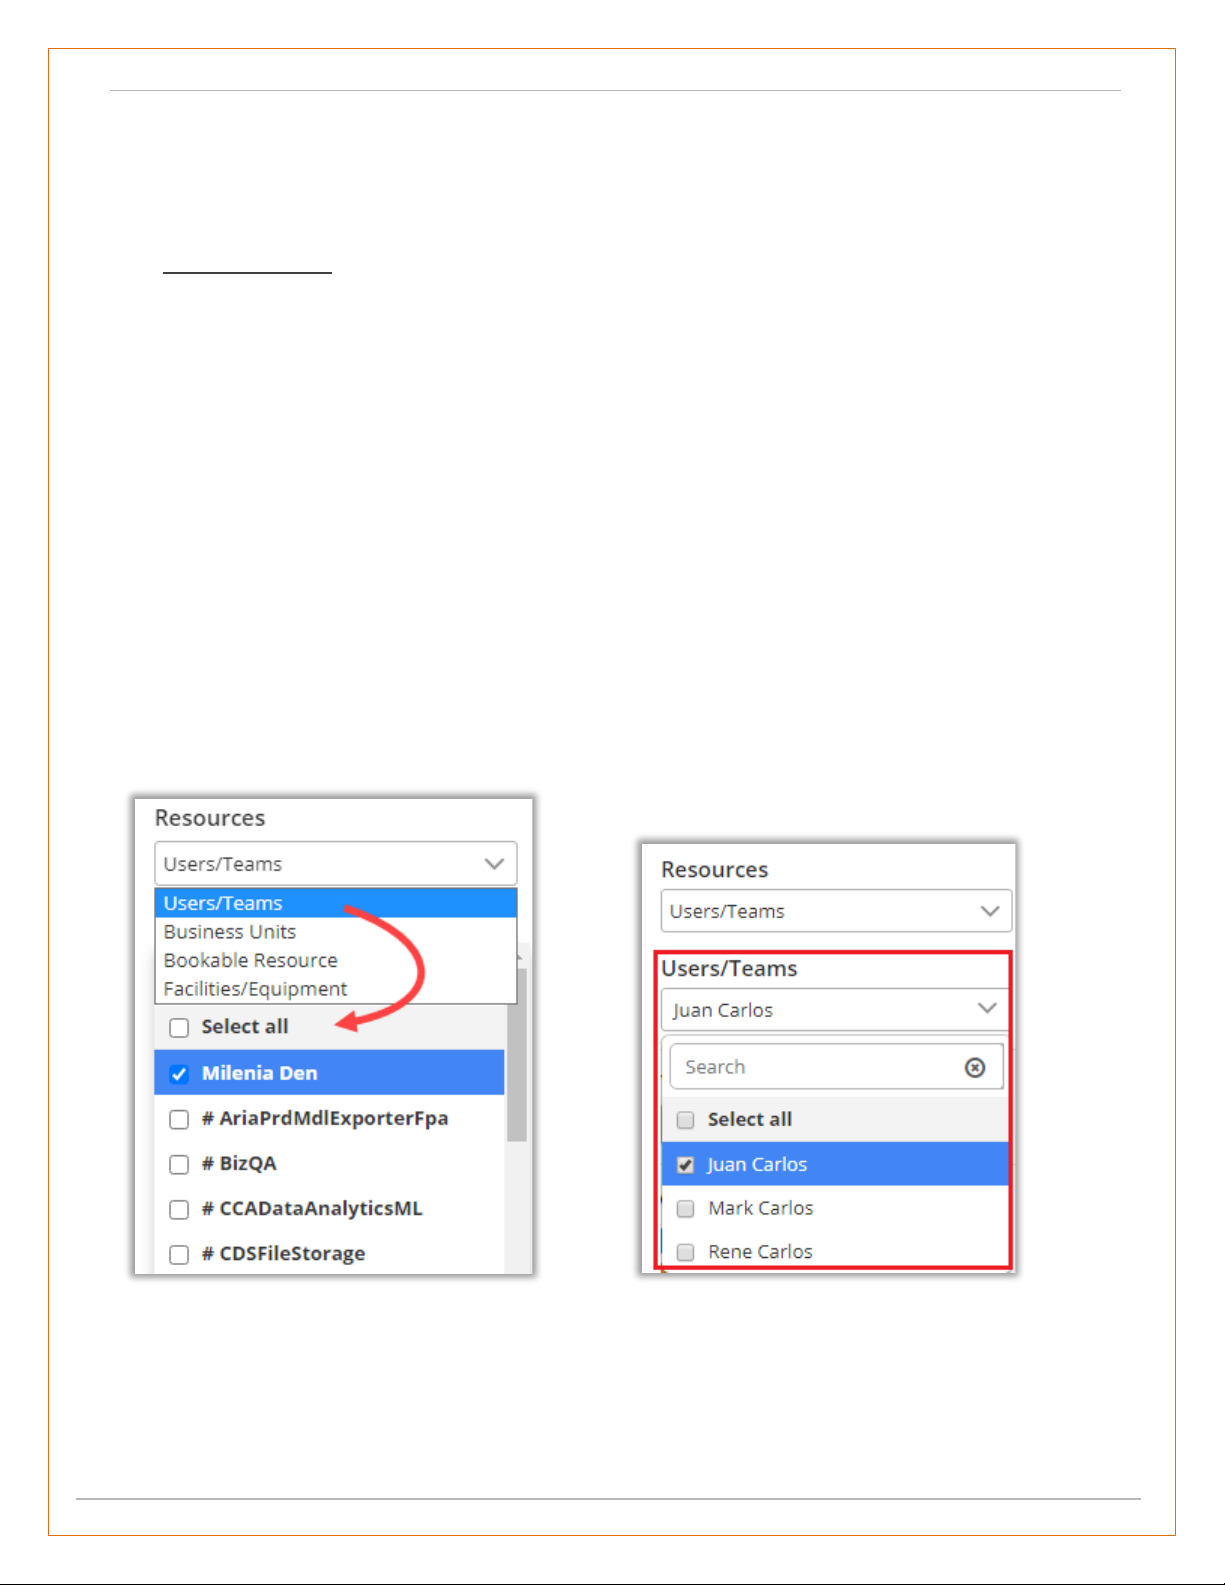
• Resource Calendar: “User/Teams”, “Resource Booking” and “Facilities/Equipment” resources can
be found in Resource Calendar.
o If User/Teams option is selected as resource, it displays list of users in multiple selection
dropdown. User/Teams is a user and a member of your organization.
If you have selected the User/Teams as “Resources”, the list will be displayed and you can
enable/disable the Users/Teams by selection.
o If Business Unit option is selected as “Resources”, it displays the busines units of the
organization like departments or divisions that have separate products, customers, and
marketing lists.
o If Bookable Resource option is selected as “Resources”, it displays list of Bookable Resource
in multiple selection dropdown. A Bookable Resource in Field Service is anything that needs
to be scheduled. Scheduling Board for Field Service & Project Service Automation.
o If Facilities/Equipment is selected as “Resources”, it displays list of facility/equipment in
multiple selection dropdown. If the resource is a physical space that needs to be scheduled,
such as a building or room, select Facilities/Equipment.
• As you select the “Resource”, you will get the records based on that.

Calendar 365- “Installation & Configuration”
BIZ/UMP/G1 Public 8
• Customer Calendar: You will get “Accounts” and “Contacts”.
o If Contact is selected as resource, it displays list of contacts in multiple selection dropdown.
These are available only when contacts are selected from the dialog box.
o If Account is selected as resource, it displays list of accounts in multiple selection dropdown.
These are available only when accounts are selected from the lookup dialog box.
• Based on Customers selection, activities in the calendar will be displayed.
Note: Only the system administrator can view the calendar along with the activities of all the users or
resources. Other users can view the calendar of only their team or an individual depending on their
respective role.
- Activities that have account or contact mentioned within regarding field, those activities are viewed in
calendar upon selection of that account or contact, respectively.
Calendar 365- “Installation & Configuration”
BIZ/UMP/G1 Public 9
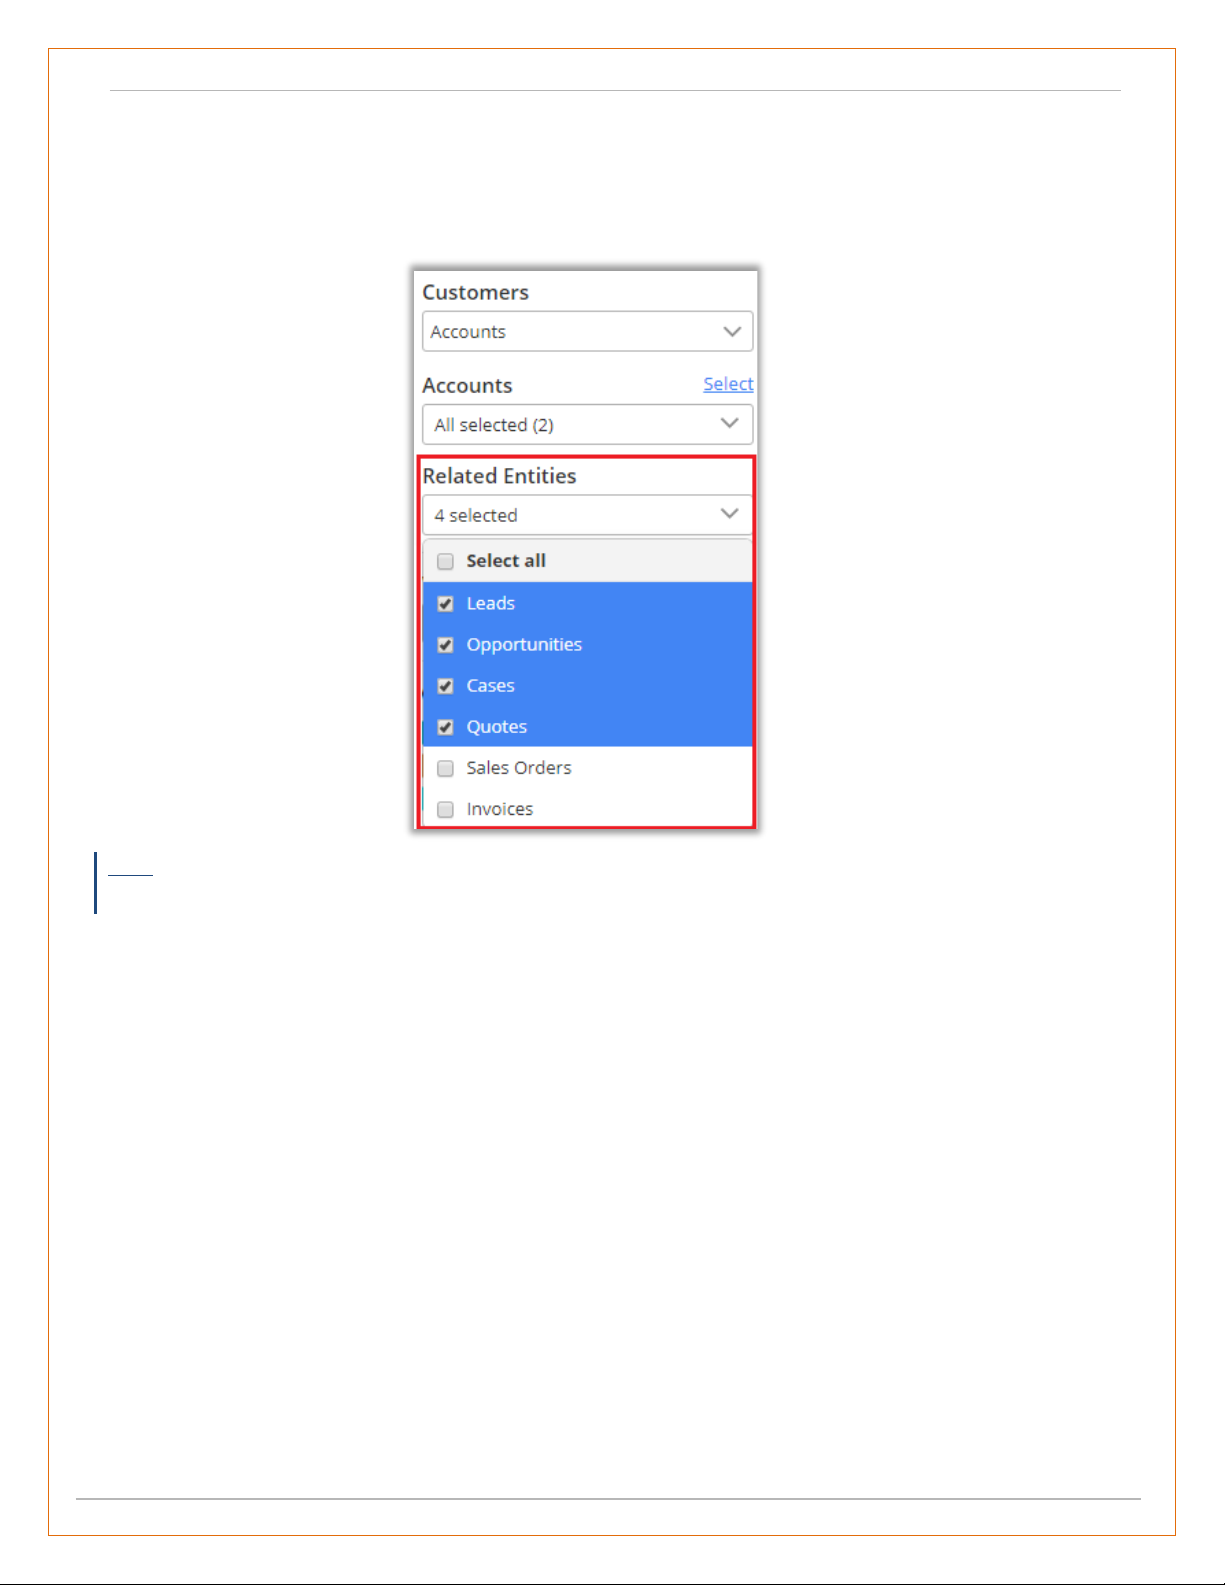
Related Entities
• On selecting accounts or contacts as Customers, Related Entities dropdown is enabled from where
user can select one or more related entity of account or contact related to which you want to view
activities.
Note: Related entities dropdown will be shown only if entities are selected from the configurations page.
And activities will be shown if these related entities have activities created within their record.
Calendar 365- “Installation & Configuration”
BIZ/UMP/G1 Public 10
Owner wise Colorized activity
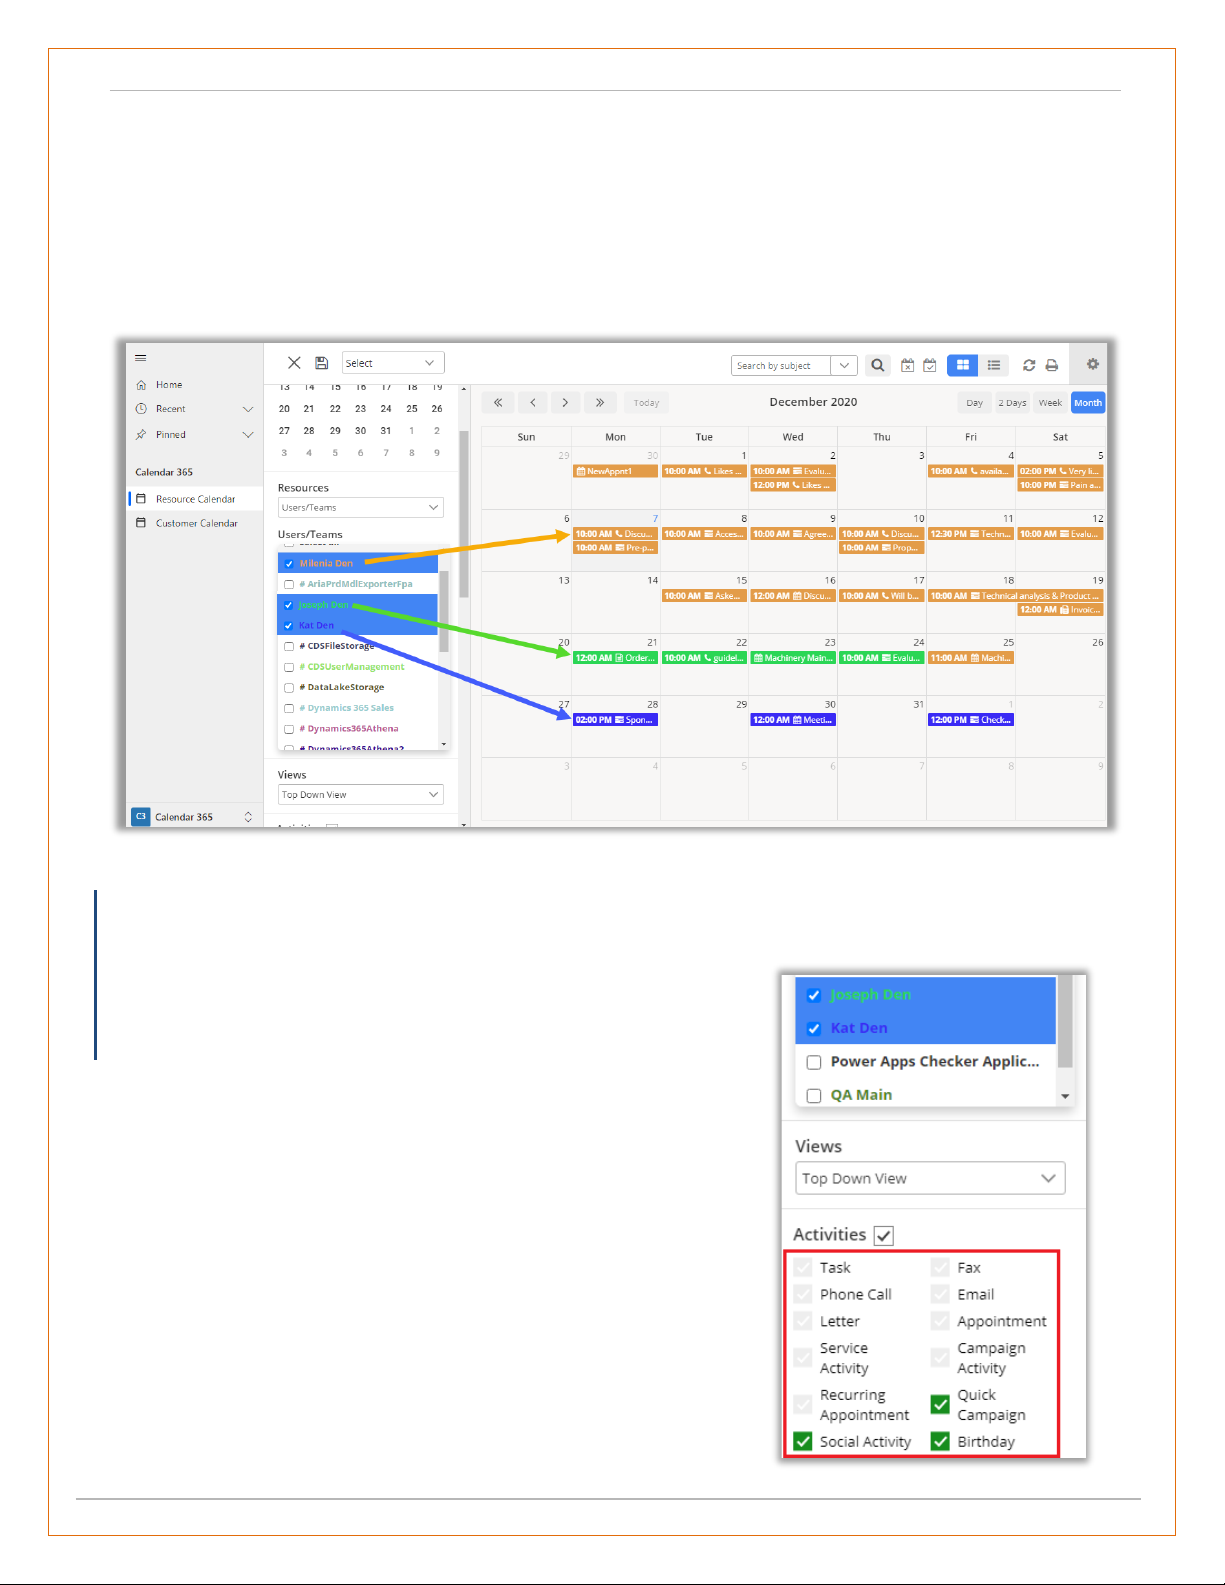
• If you have enabled the owner wise color option and set the specific color to different owners, the
activities of the different owners will appear on the Calendar based on the Owner’s color.
• On the Calendar, user can see the colorized activities based on the selected color for the specific
owner (users). i.e., the orange color activities belong to the user Milenia Den, the green color
activities belong to the Joseph Den and the blue color activities belong to the Kat Den.
• These Color specific activities option helps admin or users to clarify the activities.
Note:
- The user can see different color combinations activities for specific users only under Resource Calendar.
- Once you have selected the Owner Color option, the individual color
of the activities will be disable and the user wise colorized activities will
display on the calendar.
Calendar 365- “Installation & Configuration”
BIZ/UMP/G1 Public 11
Activity Details
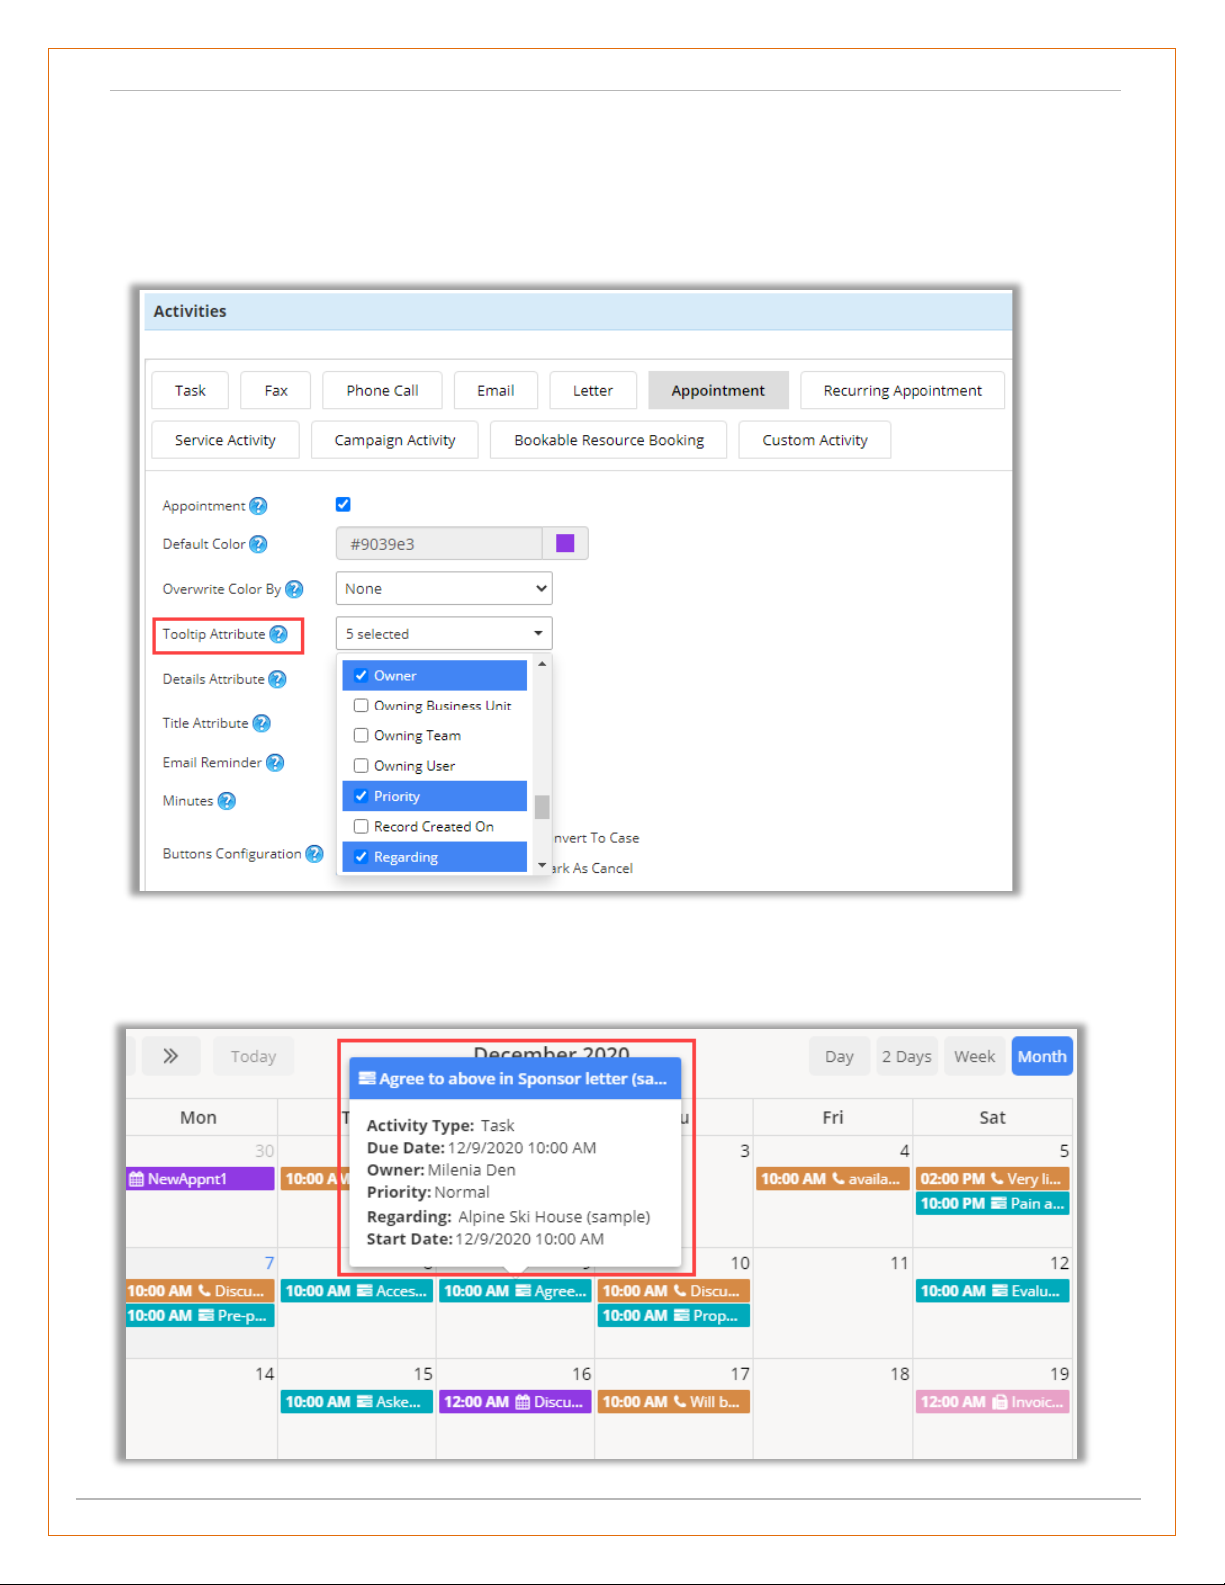
Setup for Tooltip Attribute & Tooltip view:
• To setup the Tooltip view of activity, navigate to Setup and you will find the ‘Tooltip Attribute’
option in all the activity.
Tooltip on Calendar
• Hover the mouse on the activity, then the activity details can be seen in tooltip view.
Calendar 365- “Installation & Configuration”
BIZ/UMP/G1 Public 12
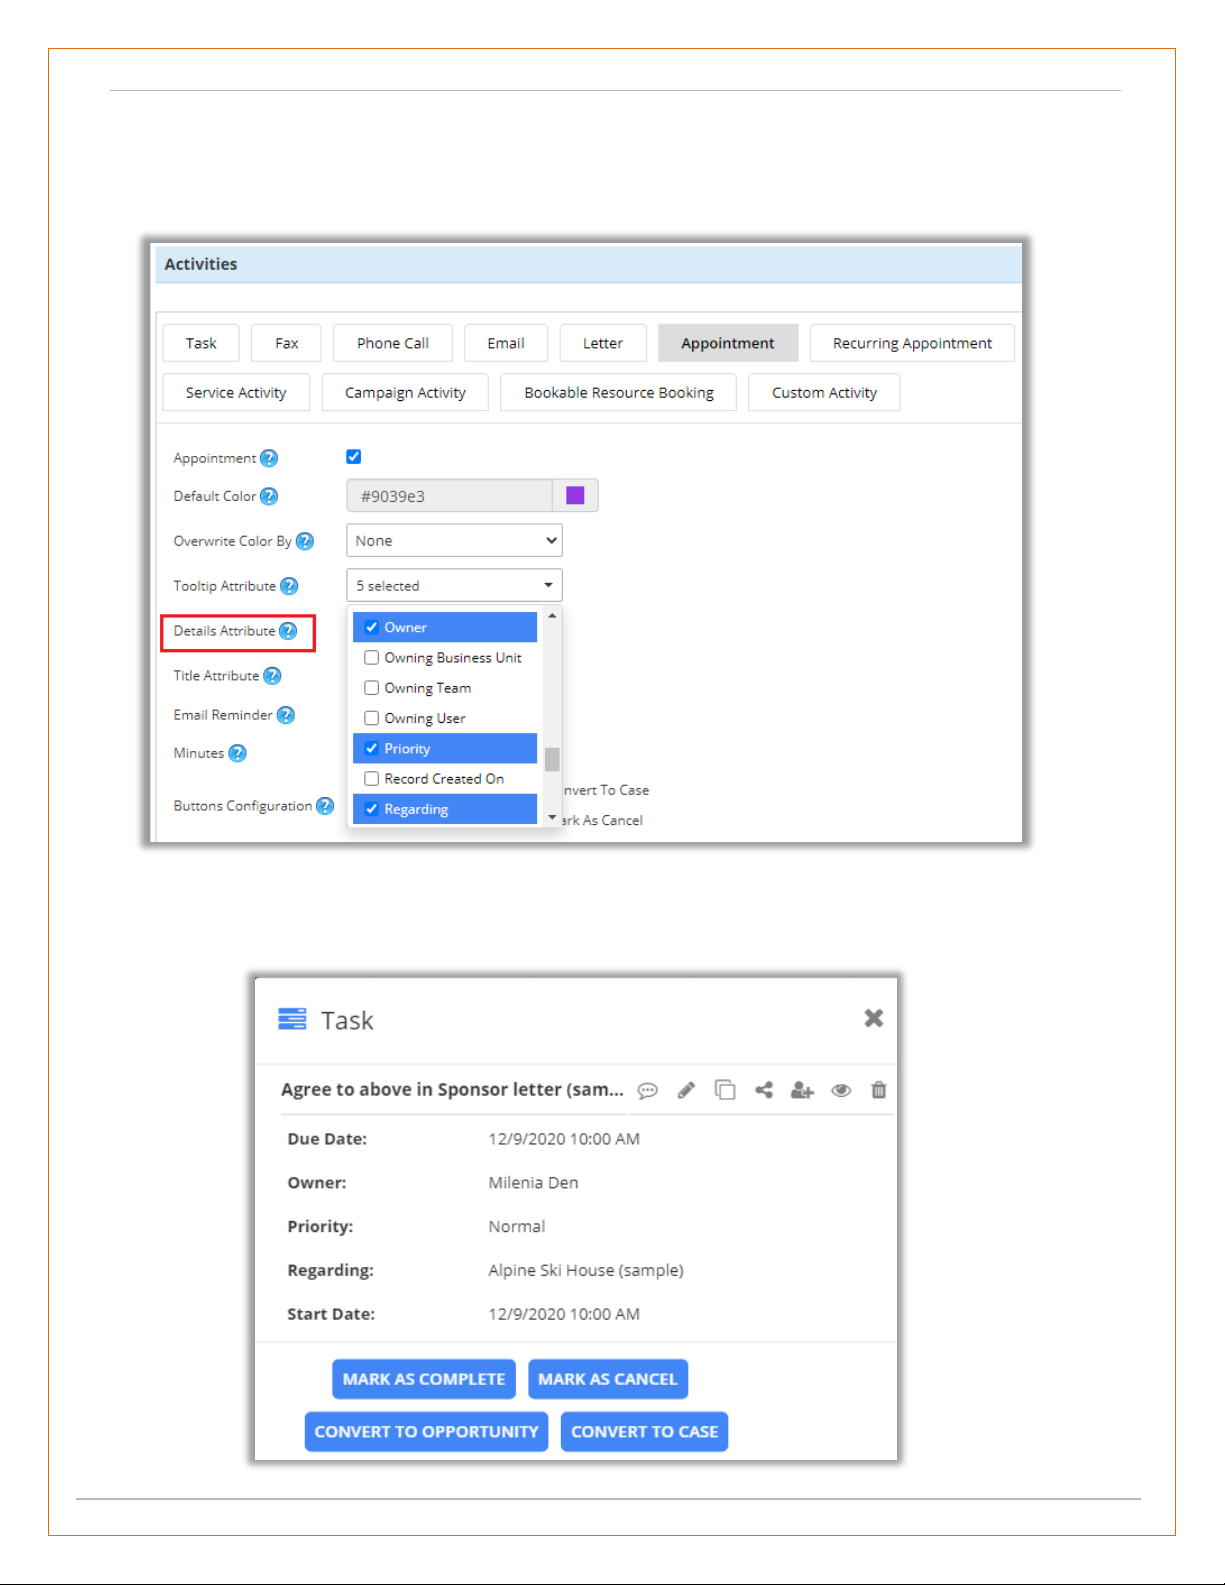
Setup for Detail Attribute & Attribute view:
• To setup the Detail view of activity, navigate to Setup and you will find the ‘Detail Attribute’ option
in all the activity.
Activity Detail view on Calendar
• To view the ‘Activity Details’, click on the activity, then the details can be seen in detail.
Calendar 365- “Installation & Configuration”
BIZ/UMP/G1 Public 13
Left side panel options
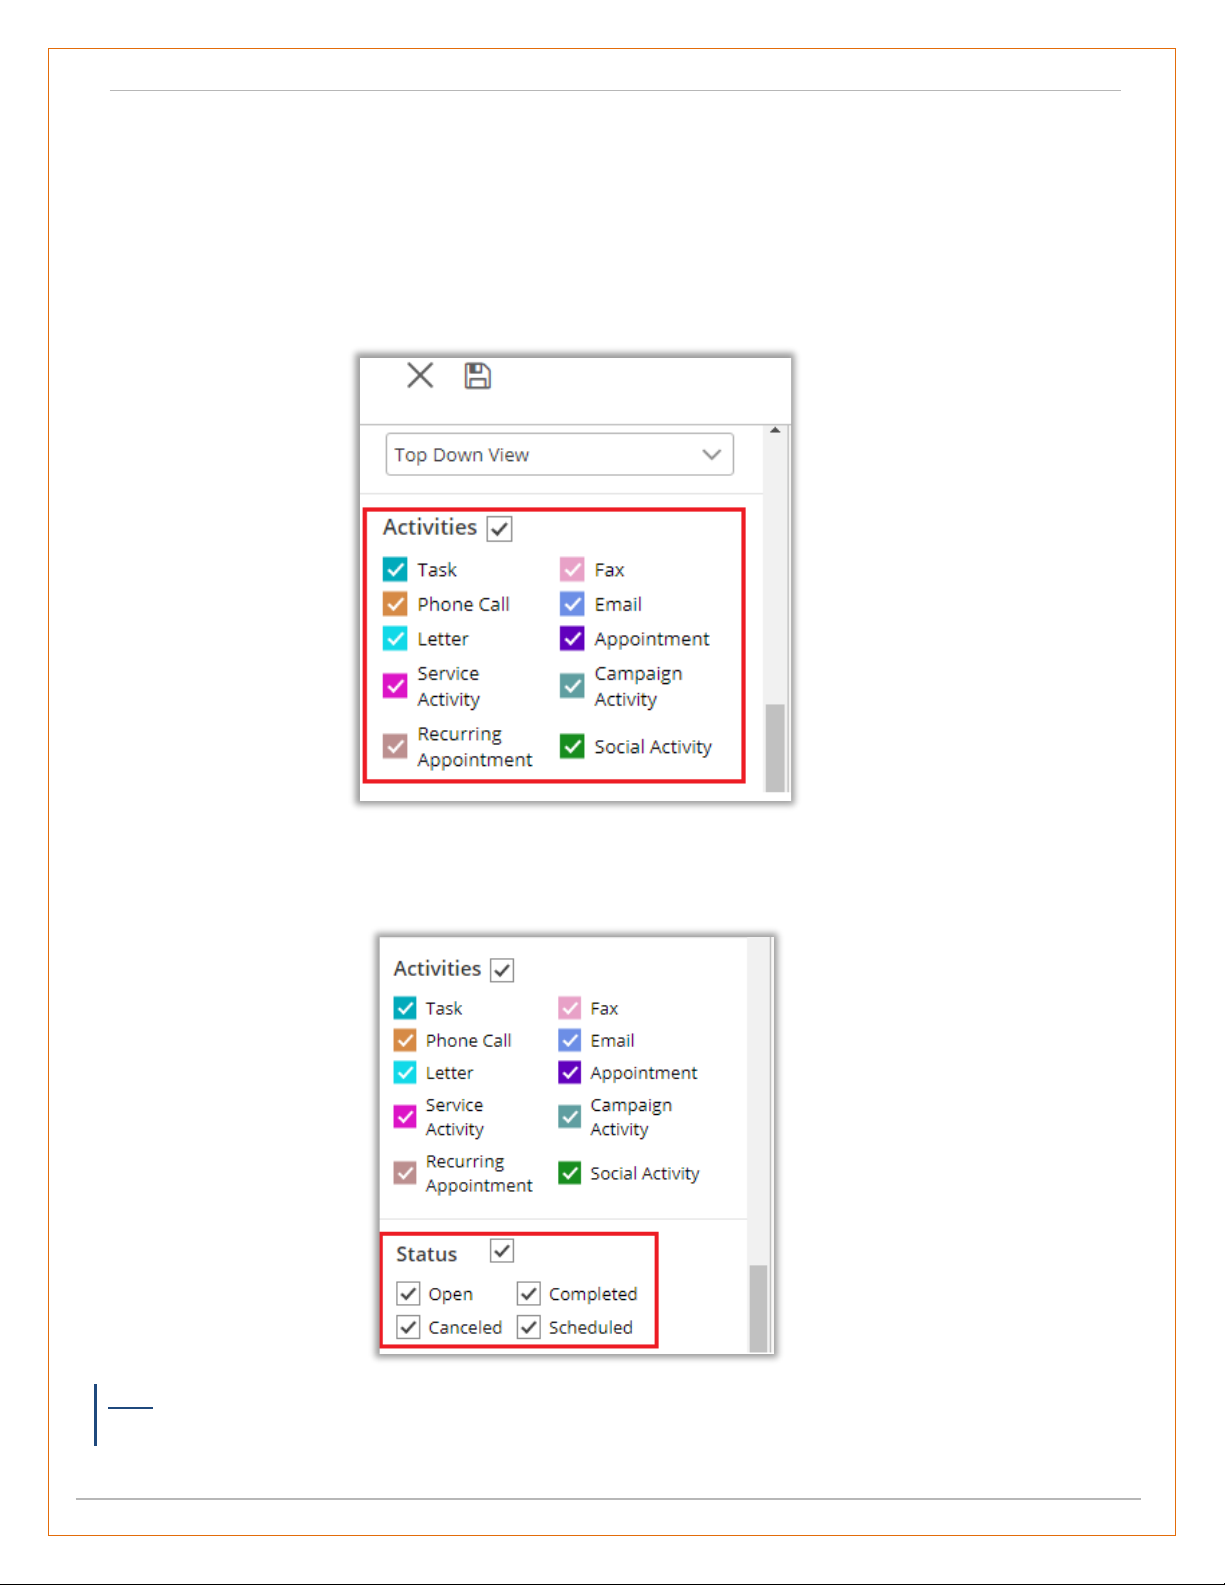
Activities
• To manage the activities which are to be displayed in the calendar, navigate to ‘Activities’ section
on the left-hand side of the calendar.
• Thereafter, check the checkbox besides the activity to display the particular activity in the calendar.
Here it will show only those activities that are enabled from the configurations page.
Status
• To view the activities as per their statuses, navigate to ‘Status’ section and check the checkbox
besides each option to display the activities with statuses in the calendar.
Note: If you have selected the Overwrite Color by Status in activity configuration, the status of activity
can be displayed in that color which is selected in ‘Overwrite Color’ option.
Calendar 365- “Installation & Configuration”
BIZ/UMP/G1 Public 14
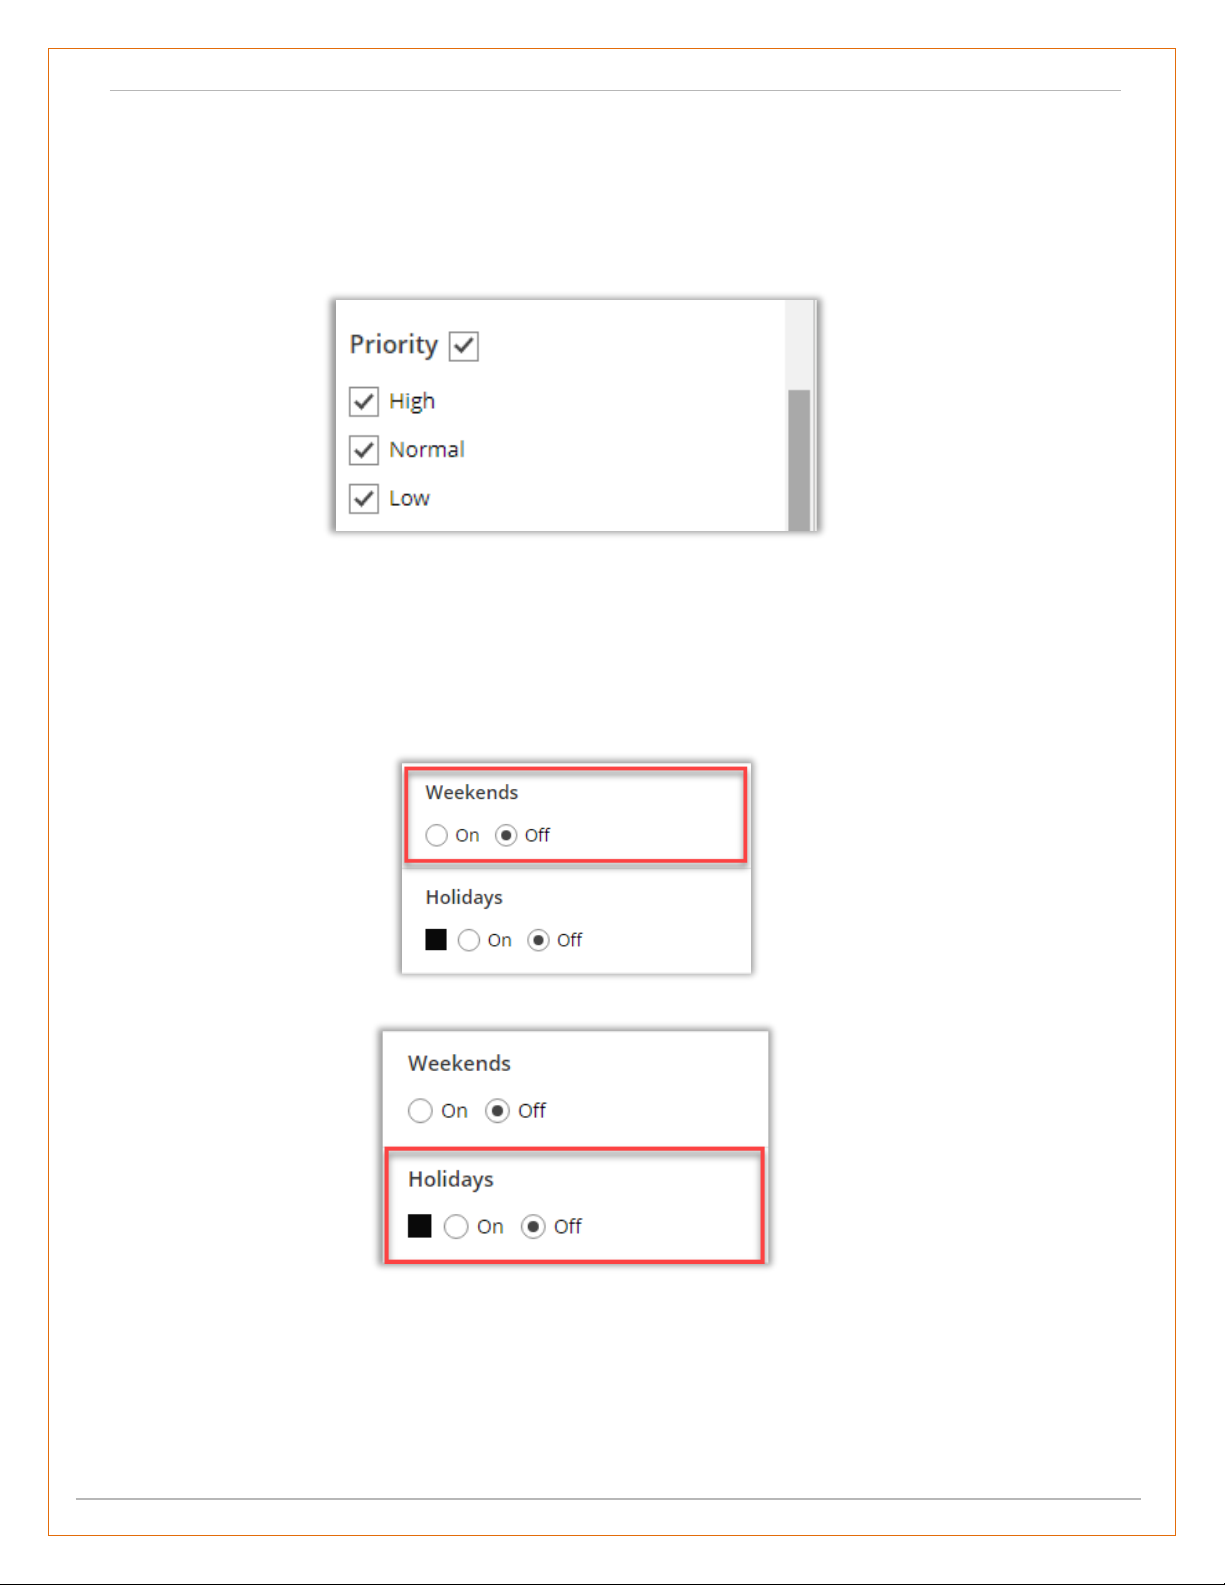
Priority
• Now to view the activities as per the priorities, navigate to ‘Priority’ section and check the
checkbox besides the priority.
• This would overwrite the actual color of the activity and display the activity in the color as per the
priority of the activity.
Weekends & Holidays
• To enable / disable weekends in the calendar navigate to the ‘Weekends’ section.
▪ To enable weekends select ‘On’ button.
▪ To disable weekends, select ‘Off’ button. The columns of ‘Saturday’ and ‘Sunday’ will
disappear.
• To enable holidays in the calendar, navigate to the ‘Holidays’ section and check the checkbox.
• By checking the checkbox besides ‘Holidays’ section, you can view all the holidays in the calendar
which is by default in black colored background.
Calendar 365- “Installation & Configuration”
BIZ/UMP/G1 Public 15
Note: Holidays will be displayed as per the country selected by the admin from the Calendar 365
Configurations.

Calendar 365- “Installation & Configuration”
BIZ/UMP/G1 Public 16
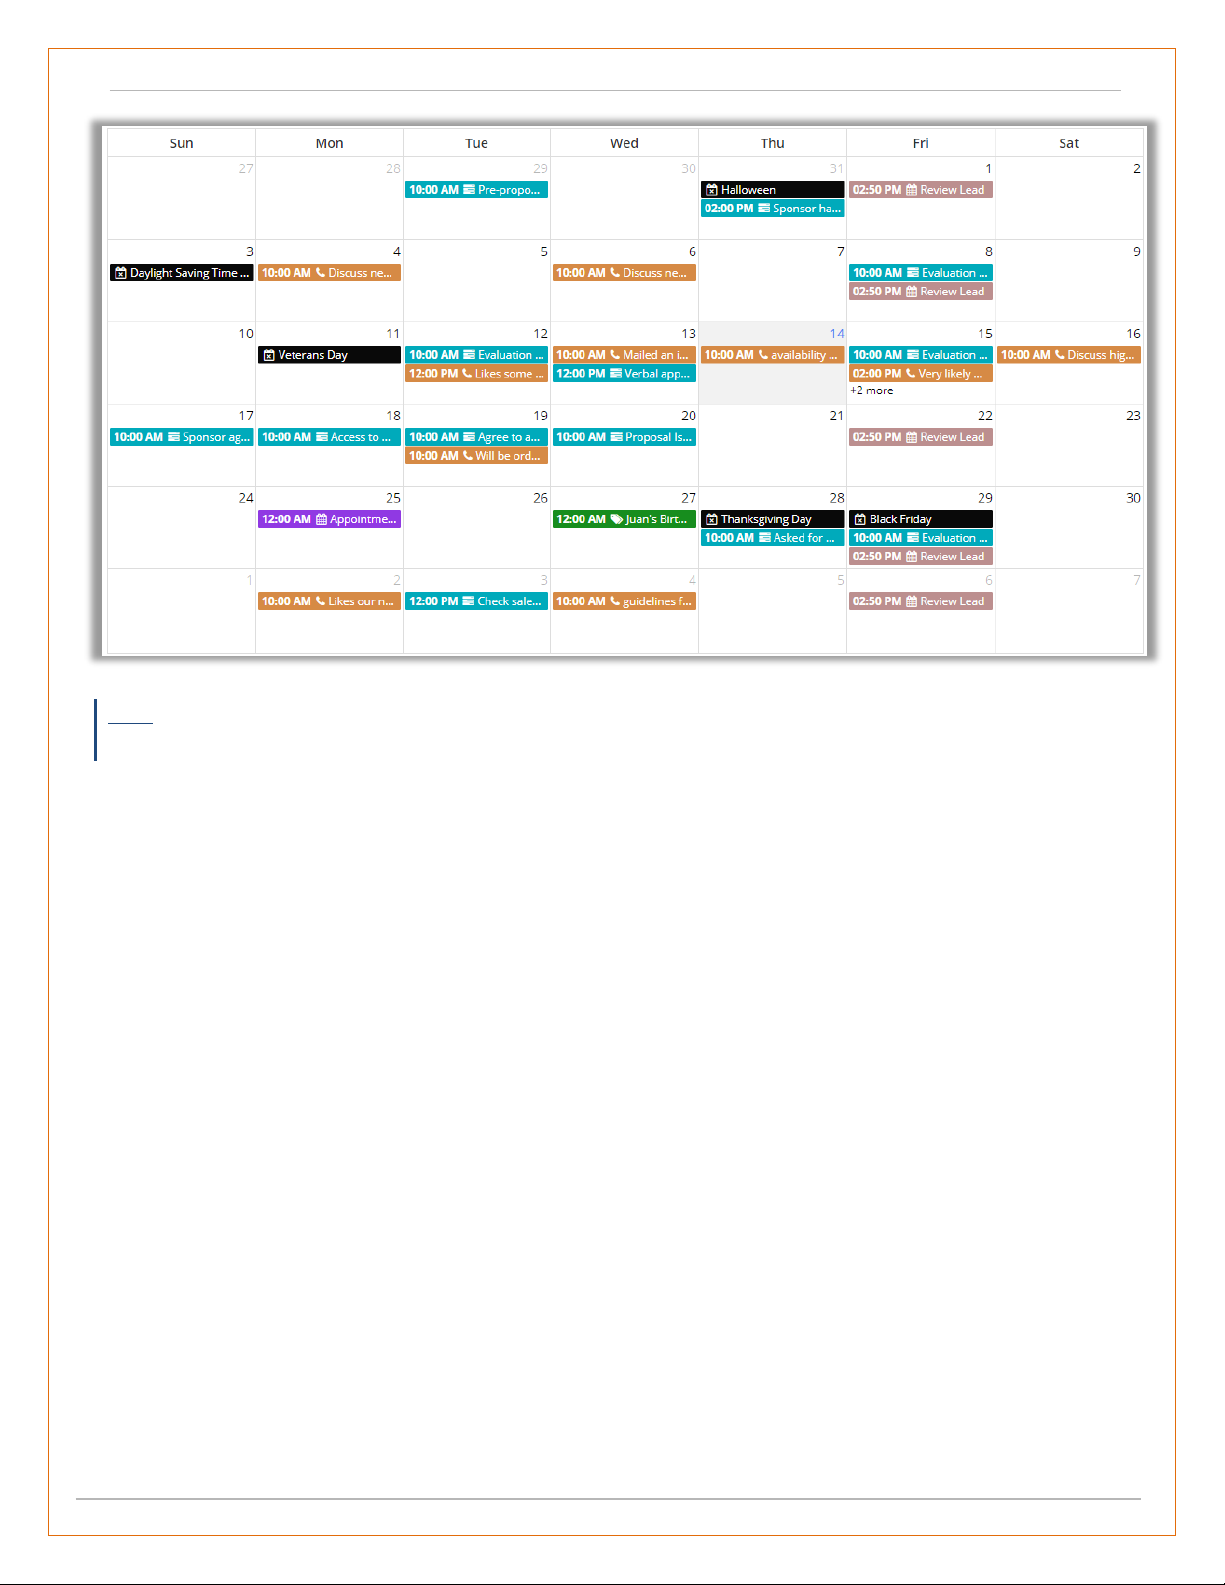
Upcoming Events
• To view a list of upcoming events, navigate to ‘Upcoming Events’ section, from here you can select
the type of view and view the upcoming events as per the ‘Day’, ‘Week’ or ‘Month’ format.
• Upcoming events will be displayed based on resource selected.
• Example: If account is the selected resource type, it displays upcoming activities related to the
accounts selected.
Refresh
• To fetch all the events or activities from the CRM, click on the ‘Refresh’ icon on the right-hand side
of the calendar.
Note: After changes in configuration, you must Refresh to view the applied changes.
Calendar 365- “Installation & Configuration”
BIZ/UMP/G1 Public 17
Save and Share Calendar Views
• You can also Save and Share any calendar view in Resource Calendar and Customer Calendar for
future reference.
• Left panel Settings like selected resources, selected calendar view as well as, activities, selected
status, priority, weekends and holidays get saved on saving view.
• You can save the calendar view on resource selection. If certain calendar settings are saved for
user resource type, that calendar view will not be available to accounts or contacts.
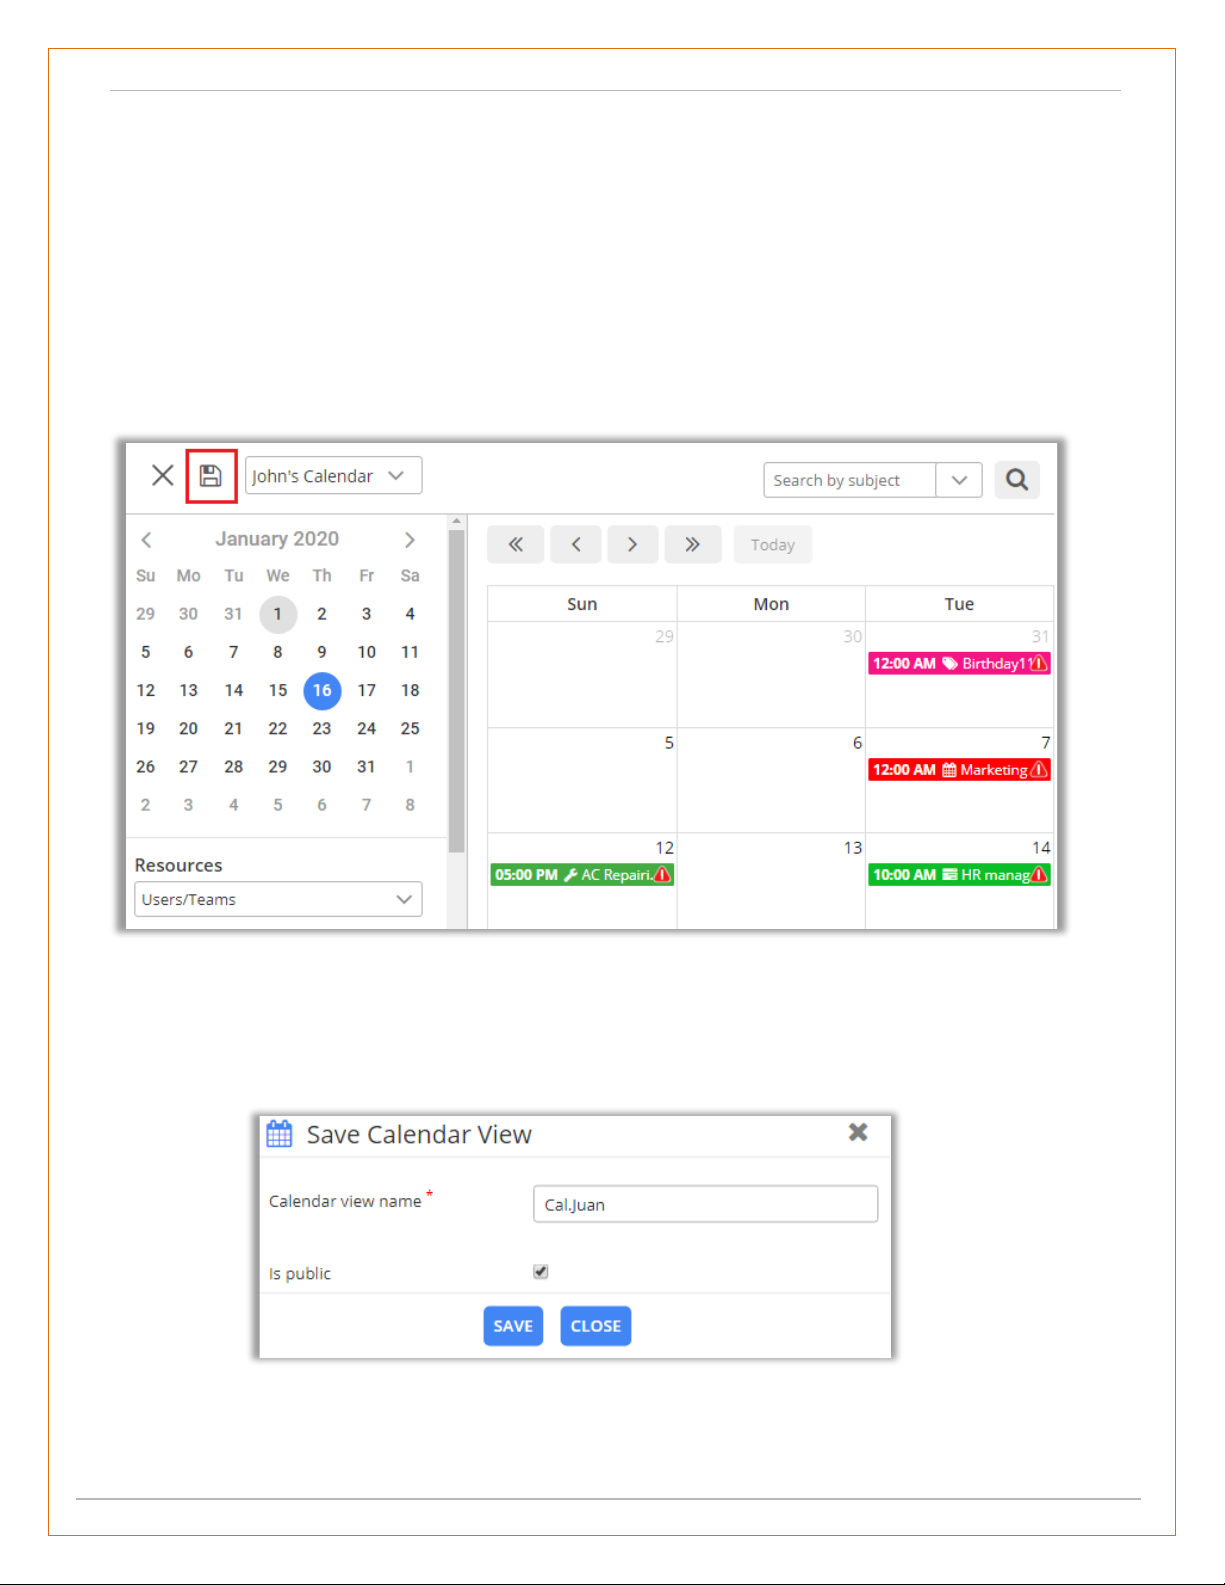
• To save a view, click on ‘Save’ icon available on the left side of the calendar.
• After you click on ‘Save’ icon, a dialog box opens, where you need to define the calendar view.
Along with naming, you can define if it’s public or private.
• By default, ‘Is Public’ check box is checked. If calendar is public, it is visible to all CRM users with
AppJetty Calendar role under shared calendars section.
• Click on ‘Save’ button to save the calendar view.
• On the header, the ‘Calendar View name’ will be appeared in left side.
Calendar 365- “Installation & Configuration”
BIZ/UMP/G1 Public 18
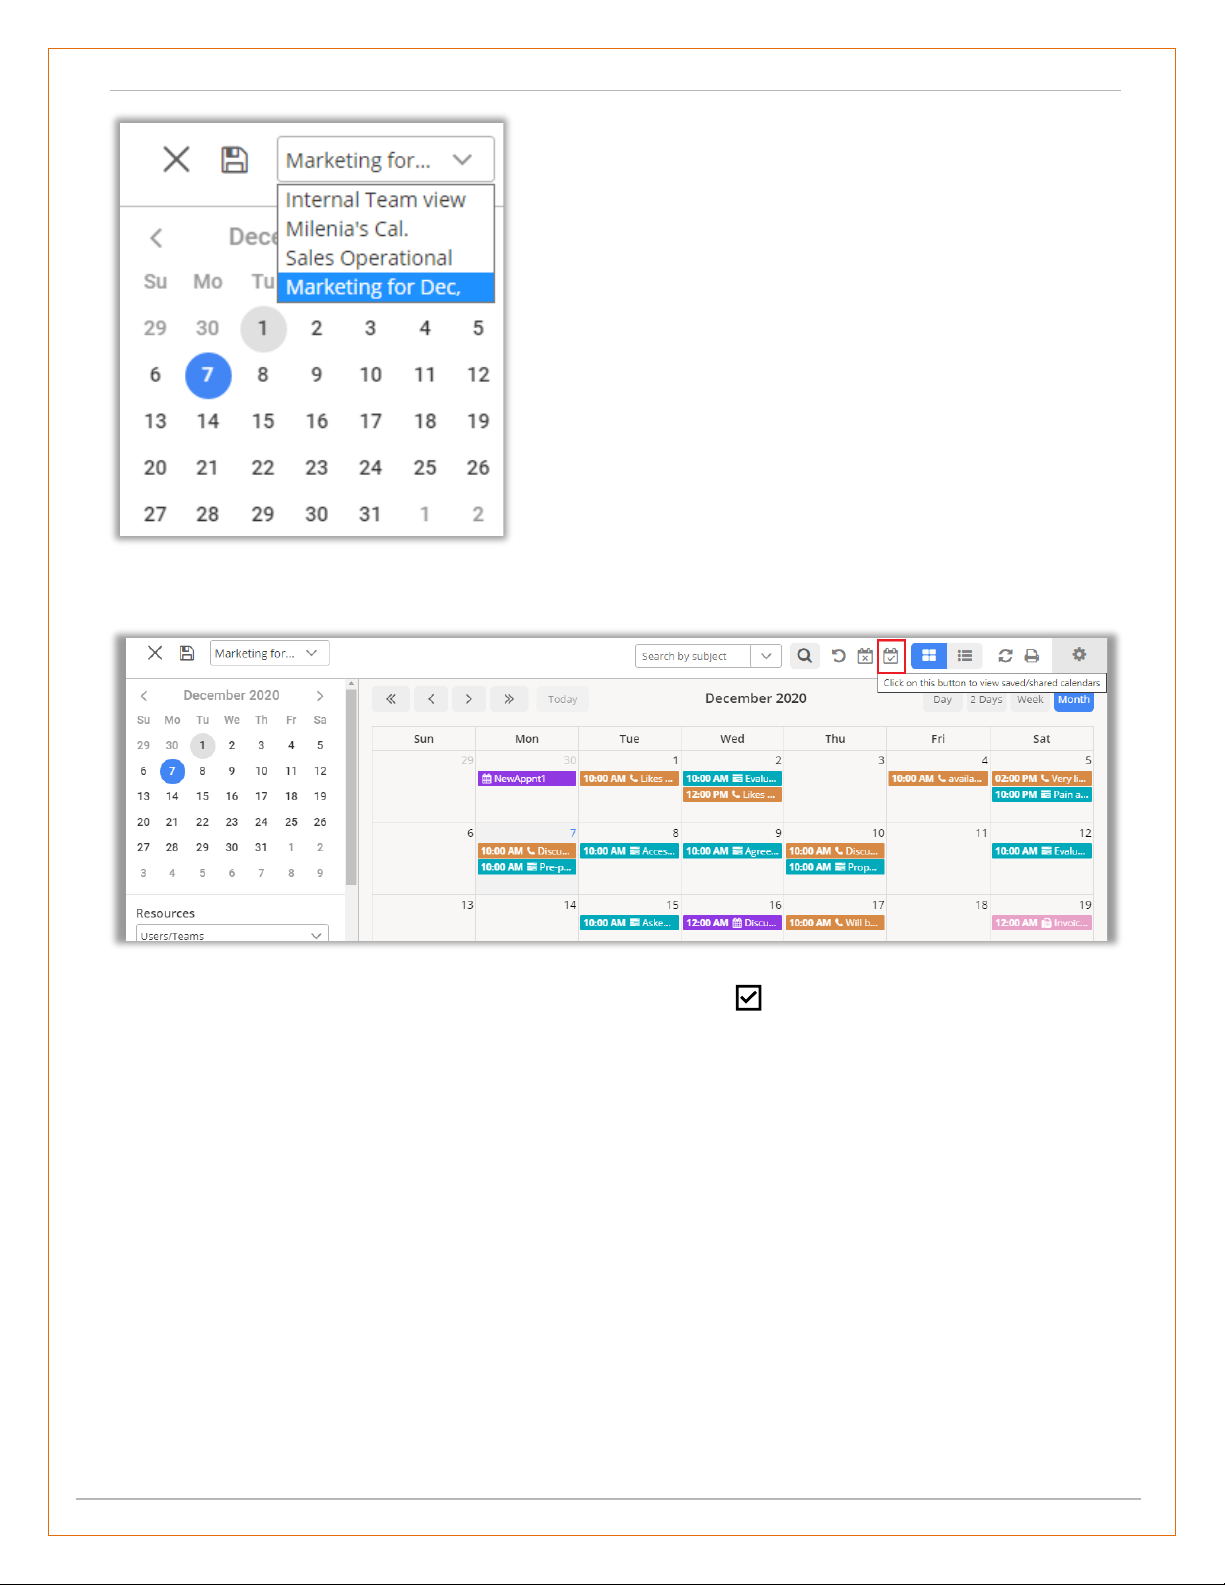
View Saved Calendar list
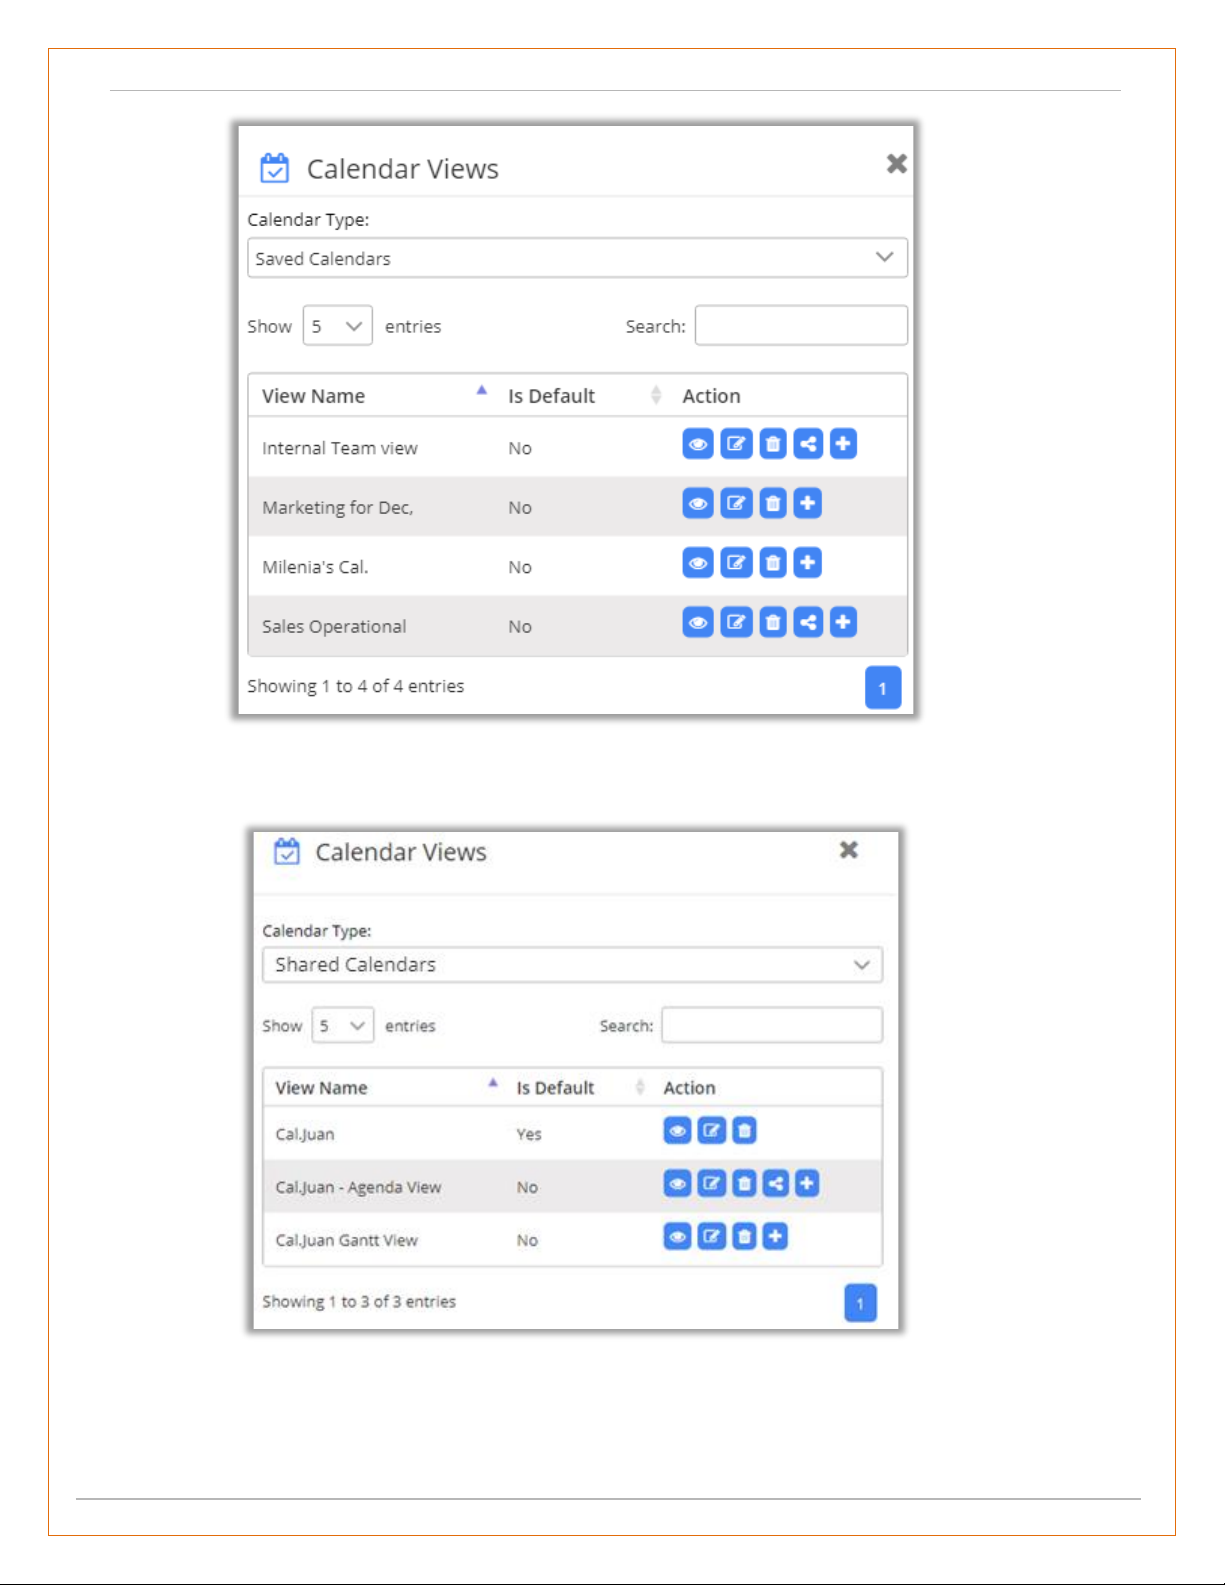
• Users can access saved calendar views by clicking on right icon that indicates the View
Calendars.
• After you click on that icon, a dialog box opens with dropdown named “Calendar Views” to check
and edit the Calendars from the list.
• Under the Calendar type, the user can check the ‘Saved Calendars’ and ‘Shared Calendars’ by other
users/teams.
• ‘Saved calendars’ are the one which you have created and saved while ‘shared calendars’ are the
one that are shared with you by other users or the calendars that are made public by other users.
• Based on Calendar Type selection, you get list of calendars.
• You can see the list of Saved Calendars from the drop-
down list of Calendar name.
• By click on any saved Calendar name, you can check that
Calendar view.
Calendar 365- “Installation & Configuration”
BIZ/UMP/G1 Public 19
• From the Saved Calendars list, you can see the View name with their actions. You can select a
default calendar by pressing + icon.
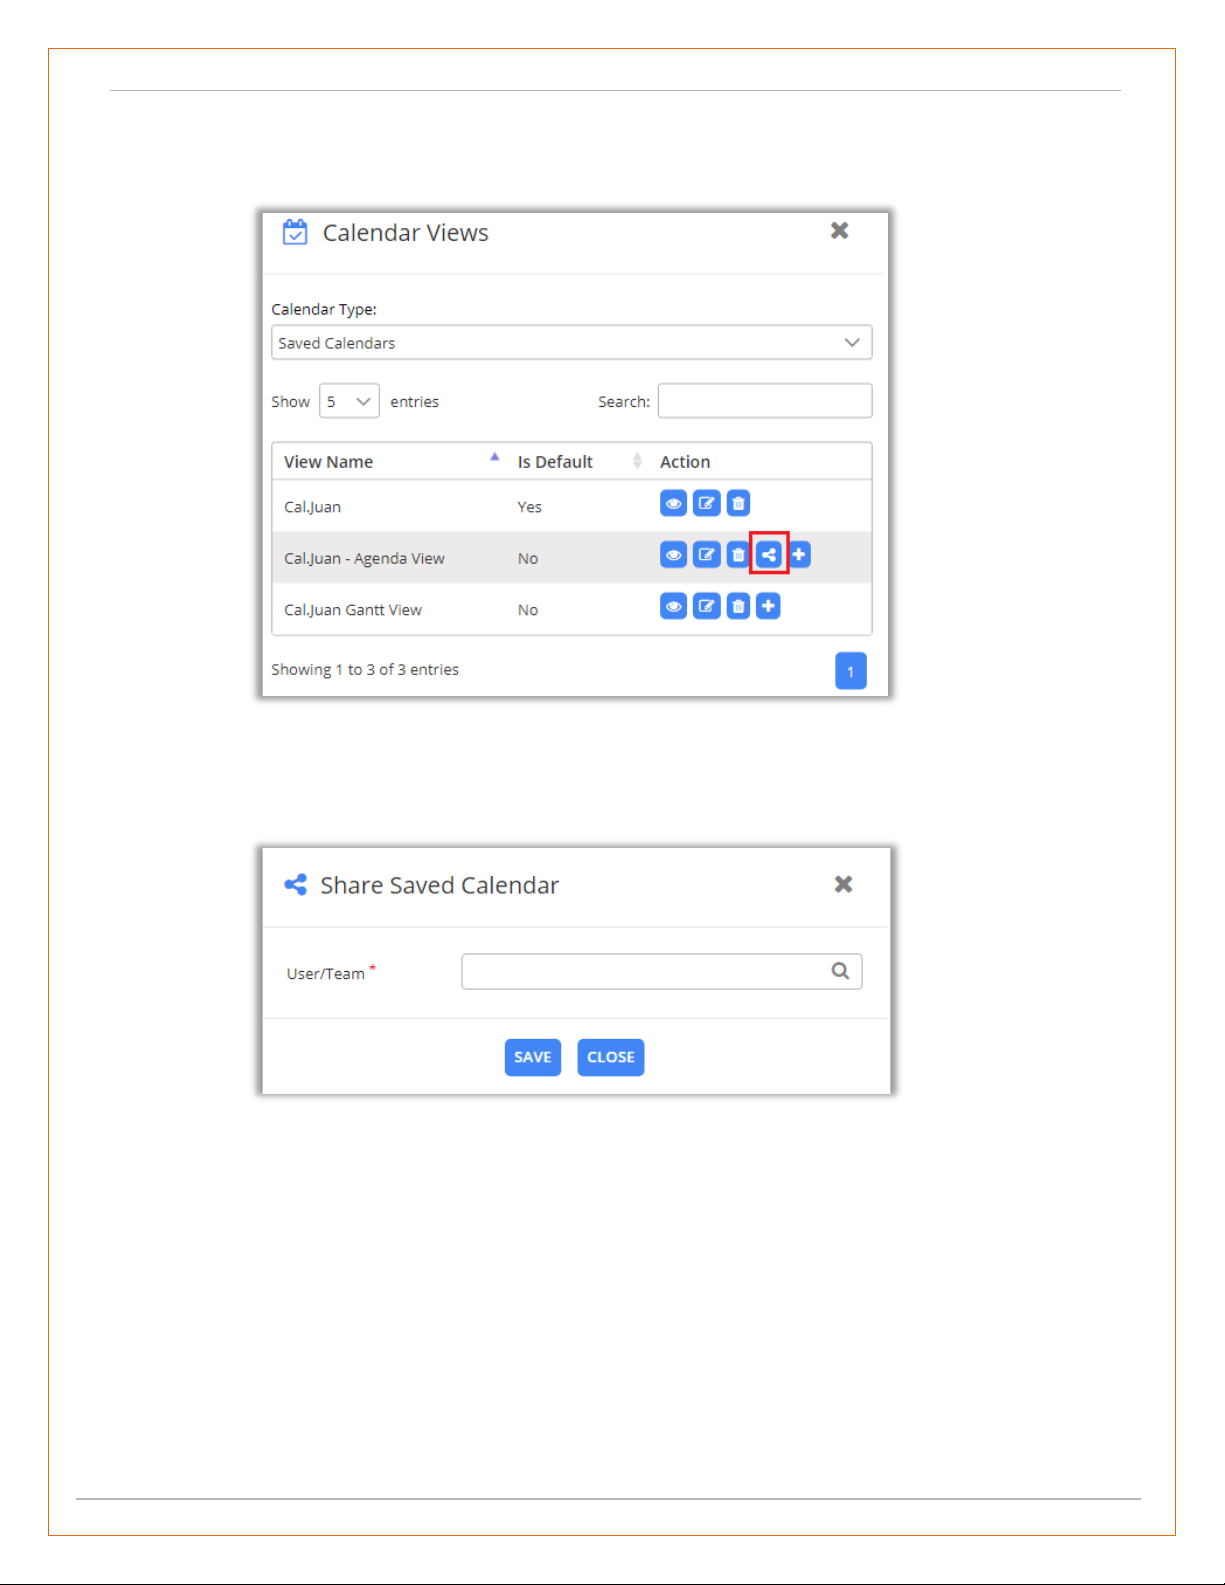
• For saved calendar and being the owner of that calendar, you can View, Edit, Delete and Share
calendar. ‘Share’ option is available only when calendar is private (should not select as ‘Is Public’).
• Also, different actions are available only when you are the owner of the calendar, else it just shows
the preview icon.
Calendar 365- “Installation & Configuration”
BIZ/UMP/G1 Public 20
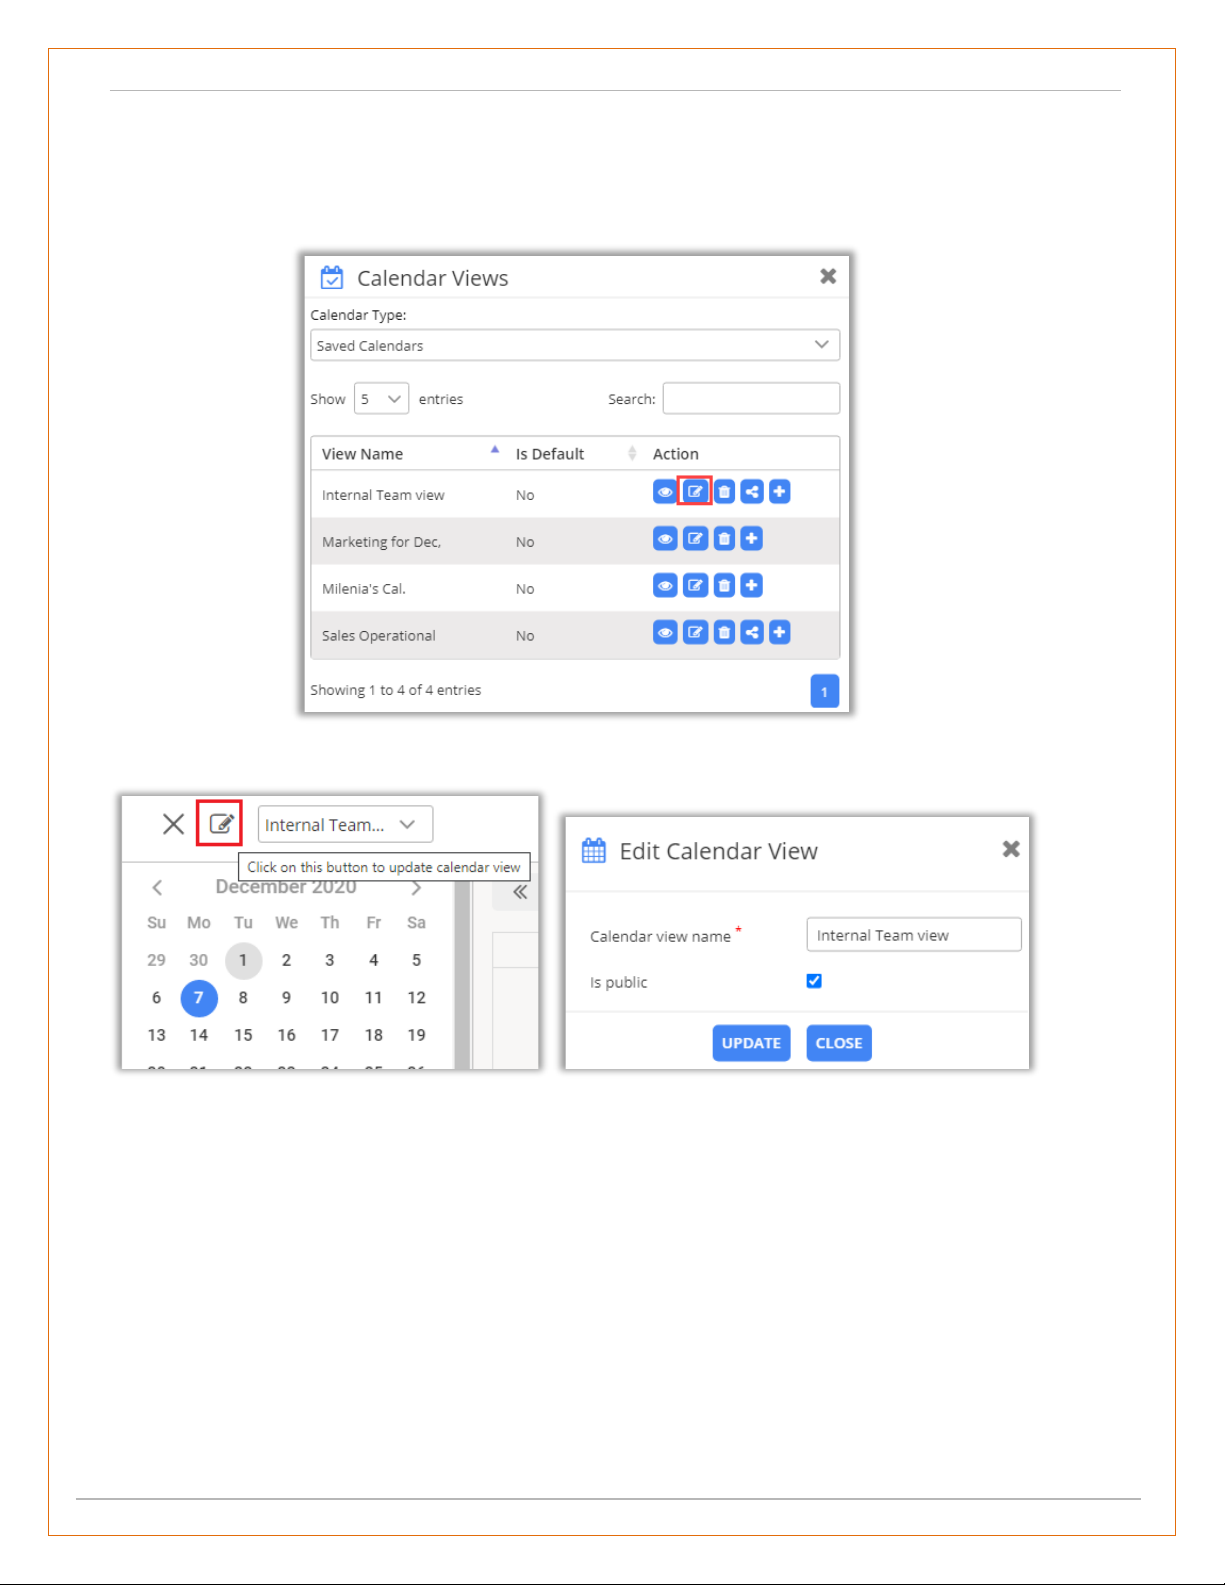
• Clicking on edit calendar, particular saved calendar opens so as to edit it as required and along
with that shows update calendar view icon to update calendar.
Edit & Update Calendar
• On clicking ‘edit’ icon, you get to update calendar name and select if calendar is public or private.
• Click on Update button to update the changes made in calendar.
Calendar 365- “Installation & Configuration”
BIZ/UMP/G1 Public 21
Share ‘Saved Calendar’ Views
• Clicking on shared icon, you can share Calendar with other CRM users or team.
• Clicking on ‘Share’ icon, opens dialog box to select user or team from the look up records box.
After selecting user, click on Save button to complete the calendar sharing. You can select
multiple users and teams to share calendar with.
Calendar 365- “Installation & Configuration”
BIZ/UMP/G1 Public 22
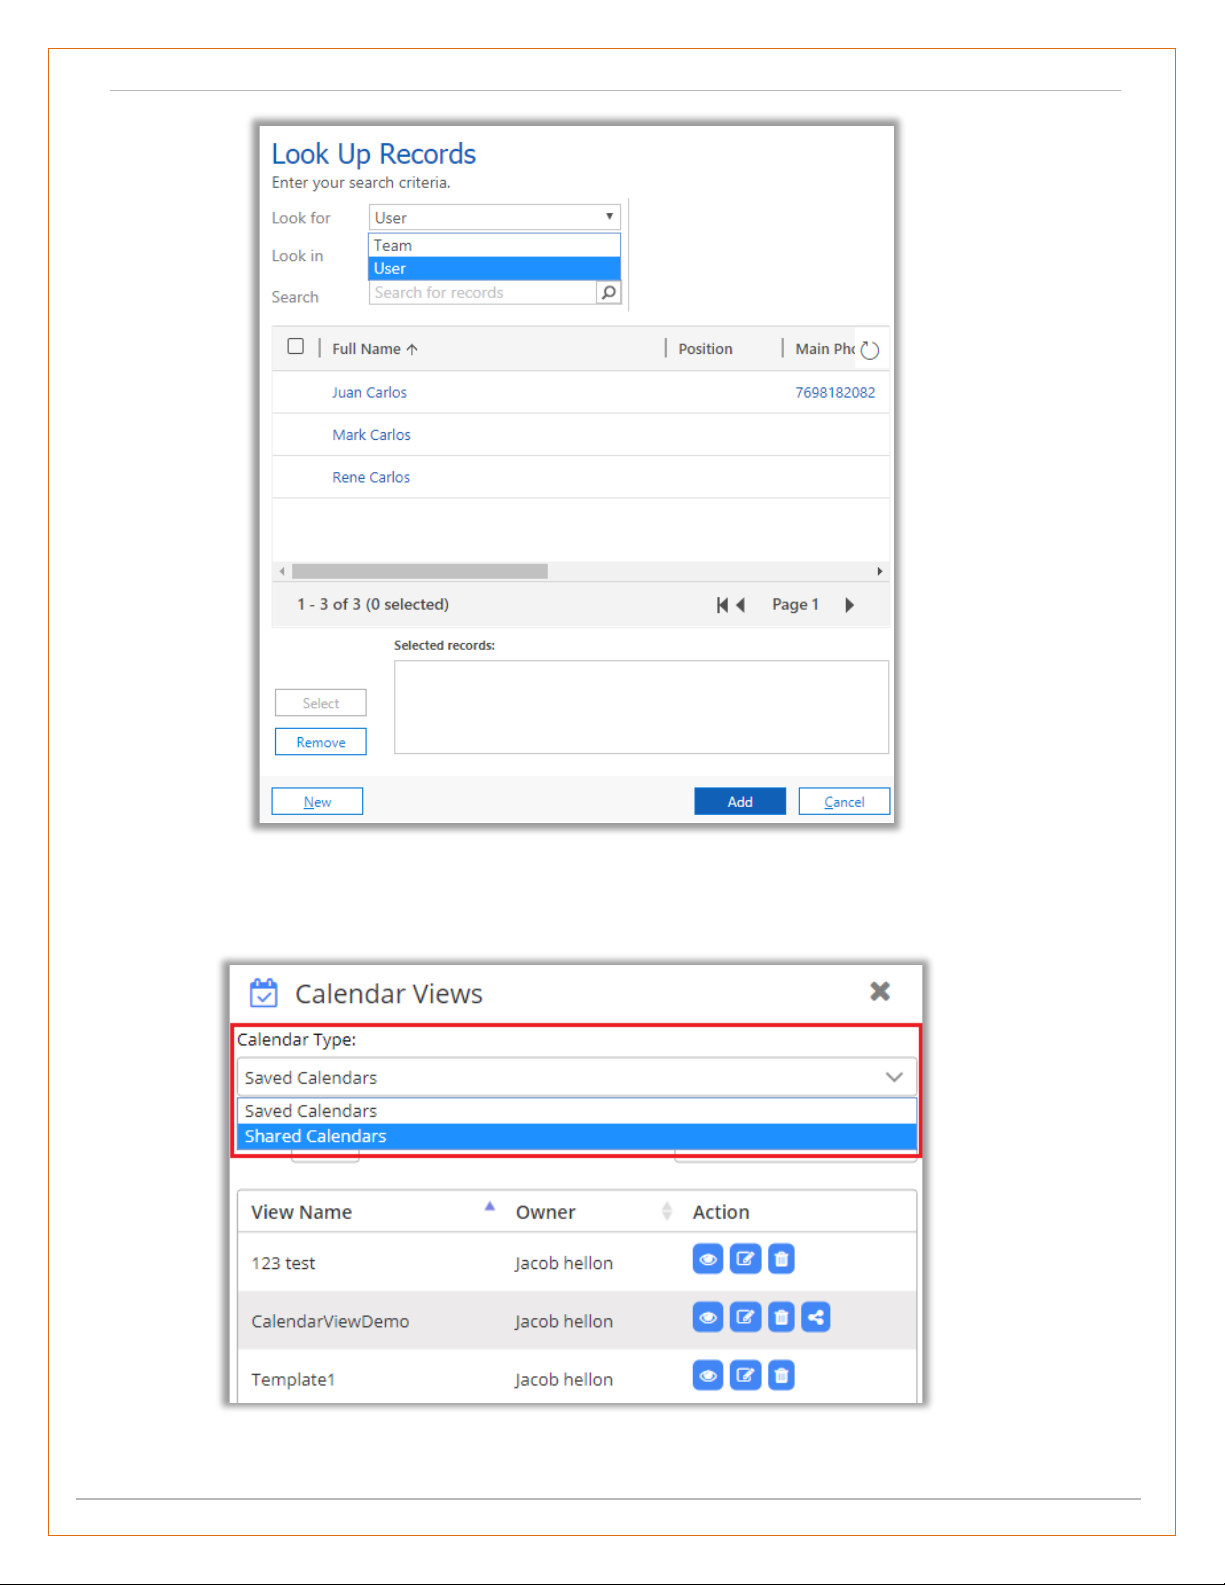
• You can select the Users/team with whom you want to share the Saved Calendar view.
• A Calendar view shared by others can be seen by selecting ‘Shared Calendars’ option.
• When saved calendar is previewed, it enables a button to go back to the current view (previous
view).
Calendar 365- “Installation & Configuration”
BIZ/UMP/G1 Public 23
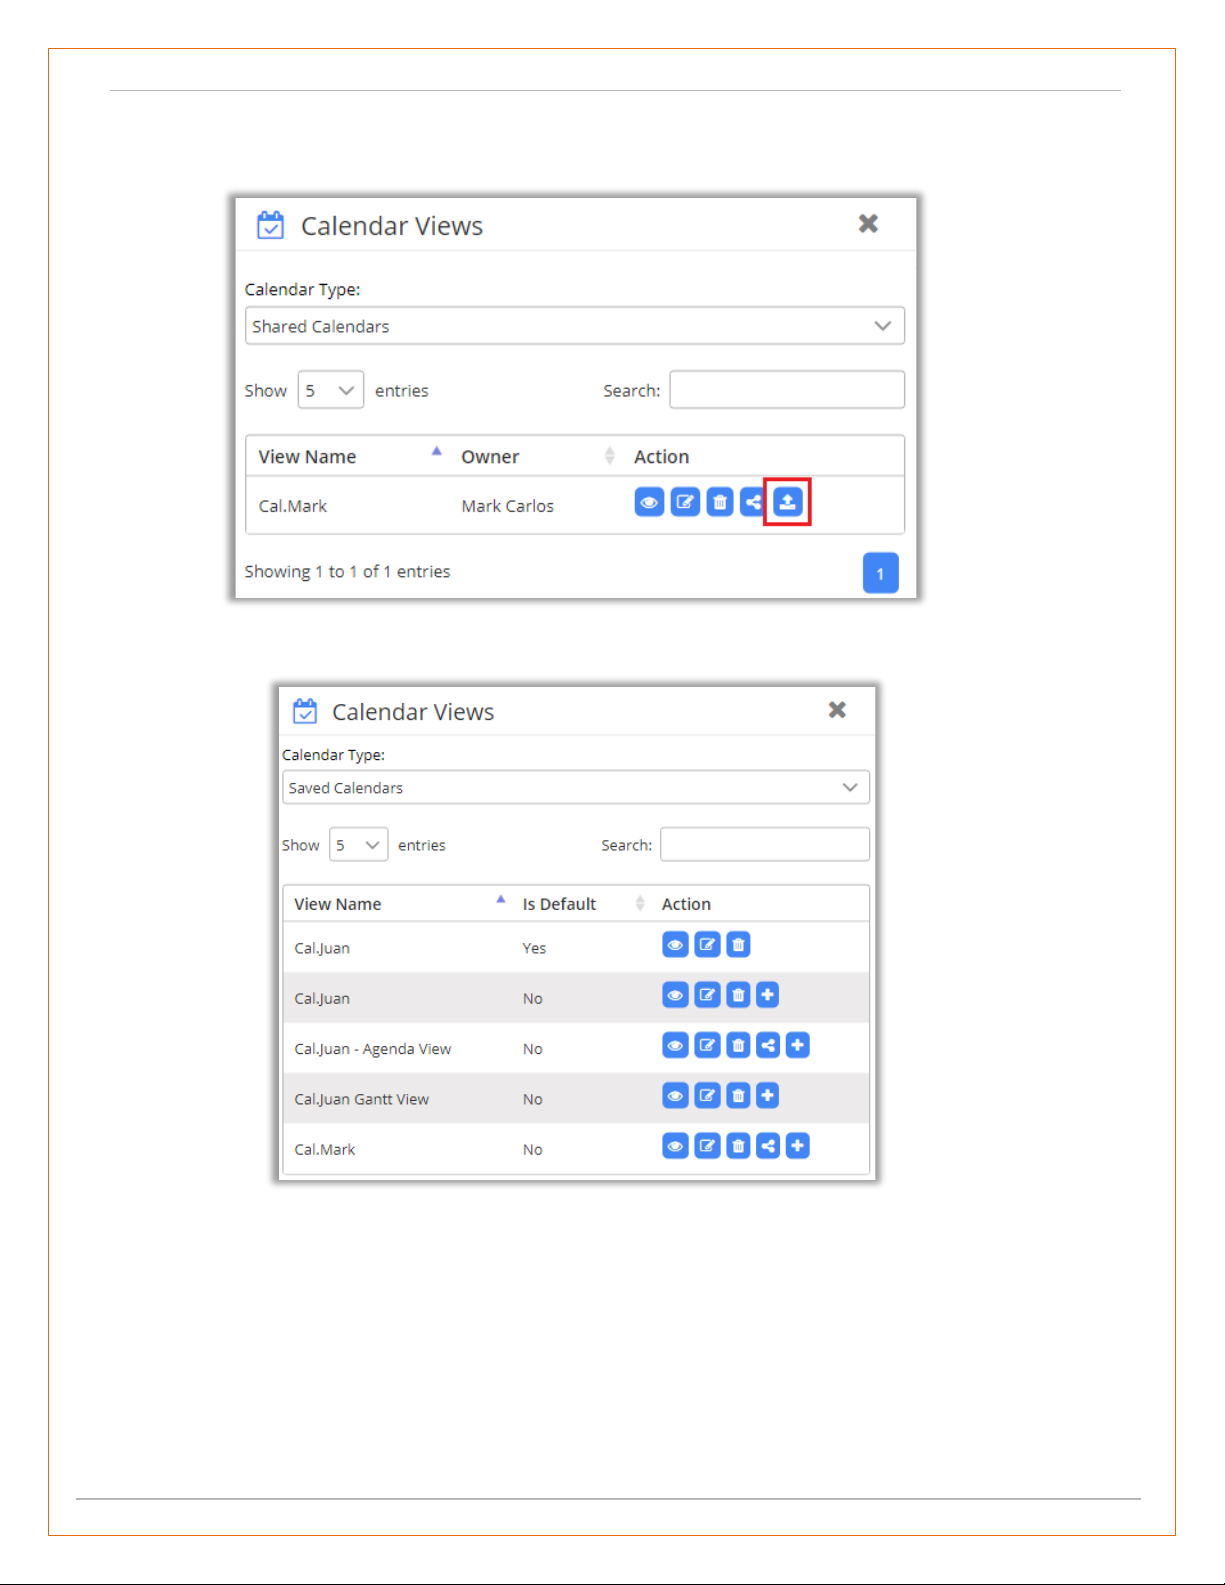
Move Shared Calendar to Saved Calendar
• You can move the ‘shared calendar’ to the ‘Saved Calendars’ list by clicking on ‘Move’ icon.
• Now you can see a shared calendar in Saved Calendars list. You can make it default if you want.
Calendar 365- “Installation & Configuration”
BIZ/UMP/G1 Public 24
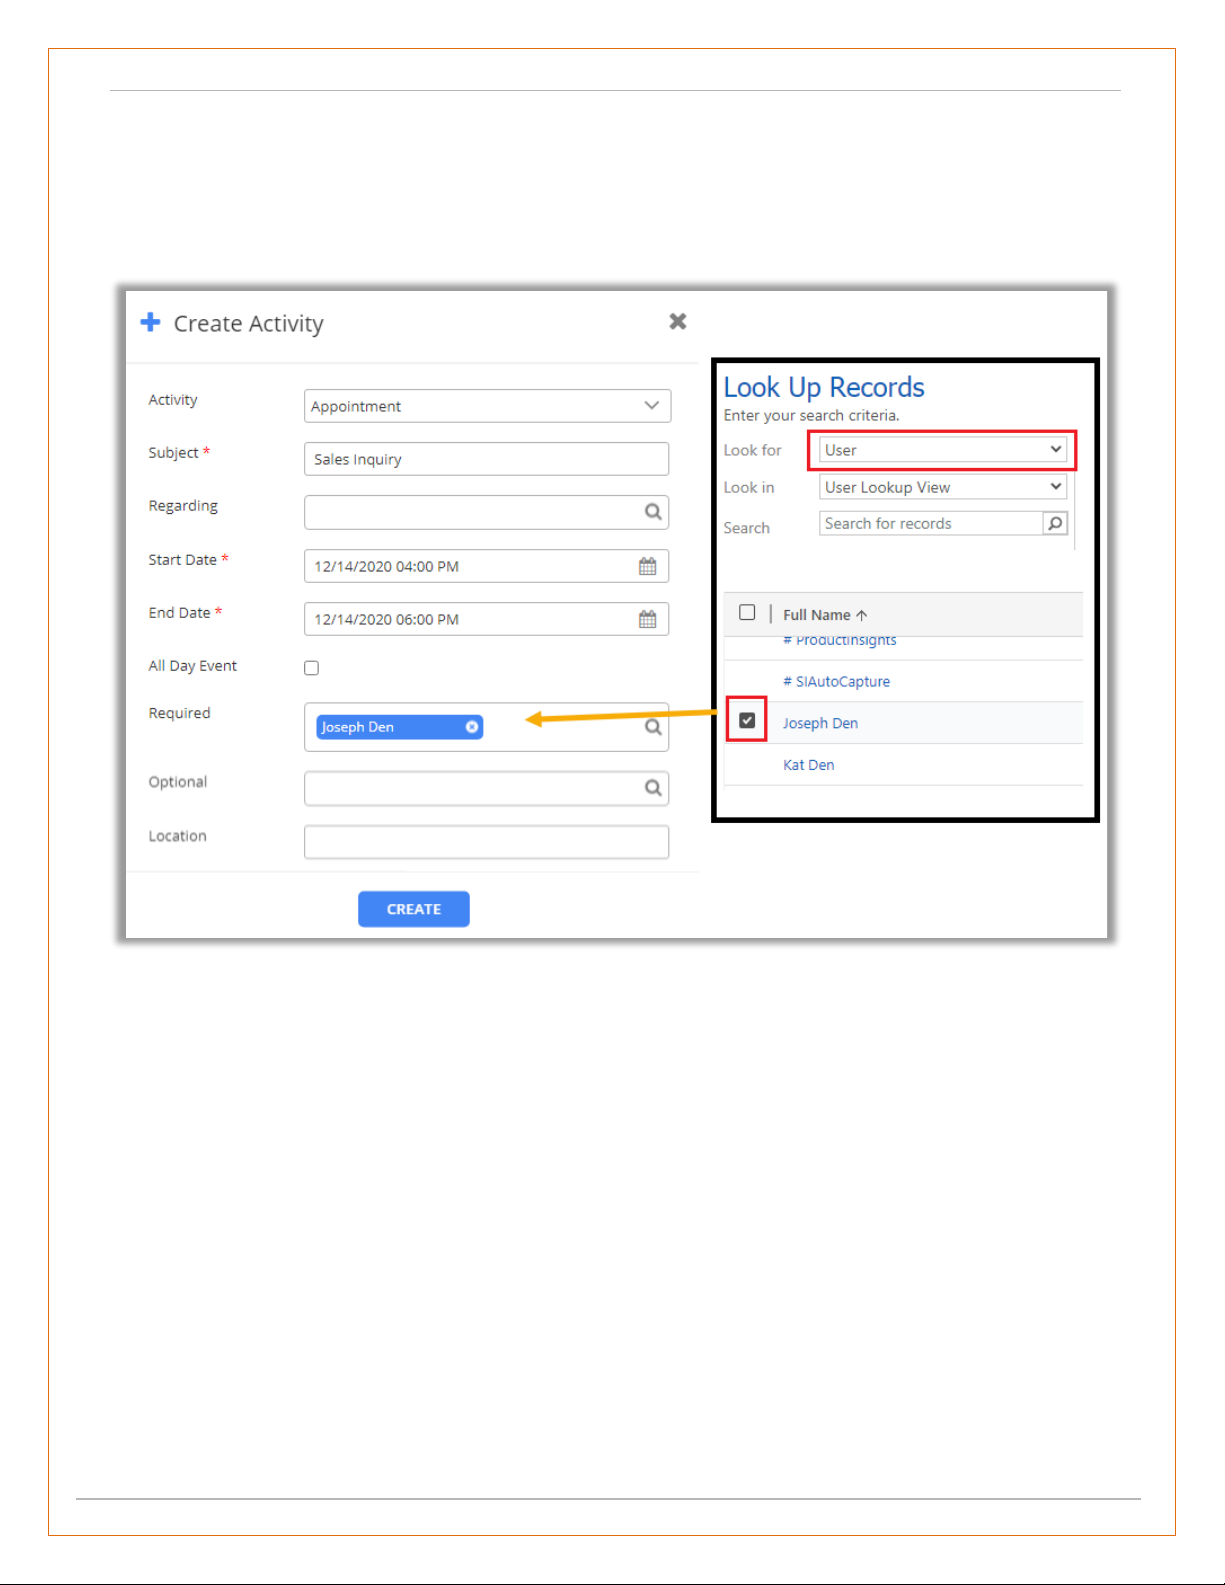
Share Appointment Activity
• You can also share the appointment with other users (team members) at the same time when
you are creating an Appointment activity.
• For that, you need to select that “User” from the Look Up Records in the Required field.
• Once the appointment is created, the other user will also get the appointment in his/her
calendar.

Calendar 365- “Installation & Configuration”
BIZ/UMP/G1 Public 25
Activity Grid View of Calendar
• To get list view of all activities, navigate to ‘list’ button on the calendar and along with that select
time span from Day, Month or Year from the dropdown.
• By clicking on ‘List’ icon, the list of events will be displayed Day wise by default. You can change to
Week or Month.
• List view works based on small calendar available on left side of the calendar view. You will get the
list of events based on day/date selected in the smaller left side calendar.
• For Day span, it shows list of events that fall under the days that are selected.
• For Week time span, it shows list of events that fall under the week in which the selected day is
part of.
• For Month time span, it displays events of months to which the selected day is part of.

Calendar 365- “Installation & Configuration”
BIZ/UMP/G1 Public 26
• From list view, you can perform multiple actions like:
o Exporting records to CSV, Excel, PDF
o Copying records,
o Printing records and Set Regarding for the selected records.
Set Regarding under Grid View
• To set regarding for the records, select the records and click on Set Regarding button.
• This opens set regarding record dialog box to select record from the look up dialog box.
• After selecting click on ‘Save’ button to set regarding for the record. As you click on Save button,
the popup message will be appeared to set regarding,

Calendar 365- “Installation & Configuration”
BIZ/UMP/G1 Public 27
Resource Scheduler (Manage Working Hours)
• In the Calendar365, you can enable the “Resource Scheduler” from the settings and you can
schedule the activity based on the added working hours.
• If the “Default (User Working Hours)” option is selected, User only can view the working hours on
the AppJetty Calendar view based on the default CRM user option.
• But if the “AppJetty Scheduler” option is selected, User can add the working hours from AppJetty
Calendar and schedule the activity based on the Working Hours. You can also manage the working
hours, break timings and the leave in Calendar365.
Set the Working hours for default CRM users:
• To set and edit the working hours in CRM, navigate to Advanced Settings → Security → Users
→ Select user for which you want to set working hours.
• By clicking on Work Hours, the default calendar of CRM will display with the records of the selected
user if already inserted.
• Besides the Username click
on the down arrow and
select Working hours.

Calendar 365- “Installation & Configuration”
BIZ/UMP/G1 Public 28
• Now, by clicking on Set Up option, you can schedule the work on weekly basis or for one day by
selecting the date.
• Similarly, you can schedule the work for weekly basis by selecting the working days.
• You can select the Start & End
Time including Break.
• Later, you can also edit and
delete the scheduled work
hours.

Calendar 365- “Installation & Configuration”
BIZ/UMP/G1 Public 29
• If you have selected the Default (User working hours) in “Resource Scheduling” option, you will get
the working hours on the AppJetty Calendar which is set in CRM default calendar.
Note: You can only view the Working hours which is set in CRM default calendar of the user.

Calendar 365- “Installation & Configuration”
BIZ/UMP/G1 Public 30
Add the Working hours in AppJetty Calendar:
• By selecting the Resource Scheduler, the Calendar with work scheduled records will display if already
inserted.
• By clicking on the date & time for scheduling work, the Create Activity popup will appear to select
the details related to schedule.
• If you have selected the AppJetty Calendar in
“Resource Scheduling” option, you can add the
working hours on the AppJetty Calendar.
• First, you need to select the
Resource Scheduler in the “Views”
option from the right panel.

Calendar 365- “Installation & Configuration”
BIZ/UMP/G1 Public 31
• Now, you can see the inserted Work Schedule for selected resource.
• From here you can select the
Activity:
Marks as Available: Time slot for
working hours.
Mark as Break: Time slot for break
timings.
Mark as Leave: To create a leave.
• Select Recurring Type for
scheduling work for One Day or
Weekly/Monthly basis (recurring).
• Select the Starting & Ending Date
& Time. Click on Create button to
add the work schedule.
• As you clicked on Resource Scheduler, the
default color of Availability will show.
• You can differentiate the Working availability;
Break timing & Leave by the colors.

Calendar 365- “Installation & Configuration”
BIZ/UMP/G1 Public 32
• Now by clicking on Working hours (Available), you can insert the activity for that work schedule slot.
• From here, you can again edit the Slot by clicking on Update Slot button if require.
• In this way, you can schedule the work for the resources(users) based on their availability.

Calendar 365- “Installation & Configuration”
BIZ/UMP/G1 Public 33
Multi-language Calendar Labels
• You can see the default CRM labels and Calendar365 captions in different languages based on the
language settings in Personalization Settings from the CRM side and in the Settings from the
Calendar365 side.
Note: To display the labels & caption in the same language, you must select the same language on the
CRM side and Calendar365.

Calendar 365- “Installation & Configuration”
BIZ/UMP/G1 Public 34
Dynamic Date formats
• You can manage the formats for Date from the Personalization Settings of the CRM.

Calendar 365- “Installation & Configuration”
BIZ/UMP/G1 Public 35
Calendar Activities
➢ Calendar Activities: You can Create, Edit, View, Copy & Share an activity.
o Create an Activity
▪ All Day event for Appointment activity
o Create a Custom Activity
o Location
o Attachment for Activity
o View Activity
▪ View Note
▪ Edit Activity
▪ Copy Activity
▪ Share Activity
▪ Re-assigning Activity
▪ View Activity
▪ Delete Activity
o Search Activity
o Recurring Appointment
o Share Activity
o Overdue Activity
o Conflict Management
o Unscheduled Activity
o Print Calendar

Calendar 365- “Installation & Configuration”
BIZ/UMP/G1 Public 36
Create an Activity
• To create activities, click on the date on the calendar that you want to add the Activity to.
• As you click on the Date, ‘Create Activity’ popup will be appeared on your screen:

Calendar 365- “Installation & Configuration”
BIZ/UMP/G1 Public 37
▪ Activity: Select the type of activity you want to create.
▪ Subject: Enter the subject of the activity.
▪ Regarding: Mention the Account, Contact, or any other record with which activity is
concerned.
▪ Clicking on Search icon in the ‘Regarding’ text area, “Lookup Record” dialog opens from
where user can select the record for activity.

Calendar 365- “Installation & Configuration”
BIZ/UMP/G1 Public 38
▪ Select any Account, Contact or any other record which is required in Activity. After
selecting from the list, click on Add button. The selected record will be displayed on
‘Regarding’ text filed.
▪ Selected record can be seen in Regarding edit box.

Calendar 365- “Installation & Configuration”
BIZ/UMP/G1 Public 39
▪ Start Time: Set the Start Date and Time of the activity.
▪ End Time: Set the End Date and Time of the activity.
▪ Priority: Set the priority of the activity. Priority can be High, Normal, or Low.
▪ Description: Enter the description of the activity.
▪ Owner: Displays name of the owner who created the activity.
• After pressing Create button, if there is no error, a confirmation message will be highlighted on
your screen.

Calendar 365- “Installation & Configuration”
BIZ/UMP/G1 Public 40
• Now you can view the added activity in your calendar.

Calendar 365- “Installation & Configuration”
BIZ/UMP/G1 Public 41
All day event for Appointment
• If the user is adding the “Appointment” activity, they will get an option to enable the All Day Event
for displaying the appointment activity whole day.
• Every “all day” appointment will be seen in the top of day/week/ day view in the All day slot.
• ‘Tick’ the checkbox of the All Day
Event when you are adding the
“Appointment” activity to set the
appointment activity for all day.

Calendar 365- “Installation & Configuration”
BIZ/UMP/G1 Public 42
Create a Custom Activity
• Click on ‘Custom Activity’ tab under ‘Activities’ section.
• Now click on ‘New’ button to create a custom activity.
`
• You can ‘Edit’ and ‘Delete’ the Custom activities you have created.
• To create a Custom Activity, click on ‘Configuration’ icon.
• Thereafter, following fields will appear
under ‘Custom Activity’ tab:
• Select required ‘custom’ activity from the
drop-down list of Entity.
• Read Only: If you tick the checkbox ‘Read
Only’, no one will be able to edit the
custom activity except for admin.
• As you click on Save button, you will get a
popup message of activity successfully
added.

Calendar 365- “Installation & Configuration”
BIZ/UMP/G1 Public 43
• If the custom activity is not selected as Read Only, any of the users can edit and perform the action
for custom activity.
• If the custom activity is selected as Read Only, the users cannot edit and perform any action for
the custom activity.

Calendar 365- “Installation & Configuration”
BIZ/UMP/G1 Public 44
Location selection
• If location suggestions are active from the ‘Configurations’ page, you even get location suggestions
based on keyword entered under location option.
Note: Location option is enabled only for ‘Appointment’, ‘Recurring Appointment’ and ‘Service Activity’.
Attachment for Activity
• Attachments facility is given only for the Email, Appointment and Custom Activities.
• To add an attachment for the activity, you will find Attachment option. By clicking on + icon, Add
Attachment popup will appear.

Calendar 365- “Installation & Configuration”
BIZ/UMP/G1 Public 45
• Now choose the file to be attached as attachment and click on ‘Attach’ button.
• On clicking Attach button, attachment will be shown in “Create Activity” dialog box along with
delete icon. Clicking on ‘Delete’ icon will remove that activity.
• Thereafter click on Create button to complete activity creation with attachment.
• ‘Attachment’ icon will be displayed on the activities in the calendar for which the attachments
were added.

Calendar 365- “Installation & Configuration”
BIZ/UMP/G1 Public 46
View & Manage Activity
• To view detail of any activity, simply click on activity.
• Clicking on the activity, the detail dialog box contains all those fields and actions buttons that are
enabled from the ‘Configurations’ page will appear.
• User can perform multiple actions such as:
• From this Activity Detail dialog box, you can perform resultant action for the activity.
• You can perform actions:
o Convert to opportunity
o Convert to case
o Convert to lead’ (Only for email activity)
o For ending the activity, you can perform action like Mark as complete, Close campaign
activity (Only for campaign activity), End series (Only for recurring appointment).
➢ View Note
➢ Edit the activity
➢ Copy activity
➢ Share an activity to other user via
email
➢ Re-assign activity to another user
or team
➢ View activity in CRM
➢ Delete the activity.

Calendar 365- “Installation & Configuration”
BIZ/UMP/G1 Public 47
View Note
• Click on ‘Note’ icon to view and add any notes.
• By clicking on ‘Notes’ icon, you can check the details of added notes for this activity.
• You can attach the file if required.
Note: All the CRM users can check and add notes.

Calendar 365- “Installation & Configuration”
BIZ/UMP/G1 Public 48
Edit Activity
• Click on ‘Edit’ icon to edit any created activity.
• On clicking edit icon, it opens activity details in edit view.
• Update or change the details and then click on Update button to save changes to the activity.

Calendar 365- “Installation & Configuration”
BIZ/UMP/G1 Public 49
Copy Activity
• Click on copy activity icon, to copy activity details. Clicking on copy icon you can edit all the details
if required.
• Click on Create button to complete the activity creation. If you don’t edit and save it as it is, it would
create a duplicate of the activity.

Calendar 365- “Installation & Configuration”
BIZ/UMP/G1 Public 50
Share Activity
• If activity is to be shared to other users via email, click on share icon available in the activity detail
pop up.
• Clicking on icon, it redirects to CRM page to email the activity details.

Calendar 365- “Installation & Configuration”
BIZ/UMP/G1 Public 51
Re-assigning Activity
• To reassign activity, click on activity. It opens a dialog box. Click on ‘ ’icon.
• Select the user or team from look up records box to which the activity is to be reassigned.
Note: To reassign any activity to any user or team, they should have roles defined or else it will prompt
error message.

Calendar 365- “Installation & Configuration”
BIZ/UMP/G1 Public 52
View Activity
• Clicking on ‘View’ icon, the activity record will be shown on CRM page with all the details.
Delete Activity
• Clicking on ‘Delete’ icon, the activity can be deleted from the Calendar page permanently.
• Clicking on Delete icon, a warning pop up message will appear to confirm the action.

Calendar 365- “Installation & Configuration”
BIZ/UMP/G1 Public 53
Search Activity
• You can search any activity by three options: Subject, Regarding and Description that are inserted
in the activities.
• Select any search option among three and click on search icon and it will show all activities with
that keyword in the search text box.
• It will display only those activities that full fill search criteria based on selection of Search options.
Recurring Appointment
• To create recurring appointment, select activity
type as ‘Recurring Appointment’.
• After Inserting all the required details. Click on
Set Recurrence button to set recurring details.
• By clicking on ‘Set Recurrence’ button, the pop-
up named Set Recurrence will appear.

Calendar 365- “Installation & Configuration”
BIZ/UMP/G1 Public 54
• Insert the details as below:
o Appointment Time: Select Start/End Time
o Recurrence Pattern: Daily/Weekly/Monthly/Yearly
▪ Daily: Select day intervals or select weekdays.
▪ Weekly: Insert week(s) on selecting Days.
▪ Monthly: Insert Date of every month or select interval of days/week/weekends.
▪ Yearly: Select Month with a date or select interval of days/weeks/weekends by selecting a
month.
o Range of Recurrence:
▪ Start Range: Select starting date
▪ End Rage: Insert the ‘number of occurrences’ when it will end or ‘End by’ selecting a
particular ‘date’ or selecting ‘No End Date’ if the ending date is not defined.
• After inserting and selecting all the details, click on Set button to save recurrence and then click
on Create button to complete the recurring appointment creation.

Calendar 365- “Installation & Configuration”
BIZ/UMP/G1 Public 55
• Now you can see the recurring activities in the calendar as per Set Recurrence details.
Share Activity
• You can share the activities in which the multiple resources are involved.
• While creating the activities in which
multiple resources are selected, the
activity will automatically be assigned
to the resources and those activities
will be displayed in their calendar as
well.
• In appointment activity, one needs to
mention required and optional users
while in case of other activities it
appears as from and to.
Note: For activity to be visible in multiple
calendars, users should be selected in the
look up record option.
All the activities can be shared with
multiple resources except ‘Task’ Activity.

Calendar 365- “Installation & Configuration”
BIZ/UMP/G1 Public 56
Overdue Activities
• You can configure ‘Overdue Activities’ by selecting ‘Yes’.
Overdue activity on Calendar
• If you have selected Yes for ‘Overdue Activities’ in Backend configuration, the expired activities
will be highlighted with ‘red’ alert mark.

Calendar 365- “Installation & Configuration”
BIZ/UMP/G1 Public 57
Conflict Management
• On creating all the activities except Custom activity, if scheduling of any activity conflicts with the
same activity it shows alerts only if enabled from the backend configurations.
• On clicking Ignore and Save button, activity gets saved but with conflicting error message on the
activity. Clicking Cancel button, scheduling gets cancelled and you again get to re-schedule date
and time of the activity.
Note: You get scheduling alerts for all the activities except Custom activity. And it works only if conflict
management is enabled from configuration page.

Calendar 365- “Installation & Configuration”
BIZ/UMP/G1 Public 58
Unscheduled Activities
• If you have enabled the Unscheduled Activates option from the configuration and the
‘Appointments’ and Service activities’ don’t have any required attendees and assigned
resources, the Unscheduled Activities button will appear on the header in the Calendar page.
• It opens dialog box with list of Unscheduled Activities.
• This list comprises of two activities based on activity type selected. Start and End date filters to
filter activities along with search box to search activities.

Calendar 365- “Installation & Configuration”
BIZ/UMP/G1 Public 59
• If activity type is ‘appointment’, it shows all the appointments that don’t have any required
attendees assigned.
• To assign attendees to an appointment, select appointment as the ‘activity type’ from the
dropdown, select activities and click on Set Required button.
• Clicking on ‘Set Required’ button, it will open dialog box to select required attendee.
• Select the attendee as required and click on Save button.
• Upon saving, attendees get assigned and that activity gets removed from the list of unscheduled
activities.
• If ‘activity type’ is service activity, it shows all the service activities that don’t have resources
assigned.
• To assign resources to the service activity, select service activity as the activity type from the
dropdown, select the service and click on Set Resource button.
• Clicking on ‘Set Resource’ button, it will open dialog box to select required resources. Select them
as required and click on Save button.

Calendar 365- “Installation & Configuration”
BIZ/UMP/G1 Public 60
Print Calendar
• To print the calendar, navigate to right hand side of the calendar and click on ‘Print’ icon.
• You can print the calendar in Portrait view as well as Landscape view in different formats like PDF,
XPS Document Writer, directly fax it and save to Google Drive.
• Upon saving, resources get assigned
and that activity gets removed from
the list of unscheduled activities.

Calendar 365- “Installation & Configuration”
BIZ/UMP/G1 Public 61
Activity Action
➢ Activity Action: You can perform the relevant action for the activities.
o Mark as Complete
o Mark as Cancel
o Convert Activity to Opportunity
o Convert Activity to Case
o Convert Activity to Lead
o End Series
o Deactivate Bookable Resource Booking
o Reminder of Activity

Calendar 365- “Installation & Configuration”
BIZ/UMP/G1 Public 62
Clicking on any activity you will get the detail view with activity actions. You can directly complete any
activity by clicking on Mark as Complete/Mark as Close and convert any activity to Opportunity/Case by
clicking on ‘Convert to Opportunity’/‘Convert to Case’ respectively.
Mark as Complete
• You can directly complete an activity from calendar itself by clicking on Mark as Complete
button. On clicking this button, warning message appears. Click “OK” to complete the activity
and its status is updated as Completed.
Mark as Cancel
• When you click on Mark as Cancel button for an activity, a warning message appears. Click
“OK” to remove from the calendar and its status will be updated as Closed in the CRM.

Calendar 365- “Installation & Configuration”
BIZ/UMP/G1 Public 63
Convert Activity to Opportunity
• Activities like Tasks, Phone calls, Letters, Fax, Custom Activities and Emails can be converted to
opportunity from calendar directly.
Convert Activity to Case
• Activities like Tasks, Phone calls, Letters, Fax, Custom Activities and Emails can be converted to
Case from calendar directly.

Calendar 365- “Installation & Configuration”
BIZ/UMP/G1 Public 64
Convert Activity to Lead
• Only Email activities can be converted to lead.
End Series
• End series option is available in case of recurring appointment.
• On clicking End Series button, you need to select when you want appointment series to end. It
can be either “This event” or “Following events from selected date”.

Calendar 365- “Installation & Configuration”
BIZ/UMP/G1 Public 65
• If This Event option is selected, it ends that appointment by selecting ‘Complete’ or ‘Cancel’ the
activity. The status will be updated as per selection of Complete or Cancel.
• Selecting Following events from selected date option, you need to select series end date and
the related status. The status will be updated as per selection of Complete or Cancel.

Calendar 365- “Installation & Configuration”
BIZ/UMP/G1 Public 66
Deactivate Bookable Resource Booking
Reminder of Activity:
• You will receive a notification for reminder of the activity before few minutes from the start time
of the activity set from the backend default configurations.
• By clicking on Bookable Resource activity, the
details of Bookable Resource will appear.
• You can Deactivate the Bookable Resource
Booking by clicking on Deactivate button.

Calendar 365- “Installation & Configuration”
BIZ/UMP/G1 Public 67
Calendar Views
• There are multiple views are given in the Calendar 365 to check the activities and as per the
schedule.
Time Slot Duration View
• If you have set the “Minimum” & “Maximum” time slots from the default configuration of Calendar
365, the users will see the working Time slots on the Calendar page.
• The Time slot duration can only be seen for Days & Weeks. By setting the time slots, you can decide
the availability and working time for any activity.

Calendar 365- “Installation & Configuration”
BIZ/UMP/G1 Public 68
• Suppose if any activity added before the time slot or after the time slot, it will allow and display
the time with the activity title .

Calendar 365- “Installation & Configuration”
BIZ/UMP/G1 Public 69
• The individual different Views also provided to check the calendar activities and plan accordingly.
Note: You can check all Calendar Views in Resource Calendar and Customer Calendars individually.
• There are four types of views of Calendar 365
and they are as follows:
▪ Top Down View
▪ Gantt View
▪ Timeline View
▪ Agenda View

Calendar 365- “Installation & Configuration”
BIZ/UMP/G1 Public 70
Top Down View
• This view provides you a Top Down view of the calendar in which you can view a column per
member on the horizontal axis and time on the vertical axis, and a plain view of activities. Members
can be user/team, account, contact or facilities/equipment depending on choice selected by you.
• In addition, you can view the calendar in Top Down View as per the Day, and Week view format.
Day View:
• You can see the activities for the day in the Top Down View.

Calendar 365- “Installation & Configuration”
BIZ/UMP/G1 Public 71
Day Span View:
• You can view the calendar as per the configured Number Of Days from default configurations in
Day Span View of Top Down view. You can select days from 2 to 5.
Week View:
• You can see the activities for the week in the Top Down view.
• Similarly, in Month View, you will the details month wise with the dates.

Calendar 365- “Installation & Configuration”
BIZ/UMP/G1 Public 72
Gantt View
• Gantt view is used for viewing what activity is scheduled to be done at a specific day/time. Gantt
view is a horizontal bar chart that visually represents an activity or task with the start and end
dates.
• Gantt view in which you can view the Resources or Customers in top down manner and date range
in a horizontal display. Here resources can be Team/User & Facilities/Equipment and customers
can be Accounts, Contacts, and are displayed based on your selection of calendar view.
• In Gantt view, you can also view all or individual Events (Activities) along with its details like Name
of the event, Start date, End date and resource name (As configured to view from the
configurations page).
• In addition, you can view the calendar in Gantt View as per the Day, Day Span, Week or Month
format.
Day View:
• You can see the activities for the day in the Gantt view.

Calendar 365- “Installation & Configuration”
BIZ/UMP/G1 Public 73
Day Span View:
• You can view the calendar as per the configured Number Of Days from default configurations in
Gantt View.

Calendar 365- “Installation & Configuration”
BIZ/UMP/G1 Public 74
Week View:
• You can see the activities for the week in the Gantt View.
Month View:
• You can see the activities for the month in the Gantt View.

Calendar 365- “Installation & Configuration”
BIZ/UMP/G1 Public 75
Timeline View
• This view provides you a Timeline view of the calendar in which you can view the simple sequential
overview of the calendar- separated by day and the selection of the Users/Teams &
Facility/Equipment in Resource Calendar and Accounts, Contacts in Customer Calendar.
• In addition, you can view the calendar in Timeline View as per the Day, Week or Month format.
Day View:
• You can see the activities for the day in the Timeline view.
Day Span View
• You can view the calendar as per the configured number of days from Default Configurations in
Day Span View.

Calendar 365- “Installation & Configuration”
BIZ/UMP/G1 Public 76
Week View:
• You can see the activities for the week in the Timeline view.
Month View:
• You can see the activities for the month in the Timeline view.

Calendar 365- “Installation & Configuration”
BIZ/UMP/G1 Public 77
Agenda View
• This view provides you an Agenda view of the calendar in which you can view a sequential list view
with grouping options for other resources like accounts, contacts, facilities/equipment or
users/teams or by date as per the requirements.
• In addition, you can view the calendar in Timeline View as per the Day, Week or Month format.
Day View:
• You can see the activities for the day in the agenda view.
Day Span View:
• You can view the calendar as per the configured number of days from Default Configurations in
Agenda View.

Calendar 365- “Installation & Configuration”
BIZ/UMP/G1 Public 78
Week View:
• You can also see the activities for the week in the agenda view.
Month View:
• You can also see the activities for the month in the agenda view.

Calendar 365- “Installation & Configuration”
BIZ/UMP/G1 Public 79
Resource Scheduler
• “Resource Scheduler” option is only visible if you have enabled from the Settings. You can create
the Work Schedule for the resources (users) and based on the available hours, you can assign the
task.

Calendar 365- “Installation & Configuration”
BIZ/UMP/G1 Public 80
Contact Us
We simplify your business, offer unique business solution in digital web and IT landscapes.
Customization:
If you would like to customize or discuss about additional feature for Calendar 365, please write to
sales@appjetty.com
Live Chat
• Get instant support with our Live Chat.
• Visit our product page at:
https://www.appjetty.com/dynamicscrmall-in-one-calendar.htmand click on the Live
Chat button for instant support.
Tickets
• Raise tickets for your specific question!
• Send an email to support@appjetty.com or
you can login to my account
www.appjetty.com and click on My Support
Tickets on your account dashboard, to get
answers to your specific questions.
 Loading...