

Page 1

Quick Start Guide
For iOS, macOS and Windows
Page 2
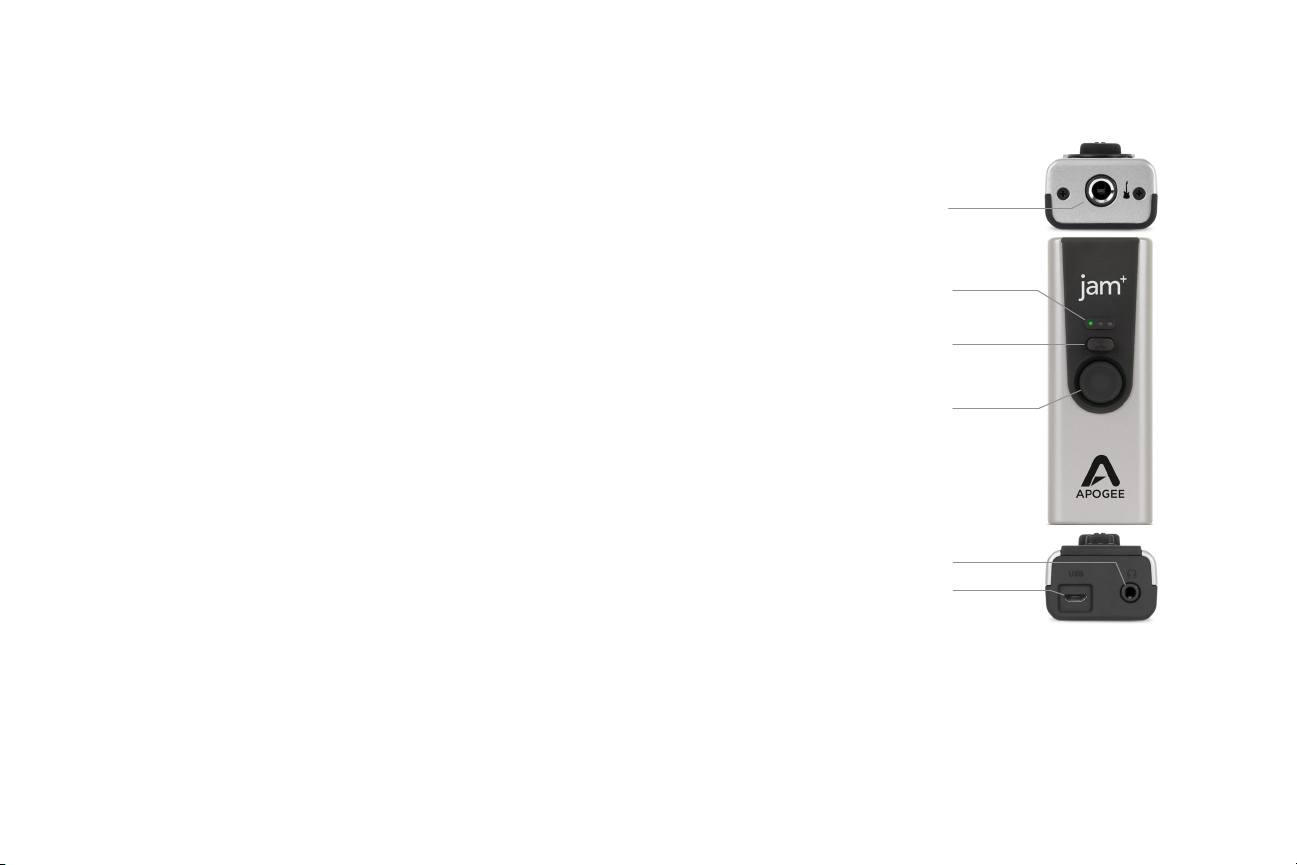
Product Tour Apogee Jam+
3 multicolor LEDs for status, input
level and Blend mode indication
• Apogee Jam+
• BIAS FX JAM software download instructions
• User’s Guide
• Warranty Booklet
• Lightning cable
• USB cable (Type C)
• USB cable (Type A)
Headphone output Blend control
for low latency recording
Input gain adjustment knob
Push to select Overdrive or Clean mode
USB port
1/4” Instrument input
1/8” Headphone or powered speaker output
In The Box
3
Page 3
Product Tour Apogee Jam+
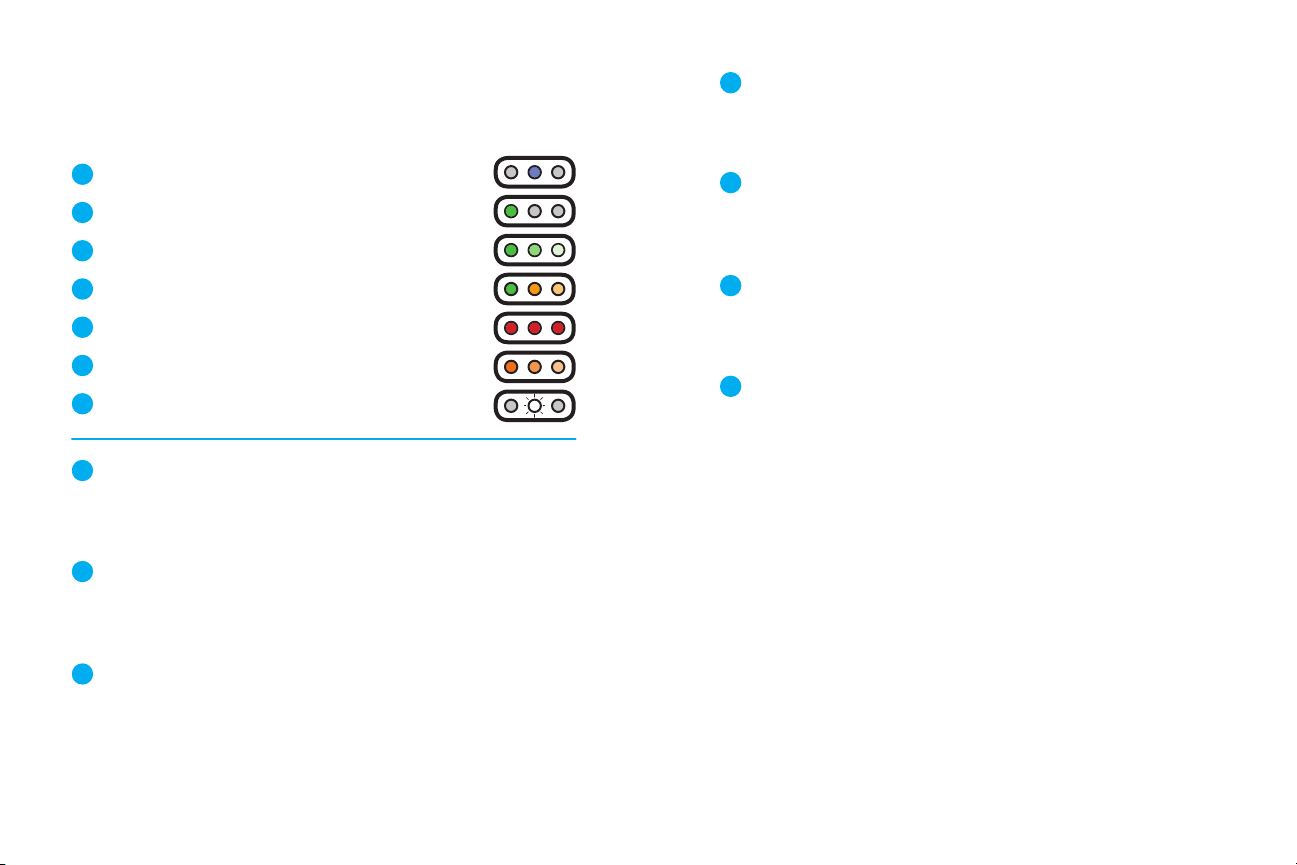
Status & Input Level Indicator LEDs
1
Single Blue = Powered but not connected to recording software
2
Single Green = Connected and working with recording software
3
Green left-to-right = Audio level meter with Clean mode on
4
Green + Orange = Approaching maximum input level
5
Red = Input Overload, Gain should be lowered
6
Orange left-to-right = Audio level meter with Overdrive mode on
7
Single White = Blend on, returns to input level after 1 second
Nur blau = Eingeschaltet, aber nicht mit Recorder-Programm verbunden
1
Azul único = Alimentado pero no conectado al software de grabación
Bleu = Sous alimentation mais non connecté au logiciel d’enregistrement
Solo Blu = Acceso ma non collegato al software di registrazione
Apenas 1 azul = Ligado, mas não conectado ao software de gravação
Nur grün = Verbunden und funktioniert mit dem Recorder-Programm
2
Verde único = Conectado y funcionando con software de grabación
Vert = Connecté et fonctionnant avec le logiciel d’enregistrement
Solo Verde = Collegato e in funzione con il software di registrazione
Apenas 1 verde = Conectado e funcionando com o software de gravação
Grün von links nach rechts = Audiopegel-Anzeige mit aktiviertem Clean-Modus
3
Verde de izquierda a derecha = Medidor de nivel de sonido con el modo Limpiar activado
Vert clignotant de gauche à droite = Indicateur de niveau audio avec le mode de nettoyage activé
Verde da sinistra a destra = Misuratore del livello audio con modalità Clean attivata
Verde da esquerda para a direita = Medidor de nível de áudio com o modo Clean ativado
Grün + orange = Nähert sich dem maximalen Eingangspegel
4
Verde + Naranja = Se acerca al nivel máximo de entrada
Vert + Orange = Approche du niveau d’entrée maximum
Verde + Arancione = Vicino al livello di entrata massimo
Verde + Laranja = Aproximando-se do nível máximo de entrada
Rot = Eingangspegel übersteuert, Verstärkung sollte verringert werden
5
Rojo = Sobrecarga de entrada y debe reducirse la ganancia
Rouge = Surcharge, le gain doit être abaissé
Rosso = Sovraccarico all’entrata, abbassare il guadagno (Gain)
Vermelho = Sobrecarga de entrada, o ganho deve ser reduzido
Orange von rechts nach links = Audiopegel-Anzeige mit aktiviertem Übersteuerungs-Modus
6
Naranja de izquierda a derecha = Medidor de nivel de audio con el modo Overdrive activado
Orange clignotant de gauche à droite = Indicateur de niveau audio avec mode Accélération activé
Arancione da sinistra a destra = Misuratore del livello audio con modalità Overdrive attivata
Laranja da esquerda para a direita = Medidor de nível de áudio com o modo Overdrive ativo
Nur weiß = Mischen aktiviert, kehrt nach 1 Sekunde zum Eingangspegel zurück
7
Blanco único = Mezcla activada, vuelve al nivel de entrada después de 1 segundo
Blanc = Blend activé, retourne au niveau d’entrée après 1 seconde
Solo Bianco = Blend attivato, ritorna al livello di entrata dopo 1 secondo
Apenas Branco = Recurso Blend ligado, retorna ao nível da entrada após 1 segundo
4 5
Page 4
Connecting to the Computer/iOS Apogee Jam+
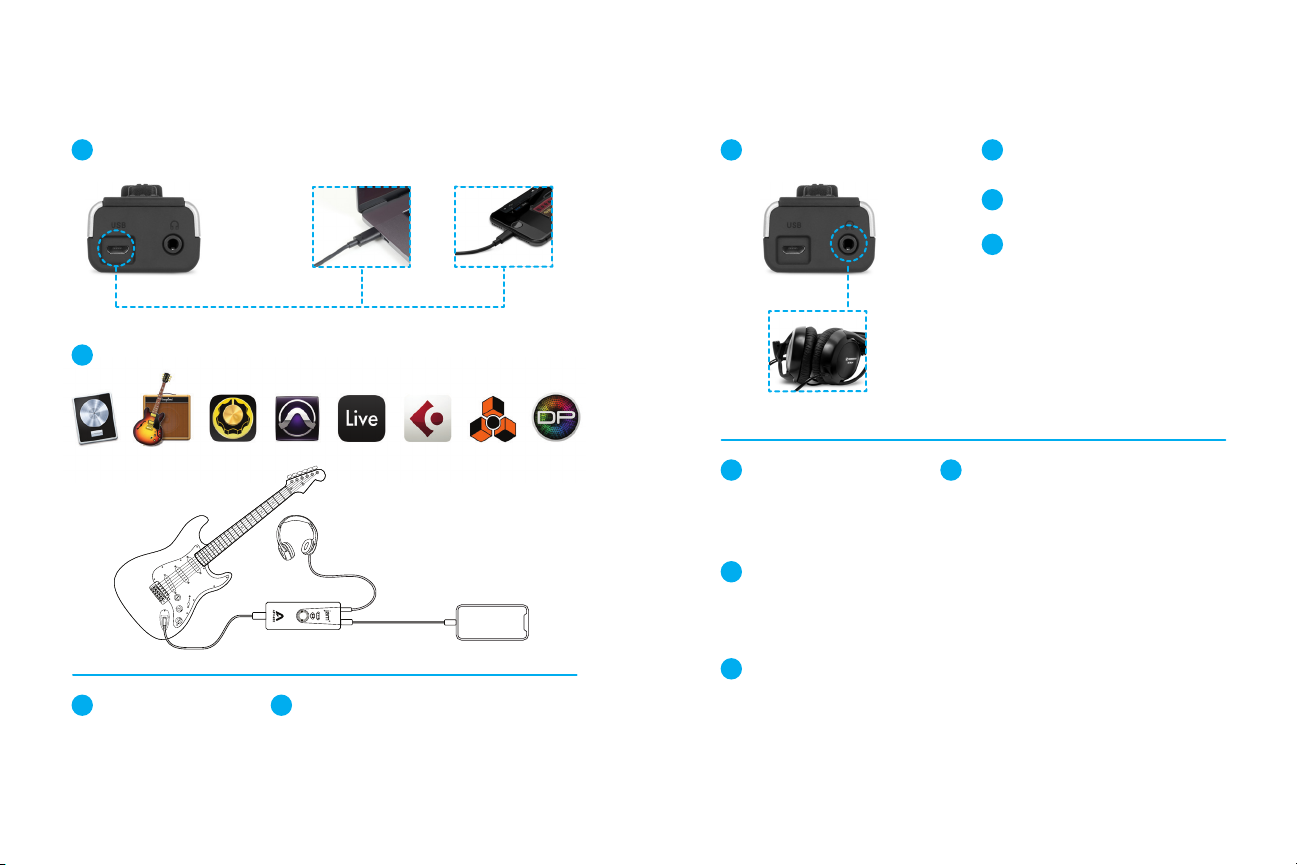
Connecting to the computer/iOS Apogee Jam+
1
Connect cable
2
Open a recording program and set up track
Connectez le câble
1
Kabel anschließen
Collegare il cavo
Conecta el cable
Ligue o cabo
Ouvrez le programme d’enregistrement et créez une piste audio
2
Aufnahme-programm önen und spur einrichten
Aprire il programma di registrazione e impostare la traccia
Abrir el programa de grabación y congurar la pista
Abra o programa de gravação e congure a track/faixa
3
Connect Headphones to Jam+
Connecter votre casque à Jam+
3
Kopfhörer mit Jam+ verbinden
Collega le cue a Jam+
Conecta los auriculares a Jam+
Conecte fones de ouvido ao Jam+
Ajuster le reçu et mélange
4
Gain anpassen und mischen
Regola Gain e Blend
Ajusta Aumento y Mezcla
Ajuste Ganho e Mesclagem
Enregistrer
5
Aufnehmen
Registra
Graba
Gravar
4
Adjust Gain & Blend
5
Record
Use volume buttons on computer/iOS device
6
to adjust playback level
Utiliser les boutons de volume sur ordinateur/système
6
iOS pour ajuster le niveau de playback
Wiedergabelautstärke mit den Lautstärketasten auf
dem Computer/iOS-Gerät anpassen
Usa i pulsanti del volume del computer o del dispositivo iOS per regolare il livello di playback
Usa los botones del volumen en el ordenador/
dispositivo iOS para ajustar el nivel de sonido de la
reproducción
Use os botões de volume no computador/dispositivo
iOS para ajustar o nível de reprodução
6 7
Page 5
Indicators and Controls Apogee Jam+
TURN
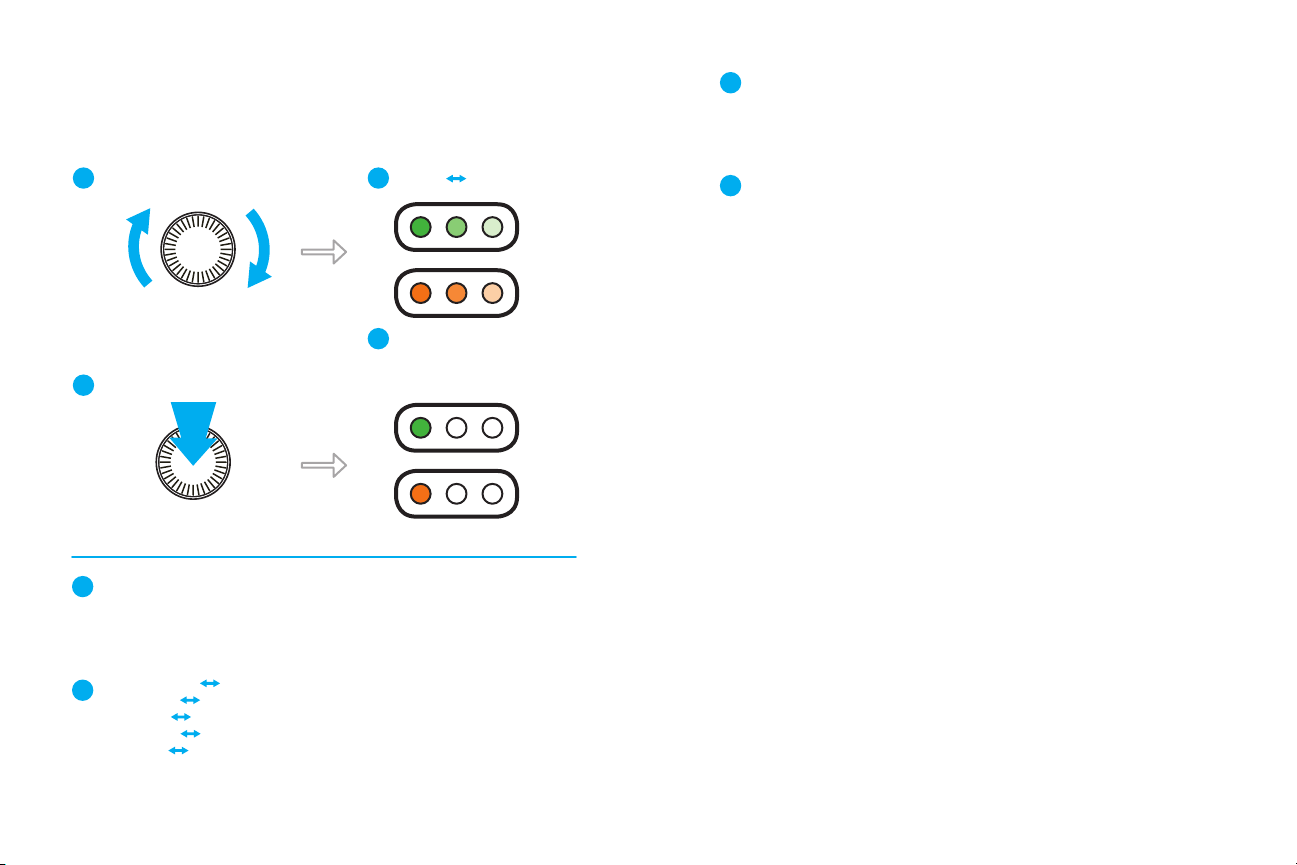
Input Gain Knob
1
Turn Input Gain knob to adjust input signal level
2
Less Gain More Gain
Clean mode
Die LEDs leuchten allmählich grün oder orange, um die Verstärkereinstellung anzuzeigen
3
Los LED se iluminan progresivamente en verde o naranja para indicar el ajuste de la ganancia
Les LED s’allument progressivement en vert ou orange pour indiquer le réglage du Gain.
I LED si illuminano gradualmente di verde o di arancione per indicare l’impostazione del guadagno
LEDs progressivamente acendem em verde ou laranja para indicar a conguração de ganho
Drücke den Verstärker-Knopf, um zwischen Clean-/Übersteuerungs-Modus zu wechseln
4
Presione la perilla de ganancia para alternar entre el modo Limpiar/Overdrive
Appuyer sur le bouton Gain pour basculer en mode Nettoyage/Accélération
Premi la manopola del guadagno per attivare o disattivare la modalità Clean/Overdrive
Empurre o botão Gain para alternar o modo Clean / Overdrive
TURN
Overdrive mode
3
LEDs progressively light green or orange
to indicate the gain setting
4
Push Gain knob to toggle Clean/Overdrive Mode.
Clean mode
Overdrive mode
PUSH
Eingangsverstärker-Knopf drehen, um Eingangssignalpegel anzupassen
1
Gire la perilla de entrada de ganancia para ajustar el nivel de la señal de entrada
Tournez le bouton Gain d’entrée pour régler le niveau du signal d’entrée
Gira la manopola del guadagno d’entrata per regolare il livello del segnale
Gire o botão Input Gain para ajustar o nível do sinal recebido
Weniger Verstärkung Mehr Verstärkung
2
Menos ganancia Más ganancia
Moins de Gain Plus de Gain
Meno guadagno Più guadagno
Menos ganho Mais ganho
8 9
Page 6
Indicators and Controls Apogee Jam+
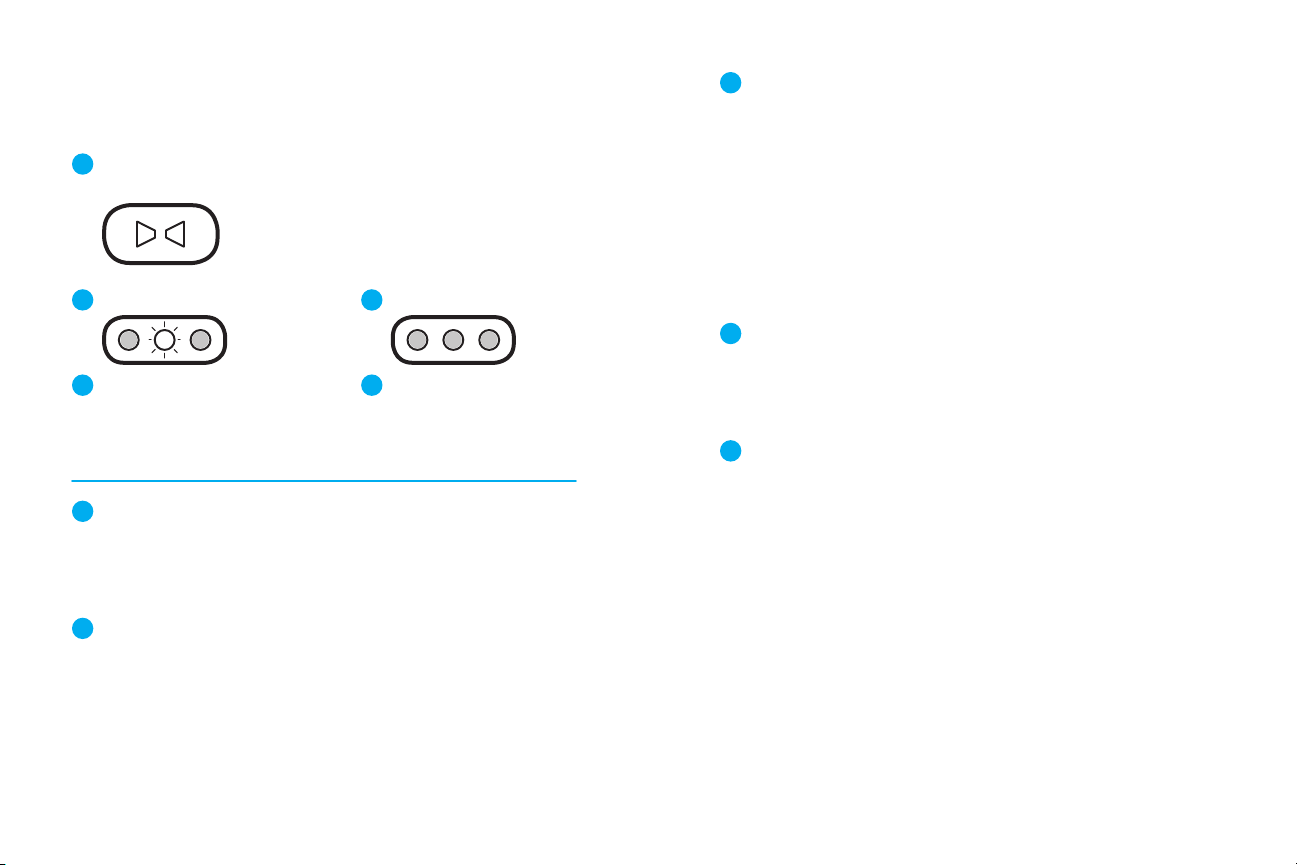
Blend Control Button
1
Push Blend button to turn on low latency monitoring feature
2
Press once to turn on
3
Center white LED indicates Blend on
- Headphone mix is 50% app, 50% input
Den Misch-Knopf drücke, um die Niedrige-Latenz-Überwachungs-Funktion zu aktivieren
1
Presione el botón Mezclar para activar la función de control de baja latencia.
Appuyez sur le bouton Blend pour activer la fonction de surveillance à faible latence
Premi il pulsante Blend per attivare la funzione di monitoring a bassa latenza
ressione o botão Blend para ativar o recurso de monitoramento de baixa latência
Einmal drücken zum Einschalten
2
Presione una vez para encenderlo
Appuyez une fois sur cette touche pour mettre en marche
Premi una volta per accendere
Pressione uma vez para ligar
4
Press again to turn o
5
LEDs o indicates Blend feature is o
- Headphone mix is 100% app
Zentrale weiße LED bedeutet aktiviertes Mischen
3
- Kopfhörer-Mischung ist 50 % App, 50 % Eingang
El LED blanco central indica que la Mezcla está activada
- La mezcla de auriculares es 50 % app, 50 % entrada
Le voyant blanc central indique que la fonction Blend est activé
- Le mix des écouteurs provient à 50 % de l’application et à 50 % de l’entrée audio
Il LED bianco centrale indica che la funzione Blend è attivata
- Il mix della cua è 50% app, 50% entrata
O LED branco do centro indica que o recurso Blend está ativo
- A mixagem do fone de ouvido está em 50% no aplicativo, 50% na entrada
Erneut drücken zum Auszuschalten
4
Presione de nuevo para apagar
Appuyez de nouveau sur cette touche pour éteindre
Premi di nuovo per spegnere
Pressione novamente para desligar
Inaktive LED bedeutet, dass Misch-Funktion inaktiviert ist
5
- Kopfhörer-Mischung ist 100 % App
Los LED apagados indican que la función de Mezcla está desactivada
- La mezcla de auriculares es 100 % app
Les voyants éteints indiquent que la fonction Blend est désactivée
- Le mix des écouteurs provient à 100 % de l’application
I LED spenti indicano che la funzione Blend è disattivata
- Il mix della cua è 100% app
LEDs apagados indicam que o recurso Blend está desativado
- Mixagem do fone de ouvido está em 100% no aplicativo
10 11
Page 7

Declarations of Conformity
This device complies with Part 15 of the FCC Rules. Operation is subject to
the following two conditions:
(1) This device may not cause harmful interference and (2) This device must
accept any interference received, including interference that may cause undesired operation. This equipment has been tested and found to comply with
the limits of a Class B digital device, pursuant to Part 15 of the FCC Rules.
CAUTION: Changes or modications not expressly approved by Apogee
Electronics Corporation compliance could void the user’s authority to
operate the equipment.
(EN50081-1/EN55022; 1995) and (EN50082-1/IEC 801-2, 3, 4; 1992)
following the provisions of: (73/23/EEC – Low Voltage Directive)
and (89/336/EEC – EMC Directive)
Declaration of Conformity – Japan
Apogee Electronics Corporation hereby declares that JAM Plus, to which this
declaration relates, is in material conformity with the VCCI Class A standard.
Declaration of Conformity – Australia
Apogee Electronics Corporation hereby declares that the JAM Plus is in
material conformity with AN/NZS standard requirements.
Rating: 3.3-5V 100mA USB 2.0
Industry Canada Notice
This Class B digital apparatus meets all requirements of the Canadian
Interference-Causing Equipment Regulations. Cet appareil numérique
de la classe B respecte toutes les exigences du Règlement sur le matérial
brouilleur du Canada.
Declaration of Conformity – CE
Apogee Electronics Corporation hereby declares that the product, JAM Plus,
to which this declaration relates, is in material conformity with the following
standards or other normative documents:
(EN50081-1/EN55022; 1995) and (EN50082-1/IEC 801-2, 3, 4; 1992)
following the provisions of: (73/23/EEC – Low Voltage Directive) and
(89/336/EEC – EMC Directive)
Declaration of Conformity – CE
Apogee Electronics Corporation hereby declares that the product, JAM Plus,
to which this declaration relates, is in material conformity with the following
standards or other normative documents:
Use of the “Made for iPhone”, “Made for iPad”, and “Made for iPod” badge
means that an accessory has been designed to connect specically to the
Apple product(s) identied in the badge, and has been certied by the
developer to meet Apple performance standards. Apple is not responsible for the operation of this device or its compliance with safety and
regulatory standards. Please note that the use of this accessory with an
Apple product may aect wireless performance.
12 13
Page 8

Registration Information
Be sure to register your JAM Plus by completing the on-line registration form at our
Web site: www.apogeedigital.com/register
The benets of registering include access to free, expert technical support by email or
phone, important email notications regarding new features and important updates,
and new Apogee product notications before they’re announced to the public.
Please address any inquiries to your dealer or directly to Apogee at:
APOGEE ELECTRONICS CORPORATION
1715 Berkeley St Santa Monica,CA 90404, USA
TEL: (310) 584-9394, FAX: (310) 584-9385
Web site:
www.apogeedigital.com
Knowledgebase:
www.apogeedigital.com/knowledgebase
Support:
www.apogeedigital.com/support
14
Page 9
www.apogeedigital.com
© 2018, Apogee Electronics Corp. All Rights Reserved
PN: 0070-0012-0000 Rev. 2.0 | AN: 2740-0054-0000 Rev. 2.0
 Loading...