


1
AHM-6077 HMI
User Manual
Release Date Revision
Nov 2012 V1.0
® 2012 Aplex Technology, Inc. All Rights Reserved. Published in Taiwan
Aplex Technology, Inc.
15F-1, No.186, Jian Yi Road, Zhonghe District, New Taipei City 235, Taiwan
Tel: 886-2-82262881 Fax: 886-2-82262883 E-mail: aplex@aplex.com.tw URL: www.aplex.com.tw
AHM-6077 User Manual

2
Warning!_______________________________
This equipment generates, uses and can radiate radio frequency energy and if not installed and
used in accordance with the instructions manual, it may cause interference to radio
communications.
It has been tested and found to comply with the limits for a Class A computing device pursuant to
FCC Rules, which are designed to provide reasonable protection against such interference when
operated in a commercial environment. Operation of this equipment in a residential area is likely
to cause interference in which case the user at his own expense will be required to take whatever
measures may be required to correct the interference.
Electric Shock Hazard – Do not operate the machine with its back cover removed. There are
dangerous high voltages inside.
Disclaimer
This information in this document is subject to change without notice. In no event shall Aplex
Technology Inc. be liable for damages of any kind, whether incidental or consequential, arising
from either the use or misuse of information in this document or in any related materials.
AHM-6077 User Manual

3
Packing List
Accessories (as ticked) included in this package are:
□ AC power cable
□ Driver & manual CD disc
□ Other.___________________(please specify)
Safety Precautions
Follow the messages below to avoid your systems from damage:
◆ Avoid your system from static electricity on all occasions.
◆ Prevent electric shock. Don‘t touch any components of this card when the card is
power-on. Always disconnect power when the system is not in use.
◆ Disconnect power when you change any hardware devices. For instance, when you
connect a jumper or install any cards, a surge of power may damage the electronic
components or the whole system.
AHM-6077 User Manual

4
Table of Contents______________________
Warning!…………………………………………………………………………….……..….2
Disclaimer………………………………………………………………….…………………2
Packing List...................................................................................................................3
Safety Precautions........................................................................................................3
Chapter 1 Getting Started
1.1 Specifications………………………………………….………….……...…..6
1.2 Dimensions…………………………………...……………….…………......8
1.3 Brief Description of AHM-6077………….………………….………………9
1.4 Installation of HDD................................................................................10
Chapter 2 Hardware Installation
2.1 Mainboard Specifications……………………………….…………….…12
2.2 Hardware Installation............................................................................15
2.2.1 Jumpers Setting…………….……………………………………………15
2.3 Connectors and Headers......................................................................17
Chapter 3 BIOS Setup
3.1 Entering Setup......................................................................................22
3.2 Getting Help..........................................................................................23
3.3 The Main Menu.....................................................................................23
3.4 Standard CMOS Features................................................................... 24
3.5 Advanced BIOS Features.....................................................................25
3.6 Advanced Chipset Features................................................................. 27
3.7 Integrated Peripherals......................................................................... 28
3.8 Power Management Setup.................................................................. 31
3.9 PnP/PCI Configuration.........................................................................33
AHM-6077 User Manual
3.10 PC Health Status................................................................................34
3.11 Miscellaneous Control.........................................................................35
3.12 Password Setting................................................................................35
3.13 Load Standard/Optimized Defaults.....................................................36

5
Chapter 4 Installation of Drivers
4.1 Intel Chipset Driver.…………………………...……………………………38
4.2 Intel VGA Chipset Driver..…....…......………..................……….......…..41
4.3 Realtek GbE & FE Ethernet PCI-E NIC Driver….......................……….44
4.4 Realtek HD Audio Driver Installation………………….…………………46
Chapter 5 Touch Screen Installation
5.1 Introduction to Touch Screen Controller Board………………………....48
5.2 Windows 2000/XP USB Driver Installation………………….………..….48
Figures
Figure 1.1: Dimensions of the AHM-6077…..………………………..………...8
Figure 1.2: Front View of AHM-6077.............................................................9
Figure 1.3: Rear View of AHM-6077..............................................................9
Figure 2.1: Mainboard Layout Diagram…………………………………….…12
Figure 2.2: Jumpers and Connectors Location-TOP…………………...……12
Figure 2.3: Jumpers and Connectors Location- Bottom………………….…13
Figure 5.1: Bird’s Eye View of Control Board…………………………........48
AHM-6077 User Manual

6
Chapter 1________________Getting Started
Model No.
Specs
AHM-6077
System
Processor
Intel Atom N270 1.6 GHz built-in, FSB 533 MHz
System Chipset
Intel 945GSE + ICH7M
System Memory
1 x 200-pin SO-DIMM socket, support 533 MHz up to 2 GB
DDR2 SDRAM
Storage
1 x 2.5” SATA HDD
1 x CF Slot (internal)
External I/O Port
4 x USB 2.0 ports
1 x RJ-45 ports(GbE)
1 x DB-9 RS-232 COM2
1 x DB-9 RS422/RS485 COM1, default RS485
1 x DVI-I output
1 x Audio Line-out and MIC-in
1 x 3 Pin terminal block DC power input
Expansion Slots
None
OS support
Windows CE 6.0, XP Pro, XP Embedded, Windows embedded
standard 7
LCD
Display Type
7" TFT-LCD
Max. Resolution
800X480
Max. Color
262K
Luminance
(cd/m2)
250
View Angle
H:140° / V:110°
Backlight Lifetime
20,000 hrs
Touch Screen
Type
Analog resistive
Light
Transmission
80%
Power Supply
Power Input
DC 11~32V
Mechanical
Construction
Aluminum front bezel and steel chassis
1.1 Specifications
AHM-6077 User Manual

7
IP Rating
Front Panel IP65
Mounting
Panel/VESA 75x75 Mount
Dimensions
(WxHxD)
198x138x73.9 mm
Net Weight
3.6kgs
Environmental
Operating
Temperature
-10~50˚C
Storage
Temperature
-20~60 ゚ C
Storage Humidity
10~90% @40 ゚ C non-condensing
Certificate
CE/FCC Class A
AHM-6077 User Manual
8
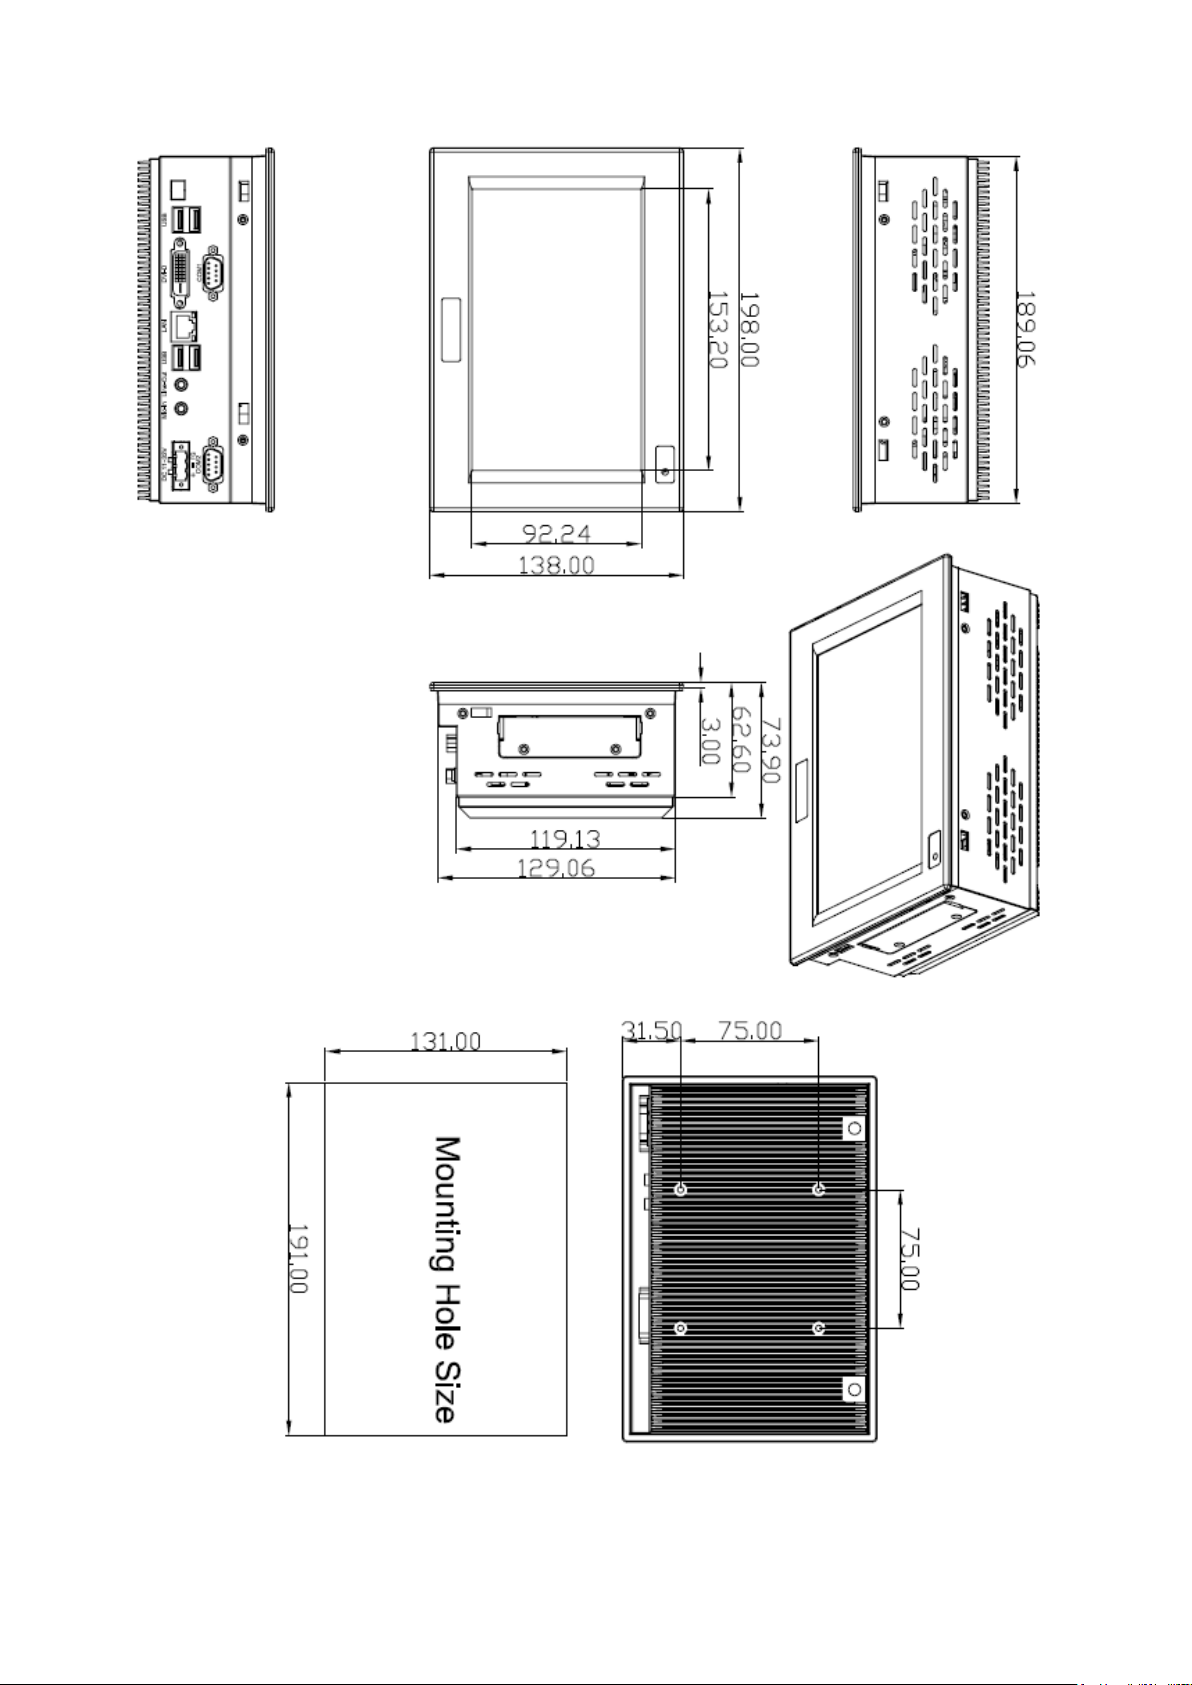
1.2 Dimensions
Figure 1.1: Dimensions of the AHM-6077
AHM-6077 User Manual
9
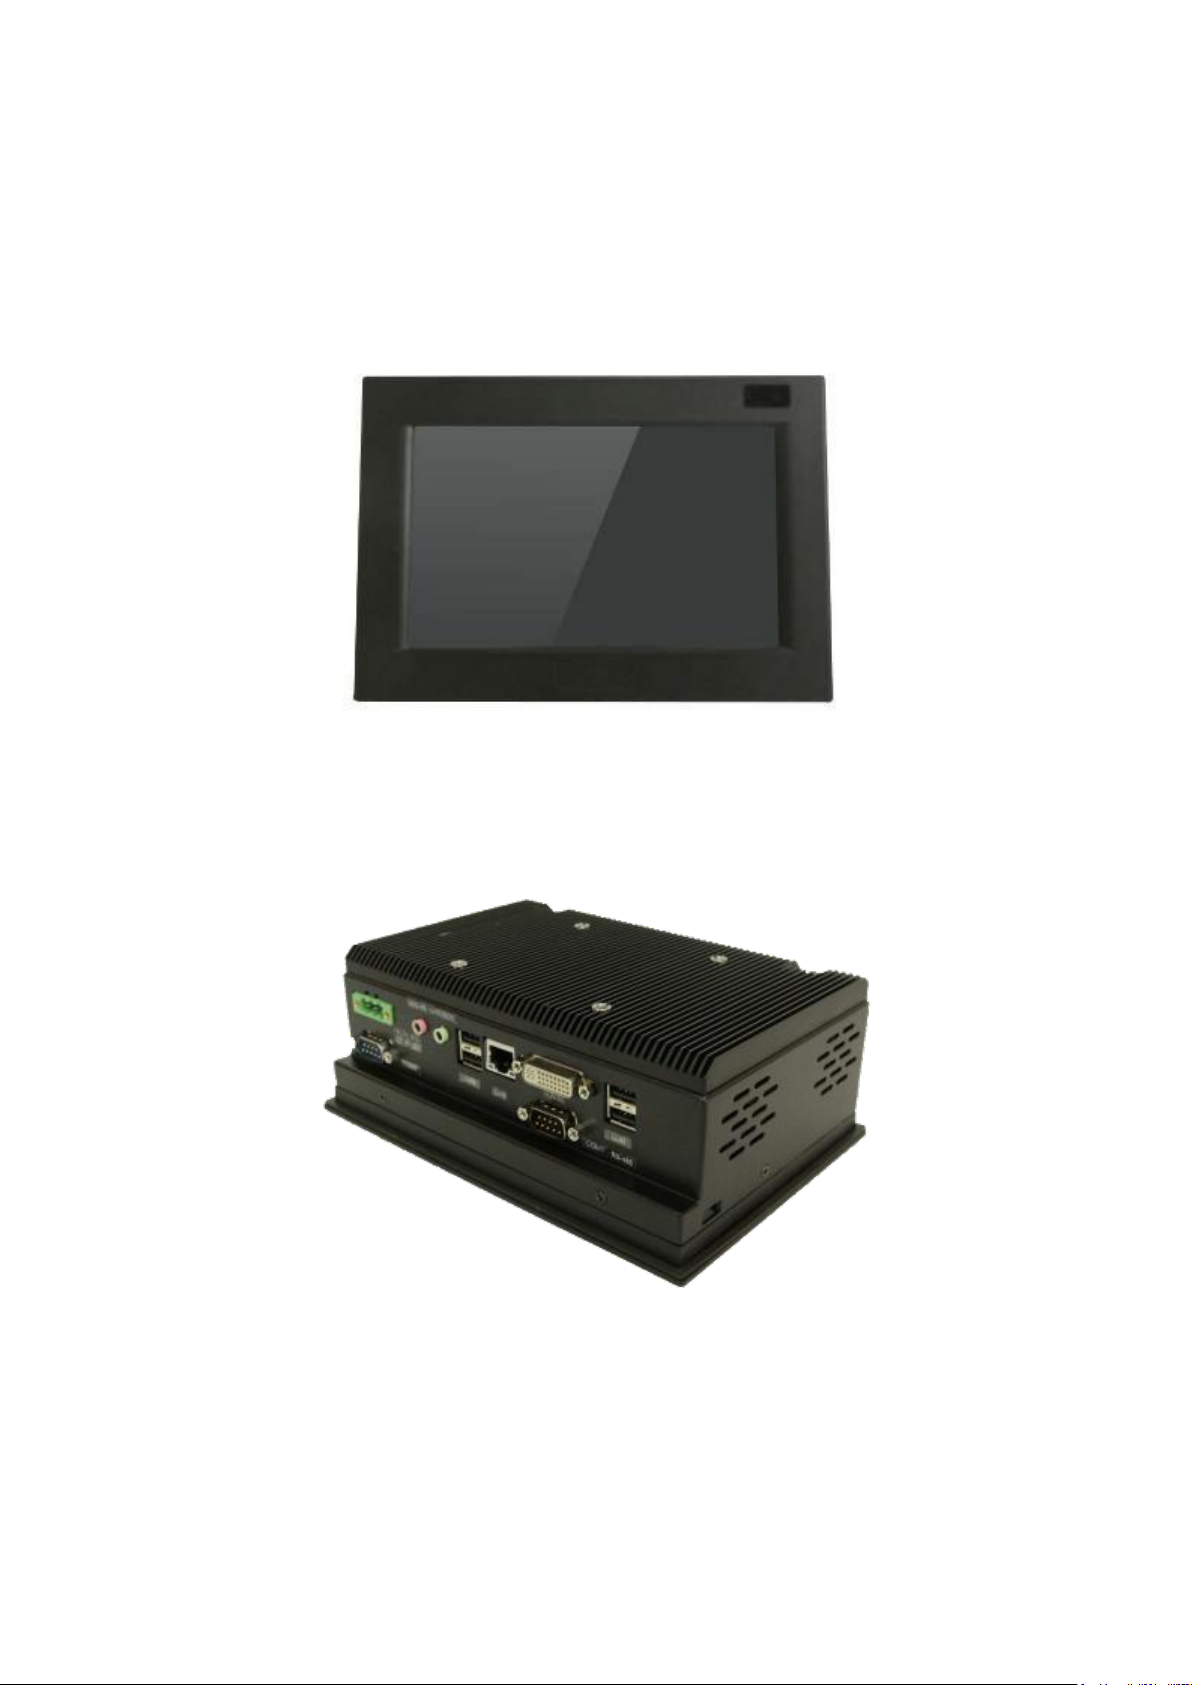
1.3 Brief Description of the AHM -6077
The AHM-6077 is a power-optimized and delivers robust performance-per-watt for embedded HMI.
The powered by an Atom N270 1.6 GHz processor. It comes with a compact flash slot, 2.5-inch hard
disk drive, DDR2 memory,1 Ethernet, 2 COM ports, DC input, and 4 USB ports. The unit supports
Windows CE6.0, XP Pro, XP Embedded and Windows Embedded Standard 7. The fanless touch
panel computer is ideal for use as Web Browser, Terminal and HMI at all levels of automation control.
Figure 1.2: Front View of AHM-6077
AHM-6077 User Manual
Figure 1.3: Rear View of AHM-6077
10
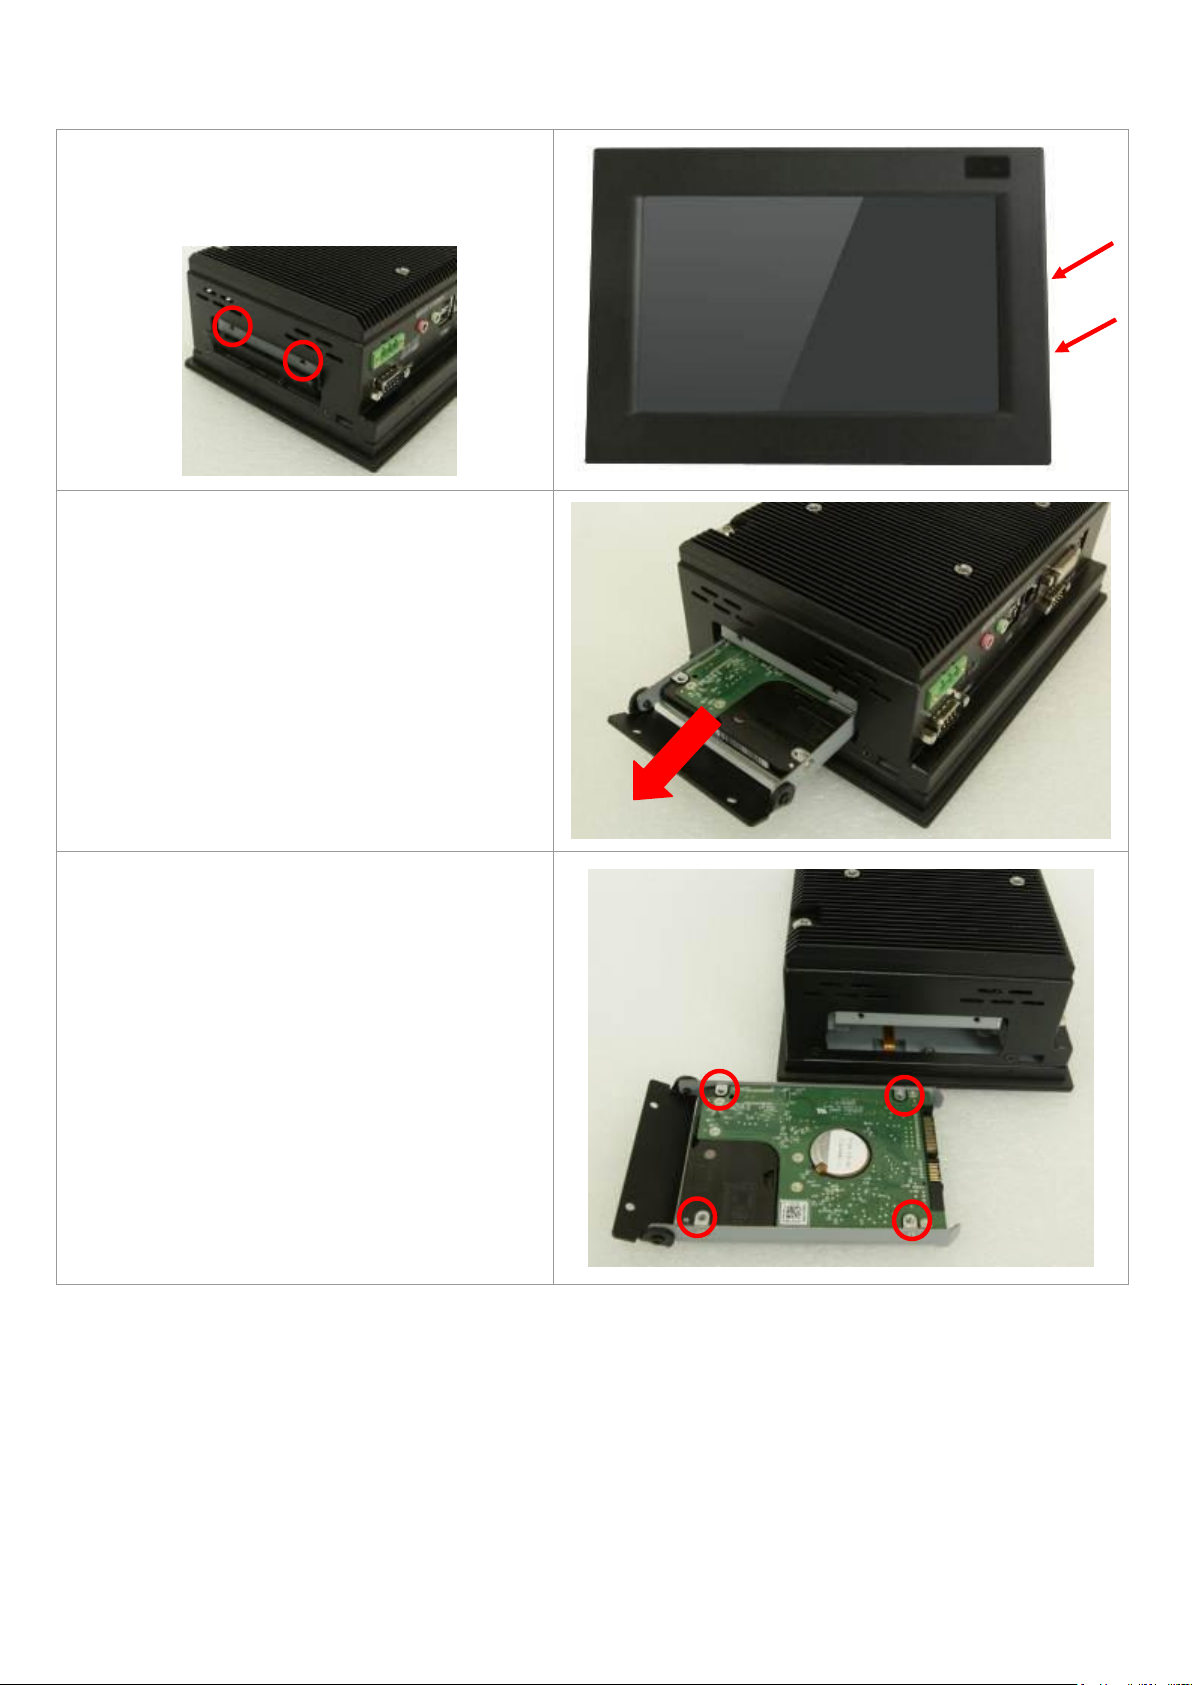
1.4 Installation of HDD
Step 1
There are 2 screws to deal with when
Installing of HDD as shown in the picture
AHM-6077
Step 2
Loosen screw and draw the HDD bracket
out as shown in the picture.as shown in the
picture AHM-6077
Step 3
Tighten four screws as shown in the picture.
AHM-6077 User Manual
11
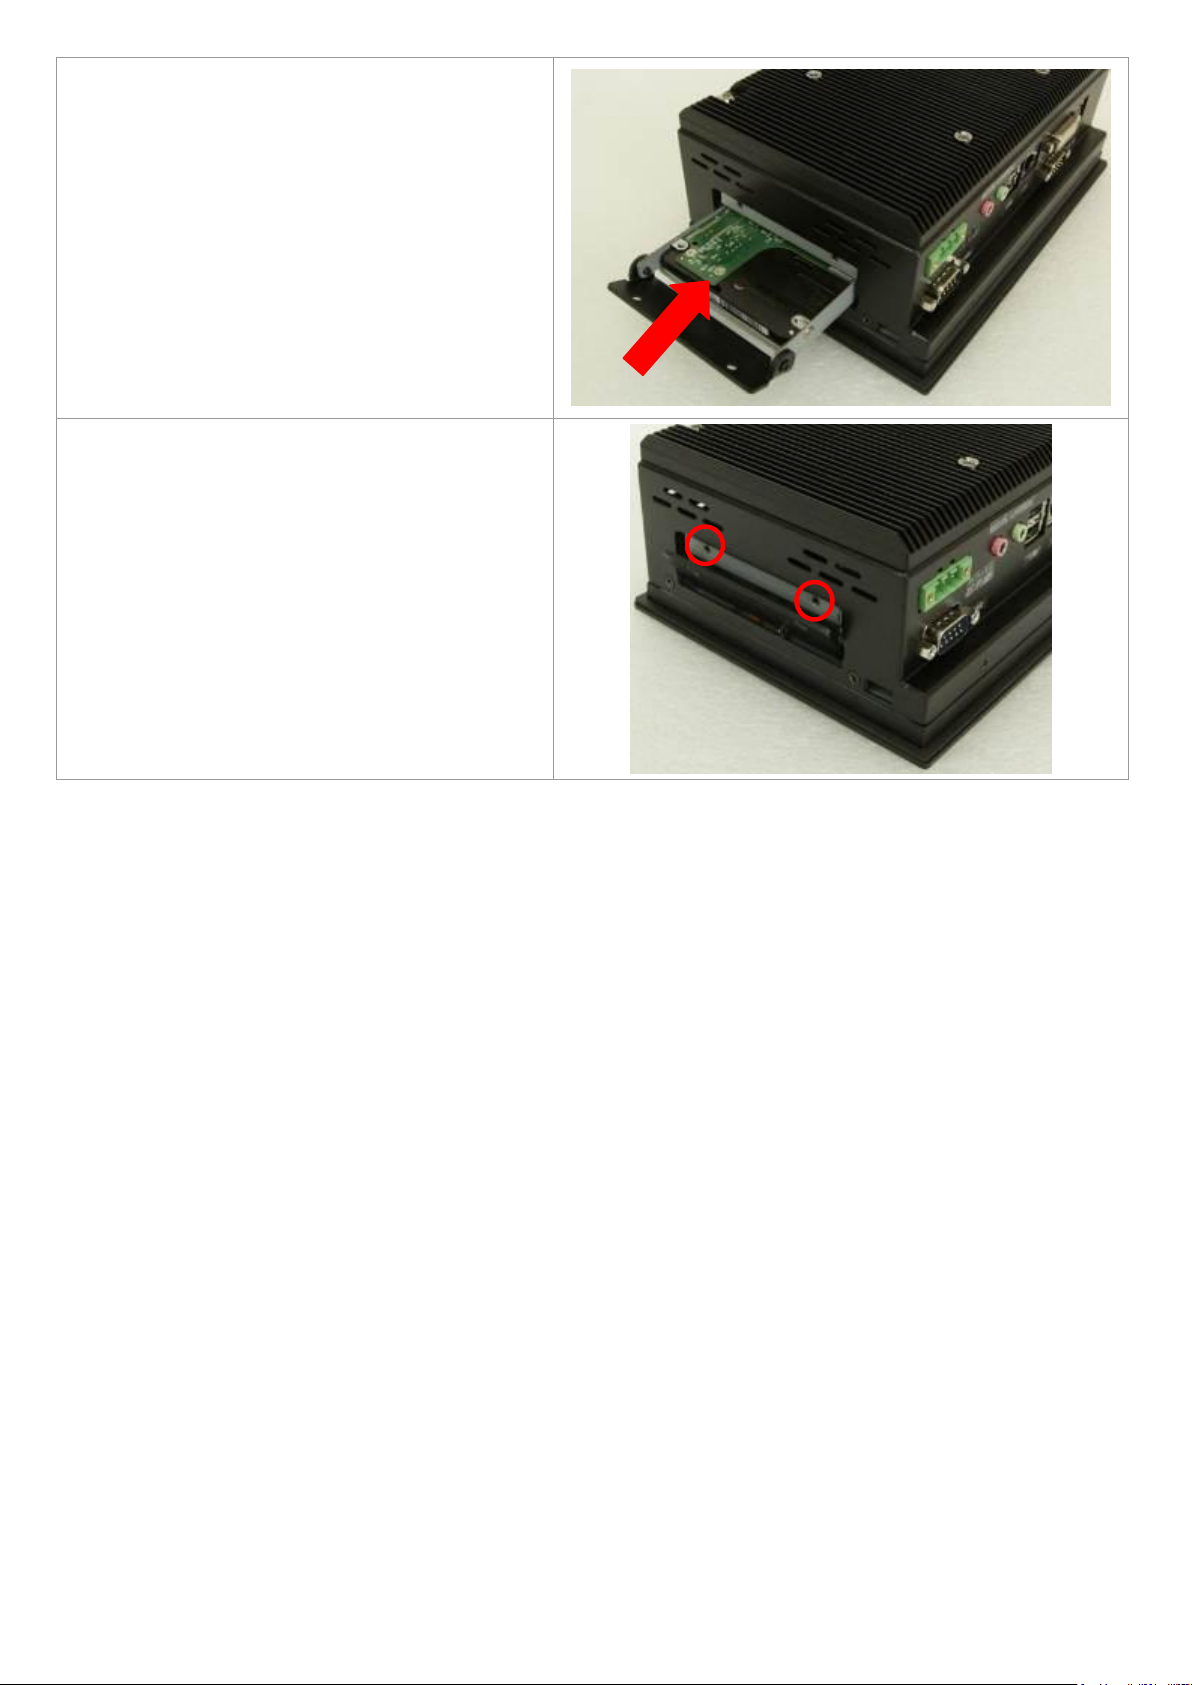
Step 4
Push into the HDD bracket as shown in the
picture AHM-6077
Step 5
Tighten the 2 screws as shown in the picture.
That’s how it should look after it has been
installed.
AHM-6077 User Manual
12
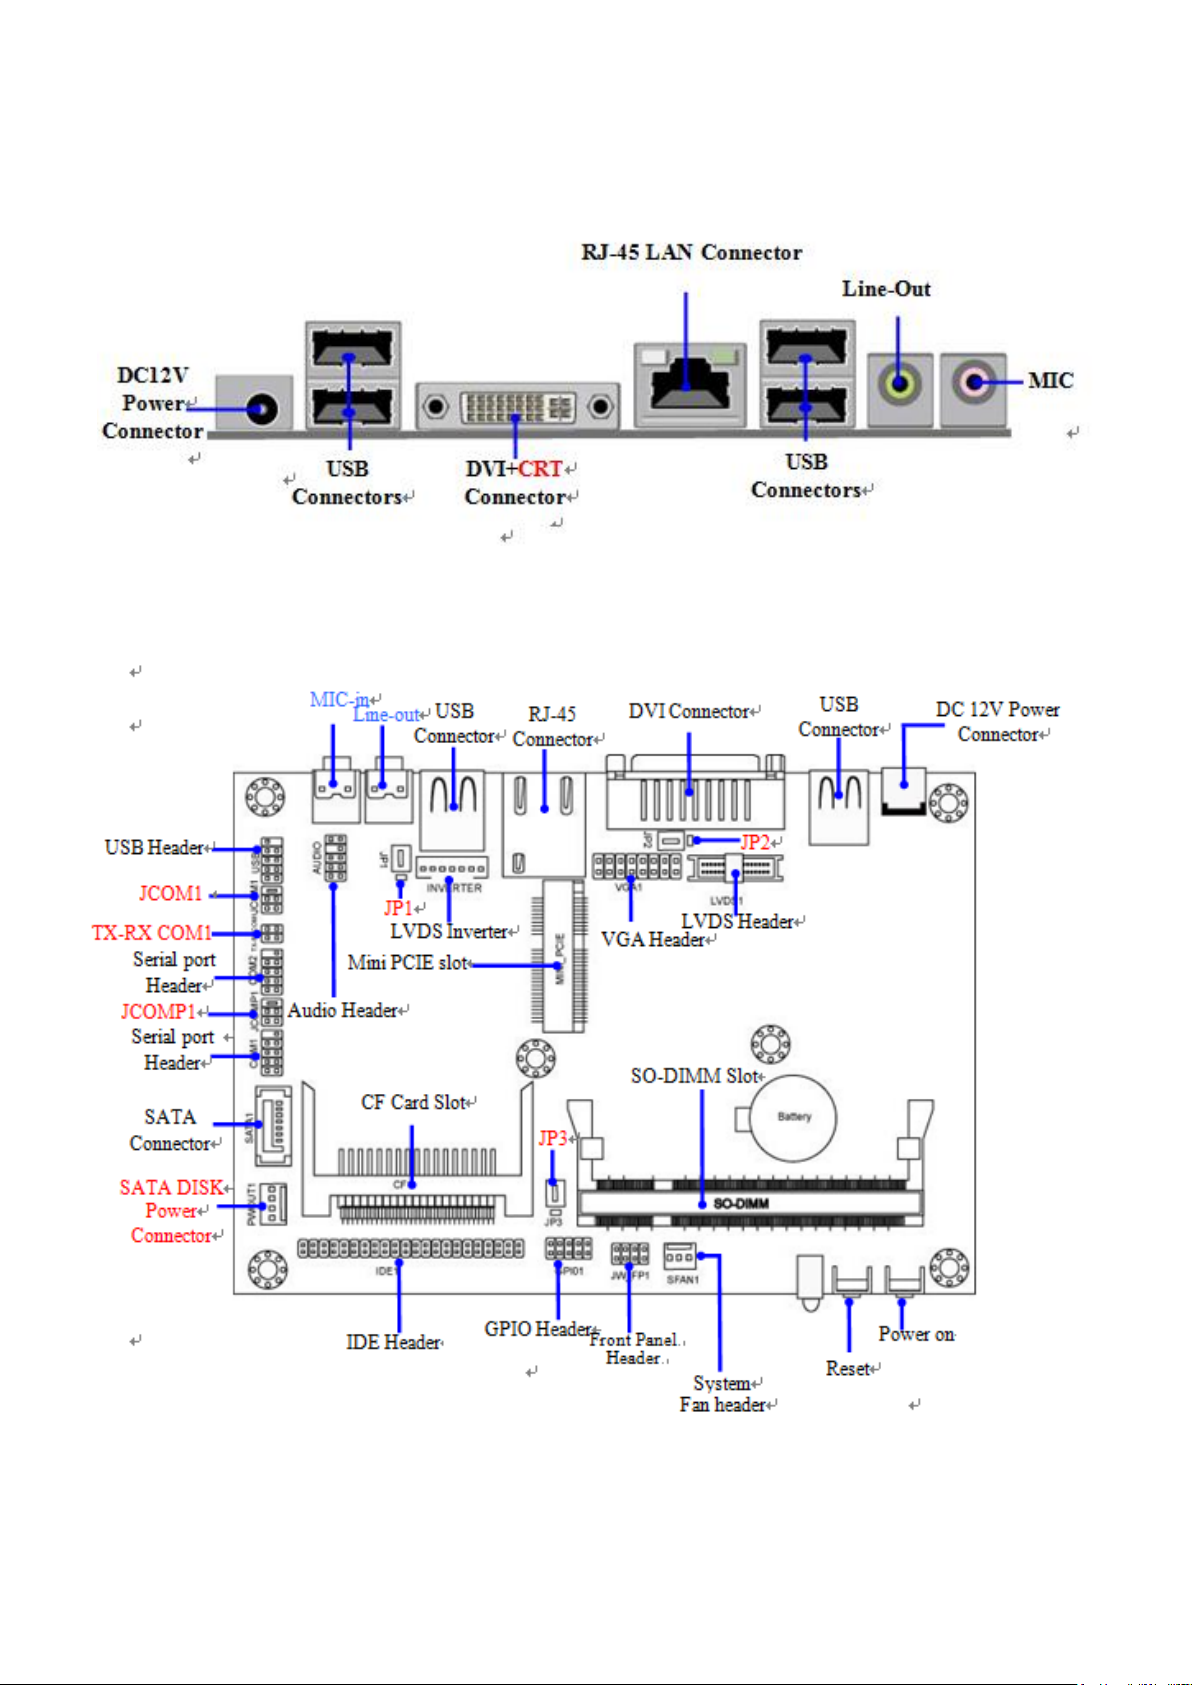
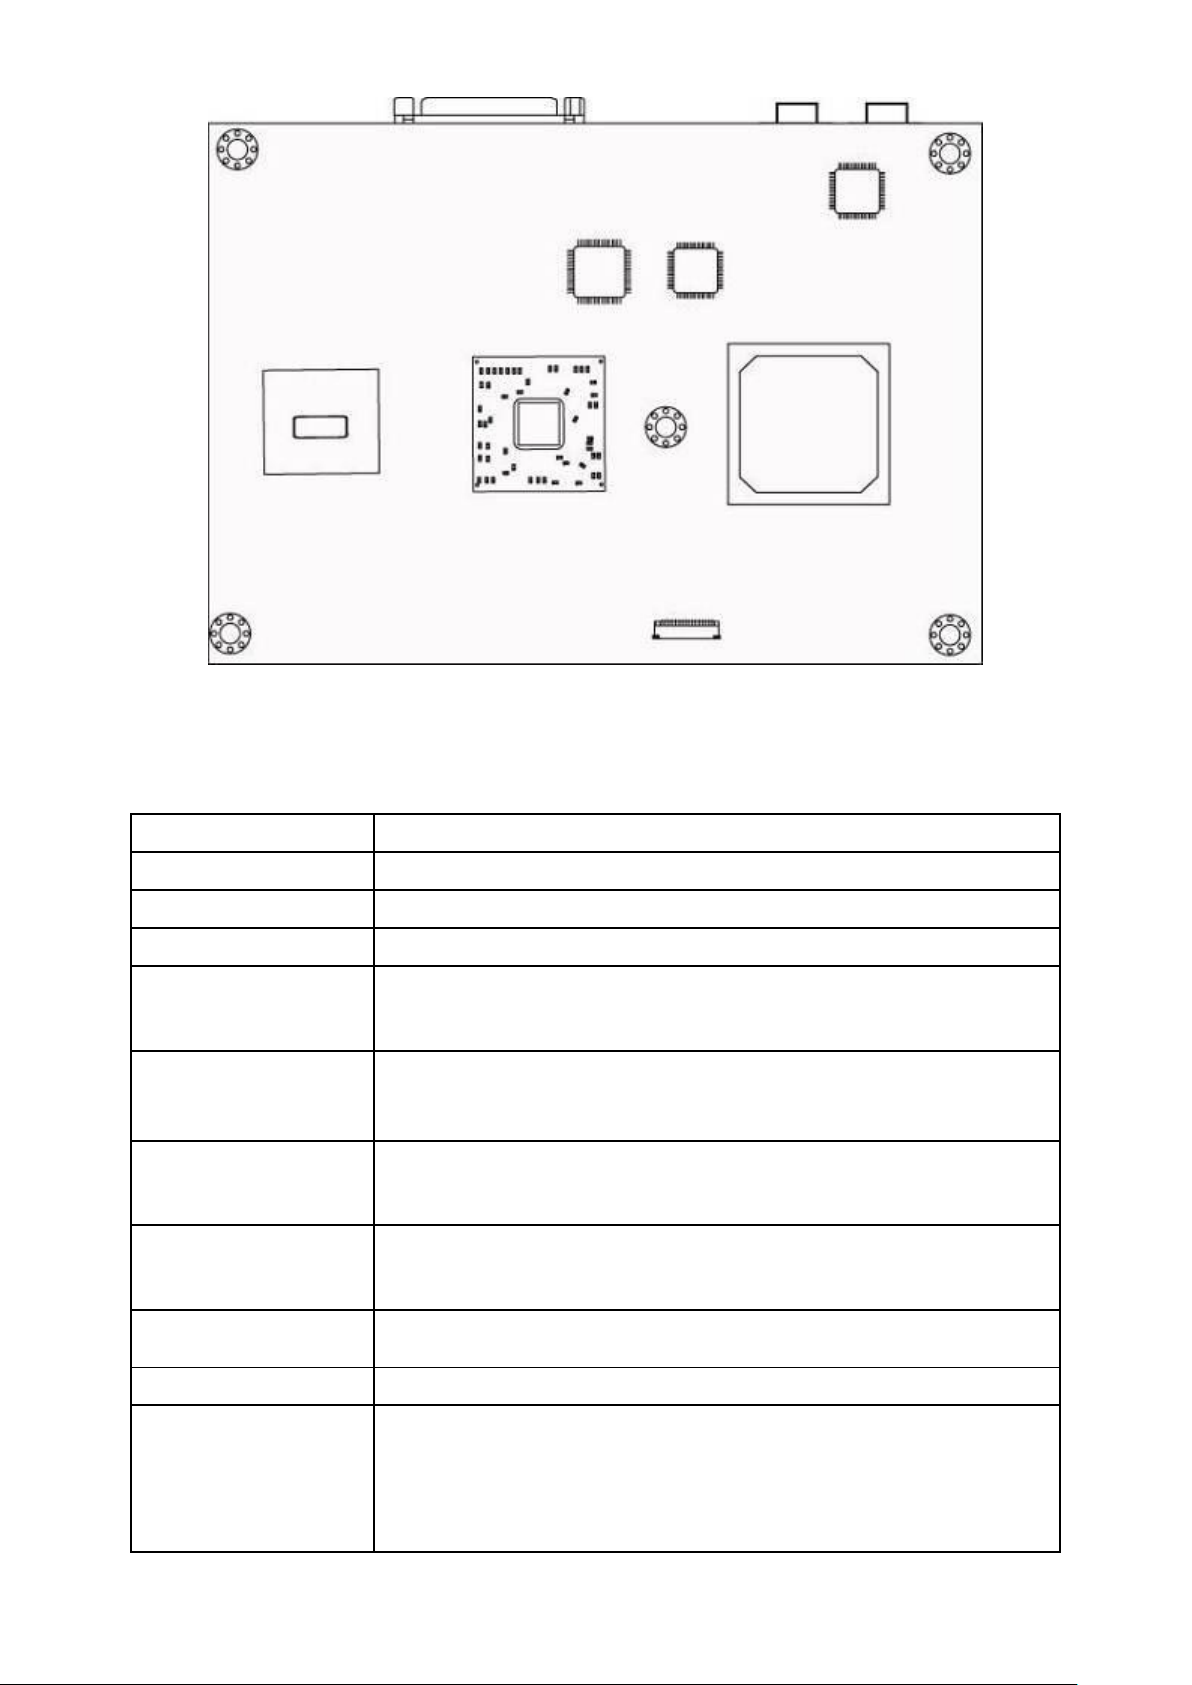
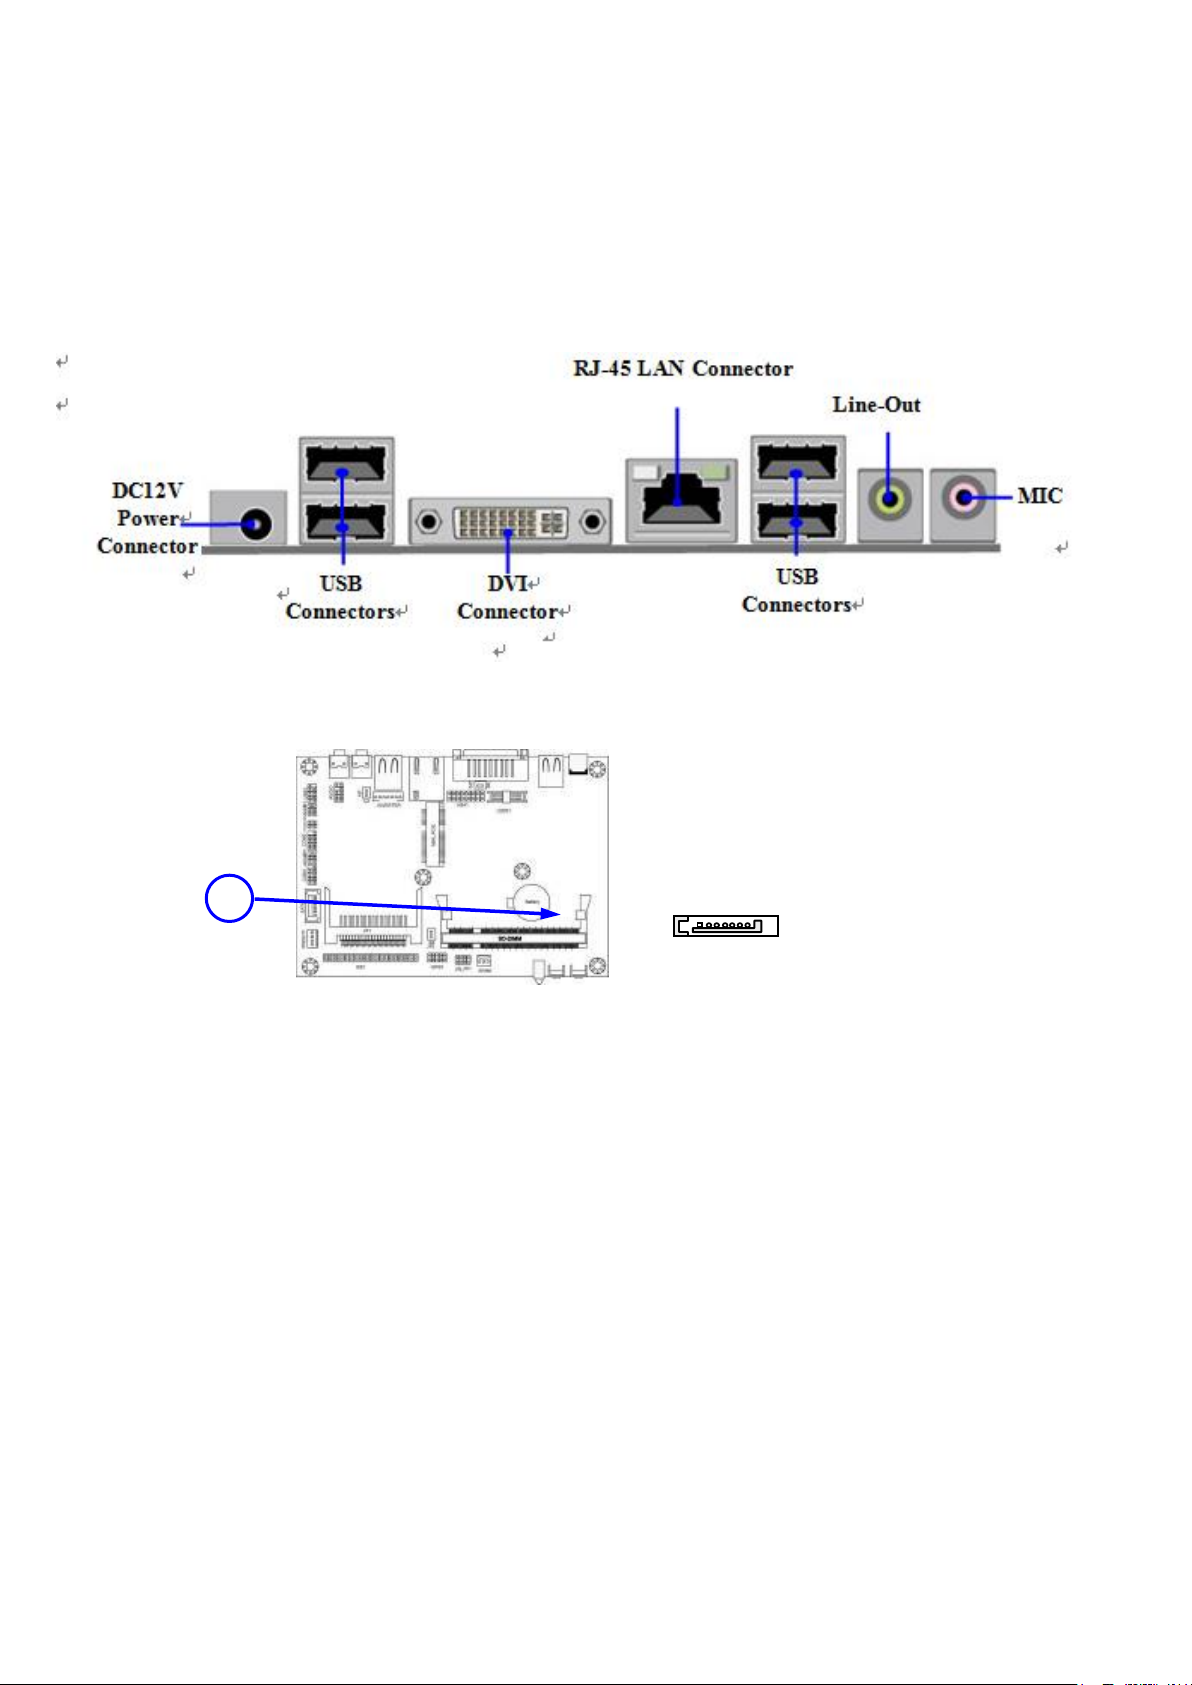
Chapter 2__________Hardware Installation
2.1 Mainboard Specifications
Figure 2.1: Layout Diagram
AHM-6077 User Manual
Figure 2.2: Jumpers and Connectors Location-TOP
13
Spec
Description
Design
3.5”SBC 6 layers; PCB size: 14.8x 10.2 cm
Chipset
Intel 945GSE+ICH7M Chipset
Embedded CPU
ATOM CPU
Memory Socket
200-pin DDRII SO-DIMM slot x1
Support DDRII 400/533MHz system Modules DDRII memory
Expandable to 2GB.
Expansion Slots
CF card slot x1
Mini-PCI E slot x1
Integrate IDE
One PCI IDE controller that supports PCI Bus Mastering,
ATA PIO/DMA and the ULTRA DMA /100/66 functions that
deliver the data transfer rate up to 100MB/s.
LAN
Integrated Realtek RTL8111DL PCI-E Gigabit LAN.
Support Fast Ethernet LAN function of providing
10Mb/100Mb/1000Mb Ethernet data transfer rate
HD Audio
ALC662 2-channel HD Audio Codec integrated
Audio driver and utility included
BIOS
Award 8MB DIP Flash ROM
Multi I/O
DVI connector x1
USB 2.0 port x 4 and USB header x1
RJ-45 gigabit LAN connector x1
Audio connector x2 (Line out/MIC connector)
Figure 2.3: Jumpers and Connectors Location- Bottom
AHM-6077 User Manual

14
SATAII x1
VGA header x1
Front panel header x1
RS422/485 header x2
LVDS connector x1
GPIO connector x1
SYSTEM FAN header x1
Jumper
Jumper
Name
Description
JCOM1
COM1 RS232/422/485 Function Select
6-pin Block
JCOMP1
RS232 Power on Function Select
6-pin Block
JP1
Inverter VCC 12V/5V Select
3-pin Block
JP2
LVDS5V/3.3V Select
3-pin Block
JP3
CF Card Master/Slave Mode Select
3-pin Block
Connector
Name
Description
DC12V2
DC Power Connector
DC Jack
USB3/ USB2
USB Port Connectors
4-pin Connectors
DVI1
DVI Port Connector
24-pin Connector
LAN1
RJ-45 LAN Connector
8-pin Connector
HOUT1
Line Out Connector
1-phone Jack
HMIC1
MIC Connector
1-phone Jack
SATA1
Serial ATAII Connector
7-pin Connector
PWOUT1
Power Out Connector
4-pin Connector
Header
Name
Description
AUDIO1
Front Panel Audio Header
9-pin block
USB1
USB header
9-pin block
COM1,COM2
Serial port headers
9-pin block
TX-RXCOM1
RS422/485 header
4-pin block
JW_FP1
(PWR LED/ HD LED/
/Power Button /Reset)
Front Panel Header
(PWR LED/ HD LED/ /Power Button
/Reset)
8-pin Block
SFAN1
FAN Speed Headers
3-pin Block
IDE1
IDE Hard Disk Drive header
44-pin block
GPIO
GPIO header
10-pin block
LVDS1
LVDS Connector
30-pin Block
INVERTER1
LVDS Inverter Connector
7-pin Block
VGA1
VGA Port Header
15-pin Connectors
Connectors
Headers
AHM-6077 User Manual
15
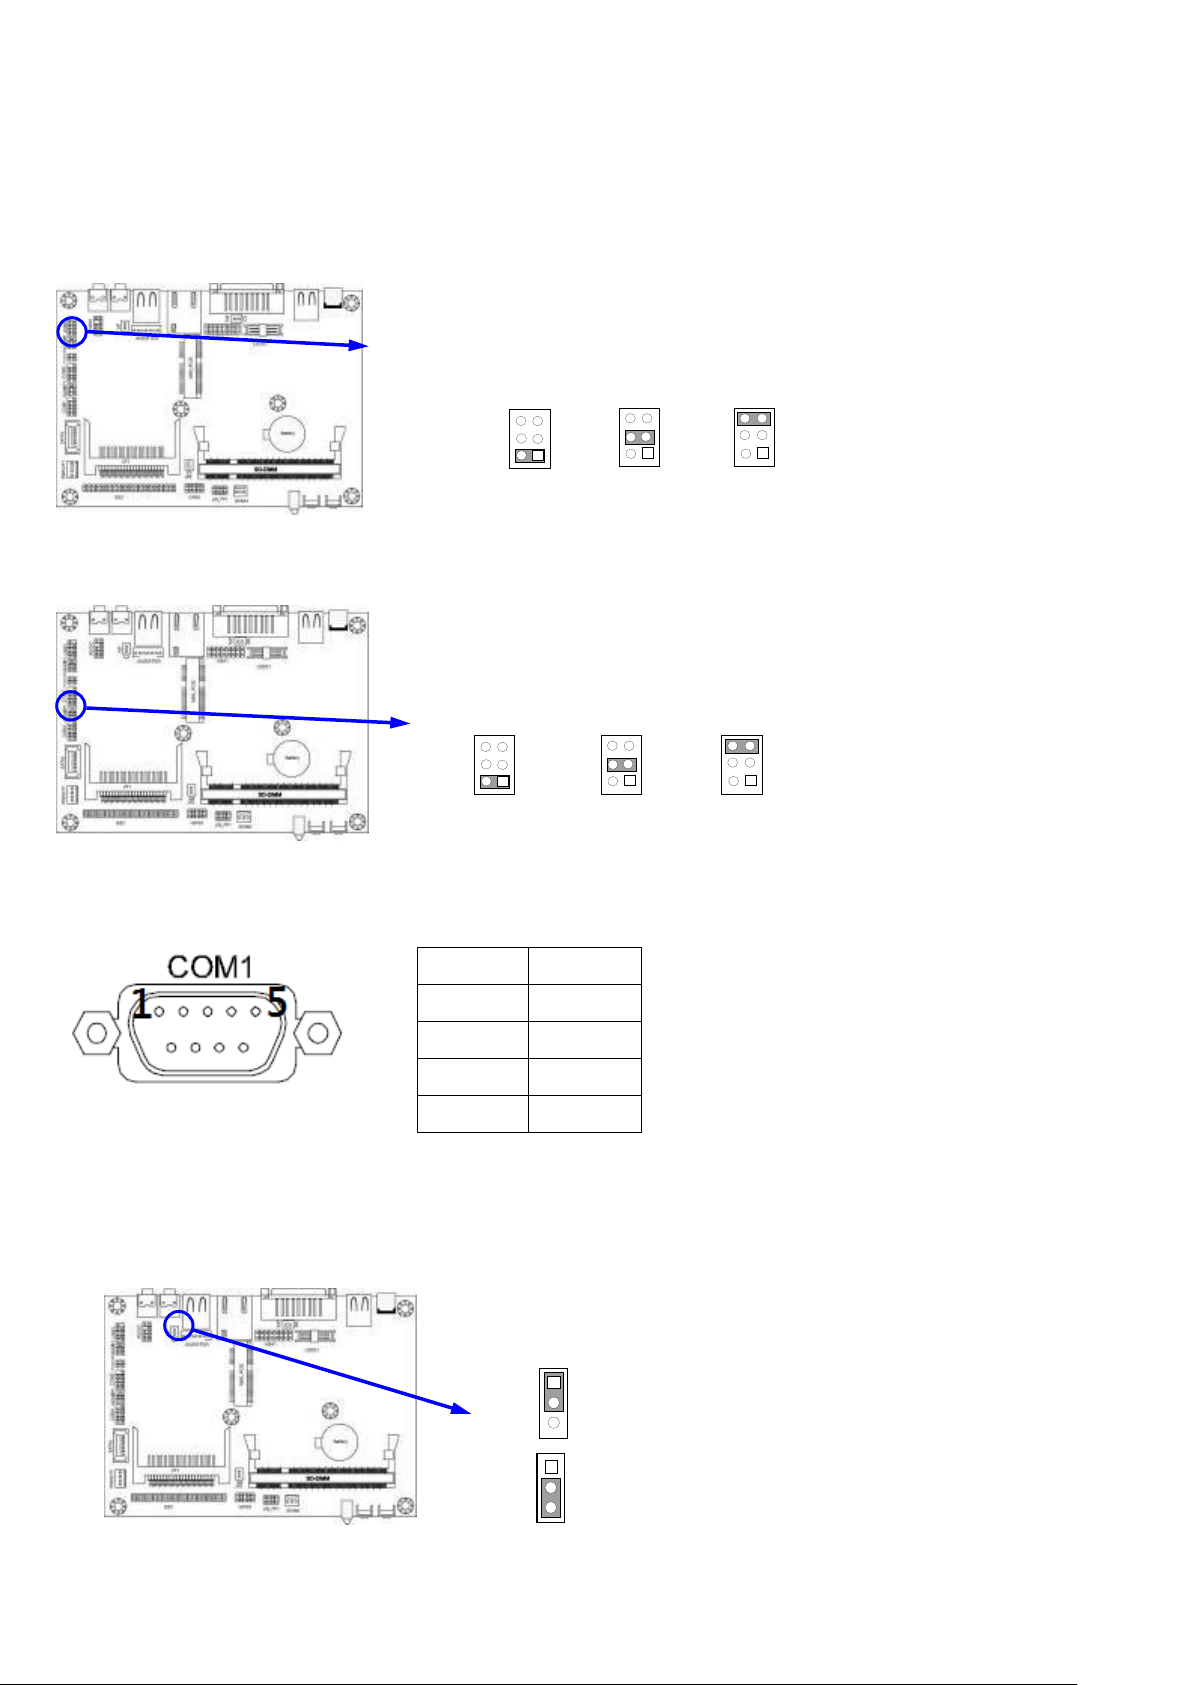
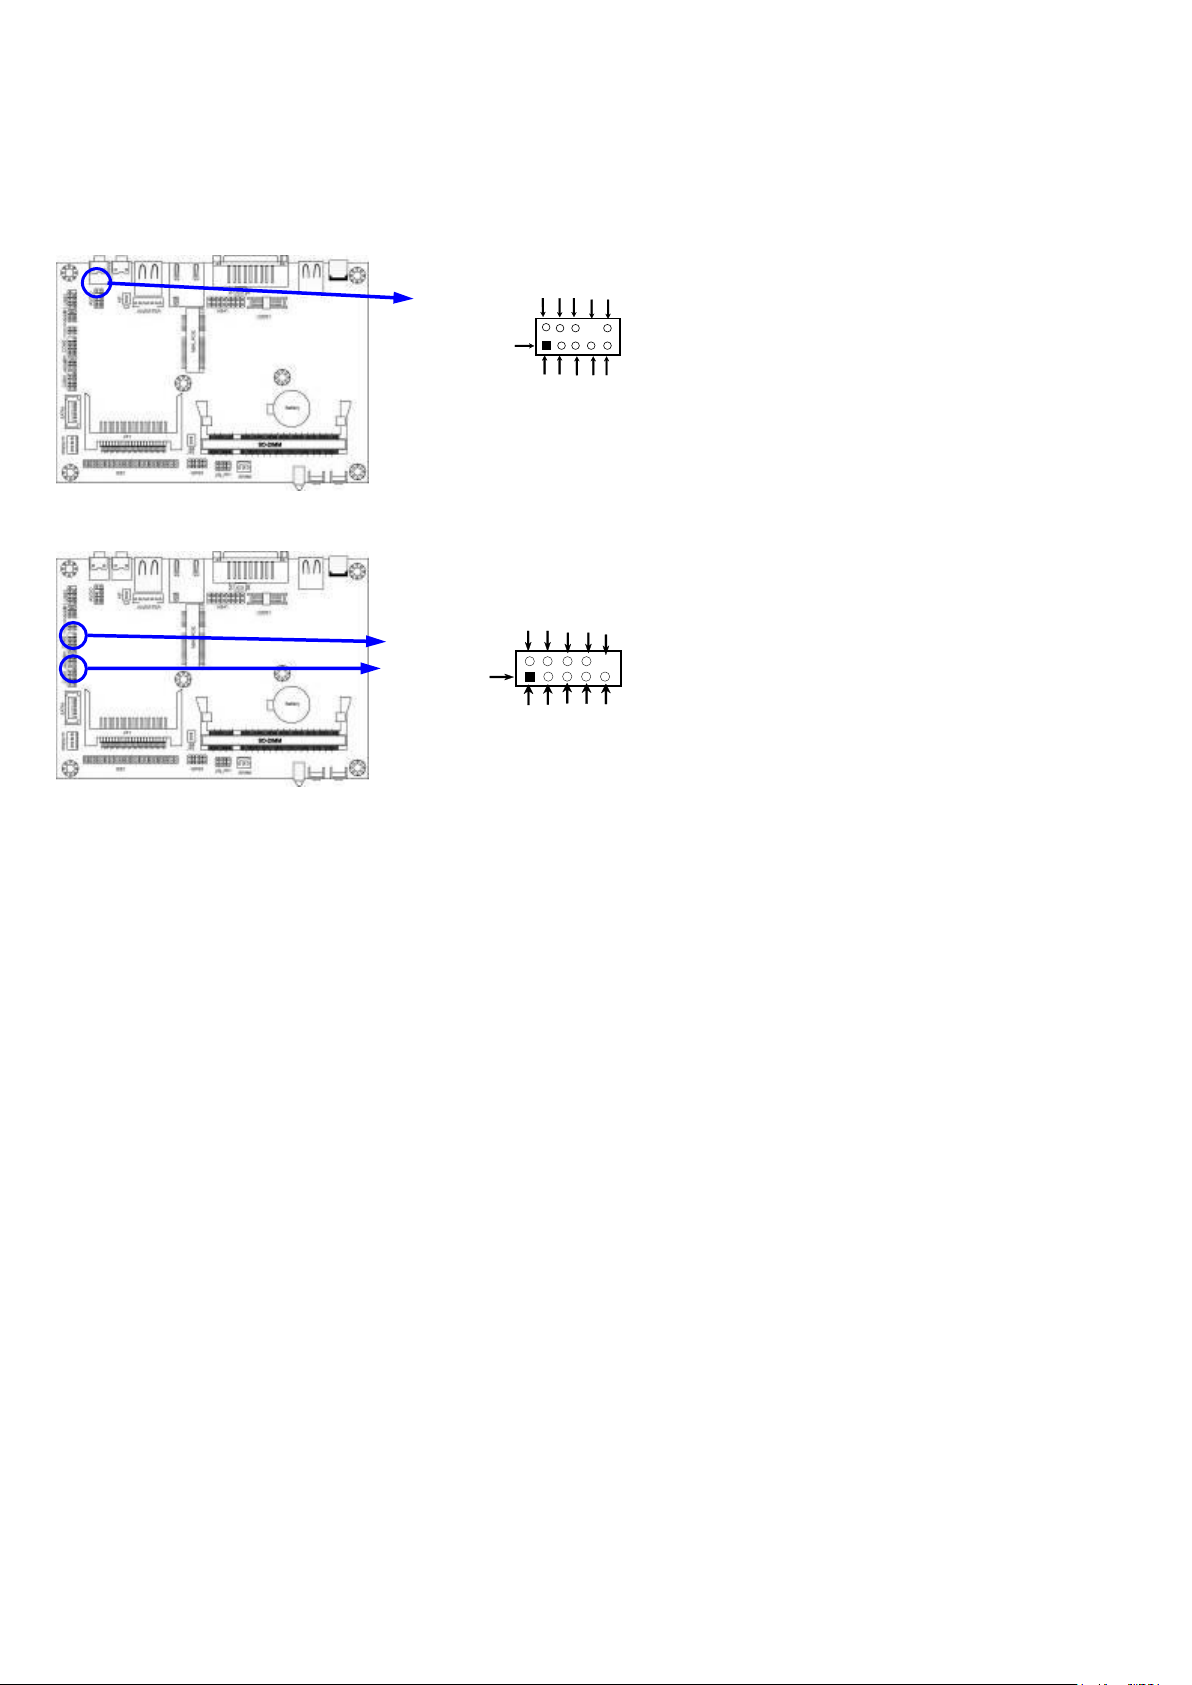
2.2 Hardware Installation
3-4 closed : RS485
JCOM1
1
1-2 closed: RS232
1
1
5-6 closed : RS422
3-4 closed : +12V
JCOMP1
1-2 closed: RS232
5-6 closed : +5V
1 1 1
1-2 closed
Inverter 12V selected
2-3 closed
Inverter 5V select
JP1
JP1
1
3
1
3
Pin 1
RX+
2
RX-
3
TX-
4
TX+
2.2.1 Jumper Setting
(1) JCOM1: COM1 Port RS232/422/485 function select
(2) JCOMP1: COM1 Pin 9 function select
**COM1 Pin Define
(3) JP1: Inverter VCC 5V/12Vselect (3-pin)
AHM-6077 User Manual
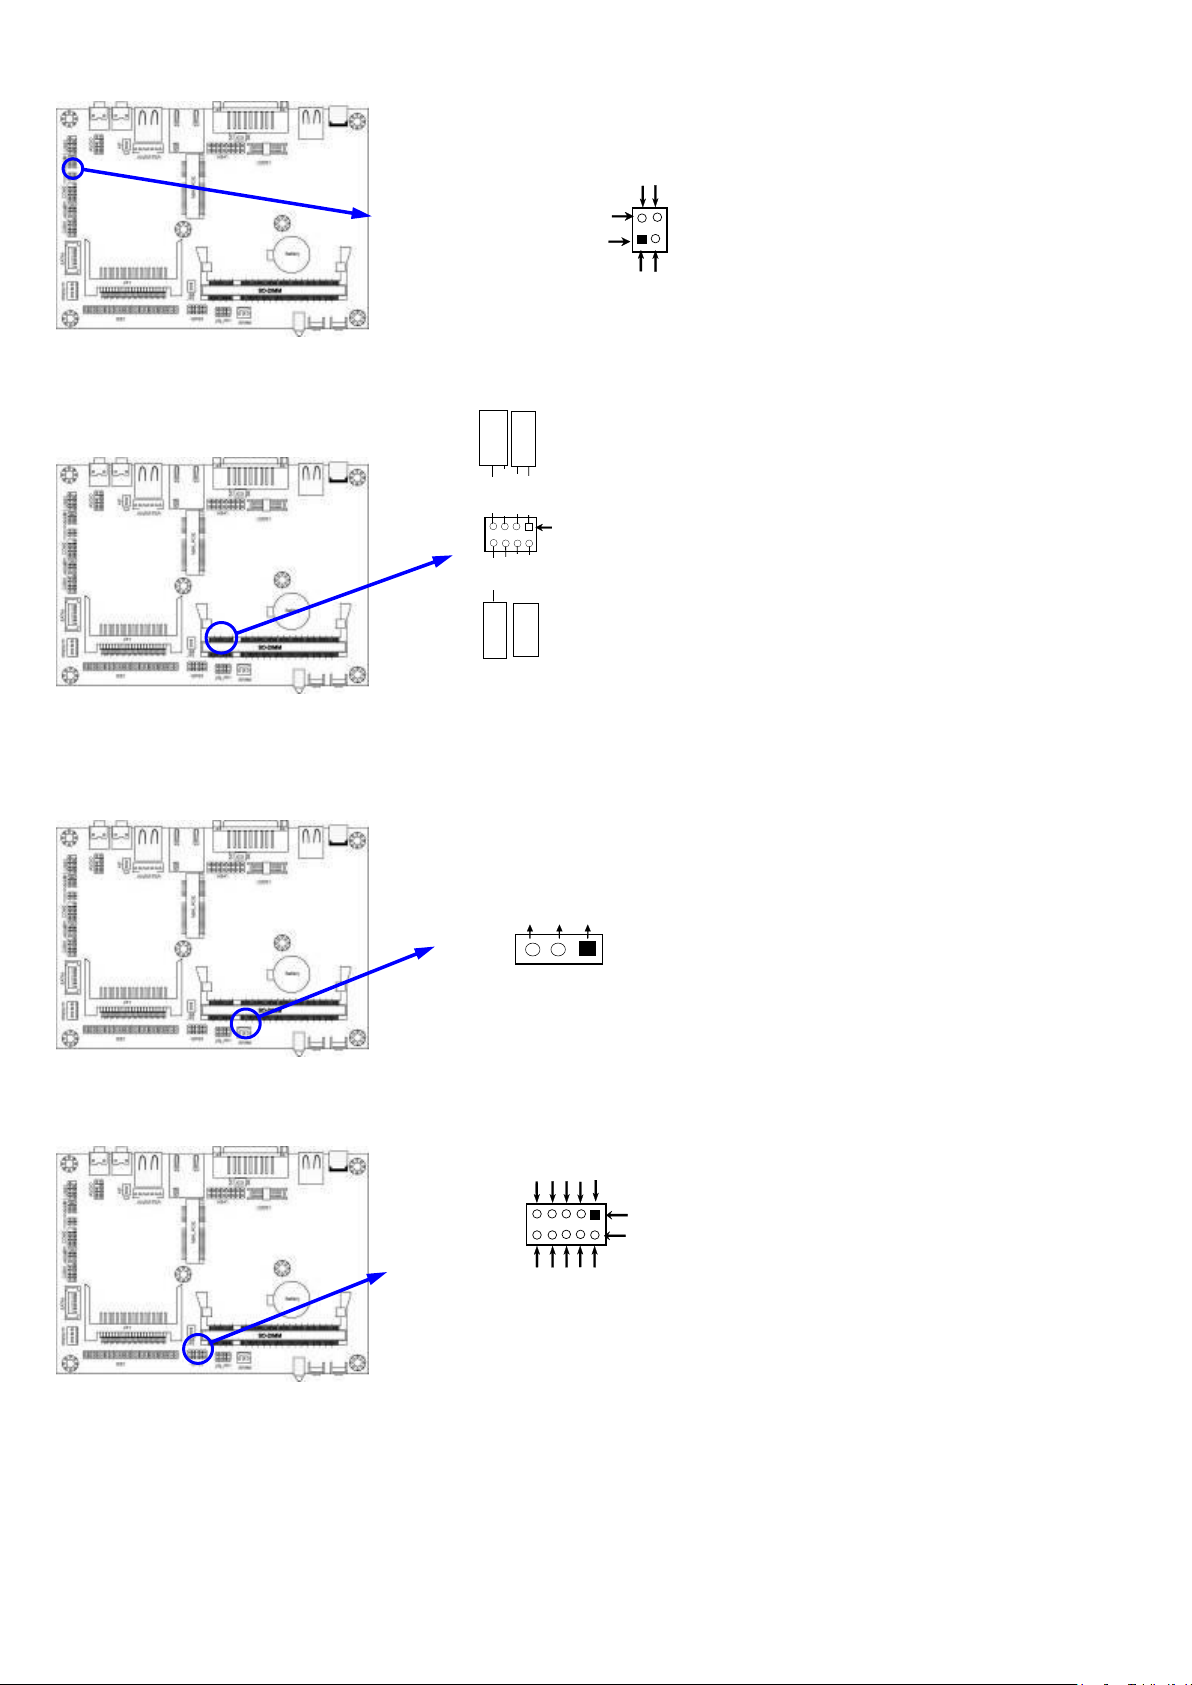
16
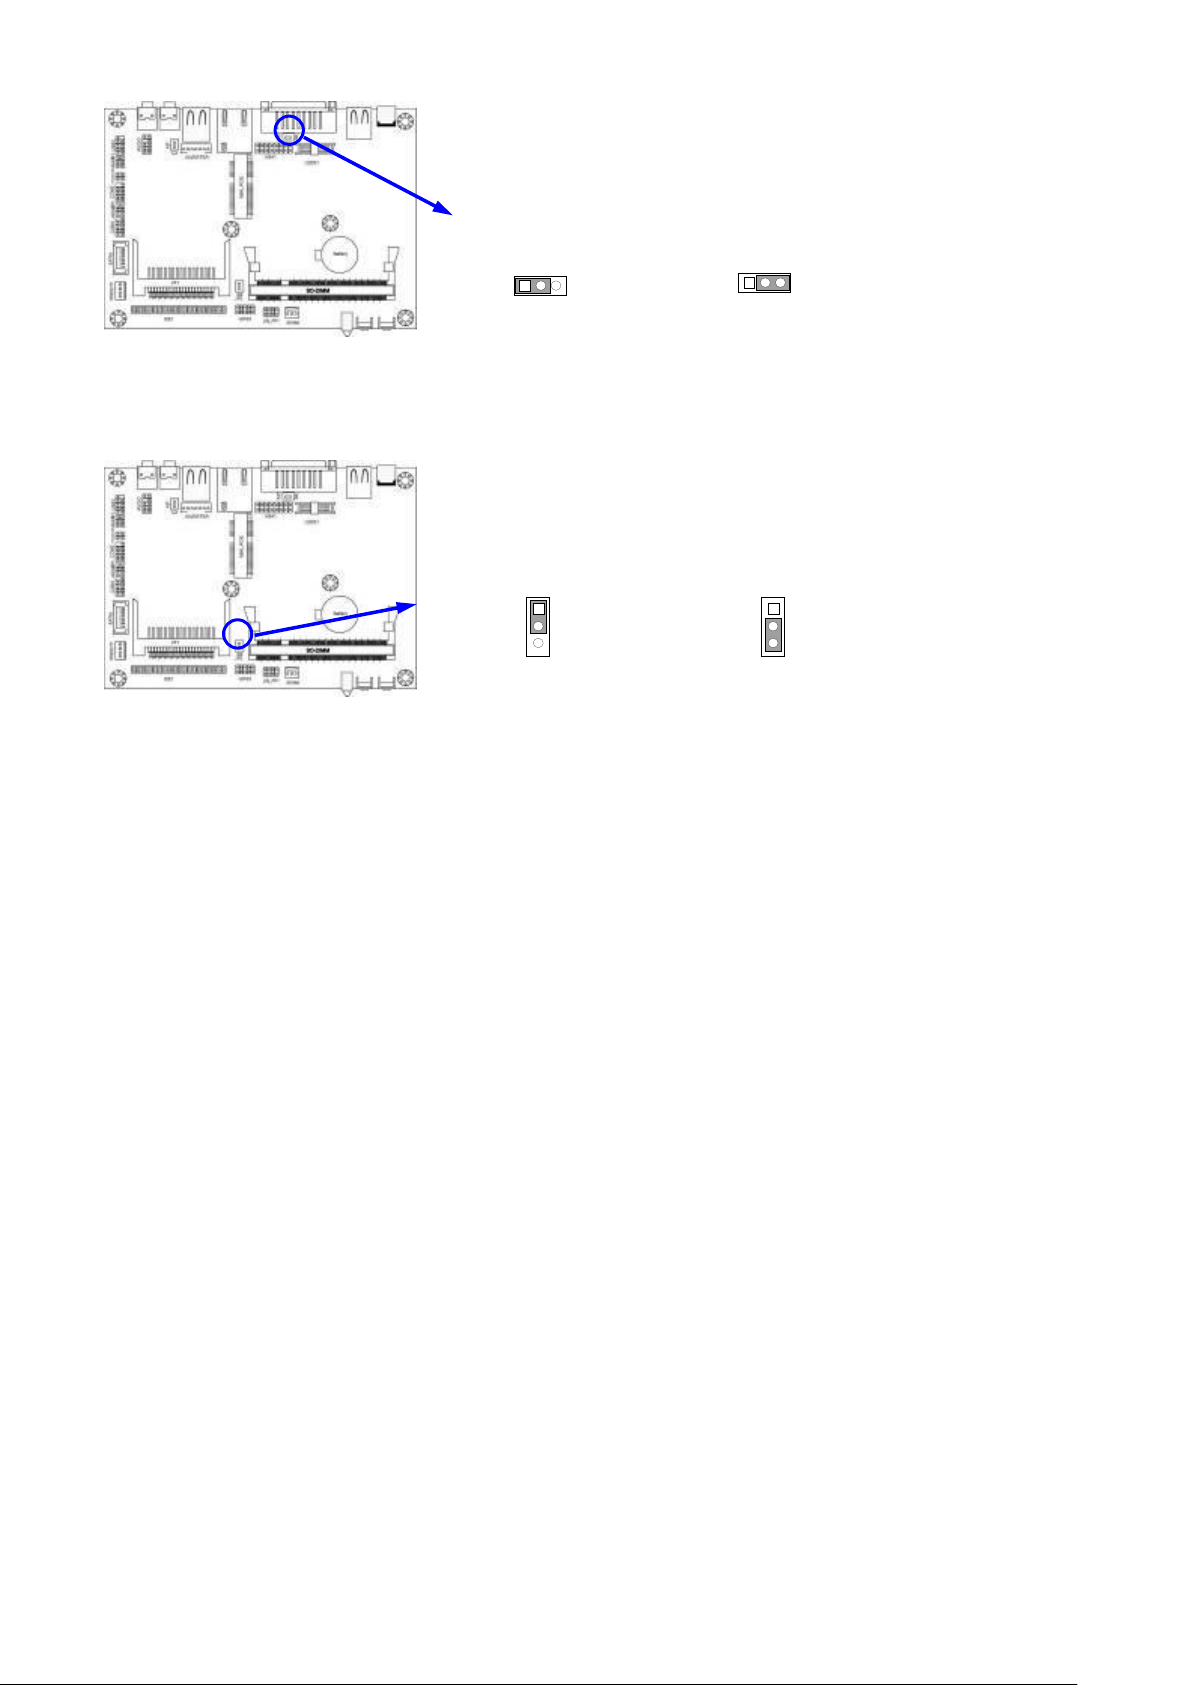
(4) JP2: LVDS 5V/3.3V Function setting (3-pin)
2-3 closed : LVDS VCC 3.3V
JP2
JP2
1
3
1-2 closed: LVDS VCC 5V
1
3
2-3 closed :CF Card Master
JP3
1
3
JP3
1
3
1-2 closed: CF Card Slave
(5) JP3: CF card Master /Slave Mode setting (3-pin)
AHM-6077 User Manual
17
2.3 Connectors and Headers
Serial-ATA Connectors
SATA1
2.3.1 Connectors
(1) Audio Connector: (Line-Out/ MIC-In)
(2) Serial-ATA Port connector: SATA1
AHM-6077 User Manual
18
2.3.2 Headers
Line-Out, MIC Headers
AUDIO
Pin 1
LINTOUT-L
LINEOUT-R
SENSE
GND
NC
NC
2 9 10
KEY
MIC1-R
NC
MIC2-L
Pin1
Serial Port 9-pin Block
-DCD
-SIN
SOUT
-DTR
GND
-DSR
-RTS
-CTS
RI
NC
(1) Front panel audio (9-pin): AUDIO1
(2) COM Connectors (9-pin): COM1/COM2
AHM-6077 User Manual
19
(3)TX-RXCOM Header: TX-RXCOM1
TX-RXCOM1 Header
Pin 1
TXDN
RXDN
TXDP
Pin 2
RXDP
System Case Connections
HDLED
RESET
VCC5
GND
PWRLED+
D=
PWR
LED
PWRBTN
PWRBTN
PWRLED-
HDDLED
RSTSW
GND
Pin 1
Fan Header
1
3
VCC12V
GND
DET
GPIO Connector
GP10
O
GP17
2
Pin 1
GP11
GP12
GP13
GND
GP63
GP64
GP65
VCC
(4) JW-FP1(8-pin)
(5) SFAN1 Headers (3-pin): SYSFAN1
(6) GPIO1 Connectors (10-pin): GPIO
AHM-6077 User Manual

20
(7)LVDS Headers: LVDS1
Pin 1
LVDS Header
Pin 2
Pin NO.
Pin Define
Pin NO.
Pin Define
Pin 1
NC
Pin 2
NC
Pin 3
LVDS_CLKBN
Pin 4
LVDS_CLKBP
Pin 5
LVDSB_DATAN2
Pin 6
LVDSB_DATAP2
Pin 7
LVDSB_DATAN1
Pin 8
LVDSB_DATAP1
Pin 9
LVDSB_DATAN0
Pin 10
LVDSB_DATAP0
Pin 11
LVDS_DDC_DATA
Pin 12
LVDS_DDC_CLK
Pin 13
GND
Pin 14
GND
in 15
GND
Pin 16
GND
Pin 17
NC
Pin 18
NC
Pin 19
LVDS_CLKAP
Pin 20
LVDS_CLKAN
Pin 21
LVDSA_DATAP2
Pin 22
LVDSA_DATAN2
Pin 23
LVDSA_DATAP1
Pin 24
LVDSA_DATAN1
Pin 25
LVDSA_DATAP0
Pin 26
LVDSA_DATAN0
Pin 27
PVDD
Pin 28
PVDD
Pin 29
PVDD
Pin 30
PVDD
AHM-6077 User Manual

21
Pin 1
INVERTER
Pin NO.
Pin Define
Pin 1
VCC
Pin 2
VCC
Pin 3
GND
Pin 4
GND
Pin 5
Backlight
Pin 6
GND
Pin 7
Bright
(8) Pin-headers of LVDS Inverter: INVERTER1
AHM-6077 User Manual

22
Chapter 3 BIOS Setup
The BIOS is a program located on a Flash Memory on the motherboard. This program is a bridge
between motherboard and operating system. When you start the computer, the BIOS program will
gain control. The BIOS first operates an auto-diagnostic test called POST (power on self test) for all
the necessary hardware, it detects the entire hardware device and configures the parameters of
the hardware synchronization. Only when these tasks are completed done it gives up control of
the computer to operating system (OS). Since the BIOS is the only channel for hardware and
software to communicate, it is the key factor for system stability, and in ensuring that your system
performance as its best.
In the BIOS Setup main menu of Figure 3-1, you can see several options. We will explain these
options step by step in the following pages of this chapter, but let us first see a short description of
the function keys you may use here:
Press <Esc> to quit the BIOS Setup.
Press (up, down, left, right) to choose, in the main menu, the option you want to confirm or
to modify.
Press <F10> when you have completed the setup of BIOS parameters to save these parameters and
to exit the BIOS Setup menu.
Press Page Up/Page Down or +/– keys when you want to modify the BIOS parameters for the active
option.
3.1 Entering Setup
Power on the computer and by pressing <Del> immediately allows you to enter Setup.
If the message disappears before your respond and you still wish to enter Setup, restart the system
to try again by turning it OFF then ON or pressing the “RESET” button on the system case. You
may also restart by simultaneously pressing <Ctrl>, <Alt> and <Delete> keys. If you do not
press the keys at the correct time and the system does not boot, an error message will be displayed
and you will again be asked to
Press <Del> to enter Setup
AHM-6077 User Manual

23
3.2 Getting Help
Main Menu
The on-line description of the highlighted setup function is displayed at the bottom of the screen.
Status Page Setup Menu/Option Page Setup Menu
Press F1 to pop up a small help window that describes the appropriate keys to use and the possible
selections for the highlighted item. To exit the Help Window, press <Esc>.
3.3 The Main Menu
Once you enter Award BIOS CMOS Setup Utility, the Main Menu (Figure 3-1) will appear on the
screen. The Main Menu allows you to select from fourteen setup functions and two exit choices.
Use arrow keys to select among the items and press <Enter> to accept or enter the sub-menu.
Figure 3-1
Standard CMOS Features
Use this Menu for basic system configurations.
Advanced BIOS Features
Use this menu to set the Advanced Features available on your system.
Advanced Chipset Features
Use this menu to change the values in the chipset registers and optimize your system’s performance.
Integrated Peripherals
Use this menu to specify your settings for integrated peripherals.
Power Management Setup
Use this menu to specify your settings for power management.
PnP/PCI Configuration
Use this menu to specify your settings for PnP and PCI configurations.
AHM-6077 User Manual

24
PC Health Status
This entry shows your PC health status.
Miscellaneous Control
Use this menu to specify your settings for Miscellaneous Control.
Load Optimized Defaults
Use this menu to load the BIOS default values these are setting for optimal performances system
operations for performance use.
Load Standard Defaults
Use this menu to load the BIOS default values for the minimal/stable performance system operation
Set Supervisor Password
Use this menu to set supervisor password.
Set User Password
Use this menu to set user password.
Save & Exit Setup
Save CMOS value changes to CMOS and exit setup.
Exit Without Saving
Abandon all CMOS value changes and exit setup.
3.4 Standard CMOS Features
The items in Standard CMOS Setup Menu are divided into several categories. Each category includes
no, one or more than one setup items. Use the arrow keys to highlight the item and then use the
<PgUp> or <PgDn> keys to select the value you want in each item.
Date
AHM-6077 User Manual

25
The date format is <day><month><date><year>.
Day Day of the week is from Sun to Sat, determined by BIOS. Read-only.
Month The month is from Jan. through Dec.
Date The date from 1 to 31 can be keyed by numeric function keys.
Year The year depends on the year of the BIOS.
Time
The time format is <hour><minute><second>.
SATA Port1 Master/IDE Channel Master/Slave
Press Enter to enter the subitem and then press PgUp/<+> or PgDn/<–> to select None, Auto type. Note
that the specifications of your drive must match with the drive table. If the controller of HDD
interface is SCSI, the selection shall be “None”.
If the controller of HDD interface is CD-ROM, the selection shall be “None”
Access Mode The settings are CHS, LBA, Large and Auto.
Capacity The capacity of the hard disk driver.
Cylinder number of cylinders
Head number of heads
Precomp write precomp
Landing Zone landing zone
Sector number of sectors
Video
The optional settings are: EGA/VGA; CGA40; CGA80; Mono.
Halt On
Three optional settings are: All Errors; No Errors; All, But Keyboard.
3.5 Advanced BIOS Features
Virus Warning
The selection Allow you to choose the VIRUS Warning feature for IDE Hard Disk boot sector protection.
If this function is enabled and someone attempt to write data into this area, BIOS will show a
warning message on screen and alarm beep.
Disabled (default) No warning message to appear when anything attempts to access the boot sector or
AHM-6077 User Manual

26
hard disk partition table.
Enabled Activates automatically when the system boots up causing a warning message to appear when
anything attempts to access the boot sector of hard disk partition table.
Hard Disk Boot Priority
The selection is for you to choose the hard disk drives priorities to boot from.
Quick Power On Self-Test
This category speeds up Power On Self Test (POST) after you power on the computer. If this is set to
Enabled, BIOS will shorten or skip some check items during POST.
Enabled (default) Enable quick POST
Disabled Normal POST
First/Second/Third Boot Device
The BIOS attempts to load the operating system from the devices in the sequence selected in these items.
The optional settings are:Removable; Hard Disk; CDROM; Network;Disabled..
Boot Up NumLock Status
The default value is On.
On (default) Keypad is numeric keys.
Off Keypad is arrow keys.
Typematic Rate Setting
Keystrokes repeat at a rate determined by the keyboard controller. When enabled, the typematic rate
and typematic delay can be selected. The settings are: Enabled/Disabled.
Typematic Rate (Chars/Sec)
Sets the number of times a second to repeat a keystroke when you hold the key down. The settings are:
6, 8, 10, 12, 15, 20, 24, and 30.
Typematic Delay (Msec)
Sets the delay time after the key is held down before beginning to repeat the keystroke. The settings are
250, 500, 750, and 1000.
Security Option
This category allows you to limit access to the system and Setup, or just to Setup.
System The system will not boot and access to Setup will be denied if the correct password is not entered
at the prompt.
Setup (default) The system will boot, but access to Setup will be denied if the correct password is not
entered prompt.
MPS Version Control for OS 1.4
This option is only valid for multiprocessor motherboards as it specifies the version of the Multiprocessor
Specification (MPS) that the motherboard will use.
OS Select for DRAM > 64MB
Allows OS2 to be used with >64MB or DRAM. Settings are Non-OS/2 (default) and OS2. Set to OS/2
if using more than 64MB and running OS/2.
HDD S.M.A.R.T Capability
This option allow you to enable the HDD S.M.A.R.T Capability (Self-Monitoring, Analysis and Reporting
Technology) . You can choose from Enabled and Disabled.
AHM-6077 User Manual

27
3.5.1 CPU Features
Limit CPUID Maxval
This option supports the max ID of comparatively old processor.
CPU C State Compatibility
The optional settings are: Disabled; C2; C4.
Enhanced Intel Speedstep Tech
This option can provide average power savings depending on system usage and design.
3.6 Advanced Chipset Features
The Advanced Chipset Features Setup option is used to change the values of the chipset registers. These
registers control most of the system options in the computer.
AHM-6077 User Manual

28
DRAM Timing Selectable
The optional settings are: By SPD; Manual. If you chose Manual, you could activate the four items
following it and make modification manually.
System BIOS Cacheable
Selecting Enabled allows caching of the system BIOS ROM at F0000h-FFFFFh, resulting in better
system performance. However, if any program writes to this memory area, a system error may
result. The settings are: Enabled and Disabled.
OnChip Frame Buffer Size
The optional settings are: 1MB; 8MB.
DVMT Memory Memory Size
The optional settings are: 64 MB; 128MB; 224MB.
Boot Display
The optional settings are: Auto; CRT; DVI; LVDS; CRT+LVDS; CRT+DVI.
3.7 Integrated Peripherals
AHM-6077 User Manual

29
3.7.1 Onboard IDE Function
IDE Channel Master/Slave PIO
The two IDE PIO (Programmed Input/Output) fields let you set a PIO mode (0-4) for each of the two
IDE devices that the onboard IDE interface supports. Modes 0 through 4 provide successively
increased performance. In Auto mode, the system automatically determines the best mode for
each device. The settings are: Auto, Mode 0, Mode 1, Mode 2, Mode 3, Mode 4.
IDE Channel Master/Slave UDMA
Ultra DMA/33 implementation is possible only if your IDE hard drive supports it and the operating
environment includes a DMA driver (Windows 95 OSR2 or a third-party IDE bus master driver).
If your hard drive and your system software both support Ultra DMA133, select Auto to enable
BIOS support. The settings are: Auto, Disabled.
IDE DMA Transfer Access
The integrated peripheral controller contains an IDE interface with support for one IDE channels. Select
Enabled to activate each channel separately. The settings are: Enabled and Disabled.
IDE HDD Block Mode
Block mode is also called block transfer, multiple commands, or multiple sector read/write. If your IDE
hard drive supports block mode (most new drives do), select Enabled for automatic detection of
the optimal number of block read/writes per sector the drive can support. The settings are:
Enabled, Disabled.
Delay for HDD (Sec.)
The optional settings range from 0 to 15 seconds.
SATA Port Speed Settings
The optional settings are: Disabled; Force GENI; Force GEN II.
AHM-6077 User Manual

30
3.7.2 Onboard Device Function
High Definition Audio
This item allows you to decide to enable/disable the chipset family to support HD Audio. The settings
are: Enabled, Disabled.
USB 2.0 Function
Use this item to enable or disable USB 2.0 function.
USB Operation Mode
The optional settings are:Full/Low Speed; High Speed.
USB Keyboard/Mouse /Storage Legacy Support
Select Enabled if your system contains a Universal Serial Bus (USB) controller and you have a USB
mouse /keyboard/USB storage device. The settings are: Enabled, Disabled.
AHM-6077 User Manual

31
3.7.3 Onboard SuperIO Function
Onboard Serial Port 1/2
The optional settings are:Disabled, 3F8/IRQ4,2F8/IRQ3, 3E8/IRQ4,2E8/IRQ3.
Onboard Serial Port1 Mode
The optional settings are: RS232; RS422/RS485.
Watchdog Timer Select
This item is used to activate the watchdog function. The optional settings are: Enabled; Disabled. When set it
as Enabled user can choose configuration figures in subitems.
Watchdog Timer Value
This item is only activated when Watchdog Timer Select is set as Enabled and users can set a value from the
range of 1~255.
Watchdog Timer Unit
This item is only activated when Watchdog Timer Select is set as Enabled and the optional units are: Sec.
and Min.
*Note: User needs an additional Watchdog Programming Reference Code to make use of this BIOS function.
Detailed procedures please download from our website if necessary.
The Delay Time for S5
users can set a value from the range of 1~255.
3.8 Power Management Setup
The Power Management Setup allows you to configure your system to most effectively save energy saving
while operating in a manner consistent with your own style of computer use.
AHM-6077 User Manual

32
ACPI Suspend Type
Use this item to select ACPI suspend type. The optional settings are: S1(POS); S3 (STR).
Power Management
The optional settings are: User Define; Min Saving; Max Saving.
Video Off Method
This determines the manner in which the monitor is blanked.
Blank Screen This option only writes blanks to the video buffer.
V/H SYNC+Blank This selection will cause the system to turn off the vertical and horizontal
synchronization ports and write blanks to the video buffer.
DPMS Initial display power management signaling.
Video Off in Suspend
The optional settings are: Yes; No.
Suspend Type
The optional settings are: Stop Grant; PwrOn Suspend.
MODEM Use IRQ
If you want an incoming call on a modem to automatically resume the system from a power-saving mode,
use this item to specify the interrupt request line (IRQ) that is used by the modem. You might
have to connect the fax/modem to the motherboard Wake On Modem connector for this feature to
work.
Soft-Off by PWRBTN
Under ACPI (Advanced Configuration and Power management Interface) you can create a software
power down. In a software power down, the system can be resumed by Wake up Alarms. This
item lets you install a software power down that is controlled by the power Button on your system.
If the item is set to Instant-Off, then the power button causes a software power down. If the item is
set to Delay 4 Sec, then you have to hold the power button down for four seconds to cause a
software power down.
EUP Function
The optional settings are: Enabled; Disabled. User can set it as Enabled to select the relative items for
AHM-6077 User Manual

33
the follwoing wake up events: Power on by Ring, Wake-Up by USB KB from S3(S4), and Resume
by Alarm.
Resume by Alarm
When set to Enabled, additional fields become available and you can set the date (day of the month),
hour, minute and second to turn on your system. When set to 0 (zero) for the day of the month, the
alarm will power on your system every day at the specified time .
Date (of month)
You can choose which month the system will boot up. Set to 0, to boot every day.The optional
settings range from 0 to 31
Time (hh:mm:ss)
You can choose what hour, minute and second the system will boot up.
Note: If you have change the setting, you must let the system boot up until it goes to the operating
system, before this function will work.
3.9 PnP/PCI Configuration
PCI/VGA Palette Snoop
This item is designed to overcome problems that can be caused by some non-standard VGA cards.
This board includes a built-in VGA system that does not require palette snooping so you must leave
this item disabled.
IRQ Resources
Names the interrupt request (IRQ) line assigned to the USB on your system. Activity of the selected
IRQ always awakens the system.
AHM-6077 User Manual

34
3.10 PC Health Status
This section shows the Status of you CPU, Fan, and Warning for overall system status. This is only
available if there is Hardware Monitor onboard.
Shutdown Temperature
This item can let users setting the Shutdown temperature, when CPU temperature over this setting the
system will auto shutdown to protect CPU.
CPU Thermal Throttling
The optional settings are: Disabled; Enabled. When it is set as Enabled user could set value for CPU
Thermal-Throttling Temp.; CPU Thermal-Throttling Duty and CPU Thermal-Throttling Beep.
Show PC Health in Post
During Enabled, it displays information list below. The choice is either Enabled or Disabled
+5V OUT/+12V OUT/Vcc3V OUT
User can set is Disabled or select to add a value in the range of +5% to +35%.
Smart Fan Configuration
The optional settings are: Disabled; Enabled. When it is set as Enabled user could set value for SYS
FAN1 Full-Speed Temp., SYS FAN1 Idle Temp. and SYS FAN1 IDLE-Speed Duty.
VCC3V/Vcore/ /NB/5 VSB /VDIMM/+5V/+12V/ VSB3V/Vbat/ CPU Temperature/ System
Temperature/ SYSFAN1 Speed/
This will show the CPU/FAN/System voltage chart and FAN Speed.
AHM-6077 User Manual

35
3.11 Miscellaneous Control
CPU Clock Ratio Unclock
This item is used to lock or unlock CPU ratio.
CPU Clock Ratio
The optional settings range from 6X to 12X.
DRAM Clock at Next Boot
This item allows you to set DRAM clock. The optional settings are:By SPD(DDR 533); 400MHz;
533MHz..
3.12 Password Setting
You can set either supervisor or user password, or both of them. The differences are:
Supervisor password: Can enter and change the options of the setup menus.
User password: Can only enter but do not have the right to change the options of the setup menus.
When you select this function, the following message will appear at the center of
the screen to assist you in creating a password.
ENTER PASSWORD:
Type the password, up to eight characters in length, and press <Enter>. The password typed now will clear
any previously entered password from CMOS memory. You will be asked to confirm the password.
Type the password again and press <Enter>. You may also press <Esc> to abort the selection and not
enter a password.
To disable a password, just press <Enter> when you are prompted to enter the password. A message will
confirm that the password will be disabled. Once the password is disabled, the system will boot and you
can enter Setup freely.
PASSWORD DISABLED.
When a password has been enabled, you will be prompted to enter it every time you try to enter Setup.
AHM-6077 User Manual

36
This prevents an unauthorized person from changing any part of your system configuration.
Additionally, when a password is enabled, you can also require the BIOS to request a password every time
your system is rebooted. This would prevent unauthorized use of your computer.
You determine when the password is required within the BIOS Features Setup Menu and its Security
option. If the Security option is set to “System”, the password will be required both at boot and at entry to
Setup. If set to “Setup”, prompting only occurs when trying to enter Setup.
3.13 Load Standard/Optimized Defaults
Load Standard Defaults
When you press <Enter> on this item, you get confirmation dialog box with a message similar to:
Pressing <Y> loads the BIOS default values for the most stable, minimal-performance system
operations.
Load Optimized Defaults
When you press <Enter> on this item, you get a confirmation dialog box with a message similar to:
Pressing <Y> loads the default values that are factory settings for optimal performance system
operations.
AHM-6077 User Manual

37
Chapter 4 Installation of Drivers
Important Note:
After installing your Windows operating system (Windows XP), you must install
first the Intel Chipset Software Installation Utility before proceeding with the
installation of drivers.
This chapter describes the installation procedures for software and drivers under the windows XP. The
software and drivers are included with the motherboard. The contents include Intel chipset driver,
VGA driver, LAN driver, Audio driver, Touch Panel driver
Installation instructions are given below.
I
AHM-6077 User Manual

38
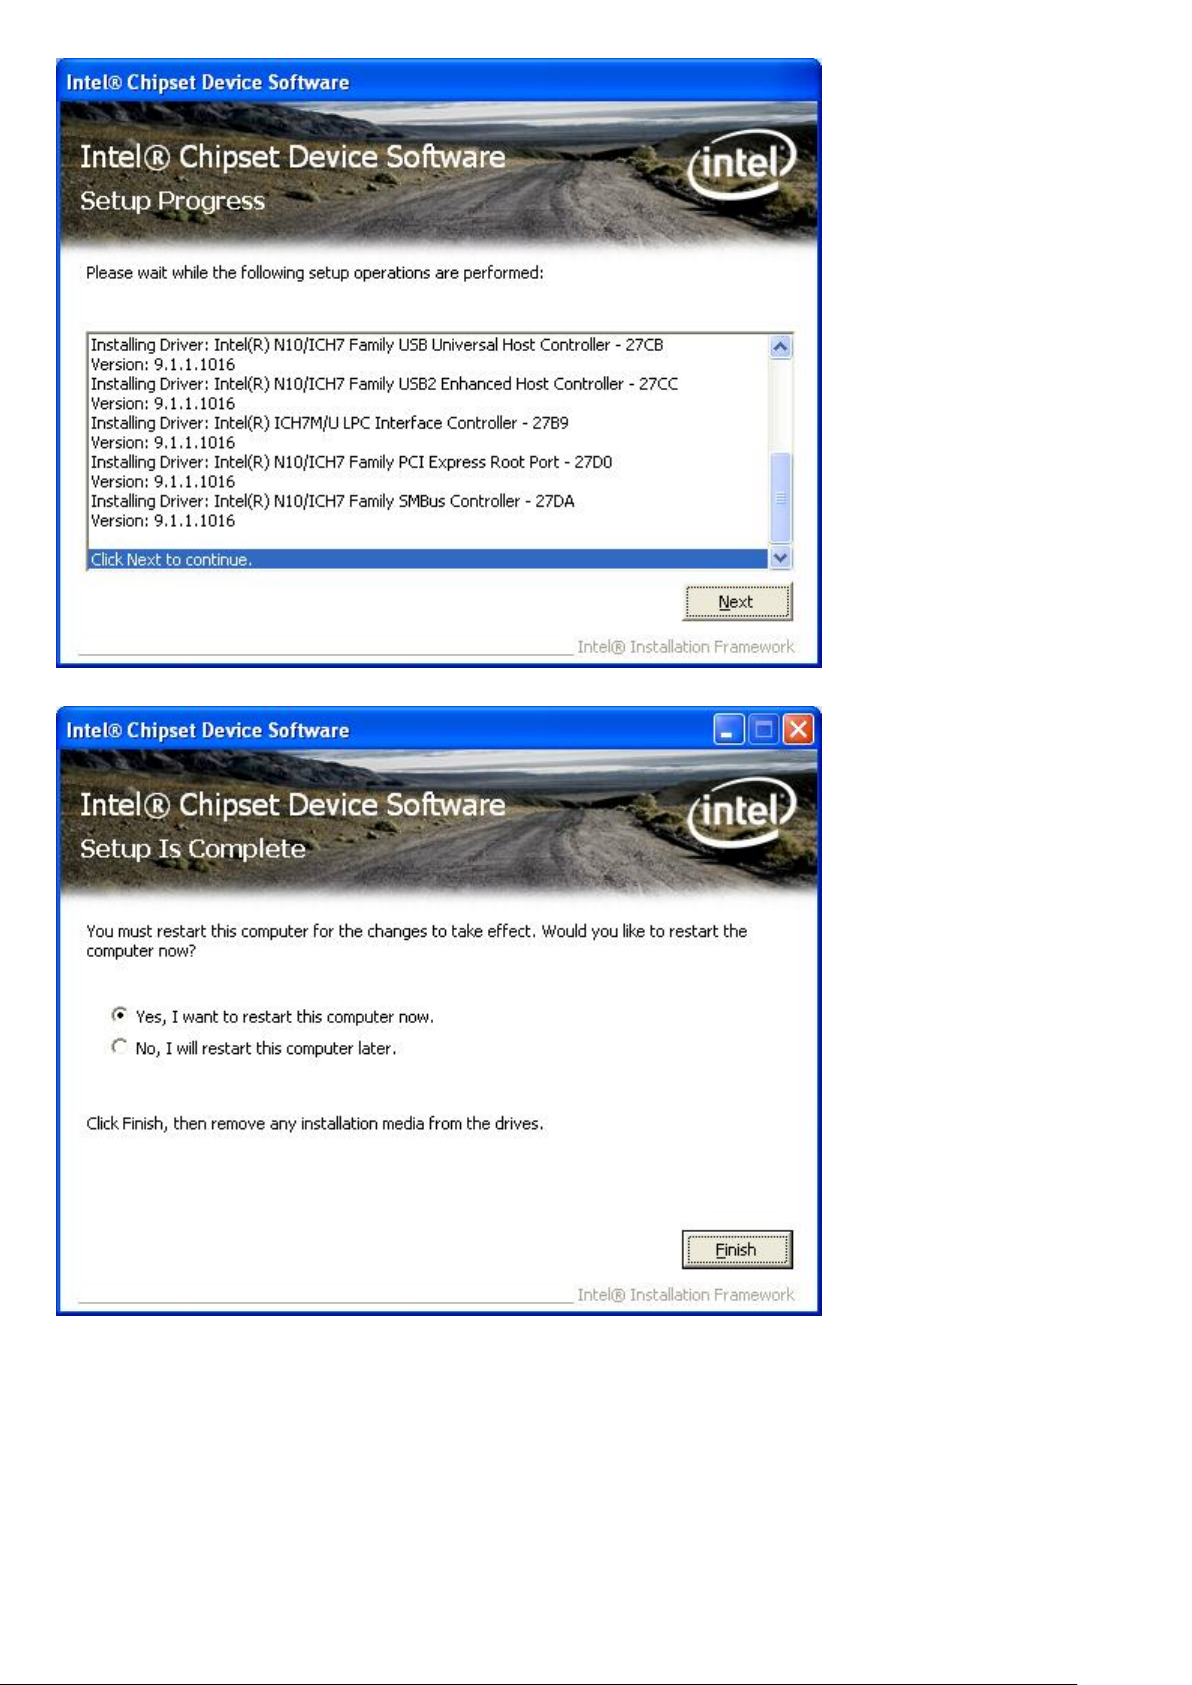
4.1 Intel Chipset Driver
To install the Intel chipset driver, please follow the steps below.
Step 1: Select Chipset from the list
Follow the step-by-step installation process to install the LMS_SQL driver.
AHM-6077 User Manual
39
AHM-6077 User Manual
40
Click Finish, when the installation process is complete, the Setup Complete screen appears. See as
picture.
AHM-6077 User Manual

41
4.2 Intel VGA Chipset Driver
To install the VGA drivers, follow the steps below to proceed with the installation.
1. Click Intel VGA Chipset Driver.
Follow the step-by-step installation process to install the Graphics Media Accelerator driver.
AHM-6077 User Manual

42
AHM-6077 User Manual

43
Click FINISH; A Driver Installation Complete.
AHM-6077 User Manual

44
4.3 Realtek GbE & FE Ethernet PCI-E NIC Driver
To install the Realtek GbE & FE Ethernet PCI-E NIC Driver, please follow the steps below.
Select LAN from the list
Follow the step-by-step installation process to install the LAN driver.
AHM-6077 User Manual

45
Click FINISH; A Driver Installation Complete.
AHM-6077 User Manual

46
4.4 Realtek HD Audio Driver Installation
To install the Realtek High Definition (HD) Audio driver, please follow the steps below.
Select Audio from the list
Follow the step-by-step installation process to install the Realtek HD Audio driver.
AHM-6077 User Manual

47
Click FINISH; A Driver Installation Complete.
AHM-6077 User Manual
48
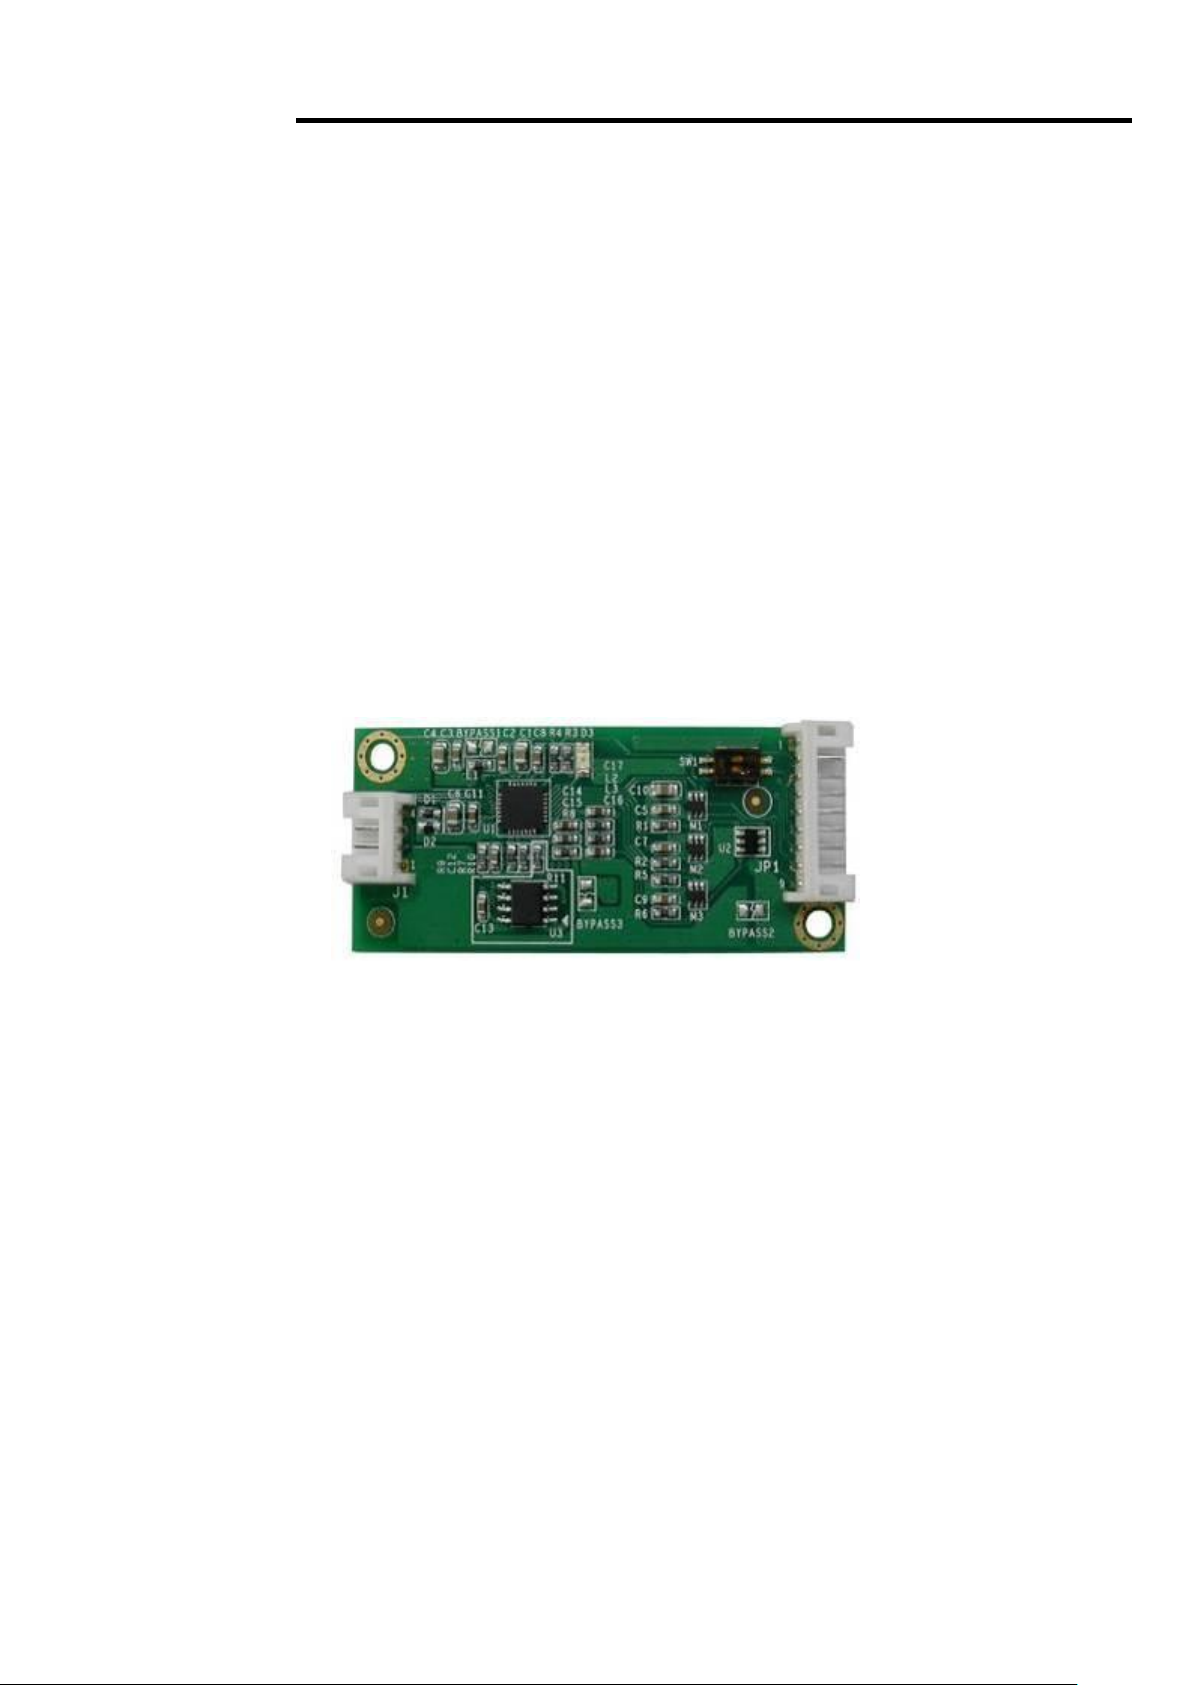
Chapter 5 Touch Screen Installation
This chapter describes how to install drivers and other software that will allow your PenMount 6000
Controller Board to work with different operating systems.
NOTE: PenMount USB drivers support up to 15 USB controllers.
5.1 Introduction to Touch Screen Controller Board
PenMount 6300 USB control board is a touch screen control board designed for USB interface and
specific for 4, 5, 8-wire touch screens. It is designed with USB interface features with multiple devices
supporting function. PenMount 6300 control board using PenMount 6000 controller that has been
designed for those who may like and all-in-one solution with 10-bit A/D converter built-in to make the
total printed circuit board denser, circuit diagram also designed for 12-bit ADC for optional. There are
two connectors on this board, one connector is for 4, 5, 8-wire touch screen cable (optional), and
another is for 4-pin USB A type cable (optional).
Figure 5.1: Bird’s Eye View of Control Board
5.2 Windows 2000/XP/2003/Vista Universal Driver Installation
for PenMount 6000 Series
Before installing the Windows 2000/XP driver software, you must have the Windows 2000/XP system
installed and running on your computer. You must also have one of the following PenMount 6000
series controller or control boards installed: PM6500, PM6300.
AHM-6077 User Manual

49
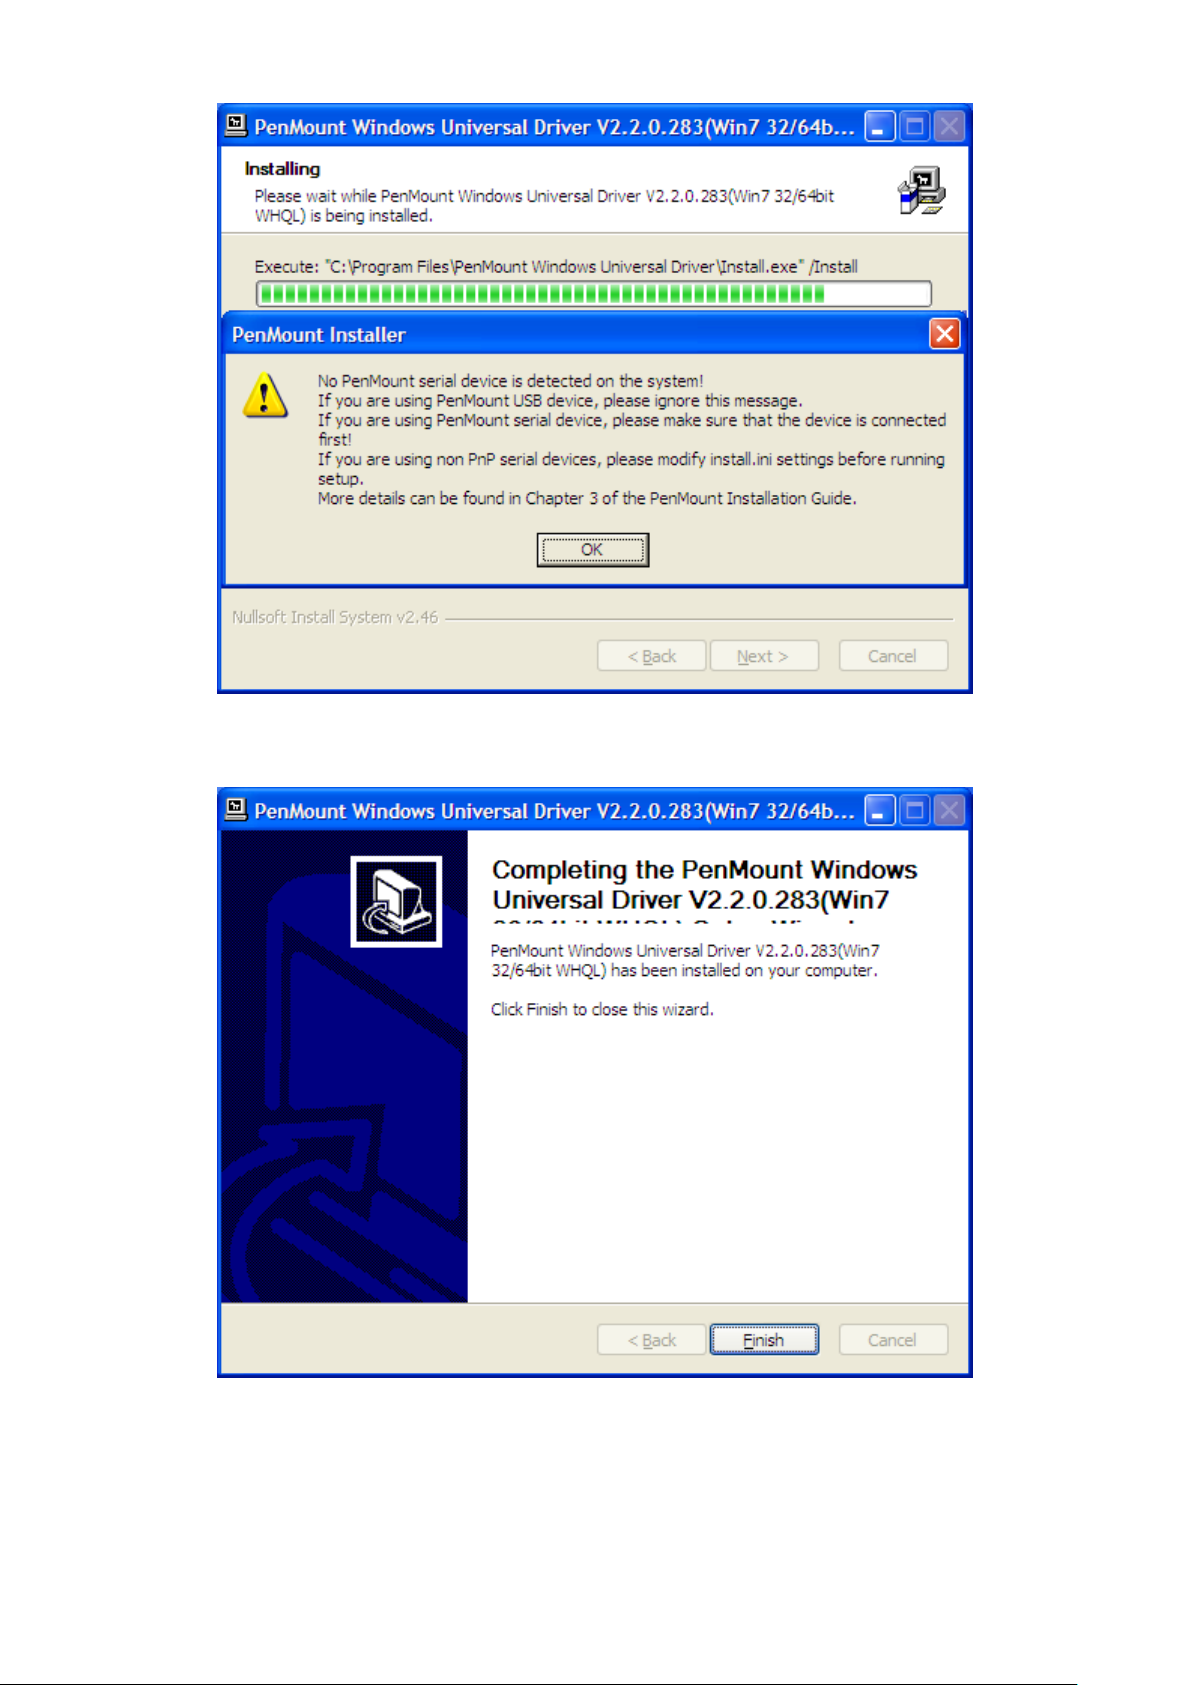
5.2.1 Installing Software
If you have an older version of the PenMount Windows 2000/XP driver installed in your system, please
remove it first. Follow the steps below to install the PenMount DMC6000 Windows 2000/XP driver.
1. Please make sure your PenMount 6000 device had plugged in advance. If your device uses RS232
interface, please plugged in before the machine is turned on. When the system first detects the
controller board, a screen appears that shows “Unknown Device”. Do not use this hardware wizard.
Press Cancel.
2. Insert the Aplex product CD install setup.exe. the screen below would appear. Click touch panel
driver
AHM-6077 User Manual

50
3. A License Agreement appears. Click “I Agree…” and “Next”
AHM-6077 User Manual

51
4. Ready to Install the Program. Click “Install”
AHM-6077 User Manual
52
5. Installing
6. The “Install Shield Wizard Completed” appears. Click “Finish”.
AHM-6077 User Manual

53
5.2.2 Software Functions
Standard Calibration
Click this button and arrows appear
pointing to red squares. Use your finger or
stylus to touch the red squares in
sequence. After the fifth red point
calibration is complete. To skip, press
‘ESC’.
Upon rebooting, the computer automatically finds the new 6000 controller board. The touch screen is
connected but not calibrated. Follow the procedures below to carry out calibration.
1. After installation, click the PenMount Monitor icon “PM” in the menu bar.
2. When the PenMount Control Panel appears, select a device to “Calibrate.”
PenMount Control Panel
The functions of the PenMount Control Panel are Device, Multiple Monitors, Tools and About,
which are explained in the following sections.
Device
In this window, you can find out that how many devices are detected on your system.
Calibrate
This function offers two ways to calibrate your touch screen. ‘Standard Calibration’ adjusts most touch
screens. ‘Advanced Calibration’ adjusts aging touch screens.
AHM-6077 User Manual

54
Advanced Calibration
Advanced Calibration uses 4, 9, 16 or 25
points to effectively calibrate touch panel
linearity of aged touch screens. Click this
button and touch the red squares in
sequence with a stylus. To skip, press
ESC’.
Command Calibration
Command call calibration function. Use
command mode call calibration function,
this can uses Standard, 4, 9, 16 or 25
points to calibrate E.g. Please run ms-dos
prompt or command prompt c:\Program
Files\PenMount Universa Driver\Dmcctrl.exe
-calibration 0 ( Standard Calibration)
Dmcctrl.exe - calibration ($) 0= Standard
Calibration 4=Advanced Calibration 4
9=Advanced Calibration 9 16=Advanced
Calibration 16 25=Advanced Calibration 25
1. Please select a device then click “Configure”. You can also double click the device too.
2.Click “Standard Calibration” to start calibration procedure
AHM-6077 User Manual

55
NOTE: The older the touch screen, the more Advanced Mode calibration points you need for an
accurate calibration. Use a stylus during Advanced Calibration for greater accuracy. Please follow the
step as below:
3.Come back to “PenMount Control Panel” and select “Tools” then Click “Advanced
Calibration”.
AHM-6077 User Manual

56
Select “Device” to calibrate, then you can start to do “Advanced Calibration”.
NOTE: Recommend to use a stylus during Advanced Calibration for greater accuracy.
AHM-6077 User Manual

57
Setting
AHM-6077 User Manual

58
About
This panel displays information about the PenMount controller and driver version.
AHM-6077 User Manual

59
Multiple Monitors
Multiple Monitors supports from two to six touch screen displays for one system. The PenMount
drivers for Windows 2000/XP support Multiple Monitors. This function supports from two to six touch
screen displays for one system. Each monitor requires its own PenMount touch screen control board,
either installed inside the display or in a central unit. The PenMount control boards must be connected
to the computer COM ports via the RS-232 interface. Driver installation procedures are the same as
for a single monitor. Multiple Monitors supports the following modes:
Windows Extend Monitor Function
Matrox DualHead Multi-Screen Function
nVidia nView Function
NOTE: The Multiple Monitors function is for use with multiple displays only. Do not use this function if
you have only one touch screen display. Please note once you turn on this function the Rotating
function is disabled.
Enable the multiple display function as follows:
1. Check the “Multiple Monitor Support” box; then click “Map Touch Screens” to assign touch
controllers to displays.
2. When the mapping screen message appears, click “OK”
AHM-6077 User Manual

60
3. Touch each screen as it displays “Please touch this monitor. Press ‘S’ to skip” Following this
sequence and touching each screen is called mapping the touch screens.
4. After the setting procedure is finished, maybe you need to calibrate for each panel and controller
NOTES:
1. If you used a single VGA output for multiple monitors, please do not use the Multiple Monitors
function. Just follow the regular procedure for calibration on each of your desktop monitors.
2. The Rotating function is disabled if you use the Multiple Monitors function.
3. If you change the resolution of display or screen address, you have to redo Map Touch Screens so
the system understands where the displays are.
4. If you more monitor mapping one touch screen, Please press ‘S’ to skip mapping step.
AHM-6077 User Manual

61
Tools
Draw
Tests or demonstrates the PenMount touch
screen operation.
Advanced Calibration
Enable Advanced Calibration function
Right Button Icon
Enable right button function. The icon can
show on Desktop or System Tray (menu bar).
About
You can see how many devices of PenMount controller that are plugged to your system
AHM-6077 User Manual

62
PenMount Monitor Menu Icon
The PenMount monitor icon (PM) appears in the menu bar of Windows 2000/XP system when you
turn on PenMount Monitor in PenMount Utilities.
PenMount Monitor has the following function
PenMount Rotating Functions
The PenMount driver for Windows 2000/XP supports several display rotating software packages.
AHM-6077 User Manual

63
Windows Me/2000/XP support display rotating software packages such as:
• Portrait’s Pivot Screen Rotation Software
• ATI Display Driver Rotate Function
• nVidia Display Driver Rotate Function
• SMI Display Driver Rotate Function
• Intel 845G/GE Display Driver Rotate Function
Configuring the Rotate Function
1. Install the rotation software package.
2. Choose the rotate function (0°, 90°, 180°, 270°) in the 3rd party software. The calibration screen
appears automatically. Touch this point and rotation is mapped.
NOTE: The Rotate function is disabled if you use Monitor Mapping
AHM-6077 User Manual
 Loading...