


T h e C h a n n e l S t r i p
5 1 2 c - 5 2 7 - 5 5 0 A - 3 2 5
A l l - D i s c r e t e
C o m p l e t e I n p u t M o d u l e
O p e r a t o r ' s M a n u a l
W r i t t e n f o r A u t o m a t e d P r o c e s s e s , I n c .
b y D a n i e l P f e i f e r
2 0 1 1
A P I , 8 3 0 1 P a t u x e n t R a n g e R o a d , J e s s u p , M D 2 0 7 9 4 T e l : 3 0 1 - 7 7 6 - 7 8 7 9
w w w . a p i a u d i o . c o m
R e v i s e d 2 - 2 2 - 1 1

Table of Contents
1
1.0 Overview
1.1 The Channel Strip Features and Introduction
2.0 Signal Flow and Block Diagrams
2.1 Default Signal Flow
2.2 Alternate Routing
2.2.1 Compressor Post EQ
2.2.2 Compressor Bypass
2.2.3 Equalizer Bypass
2.2.4 Insert
2.3 Default Signal Flow Block Diagram
2.4 Compressor Post EQ Block Diagram
2.5 512C Preamp Block Diagram
2.6 325 Output Section Block Diagram
2.7 Rear Panel Signal Flow
3.0 Input Section: 512C Microphone/I nstrument/Line Preamplifier
3.1 512C Preamp Overview and Features
3.2 Preamp Controls
3.3 Input Selection
3.3.1 Input Switch
3.3.2 Microphone Input
3.3.3 Instrument Input
3.3.4 Line Input
3.4 Polarity Inverter
3.5 Level Indication
3.6.1 VU Meter
3.6.2 Peak Indicator
3.6 Preamp Output
3.7 512C Preamp Block Diagram
4.0 Dynamic Pr ocessing: 527 Compressor
4.1 527 Compressor Overview and Features
4.2 Compressor Controls
4.2.1 Threshold
4.2.2 Attack and Release
4.2.3 Ratio
4.2.4 Type
4.2.4.1 OLD: Feed-Back Compression
4.2.4.2 NEW: Feed-Forward Compression
4.2.5 Knee
4.2.5.1 Soft Knee Compression
4.2.5.2 Hard Knee Compression
4.2.6 THRUST®
4.2.7 Gain Reduction Meter
4.3 Compressor Routing
4.3.1 Compressor Pre Equal izer (Default Signal Flow)
4.3.2 Compressor Post Equalizer
4.3.3 Compressor Bypass
4.3.4 Compressor Side Chain
4.4 DC Link
4.5 Side Chain Input
5.0 Spectral Pr ocessing: 550A Equalizer
5.1 550A Equalizer Overview and Features
5.2 Equalizer Controls
5.2.1 Low Frequency Band
5.2.2 Mid Frequenc y Band
5.2.3 High Frequency Band
5.2.4 Band-Pass Filter

2
5.3 Equalizer Routing
5.3.1 Equalizer Post Compressor (Default Signal Flow)
5.3.2 Equalizer Pre Compressor
5.3.3 Equalizer Bypass
5.3.3.2 EQ Bypass
5.3.3.1 EQ IN Switch
6.0 Output Section: 325 Line-Driv er
6.1 325 Output Section Overview and Features
6.2 Controls
6.2.1 Output
6.2.2 Soft Mute
6.2.2.1 Remote Mute Control
6.2.3 VU Meter
6.3 Output Section Routing
6.3.1 Insert
6.4 325 Output Section Block Diagram
7.0 Rear Panel Interface
7.1 Audio Path Inputs
7.2. Audio Path Outputs
7.3 Rear Panel Half-Normals
7.4 527 Compressor Side Chain and DC Link Connections
7.4.1 Si de Chain Input
7.4.2 DC Link
7.5 Remote Mute Control
7.6 Rear Panel Signal Flow
8.0 AC Power
Appendix
i. 512C Preamplifier Specifications
ii. 527 Compressor Specifications
iii. 550A Equalizer Specifications
iv. 325 Line-Driver Specifications
Daniel Pfeifer is a professor in the
Department of Recording Industry at
Middle Tennessee State University

1.0 Overview
3
The Channel Strip (TCS) is a complete input module with microphone preamplifier, dynamics processing,
precision EQ, and output level control. With extensive signal metering, multiple balanced insert points and an
output mute switch, The Channel Strip contains the best features of a large console input channel in a single
rack space. It's the perfect choice for anyone looking for that high-performance API console sound.
1.1 The Channel Strip Features and Introduction
Features
• API 512C Preamplifier
• API 527 Compressor
• API 550A Equalizer
• API 325 Line-Driver
• Internal routing supports multiple configurations
• Comprehensive rear panel interface with multiple insert points
• Two 10-segment LED VU displays
• Output clips at +30dBm
• API's all discrete signal path
• Transformer outputs
The result of thoughtful engineering, The Channel Strip includes everything needed to record an audio
signal. It all starts with the famed 512C Preamplifier, which includes the benefit of additional Mic, Line or
Instrument input switching. Next is the 527 multi-mode compressor with fully adjustable Threshold,
Attack, Release, and Ratio controls on detented pots. The patented THRUST® circuit in the 527
Compressor gives your track the "in-your-face" punch that has made this circuit an award winner. Also
included in The Channel Strip is probably the most recognized and revered API EQ of all time, the 550A
three-band equalizer with its switchable frequencies and 12dB of boost or cut. The 550A Equalizer's High
and Low frequency bands can be individually switched to be shel ving EQs, and the "B.P. Filter" switch
inserts a 50Hz to 15kHz Band-Pass filter.
At the output of the unit is the 325 Line-Driver, taken directly from API console designs with an output
level pot and 10-segment VU meter. The meter can also be switched to show the output level of the
preamp. Each of The Channel Strip's processing pieces can be switched in or bypassed individually,
while a flip switch internally routes the compressor after the EQ if desired. Additional features include a
side-chain input and the famous API 2520/transformer combination.

2.0 Signal Flow and Block Diagrams
4
2.1 Default Signal Flow
With no routing switches engaged, the default signal flow through The Channel Strip is illustrated by the
left-to-right order of the unit’s front panel:
512C Preamp ----------> 527 Compressor --------------> 550A Equalizer---> Insert --> Output
2.2 Alternate Routing
The default signal flow can be modified in four (4) ways:
• The 527 Compressor can be moved after the 550A Equalizer
• The 527 Compressor can be hard bypassed
• The 550A Equalizer can be hard bypassed
• Insert Return can be engaged
Since each of these routing functions are independent of each other, multiple signal flow configurations
are possible. Combined with the open interfacing available on the rear panel, comprehensive and
flexible routing possibilities are available to meet most production needs.
2.2.1 Compressor Post EQ
Engaging the POST EQ switch will move the 527 Compressor to after the 550A Equalizer. When
the POST EQ switch is engaged, the signal flow will be as follows:
512C Preamp -----> 550A Equalizer -----> 527 Compressor -----> Insert -----> Output
2.2.2 Compressor Bypass
Engaging the COMP BYPASS switch will completely remove the 527 Compressor from the signal
path using a relay-based hard bypass. The 527 Compressor will be bypassed regardless of its
assigned position in the signal flow. When the COMP BYPASS switch is engaged, the signal flow
will be as follows:
512C Preamp -----> 550A Equalizer -----> Insert -----> Output
POST EQ: Moves the 527 Compressor to after the 550A Equalizer
• 527 will use Second Effect rear panel interface jacks
• Illuminates when engaged
COMP BYPASS: Removes the 527 Compressor from the signal flow
• 527 will not be accessible via rear panel in terface jacks
• Illuminates when engaged

2.2.3 Equalizer Bypass
5
Engaging the EQ BYPASS switch will completely remove the 550A Equalizer from the signal path
using a relay-based hard bypass. When the COMP BYPASS switch is engaged, the signal flow will
be as follows:
512C Preamp -----> 527 Compressor -----> Insert -----> Output
EQ BYPASS: Removes the 550A Equalizer from the signal flow
• 550A Equalizer will not be accessible via rear panel interface jacks
• Illuminates when engaged
2.2.4 Insert
Engaging the INSERT switch will route the signal present at the INSERT RETURN jack to the input
of the 325 Line-Driver. When the INSERT switch is engaged, the signal flow will be as follows:
Insert -----> Output
IMPORTANT NOTE: The 550A Equalizer has an “IN” switch that must be engaged in order for the
equalizer to affect the signal when the EQ BYPASS switch is not engaged.
INSERT: Routes the signal present at the INSERT RETURN jack to the 325 Line-Driver
input
• Replaces the Second Effect output as the input to the 325 Line-D river
• Illuminates when engaged
NOTE: Since the signal can be externalized at multiple points in the audio path, The Channel
Strip does not have a dedicated “insert send” output. PRE OUT, FIRST EFFECT OUT, and
SECOND EFFECT OUT are intended to be used as “insert sends” as needed.
2.3 Default Signal Flow Block Diagram
The block diagram below illustrates The Channel Strip signal flow with no switches engaged except the
CUT button. This is the “default” signal flow through the unit.

2.4 Compressor Post EQ Block Diagram
6
The block diagram below illustrates The Channel Strip signal flow with the POST EQ switch engaged. No
other switches are engaged except the CUT button.
NOTE: The order of the First and Second Effect jacks on the rear panel does not change with the
2.5 512C Preamp Block Diagram
The block diagram below illustrates signal flow through the 512C Preamp section of The Channel Strip
with no switches engaged.
compressor when the POST EQ switch is engaged.

2.6 325 Output Section Block Diagram
7
The block diagram below illustrates signal flow through the 325 output section of The Channel Strip with
no switches engaged.
2.7 Rear Panel Signal Flow
The Channel Strip signal flow is illustrated by the right-to-left order of the unit’s rear panel. This order of
these interfaces remains constant, regardless of the order of the 527 Compressor and 550A Equalizer in
the signal path.
Second First
Output <--------------------- Insert <------ Effect <----------- Effect <------------ 512C Preamp
• The PRE OUT is “half-normalled” to feed the FIRST EFFECT IN
• The FIRST EFFECT IN feeds the first processor in the audio path (normally the 527
Compressor*)
• The FIRST EFFECT OUT is “half-normalled” to feed the SECOND EFFECT IN
• The SECOND EFFECT IN feeds the second processor in the audio path (normally the 550A
Equalizer*)
• The SECOND EFFECT OUT is “half-normalled” to feed the 325 Line-Driver input
* Engaging the POST EQ switch will move the 527 Compressor to after the 550A Equalizer, reversing
the order of these effects in the audio path.
The PRE OUT, FIRST EFFECT OUT, and SECOND EFFECT OUT jacks are all splitting outputs. This means
the connection to the input they’re normalled to will not be broken when a plug is inserted.
The FIRST EFFECT IN and SECOND EFFECT IN jacks are all switching jacks. This means the connection
with the output they’re normalled to is broken when a plug is inserted. The input is instead fed with the
signal present on the inserted plug.
The INSERT RETURN is only active when the INSERT switch on the front panel is engaged.

3.0 Input Section: 512C Microphone/Instrument/Line Preamplifier
8
3.1 512C Preamp Overview and Feature
Offering high headroom and a wide variety of inputs and input access points, it is equally at home in the
commercial recording studio as it is in the home project studio. The 512C Preamp makes use of the
2510 and 2520 op-amps and therefore exhibits the reliability, long life, and uniformity which are
characteristic of all API products.
Features
• Microphone preamp with 68dB of gain
• Line preamp at unity gain
• Instrument preamp with 50dB of gain
• -6dB line pad
• -20dB microphone pad
• Switchable 48V phantom power
• Polarity inverter
• +27dBu preamp output peak i n dicator
• LED VU meter can monitor preamp output level
• XLR rear panel MIC input
• ¼” -10dBu front panel instrument (INST) input
• ¼” TRS +4dBu rear panel LINE input
• ¼” TRS +4dBu rear panel LINE output
• Low noise (-129dBm EIN)
• Fully discrete API ci rcui t design
• Famous API 2510 and 2520 op-amps
3.2 Preamp Controls
The 512C is an all-discrete microphone / instrument /
line preamplifier designed to provide an unusually
good sounding front-end for all types of audio
recording applications. Sonically, it offers the distinct
API sound, high quality performance, and low noise.
The 512C Preamp remains faithful to the circuit
designs of API's founder, Saul Walker. Fully featured,
it carefully preserves the original sound character that
made it so much a part of the early days of recording.
The 512C Preamp provides a comprehensive suite of controls:
• GAIN: Microphone and instrument preamp gain
• POL
• 48V: Phantom Power
• PAD
• INPUT / PEAK
• INST
: Preamp output polarity inverter
: -20dB microphone pad / -6dB line pad
: Mic-Line-Instrument input selector and +27dBu output Peak Indicator
: ¼” high-impedance instrument input

3.3 Input Selection
•
9
The 512C Preamp can receive three (3) input sources:
• MIC (Microphone)
• INST (Instrument)
• LINE: Rear panel ¼” TRS balanced +4dBu line level input
3.3.1 Input Switch
The INPUT switch also serves as a peak indicator when the output of the preamp exce eds +27dBu.
The INPUT switch will change color as follows to indicate peak levels:
• MIC (Microphone)
• INST (Instrument)
• Line
3.3.2 Microphone Input
3.3.3 Instrument Input
The INPUT switch is used to select the input source. It is a momentary selector which
cycles through the three input sources, Mic-Instrument-Line. It changes color to
indicate which source is currently selected.
: Changes from white to red
48V: Provides 48 volt phantom power to the MIC IN female XLR connector
IMPORTANT: Caution should be exercised when engaging phantom power!
-20dB PAD: Inserts a -20dB attenuator after the microphone input
: Rear panel female XLR microphone input with switchable 48V phantom power
: Front panel ¼” unbalanced -10dBu instrument level input
• MIC (Microphone)
• INST (Instrument)
• Line
• Illuminates when engaged
• Illuminates when engaged
GAIN: Microphone preamp level control
GAIN: Instrument preamp level control
: Not illuminated (white)
: Changes from blue to violet
: Changes from yellow to orange
Damage can occur if phantom power is applied to some audio
devices, including most ribbon microphones. The Channel Strip
output should also be muted (CUT) when engaging the 48V switch.
• 34dB nominal gain
• 68dB maximum gain
• 14dB minimum gain with -20dB pa d engaged
Select the instrument input (INST) by pressing the INPUT switch until it
illuminates. The ¼” INST jack on the front panel will be the active input.
• -10dBu instrument level input
• Unbalanced, high-impedance input (¼” tip-sleeve)
• INPUT switch illuminates (yellow) when engaged
• 14dB minimum
• 50dB maximum gain
• No pad
: Illuminated in blue
: Illuminated (yellow)
Select the microphone input (MIC) by pressing the INPUT switch
until it illuminates in blue. The MIC IN connection on the rear
panel will be the active input.
• Female XLR microphone input
• 48v phantom power
• -20dB pad
• INPUT switch illuminates in blue when engaged
• Violet peak indication when output exceeds +27dB u
Orange peak indication when output exceeds +27dBu

3.3.4 Line Input
10
PAD: Inserts a -6dB attenuator after the line input
• Illuminates when engaged
Select the line input by pressing the INPUT switch until it is not illuminated.
The ¼” LINE IN jack on the rear panel will be the active input.
• +4dBu live level input
• Balanced, low-impedance input (¼” tip-ring-sleeve)
• -6dB pad
• Unity gain
• INPUT switch is not illuminated when engaged (white)
• Red peak indication when output exceeds +27dBu
3.4 Polarity Inverter
A polarity inverter (sometimes referred to as a “phase reverse”) is available at the outp ut of the 512C
Preamp.
POL (Polarity): Inverts the polarity of the signal at the output of the preamp
• Illuminates when engaged
3.5 Level Indication
The output level of the 512C Preamp can be monitored in two (2) ways:
• VU Meter
• Peak Indicator
3.5.1 VU Meter
: The VU meter in the output section can display the preamp output level
: The INPUT switch doubles as a peak indicator
The output of the 512C Preamp will be displayed on the VU meter
when the VU PRE switch is engaged
3.5.2 Peak Indicator
3.6 Preamp Output
VU PRE (VU Preamp): Routes the output of the 512C Preamp to the VU meter input
• Illuminates when engaged
The INPUT switch also serves as a peak indicator when the output of the 512C Preamp
exceeds +27dBu. The INPUT switch will change color as follows to indicate peak levels:
• MIC (Microphone)
• INST (Instrument): Changes from yellow to orange
• Line
: Changes from blue to violet
: Changes from white to red
The output of the 512C Preamp is available at the PRE OUT jack on the
rear panel. That jack is “half-normalled” to the FIRST EFFECT IN jack on
the rear panel.
• Balanced, low-impedance, +4dBu line level out p u t
• ¼” tip-ring-sleeve jack
• Plugging into the PRE OUT jack does not break the connecti on to
the FIRST EFFECT IN jack.

3.7 512C Preamp Block Diagram
11
The block diagram below illustrates signal flow through the 512C Preamp section of The Channel Strip
with no switches engaged.

4.0 Dynamic Processing: 527 Compressor
12
4.1 527 Compressor Over vie w and Featu res
Features common to the line like "feed forward" (NEW) and "feed back" (OLD) gain reduction methods
selectable on the front panel, provide a choice of "that old way", or "the new way" of compression, for
the highest level of flexibility in signal gain control. The "old way" or Feed-Back method is what most of
the classic compressors used for the gain control circuit. The "new way" gain reduction is more typical of
the newer VCA type compressors that rely on RMS detectors for the gain control voltage.
There is a "SOFT"/"HARD" KNEE switch for an "over-easy" type compression resulting in a very natural,
uncompressed sound or a typical sharp knee type that lends itself to a much more severe limiting effect.
The patented THRUST® function can be switched in and out via the front panel as well, applying a high
pass filter before the RMS detector circuit that preserves that punchy bottom end.
A SIDE CHAIN input is provided for keying and external detector path processing.
The 527 Compressor sections of two or more Channel Strips can be linked together via a DC link
allowing multiple units to be combined for stereo and multichannel applications.
The output level remains fairly constant regardless of the threshold or ratio control, much like the
"more/less" Ceiling control on the API 525 Compressor. This allows for live adjustments without any
noticeable gain changes in the program level.
The 527 Compressor makes use of the 2510 and 2520 discrete op-amps and exhibits the rel iability, long
life, and signature sound which are characteristic of API products.
Features
• Feed-forward or feed-back compression
• Hard or soft knee compression
• Patented THRUST® switch for frequency dependent si de chain control
• Continuously variable detented THRESHOLD control
• Continuously variable detented ATTACK and RELEASE controls
• Continuously variable detented RATIO control
• 10 segment gain reduction (GR) meter
• Side chain input
• LINK switch for multiple unit interdependent compression linking (stereo compression)
• COMP BYPASS switch with hard relay bypass when in the "Out" position
• Can be moved to POST EQ
• Audio circuit uses the 2510 and 2520 discrete op-amps
The API 527
Compressor takes it's
place alongside the
family of API VCA based
compressors, the 225L
and the 2500 Stereo
Bus Compressor.
Anyone familiar with
those units will
immediately be at home
with the 527.

4.2 Compressor Controls
13
The 527 Compressor provides a comprehensive suite of controls:
• THRESHOLD: The level at which compression begins
• ATTACK
• RELEASE
• RATIO: The amount of compression applied after threshold
• TYPE
• KNEE
• THRUST®: Patented circuit that inserts a high-pass filter before the RMS detector
• GR Meter (GAIN REDUCTION)
• LINK
• COMP BYPASS (Compressor Bypass): Completely removes the 527 Compressor from
• POST EQ
4.2.1 Threshold
4.2.2 Attack and Release
: The time it takes for the compressor to respond
: The time it takes the compressor to return to unity gain
: NEW or OLD detection path topology
: The characteristic of the response curve at the onset of compression.
: 10 LED gain reduction meter
: Activates the DC LINK for stereo/multichannel processing with other TCS units
: Moves the 527 Compressor to post the 550A Equalizer in the audio path
THRESHOLD: Sets the level at which compression begins
• Continuously variable between +10dBu and -20dBu
• Detented rotary pot for easy recall
Attack and Release times are fully variable on the 527 Compressor and share a
dual-concentric potentiometer for control. Attack time is adjusted using the
outer ring of the pot and Release time is adjusted using the inner knob.
ATTACK: Sets the time it takes the compressor to react when the level exceeds
the set THRESHOLD
• Continuously variable between 1 and 25 ms (milliseconds)
• Detented rotary pot for easy recall

RELEASE: Sets the time it takes the compressor to recover to unity gain after
14
the level falls below the set THRESHOLD
• Continuously variable between .3 and 3 seconds (S)
• Detented rotary pot for easy recall
4.2.3 Ratio
RATIO: Sets the ratio of input vs. output levels for signals that fall above the
set THRESHOLD
• Continuously variable between 1:1 and ∞:1
• A Ratio of 10:1 or greater is generally considered to be a limiter
• Detented rotary pot for easy recall
4.2.4 Compression Type
The 527 Compressor can be set to operate in two circuit topologies:
• OLD
• NEW
The compressor circuit topology is selected using the TYPE switch.
4.2.4.1 OLD: Feed-Back Compression
In a feed-back compressor, the RMS detector gets its signal from the output of the gain
reduction device (VCA). This is how older API 525, 1176 type, and 660 ty pe compressors
work. This yields a smoother, softer, more transparent sound.
: Feed-Back topology: The RMS detector receives the signal from after the VCA
: Feed-Forward topology: The RMS detector receives the signal from before the VCA
TYPE: Selects the compressor circuit topology
• OLD
• NEW
• Illuminates when engaged
: Feed-back topology (default setting with switch disengaged)
: Feed-forward topology (switch engaged)

4.2.4.2 NEW: Feed-Forward Compression
15
In a feed-forward compressor, the RMS detector normally gets its signal from a split of the
input signal. (The detector path can alternately get its signal from a Side Chain Input.) With
this method, the RMS detector sends a signal to the VCA that is an exact ratio of the desired
compression set by the RATIO control. This is how many new VCA based compressors work.
This can yield more aggressive compression and a harder, more affected sound.
4.2.5 Knee
Knee determines the 527 Compressor’s response curve at the onset of compression.
The 527 Compressor has two (2) knee settings that control how the compressor transitions into
compression:
• SOFT
• HARD
: Rounded response curve
: Sharp response curve
The knee of the compressor is selected using the KNEE switch.
KNEE: Selects the response curve at the onset of compression.
• SOFT
• HARD
• Illuminates when engaged
: Rounded response curve (default setting with switch disengaged)
: Sharp response curve (switch engaged)

4.2.5.1 Soft Knee Compression
16
SOFT
: Rounded response curve
• Gradual onset of compression (fade-in up to the set ratio)
• Similar to an “over-easy” type knee
• More transparent
4.2.5.2 Hard Knee Compression HARD
: Sharp response curve
• Immediate onset of compression (sudden transition to set ratio)
• More aggressive and noticeable
4.2.6 THRUST® The 527 Compressor includes API’s patented THRUST® circuit that can be switched in or out as
needed. This places the THRUST® filter before the RMS detector that decreases the compressor’s
reaction to low frequency content. The result is a noticeable increase of punch and low
frequencies, but a uniformly compressed signal. It’s the “little more punch” switch!
The THRUST® circuit can be engaged using the THRUST® switch.
THRUST®: Inserts the THRUST® filter before the RMS detector
• Illuminates when engaged

The patented THRUST® circuit has been used for many years in the famed API 2500 Stereo
17
Compressor, ATI Paragon and Paragon II consoles, as well as the Pro-6 Input Strip. This circuit
places a filter in front of the RMS detector with a slope of 10dB per decade (-3dB/8va), which is
the inverse of the pink noise energy curve. In acoustics, the pink noise curve is used to equaliz e
energy vs. frequency over the audio spectrum, as sound requires more low frequency energy than
high frequency energy to sound correct to your ear. In Hi-fi equ ipment, a “LOUDNESS” contour is
used to equalize the music at lower levels so it sounds correct. Even with thi s curve, there is sti ll a
substantial amount of low frequency information compared to high frequency information in the
audio signal path. When that signal is fed into the RMS detector, the detector will process the
signal into a DC control voltage based upon the those louder low frequencies, resulting in a control
voltage that favors the low frequencies of the signal, causing pumping and a loss of punch.
Sometimes, this is not desirable. By engaging the THRUST® switch, this inverse filter is placed in
front of the RMS detector, evening out the energy by lowering the energy in the low frequencies
and increasing the energy in the high frequencies, so each octave has the same energy instead of
each octave having half the energy as the one lower. This creates a unique compression effect
that still reduces the overall gain, but the sound is much more punchy and the signal actually
sounds less compressed.
THRUST® filter response
4.2.7 Gain Reduction Meter
A gain reduction (GR) meter is provided to indicate the amount of compression being applied.
When no gain reduction is being applied, all LED’s are lit on the
Gain Reduction meter (GR). When compression occurs, the
corresponding LED’s extinguish to indicate the amount of gain
reduction. The following gain reduction increments are provided:
• -1.5 dB
• -4 dB
• -6 dB
• -8 dB
• -10 dB
• -12 dB
• -15 dB
• -17 dB
• -19 dB
• -23 dB
4.3 Compressor Routing
There are four (4) routing options for 527 Compressor:
• Pre EQ
• Post EQ
• Hard Bypassed
• Side Chain Input
4.3.1 Compressor Pre Equalizer (Default Signal Flow)
In the default signal flow (no routing switches engaged), the 527 Compressor receives the output
of the 512C Preamp.
: The 527 Compressor is located after the preamp and before the EQ (default signal flow)
: The 527 Compressor is located after the EQ and before the output section
: The 527 Compressor is removed completely from the audio path
: An external signal can replace the normal detector path input
• 527 Compressor will interface via the FIRST EFFECT jacks on the rear panel
• 550A Equalizer will interface via the SECOND EFFECT jacks on the rear panel

4.3.2 Compressor Post Equalizer
18
When the POST EQ switch is engaged, the 527 Compressor receives the output of the 550A
Equalizer and is interfaced via the SECOND EFFECT jacks on the rear panel.
4.3.3 Compressor Bypass
When the COMP BYPASS switch is engaged, the 527 Compressor is completely removed from the
audio path via a hard relay-based bypass.
4.3.4 Compressor Side Chain
The 527 Compressor Side Chain (detector path) is accessible via a balanced ¼” input on the rear
panel.
When the compressor type is set to NEW, the 527 Compressor Side Chain is fed by a split of the
input to the compressor. The detection path signal can be replaced by an external source by
inserting a plug in the COMPRESSOR SIDE CHAIN IN jack on the rear panel.
POST EQ: Moves the 527 Compressor to post the 550A Equalizer in the audio path
• 527 Compressor will interface via the SECOND EFFECT jacks on the rear panel
• 550A Equalizer will interface via the FIRST EFFECT jacks on the rear panel
• Illuminates when engaged
COMP BYPASS (Compressor Bypass): Completely removes the 527 Compressor from
the audio path
• Relay hard bypass
• Illuminates when engaged
COMPRESSOR SIDE CHAIN IN: Replaces the signal to compressor detector
path with the inserted signal
• Only effective when compressor is set to NEW type
• Balanced, low-impedance +4dBu line level input
• Switching ¼” TRS jack
4.4 DC Link
The 527 Compressor in The Channel Strip can be linked with 527 Compressors in other units for stereo
and multichannel applications. When connected together and the LINK switches are engaged, the DC
control voltages from all units are summed together. This results in the same control changes being
applied to all compressors. While this is not a “Master/Slave” configuration, the Threshold,
Attack/Release Times, and Ratio of all units should be set to the same value to prevent one channel
from generating a disproportionate contribution to the summed control voltage.
DC LINK: Control voltage input/output jack for the 527 Compressor
• Active only when LINK switch is engaged
All DC LINK cables are ¼” TRS phone plugs wired tip-to-tip, ring-to-ring, and sleeveto-sleeve
• Stereo
• Multichannel
LINK: Activates the DC control voltage summing with other units
• Illuminates when engaged
: Cable with a ¼” TRS on each end
: Cable with multiple ¼” TRS plugs

4.5 Side Chain Input
19
The compressor Side Chain is the detector path that contains the THRUST® filter and RMS detector.
When the compressor type is set to NEW, the Side Chain is fed from a split of the 527 Compressor input
signal. When the NEW type is selected, the Side Chain signal can alternately be fed from an extern al
signal via the COMPRESSOR SIDE CHAIN IN jack on the rear panel.
COMPRESSOR SIDE CHAIN IN: Input to the 527 Compressor detector path
• Inserting a plug will replace the Side Chain signal
• Only available when the NEW compressor type is selected
• Balanced, low-impedance, +4dBu line level inp u t
• Switching ¼” tip-ring-sleeve jack

5.0 Spectral Processing: 550A Equalizer
20
5.1 550A Equalizer Overview and Features
the 550A Equalizer, it quickly found its way into many custom console designs by Frank DeMedio and
other leading engineers. Many of these consoles are still in use today.
Forty years later, the 550A Equalizer remains the standard against which other EQs are measured, and
it has played a major role in the recording industry for decades. Still copied but never duplicated, the
550A Equalizer became API's standard channel module EQ when the company began manufacturing
consoles in 1971. With virtually all existing units spoken for, popular demand for this EQ resul ted in API
finally resuming production in 2004.
The 550A Equalizer provides reciprocal equalization at 21 points in 7 steps of boost to a maximum of
12dB of gain or attenuation at each point. The fifteen equalization points are divided into three
overlapping ranges. The high and low frequency ranges are individually selectable as either peaking or
shelving, and a band-pass filter may be inserted independently of all other selected equalization
settings. Frequency ranges and boost/cut are selected by three dual-concentric switches, and a
pushbutton "IN" switch allows the EQ to be silently introduced into the signal path. A small toggle switch
is used to insert the band-pass filter into the 550A Equalizer.
The combination of Walker's incomparable 2520 op-amp and his "Proportional Q" circuitry gives the
550A Equalizer user an uncomplicated way to generate acoustically superior equalization. With the longawaited reissue of this unit, an EQ that has had such a part in the history of recording is continuing to
make history in today's music.
Features
• 3 bands of classic API equali zation
• Each band offers seven (7) API selected frequency centers
• Reciprocal and repeatable filtering
• Maximum 12dB of boost/cut per band
• Low and High EQ bands offer shelf/peak swi tching
• "Proportional Q" narrows filter Q at extremes
• Band–pass filter (-3dB @ 50Hz and 15 kHz)
• High headroom +30dB clip level
• Traditional API fully discrete circuit design
• Audio circuit uses the 2520 discrete op-amps
Few equalizers enjoy the
respect and admiration of the
coveted API 550A Equalizer.
Designed by the nowlegendary Saul Walker in the
late '60s, the discrete 550A
Equalizer was first used as a
modular OEM equalizer.
As the industry rapidly
embraced the sonic quality of

5.2 Equalizer Controls
gag
21
The 550A Equalizer provides three (3) bands of equalization and a band-pass filter.
• IN
: Activates/deactivates the 550A Equalizer internal bypass
• CENTER FREQUENCY (Knob): Seven (7) center frequencies indicated in blue numbers
• BOOST/CUT (Ring)
• HIGH SHELVING
• LOW SHELVING: Low band peaking/shelving switch
• B.P. Filter
• POST EQ
• EQ BYPASS (Equalizer Bypass): Completely removes the 550A Equalizer from
5.2.1 Low Frequency Band
5.2.2 Mid Frequency Band
: Band-pass Filter IN/OUT
: Moves the 527 Compressor to post the 550A Equalizer in the audio path
Low Frequency Shelving: Changes the low frequency band from a peaking EQ to a
shelving EQ
: +/- 12dB indicated in white numbers
: High band peaking/shelving switch
Low Frequency:
• Center Frequency (knob)
300Hz, 400Hz
• Boost/Cut (ring)
• Switchable shelving
• All frequencies below the selected center frequency will be boost or cut
• Illuminates when en
Mid Frequency:
• Center Frequency (knob)
1.5kHz, 3kHz, 5kHz
• Boost/Cut (ring)
: +/- 12dB
ed
: +/- 12dB
: 30Hz, 40Hz, 50Hz, 100Hz, 200Hz,
: sets 200Hz, 400Hz, 600Hz, 800Hz,

5.2.3 High Frequency Band
22
High Frequency:
• Center Frequency (knob)
15kHz, 20kHz
• Boost/Cut (ring)
• Switchable shelving
: +/- 12dB
: 2.5kHz, 5kHz, 7kHz, 10kHz, 12.5kHz,
5.2.4 Band-Pass Filter
A -3dB @ 50Hz to 15kHz band-pass filter can be inserted in the 550A Equalizer circuit by engaging
the B.P. FILTER switch.
High Frequency Shelving: Changes the high frequency band from a peaking EQ to a
shelving EQ
• All frequencies above the selected center frequency will be boost or cut
• Illuminates when engaged
B. P. FILTER: Activates the band-pass filter
• Illuminates when engaged
5.3 Equalizer Routing
There are three (3) routing options for 550A Equalizer:
• Post Compressor
section (default signal flow)
• Pre Compressor
• Hard Bypassed
5.3.1 Equalizer Post Compressor (Default Signal Flow)
In the default signal flow (no routing switches engaged), the 550A Equalizer receives the output of
the 527 Compressor.
• 550A Equalizer will interface via the SECOND EFFECT jacks on the rear panel
• 527 Compressor will interface via the FIRST EFFECT jacks on the rear panel
5.3.2 Equalizer Pre Compressor
When the POST EQ switch is engaged, the 550A Equalizer receives the output of the 527
Compressor and is interfaced via the FIRST EFFECT jacks on the rear panel.
POST EQ: Moves the 527 Compressor to post the 550A Equalizer in the audio path
: The 550A Equalizer is located after the compressor and before the output
: The 550A Equalizer is located after the preamp and before the compressor
: The 550A Equalizer is removed completely from the audio path
• 550A Equalizer will interface via the FIRST EFFECT jacks on the rear panel
• 527 Compressor will interface via the SECOND EFFECT jacks on the rear panel
• Illuminates when engaged

5.3.3 Equalizer Bypass
23
The 550A Equalizer can be removed from the audio path in two (2) ways:
• EQ BYPASS
• IN (switch)
: Hard relay-based bypass
: Internal bypass within the 550A Equalizer
5.3.3.1 EQ Bypass
When the EQ BYPASS switch is engaged, the 550A Equalizer is completely removed from the
audio path via a hard relay-based bypass.
EQ BYPASS (Compressor Bypass): Completely removes the 550A Equalizer from
the audio path
• Relay hard bypass
• Illuminates when engaged
5.3.3.2 EQ IN Switch In addition to the EQ BYPASS, the 550A Equalizer has its own IN switch, which must be
engaged for the EQ to be heard. If the IN switch is not engaged, the EQ is still in the audio
path, but is bypassed within the 550A Equalizer.
IN: Activates the 550A Equalizer internal bypass
• Silent operation
• Illuminates when engaged

6.0 Output Section: 325 Line-Driver
24
6.1 325 Output Section Overview and Fe atu r es
The output section of The Channel Strip includes an Insert,
output fader, soft mute (CUT), and the API 325 Line-Driver
output circuit (a 2520 and 1:3 output transformer) taken
directly from API console designs.
The 10-segment LED VU meter can be switched to monitor
the output level of The Channel Strip or the output of the
512C Preamp.
Features
• Switchable Insert Return
• Remote controllable soft mute (CUT)
• Full attenuation to +10dB of gain
• 10-segment LED VU Meter
• High headroom +30dB clip level
• Traditional API fully discrete circuit design
• API 2520 discrete op-amp with transformer output
6.2 Output Section Controls
The 325 Line-Driver provides the following controls:
• OUTPUT
• CUT
• INSERT
the 325 Line-Driver section
• VU Meter
• Power
6.2.1 Output
: Output level control
: Remote controllable soft mute
: Replaces the output of the Second Effect with the signal at Insert Return as the input to
: Switchable between main output and preamp output
: AC power switch
OUTPUT: Main output fader
• Full attenuation (-∞) to +10dB of gain
• Detented rotary pot for easy recall

CHANNEL OUT: Main Channel Strip output
25
• Fed from 325 Line-Driver
• Balanced, low-impedance +10dBu line level
• Male XLR connector
6.2.2 Soft Mute
CUT: Mutes main output
• Silent soft mute
• Remote control via 9-pin D-sub connector on the rear panel
• Illuminates in red when engaged
6.2.2.1 Remote Mute Control
The soft mute (CUT) can be remotely controlled via the EXT. MUTE COMMANDS connector
on the rear panel. The remote circuit operates in parallel with the on-board CUT switch, but
overrides the on-board CUT switch when activated.
EXT. MUTE COMMANDS (External Mute Commands): Control port for
the soft mute (CUT) switch
• Overrides on-board CUT switch when activated
• 9-pin D-sub connector
9-pin D-sub pin-out for remote mute control:
• Pin 1 – 5V gnd
• Pin 6 - +5V
• Pin 9 – Cut switch output active low
• Pin 5 – External mute command input active +5V high
6.2.3 VU Meter
The VU meter will normally display the output of the 325 Line-Driver.
The output of the 512C Preamp will be displayed the when the VU PRE switch is engaged.
VU PRE (VU Preamp): Routes the output of the 512C Preamp to the VU meter input
• Illuminates when engaged

6.3 Output Section Routing
26
The output section is the last stage in the audio path and provides the Insert, VU Meter, 325 Line-Driver,
and main CHANNEL OUTPUT XLR interface.
The 325 Line-Driver can be fed from two (2) sources:
• SECOND EFFECT OUT
325 Line-Driver input.
• INSERT RETURN
Driver input when the INSERT switch is engaged.
The output of the Second Effect (normally the 550A Equalizer) is sent to the input to the 325 Line-Driver,
as well as the SECOND EFFECT OUT jack on the rear panel. This signal can be replaced by the signal
present at the INSERT RETURN jack on the rear panel by engaging the INSERT switch.
6.3.1 Insert
Engaging the INSERT switch will route the signal present at the INSERT RETURN jack to the input
of the 325 Line-Driver. When the INSERT switch engaged, the signal flow will be as follows:
NOTE: Since the signal can be externalized at multiple points in the audio path, The Channel
Strip does not have a dedicated “insert send” output. PRE OUT, FIRST EFFECT OUT, and
SECOND EFFECT OUT are intended to be used as “insert sends” as needed.
: The signal present at the INSERT RETURN jack will be routed to the 325 Line-
INSERT: Activates the INSERT RETURN input
• Routes the signal present at the INSERT RETURN jack to the 325 Line-Driver
• Replaces the Second Effect output as the input to the 325 Line-D river
• Illuminates when engaged
INSERT RETURN: Replaces the input to 325 Line-Driver when the INSERT switch is
engaged
• Only active when INSERT switch is engaged
• Balanced, low-impedance, +4dBu line level inp u t
• ¼” tip-ring-sleeve jack
6.4 325 Output Section Block Diagram
The block diagram below illustrates signal flow through the 325 output section of The Channel Strip with
no switches engaged.
: The signal present at the SECOND EFFECT OUT jack is normalled to the

7.0 Rear Panel Interface
,
27
The rear panel of The Channel Strip provides a comprehensive package of interfacing options.
With the exception of the microphone and instrument inputs, all audio inputs and outputs are balanced, low
impedance +4dBu line level connections. All ¼” connectors are tip, ring, sleeve phone jacks.
7.1 Audio Path Inputs
The Channel Strip provides multiple audio inputs at various points in the audio path:
INST (Instrument): Instrument level input to the 512C Preamp (front panel)
• ¼” tip, sleeve jack
• -10dBu
• Unbalanced, high-impedance instrument input
MIC IN: microphone input to the 512C Preamp
• Female XLR
• Balanced, low-impedance input
LINE IN: Line level input to the 512C Preamp
• ¼” tip, ring, sleeve jack
• +4dBu
• Balanced, low-impedance input
FIRST EFFECT IN: Line level input to the first signal processor in audio path
• Fed from the 512C Preamp output (PRE OUT)
• Inserted signal will break the normal from the 512C Preamp output
• Switching ¼” tip, ring, sleeve jack
• +4dBu
INSERT RETURN: The signal present at this jack will replace the input to the 325
Line-Driver when the INSERT switch is engaged
• Balanced, low-impedance input
SECOND EFFECT IN: Line level input to the second signal processor in audio
path
• Fed from the FIRST EFFECT OUT
• Inserted signal will break the normal from the FIRST EFFECT OUT
• Switching ¼” tip, ring, sleeve jack
• +4dBu
• Balanced
• The output section is normally fed from the SECOND EFFECT OUT
• Engaging the INSERT switch will break the normal from the SECOND
EFFECT OUT
• ¼” tip, ring, sleeve jack
• +4dBu
• Balanced, low-impedance input
low-impedance input

7.2 Audio Path Outputs
28
The Channel Strip provides multiple audio outputs at various points in the audio path. All ¼” outputs are
non-switching jacks so inserting a plug will not break the connection with the input it feeds.
PRE OUT (Preamplifier Output): Line level output from the 512C Preamp
• Feeds the FIRST EFFECT IN
• ¼” tip, ring, sleeve jack
• +4dBu
• Balanced, low-impedance output
FIRST EFFECT OUT: Line level output from the first signal processor in audio
path
• Feeds the SECOND EFFECT IN
• ¼” tip, ring, sleeve jack
• +4 dBu
• Balanced, low-impedance output
SECOND EFFECT OUT: Line level output from the second signal processor in
audio path
• Feeds the input to the 325 Line-Driver
• ¼” tip, ring, sleeve jack
• +4 dBu
• Balanced, low-impedance output
CHANNEL OUT: Line level output from the 325 Line-Driver
• Main TCS output
• Male XLR
• +4 dBu
• Balanced, low-impedance output
7.3 Rear Panel Half-Normals
There are three “half-normalled” connections on the rear panel. Switching jacks are used on the FIRST
EFFECT IN and SECOND EFFECT IN, so the signal fed from the normal will be broken when a plug is
inserted.
SECOND EFFECT OUT to 325 Line-Driver In: (Normally 550A Equalizer output to
325 input)
PRE OUT to FIRST EFFECT IN: (Normally 512C output to 527 input)
• PRE OUT is a splitting jack and the signal will not be broken
when a plug is inserted
• FIRST EFFECT IN is a switching jack and feed from PRE OUT will
be broken when a plug is inserted
FIRST EFFECT OUT to SECOND EFFECT IN: (Normally 527 output to
550A Equalizer input)
• FIRST EFFECT OUT is a splitting jack and the signal will not be
broken when a plug is inserted
• SECOND EFFECT IN is a switching jack and feed from FIRST
• SECOND EFFECT OUT is a splitting jack and the signal will not be broken
when a plug is inserted
• INSERT RETURN will replace the input to the 325 Line-Driver when the
EFFECT OUT will be broken when a plug is inserted

7.4 527 Compressor Side Chain and DC Link Connections
29
The 527 Compressor provides two methods of external control:
• Side Chain Input
• DC Link
7.4.1 Side Chain Input
The compressor Side Chain is the detector path that contains the THRUST® filter and RMS detector.
When the compressor type is set to NEW, the Side Chain is fed from a split of the 527 Compressor input
signal. When the NEW type is selected, the Side Chain signal can alternately be fed from an extern al
signal via the COMPRESSOR SIDE CHAIN IN jack on the rear panel.
COMPRESSOR SIDE CHAIN IN: Input to the 527 Compressor detector path
• Inserting a plug will replace the Side Chain signal
• Only available when the NEW compressor type is selected
• Switching ¼” tip-ring-sleeve jack
• +4 dBu line level input
• Balanced, low-impedance
7.4.2 DC Link
The 527 Compressor in The Channel Strip can be linked with 527 Compressors in other units for stereo
and multichannel applications. When connected together and the LINK switches are engaged, the DC
control voltages from all units are summed together. This results in the same control changes being
applied to all compressors. While this is not a “Master/Slave” configuration, the Threshold,
Attack/Release Times, and Ratio of all units should be set to the same value to prevent one channel
from generating a disproportionate contribution to the summed control voltage.
DC LINK: Control voltage input/output jack for the 527 Compressor
• Active only when LINK switch is engaged
All DC LINK cables are ¼” TRS phone plugs wired tip-to-tip, ring-to-ring, and sleeveto-sleeve
• Stereo
• Multichannel
LINK: Activates the DC control voltage summing with other units
• Illuminates when engaged
: Cable with a ¼” TRS on each end
: Cable with multiple ¼” TRS plugs
7.5 Remote Mute Control
The soft mute (CUT) can be remotely controlled via the EXT. MUTE COMMANDS connector on the rear
panel. The remote circuit operates in parallel with the on-board CUT switch, but overrides the on-board
CUT switch when activated.
9-pin D-sub pin-out for remote mute control:
• Pin 1 – 5V gnd
• Pin 6 – +5V
• Pin 9 – Cut switch output active low
• Pin 5 – External mute command input active +5V high
EXT. MUTE COMMANDS (External Mute Commands): Control port for the soft
mute (CUT) switch
• Overrides on-board CUT switch when activated
• 9-pin D-sub connector

7.6 Rear Panel Signal Flow
30
The Channel Strip signal flow is illustrated by the right-to-left order of the unit’s rear panel. The order of
these interfaces remains constant regardless of the order of the 527 Compressor and 55 0A Equalizer in
the signal path.
Second First
Output <--------------------- Insert <----- Effect <------------ Effect <------------ 512C Preamp
• The PRE OUT is “half-normalled” to feed the FIRST EFFECT IN
• The FIRST EFFECT IN feeds the first processor in the audio path (normally the 527
Compressor*)
• The FIRST EFFECT OUT is “half-normalled” to feed the SECOND EFFECT IN
• The SECOND EFFECT IN feeds the second processor in the audio path (normally the 550A
Equalizer*)
• The SECOND EFFECT OUT is “half-normalled” to feed the 325 Line-Driver input
* Engaging the POST EQ switch will move the 527 Compressor to after the 550A Equalizer, reversing
the order of these effects in the audio path.
The PRE OUT, FIRST EFFECT OUT, and SECOND EFFECT OUT jacks are all splitting outputs. This means
the connection to the input they’re normalled to will not be broken when a plug is inserted.
The FIRST EFFECT IN and SECOND EFFECT IN jacks are all switching jacks. This means the connection
with the output they’re normalled to is broken when a plug is inserted. The input is instead fed with the
signal present on the inserted plug.
The INSERT RETURN is only active when the INSERT switch on the front panel is engaged.
8.0 AC Power
31
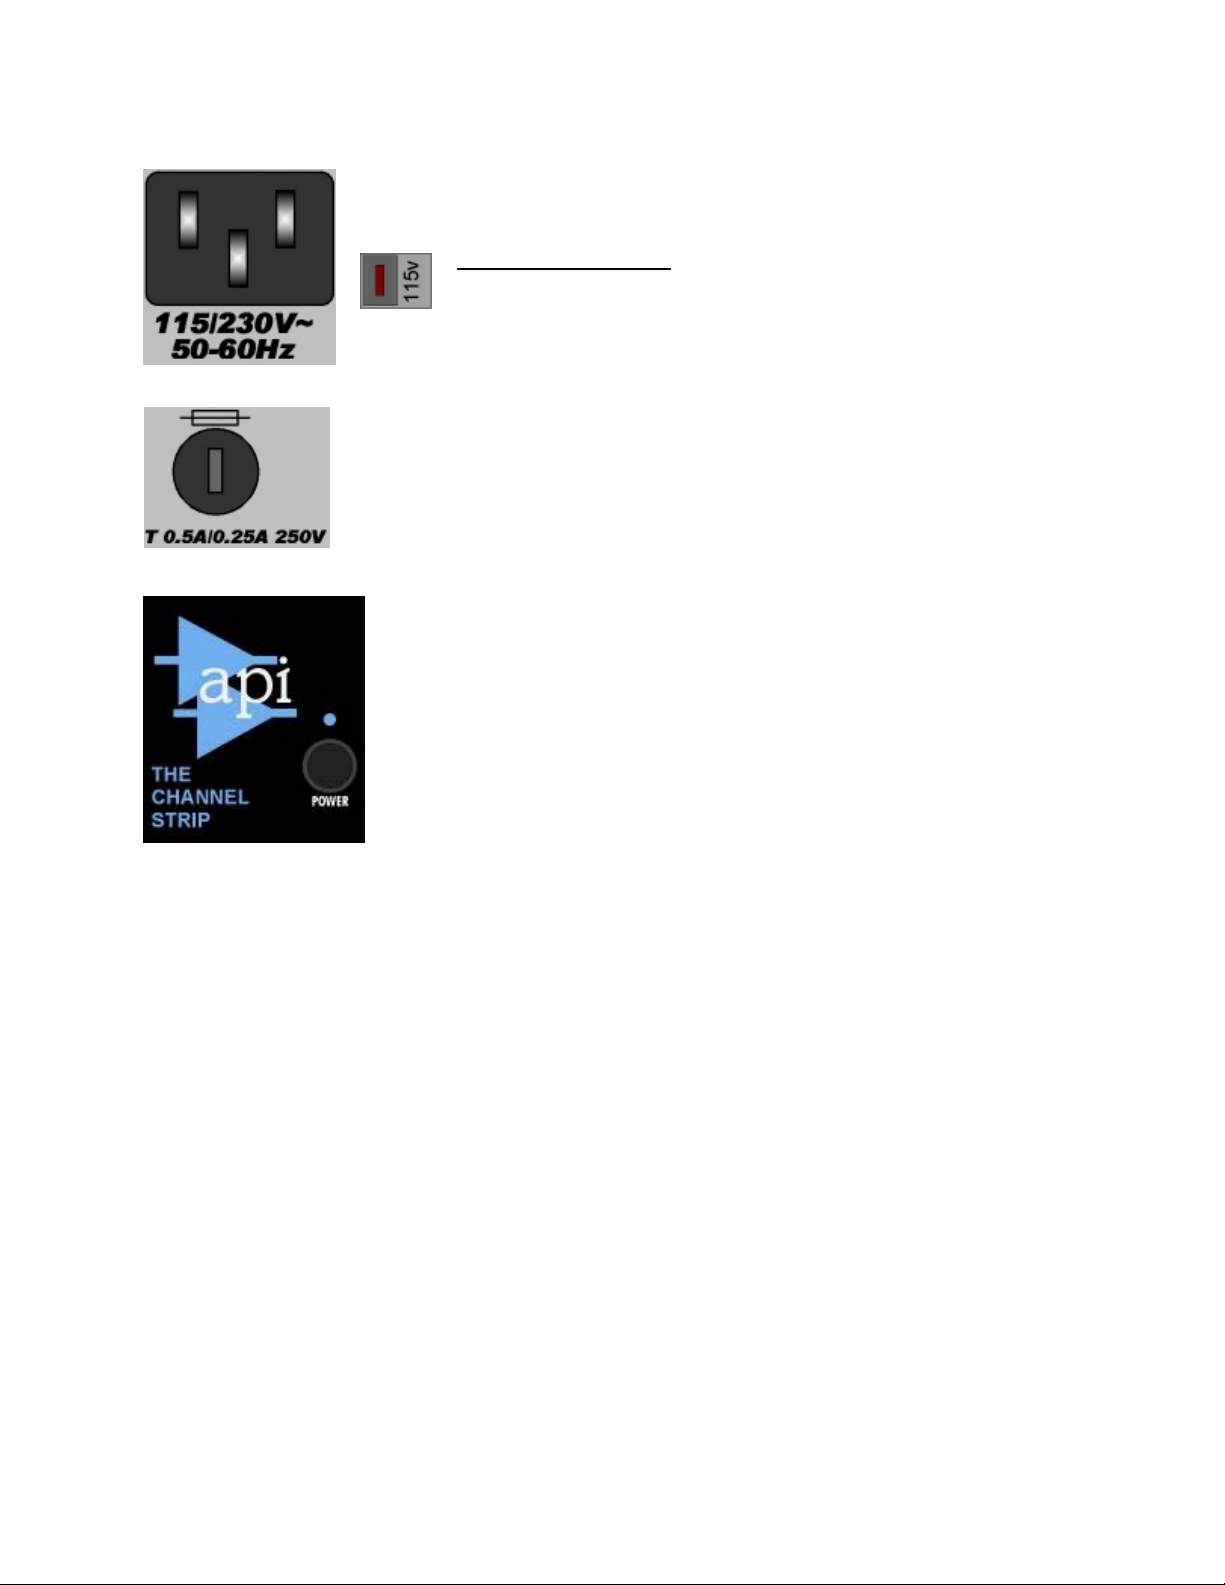
The Channel Strip can operate on either 115volt or 230volt 50-60Hz AC power.
The AC power is supplied via the IEC connector on the rear panel.
Operating voltage is determined by the Voltage Selector switch.
Voltage Selector Switch: Selects operating voltage
• 115 volts
• 230 volts
The fuse holder is located on the rear panel.
• 0.5A/0.25A 250V
The AC power switch for The Channel Strip is located at the lower right of the API
logo on the front panel.
• A blue LED indicator illuminates when the unit is on.

APPENDIX
32
i. 512C Preamplifier Specifications
ii 527 Compressor Specifications
iii. 550A Equalizer Specifications
iv. 325 Line-Driver Specifications
i. 512C Preamplifier Specifications
Rear Connector: XLR MIC Input
Balanced ¼” TRS LINE Input
Front Connector: HI-Z ¼” Unbalanced Instrument Input (INST)
Gain Range: MIC: 14dB min. 68dB max.
INST: 14dB min. 50dB max.
Maximum Input Levels: MIC: +8dBu
INST: +36dBu
Input Impedance: MIC: 1500 Ohms (150 Ohm mic)
INST: 20 K Ohms
Clipping Level: +30dBu
Output Peak Indication: +27dBu
Frequency Response: +0, -.3, 30Hz to 20kHz
Noise: Equi valent Input Noise: MIC:-129dBm; INST: -125dBm
Actual Metered Noise: MIC: -95dBm; INST: -90dBm
Distortion: Less than .05% @ +4dBu out, Less than .1% @ +28dBu out
ii. 527 Compressor Specifications
Attack Times: 1 millisecond to 25 milliseconds (typical)
Release Times: 0.3 seconds to 3 seconds (typical)
Compression Ratios: 1:1 to ∞:1
Threshold Control Range: +10dBu to -20dBu
THRUST® Filter: -10dB/Decade slope, unity @ 1kHz
Frequency Response: +/- 1dB 20Hz to 20kHz
Total Harmonic Distortion: < .2% THD, any level below clipping, any compression setting
Signal to Noise: Unweighted -100dB below clipping
(+26dBu@0.1% distortion, no compression)
Metering: 10-segment red LED: Gain Reduction scale; -1.5dB to -23dB
(negative illumination indicator)

iii. 550A Equalizer Specifications
33
Insertion Loss: None (bridging)
Frequency Response: ±0.5dB 30Hz to 20kHz
(Unequalized)
Noise: Unequal ized output noise of –90dBm high level strapping
–98dBm low level strapping
20Hz to 20kHz unweighted
Distortion: .05% THD max, 30Hz to 20kHz @ +4dBm
.07% THD max, 30Hz to 20kHz @ +18dBm
iv. 325 Line-Driver Specifications
Output Fader Control Gain: -∞ to +10dB
Clipping Level: +30dBu
Channel Output: +4dBu, Balanced, Low-impedance, Male XLR
Output Impedance: Less than 75 Ohms, Transformer Balanced
Metering: 10-segment red LED: VU scale; -20VU to +3VU
(positive illuminatio n in d i c a t o r )
Switchable between 512C Preamp and 325 Line-Driver outputs
 Loading...