

Page 1

Easy Rack Power Distribution Unit
3-Phase Switched
EPDU1216S, EPDU1232S, EPDU1232SX3620
User Guide
Release Date: 12/2020
www.apc.com
Page 2

Legal Information
The Schneider Electric brand and any trademarks of Schneider Electric SE and its
subsidiaries referred to in this guide are the property of Schneider Electric SE or its
subsidiaries. All other brands may be trademarks of their respective owners.
This guide and its content are protected under applicable copyright laws and furnished
for informational use only. No part of this guide may be reproduced or transmitted in
any form or by any means (electronic, mechanical, photocopying, recording, or
otherwise), for any purpose, without the prior written permission of Schneider Electric.
Schneider Electric does not grant any right or license for commercial use of the guide
or its content, except for a non-exclusive and personal license to consult it on an “as is”
basis. Schneider Electric products and equipment should be installed, operated,
serviced, and maintained only by qualified personnel.
As standards, specifications, and designs change from time to time, information
contained in this guide may be subject to change without notice.
To the extent permitted by applicable law, no responsibility or liability is assumed by
Schneider Electric and its subsidiaries for any errors or omissions in the informational
content of this material or consequences arising out of or resulting from the use of the
information contained herein.
Page 3

Contents
General Information ........................................................ 1
Important Safety Information . . . . . . . . . . . . . . . . . . . . . . . . . . . . . . . . . . . . . . . 1
Safety . . . . . . . . . . . . . . . . . . . . . . . . . . . . . . . . . . . . . . . . . . . . . . . . . . . . . . . . . 1
Introduction ..................................................................... 2
Product Features . . . . . . . . . . . . . . . . . . . . . . . . . . . . . . . . . . . . . . . . . . . . . . . . 2
Getting Started . . . . . . . . . . . . . . . . . . . . . . . . . . . . . . . . . . . . . . . . . . . . . . . . . . 2
Establish Network Settings. . . . . . . . . . . . . . . . . . . . . . . . . . . . . . . . . . . . . . . . . 3
DHCP Configuration . . . . . . . . . . . . . . . . . . . . . . . . . . . . . . . . . . . . . . . . . . . . . . . . . . . . . . . . . . . 3
Static IP Configuration . . . . . . . . . . . . . . . . . . . . . . . . . . . . . . . . . . . . . . . . . . . . . . . . . . . . . . . . . 3
Reset to Default . . . . . . . . . . . . . . . . . . . . . . . . . . . . . . . . . . . . . . . . . . . . . . . . . 3
Display Interface Overview ............................................. 4
Display Tree Menu . . . . . . . . . . . . . . . . . . . . . . . . . . . . . . . . . . . . . . . . . . . . . . . . . . . . . . . . . . . . 5
Web User Interface ......................................................... 6
Supported Web Browsers. . . . . . . . . . . . . . . . . . . . . . . . . . . . . . . . . . . . . . . . . . 6
Log On to the Web User Interface . . . . . . . . . . . . . . . . . . . . . . . . . . . . . . . . . . . 6
Status . . . . . . . . . . . . . . . . . . . . . . . . . . . . . . . . . . . . . . . . . . . . . . . . . . . . . . . . . 6
System Information . . . . . . . . . . . . . . . . . . . . . . . . . . . . . . . . . . . . . . . . . . . . . . . . . . . . . . . . . . . . 6
Electricity Status . . . . . . . . . . . . . . . . . . . . . . . . . . . . . . . . . . . . . . . . . . . . . . . . . . . . . . . . . . . . . . 7
Temperature and Humidity . . . . . . . . . . . . . . . . . . . . . . . . . . . . . . . . . . . . . . . . . . . . . . . . . . . . . . 7
Alarm Status . . . . . . . . . . . . . . . . . . . . . . . . . . . . . . . . . . . . . . . . . . . . . . . . . . . . . . . . . . . . . . . . . 8
Control . . . . . . . . . . . . . . . . . . . . . . . . . . . . . . . . . . . . . . . . . . . . . . . . . . . . . . . . 9
Outlet Group Control . . . . . . . . . . . . . . . . . . . . . . . . . . . . . . . . . . . . . . . . . . . . . . . . . . . . . . . . . . . 9
PDU Outlet Control . . . . . . . . . . . . . . . . . . . . . . . . . . . . . . . . . . . . . . . . . . . . . . . . . . . . . . . . . . . 10
Easy PDU User Guide for 3-Phase Switched Rack PDU i
Page 4

Configuration . . . . . . . . . . . . . . . . . . . . . . . . . . . . . . . . . . . . . . . . . . . . . . . . . . 11
Cascade Settings . . . . . . . . . . . . . . . . . . . . . . . . . . . . . . . . . . . . . . . . . . . . . . . . . . . . . . . . . . . .11
Modbus Settings . . . . . . . . . . . . . . . . . . . . . . . . . . . . . . . . . . . . . . . . . . . . . . . . . . . . . . . . . . . . . 12
Outlet Switch Action Intervals . . . . . . . . . . . . . . . . . . . . . . . . . . . . . . . . . . . . . . . . . . . . . . . . . . . 12
Network . . . . . . . . . . . . . . . . . . . . . . . . . . . . . . . . . . . . . . . . . . . . . . . . . . . . . . . . . . . . . . . . . . . .12
Web Access Setting . . . . . . . . . . . . . . . . . . . . . . . . . . . . . . . . . . . . . . . . . . . . . . . . . . . . . . . . . .13
Firmware Upgrade . . . . . . . . . . . . . . . . . . . . . . . . . . . . . . . . . . . . . . . . . . . . . . . . . . . . . . . . . . . . 14
Certificate Regenerate . . . . . . . . . . . . . . . . . . . . . . . . . . . . . . . . . . . . . . . . . . . . . . . . . . . . . . . . . 14
Certificate Upgrade . . . . . . . . . . . . . . . . . . . . . . . . . . . . . . . . . . . . . . . . . . . . . . . . . . . . . . . . . . . 15
Time Settings . . . . . . . . . . . . . . . . . . . . . . . . . . . . . . . . . . . . . . . . . . . . . . . . . . . . . . . . . . . . . . . . 16
User Settings . . . . . . . . . . . . . . . . . . . . . . . . . . . . . . . . . . . . . . . . . . . . . . . . . . . . . . . . . . . . . . . . 17
USB . . . . . . . . . . . . . . . . . . . . . . . . . . . . . . . . . . . . . . . . . . . . . . . . . . . . . . . . . . . . . . . . . . . . . . . 18
Alarm Threshold . . . . . . . . . . . . . . . . . . . . . . . . . . . . . . . . . . . . . . . . . . . . . . . . . . . . . . . . . . . . . 19
Energy Reset . . . . . . . . . . . . . . . . . . . . . . . . . . . . . . . . . . . . . . . . . . . . . . . . . . . . . . . . . . . . . . . . 19
Log . . . . . . . . . . . . . . . . . . . . . . . . . . . . . . . . . . . . . . . . . . . . . . . . . . . . . . . . . . 20
Troubleshooting............................................................. 21
Easy PDU Access Issues . . . . . . . . . . . . . . . . . . . . . . . . . . . . . . . . . . . . . . . . . 21
SNMP Issues . . . . . . . . . . . . . . . . . . . . . . . . . . . . . . . . . . . . . . . . . . . . . . . . . . 22
Easy PDU User Guide for 3-Phase Switched Rack PDUii
Page 5

General Information
Important Safety Information
Read the instructions carefully and look at the equipment to become familiar with the device before trying to
install, operate, service or maintain it.
Safety
NOTICE
This product has not been tested for Radio Frequency Interference. Sale of this product where Radio
Frequency Interference testing is required is prohibited. This includes North America and Japan.
1Easy PDU User Guide for 3-Phase Switched Rack PDU
Page 6

Introduction
Product Features
This APC by Schneider Electric Rack Power Distribution Unit, the Switched Easy PDU, may be used as a
stand-alone, network-manageable power distribution device. The Switched Easy PDU provides real-time
remote monitoring of connected loads. User-defined alarms warn of potential circuit overloads. You can
manage an Easy PDU through its Web User Interface (Web UI), or Simple Network Management Protocol
(SNMP).
Switched Easy PDUs have these additional features:
• Monitor device power, apparent power, power factor and energy
• Monitor phase voltage, current
• Configurable alarm thresholds with network access to help avoid overloaded circuits
• Various levels of access: Super User and General User. (Only one user at a time may log in at each
access level)
• Individual outlet control
• Configurable power (On/Off delays)
• RS485 cascade connection: Up to 4 Easy PDUs can be connected using an RS485 serial interface so
that only one network connection is necessary
• Event logging
• Modbus-TCP (Disabled as default configuration)
• SNMP traps (V1, V2c, and V3)
• Security protocols for authentication and encryption.
• Log file and firmware can be upgraded by inserting a USB Flash drive into the USB port on the Display
Interface of the Easy PDU
• Synchronize the time with the SNTP Server.
NOTE: There is no Real Time Clock (RTC) battery on this device. You will need to set a SNTP server
the first time you log in.
Getting Started
To start using the Easy PDU:
1. Install the Easy PDU using the Installation Instructions that were shipped with your device.
2. Apply power and connect to your network. Follow the directions in the Installation Instructions.
3. Establish network settings (See “Establish Network Settings” on page 3.)
4. Begin using the Easy PDU by way of one of the following:
– Web User Interface (See “Web User Interface” on page 6.)
– Easy PDU Front Panel (See “Display Interface Overview” on page 4.)
– SNMP protocol (See “SNMP Settings” on page 13.)
Easy PDU User Guide for 3-Phase Switched Rack PDU2
Page 7

Establish Network Settings
DHCP Configuration
The default TCP/IP configuration setting, DHCP, assumes that a properly configured DHCP server is available
to provide TCP/IP settings to the Easy PDU.
Static IP Configuration
You must define three TCP/IP settings for the Easy PDU before it can operate on the network:
• The IP address of the Easy PDU
• The subnet mask of the Easy PDU
• The IP address of the default gateway (only needed if you are going off segment)
For detailed information on how to configure the TCP/IP settings in a Easy PDU, see “Establish Network
Settings” on page 3.
Reset to Default
In some situations, users want to reset the settings to default. Press the Reset button for at least 10 seconds
and release. The Display Module will automatically reboot. The settings below will be reset to default:
• Alarm Threshold
• Network Settings
• SNMP Settings
• Users Settings (including usernames and passwords)
• SNTP configurations in Time Settings
The settings below will NOT be changed:
• Date and Time
• Electric Energy of each phase
• Event Log
3Easy PDU User Guide for 3-Phase Switched Rack PDU
Page 8
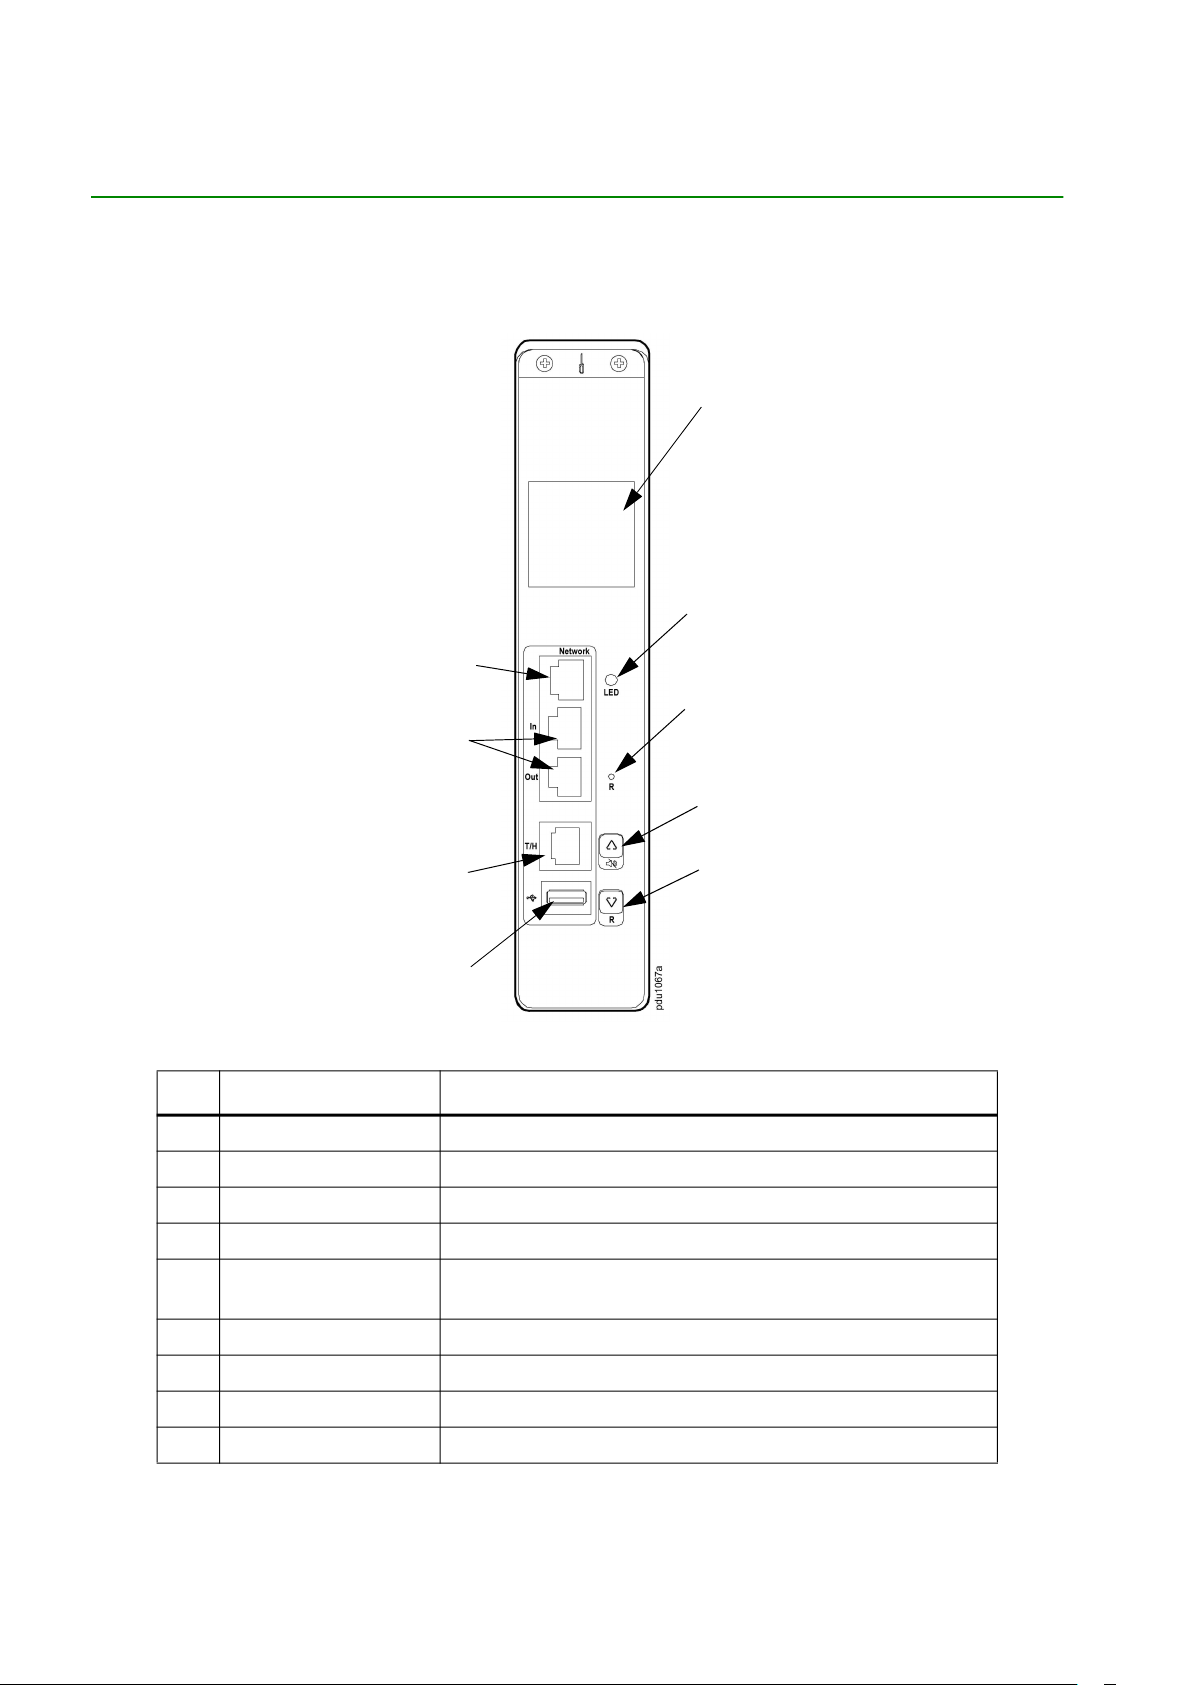
Display Interface Overview
The device has a network port, two (2) RS485 ports, a Temperature/Humidity port, and one (1) USB port.
During normal operation, the LCD will flash periodically. When an alarm is triggered, the buzzer will beep, and
the LCD backlight will be turned on. Press any button on the display to turn off the buzzer.
Item Function Description
LCD Display View functional data
Run Indicator LED Indicates the status when the power is on
Reset Button Press and hold for 4 seconds to reset to the default settings
Up Function Button Scroll for function status, Alarm shutoff
Down Function Button
USB Port For use with a Flash drive fir firmware upgrades,
Temp/Humidity Port Temp/Humidity Sensor connection port
Scroll for function status, Alarm shutoff
(Press and hold for 10 seconds to reboot)
RS485 IN/ OUT Ports For use with cascade connection feature
Network Port Connect the Easy PDU to your network
Easy PDU User Guide for 3-Phase Switched Rack PDU4
Page 9
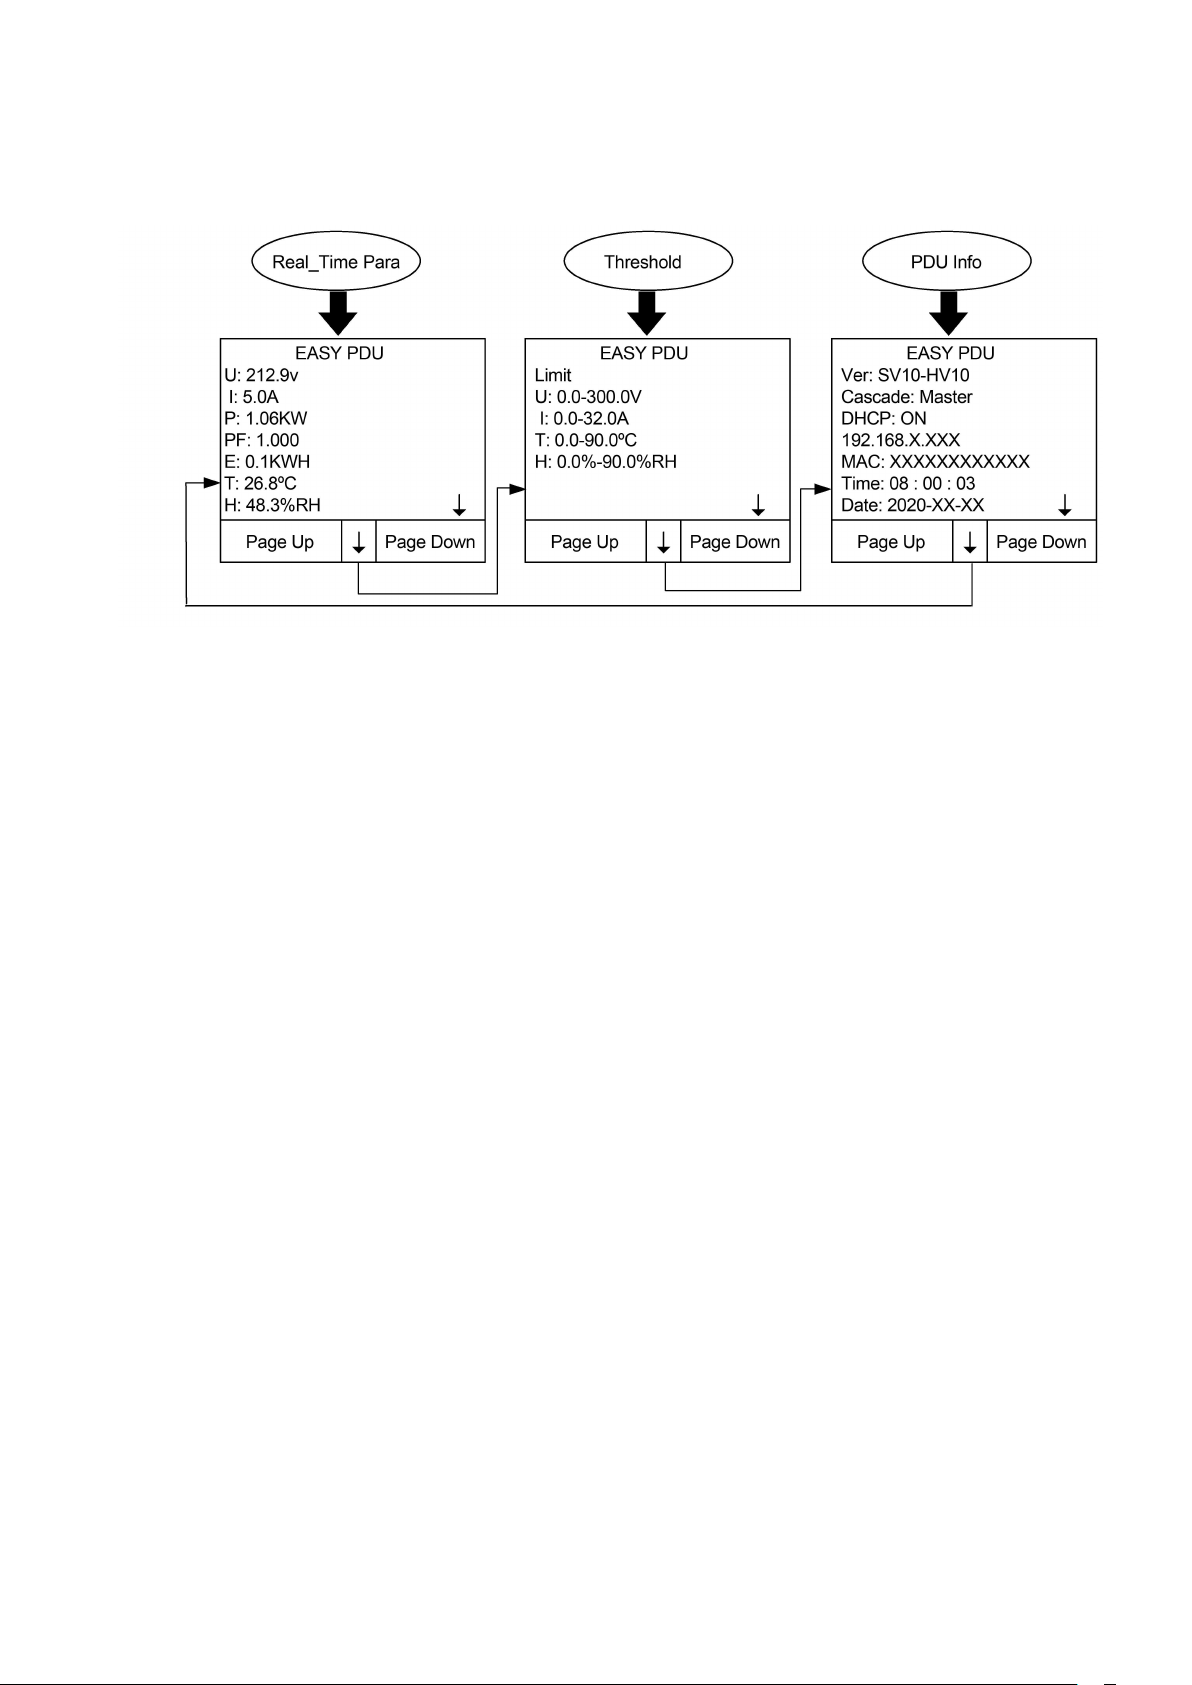
Display Tree Menu
5Easy PDU User Guide for 3-Phase Switched Rack PDU
Page 10

Web User Interface
Supported Web Browsers
You can use Microsoft® Internet Explorer® (IE) 11 or Google® Chrome® or Mozilla® Firefox® to access the
Easy PDU through its Web interface. Other commonly available browsers may work but have not been fully
tested by APC by Schneider Electric.
Log On to the Web User Interface
You can use the System IP address of the Easy PDU for the URL address of the Web interface. Use your
case-sensitive username and password to log on.
The default username and password for the Super User are both “apc”. The Super User must define a
username and password for the General User.
The DHCP is enabled by default. You must connect the Easy PDU to a network with a DHCP server before
you assign a static IP address to the Easy PDU. (See “Establish Network Settings” on page 3 for more
information.) The auto-assigned IP address can be requested from the network status page in the LCD display
of the Display Module. On your computer, type the IP address of the Easy PDU in your Web browser’s URL
address field (e.g., 192.168.0.162 or http://192.168.0.162) and press ENTER.
Status
Select the Status tab to view:
• System information
• Electrical use status
• Temperature and Humidity values
• Alarm status
System Information
The System Information page contains the following information: Model Number, Rating, and (Firmware)
Version. The System Information page is useful to users to read the basic system information and for APC by
Schneider Electric Customer Support for troubleshooting purposes. The version information allows you to see
if updated firmware is available.
Easy PDU User Guide for 3-Phase Switched Rack PDU6
Page 11

Electricity Status
The Electricity Status page displays real-time Voltage, Current, Active Power, Apparent Power, Power Factor,
and Energy values.
Temperature and Humidity
The T/H page displays real-time Temperature and Humidity values collected by the T/H sensor.
If the system cannot read the information from the T/H sensor a dash sign “-” will be displayed instead of the
temperature or humidity value.
7Easy PDU User Guide for 3-Phase Switched Rack PDU
Page 12

Alarm Status
The Alarm Status page shows Voltage, Current, Temperature and Humidity status relative to the
corresponding thresholds. A status of:
• Lower Limit Violation indicates the current value is lower than the corresponding Lower Limit value
configured in the Alarm Threshold column.
• Upper Limit Violation indicates the current value is higher than or equal with the corresponding Upper
Limit value configured in the Alarm Threshold column.
• A status of Normal is displayed when there are no threshold violations.
Easy PDU User Guide for 3-Phase Switched Rack PDU8
Page 13

Control
Select the Relay Control tab for:
• Outlet Group Control
• PDU Outlet Control
Outlet Group Control
The Outlet Group Control page allows users to customize up to 16 outlet groups and switch on/off all the
outlets by group.
Users can allocate outlets of the Host/Guest PDUs to each outlet group.
NOTE: An individual outlet cannot be allocated to multiple outlet groups.
Customize an outlet group by:
1. Clicking on the group number on the Outlet Group Control page
2. Adding the desired outlets by selecting the corresponding PDU and outlet number of that PDU to
the group or
Removing an outlet from and outlet group by changing the corresponding outlet number to 0
3. Selecting the checkbox in front of all of the changes
4. Click on the Apply button at the bottom of the page to save your changes
9Easy PDU User Guide for 3-Phase Switched Rack PDU
Page 14

PDU Outlet Control
The PDU Outlet control page allows users to read and configure the state of the outlets in both Host and Guest
PDUs.
Easy PDU User Guide for 3-Phase Switched Rack PDU10
Page 15

Configuration
Select the Configuration tab to:
• Configure the system
- set the Cascade settings
- enable/disable the Modbus-TCP
- configure the Outlet interval setting
- configure Network settings
- configure the Time settings
- manage Users
• Configure the alarm thresholds
• Reset the energy consumption page to zero
Cascade Settings
The Cascade Settings page allows users to read and configure the RS485 port for the cascade connection.
The Guest devices must use the same baud rate as the Host.
Cable connections example for cascading Easy PDUs
11Easy PDU User Guide for 3-Phase Switched Rack PDU
Page 16

Modbus Settings
The Modbus-TCP is disabled as the default configuration. To enable this feature, select ON, then click the
“Apply” button to save your changes. The system will REBOOT to make any change in the settings effective.
Outlet Switch Action Intervals
The Switch Action Interval page allows users to adjust the interval of time for turning switches on or off. The
time value should be between 0.5 and 60 seconds. The time value must be a multiple of 0.5 second.
Network
TCP/IP Settings The TCP/IP Settings page allows users to read the current IP address and MAC address
and allows users to configure basic network parameters.
• Select the DHCP allows the Easy PDU to request the network assignment from any DHCP server. If
DHCP is enabled, data in the boxes of the IP Address, Mask, and Gateway will not be used.
• Deselect DHCP to allow users to customize a static IP address, Mask, and Gateway by manually
inputting the desired values in corresponding boxes.
Click the “Apply” button to save your changes. The system will now REBOOT to initiate your changes to the
Network Settings.
Easy PDU User Guide for 3-Phase Switched Rack PDU12
Page 17

SNMP Settings The SNMP Settings page allows users to configure the following:
• Version - To access your supported SNMP version, Select V1 to enable SNMPv1 and/or select V2c to
enable SNMPv2c (V1 and V2C) or select V3 to enable SNMPv3.
• Community Name - The default Community Name is “public” and can be changed by the user.
• If SNMPv3 is enabled:
– User Name - The default User Name is “apc” and can be changed by the user.
– Authentication Protocol - The Authentication Protocol supports SHA (as the default) and
MD5 authentication. You can choose either from the drop-down menu arrow.
– Authentication Key - The Authentication Key is “APCAUTHKEY” by default.
– Private Protocol - The Private Protocol supports AES (as the default) and DES for
encrypting and decrypting data. You can choose either from the drop-down menu arrow.
– Private Key - The Private Key is “APCPRIVKEY” by default.
• Trap Proxy Server - The box on this line contains the IP address of your Trap Proxy Server and is
used to push the Trap of both SNMPv1 and SNMPv2c to the IP address specified.
Click on the “Apply” button to save your changes. The system will now REBOOT and initiate any changes you
made.
Web Access Setting
The Easy Rack PDU allows users to connect through HTTPS by default. You can change the active
protocol in the following setting.
13Easy PDU User Guide for 3-Phase Switched Rack PDU
Page 18

Firmware Upgrade
The Firmware Upgrade page allows users to upgrade the firmware of the Easy PDU in just a few steps. There
is no installation required. When you upgrade the firmware on the Easy PDU:
• You obtain the latest bug fixes and performance improvements.
• New features become available for immediate use.
Keeping the firmware versions consistent across your network ensures that all Easy PDUs support the same
features in the same manner.
Check regularly on the APC by Schneider Electric website, www.apc.com, for new upgrades.
• Download the firmware file from the APC by Schneider Electric website, www.apc.com.
• Click the “Choose File” button and select the correct firmware file to be downloaded.
• Click the “Apply” button to upload the selected firmware to the Easy PDU.
• Once the firmware upgrade succeeds, you will see the prompt (below) to remind you to reboot the
system to complete the upgrade.
NOTE: If a firmware upgrade does not load, you may see a prompt describing the reason.
Certificate Regenerate
In some situations, for example, if the Certificate is expired, you can use this page to create a new
self-signed Certificate. The valid time for the new certificate will start from current time, so make sure
the time is correct before regenerating the certificate.
Easy PDU User Guide for 3-Phase Switched Rack PDU14
Page 19

Certificate Upgrade
The default Certificate created by the Easy PDU is a self-signed Certificate, which is not trusted by web
browsers.
To use a certificate signed by a CA:
1. Choose the Certificate signed by CA. (Only PEM format is supported.)
2. Click the “Apply” button to upload the selected Certificate to the Easy PDU.
3. Choose the Private Key. (Only PEM format is supported.)
4. Click the “Apply” button to upload the selected Private Key to the Easy PDU.
5. Once the file upgrades succeed, you will see a prompt to remind you to reboot the system to
complete the upgrade.
Choose the updated certificate or the default certificate as shown on the Certificate and Key Setting page.
15Easy PDU User Guide for 3-Phase Switched Rack PDU
Page 20

Time Settings
The time settings page allows users to configure the system time of the Easy PDU. You can set the time
manually or synchronize the time through a Simple Network Time Protocol (SNTP) server.
NOTICE
It is recommended that you configure SNTP when you use the Easy PDU the first time or you will need to
set the system time manually with the Easy PDU is powered off. The time record in the Log may be
incorrect If this is not done.
Selecting the SNTP Switch enables the Easy PDU to synchronize the time from the SNTP server
automatically. If SNTP is enabled, inputs in the Date and Time boxes will NOT be effective.
• Input the IP address of the time server that supports SNTP in the box of SNTP Server IP.
• Input your time zone offset value to the SNTP Time Zone box.
• Change the SNTP Update Interval if needed.
Deselect the SNTP Switch to disable automatic time synchronization. Click the “Get Local PC Time” button to
get the current time from the PC that has the Web page loaded and fill the boxes of Date and Time. You can
also input the date and time manually to the boxes.
Click the “Apply” button to apply your changes.
Easy PDU User Guide for 3-Phase Switched Rack PDU16
Page 21
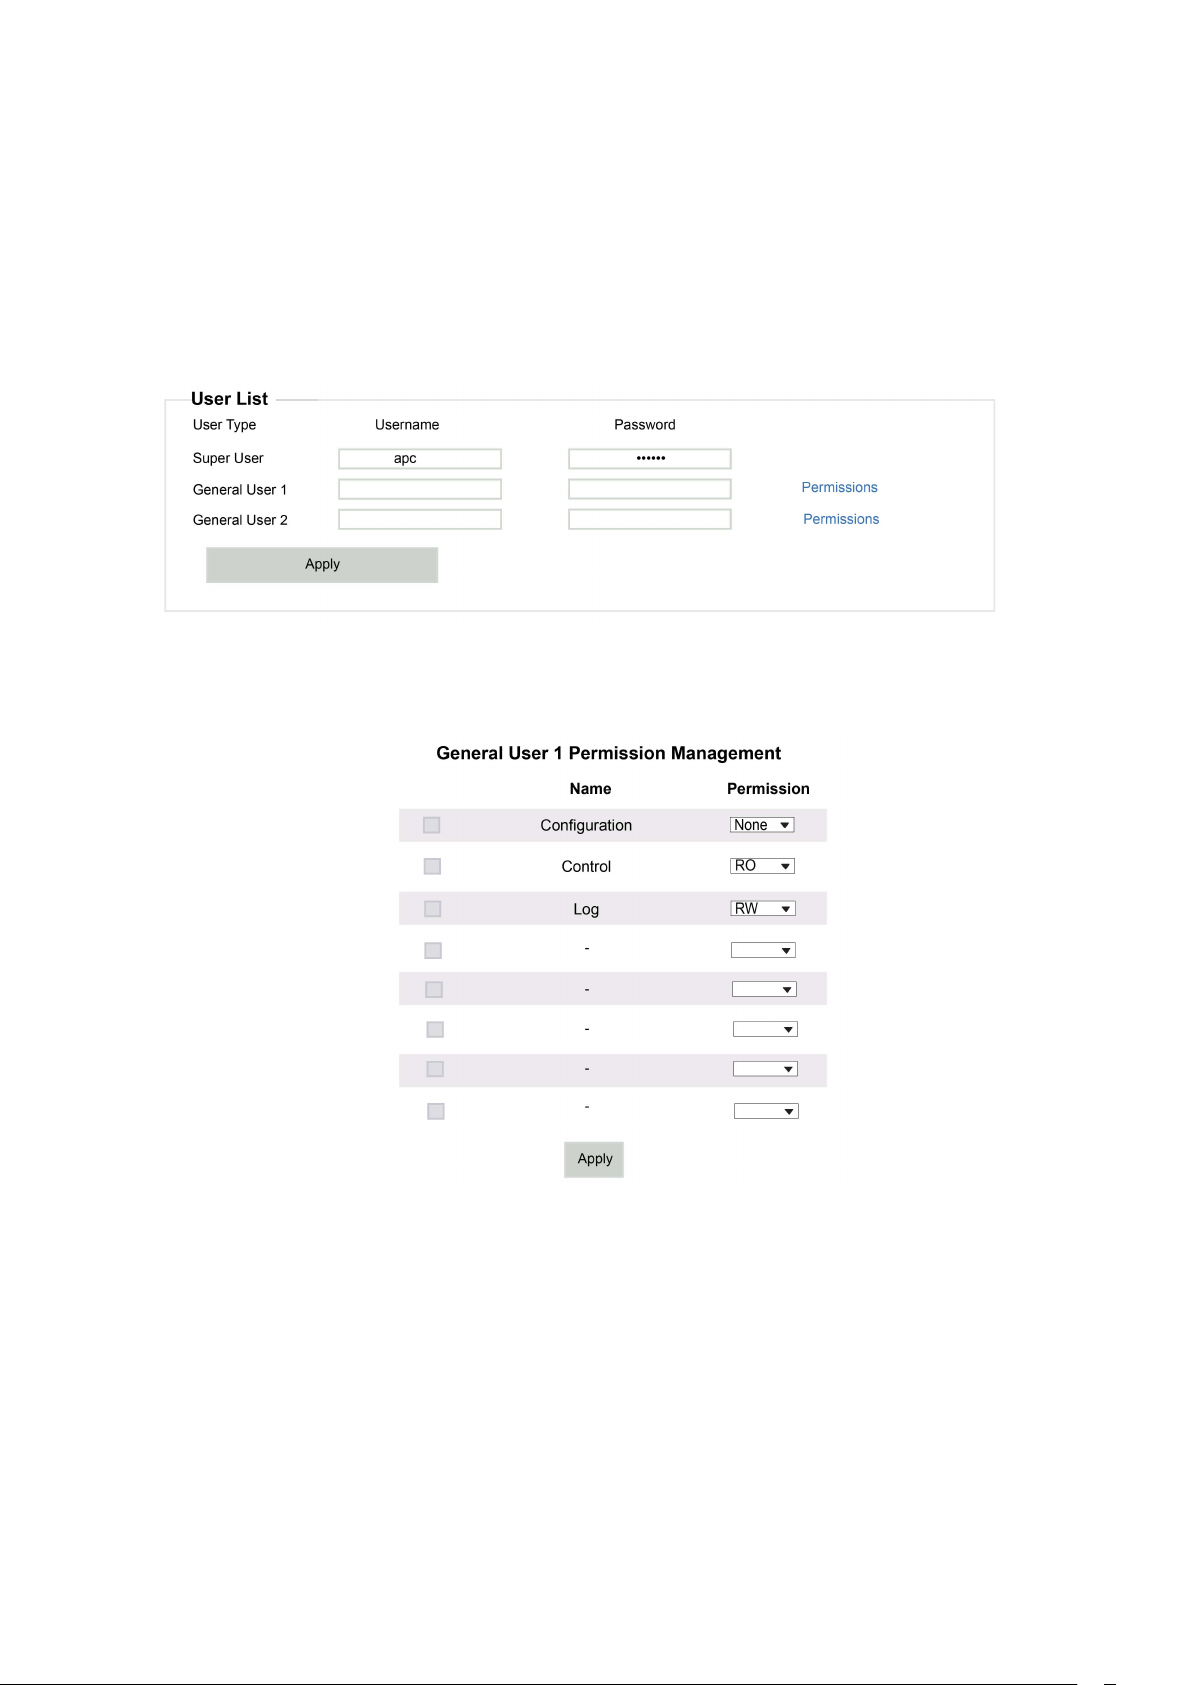
User Settings
The User Settings page allows users to configure usernames and passwords for the Super User and the
General User.
• The default Username and Password for the Super User is “apc”. The Username and Password for the
Super User are mandatory. You cannot leave them empty.
• The Username and Password for General User are optional. You can close a General User account by
leaving the Username and Password empty.
The Super User can manage the Read Only, Read/Write, or None permissions of General users as
shown below:
Click the Apply button. The system will REBOOT and make any changes in the Users Settings
effective.
17Easy PDU User Guide for 3-Phase Switched Rack PDU
Page 22

USB
Use a USB flash drive to transfer and upgrade the files. Before starting the transfer, make sure the USB drive
is formatted in exFAT or FAT32, and set the USB to an enabled state.
USB Export The Export Files page allows users to export event log to a USB flash drive.
1. Select the content to be exported
2. Click the “Apply” button
3. Insert the flash drive into the USB port on your Easy PDU
4. The letter “U” will appear in the upper right corner of the display to indicate the exporting
operation is in progress
5. Wait until the letter “U” vanishes and the display backlight goes out.
6. Remove the USB flash drive
Upgrade Firmware When using a USB drive to upgrade the firmware:
1. Download the firmware file from the APC by Schneider Electric website, www.apc.com.
2. Put the firmware file in the root path of the USB flash drive
3. Insert the flash drive into the USB port on your Easy PDU
4. The letter “U” will appear in the upper right corner of the display to indicate the exporting
operation is in progress
5. Wait until the letter “U” vanishes and the display backlight goes out.
6. Remove the USB flash drive
7. The Easy PDU will reboot and upgrade the firmware automatically
Page 23

Alarm Threshold
The Alarm Threshold page allows users to read and configure voltage, current, temperature and humidity
thresholds (or limits). If any one of the thresholds (or limits) is reached, an alarm will be issued. Select or
deselect the Beep Alarm to enable or disable the Display Module alarm sound when any one of the alarms is
issued. Click the “Apply” button to save your changes.
Alarms are issued through multiple interfaces:
• Web User Interface: see the Alarm Status page.
• SNMP: The Alarm Status can be collected though SNMP.
• SNMP Trap: push the corresponding alarm message to the target configured on the SNMP Settings
page.
• Display Module: the buzzer beeps (if enabled), the LCD display backlight remains on, the Status LED
blinks.
Energy Reset
The Energy Reset page allows users to reset the statistics of energy consumption to zero. Select the “Reset”
box to put a check mark in it and click the “Apply” button to save the reset.
19Easy PDU User Guide for 3-Phase Switched Rack PDU
Page 24

Log
The Log File page allows users to read the event log. The log preserves the most recent 500 events.
Easy PDU User Guide for 3-Phase Switched Rack PDU20
Page 25

Troubleshooting
For problems that persist or are not described here, contact APC by Schneider Electric Customer
Care at www.apc.com.
Easy PDU Access Issues
Problem Solution
If the Network Status LED of the Easy PDU is green, try to
ping another node on the same network segment as the
Easy PDU. If that fails, it is not a problem with the Easy PDU.
Unable to ping the Easy PDU
Cannot access the Web User Interface
If the Network Status LED is not green, or if the ping test
succeeds, perform the following checks:
• Verify all network connections.
• Verify the Network Settings of the Easy PDU
• Verify that HTTP or HTTPS access is enabled.
• Make sure you are specifying the correct URL — one
that is consistent with the security system used by the
Easy PDU. SSL requires HTTPS, not HTTP, at the
beginning of the URL.
• Verify that you can ping the Easy PDU.
• Verify that you are using a Web browser supported for
the Easy PDU. See “Supported Web Browsers” on
page 6.
• If the Easy PDU has just restarted and SSL security is
being set up, the Easy PDU may be generating a
server certificate. The Easy PDU can take up to
several minutes to create this certificate, and the SSL
server is not available during that time
21Easy PDU User Guide for 3-Phase Switched Rack PDU
Page 26

SNMP Issues
Problem Solution
Unable to perform a GET or SET
Unable to receive traps at the NMS
• Verify the community name (SNMPv1 or SNMPv2c) or
the Authentication configuration (SNMPv3). See
“SNMP Settings”.
• Verify the UDP port 161 of NMS is correctly opened.
• Verify the Trap Proxy Server IP address configuration
is correct.
• Verify the UDP port 162 of NMS is correctly opened
Traps received at an NMS are not
identified
See your NMS documentation to verify that the traps are
properly integrated in the alarm/trap database.
Easy PDU User Guide for 3-Phase Switched Rack PDU22
Page 27

Page 28

APC by Schneider Electric
70 Mechanic Street
Foxboro, MA 02035
USA
www.apc.com
As standards, specifications, and design change from time to time,
please ask for confirmation of the information given in this publication.
© 2020 - Schneider Electric. All rights reserved.
990-91465
 Loading...