

Page 1
KUBO3(T) / KUBO5(T)
Instruction manual
Page 2

Page 3
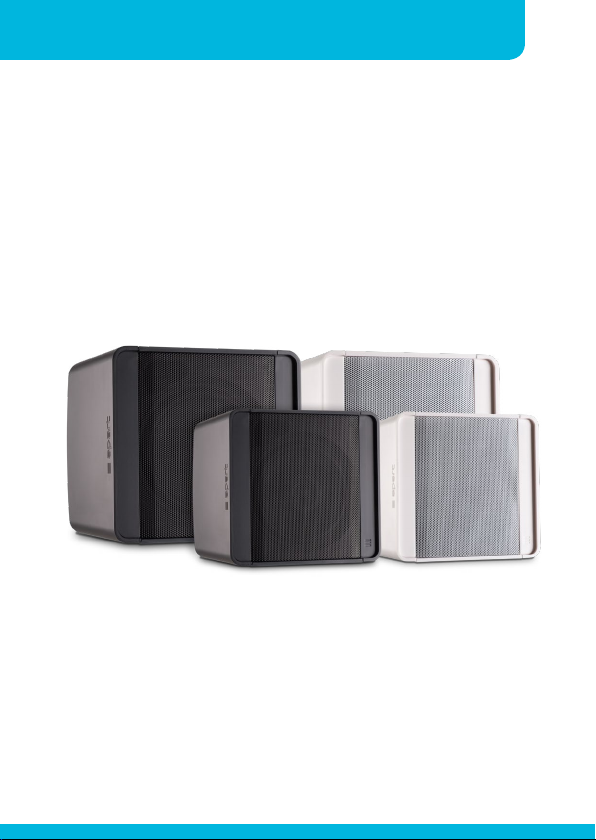
KUBO3(T) / KUBO5(T)
KUBO3(T) / KUBO5(T) manual
Instruction manual
3
Page 4

4
Design cabinet loudspeaker
Safety precautions
Please read carefully before proceeding and keep this manual for
future reference.
Always follow the basic precautions listed below to avoid the
possibility of serious injury or even death from electrical shock,
short-circuiting, damages, fire or other hazards.
These precautions include, but are not limited to, the following:
• Take care of the loudspeaker wires; they should be free of
damage. Damaged loudspeaker wires may result in poor sound
quality and can damage amplifiers.
• No mains power shall be connected to the loudspeakers, doing
so will damage the loudspeaker.
• This loudspeaker should only be serviced by qualified Apart
Audio service personnel. If not, warranty might be void.
• Use cables of the right gauge, certainly for long runs.
• Use cables with clear color indication and maintain polarity
throughout the whole system.
• Avoid loud feedback from microphones; this can damage your
loudspeakers.
• Clean only with dry cloth.
• Do not operate near heaters or place it near other apparatus
which produce a lot of heat.
• Only use accessories specified by the manufacturer.
• Make sure the mounting panel can easily support the
loudspeaker’s weight.
Page 5

KUBO3(T) / KUBO5(T)
• Use only industry-accepted mounting tools and methods.
• Exposure to loud audio levels over a long time can cause severe
hearing loss.
• Don’t forget to consult the local law directions regarding
producing sound in public places.
• Please check the unit’s condition after unpacking. If the outside
of the carton box has been damaged, inform your shipper
immediately.
• Do not open the loudspeaker or attempt to disassemble the
internal parts or modify them in any way. If it should appear
to be malfunctioning, discontinue use immediately and have it
inspected by qualified Apart Audio service personnel.
• Do not expose the loudspeaker to water, damp or wet
conditions. This can damage the loudspeaker.
• Always attach the safety cable to the provided cabinet insert to
secure the loudspeaker to the building structure. Failure to do
so could result in injury or even death in the event of a failure
of the primary mounting support system. Please, be guided by
applicable building codes here.
Instruction manual
5
The warranty of this product and the applicable terms and
conditions are provided by the dealer where you purchased this
product.
Page 6
6
Design cabinet loudspeaker
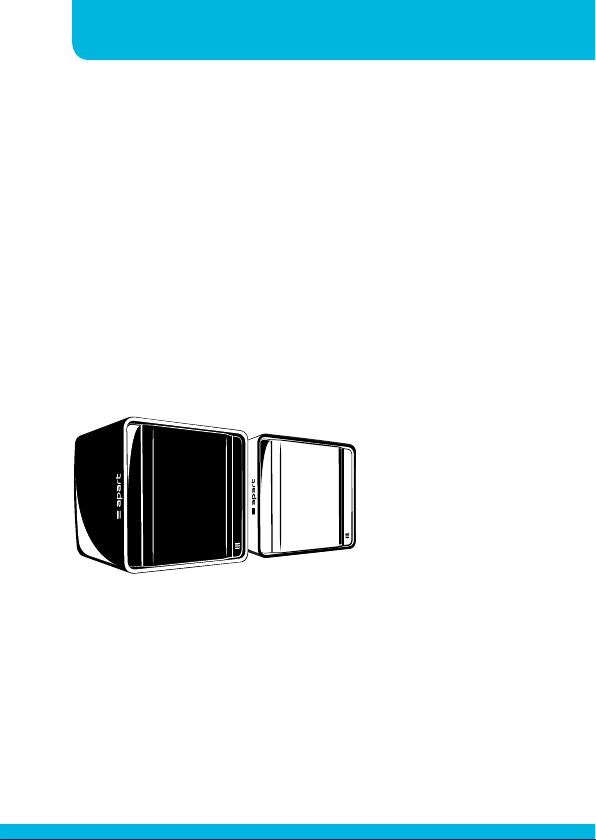
When design and technology go hand in hand
Kubo is the result of the increasing market demand for stylish
and more subtle design audio products. The Apart research &
development department was able to create a top-notch product
offering amazing sound quality and performance in a discrete and
neutral housing. The unseen original and timeless Kubo cabinet will
blend audio in with any kind of interior, adding elegance to any
architect designed environment.
The K-Mount bracket combined with the carefully designed fixing
K-bolts offers you a safe and comfortable loudspeaker hookup. The easy cable management and 140° vertical or horizontal
mounting possibility allows you to install the Kubo everywhere on
any type of wall or ceiling.
The Kubo series
comes with a 3”
full range driver unit
or 5.25” two-way
loudspeaker system
and bass reflex
port providing a
fast and dynamic
Both models are available in T-version with a rotatable 70 / 100
volt power tapping selector, with 16 ohms connection. The in &
link connection with euroblock connectors, allows for easy daisy
chaining of multiple loudspeakers. The installer friendly end-caps,
held in place by 14 integrated strong neodymium magnets, hide all
connections and bracket hardware on both sides.
bass response.
The exceptional symmetrical cube-shaped and smart installerfriendly designed Kubo is bound to become another legendary
Apart product for the small and mid-sized AV market.
Page 7

KUBO3(T) / KUBO5(T)
Instruction manual
Features
• Stylish and subtle design
• Loudspeakers designed to be used in combination with the
included K-Mount bracket
• Wall and ceiling mountable
• Vertical or horizontal mountable (140°)
• 3” driver for KUBO3(T) and 5.25” driver with 1” tweeter for
KUBO5(T)
• Bass reflex
• Easy cable management
• Fixing K-bolts give you a safe and comfortable hook-up
• The power selector switch on the side of the loudspeaker
makes it very easy and fast to balance an installation
• Paintable in any RAL color
• 40 W dynamic power handling for KUBO3(T) and 80 W for
KUBO5(T)
• 8 ohm and 16 ohm (T) versions available
• 70 V and 100 V compatible (T versions)
• End-caps on both sides hide all connections and bracket
hardware
• Typical brilliant Apart sound
• In & link connection with euroblock connectors allows easy
daisy chaining of multiple loudspeakers
• High intelligibility while remaining perfect music reproduction
quality
• Supplied with safety cable
• Integrated safety nut for supplied SAFCAB
7
Page 8

8
Design cabinet loudspeaker
Supplied items / unpacking
Unpack the contents and confirm following items are included.
• Loudspeaker x 2
• Loudspeaker side covers x 4
• Bracket x 2
• Safety cable x 2
• Mounting screws x 1
• Instruction manual x 1
• Connection terminal x 4
Loudspeaker cable is not included.
Installation instructions
Apart Audio nv is not responsible for damages
ATTENTION
resulting from the negligent installation of any
loudspeaker.
WARNING
Please make sure that the mounting structure is
capable of safely supporting the loudspeaker’s
weight.
Page 9
KUBO3(T) / KUBO5(T)
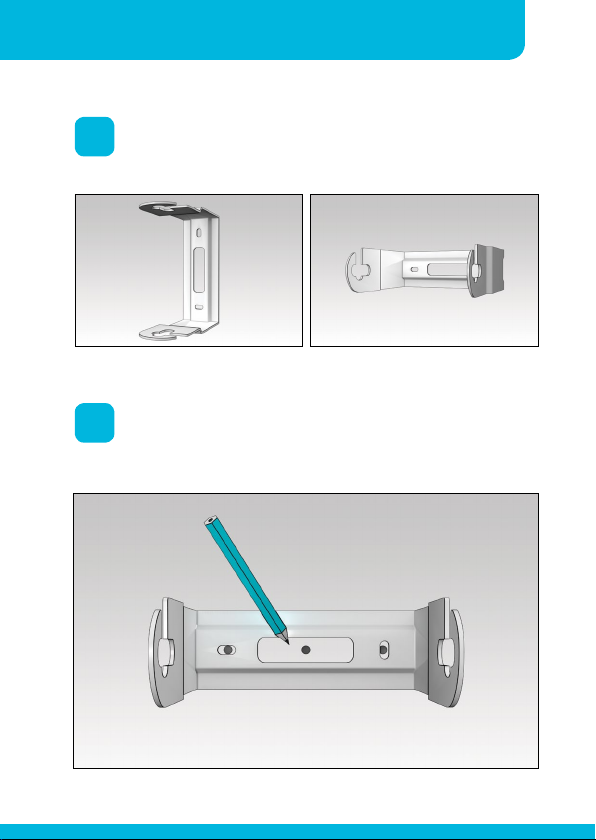
Determine the position where the bracket will be mounted
1
on the wall or ceiling.
vertical bracket alignment horizontal bracket alignment
Mark two mounting holes on the wall or ceiling and mark
2
the mounting hole in the middle for an invisible installation
of the safety cable (see below).
Instruction manual
9
Page 10
10
Design cabinet loudspeaker
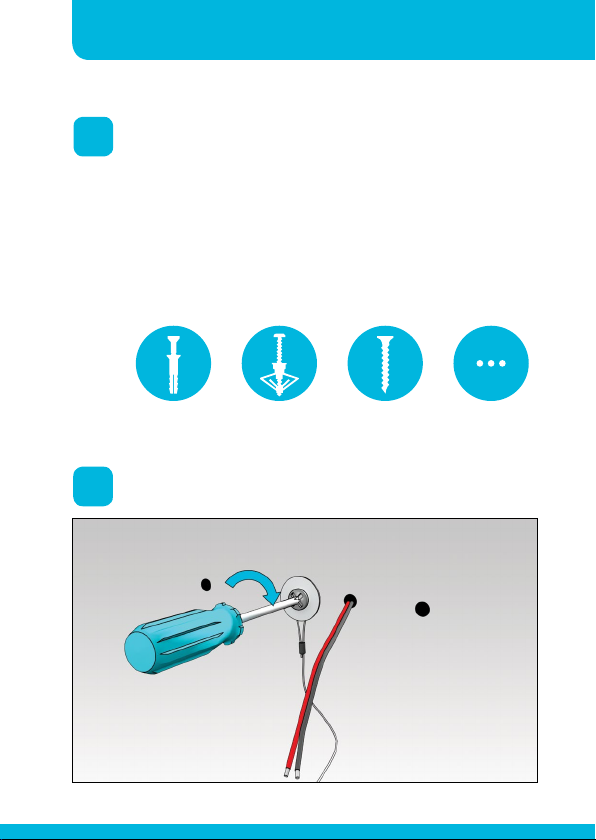
If the bracket is to be mounted on stone or concrete,
3
drill the mounting holes (stone drill 6 mm). Attach the
bracket using the adequate hardware.
For wood use only the screws, for other material use the
correct fixing material. Use only hardware capable of
supporting the loudspeaker’s weight safely. Be careful when
you drill the holes in the wall or ceiling: make sure not to
drill into the loudspeaker cables or other objects hidden
inside the wall or ceiling.
concrete plasterboard wood other
Install the safety cable on the wall.
4
Page 11
KUBO3(T) / KUBO5(T)
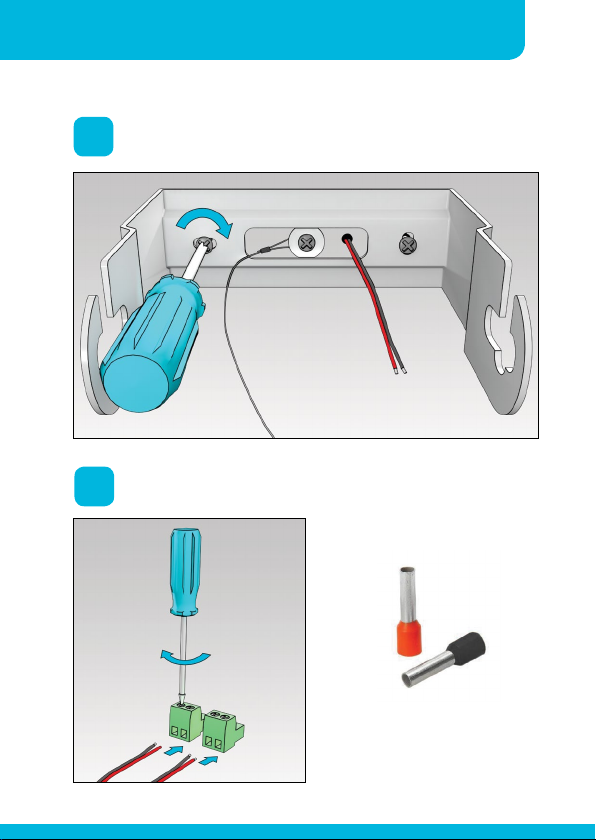
Mount the bracket on the wall.
5
Connect the loudspeaker cables to the euroblock terminals.
6
Instruction manual
11
The use of wire ferrules is
strongly recommended when
stranded wire is used.
Page 12
12
Design cabinet loudspeaker
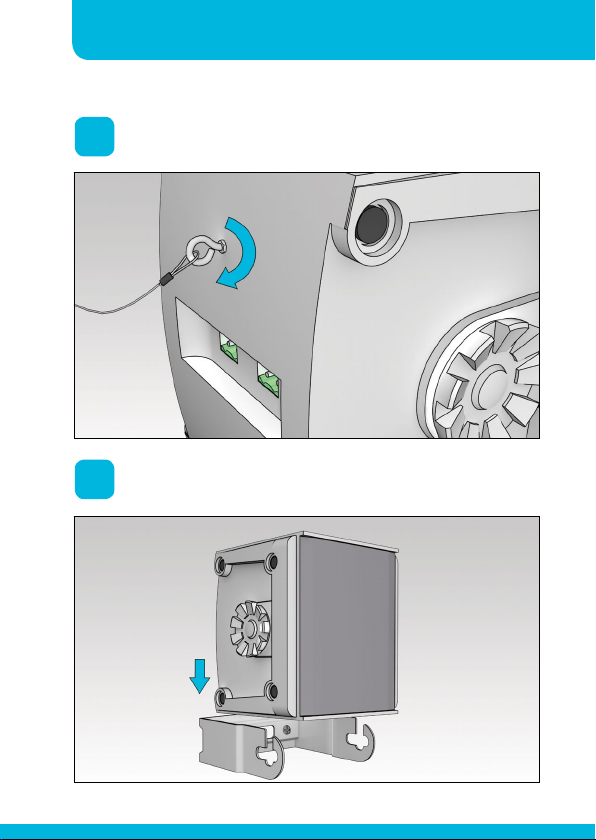
Connect the safety cable to the integrated safety nut.
7
Slide the loudspeaker into the K-Mount.
8
Page 13
KUBO3(T) / KUBO5(T)
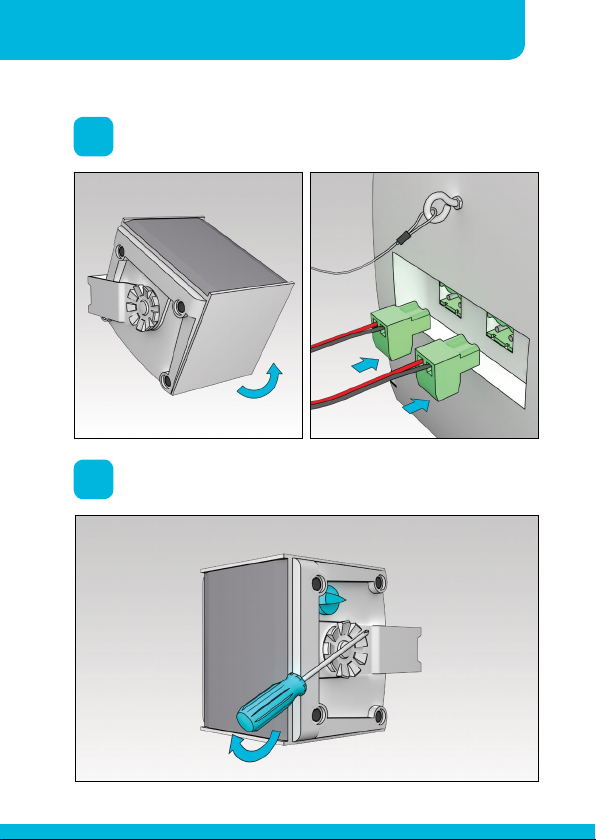
Rotate the loudspeaker and connect the euroblock
9
connectors.
Tighten the fixing bolts by hand or with a screwdriver if the
10
space between the wall and the loudspeaker is limited.
Instruction manual
13
Page 14
14
Design cabinet loudspeaker
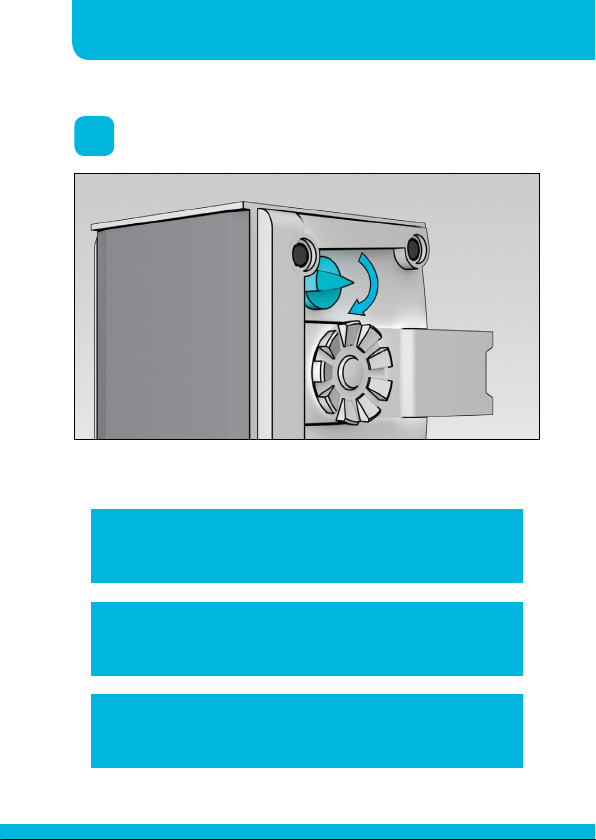
On the 70 / 100 volt versions, set the selector according to
11
the required power rating or connection type.
Set the power tapping prior to applying audio and only
change the setting while the audio amplifer is shut off.
WARNING
WARNING
The 16 ohm setting is not compatible with
70 volt or 100 volt line amplifiers!
WARNING
The highest 70 volt power setting is not compatible with
100 volt line amplifiers, only with 70 volt line amplifiers.
Page 15
KUBO3(T) / KUBO5(T)
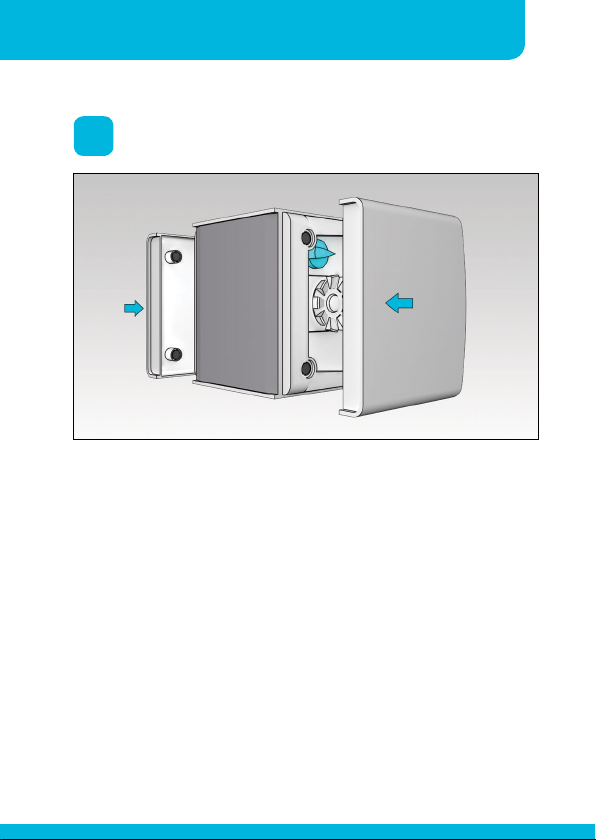
Finish the installation by mounting the supplied magnetic
12
end caps.
Instruction manual
15
Page 16
16
Design cabinet loudspeaker
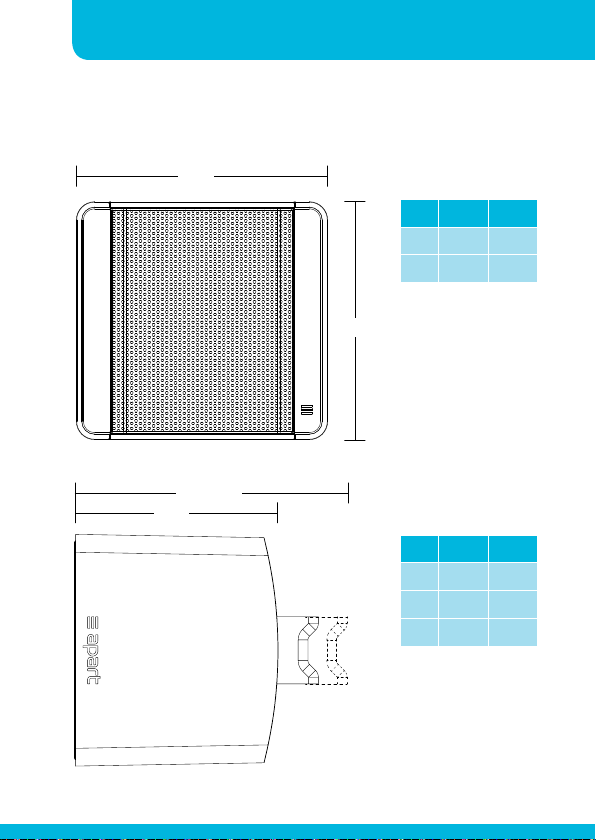
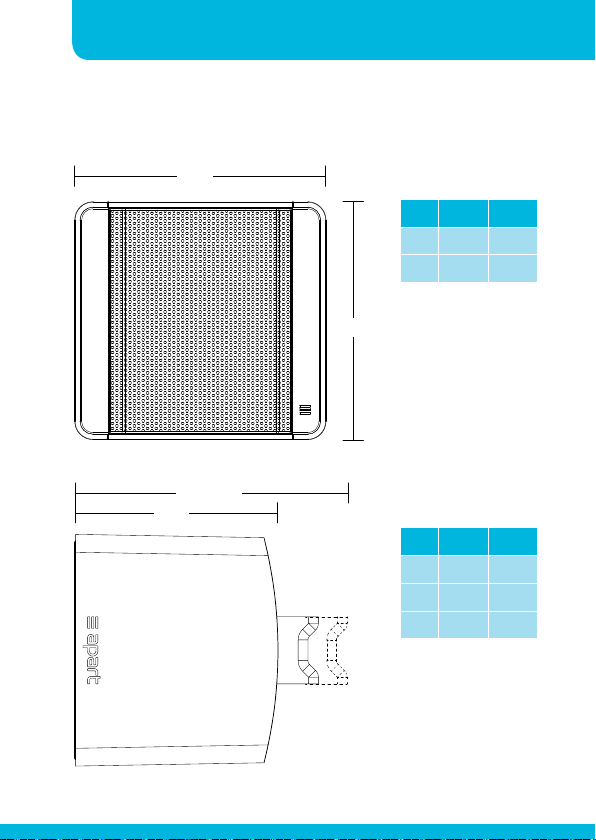
Technical drawings - KUBO5(T)
A
A - B
C
mm inch
A 164 6.44
B 155 6.10
B
mm inch
A 164 6.46
B 185 7.28
C 136 5.34
Page 17
KUBO3(T) / KUBO5(T)
Instruction manual
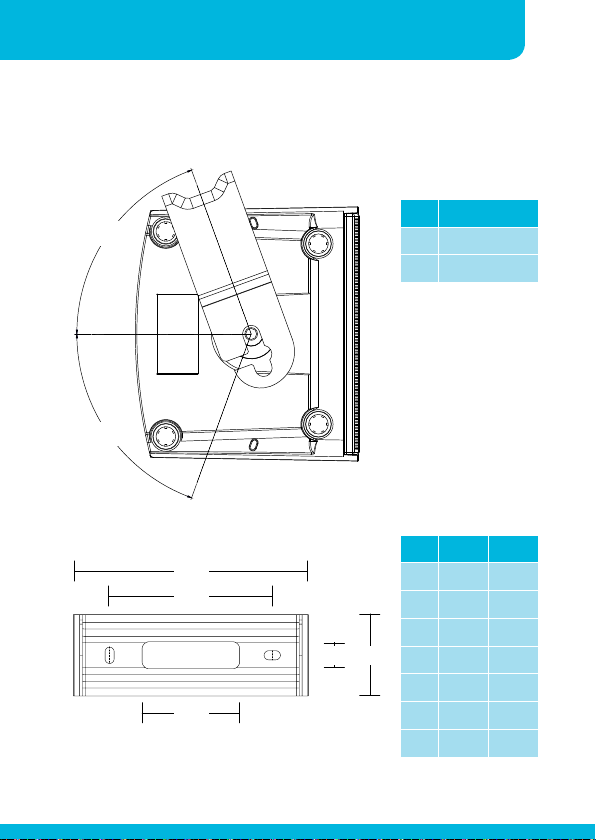
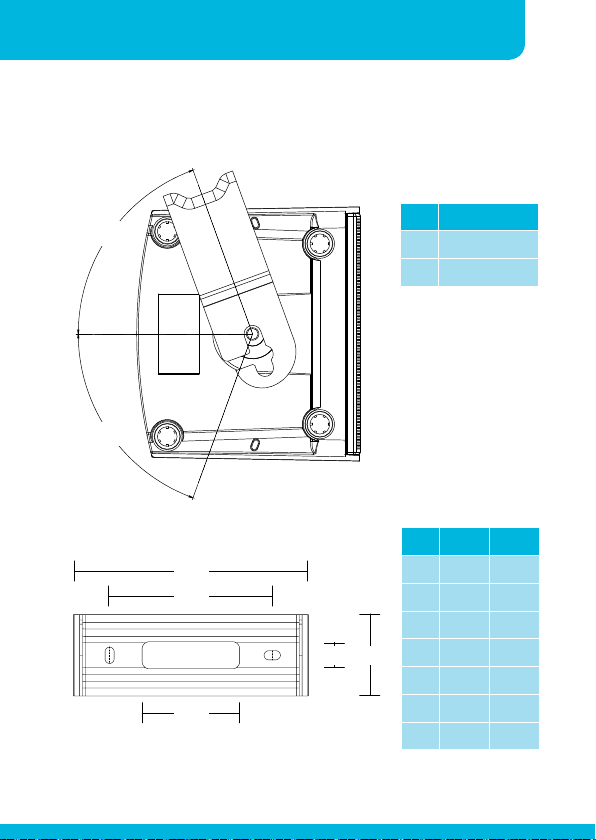
Technical drawings - KUBO5(T) bracket
A
B
A
E
F G
C
BD
17
degrees
A 70
B 70
mm inch
A 130 5.12
B 45 1.77
C 54 2.13
D 15 0.59
E 90 3.54
F 9 0.35
G 5 0.20
Page 18
18
Design cabinet loudspeaker
Technical drawings - KUBO3(T)
A
A - B
C
mm inch
A 131 5.17
B 125 4.92
B
mm inch
A 131 5.16
B 149 5.87
C 109 4.31
Page 19
KUBO3(T) / KUBO5(T)
Instruction manual
Technical drawings - KUBO3(T) bracket
19
A
B
A
E
F G
C
BD
degrees
A 70
B 70
mm inch
A 107 4.21
B 36 1.42
C 54 2.13
D 10 0.39
E 80 3.15
F 8 0.31
G 5 0.20
Page 20

20
Design cabinet loudspeaker
Notes
Page 21

Page 22

developed
by
Industriepark Brechtsebaan 8 bus 1
Apart Audio nv
2900 Schoten - Belgium
Company names, product names and trademarks are property of their
Apart Audio specifications are subject to change without notice.
respective owners.
 Loading...