

Page 1

PREZONE1
Instruction manual
Page 2

Page 3

PREZONE1 manual
Instruction manualPREZONE1
3
Page 4

4
Preamplifiers
IMPORTANT SAFETY INSTRUCTIONS
• Read these instructions - All the safety and operating instructions should be read before this
product is operated.
• Keep these instructions - The safety and operating instructions should be retained for future
reference.
• Heed all warnings - All warnings on the appliance and in the operating instructions should
be adhered to.
• Follow all instructions - All operating and use instructions should be followed.
• This professional device needs to be installed by qualified personnel only.
• Danger: Exposure to high sound levels may cause a permanent hearing loss. Individuals vary
considerably to sound pressure level induced hearing loss but nearly everyone will lose some
hearing if exposed to high sound pressure levels for a sufficient amount of time. Therefore
it is recommended that all persons exposed to equipment capable of producing high sound
pressure levels, such as this amplifier, be protected by hearing protection while installing or
operating this unit.
• Make sure to only use power outlets conform to the power requirements listed on the back
of the unit.
• Do not connect the inputs / outputs of amplifiers or consoles to any other voltage source,
such as a battery, mains source, or power supply, regardless of whether the amplifier or
console is turned on or off.
• Do not drive the inputs with a signal level higher than that required to drive equipment to
full output.
• Do not run the output of any amplifier back into another input.
• This unit has NOT been designed for use in mobile applications, such as: mobile discobars,
mobile PA systems, Live bands, audio rental systems,… Using it in such application will lead
to product damages and safety risks.
• Do not use this apparatus near water
• Clean only with dry cloth.
• Do not block any ventilation openings. Install in accordance with the manufacturer
instructions.
• Do not install near any heat sources such as radiators, heat registers, stoves, or other
apparatus (including amplifiers) that produce heat.
• Do not defeat the safety purpose of the polarised or grounding plug.
A polarised plug has two blades with one wider than the other. A grounding plug has two
blades and a third grounding prong. The wide blade or the third prong is provided for your
safety. Always use the device with a grounded mains power plug. If the provided plug does
not fit into your outlet, consult an electrician for replacement of the obsolete outlet.
• Protect the power cord from being walked on, pinched or damaged. Particularly at the plugs,
connectors and at the point where they exit from the apparatus.
• Only use attachments/accessories specified by the manufacturer.
• Unplug the apparatus during lightning storms or when unused for long
periods of time.
• Use only with the cart, stand, tripod, bracket, or table specified by the
manufacturer, or sold with the apparatus. When a cart or rack is used, use
Page 5
Instruction manualPREZONE1
caution when moving the cart/apparatus combination to avoid injury from tip-over.
• Refer all servicing to qualified personnel. Servicing is required when the apparatus has been
damaged in any way, such as power supply cord or plug is damaged, liquid has been spilled
or objects have fallen into the apparatus has been exposed to rain or moisture, does not
operate normally, or has been dropped.
• WARNING: To reduce the risk of fire or electric shock, do not expose this apparatus to rain or
moisture. The apparatus shall not be exposed to dripping or splashing and that objects filled
with liquids, such as vases, shall not be placed on apparatus.
• WARNING: The mains plug/appliance coupler is used as disconnect device, the disconnect
device shall remain readily operable.
• This lightning flash with arrowhead symbol within an equilateral triangle is intended to
alert the user to the presence of non-insulated “dangerous voltage” within the product’s
enclosure that may be of sufficient magnitude to constitute a risk of electric shock.
- Warning: To reduce the risk of electric shock, do not remove cover (or back) as there are no
user-serviceable parts inside. Refer servicing to qualified personnel.
- The exclamation point within an equilateral triangle is intended to alert the user to
the presence of important operating and maintenance instructions in the literature
accompanying the appliance.
•
•
•
• No naked flame sources, such as lighted candles, should be placed on the apparatus.
• Minimum 5 cm distances around the apparatus for sufficient ventilation.
• Do not install this equipment in a confined or building-in space such as a book case or
• The use of apparatus in moderate climates.
Caution: To reduce the risk of electric shock.
Protective earthing terminal. The apparatus should be connected to a mains socket
outlet with a protective earthing connection.
Correct Disposal of this product. This marking indicates that this product should not
be disposed with other household wastes throughout the EU. To prevent possible
harm to the environment or human health from uncontrolled waste disposal, recycle
it responsibly to promote the sustainable reuse of material resources. To return your
used device, please use the return and collection systems or contact the retailer where the
product was purchased. They can take this product for environmental safe recycling.
similar unit, and remain a well ventilation conditions at open site. The ventilation should not
be impeded by covering the ventilation openings with items such as newspaper, table-cloths,
curtains etc.
5
Page 6
6
Preamplifiers
Introduction
“Providing the missing link”
There is a huge demand for preamplifiers with multiple zone
applications in the fixed install audio market today. Although
there are a lot of products available, none are able to satisfy both
installers and users. The overall connectivity and use of existing
products remain a battle to install and operate. Thanks to the input
from our partners and the comprehensive research of our R&D
department we succeeded in creating the ultimate pre-amplifier
range “the PREZONE Series”. Apart Audio together with a world
leading design company completely redesigned the “preamplifier”
as we know it today.
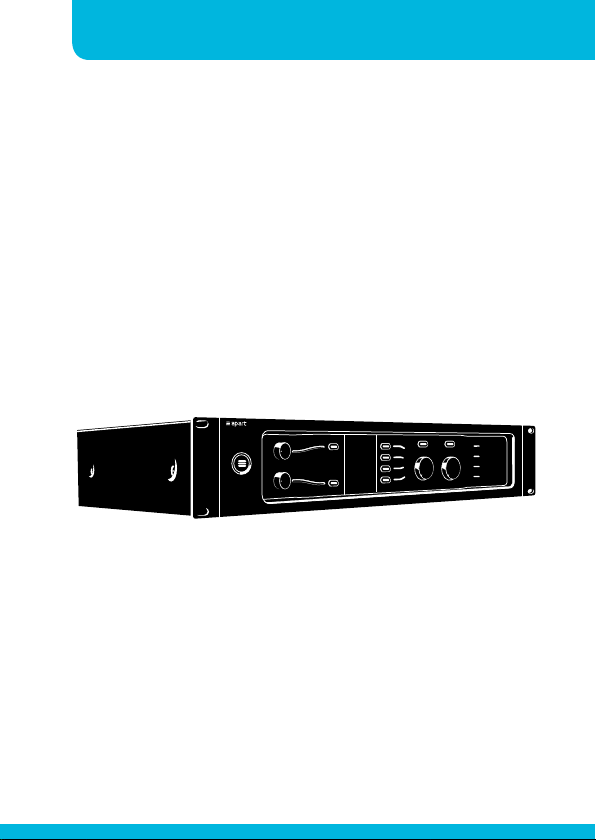
The result is the revolutionary Apart PREZONE1 a multi-functional
stereo preamplifier that allows you to independently control the
volume in 2 stereo zones. It gives you the possibility to mix the 2
microphone levels easily with a music sources. The innovative design
of the front will instantly indicate how to operate the progressive
PREZONE1. The logical rear panel will give every installer an instant
understanding on how to install the unit. It’s easy to distinguish
the PREZONE1 from its competitors. Its higher signal to noise ratio,
ease-of-use, logical design and versatile features makes it suitable
for almost every professional audio application.
Page 7

Instruction manualPREZONE1
Features
• 19” rack unit, 2U high with removable rack ears
• Patented front panel designed to create an intuitive user
interface.
• Front control for end-user and back panel for configuration
installer (out of reach of end-user)
• Universal switching mode power supply
• No cooling fan - maintenance free
• 3 priority levels for audio routing
• Dedicated isolated emergency input with vox and mute all
switch
• 2 mic / line inputs with tone controls and phantom power (48V)
• 4 stereo line inputs on RCA connectors
• 2 zone outputs with tone balance controls
• Balanced and unbalanced outputs for each zone
7
• Mono / stereo switch for each zone output
• Signal clip indicators and gain control on all inputs for fast and
easy configuration of the input gain
• Front button standby with low power consumption
Page 8
8
Connections
Preamplifiers
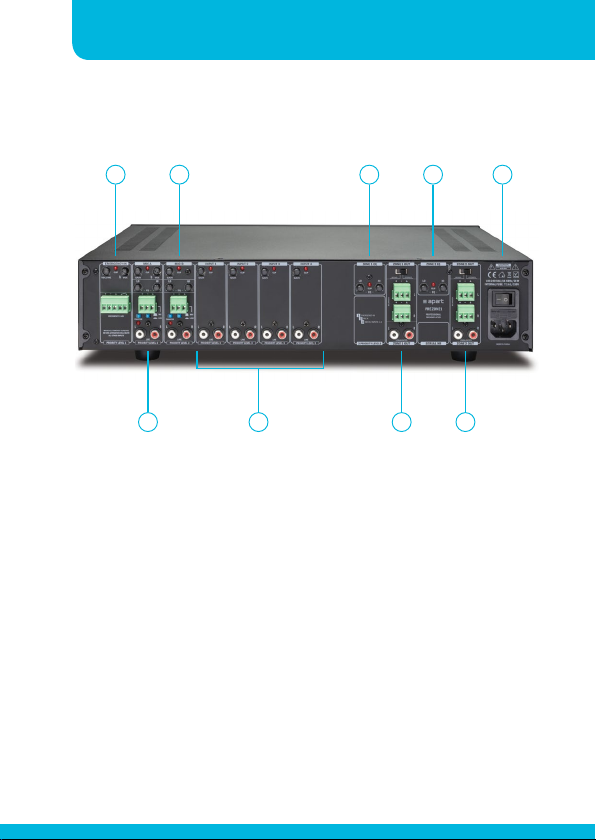
1
1. Emergency input: connect your balanced 0 dBV line level
emergency input audio signal to the euroblock connector. If
available, connect the emergency contact to the “mute all”
connection. The contact must be “potential free”, i.e. a relay
or switch contact that does not carry any voltage. Alternatively,
activate the “vox” circuitry by turning the vox control until you
hear an audible “click”. Now turn the vox control up while
playing music until the vox circuit is activated. The vox and
the mute all switch have the same function: they will mute all
other sources, and will wake up the unit from standby (auto
standby and front button standby). The emergency level can be
set with the volume control. If the clip led lights up when the
emergency signal is present, lower the level of the emergency
signal at the source to avoid distortion.
3 5 9
2
4 6 8
7
Page 9

Instruction manualPREZONE1
2. MIC A input: connect a microphone here: the euroblock
accepts balanced microphone or line level signals and RCA
accepts line level signals. Set the mic / line switch accordingly.
The stereo unbalanced input signals are mono summed and
merged with the balanced input into one signal, which is send
to all zone outputs. Phantom power (48 V) can be applied to
the balanced euroblock by pushing the phantom power switch.
The led beneath the switch will be lit when phantom power is
present. Adjust the gain control so that the clip led does not
light up when the signal is at its highest level. If necessary,
activate the vox circuitry by turning the vox level control until
you hear an audible “click”. Now turn the vox level control up
until the vox circuit is activated. The MIC A volume can be set
using the front panel level control (2). MIC A can be activated
by pressing the MIC A select switch on the front panel (3). The
vox circuit, when activated, will attenuate all lower priority
sources (MIC B, input 1-4) by 30 dB. MIC A has its own lo and
hi tone controls. MIC A input is compatible with the Apart
ALINP local input panel that requires phantom voltage.
Note:When you only use the RCA inputs, keep the mic/line
select switch set to “LINE” to improve the output noise.
3. MIC B input: connect a microphone here: the euroblock accepts
balanced microphone or line level signals and RCA accepts line
level signals. Set the mic/line switch accordingly.
The stereo unbalanced input signals are mono summed and
merged with the balanced input into one signal, which is send
to all zone outputs. Phantom power (48 V) can be applied to
the balanced euroblock by pushing the phantom power switch.
The led beneath the switch will be lit when phantom power is
present. Adjust the gain control so that the clip led does not
9
Page 10

10
Preamplifiers
light up when the signal is at its highest level. MIC B has its
own lo and hi tone controls. MIC B input is compatible with the
Apart ALINP local input panel that requires phantom voltage.
Note:When you only use the RCA inputs, keep the mic/line
select switch set to “LINE” to improve the output noise.
4. Input 1-4: line level input on RCA connectors. Adjust the gain
control so that the clip led does not light up when the signal is
at its highest level.
5. Zone 1 EQ: lo and hi tone controls for the selected line input
1-4 being fed to zone 1 output.
6. Zone 1 out:
a. Mono/stereo switch: With this switch the output can be
configured as a mono output or stereo output.
b. Balanced / RCA outputs: Balanced and RCA output supply a
line level output signal.
7. Zone 2 EQ: lo and hi tone controls for the selected line input
1-4 being fed to zone 2 output.
8. Zone 2 out:
a. Mono/stereo switch: with this switch the output can be
configured as a mono output or stereo output.
b. Balanced / RCA outputs: balanced and RCA output supply a
line level output signal.
9. Main power input, switch and fuse: connect the mains power
cord here. Switch on the power switch to power up the unit.
The mains fuse is also located here.
Page 11
Operation
Instruction manualPREZONE1
11
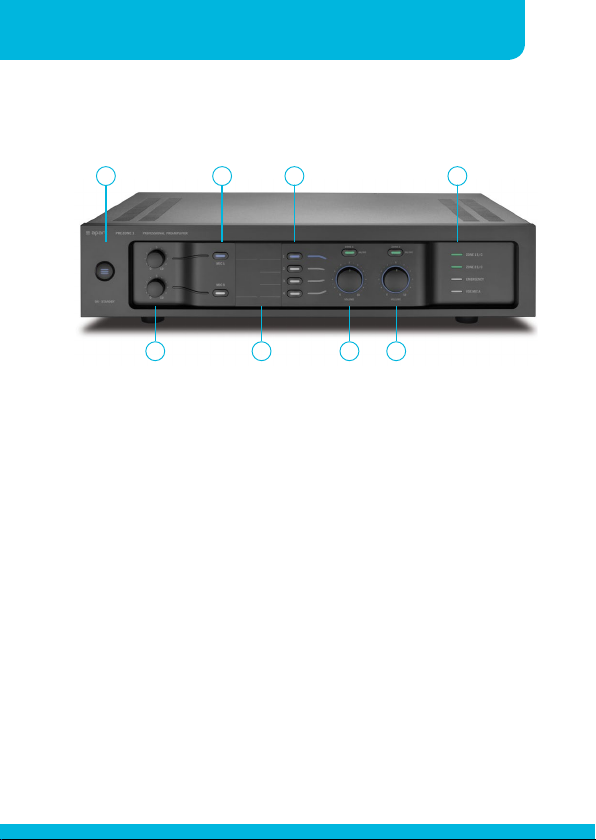
1
2
3
5
4
6 7
8
1. On/Standby button and led: switch the standby ON/OFF with this
button. Please note that the main power switch at the rear of the
unit must be switched on. Read more about the standby below.
When the unit is on, the on/standby button led will light up steadily.
When the unit is in standby, the led will fade in/ fade out.
2. MIC A/B volume control: this control determines the output volume
of MIC A/B for both zones.
3. MIC A/B on/off switch: use this button to turn MIC A/B on and off
for both zones.
4. Name field: here you can attach the name stickers and the name
fields supplied with the unit.
5. Input 1 – 4 selection buttons: by pressing these buttons, you can
toggle between inputs 1 to 4, or switch off the selected input by
pressing the button that is lit. You can only select one input at a
time for both zones.
6. Zone 1 on/off button and volume control: By pressing the on/off
button, the zone can be enabled (green) or disabled (red). While
the zone is muted, the selected inputs will be muted in these zones.
Page 12

12
Preamplifiers
When the emergency is activated, the output will be automatically
unmuted for the duration emergency is active. Turn the volume
control clockwise to increase the volume of zone 1, counter
clockwise to decrease. The volume control sets the output volume
of the selected input 1-4 for zone 1 only.
7. Zone 2 on/off button and volume control: By pressing the on/off
button, the zone can be enabled (green) or disabled (red). While
the zone is muted, the selected inputs will be muted in these zones.
When the emergency is activated, the output will be automatically
unmuted for the duration emergency is active. Turn the volume
control clockwise to increase the volume of zone 2, counter
clockwise to decrease. The volume control sets the output volume
of the selected input 1-4 for zone 2 only.
8. Status leds: S/C or signal/clip leds lights up green when an output
signal is present and turns red when the amplifier is clipping in
the zone output. Emergency led will light up to indicate that an
emergency message is coming through (mute all contact or vox).
Vox MIC will light up to indicate that the vox circuit of MIC A is
active. The vox circuit will not be active when MIC A isn’t lit.
Standby
The On / Standby knob led will slowly fade in/out to indicate that
standby is activated.
The unit will wake up from standby when:
• Pressing the standby/power button
• Activating the emergency input by making a connection to the
emergency mute all input or vox circuit
• Cycling the power using the rear power switch (or a mains power
interruption)
• Pushing any front button
Page 13

Instruction manualPREZONE1
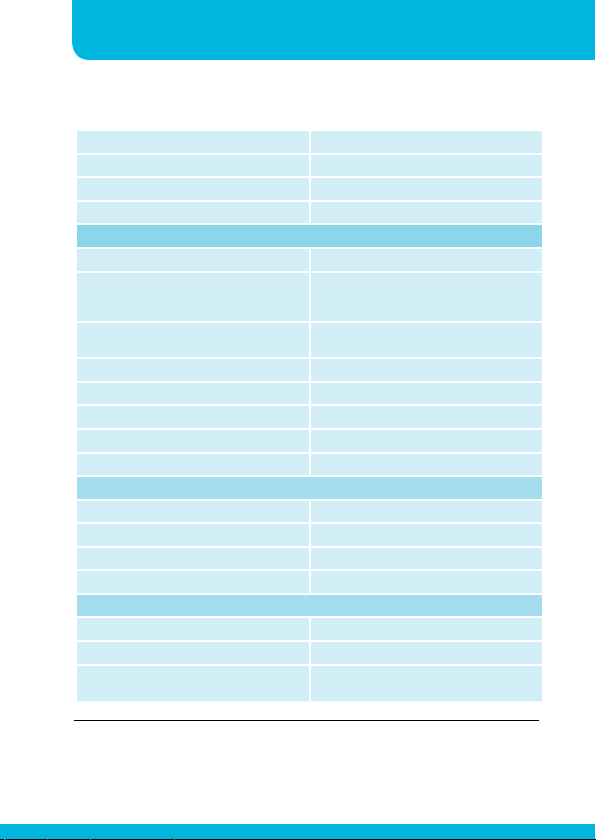
Technical specifications
Product name PREZONE1
Emergency
Nominal input sensitivity 0 dBV (1 Vrms)
SNR (Volume max)
(nominal output (0dBV), a-weighted,
20Hz-20kHz)
THD+N @ nominal output -6 dB < 0.7%
Frequency response (-3dB) 300 Hz – 20 kHz
Input impedance 5 kohms
MIC A / MIC B
Nominal input sensitivity balanced input
Mic selected (front volume max)
SNR @ balanced input, mic selected (Gain
max)(nominal output (0dBV), a-weighted,
Nominal input sensitivity balanced input
SNR @ balanced input, line selected (Gain
max)(nominal output (0dBV), a-weighted,
20Hz-20kHz)
Line selected (front volume max)
20Hz-20kHz)
Nominal input sensitivity RCA input
1 Input only (front volume max)
Nominal input sensitivity RCA input
Both inputs used (front volume max)
SNR @ RCA input (gain max)
(nominal output (0dBV), a-weighted,
20Hz-20kHz)
Frequency response (-3 dB)
THD+N @ nominal output -6 dB <0.2 %
LO EQ +-9 dB @ 100 Hz
HI EQ +- 8.5 dB @ 10 kHz
102 dB
-47dBV to -19 dBV
81 dB
-17 dBV to +11 dBV
89 dB
-17 dBV to +11 dBV
-22 dBV to +6 dBV
89 dB
Balanced mic: 190 Hz – 20 kHz
RCA/Balanced Line: 20 Hz – 20 kHz
13
Page 14
14
Preamplifiers
Phantom Voltage: 48V
Vox attenuation MIC B, input 1-4 30 dB
Input impedance Balanced 2K
Input impedance RCA 10K
Input 1-4
Nominal input sensitivity RCA (0 dBV output) -17 dBV to +11 dBV
SNR @ RCA input (Gain max)
(nominal output (0dBV), a-weighted,
20Hz-20kHz)
Crosstalk, L vs R (1kHz, nominal output
(0dBV), 20Hz-20kHz)
THD+N @ nominal output -6 dB <0.2%
Frequency response (-3 dB) 20 Hz – 20 kHz
LO EQ +-9 dB @ 100 Hz
HI EQ +-8.5 dB @ 10 kHz
Input impedance 10K
Power supply
Max power consumption 30 W
Idle power consumption 10 W
Standby power consumption <1.8 W
Power supply 100-240 VAC / 50-60 Hz / 30 W
General
Dimensions amplifier (l x d x h) 430 x 290 x 89 mm
Weight 3.65 kg
accessories
Rack ears, power cable, euroblock connectors,
sticker paper, feet, safety document
97 dB
-80 dB
The warranty of this product and the applicable terms and conditions
are provided by the dealer where you purchased this product.
Page 15

Page 16

developed
by
Industriepark Brechtsebaan 8 bus 1
Apart Audio nv
2900 Schoten - Belgium
Company names, product names and trademarks are property of their
Apart-Audio specifications are subject to change without notice.
respective owners.
 Loading...