

Page 1

User Manual
MP3 Player
USB Flash Drive + MP3 Player +
Voice Recorder + FM Radio +
Memory Stick/ Memory Stick Pro Reader
Version 2.0
Page 2

Audio Steno User Manual (Version 2.0)
Table of Contents
At a Glance
Function Keys
Overview
Getting Started
Battery
Installing Driver & Application Software
Connecting the Audio Steno
Transferring Music
Playing Music
Using the Audio Steno
General Operation
MP3 Mode
FM Mode
USB Flash Drive Mode
Voice Recorder Mode
Using the Docking Station
Tips and Troubleshooting
Firmware Upgrade
Q&A
Service and Support
Customer Service email Box: apacertechsupport@apacer.com
Technical Support Materials Download:
http://www.apacer.com/apacer_english/support_html/download.asp
Safety and Cleaning
Unpacking the Carton
Avoiding Personal Loss or Injury
Using and Storing the Audio Steno
Product Specification
Page 3

Disclaimer
Apacer offers a limited warranty for the materials and workmanship of this product as
described in the Statement of Limited Warranty, but Apacer does not warrant against
damages or defects arising out of use of this product; against defects or damages
arising from improper installation, or against defects in the product or in components.
No warranty of any kind, expressed or implied, is made regarding the safety of the
product. The buyer assumes all risks and liability from use of the product.
Page 4
At a Glance
Audio Steno
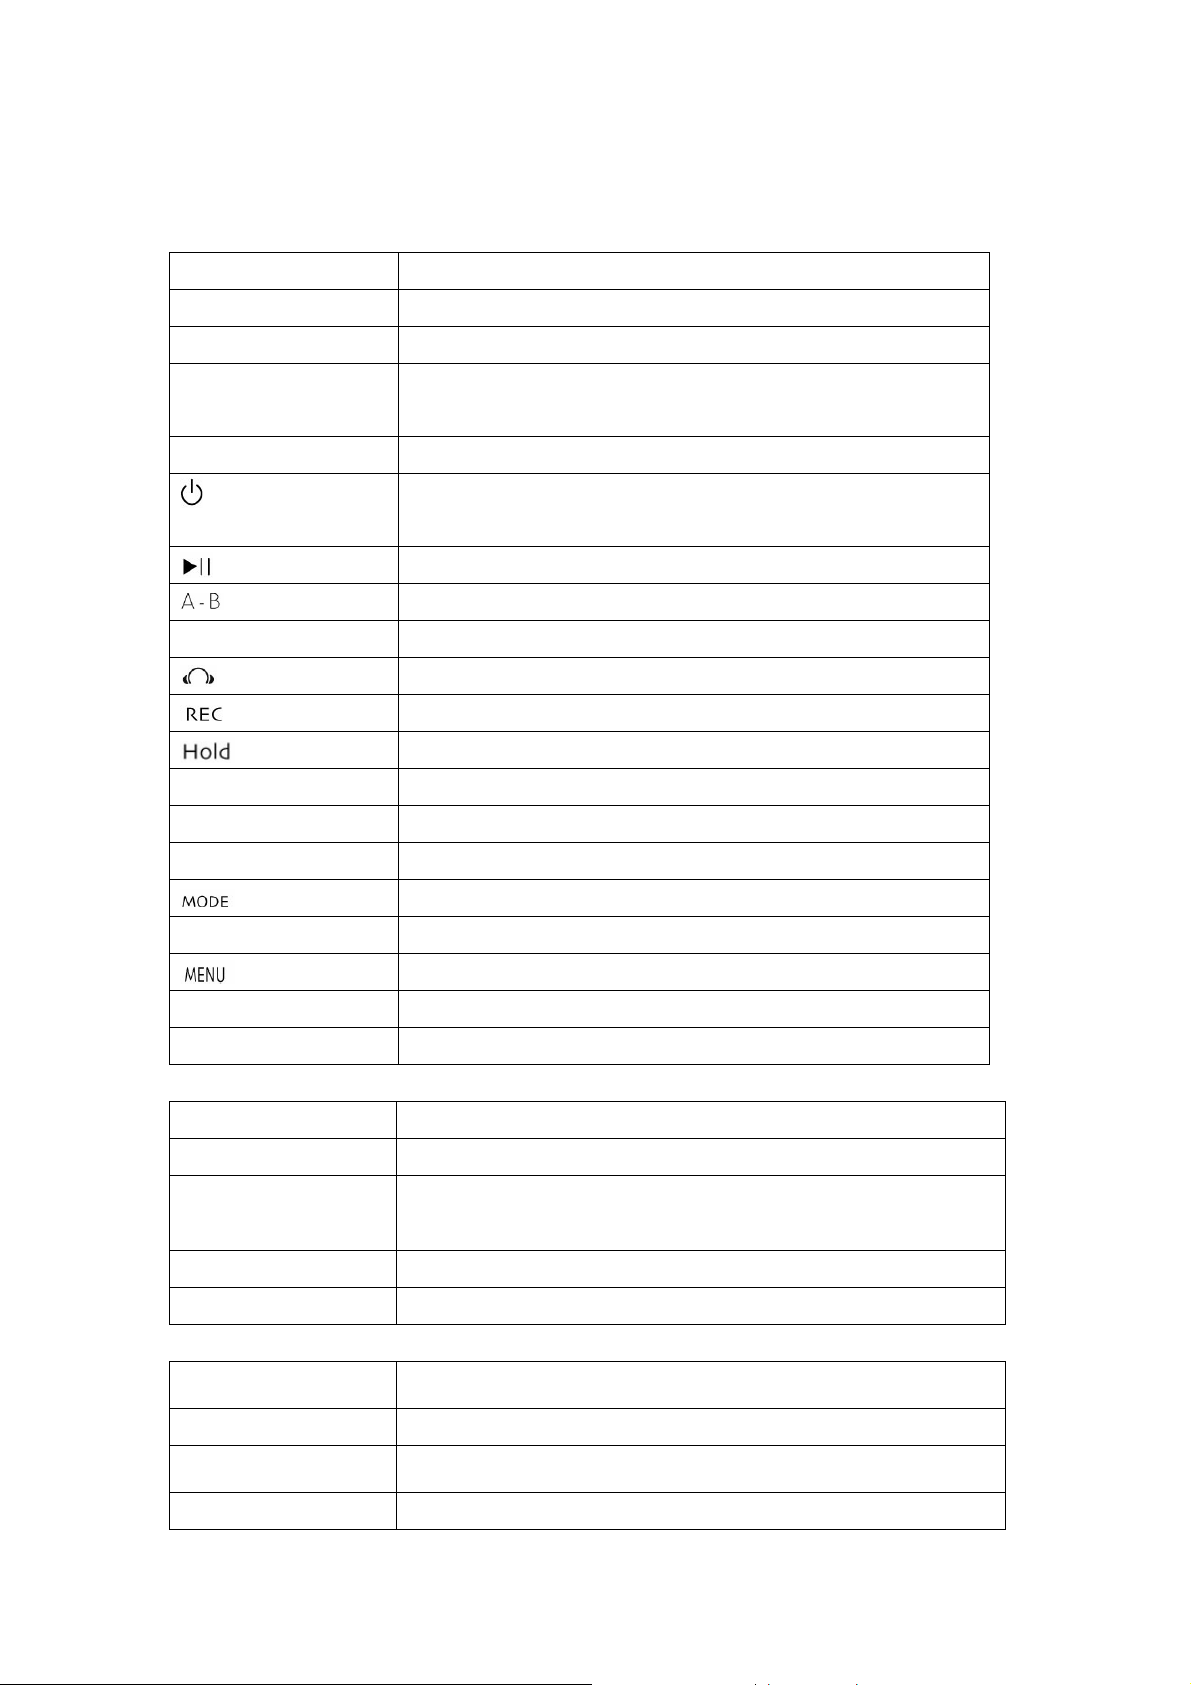
Front View Function/Operation
Battery Cover Turn the cover counterclockwise to open or clockwise to close.
Battery Compartment Contain a size AA battery.
Volume Turn the knob clockwise for hi gh volume (Loud) or Counterclockwise
for low volume (Quiet).
Screen Display the operation mode, status, and settings.
Left View Function/Operation
Mini USB Socket Plug the USB connector here.
Memory Stick Socket Inserting the memory stick here.
Right View Function/Operation
MIC Microphone
Bottom View Function/Operation
Docking Slot Connecting with docking station here.
Press this Power On/Off button for two seconds to power on or press
it again for two seconds to power off.
Press this Play/Pause button once to play or pa use.
Repeat playing the session from A to B.
Plug the earphone into the Earphone Jack here.
Push and hold this Voice Recorder button upward to record voices.
Push the Hold button upward to the lock position.
Select MP3, Recorder, or FM mode.
Select Audio Settings, Delete, or Info
Docking Station
Front View Function/Operation
Docking Slot Dock the Audio Steno here.
Data/Audio Button Push the button to the left for data transmission.
Push the button to the right for audio playback.
Rear View Function/Operation
USB Slot Connect the USB cable here.
Accessories
Antenna
Earphone
USB Cable
AA Battery One AA alkaline battery.
Give better FM broadcast reception by plugging the antenna to the
earphone jack or antenna jack.
Plug the earphone into the earphone jack for its use.
Plug one end of the cable to PC and the other end to the USB slot of the
Audio Steno or the docking stat i on.
Page 5

CD Driver Drivers required for Windows 98/98SE
Page 6

Overview
The Audio Steno is a five-in-one MP3 flash drive featuring the MP3 playback,
Memory Stick / Memory Stick PRO card reader, USB memory storage, digital
recording, and FM broadcast reception.
The compact design of the Audio Steno with a weight of only 50 grams and a built-in
memory stick socket allows you to carry it with you all the time and enjoy music
anywhere, anytime by downloading the MP3 music into a Memory Stick / Memory
Stick PRO or saving it in the built-in memory. The Audio Steno also can go with
external speakers for the better appreciation of your favorite music at home or in the
office.
Page 7

Getting Started
The Audio Steno works as a standalone device or with a PC or a docking station to
organize and play music from your music collection, or transfer songs to the
embedded memory of the Audio Steno or the Memory Stick / Memory Stick PRO for
listening on the go. The Audio Steno also serves as a memory stick card reader, a
USB memory storage device, a digital voice recorder, or a FM radio. Read the
following summarized procedures to find out how to get started with your Audio
Steno.
Step 1. Battery (or Power from PC)
Install a battery to the Audio Steno for standalone applications, or connect the Audio
Steno to a PC by a USB cable.
Step 2. Installing Software
Install necessary driver and application software. Refer to the following section for
the software installation.
Step 3. Connecting the Audio Steno
The Audio Steno is ready to go for its standalone applications. You also can connect
the Audio Steno to a PC by a USB cable.
Step 4. Transferring Music
The Audio Steno is a flash memory device. You can transfer music files (and data files)
between Audio Steno, memory stick card, and storage devices of the computer.
Step 5. Playing Music
Once you transfer songs to the Audio Steno, it is easy to browse for and listen to
songs.
Page 8

Using the Audio Steno
General Operation
Battery
z For standalone applications, use an AA alkaline battery for playbacks.
z The standalone Audio Steno will shut down automatically to save power if the
Audio Steno is idled for a predetermined time.
z Change the battery, if “Low battery” appears on screen or buttons do not respond.
The Audio Steno will shut down automatically when the battery is low.
z The Audio Steno playback and standby time vary according to the type, brand,
and capacity of the battery.
z Remove the battery to avoid damages caused by leakage if the Audio Steno is not
going to be used for a long time.
Power from PC
When connected to a PC, the Audio Steno consumes the power from your PC through
the USB cable.
Connecting the Audio Steno
You can use the Audio Steno as a standalone device, or with a PC or a docking station.
Start up your computer, and connect the Audio Steno to the computer by the included
USB cable. You also can plug the Audio Steno into the docking station and then
connect the docking station to the computer by the included USB cable.
Installing Driver & Application Software
z For Windows 98/98SE, install the driver to your computer. Insert the enclosed
CD to the optical disk drive to launch the driver.
z For Windows 2000/ME/XP, the operating system will automatically find the
device. Therefore, it is not necessary to install the driver.
z For Windows 98/2000/ME/XP, we recommend you to install the bundled
application software. Insert the enclosed CD, and the Installation Wizard will
show up on screen to guide you through the installation.
Page 9

Driver Installation Screen
Powering on the Audio Steno
z The Audio Steno is powered on automatically when connected to an operating
computer. will appear on the screen.
z For standalone applications, power on the Audio Steno by pressing and holding
the Power ON/OFF switch for two seconds. “Hello!!” will appear on the
screen.
Transferring Music
The Audio Steno is a flash memory device. You can transfer music files (or data files)
between Audio Steno, memory stick card, and storage devices of the computer.
Checking A vailable Memory
Press the menu switch to select MenuÆInfoÆFlash/Card/Exit to display the free
memory and total memory.
Options for the Settings
Setting Description Functions/Options
EQ Music Equalizer Normal/Rock/Jazz/Classical/Pop
Repeat Repeat Mode Normal/Repeat 1/Repeat All/Random/Random All
Contrast OLED Brightness Level (Brightness Level)
Power Off Auto Shutdown Time Diasbled/1 min/2min/5min/10min
REC Select Record Bit Rate
EXIT Exit Exit the menu.
Rec. Bit Rate
8.0 KHz (LP: for extensive recording)
16.0 KHz (SP: for standard recording)
44.1 KHz (HQ: for high quality recording)
Rec. Audio Steno
Flash/Card
Page 10

MP3 Mode
The Audio Steno is default to the MP3 mode. The screen below shows up when you
are in the MP3 mode.
MP3 Mode Screen
Playing Music
Follow the instructions given below to play songs.
z Press the mode button to select the music player MP3 mode. The default
setting is MP3 mode.
z Press the menu switch to make your selection. Pivot the menu switch up or
down to browse the options and select your desired song.
z Confirm your selected option by pressing the menu switch again.
(Press the menu switch to select Menu ÆMusicÆ Both/Flash/Card)
Changing Volume
Turn the volume knob of the Audio Steno clockwise for high volume (loud) and
counterclockwise for low volume (quite).
Setting Music Source
You can select to play a song from the source of a flash, a card, or both. Press the
menu switch to select Menu ÆMusicÆ Both/Flash/Card.
Repeating Session from A to B
You can repeat playing the songs in the session from A to B. Press the A-B button to
set the starting point of the repeated session, and then press the button again to set the
ending point.
Locking by Hold Button
You can disable the function keys by switching the hold button upward to the lock
position, or enable them by switching the button downward to the unlock position.
Deleting Song
Press the menu switch to delete a song by selecting Menu ÆDelete
ÆMusic/Voice/Exit Æ Flash/CardÆ Y es/No/Exit.
Page 11

FM Mode
Press the mode button to change the default MP3 mode to the FM mode.
You can search your desired FM radio station by Auto Scan or Manual Search.
FM Mode screen
Auto Scan
Pivot and hold the menu switch upward or downward to search the up-band or
down-band channels respectively. You will search for the available channel closest
to the frequency when you release the menu switch. The search is performed with
an increment of 100 KHz (0.1 MHz).
Manual Search
Pivot and hold the menu switch upward or downward to search your desired channel.
Click the menu switch when you have found your desired channel.
Direct FM Recording
Press the REC button in FM mode to record the selected channel.
USB Flash Drive Mode
z If the Audio Steno and a memory stick are connected to the computer, then both
“removable disks” will appear in My Computer, wherein one removable disk is
for the embedded flash memory and the other for the memory stick inserted in
the slot.
z If the Audio Steno is connected to the computer, you can play music and control
the volume from the PC without consuming the power from the battery.
z The following screen will show the file transfer status.
Data Transfer Screen
z After the file transfer is completed, click on the “Stop USB Mass Storage
Device” icon in the system tray, and then unplug the device from the USB port.
Stop USB Mass Storage Device Screen
Warning! You may lose your data or damage your device if the foregoing procedure is
not followed.
Page 12

Format the Device
Format the device if it is not operating properly. Acceptable formats of the Audio
Steno include the default settings: FAT 12 or FAT 16. The format FAT 12 is for the
64MB Audio Stenos, and the format FAT 16 is for the Audio Stenos of 128MB or
256MB or higher capacities.
Please use the format program on the enclosed CD, if available, to format the Audio
Steno. You can also use the format function provided by Windows to format the
Audio Steno into FAT or FAT 16.
Voice Recorder Mode
z Push the button upward to start recording voices, and push the button
upward again to stop recording.
z The voice will be recorded into WAV files and numbered with an increment of 1
(such as v001.wav, v002.wav, and so on)
z Press the button to listen to the recorded file. Pivot the menu switch
up/down to locate the previous/next .wav file respectively. Pivot and hold the
menu switch up/down to fast forward/rewind the recorded file respectively.
z Press the menu switch and select RecBitRate in the menu for various recording
or listening requirements and environments.
z You can enter the Voice Recorder Mode from the MP3 Mode by pressing the
menu switch to select Menu and pivoting the menu switch up/down to select
Voice.
z The OLED shows the sequence number, time duration, and filename of the track
that you are listening or recording.
z You can save the recorded file to the embedded flash or extended memory
media.
Using the Docking Station
The docking station bridges your Audio Steno and PC for two main functions: Data
and Audio. You can select Data or Audio by the Data/Audio switch.
When you select the Data function:
z
The docking station allows data/file transfers between your Audio Steno and PC
via a USB bus.
z When you select the Audio function:
The docking station lets your Audio Steno play songs properly by consuming the
Page 13

power of your PC.
If you connect the Audio Steno to a docking station, you can play one of the
following modes:
Provided that the docking station is switched to Audio:
MP3 mode
Power on the Audio Steno by pressing the key on the Audio Steno.
FM mode
z Plug the antenna into the earphone jack or antenna jack.
z Press the key on the Audio S teno to power on the Audio Steno.
z Press the key to switch to the FM mode.
z Pivot the switch to search your desired FM channel.
z Now, you can hear the sound from the earphone when the earphone is
plugged.
Provided that the docking station is switched to Data:
USB Flash Drive Mode
The related operations are exactly the same as described in the section USB Flash
Drive Mode. Please refer to such section at page xxxx
Page 14

Tips and Troubleshooting
Firmware Upgrade
z Remove the battery before upgrading the firmware.
z Press and hold the Power ON/OFF switch while connecting the Audio Steno to
the USB port of your PC.
Note: Keep pressing and holding the Power ON/OFF switch until the firmware
upgrade is completed.
z The message “The firmware update utility has detected your device in firmware
recovery mode. Portions of firmware are being loaded into the device.” will
appear on screen.
Firmware Upgrade Screen
z Continue to hold the Power ON/OFF switch until the firmware upgrade is
completed.
z Run the Audio Update program from the Start menu of your computer.
Audio Update Program Screen
z The device’s current firmware version, upgrade firmware version, and related
information will show up on the screen.
z Click “Start” to complete the firmware upgrade.
Firmware Upgrade Screen
Note: We reserve the right to update firmware and related application software
without prior notice. Please visit our website:
www.apacer.com/apacer_english/support_html/download.asp for firmware upgrades.
Page 15

Q&A
Q: Why we see no display after turning on the Audio Steno?
A: Check whether it is necessary to replace the battery.
Q: Why are the buttons not working?
A: Check whether the HOLD button is set to the locked position.
Q: Why we hear no sound when playing MP3 files?
A: Check whether the volume is at an audible level.
Q: Why we cannot see the playback time for some songs?
A: Some MP3 or WMA files are in the VBR compression format. The Audio Steno
cannot show the playback time for these files. You may want to compress these files
again with normal rating.
Q: Why we cannot play some MP3 songs?
A: The Audio Steno supports MPEG1 Layer III (MPEG3) and WMA formats only,
and may not be able to play songs of other formats. Convert your file to a proper
format before playing the song.
Q: Why the battery runs low so quickly when playing WMA files?
A: WMA files use a different compression format, which has a higher compression
ratio than MP3. Therefore, the WMA file will consume more battery power.
Q: Why can’t I find my currently recorded voice file in the Audio Steno?
A: Voices are recorded in WAV files, and these files are numbered with v001.wav,
v002.wav, and so on.
Q: Why can’t I record voices into the Audio Steno under recording mode?
A: The built-in flash memory may be full or the memory card not inserted. Delete
some files or insert the memory card.
Q: Why can’t I use the Audio Steno when it is connected to a PC as instructed?
A: For Windows 98 or 98SE, please install the provided software. The PC will
detect the Audio Steno automatically. If it still does not work, install the enclosed
Driver and Application Software. We highly recommend you to install the provided
software for Windows 98, 2000, ME, and XP.
Page 16

Q: Why does the memory capacity of the Audio Steno reported by your operating
system have a slight difference from that printed on the package?
A: For different file systems and algorithms, the firmware of the Audio Steno is
loaded into the flash memory and a portion of the memory is reserved for system files
and error-blocks. As a result, the available memory for users may be slightly lower
than the total memory capacity.
Warning:
z The Audio Steno has a memory capacity of N bytes, where N is the actual
number of bytes of flash memory.
z Your operating system may report a memory capacity of Y MB, where Y is equal
to N (actual number of bytes) divided by 1,048,576.
z The memory capacity of this Audio Steno appears to be lower than that printed
on the package, because different versions of the operating system have slightly
different file systems and algorithm, and some memory spaces are reserved for
system files error-blocks.
z It is quite common to have static charges. If your Audio Steno shuts down due
to static charges, turn it on and try again.
Service and Support
Please contact our local distributor or our customer service, if your have any technical
problems.
Customer Service Email Address:
apacertechsupport@apacer.com
For Technical Support Materials Download, please go to
http://www.apacer.com/apacer_english/support_html/download.asp
For the Audio Steno Product Information, please visit
http://www.apacer.com/apacer_english/product_html/audio_steno_ms400.asp
Page 17

Safety and Cleaning
Unpacking the Carton
z Unpack the carton and check if you have all included items. This product is a
precision electronic device, so take the product out with care and prevent
dropping the product.
z Check if the surface, switch, or joint of the product has damages.
z Check all items if any part or accessory is missing or damaged. If yes, contact
your merchant.
z Keep the original package and wrapping for future use or transportation.
Avoiding Personal Loss or Injury
z Do not disassemble or reinstall the product on your own to prevent electric
shocks or injuries.
z Do not use this product in humid conditions (such as using it in a bathroom) to
prevent fire, electric shocks, or system breakdowns.
z Immediately turn off the power and/or disconnect your computer if there is
smoke, smell, or a strange sound when using this product.
z Do not drop or collide the product which is a precision electronic device.
Using and Storing the Audio Steno
z Do not touch the machine when your hands are wet.
z Touch a metal item to ground any static charge of your body before using the
product.
z Do not turn off the power or reboot the product while transferring data. Apacer
is not responsible for any data loss or damage.
Page 18

Product Specification
USB Flash Drive USB 1.1 specification with a mini USB connection
Audio Steno Supports .mp3 & .wma music format
Digital Voice Recording Optimized to operate in various environments
3-Line brilliant 96*32 Full Dot Matrix
Screen Display
Digital FM Tuner
On Board Memory 64MB / 128MB/ 256MB/ 512MB/ 1GB
Memory Card support
Rec. Format ADPCM
Output 3.5mm earphone Mini-Jack 32 OHM
Display Functions
Two-Colored OLED Display
Supports FM radio frequencies worldwide (70MHz ~
110MHz)
10 programmable channels
Memory Stick Standard Format, Version 1.4
4MB/ 8MB/ 16MB/ 32MB/64MB/128MB/ 256MB
Memory Stick Pro Format, Version1.00
256MB/ 512MB/ 1GB
ID3 TAG
Battery Status, Remaining Memory, MP3/ Voice
Recorder Mode, Repeat Mode,
Equalizer Mode, Volume, Track No., Music/Voice
Playing/Recording Time
Repeat Mode Repeat One/ Repeat All/ Normal/ Random
Equalizer Mode Jazz/ Classic/ Pop/ Rock/ Normal
Battery AA Battery x 1
8.0 KHz (LP) : Extended Recording
16.0KHz (SP) : Standard Recording
Voice Sampling Rate
Weight 70g with Battery
Dimension (L) 70.7 mm x (W) 65 mm x (H) 14.3 mm
OS Support Support Windows 2000/ME/XP
Driver required for Windows 98/98SE
44.1 KHz (HQ) : High Quality Recording
 Loading...