

Page 1

X7
V6.1
Page 2
Congratulations on your purchase of the AORUS Notebook !
This Manual will help you to get started with setting up your notebook. For more detailed information, please visit our website
at http://www.aorus.com. All specications are subject to the manufacturer's conguration at the time of shipping and may
change without prior notice,written or otherwise.
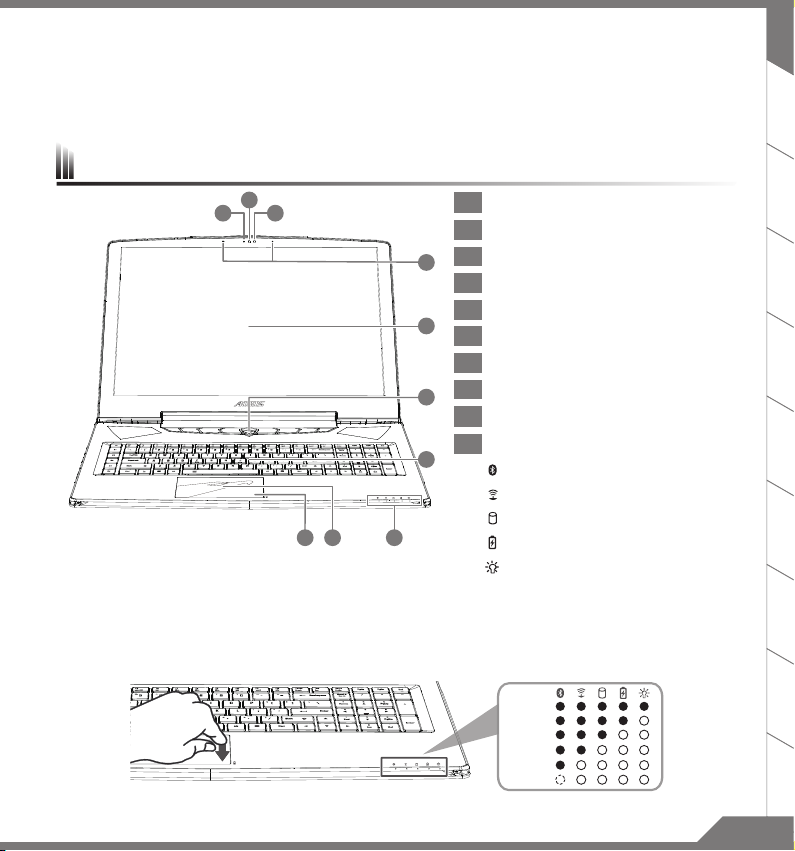
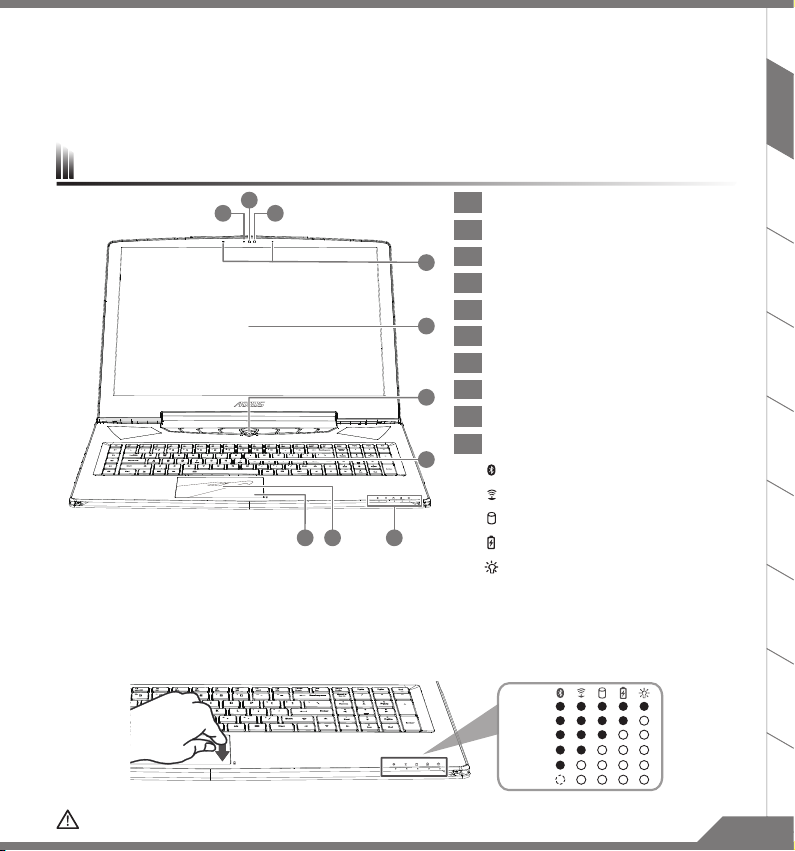
AORUS Notebook Tour
2
1
3
109 8
1 Webcam Indicator
2 Webcam
3 Light sensor
4
4 Microphone
5 Display Panel
5
6 Power Button
7 Keyboard
8 Touchpad
6
9 Battery Indicator Button
10 Status Indicators
7
Bluetooth
Wireless
Drive Activity
Battery Charge
Power
Indicator
Indicator
Indicator
Indicator
Indicator
EN
TC
Press the right button of touchpad to check the remaining battery power.Right click to show the remaining power percentage.
As shown below, the battery life indicator is available when the laptop is shut down, in stand-by or hibernation.(Battery mode)
>90%
71-90%
51-70%
31-50%
11-30%
<10%
1PB
Page 3
EN
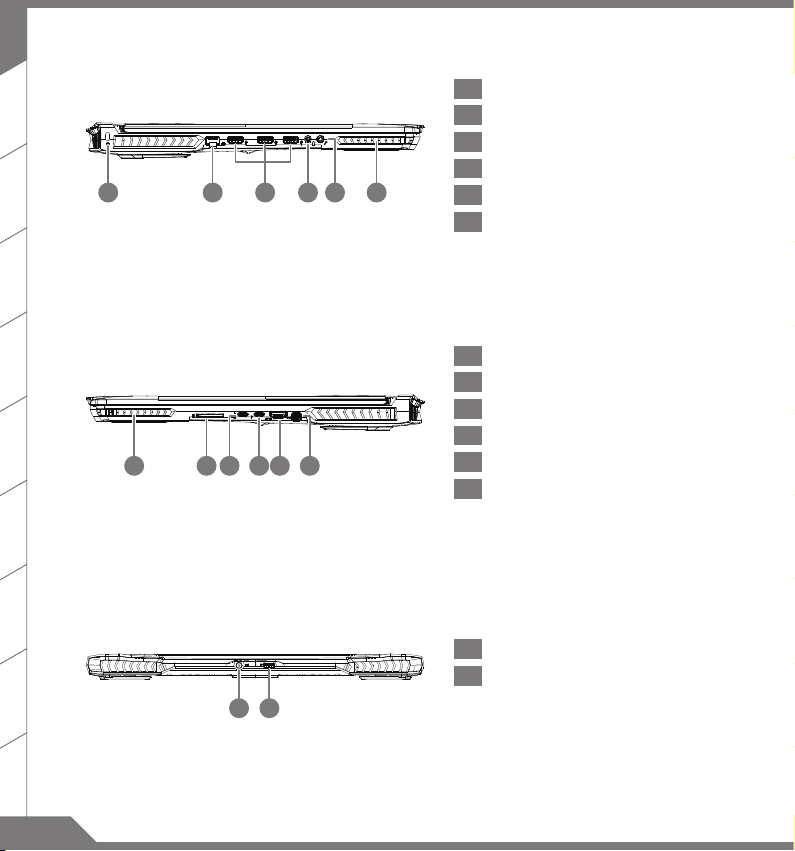
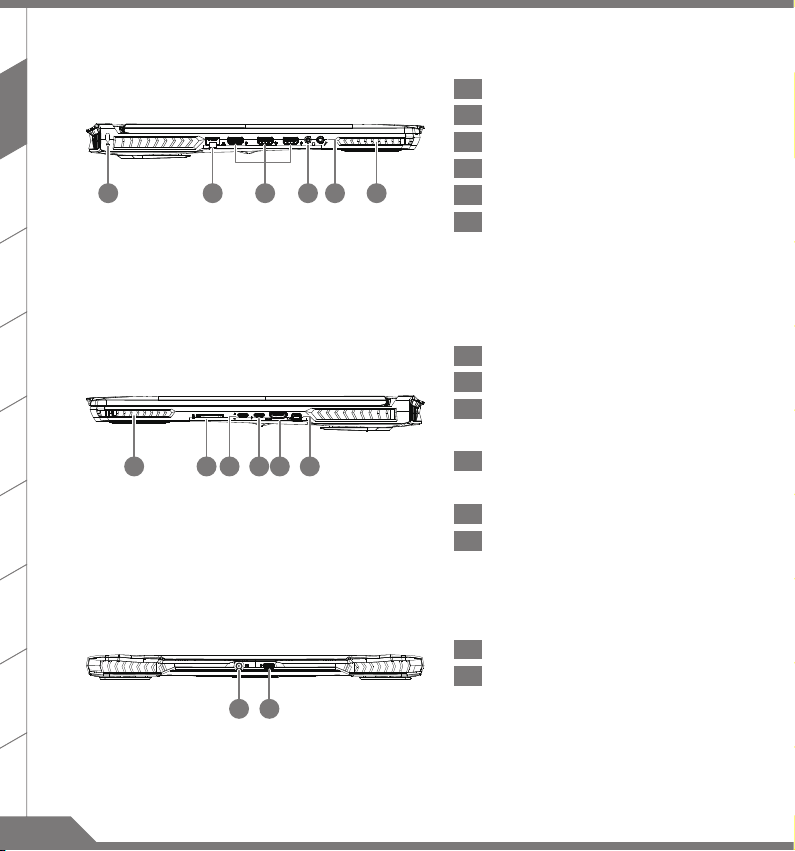
1 Kensington Lock Slot
TC
21
3
21
6543
654
2 Ethernet (LAN) Port
3 USB 3.0 Port (USB type-A)
4 Headphone Output Jack Port
5 Microphone Input Jack Port
6 Speaker
1 Speaker
2 SD Card Reader
3 USB 3.1 Port (USB type-C ,Gen2)
4 Thunderbolt 3.0 Port (USB type-C)
5 HDMI 2.0 Port
6 Mini Display Port
1 Power (DC) Input Port
2 USB 3.1 Port (USB type-A ,Gen2)
21
Page 4
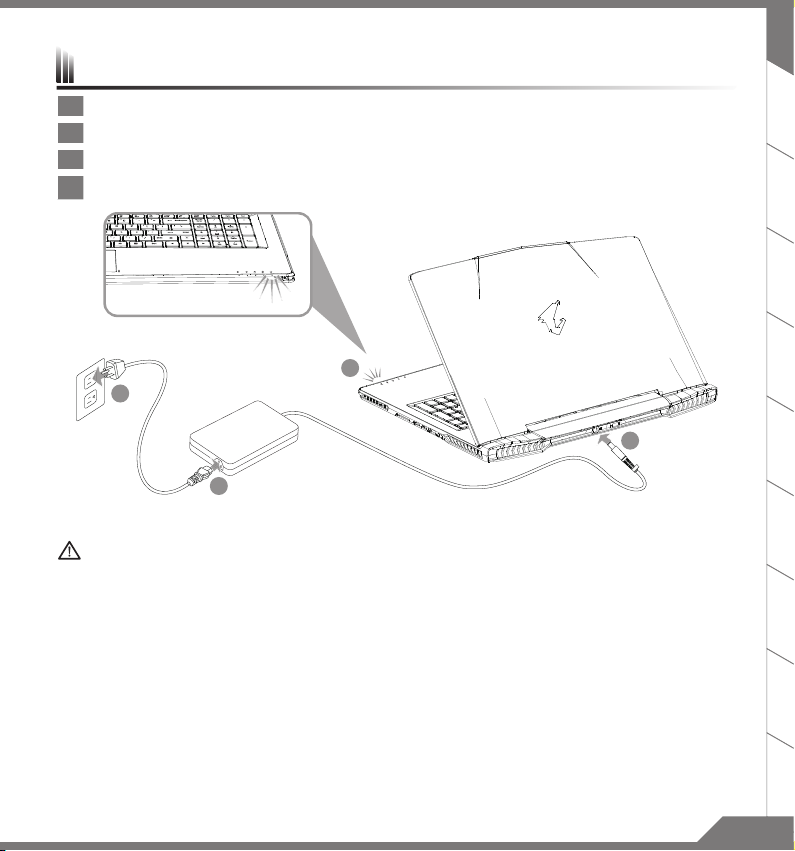
Using AORUS Notebook for the First Time
1
2
3
4
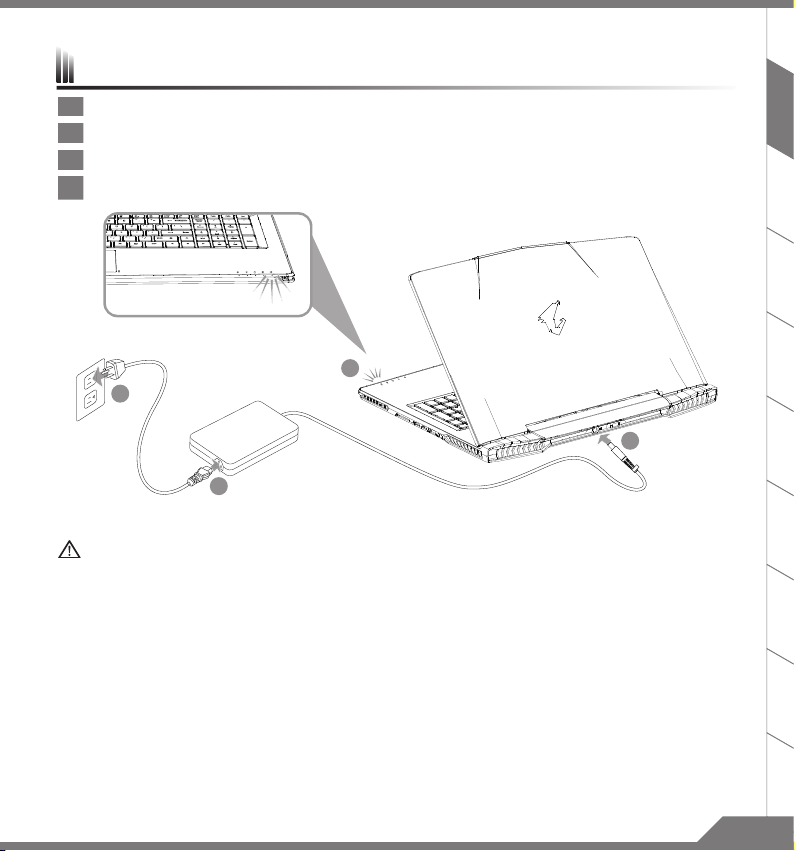
1 Connect the power cord to the AC adapter.
2 Connect the adapter to the Power (DC) Input Port on the back side of the notebook.
3 Connect the power cord to the power outlet.
4 While the Battery Indicator lights on, press the Power Button to turn on the notebook.
IMPORTANT
Ensure that your Notebook PC is connected to a grounded power adapter before turning it on for the rst time.
■
When using your Notebook PC on power adapter mode, the socket outlet must be near to the unit and easily accessible.
■
Locate the input/output rating label on your Notebook PC and ensure that it matches the input/output rating information
■
on your power adapter. Some Notebook PC models may have multiple rating output currents based on the available SKU.
Power adapter information
■
Input voltage / Input frequency:100-240 Vac / 50-60 Hz
Rating output voltage / Rating output current:19.5 Vdc / 10.3 A
Input voltage / Input frequency:100-240 Vac / 47-63 Hz
v
Rating output voltage / Rating output current:19.5 Vdc / 13.1 A
:
EN
TC
32
Page 5
EN
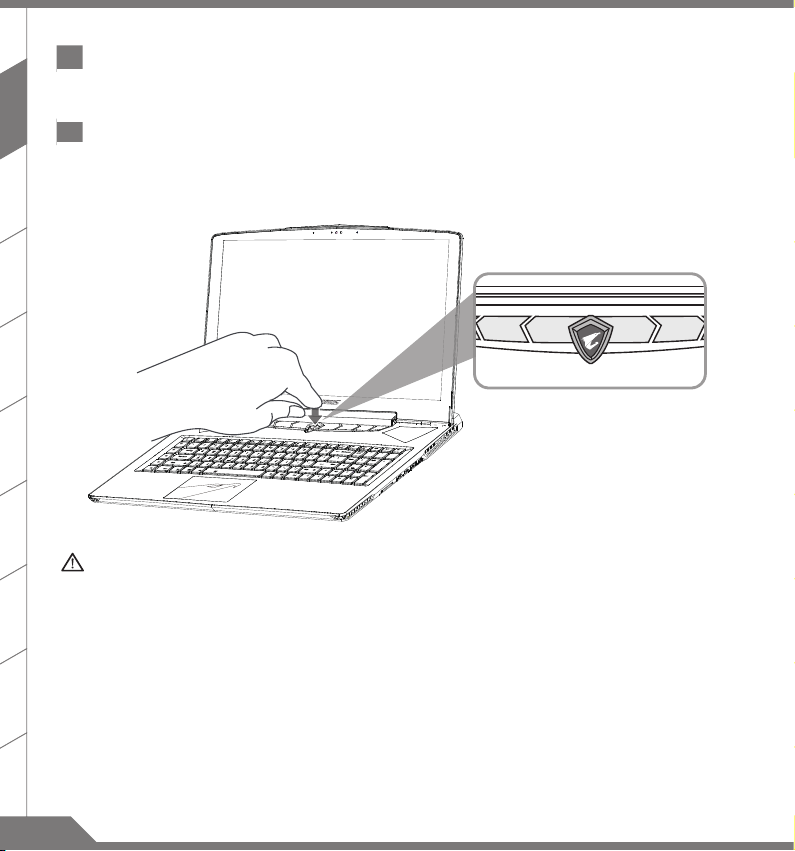
1 Switching on the Power
A
fter you turn on the notebook for the very rst time, do not turn it o until the operating system has been
congured. Please note that the volume for the audio will not function until Windows® Setup has completed.
TC
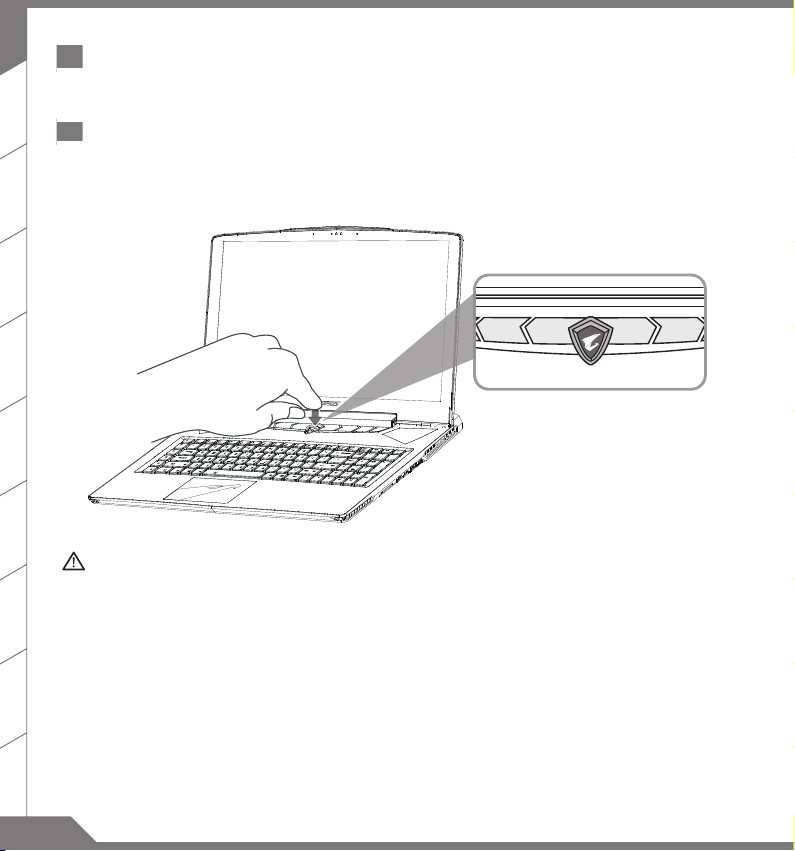
2 Booting Up the notebook for the First Time
Depending on your conguration, the Microsoft® Windows® Boot Screen may be the rst screen that you
will see as the notebook starts up. Follow the on screen prompts and instructions and enter your personal
information to complete the setup of the Windows® Operating System.
WARNING
Do not remove the built-in lithium battery. For any service needs, please contact your local AORUS Authorized
■
Service Center.
Do not install the Notebook PC on a slant or a place prone to vibrations, or avoid using the Notebook PC in
■
that location for a long time.This increases the risk that a malfunction or damage to the product will occur.
Do not store and use Notebook PC in direct sunlight or the location where temperatures exceed 112°F (45°C)
■
such as inside a vehicle.There is a danger of Lithium-ion battery expansion and aging.
Do not use the Notebook PC in a badly ventilated location such as on bedding, on a pillow or cushion, etc, and
■
do not use it in a location such as room with oor heating as it may cause the computer to overheat.Take care
that the Notebook PC vents (on the side or the bottom) are not blocked especially in these environments. If
the vents are blocked, it may be dangerous and cause the Notebook PC to overheat.
Page 6

X7 Operation Manual
Hardware Upgrade
User may upgrade memory or carry X7 to nearest repair center to upgrade; Please visit AORUS ocial website for
compatible memory brands.
CAUTION
Please ensure X7 is not powered on and unplugged to power source before the upgrade. Any damage during
■
user’s upgrade will not be covered by warranty, and user shall be responsible for related repair cost; hence
recommend to carry your laptop to nearest service center for the upgrade.
In order to maintain optimum compatibility and performance, please visit AORUS ocial website FAQ for the
■
supported memory module manufacturers, avoid compatibility problems or poor performance.
Battery Protection
When battery is in use for a period of time (not connected to power source and in high performance mode),Mass
power discharging on battery in a short period of time may cause battery to run at high temprature and may
shorten its lifespan. in order to protect the battery's lifespan, the battery will not be chargeable when its
temperature is higher than 45 ° C. The mechanism for this is to protect the battery life. However, after user
connects to power adapter, battery stops discharging and temperatures below is 45 ° C, the battery will start
charging back to the source and to maintain normal operation.Command & Control is a software that integrates
a list of basic settings to a single interface, providing user a faster and better experience when customization is
needed.
EN
TC
54
Page 7
EN
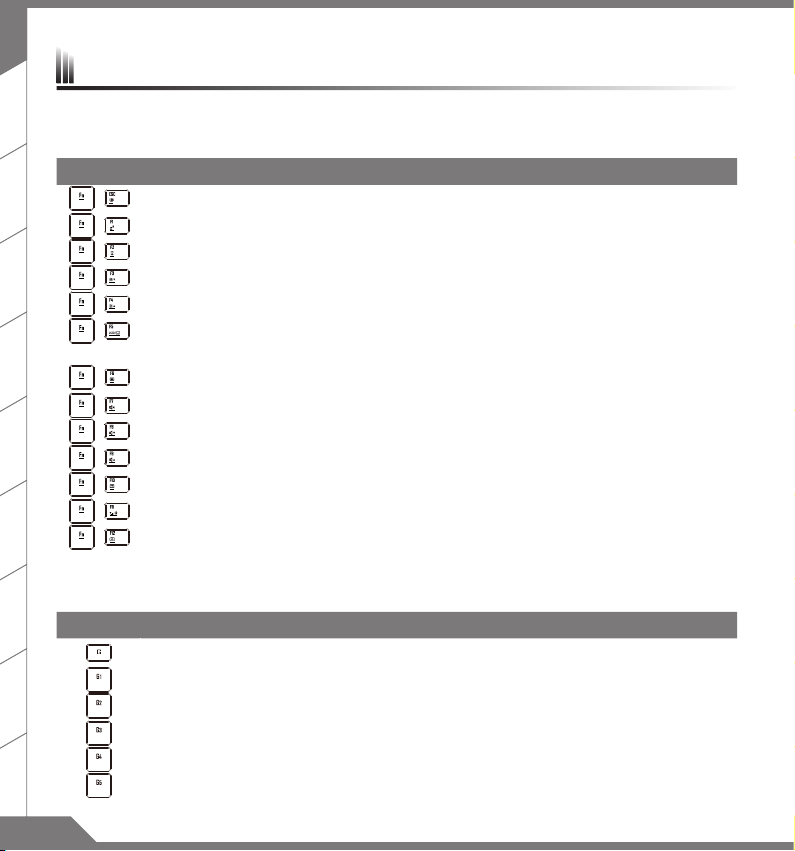
HotKeys
The computer employs hotkeys or key combinations to access most of the computer’s controls like screen
brightness and volume output. To activate hotkeys, press and hold the <Fn> key before pressing the other key in
TC
the hotkey combination.
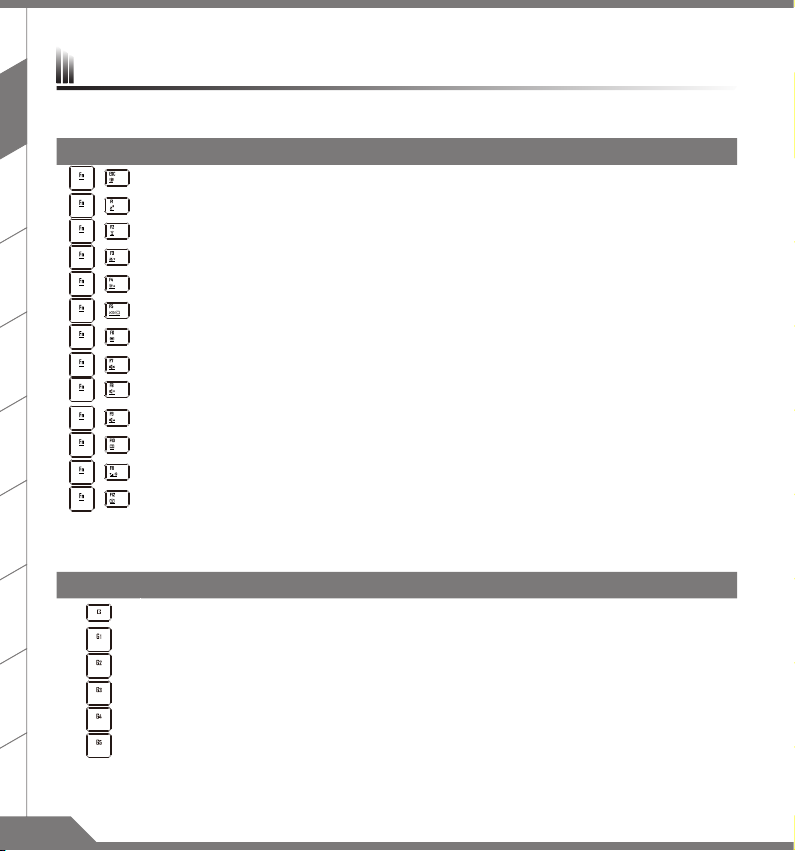
Hotkey Function Description
+
Maximize Fan Speed To increase the fan speed to 100%.
Sleep Put the computer in Sleep mode.
+
+
Wireless LAN Turn the Wireless LAN function ON and OFF.
+
Brightness Down Decrease the screen brightness.
+
Brightness Up Increase the screen brightness.
+
Display Toggle Switche display output between the display screen ,external monitor
(if connected) and both.
+
Screen Display Toggle Turn the screen display ON and OFF.
Speaker Toggle Turn the speaker ON and OFF.
+
+
Volume Down Decrease the sound volume.
+
Volume Up Increase the sound volume.
+
Touchpad Toggle Turn the internal touchpad ON and OFF.
+
WiFi / Bluetooth Toggle Turn the WiFi / Bluetooth function ON and OFF.
+
Webcam Turn the internal webcam ON and OFF.
Marco Key
Macro keys can be set via AORUS Fusion, setting combination keys for complicated and/or general operation.
Marco Key Function Description
Macro group Macro group switch, press around 3 secconds as hardware switch on/o.
Macro key 1 User self-denition Macro key.
Macro key 2 User self-denition Macro key.
Macro key 3 User self-denition Macro key.
Macro key 4 User self-denition Macro key.
Macro key 5 User self-denition Macro key.
Page 8
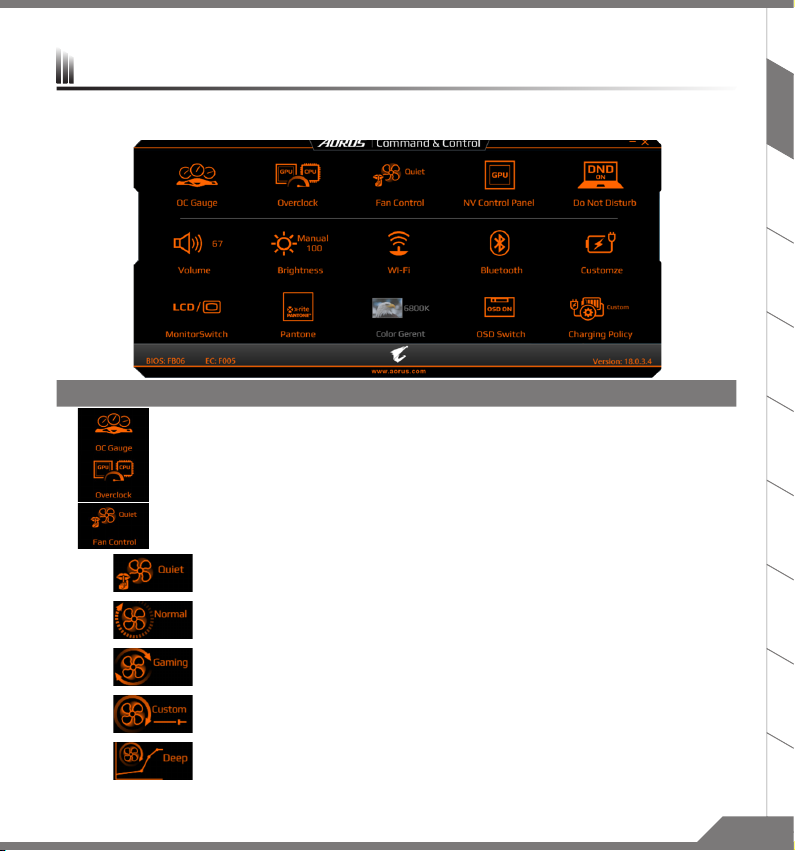
Command & Control
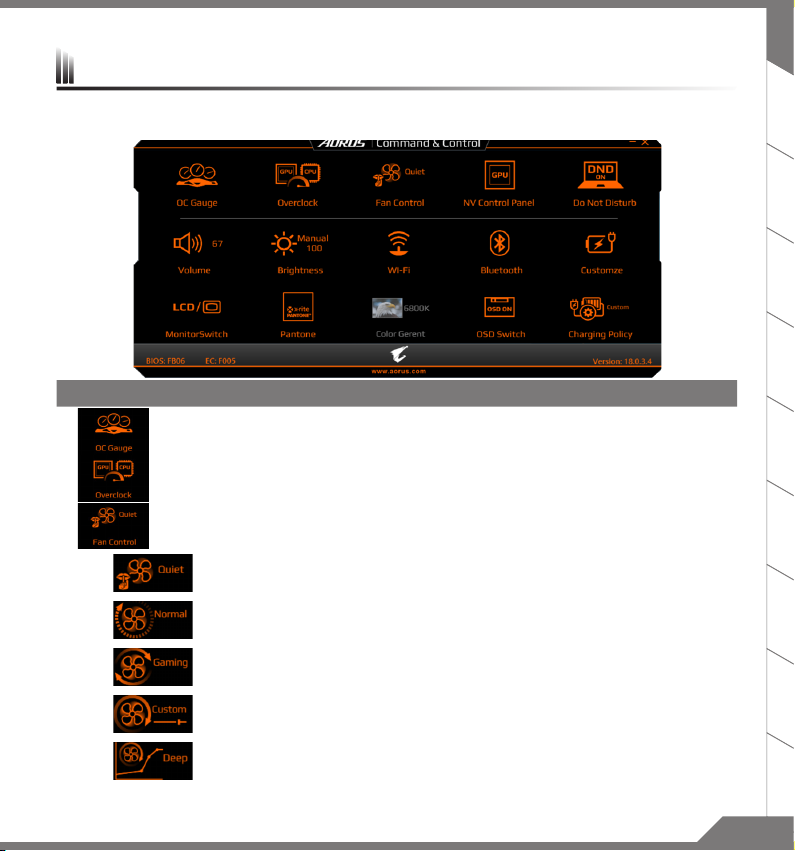
Command & Control is a software that integrates a list of basic settings to a single interface, providing user a
faster and better experience when customization is needed.
Hotkey Function Description
OC Gauge
Overclock Adjust CPU / GPU overclocking level.
Fan Control Adjust fan speed according to user's preference.
Easily do CPU / GPU overclocking with OC Gauge and close look to system info including:
CPU usage、GPU usage、memory usage、system temperature and fan speed.
EN
TC
Quiet
Normal System will automatically adjust the fan speed upon your usage and try to keep
Gaming System will automatically adjust the fan speed upon your usage and have better
Customize User can enjoy adjusting dierent maximum fan speed under "Auto Maximum"
Deep
Control
System will try to lower the fan speed to increase the battery life and reduce the noise
without aecting light-weight tasks process such as using Word or 2D drawing.
the noise down.
performance without losing stability.
or "Fixed Mode".
Based on dierent temperature users can fully customize your own fan policy.
76
Page 9
EN
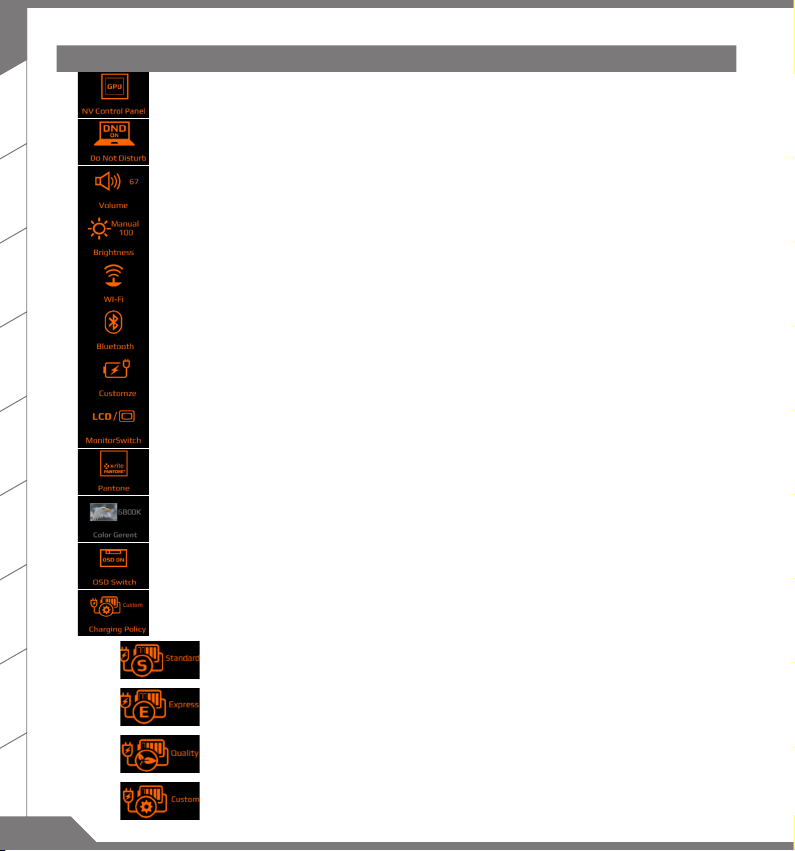
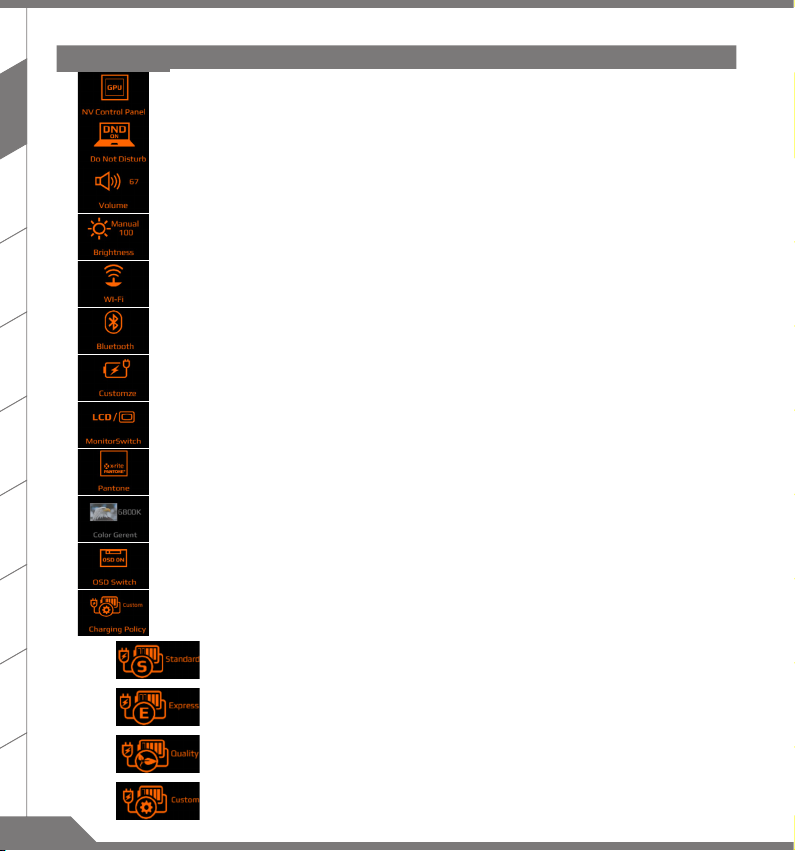
Hotkey Function Description
NV Control Panel Connet to NVIDIA control panel for more detail setting.
TC
Do Not Disturb User can disable system update.
Volume Adjust volume.
Brightness Adjust Screen brightness.
Wi-Fi Turn ON or OFF Wi-Fi connection.
Bluetooth Turn On or O Bluetooth connection.
Power Mode Adjust the power plan by user usage in order to obtain maximum
battery life or performance.
Monitor Switch Switch between the computer screen and the external display video
output, or simultaneous display.
X-Rite Pantone
Color
Color Gerent
OSD Switch Enable/Disable the display of status while adjusting the settings
Charging Policy It enables users to select a Battery Setting that is optimized for specic
Standard Fully charges at a moderate rate.This setting provides a balanced battery life.
Express Quickly charges for users who need the battery to charge quickly.
Turn ON or OFF X-Rite Pantone Color.
Adjust color temperature according to user. Also move the bar at bottom to adjust
the brightness of blue light which eases your eyestrain.
through keyboard hotkeys.
system usage patterns.
Set this mode as default is recommended.
Quality Extends battery life by lowering charge.
Customize Advanced charges.User can select when the battery stops charging.
Page 10
7654321
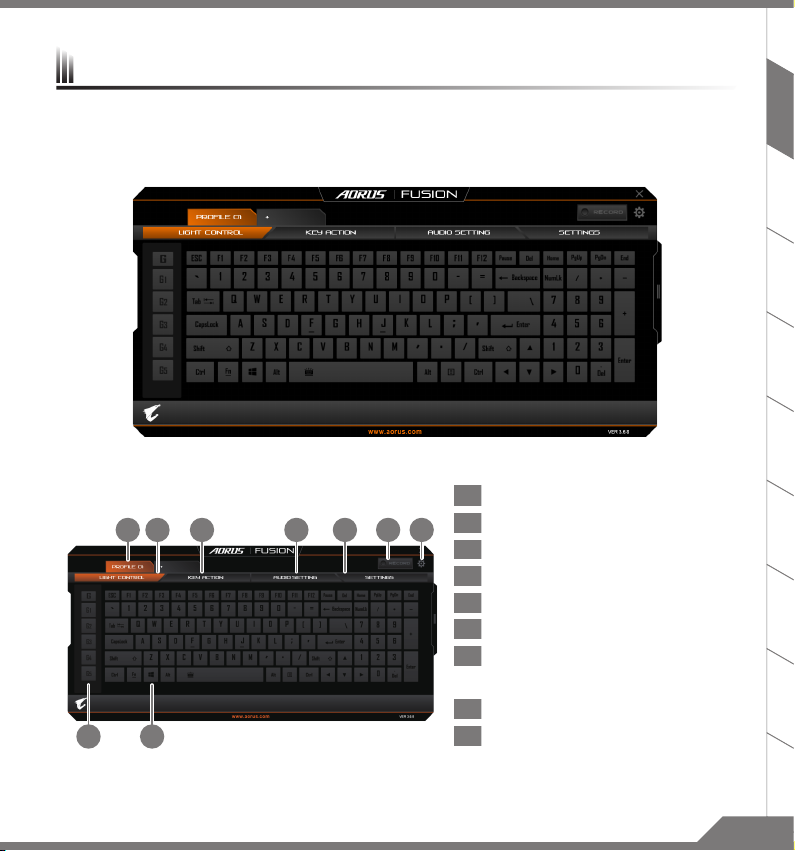
AORUS Fusion
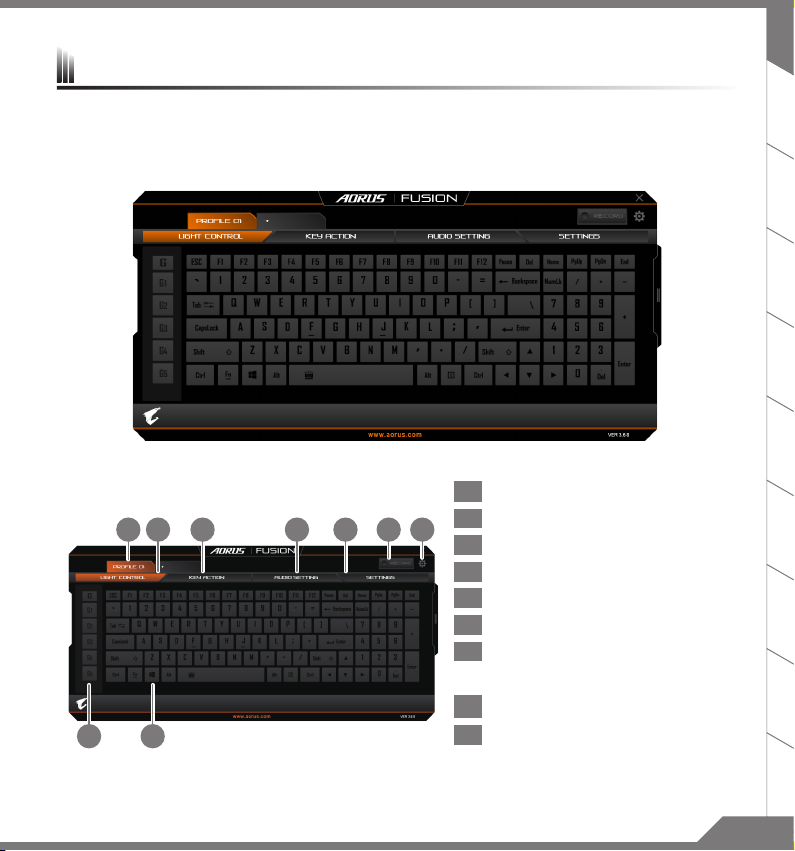
Thank you for choosing of AORUS notebook along with AORUS Fusion. AORUS Fusion is a gaming software which
combines the macro control, backlit control and sound eect control. With AORUS Fusion you can set up your
gaming environment in a second. You will always get ahead of your enemy in the preparation of war! Please read
following instruction of AORUS Fusion:
AORUS Fusion Overview
1 Prole in use now
2 Light Control tab
3 Key Action tab (Macro setting)
4 Audio Setting tab
5 Settings tab
98
6 Macro recording button
7 AORUS Fusion setting selection
Including Restore Default & Fusion Update
8 Stand-alone Macro Key
9 Main keyboard
EN
TC
98
Page 11
EN
TC
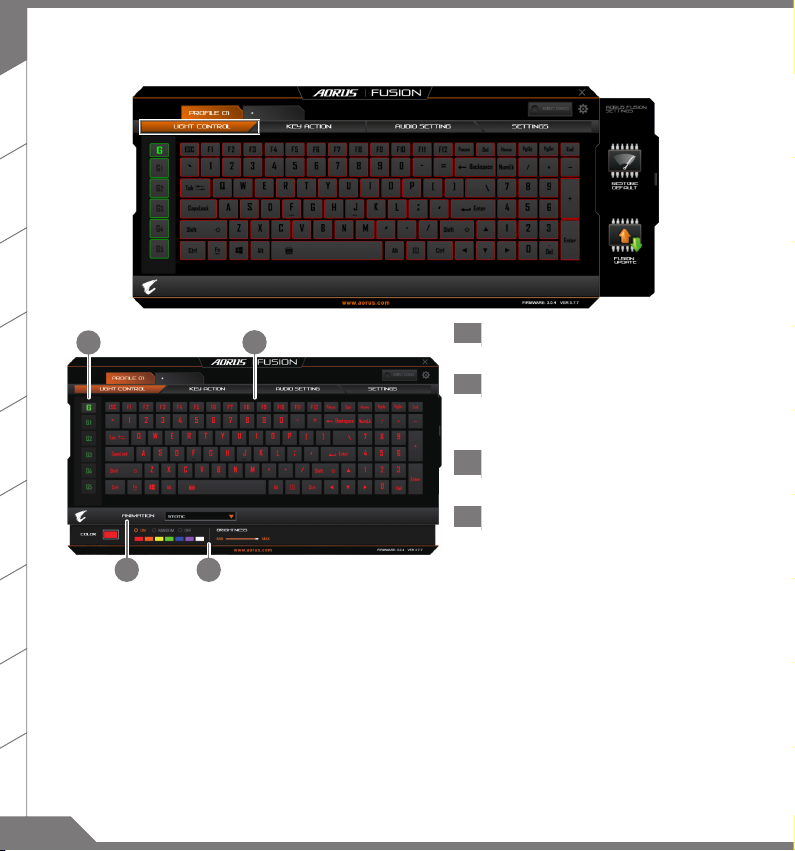
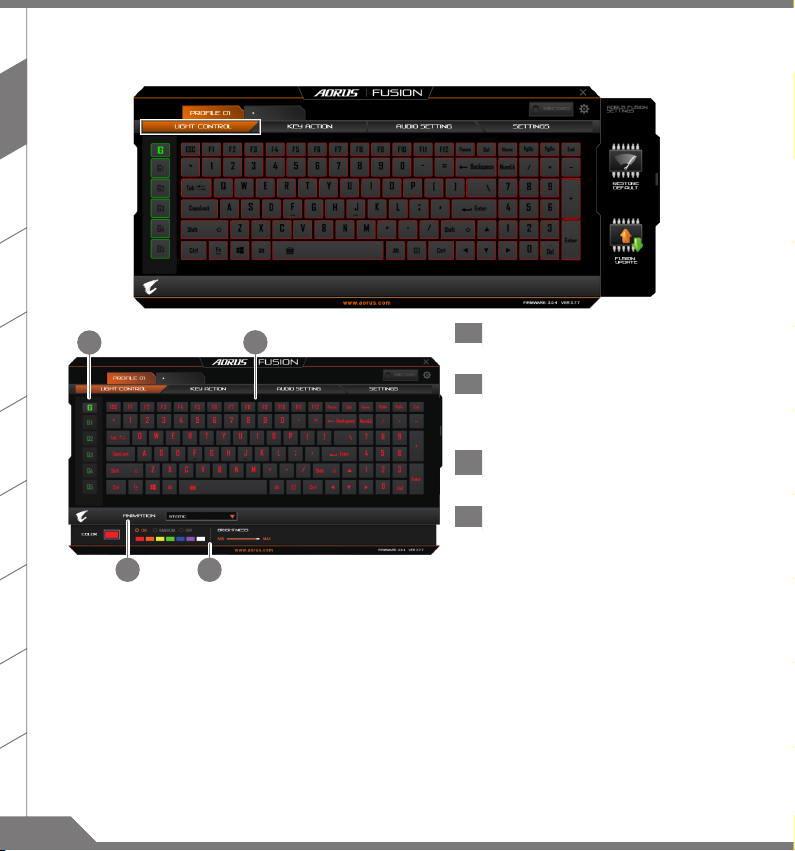
Light Control
1
2
1 G Key group, you can have ve dierent
group light at most
2 Main keybaord area, you can select single
or multiple key to set the light
only under custom mode
Animation list, you can select light eect
3
you want here
Advanced setting of light eect, you can
4
set further light setting here
43
Page 12
Key Action
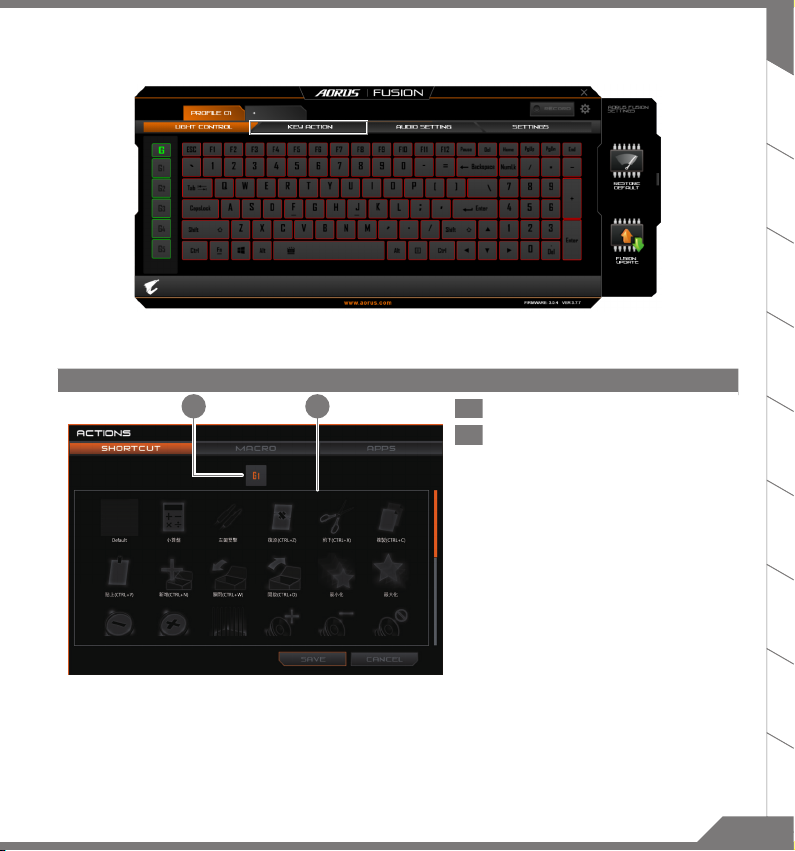
You can set macro on every key cap here. Just click the key you want to set macro and it will pop out the macro
assign page
1 . Shortcut page
21
1 Current assigning key
2 Common short-cut setting option
Default option is removing
EN
TC
1110
Page 13
EN
1 432
TC
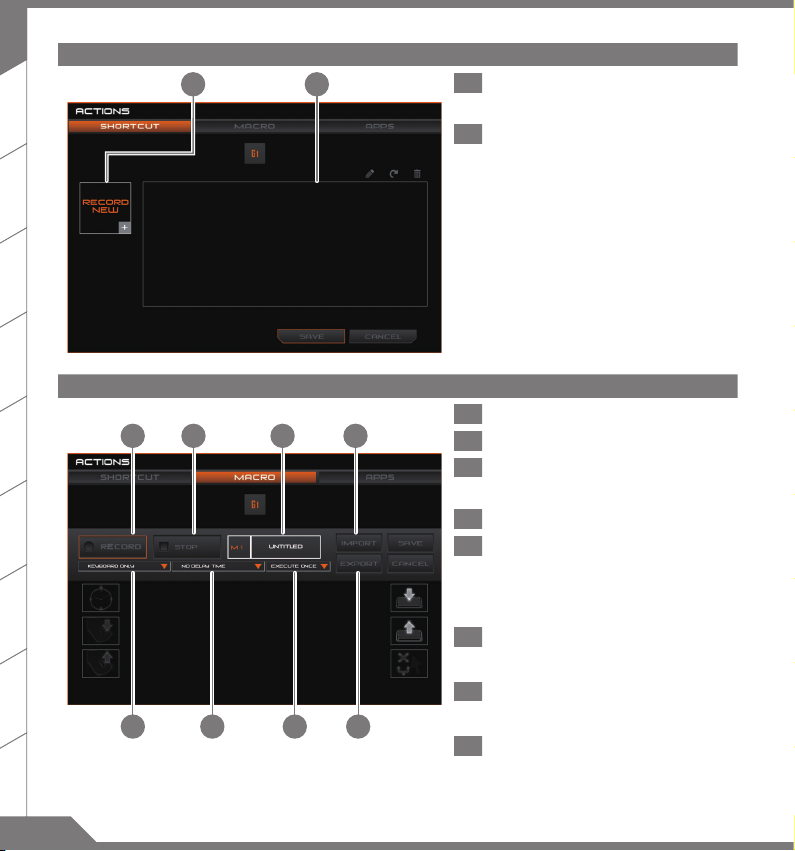
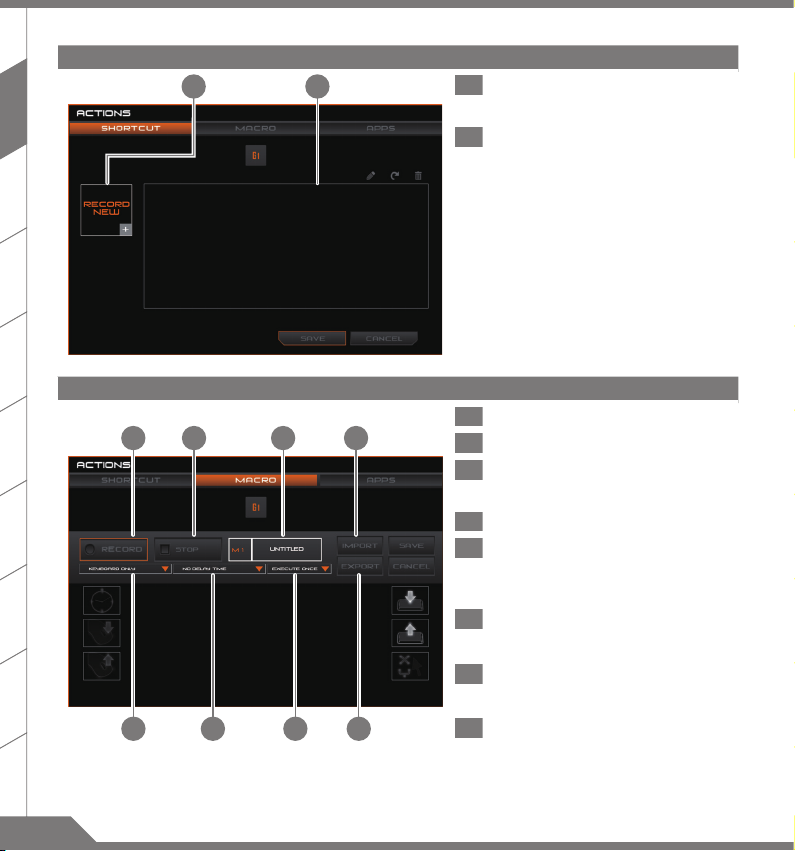
2 . Macro page
21
2-1 . Record new macro
8765
1 Record new macro
Click it to enter if you want to record new macro
Current available macro list
2
You can choose available macro here
1 Start recording macro
2 Stop recording macro
3 Macro name
you can set the name of macro here
4 Import macro
5 Record range
You can choose to record the key stroke, mouse
click, mouse movement or any combination of
them
6 Delay time
You can set the record delay time here
7 Macro execution way
You can set the execution way of macro here
Export macro
8
Page 14
3. Apps
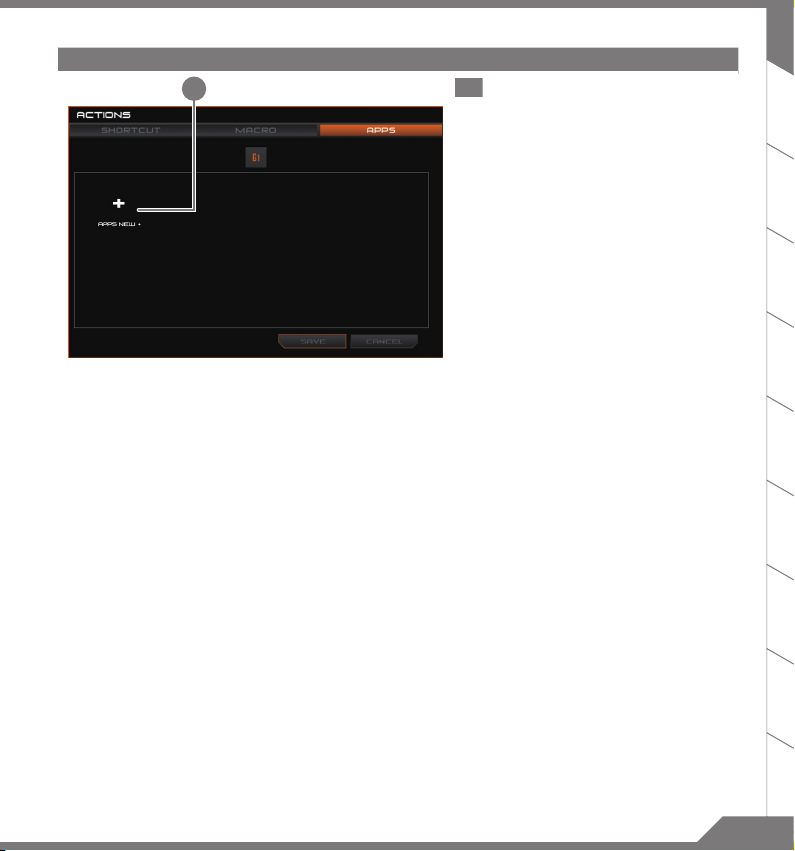
1
1 Choose the app you want to start with
the key
EN
TC
1312
Page 15
EN
TC
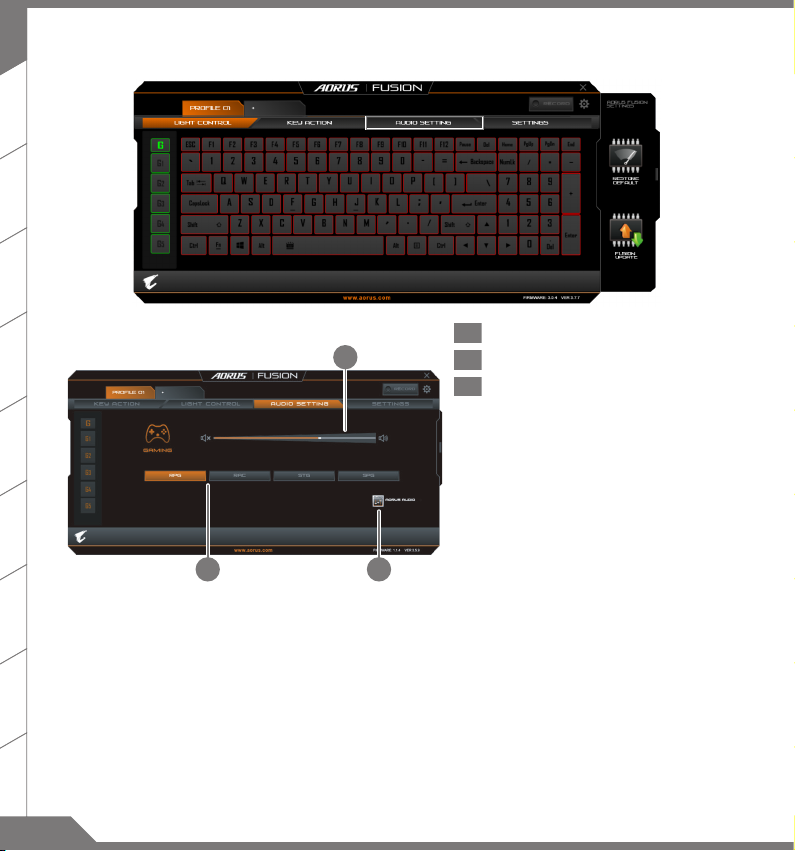
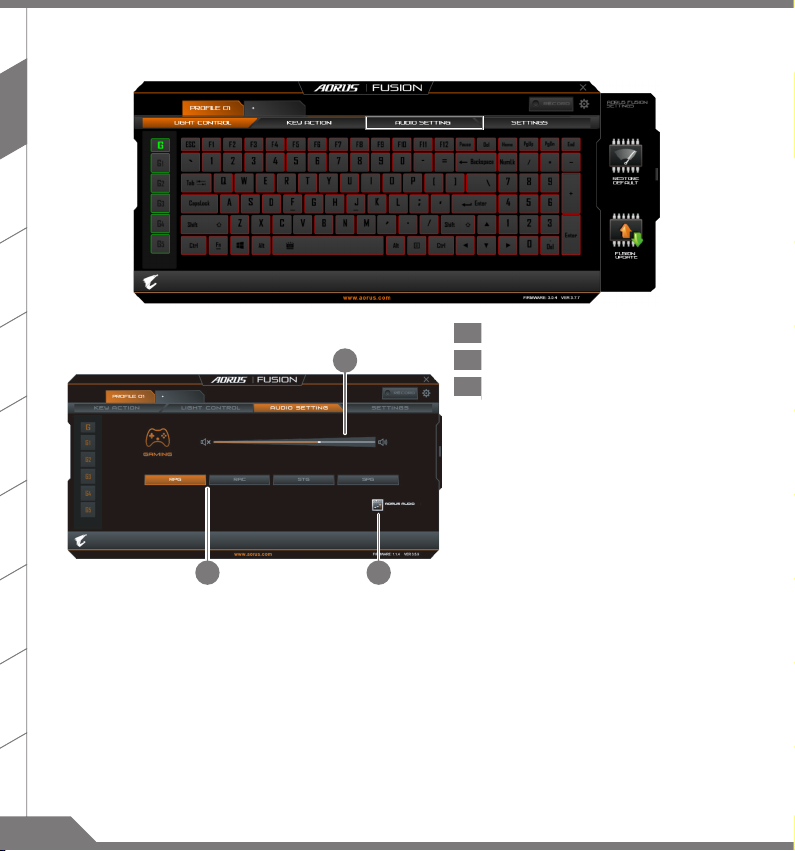
Audio setting
1 You can set the audio volume here
1
2 You can set the audio prole here
3 You can setting the detail of
AORUS audio here
32
Page 16
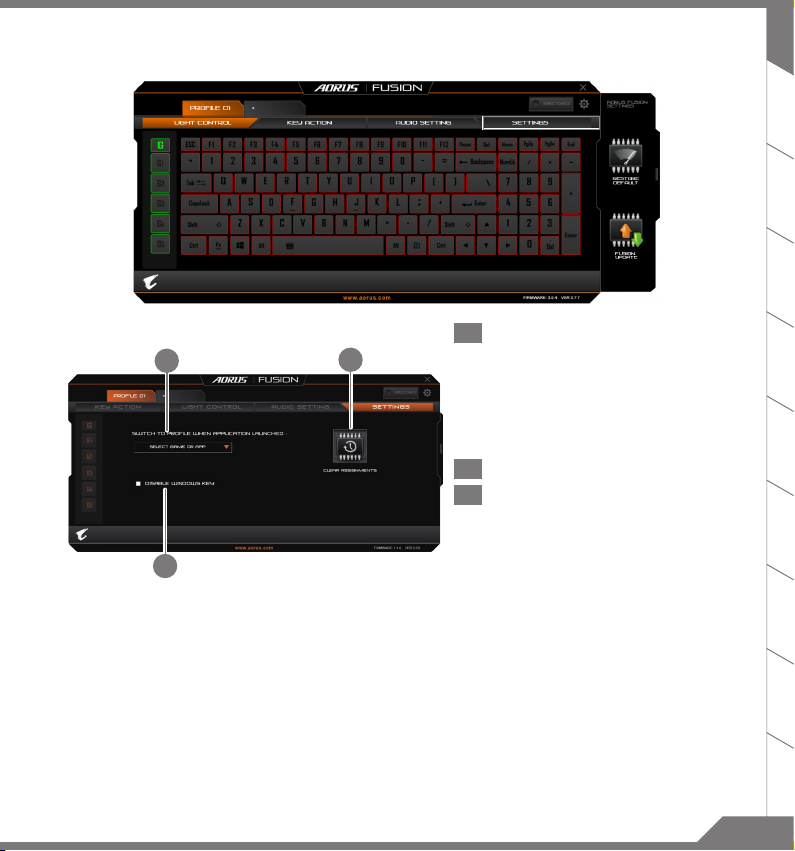
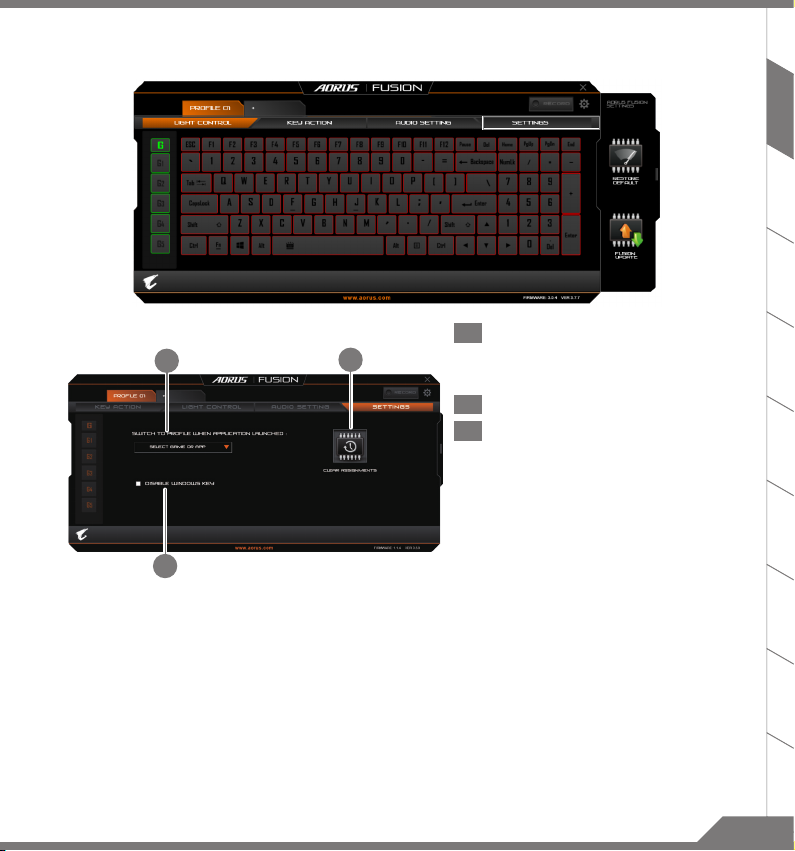
Settings
EN
TC
1 Choose the apps you want to run with
1
3
the prole
You can choose the app connected with the
prole. Once the app is launched, AORUS fusion
will automatically switch the keyboard to
connected prole
2 Disable Windows key
3 Clear assignments
Key action setting of this prole will be cleared
2
1514
Page 17
EN
2
1
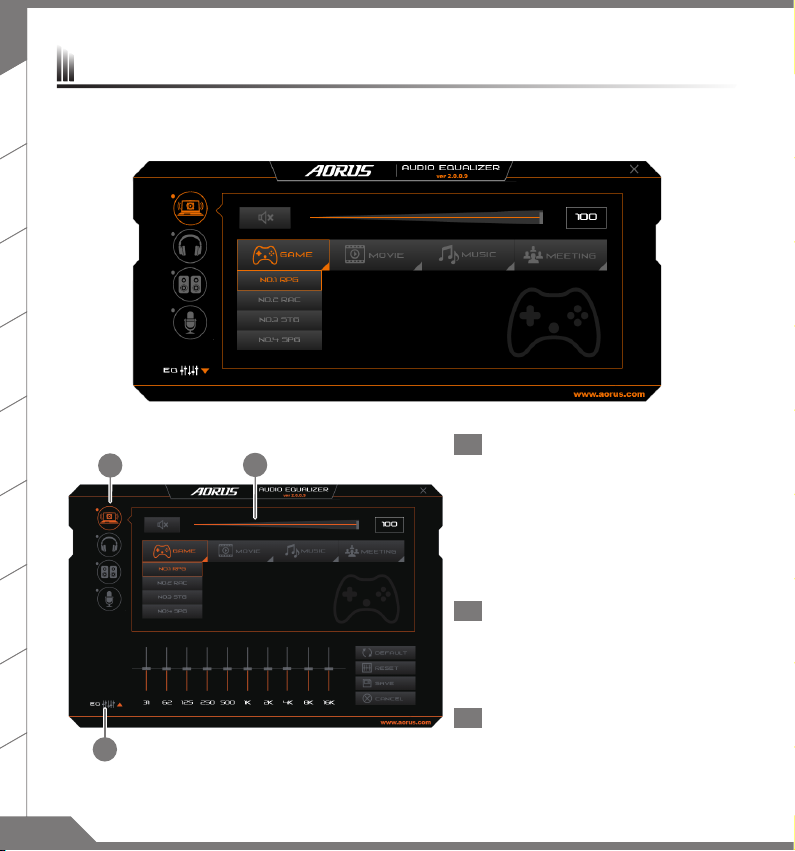
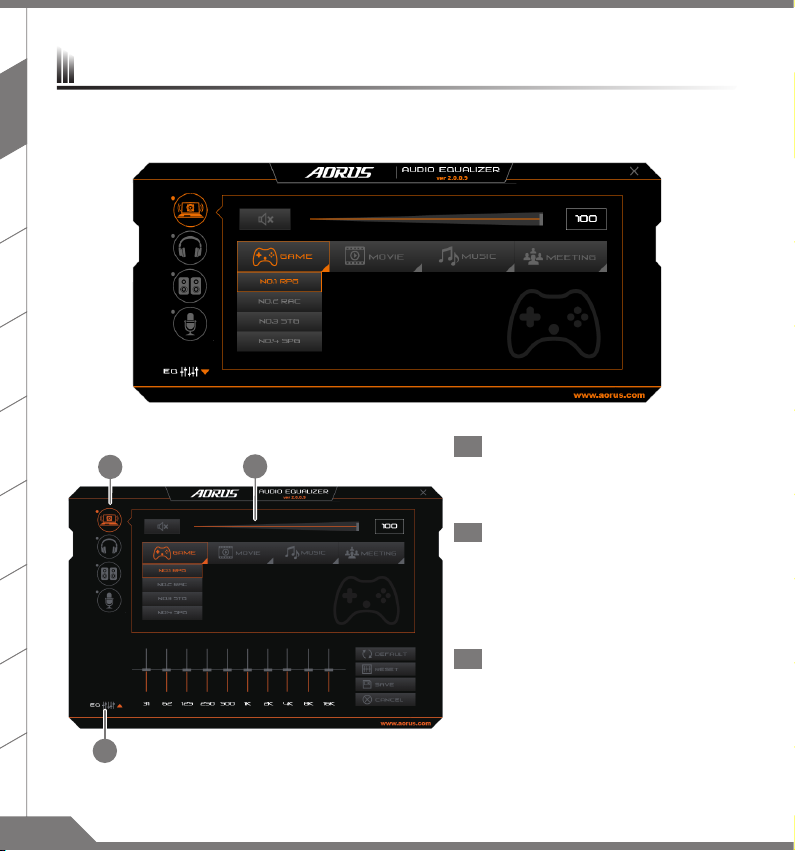
AORUS Audio Equalizer
AORUS Audio Equalizer is a professional audio eect software with several preset specic modules. You can also
use the equalizer to customize the volumm of each frequency. Please see below to start with your AORUS Audio.
TC
Enjoy your own sound arena!
Start using AORUS Audio Equalizer
To start Start using AORUS Audio
1
Equalizer, you can just double-click
the shourt-cut on desktop. Once you
enter, you will see a image as above.
The bar on the left side represent
3
dierent audio device; they are internal
speakers, headset, external speaker and
microphone respectively.
2 Besides a volumm adjustment bar, you
see four catogories as well. There are four
branches of each, which we have preset
ned audio modules. Enjoy yourself with
the most qualied audio experience!
3 Once you click the "EQ" button below,
you will see a equalizer. With this, you
can customize all the modules as you
like and then save it for using your own
customization next time.
Page 18
Killer LAN
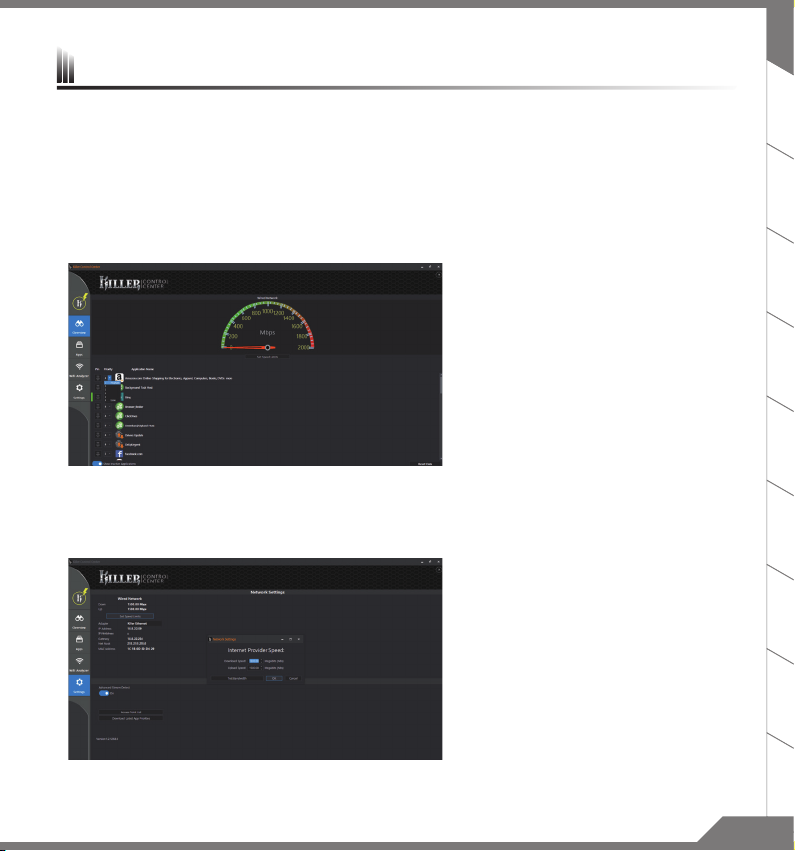
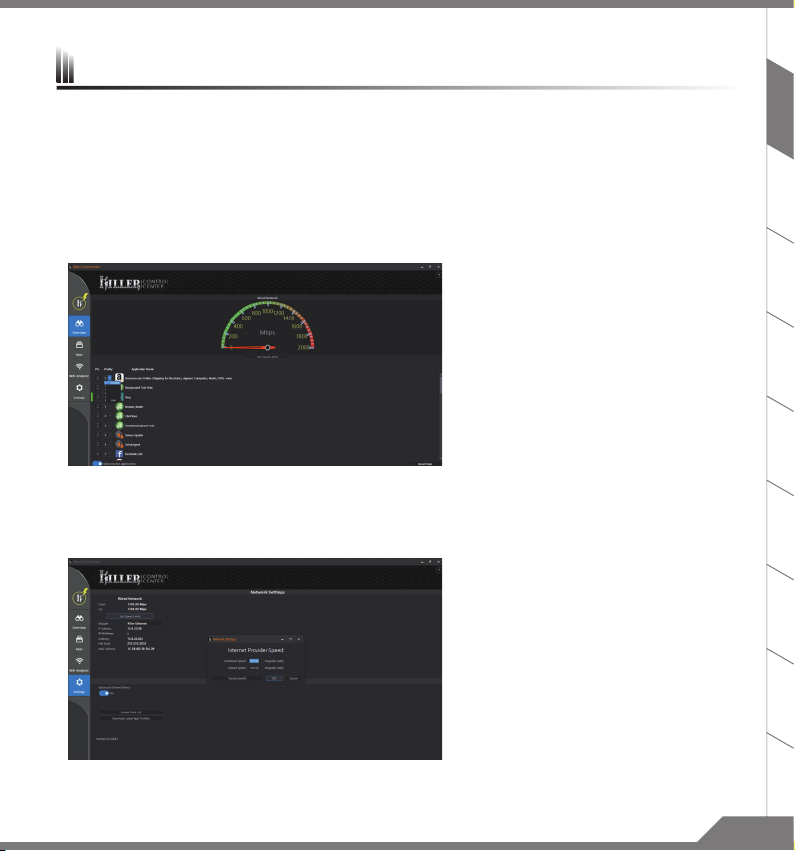
Killer LAN can automatically adjust the priority of network transmission, allowing the user to have the best gaming
network speed, by eectively reducing ping values and gain sequence control over dierent softwares that require
network packet. User may set the software manually by Killer LAN's specic program with the highest priority
network packets; Moreover, user may also congure the network for the download priority for online videos and
games packets to achieve the best network optimization.
Killer LAN : Transmitting priority control
Now you can have full control of your network
transmittion. Killer Lan let you set the
priority of every apps connected. You don't
need to worry about the lag in game while
downloading les simultaneously. Kille Lan will
have the highest priority apps transmitting the
data through LAN and have lower priority apps
through WLAN. Stop the lag and fully utiilize
your bandwidth now!
Killer Doubleshot Pro
Killer Doubleshot Pro can combine the
bandwidth of LAN and WLAN. With Killer
Doubleshot Pro, you can have bigger
bandwidth on dealing with packet crowded
apps such as online game, online movie or BT
download. Just a simple click and start to enjoy
bigger bandwidth!
EN
TC
1716
Page 19
EN
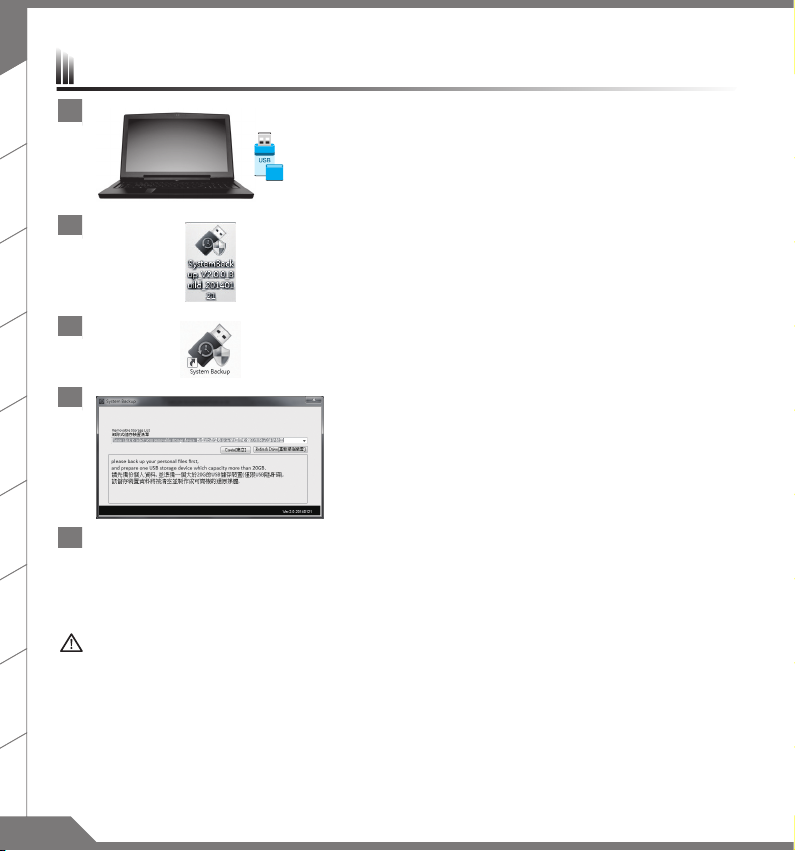
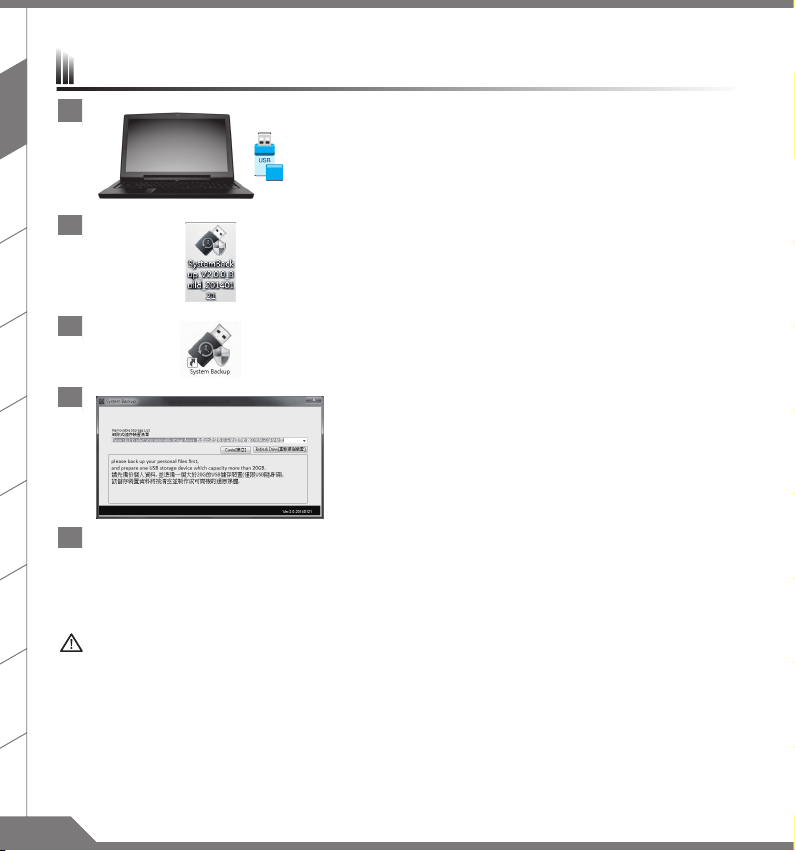
System Backup Guide
1
TC
>20G
2 Insert the driver disk to your optical drive and run the install of
3 Run the “System Backup” after nishing the install.
4 Select your USB disk from the drop-down list and start to create
The window will pop out when the creation of recovery disk is done.
5
■
Please press F12 on starting the system when you need to restore the system. Select “boot from recovery
■
USB disk” and the system will be restored.
The time needed for restore will be around 30 mins(time needed may vary by USB disk model) .
■
WARNING
You can backup original recovery image through this application in case of losing by device damage.
■
You can backup original recovery image to USB disk and restore the system if any storage system replacement
■
with the recovery USB disk.
Before you restore the system through the recovery USB disk, please make sure that you have already made
■
the backup of your data.
Please do not shut down or un-plug the system when performing backup through recovery USB disk.
■
Please plug in the USB disk which is at least 20GB in capacity to
make the original image
eliminated during the creation of recovery USB disk)
“System Backup”
download from http://www.aorus.com.)
the recovery USB disk.
(backup the data in USB rst. All data will be
(for none-ODD model, please use USB ODD device or
Page 20

Recovery Guide
System Recovery (Restore your laptop operating system)
When something is going wrong with the laptop operating system, the storage of the laptop has a hidden
partition containing a full back up image of the operating system that can be used to restore the system to factory
default settings.
CAUTION
If the storage has been switched or the partition deleted, the recovery option will no longer be available and a
■
recovery service will be needed.
The recovery function is only available on devices with O/S preinstalled. Devices with DOS do not have the
■
recovery function.
Launch System Recovery
The system recovery feature is preinstalled before the laptop is shipped from the factory. The option menu allows
you to launch the Windows recovery tool to reinstall the operating system to factory default. The brief introduction
below will show you how to start the recovery tool and restore your system.
All ready to go
Make sure your PC is plugged in. This will take a few minutes.
■
EN
TC
1918
Page 21
EN
Windows 10 Recovery Guide
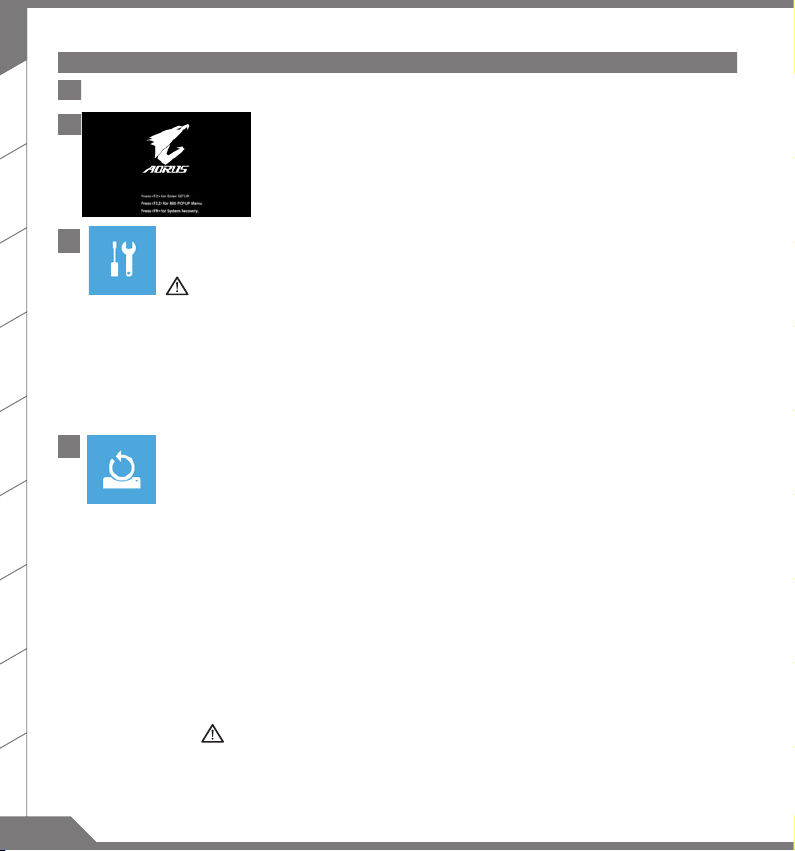
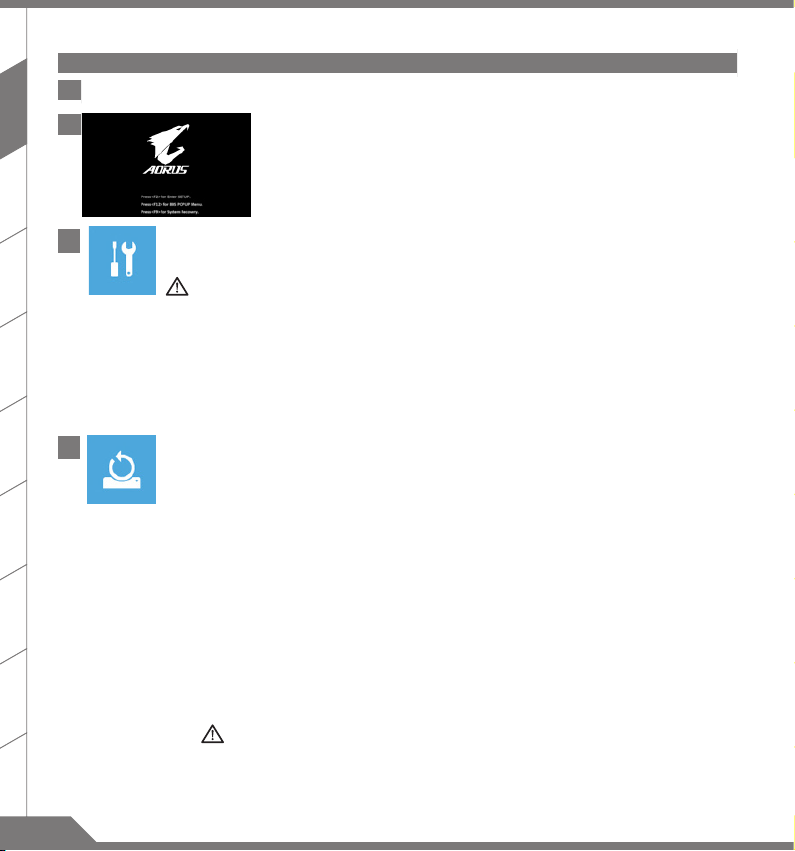
1 Turn o and restart the laptop.
2
TC
3
Choose “Troubleshoot” to enter the recovery settings.
(Also you can choose “Continue” to exit recovery system and continue to Windows 10 for les or data backup.)
■
■
4 Choose “Reset this PC”
■
■
During the laptop turn on process,
press and hold F9 key to launch the tool.
There are two options for system recovery
Reset this PC
You can choose to keep or remove your les and then reinstalls Windows without losing your les.
AORUS Smart Recovery
Your PC settings will be restored to factory default settings.
Caution : All personal data and les will be lost.
Keep my les
Choose an account to continue.All apps will be removed, and settings will back to pure O/S
(without AORUS app), but your personal les will be kept.
Remove everything
All apps, setting and personal les will be removed.
Just remove my les
■
Only personal data and les will be removed, but computer settings will be kept.
Fully clean the drive
■
The drive will be completely restored to factory default settings. It takes more time.
> [Click on “Reset” to execute recovery function.]
Here are what will happen
All of your personal les and apps will be removed.
■
Your PC settings will be restored to pure O/S (without AORUS app) .
■
Page 22
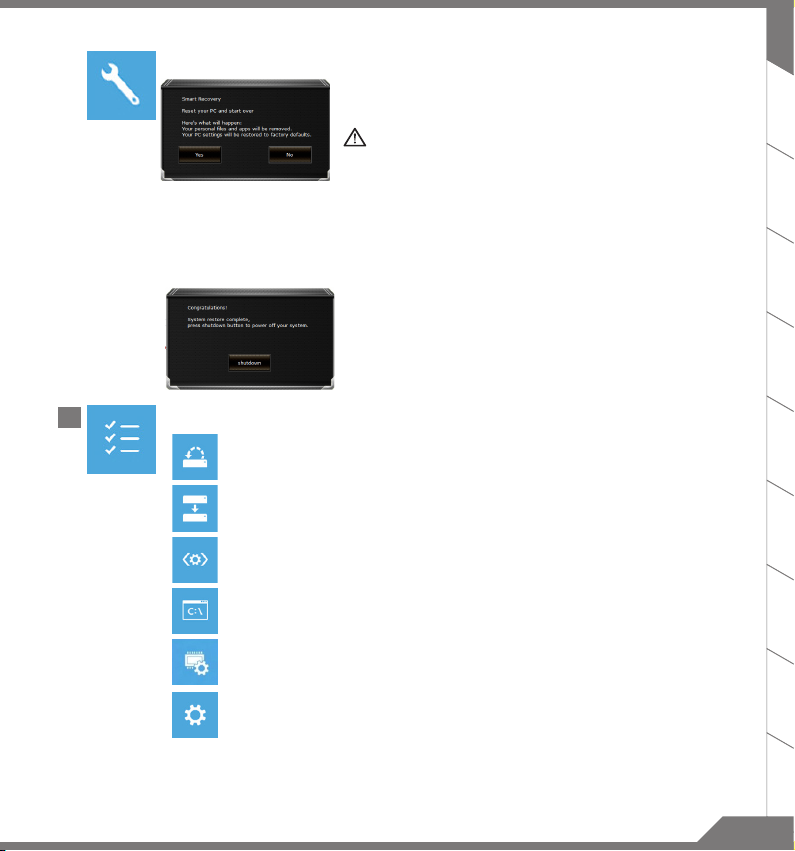
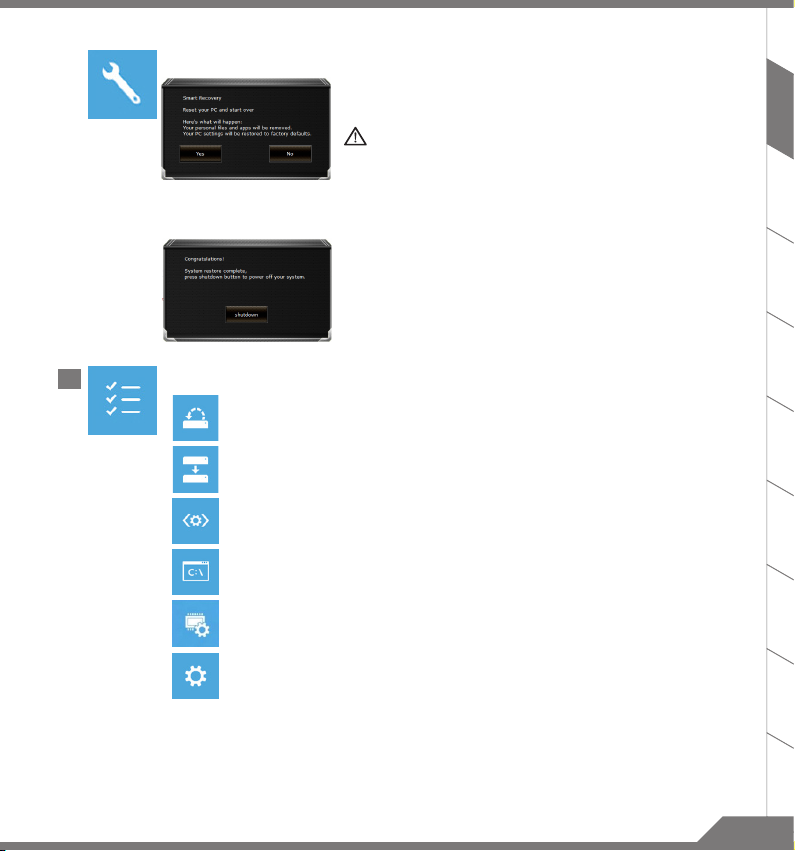
Choose “AORUS Smart Recovery”
The recovery will be activated and you will see the option buttons
on the window. Click on “Yes” to start it.
■
■
After the system recovery is completed, you will see the option
button on the window, please click on “Shutdown”.
CAUTION
Once the “Recovery” is selected, your personal data and files will be
deleted after the laptop starts restoring, and the operating system will
be reset to factory default settings.
A progress indicator bar will show on the window when the recovery
process is running. Please make sure the AC-adapter is plugged in and
do not turn o the laptop.
EN
TC
5
Advanced options
System Restore
Use a restore point recorded on your PC to restore Windows.
System Image Recovery
Recover Windows using a specic system image le.
Startup Repair
Fix problems that keep Windows from loading.
Command Prompt
Use the Command Prompt for advanced trobleshooting.
UEFI Firmware Settings
Change settings in your PC’s UEFI rmware.
Startup Settings
Change Windows Startup behavior.
2120
Page 23

EN
Appendix
Warranty & Service
TC
Warranty and service and related information please refer to the warranty card or service website as the below link:
http://www.aorus.com
FAQ
FAQ (Frequent Asked Questions) please refer to the below link: http://www.aorus.com
Page 24
感謝您選擇
為協助您順利使用
http: //www.aorus.com
AORUS
AORUS
AORUS
筆記型電腦導覽
筆記型電腦
筆記型電腦,我們特地設計此說明。如果您需要更多關於電腦功能,歡迎上
查詢。產品實際規格以出貨為準,如有異動恕不另行通知。
!
2
1
3
109 8
1
視訊指示燈
2
視訊攝影機
3
4
5
6
7
光源感應器
4
麥克風
5
螢幕面板
6
電源按鈕
7
鍵盤
8
觸控板
9
電池電量顯示鍵
10
電腦狀態指示燈
藍牙指示燈
無線網路指示燈
硬碟存取指示燈
電池充電指示燈
電源指示燈
AORUS
EN
官 方網 站。
TC
按下右鍵可檢視電池剩餘電量。
在關機/待命/休眠模式時按下右鍵可透過指示燈號檢視電池剩餘電量(電量對照如下圖)(電池模式下)。
>90%
71-90%
51-70%
31-50%
11-30%
<10%
警語:使用過度恐傷害視力。
注意事項:
(1) 使用30
分鐘請休息10分鐘。
(2) 未滿2
歲幼兒不看螢幕,2 歲以上每天看螢幕不要超過1小時。
1PB
Page 25
EN
1 Kensington
2
TC
21
3
654
乙太網路
3 USB 3.0
4
耳機輸出插孔
5
麥克風輸入插孔
6
喇叭
1
喇叭
2 SD
3 USB 3.1
(以10 Gbps
21
6543
4 Thunderbolt 3.0
(以40 Gbps
5 HDMI 2.0
6 Mini Display
1
直流電源輸入插孔
2 USB 3.1
防盜鎖孔
(LAN)
連結埠
(USB-A埠)
連結埠
記憶卡讀卡機
(USB-C埠 ,Gen2)
連結埠
)
速度傳輸資料
連結埠
速度傳輸資料, 連結顯示器, 支援
連結埠
連結埠
(USB-A埠 , Gen2)
連結埠
(USB-C埠)
Power Delivery)
21
Page 26
1
2
3
4
首次使用
1
將電源線接上電源轉換器。
2
將電源轉換器連接到筆記型電腦的直流電源輸入插孔。
3
將電源轉換器插入電源插座。
4
待電源指示燈亮起後,按下電源按鈕啟動筆記型電腦。
重要
■
第一次啟動筆記型電腦之前,請先確認已經將電源變壓器連接至電腦。
■
當筆記型電腦在電源變壓器使用模式時,請將電源變壓器靠近插座以便於使用。
■
找出筆記型電腦的輸入/輸出頻率標籤,並請確認符合電源變壓器上的輸入/輸出頻率資訊。
■
電源變壓器資訊:
v
AORUS
輸入電壓 / 輸入頻率:
額定輸出電壓
輸入電壓 / 輸入頻率:
額定輸出電壓
/
額定輸出電流:
/
額定輸出電流:
筆記型電腦
100-240 Vac / 50-60 Hz
19.5 Vdc / 10.3 A
100-240 Vac / 47-63 Hz
19.5 Vdc / 13.1 A
EN
TC
32
Page 27
EN
1
開啟筆記型電腦
電源指示燈會顯示機器是否為通電的狀態。第一次開機時,在還未完全進入作業系統前請勿強制關機。
開啟電源後,直到該作業系統配置完成前,音量無法設定。
TC
2
開始第一次使用
根據您的筆記型電腦配置,當您第一次開機,第一個畫面會是微軟
指示,完成作業系統的配置。當軟體許可條款顯示時,請務必閱讀並同意後再繼續。
®
Windows
啟動畫面,按照該螢幕上的提示和
警告
■
本機器設備配備的鋰電池為不可拆卸裝置,請交由
■
請不要於斜面上或容易震動的地方使用筆記型電腦,以降低發生故障和產品損壞的風險。
■
請勿置於車內、室內外陽光強烈或高於45度C之儲藏環境, 以免鋰電池發生老化或膨脹等危險。
請於通風良好的地方使用此產品。請勿在床上、枕頭等通風不良的地方使用此產品,並且不要在有樓板暖氣的地
■
方使用,避免導致筆記型電腦過熱。請避免底部和側邊的通風孔阻塞。如果通風孔阻塞,會有 損害筆記型電腦
或導致內部過熱的危險。
AORUS
授權專業維修服務中心移除裝置中的電池。
Page 28

X7
EN
操作說明
使用者升級硬體
消費者可自行打開背蓋升級模組,或是持機器至維修中心由維修人員協助升級;所支援的廠商模組,請至
FAQ
參考。
注意
■ 升級前請確認已關機並移除電源線,由消費者自行升級過程中所造成的損毀或不相容性,皆不在保固條款內容
中,消費者需自行負擔維修費用及更換零件的費用;建議規格的升級可將機器帶至維修中心請人員協助。
■ 為維持最佳的相容性與效能,請至
問題。
AORUS官網FAQ
參考所支援的記憶體廠商模組,避免出現相容性或效能不佳的
AORUS
官網
電池保護機制
當電池長時間放電狀態( 未接變壓器電源, 而高效能使用) 時,短時間的大量放電可能會造成電池溫渡過高影 響電池正
常使用壽命,為保護電池使用壽命,當電池溫渡高於
者將變壓器電源接上後,電池停止放電並溫度低於
45 度C
時會無法充電,此為保護電池使用壽命 的機制。但使用
45 度C
,電池才會開始回充電源並維持正常運作。
TC
54
Page 29
EN
快速鍵
許多電腦的設定例如螢幕亮度、喇叭音量等可利用電腦的快速鍵直接調整。
如需使用快速鍵,請依下表先按住
TC
快速鍵 功能 功能敘述
+
風扇轉速全轉 開啟/關閉風扇轉速全開功能
+
睡眠模式 讓電腦進入睡眠模式。
+
無線區域網路 開啟/關閉無線區域網路裝置。
+
減弱亮度 降低螢幕亮度。
+
增強亮度 提高螢幕亮度。
+
螢幕顯示切換
+
螢幕開關 開啟/關閉螢幕。
+
喇叭靜音 將喇叭切換為靜音模式。
+
減弱音量 降低喇叭音量。
+
增大音量 提高喇叭音量。
+
觸控板開關 開啟/關閉觸控板。
+
WiFi /
藍牙通訊開關 開啟/關閉
+
視訊攝影機 開啟/關閉內建視訊攝影機。
<Fn>
鍵,再按下
<F1>~<F12>
在電腦螢幕以及外接式顯示器之間切換影像輸出,或者同時顯示。
WiFi /
巨集鍵
使用者可透過
巨集鍵 功能 功能敘述
AORUS Fusion
巨集群組切換鍵 切換所設定的巨集群組,壓按約三秒可開關巨集鍵。
自定義巨集鍵 使用者自行定義的巨集鍵
自定義巨集鍵 使用者自行定義的巨集鍵
自定義巨集鍵 使用者自行定義的巨集鍵
自定義巨集鍵 使用者自行定義的巨集鍵
自定義巨集鍵 使用者自行定義的巨集鍵
自行定義巨集設定,並透過各種設定完成複雜的遊戲連續操作或一般電腦操作的需求。
等按鍵。
。
藍牙通訊裝置。
Page 30
Command & Control
Command & Control
免除至系統各個地方尋找設定點。節省尋找時間及更快速、方便的瞭解您的個人筆電設定。
快速鍵 功能 功能敘述
是一個匯整使用者日常使用的個人化設定的軟體,方便於一個整合的介面調整各種個人化設定,
OC
儀錶板
超頻 根據需求調整
OC Gauge
透過
包含了
CPU
輕鬆一鍵
使用率、
CPU/GPU
CPU/GPU超頻,
GPU
使用率、主記憶體使用率、系統溫度以及風扇速度。
同時跑車儀表外觀提供您最清楚的系統資訊,
超頻幅度
。
EN
TC
風扇轉速 根據使用者喜好調整系統的風扇轉速
安靜模式
一般模式 系統會自動依照您的使用情境調整風扇轉速,並盡量降低風扇噪音。
遊戲模式 系統會自動依照您的使用情境調整風扇轉速,
自訂模式 使用者可以透過調整
全自訂模式 使用者可依照需求設定不同溫度對應的風扇轉速。
系統會在不影響您進行文書以及2D畫面處理的情況下降低風扇轉速,
以增加電池續航力以及降低噪音。
並在不損及系統穩定的情況下讓系統釋放出最大效能。
"Auto Maximum"和"Fixed Mode"
。
享受自訂風扇轉速的快感。
76
Page 31
EN
快速鍵 功能 功能敘述
NV
控制台 連結至
NVIDIA control panel
,使用者可依需求調整設定
。
TC
勿擾模式 使用者可依照需求設定關閉系統更新
音量 調整音量大小
螢幕亮度 調整螢幕亮度
無線網路 開啟或關閉無線網路
藍牙 開啟或關閉藍牙
。
。
。
。
電源計畫設定 依使用者行為調整電源計劃,以便獲得最大的電池續航力或效能
外接螢幕設定 在電腦螢幕以及外接式顯示器之間切換影像輸出,或者同時顯示
X-Rite Pantone
開啟或關閉
X-Rite Pantone
色彩
。
。
。
。
色彩
色彩管理 依使用者需求調整色溫。同時可以移動底下的滑桿,輕鬆調整系統螢幕釋出
的藍光亮度,減緩您的眼睛疲勞。
調節顯示開關 使用快速鍵調整設定時,開啟/關閉在螢幕上調整值的顯示。
電池充電模式設定 使用者可依不同使用情境調整設定電池最佳充電模式
標準充電 依標準充電速度進行電池充電。
此設定提供平衡的電池續航力,建議選用此模式為預設。
快速充電 選擇此模式可讓電池進行快速充電。
。
品質充電 選擇此模式可讓電池進行慢充以延長電池續航力。
自訂充電 此為進階充電,使用者可選擇何時讓電池停止充電。
Page 32
7654321
AORUS Fusion
EN
感謝您使用
以及X7上的全彩背光鍵盤使用。有了
步進入戰鬥!以下是
AORUS Fusion
AORUS Fusion! AORUS Fusion
AORUS Fusion
軟體概觀
98
是一套結合巨集設定、背光控制以及音效控制的軟體,讓您搭配
AORUS Fusion
的使用說明:
,就能夠在彈指之間設定好您的遊戲環境,讓您永遠比敵人早一
1
目前正在使用的設定檔
2
背光設定選單
3
巨集設定選單
4
音效設定選單
5
一般設定選單
6
錄製巨集
7 AORUS Fusion
包含恢復原始設定值
8
獨立巨集鍵
9
主要鍵盤使用區
更新選單
& Fusion
AORUS X5
TC
更新
98
Page 33
EN
TC
背光設定選單
1
2
1 G Key群組,
您最多可擁有五組不同的顏色(巨集
2
主要鍵盤區
您可以設定單鍵或是多鍵的顏色
custom
僅限在
燈光動畫列表
3
您可以在此選擇您想要的燈光效果
4
燈光設置列表
您可以在此設定更多其他細部燈光效果
模式下
)
43
Page 34
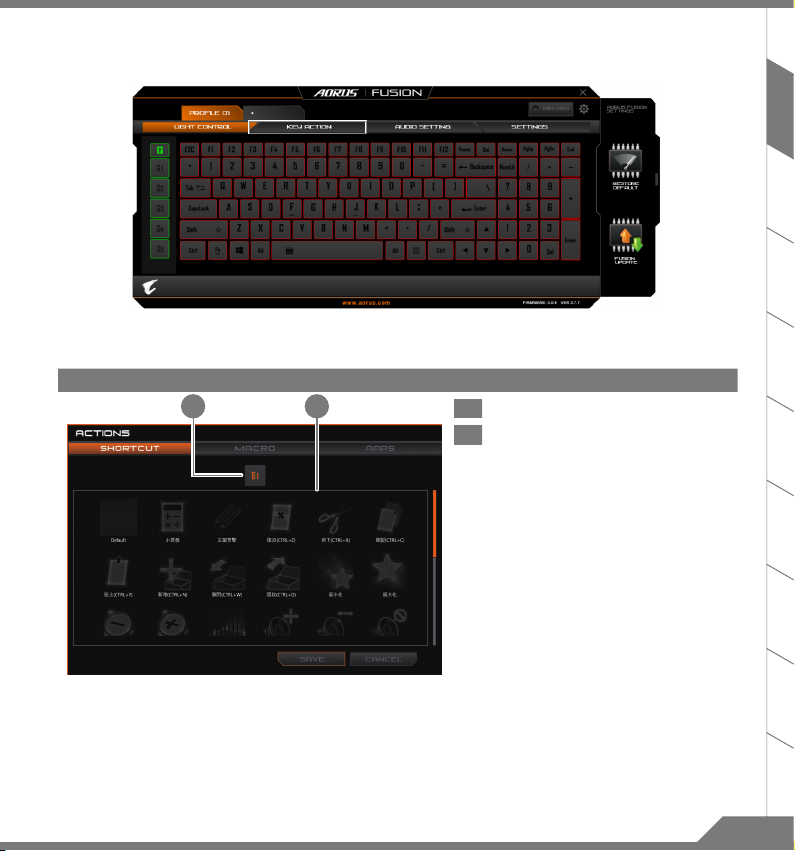
巨集設定頁面
您可以在此頁面設定巨集於任意鍵上。只要點選您想要設定巨集的按鍵,巨集設定畫面便會出現
1 .
快捷功能指定頁面
21
1
您目前正在設定的按鍵
2
常用快捷功能設定選項
Default
選項為移除
EN
TC
1110
Page 35
EN
TC
1 432
21
2 .
巨集指定頁面
2-1 .
錄製新巨集
8765
1
錄製新巨集
如果您想要錄製新巨集, 請點選此圖示
2
現有巨集列表
您可以在此選擇既有的巨集並指派到該鍵上
1
開始記錄巨集
2
停止紀錄巨集
3
巨集名稱
您可以在此編輯巨集名稱
4
匯入巨集
5
錄製範圍
您可以選擇錄製鍵盤動作, 滑鼠點擊, 滑鼠移動
或是任一上述組合
6
延遲時間
您可以在此設定錄製的延遲時間
7
執行方式
您可以在此設定巨集的執行方式
8
匯出巨集
Page 36
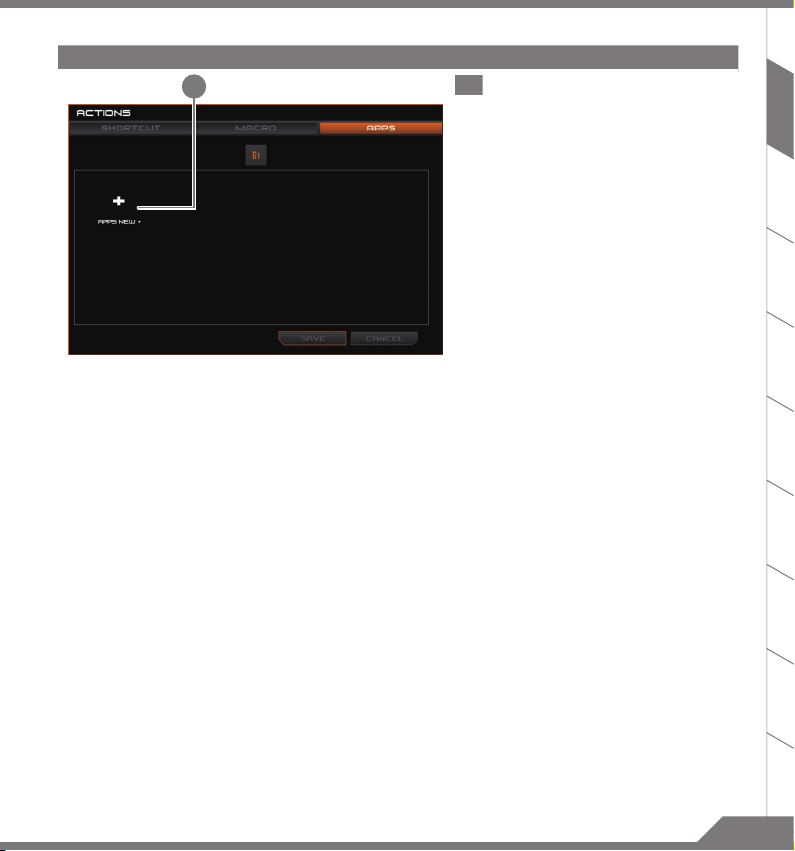
3.
程式指定頁面
1
1
選擇您要按下該鍵時啟動的程式
EN
TC
1312
Page 37
EN
TC
音效設定選單
1
您可以在此設定音量
2
1
您可以在此設定音效情境
3
您可以在此開啟
設定細節
AORUS audio
頁面
32
Page 38
一般設定
EN
TC
1
選擇您要與鍵盤設定檔連動的程式
1
3
一但設定完成, 只要啟動該程式
會立即切換至指定的設定檔
2
Windows
鎖定
3
清除設定
此檔案內巨集設定會被清除
鍵
,AORUS Fusion
就
2
1514
Page 39
EN
AORUS Audio Equalizer
AORUS Audio Equalizer
除了內建的優質模組,您還可以使用等化器調整各個不同頻率的比重,讓您在各項影音娛樂中都能透過
TC
得到最佳的音響體驗。
歡迎使用
AORUS Audio Equalizer
1
是一個由
AORUS
專業團隊設計的音效軟體。
2
1
點籍桌面捷徑即可開始使用
Equalizer,
手邊顯示您正在使用的設備,分別為內建
喇叭、耳機、外接音響及麥克風。
2
除了音量大小,您還可以看到四個不同種
類的音效娛樂,每個種類還有細項可以選
擇。在每個項目中,
隊都為您準備了優質的音響效果模組,讓
您在不同的娛樂之下都能享受最佳的聲音
表現。
3
點擊左下方的
功能。您可以隨心所欲調整各個頻率的比
重,並且儲存您的設定。下一次使用時即
可享受在您個人專屬的聲音體驗當中
3
AORUS Audio
AORUS Audio
您將會看到以下的初始畫面。左
AORUS
專業的音響團
"EQ"
按鈕即可使用等化器
!
Page 40
Killer LAN
EN
Killer LAN
可自動調整網路封包傳輸的優先順序,讓使用者有最佳的遊戲網路傳輸速度,有效降低
軟體要求網路封包傳送的順序控制。您可透過
也可以設定網路下載、線上影片與遊戲封包等的優先順序,達到最佳的網路優化。
Killer LAN:
傳輸權限控制
Killer LAN
軟體手動設定特定的程式擁有最高網路封包優先順序;同時,
Killer Lan
能讓您控制各程式使用網路的權限。
您可以設定個程式的權限高低,權限高的程式
能夠優先使用網路頻寬。您不需要再擔心遊戲
時因為同時在下載檔案而有所延遲。若您同時
連上有線及無線網路,
程式使用有線網路,權限低的程式使用無線網
路。馬上開始使用權限控制功能,終結延遲
Killer Doubleshot Pro
Killer Doubleshot Pro
路的頻寬。有了
得更大的頻寬,以處理各種需要穩定網路的應
用像是線上遊戲、電影以及BT下載。您只要一
個勾選,就能夠輕鬆享受整合頻寬帶來的自由
ping
值及同時間不同
Killer Lan
會讓權限高的
能夠整合有線以及無線網
Killer Doubleshot Pro,
TC
!
您可以取
!
1716
Page 41
EN
System Backup
使用說明
1
TC
>20G
2
3
4
5
跳出結束視窗後即完成。
■
若要還原您的系統,請在開機時按
■
系統。
還原時間約需
■
警告
為避免儲存裝置毀損導致原廠的還原映像檔遺失,您可以透過此軟體來備份原廠的還原映像檔
■
如果您想更換新的儲存裝置,您可以透過此軟體將原廠還原映像檔備份至
■
再將出廠的預設系統倒回新儲存裝置。
如果您想更換新的儲存裝置,您可以透過此軟體將原廠還原映像檔備份至
■
再將出廠的預設系統倒回新儲存裝置。
利用還原
■
30 分鐘 (
所需時間會因
USB
隨身碟進行系統還原時,請勿移除或關掉電源。
若要製作原廠映像檔的還原
USB
的
隨身碟。
USB
隨身碟裡的資料遺失
放入驅動程式光碟,執行安裝
USB
種,請外接
安裝完成後,執行桌面上的
從清單中選取剛剛插入的
F12
,選擇用【
USB
隨身碟種類而有所不同)。
光碟機;若光碟內沒有軟體,請上
USB
隨身碟開機】,【
(
USB
隨身碟,請先插入容量至少有
USB
請先將
隨身碟裡原有的資料備份,避免因下述操作造成
)
”System Backup”
”System Backup”
USB
隨身碟,然後選擇建立還原
USB
USB
www.aorus.com
。
USB
隨身碟】會自動完成還原您的
隨身碟,安裝好新的儲存裝置後,
隨身碟,安裝好新的儲存裝置後,
(
無內建光碟機的機
。
下載。
USB
20GB
)
。
Page 42
系統還原使用說明
系統還原(修復您的筆記型電腦作業系統)
當作業系統使用上出現不穩定的情況,筆記型電腦原廠出貨的儲存裝置裡有一個隱藏磁區,其內容為作業系統的完整
備份映像檔,可以用來救援系統將儲存裝置裡的作業系統還原到出廠預設值。
注意
如果儲存裝置有被更換過或刪除該隱藏磁區,還原功能將無法使用,需送維修中心還原。
■
出廠規格為預搭作業系統時才有此還原功能,若是
■
DOS
銷售則不提供此功能。
啟動系統還原
系統還原功能是筆記型電腦出廠時被預先安裝的。該選項可以啟動
預設值。以下為簡要介紹如何啟動還原工具,並開始還原系統。
執行還原前請注意
確認筆記型電腦已接上外接電源,還原系統會花費幾分鐘的時間。
■
Windows
故障還原工具,重新安裝作業系統為出廠
EN
TC
1918
Page 43
EN
TC
Windows 10
1
2
系統還原說明
關機並重新啟動筆記型電腦。
啟動筆記型電腦後,按著F9按鍵幾秒鐘以啟動還原工具。
3
4 Reset this PC -
“Troubleshoot”
選擇
(您也可以選擇
系統還原有兩種方式可供選擇
Reset this PC
■
如果電腦因軟體或設定值不佳而不穩定,您可以選擇移除或保留個人檔案,在重設電腦設定值而不遺失個人檔案。
AORUS Smart Recovery
■
筆記型電腦的設定值會被還原成出廠預設值。
注意:將會遺失所有的個人資料與檔案。
Keep my les -
■
選擇一個使用者帳戶後繼續。所有應用程式會被移除,設定值會還原成單
O/S( 不含AORUS
純的
Remove everything-
■
所有應用程式、設定值和個人檔案將會被移除。
Just remove my les -
■
只移除個人檔案,但保留電腦設定值。
Fully clean the drive - -
■
完整還原儲存裝置至出廠設定值,會花費較長的還原時間。
>
注意事項
進入系統還原及進階選項。
“Continue”
重設電腦設定值
“Reset”
【按下
您所有的個人檔案與應用程式將會被移除。
■
所有的電腦設定值將會被還原成單純的
■
Windows 10
直接進入
保留個人檔案
應用程式),但個人檔案會被保留。
移除所有項目
只移除個人檔案
完整還原
執行】。
作業系統,先行備份個人資料與檔案再作還原。)
O/S (不含 AORUS
應用程式 )。
Page 44
Choose “AORUS Smart Recovery”
進入重置系統模式,工具列會有還原選項,如您確定
要系統還原,點選“ 是” 執行。
■
■
當系統還原完成後,工具列會有選項,請點選“ 關機”。
注意事項
一選擇還原後,所有原本的個人資料與檔案將被刪除,並還原系統及儲
存裝置至出廠預設值。
還原視窗開啟並進行系統還原,在這之時請確認接上變壓器確保電力無
虞,並請勿關閉電源。
EN
TC
5
Advanced options -
System Restore -
選擇系統還原的記錄時間,將系統還原至該時間點。
System Image Recovery -
使用之前備份的系統備份資料還原
Startup Repair -
修復及解決
Command Prompt -
使用命令字元集執行進階的疑難排解。
UEFI Firmware Settings - UEFI BIOS
重新啟動,變更
Startup Settings -
Windows
變更
其它或進階選項更多系統還原的進階設定。
系統還原
系統備份還原
Windows
系統。
啟動修復程序
Windows
系統問題。
命令提示字元
設定
UEFI BIOS
設定值。
啟動設置
啟動設定。
2120
Page 45

EN
附錄
保固及客服資訊
TC
相關保固條款及客服資訊請參考隨貨所附之保固保證書或參考
http://www.aorus.com
FAQ
相關常見問題請參考
AORUS
常見問題網站
。
AORUS
http://www.aorus.com
技術服務區網站。
 Loading...