

Page 1
Page 2

GIGABYTE AM4 Guide to Overclocking AMD
3rd Gen Ryzen™ (Matisse)-Series Processors
Chapter 1: Intro
Matisse innovates
After the establishment of AMD as a top competitor in the gaming field last year, this
year AMD brings the innovation to mainstream computing. More cores, a lot more cores,
faster IPC and a larger performance improvement, not to mention the PCI Express 4.0
interface that pushes the speeds on the storage department to a new era.
Read on to learn how to get even more value out of your 3rd Gen AMD Ryzen processor.
Chapter 2: How to Overclock Your 3rd Gen AMD Ryzen CPU
For reference we are using a GIGABYTE X570 AORUS MASTER motherboard, an AMD Ryzen 9
3950X processor, 16GB AORUS DDR4 3200Mhz, and a liquid cooler, the EK-KIT P360.
Based on our testing the AMD Ryzen 9 3950X can hit around 4.3 GHz using around 1.4V Vcore.
In this guide we will be targeting a frequency of 4.3GHz on all the cores from a stock
frequency of 3.3 GHz.
Disclaimer: Overclocking will technically void your warranty. While it’s usually safe, there is
potential to damage the chip if you push voltages too high.
Taking Your CPU to the Next Level – Overclocking
Simply follow the steps below and you’ll be enjoying your overclocked Ryzen powerhouse in
no time.
Although AMD Ryzen 9 3950X processors have a Max Boost frequency of 4.7 GHz, that only
applies on two cores. Our goal is to overclock all 16 cores of this part at the maximum
possible speed.
Page 3
■ Step 1: Enter the BIOS
Enter the BIOS by restarting your computer and pressing the “delete” button before the OS
launches.
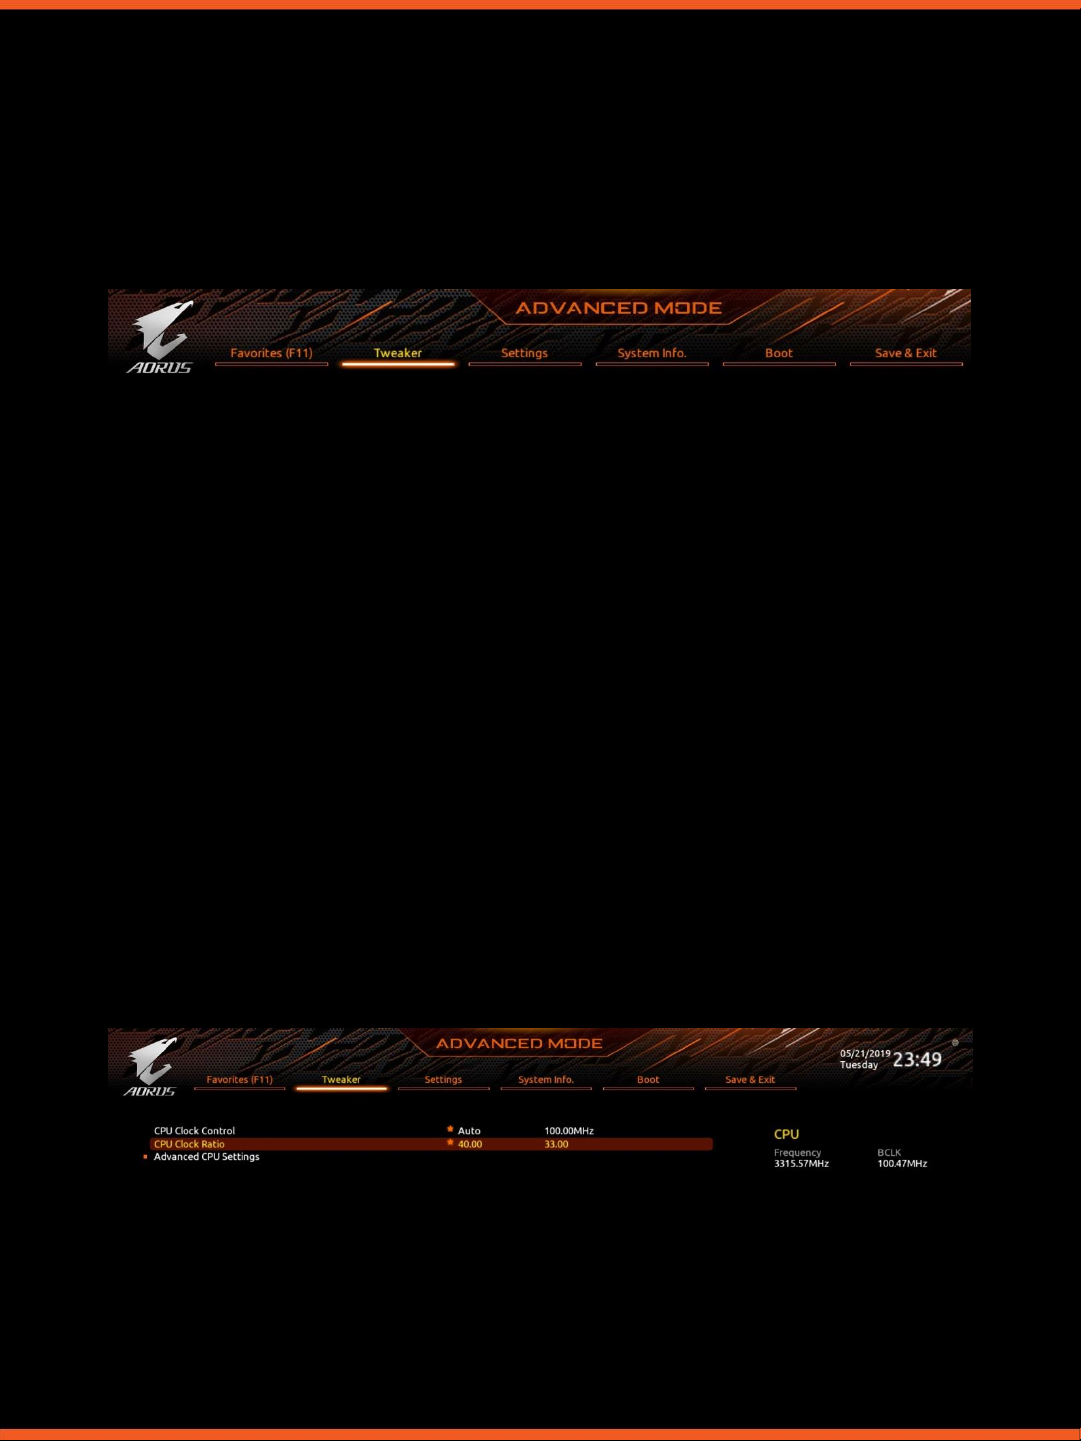
■ Step 2: Enter “Tweaker” tab
Change your “CPU Clock Ratio” to “43.00”. A CPU clock ratio of 43 multiplied by 100
which is our default “CPU Clock Control” gives you a frequency of 4300 MHz.
The CPU comes with a default CPU frequency of 3300 MHz, which means that it has a
default “CPU Clock Ratio” of “33.00” and a default “CPU Clock Control” of “100”.
Interesting fact! We noticed that if you look in CPU-Z while running at default clocks, the
frequency jumps up and down. This is the power saving settings at work. Once you
overclock and increase your “CPU Clock Ratio” to any value above the default setting of
“33.00” the measured frequency stops going up and down.
Different from Intel’s, “CPU Clock Ratio” can be adjusted in increments of 0.25x instead
of 1.0x. For example “CPU Clock Ratios” of 33.25, 33.50, 33.75 etc are possible.
Page 4
■ Step 3: Adjust Your Voltage Settings
Now we have tuned almost all the features and the frequencies of our CPU but in order
for the CPU to work at a higher speed it needs to be supplied with higher voltage.
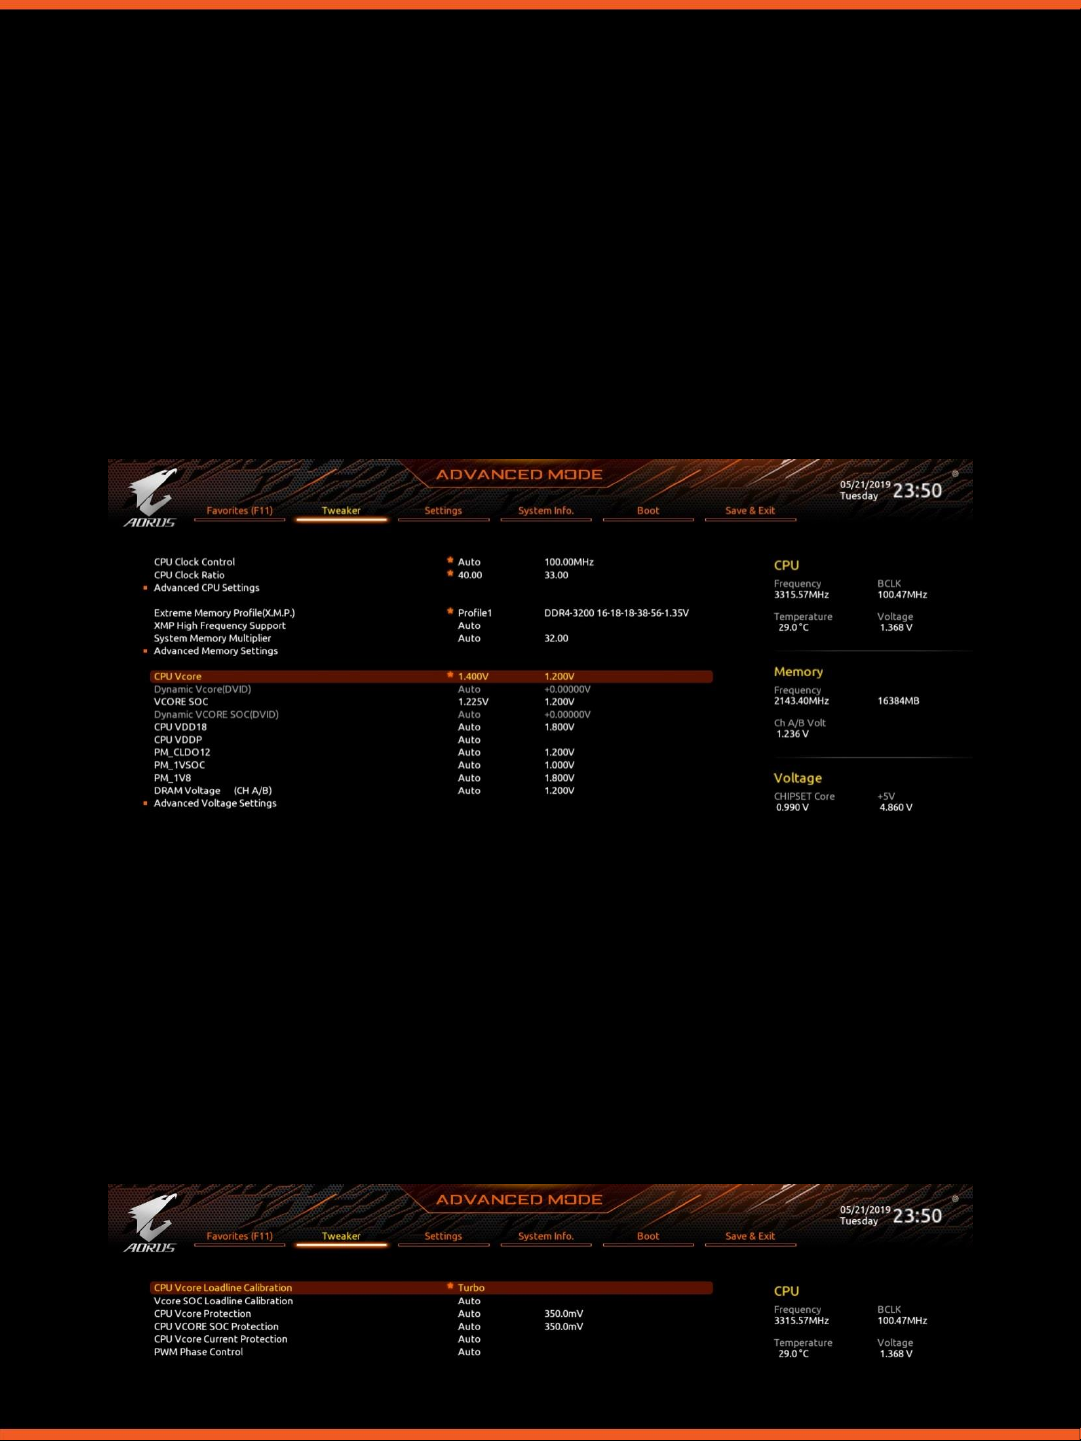
Go to the starting BIOS page (Tweaker) and scroll down to the voltage options.
3a. Change CPU Vcore:
Raising this helps keep the system stable at higher CPU frequencies. However, it also
increases the amount of heat your CPU produces. We suggest you to keep Vcore from 1.3
to 1.45v when overclocking to around 4 GHz–however—CPUs differ, some require higher
voltages to be stable, some lower. There’s a large component of luck involved.
3b. Adjust the rest of the Voltage Settings if necessary
These are the same settings that exist on the previous AMD Chipset motherboards too.
For a little extra boost in stability while overclocking we suggest you to try to change
VCORE SOC up to 1.20-1.25 volts when using standard air or liquid cooling. If you use a
PCIe 4.0 device try to avoid this adjustment on the VCORE SOC voltage. For CPU VDD18
you can adjust it up to 2.0 volts and for CPU VDDP up to +0.2 volts if this is required from
the CPU you are testing. It wasn’t necessary for us. The PM_CLDO12, PM_1VSOC and the
PM_1V8 you can adjust them up to 1.25V, 1.2V and 1.84V if your system is not stable
without them at Auto.
Page 5
3c. Adjust CPU Loadline Calibration Setting
If you need some extra stability adjust this setting to either “High” or “Turbo”. You may
notice that after this adjustment your CPU Vcore is higher. This option is located in the
“Advanced Voltage Settings” submenu.
■ Step 4: Optimize Your Memory Settings
There are two different methods of optimizing your memory settings, the easy way is
through the Extreme Memory Profile (X.M.P.) option, and the more difficult way is
through manually adjusting your ram settings.
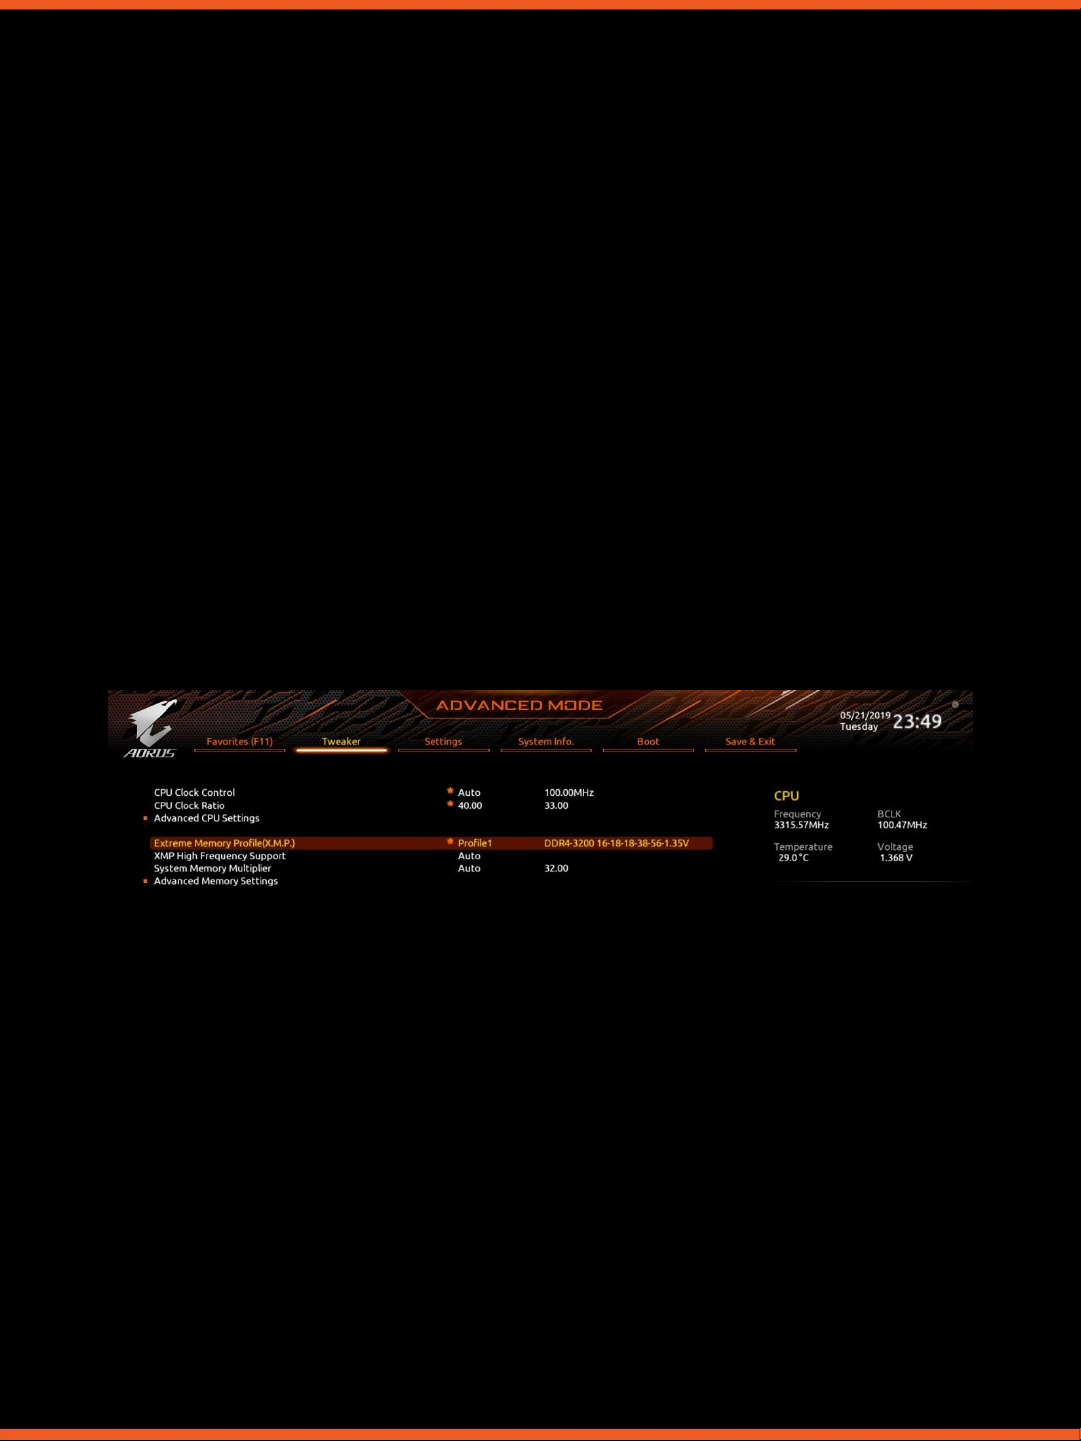
4a. Easy Way
Go back to the “Tweaker” starting page. Here you see the “Extreme Memory Profile
(X.M.P.)” option. Enable it. The system will choose the optimal memory frequency and
DRAM timings for you.
4b. More Difficult Way
AMD now supports higher memory dividers. Select the frequency that your memory sticks
run at. Since X.M.P. is not enabled, your memory timings will be automatically set by the
CPU. Next, go back to “Tweaker” and adjust the DRAM Voltage option. Set your DRAM
Voltage to your specific memory module’s recommended voltage setting.
Now that you’ve set your overclocks, it’s time to make sure that your system is stable!
Page 6
Chapter 3: Stability Testing & Results
Congratulations! You have obtained a clock rate of around 4 GHz. Now it’s time to make
sure that it’s stable. We’re going to use the software below to monitor our system,
stability test, and adjust our overclocks.
Prime95 – This is used to stress test our CPU in order to ensure that it’s stable in the
most taxing of conditions.
CPU-Z – Used to monitor our CPU frequencies. Latest version is preferred.
HWiNFO – Used to monitor idle and load temperatures and Vcore settings.
How to Stability Test
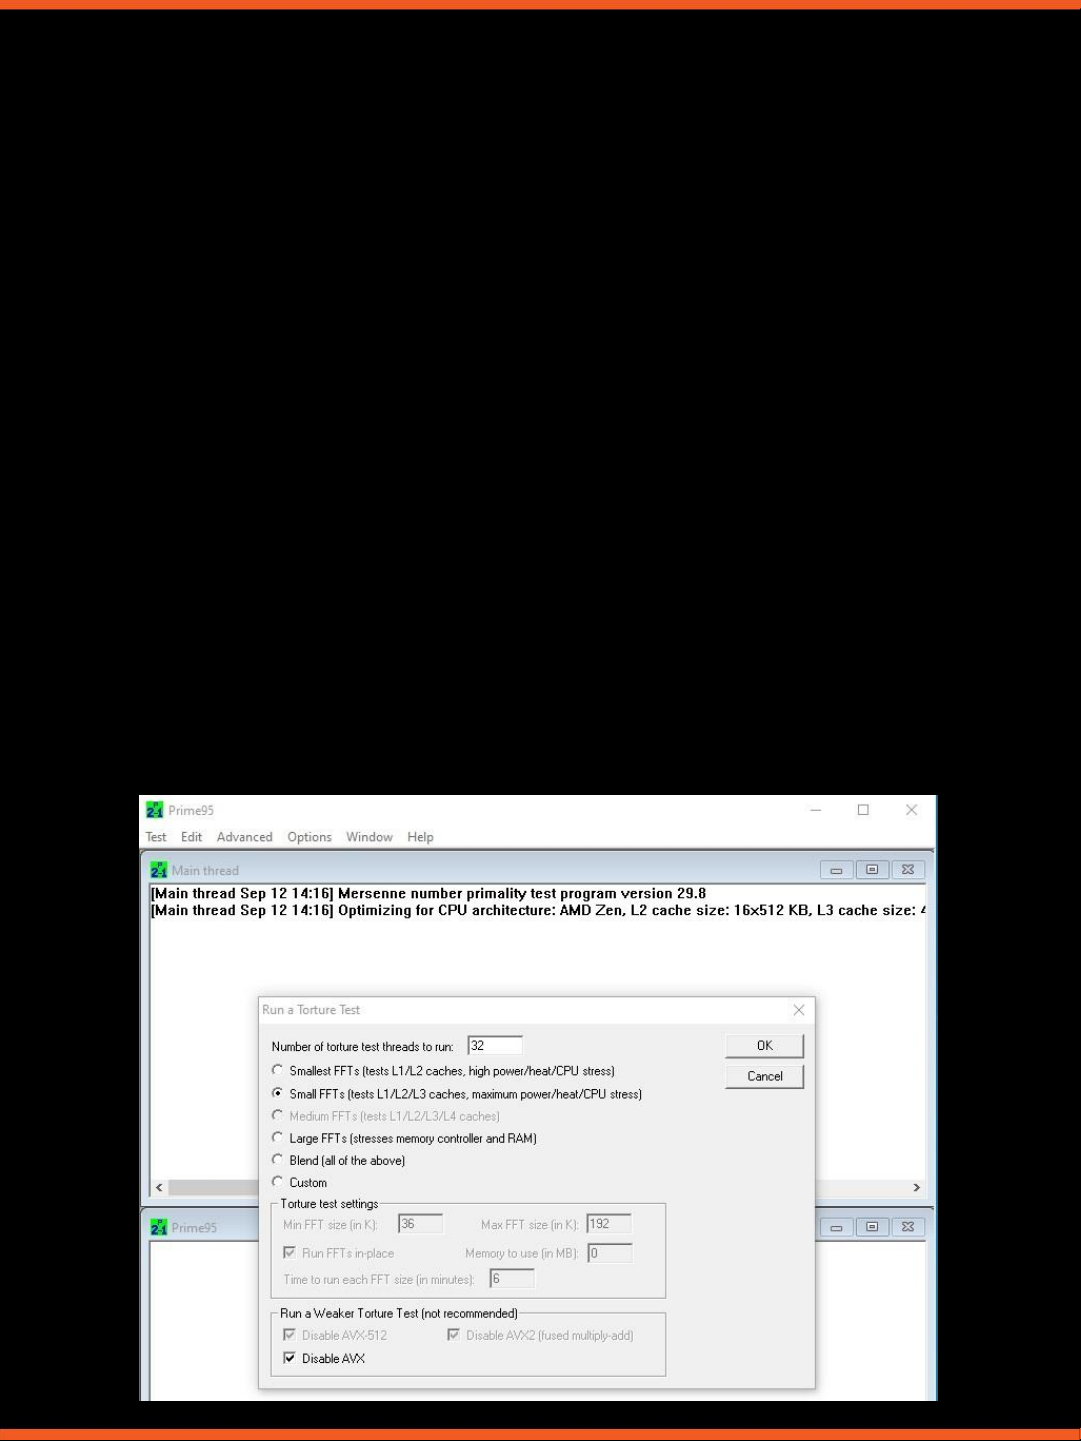
■ Step 1: Prepare Stability Testing and Monitoring Applications
Open up CPU-Z, HWiNFO, and Prime95 so you are able to stress test and monitor CPU
temperature, frequency, and memory timings all on the same screen. Disable the AVX
options or if you want to test AVX, you will obtain lower frequencies since the load on
the CPU will be much higher.
Page 7
■ Step 2 : Start Prime95
After starting the Prime95 torture test, highlight the Prime95 tray icon—all cores
should say “self-test”, if it shows “not working” that means that specific core has failed
to pass the test. Another form of failing the stability test is that your system may simply
just reboot or freeze, which means your settings were too aggressive and your CPU has
failed the stability test. We normally test Prime95 for 30 minutes. This duration can be
increased for more assurance.
■ Step 3a (Fail) : Close Prime95
Close Prime95 by right clicking the Prime95 icon on the tray bar in the lower right side
of your screen and selecting “Exit”. This closes Prime95.
■ Step 3b (Fail) : Adjust Frequency or Voltage
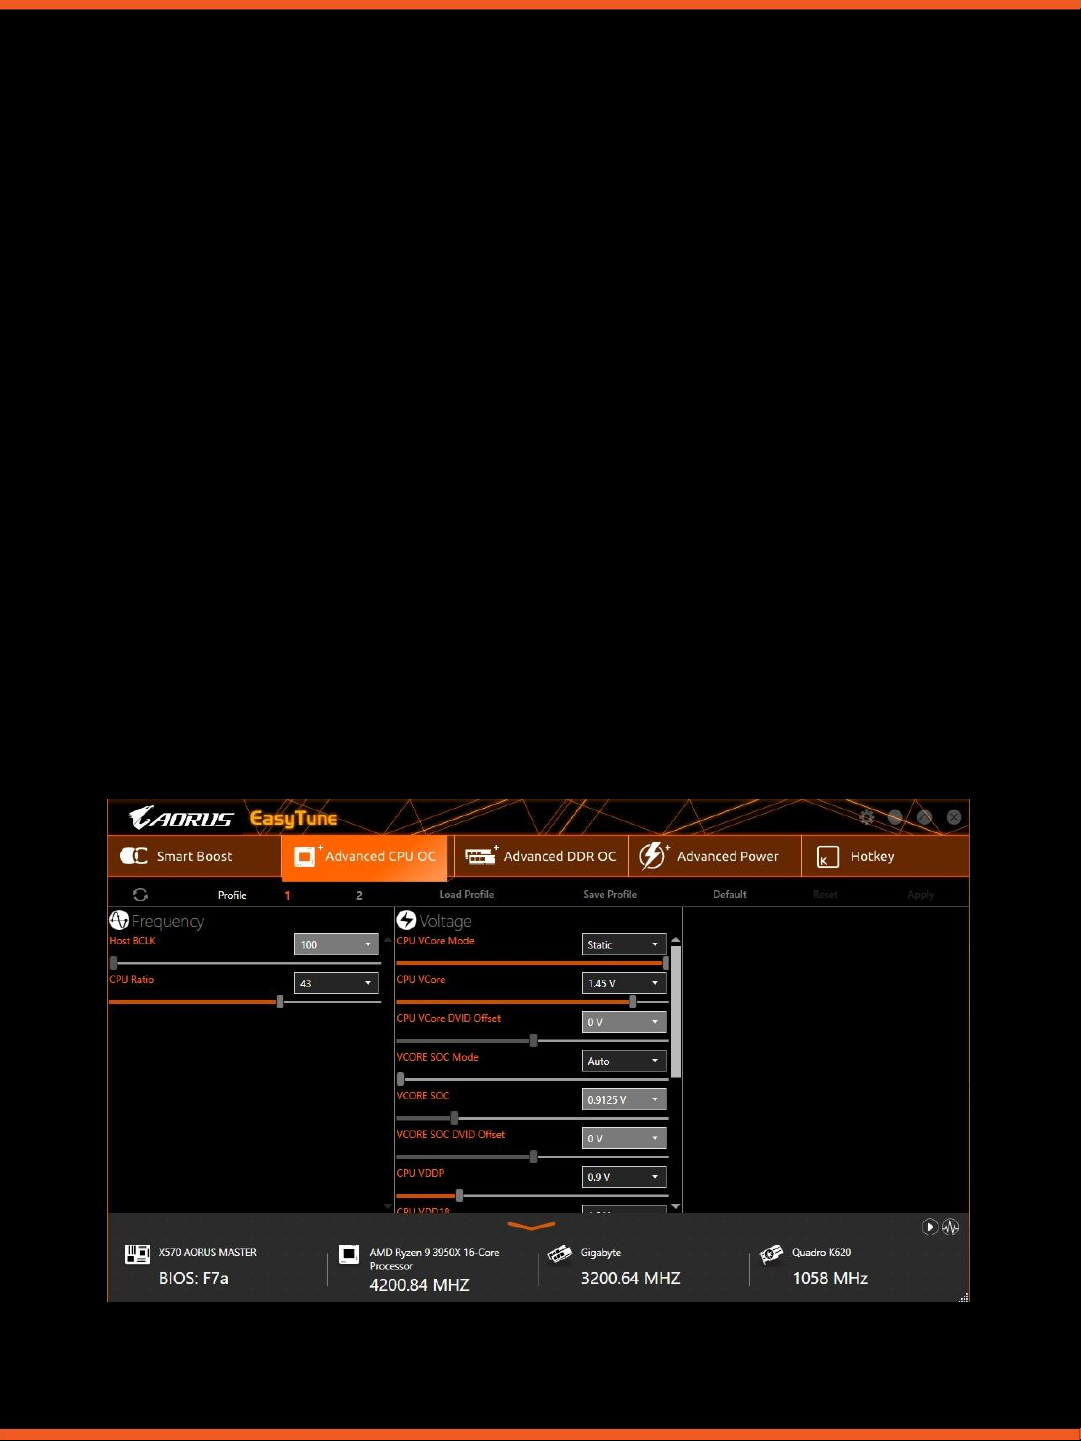
Now it’s time to adjust your frequency or voltage settings. You can do this either
through the BIOS or using EasyTune which is available through the GIGABYTE App
Center. You have two options: Either increase CPU Vcore or decrease “CPU Clock
Control”. We recommend you to stay under 95° C on your CPU along with a CPU Vcore
below 1.45 volts if possible. After making adjustments go back to Step 1. If it continues
to fail, dial down your “CPU Clock Control” until you pass stability testing.
Page 8
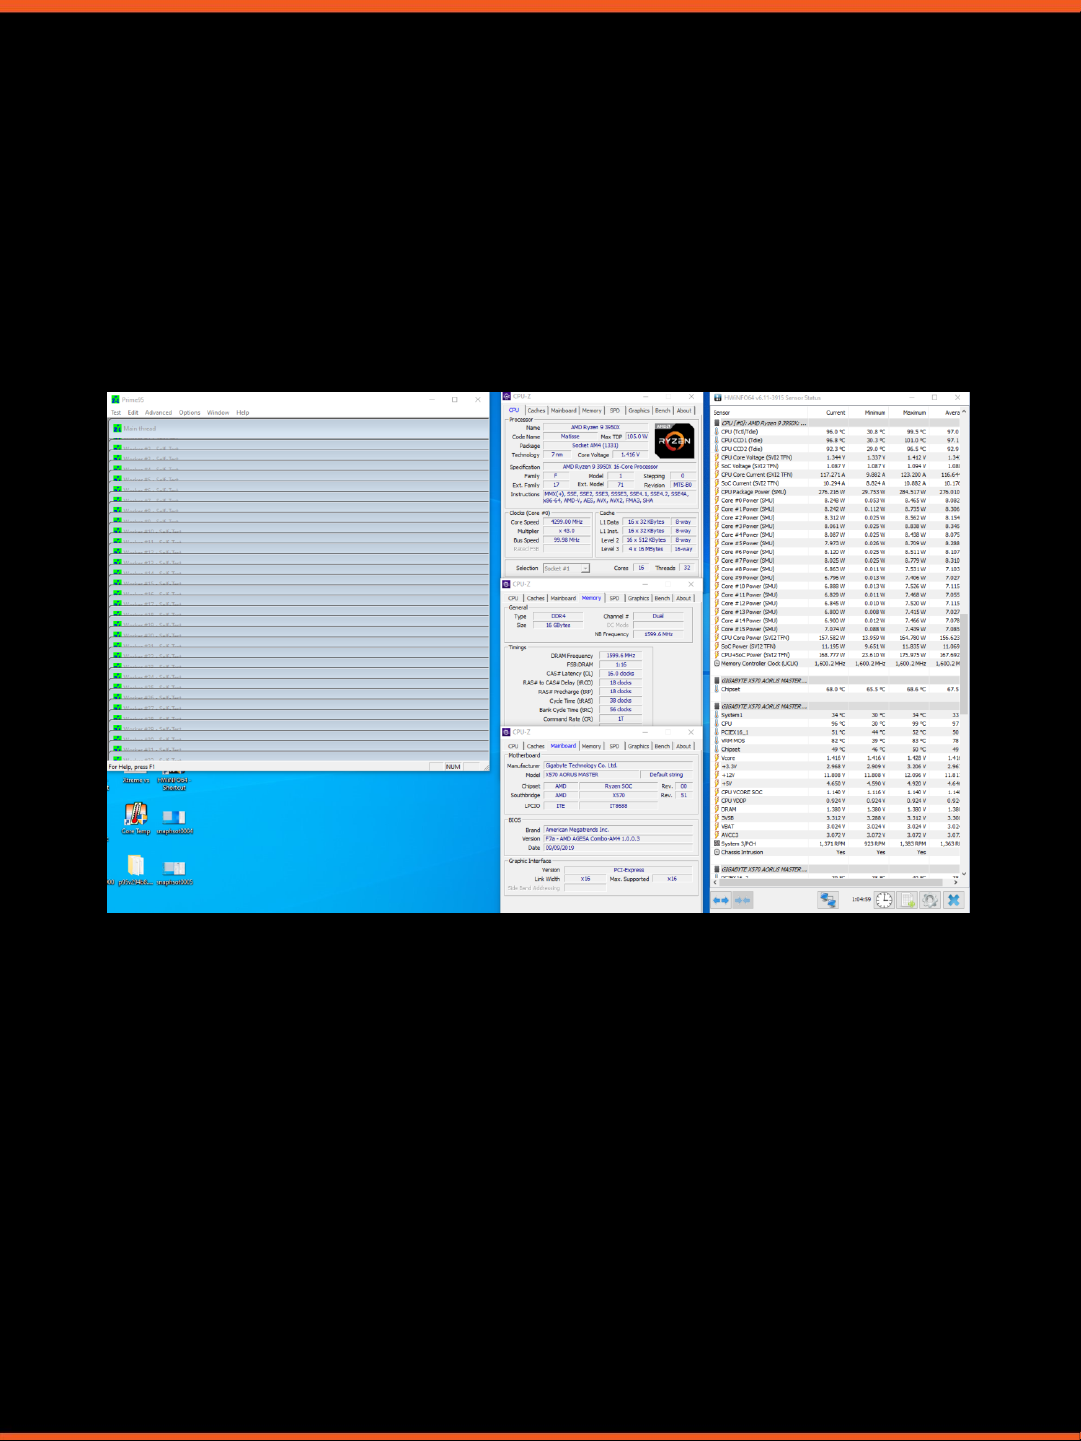
■ Step 4 (Success): Enjoy Overclock or Increase Frequency
Congratulations, your current overclock is stable. You may want to try for a higher
frequency. To do so, experiment with raising your CPU Clock Control and CPU Vcore
settings either in BIOS or EasyTune and go back to Step 1 for stability testing to ensure
that it’s stable.
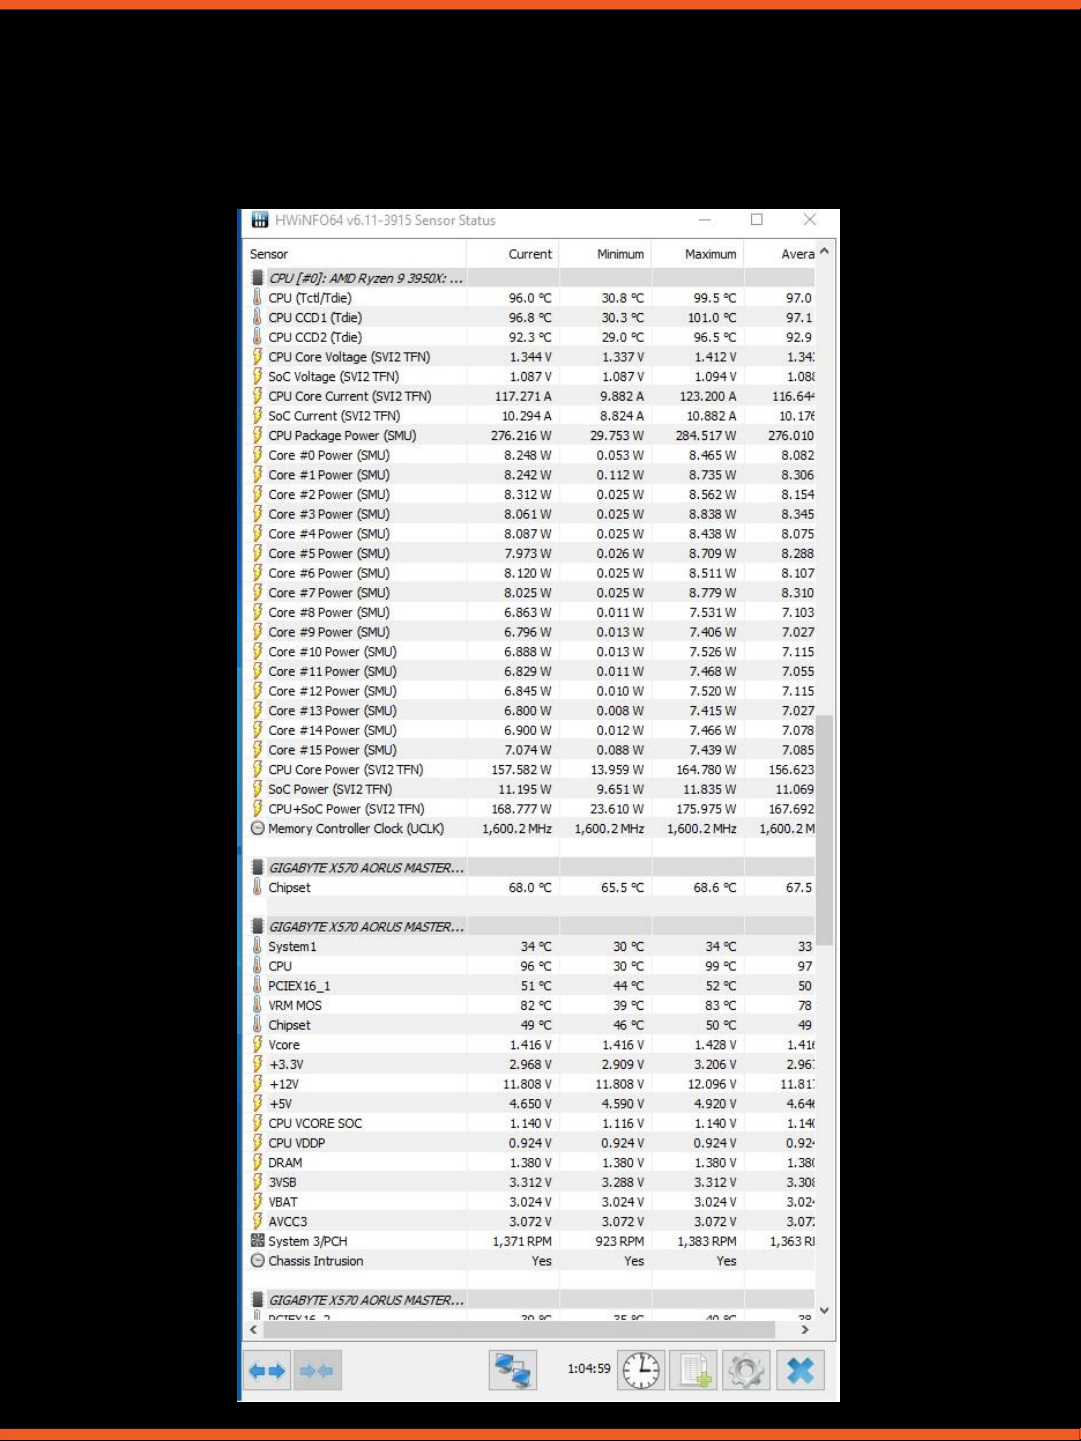
The below picture shows a 4.3 GHz OC on liquid cooling passing 1 hour of stability
testing:
Thermals
We ran tests using a liquid cooling setup at different voltages and frequencies using an
AMD Ryzen 9 3950X to show the difference in thermal performance. As you can see with
our liquid cooling setup the temperatures are similar than what we were getting last year
using a Ryzen 7 2700X.
Page 9
Our Liquid Cooling Setup
Liquid cooler: EK-KIT P360
Motherboard: GIGABYTE X570 AORUS MASTER
Page 10
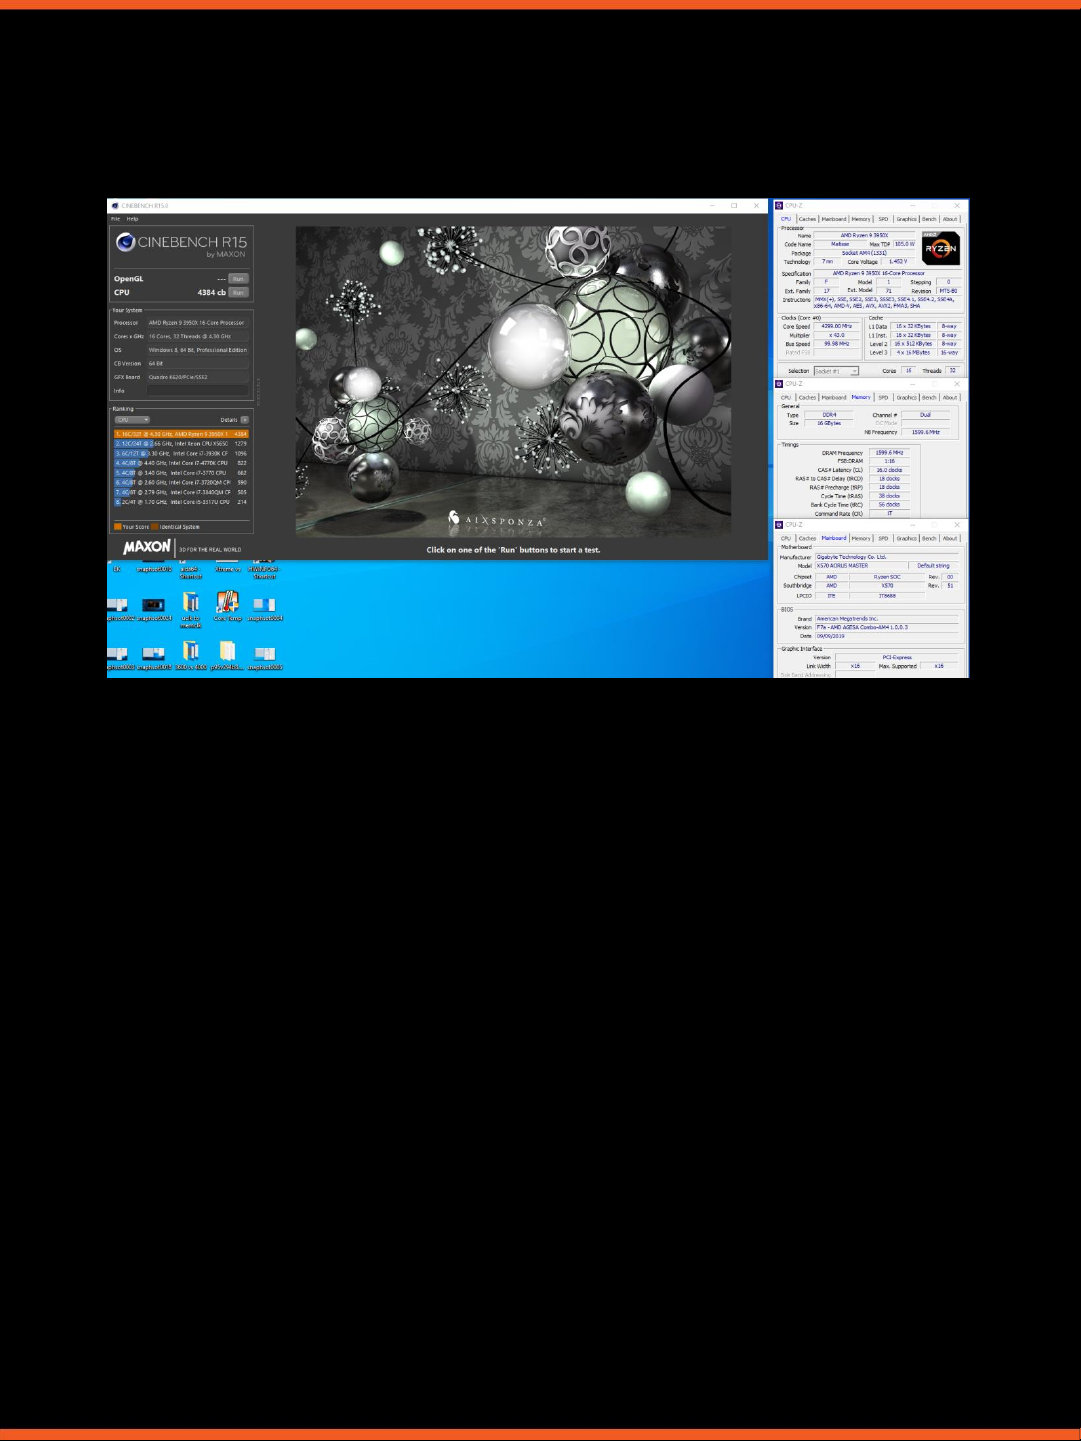
Results
At a stock frequency we obtained 3932 cb on Cinebench R15.
At our goal of 4.3 GHz while using memory XMPs at a frequency of 3200 MHz,
we obtained a Cinebench R15 score of 4384 cb. That’s a 452 point difference!
Page 11
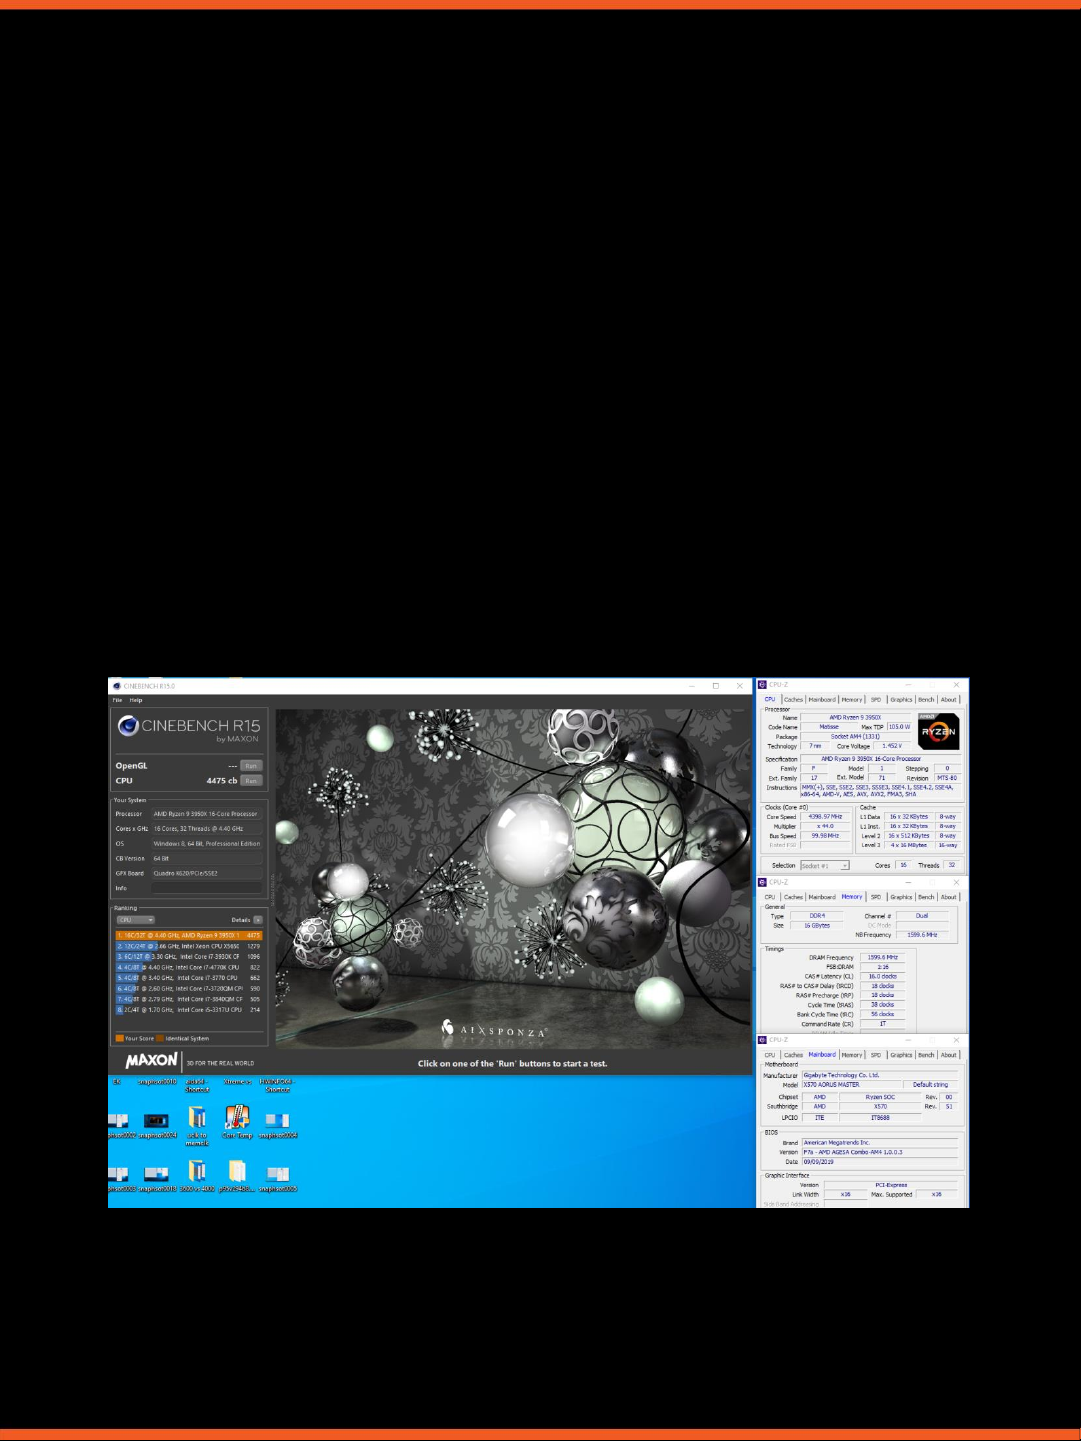
Chapter 4: Pushing Past 4.3 GHz
Although 4.3 GHz might be the limit for many parts, there are parts that can be
overclocked even higher. Not in all occasions are these results going to assure you the
prime95 stability but at least the parts might be able to be stable through Cinebench R15.
We recommend using reliable dual-radiator water cooling or even better, a triple-radiator
solution for the best results. For the specific steps please refer to the overclocking guide
above.
Follow the previous steps and just adjust the settings to the new values. With that said,
we don’t suggest you to do it since the CPU voltages that you need to achieve such
results are quite high and may damage your parts.
For experimental purposes only, we tried how high our part could pass Cinebench R15.
Unfortunately, this time we weren’t able to test multiple parts so we can only base our
experience on a single part.
And Cinebench R15 at 4400 MHz.
 Loading...