

Page 1

Page 2
Congratulations on your purchase of the AORUS Notebook!
This Manual will help you to get started with set ting up your notebook. For more detailed information,
please visit our website at http://ww w.aorus.com. All specic ations are subject to the manufacturer 's
conguration at the time of shipping and may change without prior notice,written or otherwise.
Using AORUS Notebook for the First Time
4
2
EN
TC
SC
KR
SP
3
1
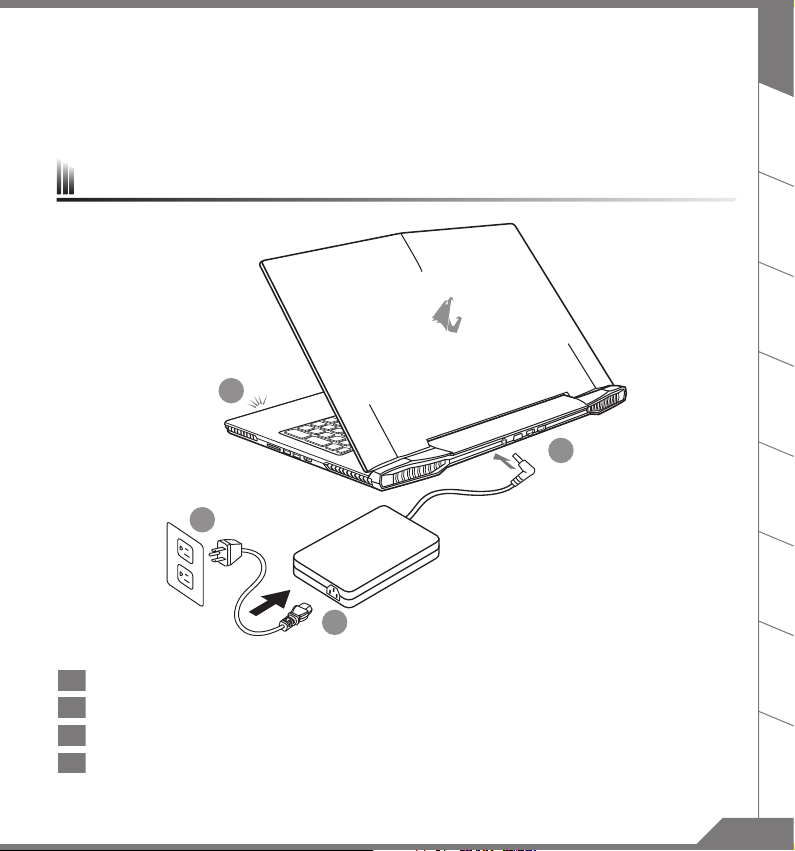
1 Connect the the power cord to the AC adapter.
2 Connect the AC adapter to the DC-in jack on the back side of the notebook.
3 Connect the power cord to the power outlet.
4 While the Battery Indicator lights on, press the Power Button to turn on the notebook.
GR
FR
RU
JP
1
Page 3
EN
TC
SC
KR
SP
GR
FR
IMPORTANT
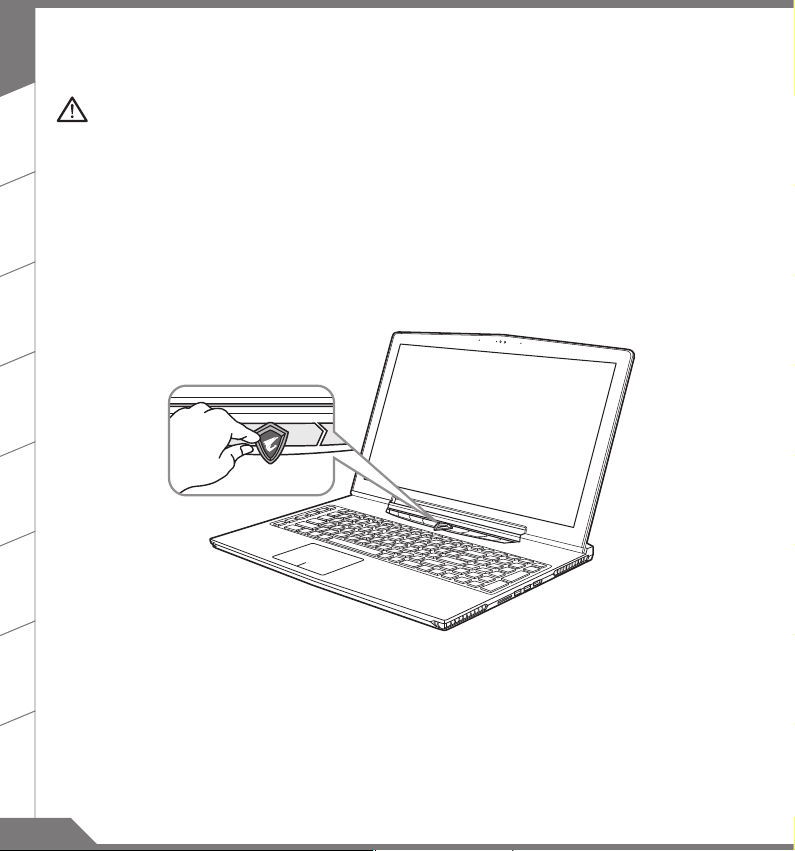
Ensure that your Notebook PC is connected to a grounded power adapter before turning it on for the rst time.
•
When using your N otebook PC on power adapter mode, the socket outlet must be near to the unit and easily
•
accessible.
Locate the input/output rating label on your Notebook PC and ensure that it matches the input/output rating
•
information on your power adapter. Some Notebook PC models may have multiple rating output cur rents based
on the available SKU.
Power adapter information:
•
- Input voltage: 100 -240Vac
- Input frequency: 50- 60Hz
- Rating output voltage: 19V or 19.5V
Switching on the Power
After you turn on the notebook for the very rst time, do not turn it off until the operating system has been
congured. Please note that the volume for the audio will not function until Windows® Setup has completed.
RU
Booting Up the notebook for the First Time
Depending on your configuration, the Microsoft® Windows® Boot Screen may be the first screen that you
will see as the notebook starts up. Follow the on screen prompts and instructions and enter your personal
information to complete the setup of the Windows® Operating System.
JP
2
Page 4
Your AORUS Notebook Tour
2
31
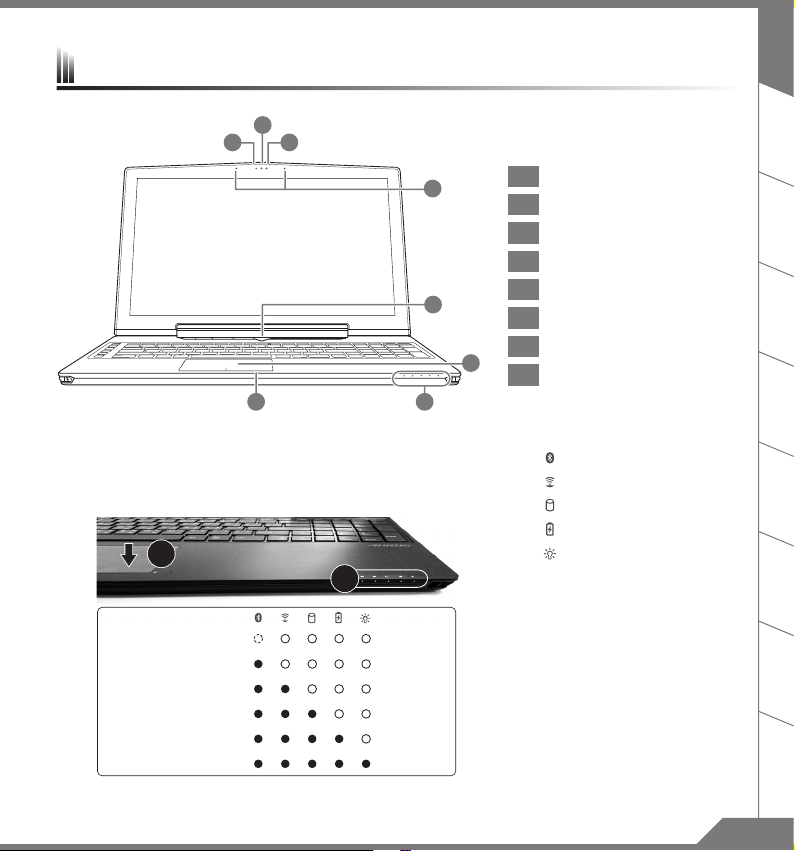
Press the right button of touchpad to check the remaining battery power.
Right click to show the remaining power percentage. As shown below, the
battery life indicator is available when the laptop is shut down, in stand-by
or hibernation.(Battery mode)
1
2
<10%
11-30%
31-50%
51-70%
71-90%
>90%
EN
4
5
87
1 Webcam Status LED Indicator
2 Webcam
3 Light sensor
4 Microphone
5 Power Button
6 TouchPad
Battery Indicator Button
7
6
8 LED Indicators
TC
SC
KR
SP
Bluetooth Status LED
Wireless Lan Status LED
HDD Status LED
Battery Status LED
Power Status LED
GR
FR
RU
JP
3
Page 5
EN
TC
SC
43 6
1 5 7
2
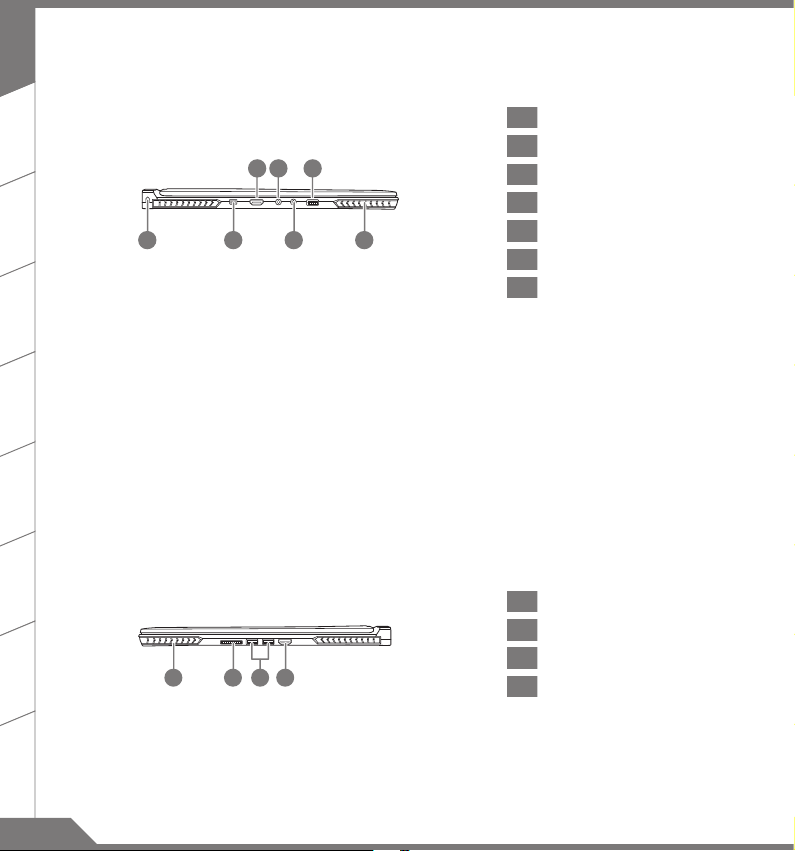
1 Kensington Lock Slot
2 Mini Display Port
3 Surround Port
4 Headphone Jack
5 Microphone Jack
6 USB 3.0 Port
Speaker
7
KR
SP
GR
FR
RU
JP
Enjoy triple display visual pleasure by connecting HDMI, mini-DP and Surround port with 3 monitors (same model number).
*Caution:
(1) Surround port is compatible with regular HDMI cable connecting television and PC.
(2) Connect HDMI or mini-DP port to external monitor for dual screen display. Surround port does not support dual display.
(3) Supported game title list please refer to NVIDIA ofcial website.
(4) NVIDIA Surround Technology is only available when connected to AC adapter.
1 Speaker
2 SD Card Reader
21 43
3 USB 3.0 Port
4 HDMI Port
4
Page 6
EN
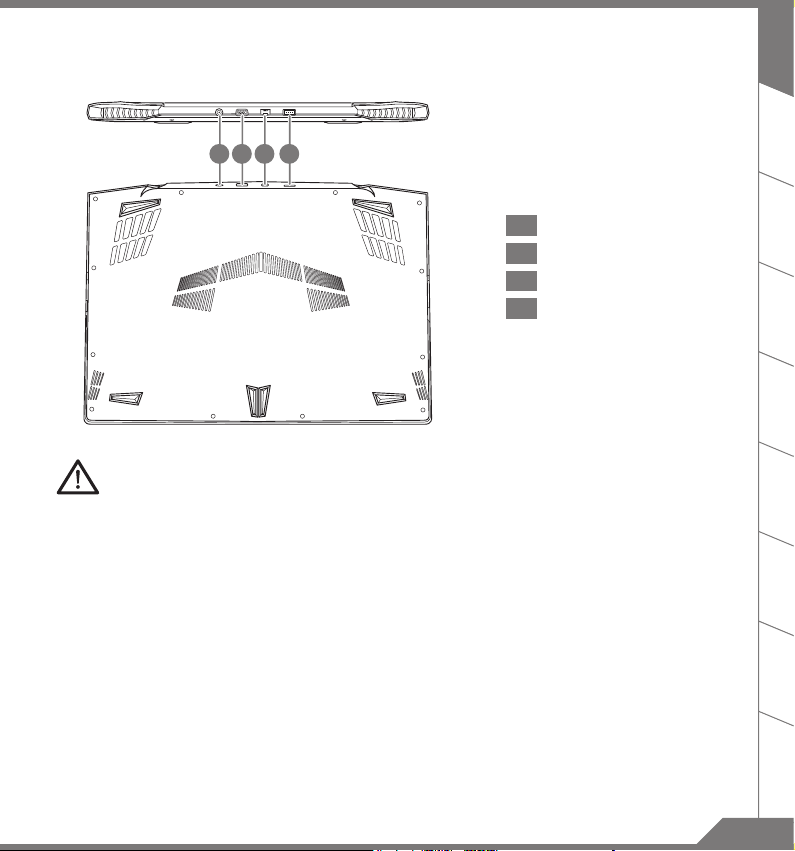
42 31
1 DC-in Jack
2 D-sub (VGA) Port
3 Ethernet Port
4 USB Port
Warning:
DO NOT remove the built-in lithium battery. For any service needs, please contact your local AORUS Authorized
Service Center.
TC
SC
KR
SP
GR
FR
RU
JP
5
Page 7
EN
TC
SC
KR
SP
GR
FR
RU
Hotkeys
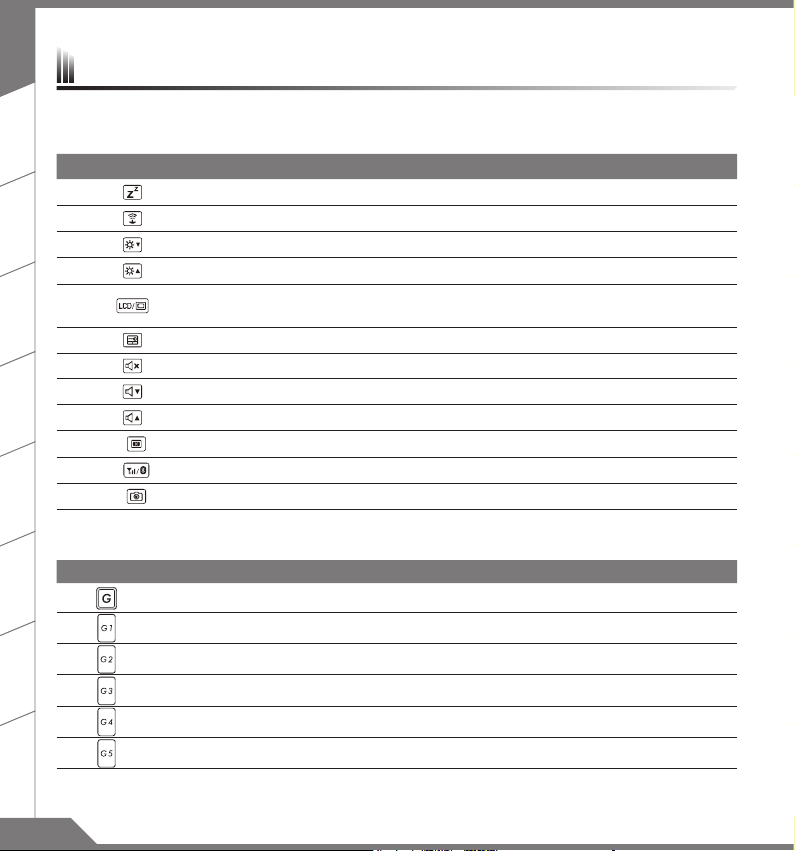
The computer employs hotkeys or key combinations to access most of the computer’s controls like screen
brightness and volume output. To activate hotkeys, press and hold the <Fn> key before pressing the other key
in the hotkey combination.
Hotkey Function Description
Fn + F1 Sleep Put the computer in Sleep mode.
Fn + F2 Wireless LAN Turn the Wireless LAN function ON and OFF.
Fn + F3 Brightness Down Decrease the screen brightness.
Fn + F4 Brightness Up Increase the screen brightness.
Fn + F5 Display Toggle
Fn + F6 Touchpad Toggle Turn the internal touchpad ON and OFF.
Fn + F7 Speaker Toggle Turn the speaker ON and OFF.
Fn + F8 Volume Down Decrease the sound volume.
Fn + F9 Volume Up Increase the sound volume.
Fn + F10 Screen Display Toggle Turn the screen display ON and OFF.
Fn + F11 WiFi / Bluetooth Toggle Turn the WiFi / Bluetooth function ON and OFF.
Fn + F12 Webcam Turn the internal webcam ON and OFF.
Macro key
Macro keys can be set via Macro Engine, setting combination keys for complicated and/or general operation.
Macro key Function Description
G Macro group switch, press around 3 seconds as hardware switch on/off.
G1 Self-denition Macro key
G2 Self-denition Macro key
G3 Self-denition Macro key
G4 Self-denition Macro key
G5 Self-denition Macro key
Switche display output between the display screen,
external monitor (if connected) and both.
JP
6
Page 8
X5 Operation manual
X5 equipped with many unique features, providing user an exceptional gaming experiences.
EN
Surround Port
Surround port is located on the left side of X5. User may connect X5 up to three external monitors with
HDMI, mini Display and Surround port, presenting true visual surround effect and enjoy outstanding gaming
experience. Surround port is compatible with television , PC’s standard HDMI cable; however, only HDMI
port and mini-DP support dual screen display. Please refer to NVIDIA ofcial website for Surround's games
supporting.
Macro key
X5 features five macro keys and macro group switch, providing users to set their own preference of
combinations, capable for switching in between maximum up to 25 sets of macros simultaneously. By using
Macro Engine, users can easily access to their own dened recorded macro, and also adjust the macro sets,
so the players are always steps ahead in games. For further detail instructions please refer Macro key setting
manual.
TC
SC
KR
SP
GR
FR
RU
JP
7
Page 9
EN
Killer LAN
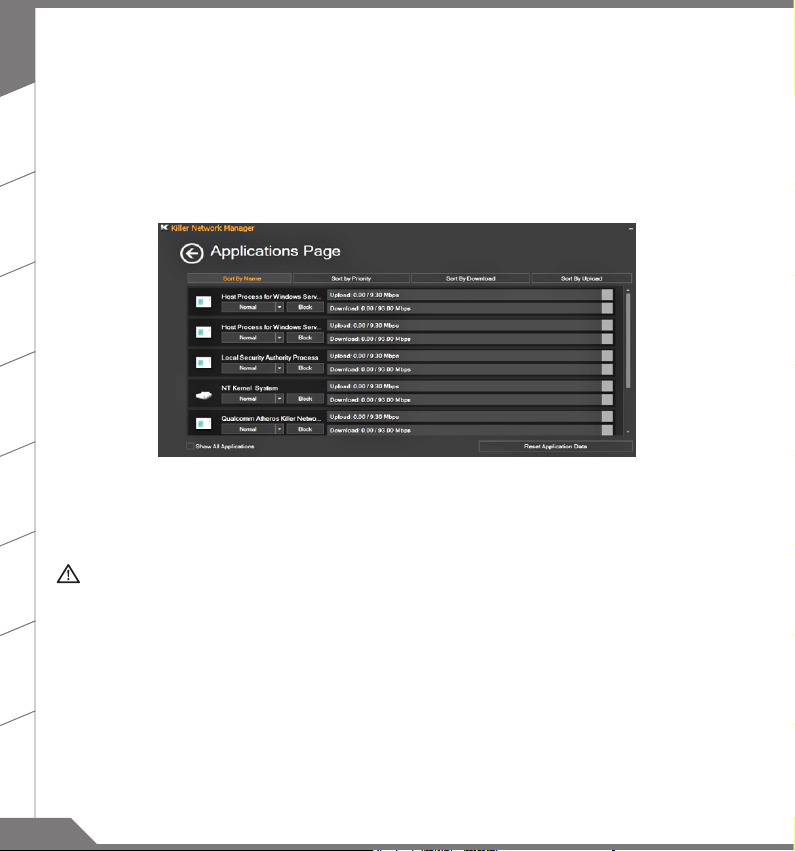
Killer LAN can automatically adjust the priority of network transmission, allowing the user to have the best
gaming network speed, by effectively reducing ping values and gain sequence control over different softwares
TC
that require network packet. User may set the software manually by Killer LAN's specic program with the
highest priority network packets; Moreover, user may also congure the network for the download priority for
online videos and games packets to achieve the best network optimization.
SC
KR
SP
Hardware Upgrade
User may upgrade memory or carry X5 to nearest repair center to upgrade; Please visit AORUS ofcial
GR
website for compatible memory brands.
Caution
Please ensure X5 is not powered on and unplugged to power source before the upgrade. Any damage during
user’s upgrade will not be covered by warranty, and user shall be responsible for related repair cost; hence
FR
recommend to carry your laptop to nearest service center for the upgrade.
Memory
In order to maintain optimum compatibility and performance, please choose the slot that ts the condition
below when upgrading memory to be installed to avoid compatibility problems or poor performance; For the
RU
supported memory module manufacturers, please visit AORUS ofcial website FAQ for the reference.
JP
8
Page 10

Battery Protection
When battery is in use for a period of time (not connected to power source and in high performance mode),
Mass power discharging on battery in a short period of time may cause battery to run at high temperature
and may shorten its lifespan. in order to protect the battery's lifespan, the battery will not be chargeable when
its temperature is higher than 45 ° C. The mechanism for this is to protect the battery life. However, after
user connects to power adapter, battery stops discharging and temperatures below is 45 ° C, the battery will
start charging back to the source and to maintain normal operation.Command & Control is a software that
integrates a list of basic settings to a single interface, providing user a faster and better experience when
customization is needed.
EN
TC
SC
KR
SP
GR
FR
RU
JP
9
Page 11
EN
TC
X5 Command & Control
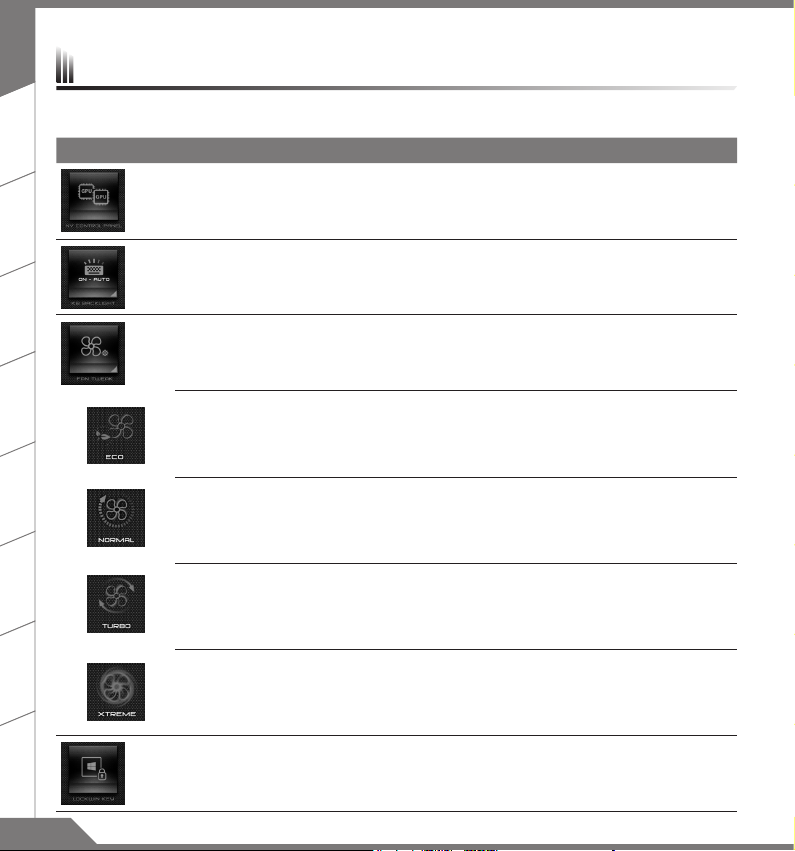
Command & Control is a software that integrates a list of basic settings to a single interface, providing user a
faster and better experience when customization is needed.
Hotkey Function Description
GPU SLI Switch
Enable or disable GPU SLI, when slave GPU turns off, it may
increase battery life.
SC
Backlit Keyboard Switch Turn On or Off keyboard backlit.
KR
SP
GR
FR
RU
JP
10
Fan Controller Adjusts fan speed according to user's preference.
Eco
Normal
Turbo
Extreme
Windows Key Lock Lock or unlock Windows key
system will try to lower the fan speed to increase the battery
life and reduce the noise without affecting light-weight tasks
process such as using Word or 2D drawing.
system will automatically adjust the fan speed upon your usage
and try to keep the noise down.
system will automatically adjust the fan speed upon your usage
and have better performance without losing stability.
system will keep the fan speed at maximum. User can enjoy the
most powerful performance under this mode.
Page 12
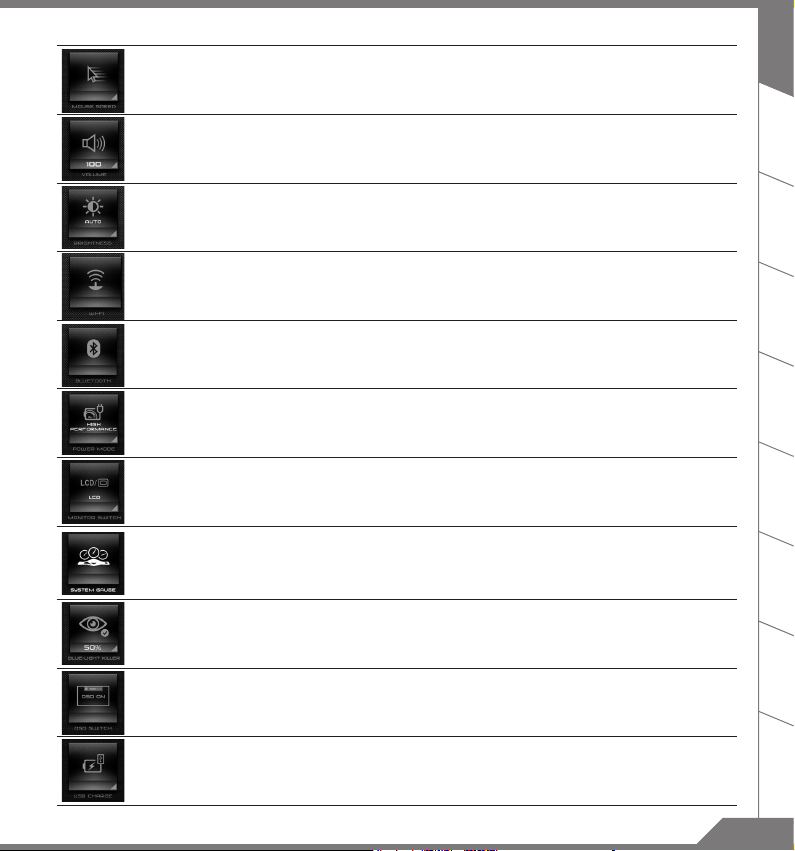
Mouse Speed Setting Adjust the mouse pointer speed according to user.
EN
Volume Setting Adjust volume.
Brightness Setting Adjust Screen brightness.
Wi-Fi Switch Turn ON or OFF Wi-Fi connection.
Bluetooth Switch Turn On or Off Bluetooth connection.
Power Plan Setting
External Monitor Setting
System Gauge
Blue-light Killer
On Screen Display
Switch
Adjust the power plan by user usage in order to obtain maximum
battery life or performance.
Switch between the computer screen and the external display
video output, or simultaneous display.
Enjoy the supercar gauge look on System Gauge and close
look to system info including: CPU usage,GPU usage,RAM
usag,Disk usage,Battery Life,system temperature and net
speed.
Blue Light Killer is the new function under Command & Control.
Just move the bar at bottom to adjust the brightness of blue light
which eases your eyestrain.
Enable/Disable the display of status while adjusting the settings
through keyboard hotkeys.
TC
SC
KR
SP
GR
FR
RU
USB Port Charge Set USB charging during the sleep mode or hybirnation mode.
JP
11
Page 13
EN
TC
SC
Macro Engine Instruction
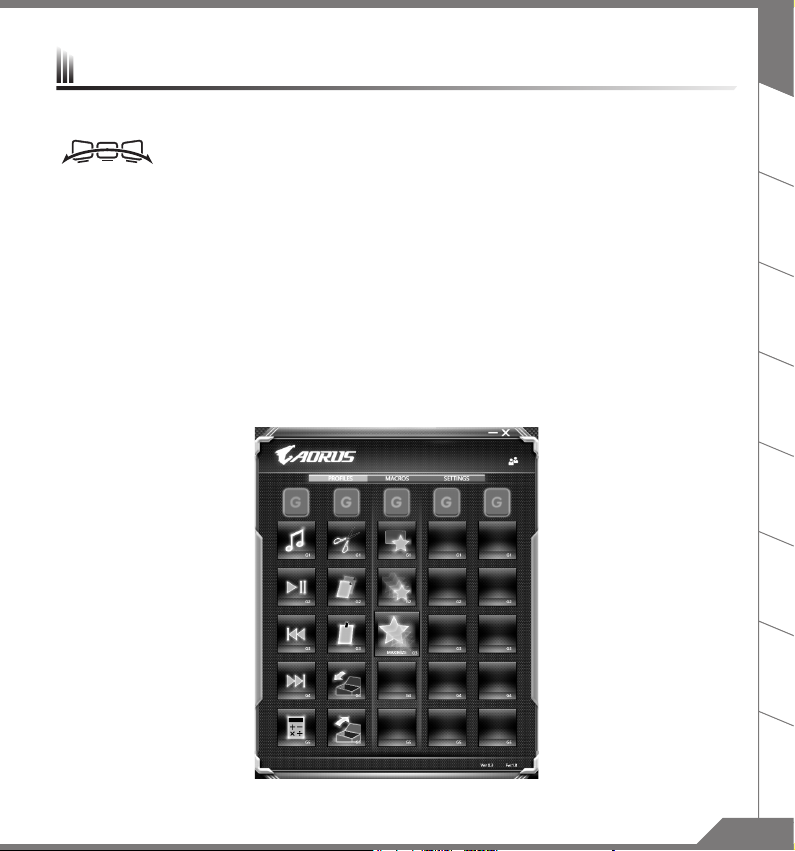
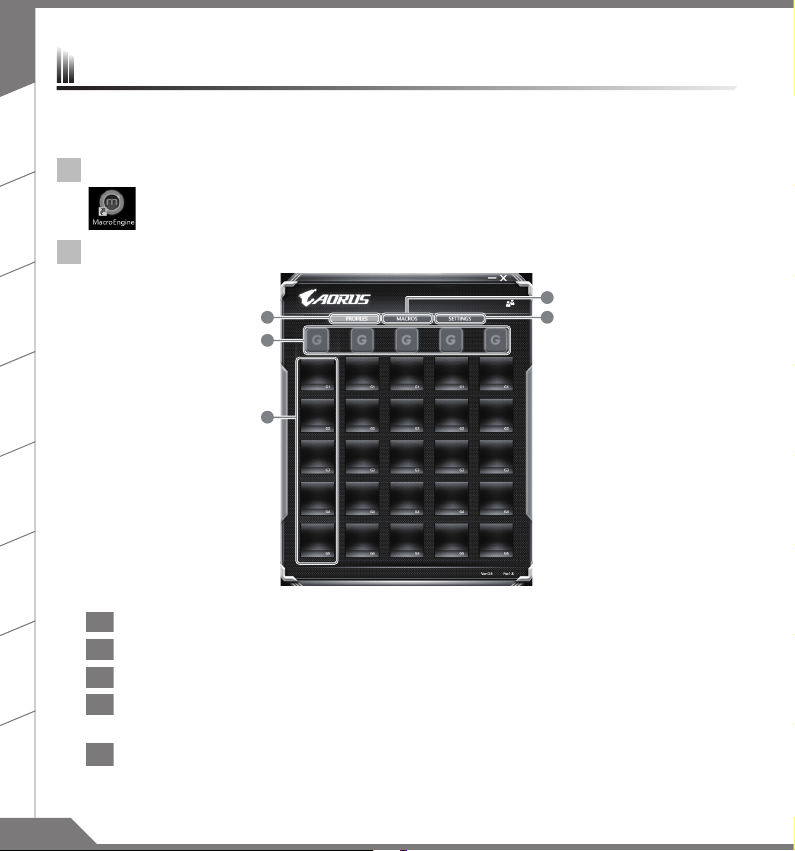
Welcome to use Macro Engine ! Macro Engine makes it much easier for you to control your Macro Key on X5.
You can deal with complex key stroke combination by just one press on macro key, which brings you benets
both in work and game. Before using Macro Engine, please read following guide,thanks.
1
Launch Macro Engine
You can nd the shortcut of Macro Engine on desktop. Just double click it.
2
The overview of Macro Engine
KR
SP
GR
FR
RU
JP
12
1 3
4
5
1 Proles: View your current macro command settings.
2 Macros: Edit macro command funtions anf settings.
3 Settings: Update Macro Engine version or renew Macro Engine settings.
4 Macro Key Group Indicators: Indicate the activated Macro Key Group
(the atcivated group indicator will light up)
Macro Key Function: Show the programmed Macro functions under the Macro Key Group, from
5
G1 to G5.
2
Page 14
3
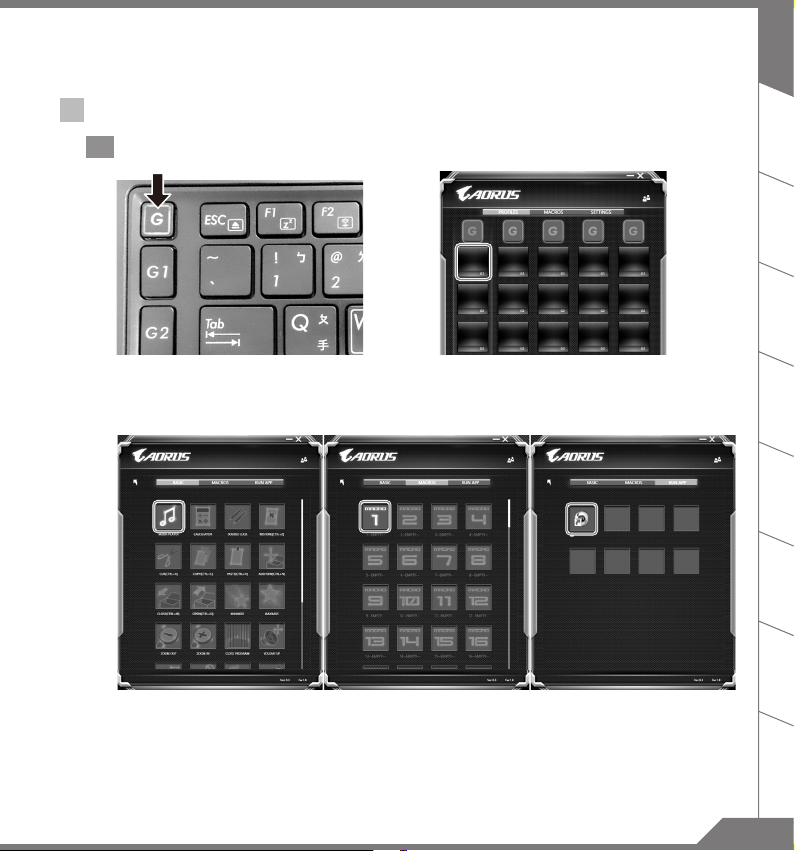
Using Macro Engine
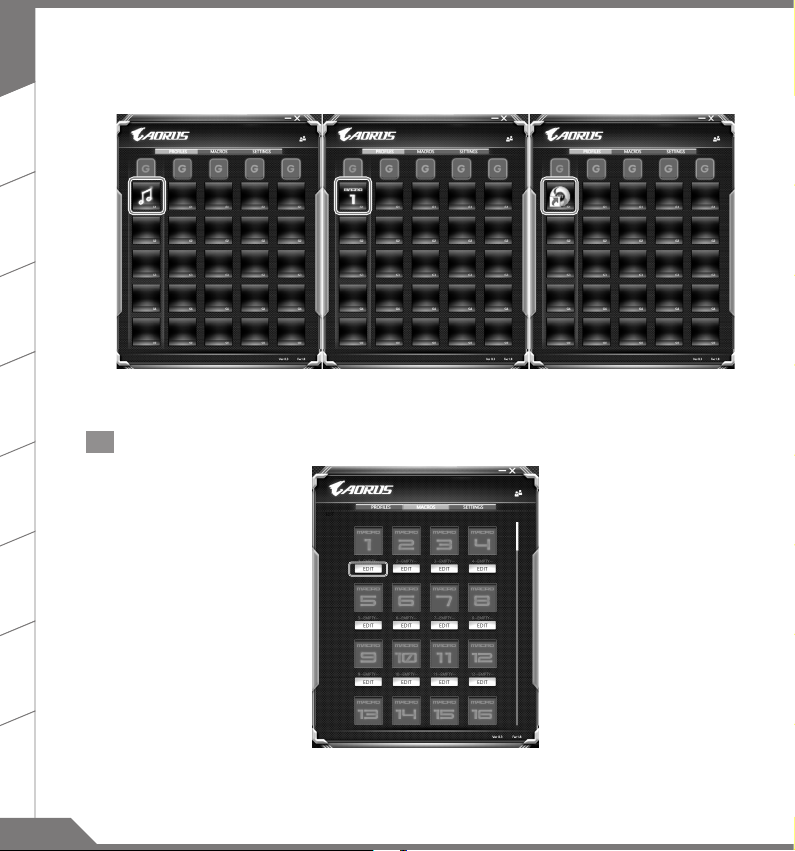
Set Macro Key to basic function
1
a. Click the G button on the left-top of the keyboard
to switch to the Macro Key group you would like
to use
EN
TC
SC
KR
b. Click the Macro Key function brick
SP
GR
FR
c. Double-click the function you would like to use(ex. Media Player) in the Basic or Macros function
area.
RU
JP
13
Page 15
EN
TC
SC
KR
d. Complete the setting
SP
GR
FR
RU
JP
14
Edit macro command funtions anf settings.
2
a. Click "Macros" (you can set up to 100 sets of macro)
Page 16
EN
13
1
2
5
12
3
8
9
4
7
6
10
11
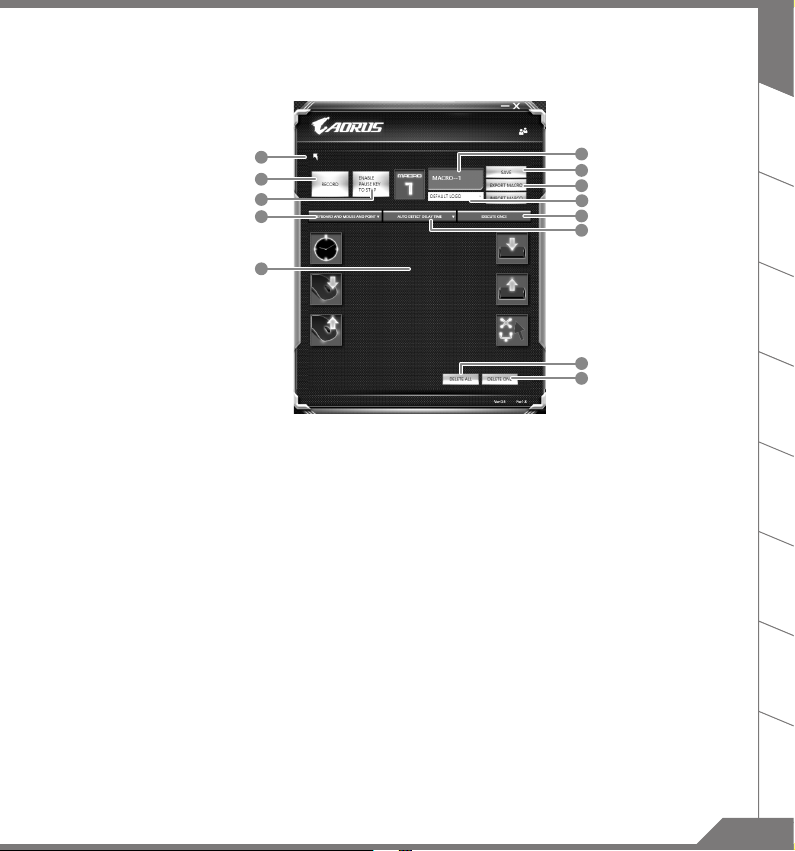
b. Overview of macro record panel (you can record your own macro here)
1. Start recording: Click when you’re about to record the macro
2. Pause key Switch: Enable/Disable Pause key to stop recording.
3. Macro Name: Set the name of this macro
4. Import icon: Set icon for this macro. You can use default icon or upload your own icon
5. Record type: You can choose to record only mouse(or keyboard) movement, or record both.
You can also decide to or not to record mouse position.
6. Record interval: You can decide to or not to record the interval of each movement(or You can
set xed interval time between every movement)
7. Execution way: You can set the macro execution way (execution once, repeat execution or
repeat execution with deep press)
8. Export macro: Export your macro
9. Import macro: Import the macro
10. Delete all: Delete all movement in this macro
11. Delete selected: Delete selected movement
12. Movement list: it shows all movement you record
13. Exit: The system will inquire you if to save the recorded macro
TC
SC
KR
SP
GR
FR
RU
JP
15
Page 17
EN
TC
SC
KR
SP
GR
FR
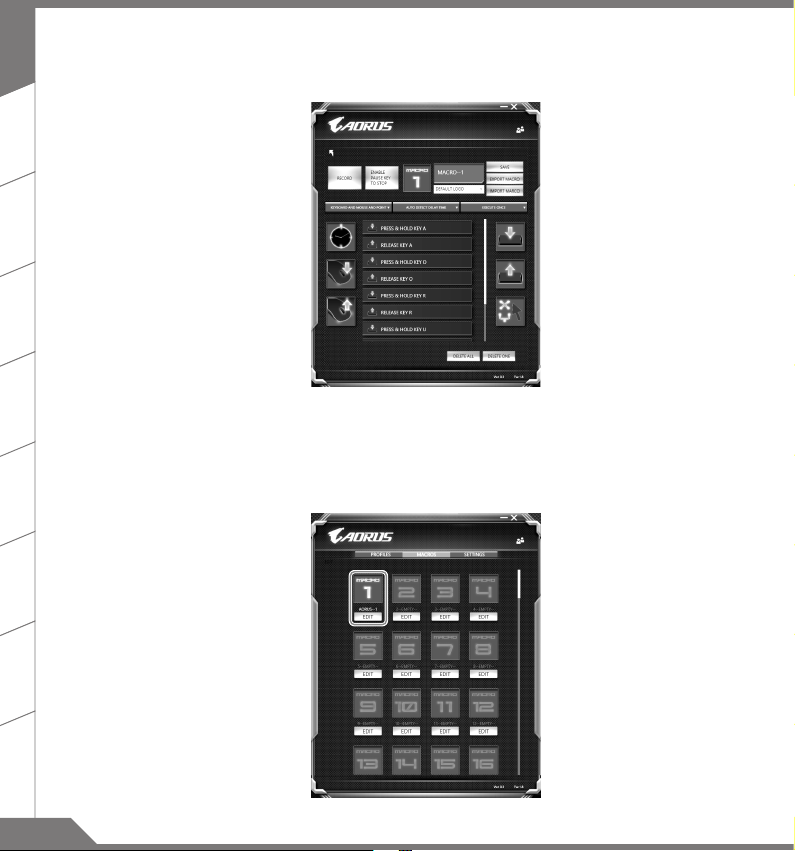
c. Start to record macro: When you click start button, the macro engine will start to record macro.
All movement you made(mouse/keyboard) will be shown in the movement list. You can decide
to use “pause” key or mouse click on stop button to stop recording based on your record range.
Finishing recording: When you have done all movement, click exit button. The Macro Engine will
inquire you if you want to save the macro. Click Yes then you can nish the record of your own
macro.
RU
JP
d. Complete the setting.
16
Page 18
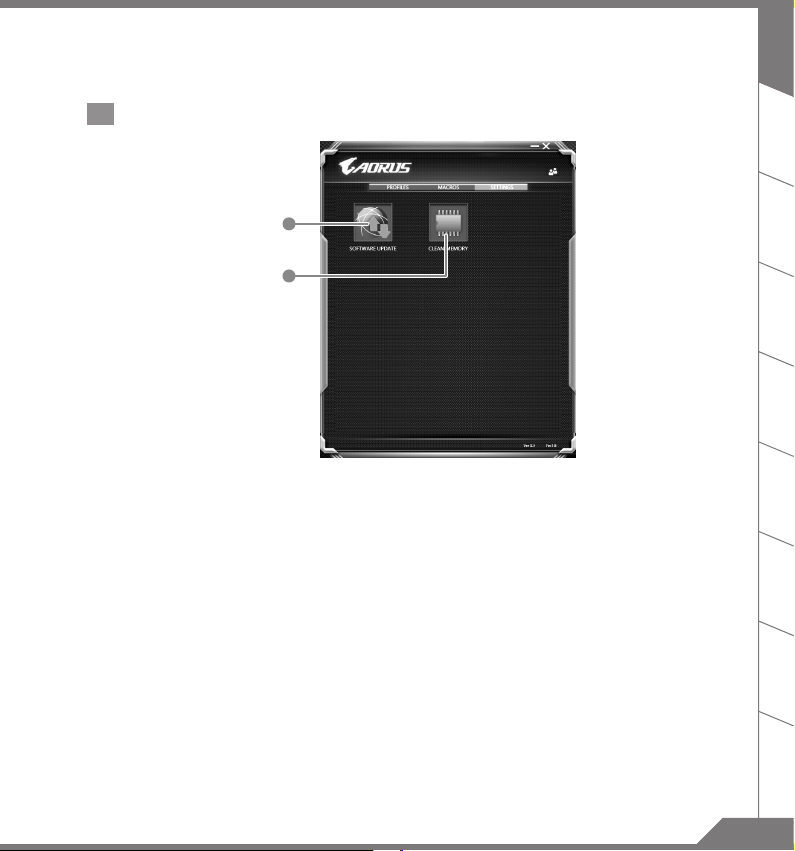
Edit "Settings" of Macro Engine
3
1
2
1. Software update: Update latest version of Macro Engine
2. Clean memory: Erase current Macro Engine settings
EN
TC
SC
KR
SP
GR
FR
17
RU
JP
Page 19
EN
TC
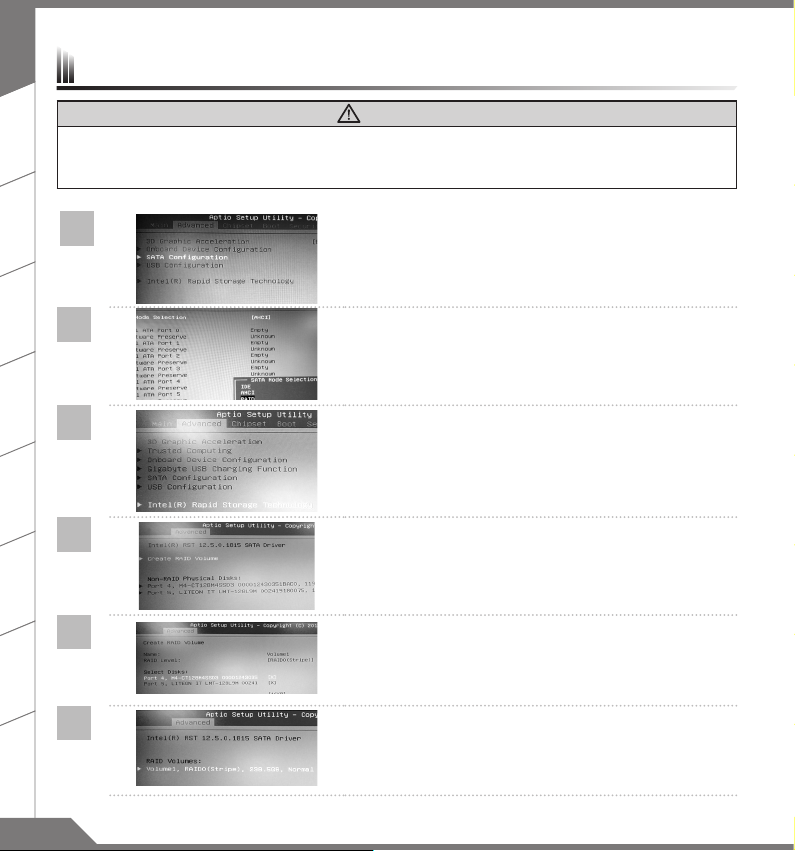
Setup Your System for RAID 0/1
WARNING
●Please backup you r data bef ore you build and ru n RAI D 0/1 on your system.
●RAI D 1 needs t wo stora ge drive s of the sam e speci cation and c apacit y in your laptop.
● RAI D 0 needs t wo stora ge drive s of the same specification in your lapto p. Diff erent capacit y is acc eptable.
SC
KR
SP
GR
FR
RU
JP
1
2
• Press F2 when computer starts to Enter BIOS setup utility.
• Go to Advanced > SATA conguration.
• Change "SATA Mode selection" from "AHCI" to "RAID".
• Press F10 to save and exit. The system will restart
automatically.
3
• After reboot, enter the Intel Rapid Storage Menu.
4
• Select Create RAID Volume.
5
• Select the storage device you would like to create RAID.
6
• Save and reboot and the set ting is done.
18
Page 20
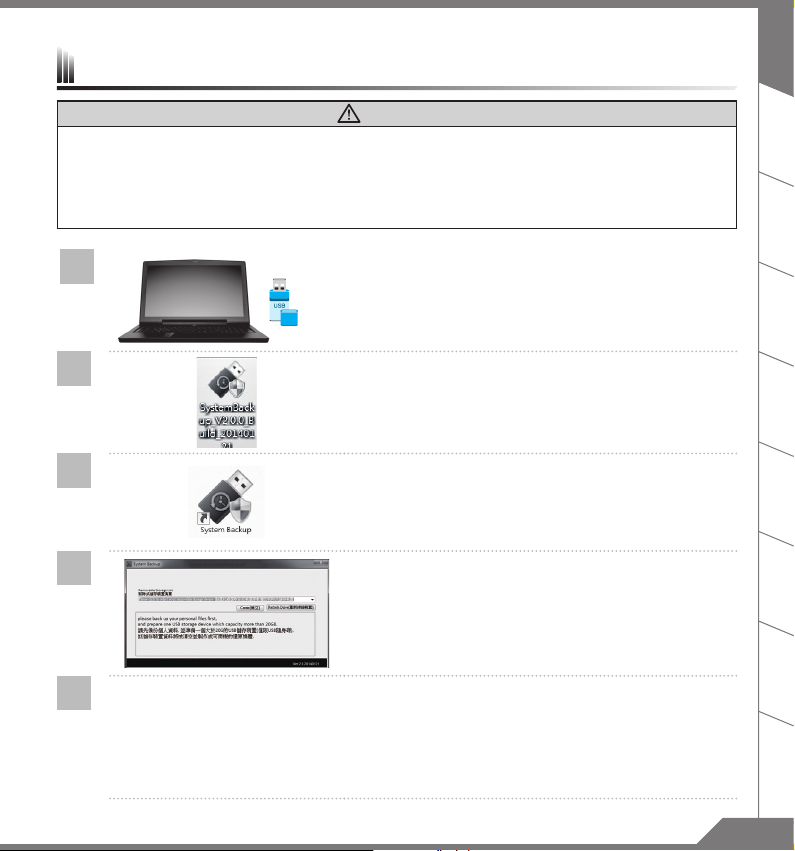
System Backup Guide
WARNING
●You can backu p original recovery im age thro ugh this applic ation i n case of losing by dev ice dam age.
● You can backup o rigin al recovery ima ge to USB di sk and res tore the system if any s torage sy stem replaceme nt with
the recovery USB disk.
● Before you restore the system through the recover y USB di sk, please make sur e that you have already made the
backup of your data.
●Please D O NOT shut do wn or un- plug th e system wh en per formi ng backu p through recove ry USB disk.
1
2
• Please plug in the USB disk which is at least 20GB in
>20G
capacity to make the original image (backup the data in
USB rst. All data will be eliminated during the creation of
recover y USB disk)
• Insert the driver disk to your optical drive and run the install
of “System Backup” (for none -ODD model, please use USB
ODD device or download from http://www.AORUS.c om
3
• Run the “System Backup” after nishing the install.
4
• Select your USB disk from the drop-down list and star t to
create the recover y USB disk.
EN
TC
SC
KR
SP
GR
FR
5
• The window will pop out when the creation of recovery disk is done.
• Please press F12 on starting the system when you need to restore the system. Select “ boot from
recover y USB disk” and the system will be restored.
• The time needed for restore will be around 30 mins(time needed may vary by USB disk model) .
RU
JP
19
Page 21
EN
Recovery Guide
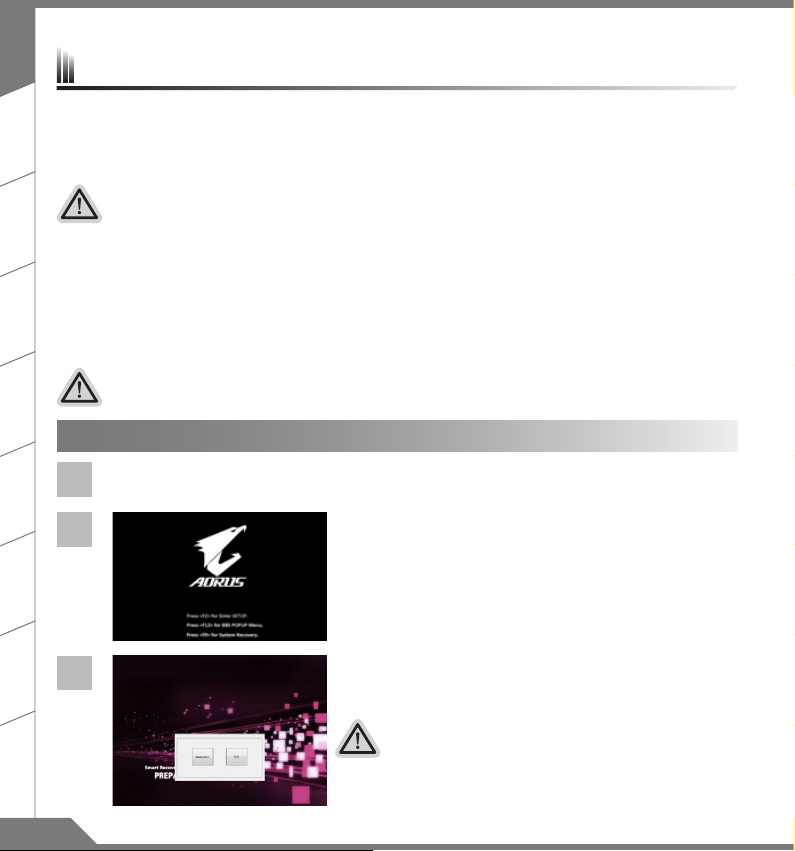
System Recovery (Restore your laptop operating system)
When something is going wrong with the laptop operating system, the storage of the laptop has a hidden
partition containing a full back up image of the operating system that can be used to restore the system to
TC
factory default settings.
Note
˙If the sto rage has b een swit ched or t he partition d eleted, the rec overy op tion wi ll no long er be avail able and a
recovery ser vice w ill be nee ded.
SC
˙The rec overy functio n is only ava ilable o n device s with O/S p reinst alled. D evice s with DOS do not have th e
recovery function.
Launch System Recovery
The system recovery feature is preinstalled before the laptop is shipped from the factory. The option menu
allows you to launch the Windows recover y tool to reinstall the operating system to factory default.
KR
The brief introduction below will show you how to start the recovery tool and restore your system.
All ready to go
Make sure yo ur PC is plugged in . This wil l take a few mi nutes.
SP
Windows 7 Recovery Guide
Turn off and restart the laptop.
1
GR
FR
RU
JP
20
2
3
During the laptop turn on process, press and hold F9 key to
launch the tool.
The recovery will be activated and you will see the option buttons
on the window. Click on “ Recovery” to start it.
Caution
Once the “Recovery” is selected, your personal
data and f iles will be deleted after the laptop starts
restoring, and the operating system will be reset to
factory default settings.
Page 22
EN
4
5
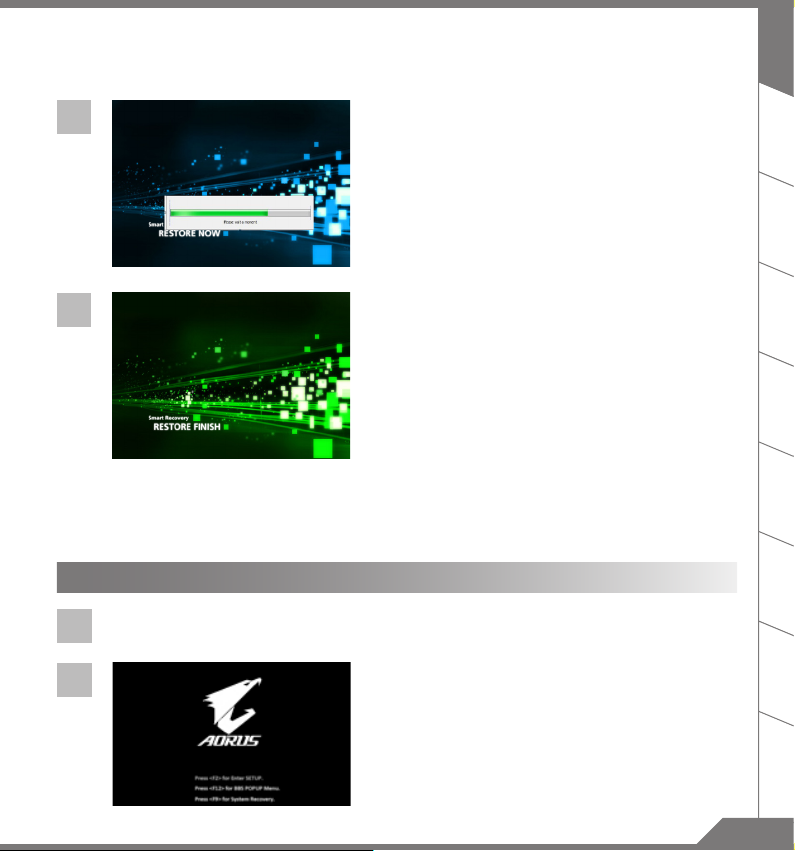
Windows 8.1 Recovery Guide
Turn off and restart the laptop.
1
2
A progress indicator bar will show on the window when the
recovery process is running. Please make sure the ACadapter is plugged in and do not turn off the laptop.
Reboot the laptop after the system recovery is complete.
During the laptop turn on process, press and hold F9 key
to launch the tool.
TC
SC
KR
SP
GR
FR
RU
21
JP
Page 23
EN
TC
SC
KR
SP
GR
FR
3
4
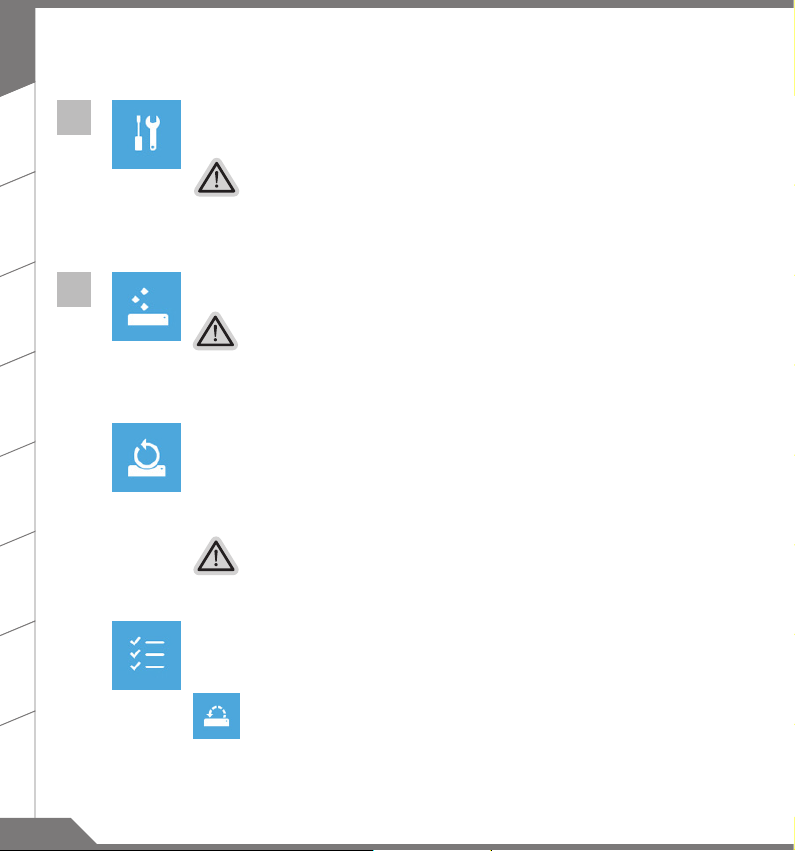
Choose “ Troubleshoot” to enter the rec overy settings. (Also you can choose
“Continue” to exit recovery system and continue to Windows 8.1 for files or data
backup.)
There are two option s for system recovery
˙Refresh your PC
You can refresh your laptop to improve the system stability without losing your les.
˙ Reset your PC
If you want to remove all of your les, you can reset your PC completely.
Cauti on: All p erson al dat a and les will b e lost .
▓Choose “Refresh your PC”
Choose an acco unt to continue.
Here are what will happen
˙Your les and personalization settings won’t be changed.
˙Your PC settings will be restored to factory default settings.
˙Apps from Windows Store will be kept.
˙Apps you installed from discs or websites will be removed.
˙A list of removed apps will be saved on your desktop.
▓▓ ▓▓▓
Choose “Reset your PC”
Just remove my les
Only personal d ata and les will b e removed , but computer set tings w ill be kept .
Fully clean the drive
The drive will be c ompletely restored to factory default s ettin gs. It take s more time. > [Clic k
on “Res et” to exec ute rec overy f uncti on.]
Here are what will happen
˙All of your personal les and apps will be removed.
˙Your PC settings will be restored to factory default settings.
▓Advanced options
RU
JP
System Restore
Use a restore point recor ded on your PC to resto re Wind ows.
22
Page 24
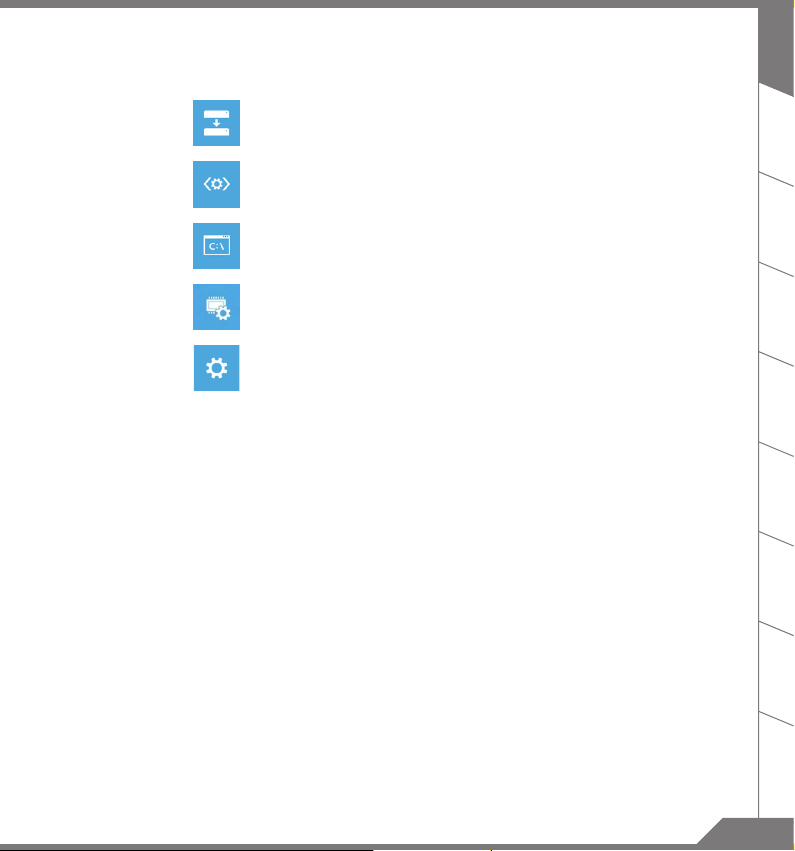
System Image Recovery
Recover W indows u sing a spe cic sy stem imag e le.
Automatic Repair
Fix prob lems that keep Windows fro m loadin g.
EN
TC
Command Prompt
Use the Command Prompt for advanced trobleshooting.
UEFI Firmware Settings
Change s ettin gs in your PC’s UEFI r mware.
Startup Settings
Change Windows Startup behavior.
SC
KR
SP
GR
FR
RU
JP
23
Page 25

EN
TC
SC
KR
SP
GR
FR
Appendix
Warranty & Service:
Warranty and service and related information please refer to the warranty card or service website as the
below link: http://www.aorus.com/
FAQ :
FAQ (Frequent Asked Questions) please refer to the below link:
http://www.aorus.com/
RU
JP
24
 Loading...