

Page 1

Introduction and Features
Introduction
Welcome to the world of AOpen Video Station VA1000 Lite/Plus. With this multimedia
product, you can use it as a convenient tool for multiple purposes including video
conferencing, video editing, class presentation, or even entertainment. The jumperless
design and PnP (Plug & Play) implementation simplify the tedious installation process. By
eliminating the VGA loop cable and feature connector (VFAC), users are able to enjoy a
clear, high-quality TV programs through this powerful product.
Key Features
Receive TV broadcasts: 125 channel cable/antenna-ready TV tuner
External inputs for video capture: AV and S-video inputs for external video
resources like cameras and VCRs.
Video conference, video phone: MS NetMeeting for video conference
Wireless remote control included: Channels up/down, Volume up/down.
Full motion video capture
Still frame video capture
External interface: 75 ohm IEC coaxial input (cable TV), FM radio antenna input,
composite (RCA) input, S-Video (SVHS) input, audio input, and line audio output
Stereo Function (VA1000 Plus only): Stereo TV sound or bilingual TV broadcasting.
Page 2

Introduction and Features
WDM Capture Driver Support
Windows 98SE
Windows ME
Windows 2000
Model Comparison table
Model name Remote Control Stereo Composite Input S-Video Input
VA1000 Lite Yes - Yes Yes
VA1000 Plus Yes Yes Yes Yes
ii
Page 3

Chapter 1-Settings for your Video Station VA1000 Lite/Plus
Chapter 1----Settings for your AOpen Video Station VA1000 Lite/Plus
1.1 Package Contents
Video Station VA1000 Lite/Plus Card
Audio Loop Back Cable
Composite to S-Video Cable
Remote Control and Receiver Cable
User’s Manual
CD of VA1000 Lite/Plus Drivers
1.2 System Requirements
IBM PC or compatible
133 MHz CPU or better processor
Minimum 16 MB memory
One free PCI slot and IRQ
VGA and with DirectDraw driver supporting 15 bit color or higher
Microsoft Windows 98SE/2000/Millennium
TV antenna or cable from CATV
Sound card
Speakers for audio output
CD-ROM drive
1
Page 4

Chapter 1-Settings for your Video Station VA1000 Lite/Plus
1.3 Hardware Installation
Caution:
Static electricity can severely damage electronic parts, Take these precautions:
Before touching any electronic part, drain the static electricity from your body. You can do this
by touching the internal metal frame of your computer while it's unplugged.
Don't remove a card from the anti-static container until you are ready to install it. When you
remove a card from your computer, place it back in its container.
Don't let your clothes touch any electronic parts.
When handling a card, hold it by its edges, and avoid touching its circuitry.
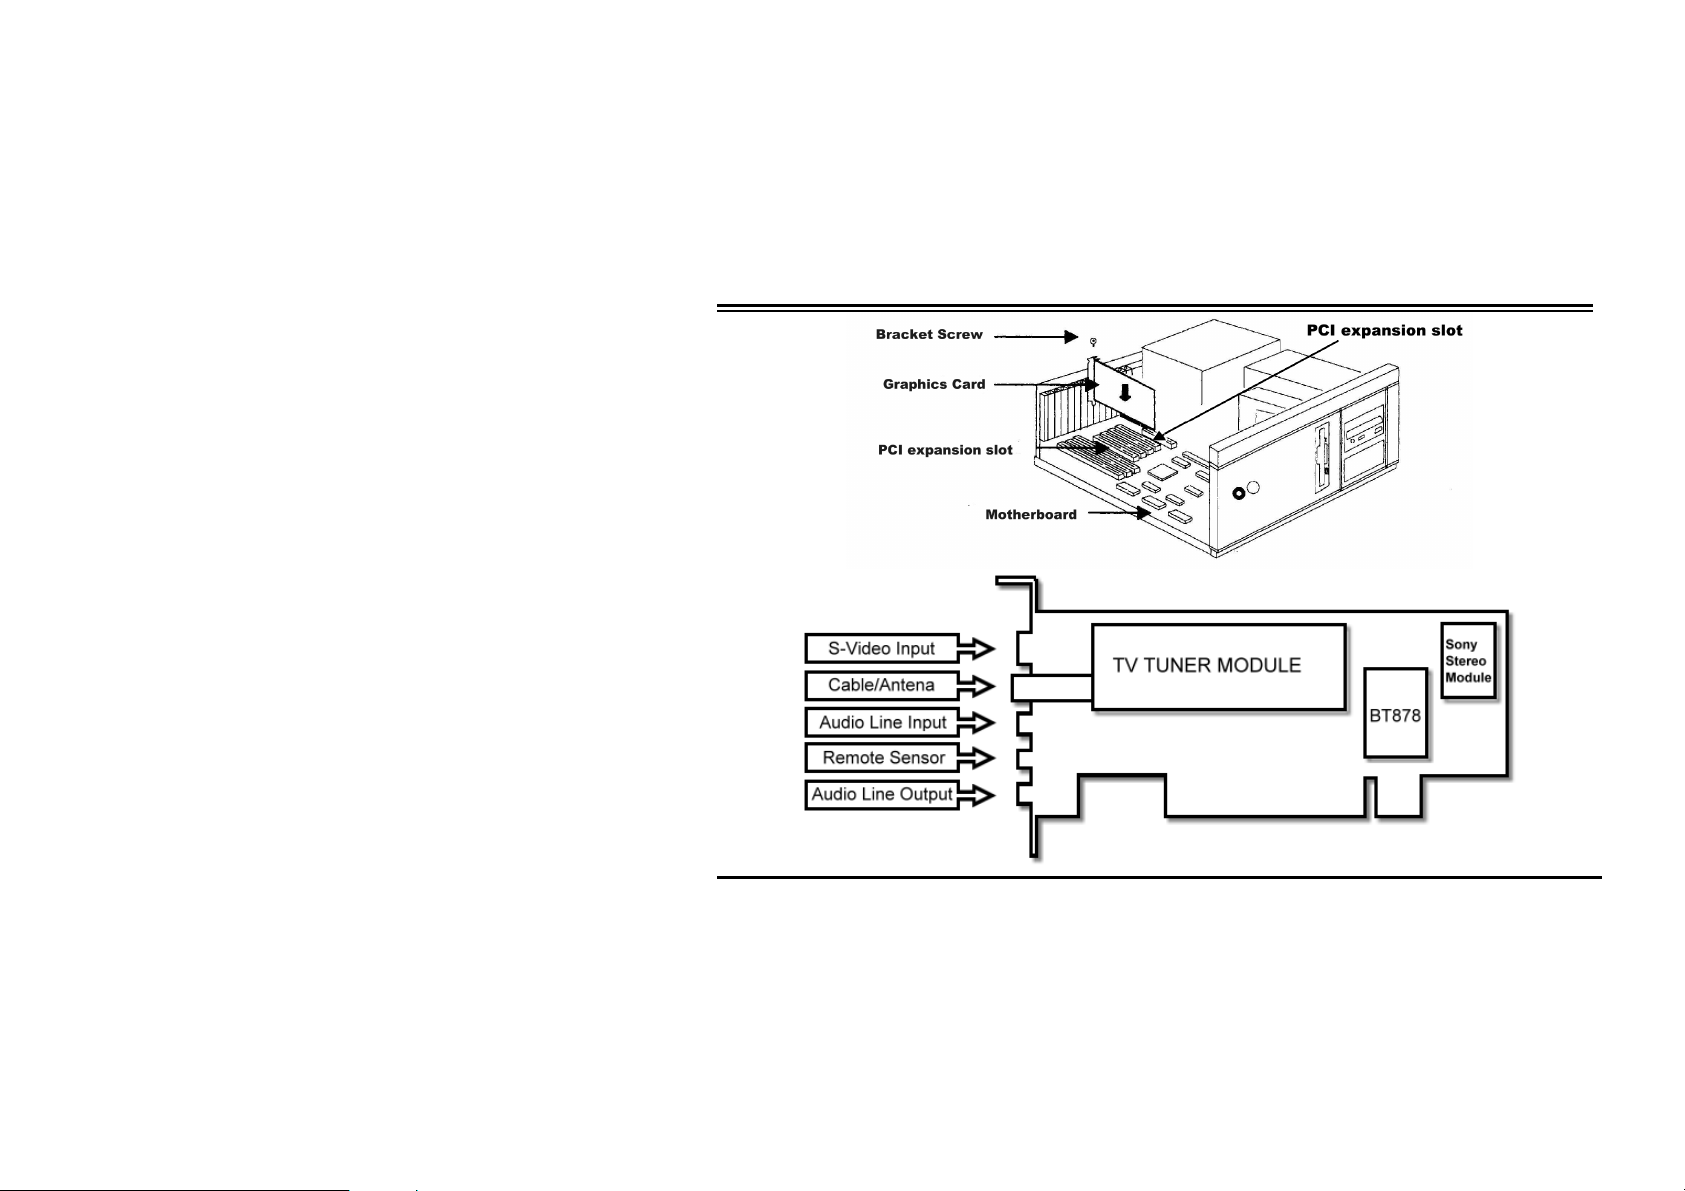
Please follow the steps shown below to install the card into your computer:
1. Turn off all your computer power and any peripherals.
2. Select an available PCI slot and remove the slot cover, screw, etc.
3. Put the Video Station VA1000 Lite/Plus card firmly into the PCI slot until it snaps in place and
secure the card by replacing the screw you remove from step 2.
4. Plug the TV cable into the antenna adapter input of Video Station VA1000 Lite/Plus.
2
Page 5
Chapter 1-Settings for your Video Station VA1000 Lite/Plus
3
Page 6
Chapter 1-Settings for your Video Station VA1000 Lite/Plus
4
Page 7

Chapter 1-Settings for your Video Station VA1000 Lite/Plus
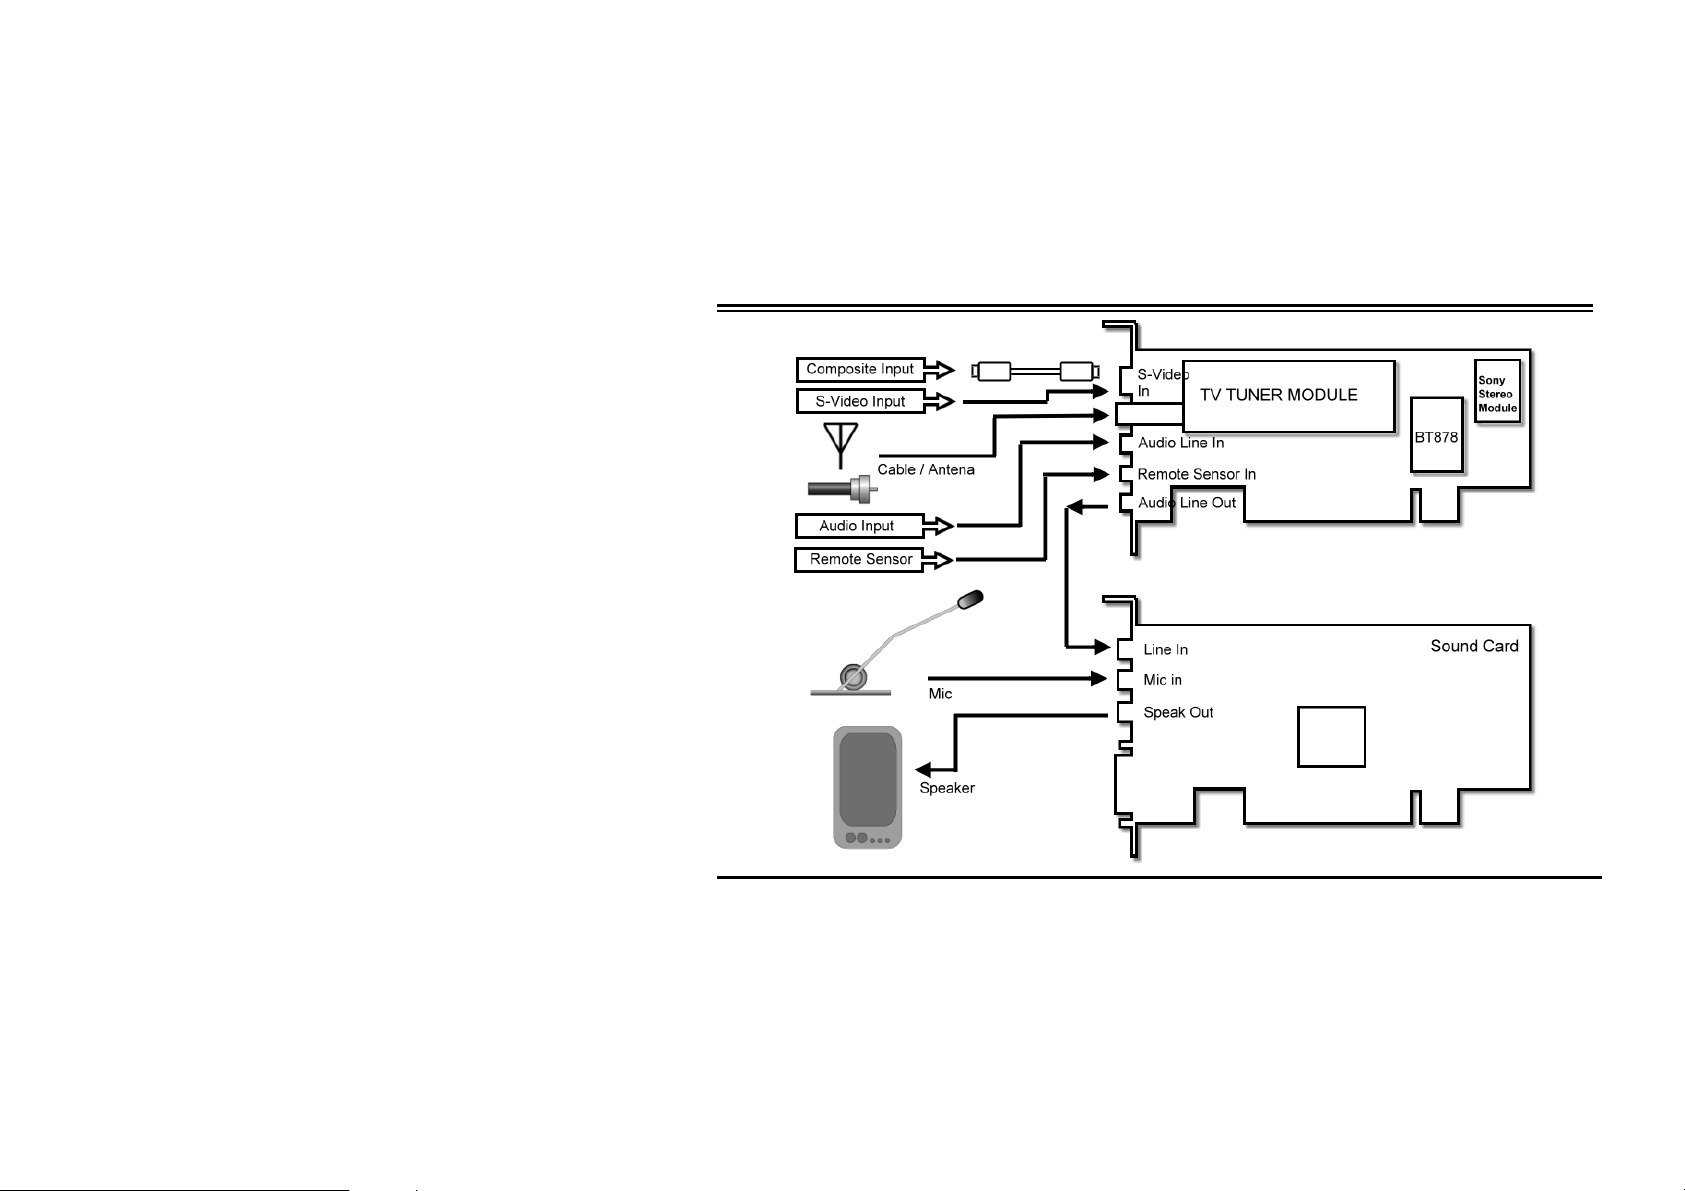
For TV watch on your PC
Connect the TV antenna or cable with the antenna input.
Connection between the audio output of card and the “Line in” of your sound card.
Connection between the “Speak out” or “Line out” connector of your sound card and the
speaker.
Connector of remote control sensor cable.
For External video sources such as VCR, VCD/DVD player, or camcorder
Connector of the AV cable / S-Video for Video equipments.
Connection between the audio output of card and the “Line in” of your sound card.
Connection between the “Speak out” or “Line out” connector of your sound card and the
speaker.
5
Page 8

Chapter 2 – Driver Installation for W indows 98 SE/2000/ME
Chapter 2----Driver Installation for Windows 98 SE/2000/ME
Prior to installation, it is highly recommended that all application programs should be disabled such
as anti-virus software and system monitoring applications.
Note that there are four drivers required to be installed for each component.
VA1000 Lite/Plus WDM Audio Capture
VA1000 Lite/Plus WDM Video Capture
VA1000 Lite/Plus Philips WDM TV tuner
VA1000 Lite/Plus WDM Crossbar
2.1 Driver Installation for Windows 98SE
Once your system is done booting, put the CD-ROM into the CD drive and Windows 98SE will
detect new hardware and started with the “Add New Hardware Wizard” to help you install the drivers
correctly. All you have to do now is follow the steps A, B, and C described below one by one to
finish the installation.
A. For the driver installation steps of VA1000 Lite/Plus WDM Audio Capture and Video
Capture
6
Page 9
Chapter 2 – Driver Installation for W indows 98 SE/2000/ME
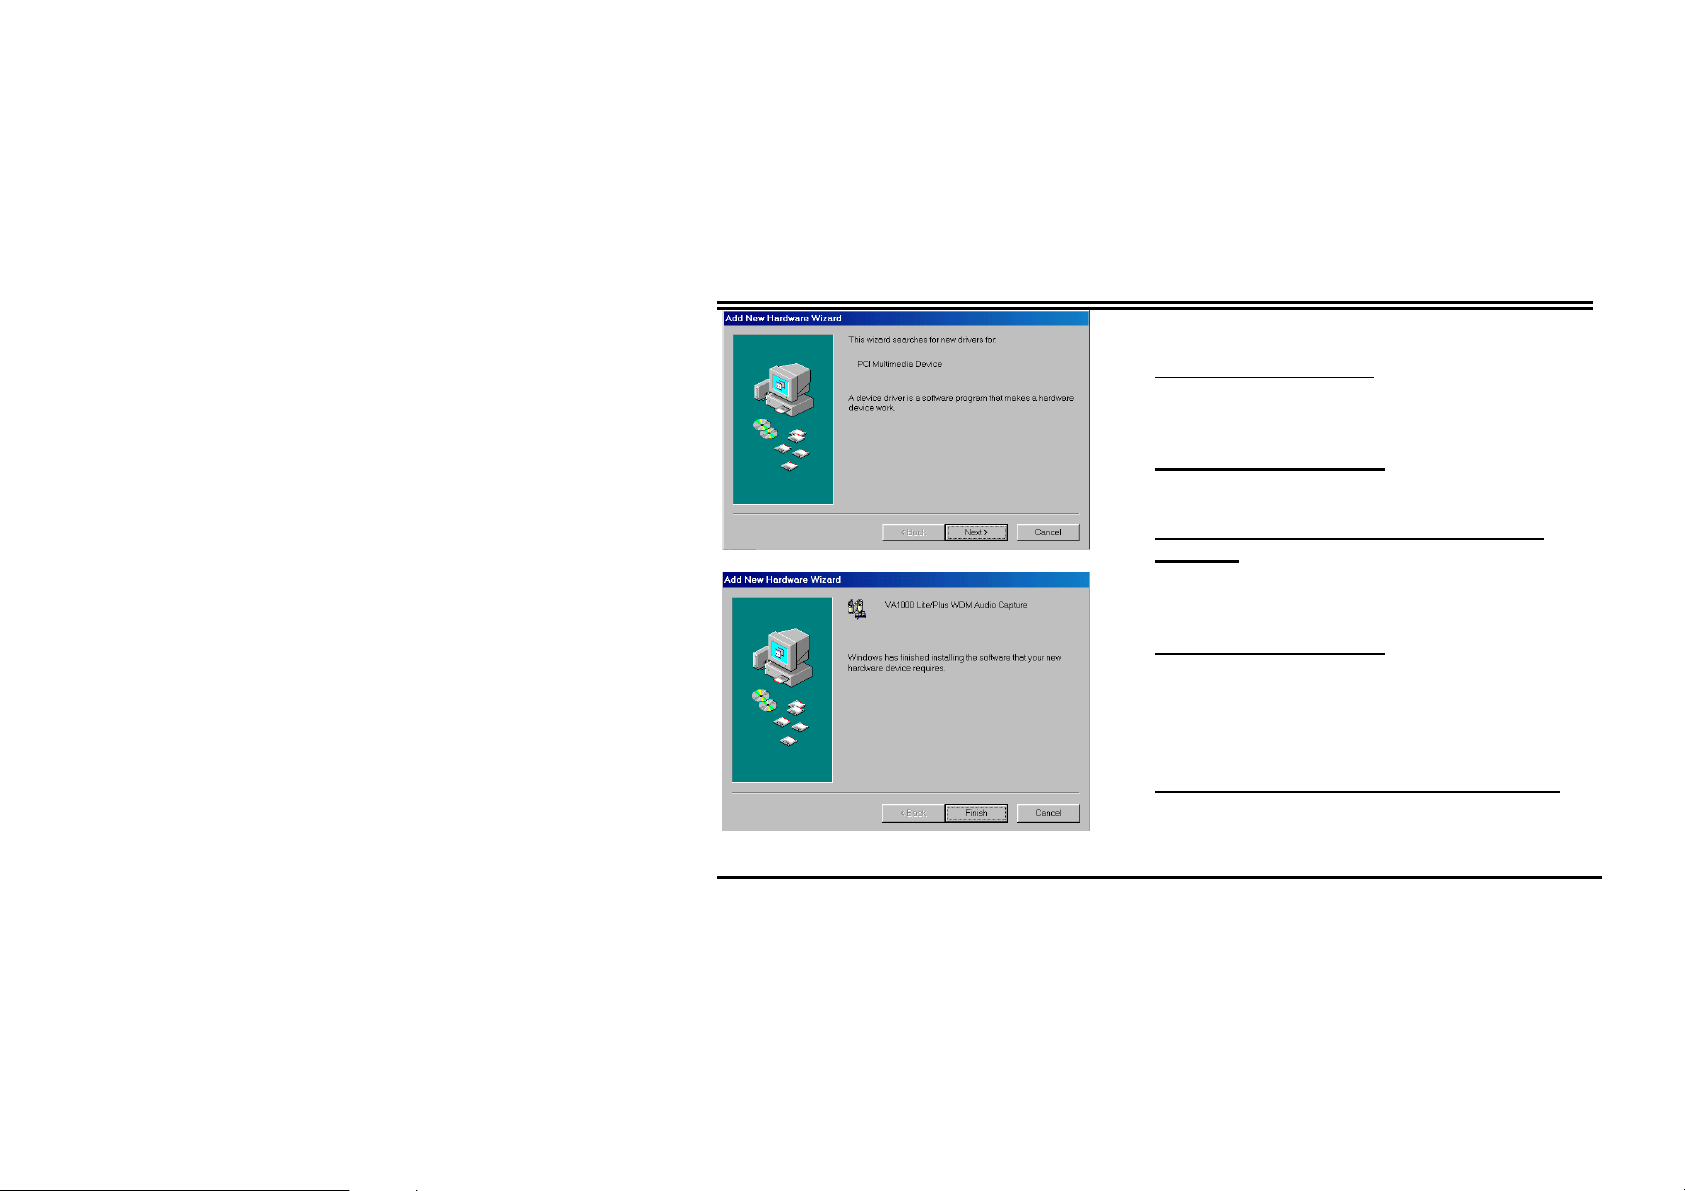
1. This is the first window you would see on the left
side as you start installing the driver.
Click “Next” to continue
.
2. Select the first option “Search for the best driver
for your device. (Recommended)”
Click “Next” to continue
.
3. Select the option “Specify a location”,
Enter D:\Driver\Win98 and click “Next” to
continue.
4. The following prompt window tells the driver has
been found.
Click “Next” to continue
.
5. Windows will start to copy files. Then the on-going
dialog box shows that the Window has finished
installing the drivers for PCI Multimedia Device
shown on the left.
Click “Finish” to end up driver installation.
B. For the driver installation steps of VA1000 Lite/Plus Philips WDM TV tuner
7
Page 10

Chapter 2 – Driver Installation for W indows 98 SE/2000/ME
1. This is the on-going window you would see.
2. Select the first option “Search for the best driver
3. Select the option “Specify a location”,
4. The following prompt window tells the driver has
5. Windows will start to copy files. Then the on-going
Click “Next” to continue
.
for your device. (Recommended)”
Click “Next” to continue
.
Enter D:\Driver\Win98 and click “Next” to
continue.
been found.
Click “Next” to continue
.
dialog box shows that the Window has finished
installing the driver for TV Tuner shown on the left.
Click “Finish” to end up driver installation.
C. For the driver installation steps of VA1000 Lite/Plus WDM Crossbar
8
Page 11

Chapter 2 – Driver Installation for W indows 98 SE/2000/ME
1. This is the on-going window you would see.
Click “Next” to continue
.
2. Select the first option “Search for the best driver
for your device. (Recommended)”
Click “Next” to continue
.
3. Select the option “Specify a location”,
Enter D:\Driver\Win98 and click “Next” to
continue.
4. The following prompt window tells the driver has
been found.
Click “Next” to continue
.
5. Windows will start to copy files. Then the on going
dialog box shows that the Window has finished
installing the driver for Crossbar shown on the left.
Click “Finish” to end up driver installation.
6. After finish the installations describe above, you
are required to restart your computer.
9
Page 12

Chapter 2 – Driver Installation for W indows 98 SE/2000/ME
2.3 Driver Installation for Windows 2000
Once your system is done booting, put the CD-ROM into the CD drive and Windows 2000 will detect
new hardware and started with the “Add New Hardware Wizard” to help you install the drivers
correctly. All you have to do now is follow the steps A, B, C, and D described below one by one to
finish the installation.
A. For the driver installation steps of VA1000 Lite/Plus WDM Video Capture
1. This is the first window displaying a message
“Multimedia Video Controller” you would see on
the left side as you start installing the driver
2. The on-going window will ask you to click next to
continue.
Click “Next” to continue.
3. Select the first option “Search for the best driver
for your device. (Recommended)”
Click “Next” to continue.
4. Select the option “Specify a location”,
Click “Next” to continue.
5. Click “Browse” to find the right path and file name.
Click “Browse” to continue.
10
Page 13

Chapter 2 – Driver Installation for W indows 98 SE/2000/ME
6. Click the file “Setup” and “Open” to continue.
7. Click “Ok” to continue.
8.
9. Click “Next” to continue.
Click “Yes”
10. Windows will start to copy files. Then the on going
dialog box shows that the Window has finished
installing the driver for Video capture shown on the
left.
Click “Finish” to end up driver installation.
B. For the driver installation steps of VA1000 Lite/Plus WDM Audio Capture and Video
Capture
1. This is the first window displaying a message
“Multimedia Video Controller” you would see on
the left side as you start installing the driver.
2. The on-going window will ask you to click next to
continue.
“
”
11
Page 14

Chapter 2 – Driver Installation for W indows 98 SE/2000/ME
3. Select the first option “Search for the best driver
4. Select the option “Specify a location”,
5. Click “Browse” to find the right path and file name.
6. Click the file “Setup” and “Open” to continue.
7. Click “Ok” to continue.
8. Click “Next” to continue.
9. Click “Yes”
10. Windows will start to copy files. Then the on going
Click “Next” to continue.
for your device. (Recommended)”
Click “Next” to continue
.
Click “Next” to continue
.
Click “Browse” to continue.
dialog box shows that the Window has finished
installing the driver for Audio Capture shown on
the left.
12
Page 15

Chapter 2 – Driver Installation for W indows 98 SE/2000/ME
Click “Finish” to end up driver installation.
C. For the driver installation steps of VA1000 Lite/Plus Philips WDM TV tuner
1. This is the first window displaying a
message “Multimedia Video Controller”
you would see on the left side as you start
installing the driver.
2. The on-going window will ask you to click
next to continue.
Click “Next” to continue.
3. Select the first option “Search for the best
driver for your device. (Recommended)”
Click “Next” to continue
.
4. Select the option “Specify a location”,
Click “Next” to continue
.
5. Click “Browse” to find the right path and file
name.
Click “Browse” to continue.
6. Click the file “Setup” and “Open” to
13
Page 16

Chapter 2 – Driver Installation for W indows 98 SE/2000/ME
7. Click “Ok” to continue.
8. Click “Next” to continue.
9. Click “Yes”
10. Windows will start to copy files. Then the
continue.
on going dialog box shows that the
Window has finished installing the driver
for TV Tuner shown on the left.
Click “Finish” to end up driver
installation.
14
Page 17

Chapter 2 – Driver Installation for W indows 98 SE/2000/ME
D. For the driver installation steps of VA1000 LITE/PLUS WDM Crossbar
1. This is the first window displaying a message
“Multimedia Video Controller” you would see on
the left side as you start installing the driver.
2. The on-going window will ask you to click next to
continue.
Click “Next” to continue.
3. Select the first option “Search for the best driver for
your device. (Recommended)”
Click “Next” to continue
.
4. Select the option “Specify a location”,
Click “Next” to continue
.
5. Click “Browse” to find the right path and file name.
Click “Browse” to continue.
6. Click the file “Setup” and “Open” to continue.
7. Click “Ok” to continue.
15
Page 18

Chapter 2 – Driver Installation for W indows 98 SE/2000/ME
8. Click “Yes”
9. Click “Next” to continue.
10. Click “Yes”
11. Windows will start to copy files. Then the on going
12. After finish the installation describe above, you are
dialog box shows that the Window has finished
installing the driver for Crossbar shown on the left.
Click “Finish” to end up driver installation.
required to restart your computer.
16
Page 19

Chapter 2 – Driver Installation for W indows 98 SE/2000/ME
2.4 Driver Installation for Windows ME
Once your system is done booting, put the CD-ROM into the CD drive and Windows ME will detect
new hardware and started with the “Add New Hardware Wizard” to help you install the drivers
correctly. All you have to do now is follow the steps A, B, and C described below one by one to
finish the installation.
A. For the driver installation steps of VA1000 Lite/Plus WDM Audio Capture and Video
Capture
1. Check the first option “Specify the location of the
driver (Advanced)”
Click “Next” to continue
.
2. Check the option “Specify a location”, Enter
D:\Driver\WinMe or Use Browse to find the
location.
Click “Next” to continue
.
3. Click “Next” to continue
.
17
Page 20

Chapter 2 – Driver Installation for W indows 98 SE/2000/ME
4. Windows will start to copy files. Then the on-going
dialog box shows that the Window has finished
installing the drivers for PCI Multimedia Device,
shown on the left.
Click “Finish” to end up driver installation.
B. For the driver installation steps of VA1000 Lite/Plus Philips WDM TV tuner
1. Check the first option “Specify the location of the
driver (Advanced)”
Click “Next” to continue
.
2. Check the option “Specify a location”, Enter
D:\Driver\WinMe or Use Browse to find the
location.
Click “Next” to continue
.
3. Click “Next” to continue
.
18
Page 21

Chapter 2 – Driver Installation for W indows 98 SE/2000/ME
4. Windows will start to copy files. Then the on-going
dialog box shows that the Window has finished
installing the driver for TV Tuner, shown on the left.
Click “Finish” to end up driver installation.
C. For the driver installation steps of VA1000 Lite/Plus WDM Crossbar
1. Check the first option “Specify the location of the
driver (Advanced)”
Click “Next” to continue
2. Check the option “Specify a location”, Enter
D:\Driver\WinMe or Use Browse to find the
location.
Click “Next” to continue
3. Click “Next” to continue
19
.
.
Page 22

Chapter 2 – Driver Installation for W indows 98 SE/2000/ME
4. Windows will start to copy files. Then the on going
5. After finish the installations describe above, you
dialog box shows that the Window has finished
installing the driver for Crossbar shown on the left.
Click “Finish” to end up driver installation.
are required to restart your computer.
20
Page 23

2.5 Component Check-out
Chapter 2 – Driver Installation for W indows 98 SE/2000/ME
Components check-out
Go to | Start | Setting | Control Panel | System
| and double click System icon.
Go to Device Manager to check out if the driver
has been installed.
21
Page 24

Chapter 3-Remote Control
Chapter 3----Remote Control
1. Power: Press this button to run tuner application.
2. Numeric Keypad: Select the desired channel directly.
3. Channel Up/Down: Click this button to go to next/previous
4. Volume Up/Down: Click this button to increase/decrease
5. Mute: Press this button to mute the sound.
channel.
the audio volume
22
Page 25

Chapter 4-AOpen Driver Live Update
Chapter 4----AOpen Driver Live Update
Live Update wizard is AOpen driver instant service. It can support:
Auto detects TV tuner driver version.
Auto link to AOpen driver FTP web service.
Auto check AOpen web driver information.
Auto downloads newer driver from AOpen web.
1. Start Windows and insert the AOpen Installation CD disc into CD-ROM drive.
2. Please click the AOpen Driver Live Update to run the program.
23
Page 26

Chapter 4-AOpen Driver Live Update
3. If your driver same with the latest version AOpen currently provide, then Live Update wills info you.
4. If Live Update found any new driver exist. It will show information about your driver versions. And
click OK to continue.
5. Please select an FTP server to download it.
24
Page 27

Chapter 4-AOpen Driver Live Update
6. During download process, the Live Update banner will share information about new AOpen
products with you. You may click the banner to get more information.
25
Page 28

Chapter 5-Technical Support
Chapter 5----Technical Support
Dear Customer,
Thanks for choosing AOpen products. To provide the best and fastest service to our customer is
our first priority. However, we receive numerous emails and phone-calls worldwide everyday, it is
very hard for us to serve everyone on time. We recommend you follow the procedures below and
seek help before contact us. With your help, we can then continue to provide the best quality
service to more customers.
Thanks very much for your understanding!
AOpen Technical Supporting Team
1
1
2
2
Online Manual: Please check the manual carefully and make sure the jumper
settings and installation procedure are correct.
http://www.aopen.com.tw/tech/download/manual/default.htm
Test Report: We recommend to choose board/card/device from the compatibility
test reports for assembling your PC.
http://www.aopen.com.tw/tech/report/default.htm
26
Page 29

Chapter 4-AOpen Driver Live Update
3
3
4
4
5
5
6
6
7
7
FAQ: The latest FAQ (Frequently Asked Questions) may contain a solution to
your problem.
http://www.aopen.com.tw/tech/faq/default.htm
Download Software: Check out this table to get the latest updated BIOS/utility
and drivers.
http://www.aopen.com.tw/tech/download/default.htm
News Group: Your problem probably had been answered by our support
engineer or professional users on the news group.
http://www.aopen.com.tw/tech/newsgrp/default.htm
Contact Distributors/Resellers: We sell our products through resellers and
integrators. They should know your system configuration very well and should
be able to solve your problem more efficiently than us. After all, their attitude of
service is an important reference for you if next time you want to buy
Contact Us: Please prepare detail system configuration and error symptom
before contacting us. The part number, serial number and BIOS version are
also very helpful.
27
Page 30

Chapter 5-Technical Support
Web: http://www.aopen.com
Email : Send us email by going through the contact form below.
English http://www.aopen.com.tw/tech/contact/techusa.htm
Japanese http://aojp.aopen.com.tw/tech/contact/techjp.ahtm
Chinese http://w3.aopen.com.tw/tech/contact/techtw.htm
German http://www.aopencom.de/tech/contact/techde.htm
Simplified Chinese http://www.aopen.com.cn/tech/contact/techcn.htm
TEL:
USA 650-827-9688
Netherlands +31 73-645-9516
China (86) 755-375-3013
Taiwan (886) 2-2696-1333
Germany +49 (0) 2102-157-700
28
 Loading...