

Page 1

Table of Contents
Table of Contents
CHAPTER 1¡ÐSETTINGS FOR YOUR AOPEN VIDEO STATION VA1000.......................................1
1.1 PACKAGE CONTENTS...........................................................................................................................1
1.2 SYSTEM REQUIREMENTS .....................................................................................................................1
1.3 HARDWARE INSTALLATION ................................................................................................................. 2
CHAPTER 2¡ÐDRIVER INSTALLATION FOR WINDOWS 95/98 SE/2000/ME................................. 6
2.1 DRIVER INSTALLATION FOR WINDOWS 95............................................................................................6
2.2 DRIVER INSTALLATION FOR WINDOWS 98/98SE ..................................................................................8
2.3 DRIVER INSTALLATION FOR WINDOWS 2000......................................................................................11
2.4 DRIVER INSTALLATION FOR WINDOWS ME........................................................................................ 19
2.5 COMPONENT CHECK-OUT..................................................................................................................23
CHAPTER 3¡ÐVA1000 UTILITY INSTALLATION FOR WINDOWS 95/98/2000/ME ......................24
3.1 UTILITY INSTALLATION.....................................................................................................................24
CHAPTER 4¡ÐTHE USE OF THE UTILITY INTERFACE.................................................................26
4.1 RUNNING THE UTILITY INTERFACE FOR THE FIRST TIME...................................................................... 26
4.2 VIEW OF UTILITY INTERFACE ............................................................................................................28
4.3 UTILITY INTERFACE IN TV/AV/SVHS MODE FOR WIN98 SE/2000/ME .............................................. 29
4.4 UTILITY INTERFACE IN FM MODE ...................................................................................................... 35
i
Page 2

Table of Contents
CHAPTER 5¡ÐACCELERATOR KEYS SUMMARY...........................................................................37
CHAPTER 6¡ÐREMOTE CONTROL.................................................................................................... 38
CHAPTER 7¡ÐAOPEN DRIVER LIVE UPDATE.................................................................................39
CHAPTER 8¡ÐTECHNICAL SUPPORT...............................................................................................42
APPENDIX I¡ÐTV AND RADIO SETTING FOR WINDOWS 95........................................................45
ii
Page 3

Introduction and Features
Introduction
Welcome to the world of AOpen Video Station VA1000. With this multimedia product, you can use
it as a convenient tool for multiple purposes including video conferencing, video editing, class
presentation, or even entertainment. The jumperless design and PnP (Plug & Play) implementation
simplify the tedious installation process. By eliminating the VGA loop cable and feature connector
(VFAC), users are able to enjoy a clear, high-quality TV programs through this powerful product.
Features
Receive TV broadcasts: 125 channel cable/antenna-ready TV tuner
Receive and capture FM radio: Listen to the FM radio stations! (FM model only)
External inputs for video capture: AV and S-video inputs for external video resources
like cameras and VCRs.
Video conference, video phone: MS NetMeeting for video conference
Wireless remote control included: Channels up/down, Volume up/down.
Full motion video capture : Up to 640 x 480 dpi; 16-, 24-, or 32-bit color; up to 30 fps;
save as AVI
Still frame video capture : Up to 640x480 resolution; 16-, 24-, or 32-bit color; save to
iii
Page 4

Introduction and Features
BMP or Clipboard
External interface : 75 ohm IEC coaxial input (cable TV), FM radio antenna input,
composite (RCA) input, S-Video (SVHS) input, audio input, and line audio output
Stereo Function (Optional): Stereo TV sound or bilingual TV broadcasting.
iv
Page 5

Chapter 1¡ÐSettings for your Video Station VA1000
Chapter 1¡ÐSettings for your AOpen Video Station VA1000
1.1 Package Contents
Unpack your Video Station VA1000 and make sure that all items are intact. The following items should be
included in your Video Station VA1000 package:
§ Video Station VA1000 card
§ Audio Cable
§ Remote control and receiver cable
§ FM Antenna (for FM model only)
§ User’s Manual
§ CD of installation software
§ Stereo daughter-board (Optional)
1.2 System Requirements
§ IBM PC or compatible
§ 133 MHz CPU or better processor
§ Minimum 16 MB memory
§ Minimum 10 MB hard disk space available
§ One free PCI slot and IRQ
§ VGA and with DirectDraw driver supporting 15 bit color or higher
§ Microsoft Windows 95/98 Edit 2 /2000/Millennium or NT4.0
§ TV antenna or cable from CATV
1
Page 6

Chapter 1¡ÐSettings for your Video Station VA1000
§ Sound card
§ Speakers for audio output
§ CD-ROM drive
1.3 Hardware Installation
Please follow the steps shown below to install the card into your computer:
1. Turn off all your computer power and any peripherals.
2. Select an available PCI slot and remove the slot cover, screw, etc.
3. Put the Video Station VA1000 card firmly into the slot until it snaps in place and secure the card by
replacing the screw you remove from step 2.
4. Plug the TV cable into the antenna adapter input of Video Station VA1000.
5. See the illustration below for Connectivity
2
Page 7
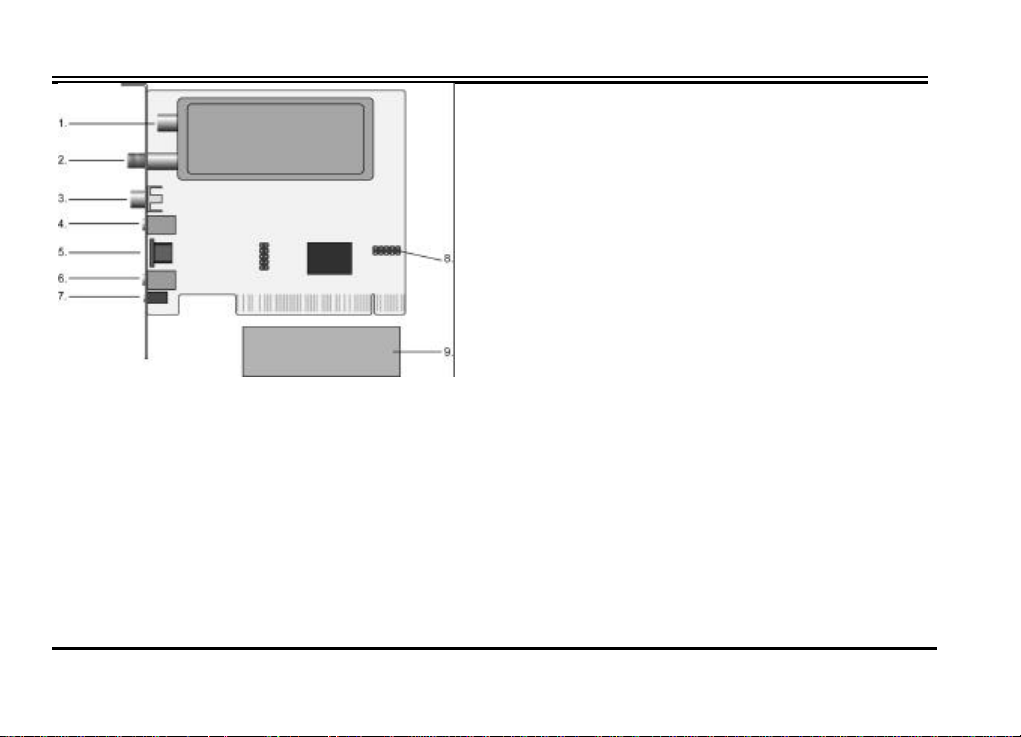
Chapter 1¡ÐSettings for your Video Station VA1000
1. FM connector (FM model only)
2. To TV antenna
3. Composite video input (RCA)
4. Audio input (3.5mm stereo jack)
5. SVHS input (mini DIN 4 pin)
6. Audio output (3.5mm stereo jack) to sound
card or speaker
7. Remote sensor connector
8. Connector for stereo daughter-board
9. Stereo daughter board
3
Page 8

Chapter 1¡ÐSettings for your Video Station VA1000
4
Page 9

Chapter 1¡ÐSettings for your Video Station VA1000
For TV watch or FM radio listening on PC
Ø Connect the TV antenna or cable with the antenna input. (Refer to ¬)
Ø Plug the supplied Radio serial cable into the FM connector. (FM model only) (Refer to -)
Ø Connection between the audio output of card and the “Line in” of your sound card. (Refer to ®)
Ø Connection between the “Speak out” or “Line out” connector of your sound card and the speaker. (Refer
to ¯)
Ø Connector of remote control sensor cable (Refer to °)
For External video sources such as VCR, VCD/DVD player, or camcorder
Ø Connector of the AV cable / S-Video for Video equipments (Refer to ±)
Ø Connection between the audio output of card and the “Line in” of your sound card. (Refer to ®)
Ø Connection between the “Speak out” or “Line out” connector of your sound card and the speaker (Refer
to ¯)
5
Page 10

Chapter 2 – Driver Installation for Windows 95/98 SE/2000/ME
Chapter 2¡ÐDriver Installation for Windows 95/98 SE/2000/ME
Your Video Station VA1000 package comes with complete Windows software utilities. These utilities can be
found from the CD-ROM in this package. Prior to installation, it is highly recommended that all application
programs should be disabled such as anti-virus software and system monitoring applications.
Note that there are four drivers required to be installed for each component.
Ø VA1000 WDM Audio Capture
Ø VA1000 WDM Video Capture
Ø VA1000 Philips WDM TV tuner
Ø VA1000 WDM Crossbar
2.1 Driver Installation for Windows 95
Once your system is done booting, the screen will be shown as follows:
6
Page 11
Chapter 2 – Driver Installation for Windows 95/98 SE/2000/ME
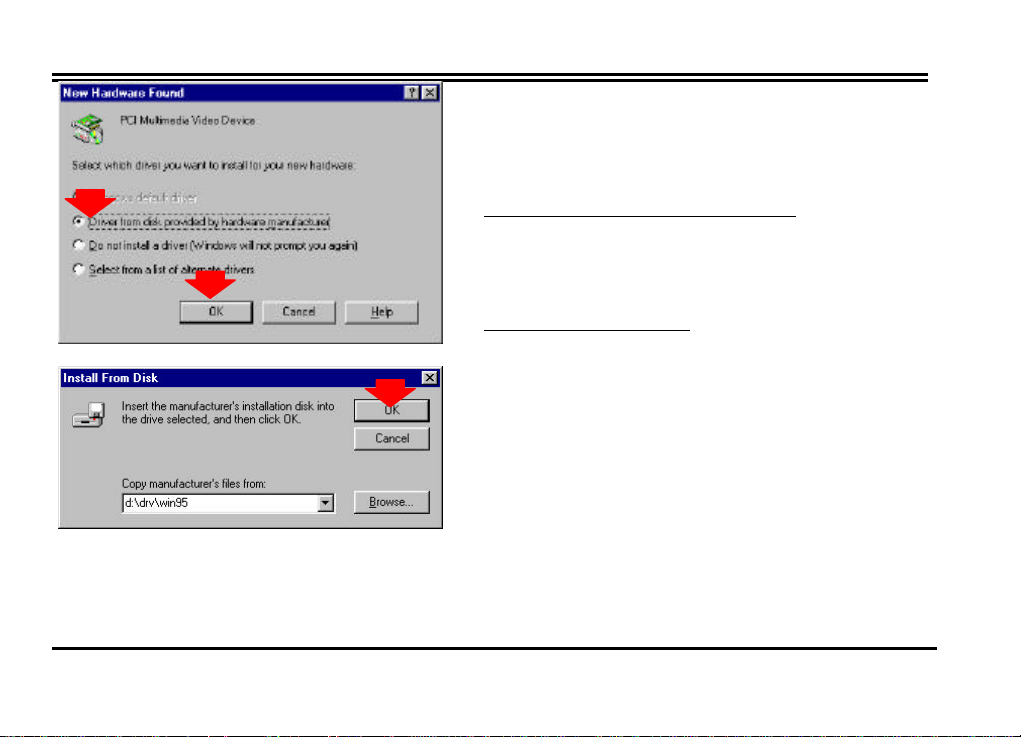
in D:\Drv\win95 or Use Browse to find the location.
1. Windows 95 has detected new hardware and started
with the Add New Hardware Wizard.
2. Select the option “Driver from disk provided by
hardware manufacturer”.
Click “OK” to begin the installation.
3. The next dialog window will ask you where the drivers
are located and present locations available: Please type
Click “OK” to continue.
4. Windows will start to copy files. Then Windows has
finished installing the driver.
7
Page 12

Chapter 2 – Driver Installation for Windows 95/98 SE/2000/ME
Enter D:\Drv\Win98 and click “Next” to continue
2.2 Driver Installation for Windows 98/98SE
Once your system is done booting, put the CD-ROM into the CD drive and Windows 98/98SE will detect new
hardware and started with the “Add New Hardware Wizard” to help you install the drivers correctly. All you
have to do now is follow the steps A, B, and C described below one by one to finish the installation.
A. For the driver installation steps of VA1000 WDM Audio Capture and Video Capture
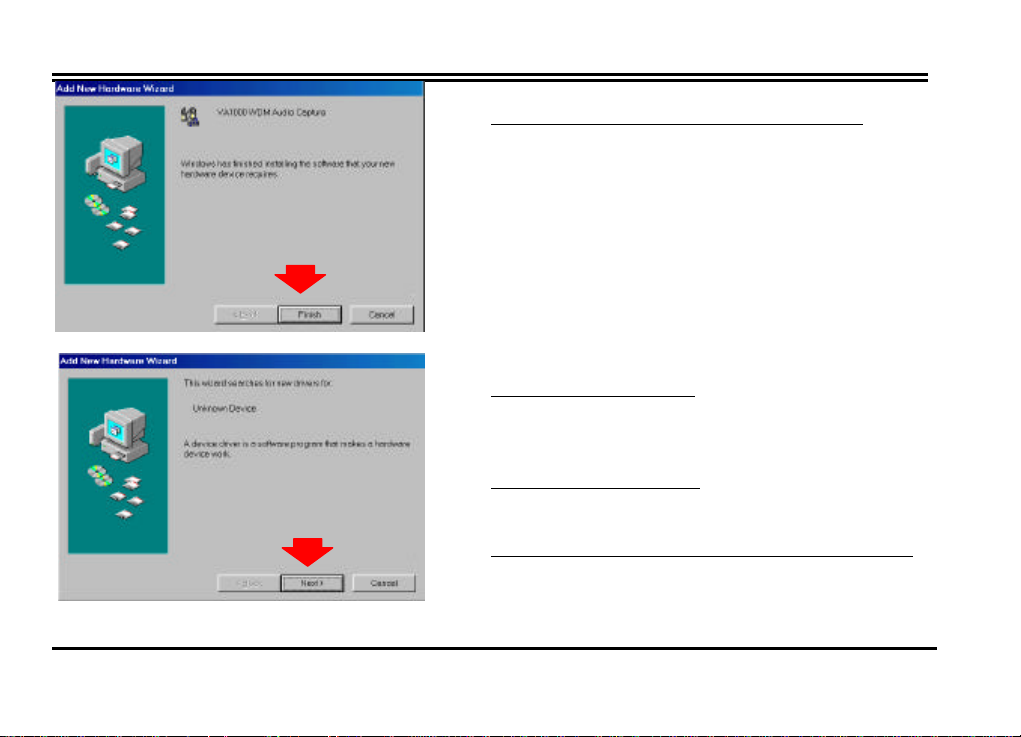
1. This is the first window you would see on the left side
as you start installing the driver.
Click “Next” to continue.
2. Select the first option “Search for the best driver for
your device. (Recommended)”
Click “Next” to continue.
3. Select the option “Specify a location”,
4. The following prompt window tells the driver has been
found.
Click “Next” to continue.
5. Windows will start to copy files. Then the on-going
dialog box shows that the Window has finished
installing the drivers for PCI Multimedia Device
.
8
Page 13
Chapter 2 – Driver Installation for Windows 95/98 SE/2000/ME
Enter D:\Drv\Win98 and click “Next” to continue
shown on the left.
Click “Finish” to end up driver installation.
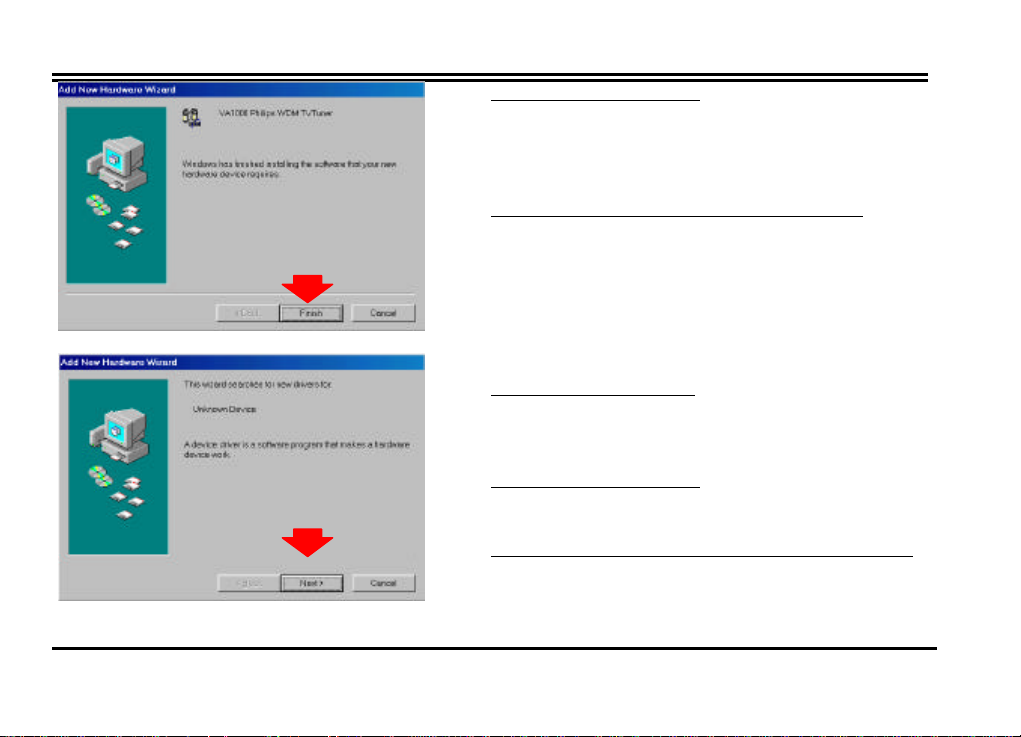
B. For the driver installation steps of VA1000 Philips WDM TV tuner
1. This is the on-going window you would see.
Click “Next” to continue.
2. Select the first option “Search for the best driver for
your device. (Recommended)”
Click “Next” to continue.
3. Select the option “Specify a location”,
4. The following prompt window tells the driver has
been found.
.
9
Page 14
Chapter 2 – Driver Installation for Windows 95/98 SE/2000/ME
Enter D:\Drv\Win98 and click “Next” to continue.
Click “Next” to continue.
5. Windows will start to copy files. Then the on-going
dialog box shows that the Window has finished
installing the driver for TV Tuner shown on the left.
Click “Finish” to end up driver installation.
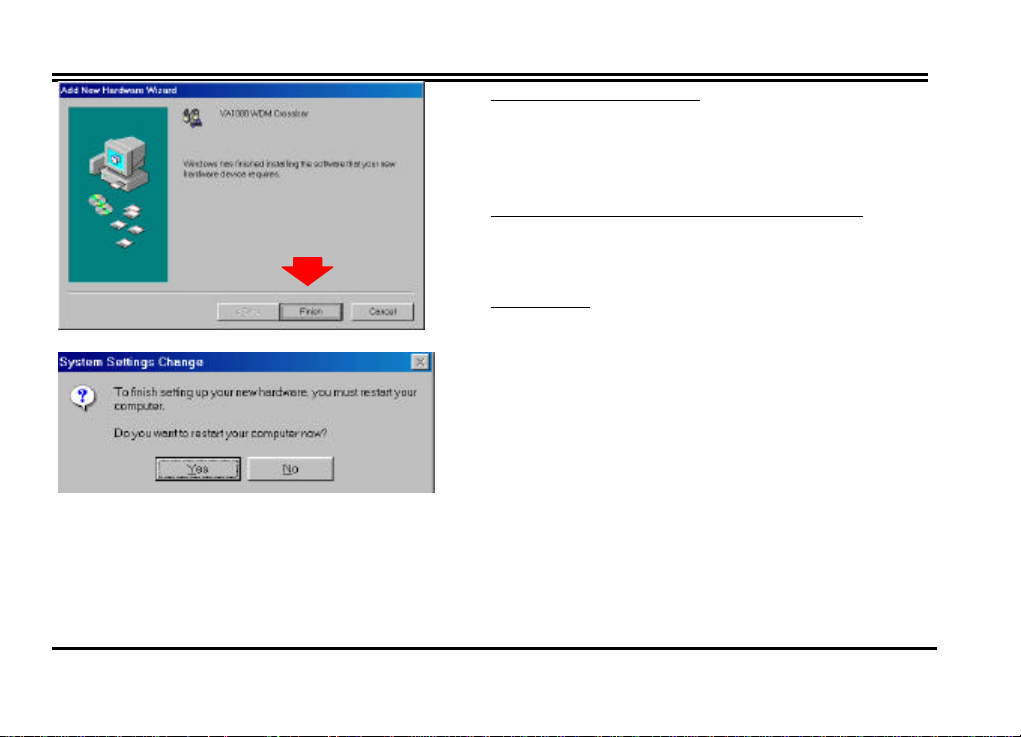
C. For the driver installation steps of VA1000 WDM Crossbar
1. This is the on-going window you would see.
Click “Next” to continue.
2. Select the first option “Search for the best driver for
your device. (Recommended)”
Click “Next” to continue.
3. Select the option “Specify a location”,
4. The following prompt window tells the driver has been
found.
10
Page 15
Chapter 2 – Driver Installation for Windows 95/98 SE/2000/ME
Click “Next” to continue.
5. Windows will start to copy files. Then the on going
dialog box shows that the Window has finished
installing the driver for Crossbar shown on the left.
Click “Finish” to end up driver installation.
6. After finish the installations describe above, you are
required to restart your computer.
Click “Yes”
2.3 Driver Installation for Windows 2000
Once your system is done booting, put the CD-ROM into the CD drive and Windows 2000 will detect new
hardware and started with the “Add New Hardware Wizard” to help you install the drivers correctly. All you
have to do now is follow the steps A, B, C, and D described below one by one to finish the installation.
11
Page 16
Chapter 2 – Driver Installation for Windows 95/98 SE/2000/ME
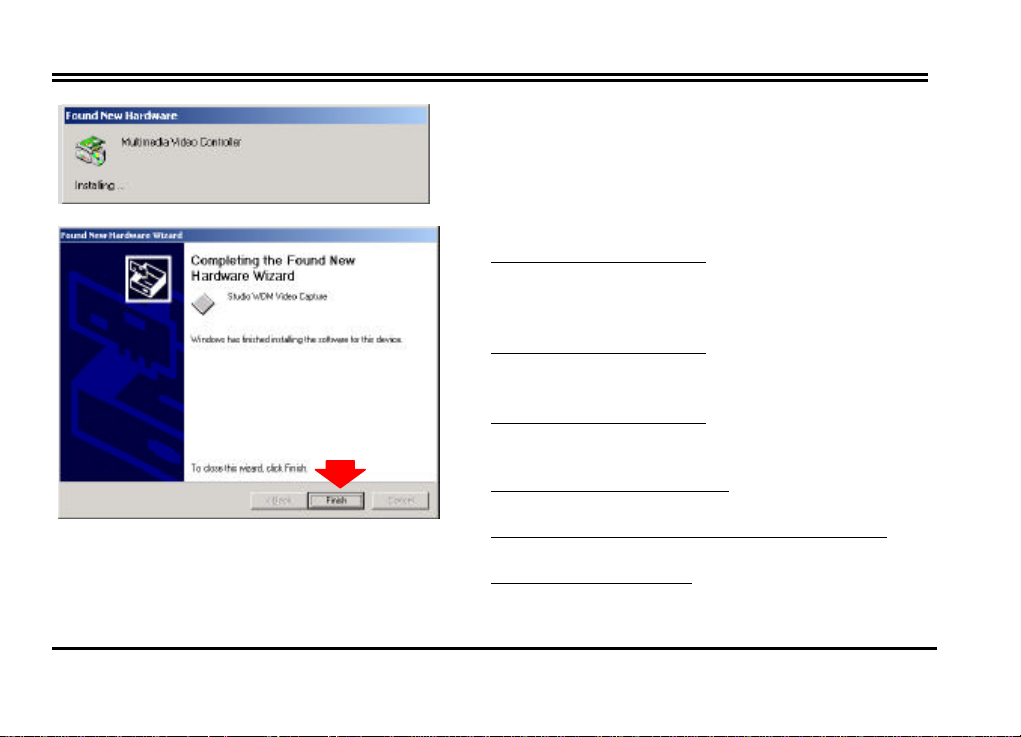
A. For the driver installation steps of VA1000 WDM Video Capture
1. This is the first window displaying a message
“Multimedia Video Controller” you would see on the
left side as you start installing the driver
2. The on-going window will ask you to click next to
continue.
Click “Next” to continue.
3. Select the first option “Search for the best driver for
your device. (Recommended)”
Click “Next” to continue.
4. Select the option “Specify a location”,
Click “Next” to continue.
5. Click “Browse” to find the right path and file name.
Click “Browse” to continue.
6. Click the file “Setup” and “Open” to continue. 1
7. Click “Ok” to continue.
12
Page 17

Chapter 2 – Driver Installation for Windows 95/98 SE/2000/ME
8. Click “Next” to continue.
Click “Yes”
9. Windows will start to copy files. Then the on going
dialog box shows that the Window has finished
installing the driver for Video capture shown on the
left.
Click “Finish” to end up driver installation.
B. For the driver installation steps of VA1000 WDM Audio Capture and Video Capture
1. This is the first window displaying a message
“Multimedia Video Controller” you would see on the
left side as you start installing the driver.
2. The on-going window will ask you to click next to
continue.
Click “Next” to continue.
3. Select the first option “Search for the best driver for
your device. (Recommended)”
Click “Next” to continue.
13
Page 18

Chapter 2 – Driver Installation for Windows 95/98 SE/2000/ME
4. Select the option “Specify a location”,
5. Click “Browse” to find the right path and file name.
6. Click the file “Setup” and “Open” to continue.
7. Click “Ok” to continue.
8. Click “Next” to continue.
9. Click “Yes”
10. Windows will start to copy files. Then the on going
Click “Next” to continue.
Click “Browse” to continue.
dialog box shows that the Window has finished
installing the driver for Audio Capture shown on the
left.
Click “Finish” to end up driver installation.
14
Page 19

Chapter 2 – Driver Installation for Windows 95/98 SE/2000/ME
C. For the driver installation steps of VA1000 Philips WDM TV tuner
1. This is the first window displaying a message
“Multimedia Video Controller” you would see
on the left side as you start installing the driver.
2. The on-going window will ask you to click
next to continue.
Click “Next” to continue.
3. Select the first option “Search for the best
driver for your device. (Recommended)”
Click “Next” to continue.
4. Select the option “Specify a location”,
Click “Next” to continue.
5. Click “Browse” to find the right path and file
name.
Click “Browse” to continue.
6. Click the file “Setup” and “Open” to
continue.
15
Page 20

Chapter 2 – Driver Installation for Windows 95/98 SE/2000/ME
7. Click “Ok” to continue.
8. Click “Next” to continue.
9. Click “Yes”
10. Windows will start to copy files. Then the on
going dialog box shows that the Window has
finished installing the driver for TV Tuner
shown on the left.
Click “Finish” to end up driver installation.
16
Page 21

Chapter 2 – Driver Installation for Windows 95/98 SE/2000/ME
D. For the driver installation steps of VA1000 WDM Crossbar
1. This is the first window displaying a message
“Multimedia Video Controller” you would see on the
left side as you start installing the driver.
2. The on-going window will ask you to click next to
continue.
Click “Next” to continue.
3. Select the first option “Search for the best driver for
your device. (Recommended)”
Click “Next” to continue.
4. Select the option “Specify a location”,
Click “Next” to continue.
5. Click “Browse” to find the right path and file name.
Click “Browse” to continue.
6. Click the file “Setup” and “Open” to continue.
7. Click “Ok” to continue.
17
Page 22

Chapter 2 – Driver Installation for Windows 95/98 SE/2000/ME
8. Click “Yes”
9. Click “Next” to continue.
10. Click “Yes”
11. Windows will start to copy files. Then the on going
After finish the installation describe above, you are required
to restart your computer.
dialog box shows that the Window has finished
installing the driver for Crossbar shown on the left.
Click “Finish” to end up driver installation.
18
Page 23

Chapter 2 – Driver Installation for Windows 95/98 SE/2000/ME
2.4 Driver Installation for Windows ME
Once your system is done booting, put the CD-ROM into the CD drive and Windows ME will detect new
hardware and started with the “Add New Hardware Wizard” to help you install the drivers correctly. All you
have to do now is follow the steps A, B, and C described below one by one to finish the installation.
A. For the driver installation steps of VA1000 WDM Audio Capture and Video Capture
1. Check the first option “Specify the location of the
driver (Advanced)”
Click “Next” to continue.
2. Check the option “Specify a location”, Enter
D:\Drv\WinMe or Use Browse to find the location.
Click “Next” to continue.
3. Click “Next” to continue.
19
Page 24

Chapter 2 – Driver Installation for Windows 95/98 SE/2000/ME
4. Windows will start to copy files. Then the on-going
dialog box shows that the Window has finished
installing the drivers for PCI Multimedia Device,
shown on the left.
Click “Finish” to end up driver installation.
B. For the driver installation steps of VA1000 Philips WDM TV tuner
1. Check the first option “Specify the location of the driver
(Advanced)”
Click “Next” to continue.
2. Check the option “Specify a location”, Enter
D:\Drv\WinMe or Use Browse to find the location.
Click “Next” to continue.
3. Click “Next” to continue.
20
Page 25

Chapter 2 – Driver Installation for Windows 95/98 SE/2000/ME
4. Windows will start to copy files. Then the on-going
dialog box shows that the Window has finished
installing the driver for TV Tuner, shown on the left.
Click “Finish” to end up driver installation.
C. For the driver installation steps of VA1000 WDM Crossbar
1. Check the first option “Specify the location of the
driver (Advanced)”
Click “Next” to continue
2. Check the option “Specify a location”, Enter
D:\Drv\WinMe or Use Browse to find the location.
Click “Next” to continue.
3. Click “Next” to continue.
4. Windows will start to copy files. Then the on going
dialog box shows that the Window has finished
21
Page 26

Chapter 2 – Driver Installation for Windows 95/98 SE/2000/ME
5. After finish the installations describe above, you are
installing the driver for Crossbar shown on the left.
Click “Finish” to end up driver installation.
required to restart your computer.
Click “Yes”
22
Page 27

2.5 Component Check-out
| Start | Setting | Control Panel | System |
Chapter 2 – Driver Installation for Windows 95/98 SE/2000/ME
Components check-out
Go to
double click System icon.
Go to Device Manager to check out if the driver has
been installed.
23
and
Page 28

Chapter 3¡ÐUtility Installation for Windows 95/98 SE/2000/ME
Chapter 3¡ÐVA1000 Utility Installation for Windows 95/98/2000/ME
3.1 Utility Installation
After the drivers are installed, the next step you need to do is install the Video Station VA1000 Utility
application.
1. Start Windows and insert the AOpen Installation CD
disk into the CD-ROM drive. The AOpen Installation
Wizard will appear, please select Driver to Install
VA1000 Utility.
2. Select the Windows system you are using now.
3. You will first see the Welcome dialog. Please read the
dialog.
Click on “Next” to continue.
4. Then “Software License Agreement” dialog will
appear. After reading the license agreement and agree
on it, click Yes to continue.
5. Select Country Code”. You can select the Auto detect
(Recommended) or Select your country.”
Please click “OK” to continue.
6. You would see a diagram for the files copy from CD.
7. Then you would see the application program has been
generated and just close the window of application
24
Page 29

Chapter 3¡ÐUtility Installation for Windows 95/98 SE/2000/ME
program.
8. This final window on the left would ask you to reboot
the system.
Please click “Finish” to reboot your system.
25
Page 30

Chapter 4 – The Use of Utility Interface
Chapter 4¡ÐThe Use of the Utility Interface
4.1 Running the Utility Interface for the first time
To start this application program, you can
Ø Double-click the AOpen Video Center icon
located in your AOpen VA1000 program
group window.
Ø Go to Start | programs | AOpen VA1000 |
AOpen Video Center.
26
Page 31

Chapter 4 – The Use of Utility Interface
Step 2. Please select the TV input and click Scan
Step 3. Then you would see the figure on the left
telling you the channel are being scanned.
Note:
The Step2 and Step 3 are only for the first time. You
don’t need to repeat the steps in the future.
27
Page 32

Chapter 4 – The Use of Utility Interface
Ø
Ø
FM mode
4.2 View of Utility Interface
Click here to
select TV or
Click here to select
TV/AV/SVHS input mode
For TV/AV/SVHS
mode and setting:
see the 4.3 for the
details
For FM mode and
setting: see the 4.4
for the details (for
FM model only)
28
Page 33

4.3 Utility Interface in TV/AV/SVHS mode for Win98 SE/2000/ME
Chapter 4 – The Use of Utility Interface
29
Page 34

Chapter 4 – The Use of Utility Interface
Snapshot:
To capture a still image and save as BMP file format.
Record:
While you click record button, you will see the
figure on the left. If you want to save it, just click
button “Save”. If you want to stop capturing, push
the button of “Esc” key on your keyboard to do so.
30
Page 35

Chapter 4 – The Use of Utility Interface
Playback:
Open the file you saved in the previous step and you
would play and see what you get
31
Page 36

Chapter 4 – The Use of Utility Interface
TV Setting
Note: Please refer to Appendix I for TV and Radio
setting for Windows 95
1.Country
Select the TV system of your country.
2.Channel Scan Mode
Click the Scan to seek the channels
3.Fine Tune
As you watch TV, you can use the Find Tune to do
adjustment.
4.Channel
Select TV channel.
5.Input
Select the TV input
6.Video Standard
Select the TV standard system.
7.TV Audio
TV Audio is based on the Video Standard you select.
As you finish the option selection, just click OK.
32
Page 37

Chapter 4 – The Use of Utility Interface
To set the capture file size (Recommend Output Size
Capture Setting
Format Type
To set the capture file video format.
Format Size
in 320X240).
33
Page 38

Chapter 4 – The Use of Utility Interface
Channel list
After you seek the channels, all channels will be
listed on the Choose Channel.
Rename
Select any channel you like. Click Rename and
enter any name you like.
Favorite Channel
If you just prefer some of the channels scanned, you
can use this function. Check On and select the
channels you prefer to add to Favorite Channel.
Also, you can change the order of the channels.
34
Page 39

4.4 Utility Interface in FM mode
Chapter 4 – The Use of Utility Interface
35
Page 40

Chapter 4 – The Use of Utility Interface
Radio Configuration
Ø Odd/Even frequency detect
Odd or Even frequency to detect FM
station is based on your country system.
For example, 92.1, 96.5,etc.which are
underlined mean odd frequency while 92.2
96.4 mean even frequency.
Ø Frequency Up/Down method
1. Select the Step Mode and click the Scan
button to search the radio channels.
2. After the search, the configuration will
automatically set up the status in Seek
Mode. Then click OK to continue.
36
Page 41

Chapter 6 – Remote Control
Chapter 5¡ÐAccelerator Keys Summary
AOpen Video Station VA1000 provides accelerator keys for easier manipulation. The following is the list of
all keystrokes.
Keyboard Buttons Function Descriptions
F1
M
C
BackSpace
P
B
PageUP
PageDown
Right Arrow (→)
Left Arrow (←)
Up Arrow (↑)
Down Arrow (↓)
Alt +F4
Help
Toggle Mute on/off
Toggle Air/Cable TV
Recall Last Channel
Add/Clear Channel
Snapshot to Clipboard
Mode Shift
Mode Shift
Volume up
Volume down
Channel up
Channel down
Power off
37
Page 42

Chapter 5¡ÐAccelerator Keys Summary
Chapter 6¡ÐRemote Control
1. Power Off: Press this button to terminate the program.
2. Full Size: Click this button to toggle the Video Window between
full size and the previous size.
3. Numeric Keypad: Select the desired channel directly.
4. Channel Up/Down: Click this button to go to next/previous
channel.
5. Volume Up/Down: Click this button to increase/decrease the
audio volume
6. Air/CATV: Click this button to toggle between Air and CATV
channels.
7. Recall: Jump to last selected TV channel.
8. Enter Button: Click this button to execute the current channel
selection.
9. Mute: Press this button to mute the sound.
38
Page 43

Chapter 7¡ÐAOpen Driver Live Update
Chapter 7¡ÐAOpen Driver Live Update
Live Update wizard is AOpen driver instant service. It can support:
n Auto detects TV tuner driver version.
n Auto link to AOpen driver FTP web service.
n Auto check AOpen web driver information.
n Auto downloads newer driver from AOpen web.
1. Start Windows and insert the AOpen Installation CD disc into CD-ROM drive.
2. Please click the AOpen Driver Live Update to run the program.
39
Page 44

Chapter 7¡ÐAOpen Driver Live Update
3. If your driver same with the latest version AOpen currently provide, then Live Update wills info you.
4. If Live Update found any new driver exist. It will show information about your driver versions. And click
OK to continue.
40
Page 45

Chapter 7¡ÐAOpen Driver Live Update
5. Please select an FTP server to download it.
6. During download process, the Live Update banner will share information about new AOpen products with
you. You may click the banner to get more information.
41
Page 46

Chapter 8¡ÐTechnical Support
Chapter 8¡ÐTechnical Support
Dear Customer,
Thanks for choosing AOpen products. To provide the best and fastest service to our customer is our first
priority. However, we receive numerous emails and phone-calls worldwide everyday, it is very hard for us to
serve everyone on time. We recommend you follow the procedures below and seek help before contact us.
With your help, we can then continue to provide the best quality service to more customers.
Thanks very much for your understanding!
AOpen Technical Supporting Team
1
1
2
2
Online Manual:
the jumper settings and installation procedure are correct.
http://www.aopen.com.tw/tech/download/manual/default.htm
Test Report:
compatibility test reports for assembling your PC.
http://www.aopen.com.tw/tech/report/default.htm
Please check the manual carefully and make sure
We recommend to choose board/card/device from the
42
Page 47

3
3
Chapter 8¡ÐTechnical Support
FAQ:
The latest FAQ (Frequently Asked Questions) may contain a
solution to your problem.
http://www.aopen.com.tw/tech/faq/default.htm
4
4
5
5
6
6
7
7
Download Software:
BIOS/utility and drivers.
http://www.aopen.com.tw/tech/download/default.htm
News Group:
support engineer or professional users on the news group.
http://www.aopen.com.tw/tech/newsgrp/default.htm
Contact Distributors/Resellers:
resellers and integrators. They should know your system
configuration very well and should be able to solve your problem
more efficiently than us. After all, their attitude of service
is an important reference for you if next time you want to buy
Contact Us:
symptom before contacting us. The
BIOS version
Your problem probably had been answered by our
Please prepare detail system configuration and error
Check out this table to get the latest updated
We sell our products through
part number, serial number
are also very helpful.
43
and
Page 48

Chapter 8¡ÐTechnical Support
Web: http://www.aopen.com
Email : Send us email by going through the contact form below.
English http://www.aopen.com.tw/tech/contact/techusa.htm
Japanese http://aojp.aopen.com.tw/tech/contact/techjp.ahtm
Chinese http://w3.aopen.com.tw/tech/contact/techtw.htm
German http://www.aopencom.de/tech/contact/techde.htm
Simplified Chinese http://www.aopen.com.cn/tech/contact/techcn.htm
TEL:
USA 650-827-9688
Netherlands +31 73-645-9516
China (86) 755-375-3013
Taiwan (886) 2-2696-1333
Germany +49 (0) 2102-157-700
44
Page 49

Appendix I¡ÐTV and Radio Setting for Windows 95
TV Setting:
Std Scan: TV channels are scanned by default TV
frequency table.
Ext Scan: Channel scan from 78MHz to 970MHz.
Rename: Enter the name you like and click Set to
rename the channel.
Search: Check the option Search , enter the name you
are going to search and click Search.
Name Default: to reset all of the names you enter.
Air / Cable: To select the TV source.
TV Audio: The option selection are based on the TV
system of your own country.
Chapter 8¡ÐTechnical Support
45
Page 50

Appendix I¡ÐTV and Radio Setting for Windows 95
Radio Setting:
Band
Except for Japanese, the band is standard.
Odd/Even frequency detect
Odd or Even frequency to detect FM station is
based on your country system. For example, 92.1,
96.5,etc.which are underlined mean odd frequency
while 92.2 96.4 mean even frequency channels.
Frequency Up/Down method
Select the Step Mode and click the Scan button to
search the radio channels.
After the search, the configuration will automatically
set up the status in Seek Mode. Then click OK to
continue.
Note: At first, you need to select the Video Source on
FM at Video setting
46
Page 51

Chapter 8¡ÐTechnical Support
Video setting:
Video Option: You can select the video source based
on your TV system.
Default: Set up the Brightness, Contrast, Hue and
Saturation.
47
Page 52

Appendix I¡ÐTV and Radio Setting for Windows 95
Enable Capture Time Limit:
Capture Audio:
Key to Abort Capture
Mouse to Abort Capture:
Capture Setting:
Frame Rate: To set how many frames per second
ranged from 0 to 30.
To set the time for video
capturing.
you have to check the option if you
want the video capturing with sound.
: To set up which Key for Capture
abortion.
To set up mouse for capture
abortion
48
 Loading...