

Page 1

AOPEN HD LED Projector
QH12a/L20/CD20/U7P2301 S
User’s Guide
Copyright © 2023. Aopen Incorporated. All Rights Reserved.
Aopen Projector User’s Guide
Original Issue: 03/2023
eries
Page 2
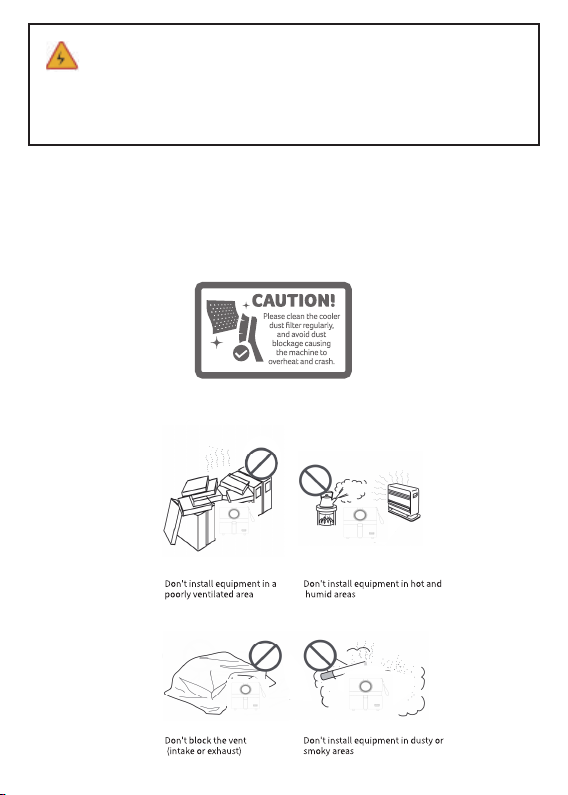
WARNING
To prevent electric shock, please do not open the device case.
Internal components of the device are not user-serviceable.
Please
contact professional maintenance staff for repairs.
NOTICE
9 This is the air inlet of the projector. Avoid obstructing the air inlet with any objects
during the use of the projector.
9 Clean the dust filter of vents every 3-months to avoid triggering the projector’s LCD
panel and COB protection mechanism due to poor ventilation.
Important safety announcements
1
Page 3
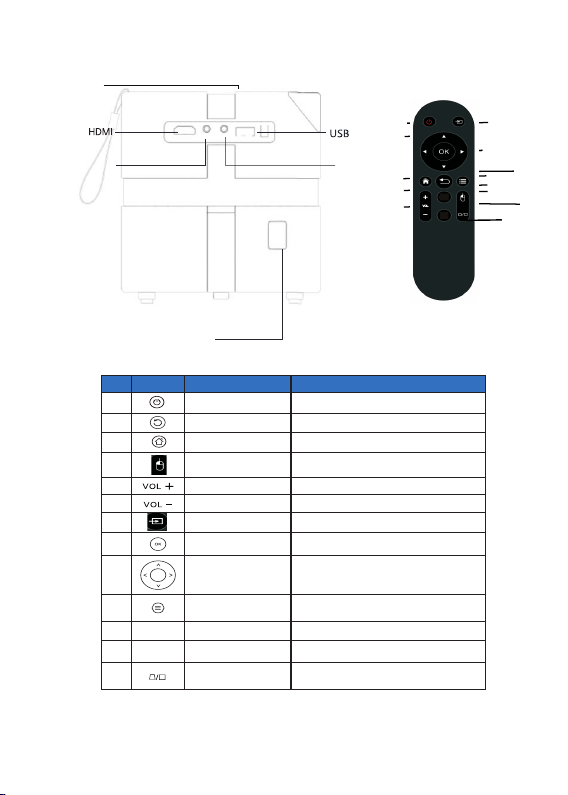
Parts and Functions
Start up
Audio outlet
AV
Power input
# Icon Function Description
1
2
3
4
5
6
7
8
9
10
11
12
13
Power Turn the projector on/off.
Back Return to the previous page.
Home
Mouse
Volume up
Volume down
Input
Select/Enter
Four directional
selection keys
Menu
F+
Focus Focus +
Focus
F-
Keystone
Back to Home page.
Switch to Mouse mode for
navigation key.
Increase the volume.
Decrease the volume.
Change the input source.
Press to confirm the selection item.
Use the up/down/left/right button to
select items or make adjustments.
Display the OSD menu for various
settings and adjustments.
Focus -
Correct the shape of an image that
is not evenly rectangular.
9 The remote control is powered by two AAA batteries. (not included)
1
9
3
5
6
7
8
2
10
4
11
F+
F-
12
13
2
Page 4
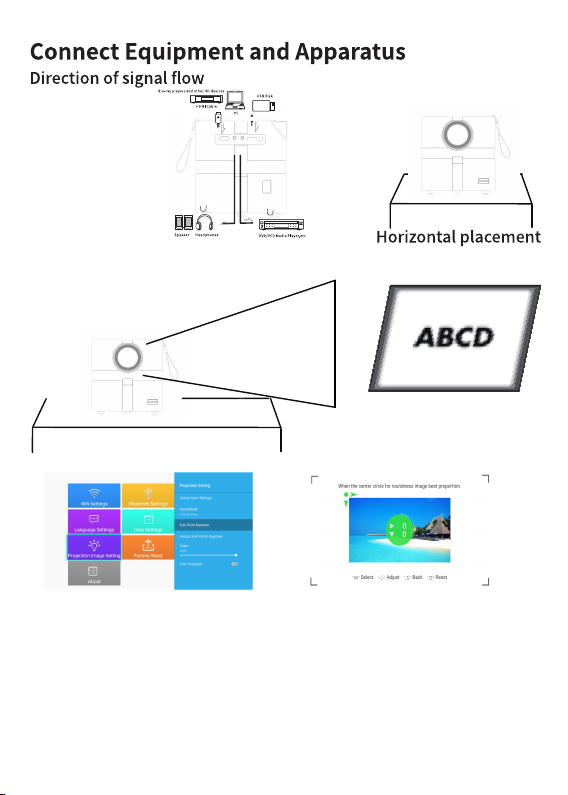
Projector installation
30° side projection image setting
Settings>Projection lmage Settings>Four Point Keystone
Use the direction keys on the remote control for digital adjustment, click OK button
to change the angles, press Reset to return to original image.
3
Page 5
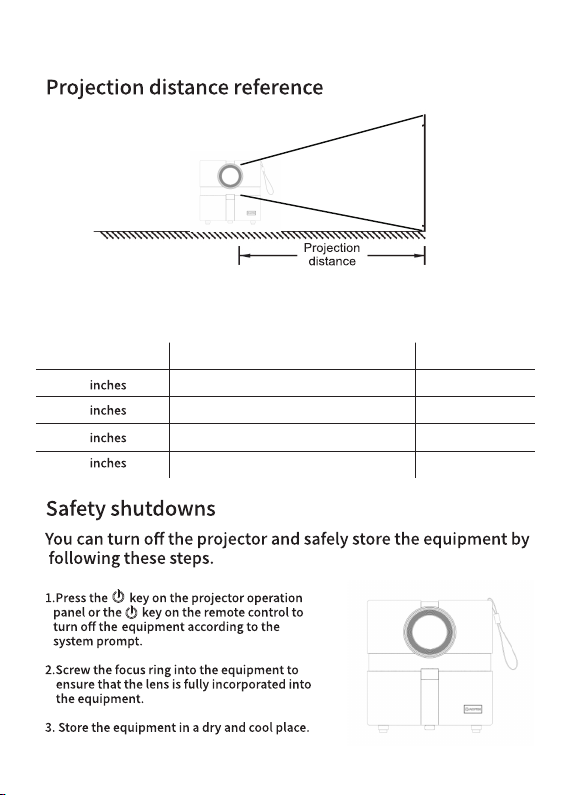
Installation and Adjustment
Projection distance corresponds to screen size
Screen Size(in)
42
50
75
100
Screen width X height(m)
height 0.52m width 0.93m
height 0.62m width 1.12m
height 0.93m width 1.65m
height 1.24m width 2.21m
4
Distance(m)
1.30
1.56
2.33
3.12
Page 6
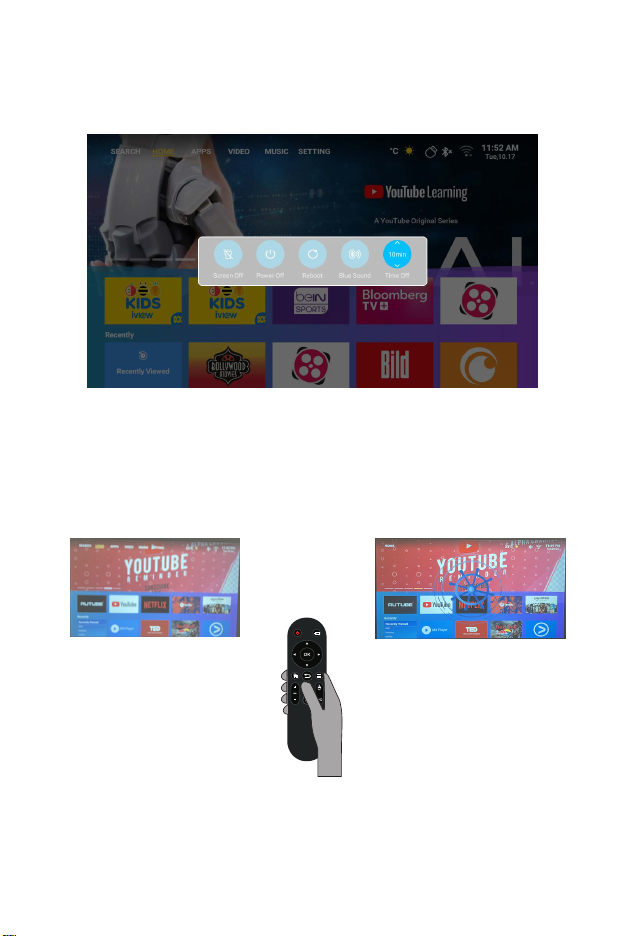
Auto Shutdown Setting
Click ”Power" button and press select timer by up or down button to
setup auto shutdown timer on remote controller.
Electronic Focus Function
This projector adds the electronic focus function, which is more convenient
and smarter than the traditional manual focus method.
Autocalibration: Press F- until lens does not move, projector will
automatically calibrate and this function can protect lens over drive that caused
lens damage, frequently doing autocalibration can prevent lens from damage.
Blurry
When using the projector for the first time or moving the projector, please press the F+
and F- buttons of the remote control to adjust it until you get a clear picture.
Note: When the lens cannt be adjusted,
please release the button immediately to avoid motor damage. And do the
autocalibration as the above description.
Clear
5
Page 7
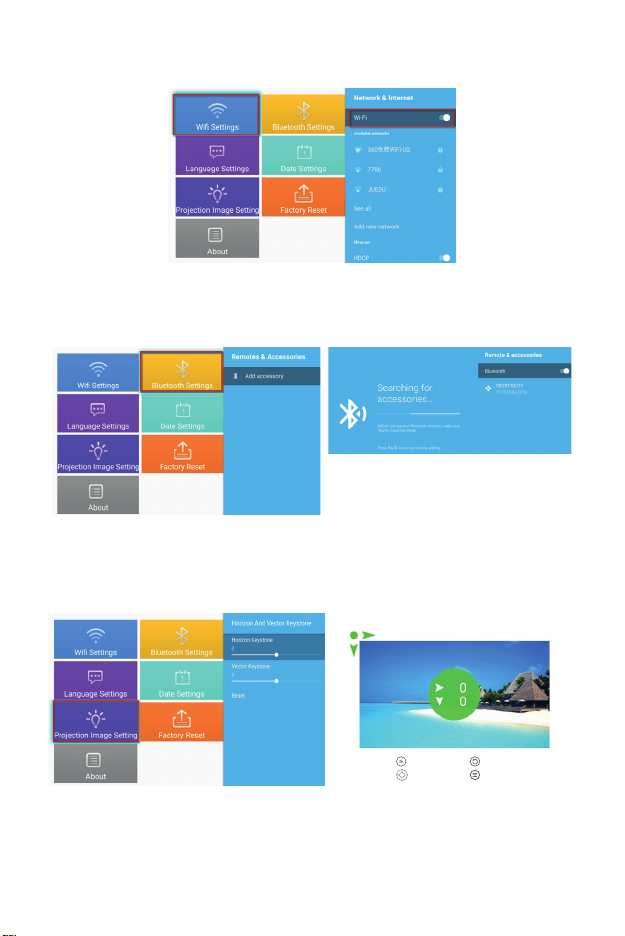
• Connect to the wireless network
1. Turn on Wi-Fi by clicking “Wifi Settings” and press “OK”.
2. Select the desired network and press “OK” to confirm.
• Bluetooth sett
1. Click “Bluetooth Settings” and press “OK”. Then, click “Add accessory”.
2. Turn on the Bluetooth switch, search for the desired device (e.g. Bluetooth speakers), and
c
onnect.
ings
• Four-point keystone correction
Select the best proportion for the roundness of the center
c
ircle.
elect
S
djust
A
1. Select “Projection Image Settings” and adjust “Horizon and Vector Keystone” by
pressing “OK” to confirm.
2. Adjust each corners separately until the image fits your desired shape.
6
B
ack
set
Re
Page 8
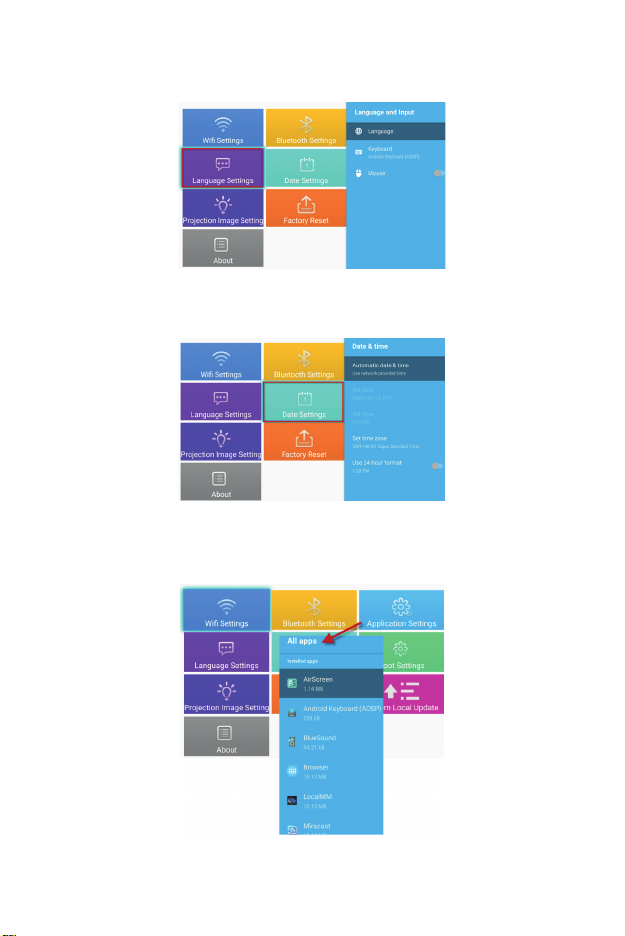
• Language selection:
Select the language that best suits your personal preference.
• Date and Time setting:
Select the preferred date and time format based on your personal preference.
• Application settings:
Click on “Application Settings” to view all downloaded apps and select the app you want to use.
7
Page 9
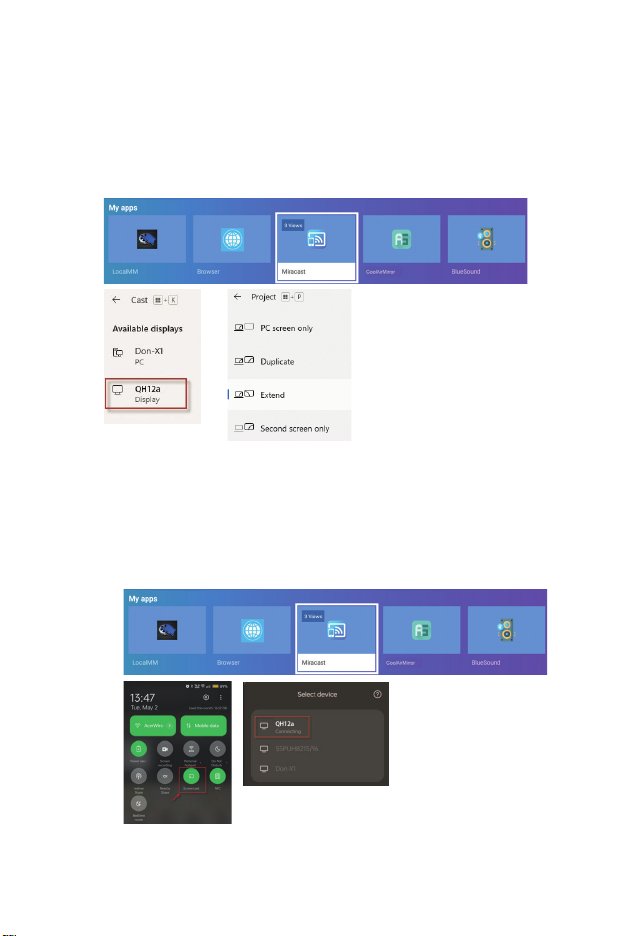
Screen Mirroring Instructions
• Windows system:
1. Go to the “My apps” menu and select “Miracast” app.
2. Press the Windows logo Key (Win+P) and (Win+K), then select the wireless
display “QH12a” to start projection.
• Android system:
M
iracast:
1. Turn on the wireless display function on your mobile device.
2. Select the “QH12a” from the list of available devices to start projection.
8
Page 10
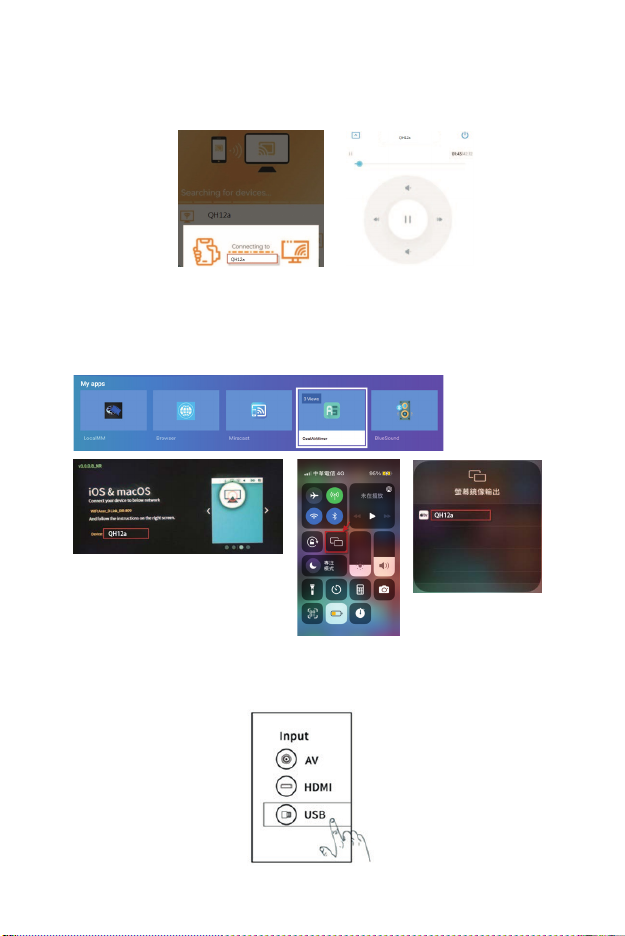
DLNA
:
1. To use DLNA streaming, download a DLNA app and connect to the same Wi-Fi as the
projector.
2. In the DLNA APP, select “QH12a” as DLNA DMR/DMP and choose a file to play on the
projector.
• iOS system:
1. Ensure both your projector and mobile device are connected to the same WiFi router.
2. Access the Screen Mirroring feature on your mobile device and select the
“QH12a-xxxxxx” from the list to start projection.
Screen mirror output
INPUT SOURCE SELECTION
In the home page, press the “up” button twice for the source menu.
9
Page 11
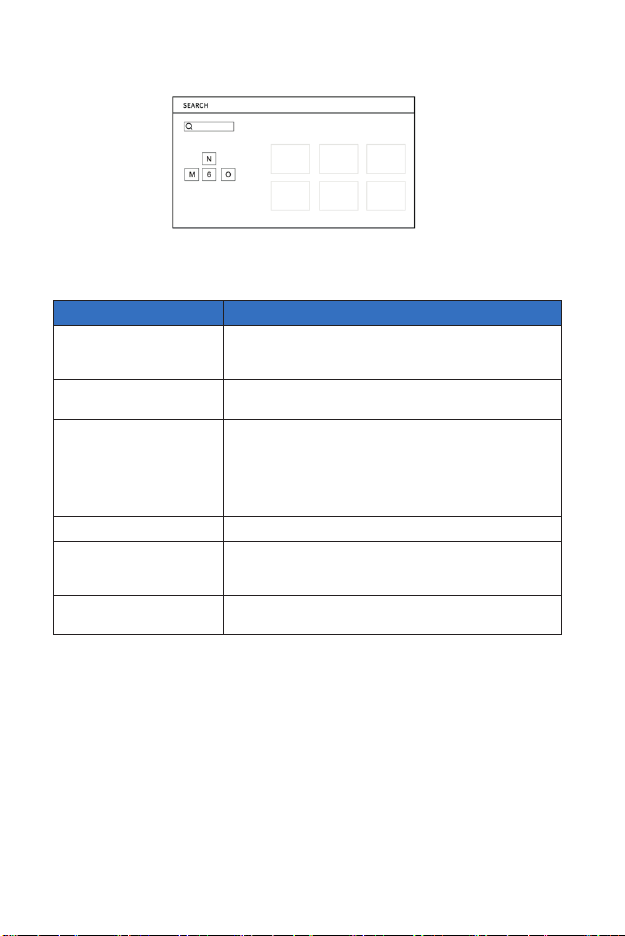
DOWNLOAD APPS FROM THE APP MARKET
Common issues and solutions
Troubleshooting
Issues Solutions
No power, LED off, and
the projector cannot
power on.
LED on but the projector
cannot power on
Cannot screen mirror
Cannot stream media Check the internet connection for your smart device.
Remote not responsive
Unable to power off the
projector
Check the power cable for loose connection.
Check the power cable for loose connection, press the
Power button to turn on the projector.
1. Refer to the user guide for the correct screen mirroring
function.
2. Shorten the distance between the smart device and
projector for better screen mirroring quality.
3. Ensure that the smart phone is connected to the correct
Wi-Fi network SSID.
1. Replace remote batteries.
2. Make sure the remote control is aligned with the IR
sensor.
Press and hold the Power button for 5 seconds until the
projector turns off.
Reminder
1. the projector is mainly used to watch native video or online video,
cannot be used as a mobile phone or computer.
2. If the remote control cannnot control a third-party APP when in use, you
need to use a USB mouse to assist inthe operation.
3. To download a third-party video APP, please note that you need to
download the TV version of the program, not the mobile version or
other versions of the program.
4. This machine does not support Dolby encoded audio and video files.
5. If you don't use it for a long time, you need to cover the lens with a
cover to prevent dust.
10
Page 12

DISPOSAL INSTRUCTIONS
This symbol on the product or on its packaging indicates that the product must
not be disposed of with other household waste. When disposing of used
devices, it is your responsibility to bring it to a collection point that recycles used
electrical and electronic equipment. The separate collection and recycling of
used devices at the time of disposal helps to conserve natural resources and
ensures that they are recycled in a manner that protects human health and the
recycling points for used devices, please contact your local city offce, household waste
disposal service, or the shop where you purchased the product.
environment. For more information about
CLEANING METHODS
Before cleaning, ensure that the power socket is unplugged. Do not use pesticides
or other volatile chemicals on the projector or lens, and avoid leaving rubber or vinyl products
in contact with the projector for extended periods of time, as this may damage or peel off the
remaining layers.
Cleaning the projector:
1. Use a soft and dry cotton cloth to wipe the surface of the projector.
2. Dampen a soft cotton cloth with a diluted neutral cleaner, and gently wipe the
projector surface. Dry with a dry cotton cloth.
3. Do not use water, benzene, or other solvents on the projector.
4. Do not scratch the main body of the projector with fingernails or other hard objects.
Cleaning the lens:
1. Blow off the dust on the lens surface, and wipe off any stains with a soft cloth.
2. Use a professional dryer or lens cleaning paper specifically for camera and glasses.
REMARKS: Do not use ordinary tissue to clean the lens. Ordinary tissue contains
large particles of impurities that may scratch the lens.
Cleaning the outlet dust filter:
Turn off the power and unplug the power cord before cleaning the outlet dust filter of
vents every three months. This will prevent poor ventilation from triggering the projector
LCD panel and COB protection mechanism.
11
Page 13
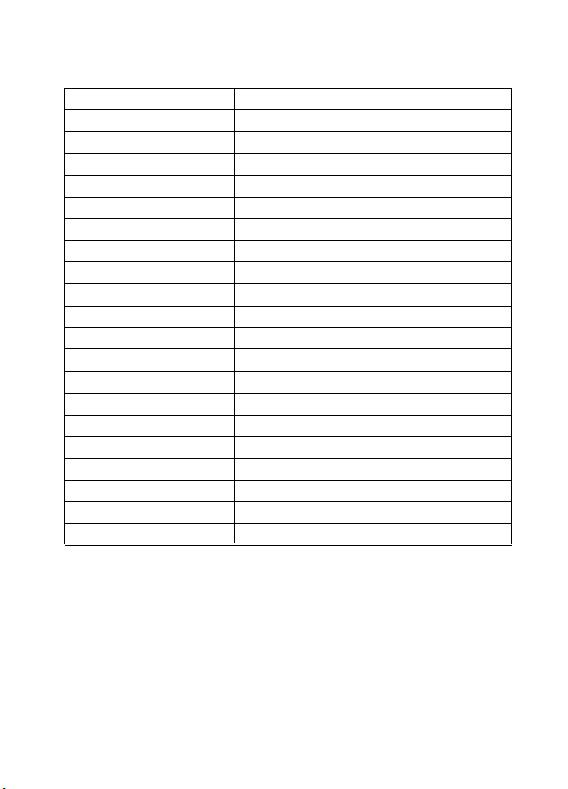
Projector Specifications
Model
CP
U MST9269
DDR/EEMC
Androld System Androld 9.0
WIFI 2.4G&5G dual band wifi
Bluetooth Bluetooth4.2
Native Resolution
Max Resolution Supporte
Contrast Ratio 1000:1
Aspect Ratio 16:9
Projection Size 35"-120"
Lcd Display
Light Source LED
Zoom Function
Focusing electronic focus
1*Hdmi Port Support Chromecast/TV Stick/RuKu/X Box
1*USB Port Support USB Driver
1*Audio Ports Speaker/Headset
Package Contents
QH12a
1
G/ 8G
1280*720P
d 1080
2.69 inch
75%-100%
1*Android Projector
1*Power Cord
1*HDMI Cable
Attention: If miss any parts or receive the broken product in the
package, please contact us, we will send a new one to you for free.
12
 Loading...